На чтение 6 мин Просмотров 25.4к.
Домашний Wi-Fi роутер поставляется с идентификатором SSID. Он помогает распознать вашу сеть и отличить ее от других. Когда вы покупаете новый маршрутизатор, по умолчанию SSID — название компании или производителя устройства. Это безличное сетевое имя. Например, TP-Link или Tenda. Оно может создать путаницу при подключении. В статье вы узнаете, как поменять название сети wi-fi на различных роутерах.
Содержание
- Как войти в настройки маршрутизатора
- Меняем имя сети wifi: инструкция для разных марок роутера
- TP-Link
- Asus
- D-Link
- ZyXEL
- Huawei
- Tenda
- Как изменить имя iPhone в режиме модема
- Возможные проблемы
Как войти в настройки маршрутизатора
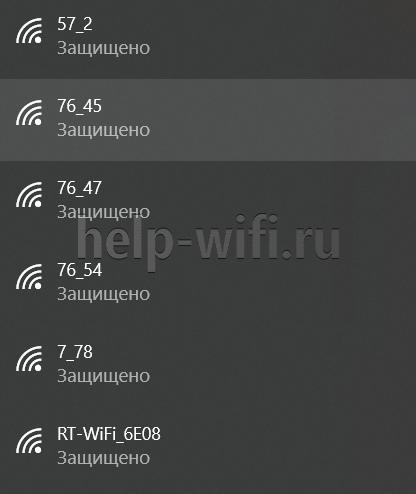
После установки роутера многие пользователи не меняют название Wi-Fi. Работает да и ладно. Затем соседи покупают себе роутер. И вот у вас уже целый список из обезличенных имен.
Иногда вы путаетесь, а иногда просто хотите выделиться, дать осмысленное название. В любом случае изменить имя по умолчанию несложно. А наша инструкция в этом поможет.
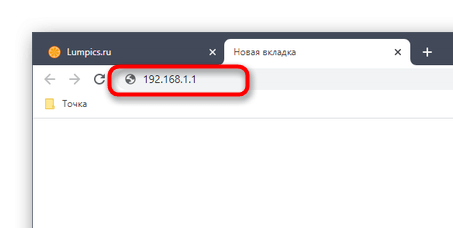
Для решения задачи нужен доступ к административному интерфейсу маршрутизатора. В нем находятся все настройки роутера, где мы и сможем переименовать сеть. Но для этого нужно знать IP-адрес веб-интерфейса.
Не волнуйтесь, если вы его не знаете. Узнать его можно многими способами. Перед входом в настройки убедитесь, что ваш компьютер или ноутбук подключены к интернету через LAN кабель. Если вы будете подключены через вайфай соединение, то после изменения названия сети на компьютере пропадет интернет и вам придется переподключиться.
Для большинства маршрутизаторов IP-адрес веб-интерфейса — 192.168.1.1. Попробуйте вставить этот IP-адрес в строку браузера и нажать Enter. Другие варианты — my.keenetic.net (для маршрутизаторов марки Keentic),192.168.0.1
Вход в веб-интерфейс:
- Вводим адрес для входа в адресную строку любого браузера.

- Должно всплыть окошко с формой входа.

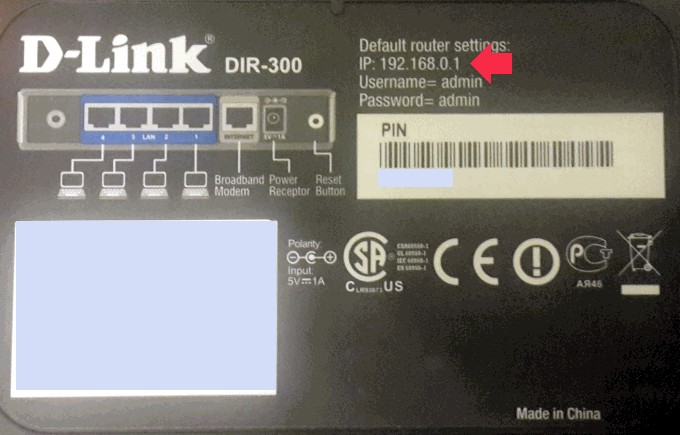
- Необходимо ввести имя пользователя и пароль. Эти данные можно узнать на этикетке на нижней стороне маршрутизатора.
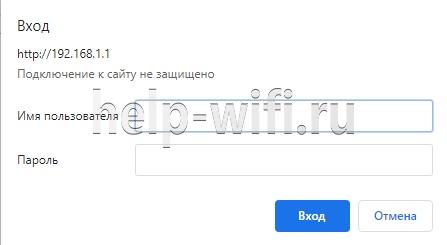

Если вы никогда не меняли пароль для входа в настройки, проверьте в руководстве к маршрутизатору имя пользователя и пароль по умолчанию. В большинстве случаев это:
- Имя пользователя: admin.
- Пароль: admin.
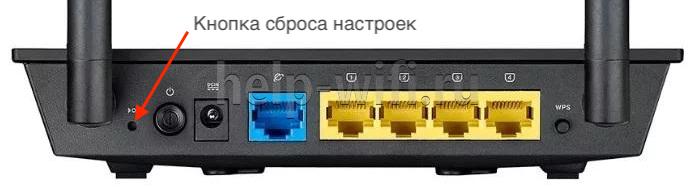
В случае потери пароля необходимо воспользоваться инструкцией к устройству и вернуть его к заводским настройкам.
Для этого нужно найти на устройстве утопленную в корпус роутера кнопку «RESET» и зажать ее на 10-15 секунд. Для удобства нажатия лучше использовать тонкий предмет, например, скрепку или иголку.
Если адрес для входа не подошел, то можно его посмотреть на компьютере.
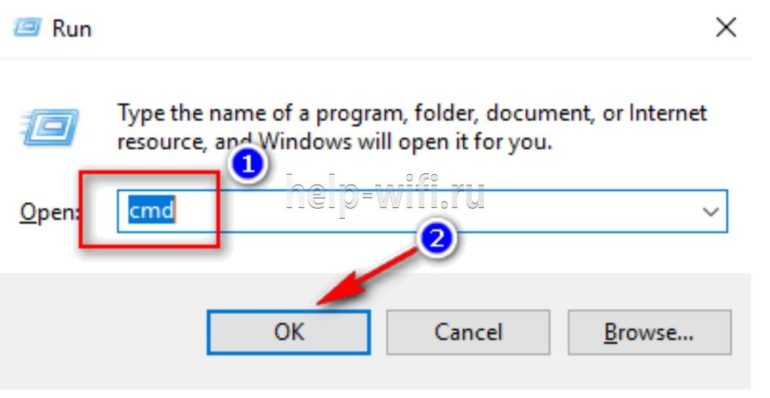
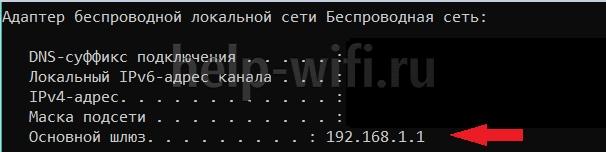
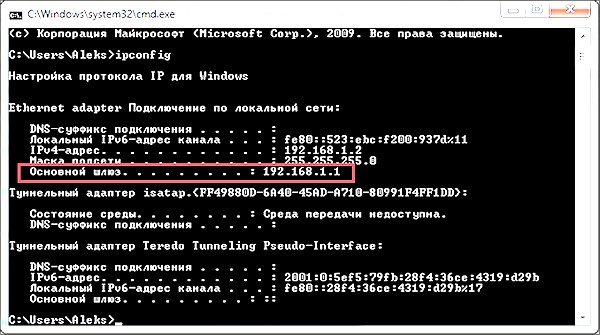
Пользователи Windows 10 могут узнать локальный IP-адрес через командную строку. Просто выполните шаги:
- Нажмите комбинацию клавиш «Windows + R» на клавиатуре, чтобы открыть окно «Выполнить». Теперь введите «cmd» и нажмите «ОК» или просто нажмите клавишу Enter.

- Перед вами появится черное окошко. В этом окне введите команду «ipconfig» и нажмите Enter на клавиатуре. Прокрутите вниз, пока не увидите раздел «Адаптер беспроводной локальной сети / Беспроводная сеть». Значение параметра «Основной шлюз» и есть локальный IP-адрес.
Пользователям MacOS нужно выполнить другие действия, чтобы найти IP-адрес сетевого маршрутизатора:
Меняем имя сети wifi: инструкция для разных марок роутера
Теперь мы вошли в настройки маршрутизатора. У каждого производителя интерфейс может отличаться. Но возможность изменить название предусмотрена каждой компанией.
Беспроводная сеть показывается всем в радиусе действия. Поэтому при смене названия для wi-fi не стоит использовать личные данные или оскорбительные слова.
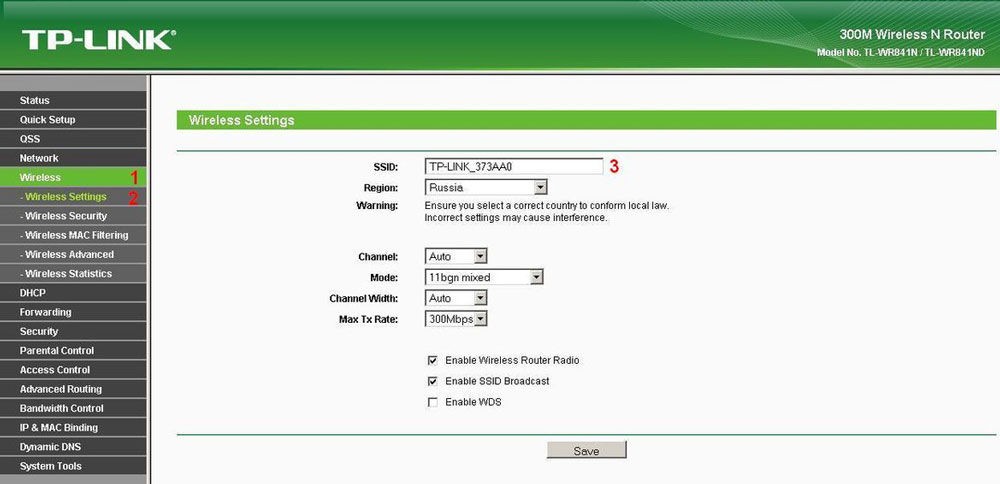
TP-Link
Начнем с производителя TP-Link.
Попробуйте поменять имя вайфай по инструкции:
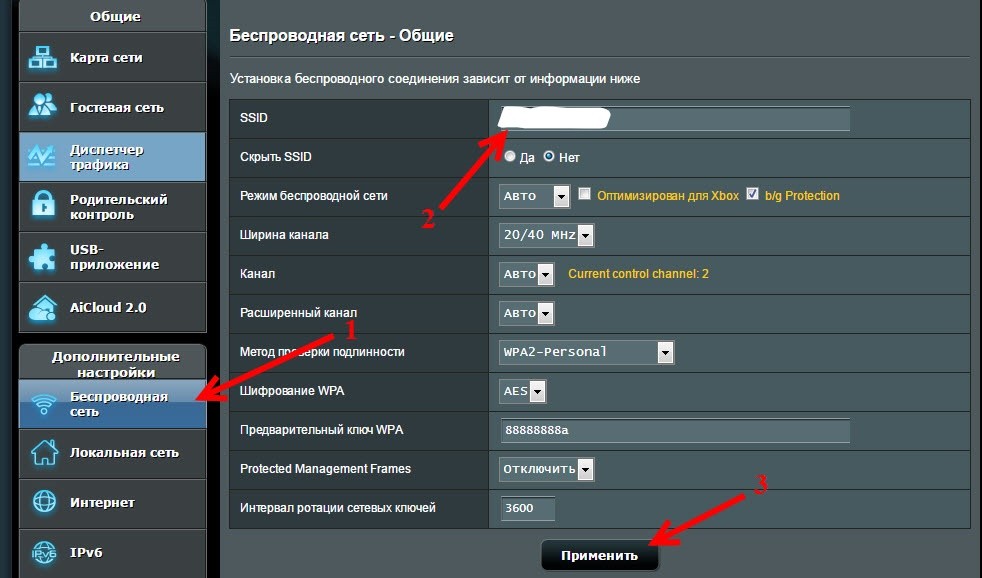
Asus
Алгоритм действий:
- Заходим в веб интерфейс роутера.
- В меню «Дополнительные настройки» выбираем вкладку «Беспроводная сеть».
- Меняем имя сети в поле «SSID».
- Сохраняем настройки и перезагружаем устройство.

D-Link
Изменить имя и пароль в таких моделях очень просто. На главной странице настроек в разделе «Network Information» находим поле SSID. Кликаем по названию.
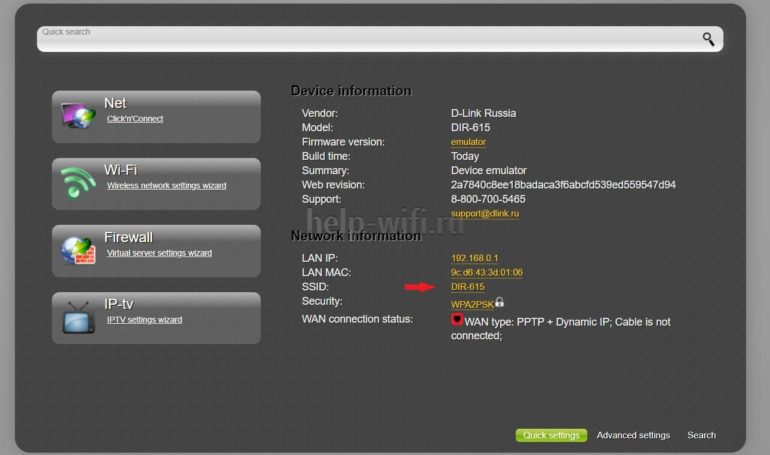
Вас перенаправит на другую страницу:
- Изменяем имя (SSID);
- Принимаем изменения.

Перезагружаем маршрутизатор, если изменения не вступили в силу.
ZyXEL
Так же, как и у других производителей, поменять имя вайфай легко. Разберем на примере интерфейса ZyXEL Keentic GIGA.
Также не забываем перезагрузить роутер.
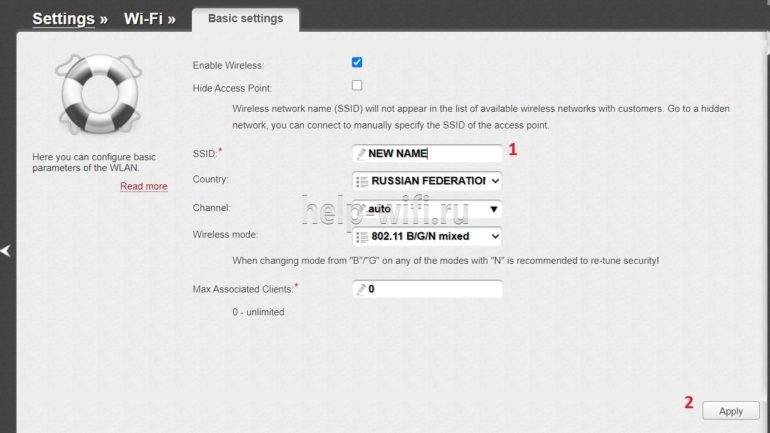
Huawei
Чтобы изменить имя сети, переходим во вкладку «Settings» в верхнем меню.  Затем выбираем пункт «WLAN Basic Settings» слева. И на странице меняем значение поля SSID на нужное. Затем кликаем по кнопке «Apply».
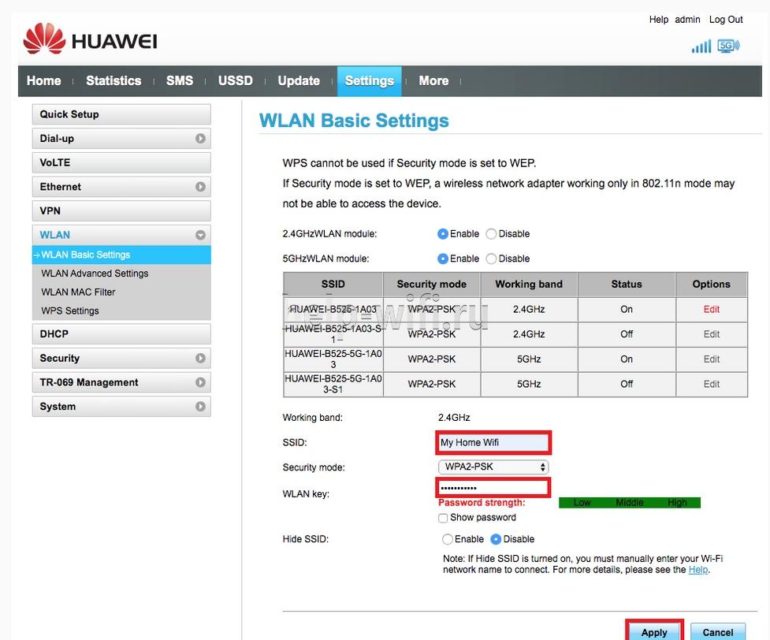
Перезагрузите роутер, чтобы полностью обновить настройки. Заново подключитесь к вашей сети.
Tenda
Переходим к инструкции для маршрутизатора Tenda. Выполните следующие шаги, чтобы сменить название сети:
Как изменить имя iPhone в режиме модема
Режим модема на айфоне дает возможность подключиться к вам и пользоваться вашим интернетом другим устройствам.
По умолчанию в iOS имя вашего телефона будет отображаться для всех устройств, которые захотят к вам подключиться. Потому что наименование iPhone одновременно является и названием сети.
Выполните следующие действия, чтобы изменить имя:
- Зайдите в меню настроек на вашем iPhone;
- Затем прокрутите вниз, пока не увидите «Основные», щелкните по этому пункту;
- Вверху экрана находится вкладка «Об этом устройстве», щелкните по ней;
- Нажимаем на вкладку «Имя», чтобы просмотреть текущее имя вашей точки доступа;
- Введите желаемое имя для точки доступа. Нажмите синюю кнопку «Готово» на клавиатуре.
Возможные проблемы
Переименовать название Wi-Fi просто. И все же вы можете столкнуться с некоторыми проблемами:
- Вы не помните пароль от панели настроек маршрутизатора.
В таком случае воспользуйтесь инструкцией по сбросу устройства к заводским настройкам. Затем воспользуйтесь стандартными именем пользователя и паролем. Эти данные находятся на нижней части роутера.
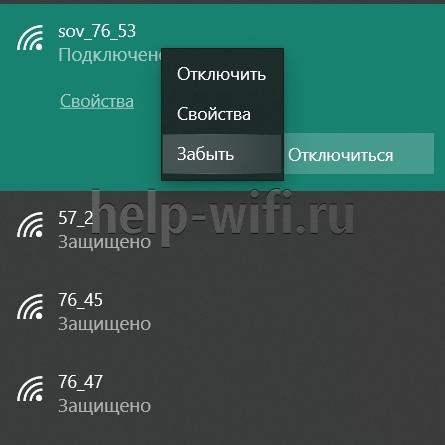
- Вы не можете подключиться после изменения имени.
Попробуйте перейти к списку доступных соединений, найдите вашу сеть, кликните правой кнопкой мыши по ней, выберите пункт «Забыть» или «Удалить». Затем снова подключитесь.
Мы рассмотрели, как поменять название сети WiFi. Алгоритм прост и сводится к трем шагам:
- Войти в настройки роутера
- Найти поле с именем сети и поменять его
- Перезагрузить устройство.
Как правило, сложностей не возникает. Но если вы столкнулись со специфичной проблемой для вашего производителя, обратитесь в службу поддержки.
Популярный вопрос пользователей – как переименовать Вай-Фай? Любому человеку может понадобиться изменить имя беспроводной сети (SSID). Сделать это можно через настройки роутера.
При смене названия стоит соблюдать следующие рекомендации:
- имя не должно быть длинным;
- используются только латинские символы;
- не стоит применять специальные символы (например, #), включать личные данные;
- уникальность (не должно быть повторения с другими сетями, которые находятся в зоне доступного подключения, так как это может создать путаницу).
Видео-инструкцию по смене названия сети смотрите в следующем ролике:
Содержание
- План действий
- Как узнать адрес роутера?
- Как изменить пароль сети?
- Задать вопрос автору статьи
План действий
Чаще всего в графе SSID (имя сети) стоит название роутера:
Как изменить имя Wi-Fi? Пошаговая инструкция об этом приведена ниже.
В зависимости от модели оборудования (ASUS, TP-Link, Ростелеком и т. д.) названия разделов и полей могут отличаться.
Для того, чтобы поменять название Wi-Fi-сети, необходимо выполнить следующие действия:
- Проверить работоспособность устройства и возможность подключения к Интернету.
- Открыть браузер и указать адрес роутера.
- Ввести логин и пароль для входа в настройки.
- Перейти в настройки подключения (на разных моделях наименование раздела будет отличаться. Для поиска нужного следует искать слова сеть, wireless или networking).
- Напротив поля нужной сети (Wireless network name или SSID) указать желаемое название.
- Нажать на кнопку «Сохранить».
- Перезапустить оборудование, а также, при необходимости, перезапустить компьютер.
Далее потребуется заново подключиться к новой сети, указав ее имя и старый пароль (если не производилось его смены).
Дополнительным способом, позволяющим внести изменения, являются специальные приложения, которые могут поставляться в комплекте с устройством. Общая процедура действий в них аналогична приведённой выше.
В качестве примера рассмотрим выполнение действий на ASUS. Для того, чтобы переименовать точку доступа на этой модели, необходимо сделать следующее:
- Зайти в конфигурацию устройства.
- Выбрать раздел, отвечающий за беспроводное подключение.
- Внести правки в поле “SSID”.
- Применить внесённые изменения.
Как узнать адрес роутера?
Адрес для просмотра настроек можно узнать:
- на самом устройстве (чаще всего этикетка со специальной информацией расположена внизу устройства);
- при помощи ввода в командную строку команды “ipconfig”, которая выдаёт сетевые параметры;
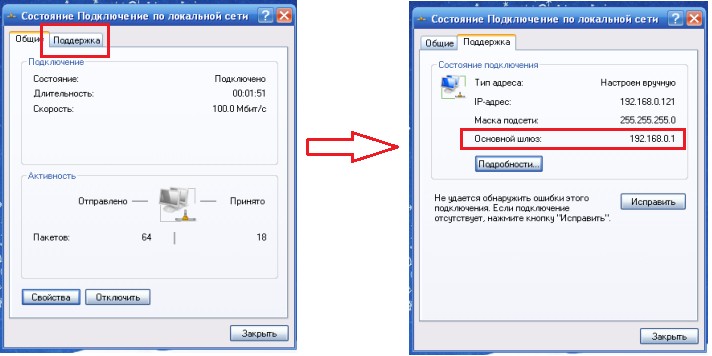
- просмотрев свойства активного подключения к Интернету.
Как изменить пароль сети?
Пароль можно изменить следующим образом:
- Перейти к конфигурации устройства.
- Зайти на вкладку, отвечающую за подключение к Интернету.
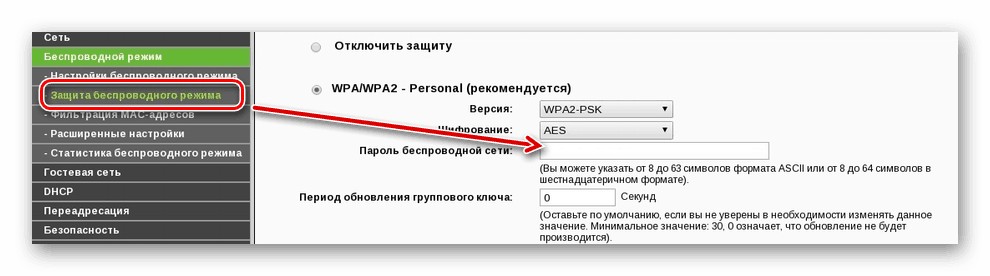
- Внести правки в поле, отвечающее за пароль (может называться «ключ WPA»).
- Сохранить результат.
Надеемся, наша статья оказалась полезной, и вы без проблем переименовали свою сеть Wi-Fi!
![]()
Download Article
![]()
Download Article
- Changing the Wi-Fi Name on the Web
- Resetting Your Router
- Finding Your Router’s Address on Windows
- Finding Your Router’s Address on Mac
- Q&A
- Tips
- Warnings
|
|
|
|
|
|
Did you know that hackers can hack default-named Wi-Fis easier than customized ones? The default name is usually something generic like «Linksys» or «ComcastHOME», but you can usually change your network’s name from your router’s page in a web browser. Some modern routers, like Google Wi-Fi and Spectrum routers, instead have an app that you need to use to change your Wi-Fi’s name. This wikiHow article teaches you how to change a wireless network’s name.
Things You Should Know
- If you rent a router from a ISP, you may have to use an app to access your router settings and change your Wi-Fi name.
- If you own the router instead of rent it, go through the router’s settings in a web browser to change your Wi-Fi’s name.
- If you don’t know your router’s address, you can easily find it on Windows or Mac.
-

1
Get the IP address of your router. If you’re not sure of your router’s IP address, you can easily look it up using Windows or macOS. You might also find it listed on your router, but here are a few common ones: «192.168.0.1», «192.168.1.1», «192.168.2.1», «10.0.0.1», «10.0.1.1».
- Changing the name of your Wi-Fi also means that any devices that are currently connected will no longer have the correct credentials for your network, so they will all be kicked off.
-
2
Open a web browser. Default web browsers for Windows and Mac computers are Microsoft Edge and Safari, respectively, but you can use any web browser for this step.
- You can also change the name of your phone’s hotspot in your phone’s Settings app.
Advertisement
-
3
Enter your router’s address. Type into the address bar the address number you found in the last method, then press ↵ Enter. Doing so will take you to your router’s Settings page.
- For some specialized routers, such as Google WiFi routers, you’ll be prompted to download an app onto your smartphone and proceed using the phone app to configure your network.
-
4
Enter the password for your router if prompted. If you set a specific password for the settings page when you installed the router, you’ll need to enter it to continue.
- The default information including your username and password should be on the router’s casing.
-
5
Select your router’s current name. Since each router’s Settings page is different, this step will vary. Typically, you can either click the router’s name or click a Settings option to go to the general section of your router’s settings.
-
6
Look for the SSID field. It may also be labeled «Network Name», «Wireless Network Name», «Router Name», or something similar.
- There will likely be a name already in the SSID field (e.g., «Belkin.be») that correlates with your network’s current name.
-
7
Enter a new name for your wireless network. This should be the name you want to see while selecting your network from your computer’s Wi-Fi menu.
- Common names are bad and can lead to hackers getting into your network easier than non-common Wi-Fi names. A common name, like DoeHome, can invite hackers to use common passwords to crack that locked network (using, for example, the Does’ pet’s name or the street they are on). Creative and funny Wi-Fi names, like FBI Surveillance Van #3, Hey_You_Get_Off_My_Lan, are more difficult for hackers to access.
-
8
Save your new network name. Click Apply, Save Settings, Save, or whatever your configuration screen uses to finalize the process. This will save your new network name.
- In some cases, you may have to click an image of a floppy disc or a checkmark.
- Changing your router’s settings will often cause the router to reboot and you’ll need to reconnect every device that was previously connected.
- For even more security, you can make your Wi-Fi network invisible.


Advertisement
-
1
Understand when to use this method. If your router’s page doesn’t allow you to change your network’s name or your network name changes aren’t saving, you can reset the router to its factory settings and then assign a new name to the network when first signing into it. Since resetting the router also disconnects any currently connected items, this should be a last resort.
- Resetting your router will change the network’s name back to the name (or «SSID») printed on the back or bottom of the router.
- If you reset your router, you’ll need to reconnect manually every Internet-connected item in your home to the router.
-
2
Make sure that the router has a password sticker. If you’ve had your router for a few years, the factory password sticker may have faded or been damaged. You’ll usually find the password sticker on the back or bottom of the router.
- If you don’t have the factory password, you won’t be able to sign into the network with the necessary password after resetting your router.
-
3
Find the router’s «Reset» button. This is usually a small, recessed button on the back of the router.
-
4
Press and hold the «Reset» button for 30 seconds. You may need to use a bent paperclip or a needle to do this.
-
5
Release the button after 30 seconds. Your router should turn itself off and begin rebooting.
-
6
Allow the router to finish resetting. Once the router is on again, you can proceed.
-
7
Connect to the router to a computer. In most cases, you’ll be given the option of changing the router’s name once you connect to it from your computer’s Wi-Fi menu:
- Windows — Click the Wi-Fi icon in the lower-right corner of the screen, select your router’s factory name, click Connect, enter the factory password, and click Next. You can then enter the network name you want to use when prompted.
- Mac — Click the Wi-Fi icon in the upper-right corner of the screen, select your router’s factory name, enter the factory password, and click Join. You can then enter the network name you want to use when prompted.


Advertisement
-
1
Open Settings
. Click the gear-shaped icon in the lower-left side of the Start menu.
- To change your router’s name, you’ll need to connect to its IP address. This method will help you find the address you’ll need to connect to.
-
2
Click
Network & Internet. It’s a globe-shaped icon in the Settings window.
-
3
Click the Status tab. You’ll find this in the upper-left side of the window.
-
4
Click View your network properties. This link is near the bottom of the page. Doing so opens a list of the different Internet connection types currently available on your computer.
-
5
Scroll down to the «Wi-Fi» heading. It’s near the bottom of the list.
-
6
Review the «Default gateway» address. The number to the right of the «Default gateway» heading in the «Wi-Fi» list is the address you’ll enter in your web browser to access your router’s page.
- The address number will usually resemble something like «192.168.1.1» or «10.0.0.1».


Advertisement
-
1
Open System Preferences… on your Mac. Click the Apple menu at the top-left and select System Preferences.
- To change your router’s name, you’ll need to connect to its IP address. This method will help you find the address you’ll need to connect to.
-
2
Click Network. This globe-shaped icon is in the System Preferences window. Clicking it opens a new window.
-
3
Click Advanced…. It’s in the lower-right side of the Network window. A pop-up window will appear.
-
4
Click the TCP/IP tab. This is at the top of the pop-up window.
-
5
Find the «Router» address. You’ll find this number to the right of the «Router» heading in the middle of the page. This is the number you’ll enter into your web browser in order to access your router’s page.
- The address will usually resemble something like «192.168.1.1» or «10.0.0.1».


Advertisement
Add New Question
-
Question
I want to change my password we had a friend living with us I gave him the password and now he has moved out and lives nextdoor so I can change the password and keep the same network name

This answer was written by one of our trained team of researchers who validated it for accuracy and comprehensiveness.
wikiHow Staff Editor
Staff Answer
Yes, just follow the instructions here to change the password instead of the name.
-
Question
If I want to just change the user name on my wireless network, do I need to reconnect everything on the network?
This answer was written by one of our trained team of researchers who validated it for accuracy and comprehensiveness.
wikiHow Staff Editor
Staff Answer
Yes. When you change the name, everything that is currently connected to the network will no longer have correct credentials, so you’ll need to log them in again.
-
Question
How do I change the SSID Name even if is unchangeable?
Maybe there is some option holding you from changing the SSID, if not reset the router and try again.

See more answers
Ask a Question
200 characters left
Include your email address to get a message when this question is answered.
Submit
Advertisement
-
Resetting your router once every year or so may improve its performance.
Thanks for submitting a tip for review!
Advertisement
-
Always make sure your wireless network is password-protected.
Advertisement
About This Article
Thanks to all authors for creating a page that has been read 2,164,430 times.
Is this article up to date?
![]()
Download Article
![]()
Download Article
- Changing the Wi-Fi Name on the Web
- Resetting Your Router
- Finding Your Router’s Address on Windows
- Finding Your Router’s Address on Mac
- Q&A
- Tips
- Warnings
|
|
|
|
|
|
Did you know that hackers can hack default-named Wi-Fis easier than customized ones? The default name is usually something generic like «Linksys» or «ComcastHOME», but you can usually change your network’s name from your router’s page in a web browser. Some modern routers, like Google Wi-Fi and Spectrum routers, instead have an app that you need to use to change your Wi-Fi’s name. This wikiHow article teaches you how to change a wireless network’s name.
Things You Should Know
- If you rent a router from a ISP, you may have to use an app to access your router settings and change your Wi-Fi name.
- If you own the router instead of rent it, go through the router’s settings in a web browser to change your Wi-Fi’s name.
- If you don’t know your router’s address, you can easily find it on Windows or Mac.
-
1
Get the IP address of your router. If you’re not sure of your router’s IP address, you can easily look it up using Windows or macOS. You might also find it listed on your router, but here are a few common ones: «192.168.0.1», «192.168.1.1», «192.168.2.1», «10.0.0.1», «10.0.1.1».
- Changing the name of your Wi-Fi also means that any devices that are currently connected will no longer have the correct credentials for your network, so they will all be kicked off.
-
2
Open a web browser. Default web browsers for Windows and Mac computers are Microsoft Edge and Safari, respectively, but you can use any web browser for this step.
- You can also change the name of your phone’s hotspot in your phone’s Settings app.
Advertisement
-
3
Enter your router’s address. Type into the address bar the address number you found in the last method, then press ↵ Enter. Doing so will take you to your router’s Settings page.
- For some specialized routers, such as Google WiFi routers, you’ll be prompted to download an app onto your smartphone and proceed using the phone app to configure your network.
-
4
Enter the password for your router if prompted. If you set a specific password for the settings page when you installed the router, you’ll need to enter it to continue.
- The default information including your username and password should be on the router’s casing.
-
5
Select your router’s current name. Since each router’s Settings page is different, this step will vary. Typically, you can either click the router’s name or click a Settings option to go to the general section of your router’s settings.
-
6
Look for the SSID field. It may also be labeled «Network Name», «Wireless Network Name», «Router Name», or something similar.
- There will likely be a name already in the SSID field (e.g., «Belkin.be») that correlates with your network’s current name.
-
7
Enter a new name for your wireless network. This should be the name you want to see while selecting your network from your computer’s Wi-Fi menu.
- Common names are bad and can lead to hackers getting into your network easier than non-common Wi-Fi names. A common name, like DoeHome, can invite hackers to use common passwords to crack that locked network (using, for example, the Does’ pet’s name or the street they are on). Creative and funny Wi-Fi names, like FBI Surveillance Van #3, Hey_You_Get_Off_My_Lan, are more difficult for hackers to access.
-
8
Save your new network name. Click Apply, Save Settings, Save, or whatever your configuration screen uses to finalize the process. This will save your new network name.
- In some cases, you may have to click an image of a floppy disc or a checkmark.
- Changing your router’s settings will often cause the router to reboot and you’ll need to reconnect every device that was previously connected.
- For even more security, you can make your Wi-Fi network invisible.
Advertisement
-
1
Understand when to use this method. If your router’s page doesn’t allow you to change your network’s name or your network name changes aren’t saving, you can reset the router to its factory settings and then assign a new name to the network when first signing into it. Since resetting the router also disconnects any currently connected items, this should be a last resort.
- Resetting your router will change the network’s name back to the name (or «SSID») printed on the back or bottom of the router.
- If you reset your router, you’ll need to reconnect manually every Internet-connected item in your home to the router.
-
2
Make sure that the router has a password sticker. If you’ve had your router for a few years, the factory password sticker may have faded or been damaged. You’ll usually find the password sticker on the back or bottom of the router.
- If you don’t have the factory password, you won’t be able to sign into the network with the necessary password after resetting your router.
-
3
Find the router’s «Reset» button. This is usually a small, recessed button on the back of the router.
-
4
Press and hold the «Reset» button for 30 seconds. You may need to use a bent paperclip or a needle to do this.
-
5
Release the button after 30 seconds. Your router should turn itself off and begin rebooting.
-
6
Allow the router to finish resetting. Once the router is on again, you can proceed.
-
7
Connect to the router to a computer. In most cases, you’ll be given the option of changing the router’s name once you connect to it from your computer’s Wi-Fi menu:
- Windows — Click the Wi-Fi icon in the lower-right corner of the screen, select your router’s factory name, click Connect, enter the factory password, and click Next. You can then enter the network name you want to use when prompted.
- Mac — Click the Wi-Fi icon in the upper-right corner of the screen, select your router’s factory name, enter the factory password, and click Join. You can then enter the network name you want to use when prompted.
Advertisement
-
1
Open Settings
. Click the gear-shaped icon in the lower-left side of the Start menu.
- To change your router’s name, you’ll need to connect to its IP address. This method will help you find the address you’ll need to connect to.
-
2
Click
Network & Internet. It’s a globe-shaped icon in the Settings window.
-
3
Click the Status tab. You’ll find this in the upper-left side of the window.
-
4
Click View your network properties. This link is near the bottom of the page. Doing so opens a list of the different Internet connection types currently available on your computer.
-
5
Scroll down to the «Wi-Fi» heading. It’s near the bottom of the list.
-
6
Review the «Default gateway» address. The number to the right of the «Default gateway» heading in the «Wi-Fi» list is the address you’ll enter in your web browser to access your router’s page.
- The address number will usually resemble something like «192.168.1.1» or «10.0.0.1».
Advertisement
-
1
Open System Preferences… on your Mac. Click the Apple menu at the top-left and select System Preferences.
- To change your router’s name, you’ll need to connect to its IP address. This method will help you find the address you’ll need to connect to.
-
2
Click Network. This globe-shaped icon is in the System Preferences window. Clicking it opens a new window.
-
3
Click Advanced…. It’s in the lower-right side of the Network window. A pop-up window will appear.
-
4
Click the TCP/IP tab. This is at the top of the pop-up window.
-
5
Find the «Router» address. You’ll find this number to the right of the «Router» heading in the middle of the page. This is the number you’ll enter into your web browser in order to access your router’s page.
- The address will usually resemble something like «192.168.1.1» or «10.0.0.1».
Advertisement
Add New Question
-
Question
I want to change my password we had a friend living with us I gave him the password and now he has moved out and lives nextdoor so I can change the password and keep the same network name
This answer was written by one of our trained team of researchers who validated it for accuracy and comprehensiveness.
wikiHow Staff Editor
Staff Answer
Yes, just follow the instructions here to change the password instead of the name.
-
Question
If I want to just change the user name on my wireless network, do I need to reconnect everything on the network?
This answer was written by one of our trained team of researchers who validated it for accuracy and comprehensiveness.
wikiHow Staff Editor
Staff Answer
Yes. When you change the name, everything that is currently connected to the network will no longer have correct credentials, so you’ll need to log them in again.
-
Question
How do I change the SSID Name even if is unchangeable?
Maybe there is some option holding you from changing the SSID, if not reset the router and try again.
See more answers
Ask a Question
200 characters left
Include your email address to get a message when this question is answered.
Submit
Advertisement
-
Resetting your router once every year or so may improve its performance.
Thanks for submitting a tip for review!
Advertisement
-
Always make sure your wireless network is password-protected.
Advertisement
About This Article
Thanks to all authors for creating a page that has been read 2,164,430 times.
Is this article up to date?
После установки роутера и настройки вещания вы можете обнаружить, что у всех устройств, оснащённых антенной Wi-Fi, появилась возможность подключения к новой беспроводной сети. Однако, её название обычно повторяет бренд девелопера маршрутизатора либо модель указанного девайса. Такой подход удобен далеко не всегда, например, если вы живёте в современном многоэтажном доме либо работаете в офисном центре, похожих названий может быть около 20–30. Чтобы сделать подключение любого гаджета к интернету максимально удобным, нужно будет изменить имя сети. Как поменять название сетей Wi-Fi, должен знать любой пользователь, учитывая, что этот процесс отнимает минимум времени и не требует специальных навыков.

Часто юзеры оставляют стандартное название Wi-Fi по модели роутера
Работа с названиями
Предположим, что беспроводная сеть уже создана, и вы смогли установить соединение с ней, а теперь просто хотите поменять её название. Первым делом необходимо получить доступ к веб-клиенту роутера, набрав его адрес в строке браузера. По умолчанию большинство изготовителей утилизирует сочетание 192.168.0.1, хотя в некоторых случаях ноль заменяется единицей. Если вы не устанавливали логин и пароль самостоятельно, в обеих строках появившегося диалогового окна вам нужно будет ввести «admin». Однако, подобные базовые настройки используют далеко не все маршрутизаторы — чтобы изменить имя беспроводной сети, иногда приходится подробно изучить инструкцию.
Получив доступ к клиенту, воспользуйтесь вкладкой настроек беспроводного вещания — в англоязычных интерфейсах найти её можно будет по слову «Wireless». Встречаются следующие варианты названия вкладки, в которой можно изменить имя беспроводной сети:
- Wireless setup в D-Link;
- Wireless settings в TP-Link;
- Networking в Zyxel;
- Wireless network в Asus.
Перейдя в нужную вкладку, найдите строку с именем подключения — в ней вы увидите название, которое отображалось ранее в окне беспроводных сетей компьютера либо смартфона. Некоторые компоновщики называют искомую строку «Wireless network name», однако большинство пользуется стандартным обозначением «SSID».

Чтобы поменять имя, просто установите курсор в эту строку, удалите существующие символы и введите новое название, которое будет удобным для вас. Крайне нежелательно выбирать наименование Wi-Fi, которая уже существует в непосредственной близости от вас. В данном случае компьютеры, планшеты и смартфоны будут путаться, постоянно пытаясь подключаться к чужому роутеру — ничего хорошего из этого точно не выйдет. Также специалисты настоятельно рекомендуют не эксплуатировать служебные символы, включая косые и прямые черты, знак доллара, кавычки, решётку и проценты. Они могут помешать подключить к Wi-Fi конкретные смартфоны и прочие мобильные девайсы.
Остаётся только сохранить подобные установки и перезагрузить роутер, воспользовавшись пунктом меню «Системные настройки». Если после перезагрузки вы не сможете найти нужную сеть либо установить соединение с ней, придётся выполнить сброс до заводских параметров. Восстановить их можно при помощи специальной кнопки на маршрутизаторе, промаркированной «Reset», после чего настроить роутер придётся заново. Если устройство поставляется с прошивкой провайдера, перед его сбросом следует проконсультироваться со службой технической поддержки.

Быстро и легко
Практика показывает, что изменение имени сети в 99% случаев выполняется успешно, причём на эту работу уходит не более 2 минут, включая время перезагрузки и повторного подключения. Однако, некоторые устройства могут отказаться подключаться к сети с обновлённым названием. Чтобы устранить проблему, необходимо войти в меню доступных беспроводных сетей и удалить подключение с прежним SSID. После этого можно будет провести повторную попытку соединения, не забыв указать пароль. Если вы предпочли скрыть SSID, закрыв его для общего доступа, подключиться придётся через пункт меню «Другие сети».