Интерфейс Spotify в Интернете или с программным обеспечением Spotify, установленным на компьютере, аналогичен. Интерфейс Spotify будет представлять собой список воспроизведения вашего плейлиста или альбом на Spotify. Ниже представлена песня, воспроизводимая с изображением песни, если таковая имеется, а также многие другие элементы управления.
Если пользователи хотят оптимизировать интерфейс воспроизведения музыки на Spotify в Интернете, но при этом произвести впечатление, можно установить утилиту Spotify Web Visualizer. Эта утилита скроет все кнопки управления воспроизведением музыки, списком воспроизведения или альбомом в интерфейсе, но отобразит только изображения альбомов, исполнителей только этой песни. Ваше изображение также преобразуется в режим размытия для музыкального веб-интерфейса Spotify. В следующей статье показано, как изменить фон для Spotify в Интернете.
- Как использовать Xpotify для прослушивания музыки Spotify в Windows 10
- 15 советов Spotify, которые нельзя упустить, чтобы лучше слушать
- Как улучшить впечатления от Spotify с помощью веб-сайтов поддержки
- Для прослушивания музыки Spotify в Windows 10 не требуется учетная запись
Шаг 1:
Пользователи скачивают утилиту Spotify Web Visualizer для браузера Chrome по ссылке ниже.
- Скачать Spotify Web Visualizer Chrome
Утилита требует, чтобы вы вошли в свою учетную запись Google для использования. Утилиты предоставят бесплатную пробную версию, нажмите «Попробовать», чтобы установить утилиту в Chrome.
Шаг 2:
Затем пользователи получают доступ к Spotify в Интернете по ссылке ниже.
https://www.spotify.com
В этом интерфейсе пользователи нажимают кнопку «Войти» в правом верхнем углу интерфейса.
Шаг 3:
Отобразите интерфейс, чтобы мы могли ввести личную информацию об учетной записи Spotify, затем нажмите «Войти», чтобы войти.
Переключившись на интерфейс Spotify, пользователи нажимают кнопку «Запустить веб-плеер», чтобы слушать музыку Spotify.
Шаг 4:
Отобразите интерфейс музыкального проигрывателя Spotify по умолчанию. Вы посмотрите под музыкальный проигрыватель справа, чтобы увидеть значок с двухсторонней стрелкой. Щелкаем по иконке.
Результатом интерфейса Spoyify является сворачивание всего содержимого из списка воспроизведения и альбома, оставляя только название воспроизводимой песни и исполнителя, а также пользовательские значки воспроизведения музыки. Изображение песни используется в качестве интерфейса воспроизведения музыки на Spotify.
Чтобы выйти из этого интерфейса, нажмите значок x в верхнем левом углу экрана.
Утилита Spotify Web Visualizer упростит и оптимизирует веб-интерфейс музыкального проигрывателя Spotify, оставив только название песни и необходимые кнопки настройки.
Желаю всем успехов!
FAQ
На чтение
3 мин.
Просмотров
1560
Опубликовано
24.05.2022
Можно ли установить светлую тему Spotify – или рассчитывать не на что? Где искать нужные настройки, как сменить дизайн? Расскажем в этом обзоре!
Как поменять оформление?
К сожалению, просто так включить светлую тему в Спотифай не получится – придется воспользоваться сторонним инструментом. Дефолтное оформление музыкального сервиса – черное, изменить его встроенными возможностями нельзя!
Что можно сделать? Скачать Spicetify – это программное обеспечение с открытым исходным кодом, позволяющее настроить через командную строку пользовательский дизайн интерфейса. Готовы?
- Откройте ссылку Spicetify на ГитХабе и скачайте нужную версию (выберите соответствующую операционную систему);
- Распакуйте загруженный архив и найдите файл под названием «spicetify.exe»;
- Кликните левой кнопкой мышки для запуска – ничего не произойдет, но это нормально.

Светлая тема в Спотифай становится ближе! Теперь вы можете просмотреть и выбрать один из вариантов оформления интерфейса:
- Откройте страницу каталога и пролистайте доступные варианты – есть золотой, розовый, зеленый и масса других способов оформить интерфейс;
- Остановили выбор на одном из вариантов? Теперь переходим к загрузке – открываем страницу на ГитХабе;
- Жмем на зеленую иконку «Code» и выбираем вариант «Download ZIP»;

- На ваше устройство будут загружены все виды оформления – но вы запомнили название понравившегося;

- Ищем в загруженном архиве папку с нужным именем белой темы Спотифай;
- Теперь открывайте папку пользователя устройства, переходите к директории «.spicetify» и ищите папку с названием «Themes»;
- Вставьте туда скопированную папочку с новым дизайном;
- Найдите файл «config.ini» и жмите по нему правой кнопкой мыши;

- Выбирайте пункт «Открыть с помощью… блокнота»;
- В открывшемся тексте нужно отыскать строчку current_theme и поменять ее на светлую тему Спотифай, то есть ввести новое название;
- Закройте блокнот, не забыв сохранить внесенные изменения. Здесь кстати рассказали про ограничения бесплатного аккаунта.

Теперь переходим к заключительному этапу кастомайзинга – внедрим новый светлый дизайн в музыкальный сервис.
- Воспользуйтесь сочетанием клавиш Win+X, чтобы открыть командную строку;

- Вводим адрес папки, куда был загружена программа (например, DUserDownloads>cd spicetify-0.9.9-windows-x64);
- Вписываем команду «spicetify backup apply» (без кавычек);
- Несколько секунд ждем и открываем музыкальный сервис – перед вами отлично выполненный кастомайз!

Сложно лишь на первый взгляд – на деле каждый пользователь может сделать светлую тему в Спотифай, приложив немного усилий! Здесь остальные хитрости Спотифи — посмотрите так же.
Многолетний коктейль
20.04.2021
Разницы с новым минимум.
Ответить
Развернуть ветку
Sevatyan Young
6.05.2021
возможно на больших мониторах новый дизайн смотрится нормально, но у меня на ноутбуке этот новый дизайн какой то не пропорциональный, старый смотрится куда лучше.
Ответить
Развернуть ветку
Inversium
20.04.2021
А наоборот можно сделать? Просто у меня старый, хотел бы новый попробовать, но как я понял, там не всем доступ дали
Ответить
Развернуть ветку
Истинный бинокль
20.04.2021
У меня новый интерфейс появился после того как я разлогинился в приложении, перезапустил его и залогинился заново.
Ответить
Развернуть ветку
Истинный бинокль
20.04.2021
С сайта
Ответить
Развернуть ветку
SuxoiKorm
20.04.2021
Видимо с версией стороа не работает так, хотя обновление было в магазине
Ответить
Развернуть ветку
Прикладной каякер
20.04.2021
Всм? Ты ж программист
Ответить
Развернуть ветку
A X
20.04.2021
Хочешь качать — покупай на BandCamp, например.
А для рекламы раньше эта штука работала, щас уже не уверен, я сам не пользуюсь Spotify.
Ответить
Развернуть ветку
Былой якорь
20.04.2021
Комментарий недоступен
Ответить
Развернуть ветку
Варвара Саркисова
6.05.2021
Спасибо огромное! Очень раздражала новая версия, а ваш способ простой и действенный)))
Ответить
Развернуть ветку
DinoHipe
7.05.2021
в старом при нажатии на поиск вылазили те треки что я когда то искал, а сейчас такого нет
и мне не помог способ на старый вернуться
Ответить
Развернуть ветку
Читать все 25 комментариев
Spotify is one of the best music streaming services around. Sure, some will disagree with that statement, but the numbers and longevity of the service don’t lie.
However, the Spotify desktop app isn’t great. The colors are dull, the user interface is clunky and slow to load, and it can sometimes take a while to find what you’re looking for.
Did you know that Spotify is customizable? With the help of Spicetify, you can change how Spotify looks with themes and even add custom apps for extra functionality.
So, here’s how you customize Spotify with Spicetify.
What Is Spicetify?
Spicetify is an open-source Spotify customization tool that you use through the command-line. Spicetify features include:
- Changing the Spotify user interface color scheme and theme
- Installing custom apps within Spotify
- Installing custom extensions within Spotify
- Remove bloat from the Spotify desktop app
Spicetify is a command-line only tool. That means you make edits using a series of commands and edits to configuration files. It sounds a little tricky, but with this tutorial, you’ll be able to customize Spotify exactly how you want.
A Spicetify theme consists of two configuration files. One configuration file controls the colors, and the other controls Spotify’s style and layout options (via a CSS file). If you’ve ever created a website, you have probably encountered a CSS (Cascading Style Sheet) file, as they are commonly used to alter the appearance of websites and other online document types.
You don’t need Spotify Premium to customize themes with Spicetify. Is Spotify Premium worth it? That depends on how frequently you want to hear adverts.
How to Customize Spotify With Spicetify
Getting up and running with Spicetify requires a few steps. Spicetify is available for Windows, macOS, and Linux, although the following steps only apply to Windows. You can find the instructions for macOS and Linux on the Spicetify GitHub page.
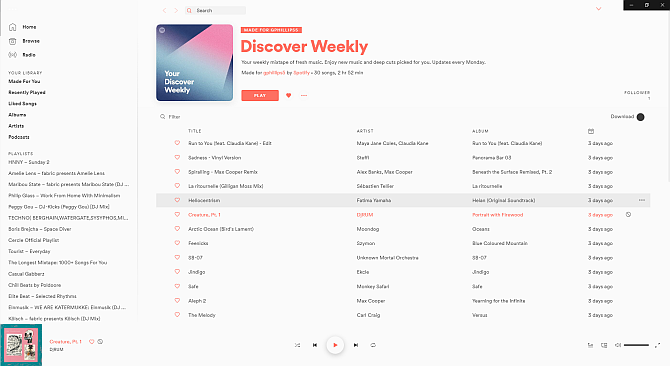
Before beginning the customization, here’s the default Spotify theme:

1. Installing Spicetify on Windows
Let’s install Spicetify on Windows.
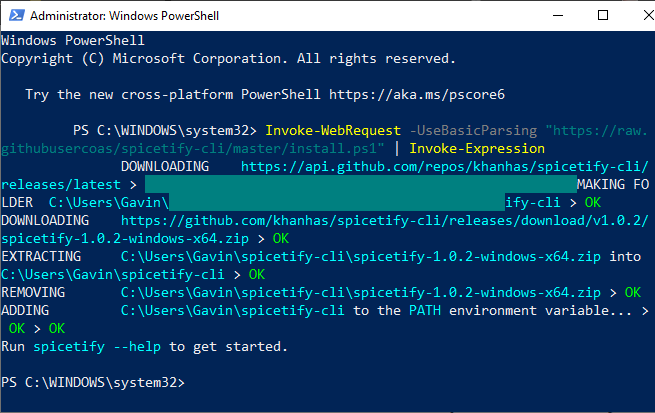
In your Start Menu search bar, type powershell, then select Run as Administrator. Now, copy and paste the following command:
Invoke-WebRequest -UseBasicParsing "https://raw.githubusercontent.com/khanhas/spicetify-cli/master/install.ps1" | Invoke-Expression
After the installation completes, you can input spicetify —help to see the comprehensive list of commands. Alternatively, continue to the next step to begin customizing Spotify.
2. Backup Spicetify Configuration Files
Remaining within PowerShell, input spicetify, and press Enter to create the Spicetify configuration file.
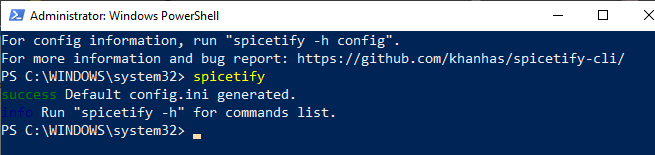
Next up, enter the following command to create a backup of the standard Spicetify configuration:
spicetify backup apply enable-devtool
You’re now ready to begin customizing Spicetify. But keep PowerShell open.
At this point, Spotify will also update with the default Spicetify theme which looks like this:
3. Customizing Spotify With Spicetify
There are two ways you can customize Spicetify: creating your own color scheme or using someone else’s. Creating a copy of and then editing the standard Spicetify theme is an easy way to start customizing Spotify and learning how Spicetify works.
You’ll find the default Spicetify theme configuration in the following location:
C:Users[Your Name]spicetify-cliThemesSpicetifyDefault
Hold CTRL and click each file to select both, then press CTRL + C to copy. Now, head to
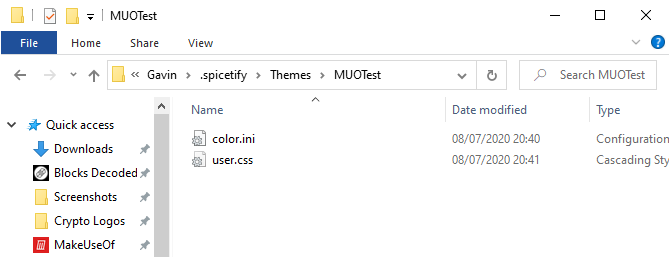
C:Users[Your Name].spicetifyThemes
Right-click and select New > Folder, then give your theme folder a name. Open the new folder and press CTRL + V to paste the default Spicetify configuration files. Your setup should look like this:
Open color.ini with a text editor, such as Notepad. Here you’ll see the hex color codes for the default theme. You’ll also note that there are two color sets, one for «Base» and one for «Dark.» You can add multiple color sets to a single color configuration file and switch between them using the main Spicetify configuration file (more on this in a moment).
Back to the colors. Spicetify uses hex color codes, which appear as a string of six characters (A-F, 0-6). From here, you can edit the color scheme.
Head to HTML Color Codes for help finding hex codes as well as complimentary colors. Press CTRL + S to save your color scheme.
If you are unsure which colors to change, check out the color.ini reference sheet at the bottom of the page.
Keep the default CSS configuration at the current time.
4. Updating Spotify With Your Custom Theme
Once you pick your Spotify theme colors, you can update Spicetify to import the theme. First, you need to specify your theme in the Spicetify configuration file.
Head back to C:Users[Your Name].spicetify and open configuration.ini.
Replace «SpicetifyDefault» with your custom Spotify theme name. Press CTRL + S to save the configuration.
You might also note the «color_scheme» option, beneath «current_theme.» If you create multiple color schemes within a single color.ini file, this is where you type the color scheme name.
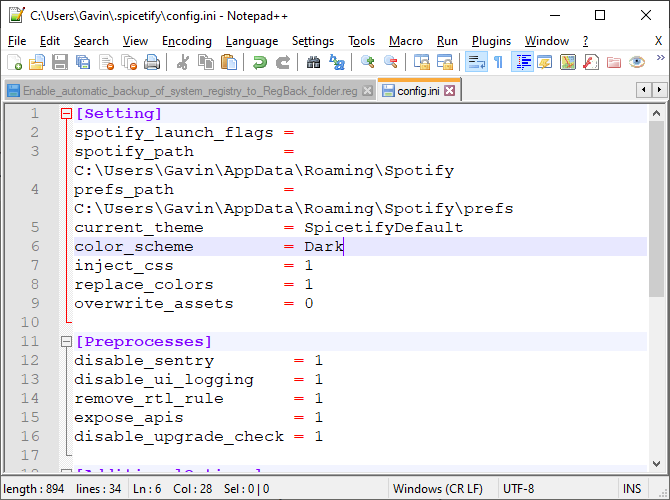
For example, the default Spicetify theme has two color schemes, Base and Dark. Inputting either option here switches between the two.
Okay, head back to PowerShell and enter the following:
spicetify apply
Now, watch as Spotify magically updates with your color scheme!

5. Restore the Default Spotify Theme
If you want to restore Spotify to its default theme and remove all customization, Spicetify includes a simple command:
spicetify restore
You enter the command in PowerShell, and it clears any Spicetify customization, restoring Spotify to its original configuration. The «restore» command is especially handy when you begin creating custom CSS configuration files, as you might break something in the process.
Importing More Spicetify Themes
If you want inspiration, or just want to switch through a bunch of new Spotify themes easily, you have two options.
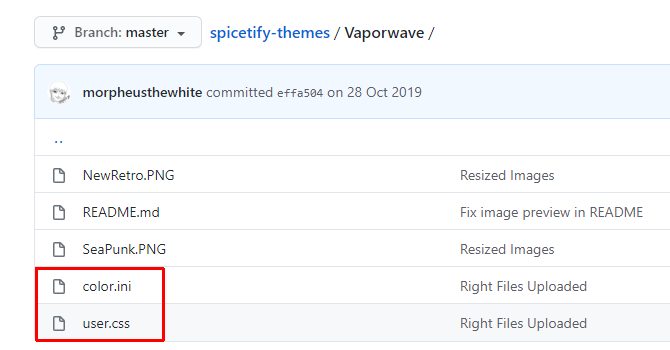
The Spicetify Themes GitHub is a repository of custom Spotify themes. You can copy and paste the configuration for each theme you like the look, or you can clone the entire GitHub repository to your computer. The first option is slower, whereas the second option requires some extra technical steps but makes it easier to switch between themes.
Read on to see both.
Option 1: Copy and Paste Spicetify Theme
Let’s start with the copy and paste method.
Find the Spicetify theme you want to copy. Head to your Spicetify themes folder (found at C:Users[Your Name].spicetifyThemes) and create a new folder using the theme name.
Right-click and select New > Text Document.
Now, head back to the Spicetify theme you want to copy. The two files you want, color.ini and user.css, are here. Select color.ini to open the file contents, and you’ll see the theme color scheme.
Drag your mouse over the color scheme to select each item, then press CTRL + C to copy. Head back to your new text document and press CTRL + V to paste the color scheme.
Press CTRL + Shift + S to Save As. Save the file name as «color.ini.» In the dropdown menu underneath the file name, change the file type to All Files.
You can now complete the same process for the user.css file, which alters the Spotify layout. Create a new text document, then copy and paste the contents of the user.css file into the new text document.
Press CTRL + Shift + S to Save As. Save the file name as «user.css.» In the dropdown menu underneath the file name, change the file type to All Files.
Once you save the color scheme and CSS files, you can update the main configuration file to point at the new Spotify theme.
Head back to C:Users[Your Name].spicetify and open configuration.ini. Replace «SpicetifyDefault» with your custom Spotify theme name. Press CTRL + S to save the configuration.
Option 2: Import Spicetify Themes From GitHub
If copying and pasting individual files seems time-consuming, you can clone the entire Spicetify Themes GitHub repository to your local storage for easy access.
You need to download and configure GitHub Desktop, which only takes a moment. GitHub Desktop is a handy visual tool for interacting with GitHub, which you would normally do through the command line. Having a GUI makes using GitHub easier, especially if you have never used it before.
Download: GitHub Desktop for Windows or macOS (Free)
Double-click the file to install GitHub Desktop. Once the installation completes, open GitHub Desktop. You don’t need to create a GitHub account, but it does require you to add a username and email address to track any changes or comments you leave on GitHub projects.
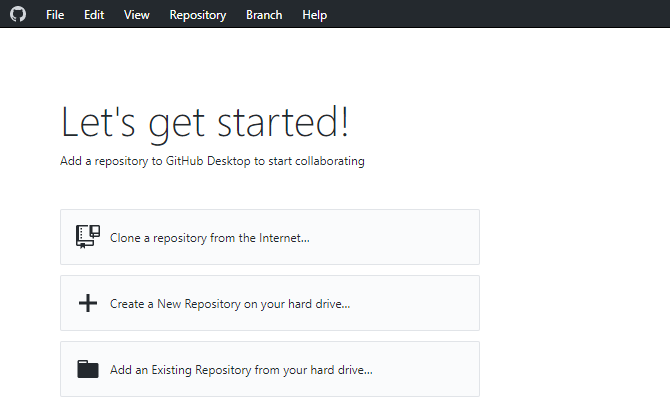
Select Clone a repository from the internet from the GitHub Desktop menu, then open the URL tab.
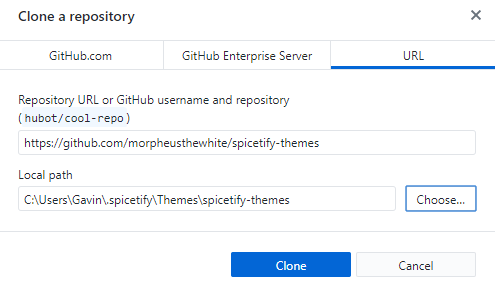
Copy and paste the Spicetify Themes Github URL into the top box (https://github.com/morpheusthewhite/spicetify-themes).
Browse to the location of your Spicetify theme folder in the second box (C:Users[Your Name].spicetifyThemes).
Press Clone and wait for the process to complete.
You’ll now find the files from the GitHub repository in your Spicetify themes folder. Now, open the downloaded Spicetify Themes folder, press CTRL + A to select all, then press CTRL + X.
Go back to the existing Spicetify themes folder (not the folder you just downloaded, the folder you were using for themes previously), and press CTRL + V to paste.
You can now update your Spotify themes using the main Spicetify configuration file. Swap the «current_theme» for the theme you want, and change the «color_scheme» if you want (if available to the theme).
Save the configuration file, then run «spicetify apply» in PowerShell, and you’re good to go.
Spice-Up Your Spotify With Spicetify
Spicetify is a great way to breathe new life into Spotify desktop. You can add color, change fonts, overhaul the style, and much more. Then there are the Spicetify Extensions which you can use to change or extend the functionality of Spotify.
Now, as your Spotify looks amazing, it’s time to take a look at the mess of playlists in your sidebar. Check out the best tips and tricks for managing your Spotify playlists.
Spotify is one of the best music streaming services around. Sure, some will disagree with that statement, but the numbers and longevity of the service don’t lie.
However, the Spotify desktop app isn’t great. The colors are dull, the user interface is clunky and slow to load, and it can sometimes take a while to find what you’re looking for.
Did you know that Spotify is customizable? With the help of Spicetify, you can change how Spotify looks with themes and even add custom apps for extra functionality.
So, here’s how you customize Spotify with Spicetify.
What Is Spicetify?
Spicetify is an open-source Spotify customization tool that you use through the command-line. Spicetify features include:
- Changing the Spotify user interface color scheme and theme
- Installing custom apps within Spotify
- Installing custom extensions within Spotify
- Remove bloat from the Spotify desktop app
Spicetify is a command-line only tool. That means you make edits using a series of commands and edits to configuration files. It sounds a little tricky, but with this tutorial, you’ll be able to customize Spotify exactly how you want.
A Spicetify theme consists of two configuration files. One configuration file controls the colors, and the other controls Spotify’s style and layout options (via a CSS file). If you’ve ever created a website, you have probably encountered a CSS (Cascading Style Sheet) file, as they are commonly used to alter the appearance of websites and other online document types.
You don’t need Spotify Premium to customize themes with Spicetify. Is Spotify Premium worth it? That depends on how frequently you want to hear adverts.
How to Customize Spotify With Spicetify
Getting up and running with Spicetify requires a few steps. Spicetify is available for Windows, macOS, and Linux, although the following steps only apply to Windows. You can find the instructions for macOS and Linux on the Spicetify GitHub page.
Before beginning the customization, here’s the default Spotify theme:
1. Installing Spicetify on Windows
Let’s install Spicetify on Windows.
In your Start Menu search bar, type powershell, then select Run as Administrator. Now, copy and paste the following command:
Invoke-WebRequest -UseBasicParsing "https://raw.githubusercontent.com/khanhas/spicetify-cli/master/install.ps1" | Invoke-Expression
After the installation completes, you can input spicetify —help to see the comprehensive list of commands. Alternatively, continue to the next step to begin customizing Spotify.
2. Backup Spicetify Configuration Files
Remaining within PowerShell, input spicetify, and press Enter to create the Spicetify configuration file.
Next up, enter the following command to create a backup of the standard Spicetify configuration:
spicetify backup apply enable-devtool
You’re now ready to begin customizing Spicetify. But keep PowerShell open.
At this point, Spotify will also update with the default Spicetify theme which looks like this:
3. Customizing Spotify With Spicetify
There are two ways you can customize Spicetify: creating your own color scheme or using someone else’s. Creating a copy of and then editing the standard Spicetify theme is an easy way to start customizing Spotify and learning how Spicetify works.
You’ll find the default Spicetify theme configuration in the following location:
C:Users[Your Name]spicetify-cliThemesSpicetifyDefault
Hold CTRL and click each file to select both, then press CTRL + C to copy. Now, head to
C:Users[Your Name].spicetifyThemes
Right-click and select New > Folder, then give your theme folder a name. Open the new folder and press CTRL + V to paste the default Spicetify configuration files. Your setup should look like this:
Open color.ini with a text editor, such as Notepad. Here you’ll see the hex color codes for the default theme. You’ll also note that there are two color sets, one for «Base» and one for «Dark.» You can add multiple color sets to a single color configuration file and switch between them using the main Spicetify configuration file (more on this in a moment).
Back to the colors. Spicetify uses hex color codes, which appear as a string of six characters (A-F, 0-6). From here, you can edit the color scheme.
Head to HTML Color Codes for help finding hex codes as well as complimentary colors. Press CTRL + S to save your color scheme.
If you are unsure which colors to change, check out the color.ini reference sheet at the bottom of the page.
Keep the default CSS configuration at the current time.
4. Updating Spotify With Your Custom Theme
Once you pick your Spotify theme colors, you can update Spicetify to import the theme. First, you need to specify your theme in the Spicetify configuration file.
Head back to C:Users[Your Name].spicetify and open configuration.ini.
Replace «SpicetifyDefault» with your custom Spotify theme name. Press CTRL + S to save the configuration.
You might also note the «color_scheme» option, beneath «current_theme.» If you create multiple color schemes within a single color.ini file, this is where you type the color scheme name.
For example, the default Spicetify theme has two color schemes, Base and Dark. Inputting either option here switches between the two.
Okay, head back to PowerShell and enter the following:
spicetify apply
Now, watch as Spotify magically updates with your color scheme!
5. Restore the Default Spotify Theme
If you want to restore Spotify to its default theme and remove all customization, Spicetify includes a simple command:
spicetify restore
You enter the command in PowerShell, and it clears any Spicetify customization, restoring Spotify to its original configuration. The «restore» command is especially handy when you begin creating custom CSS configuration files, as you might break something in the process.
Importing More Spicetify Themes
If you want inspiration, or just want to switch through a bunch of new Spotify themes easily, you have two options.
The Spicetify Themes GitHub is a repository of custom Spotify themes. You can copy and paste the configuration for each theme you like the look, or you can clone the entire GitHub repository to your computer. The first option is slower, whereas the second option requires some extra technical steps but makes it easier to switch between themes.
Read on to see both.
Option 1: Copy and Paste Spicetify Theme
Let’s start with the copy and paste method.
Find the Spicetify theme you want to copy. Head to your Spicetify themes folder (found at C:Users[Your Name].spicetifyThemes) and create a new folder using the theme name.
Right-click and select New > Text Document.
Now, head back to the Spicetify theme you want to copy. The two files you want, color.ini and user.css, are here. Select color.ini to open the file contents, and you’ll see the theme color scheme.
Drag your mouse over the color scheme to select each item, then press CTRL + C to copy. Head back to your new text document and press CTRL + V to paste the color scheme.
Press CTRL + Shift + S to Save As. Save the file name as «color.ini.» In the dropdown menu underneath the file name, change the file type to All Files.
You can now complete the same process for the user.css file, which alters the Spotify layout. Create a new text document, then copy and paste the contents of the user.css file into the new text document.
Press CTRL + Shift + S to Save As. Save the file name as «user.css.» In the dropdown menu underneath the file name, change the file type to All Files.
Once you save the color scheme and CSS files, you can update the main configuration file to point at the new Spotify theme.
Head back to C:Users[Your Name].spicetify and open configuration.ini. Replace «SpicetifyDefault» with your custom Spotify theme name. Press CTRL + S to save the configuration.
Option 2: Import Spicetify Themes From GitHub
If copying and pasting individual files seems time-consuming, you can clone the entire Spicetify Themes GitHub repository to your local storage for easy access.
You need to download and configure GitHub Desktop, which only takes a moment. GitHub Desktop is a handy visual tool for interacting with GitHub, which you would normally do through the command line. Having a GUI makes using GitHub easier, especially if you have never used it before.
Download: GitHub Desktop for Windows or macOS (Free)
Double-click the file to install GitHub Desktop. Once the installation completes, open GitHub Desktop. You don’t need to create a GitHub account, but it does require you to add a username and email address to track any changes or comments you leave on GitHub projects.
Select Clone a repository from the internet from the GitHub Desktop menu, then open the URL tab.
Copy and paste the Spicetify Themes Github URL into the top box (https://github.com/morpheusthewhite/spicetify-themes).
Browse to the location of your Spicetify theme folder in the second box (C:Users[Your Name].spicetifyThemes).
Press Clone and wait for the process to complete.
You’ll now find the files from the GitHub repository in your Spicetify themes folder. Now, open the downloaded Spicetify Themes folder, press CTRL + A to select all, then press CTRL + X.
Go back to the existing Spicetify themes folder (not the folder you just downloaded, the folder you were using for themes previously), and press CTRL + V to paste.
You can now update your Spotify themes using the main Spicetify configuration file. Swap the «current_theme» for the theme you want, and change the «color_scheme» if you want (if available to the theme).
Save the configuration file, then run «spicetify apply» in PowerShell, and you’re good to go.
Spice-Up Your Spotify With Spicetify
Spicetify is a great way to breathe new life into Spotify desktop. You can add color, change fonts, overhaul the style, and much more. Then there are the Spicetify Extensions which you can use to change or extend the functionality of Spotify.
Now, as your Spotify looks amazing, it’s time to take a look at the mess of playlists in your sidebar. Check out the best tips and tricks for managing your Spotify playlists.
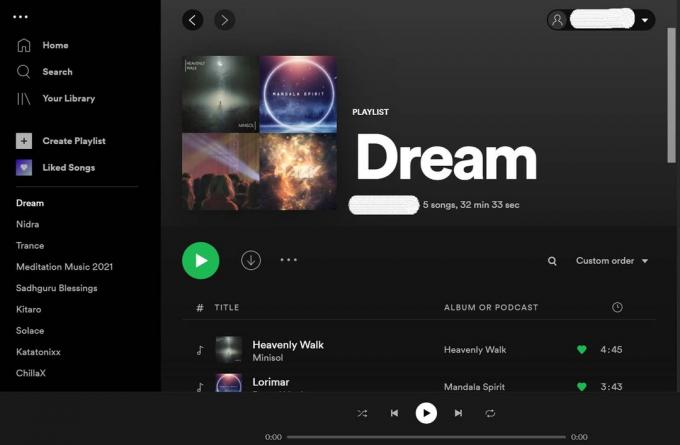
Spotify представила новое обновление пользовательского интерфейса для своего настольного приложения. Однако пользователи и любители музыки находят новый интерфейс менее интерактивным. Итак, в качестве решения проблемы я расскажу вам, как вернуться к классическому пользовательскому интерфейсу рабочего стола Spotify.
Я объяснил, как перейти на старый плавный интерфейс популярного приложения для потоковой передачи музыки во всех основных операционных системах, таких как Windows, macOS и Linux. С новым обновлением панель поиска на домашней странице сместилась в левую панель.
Ранее с классический старый настольный интерфейс Spotify, вы можете легко получить доступ к собственному окну поиска и мгновенно ввести свой музыкальный запрос. Для большинства пользователей это невозможно с новым интерфейсом. Итак, следуя этому руководству, вы можете исправить все эти неудобства и насладиться предыдущим интерфейсом.
Содержание страницы
-
Вернуться к классическому интерфейсу рабочего стола Spotify
- Переход на классический интерфейс Spotify в ОС Windows
- Переход на классический интерфейс Spotify в Linux
- Как перейти на более старый интерфейс Spotify в Mac OS
Вернуться к классическому интерфейсу рабочего стола Spotify
В текущей настольной версии вам нужно нажать кнопку «Поиск», которую не так легко увидеть. Те, кто не часто использует Spotify Desktop или новые пользователи, легко запутаются. Ниже приведен снимок экрана моего Spotify, автоматически обновленного до последней версии пользовательского интерфейса. Вы можете видеть, что панель поиска перемещена на левую панель, а не на верхнюю.
Чтобы перейти к старому пользовательскому интерфейсу, вам нужно внести небольшое изменение в файл конфигурации настольного приложения Spotify. Этот файл легко доступен на вашем компьютере независимо от используемой вами операционной системы.
Переход на классический интерфейс Spotify в ОС Windows
Если вы используете компьютер с Windows, следуйте этому руководству.
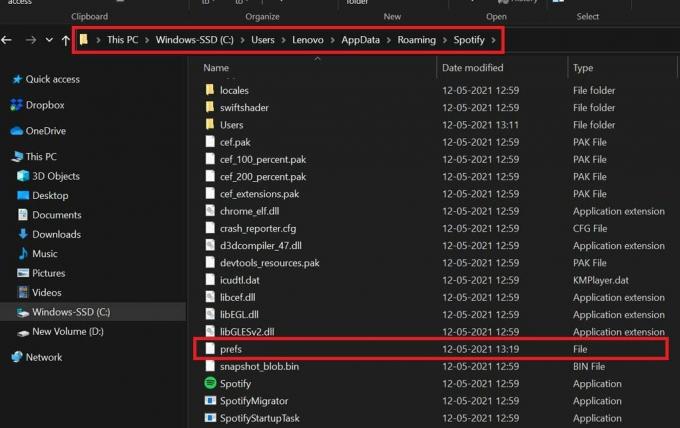
- Открыть файловый менеджер
- перейдите по следующему пути, который я упомянул ниже
- C: Users Имя пользователя AppData Roaming Spotify prefs

- Откройте файл prefs с помощью приложения «Блокнот»
- В этом файле prefs добавьте эту строку.
ui.experience_override = ‘’ классический »
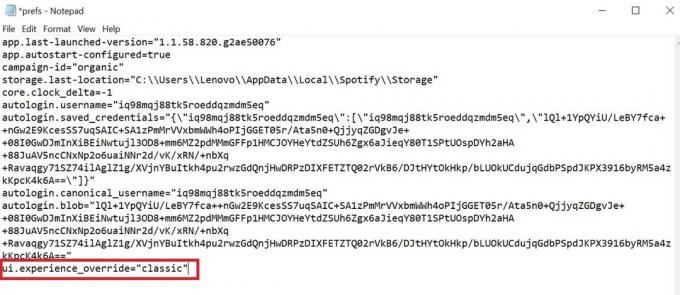
Примечание: В команде замените Username на конкретное имя пользователя, которое вы используете для своего компьютера.
Также помните, что в проводнике вы должны включить скрытые файлы в пункте «Просмотр» в строке меню. Это позволит вам получить доступ к папке AppData.
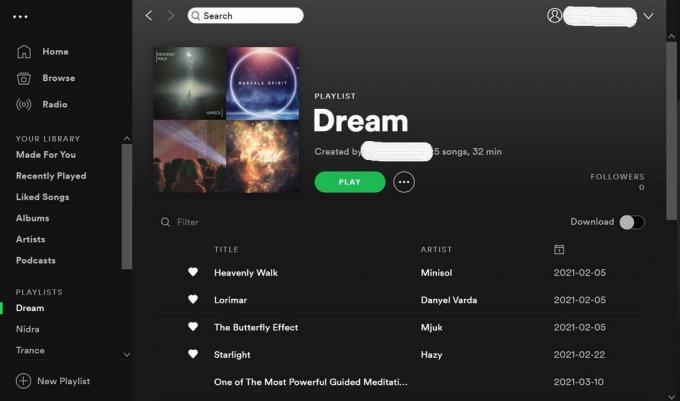
После того, как вы переключитесь на классический пользовательский интерфейс Spotify, выполнив описанные выше действия, в верхней части дисплея появится панель поиска. вот скриншот из моего Spotify после выполнения настройки AppData.
Переход на классический интерфейс Spotify в Linux
В Linux процесс возврата к классическому пользовательскому интерфейсу рабочего стола Spotify такой же, как и в Windows.
- перейдите к главная / $ USER / .config / Spotify / prefs
- В файле prefs добавьте ui.experience_override = ‘’ классический »
Как перейти на более старый интерфейс Spotify в Mac OS
Если вы используете MacBook или iMac, то вот шаги, которые вы должны выполнить, чтобы изменить Spotify на классический интерфейс.
- Поиск запуска
- На левой панели нажмите на свое имя пользователя
- Вы увидите, что все включая папки будут отображаться
- Теперь сделайте скрытые файлы библиотеки видимыми, нажав Command + Shift +.
- Нажмите на Библиотека > Поддержка приложения > Spotify > префы
- Как вы видели шаги для Windows и Linux, то же самое, что вы должны сделать здесь
- В файле prefs добавьте строку.
ui.experience_override = ‘’ классический »
Для всех операционных систем обязательно перезапустите приложение Spotify после настройки файла prefs. После перезапуска Spotify вернется к классическому интерфейсу рабочего стола.
Попробуйте это руководство для своего компьютера, если вы находите новый пользовательский интерфейс Spotify менее интерактивным и полезным.
Статьи по Теме
- Как удалить все песни Spotify
- Медленная проблема в настольном приложении Spotify: как исправить
- Я не могу воспроизводить музыку в приложении Spotify: как исправить