По умолчанию в большинстве дистрибутивов Linux, ip адрес устанавливается автоматически, по протоколу DHCP, независимо от того какой тип соединения используется, будь то проводной интернет или беспроводное подключение к точке доступа Wifi или даже USB модем. Но если необходимо вы можете задать ip адрес Linux вручную. Это может понадобиться если вы хотите использовать статический ip адрес чтобы сеть запускалась быстрее при старте системы.
Есть несколько способов ручной настройки ip адреса в системе Linux, все можно сделать с помощью терминала или в графическом интерфейсе. Мы будем рассматривать только ipv4 адреса, и поговорим о том, как настроить статический ip, который будет присваиваться сетевому интерфейсу автоматически, а также как установить ip для сетевого интерфейса с помощью утилиты ip.
Вы не можете установить любой IP для своего компьютера. Есть определенный диапазон значений, которые можно использовать. Ваш новый ip адрес должен быть в той же сети, что IP адрес роутера, который представляет из себя шлюз в сеть. Также, если вы задаете IP вручную, то нужно указать и другие параметры, которые система раньше получала по DHCP. И перед тем как переходить к настройке давайте рассмотрим откуда взять эти данные.
Обычно, в локальных сетях адрес находится в одном из следующих диапазонов:
- 10.0.0.0 – 10.255.255.255
- 172.16.0.0 – 172.31.255.255
- 192.168.0.0 – 192.168.255.255
Они все зарезервированы для локальных сетей и их использование не должно вызвать конфликтов с общим интернетом, таким образом сначала надо узнать адрес шлюза. Но со шлюзом все немного сложнее. Это ваш маршрутизатор. Очень важно указать шлюз правильно, иначе компьютер не сможет получить доступ к сети. Посмотреть текущий адрес шлюза можно командой:
ip route show match 0/0
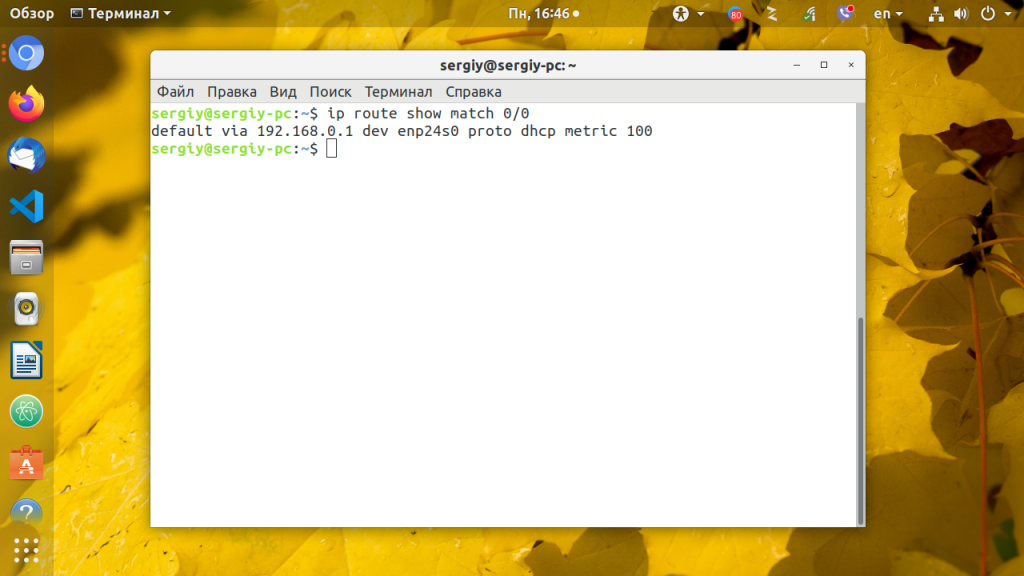
Здесь мы видим, что наш адрес шлюза — 192.168.0.1. Отсюда выплывает, что нам нужно выбирать наш ip именно из этого диапазона, можно менять только последнюю цифру и надо, чтобы в этой сети компьютеров с такими адресами больше не было, например, 192.168.0.64.
Маска подсети используется чтобы отделить локальную часть ip адреса, которая меняется, от статической. Сейчас в большинстве случаев применяется значение 255.255.255.0, которое означает изменение только последней цифры. Теперь, когда вы знаете откуда брать все значения, рассмотрим как установить ip адрес Linux.
Настройка ip адреса в Ubuntu
Настройкой сети в Ubuntu по умолчанию занимается специальная служба networking, конфигурация которой находятся в файле /etc/network/interfaces. Стандартные настройки с использованием динамического получения ip адреса по DHCP выглядят следующим образом:
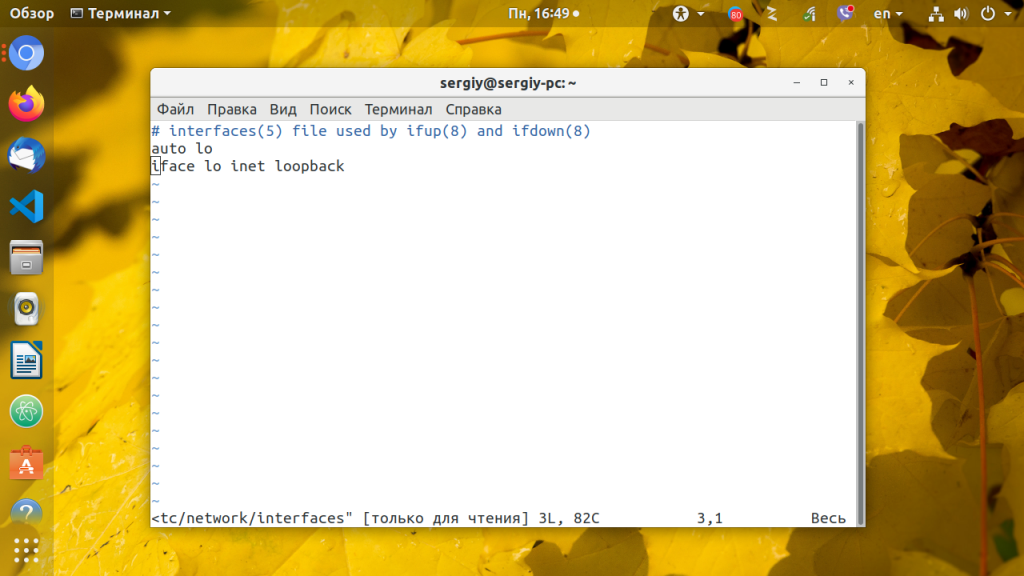
В этом примере настраиваются два интерфейса, lo и eth0. Нас будет интересовать только строчка, касающаяся проводного соединения eth0, она тут одна:
iface eth0 inet dhcp
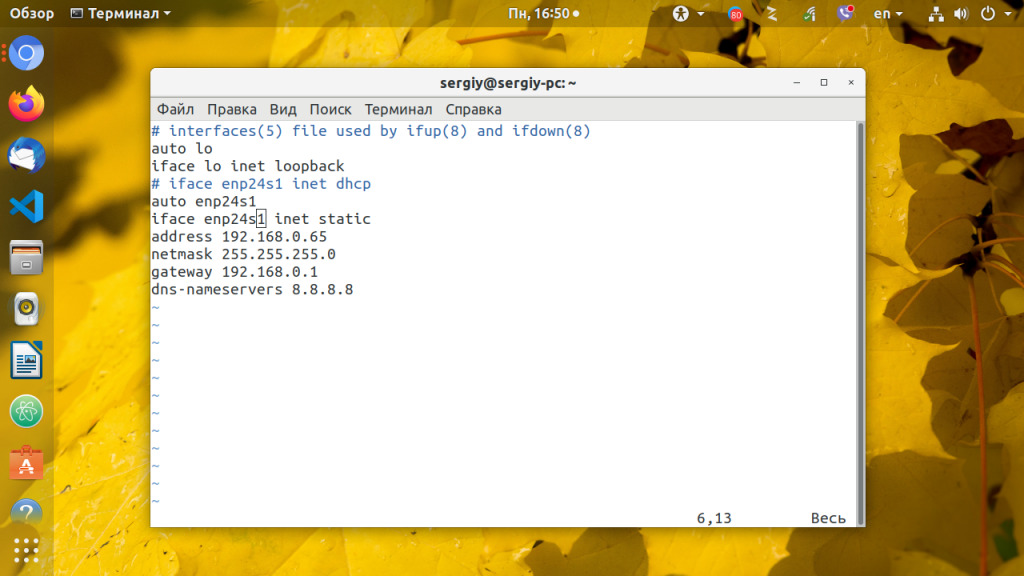
Отредактируйте конфигурацию как показано ниже, нужно закомментировать строчку получения ip по DHCP и добавить вместо нее настройку статического ip адреса, подсети, и шлюза:
sudo vi /etc/network/interfaces
auto lo

iface lo inet loopback

# iface enp24s0 inet dhcp

auto enp24s0

iface enp24s0 inet static

address 192.168.0.65

netmask 255.255.255.0

gateway 192.168.0.1

dns-nameservers 8.8.8.8,8.8.4.4
Более подробно настройка сети Ubuntu через терминал описана в отдельной статье. Настройте параметры в соответствии с вашими параметрами сети. Затем перезапустите сетевые службы чтобы изменения вступили в силу без перезагрузки компьютера:
sudo systemctl restart networking
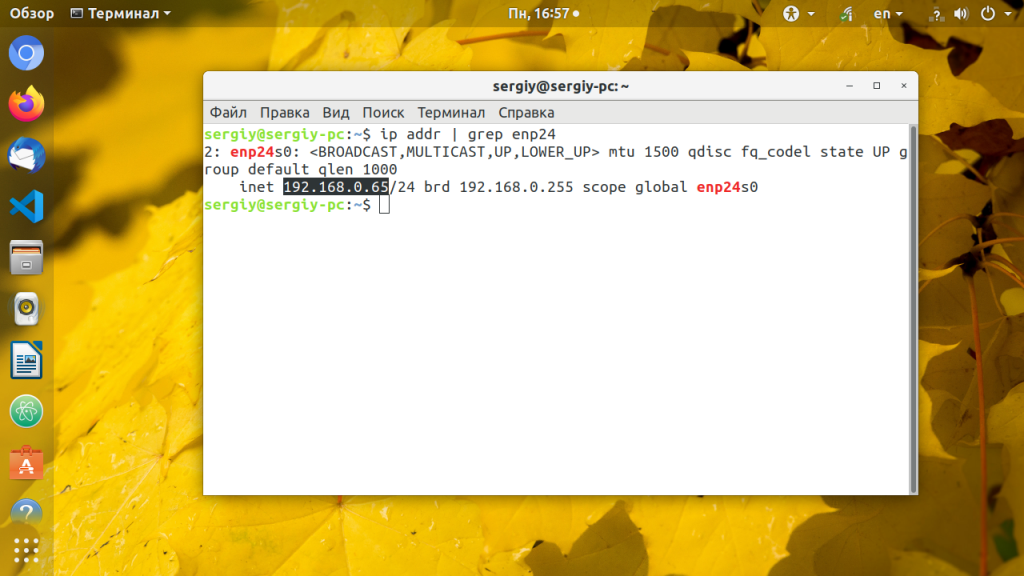
Чтобы убедиться что все установлено правильно используйте утилиту ip.
ip addr list | grep enp24s0
Настройка IP адреса в CentOS
В системах, основанных на дистрибутиве RedHat, файлы настройки сети немного отличаются. Тут за начальную настройку сети отвечает фреймворк Wiched. Настройки получения IP адреса хранятся отдельно для каждого сетевого интерфейса в файлах /etc/sysconfig/network-scripts/ifcfg-имя_интерфейса, например, enp2s0. Настройки статического ip для сетевого адаптера с адресом enp2s0 будут выглядеть следующим образом:
sudo vi /etc/sysconfig/network-scripts/ifcfg-enp2s0
DEVICE="enp2s0"

BOOTPROTO="static"

NM_CONTROLLED="yes"

ONBOOT="yes"

TYPE="Ethernet"

IPADDR=192.168.0.65

NETMASK=255.255.255.0

GATEWAY=192.168.0.1

DNS1="8.8.8.8"
Чтобы изменения вступили в силу перезапускаем сеть:
sudo systemctl restart networking
Готово, настройка ip адреса linux с помощью стандартных средств системы завершена и вы можете дальше использовать свой компьютер.
Настройка статического IP адреса в nmcli
Сетевой конфигуратор NetworkManager сейчас используется практически повсеместно. Если нужно настроить IP в терминале вы можете использовать утилиту nmcli. Сначала смотрим доступные подключения. Для этого выполните:
nmcli connection
Допустим, что необходимое вам подключение называется Проводное соединение 2. Тогда осталось установить IP адрес, шлюз и DNS сервер:
nmcli con mod "Проводное соединение 2" ipv4.addresses 192.168.1.64/24
nmcli con mod "Проводное соединение 2" ipv4.gateway 192.168.1.1
nmcli con mod "Проводное соединение 2" ipv4.dns "8.8.8.8"
Затем надо сообщить утилите, что IP адрес будет настраиваться вручную:
nmcli con mod "Проводное соединение 2" ipv4.method manual
В этом примере IP адрес задается немного по другому. Сначала идёт выбранный ip адрес, а затем маска в формате /24. Это аналог записи 255.255.255.0, только короче.
Настройка IP в графическом интерфейсе
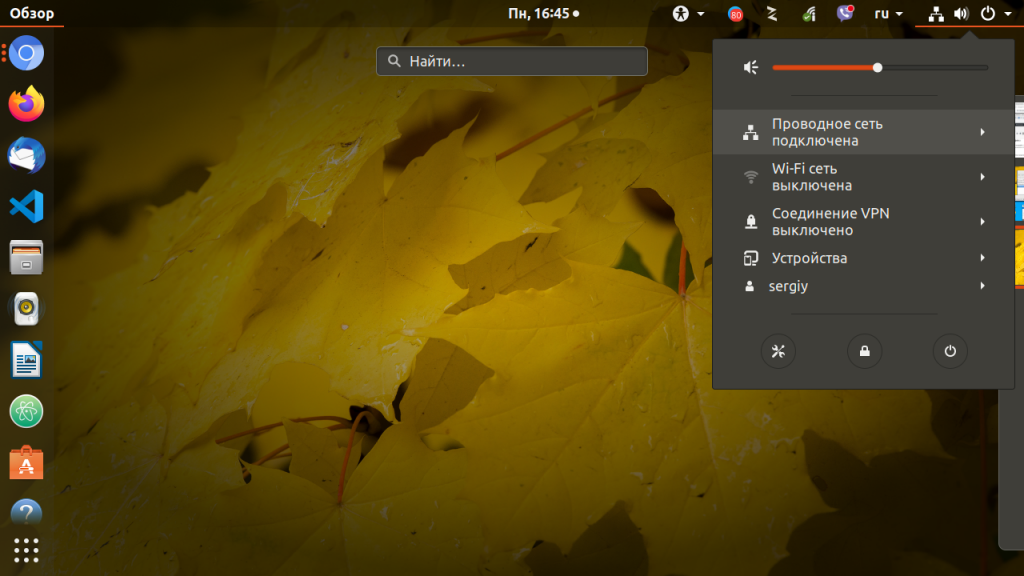
Разберемся ещё как изменить IP адрес через графический интерфейс. Для этого кликните по значку сети в правом верхнем углу экрана, затем выберите любое сетевое подключение и кликните по пункту Параметры соединения:
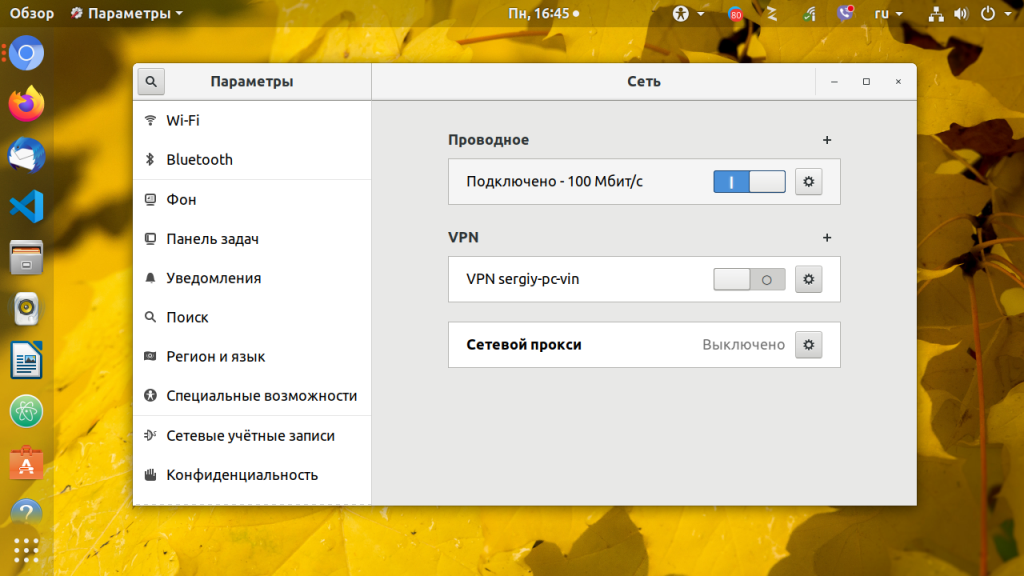
В открывшемся окне параметров нажмите значок шестеренки напротив нужного соединения, например, Проводное:
Перейдите на вкладку IPv4 и напротив пункта Метод IPv4 выберите Вручную. Появится несколько полей, которые надо заполнить. Заполните IP адрес, маску и шлюз:
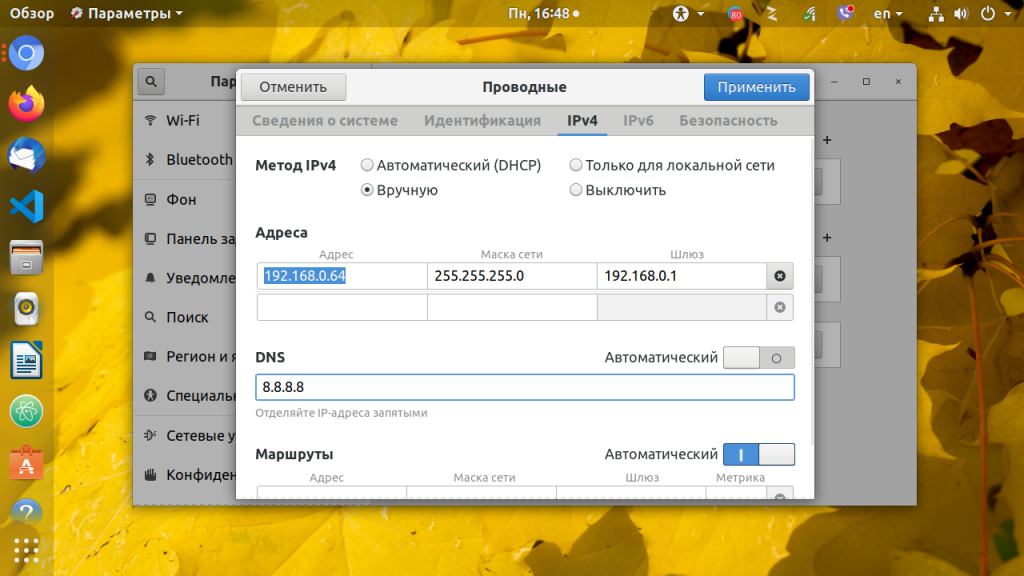
Затем чуть ниже пропишите DNS. Когда всё будет готово нажмите кнопку Применить.
Настройка IP адреса с помощью утилиты ip
Если вам не нужно настраивать статический ip при загрузке, а необходимо только один раз задать ip адрес linux через терминал, то можно использовать утилиту ip. Включите интерфейс, если он выключен:
sudo ip link set eth0 up
Сначала нужно изменить IP и маску сети:
sudo ip addr add 192.168.0.65/255.255.255.0 dev eth0
Затем добавить шлюз:
sudo ip route add default via 192.168.0.1
Готово, теперь ваша сеть должна работать. Только эти настройки будут работать до первой перезагрузки.
Выводы
Вот и все. В этой статье мы рассмотрели как выполняется настройка ip адреса linux. Все это может показаться сложным, но если хорошо разобраться, то смена ip linux уже не будет вызывать таких проблем. Если у вас остались вопросы, спрашивайте в комментариях!
На завершение, видео о том что значат цифры ip адреса и зачем они нужны:

Статья распространяется под лицензией Creative Commons ShareAlike 4.0 при копировании материала ссылка на источник обязательна .
![]()
Загрузить PDF
![]()
Загрузить PDF
Из данной статьи вы узнаете, как назначить компьютеру с Linux новый IP-адрес. Это поможет решить проблемы с подключением к интернету.
-

1
Обновите свою версию Linux. Популярными дистрибутивами Linux на базе Debian являются Ubuntu, Mint и Raspbian.
-
2
Откройте терминал. Это приложение командной строки, которое является основой всех дистрибутивов Linux. В зависимости от версии Linux терминал можно открыть следующим образом:
- Нажмите Ctrl+Alt+T или Ctrl+Alt+F1 (в Mac OS X вместо Ctrl зажмите ⌘ Command).
- Если возможно, щелкните по текстовому полю в верхней или нижней части экрана.
- Откройте окно «Меню» и щелкните по «Терминал».
-
3
Получите права суперпользователя. Если вы не вошли в систему в качестве суперпользователя (root-пользователя), введите su, нажмите ↵ Enter, введите пароль суперпользователя, когда появится запрос, а затем нажмите ↵ Enter.
- Учетная запись суперпользователя в Linux является аналогом учетной записи администратора в Windows или Mac OS X.
-
4
Выведите на экран список сетевых интерфейсов. Введите ifconfig и нажмите ↵ Enter. В левой части окна отобразятся сетевые интерфейсы, а в правой – информация о них.
- Возглавляет список активный сетевой интерфейс (Wi-Fi или Ethernet). Он помечен как «eth0» (Ethernet) или «wifi0» (Wi-Fi).
-
5
Найдите сетевой интерфейс, которому нужно назначить новый IP-адрес. Обратите внимание на имя интерфейса, которое отобразится в левой части окна.
- В большинстве случаев таким интерфейсом является «eth0» или «wifi0».
-
6
Измените IP-адрес интерфейса. Введите sudo ifconfig имя ip-адрес netmask 255.255.255.0 up, где вместо «имя» подставьте имя интерфейса, а вместо «ip-адрес» – нужный IP-адрес. Нажмите ↵ Enter.
- Например, чтобы назначить IP-адрес «192.168.2.100» Ethernet-соединению («eth0»), введите sudo ifconfig eth0 192.168.0.100 netmask 255.255.255.0.
-
7
Назначьте адрес основного шлюза. Введите route add default gw 192.168.1.1 и нажмите ↵ Enter.[1]
-
8
Добавьте DNS-сервер. Введите echo "nameserver 8.8.8.8"> /etc/resolv.conf и нажмите ↵ Enter.
- Если у вас есть другой адрес DNS-сервера, введите его вместо 8.8.8.8.
-
9
Проверьте, изменился ли IP-адрес выбранного сетевого интерфейса. Введите ifconfig, найдите сетевой интерфейс и посмотрите на адрес справа от имени интерфейса. Скорее всего, вы увидите IP-адрес, который вы только что назначили.
Реклама


-
1
Обновите свою версию Linux. Популярными дистрибутивами Linux с менеджером пакетов RPM являются CentOS, Red Hat и Fedora.
-
2
Откройте терминал. Это приложение командной строки, которое является основой всех дистрибутивов Linux. В зависимости от версии Linux терминал можно открыть следующим образом:
- Нажмите Ctrl+Alt+T или Ctrl+Alt+F1 (в Mac OS X вместо Ctrl зажмите ⌘ Command).
- Если возможно, щелкните по текстовому полю в верхней или нижней части экрана.
- Откройте окно «Меню» и щелкните по «Терминал».
-
3
Получите права суперпользователя. Если вы не вошли в систему в качестве суперпользователя (root-пользователя), введите su, нажмите ↵ Enter, введите пароль суперпользователя, когда появится запрос, а затем нажмите ↵ Enter.
- Учетная запись суперпользователя в Linux является аналогом учетной записи администратора в Windows или Mac OS X.
-
4
Выведите на экран список сетевых интерфейсов. Введите ip a, чтобы отобразить сетевые соединения.
-
5
Найдите сетевой интерфейс, которому нужно назначить новый IP-адрес. Обычно это Ethernet-соединение или Wi-Fi-соединение, текущий IP-адрес которого можно найти в правой части окна.
-
6
Перейдите в каталог сетевых скриптов. Введите cd /etc/sysconfig/network-scripts и нажмите ↵ Enter.
-
7
Выведите на экран параметры сети. Введите ls и нажмите ↵ Enter. Имя текущего соединения отобразится в верхнем левом углу параметров сети.
-
8
Откройте параметры своего сетевого соединения. Введите vi ifcfg-имя сети и нажмите ↵ Enter. Параметры откроются в редакторе Vi.
- Например, если сеть называется «eno12345678», введите vi ifcfg-eno12345678.
-
9
Измените параметры сети. Измените следующие значения:
- BOOTPROTO: измените dhcp на none.
- Any IPV6 entry: удалите все записи с IPV6; для этого поставьте курсор возле I (слева) и нажмите Del.
- ONBOOT: измените no на yes.
-
10
Создайте новую категорию. Нажмите ↵ Enter, чтобы перейти на новую строку (из категории ONBOOT), введите
IPADDR=, введите новый IP-адрес, а затем нажмите ↵ Enter.- Например, если новый IP-адрес «192.168.2.23», введите
IPADDR=192.168.2.23и нажмите ↵ Enter.
- Например, если новый IP-адрес «192.168.2.23», введите
-
11
Введите сетевую маску, адрес шлюза и DNS-сервера. Для этого:[2]
- Введите
PREFIX=24и нажмите ↵ Enter. Также можно ввестиNETMASK=255.255.255.0. - Введите
GATEWAY=192.168.2.1и нажмите ↵ Enter. Если нужно, замените адрес шлюза на свой.
- Введите
-
12
Сохраните внесенные изменения и закройте файл. Для этого воспользуйтесь меню «Файл» или введите :wq и нажмите ↵ Enter.
Реклама


Советы
- В некоторых специфических дистрибутивах Linux необходимо выполнить другие действия, чтобы назначить новый IP-адрес. Подробную информацию ищите в интернете.
Реклама
Предупреждения
- Когда вы закончите, выйдите из учетной записи суперпользователя.
Реклама
Об этой статье
Эту страницу просматривали 89 488 раз.
Была ли эта статья полезной?
Будучи системным администратором, вы часто сталкиваетесь с конфигурацией IP-адресов.
Изменение IP-адреса является одной из распространенных задач настройки IP-адресов.
Хотя IP-адреса в большинстве систем настраиваются автоматически, в некоторых случаях вам может понадобиться изменить их вручную.
В этой статье вы увидите различные способы изменения IP-адреса в Linux.
Я также отдельно остановлюсь на сетевой конфигурации Ubuntu.
🖧 Основные номера сетевых портов на Linux
Прежде чем продолжить, выполните эту команду, чтобы проверить текущий IP-адрес:
ip aЗдесь также будет показано имя интерфейса, которое понадобится при изменении IP-адреса.
Использование команды ip для установки IP-адреса
Команда ip доступна в большинстве дистрибутивов Linux.
Для установки IP-адреса используйте ее следующим образом:
ip addr add [ip_address] dev [interface]Например, добавьте IP-адрес к интерфейсу eth1 следующим образом:
sudo ip addr add 192.168.56.21/24 dev eth1Теперь у вас есть два IP-адреса: один из старой конфигурации и один из новой команды.
Как сделать IP-адрес постоянным
Удивительно, но IP-адреса, установленные вышеописанным способом, не сохраняются при перезагрузке системы.
🖧 Использование команд ifup, ifdown и ifquery на Linux
Если вы используете старую версию Ubuntu (<17.10), вы можете сделать эти изменения постоянными, отредактировав файл ‘/etc/network/interfaces’:
sudo nano /etc/network/interfacesЕсли ваш файл выглядит так, как показано ниже, ваш IP-адрес будет установлен клиентом DHCP:
auto eth0

iface eth0 inet dhcp
Чтобы изменить IP-адрес по своему усмотрению, мы можем изменить этот файл для ручной установки IP-адреса.
Чтобы установить IP-адрес статически, например, как 192.168.56.20, измените приведенную выше запись следующим образом:
auto enp0s3

iface enp0s3 inet static

address 192.168.56.20

netmask 255.255.255.0

gateway 192.168.40.31
Приведенные выше записи не требуют пояснений для уверенных пользователей Linux.
Чтобы применить изменения, необходимо выполнить команду:
$ sudo systemctl restart networking.serviceСовет: В системах на базе RedHat файл ‘/etc/sysconfig/networking-scripts/ifcfg-*’ служит для настройки сетевых интерфейсов.
Использование Netplan для конфигурации сети (для Ubuntu)
Ubuntu предоставляет утилиту Netplan для настройки сети.
Давайте рассмотрим пример настройки IP-адреса на Ubuntu 20.04.
Я использую ‘NetworkManager’ в качестве визуализатора для конфигурации сети.
Текущий IP-адрес можно проверить из файла конфигурации Netplan.
Этот файл имеет формат YAML и может быть создан, если его нет:
sudo nano /etc/netplan/config.yamlЕсли IP-адрес динамический, вы увидите, что параметр ‘dhcp4’ установлен на true.
В случае, если у вас предварительно настроен статический IP, конфигурация будет выглядеть следующим образом:
---

network:

  version: 2

  renderer: networkd

  ethernets:

    eth1:

      addresses:

        - 192.168.56.66/24

      nameservers:

         addresses:

           - 8.8.8.8

      routes:

        - to: default

          via: 10.0.2.2
Чтобы изменить IP-адрес, замените старый IP-адрес на новый.
Кроме того, вы можете оставить этот IP и добавить еще один к указанному выше интерфейсу (en01).
После того как вы настроили сеть, предварительно протестируйте ее перед применением:
sudo netplan tryПосле подтверждения изменений новая конфигурация может быть применена как:
sudo netplan applyПроверьте, были ли применены новые настройки:
ip addr show
Одним из преимуществ использования Netplan является то, что конфигурация сети будет сохраняться после перезагрузки.
Изменение вашего IP-адреса будет постоянным.
Заключение
Команда ip подходит для всех систем Linux.
Netplan – это новый способ управления сетью и очень простой подход для систем Ubuntu.
Я также добавил шаги для пользователей настольных систем, чтобы помочь им изменить IP-адрес графически.
Дайте мне знать, если у вас есть какие-либо вопросы или предложения.
см. также:
- 🐳 Как изменить IP-адрес по умолчанию для Docker Bridge
- 🐧 Как изменить цвет вывода команд в системах Linux
- 🖧 Как отключить / включить IP форвардинг на Linux
- 🐳 Как изменить сохранение истории задач в кластере Docker Swarm
- 🐧 Как изменить количество зарезервированных блоков файловой системы
- 🚦 Как изменить имена сетевых интерфейсов на схему eth0 в Debian 10/9
- 💆♀️ Четыре метода проверки IP-адреса шлюза или маршрутизатора по умолчанию в Linux
As a sysadmin, you’ll often deal with IP address configuration. Changing the IP address is one of the common IP configuration tasks.
While the IP addresses on most systems are configured automatically, you may need to change them manually in some cases.
In this article, you’ll see various ways to change the IP address in Linux. I’ll also focus on Ubuntu network configuration separately.
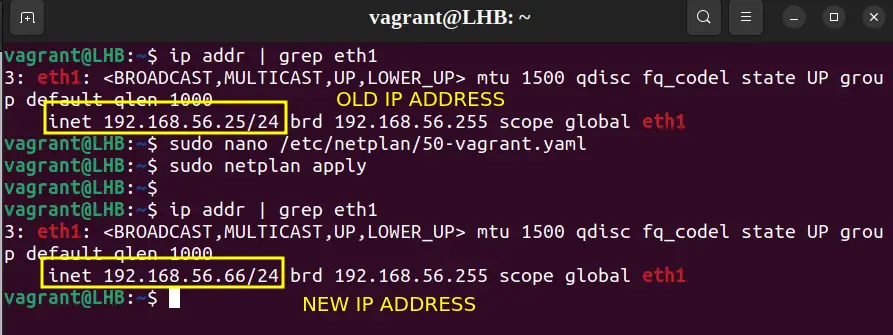
Before you proceed any further, you should run this command to check your current IP address:
ip aThis will also show the interface name which you’ll need while changing the IP address.
Using the ip Command to Set an IP Address
The ip command is available on most Linux distributions.
For setting an IP address, use it like this:
ip addr add [ip_address] dev [interface]For example, add an IP address to the eth1 interface as:
sudo ip addr add 192.168.56.21/24 dev eth1You now have two IP addresses: one from the old configuration and one from the new command:
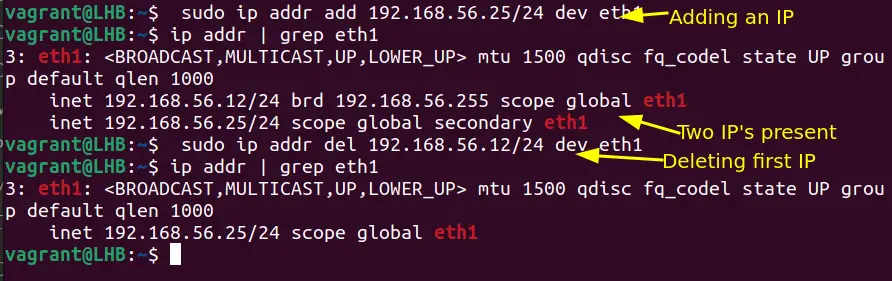
As you can see in the above screenshot, after deleting the old one, you are left with only one.
Making an IP Address Permanent
Surprisingly, the IP addresses set by the above method are not going to persist in system reboots.
If you are using an old version of Ubuntu(<17.10), you can make these changes permanent by editing the file ‘/etc/network/interfaces’:
sudo nano /etc/network/interfacesIf your file read like the below, your IP address will be set by a DHCP client:
auto eth0

iface eth0 inet dhcp
To change the IP address as per our choice, we can modify this file to manually set the IP address. To set the IP address statically, for e.g. as 192.168.56.20, change the above entry to look as:
auto enp0s3

iface enp0s3 inet static

address 192.168.56.20

netmask 255.255.255.0

gateway 192.168.40.31
The entries above are self-explanatory for moderate Linux users. To apply the changes, you need to run the command:
$ sudo systemctl restart networking.serviceTip: On RedHat-based systems, the file ‘/etc/sysconfig/networking-scripts/ifcfg-*’ serves the purpose of configuring network interfaces.
Using Netplan for Network configuration (for Ubuntu)
Ubuntu provides a Netplan utility for network configuration.
Let us take an example of configuring an IP address on Ubuntu 20.04. I am using ‘NetworkManager’ as the renderer for the network configuration.
The current IP address can be checked from the Netplan configuration file. This file is in YAML format and can be created if not present:
sudo nano /etc/netplan/config.yamlIf the IP address is dynamic, you will see the ‘dhcp4’ parameter set to true.
In case, you have a pre-configured static IP, the configuration will look much like this:
---

network:

  version: 2

  renderer: networkd

  ethernets:

    eth1:

      addresses:

        - 192.168.56.66/24

      nameservers:

         addresses:

           - 8.8.8.8

      routes:

        - to: default

          via: 10.0.2.2
To change the IP address, replace the old IP address with a new one. Additionally, you can keep this IP and add one more to the above interface (en01).
Once you have configured the network, pre-test it before applying:
sudo netplan tryAfter confirming the changes, the new configuration can be applied as:
sudo netplan applyCheck if the new settings have been applied:
One of the advantages of using Netplan is that the network configuration will persist between reboots. Your IP address change is permanent.
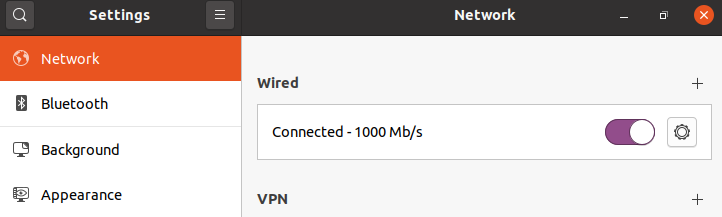
Using Graphical Interface to Change the System IP Address (for Desktop Users)
Managing IP addresses with a graphical interface is the easiest one and preferable for new Linux users. On a Ubuntu system, the Network settings contain all the required configurations.
Open ‘Settings’ from the GNOME dashboard and look for the ‘Network’ option:
Choose the setting icon from the active network on your system:
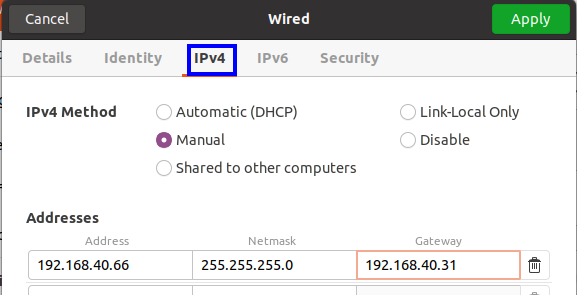
On the new window, select the IPv4 tab and then under the IPv4 method, choose the Manual option. Enter the details for the new IP address:
Now restart your connection and check the IP address:
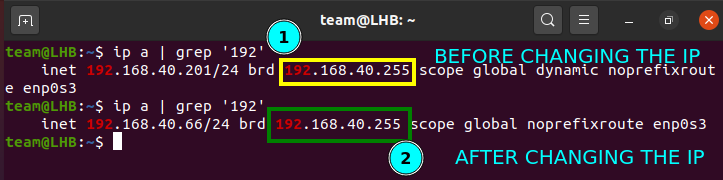
As you can see from the above screenshot, the IP address has now changed.
Wrapping Up
The ip command is suitable for all Linux systems. Netplan is a new way of managing a network and is a very straightforward approach for Ubuntu systems.
I also added steps for the desktop users to help them change the IP address graphically.
Let me know if you have any questions or suggestions.

Team LHB indicates the effort of a single or multiple members of the core Linux Handbook team.
Configure Network Interface Using Command-Line
You can configure a network interface from the command line. You configure your network client hosts with the command line by using commands to change your current settings or by editing a number of system files.
Find Network Interface Card
When setting up your network you will need to know the network interface cards on your computer. The interface name of cards for different vendors may be different, which is why this step is needed.
ls /sys/class/net
This will list the interface names for all NICs on your computer. It will probably include eth0 (hardwired NIC), lo (loopback interface for the localhost), and something for your wireless card (like wifi0, or wlan0).
Configuring Static IP Address For Your Network Card
Configure a Static IP address by editing /etc/network/interfaces. Replace eth0 with your network interface card (see Find Network Interface Card).
sudo nano /etc/network/interfaces
# The primary network interface
auto eth0
iface eth0 inet static
address 192.168.2.33
gateway 192.168.2.1
netmask 255.255.255.0
network 192.168.2.0
broadcast 192.168.2.255
For these settings to take effect you need to restart your networking services.
sudo /etc/init.d/networking restart
Setting up Second IP Address or Virtual IP Address
If you need to set up a second ip address you need to edit the /etc/network/interfaces.
sudo nano /etc/network/interfaces
auto eth0:1
iface eth0:1 inet static
address 192.168.2.33
netmask 255.255.255.0
network x.x.x.x
broadcast x.x.x.x
gateway x.x.x.x
You need to enter all the details like address,netmask,network,broadcast and gateways values.
For these new settings to take effect you need to restart networking services using the following command
sudo /etc/init.d/networking restart
Setting Your Hostname
The hostname command allows you to directly query, or set, the hostname from the command line.
You can see your current hostname with
sudo /bin/hostname
To set the hostname directly you can become root and run
sudo /bin/hostname newname
When your system boots it will automatically read the hostname from the file /etc/hostname
Setting up DNS
You can add hostname and IP addresses to the file /etc/hosts for static lookups.
To cause your machine to consult with a particular server for name lookups you simply add their addresses to /etc/resolv.conf.
For example a machine which should perform lookups from the DNS server at IP address 192.168.3.2 would have a resolv.conf file looking like this
sudo nano /etc/resolv.conf
enter the following details
search myaddress.com nameserver 192.168.3.2
Configuring DHCP Address for Your Network Card
The DHCP address can be configured by editing the following file /etc/network/interfaces. Replace eth0 with your interface card (see Find Network Interface Card).
sudo nano /etc/network/interfaces
# The primary network interface – use DHCP to find our address
auto eth0
iface eth0 inet dhcp
Howto Set MTU for a DHCP Connection
Although this is not documented in the manual for interfaces, MTU for a DHCP connected device can be set in the /etc/network/interfaces file. To do so you need to append the ‘pre-up’ command to the ‘iface’ section of the relevent interface.
       iface eth0 inet dhcp
          pre-up /sbin/ip link set $IFACE mtu 1492
The above example sets the MTU for device eth0 to 1492, the usual MTU for a PPPoE ISP connection. This however is only needed if connections seem to hang otherwise (with the default of 1500).
This tip was found on http://glasnost.beeznest.org/articles/290.
CategoryNetworking CategoryWireless

Команда ip — это новая сетевая утилита командной строки, которая используется для назначения IP-адреса сетевому интерфейсу или настройки/обновления сетевых переменных в системе Linux.

Она является частью пакета iproute2 и решает такие задачи, как подключение или отключение сетевых интерфейсов, назначение и удаление IP-адресов и маршрутов, управление ARP-кэшем и многое другое.
Команда ip во многом похожа на старую команду ifconfig, но она значительно мощнее, в нее добавлено больше функций и возможностей.
Команда ifconfig устарела и была заменена командой ip во всех современных дистрибутивах Linux. Однако команда ifconfig по-прежнему работает и доступна для большинства дистрибутивов Linux.
Как настроить статический IP-адрес (IPv4)
Для настройки статических IP-адресов в Linux необходимо обновить или отредактировать файл конфигурации сети, чтобы назначить системе статический IP-адрес. Вы должны быть суперпользователем с командой su (switch user) из терминала или командной строки.
Open and edit the network configuration files for (eth0 or eth1) using your favorite text editor. For example, assigning IP Address to eth0 interface as follows.
Откройте и отредактируйте файлы сетевой конфигурации для (eth0 или eth1) с помощью вашего любимого текстового редактора. Например, назначить IP-адрес интерфейсу eth0 можно следующим образом.
[[email protected] ~]# vi /etc/sysconfig/network-scripts/ifcfg-eth0
DEVICE="eth0"
BOOTPROTO=static
ONBOOT=yes
TYPE="Ethernet"
IPADDR=192.168.50.2
NAME="System eth0"
HWADDR=00:0C:29:28:FD:4C
GATEWAY=192.168.50.1
Для Ubuntu / Debian / Linux Mint
Назначьте статический IP-адрес интерфейсу eth0, отредактировав конфигурационный файл /etc/network/interfaces для внесения постоянных изменений, как показано ниже.
auto eth0
iface eth0 inet static
address 192.168.50.2
netmask 255.255.255.0
gateway 192.168.50.1
Затем перезапустите сетевые службы после ввода всех данных с помощью следующей команды.
# systemctl restart NetworkManager.service
Or
# /etc/init.d/networking restart
1. Как назначить IP-адрес определенному интерфейсу?
Следующая команда используется для назначения IP-адреса определенному интерфейсу (eth1).
# ip addr add 192.168.50.5 dev eth1
$ sudo ip addr add 192.168.50.5 dev eth1
Примечание: К сожалению, все эти настройки будут потеряны после перезагрузки системы.
2. Как проверить IP-адрес?
Для получения подробной информации о сетевых интерфейсах, такой как IP-адрес, MAC-адрес, используйте следующую команду, как показано ниже.
# ip addr show
$ sudo ip addr show
Пример вывода
1: lo: <LOOPBACK,UP,LOWER_UP> mtu 16436 qdisc noqueue state UNKNOWN
    link/loopback 00:00:00:00:00:00 brd 00:00:00:00:00:00
    inet 127.0.0.1/8 scope host lo
    inet6 ::1/128 scope host
       valid_lft forever preferred_lft forever
2: eth0: <BROADCAST,MULTICAST,UP,LOWER_UP> mtu 1500 qdisc pfifo_fast state UNKNOWN qlen 1000
    link/ether 00:0c:29:28:fd:4c brd ff:ff:ff:ff:ff:ff
    inet 192.168.50.2/24 brd 192.168.50.255 scope global eth0
    inet6 fe80::20c:29ff:fe28:fd4c/64 scope link
       valid_lft forever preferred_lft forever
3: eth1: <BROADCAST,MULTICAST,UP,LOWER_UP> mtu 1500 qdisc pfifo_fast state UNKNOWN qlen 1000
    link/ether 00:0c:29:28:fd:56 brd ff:ff:ff:ff:ff:ff
    inet 192.168.50.5/24 scope global eth1
    inet6 fe80::20c:29ff:fe28:fd56/64 scope link
       valid_lft forever preferred_lft forever
3. Как удалить IP-адрес?
Следующая команда удалит назначенный IP-адрес с заданного интерфейса (eth1).
# ip addr del 192.168.50.5/24 dev eth1
$ sudo ip addr del 192.168.50.5/24 dev eth1
4. Как включить сетевой интерфейс?
Флаг «up» с именем интерфейса (eth1) включает сетевой интерфейс. Например, следующая команда активирует сетевой интерфейс eth1.
# ip link set eth1 up
$ sudo ip link set eth1 up
5. Как отключить сетевой интерфейс?
Флаг «down» с именем интерфейса (eth1) отключает сетевой интерфейс. Например, следующая команда отключит сетевой интерфейс eth1.
# ip link set eth1 down
$ sudo ip link set eth1 down
6. Как проверить таблицу маршрутизации?
Введите следующую команду для проверки информации таблицы маршрутизации системы.
# ip route show
$ sudo ip route show
Пример вывода
10.10.20.0/24 via 192.168.50.100 dev eth0
192.168.160.0/24 dev eth1  proto kernel  scope link  src 192.168.160.130  metric 1
192.168.50.0/24 dev eth0  proto kernel  scope link  src 192.168.50.2
169.254.0.0/16 dev eth0  scope link  metric 1002
default via 192.168.50.1 dev eth0  proto static
7. Как добавить статический маршрут?
Зачем нужно добавлять Static или Manual маршруты, потому что трафик не должен проходить через шлюз по умолчанию. Нам нужно добавить статические маршруты, чтобы трафик шел наилучшим способом к места назначения.
# ip route add 10.10.20.0/24 via 192.168.50.100 dev eth0
$ sudo ip route add 10.10.20.0/24 via 192.168.50.100 dev eth0
8. Как удалить статический маршрут?
Чтобы удалить назначенный статический маршрут, просто введите следующую команду.
# ip route del 10.10.20.0/24
$ sudo ip route del 10.10.20.0/24
9. Как добавить постоянные статические маршруты?
Все вышеперечисленные маршруты будут потеряны после перезагрузки системы. Чтобы добавить постоянный статический маршрут, отредактируйте файл /etc/sysconfig/network-scripts/route-eth0 (Мы сохраняем статический маршрут для (eth0).
Для RHEL / CentOS / Fedora и Rocky Linux / AlmaLinux
# vi /etc/sysconfig/network-scripts/route-eth0
и добавьте следующие строки, сохраните и выйдите. По умолчанию файл route-eth0 будет отсутствовать, его необходимо создать.
10.10.20.0/24 via 192.168.50.100 dev eth0
Для Ubuntu/Debian/Linux Mint
Откройте файл /etc/network/interfaces и в конце добавьте постоянные статические маршруты. IP-адреса могут отличаться в вашей системе.
$ sudo vi /etc/network/interfaces
auto eth0
iface eth0 inet static
address 192.168.50.2
netmask 255.255.255.0
gateway 192.168.50.100
#########{Static Route}###########
up ip route add 10.10.20.0/24 via 192.168.50.100 dev eth0
Затем перезапустите сетевые службы после ввода всех данных с помощью следующей команды.
# systemctl restart NetworkManager.service
Or
# /etc/init.d/networking restart
Шлюз по умолчанию может быть указан глобально или в конфигурационных файлах для конкретного интерфейса. Преимущество шлюза по умолчанию заключается в том, что если в системе имеется более одной сетевой карты. Вы можете добавить шлюз по умолчанию «на лету», как показано ниже.
# ip route add default via 192.168.50.100
$ sudo ip route add default via 192.168.50.100
За дополнительной информацией, пожалуйста, обратитесь к странице руководства, выполняя man ip из терминала/в командной строке.
Do you need to change your IP address frequently? Are you having trouble finding a way to do it on Linux? If so, you have come to the right place. In this blog post, we will discuss three different ways that you can change your IP address on Linux.
We will also provide instructions on how to do it. So, whether you are a beginner or an expert Linux user, you should be able to follow along without any problems!
The following commands can be used to change ip address in Linux.
- ifconfig eth0 192.168.0.100 netmask 255.255.255.0
- ip addr add 192.168.0.100/24 dev eth0
- change ip address in file /etc/sysconfig/network-scripts/ifcfg-eth0 and restart network systemctl restart network
understanding network interface and ip address in Linux
Network interfaces are devices that allow communication with other devices on a computer network. A computer can have multiple network interfaces, each of which has its own IP address.
In Linux, you can view a list of all the network interfaces and their associated IP addresses by running the ifconfig -a or ip addr command. Check this post to get more info about how to find ip address in Linux.
change ip address with ifconfig Command in Linux
The most convenient way to change IP address in Linux using the “ifconfig” command. Type ifconfig followed by the name of your network interface and the new IP address. Press enter. The new ip address will be assigned to this interface.
For example, ifconfig eth0 192.168.0.100 netmask 255.255.255.0 will change the ip address on eth0 to 192.168.0.100.
The “interface” parameter specifies the name of the network interface. The “ip address” parameter specifies the IP address for the network interface. The “netmask” parameter specifies the netmask for the network interface.
I found that using the ifconfig command is quick and easy way to change the IP address of a network interface, but it has some disadvantages.
For example, the changes made with ifconfig will not persist after a reboot, which means that every time the system is restarted, the IP address will be reset to the value it had before the last ifconfig command was run.
In addition, that ifconfig command is considered as deprecated command and it is replaced by iproute2 package in many distributions. This means that it may not be supported in newer versions of the operating system and it may not be compatible with some distributions.
To ensure that your IP address remains static even after a reboot, you should change the ip address in the network configuration file. We will introduce this later.
procedure to change IP address with ifconfig command in Linux
The procedure to change IP address in Linux is as follows:
- Open the terminal application.
- List the current IP addresses for all network interfaces with command ifconfig -a
- Take the network interface down with command: ifconfig <interface> down
- Change the IP address with command ifconfig <interface> <ip address> <netmask>
- Press Enter to run the command.
- Verify that the new IP address is correct with command ifconfig -a
- Take the interface up with command ifconfig <interface> up
change ip address with ip Command in Linux
Another way to change your IP address on Linux is to use the ip command. This is a more advanced method that can be used to change your IP address. To use this method, you will need to open a terminal window and type in the following command:
sudo ip addr add 192.168.0.100 255.255.255.0 dev eth0
Replace 192.168.0.100 with the IP address and netmask that you want to use. This will add an IP address to your system. You can then close the terminal window and continue using your computer as normal.
This command adds the new IP address to the specified interface. It does not remove or update the existing IP address. It appends the current IP configuration.
You need to run sudo ip addr del command to remove the old ip address.
The ip command allows you to configure settings which take effect immediately – however they are not persistent and will be lost after a reboot.
I have found that the ip command is more versatile and allows me to perform various network configurations and tasks in a more efficient way.
For example, I can use it to set up multiple IP addresses on a single interface, or to configure routing and policy-based routing with more flexibility.
Another advantage that I have experienced is that ip command is more up-to-date, and it is considered as the standard tool for managing the network on Linux systems, replacing the older commands such as ifconfig.
Also, the ip command has a consistent syntax across different distributions, which makes it easier to use and understand. This means that once I have learned the syntax, I can use it on different systems without having to learn new commands.
Overall, I have found that using the ip command to change the IP address provides a more powerful and versatile tool for managing network configurations, and it is considered as a standard tool for managing the network on Linux systems.
change ip address permanently in configuration file in Linux
You can change the IP Address permanently. Under the /etc/sysconfig/network-scripts directory, you’ll see file for every network interface on your system. For example, if your interface is “eth0″, you’ll see ifcfg-eth0 file under this directory.
Modify the ifcfg-eth0 file with your favorite text editor (a lot of people prefer to use vi or nano) and change the IPADDR field accordingly as shown below to change the ip-address.
# vi /etc/sysconfig/network-scripts/ifcfg-eth0
Change the IP address to the correct IP, make sure that the Netmask and Gateway are configured correctly as well and save.
#  vi /etc/sysconfig/network-scripts/ifcfg-eth0

DEVICE="eth0"

BOOTPROTO=none

ONBOOT=yes

TYPE="Ethernet"

IPADDR="192.168.0.100"

NETMASK="255.255.255.0"

GATEWAY="192.168.0.1"
After you save the ifcfg-eth0 you will have to restart the network. You can restart the network with the following command: systemctl restart network
Change Public ip address with VPN in Linux
A VPN (Virtual Private Network) is the best and safest way to change your public IP address. While there are many VPN apps on the market, one of the most popular options is ExpressVPN.
It can stop your ISP monitoring your internet activity. Changing to an address that’s based in another country can also give you access to that country’s streaming content.
We have found ExpressVPN to be extremely reliable and secure. Technically speaking, a VPN “hides” your IP address by creating an encrypted connection. This type of connection acts as a tunnel between your device and the internet.
- Open up your VPN application.
- Select which server you want to connect to. If you’re just looking for privacy, choose one in your home country. If you want to access content from another country, pick one in your desired location.
- Press the connect button — it should be easy to find.
- Wait a few seconds for the VPN to connect. You’ll now be using a new IP address.
So if you want to change your public IP address, look no further than ExpressVPN. Plus, they have a 30-day money-back guarantee and 3 months free, so you can try them out risk-free.
Check out ExpressVPN here
FAQ about ip address in Linux
How to find your IP address in Linux
To find your IP address in Linux, use the ip addr command. This will print the IP address and other information about your network interfaces.
If you want to find out your public IP address, you can use the curl command. This will send a request to a web server and return your public IP address. curl ifconfig.me
What is the netmask for your ip address in Linux?
The netmask in Linux is a bitmask that determines what IP addresses are on the same network as your computer. If two computers have the same netmask, they are on the same network. If they have different netmasks, they are on different networks.
how to find the gateway for ip address in Linux
To find the gateway in Linux, you can use the route command. This will print the IP address of the gateway for your default route. You can also use the ip addr command to find the gateway.
what is difference between a private and public IP address in Linux
The private IP address space is reserved for internal networks only and cannot be routed on the Internet as addressing like a public IP address space can be, which makes it much more difficult to use this form of addressing on the Internet.
A public IP address can be easily found by looking up the domain name of a website. Conversely, a private IP address is much harder to find as it requires special software and tools to do so.
Additionally, most home users will not have a static public IP address but their private IP addresses will remain the same unless they take specific action to change it.
ifconfig command vs ip command
The ip command is a replacement for the ifconfig command. In earlier versions of Linux, the ifconfig command was the default utility for checking and verifying IP configuration. The ifconfig command does not support many modern features that were not relevant in earlier times.
The ifconfig command is deprecated. Although some Linux distributions still include the ifconfig command for backward compatibility in their current version of Linux, they may consider gradually removing it from their upcoming Linux versions.
Because of this, even if the ifconfig command is still available on some Linux distributions, you should use the ip command for all IP validation and verification-related tasks. The ip command is designed to meet the requirements of modern networks.