Translation(s): English — Español — Français — Italiano — Português (Brasil) — 简体中文
Reader Prerequisites: To get the most from this article, understand the following concepts before reading: basic unix command line tools, text editors, DNS, TCP/IP, DHCP, netmask, gateway
Table of Contents
Contents
- 3 ways to configure the network
-
Setting up an Ethernet Interface
- Starting and Stopping Interfaces
- Reinitialize new network setup
- Network Interface Names
- Using DHCP to automatically configure the interface
- Configuring the interface manually
- Setting the speed and duplex
- Bringing up an interface without an IP address
-
Defining the (DNS) Nameservers
- The resolv.conf configuration file
- The resolvconf program
- DNS configuration for NetworkManager
- DHCP Client Configuration
-
Bridging
- Bridging without Switching
-
Howto use vlan (dot1q, 802.1q, trunk) (Etch, Lenny)
- Manual config
- Network init script config
- Bridges and VLANs
- Caveats when using bridging and vlan
-
Howto create fault tolerant bonding with vlan (Etch — Stretch)
- Network config
- bonding with active backup
- /etc/network/interfaces
- How to set the MTU (Max transfer unit / packet size) with VLANS over a bonded interface
-
Multiple IP addresses on one Interface
- Legacy method
- iproute2 method
3 ways to configure the network
- The interfaces configuration file at /etc/network/interfaces (this page): for basic or simple configurations (e.g. workstation)
-
NetworkManager: This is the default for Laptop configuration
-
Systemd: Debian reference Doc Chapter 5
Setting up an Ethernet Interface
The majority of network setup can be done via the interfaces configuration file at /etc/network/interfaces. Here, you can give your network card an IP address (or use dhcp), set up routing information, configure IP masquerading, set default routes and much more.
Remember to add interfaces that you want brought up at boot time to the ‘auto’ line.
See man interfaces for more options.
Starting and Stopping Interfaces
Interfaces configured with /etc/network/interfaces can be brought up and down with the ifup and ifdown commands.
Some outdated guides instruct to restart the networking service to apply changes to /etc/network/interfaces, however this was deprecated because it is possible that not all interfaces will be restarted. Instead use ifup and ifdown to apply changes to each interface, for example with an interface named enp7s0:
# ifdown enp7s0
# ifup enp7s0
Reinitialize new network setup
If you make more fundamental network changes e.g. adding new virtual interfaces (e.g. bridge) in /etc/network/interfaces you can reinitialize the network-configuration be restarting the networking daemon:
# systemctl status networking
# systemctl restart networking
Network Interface Names
See NetworkInterfaceNames. Since Stretch, new systems by default no longer use old-style interface names such as eth0, eth1, wlan0, wlan1. The new system uses names based on hardware location, like eno0, enp0s31f6, wlp1s7 (or in the case of USB dongles, MAC address: enx2c56ac39ec0d).
You can list interfaces with: ls /sys/class/net
Various examples below continue to use «eth0» as a default interface name, even though it is unlikely to exist on a modern system.
Upgrading and Network Interface Names
Stretch and Buster still retain support for the old naming system as long as the file /etc/udev/rules.d/70-local-persistent-net.rules is still in place, but users are advised to switch ahead of the upgrade to Bullseye.
Using DHCP to automatically configure the interface
If you’re just using DHCP then all you need is something like:
    auto eth0
    allow-hotplug eth0
    iface eth0 inet dhcp
For DHCPv6 (used for IPv6), append also the following iface stanza
iface eth0 inet6 dhcp
Alternatively, IPv6 can be autoconfigured using stateless address autoconfiguration, or SLAAC, which is specified using auto instead of dhcp in the inet6 stanza:
iface eth0 inet6 auto
Also see IPv6PrefixDelegation.
Configuring the interface manually
If you’re configuring it manually then something like this will set the default gateway (network, broadcast and gateway are optional):
    auto eth0
    iface eth0 inet static
        address 192.0.2.7/24
        gateway 192.0.2.254
If you want to add an IPv6 address, too, append something like:
    iface eth0 inet6 static
        address 2001:db8::c0ca:1eaf/64
        gateway 2001:db8::1ead:ed:beef
See man interfaces for more options.
Make sure to disable all DHCP services, e.g. dhcpcd.
Mixing manual and automatic configuration is also possible, e.g. to use IPv6 SLAAC for internet connectivity and static addresses within the network:
# manual unique local address
iface eth0 inet6 static
        address fdc3:cafe::3/64
        # use SLAAC to get global IPv6 address from the router
        # we may not enable ipv6 forwarding, otherwise SLAAC gets disabled
        autoconf 1
        accept_ra 2
Setting the speed and duplex
Autonegotiation repeatedly failing is often a symptom of faulty cabling, so investigate physical matters before assuming that the interfaces’ autonegotiation algorithms are incompatible. If you turn off autonegotiation and set speed and duplex manually then the partner interface at the other end of the cable will assume that the absence of autonegotiation indicates a speed of 10Mbps and a duplex of half. For error-free operation if you set speed and duplex manually you must ensure that exactly the same speed and duplex are configured on the partner interface.
If you set your interface’s speed and duplex by hand, then some trial and error may be required. Here are the basic steps:
-
Install the ethtool and net-tools packages, so that you have the ethtool and mii-tool programs. One or both of these might work for your interface.
-
Make sure you have a way to login to the system in case the network interface becomes nonfunctional. An SSH connection could be disrupted, so you should have a fallback strategy.
- Identify the interface in question (it will often be eth0). Adjust the remainder of these instructions accordingly.
- Try to determine what its current speed and duplex settings are. This is where it gets fun:
-
As root, try ethtool eth0 first, and see whether the «Speed:» and «Duplex:» lines look valid. If not, the ethtool may not be supported by your device.
-
As root, try mii-tool -v eth0 and see whether its output looks correct. If not, them mii-tool may not be supported by your device.
-
If neither one is supported, you may have to set parameters directly on the kernel driver module. Identify which driver module you’re using by reading the output of dmesg and lsmod. You can then try modinfo MODULENAME to see what parameters it accepts, if any. (You can use modinfo even on modules that are not loaded, for comparison.) ToDo: where does one set kernel module parameters?
-
- Next, try to change the settings of the interface while it’s operating. You’ll need to be root, of course. Either:
-
ethtool -s eth0 speed 100 duplex full autoneg off (assuming 100 Mbps and full duplex)
-
mii-tool -F 100baseTx-FD eth0 (same assumption)
In each case, re-check to see whether the interface settings actually changed, and then try sending some data in and out of the system to see whether the NIC is operating correctly.
-
-
If one of these commands successfully set your NIC, then you can put it into /etc/network/interfaces so it runs when you bring the interface up (e.g. at boot time). However, before you do that, you should understand that some drivers and devices behave differently than others. When the driver module is loaded, the NIC may begin autonegotiation without any way to stop it (particularly with drivers that do not accept parameters). The settings from interfaces are applied at some point after that, which may be right in the middle of the negotiation. So, some people find it necessary to delay the ethtool or mii-tool command by a few seconds. Thus:
 iface eth0 inet static
        address .../...
        gateway ...
        up sleep 5; ethtool -s eth0 ...
Or the analogous mii-tool command.
- Reboot the machine to make sure it comes up correctly, and be prepared to intervene manually (e.g. Ctrl-Alt-Del and then boot into single-user mode from GRUB or LILO) if things don’t work.
Bringing up an interface without an IP address
To create a network interface without an IP address at all use the manual method and use pre-up and post-down commands to bring the interface up and down.
   iface eth0 inet manual
      pre-up ifconfig $IFACE up
      post-down ifconfig $IFACE down
If the interface is a VLAN interface, the up/down commands must be executed after/before the vlan hooks. (You also have to install the vlan package.)
   iface eth0.99 inet manual
      post-up ifconfig $IFACE up
      pre-down ifconfig $IFACE down
Note: If you create the VLAN interface only to put it into a bridge, there is no need to define the VLAN interface manually. Just configure the bridge, and the VLAN interface will be created automatically when creating the bridge (see below).
Defining the (DNS) Nameservers
Before a computer can connect to an external network resource (say, for example, a web server), it must have a means of converting any alpha-numeric names (e.g. wiki.debian.org) into numeric network addresses (e.g. 140.211.166.4). (The Internet uses these structured numeric IP addresses as network addresses.)
The C library and other resolver libraries look to /etc/resolv.conf for a list of nameservers. In the simplest case, that is the file to edit to set the list of name servers. But note that various other programs for dynamic configuration will be happy to overwrite your settings:
-
The resolvconf program
-
The network-manager daemon
- DHCP clients
In most situations, the file to edit is the configuration file for such a program.
In the most complex situations, using resolvconf really is the way to go, though in more simple configurations it is probably overkill.
The resolv.conf configuration file
The configuration file resolv.conf at /etc/resolv.conf contains information that allows a computer connected to a network to resolve names into addresses. (Note: Do not confuse this configuration file with the program resolvconf, which unfortunately has a nearly identical name.)
The resolv.conf file typically contains the IP addresses of nameservers (DNS name resolvers) that will attempt to translate names into addresses for any node available on the network. There will be a line or lines that look like this:
nameserver 12.34.56.78
nameserver 12.34.56.79
In this example, the system is using nameservers at the IP addresses 12.34.56.78 and 12.34.56.79. Simply edit the file and enter the IP addresses of the nameservers you need to use after each nameserver. Add more nameserver lines if you have more nameservers. Don’t use this method if you have the resolvconf program installed.
The resolv.conf configuration file has many other options for defining how resolver looks up names. See man resolv.conf for details.
The resolvconf program
The resolvconf program keeps track of system information about the currently available nameservers. It should not be confused with the configuration file resolv.conf, which unfortunately has a nearly identical name. The resolvconf program is optional on a Debian system.
The configuration file resolv.conf contains information about the nameservers to be used by the system. However, when multiple programs need to dynamically modify the resolv.conf configuration file they can step on each other and the file can become out-of-sync. The resolvconf program addresses this problem. It acts as an intermediary between programs that supply nameserver information (e.g. dhcp clients) and programs that use nameserver information (e.g. resolver).
When resolvconf is properly installed, the resolv.conf configuration file at /etc/resolv.conf is replaced by a symbolic link to /etc/resolvconf/run/resolv.conf and the resolver instead uses the configuration file that is dynamically generated by resolvconf at /etc/resolvconf/run/resolv.conf.
The resolvconf program is generally only necessary when a system has multiple programs that need to dynamically modify the nameserver information. In a simple system where the nameservers do not change often or are only changed by one program, the resolv.conf configuration file is adequate.
If the resolvconf program is installed, you should not edit the resolv.conf configuration file manually as it will be dynamically changed by programs in the system. If you need to manually define the nameservers (as with a static interface), add a line something like the following to the interfaces configuration file at /etc/network/interfaces:
dns-nameservers 12.34.56.78 12.34.56.79
Place the line indented within an iface stanza, e.g., right after the gateway line. Enter the IP addresses of the nameservers you need to use after dns-nameservers. Put all of them on one line separated by spaces. Don’t forget the «s» on the end of dns-nameservers.
The resolvconf program is a fairly new addition to Debian and many older programs need to be updated or reconfigured to work properly with it. If you have problems, see /usr/share/doc/resolvconf/README. It has lots of information on making other programs get along with resolvconf.
DNS configuration for NetworkManager
NetworkManager will override dhcp settings, overwriting resolv.conf even if you’ve configured DNS in /etc/dhcp/dhclient.conf, e.g. causing DNS to first search the local domain, which may have to time out before DNS resolution continues causing lengthy DNS resolution times. You can get an idea of what NetworkManager thinks the settings should be by executing nm-tool at the command line.
You may configure these settings using a GUI by launching nm-connection-editor which currently (13.11.23) isn’t to be found in System Tools → Administration menu, rather it must be launched by hand from the command line. After launching:
- Choose a connection (from the Wired or Wireless tab) and click Edit.
- Click on the IPv4 Settings tab
- Choose ‘Automatic (DHCP) addresses only’ instead of just ‘Automatic (DHCP)’.
- Enter the DNS servers in the “DNS servers” field, separated by spaces (e.g. 208.67.222.222 for OpenDNS).
- Click “Apply.”
NetworkManager saves these settings in /etc/NetworkManager/system-connections/name-of-connection. Example /etc/NetworkManager/system-connections/Wired connection 1 :
[802-3-ethernet]
duplex=full
mac-address=XX:XX:XX:XX:XX:XX

[connection]
id=Wired connection 1
uuid=xxx-xxxxxx-xxxxxx-xxxxxx-xxx
type=802-3-ethernet
timestamp=1385213042

[ipv6]
method=auto

[ipv4]
method=auto
dns=208.67.222.222;
ignore-auto-dns=true
Running nm-tool again should show that NetworkManager now has the right idea of how your DNS should be resolved.
DHCP Client Configuration
Setting additional DNS Servers
Example: dhclient3 uses /etc/dhcp/dhclient.conf. The setting you want is
supersede domain-name-servers 12.34.56.78, 12.34.56.79;
or perhaps
prepend domain-name-servers 12.34.56.78, 12.34.56.79;
Setting additional search domains
adding search domains for VPNs or local virtual networks:
append domain-name " virt vpn";
Note the leading space since the string is literally appended to the search domain provided by other configurations.
See the dhclient.conf(5) manual page for details.
Bridging
Bridging puts multiple interfaces into the same network segment. This is very popular when connecting a server to multiple switches for high availability or with virtualization. In the latter case it is usually used to create a bridge in the host (eg. dom0) and put the virtual interfaces of the guests (domU) into the bridge.
-
The bridge-utils package is required to create bridged interfaces.
Example: Connect a server to 2 switches (via eth0 and eth1) by defining bridge 0 and give the server an IP address in this subnet:
auto br0
iface br0 inet static
        address 10.10.0.15/24
        gateway 10.10.0.1
        bridge_ports eth0 eth1
        up /usr/sbin/brctl stp br0 on
If a server is connected to multiple switches then you usually need to run the spanning tree protocol to avoid loops. Therefore STP must be turned on via an «up» command as shown above.
Example: Bridge setup without IP address configuration (use «manual» instead of «static») to «forward» an interface to a guest VM. (The static bridge config contains only 1 physical interface. The virtual interface will be added to the bridge when the VM is started.)
auto br1
iface br1 inet manual
        bridge_ports eth4
        up /usr/sbin/brctl setageing br1 0
        up /usr/sbin/brctl stp br1 off
Note: The Linux bridge supports only STP, no RSTP (Rapid Spanning Tree). Therefore it supports only the old STP Costs, not the new RSTP Costs (see Spanning_Tree_Protocol). This is usually fine with Cisco Switches, but eg. Juniper switches use the RSTP costs and therefore this may lead to different spanning tree calculations and loop problems. This can be fixed by settings the costs manually, either on the switch or on the server. Setting the cost on the switch is preferred as Linux switches back to the default costs whenever an interface does down/up.
Bridging without Switching
By default the Linux bridge acts like a switch. This means, it remembers the MAC addresses behind a switch port and if the destination MAC address is known, data packets or only forward to the respective port — otherwise packets will be broadcasted.
In some setups this is bad. For example if the bridge connects 2 trunk interfaces and the same MAC addresses may be seen from both interfaces, depending on the VLAN. As the Linux bridge does not support VLANs (dedicated MAC address tables per each VLAN), in such setups you have to disable the MAC address learning and put the bridge into a real «bridge» mode with:
        up /sbin/brctl setageing br0 0
        up /sbin/brctl stp br0 off
Howto use vlan (dot1q, 802.1q, trunk) (Etch, Lenny)
Manual config
modprobe 8021q

apt install vlan

vconfig add eth0 222    # 222 is vlan number
ifconfig eth0.222 up
ifconfig eth0.222 mtu 1496    #optional if your network card doesn't support MTU 1504B
ifconfig eth0.222 10.10.10.1 netmask 255.255.255.0
Network init script config
Into /etc/modules add line:
8021q
In /etc/network/interfaces to section iface add parameter:
vlan-raw-device eth0
The interface name should be the raw interface name (the same as specified by vlan-raw-device), then a dot, then the VLAN ID, for example eth0.100. It can instead be «vlan» then the VLAN ID, for example vlan100. In either case, the VLAN ID is on the end, and this is the only place that it is configured.
Note: If you name your VLAN interfaces ethX.YYY, then there is no need to specify the vlan-raw-device, as the raw device can be retrieved from the interface name.
Eg:
auto eth0.222
iface eth0.222 inet static
        address 10.10.10.1/24
        vlan-raw-device eth0
Bridges and VLANs
If you create VLAN interfaces only to put them into a bridge, there is no need to define the VLAN interfaces manually. Just config the bridge, and the VLAN interface will be created automatically when creating the bridge, e.g:
auto br1
iface br1 inet manual
        bridge_ports eth0.99 eth1.99
        up /usr/sbin/brctl stp br1 on
Caveats when using bridging and vlan
#/etc/network/interfaces
auto eth0 bri0
iface eth0 inet static
        address 192.168.1.1/24
iface eth0.110 inet manual
        vlan-raw-device eth0
iface bri0 inet static
        address 192.168.110.1/24
        bridge_ports eth0.110
        bridge_stp on
        bridge_maxwait 10
If you are using a brigded VLAN setup, which is probably useful for networking in virtualization environments, take care to only attach either a bridge device or VLAN devices to an underlying physical device — like shown above. Attaching the physical interface (eth0) to a bridge (eg. bri1) while using the same physical interface on apparently different VLANs will result in all packets to remain tagged. (Kernel newer than 2.6.37 and older than 3.2).
Howto create fault tolerant bonding with vlan (Etch — Stretch)

debian_bonding.dia
How to configure one of the above server active backup bonding 3 vlan {vlan10,vlan20,vlan30} Debian networking without SPOF without native vlan.
aptitude install vlan ifenslave-2.6
Network config
Cisco switch interface example config
interface GigabitEthernet1/2
 description eth1
 switchport
 switchport trunk encapsulation dot1q
 switchport trunk allowed vlan 10,20,30
 switchport mode trunk
 no ip address
 no cdp enable
 spanning-tree portfast trunk
bonding with active backup
Create a file /etc/modprobe.d/bonding.conf containing:
alias bond0 bonding
options bonding mode=active-backup miimon=100 downdelay=200 updelay=200 primary=eth1
/etc/network/interfaces
# The loopback network interface
auto lo
iface lo inet loopback
# The primary network interface
auto bond0
iface bond0 inet manual
        up ifconfig bond0 0.0.0.0 up
        slaves eth1 eth0
auto vlan10
iface vlan10 inet static
        address 10.10.10.12/24
        vlan-raw-device bond0
        gateway 10.10.0.1
        dns-search hup.hu
        dns-nameservers 10.10.0.2
auto vlan20
iface vlan20 inet static
        address 10.20.10.12/24
        vlan-raw-device bond0
auto vlan30
iface vlan30 inet static
        address 10.30.10.12/24
        vlan-raw-device bond0
-
In Debian Buster, you must use interface names for VLANs in the form of: bond0.10, bond0.20, and bond0.30 instead of vlan10, vlan20, vlan30
-
https://www.kernel.org/doc/Documentation/networking/bonding.txt — Linux kernel documentation on bonding
-
https://www.dm.unibo.it/~donatini/admin/rete/bonding.html — Bonding on Linux 2.6
How to set the MTU (Max transfer unit / packet size) with VLANS over a bonded interface
MTU needs to be configured on the bonding interface and slave interfaces after the reset of the configuration has been applied to the bonding interfaces. This is done using a post-up line in the bonding interface configuration.
auto bond0
iface bond0 inet manual
        up ifconfig lacptrunk0 0.0.0.0 up
        slaves eth0 eth1
# bond-mode 4 = 802.3ad
        bond-mode 4
        bond-miimon 100
        bond-downdelay 200
        bond-updelay 200
        bond-lacp-rate 1
        bond-xmit-hash-policy layer2+3
        post-up ifconfig eth0 mtu 9000 && ifconfig eth1 mtu 9000 && ifconfig bond0 mtu 9000

#vlan devices will use the MTU set on bond0 device
auto vlan101
iface vlan101 inet static

        address 10.101.60.123/24
        gateway 10.155.60.1
        vlan-raw-device bond0

auto vlan151
iface vlan151 inet static

        address 192.168.1.1/24
        vlan-raw-device bond0
Multiple IP addresses on one Interface
Interface aliasing allows one interface to have multiple IP addresses. This is useful when more than one server is to be visible via the Internet. Note that virtual hosts can support multiple Apache servers with a single IP address. Apache responds to the domain name supplied by the client in the HTTP header. In many other situations, one external IP is needed for each server using a port.
Legacy method
This /etc/network/interfaces text assigns three IP addresses to eth0.
auto eth0
allow-hotplug eth0
iface eth0 inet static
    address 192.168.1.42/24
    gateway 192.168.1.1

auto eth0:0
allow-hotplug eth0:0
iface eth0:0 inet static
    address 192.168.1.43/24

auto eth0:1
allow-hotplug eth0:1
iface eth0:1 inet static
    address 192.168.1.44/24
An alias interface should not have «gateway» or «dns-nameservers»; dynamic IP assignment is permissible.
The above configuration is the previous traditional method that reflects the traditional use of ifconfig to configure network devices. ifconfig has introduced the concept of aliased or virtual interfaces. Those types of virtual interfaces have names of the form interface:integer and ifconfig treats them very similarly to real interfaces.
Nowadays ifupdown uses the ip utility from the iproute2 package instead of ifconfig. The newer ip utility does not use the same concept of aliases or virtual interfaces. However, it supports assigning arbitrary names to the interfaces (they’re called labels). ifupdown uses this feature to support aliased interfaces while using ip.
iproute2 method
Also, ifupdown supports specifying multiple interfaces by repeating iface sections with the same interface name. The key difference from the method described above is that all such sections are treated by ifupdown as just one interface, so user can’t add or remove them individually. However, up/down commands, as well as scripts, are called for every section as it used to be.
Note however that this method is dangerous! Certain driver/hardware combinations may sometimes fail to bring the link up if no labels are assigned to the alias interfaces. (Seen this on Debian Wheezy and Jessie with RTL8111/8168/8411 PCI Express Gigabit Ethernet Controller (rev 01) auto-negotiating to 10/full. A similar warning from another person exists in the history of this page.)
This /etc/network/interfaces text assigns three IP addresses to eth0.
auto eth0
allow-hotplug eth0
iface eth0 inet static
    address 192.168.1.42/24
    gateway 192.168.1.1

iface eth0 inet static
    address 192.168.1.43/24

iface eth0 inet static
    address 192.168.1.44/24

# adding IP addresses from different subnets is also possible
iface eth0 inet static
    address 10.10.10.14/24
Manual approach:
auto eth0
allow-hotplug eth0
iface eth0 inet static
    address 192.168.1.42/24
    gateway 192.168.1.1
    up   ip addr add 192.168.1.43/24 dev $IFACE label $IFACE:0
    down ip addr del 192.168.1.43/24 dev $IFACE label $IFACE:0
    up   ip addr add 192.168.1.44/24 dev $IFACE label $IFACE:1
    down ip addr del 192.168.1.44/24 dev $IFACE label $IFACE:1
    up   ip addr add 10.10.10.14/24 dev $IFACE label $IFACE:2
    down ip addr del 10.10.10.14/24 dev $IFACE label $IFACE:2
CategoryNetwork CategorySystemAdministration CategoryNetwork
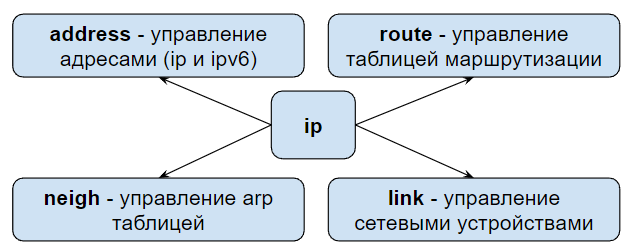
Команда ip используется для назначения адреса сетевому интерфейсу и/или конфигурирования параметров сетевого интерфейса в дистрибутивах Linux. Эта команда заменяет собой старую добрую и ныне устаревшую команду ifconfig в современных дистрибутивах Linux.
Команда ip может использоваться для следующих целей:
- Узнать какие интерфейсы сконфигурированы в системе.
- Запросить статус IP интерфейса.
- Сконфигурировать локальный, Ethernet и другие интерфейсы.
- Пометить интефейс как up или down.
- Сконфигурировать или изменить статическую маршрутизацию или маршрутизацию по умолчанию.
- Сконфигурировать туннель через IP.
- Сконфигурировать содержимое ARP или NDISC кэша.
- Назначить IP адресы, маршруты, подсети и другую IP информацию на интерфейс.
Синтаксис
ip OBJECT COMMAND
ip [options] OBJECT COMMAND
ip OBJECT help
Понимание синтаксиса OBJECTS в комманде ip
OBJECTS может быть одним из следующих и может записываться в полной или сокращенной форме:
| Объект | Сокращенная форма | Задача |
|---|---|---|
| link | l | Сетевое устройство. |
| address | a, addr | IP адрес на устройстве. |
| addrlabel | addrl | Управление метками для выбора адреса. |
| neighbour | n, neigh | Записи для ARP или NDISC кэшей. |
| route | r | Управление записямя таблицы маршрутизации. |
| rule | ru | Правила в базе политик маршрутизации. |
| maddress | m, maddr | Мультикаст адрес. |
| mroute | mr | Записи мультикастового кэша маршрутизации. |
| tunnel | t | Туннель через IP. |
| xfrm | x | Фреймворк для протокола IPsec. |
Чтобы получить информацию о каждом из объектов используйте команду help следующим образом:
ip OBJECT help
ip OBJECT h
ip a help
ip r help
Предупреждение: команды описанные ниже должны выполняться с осторожностью, так как ошибка может привести к потере соединения с сервером. Вы должны быть особо аккуратны при работе в удаленной сессии по ssh.
Примеры использования команды ip
Не пугайтесь синтаксиса команды ip. Давайте сразу начнем с примеров.
Показать информацию обо всех сетевых интерфейсах
Введите следующую команду чтобы получить список всех ip адресов назначенных всем сетевым интерфейсам:
ip a
или
ip addr
Пример вывода:
1: lo: <LOOPBACK,UP,LOWER_UP> mtu 65536 qdisc noqueue state UNKNOWN group default
link/loopback 00:00:00:00:00:00 brd 00:00:00:00:00:00
inet 127.0.0.1/8 scope host lo
valid_lft forever preferred_lft forever
inet6 ::1/128 scope host
valid_lft forever preferred_lft forever
2: eth0: <BROADCAST,MULTICAST,UP,LOWER_UP> mtu 1500 qdisc pfifo_fast state UP group default qlen 1000
link/ether 08:00:27:8b:46:9a brd ff:ff:ff:ff:ff:ff
inet 10.0.2.15/24 brd 10.0.2.255 scope global eth0
valid_lft forever preferred_lft forever
inet6 fe80::a00:27ff:fe8b:469a/64 scope link
valid_lft forever preferred_lft forever
Вы можете выбрать между IPv4 и IPv6 используя следующий синтаксис:
### Показывать только TCP/IP IPv4  ##
ip -4 a

### Показывать только TCP/IP IPv6  ###
ip -6 a
Также существует возможность вывести детали только об определенном сетевом интерфейсе:
### Показать только интерфейс eth0 ###
ip a show eth0
ip a list eth0
ip a show dev eth0

### Показать только поднятые интерфейсы ###
ip link ls up
Назначить интерфейсу IP адрес
Для того чтобы добавить IP адрес используется синтаксис следующего вида:
ip a add {ip_addr/mask} dev {interface}
Чтобы назначить адрес 192.168.1.200/255.255.255.0 на интерфейс eth0, введите:
ip a add 192.168.1.200/255.255.255.0 dev eth0
или
ip a add 192.168.1.200/24 dev eth0
Добавить широковещательный адрес на интерфейс
По умолчанию, команда ip не задает какой-либо широковещательный адрес до тех пор, пока это будет недвусмысленно указано. Таким образом следующий синтаксис задает широковещательный адрес ADDRESS:
ip addr add brd {ADDDRESS-HERE} dev {interface}
ip addr add broadcast {ADDDRESS-HERE} dev {interface}
ip addr add broadcast 172.20.10.255 dev dummy0
Существует возможность использовать специальные символы + и — вместо широковещательного адреса указывая хостовую часть адреса. В этом примере добавим адрес 192.168.1.50 с маской 255.255.255.0 (/24) со стандартным широковещательным адресом и зададим название eth0Work на интерфейс eth0:
ip a add 192.168.1.50/24 brd + dev eth0 label eth0Work
Вы можете задать лупбек адрес на лупбек интерфейсе lo следующим образом:
ip a add 127.0.0.1/8 dev lo brd + scope host
Удалить IP адрес с интерфейса
Синтаксис для удаления IPv4/IPv6 адреса следующий:
ip a del {ipv6_addr_OR_ipv4_addr} dev {interface}
Чтобы удалить 192.168.1.200/24 с интерфейса eth0, введите:
ip a del 192.168.1.200/24 dev eth0
Сбросить ряд IP адресов с интерфейса
Вы можете удалять IP адреса с интерфейса по одному, как показано выше. Однако команда flush может удалить набор адресов с интерфейса по указанному признаку. Например, вы можете удалить все адреса из частной сети 192.168.2.0/24 с помощью команды:
ip -s -s a f to 192.168.2.0/24
Пример вывода:
2: eth0 inet 192.168.2.201/24 scope global secondary eth0
2: eth0 inet 192.168.2.200/24 scope global eth0
*** Round 1, deleting 2 addresses ***
*** Flush is complete after 1 round ***
Вы можете выключить IP адрес на всех ppp (Point-to-Point) интерфейсах:
ip -4 addr flush label "ppp*"
Еще один пример для всех Ethernet интерфейсов:
ip -4 addr flush label "eth0"
Как изменить состояние интерфейса на UP или DOWN
Синтаксис:
ip link set dev {DEVICE} {up|down}
К примеру, чтобы положить интерфейс eth1, используйте:
ip link set dev eth1 down
А чтобы поднять этот же интерфейс:
ip link set dev eth1 up
Как изменить txqueuelen устройства
Вы можете установить длину очереди передачи устройства с помощью ifconfig или команды ip следующим образом:
ip link set txqueuelen {NUMBER} dev {DEVICE}
В этом примере изменим txqueuelen со значения по умолчанию, равного 1000, на 10000 для интерфейса 10000:
ip link set txqueuelen 10000 dev eth0
ip a list eth0
Как изменить MTU устройства
Для гигабиных сетей вы можете установить максимальный размер блоков передачи (MTU) для лучшей производительности сети. Синтаксис следующий:
ip link set mtu {NUMBER} dev {DEVICE}
Например, установим MTU устройства eth0 на 9000:
ip link set mtu 9000 dev eth0
ip a list eth0
Пример вывода:
2: eth0: mtu 9000 qdisc pfifo_fast state UP qlen 1000
link/ether 00:08:9b:c4:30:30 brd ff:ff:ff:ff:ff:ff
inet 192.168.1.10/24 brd 192.168.1.255 scope global eth1
inet6 fe80::208:9bff:fec4:3030/64 scope link
valid_lft forever preferred_lft forever
Показать соседей (arp кэш)
Синтаксис:
ip n show
ip neigh show
Пример вывода (часть информации скрыта):
74.xx.yy.zz dev eth1 lladdr 00:30:48:yy:zz:ww REACHABLE
10.10.29.66 dev eth0 lladdr 00:30:48:c6:0a:d8 REACHABLE
74.ww.yyy.xxx dev eth1 lladdr 00:1a:30:yy:zz:ww REACHABLE
10.10.29.68 dev eth0 lladdr 00:30:48:33:bc:32 REACHABLE
74.fff.uu.cc dev eth1 lladdr 00:30:48:yy:zz:ww STALE
74.rr.ww.fff dev eth1 lladdr 00:30:48:yy:zz:ww DELAY
10.10.29.65 dev eth0 lladdr 00:1a:30:38:a8:00 REACHABLE
10.10.29.74 dev eth0 lladdr 00:30:48:8e:31:ac REACHABLE
Последнее поле показывает состояние системы «определения недоступности соседа»:
- STALE — сосед существует, но, скорее всего недоступен, поэтому ядро попробует проверить это при первой ближайшей передаче.
- DELAY — пакет был отправлен соседу в состоянии STALE и ядро ждет подтверждения.
- REACHABLE — сосед существует и определенно доступен.
Добавить новую ARP запись
Синтаксис:
ip neigh add {IP-HERE} lladdr {MAC/LLADDRESS} dev {DEVICE} nud {STATE}
Например, добавить постоянную ARP запись для соседа 192.168.1.5 на устройстве eth0:
ip neigh add 192.168.1.5 lladdr 00:1a:30:38:a8:00 dev eth0 nud perm
Где,
| Состояние соседа | Значение |
|---|---|
| permanent | Состояние соседа занято навсегда и может быть удалено только администратором. |
| noarp | Состояние соседа валидно. Попыток проверить состояние не будет, но может быть удалено, когда закончится время жизни. |
| stale | Состояние соседа валидно, но подозрительно. Эта опция для ip neigh не меняет состояние соседа, если оно было валидно и адрес не был изменен этой командой. |
| reachable | Состояние соседа валидно до окончания таймаута доступности. |
Удалить ARP запись
Синтаксис:
ip neigh del {IPAddress} dev {DEVICE}
Удалить запись для соседа 192.168.1.5 на интерфейсе eth1:
ip neigh del 192.168.1.5 dev eth1
Изменить состояние на reachable для соседа 192.168.1.100 на устройстве eth1:
ip neigh chg 192.168.1.100 dev eth1 nud reachable
Очистить ARP запись
Команда flush или f очищает таблицы соседей или arp таблицы. Синтаксис:
ip -s -s n f {IPAddress}
Например:
ip -s -s n f 192.168.1.5
или
ip -s -s n flush 192.168.1.5
ip route: команды управления таблицей маршрутизации
Используйте следующие команды для управления таблицей маршрутизации ядра.
Показать таблицу маршрутизации
Посмотреть таблицу маршрутизации:
ip r
ip r list
ip route
Пример вывода:
default via 192.168.1.254 dev eth1
192.168.1.0/24 dev eth1  proto kernel  scope link  src 192.168.1.10
Показать роутинг для 192.168.1.0/24:
ip r list 192.168.1.0/24
Пример вывода:
192.168.1.0/24 dev eth1 proto kernel scope link src 192.168.1.10
Добавить новый маршрут
Синтаксис:
ip route add {NETWORK/MASK} via {GATEWAYIP}
ip route add {NETWORK/MASK} dev {DEVICE}
ip route add default {NETWORK/MASK} dev {DEVICE}
ip route add default {NETWORK/MASK} via {GATEWAYIP}
Добавить статический маршрут в сеть 192.168.1.0/24 через шлюз 192.168.1.254:
ip route add 192.168.1.0/24 via 192.168.1.254
Чтобы маршрутизировать весь трафик через шлюз 192.168.1.254 подключенный через сетевой интерфейс eth0:
ip route add 192.168.1.0/24 dev eth0
Удалить маршрут
Команда чтобы удалить маршрут по умолчанию:
ip route del default
В этом примере удалим маршрут созданный в предыдущем блоке:
ip route del 192.168.1.0/24 dev eth0
Наверх
Опубликовано 23 January 2016
Настройка сети – это один из важнейших навыков системного администрирования, и в этой статье мы научимся настраивать сеть на Debian 11.
Получение информации о сетевых интерфейсах
Так как в предыдущем уроке мы научились пользоваться и устанавливать sudo на debian, то для административных действий теперь будем использовать эту утилиту. А настройка сети – это административное действие на любой системе, в том числе и на Debian.
Определить какие интерфейсы есть у вашего сервера поможет утилита lshw. Но её предварительно нужно установить с помощью следующей команды:
$ sudo apt install lshw
Эта утилита предназначена для определения железа вашего сервера. Например, с её помощью можно посмотреть какой на сервере процессор или оперативная память. Используя параметр -С network получим информацию только по сетевым устройствам:
$ sudo lshw -C network
  *-network
       description: Ethernet controller
       product: Virtio network device
       vendor: Red Hat, Inc.
       physical id: 12
       bus info: pci@0000:00:12.0
       version: 00
       width: 64 bits
       clock: 33MHz
       capabilities: msix bus_master cap_list rom
       configuration: driver=virtio-pci latency=0
       resources: irq:11 ioport:e0a0(size=32) memory:fea52000-fea52fff memory:fe408000-fe40bfff memory:fea00000-fea3ffff
     *-virtio2
          description: Ethernet interface
          physical id: 0
          bus info: virtio@2
          logical name: ens18
          serial: 2a:75:9e:4d:1d:fa
          capabilities: ethernet physical
          configuration: autonegotiation=off broadcast=yes driver=virtio_net driverversion=1.0.0 ip=172.28.90.31 link=yes multicast=yes
Из этого вывода вы можете получить следующую информацию:
- logical name: ens18 – имя сетевого интерфейса;
- serial: 2a:75:9e:4d:1d:fa – mac-адрес;
- ip=172.28.90.31 – ip-адрес;
- и другое.
Утилита lshw в основном используется, чтобы узнать имя и возможности сетевой карты. А для получения информации о mac и ip адресах нужно использовать другую утилиту – ip. Эта утилита командной строки не так проста, команда ip имеет множество подкоманд, которые мы изучим в этой статье. И первая подкоманда это address – она означает, что работать мы будем с ip-адресами. У подкоманды address, тоже есть свои подкоманды, например подкоманда show покажет информацию о назначенных ip-адресах. В самом конце команды можно указать имя сетевого интерфейса, чтобы получить информацию только по нему, а не по всем сетевым интерфейсам в системе.
Все эти подкоманды можно сокращать, например address = addr, show = sh. Но пока не будем этого делать, так как вначале нужно их запомнить.
Для того чтобы посмотреть, какие настройки использует сетевой интерфейс ens18 выполним команду ip address show ens18:
$ ip address show ens18
2: ens18: <BROADCAST,MULTICAST,UP,LOWER_UP> mtu 1500 qdisc pfifo_fast state UP group default qlen 1000
    link/ether 2a:75:9e:4d:1d:fa brd ff:ff:ff:ff:ff:ff
    altname enp0s18
    inet 172.28.90.31/20 brd 172.28.95.255 scope global dynamic ens18
       valid_lft 258476sec preferred_lft 258476sec
    inet6 fe80::2875:9eff:fe4d:1dfa/64 scope link
       valid_lft forever preferred_lft forever
Здесь мы также видим mac и ip адрес с маской подсети.
Этот ip адрес был получен по dhcp.
Настройка IP адреса
Чтобы изменить ip адрес на какой-нибудь другой, нужно отредактировать конфигурационный файл “/etc/network/interfaces”. Но вначале глянем на него с помощью команды cat:
$ cat /etc/network/interfaces
# This file describes the network interfaces available on your system
# and how to activate them. For more information, see interfaces(5).

source /etc/network/interfaces.d/*

# The loopback network interface
auto lo
iface lo inet loopback

# The primary network interface
allow-hotplug ens18
iface ens18 inet dhcp
Посмотрим внимательнее на блок настроек для интерфейса ens18:
- # The primary network interface – это комментарий, так как в начале строки стоит символ #. Он ни на что не влияет, просто подсказывает нам, что следующие за ним настройки редактируют основной сетевой интерфейс (ens18).
- allow-hotplug ens18 – разрешает горячее подключение для интерфейса ens18. То есть этот сетевой интерфейс будет включен при старте системы.
- iface ens18 inet dhcp – интерфейс ens18 будет получать настройки с помощью dhcp.
Чтобы назначить другой статический ip адрес нужно отредактировать этот блок в файле, например с помощью текстового редактора nano.
$ sudo nano /etc/network/interfaces

***** пропущу другие блоки настроек *****

# The primary network interface
allow-hotplug ens18
iface ens18 inet static
        address 172.28.90.77/20
        gateway 172.28.80.1
То есть меняем dhcp на static и ниже указываем адрес интерфейса (address) и адрес шлюза по умолчанию (gateway).
Дальше нужно перезагрузить сетевую подсистему чтобы применились изменения. Для этого можно воспользоваться следующими командами:
- $ sudo systemctl restart networking.service – перезагружает службу отвечающую за сеть на сервере, но если сетевых интерфейсов несколько, то все они на время окажутся недоступными. Также эта команда у меня не всегда срабатывала, то есть после перезапуска службы, интерфейс оказывался без назначенного ip адреса. Поэтому я не рекомендую этот способ.
- $ sudo ifdown ens18; sudo ifup ens18 – это две команды, которые выполнятся по очереди. Первая команда (ifdown ens18) отключит сетевой интерфейс, а вторая (ifup ens18) включит. Эта команда меня ещё не подводила.
- $ sudo reboot – эта команда перезагрузит сервер полностью. После чего сервер загрузится уже с новыми сетевыми настройками.
В любом случае вы отвалитесь от сервера, так как были подключены к нему по ssh по другому ip адресу. Вам придется заново подключиться к серверу, но использовать уже новый ip адрес.
Настройка DNS сервера
Чтобы указать серверу, какой ему использовать dns сервер, нужно редактировать конфигурационный файл /etc/resolv.conf. Давайте взглянем на него:
$ cat /etc/resolv.conf
nameserver 172.28.80.1
Этот адрес был получены от dhcp сервера. Но его можно изменить прям в этом файле:
$ sudo nano /etc/resolv.conf
nameserver 77.88.8.8
После редактирования этого файла ничего перезагружать не нужно, настройки подхватятся на лету. Проверить это можно с помощью команды nslookup, которая определит ip адрес по имени используя указанный dns сервер.
$ nslookup ya.ru
Server:         77.88.8.8
Address:        77.88.8.8#53

Non-authoritative answer:
Name:   ya.ru
Address: 87.250.250.242
Name:   ya.ru
Address: 2a02:6b8::2:242
Как видим, был использован dns от Яндекса – 77.88.8.8. Именно его мы внесли в конфиг /etc/resolv.conf.
Утилита IP
Теперь более подробно разберем утилиту ip.
Работая с ней вы используете различные подкоманды. Все их рассматривать не будем. Разберём лишь некоторые из них:
- address – позволяет назначать и удалять ip адреса, просматривать их и тому подобное.
- link – можно включить или выключить сетевой интерфейс, посмотреть список интерфейсов и их mac адреса.
- neigh – можно добавить или удалить mac адрес из arp таблицы, или полностью её очистить.
- route – позволяет создавать новые маршруты и удалять их, а также просматривать уже созданные маршруты.
У этих подкоманд есть свои подкоманды. Например, чтобы посмотреть информацию используется общая подкоманда show:
# ip address show - посмотреть ip адреса
# ip link show    - посмотреть физические устройства
# ip neigh show   - посмотреть arp таблицу
# ip route show   - посмотреть таблицу маршрутизации
Во всех случаях можно указывать конкретный интерфейс:
# ip address show ens18
Помимо просмотра информации можем настраивать сеть, например можно добавить или удалить ip адрес на интерфейсе. Но в отличии от правки конфигурационного файла, изменённый ip адрес этим способом будет действовать только до перезагрузки сервера:
# ip address add 192.168.0.44/24 dev ens18 - добавить ip для ens18
# ip address del 192.168.0.44/24 dev ens18 - удалить ip для ens18
Также можем добавлять или удалять маршруты. Такие маршруты тоже будут действовать только до перезагрузки сервера:
# ip route add 192.168.5.0/24 via 192.168.0.10 - добавить маршрут
# ip route delete 192.168.5.0/24               - удалить маршрут
Можем включать и выключать сетевые интерфейсы:
# ip link set ens18 up   - включить
# ip link set ens18 down - выключить
Кстати, выключение и включение сетевых интерфейсов с помощью ip link set не перечитывают настройки из /etc/network/interfaces, поэтому если вы что-то там изменили, то выполняйте ifdown и ifup.
Можем очистить arp таблицу:
# ip neigh flush
Если хотите, можете почитать мануал по команде ip. На русском языке он доступен тут.
Добавление статических маршрутов
Чтобы добавленный маршрут остался после перезагрузки его нужно вписать в уже знакомый файл /etc/network/interfaces в таком виде:
up ip route add 192.168.5.0/24 via 192.168.0.10
То есть в конце файла, с новой строки пишите up, а дальше команду с помощью которой вы создаете маршрут.
Итог
Вот мы и прошли тему “Настройка сети Debian“.
Мы познакомились с командами lshw, и ip. Научились настраивать сеть с помощью конфигурационных файлов /etc/network/interfaces и /etc/resolv.conf, а также с помощью команды ip. Научились включать и выключать сетевые интерфейсы с помощью команд ifup и ifdown.
Настраивая сеть мы теперь можем указать ip адрес, адрес шлюза, адрес dns сервера, а также можем создать отдельные маршруты. Это не все сетевые настройки, которые можно сделать, их намного больше, можно даже создать свой роутер на Debian, но это выходит за рамки этого курса.
Сводка

Имя статьи
Настройка сети на Debian
Описание
Настройка сети — это один из важнейших навыков системного администрирования, и в этой статье мы научимся настраивать сеть на Debian 11
Overview
In this tutorial, you will learn how to configure network in Debian to use static IP addresses and DHCP. You will also learn how to configure the DNS name servers, Gateways, and subnets.
This tutorial covers the following versions of Debian:
- Debian 8 Jessie
- Debian 9 Stretch
- Debian 10 Buster
Network Interfaces Files
Debian’s network interfaces can be configured in two places. The primary location for network configurations is in the /etc/networks/interfaces file.
The second location for network configurations is under /etc/networks/interfaces.d, where you can drop network config files rather than storing everything in the interfaces file.
The /etc/networks/interfaces file looks like the following.
# This file describes the network interfaces available on your system
# and how to activate them. For more information, see interfaces(5).

source /etc/network/interfaces.d/*

# The loopback network interface
auto lo
iface lo inet loopback

# The primary network interface
allow-hotplug enp0s3
iface enp0s3 inet dhcp
The first thing the interfaces file does it load additional configuration files from /etc/network/interfaces.d, if any files are stored there. It then proceeds to load network configurations from defined below that line.
Setting a Static IP address
To set a static IP address for an interface named enp0s3, you would write the following configuration.
iface enp0s3 inet static
     address 192.168.1.2/24
     gateway 192.157.1.1
The configuration above does the following:
- static sets the interface as static
- address sets the IP address to 192.168.1.2 and its subnet using CIDR /24, or subnet 255.255.255.0.
- gateway sets the network gateway IP address for routing traffic outside of the interface’s subnet.
This configuration can be added to the interfaces file or written to a configuration file under /etc/network/interfaces.d.
For example, the file could be saved as /etc/network/interfaces.d/enp0s3.conf.
To apply your new network settings you will need to bring the interface down and then back up again.
- Bring the interface you just updated down.
ifdown enp0s3 - Bring the interface back online.
ifup enp0s3
Verify your network settings are applied correctly. For Debian 10 and Debian 9, you can use the ip a command. For Debian 8 you would use the ifconfig command.
Setting a DHCP Address
A DHCP address is configured as shown in the example below. Unlike the the static IP address it’s a one-liner, as we do not need to set an address or gateway. These values will automatically be assigned by your network.
iface enp0s3 inet dhcpApplying New Network Settings
To apply your new network settings you will need to bring the interface offline and then back online.
- Bring the interface down.
ifdown enp0s3 - Bring the interface back online
ifup enp0s3
Verifying network settings in Debian 9 and Debian 10
With Debian 9 and Debian 10 you must use the ip command to view the current state of your network interfaces.
ip a2: enp0s3: <BROADCAST,MULTICAST,UP,LOWER_UP> mtu 1500 qdisc pfifo_fast state UP group default qlen 1000
link/ether 08:00:27:de:14:99 brd ff:ff:ff:ff:ff:ff
inet 10.0.0.41/24 brd 10.0.0.255 scope global dynamic enp0s3
valid_lft 562759sec preferred_lft 562759sec
inet6 2607:fea8:4de0:b900:a00:27ff:fede:1499/64 scope global dynamic mngtmpaddr
valid_lft 298sec preferred_lft 298sec
inet6 fe80::a00:27ff:fede:1499/64 scope link
valid_lft forever preferred_lft foreverIn the output of the ip a command we can see that our interface, enp0s3, is in an UP state, has been assigned IP address 10.0.0.41/24. If you set your IP address to 10.0.0.41/24, then your changes have been applied successfully.
Verifying network settings in Debian 8
Network interfaces states can be check in Debian 8 using the ifconfig command.
ifconfiglo Link encap:Local Loopback
inet addr:127.0.0.1 Mask:255.0.0.0
inet6 addr: ::1/128 Scope:Host
UP LOOPBACK RUNNING MTU:16436 Metric:1
RX packets:8 errors:0 dropped:0 overruns:0 frame:0
TX packets:8 errors:0 dropped:0 overruns:0 carrier:0
collisions:0 txqueuelen:0
RX bytes:480 (480.0 b) TX bytes:480 (480.0 b)
p2p1 Link encap:Ethernet HWaddr 00:1C:C0:AE:B5:E6
inet addr:192.168.0.1 Bcast:192.168.0.255 Mask:255.255.255.0
inet6 addr: fe80::21c:c0ff:feae:b5e6/64 Scope:Link
UP BROADCAST RUNNING MULTICAST MTU:1500 Metric:1
RX packets:41620 errors:0 dropped:0 overruns:0 frame:0
TX packets:40231 errors:0 dropped:0 overruns:0 carrier:0
collisions:0 txqueuelen:1000
RX bytes:21601203 (20.6 MiB) TX bytes:6145876 (5.8 MiB)
Interrupt:21 Base address:0xe000Все операционные системы предоставляют команды и интерфейс для настройки сети из командной строки. В дистрибутивах Linux нам даже это не нужно, потому что мы можем сами редактировать конфигурационные файлы и вносить необходимые изменения. В некоторых случаях настройка через конфигурационные файлы будет проще, чем с помощью графических утилит, потому что вы можете полностью все контролировать.
В этой статье будет рассмотрена настройка сети Debian 9. Мы разберем как настроить имя хоста, сетевые интерфейсы и получить IP адреса для них. Эта инструкция подойдет как для обычных компьютеров, так и для серверов.
1. Имя компьютера
Чтобы посмотреть текущее имя хоста вы можете использовать команду hostname:
hostname
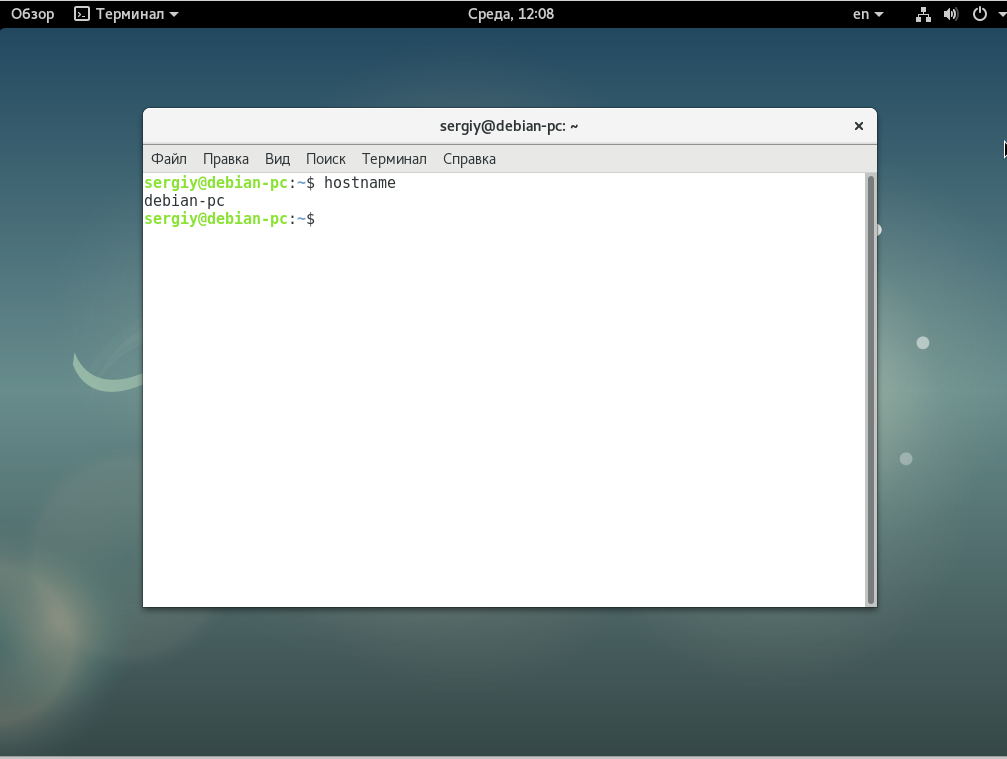
Установить новое имя хоста очень просто, для этого достаточно передать его команде hostname в качестве параметра:
hostname debian-pc-1
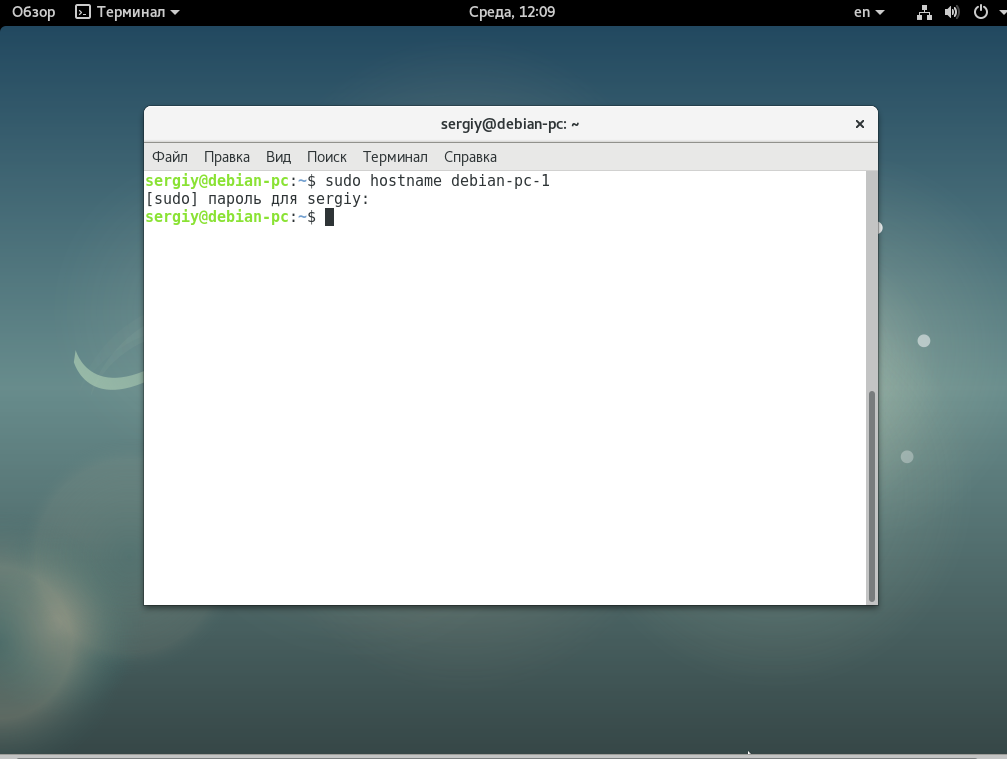
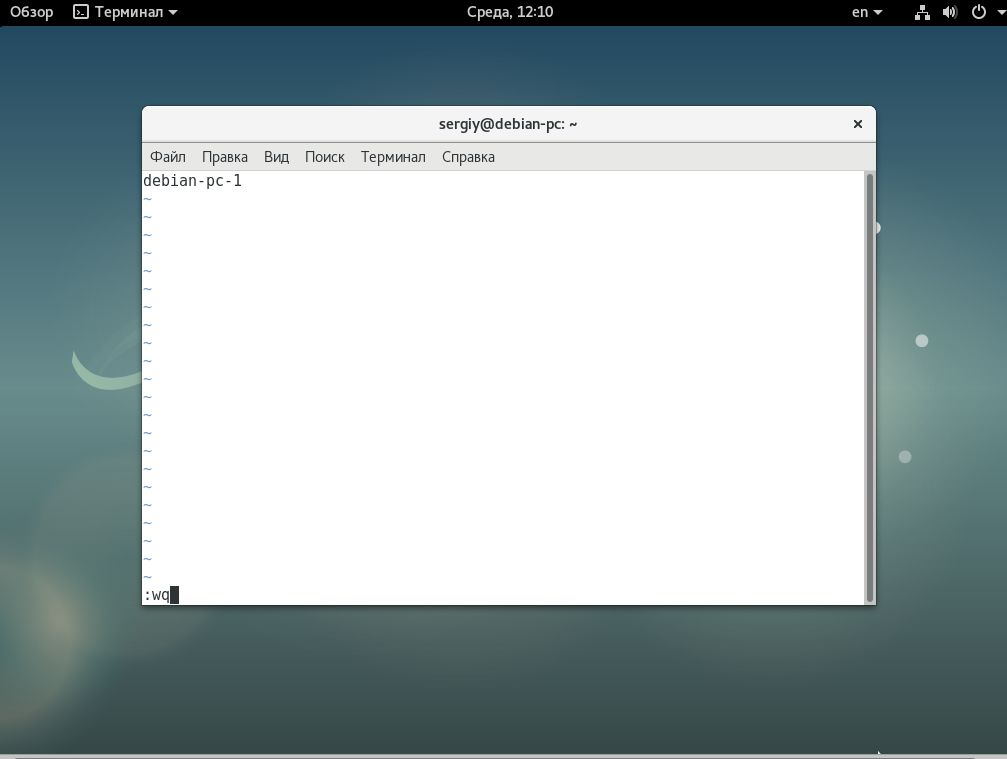
После перезагрузки имя хоста не сохранится, поэтому вам нужно отредактировать файл /etc/hostname и добавить туда новое имя хоста, уже это имя останется даже после перезагрузки:
vi /etc/hostname
debian-pc-1
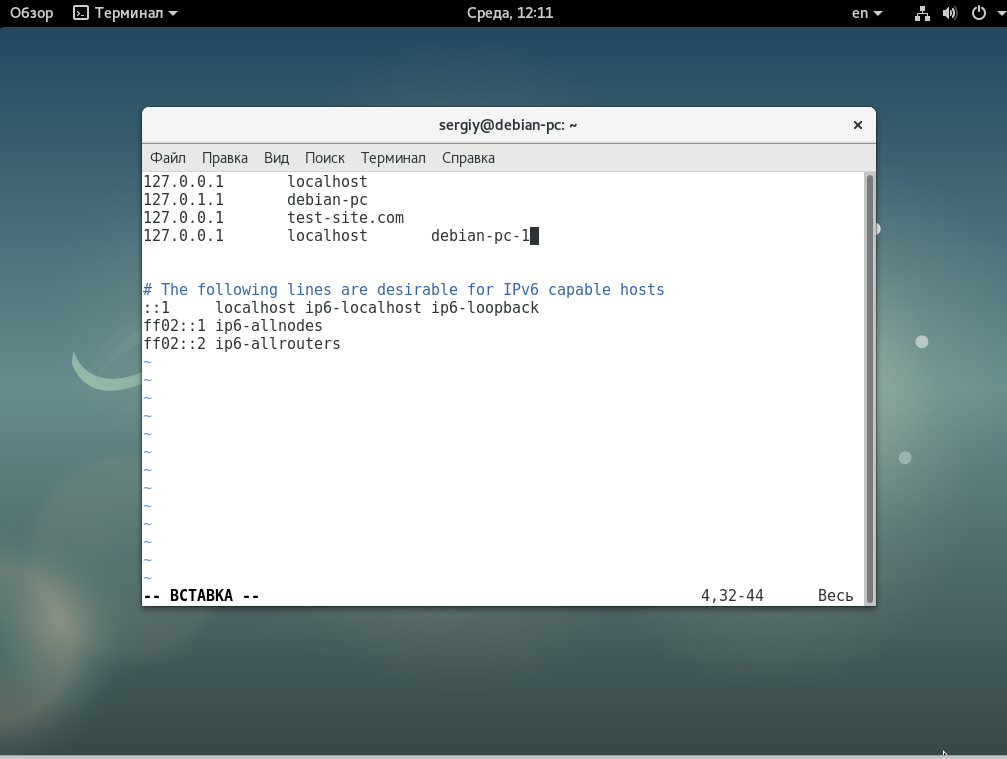
Осталось только связать новое имя хоста с локальным IP адресом, чтобы иметь возможность обращаться по нему к компьютеру. Для этого добавьте такую строку в файл /etc/hosts:
vi /etc/hosts
127.0.0.1 localhost debian-pc
2. Список сетевых интерфейсов
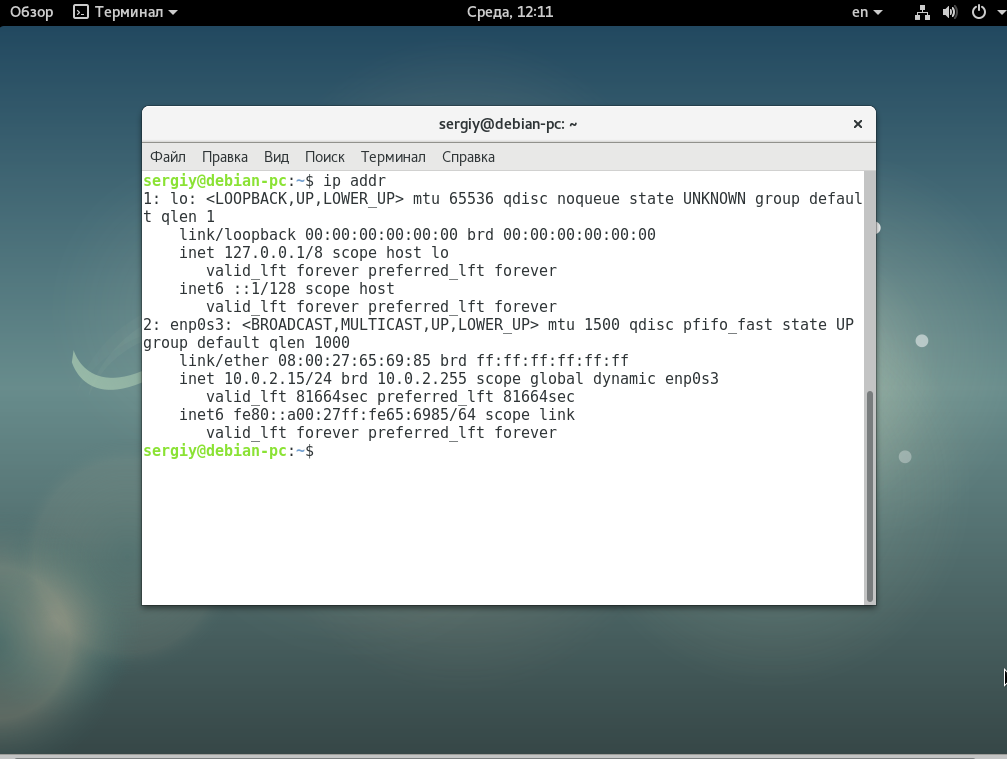
Перед тем как мы сможем настроить сеть нужно посмотреть какие сетевые интерфейсы подключены к вашей системе и какие имена им присвоены. Для этого наберите:
ip addr
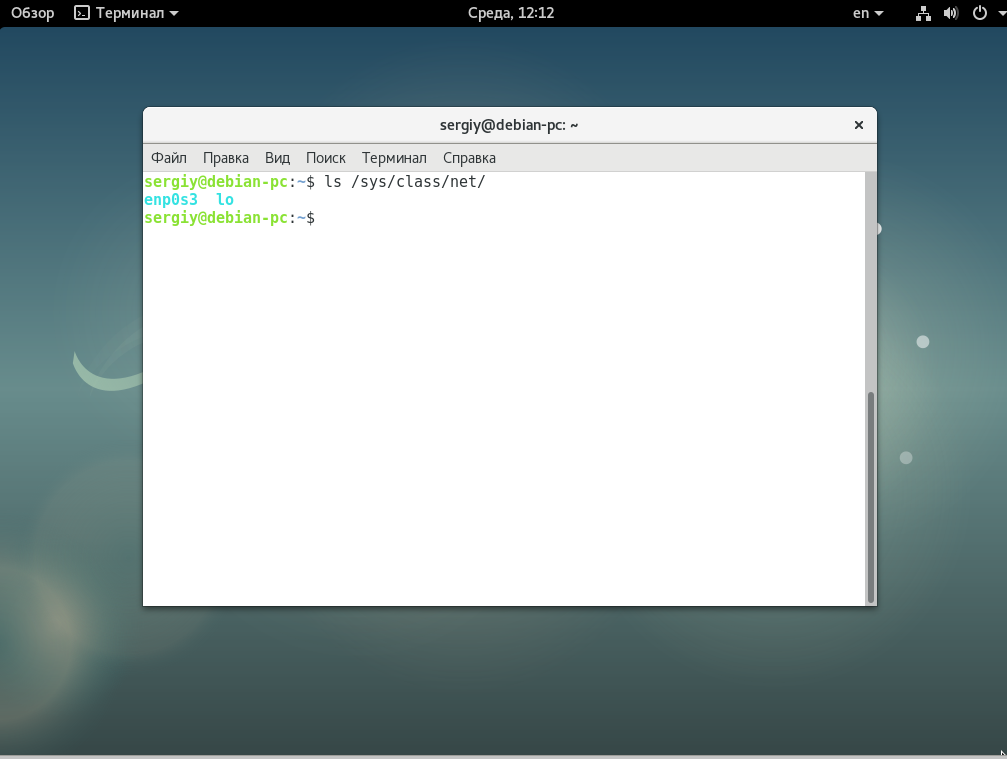
 Также можно посмотреть только имена интерфейсов, в папке /sys/class/net:
ls /sys/class/net/
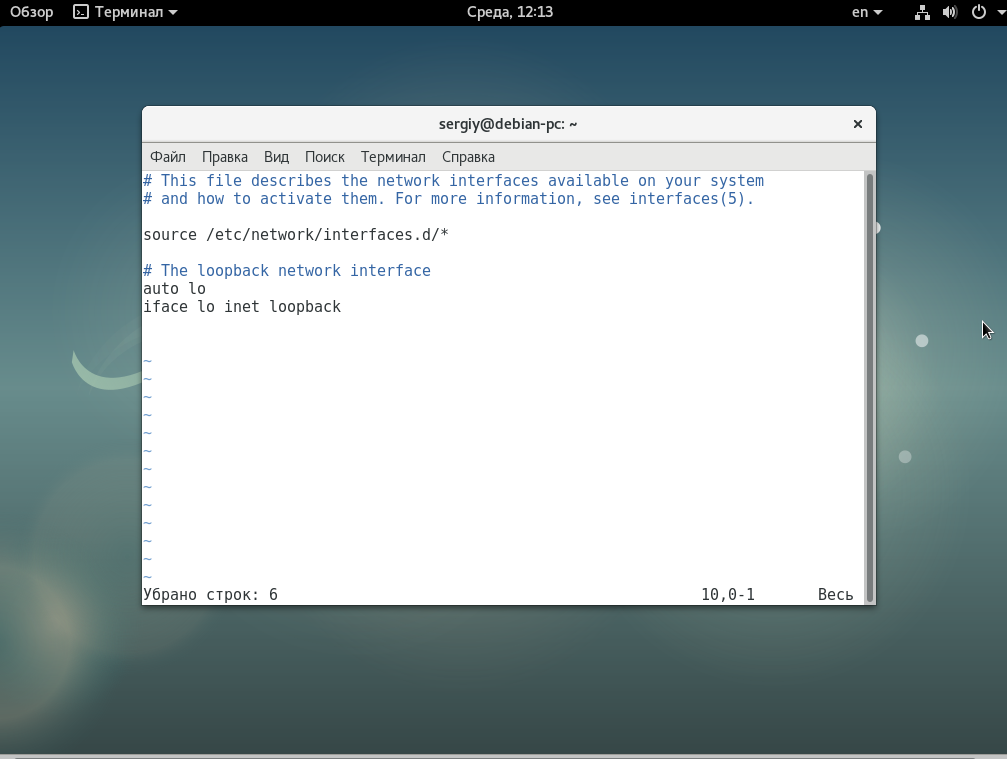
3. Настройка сетевого интерфейса
Для настройки сетевых интерфейсов в операционных системах, основанных на Debian, используется файл /etc/network/interfaces. Здесь должно находится описание для каждого интерфейса, способ получения IP а другие параметры. В одном файле может быть настроено несколько интерфейсов. Описание каждого интерфейса начинается со слова auto после которого идет имя интерфейса.
Это означает, что указанный интерфейс должен быть запущен при выполнении ifup с опцией -a, именно она используется при инициализации системы. После строки auto идут другие строки настроек, которые касаются именно этого интерфейса. Вот так, например, выглядит строка для включения локального интерфейса:
auto lo;
Перед тем как рассматривать все более подробно, поговорим про опции, которые можно использовать:
- pre-up — выполнить команду перед запуском интерфейса;
- post-up — выполнить команду после запуска интерфейса;
- up — выполнить команду при запуске интерфейса;
- pre-down — команда перед отключением;
- post-down — команда после отключения;
- iface — указывает имя интерфейса;
- inet — указывает
- description — создать имя синоним для устройства;
- address — устанавливает ip адрес для статического соединения;
- netmask — установка маски сети;
- broadcast — широковещательный адрес;
- metric — приоритет для шлюза по умолчанию;
- gateway — шлюз по умолчанию;
- hwaddress — установить MAC адрес;
- mtu — размер одного пакета.
Это далеко не все опции, которые можно использовать, но основные из них и уже с помощью этого можно настроить большинство из того, что нужно. Дальше рассмотрим различные варианты настройки интерфейсов, самый часто используемый на домашних компьютерах — это получение ip адреса по DHCP, в таком случае, ip адрес может меняться при каждом запуске. Рассмотрим его первым.
Настройка динамического IP
Мы будем получать IP адрес через DHCP сервер, оттуда же будут получены шлюзы и DNS сервер, поэтому для работы достаточно добавить две строчки. Например, настроем получение IP по DHCP для интерфейса eth0:
auto eth0

iface eth0 inet dhcp
Но если необходимо, то вы можете установить вручную ip адрес DNS сервера:
nameserver 8.8.8.8
Для локального интерфейса настройка будет выполняться таким образом:
auto lo

iface lo inet loopback
Здесь мы не получаем адрес по DHCP, но присваиваем локальный адрес 127.0.0.1.
Настройка статического IP адреса
Если вы хотите установить именно статический IP, то здесь все будет немного сложнее. Нам нужно знать не только этот свободный IP адрес, но и шлюз, маску сети и DNS сервер. Для настройки используется такой набор строк:
iface eth0 inet static

address 192.168.1.15

netmask 255.255.255.0

gateway 192.168.1.1

broadcast 192.168.0.255

dns-nameservers 8.8.8.8
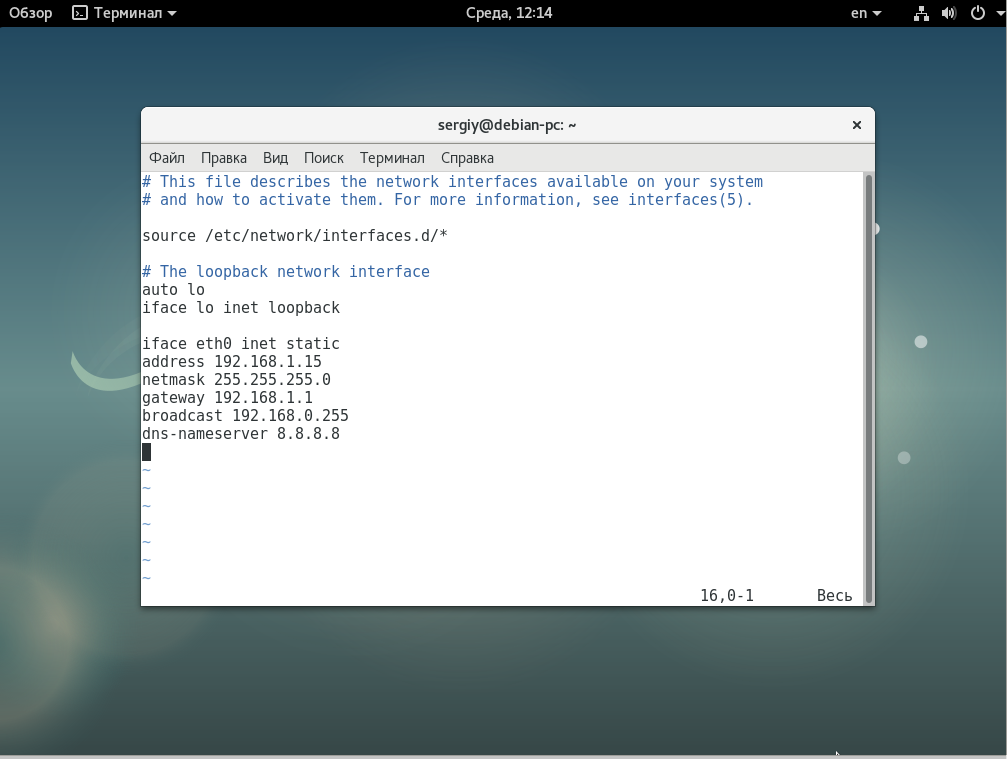
Здесь указывается, что мы будем использовать метод получения ip адреса static, а затем расписаны все параметры. Но это еще далеко не все, что можно сделать с помощью файла /etc/network/interfaces. Также вы можете создавать виртуальные интерфейсы.
Настройка виртуальных интерфейсов
В некоторых случаях нам может понадобиться создать виртуальный интерфейс. Это позволяет добавить еще один IP адрес к интерфейсу. Чтобы создать такой интерфейс достаточно дописать его номер после двоеточия:
auto eth0:0

iface eth0:0 inet static

address 192.168.1.101

netmask 255.255.255.0

gateway 192.168.1.1

dns-nameservers 8.8.8.8
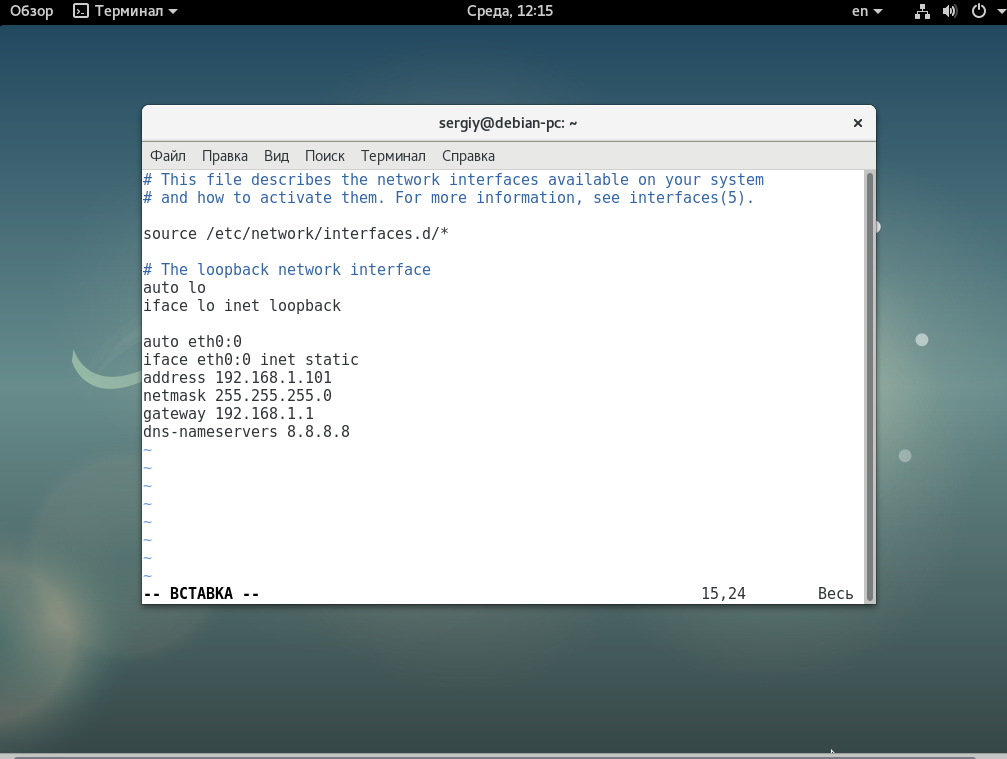
Имя интерфейса, для которого создается виртуальный интерфейс должно совпадать с реальным.
Настройка мостов
Сетевые мосты между виртуальными интерфейсами в системе позволяют настроить полноценный доступ к интернету из виртуальных машин. Они могут применяться для KVM,qemu,XEN и других конфигураций. Для настройки моста используйте:
auto br0

iface br0 inet static

address 192.168.1.20

network 192.168.1.0

netmask 255.255.255.0

broadcast 192.168.1.255

gateway 192.168.1.1

bridge_ports eth0

bridge_stp off

bridge_fd 0

bridge_maxwait 0

Здесь мы указываем имя интерфейса br0, дальше выполняем стандартную настройку получения статического IP адреса, затем связываем этот мост с интерфейсом eth0.
Перезагрузка сети
После внесения всех изменений необходимо перезапустить сеть, чтобы сетевые настройки debian вступили в силу, для этого наберите:
sudo systemctl restart networking
Выводы
В этой статье мы рассмотрели как выполняется настройка сети Debian 9. Конечно, это еще далеко не все, что возможно настроить, но с помощью этих команд можно в большинстве случаев заставить работать сеть. настройка сети из консоли debian дело сложное, в графическом интерфейсе все делается намного проще, с помощью NetworkManager все настраивается автоматически. Надеюсь, эта информация была полезной для вас.

Статья распространяется под лицензией Creative Commons ShareAlike 4.0 при копировании материала ссылка на источник обязательна .
![]()
Download Article
![]()
Download Article
- Debian, Ubuntu, & Linux Mint
- Red Hat, CentOS, & Fedora
- Video
- Tips
- Warnings
|
|
|
|
This wikiHow teaches you how to assign a new IP address to your computer when using Linux. Doing so can prevent connection issues for the item in question.
-

1
Verify your Linux version. Popular Debian-based Linux distributions include Ubuntu, Mint, and Raspbian versions.
-
2
Open Terminal. This is the command line app that’s the basis of all Linux distributions. Depending on your Linux version, you may have several ways of opening Terminal:
- Press Ctrl+Alt+T or Ctrl+Alt+F1 (if you’re on a Mac, substitute the ⌘ Command key for Ctrl.
- Click the text box at the top or bottom of the screen if possible.
- Open the Menu window and find the «Terminal» application, then click on it.
Advertisement
-
3
Switch to root. If you aren’t already logged into the «root» user directory, type in su and press ↵ Enter, then type in your root user password when prompted and press ↵ Enter.
- A «root» account is the Linux equivalent of an Administrator account on a Windows or Mac computer.
-
4
Bring up a list of your current Internet items. Type in ifconfig and press ↵ Enter to do so. You should see a list of item names appear on the left side of the window with their details listed on the right.
- The top item should be your current router or Ethernet connection. This item’s name is «eth0» (Ethernet) or «wifi0» (Wi-Fi) in Linux.
-
5
Find the item to which you want to assign an IP address. Note the name of the item that you want to change. You’ll find the name on the left side of the window.
- In most cases, this is the «eth0» or «wifi0» item.
-
6
Change the item’s IP address. Type in sudo ifconfig name ipaddress netmask 255.255.255.0 up—making sure to replace name with your item’s name and ipaddress with your preferred IP address—and press ↵ Enter.
- To assign an IP of «192.168.2.100» to your ethernet connection («eth0»), for example, you’d enter sudo ifconfig eth0 192.168.0.100 netmask 255.255.255.0 here.
-
7
Assign a default gateway. Type in route add default gw 192.168.1.1 and press ↵ Enter.[1]
-
8
Add a DNS server. Type in echo "nameserver 8.8.8.8" > /etc/resolv.conf and press ↵ Enter.
- If you have a different DNS server address that you would rather use, enter that in the place of 8.8.8.8.
-
9
Check your item’s new IP address. Enter the ifconfig command again, find your item, and look at the address to the right of the item’s name. You should see the IP address that you just assigned.


Advertisement
-
1
Verify your Linux version. Popular RPM-based Linux distributions include CentOS, Red Hat, and Fedora versions.
-
2
Open Terminal. This is the command line app that’s the basis of all Linux distributions. Depending on your Linux version, you may have several ways of opening Terminal:
- Press Ctrl+Alt+T or Ctrl+Alt+F1 (if you’re on a Mac, substitute the ⌘ Command key for Ctrl.
- Click the text box at the top or bottom of the screen if possible.
- Open the Menu window and find the «Terminal» application, then click on it.
-
3
Switch to root. If you aren’t already logged into the «root» user directory, type in su and press ↵ Enter, then type in your root user password when prompted and press ↵ Enter.
- A «root» account is the Linux equivalent of an Administrator account on a Windows or Mac computer.
-
4
Bring up a list of your current Internet items. Type in ip a to view your network connections.
-
5
Find the network connection that you want to change. This will normally be the Ethernet or Wi-Fi connection, which has an IP address currently listed on the right side of the window.
-
6
Switch to the network scripts directory. Type in cd /etc/sysconfig/network-scripts and press ↵ Enter.
-
7
Display the network options. Type in ls and press ↵ Enter. You should see your current connection’s name in the upper-left side of the network option results.
-
8
Open the network options for your connection. Type in vi ifcfg-network name and press ↵ Enter. Doing so will open the network’s properties in your Vi editor.
- For a network named «eno12345678», for example, you’d enter vi ifcfg-eno12345678 here.
-
9
Edit the network’s information. Change the following values:
- BOOTPROTO — Change dhcp to none
- Any IPV6 entry — Delete any IPV6 entries entirely by moving the cursor to the I on the left and pressing Del.
- ONBOOT — Change no to yes
-
10
Enter a new IP category. Press ↵ Enter to jump down one line from the ONBOOT category, type in
IPADDR=and enter the IP address that you want to use, and then press ↵ Enter.- For example: to use «192.168.2.23» as your IP address, you’d type in
IPADDR=192.168.2.23and press ↵ Enter.
- For example: to use «192.168.2.23» as your IP address, you’d type in
-
11
Enter netmask, gateway, and DNS information. To do so:[2]
- Type in
PREFIX=24and press ↵ Enter. You can also enterNETMASK=255.255.255.0here. - Type in
GATEWAY=192.168.2.1and press ↵ Enter. Substitute your preferred gateway address if different.
- Type in
-
12
Save and exit the file. You can use the File menu to do this, or you can type in :wq and press ↵ Enter.


Advertisement
Ask a Question
200 characters left
Include your email address to get a message when this question is answered.
Submit
Advertisement
Video
-
Some very specific Linux distributions will require you to go through a different process to assign an IP address. To see your specific distribution’s specifications, check online.
Thanks for submitting a tip for review!
Advertisement
-
Don’t forget to switch back to the regular (non-root) user account when you’re done.
Advertisement
About This Article
Thanks to all authors for creating a page that has been read 686,239 times.
Is this article up to date?
![]()
Download Article
![]()
Download Article
- Debian, Ubuntu, & Linux Mint
- Red Hat, CentOS, & Fedora
- Video
- Tips
- Warnings
|
|
|
|
This wikiHow teaches you how to assign a new IP address to your computer when using Linux. Doing so can prevent connection issues for the item in question.
-
1
Verify your Linux version. Popular Debian-based Linux distributions include Ubuntu, Mint, and Raspbian versions.
-
2
Open Terminal. This is the command line app that’s the basis of all Linux distributions. Depending on your Linux version, you may have several ways of opening Terminal:
- Press Ctrl+Alt+T or Ctrl+Alt+F1 (if you’re on a Mac, substitute the ⌘ Command key for Ctrl.
- Click the text box at the top or bottom of the screen if possible.
- Open the Menu window and find the «Terminal» application, then click on it.
Advertisement
-
3
Switch to root. If you aren’t already logged into the «root» user directory, type in su and press ↵ Enter, then type in your root user password when prompted and press ↵ Enter.
- A «root» account is the Linux equivalent of an Administrator account on a Windows or Mac computer.
-
4
Bring up a list of your current Internet items. Type in ifconfig and press ↵ Enter to do so. You should see a list of item names appear on the left side of the window with their details listed on the right.
- The top item should be your current router or Ethernet connection. This item’s name is «eth0» (Ethernet) or «wifi0» (Wi-Fi) in Linux.
-
5
Find the item to which you want to assign an IP address. Note the name of the item that you want to change. You’ll find the name on the left side of the window.
- In most cases, this is the «eth0» or «wifi0» item.
-
6
Change the item’s IP address. Type in sudo ifconfig name ipaddress netmask 255.255.255.0 up—making sure to replace name with your item’s name and ipaddress with your preferred IP address—and press ↵ Enter.
- To assign an IP of «192.168.2.100» to your ethernet connection («eth0»), for example, you’d enter sudo ifconfig eth0 192.168.0.100 netmask 255.255.255.0 here.
-
7
Assign a default gateway. Type in route add default gw 192.168.1.1 and press ↵ Enter.[1]
-
8
Add a DNS server. Type in echo "nameserver 8.8.8.8" > /etc/resolv.conf and press ↵ Enter.
- If you have a different DNS server address that you would rather use, enter that in the place of 8.8.8.8.
-
9
Check your item’s new IP address. Enter the ifconfig command again, find your item, and look at the address to the right of the item’s name. You should see the IP address that you just assigned.
Advertisement
-
1
Verify your Linux version. Popular RPM-based Linux distributions include CentOS, Red Hat, and Fedora versions.
-
2
Open Terminal. This is the command line app that’s the basis of all Linux distributions. Depending on your Linux version, you may have several ways of opening Terminal:
- Press Ctrl+Alt+T or Ctrl+Alt+F1 (if you’re on a Mac, substitute the ⌘ Command key for Ctrl.
- Click the text box at the top or bottom of the screen if possible.
- Open the Menu window and find the «Terminal» application, then click on it.
-
3
Switch to root. If you aren’t already logged into the «root» user directory, type in su and press ↵ Enter, then type in your root user password when prompted and press ↵ Enter.
- A «root» account is the Linux equivalent of an Administrator account on a Windows or Mac computer.
-
4
Bring up a list of your current Internet items. Type in ip a to view your network connections.
-
5
Find the network connection that you want to change. This will normally be the Ethernet or Wi-Fi connection, which has an IP address currently listed on the right side of the window.
-
6
Switch to the network scripts directory. Type in cd /etc/sysconfig/network-scripts and press ↵ Enter.
-
7
Display the network options. Type in ls and press ↵ Enter. You should see your current connection’s name in the upper-left side of the network option results.
-
8
Open the network options for your connection. Type in vi ifcfg-network name and press ↵ Enter. Doing so will open the network’s properties in your Vi editor.
- For a network named «eno12345678», for example, you’d enter vi ifcfg-eno12345678 here.
-
9
Edit the network’s information. Change the following values:
- BOOTPROTO — Change dhcp to none
- Any IPV6 entry — Delete any IPV6 entries entirely by moving the cursor to the I on the left and pressing Del.
- ONBOOT — Change no to yes
-
10
Enter a new IP category. Press ↵ Enter to jump down one line from the ONBOOT category, type in
IPADDR=and enter the IP address that you want to use, and then press ↵ Enter.- For example: to use «192.168.2.23» as your IP address, you’d type in
IPADDR=192.168.2.23and press ↵ Enter.
- For example: to use «192.168.2.23» as your IP address, you’d type in
-
11
Enter netmask, gateway, and DNS information. To do so:[2]
- Type in
PREFIX=24and press ↵ Enter. You can also enterNETMASK=255.255.255.0here. - Type in
GATEWAY=192.168.2.1and press ↵ Enter. Substitute your preferred gateway address if different.
- Type in
-
12
Save and exit the file. You can use the File menu to do this, or you can type in :wq and press ↵ Enter.
Advertisement
Ask a Question
200 characters left
Include your email address to get a message when this question is answered.
Submit
Advertisement
Video
-
Some very specific Linux distributions will require you to go through a different process to assign an IP address. To see your specific distribution’s specifications, check online.
Thanks for submitting a tip for review!
Advertisement
-
Don’t forget to switch back to the regular (non-root) user account when you’re done.
Advertisement
About This Article
Thanks to all authors for creating a page that has been read 686,239 times.
Is this article up to date?

If you are a regular Linux user or a system administrator, you might require to set up networking on your system. Unlike the desktop systems where you can use dynamic configurations, you will have to do specific configurations on servers depending upon your network environment. Dynamic configurations keep changing upon the server reboot so in some cases it becomes necessary to have static configurations for instance when a server needs to be remotely administered, or when a server is running an application or service that needs constant access. So, In this article, we will explain how you can set up a basic network in a Debian-based Linux OS. The basic setup includes setting a static IP, gateway, DNS, and hostname.
We have used Debian 11 OS for describing the procedure mentioned in this article.
View current network configuration
To view current network configurations, run the following command in Terminal. It will show the output for each interface in a separate section.
$ ip a

You can also run ifconfig command to view the IP address.
$ ifconfig

Run the below command in Terminal to find DNS server IP:
$ cat /etc/resolv.conf
Basic network configuration includes setting a static or dynamic IP address, adding a gateway, DNS server information. There are different ways to configure the network on Debian OS.
Method 1: Use ifconfig and route command
In this method, we will see how to configure network settings. However, remember, these settings will not be permanent. Once you reboot your system, the settings will be removed.
1. Assign an IP address to the interface
We will use ifconfig to assign an IP address to our network interface. Below is the syntax of the command:
$ sudo ifconfig <interface> <IP_address> netmask <subnetmask> up
In the following example, the command assigns the IP address 192.168.72.165 to the network interface eth0. The network mask is 24 (255.255.255.0) bits.
$ sudo ifconfig eth0 192.168.72.165 netmask 255.255.255.0 up
![]()
2. Set the Default Gateway
The default gateway is the address used to communicate with the outside network. To configure the default gateway, use the following command syntax:
$ sudo route add default gw <IP_address> <interface>
In the following example, I am using 192.68.72.2 as my default gateway address.
$ sudo route add default gw 192.168.72.2 eth0

3. Set Your DNS server
DNS server resolves a domain name to an IP address so the browser can load Internet resources. To configure the DNS name server address, use the following command syntax:
$ echo “nameserver <IP_address>” > /etc/resolv.conf
In the following example, I am setting Google’s public DNS IP address as my nameservers address that is 8.8.8.8.
$ echo “nameserver 8.8.8.8” > /etc/resolv.conf
![]()
Once done, you can test your configuration by running the ifconfig command as follows: 
Remove IP address from a network interface
To remove an IP address from a network interface, run the following command in Terminal:
$ ip address del <IP_address> dev <interface>
Method 2: Change network settings by using the interfaces file
In this method, we will configure permanent network settings that your system will remember even after a reboot. For that, we will have to edit /etc/network/interfaces file using any text editor. Run the following command in terminal to do so:
$ sudo nano /etc/network/interfaces
Then add the following lines in it:
auto eth0

iface eth0 inet static

address 192.168.72.165

netmask 255.255.255.0

gateway 192.168.72.2
Now press Ctrl+O and then Ctrl+X to save and exit the file.

Please note that the address, netmask and gateway line must start with leading whitespace! In case, you want to dynamically assign the address, use the following lines:
auto eth0
iface eth0 inet dhcp
Defining the (DNS) Nameservers
To add DNS server information, we will need to edit the /etc/resolv.conf file. Run the following command to do so:
$ nano /etc/resolv.conf
I am adding here two Nameservers. One is Google’s public DNS server address and the other is my router’s IP address.
nameserver 8.8.8.8
nameserver 192.168.72.2
Now press Ctrl+O and then Ctrl+X to save and exit the file.

Once done, you can verify the IP address using ip a or ifconfig command.

Method 3: Change network configuration through Debian GUI
In this method, we will use the graphical way for configuring the basic network settings.
To do so, hit the windows button on your keyboard, then in the search bar type settings. From the results that appear, open the Settings. Then on the left sidebar, click on the Network tab. After that, click on the gear icon of the interface that you want to configure.

Go to IPv4 tab. Choose Manual and enter the IP address, netmask, gateway, and DNS.

In case you want to dynamically assign the IP address, choose the Automatic (DHCP) option and enter the DNS information.

Once done, click on Apply to save the changes.
Setting up Hostname
Just like the IP address, a unique hostname is also used to recognize a system on a network. To find the current hostname of your system, run the below command in Terminal:
$ hostname

To change the hostname of the system, you can run the below command. But once you reboot your system, your original hostname will be restored.
$ hostname host_name
I am changing here my hostname from Debian to Debian10.
![]()
To permanently change the host name, you perform will need to edit hostname file located at /etc/hostname. Enter the below command to do so:
$ sudo nano /etc/hostname

This file contains only the hostname of the file, change the old name to your desired name, and then press Ctrl+O and Ctrl+X to save and exit.
Some other useful commands you might require while setting up a network in a Debian OS:
Ping
It can be used to test connectivity between two systems on aLAN or WAN. To test connectivity to a device, type ping followed by IP or host name of that device:
$ ping <IP or hostname>
Arp:
Arp is used to translate IP addresses into Ethernet addresses. To print arp table, type:
$ arp –a
Route
It is used to display the routing table of a Linux system.
$ route
Host
It translates host names to IP addresses and vice versa.
To find IP against a specified domain:
$ host domain_name
To find a domain name against the specified IP address.
$ host IP_address
Enable and disable the interface
To enable up the interface, use:
$ ifup <interface>
To bring down the interface, use:
$ ifdown <interface>
That is all there is to it! In this article, we have explained how to setup a basic network in Debian OS. We have discussed different methods including the graphical and command-line based. You can choose the one that you find more easy and convenient.