Прочитано:
4 944
В данной заметке я покажу, что нужно прописать в системе «Red Hat Enterprise Linux 6.4» чтобы настроить статический IP – адрес на сетевом интерфейсе. Данная заметка в последующем будет необходима, когда я буду описывать, как настроить «VMware vCloud«, а сейчас небольшая подготовка.
Поэтому, начнем:
[root@server ~]# nano /etc/sysconfig/network-scripts/ifcfg-eth0
DEVICE=eth0
HWADDR=08:00:27:15:34:8E
TYPE=Ethernet
UUID=f409448a-127d-4b10-9e6e-d2c737b00525
ONBOOT=YES
NM_CONTROLLED=yes
BOOTPROTO=none
IPADDR=192.168.1.58
NETMASK=255.255.255.0
DNS=192.168.1.1
Сохраняем внесенные изменения:
если в системе две сетевые карточки то файлы будут различаться, поэтому следует редактировать уже другой:
- /etc/sysconfig/network-scripts/ifcfg-eth0: First Ethernet card configuration file
- /etc/sysconfig/network-scripts/ifcfg-eth1: Second Ethernet card configuration file
, кратко поясню назначение директив:
DEVICE = eth0 – именование сетевого адаптера в система, может (eth1 – вторая сетевая карта и т.д)
HWADDR = MAC-адрес сетевой карточки (зашит в сетевую карточку аппаратно)
ONBOOT = YES – подгружать карточку при перезагрузке системы
BOOTPROTO = none – использовать статический адрес
IPADDR = IP-адрес назначаемый сетевому адаптеру в сети
NETMASK = сетевая маска для обслуживаемой сети
DNS = DNS—сервер в обслуживаемой сети (может быть, домен контроллером, Вашим интернет центром на подобии Zyxel Keenetic Giga 2, Zyxel Keenetic Lite и т.д.)
Далее отредактируем файл /etc/sysconfig/network добавив строку с IP-адресом шлюза через который происходит связь с внешним миром или другими сетями (может быть таким же как и DNS-сервер выше):
[root@server ~]# nano /etc/sysconfig/network
NETWORKING=yes
HOSTNAME=server
GATEWAY=192.168.1.1
Пропишем IP-адрес DNS-сервера в файл /etc/resolv.conf:
[root@server ~]# nano /etc/resolv.conf
nameserver 192.168.1.1
Чтобы сетевые настройки применились системой следует рестартовать службу по управлению сетью:
[root@server ~]# service network restart
Shutting down interface eth0: [ OK ]
Shutting down loopback interface: [ OK ]
Bringing up loopback interface: [ OK ]
Bringing up interface eth0: [ OK
Для проверки правильности настройки сетевого интерфейса можно задействовать команду ping до ресурса, к примеру DNS и GATEWAY адресов:
[root@server ~]# ping 192.168.1.1
PING 192.168.1.1 (192.168.1.1) 56(84) bytes of data.
64 bytes from 192.168.1.1: icmp_seq=1 ttl=64 time=0.042 ms
Вот собственно и всё, что нужно сделать что заставить работать сетевую карточку в rhel 6.4. На этом всё и удачи. С уважением, ekzorchik.
Configuring a static IP address for your Linux distribution is a fundamental task and should be completed in few easy steps. With the release of RHEL 8 public beta, you can now configure your network interface in a few different ways using NetworkManager utilities.
In this tutorial we are going to show you few different ways to set a static IP address on RHEL 8 installation. Note that this article presumes, that you already know the network settings that you wish to apply for your system.
1. How to Configure Static IP Using Network Scripts Manually
You can configure a static IP address the old fashioned way by editing:
/etc/sysconfig/network-scripts/ifcfg-(interface-name)
In my case the file is named:
/etc/sysconfig/network-scripts/ifcfg-enp0s3
To find your network interface name, you can use the following nmcli command.
# nmcli con

To edit the file simply use your favorite editor and open the file:
# vim /etc/sysconfig/network-scripts/ifcfg-enp0s3
ifcfg-enp0s3 Configuration
TYPE="Ethernet"
BOOTPROTO="none"
NAME="enp0s3"
IPADDR="192.168.20.150"
NETMASK="255.255.255.0"
GATEWAY="192.168.20.1"
DEVICE="enp0s3"
ONBOOT="yes"
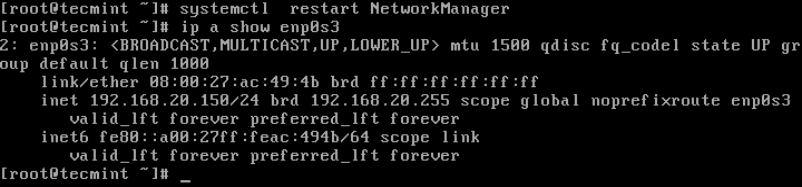
Then restart the NetworkManager with:
# systemctl restart NetworkManager
Alternatively, you can reload the network interface by using:
# nmcli con down enp0s3 && nmcli con up enp0s3
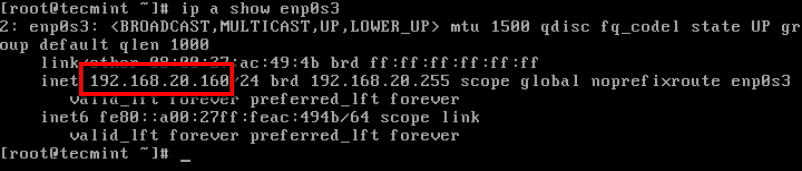
Now you can then check the new IP address using ip command as shown.
# ip a show enp0s3
2. How to Configure Static IP Using Nmtui Tool
Another way to configure static IP address for your RHEL 8 is by using nmtui tool, is a text user interface (TUI). To use it simply type the following command in your terminal.
# nmtui
This is will launch the program:
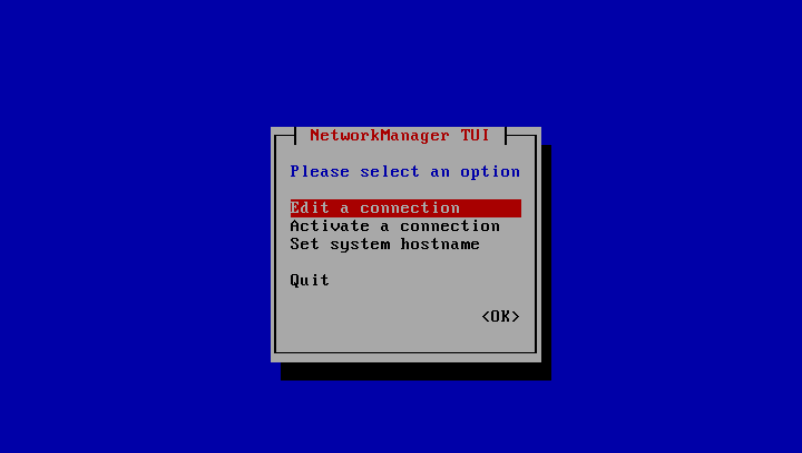
Choose to edit a connection, then select the interface:
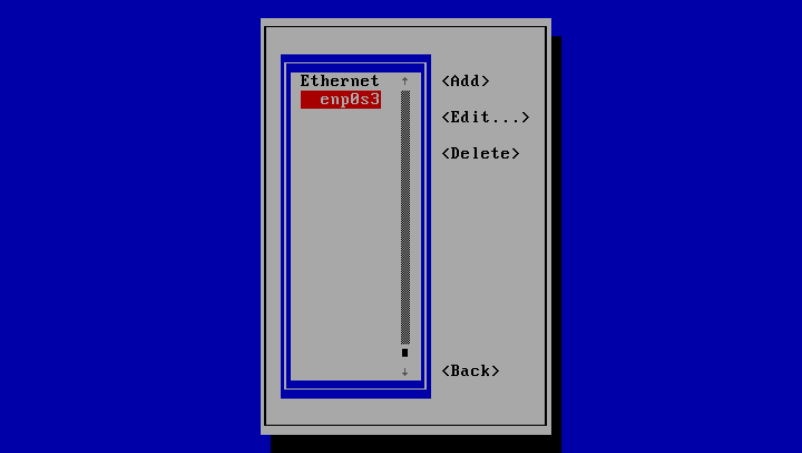
In the next window you will be able to edit the network interface settings by moving the cursor with the arrow keys on your keyboard:

In this example, I have changed my IP address from 192.168.20.150 to 192.168.20.160. To save the changes scroll down to the end of the page and select OK.
Then reload the network interface by choosing “Activate a connection”:
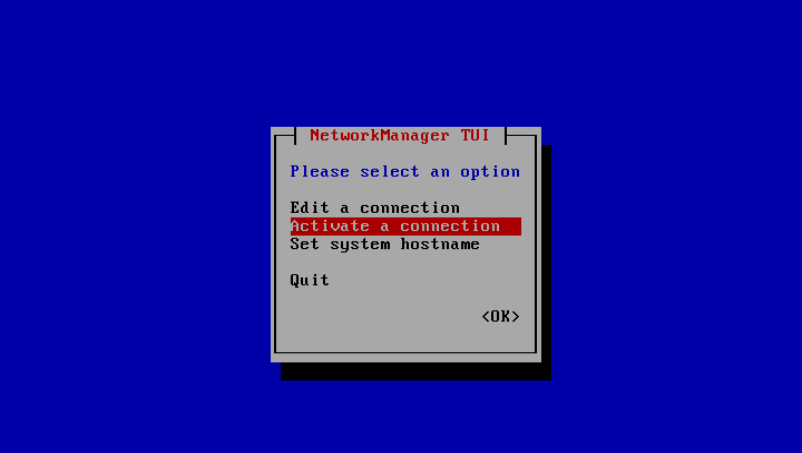
Then choose the connection name and select <Deactivate>:
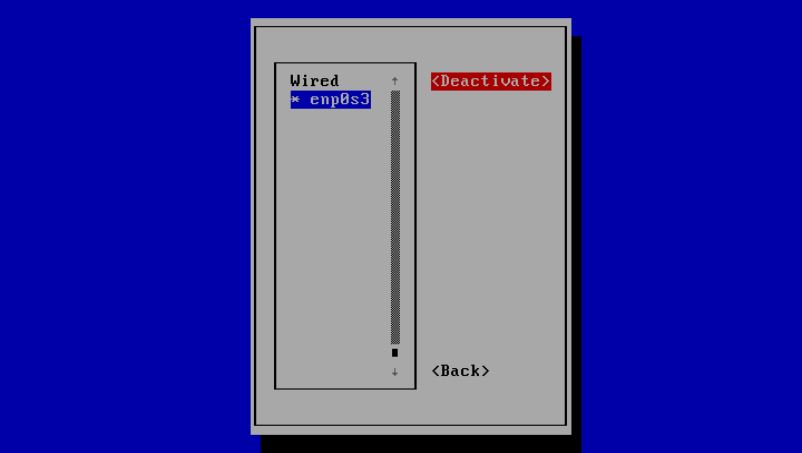
And now select <Activate> to activate the interface with the new settings you have given it.

Then select <Back> to return to the main menu and then select “Quit” to exit.

Verify that the new IP address settings have been applied with:
# ip a show enp0s3
3. How to Configure Static IP Using Nmcli Tool
Nmcli is a NetworkManager command line interface that can be used for obtaining information or configuring a network interface.
If you want to set a static IP address, you can use the following options:
Set the IP address for interface enp0s3 on RHEL 8.
# nmcli con mod enp0s3 ipv4.addresses 192.168.20.170/24
Set the gateway on RHEL 8:
# nmcli con mod enp0s3 ipv4.gateway 192.168.20.1
Inform the interface that it is using manual configuration (not dhcp etc.).
# nmcli con mod enp0s3 ipv4.method manual
Configure DNS:
# nmcli con mod enp0s3 ipv4.dns "8.8.8.8"
Reload the interface configuration:
# nmcli con up enp0s3

Your changes will be saved in /etc/sysconfig/network-scripts/ifcfg-.
Here is the configuration file that has been generated for me:
# cat /etc/sysconfig/network-scripts/ifcfg-enp0s3
ifcfg-enp0s3 Configuration
TYPE="Ethernet"
BOOTPROTO="none"
NAME="enp0s3"
IPADDR="192.168.20.170"
NETMASK="255.255.255.0"
GATEWAY="192.168.20.1"
DEVICE="enp0s3"
ONBOOT="yes"
PROXY_METHOD="none"
BROWSER_ONLY="no"
PREFIX="24"
DEFROUTE="yes"
IPV4_FAILURE_FATAL="no"
IPV6INIT="no"
UUID="3c36b8c2-334b-57c7-91b6-4401f3489c69"
DNS1="8.8.8.8"
Conclusion
In this tutorial you have seen how to configure a static IP address with network scripts, nmtui and nmcli utilities in RHEL 8. If you have any questions or comments, please do not hesitate to submit them in the comment section below.
If You Appreciate What We Do Here On TecMint, You Should Consider:
TecMint is the fastest growing and most trusted community site for any kind of Linux Articles, Guides and Books on the web. Millions of people visit TecMint! to search or browse the thousands of published articles available FREELY to all.
If you like what you are reading, please consider buying us a coffee ( or 2 ) as a token of appreciation.

We are thankful for your never ending support.
How to change IP Address on Linux Redhat
April 20, 2008
IT Support
Most of the time, I work in Windows environment. But I sometimes have to work on Linux platform, too. So I decide to note it down this topic to remind myself.
There are many ways to change IP Address on Linux. First one is the easiest way that configure on GUI because it’s like on Windows platform. The second way is configure on command-line but it is only temporary, it’ll reload to the old configuration when the network service is restart. And the last one is also configure on command-line to change IP Address permanently.
Section
- Configure on GUI (Permanently)
- Configure on commad-line (Temporary)
- Configure on commad-line by edit configuration file (Permanently)
Step-by-step to change IP Address on Linux RedHat
Configure on GUI (Permanently)
- Select Application -> System Settings ->Network.

- On Network Configuration and Devices tab, you’ll see available network card on the PC. In this example, the PC has 1 network interface card (NIC) and it’s currently inactive. Double click on the network interface card (NIC) that you want to configure to open its property.

- On Ethernet Device, you can configure the NIC to be either DHCP or static IP Address. When you finish, click OK.

- There is a pop-up message ask for activate the NIC. Click Yes to enable the NIC.

- The NIC will be restarted to reload the new configurations and the NIC is active now.


Back to top
Configure on commad-line (Temporary)
Note: This way change IP Address only temporary. When you restart network service, it’ll load from configuration file to replace this configuration.
- Open Terminal.
- Type
ifconfig -a
to list all network interface card on the current PC.

- Type
ifconfig eth0 192.168.125.10 netmask 255.255.255.0 up
to configure IP Address on interface eth0.

-
Note: To configure gateway, type
route add default gw [gateway address].


Back to top
Configure on commad-line by edit configuration file (Permanently)
- Open Terminal.
- Open network configuration file. In this example, it’ll configure on interface eth0. Type
vi /etc/sysconfig/network-scripts/ifcfg-eth0

- The current configuration is DHCP.

- Modify the file by press ‘i’ to enter insert mode. Change BOOTPROTO to static and add IP Address and Net mask as new lines if they’re not existed yet..
BOOTPROTO=static
IPADDR=192.168.125.10
NETMASK=255.255.255.0Save the configuration file by press ESC + ‘:’ and type ‘wq’ to write and quit the editor.

- You can added these configuration to the config file. Replace [number] with your actual value.
GATEWAY=[number]
TYPE=Ethernet
NETWORK=[number]
BROADCAST=[number] - Restart the network interface card. Type
service network restart

- Review the configuration. Type
ifconfig
. The IP Address has been changed permanently.


Back to top
You can use any one of the following methods to change the hostname and/or ip-address on RedHat related distributions.
If you want to change only the hostname you can either do it from command line, or from GUI as explained below.
To change the ip-address along with the hostname, follow the steps shown below.
I. Change HostName From Command Line
1. Use hostname command to Change Hostname
In this example, we’ll change the hostname from dev-server to prod-server.
hostname command by default will display the current hostname as shown below:
# hostname
dev-server
The following will change the hostname to prod-server.
# hostname
prod-server
Once the hostname is changed, verify that it has changed the hostname successfully. As you see below, it has changed the hostname to prod-server
# hostname prod-server
2. Modify the /etc/hosts file
If you have entries in the /etc/hosts file with the old hostname, you should modify it.
For example, the entry for 127.0.0.1 line in the /etc/hosts file will still show the old hostname. In this example, it shows as dev-server.
$ cat /etc/hosts
127.0.0.1  dev-server localhost.localdomain localhost
Modify this file, and set the new hostname here. For example, change dev-server to prod-server as shown below.
$ cat /etc/hosts
127.0.0.1  prod-server localhost.localdomain localhost
3. Modify the /etc/sysconfig/network file
The /etc/sysconfig/network file also has an entry for HOSTNAME. Change the value here as shown below.
# cat /etc/sysconfig/network
NETWORKING=yes
HOSTNAME=prod-server
4. Restart the Network
Restart the network service, if you want any other services that are using the hostname to pickup the changes.
# service network restart
Shutting down interface eth0:        [  OK  ]
Shutting down loopback interface:   [  OK  ]
Bringing up loopback interface:     [  OK  ]
Bringing up interface eth0:          [  OK  ]
If this is not a production system, you can also reboot the system to make sure the hostname is changed properly, and the system is picking it up properly during startup.
II. Change Hostname from UI
If you have desktop related utilities installed on your system, you can change the hostname from the GUI.
Execute system-config-network from the command line.
# system-config-network
This will display the “Network Configuration” GUI. Go to the “DNS” tab and change the hostname from here as shown below.

III. Change the IP-Address
1. Change ip-address Temporarily Using ifconfig
You can change the ip-address of the server using ifconfig command as we discussed earlier. For example, the following changes the ip-address of the server on eth0 interface to 192.168.1.2
# ifconfig eth0 192.168.1.2
2. Change ip-address Permanently
Under the /etc/sysconfig/network-scripts directory, you’ll see file for every network interface on your system. For example, if your interface is “eth0”, you’ll see ifcfg-eth0 file under this directory.
Modify the ifcfg-eth0 file and change the IPADDR field accordingly as shown below to change the ip-address.
# vi /etc/sysconfig/network-scripts/ifcfg-eth0
DEVICE="eth0"
BOOTPROTO=none
NM_CONTROLLED="yes"
ONBOOT=yes
TYPE="Ethernet"
UUID="11111-2222-3333-4444"
IPADDR=192.168.1.2
PREFIX=24
GATEWAY=192.168.1.1
DEFROUTE=yes
IPV4_FAILURE_FATAL=yes
IPV6INIT=no
NAME="System em1"
HWADDR=DD:BB:DD:AA:11:55
3. Modify /etc/hosts file
If you’ve defined the ip-address in the /etc/hosts file, make sure to change those also. For example, if you have a FQDN that was pointing to the old ip-address in the /etc/hosts file, change it to the new ip-address. Depending on how you’ve configured your system, you might not have to do this step.
$ vi /etc/hosts
127.0.0.1               prod-server localhost.localdomain localhost
192.168.1.2             prod-server.mydomain.com
4. Restart the Network
Finally, restart the network service, for the system to pick-up the changes.
# service network restart
Shutting down interface eth0:        [  OK  ]
Shutting down loopback interface:   [  OK  ]
Bringing up loopback interface:     [  OK  ]
Bringing up interface eth0:          [  OK  ]
If this is not a production system, you can also reboot the system to make sure the hostname and ip-address is changed properly, and the system is picking it up properly during startup.