Вступление
Несколько месяцев назад я писал об установке и настройке слушающего сервера Garry’s Mod. В данном HOWTO я подробно напишу как скачать, установить и настроить выделенный (Dedicated) сервер Garry’s Mod. Мы подробно рассмотрим установку админки, расширений и плагинов.
Внимание! Статья обновлена 20.07.2013. В связи с переходом игры Garry’s Mod на новую систему контента, сервер теперь необходимо загружать и обновлять через SteamCMD. Обновление ранее скачанного через hldsupdatetool сервера до нового невозможно — сделайте резервную копию каталогов аддонов, конфигов и т.д. и загрузите сервер заново.
Техническая часть
- Чтобы к Вам могли подключаться клиенты, Вы должны иметь «белый» IP-адрес, т.е. видимый из Интернета. Создание сервера с «серым» IP, либо с жёстким NAT’ом провайдера не имеет смысла, т.к. подключиться к такому серверу никто не сможет (кроме находящихся с Вами в одной подсети).
- Если у Вас ADSL, вы должны пробросить порт, на котором будет установлен сервер, по протоколу UDP (для подключения клиентов) и TCP (для удалённого администрирования (rcon)) в настройках своего роутера (модема). Обычно проброс портов настраивается в веб-интерфейсе роутера в разделе NAT – Port Forwarding или NAT – Virtual Servers.
- На сервере главное – скорость отдачи от Вас клиентам, а также мощность процессора Вашего компьютера. На ADSL максимальная отдача может составлять около 780 Кбит/с – 1 МБит/с (на ADSL с модуляцией AnnexM (такая разновидность встречается крайне редко) – 3 Мбит/с). Если у Вас тариф на 256 КБит/с, то к Вам могут подключиться 6 клиентов. Если 512 – 10-12 клиентов, если 1 Мбит и более (ADSL) – 18 клиентов, кабель без NAT – 23 клиента (максимум для слушающего сервера). В соотвествие с этими параметрами Вы должны настроить значение переменной «Максимальное число игроков» во время создания сервера. Если Ваш канал или процессор не будут выдерживать такое количество подключившихся игроков, у всех появятся лаги.
Внимание! Не создавайте сервер на большое количество пользователей, т.к. это может вызывать серьёзные лаги.
Установка выделенного сервера
- Скачайте SteamCMD с официального сайта по ссылке: http://media.steampowered.com/installer/steamcmd.zip.
- Распакуйте скачанный SteamCMD в папку по умолчанию C:SteamCMD (в пути не должно быть пробелов и русских букв).
- Создайте папку, в которую Вы будете устанавливать выделенный сервер Garry’s Mod. Рекомендуем устанавливать в корень диска чтобы не было проблем с пробелами в путях. Также в пути не должно быть русских букв (допустимы только латинские буквы, цифры и символ подчёркивания). Рекомендуем: C:srcds, где вместо C: подставьте букву любого диска с достаточным количеством свободного места (установленный сервер Garry’s Mod с плагинами требует минимум 4 ГБ).
- Перейдите в созданную на предыдущем шаге папку папку и создайте в ней файл update.cmd (можно update.bat). В этот файл впишите следующее:
@echo off
C:SteamCMDsteamcmd.exe +login anonymous +force_install_dir C:/srcds +app_update 4020 validate +quit
pause
Здесь C:SteamCMD — путь к установленному SteamCMD, а c:srcds — каталог, в который будем устанавливать сервер.
- Запускайте созданный файл update.cmd на выполнение. При первом запуска будет произведено автоматическое обновление утилиты обновления, затем начнётся скачивание и установка выделенного сервера.

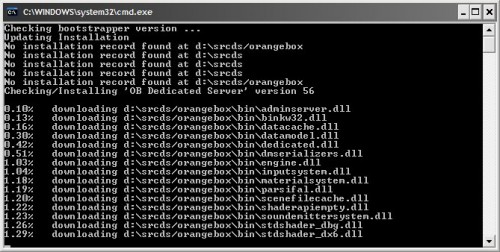
Автоматическое обновление hldsupdatetool 
Скачивание выделенного сервера - По окончании скачивания (зависит от скорости Вашего Интернет-соединения; сервер весит около 900 МБ), перейдите в каталог с:srcdsorangebox, где с:srcds — это каталог установки выделенного сервера и создайте там файл launch.cmd (или launch.bat) с текстом:
start /high srcds.exe -console -game garrysmod -port 27015 -maxplayers 12 +map gm_flatgrass
Здесь -port 27015 — порт, на котором будет «висеть» сервер (UDP/TCP), -maxplayers 12 — максимальное количество игроков на данном сервере, +map gm_flatgrass — карта, с которой запустится сервер. Если требуется автоматически перезапускать сервер при ошибках/падениях, то вместо предыдущего текста, впишите следующий:
@echo off
cls
echo Protecting srcds from crashes…
echo If you want to close srcds and this script, close the srcds window and type Y depending on your language followed by Enter.
title srcds.com Watchdog
: srcds
echo (%time%) srcds started.
start /wait srcds.exe -console -game garrysmod -port 27015 -maxplayers 12 +map gm_flatgrass
echo (%time%) WARNING: srcds closed or crashed, restarting.
goto srcds
- Запустите сервер созданным файлом launch.cmd или launch.bat.
- Сервер успешно установлен.

Сервер был установлен, но, к сожалению, пока он не пригоден для использования. Нужно его настроить.
- Установите джентльменский набор плагинов из svn для Garry’s Mod, так, как описано в этой статье вручную или автоматически (устанавливать плагины Вы должны в каталог c:srcdsorangeboxgarrysmodaddons, где c:srcds — каталог установки выделенного сервера. Всю информацию по установке и сами скрипты установки/обновления плагинов Вы найдёте по этой ссылке. Обязательно установите ULX, U-Lib и U-Restrict.
- Скачайте и распакуйте архив с файлами конфигурации сервера в папку c:srcdsorangeboxgarrysmodcfg, где c:srcds — путь установки сервера.
- Откройте файл c:srcdsorangeboxgarrysmodcfgserver.cfg в любом текстовом редакторе и внесите в него правки: измените имя сервера (переменная hostname), смените rcon-пароль (rcon_password) и т.д. В файле я всё подробно описал какая переменная чем управляет, что включает/выключает, поэтому на этом я останавливаться не буду здесь. Внимание! Первым делом задайте пароль вместо !!!CHANGEME!!!, иначе Ваш сервер могут взломать.
- Сделайте себя и, если нужно, своих друзей администраторами свежесозданного сервера (обязательно, иначе ULX-админка не даст Вам доступа). Чтобы сделать себя админом, нужно узнать Ваш личный SteamID и выбрать автоматический или ручной способ:
- Автоматический способ. Запустите сервер (ULX и U-Lib должны быть установлены), запустите клиент Garry’s Mod и зайдите на свой сервер с помощью команды connect ВАШ_ВНЕШНИЙ_IP:ПОРТ. Сверните Garry’s Mod и перейдите в консоль сервера, введите в консоли сервера
ulx adduser ВАШ_НИК superadmin
где ВАШ_НИК — это Ваш ник в Steam (при наличии пробелов в нике кавычки обязательны; допускаются только латинские буквы, цифры и знак подчёркивания). ULX автоматически пропишет этого пользователя в админы сервера.
- Ручной способ. В любом текстовом редакторе откройте файл с:srcdsorangeboxgarrysmodsettingsusers.txt. В этот файл прописываются администраторы сервера по SteamID. Найдите в этом файле раздел “superadmin” и после строки
//”garry” “STEAM_0:1:7099
впишите свою в виде
“ВАШ_НИК” “STEAM_0:1:XXXXXXXXX”
где ВАШ_НИК – это ник админа, который будет в списке вывода админов сервера (здесь разрешено вводить только латинские буквы и цифры без пробелов; кавычки обязательны), а STEAM_0:1:XXXXXXXXX – это Ваш SteamID (замените на настоящий, естественно 😉 ), полученный на 3 шаге.
- Автоматический способ. Запустите сервер (ULX и U-Lib должны быть установлены), запустите клиент Garry’s Mod и зайдите на свой сервер с помощью команды connect ВАШ_ВНЕШНИЙ_IP:ПОРТ. Сверните Garry’s Mod и перейдите в консоль сервера, введите в консоли сервера
- Обязательно установите плагин Simple Prop Protection из SVN отсюда:
- Пробуйте запустить сервер и зайти на него с помощью клиента Garry’s Mod. Вызовите админку командой ulx admin. Если всё пройдёт успешно, сервер был успешно настроен и готов к приёму игроков.
Мини-FAQ по серверу Garry’s Mod
Q: Как запретить выдавать игрокам оружие (давать только Physgun, грави-ган, тулган и скриншотган)?
A: Установите плагин U-Restrict (если Вы устанавливали с помощью наших скриптов, то он уже установлен и автоматически активирован).
Q: Как изменить сообщение, которое появляется при заходе на созданный сервер Garry’s Mod?
A: Отредактируйте файл с:srcdsorangeboxgarrysmoddataulxmotd.txt. Это обычный HTML-файл.
Q: Куда пишутся сокращённые логи админки?
A: Логи админки ULX пишутся в с:srcdsorangeboxgarrysmoddataulx_logsДАТА.txt, где ДАТА – сегодняшняя дата в формате ММ-ДД-ГГ.
Q: Мне нужно выдавать игрокам при подключении к серверу определённое оружие. Как это сделать?
A: Как уже писалось выше, нужен плагин U-Restrict для админки (если Вы устанавливали набор плагинов с помощью наших скриптов, он уже установлен). Итак, чтобы выдать нужное оружие, откройте файл с:srcdsorangeboxgarrysmoddataURestrictloadouts.txt в любом текстовом редакторе и в разделе loadout после gmod_tool введите полное имя нужного оружия, например weapon_smg. Это оружие будет автоматически выдано игроку после подключения к серверу, а также после его респауна.
Q: Как мне добавить контент других Source-игр для использования на моём сервере?
A: Чтобы контент других игр стал доступен в Garry’s Mod всем играющим, его необходимо установить через SteamCMD. Приведу пример для контента CSS и TF2:
- Скачиваем в отдельную папку сервер Counter-Strike: Source или любой другой игры, поддерживаемой Garry’s Mod, следующей командой (папку, в которую будем скачивать, должна быть создана заранее, иначе установка и скачивание не начнётся). Команда для скачивания сервера Counter-Strike: Source:
C:SteamCMDsteamcmd.exe +login anonymous +force_install_dir C:/cssserver +app_update 232330 validate +quit
Команда для скачивания сервера Team Fortress 2:
C:SteamCMDsteamcmd.exe +login anonymous +force_install_dir C:/tf2server +app_update 232250 validate +quit
- После полного завершения, заходим в папку скачанного сервера и перемещаем папку «cstrike» (для Counter-Strike: Source) или «tf«, «dods«, «hl2mp» (для других игр) в папку C:srcdsorangebox (не «garrysmod»), где C:srcds — папка установки сервера Garry’s Mod.
- Открываем файл garrysmodcfgmount.cfg в текстовом редакторе и вносим в него правки. Пример для TF2 и CSS:
"mountcfg" { "cstrike" "C:srcdsorangeboxcstrike" "tf" "C:srcdsorangeboxtf" } - Перезапускаем сервер Garry’s Mod. Контент установлен и доступен всем играющим.
- Папку со скачанным сервером другой игры, из которой мы взяли контент, можно удалить.
- Ich Schlange
- 🤣Какой еблан уморительно поставил?
- 28 Март 2021
Чтобы сделать свой сервер
на локальной основе
нам нужно:
-
Создать папку где будет лежать основа сервера. ( можете хоть где создать, у меня лично на локальном диске)
-
Создали? Теперь нужно скачать SteamCMD, затем распаковываем это все в созданную в п.1 папку и запускаем steamcmd.exe
- После скачивания и обновление у вас будет пустое поле ввода

- Туда вводим следующие значения: и мы заходим на сервера STEAM
- Теперь надо скачать GarrysModDS, также вводим в пустое поле следующую команду:
Конечно можно делать сервер и для других игр, но нам нужен все таки Garry`s Mod, поэтому вводим код 4020
Список серверов И ждем когда скачаются все файлы (оооо как это доооолго!)
- После скачивания необходимого, переходим по директориям steamapps/common/GarrysModDS и мы видим основу сервера

- Для упрощения запуска мы сделаем start.bat. Открываем любой текстовый редактор и вставляем код
-
@echo off
cls
title srcds.com Watchdog
:srcds
echo (%time%) srcds started.
start /wait srcds.exe -console -game garrysmod +map gm_construct +maxplayers 2 +gamemode sandbox +hostname test +port 27015
goto srcds
+map «name_map» — карта на которой будет стоять ваш сервер. Можете любую карту закинуть в GarryModDSgarrysmodmaps и изменить значение.
+maxplayers «count» — максимальное значение игроков на сервере (от 1 до 128)
+gamemode — режим, на котором сервер будет стоять (на примере стоит режим sandbox). Любые режимы вы можете закинуть по пути GarryModDSgarrysmodgamemodes и изменить значение.
+hostname «name» — Название сервера, который отображается в главном меню. (Если убрать эту команду, то по дефолту будет стоять Garry`s Mod)
+port 27015 — порт вашего сервера, ну я думаю не стоит объяснять, что да как - Сохраняем это с ФОРМАТОМ .bat
- Ура! Теперь мы можем запустить сервер и появится такое окошко
Если ошибок нет, то сервер работает и отображается во вкладке Локальная сеть (Local Networks)

Последнее редактирование модератором: 19 Май 2021

Данная статья написана для более продвинутых пользователей PC.
Все возможные проблемы буду описаны тут же.
Что касается более младшего поколения,уверяю вас,вам это не нужно.
Выделенный сервер отличается от других тем,что он работает без игры в режиме мультиплеер.
и работает абсолютно отделена от гариса.
И так для создания не обязательно иметь официальный GMod 10.
Ну что,поехали.
1)Для создания сервера нам нужно HldsUpdate скачиваем его с сайта Steam.
(не обязательно именно с официального сайта.)
HldsUpdate — Установочный файл,который установит нам HldsUpdateTool
HldsUpdateTool — Это маленький файл,через который мы получим чистый,обновлённый сервер.
Что бы Запустить его делаем следующие:
2)Устанавливаем HldsUpdate и идем в установленную папку
к примеру (C:Program FilesValveHLSever)
3)Затем создаем ярлык HldsUpdateTool и в свойствах прописываем после hldsupdatetool.exe«
-command update -game garrysmod -dir (куда?)к примеру как у меня D:gameValveHLServer
Так же это можно сделать другим образом.
создаем в папке с установленным HldsUpdateTool Текстовый файл и назовём его например «Start»
В нём прописываем hldsupdatetool.exe -command update -game garrysmod -dir
На сколько я помню, если мы идём вторым вариантом,то указывать путь после -dir не надо.
Не забудьте поменять расширение текстового файла txt на bat
Он автоматически будет качать наш сервер в эту папку.
4)Если вы всё правильно сделали,то после запуска,у вас должно появиться чёрное окно.
Проще говоря cmd.exe
если всё идёт как надо вы увидите проценты скачки сервера.
обычно это занимает не мало времени.
от часа до 4 часов.
5).Устанока no-Steam сервера
Берем последнюю *dll SteamEmu найти его можно в google
Кидаем скачанный *dll файлик в папку bin (пример D:scrdorangeboxbin)
В папке где у вас лежит hl2.exe создаем текстовый файл и называем его steamemu.ini или редактируем имеющийся.
7) Приводим его в вид :
[HL2.EXE_cstrike]
appID=4000
[HL2.EXE_hl2]
appID=4000
[HL2.EXE_hl2mp]
appID=4000
[HL2.EXE_dystopia]
appID=4000
[HL2.EXE_garrysmod]
appID=4000
[HL2.EXE_dod]
appID=4000
[HL2.EXE_hl2dmpro]
appID=4000
[HL2.EXE_lostcoast]
appID=4000
[HL2.EXE_episodic]
appID=4000
6)Вот,мы уже и близки к нашей конечной цели. «Запуск»
7)Консольный режим
Далее создаёте ярлык к srcds.exe он находится в папке с сервером.
И в его свойствах дописываем
-console -game garrysmod -nomaster +sv_lan 0 -port 27015 +map gm_construct.bsp +maxplayers 14 -exec server.cfg
Также можно вставить свои теги
Команды SrcDS:
-allowdebug
То же, что и -debug ?
-autoupdate
Сервер проверяет обновления при запуске.
-console
SrcDS будет запущен в консольном режиме (только в Windows).
-dev
Показывать сообщение разработчика.
-debug
Режим разработки.
-game <игра>
Задает, какую игру/мод запустить.
-insecure
Запускает сервер без использования технологии защиты от читеров (Valve Anti-Cheat).
-nobots
Отключить ботов.
-port
Порт для подключения клиента к серверу.
-tickrate <число>
Задает tickrate сервера (подробнее в Source Multiplayer Networking).
-verify_all
Производит проверку на то, что каждый файл сервера последней версии.
Консольные значения SrcDS:
+hostname «Имя Сервера»
Задает имя сервера.
+ip
Задает IP сервера, когда в системе несколько сетевых карт.
+map <карта>
Задает карту для запуска.
+maxplayers <число>
Задает максимальное количество игровых слотов.
+hostport <порт>
Задает порт хоста.
+clientport <порт> обычно 27015
Задает порт клиента.
+sv_lan <0/1>
Если установлено в 1, то сервер может принять только пользователей локальной сети (LAN).!!!!!!!Это важно !!!!!
Админа прописываем в Orangeboxgarrysmodsettingusers.txt
Устал писать,возможные проблемы будут либо, в другой статье, либо найдите их решение сами.
Могу лишь подметить,что у ролтера с закрытыми партами 27006 по 27015 сервер идти не будет.
Для этого,ищите способ открыть парты,или умного дядю который сделает это в мгновение око.
есть ещё 1 варианта. Не идите этим сложным путём.
спасибо за внимание
Smiler Cat
специально для www.garrymania.ru
Easy Gmod
Garry’s Mod servers are typically a pain in the butt to set up correctly. This project aims to change that, with the help of Docker.
Docker is a very useful program that allows you to run all kinds of software in containers (containers are like virtual machines, except they don’t emulate the entire computer, so it’s way faster). This project can be pulled as a Docker image, which is basically a template for a container.
To use this image, you simply run it with the settings that you want (explained in detail below). These settings allow you to configure most of the important parts of the server without having to deal with the usual, complicated setup process. This image automatically installs and mounts Counter Strike: Source and Team Fortress 2 content. This prevents issues with maps and other addons using resources from those games (which is quite common). Players will still need to install the content on their end to avoid seeing missing textures and errors everywhere.
How to use this
Do you…
- already know what you’re doing and just want to know what the settings are? Scroll down to the Reference section!
- have no clue what you’re doing but can’t stand the idea of reading? I’m working on a video tutorial.
- have no clue what you’re doing and prefer reading a guide? Read on, my friend.
In case you haven’t realized yet, you need a Docker installation to use this. On Windows, you can download Docker CE from the official website; on most Linux distributions, you should be able to install Docker with something like sudo apt-get install docker-ce (or your distribution’s equivalent). If you’re having difficulties installing Docker CE, go get help somewhere else. I didn’t make Docker, so I’m not going to debug it for you. Sorry.
Once you’ve got Docker installed, you’re only one command away from having your own Garry’s Mod server (but you probably shouldn’t run this command yet — read through the whole guide first, and ignore the fact that I act like you ran the command already). Here’s an example command:
docker run -p 27015:27015/udp phyremaster/easy-gmod
But… But… How do I run this command?
Sigh… On Windows press Windows Key + R, type cmd, then press Enter. Type the command and press Enter. Ta-daa. If that doesn’t work, try pressing Ctrl + Shift + Enter instead of just Enter after typing cmd, then click «Yes». On Linux, open the terminal (try the shortcut Ctrl + T), type the command, and press Enter. If that doesn’t work, type the command again, but put sudo before the rest of the command and enter your password if necessary.
Assuming you didn’t screw up, you should now have a functional Garry’s Mod server. It will take a while to start, especially the first time that you start it. This is because this image does not come with the Garry’s Mod server, Counter Strike: Source content, and Team Fortress 2 content preinstalled. Instead, the container validates and either installs or updates the server every time that it is started. While to a casual user that may seem like a really stupid way to have this image work, trust me, there are plenty of really good reasons why I made the image this way from a development perspective. It makes updating smoother, code simpler, images smaller, build times quicker, and programming easier. It might even help me in a legal situation, should one arise.
Wait, what about the settings? I don’t want a 20 player sandbox server on gm_flatgrass called «A Garry’s Mod Server»!
Calm down, buddy. We’re getting there. And there are way more settings than that.
How to change stuff
You remember the command from earlier? That was just an example. A better way to represent the command that you should use to start your Garry’s Mod server is this:
docker run <options> phyremaster/easy-gmod
In this version of the command, you replace the <options> part with a list of command line options separated by spaces. Just a heads up: I’m always going to use angle brackets (these things: < >) to enclose things that you should replace.
Erm… «Command line options»? What are those?
Command line options are letters preceded by a single hyphen (like this: -o) or strings of text preceded by two hyphens (like this: --option). Many command line options, including the vast majority of the ones that I will show you here, are followed by some sort of value (like this: -o value or this: --option value). When using multiple command line options, you must separate them with spaces (like this: -o value --options value). You must also separate these command line options from other parts of the command with spaces (like this: command -o value file).
Environment variables
Many of the following settings for the server are set using environment variables, so I should probably just explain environment variables now. For our purposes, environment variables are additional settings that I created to make your life easier. All environment variables are specified through a -e command line option with a value in the format <name>=<value>. <name> is to be replaced with the name of the environment variable (which must be entered exactly as I give it to you and will always be in all capital letters), and <value> is to be replaced with whatever you are setting the environment variable to. Got it? Good, now we can continue with the settings.
Oh, and one final note: you should never use a backtick (this little guy: `) in the value of one of these environment variables. If you do, it will ruin everything. Due to the way the programming for this image works, there must be one ASCII character that cannot be used. I chose the backtick, because I believe it is the symbol that you will need the least.
Setting ports
What are «ports»?
Your computer is identified in computer networks by its IP address, a series of number separated by periods (or, in IPv6, colons). A port is an additional number, ranging from 0 to 65535 (which may seem like a random number, but it’s significant because it’s one less than 2^16, making it the highest number that can be represented by two bytes of binary data), which tells your computer which program to send the information that it receives to.
Docker needs to know which port or ports on your computer it should connect the container to. To tell it this, you use the command line option -p. The value of the -p command line option should be in the format <port>:<port>/<protocol>. For the Garry’s Mod server, you will need to replace <port> with the Garry’s Mod server port (default is 27015) and <protocol> with udp. If you want to use a port other than the default port (which I recommend against, unless you are running multiple server one computer, in which case you must set different ports for each server), you must set the environment variable GMODPORT to the port that you are using.
To prevent various bugs (mostly with the server list and running multiple servers), I recommend that you also configure the client port with another -p command line option. Replace <port> with the client port (default is 27015) and <protocol> with udp. When using a port other than the default port (which is, again, not recommended when running only one server, but required for multiple servers), you need to set the environment variable CLIENTPORT to the port that you are using.
If you want to use RCON, you have to set yet another -p command line option. This time, <port> has to be replaced with the same port that you used for the Garry’s Mod server (again, default is 27015) and <protocol> must be replaced with tcp.
You also need to port forward the port(s) that you are using, but this process varies quite a bit depending on your router and network, so instead of meticulously explaining the steps for every router in existence, I’m just going to tell you to go Google it.
Go Google it.
One last note: you have to include the -p command line option for Garry’s Mod, even if you’re using the default port, 27015. If you don’t, it won’t work. Period.
Storing the files
Docker containers are virtualized. Because of this, you can’t just navigate your way to their files on your computer. This also means that containers lose all of their files when they are stopped. For a Garry’s Mod server, both of these things are problems.
Fortunately, Docker provides a way around this with the -v command line option. The -v command line option requires a value in the format <volume>:<path>. In this image, there are three pathes that you can replace <path> with: /home/steam/garrysmod, /home/steam/css, and /home/steam/tf2 (actually, there is a fourth one, but you should probably just leave it alone). If you can’t guess which files are stored in each of those pathes, there is no hope for you.
<volume> can be replaced with a valid name for a Docker volume, in which case Docker will store the files from <path> in a folder named <volume> buried somewhere in your system files. I don’t recommend doing that for multiple reasons: it’s annoying to navigate to these folders on your filesystem, and Docker volumes have a weird tendency to «run out of space» even if your computer still has plenty of available storage. Instead, I suggest that you replace <volume> with the full path to a folder on your computer, which will cause Docker to place the files in <path> in the folder that you specify. Linux users must run chmod 777 on the folder. Please note that <path> and <volume> must be different for every -v command line option that you add.
If you don’t specify any -v command line options, Docker will automatically assign volumes to all of the pathes that I mentioned above. These randomly assigned volumes have long, random strings of numbers and letters as their names. This will make accessing the server files a massive pain in the butt. You have been warned.
Naming the conatiner
Giving the container a name may help with managing the server later. To give the container a name (and prevent it from being given a randomly assigned two-word name instead), use the --name command line option with the name that you want as the value. The name cannot contain spaces or other special characters.
Stayin’ alive
To make the container automatically restart any time that it crashes, include the command line option --restart on-failure. Stopping the server from its console will stop the container, and it is recommended that you do that instead of stopping the container via Docker.
If you want the Garry’s Mod server to start when your computer starts, just make sure that Docker is configured to start when your computer starts. When Docker starts, it will start all of your containers by default.
Running in the background
Normally, when you enter the command to run this image, your command prompt or terminal will turn into the server console. If you don’t want this and instead want the server to just run silently in the background, just add the -d command line option, no value necessary.
Getting the command line back
If you want the server to run silently in the background most of the time, but still have access to the server console sometimes, you can add the -t and -i command line options (which can actually be set together, as -ti or -it) in addition to the -d command line option. -d will still work as explained above, but you can now access the server console any time that you want to with the docker attach command.
Naming the server
You can set the name of your server (as it will appear on the multiplayer server list) with the HOSTNAME environment variable. The value should, of course, be set to the name that you want your server to have. If your name contains spaces, put quotes before and after it (like this: "Server Name"). If not set, this will default to "A Garry's Mod Server".
Setting the player limit
To set the maximum number of players who can connect to the server at the same time, use the MAXPLAYERS environment variable. The value should be set to the number of players that you want to allow to connect simultaneously (as a number, not spelled out). If not set, this will default to 20 players.
Setting the gamemode
To set the gamemode for your server, use the GAMEMODE environment variable. The value of this environment variable must be set to the exact, official name of a gamemode. Additionally, if you want to run a gamemode other than sandbox (sandbox) or Trouble in Terrorist Town (terrortown), you must install the gamemode (or the addon containing the gamemode). If you don’t specify a gamemode, sandbox will be used by default.
Setting the map
To set the map that your server will start on, use the GAMEMAP environment variable. Similar to setting the gamemode, you must use the exact, official name of the map as the value, and, if you want to use a map other than Flatgrass (gm_flatgrass) or Construct (gm_construct), you will have to install the map (or addon containing the map). If you don’t specify a map, Flatgrass will be used by default.
Talking between teams
To allow players to talk to players on other teams, set the value of the ALLTALK environment variable to the number 1 (this is the default setting). If you want to prevent this, set it to the number 0.
Displaying voice chat
To show the default voice chat icon over players while they have their voice chat button pressed, set the value of the VOICEICON environment variable to the number 1. To prevent this icon from ever appearing, set it to the number 0. Since this icon tends to give away players who are hiding (usually on Prop Hunt servers), it is set to 0 by default.
Setting the players’ download limit
You can prevent players from downloading any file from your server larger than a certain size with the MAXFILESIZE environment variable. Set the value of this environment variable to a number representing the size of the largest file you want to let players download in megabytes. If not set, this will default to 1024 (this is the number of megabytes in a gigabyte).
Installing addons
To install addons to your server, first create a Garry’s Mod Steam Workshop Collection and put all of the addons that you want to install to your server in the collection. Once the collection is created, copy its ID (the last, long number in the collection’s URL). Set the value of the WORKSHOPID environment variable to this ID. Your server will automatically install the addons in the collection and keep them up to date (although you can’t find them in the server files, for some reason), and players will automatically download these addons from the Steam Workshop (meaning that you do not need to set up FastDL for these addons).
If, for whatever reason, your addon or addons cannot be found in the Steam Workshop (usually the case with custom addons and maps), you must manually place them into the server files. These addons will take a long time for players to download, unless you set up FastDL.
Speeding up downloads
If you have some content on your server that cannot be downloaded from Steam, it will normally take a very long time to download, because the Source Engine protocol does not handle file transfers very well. To fix this, you can use FastDL, which allows players to automatically download your server’s content over HTTPS from a website. To use FastDL, you must have a website containing your server content with the exact same file structure as your actual Garry’s Mod server files. To set up FastDL, set the value of the DOWNLOADURL environment variable to the full link (including the https:// part) to the folder on your website that contains the contents of the garrysmod folder from the default Garry’s Mod server file structure. You should probably put quotes around the link.
You should avoid putting any unnecessary files on your FastDL website. Doing so will increase download times and could be a security risk, depending on which files are exposed.
Adding a loading screen
To give your server a custom loading screen, set the value of the LOADINGURL environment variable to the full link (including the https:// part) to the webpage that will be your loading screen. You should probably put quotes around the link.
Making the server private
If you want to make your server private, you can require that players correctly enter a password before connecting. To do this, set the value of the PASSWORD environment variable to whatever you want the password to be. If you use special characters, you will need to put quotes around the password.
Using RCON
RCON stands for «remote console». It allows you to access your server’s console from another computer. To enable this, you must set a password. You can set the RCON password with the RCONPASSWORD environment variable. Set this environment variable’s value to the password that you want to use, with quotes around it if it contains special characters. To use RCON you will also need to set up the RCON port, but that topic has already been covered.
RCON is a pretty big security risk. Avoid it if doing so is a reasonable option. If you must use RCON, set a very strong password, do not share your password, and avoid port forwarding for RCON if possible.
Connecting a Steam Game Server Account
If your Steam account is elligible, you can create a Steam Game Server Account for your server. This helps you monitor and manage your game server or servers. To link your Garry’s Mod server to a Steam Game Server Account, set the value of the LOGINTOKEN environment variable to the login token for your Steam Game Server Account.
Further configuration
Wait, that’s it? What if I want to change a setting that you didn’t list here?
In that case, you will have to manually edit the configuration files. Don’t worry about the image overwriting your settings; the script only edits the lines of the configuration files relevant to the environment variables that have been set. To prevent default settings from overwriting your manually-added, custom settings, just set the value or values of the relevant environment variable or variables to the empty string (a pair of quotes with nothing between them, like this: "").
Additionally, please note that, to prevent removing manually-added custom settings, changing an environment variable to the empty string will not remove the relevant part of the configuration files.
Wow, I can’t believe that you didn’t have an environment variable for <insert obscure setting>. This image sucks.
I’m sorry, did you have to pay for this image? Did you contribute to this project? No? Then shut up and appreciate that I took care of most of the hard stuff for you.
All joking aside, though, if you have feedback or, even better, want to contribute to this project, it is much appreciated. Just don’t be a jerk about it.
Reference
Ports
27015— TCP — RCON27015— UDP — SRCDS (the Garry’s Mod server)27005— UDP — SRCDS client port (used for the multiplayer server list)
Volumes
/home/steam/garrysmod— The Garry’s Mod server files/home/steam/css— The Counter Strike: Source content files/home/steam/tf2— The Team Fortress 2 content files
Environment variables (change server.cfg or SRCDS launch command)
HOSTNAME—hostname— the name of the server, seen in the server list —"A Garry's Mod Server"GMODPORT—-port— the SRCDS (Garry’s Mod server) port —27015CLIENTPORT—-clientport— the SRCDS client port (for the server list) —27005MAXPLAYERS—-maxplayers— the maximum number of concurrent players allowed —20GAMEMODE—+gamemode— the gamemode to host —sandboxGAMEMAP—+map— the map to host when the server starts —gm_flatgrassALLTALK—sv_alltalk— players can voice chat between teams —1(enabled)VOICEICON—mp_show_voice_icons— show overhead voice chat icons —0(disabled)MAXFILESIZE—net_maxfilesize— the maximum size of file a player can download (in MB) —1024WORKSHOPID—+host_workshop_collection— the Workshop ID of the addon collection to hostDOWNLOADURL—sv_downloadurl,sv_allowdownload,sv_allowupload— the link to the FastDL websiteLOADINGURL—sv_loadingurl— the link to the loading screen webpagePASSWORD—sv_password— the server password, makes server private if setRCONPASSWORD—rcon_password— the RCON password, enables RCON if setLOGINTOKEN—+sv_setsteamaccount— the login token for the Steam Game Server Account
Automatic file editing (if text or file not already present)
exec banned_ip.cfg,exec banned_user.cfg— added toserver.cfg"cstrike" "/home/steam/css/cstrike","tf" "/home/steam/tf2/tf"— added tomount.cfgserver.cfg,mount.cfg— created
Technical
This project uses cm2network/steamcmd:root as a base image (GitHub, Docker Hub) and takes some inspiration from zennoe/gmod-css-tf2:latest (GitHub, Docker Hub). This project is not affiliated with Facepunch Studios or Valve. I had nothing to do with the creation of the Half Life games, the Counter Strike games, Garry’s Mod, or SRCDS. I just built something around those things.
Project pages
- GitHub
- Docker Hub
Introduction: How to Make a Dedicated Garry’s Mod Server(Windows)
This is one way to make a dedicated server for Garry’s Mod via port forwarding instead of using a hamachi client. The benefit to this is that anyone can go on your server, as long as you allow it. I will also teach you how to set permissions as well so you can lock people out too.
————————————————————————**PLEASE READ**————————————————————————————-
When clicking on links please right-click and select open in new tab, it makes things a lot easier.
Step 1: Download and Install the Half-Life Dedicated Source Update Tool.
Download the Half-Life Dedicated Source Update Tool here then run the program.
When installing change the destination folder to «C:srcds» by clicking the «browse» button and then at the top of the window that says «Select Destination Directory» change whatever is in the top bar you can edit to «C:srcds (If the file does not exist the installer will make the folder for you).
Step 2: Use Command Prompt to Update the Server Files
Once you have finished installing the Half-Life Dedicated Source Update Tool, open command prompt and copy and paste this code in:
C:
cd srcds
hldsupdatetool
Now your able to use the update tool commands. Copy and paste this code to update the server in the same command prompt:
hldsupdatetool -command update -game «garrysmod» -dir C:srcds
The update process can take anywhere from half an hour to an hour and a half depending on where you live, your internet connection speed and the speed of the valve servers.
Step 3: Set Server.cfg Parameters
Go to «C:srcdsorangeboxgarrysmodcfg» and open up the server.cfg file with notepad, if the file does not exist, create it using notepad and save the file as «server.cfg» NOT «server.cfg.txt»
Go here to create the server.cfg file’s code. Only worry about the Server Name, Rcon Password, and Server Password. The difference between an Rcon and Server Password is that the Rcon Password is used to kick and ban players while the Server Password is used to prevent random people from joining your server.
Once finished setting the server name and passwords scroll to the bottom of the page and click «Run cfgmaker»
Copy only to what i highlighted in the 3rd picture and then paste into the server.cfg file.
Step 4: Port Forwarding (ipconfig Command)
If you have Windows Vista, 7, or 8 in the search bar type «cmd» and then press enter.
If you have any earlier version of windows the command prompt should be located in your Accessories Folder.
Once opened type: «ipconfig» and press enter
You will get a bunch of information but all you need to worry about is the current IPv4 address and the default gateway located near the top. If you cannot find what i’m talking about look at the picture.
Step 5: Open Router Settings
Open an internet browser such as Mozilla Firefox or Google Chrome(which I am using) and in the address type your default gateway (as mentioned in the previous step).
Your browser will then ask you for a password, most of the time the password is «password» however there are a few exceptions…if your router password is not «password» look here for your default password.
Step 6: Create Custom Services
Once logged in you get a page similar to the image below.
To set up port forwarding you will want to head over to the Port Forwarding/Port Triggering option in the menu(this could be under Advanced Settings in different router models). You will have to log in again.
Once in the Port Forwarding/Port Triggering menu add a new/custom service. Make sure you are port forwarding NOT port triggering.
When creating your custom service, make sure your settings are EXACTALLY the same as these:
Service Type: BOTH TCP and UDP (Usually Listed as TCP/UDP) NOT one or the other
Starting Port: 27015
Ending Port: 27015
Server IP Address: Same as you IPv4 address mentioned earlier (Found in command prompt using «ipconfig» command).
The Service Name can be anything you want it to be.
Make another custom service with the same settings but with a Starting Port and Ending Port of 27016.
Hit apply and restart your router if necessary
Step 7: Create Run.bat File
Open notepad and copy and paste this code in:
@echo off
cls
echo Protecting srcds from crashes…
echo If you want to close srcds and this script, close the srcds window and type Y depending on your language followed by Enter.
title srcds.com Watchdog
:srcds
echo (%time%) srcds started.
start /wait srcds.exe -console -game garrysmod +map gm_flatgrass +maxplayers 16
echo (%time%) WARNING: srcds closed or crashed, restarting.
goto srcds
Note: To change the map type the map name in the code where it says gm_flatgrass. The map HAS TO be placed in:
C:srcdsorangeboxgarrysmodmaps
It has to have the file extension .bsp aswell.
Save the bat file and run it to start the server.
Be the First to Share
Recommendations
Вам необходимо обновить браузер или попробовать использовать другой.
Как создать свой сервер Garry’s Mod (Steam) (хост на компьютере)
-
Автор темы
Ghost_Team -
Дата начала
11 Мар 2016
- Статус
- В этой теме нельзя размещать новые ответы.

- Дней с нами
- 2.610
- Розыгрыши
- 0
- Сообщения
- 57
- Репутация
+/- -
7
- Реакции
- 35
-
#1
Вложения

- Дней с нами
- 2.599
- Розыгрыши
- 0
- Сообщения
- 271
- Репутация
+/- -
18
- Реакции
- 122

- Дней с нами
- 2.617
- Розыгрыши
- 0
- Сообщения
- 328
- Репутация
+/- -
45
- Реакции
- 205

- Дней с нами
- 3.415
- Розыгрыши
- 0
- Сообщения
- 372
- Репутация
+/- -
270
- Реакции
- 276
-
#4

- Дней с нами
- 3.293
- Розыгрыши
- 0
- Сообщения
- 30
- Репутация
+/- -
2
- Реакции
- 12

- Дней с нами
- 2.897
- Розыгрыши
- 0
- Сообщения
- 706
- Репутация
+/- -
98
- Реакции
- 567
- Дней с нами
- 2.610
- Розыгрыши
- 0
- Сообщения
- 57
- Репутация
+/- -
7
- Реакции
- 35
-
#9
нужно обязательно чтобы файл был .bat
- Дней с нами
- 2.897
- Розыгрыши
- 0
- Сообщения
- 706
- Репутация
+/- -
98
- Реакции
- 567
-
#10
нужно обязательно чтобы файл был .bat
А почему у меня не получается добавить аддоны?
- Дней с нами
- 2.610
- Розыгрыши
- 0
- Сообщения
- 57
- Репутация
+/- -
7
- Реакции
- 35
-
#11
А почему у меня не получается добавить аддоны?
скинь ссылку на свою коллекцию
- Дней с нами
- 2.897
- Розыгрыши
- 0
- Сообщения
- 706
- Репутация
+/- -
98
- Реакции
- 567
-
#12
скинь ссылку на свою коллекцию
Не получается поставить это: ТЫК
И ещё вопрос. Когда подключаюсь я, то я бессмертен. Как убрать бессмертие? Команды не работают
- Дней с нами
- 2.610
- Розыгрыши
- 0
- Сообщения
- 57
- Репутация
+/- -
7
- Реакции
- 35
-
#13
- Дней с нами
- 2.897
- Розыгрыши
- 0
- Сообщения
- 706
- Репутация
+/- -
98
- Реакции
- 567
-
#14
636109972 вот это в +host_workshop_collection,а беcсмертие можно выключить в меню ULX
Всё равно не получается
cls
title srcds.com Watchdog
:srcds
echo (%time%) srcds started.
start /wait srcds.exe -console -game garrysmod map gm_laboratory_alt maxplayers 12 port 27016 host_workshop_collection 636109972 -authkey 1680F93FABDBF14D682208EAC8051DE6
goto srcds
quit
- Дней с нами
- 2.610
- Розыгрыши
- 0
- Сообщения
- 57
- Репутация
+/- -
7
- Реакции
- 35
-
#15
cls
title srcds.com Watchdog
:srcds
echo (%time%) srcds started.
start /wait srcds.exe -console -game garrysmod +map gm_laboratory_alt +maxplayers 12 +port 27016 +host_workshop_collection 636109972 -authkey 1680F93FABDBF14D682208EAC8051DE6
goto srcds
quit
- Дней с нами
- 2.897
- Розыгрыши
- 0
- Сообщения
- 706
- Репутация
+/- -
98
- Реакции
- 567
-
#16
@echo off
cls
title srcds.com Watchdog
:srcds
echo (%time%) srcds started.
start /wait srcds.exe -console -game garrysmod +map gm_laboratory_alt +maxplayers 12 +port 27016 +host_workshop_collection 636109972 -authkey 1680F93FABDBF14D682208EAC8051DE6
goto srcds
quit
А если я захочу ещё один аддон добавить. То как надо?
- Дней с нами
- 2.610
- Розыгрыши
- 0
- Сообщения
- 57
- Репутация
+/- -
7
- Реакции
- 35
-
#18

- Дней с нами
- 2.647
- Розыгрыши
- 0
- Сообщения
- 157
- Репутация
+/- -
2
- Реакции
- 41
- Статус
- В этой теме нельзя размещать новые ответы.
Похожие темы

СЕРВЕР:
sbox_noclip 1 // Разрешить режим полёта 0-Выкл. 1-Вкл.
sbox_weapons 1 // Давать оружия при возрождение 0-Выкл. 1-Вкл.
sbox_godmode 1 // Бесмертие 0-Выкл. 1-Вкл.
sbox_playershurtplayers 1 // Разрешить убийство игроков 0-Выкл. 1-Вкл.
sbox_bonemanip_npc 1 // Разрешить изменение костей нпс 0-Выкл. 1-Вкл.
sbox_bonemanip_player 1 // Разрешить изменение костей игроков 0-Выкл. 1-Вкл.
sbox_bonemanip_misc 1 // Разрешить изменение костей прочего 0-Выкл. 1-Вкл.
sbox_admin_nolimits 1 // Убрать лимит для админов 0-Выкл. 1-Вкл.
physgun_limited 1 // Ограничить Гравити Ган 0-Выкл. 1-Вкл.
sv_gravity 600 // Устанавливает гравитацию (стандарт 600)
sk_plr_dmg_357 # // Изменить дамаг «Магнума» (вместо # подставляйте свое число). Этот код действует и на остальное оружие, только вместо «357»
sk_max_357 # — Установить максимальное число патронов в обойме для «Магнума». По аналогии с предыдущим кодом — действует и на остальное оружие (просто подставляйте вместо «357» название нужного ствола).
Название оружий:
crossbow (арбалет), grenade (гранаты), pistol (пистолет), ar2 (Pulse Rifle), rpg_round (ракетница), buckshot (шотган), smg1_grenade (подствольный SMG-гранатомет), smg1 (пистолет-пулемет)
kick Bady // Кикает игрока
banid <минуты> // Банит игрока
Перманентный бан — цифра 0 (навсегда бан)
Как узнать SteamID или скопировать нестандартный ник?
status // Выдаёт в консоле таблицу с ником и ID Steam
Как поменять карту на сервере?
map gm_flatgrass // Кикает всех людей на сервере кроме вас и меняет карту
changelevel gm_flatgrass // Меняет карту
Как поставить пароль на сервере?
sv_password 123
Моего друга кикает с ошибкой «Too Many Lua Errors» что делать?
sv_kickerrornum 0
Как мне быстро перезапустить сервер?
restart
Может быть полезно для удаления игроков со слишком высоким и низким интернетов
sv_minrate 0 // Мин. передача пакетов (Стандартно 1)
sv_maxrate 10000 // Макс. передача пакетов (Стандартно 5000)
Прочее команды для сервера
mp_flashlight 0 // Возможности использования фонарика 0-Выкл. 1-Вкл.
sv_noclipspeed 50 // Изменяет скорость Ноклипа
Лимиты:
sbox_maxprops 200 // Лимит на пропы
sbox_maxnpcs 200 // Лимит на нпс
sbox_maxragdolls 200 // Лимит на рагдолы
sbox_maxthrusters // Лимит на трастеры (Ускорители)
sbox_maxbuttons 200 // Лимит на кнопки
sbox_maxdynamite 200 // Лимит на динамитов
sbox_maxeffects 200 // Лимит на эффекты
sbox_maxemitters 200 // Лимит на эмиттеры
sbox_maxhoverballs 200 // Лимит на ховерболы
sbox_maxballoons 200 // Лимит на шары
sbox_maxlamps 200 // Лимит на лампы
sbox_maxlights 200 // Лимит на свет
sbox_maxvehicles 200 // Лимит на машины/стулья
sbox_maxwheels 200 // Лимит на колёса
Если у вас скачен инструмент Turrent
sbox_maxturrets 200 // Лимит на Turrent
Если у вас скачен инструмент KeyPad
sbox_maxkeypads 200 // Лимит на Кейпады
Если у вас скачен инструмент Door
sbox_maxdoors 200 // Лимит на двери
sv_cheats 1:
Пишем в консоль sv_cheats 1
viewmodel_fov 30 // Установить размер текущего оружия (Стандартно 54)
thirdperson // От 3 лица
firstperson // От 1 лица
god // Режим бессмертия (для отключения введите god)
notarget // Режим незаметности (для откл. сного ведите notarget)
cl_drawhud 0 // Интерфейс 0-Выкл. 1-Вкл.
hurtme 10 // Отнимает определённое количество жизней (10=100-10=90hp)
impulse 82 // Появляется багги (Джип)
impulse 83 // Появляется катамаран (Лодка воздушная)
Impulse 203 // Удаление объекта, на который направлена камера
impulse 101 // Даёт все оружия HL2 и много патронов к ним
mat_depthbias_normal 1 // Режим видения сквозь стены (почувствуй себя читером)
bind i «toggle mat_depthbias_normal 0 1» // Для быстрого переключения
vcollide_wireframe 1 // Показывает модель физических столкновений в виде синей структуры во время запуска 0-Выкл. 1-Вкл.
bind k «toggle vcollide_wireframe 0 1» // Для быстрого переключения
host_timescale 0.1 // Замедление времени (Стандарт 1.0)
bind o «toggle host_timescale 0.1 1» // Для быстрого переключения
Читы на заряды:
Пишем в консоль sv_cheats 1
give item_box_mrounds
box_buckshot (патроны на дробовик), box_mrounds (на автомат), box_sniper_rounds (на снайперку), box_srounds (на пехаль), healthkit (большая аптечка), healthvial (маленькая аптечка), battery (батареи для костюма), suit (костюм), ml_grenade (заряды на ракетницу), ar2_grenade (лимонки для импульсного автомата)
bind u «give item_box_mrounds»
Команда для создания NPC:
Пишем в консоль sv_cheats 1
npc_create npc_Название // Вместо ‘Название’ писать вот что :
Повстанцы
alyx, barney, eli, mossman, dog, gman, citizen, kleiner, vortigaunt
Комбайны
metropolice, combine_s, breen, stalker, combinedropship, combinegunship, helicopter, manhack
Монстры
zombie, zombie_torso, fastzombie, poisonzombie, zombine (EP1), antlion, antlionguard, ministrider (EP1), headcrab, headcrab_fast, headcrab_poison, barnacle
Нейтралы
monk, pigeon, seagull, crow
Читы с грави пушкой:
Пишем в консоль sv_cheats 1
physcannon_maxforce # — изменить силу, с которой гравипушка толкает предметы.
physcannon_maxmass # — изменить максимальный размер предметов, которые может притянуть гравипушка.
physcannon_pullforce # — изменить скорость, с которой гравипушка притягивает предметы.
physcannon_tracelength # — изменить максимальное расстояние, с которого гравипушка может притягивать предметы.
physcannon_cone # — изменить расстояние, с которого гравипушка может поднимать предметы в воздух.
Можно создавать команды командой alias , но эти команды будут состоять из других команд. Это можно в отличие от бинда можно использовать для создания +команд, то есть когда вы нажмете кнопку — выполнится одно действие, когда отпустите – другое
Alias +команда «действие когда нажмете кнопку»
Alias -команда «действие, когда отпустите кнопку»
Alias +megaphyscannon «physcannon_maxmass 700; physcannon_maxforce 9000»
Alias -megaphyscannon «physcannon_maxmass 250; physcannon_maxforce 1500» // Возвращает стандартные
Bind alt «+megaphyscannon»
Прочее:
kill // Убивает вашего персонажа
disconnect // Выйти из сервера
quit // Выйти из игры
killserver // Когда вы хост, вписывая команду можно быстро выйти в главное меню
reconnect // Переконнект к текущему серверу
hud_deathnotice_time 0 // Время появление иконок убийств в секундах (Стандарт 6 — 6 секунд)
unbind кнопка // Отбиндивает кнопку
Команды управления:
+forward // Двигаться вперед
+back // Двигаться назад
+moveleft // Стрейфиться налево
+moveright // Стрейфиться направо
+left // Повернуться налево
+right // Повернуться направо
+jump // Подпрыгнуть
+duck // Присесть
+use // Использовать
+attack // Стрелять
+attack2 // Альтернативная стрельба / дополнительная функция оружия
+reload // Перезарядить оружие
slot1 // 1-ый слот
slot2 // 2-ой слот
slot3 // 3-ий слот
slot4 // 4-ый слот
slot5 // 5-ый слот
slot6 // 6-ой слот
slot7 // 7-ой слот
slot8 // 8-ой слот
slot9 // 9-ый слот
slot10 // Нулевой слот
impulse 201 // Нарисовать лого
impulse 100 // Включить/выключить фонарь
Источник