Шаг 1: Скачать установочный файл с сайта
На сегодня местонахождения файлов для скачивания JDK находится по адресу Java SE Downloads
Думаю, что вы можете взять самый последний JDK — в нашем курсе это JDK 1.7 update 3. Но еще раз повторюсь — принципиальных отличий в установке вы не увидите. Ваша задача — найти версию JDK, которая установится на ваш компьютер — выберите операционную систему и разрядность.
Шаг 2: Установить JDK из файла
Здесь тоже каких-либо сложностей быть не должно — я не видел принципиальной разницы между версиями 1.4, 1.5, 1.6 и 1.7. Запускаем скачанный файл и после некоторого ожидания вы увидите стартовый экран для установки. Нажимаем «Next».

На следующем экране вам предложат директорию для установки. Мне больше нравится установка не в директорию по умолчанию. (она выделена красным). Нажмите кнопку «Change…».

В появившемся окне установите директорию «C:Javajdk1.7.0_03». После этого я вам настоятельно советую выделить этот путь и сохранить его в буфере обмена (чуть позже мы им воспользуемся). Дальше жмем «OK».

После этого можно увидеть установленную директорию в окне. Снова нажимаем кнопку «Next».

Через некоторое время установка JDK почти закончится, но вам также придется установить JRE (Java Runtime Environment). Вы это сразу увидите по форме, которая должна появиться. Здесь нет необходимости менять директорию — смело жмем «Next».

Какое-то время перед вами будет экран, на котором будет говориться, что 3 миллиарда устройств используют Java.

И наконец вы увидите, что установка закончилась.

В версии 1.7 появился еще один шаг — выбор установки JavaFX 2.0. У вас появиться экран для выбора директории (мне не очень понравилось, как он реализован). Но в общем можно просто нажимать кнопку «Next». Т.к. я плохо отношусь к диреториям с пробелом, то я выбрал свой вариант.

Шаг 3: Установка переменных среды — JAVA_HOME и PATH
На этом установка практически завершена. Останется сделать только еще один шаг — прописать путь до файлов JDK в путях операционной системы. Это позволит нам запускать основные файлы из командной строки — удобный момент. И также мы установим переменную JAVA_HOME — это правда нам пригодится не скоро, но сделаем это прямо сейчас. Думаю, что большинство из вас знает как это сделать. Но давайте все-таки это сделаем вместе. Я использую ОС Windows 7.0 — поэтому буду демонстрировать на ней. В меню «Пуск» найдите пункт «Компьютер» и щелкните на нем правой кнопкой мыши. В появившемся меню выберите пункт «Свойства». Появится окно
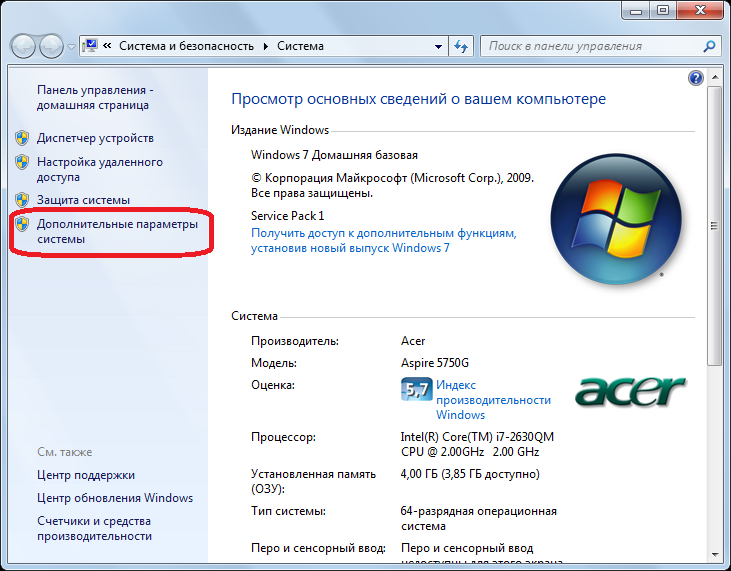
Выбираем пункт «Дополнительные параметры системы» (я выделил этот пункт). Получим окно, в котором надо выбрать пункт «Переменные среды».

В появившемся окне вам надо создать одну переменную — «JAVA_HOME». И отредактировать переменную «Path». Для этого нажимаем кнопку «Создать».

Вариант установки переменной «JAVA_HOME» показано на рисунке. Вот тут как раз и пригодится та строка, которую я предлагал вам запомнить при установке JDK.

Для установки переменной «Path» скорее всего ее создавать не надо — она уже обычно есть. Так что надо ее найти в списке и нажать кнопку «Изменить». Но будьте внимательны — во-первых здесь надо вводить строку предварительно поставив «;» в конце списка всех путей. И во-вторых — надо добавить строку «bin» после. Пример показан на рисунке.
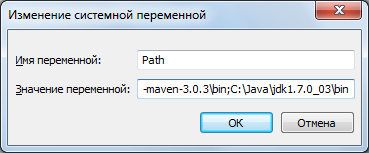
И еще раз — БУДЬТЕ ВНИМАТЕЛЬНЫ при редактировании PATH — она содержит важную информацию. Не надо ее целиком стирать и оставлять только свою строку. Надо после точки с запятой ДОБАВИТЬ строку до каталога с JDK (+ строка «bin»). Т.е. если у вас JDK установлен в каталог C:Javajdk1.7, то в PATH надо добавить (через «;») строку C:Javajdk1.7bin.
Теперь мы сделали все необходимые шаги для установки JDK — пора приступать к написанию простой программы. Основные шаги
Во многих статьях в интернете, документации к инструментам для разработки на Java и в книгах зачастую упоминается JAVA_HOME. Что же такое JAVA_HOME?
JAVA_HOME это переменная окружения, указывающая на директорию с установленным JDK (Java Development Kit, комплект разработчика Java). JAVA_HOME это соглашение, используемое во многих программах из экосистемы Java.
Какие программы используют JAVA_HOME
- Intellij IDEA, Eclipse, NetBeans
- Apache Maven, Apache Ant, Gradle
- Apache Tomcat
- Jenkins
Некоторые игры, написанные на Java (например, Minecraft), тоже могут требовать установленной переменной JAVA_HOME.
Ошибки, связанные с JAVA_HOME
Если переменная окружения JAVA_HOME не определена, некоторые программы могут выдавать следующие ошибки:
- Переменная среды java_home не определена
- Cannot determine a valid Java Home
- JAVA_HOME is set to an invalid directory
- JAVA_HOME is not defined correctly
- JAVA_HOME environment variable is not set
- JAVA_HOME command not found
- JAVA_HOME not found in your environment
- JAVA_HOME does not point to the JDK
При появлении таких ошибок просто установите переменную JAVA_HOME
Как установить переменную окружения JAVA_HOME в Windows
Сперва вам нужно установить JDK или JRE.
- Установите JDK, если вы занимаетесь разработкой программ на Java
- Установите JRE, если вам нужно только запустить прикладную программу на Java
После установки JDK либо JRE запишите путь установки, он понадобится.
Теперь щёлкните правой кнопкой на «Мой компьютер» → «Свойства» → «Дополнительные параметры системы» → «Переменные среды…». В разделе «Системные переменные» нажмите кнопку «Создать…» и укажите следующие данные:
| Имя переменной | JAVA_HOME |
| Значение переменной | Путь к директории JDK / JRE, например: C:Javajdk-11.0.6 |
Сохраните изменения, кликнув «OK». Теперь выберите в списке переменную окружения Path и нажмите «Изменить…». В конце списка добавьте строчку со значением «%JAVA_HOME%bin«
Для проверки откройте консоль (Win+R, cmd) и укажите последовательно укажите две команды:
echo %JAVA_HOME%
java --version
Если вы правильно установили JDK/JRE и правильно установили переменные окружения, вы увидите вывод наподобие этого:
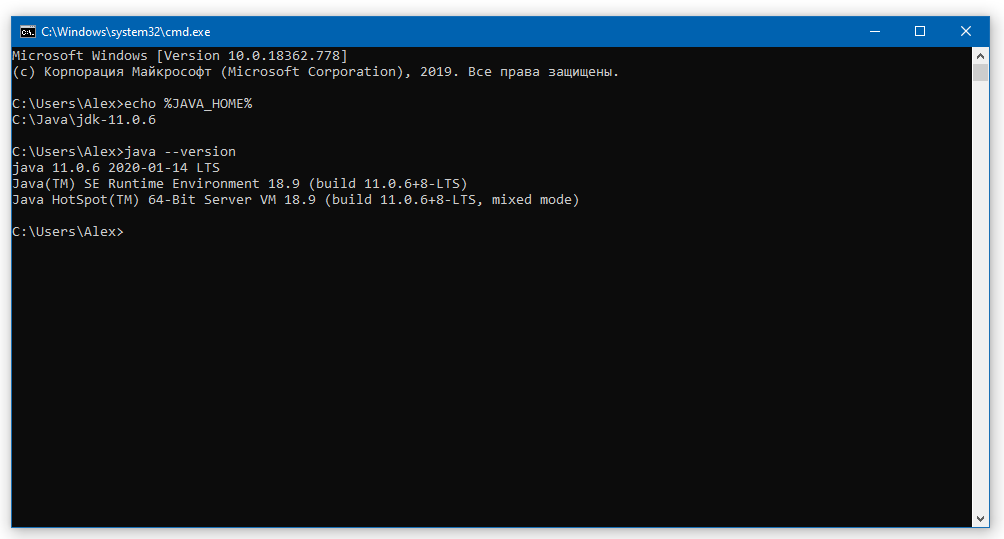
Это будет служить результатом того, что переменная JAVA_HOME установлена правильно и Java работает из командной строки.
Резюме
В данной статье мы рассказали вам, что являет собой переменная окружения JAVA_HOME, где она используется и как её корректно указать.
We need to make a distinction between the two environment variables that are discussed here interchangeably. One is the JAVA_HOME variable. The other is the Path variable. Any process that references the JAVA_HOME variable is looking for the search path to the JDK, not the JRE. The use of JAVA_HOME variable is not meant for the Java compiler itself. The compiler is aware of its own location. The variable is meant for other software to more easily locate the compiler. This variable is typically used by IDE software in order to compile and build applications from Java source code. By contrast, the Windows CMD interpreter, and many other first and third party software references the Path variable, not the JAVA_HOME variable.
Use case 1: Compiling from CMD
So for instance, if you are not using any IDE software, and you just want to be able to compile from the CMD, independent of your current working directory, then what you want is to set the Path variable correctly. In your case, you don’t even need the JAVA_HOME variable. Because CMD is using Path, not JAVA_HOME to locate the Java compiler.
Use case 2: Compiling from IDE
However, if you are using some IDE software, then you have to look at the documentation first of all. It may require JAVA_HOME to be set, but it may also use another variable name for the same purpose. The de-facto standard over the years has been JAVA_HOME, but this may not always be the case.
Use case 3: Compiling from IDE and CMD
If in addition to the IDE software you also want to be able to compile from the CMD, independent of your current working directory, then in addition to the JAVA_HOME variable you may also need to append the JDK search path to the Path variable.
JAVA_HOME vs. Path
If your problem relates to compiling Java, then you want to check the JAVA_HOME variable, and Path (where applicable). If your problem relates to running Java applications, then you want to check your Path variable.
Path variable is used universally across all operating systems. Because it is defined by the system, and because it’s the default variable that’s used for locating the JRE, there is almost never any problem running Java applications. Especially not on Windows where the software installers usually set everything up for you. But if you are installing manually, the safest thing to do is perhaps to skip the JAVA_HOME variable altogether and just use the Path variable for everything, for both JDK and the JRE. Any recent version of an IDE software should be able to pick that up and use it.
Symlinks
Symbolic links may provide yet another way to reference the JDK search path by piggybacking one of the existing environment variables.
I am not sure about previous versions of Oracle/Sun JDK/JRE releases, but at least the installer for jdk1.8.0_74 appends the search path C:ProgramDataOracleJavajavapath to the Path variable, and it puts it at the beginning of the string value. This directory contains symbolic links to the java.exe, javaw.exe and javaws.exe in the JRE directory.
So at least with the Java 8 JDK, and presumably the Java 8 JRE standalone, no environment variable configuration needs to be done for the JRE. As long as you use the installer package to set it up. There may be differences on your Windows installation however. Note that the Oracle JRE comes bundled with the JDK.
If you ever find that your Java JDK configuration is using the wrong version of the compiler, or it appears to be working by magic, without being explicitly defined so (without casting the spell), then you may have a symlink somewhere in your environment variables. So you may want to check for symlink.
![]()
Download Article
The easiest ways to set the JAVA_HOME environment variable on any computer
![]()
Download Article
- Windows
- macOS
- Linux
- Video
- Tips
|
|
|
|
Are you seeing Java errors like «JAVA_HOME is not defined correctly?» or «JAVA_HOME is set to an invalid directory?» If you’ve recently installed the Java Development Kit (JDK) or the Java Runtime Environment (JRE), you’ll need to set your JAVA_HOME variables and configure the path so applications know where to find Java. This wikiHow article will show you the easiest ways to change or set the Java home path on Windows, macOS, and Linux.
Things You Should Know
- Before you can set JAVA_HOME, you’ll need the full path to your JDK or JRE installation.
- Once you set the JAVA_HOME environment variable, you can run the command
echo $JAVA_HOMEto see the new path. - To set the Java home and path on Linux or macOS permanently (even after a reboot), add the environment variables to your .bashrc or .zshrc file.
-

1
Find your Java installation directory. Assuming that you didn’t change the path for the JDK or JRE during installation is not changed, it should be in a directory under C:Program FilesJava. There are a few ways to find the full path:
- Open File Explorer, click This PC in the left panel, then navigate to C:Program FilesJava. The directory you’re looking for should have the name of the JDK version, such as C:Program FilesJavajdk-19.
- If you installed the JRE instead of the JDK, you’ll have something like C:Program FilesJavajre1.8.0_351 instead.
- You can also open the command prompt and run the command wmic product where "Name like '%%Java%%'" get installlocation,Name. This will tell you the full path of the JDK, even if you haven’t yet set JAVA_HOME.
-
2
Open your Advanced System Settings. Here’s how:
- Press the Windows key on your keyboard and type advanced system.
- Click View advanced system settings in the search results.
Advertisement
-
3
Click the Environment Variables button. You’ll see it at the bottom-right corner of the System Properties window.
-
4
Click the New… button under «User variables.» You’ll have two sections on this window—»User variables» and «System variables.» You’ll want to make sure you’re clicking New under the first box (User variables).
- If you have multiple installations of the JDK and want to change JAVA_HOME to your new installation, select the current JAVA_HOME user variable and click Edit… instead.
-
5
Type JAVA_HOME as the «Variable name.»
- If you’re editing the current JAVA_HOME path, you’ll already have JAVA_HOME here. So, you can skip this step.
-
6
Enter the full path to your JDK or JRE installation. For example, if the path is C:Program FilesJavajdk-19, enter that full path into the «Variable value» field.[1]
- If you’re adding a second path to JAVA_HOME, just type a semicolon (;) after the first path, then enter the second path.
- If you’re replacing an old JAVA_HOME path, just delete the current path and enter the new one.
-
7
Click OK. This takes you back to the Environment Variables window.
-
8
Select the Path user variable and click Edit. You should already have a variable in the «User variables» section called «Path.» To make sure you can run the Java binaries, you’ll need to edit your path to add the location of the JDK bin directory.
- If you want other users on this PC to be able to access Java binaries from the command line, repeat this step for the «Path» variable under «System variables» as well.
-
9
Append the path to your Java /bin directory to the end of the path. You’ll already have at least one directory in your path, which needs to stay in place. Here’s how to add the Java bin directory:
- Click the New button at the top.
- Enter the full path to the JRE or JDK with bin at the end. For example, C:Program FilesJavajdk-19bin or C:Program FilesJavajre1.8.0_351bin.
- Click OK.
-
10
Click OK on all subsequent windows. This updates your JAVA_HOME variable and adds the Java binaries to your path.
- You won’t need to restart your computer for the changes to take effect, but you will need to relaunch any apps that were trying to access Java.
- Open a new command prompt window and run the command echo %JAVA_HOME% to display the new path to JAVA_HOME.
- Make sure this is a new command prompt window. If you still have the same window open, the command will fail because it doesn’t have the new environment variables.


Advertisement
-
1
Open a Terminal window. To open Terminal, search for Terminal in Spotlight. Or, you can open Finder, click the Go menu, select Utilities, and choose the Terminal app.
-
2
Type /usr/libexec/java_home and press ⏎ Return. This handy utility that comes preinstalled on macOS will tell you the full path to your Java installation, which you’ll need to set JAVA_HOME.
- If you have more than one Java installation and want to see the paths to all of them, use /usr/libexec/java_home -V instead.
-
3
Copy the path and paste it somewhere handy. Highlight the path to the Java installation you want to use as JAVA_HOME, press Cmd + V to copy it, then paste it into a sticky note or text file.
-
4
Open your .zshrc file in a text editor. As long as you’re using macOS Catalina or later, you’ll be using the zsh shell by default, which means you’ll add JAVA_HOME and the path to your .zshrc file.[2]
If you’re using an earlier version of macOS (or prefer the bash shell), replace .zshrc with .bashrc in these commands instead. Here’s the easiest way to open the file:- Type cd ~ and press Return.
- Type open .zshrc and press Return. This should open the file in a text editor.
- If the file is not found, type echo > .zshrc and press Return. Then, run open .zshrc again.
-
5
Add these lines to the bottom of the file. Adding these lines ensures that JAVA_HOME will be set correctly even after you log off or open another window. If the file has existing contents, just scroll down past them to enter the following text on individual lines:
-
export JAVA_HOME=/Library/Java/JavaVirtualMachines/jdk-17.0.1.jdk/Contents/Home- Replace
/Library/Java/JavaVirtualMachines/jdk-17.0.1.jdk/Contents/Homewith the full path to the /Contents/Home directory of your Java installation if it’s different.
- Replace
export PATH=$JAVA_HOME/bin:$PATH- Save the file and exit the text editor when you’re finished.
-
-
6
Type source .zshrc and press ⏎ Return. Once you’ve edited your profile, this command ensures that your environment variables will be updated for the current terminal window (and any other windows you open from now on).
-
7
Type echo $JAVA_HOME and press ⏎ Return to confirm JAVA_HOME. You should now see the full path to JAVA_HOME.
- If you had any other windows open that were attempting to find Java binaries, close and reopen them.
- Shopping for PC accessories or office supplies? Check out our coupon site for Staples discounts or our coupon site for Office Depot.


Advertisement
-
1
Open a terminal window. If you’re logged in to your desktop environment, you can press Ctrl + Alt + T to launch a terminal window.
- This method will work in just about any version of Linux, including Ubuntu and Redhat.
-
2
Find the location of your Java installation. One way you might find the Java install location is to run the which javac command, but this will only give you a symbolic link. Instead, run this command to find the location of the executable file:
- readlink -f `which javac`
- If that doesn’t work, try running update-alternatives --list java.
- If neither of these commands works, run whereis java, which will usually result in a symbolic link like /usr/bin/java.
- Once you get the directory, find out where it links using ls -la /bin/java.
- If that points you to another directory, e.g., /etc/alternatives/java, run ls -la /etc/alternatives/java.
- At that point, you should see a much longer directory, which is actually the home to the Java binaries. For example, usr/lib/jvm/java-11-openjdk-arm64/bin/java. This is the directory you want.
-
3
Set the JAVA_HOME path. Now that you have the location of Java, you can add the path to your .bashrc file (if you’re using the bash shell), .zshrc (for the zsh shell), or the equivalent for your shell.[3]
Run both of the following commands, replacing the path with the path to your JDK or JRE installation, and «bashrc» with your shell’s login script:echo "export JAVA_HOME=/usr/lib/jvm/java-11-openjdk-arm64" >> ~/.bashrcecho "export PATH=$PATH:$JAVA_HOME/bin" >> ~/.bashrc
-
4
Type source .bashrc to apply the changes to the current terminal window. Though you’ve already set the home for Java and added the path to its binaries permanently, the changes won’t take effect in your current terminal window until you run this command.
- At this point, you can run echo $JAVA_HOME to see the location of Java on your system.


Advertisement
Ask a Question
200 characters left
Include your email address to get a message when this question is answered.
Submit
Advertisement
Video
-
In Linux, you can set JAVA__HOME for all users by editing the global .bashrc, which is located at /etc/bash.bashrc. Just use echo and replace ~/.bashrc with /etc/bash.bashrc.
-
On both Linux and macOS, you can set the Java home in your .bash_profile or .zprofile if you prefer.
Thanks for submitting a tip for review!
Advertisement
About This Article
Thanks to all authors for creating a page that has been read 293,971 times.
Is this article up to date?
We need to make a distinction between the two environment variables that are discussed here interchangeably. One is the JAVA_HOME variable. The other is the Path variable. Any process that references the JAVA_HOME variable is looking for the search path to the JDK, not the JRE. The use of JAVA_HOME variable is not meant for the Java compiler itself. The compiler is aware of its own location. The variable is meant for other software to more easily locate the compiler. This variable is typically used by IDE software in order to compile and build applications from Java source code. By contrast, the Windows CMD interpreter, and many other first and third party software references the Path variable, not the JAVA_HOME variable.
Use case 1: Compiling from CMD
So for instance, if you are not using any IDE software, and you just want to be able to compile from the CMD, independent of your current working directory, then what you want is to set the Path variable correctly. In your case, you don’t even need the JAVA_HOME variable. Because CMD is using Path, not JAVA_HOME to locate the Java compiler.
Use case 2: Compiling from IDE
However, if you are using some IDE software, then you have to look at the documentation first of all. It may require JAVA_HOME to be set, but it may also use another variable name for the same purpose. The de-facto standard over the years has been JAVA_HOME, but this may not always be the case.
Use case 3: Compiling from IDE and CMD
If in addition to the IDE software you also want to be able to compile from the CMD, independent of your current working directory, then in addition to the JAVA_HOME variable you may also need to append the JDK search path to the Path variable.
JAVA_HOME vs. Path
If your problem relates to compiling Java, then you want to check the JAVA_HOME variable, and Path (where applicable). If your problem relates to running Java applications, then you want to check your Path variable.
Path variable is used universally across all operating systems. Because it is defined by the system, and because it’s the default variable that’s used for locating the JRE, there is almost never any problem running Java applications. Especially not on Windows where the software installers usually set everything up for you. But if you are installing manually, the safest thing to do is perhaps to skip the JAVA_HOME variable altogether and just use the Path variable for everything, for both JDK and the JRE. Any recent version of an IDE software should be able to pick that up and use it.
Symlinks
Symbolic links may provide yet another way to reference the JDK search path by piggybacking one of the existing environment variables.
I am not sure about previous versions of Oracle/Sun JDK/JRE releases, but at least the installer for jdk1.8.0_74 appends the search path C:ProgramDataOracleJavajavapath to the Path variable, and it puts it at the beginning of the string value. This directory contains symbolic links to the java.exe, javaw.exe and javaws.exe in the JRE directory.
So at least with the Java 8 JDK, and presumably the Java 8 JRE standalone, no environment variable configuration needs to be done for the JRE. As long as you use the installer package to set it up. There may be differences on your Windows installation however. Note that the Oracle JRE comes bundled with the JDK.
If you ever find that your Java JDK configuration is using the wrong version of the compiler, or it appears to be working by magic, without being explicitly defined so (without casting the spell), then you may have a symlink somewhere in your environment variables. So you may want to check for symlink.
- 19 января 2018 в 16:09

Картинка для привлечения внимание. Ноги, кафель, ну вы поняли…
Windows:
Приступим к настройке.
- Давим по значку рабочего стола правой кнопки мыши -> открывается окно «Система».
- На левой панели давим по пункту «Дополнительные параметры системы» -> открывается окно «Свойства системы»
- На вкладке «Дополнительно» нажимает на кнопку «Переменные среды…» -> открывается окно «Переменные среды»
Перед вами 2 списка, в верхнем списке указаны все переменные доступные только вашему пользователю, в нижнем — всей системе. В некоторых случаях может потребоваться установить разные переменные JAVA_HOME для нескольких юзеров одной системы, в этом случае для каждого юзера придется прописать свою переменную в списке «Переменные среды пользователя». Мы пойдем обычным путем и установим одинаковую переменную для всех.
- Необходимо убедиться что переменной JAVA_HOME нет в списке, если есть, давим кнопку изменить и переходим к 6 пункту.
- Давим кнопку «Создать…».
- Указываем имя переменной «JAVA_HOME», в значении переменной указываем полный путь до папки с JDK, например «C:javajdk1.7.0_79».

Окно «Свойств системы» в Windows
Не будет лишним так-же указать переменную «JRE_HOME», она пригодится, например, для разработки портлетов для портала Liferay, для этого по аналогии повторите пункт 6. Как правило, JRE находится в папке с JDK, примерный путь «C:javajdk1.7.0_79jre».
После установки дистрибьютива JDK виртуальная машина «java.exe» будет доступна в консоли повсеместно. Для выполнения некоторых задач, необходимо так-же предоставить доступ к компилятору «javac.exe», для этого отредактируйте переменную Path. Добавьте в значение переменной «;» и путь до папки с компилятором, например «C:Javajdk1.7.0_79bin».
Ubuntu:
Для начала необходимо понять куда была установлена Java, выполните команды:
sudo update-alternatives --config java
Результатом выполнения команды будет список установленных виртуальных машин Java:
There are 2 choices for the alternative java (providing /usr/bin/java).

Selection Path Priority Status
------------------------------------------------------------
* 0 /usr/lib/jvm/java-8-oracle/jre/bin/java 2 auto mode
1 /usr/lib/jvm/java-7-oracle/jre/bin/java 1 manual mode
2 /usr/lib/jvm/java-8-oracle/jre/bin/java 2 manual mode

Press enter to keep the current choice[*], or type selection number:
Из этого списка нам потребуется столбик Path. Полный путь до виртуальных машин должен быть до «jre/bin/java», например в нашем случае 0-ой пункт будет иметь полный путь до машины «/usr/lib/jvm/java-8-oracle».
Для установки переменной JAVA_HOME, необходимо прописать ее в /etc/environment, используя путь до машины Java.
sudo echo 'JAVA_HOME="/usr/lib/jvm/java-8-oracle"' >> /etc/resolv.conf
Изменения вступят в силу автоматически после перезагрузки, либо мы можем перегрузить переменные окружения командой:
source /etc/environment
Осталось выполнить проверку:
echo $JAVA_HOME
Если в результате команда напечатает путь до машины JAVA, значит настройка завершена успешно.
JRE_HOME
Не будет лишним так-же указать переменную «JRE_HOME», она пригодится, например, для разработки портлетов для портала Liferay. Как правило, JRE находится в папке с JDK, т.е. значение JRE_HOME = путь до виртуальной машины + «/jre».
sudo echo 'JRE_HOME="/usr/lib/jvm/java-8-oracle/jre"' >> /etc/resolv.conf
source /etc/environment
echo $JRE_HOME