Have you ever wished that you could create and customize the WooCommerce cart page using Elementor’s visual interface?
We have great news! In the Elementor Pro 3.5 release in November 2021, we extended Elementor WooCommerce Builder with new features including dedicated widgets for your store’s shopping cart, checkout, and my account pages.
Whereas before you needed to rely on your WooCommerce theme to control these key pages, you’ll now be able to control the design, layout, and content of these elements directly from Elementor.
In this tutorial, we’re going to focus on how to use one specific element — the new Cart widget. More specifically, you’re going to learn how to use Elementor Pro’s new Cart widget to control and optimize your store’s cart page without leaving Elementor.
If you want to see this tutorial in video format, you can watch the video above. Otherwise, keep reading for the full text-based tutorial that follows along with the video.
How Does the Elementor Cart Widget Work?
Your store’s shopping cart is an essential part of your ecommerce website’s user experience. Shopping carts simplify the payment process for your customers and make it easy for shoppers to save the products that they’re interested in.
With Elementor’s new Cart widget, you can use Elementor’s visual design interface to fully customize your cart page to make sure it matches the rest of your store’s branding and is set up to optimize sales.
Here are some examples of the types of customizations that you’ll be able to make with the Cart widget:
- Choose different cart layouts, such as a one-column or two-column layout.
- Customize all of the colors and typography for every single element in your cart.
- Configure the layout and spacing of each element on a granular level, such as adjusting the row gap between certain cart information.
- Edit the labels for key areas of your cart page, along with the text for various buttons.
- Customize your cart’s forms, such as the coupon form and shipping rate calculator.
As with all of your Elementor designs, you’ll also get special options to customize how your cart looks on different devices, which lets you make sure every shopper has a great experience, whether they’re browsing on a desktop, tablet, or mobile device.
How To Use the Cart Widget in Elementor
Now, let’s get into the step-by-step guide for how you can start using the Elementor Cart widget on your WooCommerce store.
1. Edit Your Store’s Default Cart Page in Elementor
When you create a WooCommerce store, WooCommerce will automatically create a cart page for your store that uses the WooCommerce cart shortcode.
For this tutorial, you’re going to use this existing page for your design. But rather than just sticking with the default styling from your theme, you’ll edit this page with Elementor to access all of Elementor’s design options.
To begin, go to the Pages list in your dashboard and find the Cart page. It should be marked as “Cart Page”.
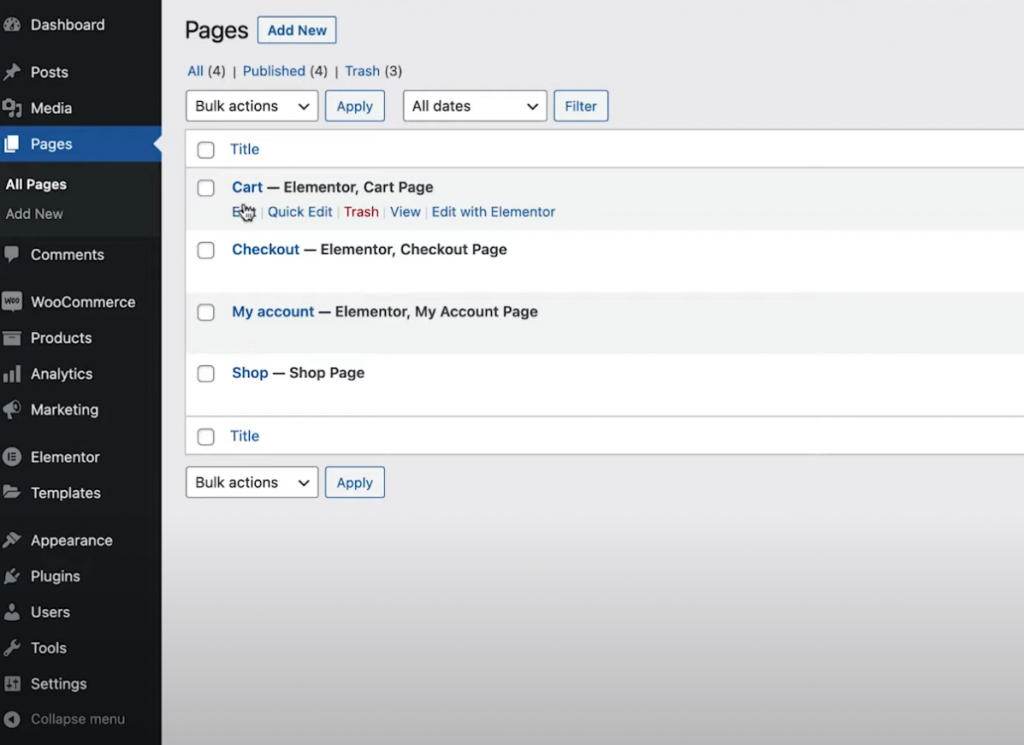
Once you find it, click the Edit button to open the WordPress editor. Then, inside the editor, click the option to Edit With Elementor to launch Elementor’s interface.
2. Replace the WooCommerce Cart Shortcode With the Elementor Cart Widget
When you first open your store’s existing cart page in Elementor, you’ll see the [woocommerce_cart] shortcode in an Elementor Text Editor widget.
To start your design, you’ll want to delete this existing widget/shortcode and replace it with Elementor’s new dedicated Cart widget:

Now, you’re ready to start customizing the design of your cart page.
Note – we recommend adding some items to your shopping cart so that you can see what a “full” cart looks like while you’re working on your design. Otherwise, you’ll see your cart in its empty state when you’re working in Elementor.
You can do this by going to the frontend of your store, adding some items to your cart, and then reloading the Elementor interface. Once you reload Elementor, those items should appear in your cart while you’re working on your design.
If you ever want to go back to previewing how an “empty” cart looks, you can just remove those items from your cart on the frontend of your site and then reload the Elementor interface.
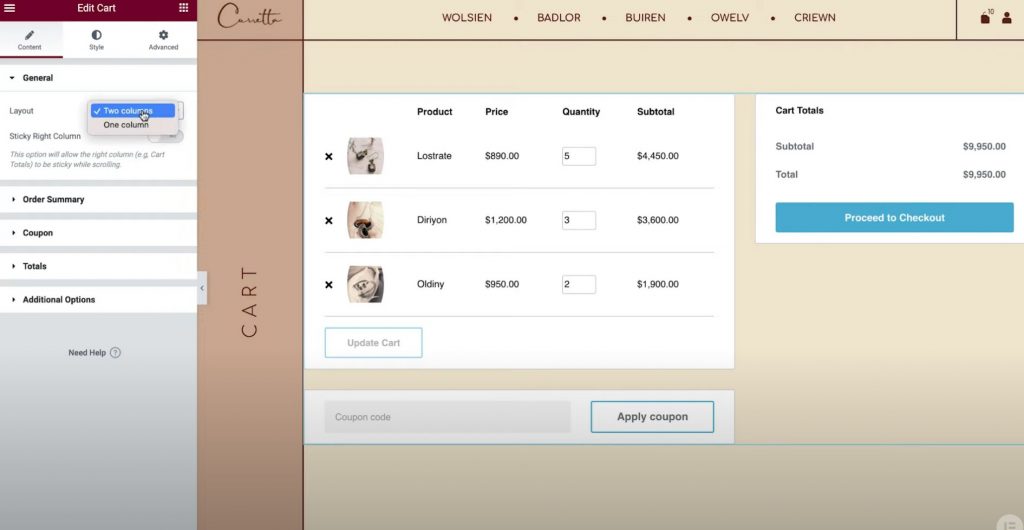
3. Set Up the Layout of Your Cart
To control the layout, design, and other behavior of your cart, you can open its settings in the sidebar just like you would edit any other Elementor widget.
To start, you can choose between using a one-column or two-column layout in the Layout drop-down of the General settings. Using a two-column layout is nice because it brings the cart totals up top, which makes the cart totals more visible when browsing on larger devices.
You can also make the cart totals column sticky on scroll by enabling the Sticky Right Column toggle. You might want to also add an offset to ensure that this doesn’t overlap with other content.
Next, you can use the Order Summary settings to adjust the “Update Cart” button text if needed.
In the Totals settings, you’ll get similar options to adjust the labels and alignment of various cart elements, such as the “Proceed to Checkout” button text.
If you’ve enabled the WooCommerce shipping calculator feature, you can also configure that in the widget’s settings. You can enable the shipping calculator in WooCommerce’s settings by going to WooCommerce → Settings → Shipping → Shipping options and checking the box to enable the shipping calculator on the cart page.
Finally, the Additional Options settings give you a toggle to enable automatic cart updates. Instead of requiring shoppers to click the Update button to apply their changes; enabling this feature, will update the cart automatically without a page reload.
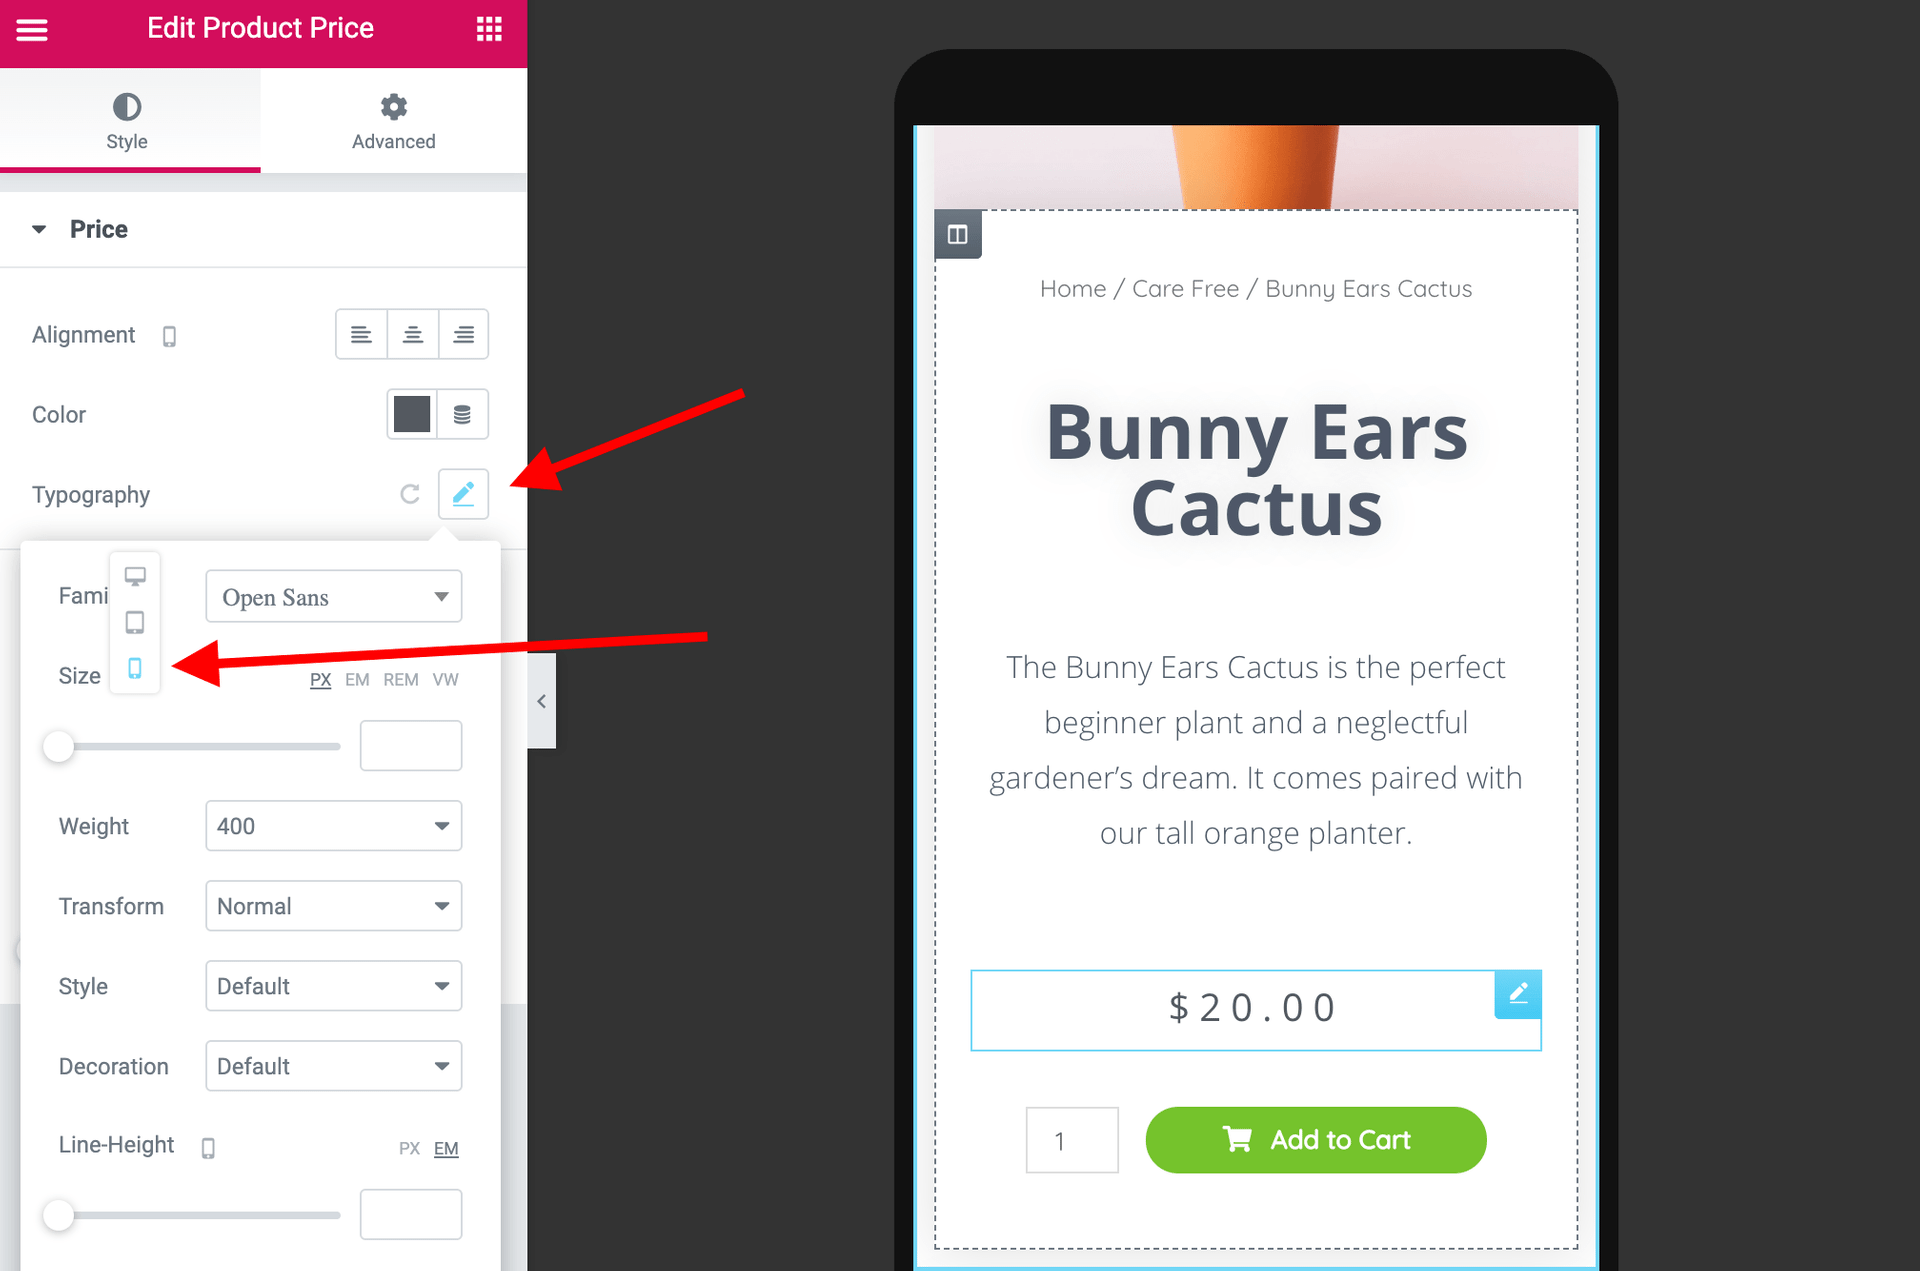
4. Adjust the Styling of Your Cart
Now, you can configure the style and design of your cart by going to the Style tab in the widget’s settings. Here, you’ll see a number of different settings areas including Sections, Typography, Forms, and more.

Here are the general style options that you’ll find in each area:
- Sections – you can control the overall style of all three cart widget parts. For example, you can apply a background to the entire cart or add a box shadow.
- Typography – you can control some general typography and colors for key labels such as the titles, descriptions, links, and so on.
- Forms – you can control the styling of the coupon field form and the shipping fields form (if you’ve enabled the shipping calculator on the cart page). For example, you can use the Rows Gap setting to create some space between form fields.
- Buttons – you can style the Apply Coupon and Update buttons with all the Elementor button styling options that you’re familiar with.
- Order Summary – you can control the style for the products in cart and order summary.
- Totals – you can control the design of the “Cart Totals” section, which is what lists the total cost of the shopper’s order.
- Checkout Button – you can control the design of the checkout button. You’ll want to make it eye-catching to ensure shoppers don’t miss it as this is the action that you want them to perform.
- Customize – you can get more granular control over the order summary, coupon, and totals. If you add these options, you’ll get additional settings focused on those areas. For example, you could use this to make your “totals” section stand out from the rest of your cart with a separate background color, box shadow, border, and so on.
5. Customize the Mobile Version of Your Cart
When you use the Elementor Cart widget, your cart will be mobile responsive by default. However, as with other Elementor widgets and designs, you can also go in and manually adjust how your cart should look on different devices to create the absolute best experience for every shopper.
To do this, open Elementor’s responsive editing mode and then you’ll see device icons next to the settings that you’re able to tweak for different devices.
For example, you can change the row gap depending on whether someone is using a desktop or mobile device or adjust the font size of different elements.
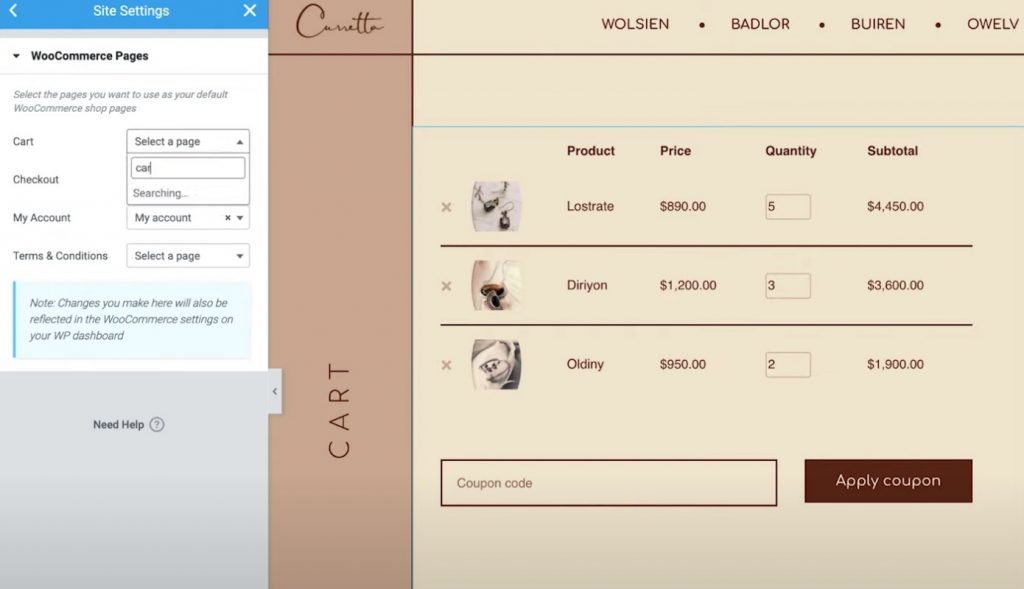
6. Adjust WooCommerce Settings in Site Settings If Needed
This last step is optional, but it’s worth pointing out that you can also control key WooCommerce page assignments from the Elementor Site Settings area.
For example, if you created a new page for your cart with Elementor instead of editing the existing WooCommerce cart page, you could tell WooCommerce to use your new page from the Elementor Site Settings.
You can access these options from the WooCommerce tab of the regular Site Settings area. The WooCommerce option will appear under the Settings heading.
Create and Customize Your Cart Page Without Leaving Elementor
With the new WooCommerce Cart widget in Elementor Pro, you can now create and customize your cart page without leaving Elementor.
Using Elementor’s settings, you’ll be able to customize the design of every element, choose from different layouts, change the labels, and more. Having this extra control over your cart page will give you the power to ensure a cohesive design with the rest of your store and optimize your cart page to boost sales.
What’s more, Elementor Pro also has new widgets for other key areas of your store, such as the checkout page and My Account page. These widgets eliminate the need to use WooCommerce shortcodes and give you more control over your store than ever before.
All of these new widgets build on the existing features that you had in WooCommerce Builder, such as the ability to customize the WooCommerce single product page.
If you’re already using Elementor Pro and WooCommerce Builder, you can get started with the Cart widget today by following this tutorial. If you’re not using Elementor Pro yet, upgrade today to access the new Cart widget, WooCommerce Builder, and all the other great features in Elementor Pro.
Do you still have any questions about how to use the WooCommerce Cart widget in Elementor Pro 3.5? Let us know in the comments!

Do you want to customize your product page and maximize your conversions? In this guide, we’ll show you how to edit the WooCommerce product page using Elementor to boost your sales.
Previously, we’ve seen how to customize the Shop Page using Elementor to improve the way you display your products. However, in a standard funnel, after the shoppers select a product on the Shop Page, they’ll go to the Product Page. To optimize this step of the funnel as much as possible, you can create and customize the WooCommerce product page using Elementor’s widgets and template designs. So, let’s have a look at how you can make the most of your product pages using Elementor.
Why customize the WooCommerce Product page?
Before jumping into the tutorial, let’s better understand the benefits of personalizing your product page in WooCommerce. With a fully customized Product page, you get the advantage of making your product pages informative, effective, and fully representative of your product’s quality.
To that extent, you can add every element that will give you the extra edge when it comes to convincing your customers. For example, with Elementor, you can quickly add elements to display users’ testimonials or product ratings. Additionally, you can include upselling elements, related products, and even additional sales offers. You can add a custom contact form to every product for better customer responses or demo videos.
Nowadays, competition in eCommerce is fierce. So, you need to be creative and provide shoppers with an excellent customer experience to be a step ahead of your competition. That’s why creating a more curated shopping experience with a customized WooCommerce product page is a must. And the best part is that with Elementor, you can easily create and redesign your product pages.
Elementor comes with many product page templates that allow you to create product pages in no time even if you don’t have any designing experience. Let’s have a look at how you can edit the WooCommerce Product page in Elementor.
Before we start
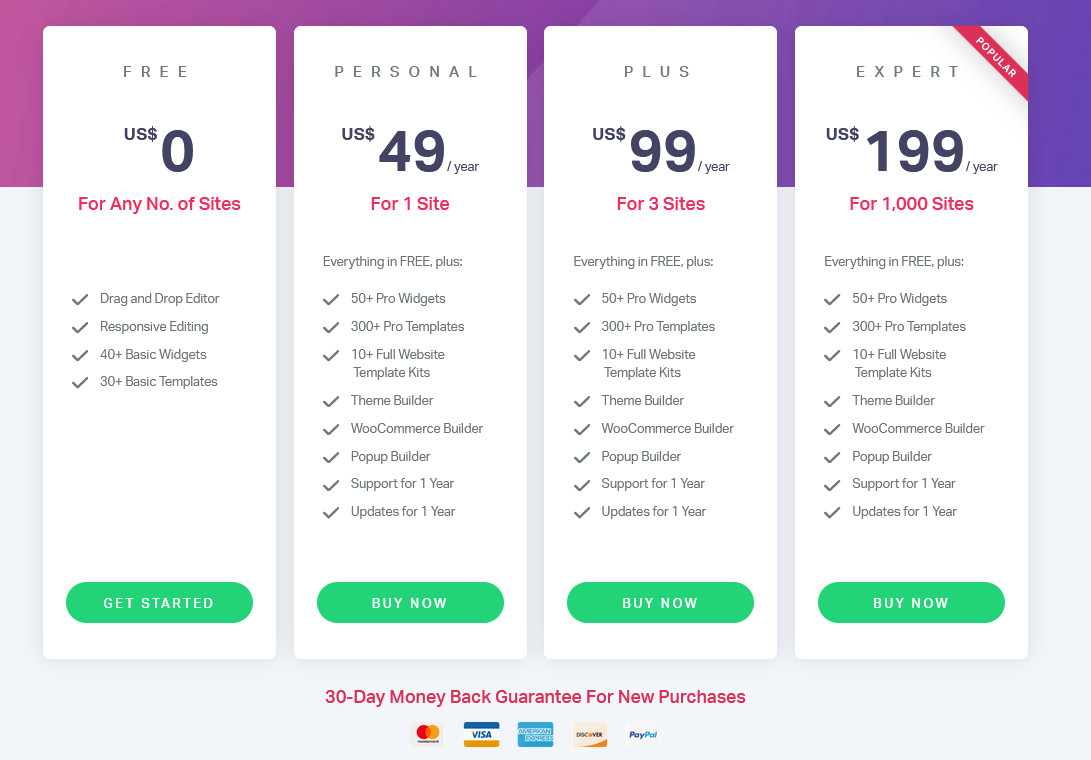
Before we start with the tutorial, it’s important to note that for this process you will need Elementor Pro. The premium versions allow you to customize your Product Page templates and enable all the WooCommerce Widgets. If you want to personalize more areas of your site, Elementor Pro is a great investment considering its features and price. For 49 USD per year, you can enjoy:
- Over 50+ Pro widgets with dedicated WooCommerce widgets
- Full customization options for specific WooCommerce pages like the Shop page, Cart page, checkout pages, and more
- 10+ full website kits with 300+ Pro templates for various pages and website designs
- Dedicated WooCommerce builder with specific templates and widget building options
All the plans have a 30-day money-back guarantee for new purchases.
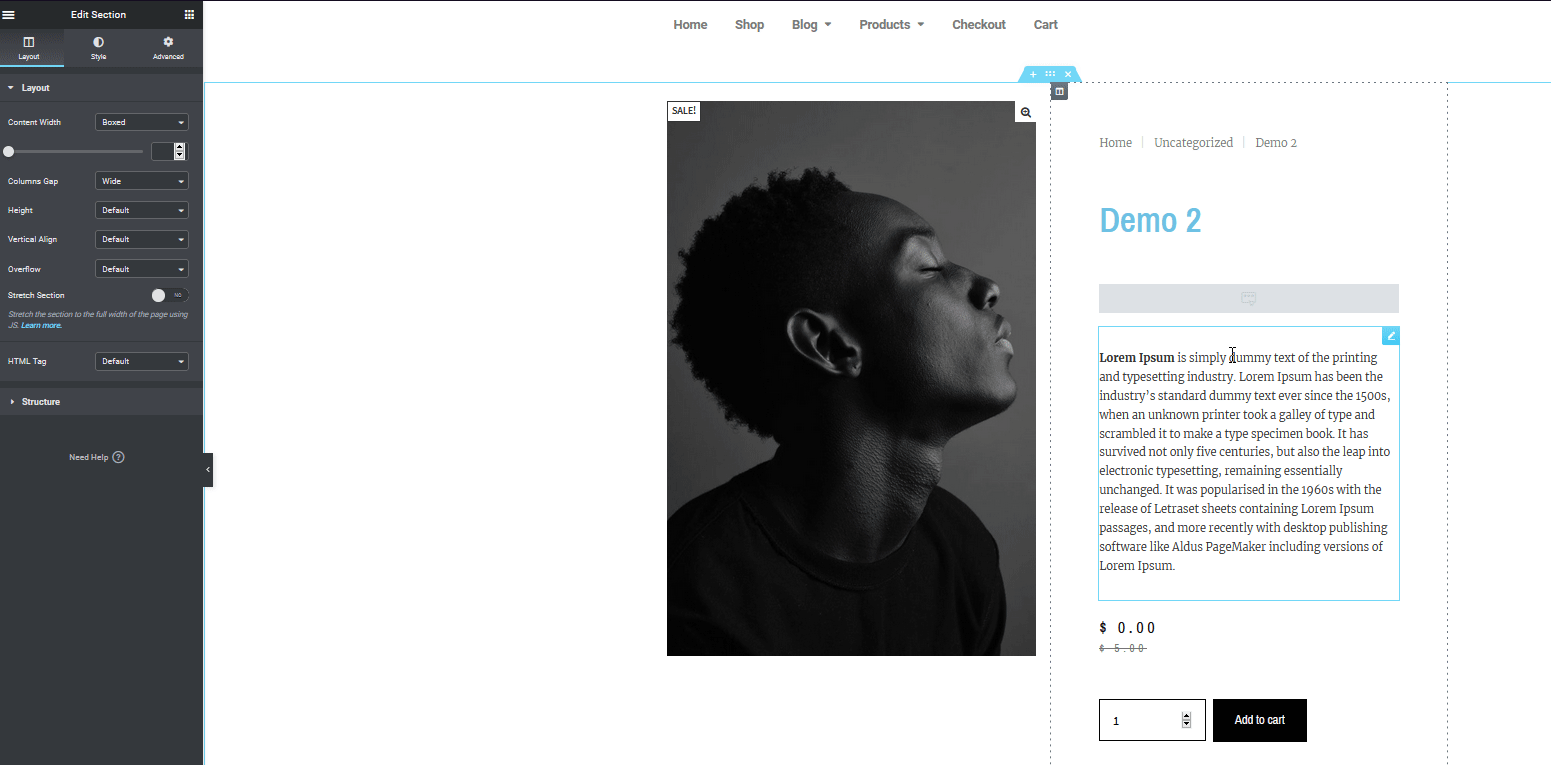
How to edit the WooCommerce product page in Elementor
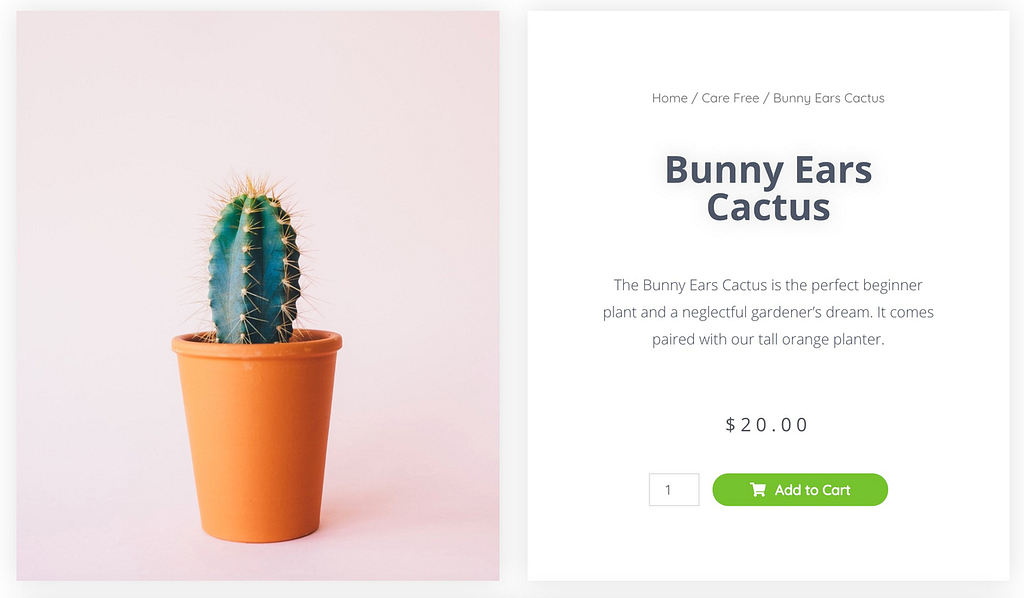
Before starting with the tutorial, let’s see what the default WooCommerce product page looks:

As you can see, there’s nothing wrong with it, but there are things that can be improved. Additionally, if you want to stand out and make an impression on your visitors, customizing the product page is a must. The good news is Elementor makes that task easy.
Let’s start by setting up a template for your Product page so you can easily implement all your changes to the product pages.
Create a product page template
So, go ahead and press Templates in your WordPress Admin Dashboard. Then, click Add New to create a new template, select the type as Single product, give it a name, and click Create Template. 
Once you’re on Elementor’s customization screen, you’ll have the option to either use setup blocks or templates to work with your product page. You can always open this screen by clicking on the Add Template button on the Drag Widget Here section. Moreover, you can choose a wide range of fully designed product page templates that Elementor offers to make your life easier.
You can also use smaller blocks that only give you setup sections for your Product page that you can start working with. For now, we’ll use a few blocks. So, let’s click on the Add Template button, then go to the Blocks tab and select Single product on the template drop-down menu. After that, choose a block that fits your needs and click Insert to add it to your template.
You’ve just created a WooCommerce product page. Now, it’s time to add some flavor to it so let’s start by customizing our page a bit more using Elementor.
Customizing the WooCommerce Product Page in Elementor
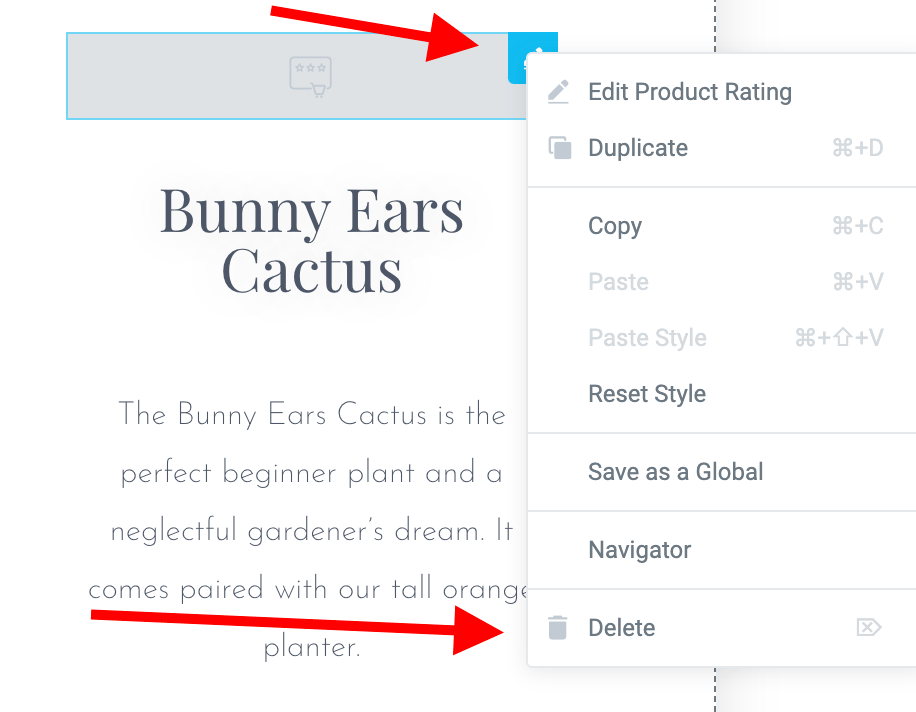
To start with the Product page customization, we’ll first remove the Product rating widget since we don’t have Product ratings enabled on our website. To do this, right-click on the widget you want to remove and press Delete.
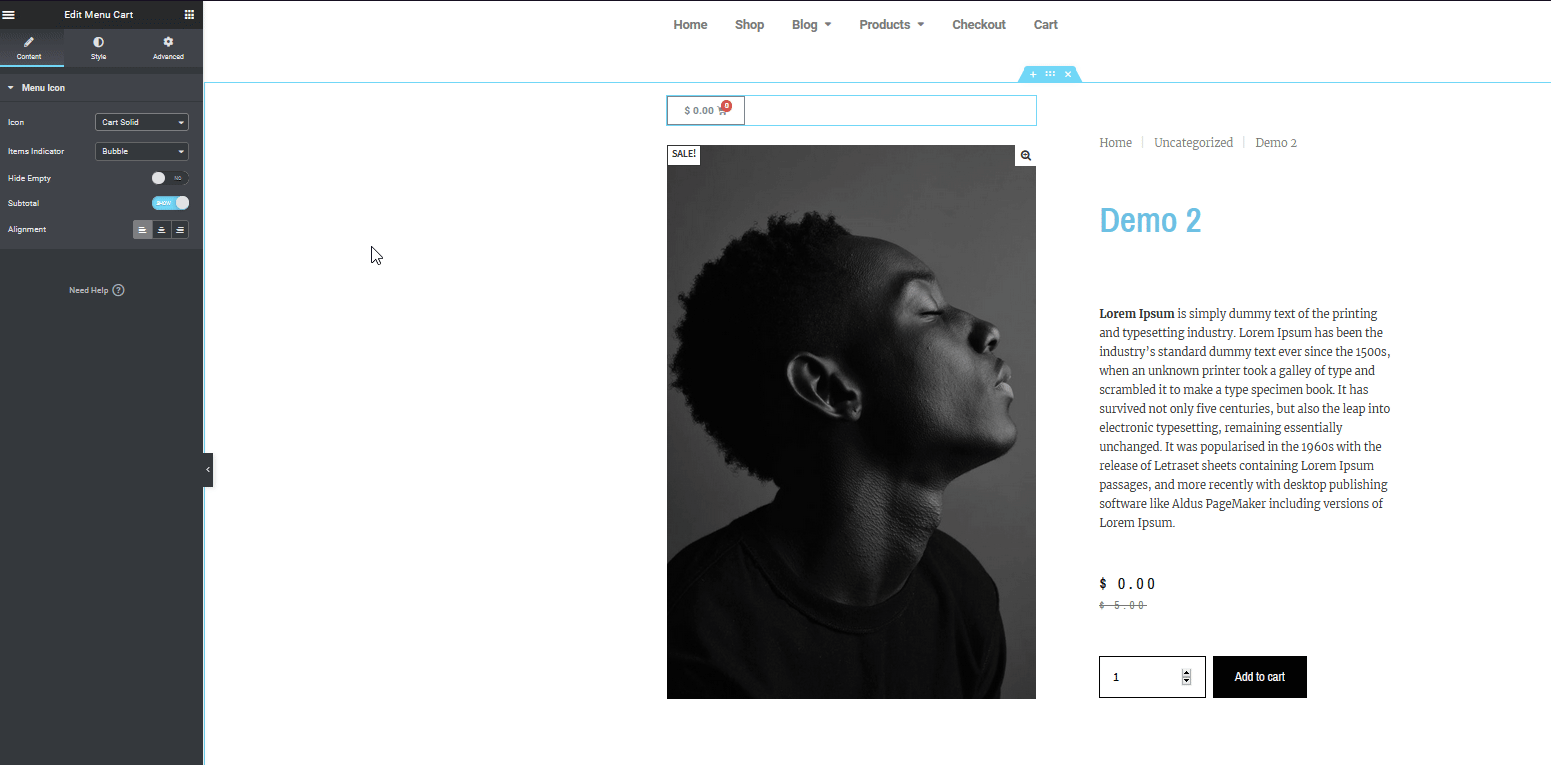
Next, let’s add a menu cart button that shows the current cart for the customer. To do that, click on the Grid icon on the top right of the sidebar and use the search bar to look for the Widget menu. Then, drag the widget to your preferred location.
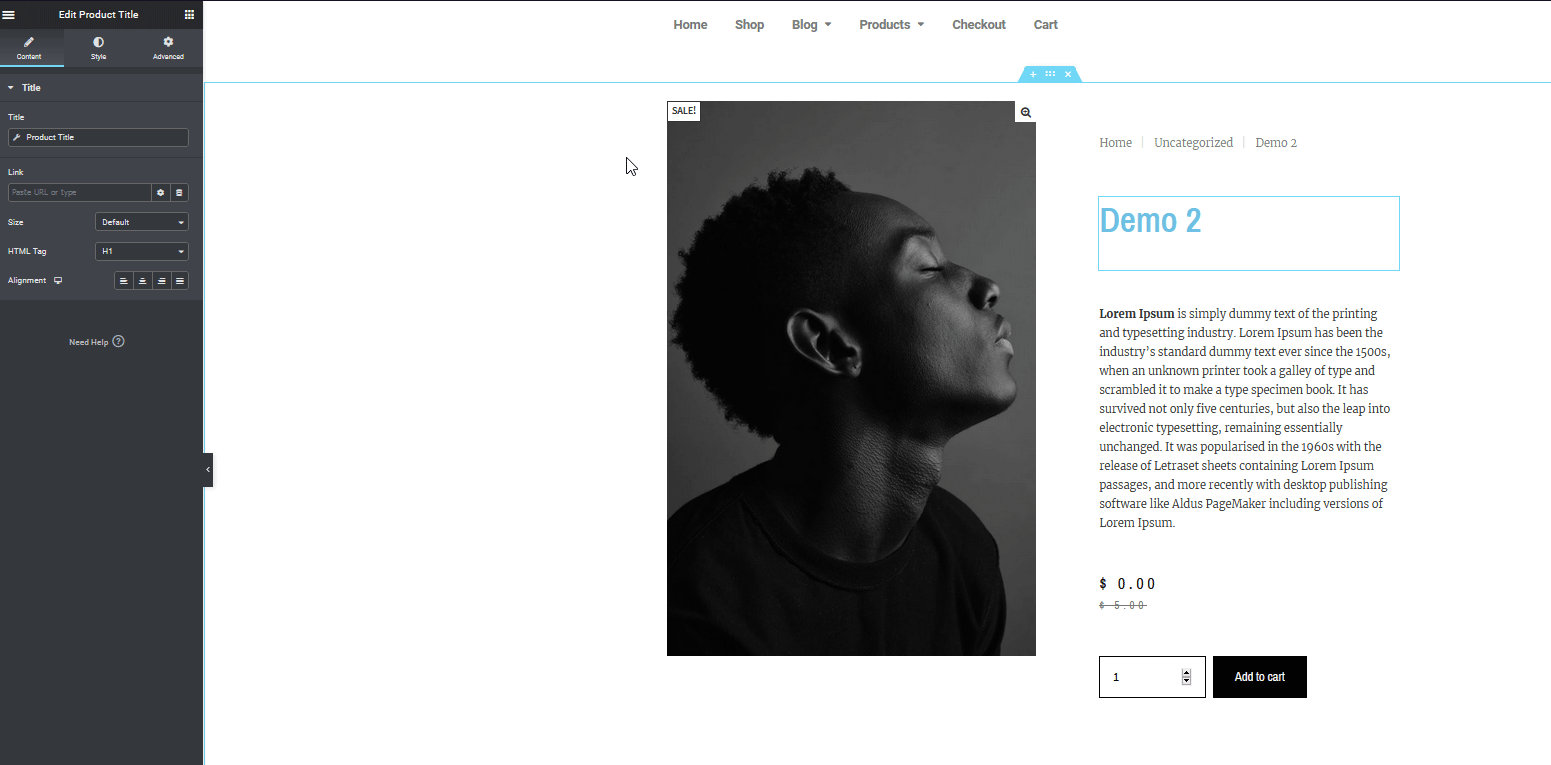
Now, let’s customize the WooCommerce product page a bit more. Click on the widget, use the left sidebar options to change the icon and its alignment.
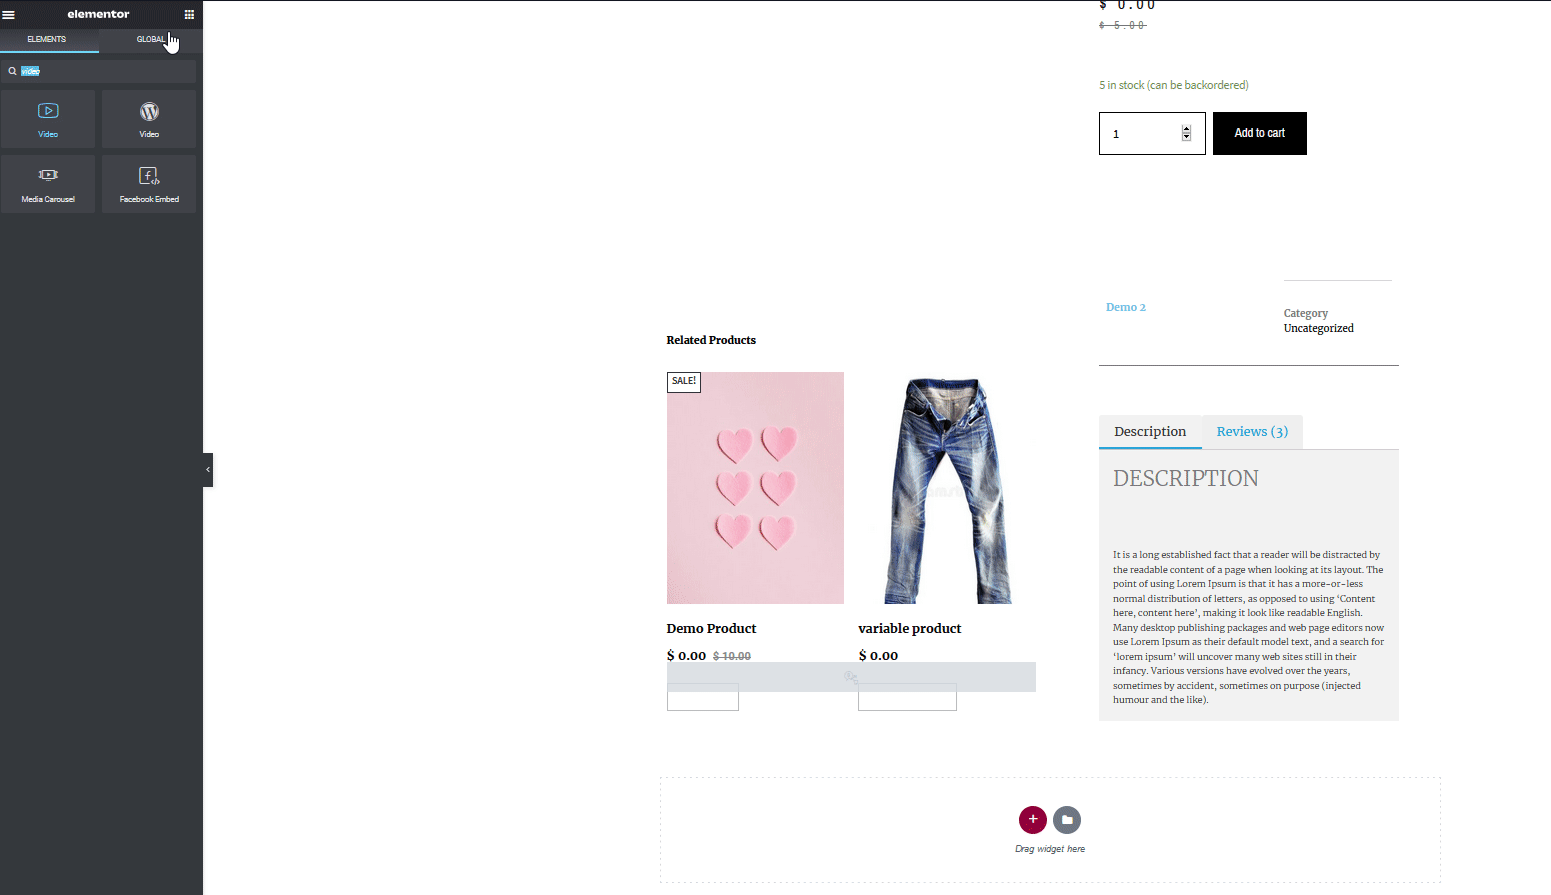
 Finally, let’s add a few more elements that can be extremely handy for your online store. For example, why not add a video to better display what your product has to offer? You can simply add either a YouTube video or a server-hosted video to the bottom of your product pages and customize it to suit your product page.
The process for both options is quite similar. Simply add the widget from the widget menu and include the source for the video. You can also choose to autoplay the video, mute it, and so on.
This is just scratching the surface but there’s a lot more you can do to edit the WooCommerce product page in Elementor. For example, you can add descriptions, related products, ratings, images, buttons, and much more. So unleash your creativity and play around with all the widgets and blocks Elementor offers. Once you finish your customizations, make sure that your page looks good both on desktop and mobile devices.
Edit the Product Page for Mobiles and Tablets
Elementor offers an interesting option to make sure that your product page looks perfect on mobile devices. Simply click on the responsive mode button on the bottom of the left sidebar and change it to either tablet or mobile.
Then, you can customize various widgets and adjust them so they look perfect on mobile.
Activate your new WooCommerce Product Page
Once you finish customizing your product page template in Elementor, it’s time to enable it for all your product pages. To do this, click on the Publish button on the bottom of the left Elementor sidebar. Then, you’ll need to set a condition for the template. This allows you to enable this new template on specific pages or for specific conditions on your website.
For example, you can activate your templates on product pages but also others such as categories pages or even products under specific authors. To do that, press the Add Condition button and under Include, select the Dropdown option and click Products (or any other option where you want to enable the template). Then, hit Save and Close, and now your newly customized Product Page should be enabled for all your WooCommerce products. 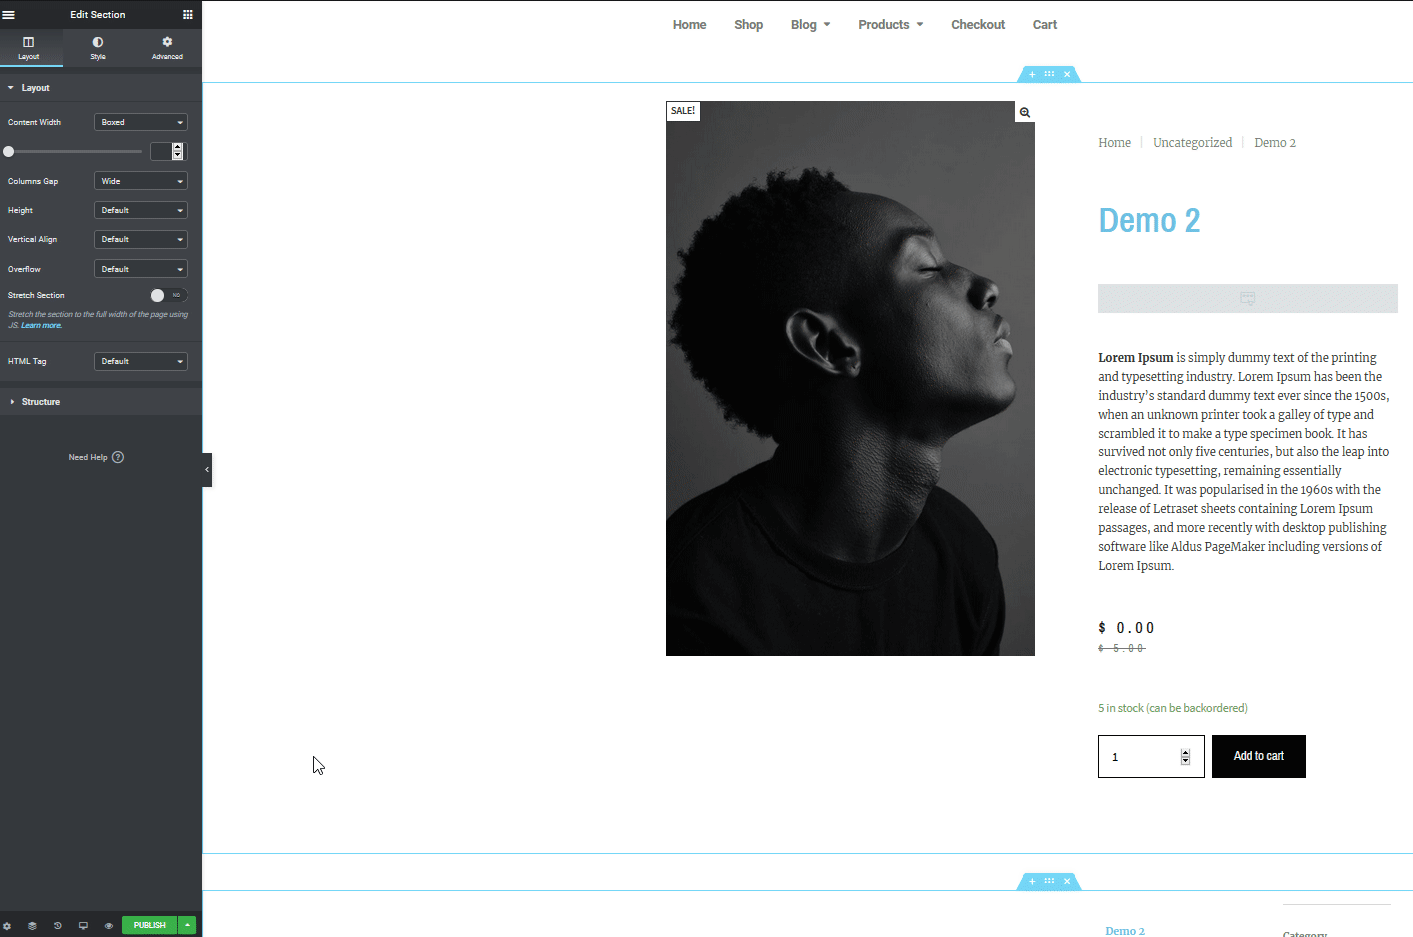
More customizations with Elementor
Apart from editing the Product Page, Elementor allows you to customize other parts of your site as well. This is key to making your store stand out and increasing your conversion rates. For example, you can easily edit your shop page and cart page. If you want to know more about this, have a look at the following step-by-step guides:
- How to customize the WooCommerce Shop Page with Elementor
- How to edit the Cart Page with Elementor
Wrapping up
To sum up, personalizing the product page can improve customer experience and boost your conversion rates. And the best part is that that’s very easy with Elementor. Learning how to edit the WooCommerce product page in Elementor will help you take your store to the next level.
In this guide, we’ve seen a few examples of what you can do to create and edit the product page. But there are many other things you can do. With Elementor’s amazing drag and drop page builder and the huge number of WooCommerce widgets, you can make any kind of product page to fit your needs. For example, you can include widgets such as Google Maps, contact forms for responses, testimonial carousels, and a lot more. You can also use pre-designed page templates.
We recommend you play around with the options to discover everything that Elementor has to offer.
Ideas to improve your product page with Elementor
To help you in the process, here are some tips and ideas that you can use to ensure that you have an amazing WooCommerce Product page:
- Remember to set up your product page so it looks good on both Desktop and Mobile devices
- Explore Elementor’s typography options to change various text elements on every widget
- Using fully designed blocks and templates is a swift way to set your Product page
- Make sure your customized Shop page and your product page fit each other
- Consider customizing your product page and enable a quick, direct checkout option for your products
For more information to make the most of Elementor and WooCommerce, we recommend you check out these guides:
- How to customize WooCommerce Shop Page in Elementor
- How to create a Mega Menu with Elementor
- Customize the WooCommerce Product Page templates
Do you have any questions about how to use Elementor to edit your product page? Let us know in the comments section below! We’ll be happy to help you out.
Вы когда-нибудь хотели представить создать карточку продукта с Факир ?
Это то, что мы покажем вам в этом уроке. Чтобы получить достаточно точное представление о том, о чем мы сегодня будем говорить, предлагаем вам посмотреть следующее видео:

В этом руководстве рассказывается о представлении продуктов, которые являются обувью, путем выделения их размеров, цветов и кнопки покупки для каждого из них. Эта информация появится при наведении курсора на каждую из карточек. Вот краткое изложение того, что мы будем делать.
Чтобы следовать этому руководству, мы предлагаем вам найти фотографии обуви и Профессиональная версия Elementor. Если у вас его еще нет, нажмите на эту ссылку, чтобы получить.
Но вернемся к тому, для чего мы здесь.
Давайте создадим страницу и изменим ее с помощью Факир.
В этом примере давайте выберем структуру с 3 колонками. Давай уладим это высокомерие из минимальная высота , минимальную высоту на VH и установите курсор на 100

На вкладке Стиль выберите цвет фона, чтобы #130640

В средний столбец вставьте Виджет изображения выбрав изображение обуви из своей библиотеки.

Перейдите на вкладку Стиль и в свойстве изображения установите ширину 80.

Затем перетащите Виджет заголовка и введите название Nike обувь — Это пример, это мог бы быть совсем другой бренд —
Читайте также: Как оптимизировать макет вашего сайта с помощью Elementor

Установите для тега HTML значение H3 и отцентрируйте выравнивание.

Перейдите на вкладку Стиль и измените цвет текста на белый.

Измените и типографику

Затем перетащите Виджет внутреннего раздела ниже Виджет заголовка что вы вставили выше.
По умолчанию этот виджет предложит вам 2 столбца, удалите один из них. В этом Виджет внутреннего раздела, Вставить Виджет заголовка.

Дайте это как название Резать : и установите для тега HTML значение пролет.

На вкладке «Стиль» измените цвет заголовка, размер на 15 и жирность на 300.

На вкладке Advanced установите только Right margin на 5 и в свойстве позиционирование выбрать Встроенный (Авто).


Добавьте в тот же внутренний раздел виджет Button с текстом 8 и интервалом значков на 0.
Читайте также: Как пролистать длинное изображение портфолио с помощью Elementor
На вкладке «Стиль» измените цвет текста и цвет фона кнопки соответственно на черный и белый, а в поле «Внутреннее поле» введите 6-10-6-10 соответственно для внутренних полей сверху-справа-снизу-слева.

На вкладке «Дополнительно» установите только левое поле на 5, а в свойстве «Позиционирование» выберите «Встроенный (Авто)».

Продублируйте эту кнопку 3 раза и измените текст последних 3 кнопок на 9,10,11 — вы также можете сделать это, используя буквы S, M, L, XL, XXL-

Щелкните раздел редактирования и установите для параметра «Горизонтальное выравнивание» значение «Центр».

Затем продублируйте этот Внутренний раздел -Внутренний раздел- и измените размер по цвету, удалите 3 кнопки и на той, которая останется, удалите текст кнопки.

На вкладке «Содержимое кнопки» выберите значок «Круг» из библиотеки значков, нажмите «Вставить», чтобы добавить его к кнопке.

На вкладке «Стиль» укажите размер 24 для типографики, свяжите внутренние поля и введите 0. В цвете фона установите прозрачность на минимальное значение, а затем вы можете изменить цвет текста, например, на синий.

Затем продублируйте эту кнопку 3 раза и измените цвета двух других на желтый и красный. Затем щелкните внутреннюю секцию, чтобы отредактировать ее, и на вкладке «Дополнительно» установите для верхних и нижних полей значения -5 и 10.

Теперь мы собираемся добавить виджет кнопки под вторым виджетом внутреннего раздела, введите его как текст. Купи сейчас и выравнивание по центру. На вкладке «Стиль» установите для кнопки значение «Белый», а для текста кнопки — «Черный», затем установите для всех радиусов границ значение 20.

Выберите основной столбец, над которым мы работали, и установите выравнивание. вертикальный из Окружениена вкладке Стиль выберите тип фона как градиент и в качестве Типа выберите Радиальный затем на основном цвете установите прозрачность и расположение на 94. Для второго цвета установите местоположение на 77 и радиус кромок более 10.

На вкладке «Дополнительно» установите поля 0-35-0-35 и внутренние поля 50-20-50-20.

Затем вы можете скрыть панель, чтобы увидеть, как выглядит ваша работа. Вы увидите, что ваша карточка очень красивая, но мы собираемся воплотить ее в жизнь, анимируя определенные разделы. И для этого мы собираемся анимировать размер, цвет и кнопку покупки.
См. Также: Как изменить заголовок при прокрутке страницы в Elementor
Давайте сначала разделим первый внутренний раздел, в котором отображается размер продукта, и на вкладке «Дополнительно» определим Fade In Up as Movement Effect — Анимация входа и задержка анимации включены 300.

Сделаем то же самое с внутренним разделом, который отображает цвета, но с задержкой анимации 800. Для кнопки покупки задержка будет 1000
Теперь мы собираемся назначить класс спрятаться Внутренний раздел и кнопка покупки. Выберите первый внутренний раздел, на вкладке «Дополнительно» и в свойстве «Дополнительно» введите hide-first в поле «Классы CSS». Сделайте то же самое для другого внутреннего раздела и для кнопки покупки.

Поэтому мы собираемся добавить код CSS, который будет анимировать весь столбец. Скопируйте следующий код:
selector {
Высота: 400px;
дисплей: гибкий;
}
/ * CSS для Показать / Скрыть * /
selector .hide-first {
Дисплей: нет;
}
selector: hover .hide-first {
Дисплей: блок;
}
/ * Преобразование изображения * /
selector img {
переход: легкость .5s;
}
selector: hover img {
преобразовать: перевести (-20 пикселей, -40 пикселей) повернуть (-25 градусов) масштаб (1.4);
}
/ * Обзор мобильных * /
@media (max-width: 767 пикселей) {
selector: hover img {
преобразовать: перевести (-20 пикселей, 0 пикселей) повернуть (-10 градусов) масштаб (1);
}
selector {
маржа: 50 пикселей 10 пикселей;
}
}
Выберите столбец, чтобы изменить его, перейдите на вкладку «Дополнительно» и в поле «Пользовательский CSS» вставьте этот код.
NB: вы должны знать, что эта опция доступна только в том случае, если у вас есть Pro-версия Elementor.

Если это будет сделано, ваша карта будет анимироваться при наведении курсора мыши, по умолчанию скрывая размеры, цвета и кнопку покупки.
Что касается объяснения кода, часть комментариев дает обзор. Но изменяя значения вы поймете для чего нужна каждая инструкция.
Смотрите также: Как добавить две кнопки рядом в один столбец с Elementor
Если все работает нормально, продублируйте этот столбец дважды и удалите остальные пустые столбцы.

Все, что вам нужно сделать, это заменить изображения и заголовки других блоков и, наконец, просмотреть свою работу.

Вы только что создали красивую карточку товара.
Получите Elementor Pro прямо сейчас!
Заключение
Так ! Вот и все, что касается этого урока, в котором показано, как создать карточку продукта с помощью Elementor. Если у вас есть какие-либо вопросы о том, как туда добраться, сообщите нам об этом в Комментарии.
Тем не менее, вы также можете проконсультироваться наши ресурсы, если вам нужно больше элементов для реализации ваших проектов создания интернет-сайтов, обратитесь к нашему руководству по Создание блога на WordPress или Divi: лучшая тема WordPress всех времен.
Но тем временем поделитесь этой статьей в разных социальных сетях.
…
Стандартная страница продукта WooCommerce работает хорошо и выглядит хорошо! Тем не менее, мы можем добиться большего успеха, особенно благодаря интеграции WooCommerce и Elementor!
В этом руководстве мы покажем вам, как создать собственную (и красивую) страницу продукта WooCommerce, чтобы «ВАУ» вашим клиентам и увеличить продажи.
Что вам нужно
В дополнение к тому, что у вас уже есть – работает установка WordPress и добавлен WooCommerce – вам необходим плагин для страницы разработчика Elementor.
Элементоры бывают двух типов – бесплатные и платные. Хотя в бесплатной версии Elementor есть некоторые настройки для WooCommerce, вам нужно перейти на профессиональную версию, чтобы получить действительно хорошие вещи. Это будет стоить 49 долларов за сайт.
Запись; Elementor – не единственный разработчик страниц, работающий с WooCommerce и позволяющий создавать собственные страницы продуктов WooCommerce. Вот несколько альтернатив, если вы хотите изучить другие вещи. Тем не менее, Elementor является нашим любимым решением для настройки WooCommerce.
Перед началом работы вы должны установить бесплатный плагин Elementor и Elementor pro на свой веб-сайт:
- Установить бесплатный Elementor легко. Просто иди Дополнения → Добавить новый и введите Elementor в поле поиска. Установите и активируйте.
- Чтобы установить Elementor pro, сначала необходимо совершить покупку на Elementor.com. Вы можете скачать пакет Elementor pro из своего профиля пользователя – это ZIP-файл. Перейти на свой адрес Дополнения → Добавить новый и нажмите Установить плагин Нажми на кнопку. Выберите ZIP Elementor на рабочем столе и загрузите его на свой веб-сайт. Включить дополнения.
Элемент предложит вам подтвердить вашу лицензию, прежде чем все начнется.
Чтобы начать, перейдите по ссылке: шаблон и нажмите Добавить новое,
из списка Один продукт,
Elementor покажет вам несколько предустановленных шаблонов страниц продуктов WooCommerce, с которых вы можете начать. Выбор того, что вы хотите больше всего, является лучшим способом для большинства пользователей. Обычно создание нового шаблона продукта занимает больше времени. Проще заменить существующие шаблоны. кликните сюда войти шаблон принес.
Вы обнаружите, что ваш шаблон был добавлен на холст Elementor. Теперь вы можете настроить шаблон по своему усмотрению – добавлять новые элементы на страницу, настраивать последние, удалять ненужные элементы и т. Д.
В левой боковой панели вы увидите различные элементы, такие как WooCommerce. Название продукта, Изображение продукта, Цена продуктаи другие данные, которые WooCommerce отображает о ваших продуктах.
Вы можете взять каждый из этих предметов и перетащить их на холст именно там, где они вам нужны.
Некоторые корректировки, которые вы можете сделать заранее:
Добавьте свой бренд и цвет
Шаблоны продуктов Elementor выглядят хорошо, но могут не подходить для вашего бренда. Быстрое изменение, которое мы можем сделать, чтобы улучшить это, это настроить цвет фона, цвет шрифта и различные типографские настройки в целом.
Чтобы настроить блок на странице, щелкните значок карандаша в правом верхнем углу блока.
Далее на левой боковой панели стиль Вкладка. Здесь вы можете внести все изменения в свой стиль и внешний вид. Например, Название продукта Вы можете изменить цвет блока, текста, типографии и тени.
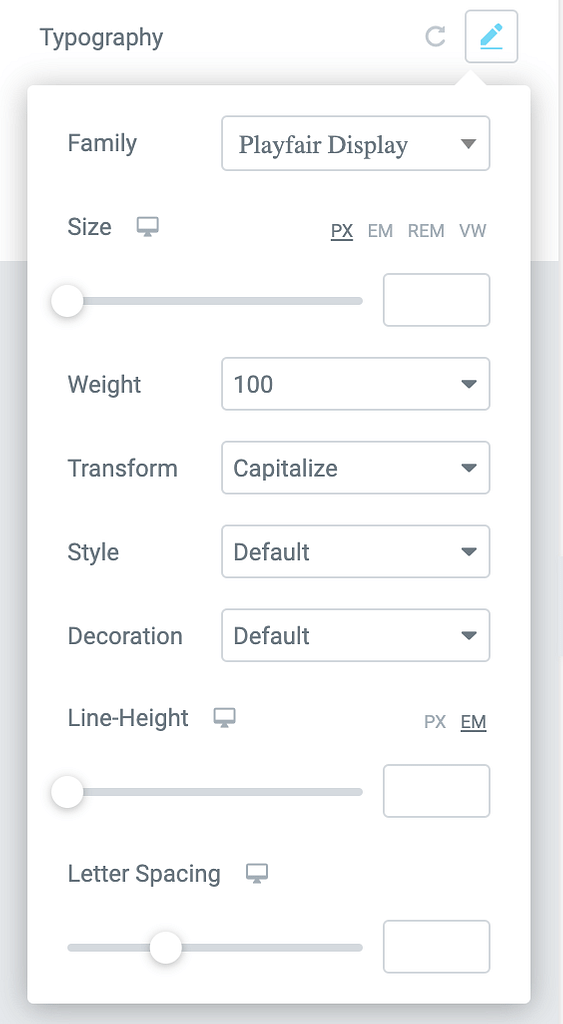
Затем нажмите типографияЭто показывает еще одно поле, где вы можете изменить шрифт и все его параметры.
Просмотрите весь текст один за другим и отредактируйте его, как считаете нужным. Обратите внимание на то, как выглядит ценовой блок – должно быть ясно, что клиенты не растеряны.
Выровнять / переместить описание товара
WooCommerce отображает описания ваших продуктов в разных местах. Нам не нужно понимать все функции прямо сейчас, но давайте сосредоточимся на двух вещах:
- Краткое описание
- вкладка данных вашего продукта
Краткое объяснение звучит хорошо. WooCommerce этот текст Краткое описание (одно из полей, которые вы заполнили при создании нового продукта). Рекомендуется отображать простой экран в верхней части страницы продукта.
Элементор Краткое описание Блок и перетащите туда, где вам это нужно.

Вкладка «Эффективные данные о продукте» – это блок с важной информацией о продукте. Убедитесь, что ваша новая страница продукта WooCommerce отображается в вашем шаблоне.
Не забудьте сформировать цвет и типографику блока.
Измените кнопку «Добавить в корзину»
Кнопка «Добавить в корзину» – это самая важная кнопка на любом сайте электронной коммерции. Вы действительно хотите, чтобы это выделялось и привлекало ваших клиентов.
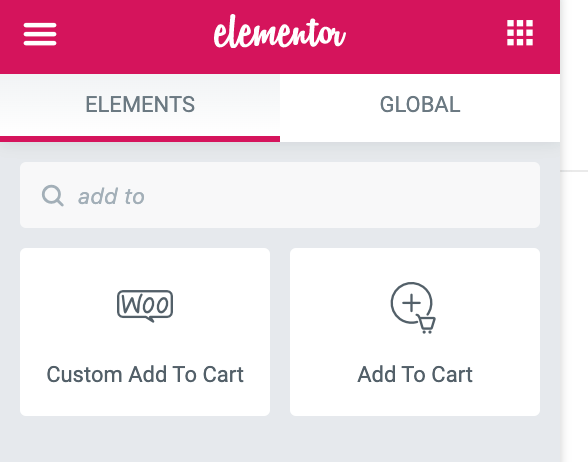
Вы можете использовать два разных типа блоков для кнопки «добавить в корзину» в Elementor. Там есть Добавить в корзину блоки и Добавить в корзину ограничения.
Поэкспериментируйте с обоими, чтобы увидеть, какой из них лучше в вашей ситуации. Нажмите на значок карандаша и посмотрите, что происходит на боковой панели, когда речь идет о конкретных настройках блока.
С помощью нескольких щелчков ваша кнопка будет выглядеть лучше.
Добавить / удалить рейтинг продукта
Просмотр оценки продукта может быть отличным способом дать вашим клиентам последний толчок для покупки ваших товаров. Единственная проблема заключается в том, что в первую очередь должны быть рейтинги. 🤷♂️
Когда ваш магазин новый и у вас еще нет рейтинга, лучше не блокировать рейтинг на странице. Щелкните правой кнопкой мыши Оценка продукта Выберите и удалите.
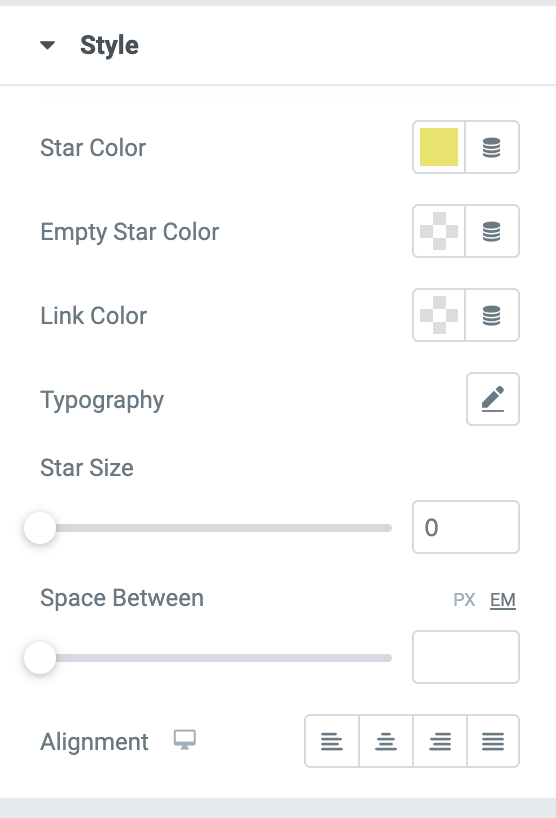
Затем вы можете добавить блок обратно и даже настроить его. Некоторые вещи, которые вы можете изменить, это цвет звезд и расстояние до объектов.
Тонкая настройка мобильных и планшетных экранов
Сегодня все больше и больше людей получают доступ к сети smartphones с настольных компьютеров и ноутбуковПоэтому ваш магазин должен быть оптимизирован для мобильного просмотра, иначе вы потеряете свои продажи!
WooCommerce оптимизирован для мобильных устройств за пределами двери, но мы должны убедиться, что ваши новые шаблоны продуктов выглядят хорошо при создании пользовательских страниц продуктов.
В левом нижнем углу интерфейса Elementor есть помеченная кнопка. Отзывчивый режим,
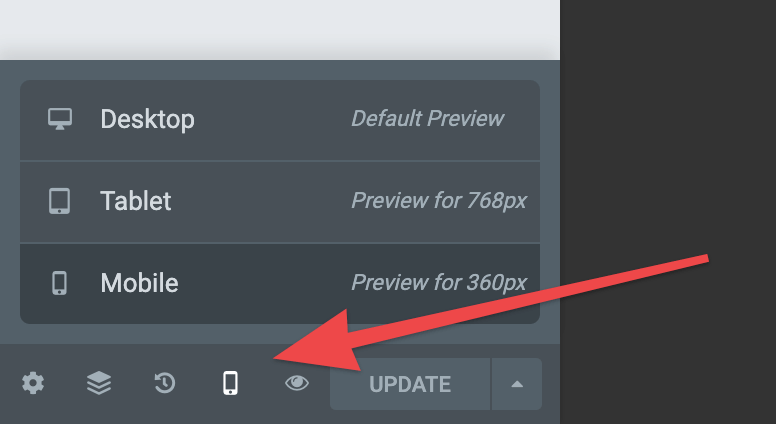
Когда вы нажимаете, вы можете переключаться между ними. рабочий стол, таблеткаа также портативный Посмотреть. Выберите один из них и при необходимости измените дизайн.
Интересно то, что вы можете изменить настройки дисплея только на мобильном телефоне или планшете. Например, если вы считаете, что на мобильном телефоне цена выше, щелкните значок карандаша в ценовом блоке, затем нажмите, чтобы отредактировать типографику и, наконец, переключиться на «Мобильный» рядом с размером шрифта:
Если вы измените размер шрифта сейчас, это повлияет только на экран мобильного телефона.
Заполняйте элементы шаблона по одному, пока не настроите их для мобильных устройств и планшетов.
Публикация пользовательских страниц продуктов WooCommerce
Нажмите, когда ваш новый шаблон продукта будет готов публиковать Нажмите кнопку в левом нижнем углу интерфейса Elementor.
Элемент предлагает добавить условие, которое указывает, когда следует использовать шаблон.
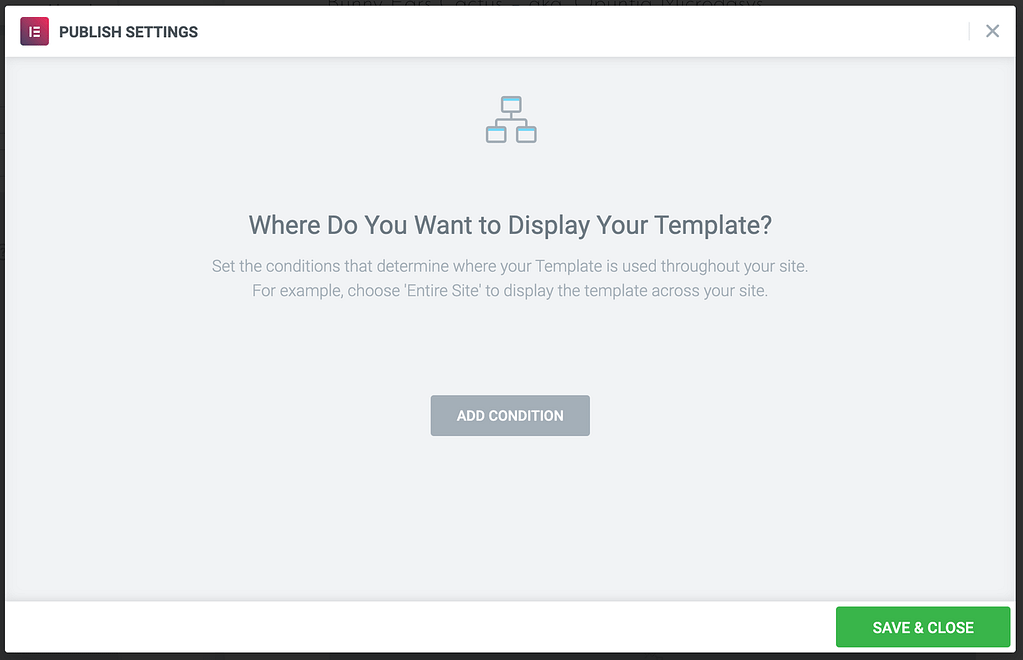
Чтобы использовать шаблоны для всех продуктов, выберите «Продукты» из списка, например:

кликните сюда Сохранить и закрыть решить все.
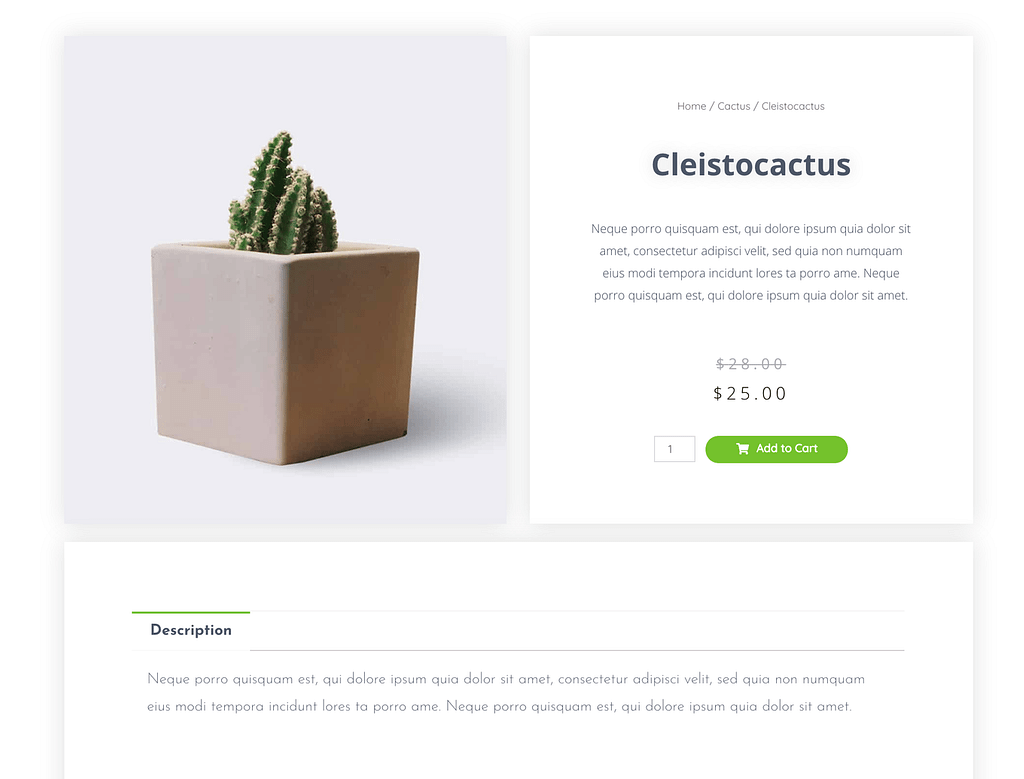
Это все! Благодаря этому пользовательская страница продукта WooCommerce была сохранена и заменена страницей продукта по умолчанию.
Когда вы посещаете один из продуктов в вашем магазине, вы можете увидеть страницу своего продукта в действии.
Сегодня рассмотрю, казалось бы, простую задачу, но, как выяснилось, без специального плагина с ней рядовому пользователю справиться будет достаточно сложно. Итак, мне нужно было на существуем сайте с установленным конструктором Elementor вывести список последних товаров по определенной категории. Если у вас есть премиальная версия данного плагина, то в нем предусмотрены специальные виджеты для этого, но в обычном бесплатном Элементоре они недоступны.
Теоретически, вы можете воспользоваться стандартным виджетом самого модуля Woocommerce, сделанного под WordPress. Называется он “Товары”.
Минусы этого подхода видных сразу:
- во-первых, элементы отображаются в виде списка и пользователю придется перегруппировать их с помощью CSS стилей в что-то более солидное;
- во-вторых, виджет имеет крайне скудные настройки — тут даже нет выборки по категории.
Насколько я помню, с помощью шорткодов Woocommerce там можно выводить информацию куда более гибко чем в данном виджете. Если интересует этот подход, можете загуглить соответствующие шорткоды, но есть вариант немного проще – специальный модуль.
Woo Products Widgets For Elementor
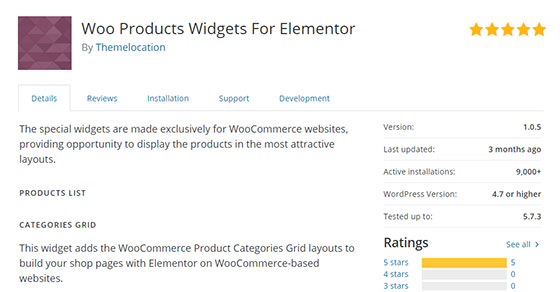
На первый взгляд разработка смотрится немного не солидно – ни тебе превью на странице модулей, ни обновлений 3 последних месяца. В целом, он не идеальный, но, как показала практика, со своей задачей справился.
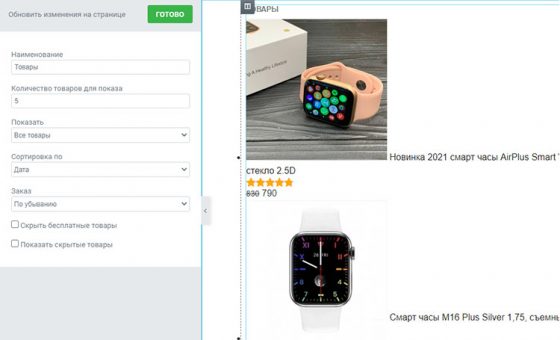
После установки в редакторе Elementor появится сразу 3 разных блока:
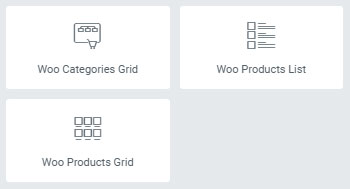
А именно:
- Продукция в Grid-формате (в несколько колонок).
- Категории Woocommerce в такой же Grid стилистке.
- Вывод продукции обычным списком.
Я взял первый вариант. И тут, конечно, передо мной открылось нереальное множество разных параметров и настроек. Редакторам/новичкам это однозначно понравится.
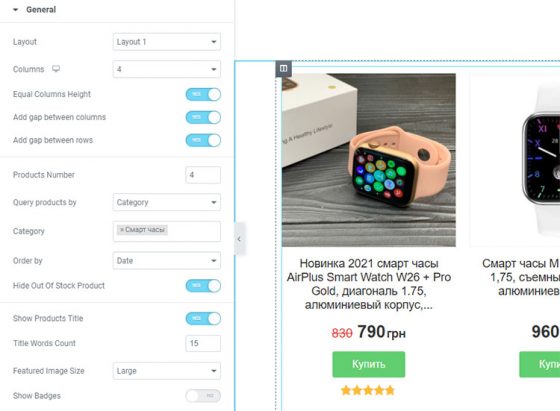
В первой вкладке отображаются главные параметры и даже есть возможность запустить слайдер (карусель) с товарами! Плюс на выбор имеется 5 вариантов оформления блока с продукцией.
А дальше идут всякие опции в стиле:
- количество отображаемых колонок/товаров;
- выборка по категории + сортировка результатов;
- вывод описания, заголовка, бейджей, кнопок, цены и др.
Во второй вкладке (Стиль) вы можете редактировать абсолютно все элементы блока: заголовок, картинку, кнопку, рейтинг, категории, описание и др. Ну, круто же!
Единственное, с чем у меня возникли проблемы – почему-то не выводился символ валюты, пришлось дописывать его через CSS псевдокласс after.
Альтернативы
Думаю, несколько альтернативных решений найти можно, но и там есть нюансы. Например, я сразу же попал на плагин Unlimited Elements For Elementor с сотней полезных виджетов на любой вкус и цвет. Но, во-первых, только часть из них бесплатная + настройки ограничены, а, во-вторых, не хочется ставить громоздкий модуль из-за одной вполне конкретной задачи. Поэтому сегодня лично я использовал Woo Products Widgets For Elementor.
Would you like to deeply customize WooCommerce product page layouts?
The WooCommerce product page is one of the most vital pages in your WooCommerce store, but by default, you have very little control over the design. Hence, almost all these WooCommerce shop page templates tend to look exactly the same. But not all products are the same, some require different product page layouts to really sell them.
By creating better shop page layouts, you can get a breakthrough over your competitors to really show off your products in the best way possible.
- Benefits of customizing WooCommerce product pages perfectly
- How to customize WooCommerce product pages with Elementor Pro?
- What’s the Elementor Theme Builder?
- Can we use Elementor with WooCommerce in Woostify?
- Below is how to edit WooCommerce product pages with Elementor:
- How to Customize WooCommerce Product page with Woostify Pro?
- Why we can use Woostify Pro instead of Elementor pro to build a WooCommerce product page?
- Below is how to design and customize WooCommerce single product page with WooBuilder:
- What you need consider when customizing WooCommerce product pages
- Improve Your Product Images
- Improve Your Product Description
- Test Your Pricing Placement
- Make the Related Product Recommendations appropriate
- Conclusion
Benefits of customizing WooCommerce product pages perfectly
Below are the benefits that you will get if designing beautiful product pages.
- An awesome WooCommerce Product page will attract more visitors to stay longer on your site, and convert more of your potential customers into new ones.
- By creating a good WooCommerce product page, you can dramatically enhance SEO by including more keywords in rich content that your leads will be searching for on Google search engine.
In the past, editing WooCommerce product page templates involved dozens of lines of code. In this article, we will guide you on how to customize WooCommerce product page in 2 ways: via Elementor pro and via Woostify Elementor WooCommerce theme pro, both of which require almost no programming skills.
The WooCommerce shop archive page and WooCommerce single product page are the default WooCommerce template. Therefore, it’s very limited to edit the WooCommerce shop page layout. Luckily, thanks to Elementor WooCommerce Builder, we can totally edit WooCommerce product page layouts.
What’s the Elementor Theme Builder?
Theme Builder is an advanced function of Elementor Pro. This feature helps visually customize WooCommerce Elementor product page elements, including headers, footers, archive pages, single post pages, and other shop pages. Basically, you can build these pages by using the pro version of Elementor page builder.
Can we use Elementor with WooCommerce in Woostify?
Woostify was integrated with Elementor and WooCommerce. Therefore, you can use Elementor to build any parts of eCommerce sites when using Woostify free WooCommerce theme. Especially, this is the best way to create incredible WooCommerce Elemetor product pages.
Below is how to edit WooCommerce product pages with Elementor:
Step 1: To build a product single page, you can go to Templates -> Theme builder -> Add new and select Product single template
Step 2: Just drag and drop widget to build this page
Note: Product image widget default doesn’t work. You must choose Woostify – Product images widget that requires Elementor bundle add-on of Woostify Pro
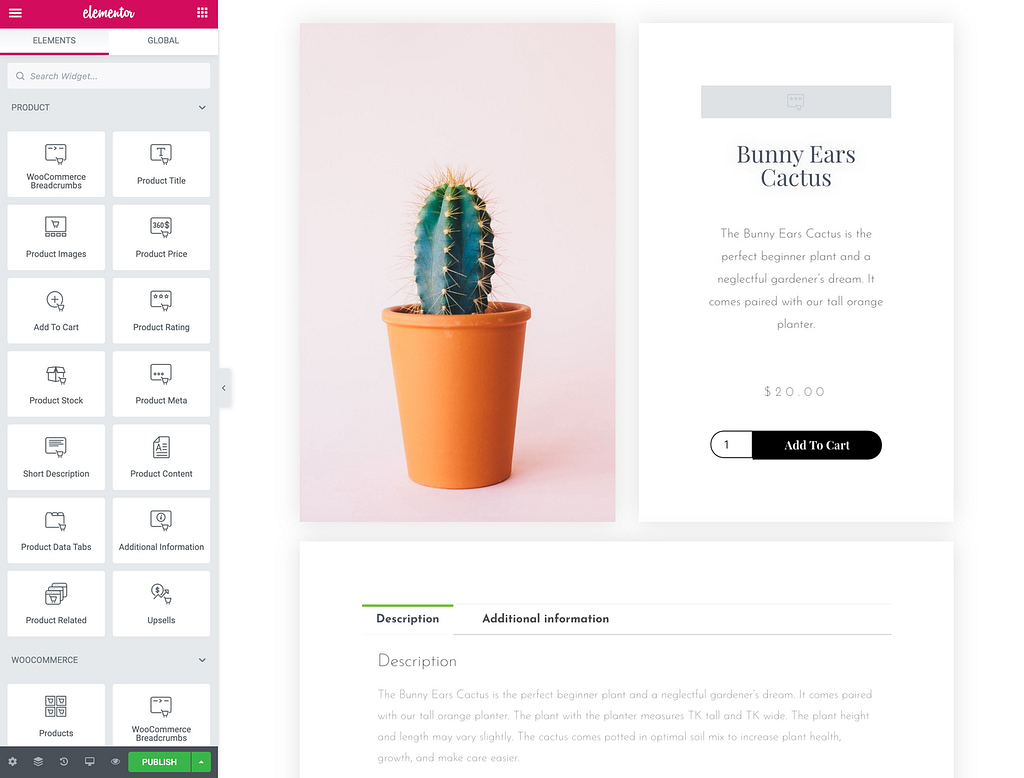
For this tutorial, you can build an Elementor Woocommerce single product page by using the following widgets:
- Product Title widget
- Woo Breadcrumbs widget
- Woostify – Product image widget
- Product rating widget
- Short description widget
- Product price widget
- Add to cart widget
- Product meta widget
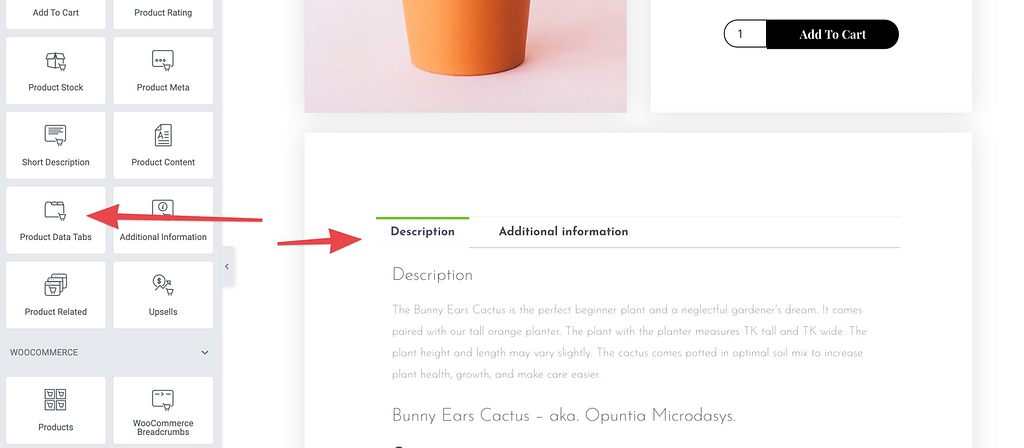
- Product data tabs
- Product related
- Upsells widget
Step 3: Click to Publish button and set the condition where you want to apply this page. You can set it for all product pages or by category and tag.
If you want to build a custom Elementor WooCommerce product archive page, you only need to create a new page and set it for the Product Archive template and follow all the steps above.
With this feature, you can build and customize WooCommerce Elementor product pages visually without any coding knowledge. This feature helps save a ton of time and brings flexibility to build a fully-functional online store.
How to Customize WooCommerce Product page with Woostify Pro?
Why we can use Woostify Pro instead of Elementor pro to build a WooCommerce product page?
Woostify has recently released a unique and useful Elementor WooCommerce addon, WooBuilder that allows store owners to build their desired shop page, single product page, cart page, and checkout page, custom My Account page WooCommerce, and Thank You page Elementor. This feature is built with the aim to increase conversion rates, which has a big contribution to the sale improvement of their eCommerce websites.
With this WooCommerce single product page builder, you don’t need to get Elementor Pro to build your shop pages. The Woostify theme has already been integrated with Elementor Free, so you don’t need to install Elementor anymore. Particularly, Woostify offers separate bundles of useful Elementor WooCommerce widgets for shop owners to have completely full control over the WooCommerce shop pages. They can fully customize any part of their product pages without any code experiences.
Below is how to design and customize WooCommerce single product page with WooBuilder:
Step 1: Go to Woostify Option in the Dashboard, then enable WooBuilder by clicking into Activate.
Step 2: Now, you can build the page as you desire by clicking in Add New:
Step 3: Choose Product page in the scroll-down options to create and customize Elementor WooCommerce single product page.
Step 4: Now, using WooBuilder integrated with WooCommerce and Elementor page builder, you can add elements you want to show on your page easily within the lively drag and drop editor. Some widgets you may need to build a single product page are:
- Product add to cart
- Product meta
- Product navigation
- Product related
- Product ratings
- Countdown urgency
- Much more
After customizing your single product page, you are allowed to apply the page your have created for other products, other pages and preview it.
In addition to the shop page and single product page, you can easily design and customize Elementor WooCommerce checkout page, cart page, and empty cart page using WooBuilder. To get further detail tutorial, you should take a look at this guide on how to build Elementor WooCommerce shop pages with WooBuilder.
In comparison with Elementor Pro, using Woostify Pro to create and customize WooCommerce product pages will definitely bring you more benefits. It is because Woostify Pro gives you more functionalities to edit product page, single product page, cart page, checkout page, and empty cart page, while Elementor pro does not allow users to make any changes in the checkout page, cart page, and empty cart page.
What you need consider when customizing WooCommerce product pages
Whatever method you go for, you should notice the aspects below while designing WooCommerce product pages to make them outstanding.
Improve Your Product Images
All customers like to see the product images as clear as possible. Besides, the more images there are, the better customers prefer. Your product photos have more influence in customers than text. The more ways customers can view a product, the more likely they make the purchase.
In detail, a product image should be high quality, clear, and showcase different views of the product. Besides, you should try to present the company’s signs, and logo in the pictures if it is possible.
Make sure to capture images with enough resolution to show your product details clearly. However, high-resolution images are large files, which can slow down the page loading speed of your WooCommerce store. You can avoid this by following some useful tips to optimize your product page images.
Improve Your Product Description
Effective product descriptions include a short and long section. The short description is for quick page scans, while the longer section goes more in-depth.
To keep the customer’s attention on your product, you should not only sell the product but also sell a meaningful story related to it. So in your product descriptions, besides the basic features, you should make up a story about your product to give them positive feelings at the point of sale, pushing them to make purchases. That is a powerful way to boost sales. In this part, Jack Rudy Cocktail, a family-run company selling wine and other drinks, has done a very good job because they tell the customers about meaningful stories about their products.
Test Your Pricing Placement
The first two information that online shopper finding on a product page are the answers to these question: “Is this the product I’m looking for?” and then “Can I afford this?”. So you need to put the product price at an easy to see place.
Many WooCommerce themes have a common design that puts the price next to the product title, near the top of the page, and on the right side. You can use one of these prebuilt layout but don’t forget to follow the criteria below when customizing WooCommerce product pages to make it easier for the customers to quickly know the price:
- The price is displayed in a larger font size.
- Text is bold.
- Font color is highly visible.
Showing related products in WooCommerce is a smart strategy to up-sell or cross-sell products on your WooCommerce store. For example, after a customer puts a moisture skin lotion on their shopping cart, you can offer on a cotton pad, makeup removal, and whitening cream for cross-sells to encourage them to make more purchases. This is a little similar to WooCommerce grouped products because they all offer bundle products.
Some product page templates will automatically put products with similar tags or categories into your related products section. Therefore, which WooCommerce categories or tags you add to the products will influence how the related items are presented.
You can make it more useful by manually managing the related items to push sell the specific products as you want.
Conclusion
Customizing WooCommerce Elementor product pages and making it is a good way to improve customer experience and boost your conversion rates. Regarding WooCommerce shop pages customization, Woostify offers users various awesome features to edit shop pages and make them flexible to fit your store and your niches. That definitely enhances shopping experience and drives more sales to your store.
Elementor is one of the leading WordPress page builders on the market, but did you also know you could build WooCommerce stores using it?
There are many built in Elementor WooCommerce modules that allow you to insert blocks of WooCommerce content or functionality, and style them using the Elementor builder. Pretty awesome right?
Styling and customising WooCommerce used to require PHP and CSS for every little tweak, but as tools like Elementor develop and become more sophisticated, more and more options become available for taking control of the way your store looks and works.
Creating an Elementor template
The first step in the process is to create a new Elementor template by going to Templates in the WordPress dashboard. Click ‘Create New’ then select Single Product as the template you wish to create.

As we are going to be building this template from scratch, there is no need to insert any blocks, exit the next box that appears until you reach the standard Elementor builder screen for a new page.
Product image gallery
Every WooCommerce product has a product image, or image gallery, showing pictures of the product to customers. Elementor has a built in Product Images module that allows us to insert this in our template.
Create a simple 2 column row and insert the Product Images module in the left column.

This looks functional and does the job, but let’s style the sales badge so that it matches the Elementor Hello Theme being used for this tutorial. To do this, we need to apply a small line of custom CSS, which can be inserted by going to Advanced > Custom CSS and pasting the below code in.
![]()
selector .onsale {
background-color: #cc3366 ;
}
Product title, price and add to cart
In the right hand column, we are going to be adding the Elementor modules for Product Title, Product Price and Add To Cart.
Search for these three modules in the Elementor builder, then drag and drop them across to place them in the order listed above.

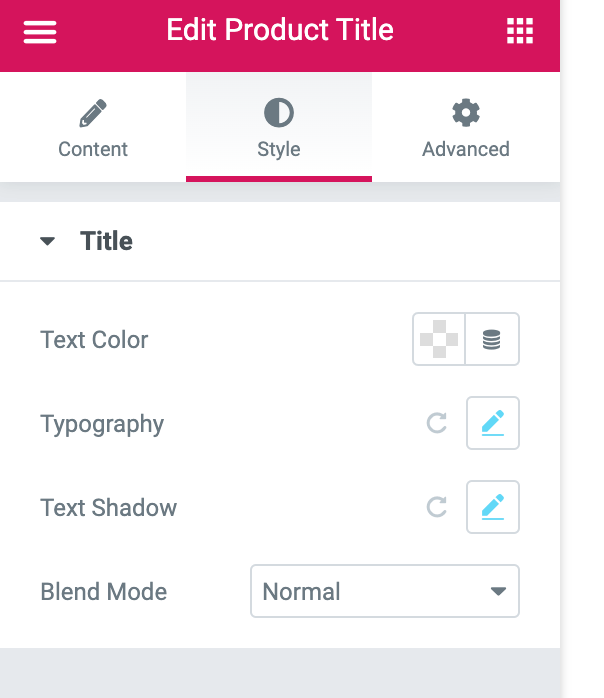
This is perfectly functional, but as with the above section, we want to style it so that it matches the styling of our Hello Elementor theme. Styling modules with Elementor is easy, all that you need to do is click on the module and the editor should open up the styling options to the left.
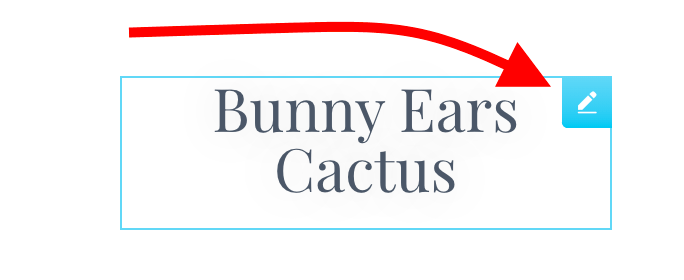
The content of these modules is fine, so we are going to be working in the Style tab. Firstly, let’s change the font and color of the Product Title so that it matches those used in the Hello Elementor theme.

We then need to do the same for the Product Price and Add To Basket modules by clicking on each module and altering the text color. For the Product Price I’m going to use a dark grey to contrast against the title, so input this hexcode if you are following along – #54595f

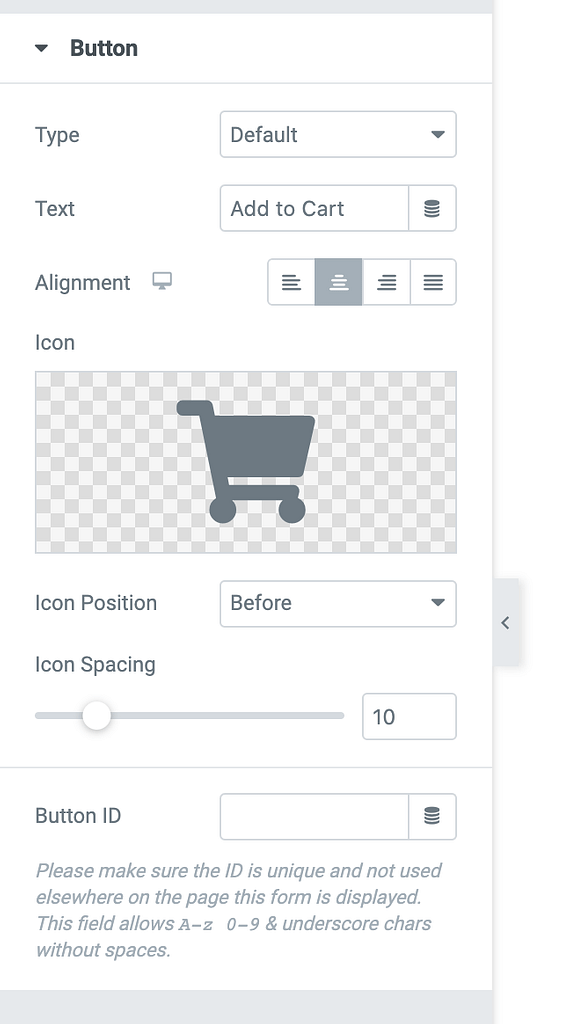
Next on the Add To Cart module we will change a few things. The background color of the button and the border radius of the button using the below settings:
- Set the content to ‘Add to cart’
- Set the background color to ‘#cc3366’
- Set the border radius to 0
One further thing I did was to set the border radius of the quantity selector to 0, which you can do within the Style tab for Quantity.

Setting up product tabs
Every product needs to display some basic information like a product description and reviews if they are available. This is often handled by product tabs.
Create a new row beneath the top section and drag the Product Data Tabs module from the Elementor builder into the row to insert it. There’s not much styling required here, because it is inheriting some styles from the Hello Elementor theme. However, let’s change the styling of the review submission button.
To do this, we’re going to need a little bit of custom CSS again. Start editing the Product Data Tabs then click on the Advanced tab and scroll down to Custom CSS. Input the below CSS and you can change the colors according to your own design.
.woocommerce #review_form #respond .form-submit input { background-color: #cc3366; color: #fff; border-radius: 0px; }

Product short description
O.k, so we have a nice simple looking design so far, but it looks a little bare. Adding a Product Short Description module to the top section will help pad this out and give a bit more context.
Search for the WooCommerce Short Description module, then drag and drop it beneath the Product Price and above the Add To Cart Module.
There’s no styling required here currently as it’s inherited the styles from Hello Elementor.

Product upsells
Increasing your average basket value is key for any WooCommerce store, which is why it’s good that Elementor provides a Product Upsells module for you to easily insert a customize on your store.
Search for the Product Upsells module in the Elementor builder and insert it in a new row beneath the Product Data Tabs.

As you can see, this requires a little bit of customisation to match the rest of our design. Start editing the module and make the following changes:
- Set the Title color to – #cc3366
- Set the Heading color to – #cc3366
- Set the Price color to – #54595f
- Set the Button background color to – #cc3366
- Set the Button color to – #fff
- Set the Button border radius t0 – 0
The end result will look like the below. You can change the color hexcode as you see fit if you are using this tutorial as a jumping off point for your template.

To finish up, make sure you Save Draft or Publish your template. For Display Conditions you will want to make sure that Products is selected. If you found this video useful, check back soon for the video tutorial.
Планируете запустить новый магазин WooCommerce и начать продавать услуги и товары в сети? Поскольку вы можете найти множество советов в Интернете, вся процедура создания действительно хорошего магазина обычно может показаться немного утомительной.
В этой статье мы покажем вам конкретные меры, которые вы хотите предпринять, чтобы разбудить свой магазин и запустить его как можно быстрее.
Вместе с Elementor и WooCommerce Builder вы попадаете в безупречный магазин с индивидуальным дизайном. Этот свежий, компактный и наглядный процесс просто устраняет большинство проблем, с которыми сталкиваются профессионалы при создании магазина на WordPress.
Если вы просто планируете открыть небольшой интернет-магазин, эта статья станет для вас идеальным руководством.
Сегодня мы шаг за шагом поможем вам создать сайт электронной коммерции с Elementor И WooCommerce.
Однако, прежде чем мы перейдем к делу, позвольте мне объяснить несколько истинных истин.
Благодаря технологическим прорывам за все эти годы стало намного проще и быстрее инвестировать и продавать услуги и продукты через сайт электронной коммерции.
Ваш физический магазин должен иметь интернет-платформу для развития бизнеса. Жизненно важно развивать свою веб-стратегию, чтобы оставаться в этой конкурентной среде. В противном случае вы можете потерять большое количество потенциальных клиентов для своей компании.
С другой стороны, если у вас нет физического магазина, вы все равно можете начать свой онлайн-бизнес и продавать свои услуги и продукты своим посетителям. Все, что вам нужно, это профессиональный веб-сайт.
Растущее количество покупателей наглядно демонстрирует, что для вас никогда не было лучшего времени, чтобы начать бизнес в сфере электронной коммерции, чем сейчас.
Однако здесь вопрос в том, как построить дизайн веб-сайта электронной коммерции без знания кодирования. Что ж, WordPress с его полезными наборами инструментов решил эту дилемму много десятилетий назад.
WooCommerce — это плагин для отображения вашего сайта WordPress в качестве бизнес-платформы для электронной коммерции. Все просто в мгновение ока. Никакого программирования, никакого HTML, просто пара кликов.
И самое интересное, что это совершенно бесплатно. По этим причинам многие пользователи перенесли свои магазины с других платформ электронной коммерции, таких как Shopify в WooCommerce.
Сегодня мы собираемся обратить внимание на Elementor. Этот конструктор страниц с перетаскиванием упростил создание веб-сайтов, как ABC. Просто переместите курсор, и ваш сайт будет готов к запуску. Без предварительной информации или квалифицированной помощи у вас есть все идеальные варианты для создания более красивого сайта, как у специалиста.
Вот предпосылки для развития вашего интернет-магазина:
- Блог WordPress
- Плагин WooCommerce (бесплатно)
- Плагин Elementor (бесплатно)
Elementor Конструктор WooCommerce

Предположим, что у вас ранее был подходящий хостинг для доменного имени и план хостинга для вашего сайта. Затем настройте свой собственный веб-сайт WordPress и установите все необходимые плагины, включая WooCommerce и Elementor.
Настройка, а также процедура запуска для WooCommerce похожа на все плагины WordPress. Давайте раскроем лучший способ настроить основные страницы и параметры WooCommerce.
Шаг первый: начните с установки плагина WooCommerce

Image Source
Чтобы настроить и запустить подключаемый модуль WooCommerce:
- Перейдите в панель администратора WordPress → Плагины → Вставить новый.
- Ищите «WooCommerce»
- Затем установите и активируйте плагин.
- Нажмите «Активировать сейчас».
Затем вы найдете мастер установки. Эту часть можно обойти. Также можно пропустить эту часть и применить все изменения вручную. Тем не менее, гораздо лучше почувствовать процедуру и настройки, касающиеся настройки. Итак, перейдем к мастеру установки.
Предоставление основной информации
Вначале мастер задает вам несколько вопросов относительно исходных данных вашего магазина, включая местоположение магазина, тип товара, используемую валюту, а также типы товаров, которые вы собираетесь продавать (физические, электронные или и то, и другое). .
Здесь вы также можете узнать, хотите ли вы разрешить WooCommerce отслеживать ваше использование для продвижения магазина.
Заполните эту форму соответствующим образом, а затем нажмите кнопку «Поехали» внизу, чтобы перейти к следующим шагам.
Создание платежных шлюзов WooCommerce
Здесь вы можете настроить варианты оплаты для вашего интернет-магазина. Параметры в этом разделе касаются местоположения вашего магазина и типов продуктов, которые вы хотели бы продавать. продавать онлайн.
Вы также можете выбрать «Автономные платежи» и выбрать вариант оплаты, например чек, банковский перевод или наличные, в раскрывающемся меню.
После того, как вы закончите с деталью, нажмите «Продолжить», чтобы перейти к следующему шагу.
Создание WooCommerce Shipping
Этот раздел посвящен доставке информации о вашем продукте. WooCommerce поддерживает две зоны доставки:
Один — это США и Канада, а другой — остальной мир.
Если вы находитесь в США или Канаде, у вас есть вариант доставки по тарифу в реальном времени. Однако у вас также есть возможность установить фиксированную стоимость доставки.
Также, что касается реальной скорости доставки, вы должны указать вес и размеры вашего продукта.
Перед тем, как нажать «Продолжить», обязательно распечатайте свои учетные данные с помощью опции «Распечатать транспортные этикетки дома».
Настройка некоторых дополнительных параметров
На этом этапе WooCommerce просит вас настроить ряд плагинов, таких как Jetpack для автоматических налогов, Facebook для WooCommerce и MailChimp для маркетинг по электронной почте.
Выберите то, что вы считаете важным для своего сайта электронной коммерции. Просто отметьте каждый, некоторые или все эти параметры, и они автоматически добавятся на ваш веб-сайт. Кроме того, вы можете установить их вручную, если хотите.
Подключение WooCommerce и Jetpack и завершение настройки
Теперь мастер установки попросит вас подключить ваш сайт к Jetpack. С этим плагином вам не нужно будет беспокоиться о безопасности автоматического процесса налогообложения. Кроме того, Jetpack невероятно работает вместе с большинством функций, связанных с налогообложением. Опять же, вы можете установить его вручную из каталога WordPress.
Нажмите «Продолжить с Jetpack».
Почти конец.
Используя эту страницу, вы можете создавать, экспортировать, проверять свою панель управления или просматривать все настройки. Просто проверьте и продолжайте.
Отличная работа! Вы выполнили все основные настройки магазина WooCommerce. Теперь вы можете добавлять в него товары.
Шаг второй: добавление продуктов в ваш магазин WooCommerce

Image Source
Так так так. Пришло время наполнить ваш интернет-магазин электронной коммерции услугами и продуктами, которые вы хотите предоставить пользователям для покупки.
Давайте рассмотрим его шаг за шагом, чтобы вы ничего не пропустили!
Вставка продукта
Используя панель управления WordPress, перейдите в раздел «Продукты» → «Добавить».
Там вы увидите, что можете добавить информацию о товарах, которые хотите добавить на свой сайт.
Здесь вы можете вставить информацию о вашем продукте, такую как название продукта, тип, изображение, этикетка, галерея, описание и т.д.
Настройка данных продукта

Под основным окном редактора вы можете увидеть панель, на которой вы можете разместить данные о вашем продукте. Обязательно внимательно настраивайте эту информацию, потому что это влияет на плавность вашего сайта.
Сначала выберите типы данных ваших доступных товаров из выпадающего меню. Эти типы могут быть:
- Простые продукты
- Сгруппированные продукты
- Внешние / партнерские продукты
- Различные продукты
Этот выбор влияет на ваши параметры конфигурации. Таким образом, выбирайте эти данные на основе вашего бизнес-преимущества, типа бизнеса, групп продуктов и т. Д.
Как только вы закончите, вы можете получить доступ к элементам из «Все продукты».
Проверка внешнего вида ваших продуктов
Теперь вы можете видеть внешний вид вашего магазина и то, как отображаются ваши услуги и продукты. Однако вы должны знать, что во многом этот внешний вид зависит от тема, которую вы выбрали.
Шаг третий: проектирование с помощью Elementor

Чтобы создать свой интернет-магазин с помощью Elementor, вам нужно перейти в панель управления WordPress → Плагины → Добавить новый, затем найти «Elementor», а затем установить и активировать его.
Процесс активации такой же, как и для WooCommerce.
В качестве альтернативы также можно вручную загрузить Elementor и загрузить его файл с помощью параметра «Загрузить плагин».
Теперь Elementor под вашим контролем. Начните создавать свои страницы.
Создание страницы продукта с помощью Elementor
Динамические функции и виджеты Elementor позволяют настраивать каждый дюйм вашего интернет-магазина. Если вы не знакомы с Elementor, вы также можете использовать это пошаговое руководство.
Теперь давайте вместе разработаем страницу элемента, чтобы вы могли увидеть точную специфику такого процесса.
Перейдите в панель управления WordPress → Страницы → Добавить новый.
Затем введите имя страницы и выберите опцию Elementor Canvas в раскрывающемся меню шаблона справа.
В конце нажмите «Редактировать с помощью Elementor» и приступайте к проектированию с помощью этого конструктора WordPress.
Также возможно использование готового шаблона.
Чтобы расширить вашу библиотеку шаблонов, можно также установить сторонние надстройки.
Elementor предоставляет вам совершенно бесплатные базовые инструменты, которые позволят вам создать профессиональный интернет-магазин. Это помогает вам создавать разные виды категорий и определенный класс для каждого из ваших продуктов.
Завершить дизайн
После того, как вы закончите со всеми настройками, вы должны опубликовать страницу. Но подождите! Перед тем, как сделать это, вам необходимо установить определенную категорию для отображения вашей страницы.
Что ж, используя тот же процесс, вы можете настроить и другие страницы. Здесь вас ничто не ограничивает. Все, что приходит вам в голову, можно сделать и отобразить с помощью различных виджетов из левой панели редактора.
Ряд обязательных страниц и функций для вашего веб-сайта электронной коммерции
Ключ к созданию интернет-магазина — поддерживать заинтересованность клиентов в том, чтобы они могли использовать ваш сайт в течение длительного времени. В противном случае они идут в торговый центр и покупают все, что им нужно.
Чтобы получить такой статус, ваш веб-сайт должен иметь организованную структуру.
Очень важно, чтобы посетители без труда находили свои нужды. Ваш интернет-магазин должен быть настолько легкодоступным, чтобы пользователи могли быстро и легко получить желаемые услуги и продукты. Теперь, когда вы являетесь владельцем интернет-магазина, вы должны знать, какие страницы требуются вашему сайту. Давайте проведем экскурсию!
- Главная: На самом деле это витрина вашего магазина. Это самое главное место притяжения, которое привлекает внимание ваших зрителей. Это дает посетителям общее представление о вашем бизнесе.
- Страница продукта: эта страница предназначена для отображения информации о конкретном продукте вместе с кнопкой «добавить в корзину». Кроме того, у вас есть возможность предложить аналогичные или другие соответствующие продукты на этой странице.
- Категория Page: На самом деле это список ваших продуктов.
- Обзор категории: используя эту страницу, вы можете отображать все категории и подкатегории. Это позволяет посетителям увидеть, что вы пытаетесь продать, и мгновенно проверить, что им нужно. Также можно пропустить эту часть, если ваш магазин содержит только одну группу товаров.
- Поиск: Предоставление параметров поиска является обязательным для интернет-магазина.
- Страница входа / создания учетной записи: это фантастическая возможность получить информацию о ваших посетителях. Позже вы можете использовать его для предложения акций и скидок.
- Гость заказ: если вы посвящаете страницу гостевым пользователям, которые не хотят делиться с вами своей информацией, вы на самом деле уважаете их.
- Моя покупка: История покупок помогает вашим клиентам просматривать их предыдущие заказы в вашем магазине.
- Корзина: Здесь цифровые покупатели могут видеть, что они добавили в свою корзину, а также общую цену, стоимость доставки, поле для купонов и т. Д.
- Возврат: Если вы даете своим клиентам возможность вернуть / обменять то, что они купили при определенных условиях, вы даете им отличную уверенность в том, что они смогут продолжать делать покупки на вашем веб-сайте.
- Местоположение: Некоторые покупатели могут проверить адрес вашего магазина. Обязательно предоставьте им эту информацию.
- Живой чат: Эксперименты показывают, что большое количество клиентов предпочитают человеческое общение. Так что добавьте опцию живого чата в свой магазин.
- Отзывы: Это очень важно! Предоставьте своим клиентам возможность поделиться своими взглядами, требованиями, вопросами и опытом покупок на вашем собственном веб-сайте электронной коммерции. Благоприятная обратная связь является отличным фактором влияния на ваших потенциальных клиентов.
Не смотрите на вышеупомянутые страницы как на жесткие. Вы можете вычесть или прибавить их по своему усмотрению в зависимости от продуктов, которые вы предоставляете.
Подводя итог, не забывайте, что онлайн-переходы — это уже не просто роскошь.
Огромное количество людей занимаются онлайн-бизнесом, чтобы предлагать свои услуги или продукты. Чтобы выделиться из аудитории, вам понадобится правильный план и программа для малого бизнеса. Это дает вам возможность привлечь идеальную аудиторию к собственному бренду.