I’m trying to make GUI for my application written in Java.
I made fxml document with Scene Builder, set fx:id properly and now I’m trying to make simple changes in form.
My DocumentController:
public class FXMLDocumentController implements Initializable {
@FXML
Label LabelDatum;


@Override
public void initialize(URL url, ResourceBundle rb) {
     LabelDatum.setText((new Date()).toString());
}
}
My FX main file:
public class FXMain extends Application {

@Override
public void start(Stage primaryStage) throws IOException {
   Parent root = FXMLLoader.load(getClass().getResource("FXMLDocument.fxml"));
   Scene scene = new Scene(root);

   primaryStage.setScene(scene);
   primaryStage.show();
}

/**
 * @param args the command line arguments
 */
public static void main(String[] args) {
    launch(args);
}
}
Everything I want to now, it’s to set LabelDatum to actual timestamp, but when i run FX main file, nothing happens.
Is there anybody, who is able to help me?
Thank you.
Paul
UPDATE:
My whole FXMLDocument:
<?xml version="1.0" encoding="UTF-8"?>

<?import javafx.scene.text.*?>
<?import java.lang.*?>
<?import javafx.scene.control.*?>
<?import javafx.scene.layout.*?>

<BorderPane maxHeight="-Infinity" maxWidth="-Infinity" minHeight="-Infinity" minWidth="-Infinity" prefHeight="478.0" prefWidth="682.0" xmlns="http://javafx.com/javafx/8" xmlns:fx="http://javafx.com/fxml/1">
   <top>
      <AnchorPane prefHeight="116.0" prefWidth="600.0" BorderPane.alignment="CENTER">
         <children>
            <Label fx:id="LabelNadpis" layoutX="14.0" layoutY="16.0" text="Jídelní lístek Dne">
               <font>
                  <Font name="System Bold" size="24.0" />
               </font>
            </Label>
            <Label fx:id="LabelDatum" layoutX="237.0" layoutY="18.0" prefHeight="32.0" prefWidth="127.0" text="datum">
               <font>
                  <Font size="22.0" />
               </font>
            </Label>
            <Label fx:id="LabelNazevRestauraceNadpis" layoutX="14.0" layoutY="55.0" prefHeight="17.0" prefWidth="99.0" text="Název restaurace" />
            <Label fx:id="LabelSestavilNadpis" layoutX="14.0" layoutY="72.0" text="Sestavil" />
            <Label fx:id="LabelNazevRestauraceHodnota" layoutX="237.0" layoutY="55.0" text="nazev_restaurace" />
            <Label fx:id="LabelSestavilHodnota" layoutX="237.0" layoutY="72.0" text="sestavil" />
         </children>
      </AnchorPane>
   </top>
   <center>
      <ListView fx:id="ListViewPokrmy" prefHeight="231.0" prefWidth="600.0" BorderPane.alignment="CENTER" />
   </center>
   <bottom>
      <AnchorPane prefHeight="46.0" prefWidth="696.0" BorderPane.alignment="CENTER">
         <children>
            <Button fx:id="ButtonNactiTxt" layoutX="26.0" layoutY="12.0" mnemonicParsing="false" text="Načti txt" />
            <Button fx:id="ButtonVlozNovy" layoutX="97.0" layoutY="12.0" mnemonicParsing="false" prefHeight="25.0" prefWidth="83.0" text="Vlož nový" />
            <Button fx:id="ButtonOdeber" layoutX="188.0" layoutY="12.0" mnemonicParsing="false" text="Odeber" />
            <Button fx:id="ButtonEditace" layoutX="250.0" layoutY="12.0" mnemonicParsing="false" text="Editace" />
            <ChoiceBox layoutX="316.0" layoutY="12.0" prefWidth="150.0" />
            <Button fx:id="ButtonZrusListek" layoutX="472.0" layoutY="11.0" mnemonicParsing="false" text="Zruš lístek" />
            <Button fx:id="ButtonUloz" layoutX="550.0" layoutY="11.0" mnemonicParsing="false" text="Ulož" />
            <Button fx:id="ButtonObnov" layoutX="597.0" layoutY="11.0" mnemonicParsing="false" text="Obnov" />
         </children>
      </AnchorPane>
   </bottom>
</BorderPane>
Everything I want: LabelDatum with actual timestamp.
Happens: the scene shows up, but the initial label text doesn’t change to the date
- Use the
setStyle()Method to Color Texts Label in Java - Alternative Way to Change the Label Text Color

Sometimes we need to colorize the texts to make them focused on users. In JavaFX, we can do this very easily by including the setStyle() method.
In this article, we are going to see how we can change the label’s text color, and we also see a necessary example with a proper explanation so that the topic is much easier to understand.
Use the setStyle() Method to Color Texts Label in Java
In our below example, we just set the color of the text to read and the background color to yellow. First, we import the following JavaFx libraries needed to make it work.
import javafx.application.Application;
import javafx.scene.Scene;
import javafx.scene.control.Label;
import javafx.stage.Stage;
Full Source Code:
import javafx.application.Application;
import javafx.scene.Scene;
import javafx.scene.control.Label;
import javafx.stage.Stage;

public class FXlabel extends Application {

      public void start(Stage PrimaryStage) throws Exception {
        PrimaryStage.setTitle("Label Color");  // Setting the application title

        Label lbl = new Label("This is the colored text !!!"); // Creating a simple label with a text "This is the colored text !!!"
        lbl.setStyle("-fx-text-fill: red; -fx-background-color: yellow"); // Styling the text by applying necessary CSS properties.
        Scene scene = new Scene(lbl, 200, 100); // Creating a scene
        PrimaryStage.setScene(scene); // Setting the scene to stage
        PrimaryStage.show(); // Make the stage visible
    }

    public static void main(String[] args) {
        Application.launch(args);  // Launching the application
    }
}
In the line lbl.setStyle("-fx-text-fill: red; -fx-background-color: yellow");, we applied some additional CSS properties to the label by using setStyle() method. In detail, the first property we used here is -fx-text-fill: red; through which we set the text color to red, and the property -fx-background-color: yellow is used to set the background color to yellow.
After compiling the above example code and running it in your environment, you will get the below output.
Output:
Alternative Way to Change the Label Text Color
JavaFX supports CSS that works will FXML. Now, when designing the User Interface with JavaFX GUI building tool like Scene Builder provided by Oracle, You can easily define the text color with the CSS property while developing the UI.
Also, you can add a CSS file on which you can add below two properties.
-fx-text-fill: red;
-fx-background-color: yellow;
You can use the code below to include your CSS file in your code directly.
Code:
scene.getStylesheets().add("YourCSS.css")
Remember, if your IDE doesn’t support the automatic inclusion of Libraries and Packages. Then you may need to manually include these necessary Libraries and Packages before compiling.
Introduction to JavaFX Label
JavaFX Label is a part of the package JavaFX.scene.control and class JavaFX label. It is mainly used to represent the label control and also, it is non-editable. Even though it helps in displaying the graphical image or a small text on the screen, it can’t be focused. It is also useful for presenting text that is necessary to fit in an exact space. Below is the syntax for creating a label.
Syntax:
Syntax to Initialize JavaFX label is:
Label lbl = new Label();Here, the constructor can be of parameterized and non-parameterized, which depends on the requirement. It will be discussed in the below section.
Syntax Used
The following are some of the commonly used syntaxes that help in changing the font, color, wrapping up of text, etc.
1. To Change the Font
//set font as Times New Roman
l2.setFont(Font.font("Times New Roman", 34));
Here, l2 is the label.
2. To Change the Color
//set color for the font as Red
l2.setTextFill(Color.web("Red"));
Here, l2 is the label.
3. Wrapping up of Text
l3.setMaxWidth(100);
l3.setWrapText(true);
Here, l3 is the label.
Constructor of JavaFX Label
JavaFX Label has 3 constructors they are:
1. Label()
This constructor helps in creating an empty label.
Code:
Label lbl = new Label();2. Label(String txt)
A label with the specified text will get created.
Code:
Label lbl = new Label("Name of the user");3. Label(String txt, Node ng)
This constructor helps in creating a label with the specified text and graphic.
Code:
Label lbl = new Label("Name of the user", new Imageview(graph));Methods
There are certain methods that are commonly used in JavaFX. They are:
- createDefaultSkin(): For the specified control, a new instance will be created for the default skin.
- getLabelFor(): labelFor property’s value will be returned.
- labelForProperty(): For another node or control, a label can behave like a label.
- setLabelFor(Node n): labelFor property’s value will be set.
Example to Implement in JavaFX Label
Now, let us see some of the programming examples for JavaFX Labels.
Example #1
Program to Create a Label
Code:
// Java program that demonstrates creation of label
import javafx.application.Application;
import javafx.scene.Scene;
import javafx.scene.layout.*;
import javafx.scene.control.Label;
import javafx.stage.Stage;
//Example class that extends Application class
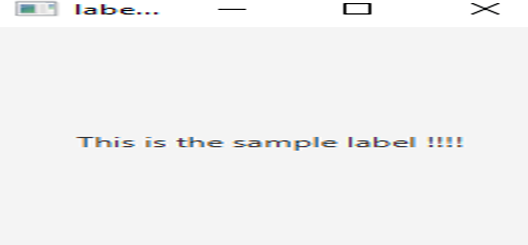
public class JavaFXLabelExamples extends Application{
// launch the application
public void start(Stage s)
{
// set stage title
s.setTitle("label is created");
// label creation
Label lb = new Label("This is the sample label !!!!");
// Stack pane creation
StackPane sp = new StackPane();
sp.getChildren().add(lb);
// scene creation
Scene scn = new Scene(sp, 200, 200);
// set scene
s.setScene(scn);
s.show();
}
public static void main(String args[])
{
// launch the application
launch(args);
}
}Output:
The explanation for the above program:
- A stage is created and a title is set.
- The label is created with the help of a default constructor.
- Stack pane is also created.
- Show() method helps in displaying the results.
Example #2
Program to create a label and set a color.
Code:
// Java program that demonstrates creation of label
//Java program to set a color for the created label
import javafx.application.Application;
import javafx.scene.Group;
import javafx.scene.Scene;
import javafx.scene.control.Label;
import javafx.scene.layout.HBox;
import javafx.scene.paint.Color;
import javafx.stage.Stage;
//Example class that extends Application class
public class JavaFXLabelExamples extends Application{
public static void main(String[] args) {
// launch the application
launch(args);
}
//application starts here
public void start(Stage stage) {
//a new scene is created
Scene scn = new Scene(new Group());
//set the title, width and height of stage
stage.setTitle("Example of Label");
stage.setWidth(300);
stage.setHeight(200);
//horizontal direction box
HBox hb = new HBox();
//create label with parameterised constructor
Label lbl = new Label("This is the sample label");
//set the color for the text
lbl.setTextFill(Color.web("Red"));
hb.setSpacing(10);
hb.getChildren().add((lbl));
((Group) scn.getRoot()).getChildren().add(hb);
//set scene
stage.setScene(scn);
//display result
stage.show();
}
}
Output:

The explanation for the above program:
- A stage is created and a title is set
- The label is created with the help of a parameterized constructor. That is, label with the specified name will be created.
- Text with the specified color gets created.
- Show() method helps in displaying the results
Example #3
Program to set color, font, wrap and add effects.
Code:
import java.io.*;
import javafx.application.Application;
import javafx.event.EventHandler;
import javafx.geometry.Insets;
import javafx.scene.Scene;
import javafx.scene.control.Label;
import javafx.scene.image.Image;
import javafx.scene.image.ImageView;
import javafx.scene.input.MouseEvent;
import javafx.scene.layout.FlowPane;
import javafx.scene.paint.Color;
import javafx.scene.text.Font;
import javafx.stage.Stage;
public class JavaFXLabelExamples extends Application {
@Override
public void start(Stage primaryStage) throws Exception {
// Image Source
//Make sure you have a source image in the specified path
FileInputStream input = new FileInputStream("D:\EduCBA\nov\download.png");
//image creation
Image i = new Image(input);
//image view creation
ImageView iv = new ImageView(i);
//label 1
Label l1 = new Label("Sample Label for Text & image");
// Set image
l1.setGraphic(iv);
//  Label 2
Label l2 = new Label("sample Label for Font & Color");
//set font as Times New Roman
l2.setFont(Font.font("Times New Roman", 34));
//set color for the font
l2.setTextFill(Color.web("Red"));
// Label 3
Label l3 = new Label("Sample label for wrapping of the text");
l3.setMaxWidth(100);
l3.setWrapText(true);
// Label 4
Label l4 = new Label("Label with 45 degree rotation");
// Rotate in a degree of 45
l4.setRotate(45);
l4.setTranslateY(30);
FlowPane root = new FlowPane();
//set the padding
root.setPadding(new Insets(10));
//set horizontal gap
root.setHgap(10);
//set vertical gap
root.setVgap(10);
//add it to the stage
root.getChildren().addAll(l1, l2, l3, l4);
//scene creation
Scene scene = new Scene(root, 400, 250);
//set title
primaryStage.setTitle("Sample Labels for demo purpose");
//set the scene
primaryStage.setScene(scene);
//display the results
primaryStage.show();
}
public static void main(String[] args) {
//launch the application
launch(args);
}
}
Output:
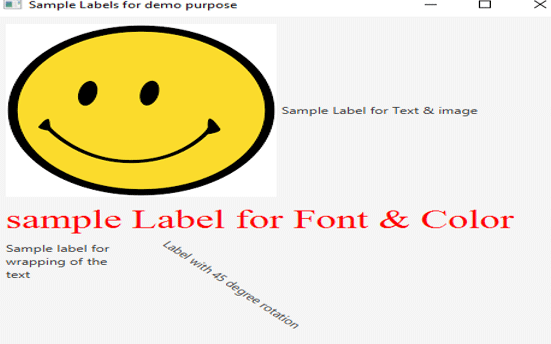
The explanation for the above program:
- An image is taken from the source specified. If an image is not present in the source, an error can occur.
- Four labels are present.
- The first label creates a text and an image.
- The second label creates a text with specified font and color
- The third label creates a text that wraps
- The fourth label creates a text with a 45-degree rotation.
- All these labels are created with the help of parameterized constructors. That is, label with the specified name will be created.
- Show() method helps in displaying the results
Conclusion
It helps in displaying graphical images, texts on the screen. These texts can be made changes based on the user’s requirement. This document covers the syntax, sample programs, parameterized and non-parameterized constructors of JavaFX labels in detail.
Recommended Articles
This is a guide to JavaFX Label. Here we discuss the method, examples, and function in JavaFX Label with proper codes and output. You can also go through our other related articles to learn more –
- JavaFX Slider
- JavaFx Button
- JavaFX FileChooser
- JavaFX StackPane

Есть такая программа:
Main.java:
| Java | ||
|
sample.fxml:
| Java | ||
|
MainController.java:
| Java | ||
|
one.fxml:
| Java | ||
|
| Java | ||
|
| Java | ||
|
В ChildController.java в методе oneAction() хочу поменять текст переменной one, которая определена в MainController.java. То есть чтобы при клике на кнопку, которая находится в one.fxml, менялся бы текст лейбла, который находится в sample.fxml. Это вообще возможно? Уже испробованы разные способы с форумов и из документации, не работает ничего. Не хотелось бы отказываться от fxml и добавлять элементы в интерфейс через контроллеры.
__________________
Помощь в написании контрольных, курсовых и дипломных работ, диссертаций здесь
Элементы управления
Кнопки и метки
Последнее обновление: 16.06.2018

Наиболее часто используемые элементы управления в JavaFX — это, без сомнения, кнопки и метки. Кнопки
представлены классом javafx.scene.control.Button и позволяют по нажатию выполнять некоторые действия. А метки представлены
классы javafx.scene.control.Label, и их задача — вывод текстовой информации. Класс Button унаследован от классов ButtonBase, Labeled, Region, Control, Parent и Node,
а класс Label — от Labeled, Region, Control, Parent и Node. JavaFX позволяет создавать самые разнообразные кнопки и метки: с текстом, графикой, и тем и другим, с различными стилями.
Класс Button имеет три конструктора:
-
Button(): создает кнопку без надписи -
Button(String text): создает кнопку с определенной надписью -
Button(String text, Node graphic): создает кнопку с определенной надписью и иконкой
Класс Label имеет три похожих конструктора:
-
Label(): создает метку без надписи -
Label(String text): создает метку с определенной надписью -
Label(String text, Node graphic): создает метку с определенной надписью и иконкой
Ключевой возможностью кнопки является способность реагировать на нажатия пользователей и по нажтию выполнять некоторое действие.
Для обработки нажатий в базовом классе ButtonBase определен метод setOnAction(), который устанавливает обработчик нажатия:
final void setOnAction(EventHandler<ActionEvent> handler)
В качестве параметра в этот метод передается реализация интерфейса EventHandler:
public interface EventHandler<T extends Event>{
void handle(T event);
}
Используем кнопку в программе:
import javafx.application.Application;
import javafx.stage.Stage;
import javafx.scene.Scene;
import javafx.scene.Parent;
import javafx.scene.layout.FlowPane;
import javafx.scene.control.Label;
import javafx.scene.control.Button;
import javafx.event.ActionEvent;
import javafx.event.EventHandler;
public class Main extends Application{
int clicks = 0;
public static void main(String[] args) {
Application.launch(args);
}
@Override
public void start(Stage stage) throws Exception {
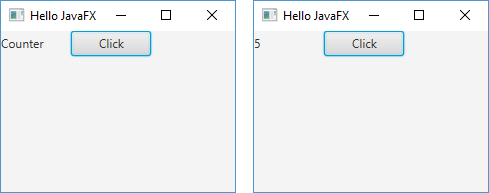
Label lbl = new Label("Counter");
lbl.setPrefWidth(70);
Button btn = new Button("Click");
btn.setPrefWidth(80);
btn.setOnAction(new EventHandler<ActionEvent>() {
@Override
public void handle(ActionEvent event) {
clicks++;
lbl.setText(String.valueOf(clicks));
}
});
FlowPane root = new FlowPane(lbl, btn);
Scene scene = new Scene(root);
stage.setScene(scene);
stage.setTitle("Hello JavaFX");
stage.setWidth(250);
stage.setHeight(200);
stage.show();
}
}
В классе определена переменная-счетчик counter. И по нажатию на кнопку будет увеличиваться ее значение.