Improve Article
Save Article
Improve Article
Save Article
Prerequisites: Introduction to tkinter
Tkinter is a standard GUI (Graphical user interface) package for python. It provides a fast and easy way of creating a GUI application.
To create a tkinter application:
- Importing the module — tkinter
- Create the main window (container)
- Add any number of widgets to the main window.
- Apply the event Trigger on the widgets.
Widgets are the controlling tools for any GUI application. Here widget’s main role is to provide a good variety of control. Some widgets are buttons, labels, text boxes, and many more.
One of its widgets is the label, which is responsible for implementing a display box-section for text and images. Click here For knowing more about the Tkinter label widget.
Now, let’ see how To change the text of the label:
Method 1: Using Label.config() method.
Syntax: Label.config(text)
Parameter: text– The text to display in the label.
This method is used for performing an overwriting over label widget.
Example:
Python3
from tkinter import *
Main_window = Tk()
my_text = "GeeksforGeeks updated !!!"
def counter():
global my_text
my_label.config(text = my_text)
my_button = Button(Main_window,
text = "Please update",
command = counter)
my_label = Label(Main_window,
text = "geeksforgeeks")
my_label.pack()
my_button.pack()
Main_window.mainloop()
Output:

Method 2: Using StringVar() class.
Syntax: StringVar()
Return: String variable object
This class is used for setting the values and changing it according to the requirements.
Python3
from tkinter import *
Main_window = Tk()
Main_window.geometry("220x100")
def java():
my_string_var.set("You must go with Java")
def python():
my_string_var.set("You must go with Python")
btn_1 = Button(Main_window,
text = "I love Android",
command = java)
btn_2 = Button(Main_window,
text = "I love Machine Learning",
command = python)
my_string_var = StringVar()
my_string_var.set("What should I learn")
my_label = Label(Main_window,
textvariable = my_string_var)
btn_1.pack()
btn_2.pack()
my_label.pack()
Main_window.mainloop()
I am having trouble with using a key binding to change the value of a label or any parameter.
This is my code:
from tkinter import*

class MyGUI:
  def __init__(self):
    self.__mainWindow = Tk()
    #self.fram1 = Frame(self.__mainWindow)
    self.labelText = 'Enter amount to deposit'
    self.depositLabel = Label(self.__mainWindow, text = self.labelText)
    self.depositEntry = Entry(self.__mainWindow, width = 10)
    self.depositEntry.bind('<Return>', self.depositCallBack)
    self.depositLabel.pack()
    self.depositEntry.pack()

    mainloop()

  def depositCallBack(self,event):
    self.labelText = 'change the value'
    print(self.labelText)

myGUI = MyGUI()
When I run this, I click the entrybox and hit enter, hoping that the label will change value to ‘change the value’. However, while it does print that text, the label remains unchanged.
From looking at other questions on similar problems and issues, I have figured how to work with some of this outside a class, but I’m having some difficulties with doing it inside a class.
![]()
Karl Knechtel
60.7k11 gold badges93 silver badges140 bronze badges
asked Jun 15, 2013 at 16:48
![]()
1
self.labelText = 'change the value'
The above sentence makes labelText change the value, but not change depositLabel’s text.
To change depositLabel’s text, use one of following setences:
self.depositLabel['text'] = 'change the value'
OR
self.depositLabel.config(text='change the value')
![]()
answered Jun 15, 2013 at 17:13
![]()
falsetrufalsetru
350k62 gold badges704 silver badges625 bronze badges
4
You can also define a textvariable when creating the Label, and change the textvariable to update the text in the label.
Here’s an example:
labelText = StringVar()
depositLabel = Label(self, textvariable=labelText)
depositLabel.grid()

def updateDepositLabel(txt) # you may have to use *args in some cases
    labelText.set(txt)
There’s no need to update the text in depositLabel manually. Tk does that for you.
![]()
Wolf
9,4847 gold badges62 silver badges105 bronze badges
answered Jan 30, 2016 at 1:05
![]()
psyFipsyFi
7397 silver badges21 bronze badges
2
Use the config method to change the value of the label:
top = Tk()

l = Label(top)
l.pack()

l.config(text = "Hello World", width = "50")
![]()
answered Mar 25, 2016 at 17:18
![]()
2
Here is another one, I think. Just for reference.
Let’s set a variable to be an instantance of class StringVar
If you program Tk using the Tcl language, you can ask the system to let you know when a variable is changed. The Tk toolkit can use this feature, called tracing, to update certain widgets when an associated variable is modified.
There’s no way to track changes to Python variables, but Tkinter
allows you to create variable wrappers that can be used wherever Tk
can use a traced Tcl variable.
text = StringVar()
self.depositLabel = Label(self.__mainWindow, text = self.labelText, textvariable = text)
#                                                                   ^^^^^^^^^^^^^^^^^^^
def depositCallBack(self,event):
    text.set('change the value')
![]()
Wolf
9,4847 gold badges62 silver badges105 bronze badges
answered Dec 11, 2013 at 13:09
![]()
1
I made a small tkinter application which is sets the label after button clicked
#!/usr/bin/env python
from Tkinter import *
from tkFileDialog import askopenfilename
from tkFileDialog import askdirectory


class Application:
    def __init__(self, master):
        frame = Frame(master,width=200,height=200)
        frame.pack()

        self.log_file_btn = Button(frame, text="Select Log File", command=self.selectLogFile,width=25).grid(row=0)
        self.image_folder_btn = Button(frame, text="Select Image Folder", command=self.selectImageFile,width=25).grid(row=1)
        self.quite_button = Button(frame, text="QUIT", fg="red", command=frame.quit,width=25).grid(row=5)

        self.logFilePath =StringVar()
        self.imageFilePath = StringVar()
        self.labelFolder = Label(frame,textvariable=self.logFilePath).grid(row=0,column=1)
        self.labelImageFile = Label(frame,textvariable = self.imageFilePath).grid(row = 1,column=1)

        def selectLogFile(self):
            filename = askopenfilename()
            self.logFilePath.set(filename)

        def selectImageFile(self):
            imageFolder = askdirectory()
            self.imageFilePath.set(imageFolder)

root = Tk()
root.title("Geo Tagging")
root.geometry("600x100")
app = Application(root)
root.mainloop()
answered Mar 18, 2016 at 13:38
![]()
Harun ERGULHarun ERGUL
5,6125 gold badges54 silver badges62 bronze badges
There are many ways to tackle a problem like this. There are many ways to do this. I’m going to give you the most simple solution to this question I know. When changing the text of a label or any kind of wiget really. I would do it like this.
Name_Of_Label["text"] = "Your New Text"
So when I apply this knowledge to your code. It would look something like this.
from tkinter import*

class MyGUI:
   def __init__(self):
    self.__mainWindow = Tk()
    #self.fram1 = Frame(self.__mainWindow)
    self.labelText = 'Enter amount to deposit'
    self.depositLabel = Label(self.__mainWindow, text = self.labelText)
    self.depositEntry = Entry(self.__mainWindow, width = 10)
    self.depositEntry.bind('<Return>', self.depositCallBack)
    self.depositLabel.pack()
    self.depositEntry.pack()

    mainloop()

  def depositCallBack(self,event):
    self.labelText["text"] = 'change the value'
    print(self.labelText)

myGUI = MyGUI()
If this helps please let me know!
answered Apr 30, 2019 at 2:37
![]()
- Используйте
Stringvarдля изменения текста этикетки Tkinter - Метка
textсвойство для изменения текста метки
В этом уроке мы расскажем, как изменить текст этикетки Tkinter, нажав на кнопку.
Используйте Stringvar для изменения текста этикетки Tkinter
StringVar — один из типов конструктора Tkinter для создания строковой переменной Tkinter.
После того, как мы свяжем переменную StringVar с виджетами Tkinter, Tkinter обновит этот виджет, когда переменная будет изменена.
import tkinter as tk

class Test():
    def __init__(self):
        self.root = tk.Tk()
        self.text = tk.StringVar()
        self.text.set("Test")
        self.label = tk.Label(self.root, textvariable=self.text)

        self.button = tk.Button(self.root,
                                text="Click to change text below",
                                command=self.changeText)
        self.button.pack()
        self.label.pack()
        self.root.mainloop()

    def changeText(self):
        self.text.set("Text updated")

app=Test()
self.text = tk.StringVar()
self.text.set("Test")
Конструктор Tkinter не смог инициировать строковую переменную со строкой типа self.text = tk.StringVar().
Надо вызвать метод set для установки значения StringVar, как self.text.set("Test").
self.label = tk.Label(self.root, textvariable=self.text)
Он связывает переменную StringVar self.text с виджетами меток self.label, устанавливая textvariable в качестве self.text. Инструментарий Tk начинает отслеживать изменения self.text и будет обновлять текст self.label, если self.text будет изменён.
Метка text свойство для изменения текста метки
Другим решением для изменения текста этикетки Tkinter является изменение свойства text этикетки.
import tkinter as tk

class Test():
    def __init__(self):
        self.root = tk.Tk()
        self.label = tk.Label(self.root, text="Text")

        self.button = tk.Button(self.root,
                                text="Click to change text below",
                                command=self.changeText)
        self.button.pack()
        self.label.pack()
        self.root.mainloop()

    def changeText(self):
        self.label['text'] = "Text updated"

app=Test()
Текст метки может быть инициирован с помощью свойства text="Text", а также может быть обновлен путем присвоения нового значения ключу text объекта метки.
Мы также можем изменить свойство text методом tk.Label.configure(), как показано ниже. Он работает так же, как и вышеприведенные коды.
import tkinter as tk

class Test():
    def __init__(self):
        self.root = tk.Tk()
        self.label = tk.Label(self.root, text="Text")

        self.button = tk.Button(self.root,
                                text="Click to change text below",
                                command=self.changeText)
        self.button.pack()
        self.label.pack()
        self.root.mainloop()

    def changeText(self):
        self.label.configure(text="Text Updated")

app=Test()
I am having trouble with using a key binding to change the value of a label or any parameter.
This is my code:
from tkinter import*

class MyGUI:
  def __init__(self):
    self.__mainWindow = Tk()
    #self.fram1 = Frame(self.__mainWindow)
    self.labelText = 'Enter amount to deposit'
    self.depositLabel = Label(self.__mainWindow, text = self.labelText)
    self.depositEntry = Entry(self.__mainWindow, width = 10)
    self.depositEntry.bind('<Return>', self.depositCallBack)
    self.depositLabel.pack()
    self.depositEntry.pack()

    mainloop()

  def depositCallBack(self,event):
    self.labelText = 'change the value'
    print(self.labelText)

myGUI = MyGUI()
When I run this, I click the entrybox and hit enter, hoping that the label will change value to ‘change the value’. However, while it does print that text, the label remains unchanged.
From looking at other questions on similar problems and issues, I have figured how to work with some of this outside a class, but I’m having some difficulties with doing it inside a class.
![]()
Karl Knechtel
60.7k11 gold badges93 silver badges140 bronze badges
asked Jun 15, 2013 at 16:48
![]()
1
self.labelText = 'change the value'
The above sentence makes labelText change the value, but not change depositLabel’s text.
To change depositLabel’s text, use one of following setences:
self.depositLabel['text'] = 'change the value'
OR
self.depositLabel.config(text='change the value')
![]()
answered Jun 15, 2013 at 17:13
![]()
falsetrufalsetru
350k62 gold badges704 silver badges625 bronze badges
4
You can also define a textvariable when creating the Label, and change the textvariable to update the text in the label.
Here’s an example:
labelText = StringVar()
depositLabel = Label(self, textvariable=labelText)
depositLabel.grid()

def updateDepositLabel(txt) # you may have to use *args in some cases
    labelText.set(txt)
There’s no need to update the text in depositLabel manually. Tk does that for you.
![]()
Wolf
9,4847 gold badges62 silver badges105 bronze badges
answered Jan 30, 2016 at 1:05
![]()
psyFipsyFi
7397 silver badges21 bronze badges
2
Use the config method to change the value of the label:
top = Tk()

l = Label(top)
l.pack()

l.config(text = "Hello World", width = "50")
![]()
answered Mar 25, 2016 at 17:18
![]()
2
Here is another one, I think. Just for reference.
Let’s set a variable to be an instantance of class StringVar
If you program Tk using the Tcl language, you can ask the system to let you know when a variable is changed. The Tk toolkit can use this feature, called tracing, to update certain widgets when an associated variable is modified.
There’s no way to track changes to Python variables, but Tkinter
allows you to create variable wrappers that can be used wherever Tk
can use a traced Tcl variable.
text = StringVar()
self.depositLabel = Label(self.__mainWindow, text = self.labelText, textvariable = text)
#                                                                   ^^^^^^^^^^^^^^^^^^^
def depositCallBack(self,event):
    text.set('change the value')
![]()
Wolf
9,4847 gold badges62 silver badges105 bronze badges
answered Dec 11, 2013 at 13:09
![]()
1
I made a small tkinter application which is sets the label after button clicked
#!/usr/bin/env python
from Tkinter import *
from tkFileDialog import askopenfilename
from tkFileDialog import askdirectory


class Application:
    def __init__(self, master):
        frame = Frame(master,width=200,height=200)
        frame.pack()

        self.log_file_btn = Button(frame, text="Select Log File", command=self.selectLogFile,width=25).grid(row=0)
        self.image_folder_btn = Button(frame, text="Select Image Folder", command=self.selectImageFile,width=25).grid(row=1)
        self.quite_button = Button(frame, text="QUIT", fg="red", command=frame.quit,width=25).grid(row=5)

        self.logFilePath =StringVar()
        self.imageFilePath = StringVar()
        self.labelFolder = Label(frame,textvariable=self.logFilePath).grid(row=0,column=1)
        self.labelImageFile = Label(frame,textvariable = self.imageFilePath).grid(row = 1,column=1)

        def selectLogFile(self):
            filename = askopenfilename()
            self.logFilePath.set(filename)

        def selectImageFile(self):
            imageFolder = askdirectory()
            self.imageFilePath.set(imageFolder)

root = Tk()
root.title("Geo Tagging")
root.geometry("600x100")
app = Application(root)
root.mainloop()
answered Mar 18, 2016 at 13:38
![]()
Harun ERGULHarun ERGUL
5,6125 gold badges54 silver badges62 bronze badges
There are many ways to tackle a problem like this. There are many ways to do this. I’m going to give you the most simple solution to this question I know. When changing the text of a label or any kind of wiget really. I would do it like this.
Name_Of_Label["text"] = "Your New Text"
So when I apply this knowledge to your code. It would look something like this.
from tkinter import*

class MyGUI:
   def __init__(self):
    self.__mainWindow = Tk()
    #self.fram1 = Frame(self.__mainWindow)
    self.labelText = 'Enter amount to deposit'
    self.depositLabel = Label(self.__mainWindow, text = self.labelText)
    self.depositEntry = Entry(self.__mainWindow, width = 10)
    self.depositEntry.bind('<Return>', self.depositCallBack)
    self.depositLabel.pack()
    self.depositEntry.pack()

    mainloop()

  def depositCallBack(self,event):
    self.labelText["text"] = 'change the value'
    print(self.labelText)

myGUI = MyGUI()
If this helps please let me know!
answered Apr 30, 2019 at 2:37
![]()
Последнее обновление: 11.09.2022
Виджет Label представляет текстовую метку. Этот элемент позволяет выводить статический текст без возможности редактирования.
Для создания элемента Label применяется конструктор, который принимает два параметра:
Label(master, options)
Параметр master представляет ссылку на родительский контейнер, а параметр options представляет следующие именованные параметры
-
anchor: устанавливает позиционирование текста
-
background: фоновый цвет
-
borderwidth: толщина границы метки
-
cursor: курсор указателя мыши при наведении на метку
-
font: шрифт текста
-
foreground: цвет текста
-
height: высота виджета
-
image: ссылка на изображение, которое отображается на метке
-
justify: устанавливает выравнивание текста. Значение LEFT выравнивает текст по левому краю, CENTER — по центру,
RIGHT — по правому краю -
pading: отступы от границ вилжета до его текста
-
relief: определяет тип границы, по умолчанию значение FLAT
-
text: устанавливает текст метки
-
textvariable: устанавливает привязку к элементу StringVar
-
underline: указывает на номер символа в тексте кнопки, который подчеркивается. По умолчанию значение -1, то есть никакой символ не подчеркивается
-
width: ширина виджета
-
wraplength: при положительном значении строки текста будут переносится для вмещения в пространство виджета
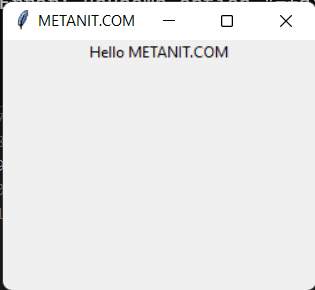
Выведем в окне приложения простейший текст:
from tkinter import *
from tkinter import ttk

root = Tk()
root.title("METANIT.COM")
root.geometry("250x200")

label = ttk.Label(text="Hello METANIT.COM")
label.pack()

root.mainloop()
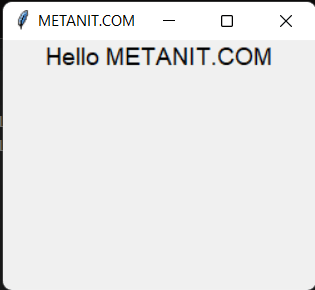
Установка шрифта
Параметр font принимает определение шрифта в виде:
font = ("имя шрифта", размер_шрифта)
Первое значение передает имя шрифта в кавычках, а второе — числовой размер шрифта. Например, установим шрифт Arial высотой в 14 единиц:
from tkinter import *
from tkinter import ttk

root = Tk()
root.title("METANIT.COM")
root.geometry("250x200")

label = ttk.Label(text="Hello METANIT.COM", font=("Arial", 14))
label.pack()

root.mainloop()
Установка изображения
За установку изображения на метке отвечает параметр image. Самый простой способ определения изображения представляет
создание объекта PhotoImage, в конструктор которого передается путь к изображению:
from tkinter import *
from tkinter import ttk

root = Tk()
root.title("METANIT.COM")
root.geometry("250x200")

python_logo = PhotoImage(file="./python_logo.png")

label = ttk.Label(image=python_logo)
label.pack()

root.mainloop()
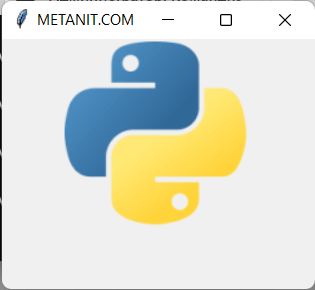
В моем случае изображение представляет файл python_logo.png, которое находится в одной папке с файлом приложения и которое изображает логотип python:
Если необходимо также отображать и текст, то для этого можно установить параметр compound, который определяет положение текста по отношению к изображению
с помощью одного из следующих значений:
-
top: изображение поверх текста
-
bottom: изображение под текстом
-
left: изображение слева от текста
-
right: изображение справа от текста
-
none: при наличии изображения отображается только изображение
-
text: отображается только текст
-
image: отображается только изображение
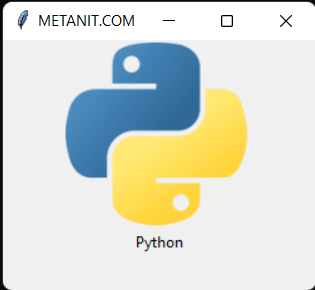
Например, отобразим картинку поверх текста:
from tkinter import *
from tkinter import ttk

root = Tk()
root.title("METANIT.COM")
root.geometry("250x200")

python_logo = PhotoImage(file="./python_logo.png")

label = ttk.Label(image=python_logo, text="Python", compound="top")
label.pack()

root.mainloop()
Стилизация
По умолчанию метка не имеет границы. Для установки толщины границы используется параметр borderwidth, при этом нам также надо
установить тип границы с помощью параметра releaf, который может принимать значения: «flat», «raised», «sunken», «ridge», «solid» и «groove»:
from tkinter import *
from tkinter import ttk
root = Tk()
root.title("METANIT.COM")
root.geometry("250x200")
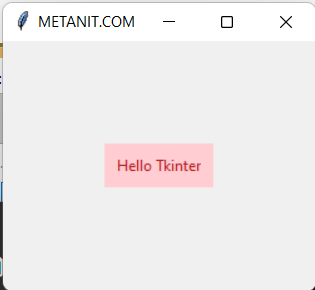
label = ttk.Label(text="Hello Tkinter", borderwidth=2, relief="ridge", padding=8)
label.pack(expand=True)
root.mainloop()
Установка цвета фона и текста:
from tkinter import *
from tkinter import ttk

root = Tk()
root.title("METANIT.COM")
root.geometry("250x200")


label = ttk.Label(text="Hello Tkinter", background="#FFCDD2", foreground="#B71C1C", padding=8)
label.pack(expand=True)

root.mainloop()
Tkinter label widgets can display text or a picture on the screen. You can use only one typeface on a label. It is possible to have many lines of text. For instance, a label can include any text, and a window can have numerous labels (just like any widget can be displayed multiple times in a window).
The label text attribute in Python Tkinter allows you to change/update the label text easily. Another technique to edit the Tkinter label text is to change the label’s text property. In this lesson, we’ll look at changing label text in Tkinter Python using more than one approach.
Tkinter is a python module that provides a standard GUI (Graphical user interface). It allows you to quickly and easily create a graphical user interface (GUI) application.
To make a tkinter application, follow these steps:
- First import the module — tkinter
- Make the primary window (container)
- Add as many widgets as you want to the main window.
- Apply the Trigger event to the widgets.
Widgets are the command and control elements of any graphical user interface (GUI) application. The primary purpose of this widget is to provide a wide range of controls. Buttons, labels, text boxes, and many other widgets are examples. Importing tkinter is similar to importing any other Python package. The module’s name in Python 2.x is ‘Tkinter,’ but in Python 3.x, it is ‘tkinter.’
When establishing a Python application with GUI, there are two primary approaches that the user must remember.
Tk(screenName=None, baseName=None, className=’Tk’, useTk=1):
Tkinter provides the method Tk(screenName=None, baseName=None, className=’Tk’, useTk=1) for creating a main window. You can replace the className with the desired name to change the window’s name. The following is the basic code used to generate the application’s primary window:
where m is the main window object’s name
When your application is ready to run, you call the mainloop() method. mainloop() is an infinite loop that runs the application, waits for an event and processes the event as long as the window is open.
m.mainloop()

import tkinter
m = tkinter.Tk()
'''
It is the region where widgets are added.
'''
m.mainloop()
Tkinter also provides access to the widgets’ geometric configuration, which you can use to organize widgets in parent windows. There are three types of geometry manager classes.
- pack() method: It arranges the widgets into blocks before placing the widgets in the parent widget.
- grid() method: Before placing the widgets in the parent widget, it organizes them in a grid (table-like structure).
- The method place(): It arranges the widgets by placing them in the program’s specified locations.
The label is one of its widgets, and it’s in charge of creating a display box area for text and graphics. Let’s first explore the Tkinter label widget.
Python Tkinter – Label
Python provides many alternatives for creating a graphical user interface (Graphical User Interface). Further, Tkinter is the most widely used GUI technique out of all the options. It’s a standard Python interface to the Python-supplied Tk GUI toolkit. Python with Tkinter is the quickest and most straightforward approach to constructing graphical user interfaces.
Using widgets, creating a GUI with Tkinter is simple. Widgets, such as buttons and menus, are standard graphical user interface (GUI) elements. Now, let’s look at how to update the label’s text:
The Label Widget
Tkinter Label is a widget that allows you to create display boxes with text or graphics. The developer can change the text displayed by this widget at any moment. You can also use it to execute operations like underlining text and spanning text across numerous lines. It’s vital to remember that a label can only display text in one typeface at a time. To utilize a label, you have to tell it what to display (this can be text, a bitmap, or an image).
The syntax is as follows:
w = Label ( master, option, … )
The master parameter represents the parent window.
Parameters
- master: This is the window’s parent.
- Options: The format of the widget can be changed using various settings. The most commonly used options for this widget are listed below. These options can be used as comma-separated key-value pairs:
The following are a few options:
anchor: If the widget has more space than required for the text, this option is used to manage the alignment of the text. anchor=CENTER is the default, which centered the text in the available space.
bg: This option changes the background color behind the label and indicator.
height: This option is used to specify the new frame’s vertical dimension.
width: The label’s width in characters (not pixels!). If this option is not selected, the label is scaled to fit its contents.
bd: This option is used to control the size of the indicator’s border. Also, the default bd value is 2 pixels.
font: If you’re using the text or textvariable options to show text in the label, the font option is used to select the typeface displayed in the text.
cursor: When the mouse is moved over the label, it is used to designate which cursor should be displayed. The standard cursor is used by default.
bitmap: It is used to set the bitmap to the provided graphical object so that the label can represent graphics rather than text.
fg: Text and bitmap labels use the label clear. The operating system determines the default.
It is the color that will appear at the place of the 1-bits in a bitmap if it is displayed.
image: In the label widget, this option displays a static image.
padx: This option adds extra spaces between the text on the label’s left and right sides. This option has a default value of 1.
pady: This option adds extra space between the label’s top and bottom text. This option has a default value of 1.
Justify: This option is used to specify how many lines of text should be aligned. Use the values LEFT, RIGHT, or CENTER. It’s worth noting that the anchor option is used to position the text within the widget. CENTER is the default setting for justify.
relief: The appearance of a decorative border around the label is controlled by this option. FLAT is the default setting for this parameter.
underline: This
wraplength: Instead of having a single line for the label text, it can be split across multiple lines, each with the number of characters indicated in this option.
from tkinter import *


top = Tk()
top.geometry("450x300")

# email's label
user_email = Label(top, text = "Email").place(x = 40,	y = 60)

# the label for user_password
user_password = Label(top,	text = "Password").place(x = 40, y = 100)

submit_button = Button(top,	text = "Submit").place(x = 40, y = 130)
	There are number of options which are used to change the format of the widget.
user_email_input_area = Entry(top,	width = 30).place(x = 110, y = 60)

user_password_entry_area = Entry(top, width = 30).place(x = 110, y = 100)

top.mainloop()
Example: using a Label in Tkinter
from tkinter import *
root = Tk()
w = Label(root, text='Codeunderscored.com!')
w.pack()
root.mainloop()
Now, let’s look at how to update the label’s text:
Using Label.config() method
The syntax for Label.config() is as follows:
Parameter: text– The text to display in the label.
This method is used to do a label widget overwriting.
Example:
importing everything from tkinter
from tkinter import *

# creating the tkinter window
Main_window = Tk()

# variable
my_text = "Codeunderscored updated !!!"

# function define for
# updating the my_label
# widget content
def counter():

	# use global variable
	global my_text

	# configure
	my_label.config(text = my_text)

# create a button widget and attached
# with counter function
my_button = Button(Main_window,
				text = "Please update",
				command = counter)

# create a Label widget
my_label = Label(Main_window, text = "Codeunderscored")

# place the widgets
# in the gui window
my_label.pack()
my_button.pack()

# Start the GUI
Main_window.mainloop()
Using StringVar() class
StringVar is a type of Tkinter constructor that creates a string variable in Tkinter. Tkinter will update this particular widget when the StringVar variable is adjusted when we pair it with the Tkinter widgets.
The syntax for StringVar() is as follows:
Return: String variable object
This class is used to set and change values per the requirements.
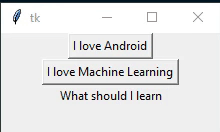
Example 1 : Using StringVar() class
# importing everything from tkinter
from tkinter import *

# create gui window
Main_window = Tk()

# set the configuration
# of the window
Main_window.geometry("220x100")

# define a function
# for setting the new text
def java():
	my_string_var.set("You must go with Java")

# define a function
# for setting the new text
def python():
	my_string_var.set("You must go with Python")


# create a Button widget and attached
# with java function
btn_1 = Button(Main_window,
			text = "I love Android",
			command = java)

# create a Button widget and attached
# with python function
btn_2 = Button(Main_window,
			text = "I love Machine Learning",
			command = python)

# create a StringVar class
my_string_var = StringVar()

# set the text
my_string_var.set("What should I learn")

# create a label widget
my_label = Label(Main_window,
				textvariable = my_string_var)


# place widgets into
# the gui window
btn_1.pack()
btn_2.pack()
my_label.pack()

# Start the GUI
Main_window.mainloop()
Example 2: Using StringVar() class
import tkinter as tk

class Test():
    def __init__(self):
        self.root = tk.Tk()
        self.text = tk.StringVar()
        self.text.set("Test")
        self.label = tk.Label(self.root, textvariable=self.text)

        self.button = tk.Button(self.root,
                                text="Click to change text below",
                                command=self.changeText)
        self.button.pack()
        self.label.pack()
        self.root.mainloop()

    def changeText(self):
        self.text.set("Text updated")

app=Test()


self.text = tk.StringVar()
self.text.set("Code Test")
The string variable could not be started by the Tkinter constructor using the string.
self.text = tk.StringVar()
To set the StringVar value, we should use the set method, such as self.text.set (“Test”).
self.label = tk.Label(self.root, textvariable=self.text)
By setting textvariable to self.text associates the StringVar variable self.text with the label widget self.label. If self.text is changed, the Tk toolkit starts tracking the changes and updates the text self.label. A Tkinter dynamic label is created with the code above. When the self.text is changed, it immediately displays the Tkinter label text.
Use the label text property to change/update the Python Tkinter Label Text
Changing the label’s text property is another way to change the Tkinter label text.
import tkinter as tk

class Test():
    def __init__(self):
        self.root = tk.Tk()
        self.label = tk.Label(self.root, text="Text")

        self.button = tk.Button(self.root,
                                text="Click to change text below",
                                command=self.changeText)
        self.button.pack()
        self.label.pack()
        self.root.mainloop()

    def changeText(self):
        self.label['text'] = "Text updated"

app=Test()
The text of the label object can be started with text=”Text” and altered by setting a new value to the text key of the label object. We may alternatively use the tk.Label.configure() method to update the text property, as seen below. The above codes function in the same way.
import tkinter as tk

class Test():
    def __init__(self):
        self.root = tk.Tk()
        self.label = tk.Label(self.root, text="Text")

        self.button = tk.Button(self.root,
                                text="Click to change text below",
                                command=self.changeText)
        self.button.pack()
        self.label.pack()
        self.root.mainloop()

    def changeText(self):
        self.label.configure(text="Text Updated")

app=Test()
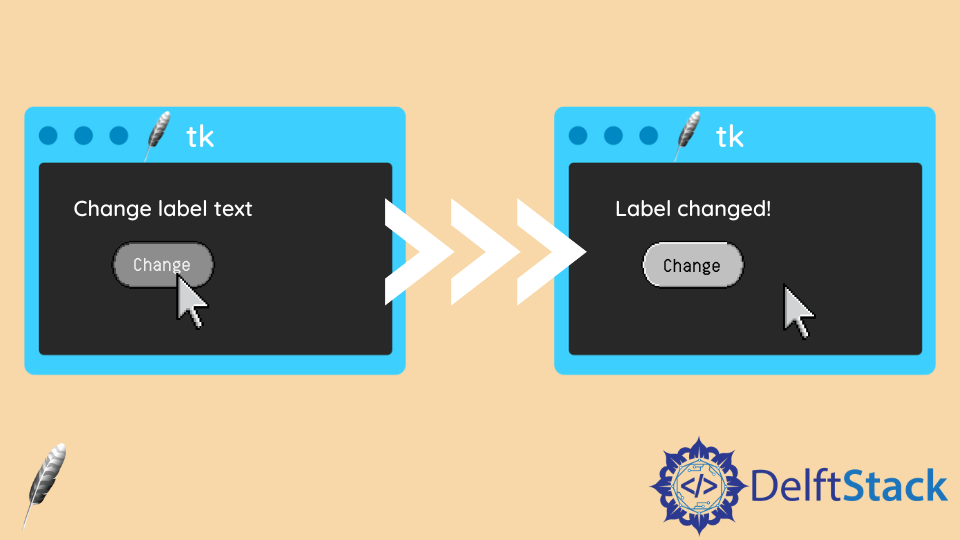
You can update the text of the label widget using a button and a function if you need to tweak or change it dynamically.
# Import the required libraries
from tkinter import *

# Create an instance of tkinter frame or window
tk_win = Tk()

# Set the size of the tkinter window
tk_win.geometry("700x350")

# Define a function update the label text
def on_click():
   label["text"] = "Code in Python"
   b["state"] = "disabled"

# Create a label widget
label = Label(tk_win, text="Code: Click the Button to update this Text",
font=('Calibri 15 bold'))
label.pack(pady=20)

# Create a button to update the label widget
b = Button(tk_win, text="Update Label", command=on_click)
b.pack(pady=20)

tk_win.mainloop()
Output

When you run the code above, a label text and a button will appear in the window. The label text will only be updated when you click the button.

Example: font configuration
Some Tk widgets, such as the label, text, and canvas widgets, allow you to choose the typefaces used to display text. A “font” configuration option is commonly used to accomplish this. It’s crucial to keep in mind that typefaces are a few areas that aren’t platform-independent. The attribute “fg” is used to modify the color of the text. On the other hand, the attribute “bg,” can be used to change the label’s background color.
import tkinter as tk
rt = tk.Tk()
tk.Label(rt,
         text="Codeunderscored: Red Text in displayed in Times Font",
         fg = "red",
         font = "Times").pack()
tk.Label(rt,
         text="Codeunderscored: Green Text in displayed in Helvetica Font",
         fg = "dark green",
         bg = "light green",
         font = "Helvetica 12 bold italic").pack()
rt.mainloop()
Conclusion
Tkinter Label widgets are commonly used in applications to show text or images. Using the config(**options) method, we can change the label widget’s text property, color, background, and foreground colors. If you need to adjust or change the text of the label widget dynamically, you can use a button and a function to do so.
Summary: in this tutorial, you’ll learn about Tkinter Label widget and how to use it to display a text or image on the screen.
Introduction to Tkinter Label widget
Tkinter Label widget is used to display a text or image on the screen. To use a Label widget, you use the following general syntax:
Code language: Python (python)
label = ttk.Label(container, **options)
The Label widget has many options that allow you to customize its appearance:
| Options | Meaning |
|---|---|
| anchor | When the text and/or image are smaller than the width, the anchor option determines where to position them tk.W, tk.CENTER or tk.E for left, center, and right alignment respectively. |
| background | Set the background color for the label |
| borderwidth | Add a border around the label. |
| class_ | Specify a custom widget class name for changing the label’s appearance. |
| compound | Specify how to display both text and image on the Label. |
| cursor | Specify the mouse cursor’s appearance when the mouse is over the widget. |
| font | Specify the font style for displaying text |
| foreground | Specify the color of the text |
| image | Specify an image or images to show in addition to text or instead of text. |
| justify | If the text contains newline characters, the justify option specifies how each line is positioned horizontally. The valid values are tk.LEFT (left-justify), tk.CENTER (center), and tk.RIGHT (right-justify). |
| padding | Add more space around the label. |
| relief | Use this option to create an effect for the Label .e.g, flat, raised, sunken, groove, and ridge. |
| style | Specify the custom widget style. |
| takefocus | is a boolean value that specifies whether the label is visited during focus traversal. It defaults to False which doesn’t get focus. |
| text | Specify a string of text to show in the widget |
| textvariable | A StringVar instance that holds the text value of the widget. It overrides the text option if both textvariable and text are available. |
| underline | Specify the position of the letter that should be underlined e.g, underline = 0 would underline the letter E in the text='Exit' |
| width | Specify the number of characters to show |
| wraplength | Chop the text into the lines which less than the length specified by the wraplength option. |
The following shows a skeleton program that we’ll use to illustrate various options of the Label widget:
Code language: Python (python)
import tkinter as tk from tkinter import ttk root = tk.Tk() root.geometry('300x200') root.resizable(False, False) root.title('Label Widget Demo') # show the label here root.mainloop()
Displaying a regular label
The following program shows how to display a regular label on the root window:
Code language: Python (python)
import tkinter as tk from tkinter.ttk import Label root = tk.Tk() root.geometry('300x200') root.resizable(False, False) root.title('Label Widget Demo') # show a label label = Label(root, text='This is a label') label.pack(ipadx=10, ipady=10) root.mainloop()
Output:
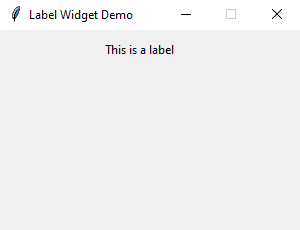
How it works.
- First, import
Labelclass from thetkinter.ttkmodule. - Second, create the root window and set its properties including size, resizeable, and title.
- Third, create a new instance of the Label widget, set its container to the root window, and assign a literal string to its
textproperty.
Setting a specific font for the Label
To set a particular font for a label, you pass the font keyword argument to the Label constructor like this:
Code language: Python (python)
font = ('font name', font_size)
The font keyword argument is a tuple that contains font name and size. For example:
Code language: Python (python)
font=("Helvetica", 14)
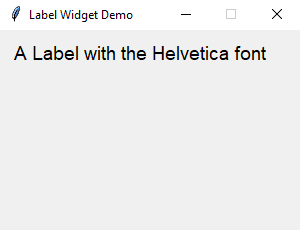
The following example shows a label with the Helvetica font:
Code language: Python (python)
import tkinter as tk from tkinter import ttk root = tk.Tk() root.geometry('300x200') root.resizable(False, False) root.title('Label Widget Demo') # label with a specific font label = ttk.Label( root, text='A Label with the Helvetica font', font=("Helvetica", 14)) label.pack(ipadx=10, ipady=10) root.mainloop()
Output:
Displaying an image
To use a Label widget to display an image, you follow these steps:
First, create a PhotoImage widget by passing the path to the photo to the PhotoImage constructor:
Code language: Python (python)
photo = tk.PhotoImage(file='./assets/python.png')
Second, assign the PhotoImage object to the image option of the Label widget:
Code language: Python (python)
Label(..., image=photo)
The following example shows how to use a Label widget to display an image:
Code language: Python (python)
import tkinter as tk from tkinter import ttk # create the root window root = tk.Tk() root.geometry('300x200') root.resizable(False, False) root.title('Label Widget Image') # display an image label photo = tk.PhotoImage(file='./assets/python.png') image_label = ttk.Label( root, image=photo, padding=5 ) image_label.pack() root.mainloop()
Output:
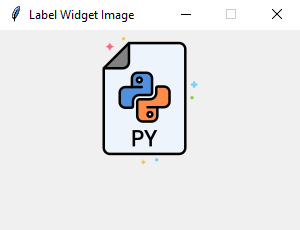
Note that the image file is located at the /assets/ folder.
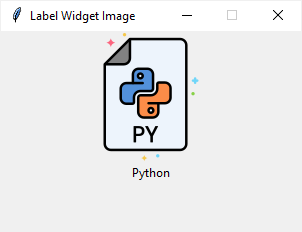
To display both text and image, you’ll use the text attribute and compound option.
The compound option specifies the position of the image relative to the text. Its valid values are:
| Compound | Effect |
|---|---|
'top' |
Display the image above the text. |
'bottom' |
Display the image below the text. |
'left' |
Display the image to the left of the text. |
'right' |
Display the image to the right of the text. |
'none' |
Display the image if there’s one, otherwise display the text. The compound option defaults to 'none'. |
'text' |
Display the text, not the image |
'image' |
Display the image, not the text. |
The following program shows how to display both text and image on a label:
Code language: PHP (php)
import tkinter as tk from tkinter import ttk # create the root window root = tk.Tk() root.geometry('300x200') root.resizable(False, False) root.title('Label Widget Image') # display an image label photo = tk.PhotoImage(file='./assets/python.png') image_label = ttk.Label( root, image=photo, text='Python', compound='top' ) image_label.pack() root.mainloop()
Output:
Summary
- Use the Label widget to display a text or an image or both.
Did you find this tutorial helpful ?
В этом уроке мы узнаем, как разрабатывать графические пользовательские интерфейсы, с помощью разбора некоторых примеров графического интерфейса Python с использованием библиотеки Tkinter.
Библиотека Tkinter установлена в Python в качестве стандартного модуля, поэтому нам не нужно устанавливать что-либо для его использования. Tkinter — очень мощная библиотека. Если вы уже установили Python, можете использовать IDLE, который является интегрированной IDE, поставляемой в Python, эта IDE написана с использованием Tkinter. Звучит круто!
Мы будем использовать Python 3.7 поэтому, если вы все еще используете Python 2.x, настоятельно рекомендуем перейти на Python 3.x, если вы не в курсе нюансов изменения языка, с целью, чтобы вы могли настроить код для запуска без ошибок.
Давайте предположим, что у вас уже есть базовые знания по Python, которые помогут понять что мы будем делать.
Мы начнем с создания окна, в котором мы узнаем, как добавлять виджеты, такие, как кнопки, комбинированные поля и т. д. После этого поэкспериментируем со своими свойствами, поэтому предлагаю начать.
Создание своего первого графического интерфейса
Для начала, следует импортировать Tkinter и создать окно, в котором мы зададим его название:
from tkinter import *


window = Tk()
window.title("Добро пожаловать в приложение PythonRu")
window.mainloop()
Результат будет выглядеть следующим образом:
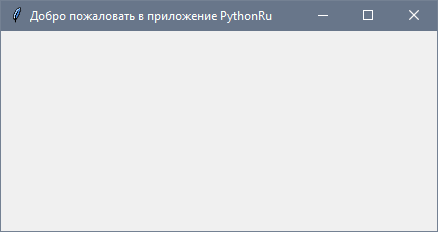 Прекрасно! Наше приложение работает.
Последняя строка вызывает функцию mainloop. Эта функция вызывает бесконечный цикл окна, поэтому окно будет ждать любого взаимодействия с пользователем, пока не будет закрыто.
В случае, если вы забудете вызвать функцию mainloop , для пользователя ничего не отобразится.
Создание виджета Label
Чтобы добавить текст в наш предыдущий пример, мы создадим lbl , с помощью класса Label, например:
lbl = Label(window, text="Привет")
Затем мы установим позицию в окне с помощью функции grid и укажем ее следующим образом:
lbl.grid(column=0, row=0)
Полный код, будет выглядеть следующим образом:
from tkinter import *


window = Tk()
window.title("Добро пожаловать в приложение PythonRu")
lbl = Label(window, text="Привет")
lbl.grid(column=0, row=0)
window.mainloop()
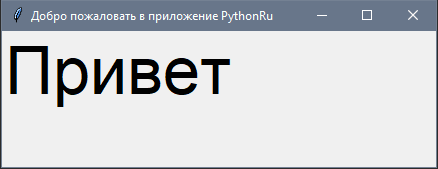
И вот как будет выглядеть результат:
 Если функция
 grid не будет вызвана, текст не будет отображаться.
Настройка размера и шрифта текста
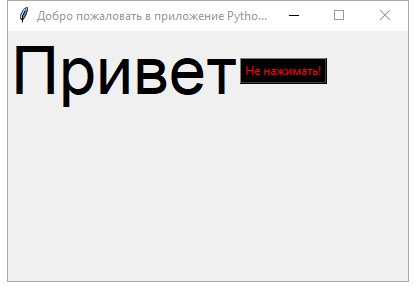
Вы можете задать шрифт текста и размер. Также можно изменить стиль шрифта. Для этого передайте параметр font таким образом:
lbl = Label(window, text="Привет", font=("Arial Bold", 50))
 Обратите внимание, что параметр
 font может быть передан любому виджету, для того, чтобы поменять его шрифт, он применяется не только к Label.
Отлично, но стандартное окно слишком мало. Как насчет настройки размера окна?
Настройка размеров окна приложения
Мы можем установить размер окна по умолчанию, используя функцию geometry следующим образом:
window.geometry('400x250')
В приведенной выше строке устанавливается окно шириной до 400 пикселей и высотой до 250 пикселей.
Попробуем добавить больше виджетов GUI, например, кнопки и посмотреть, как обрабатывается нажатие кнопок.
Добавление виджета Button
Начнем с добавления кнопки в окно. Кнопка создается и добавляется в окно так же, как и метка:
btn = Button(window, text="Не нажимать!")
btn.grid(column=1, row=0)
Наш код будет выглядеть вот так:
from tkinter import *


window = Tk()
window.title("Добро пожаловать в приложение PythonRu")
window.geometry('400x250')
lbl = Label(window, text="Привет", font=("Arial Bold", 50))
lbl.grid(column=0, row=0)
btn = Button(window, text="Не нажимать!")
btn.grid(column=1, row=0)
window.mainloop()
Результат будет следующим:
 Обратите внимание, что мы помещаем кнопку во второй столбец окна, что равно 1. Если вы забудете и поместите кнопку в том же столбце, который равен 0, он покажет только кнопку.
Изменение цвета текста и фона у Button
Вы можете поменять цвет текста кнопки или любого другого виджета, используя свойство fg.
Кроме того, вы можете поменять цвет фона любого виджета, используя свойство bg.
btn = Button(window, text="Не нажимать!", bg="black", fg="red")
 Теперь, если вы попытаетесь щелкнуть по кнопке, ничего не произойдет, потому что событие нажатия кнопки еще не написано.
Кнопка Click
Для начала, мы запишем функцию, которую нужно выполнить при нажатии кнопки:
def clicked():
    lbl.configure(text="Я же просил...")
Затем мы подключим ее с помощью кнопки, указав следующую функцию:
btn = Button(window, text="Не нажимать!", command=clicked)
Обратите внимание: мы пишем clicked, а не clicked()с круглыми скобками. Теперь полный код будет выглядеть так:
from tkinter import *


def clicked():
    lbl.configure(text="Я же просил...")


window = Tk()
window.title("Добро пожаловать в приложение PythonRu")
window.geometry('400x250')
lbl = Label(window, text="Привет", font=("Arial Bold", 50))
lbl.grid(column=0, row=0)
btn = Button(window, text="Не нажимать!", command=clicked)
btn.grid(column=1, row=0)
window.mainloop()
При нажатии на кнопку, результат, как и ожидалось, будет выглядеть следующим образом:
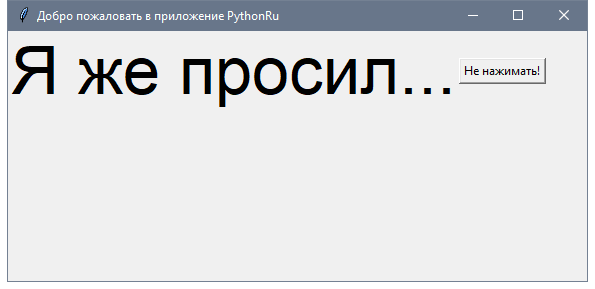 Круто!
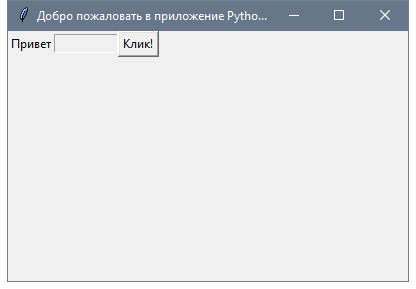
Получение ввода с использованием класса Entry (текстовое поле Tkinter)
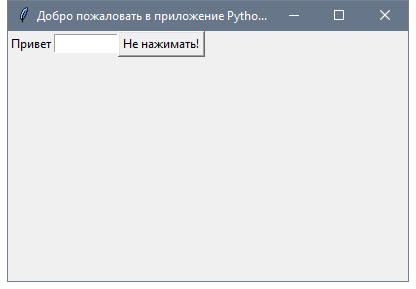
В предыдущих примерах GUI Python мы ознакомились со способами добавления простых виджетов, а теперь попробуем получить пользовательский ввод, используя класс Tkinter Entry (текстовое поле Tkinter).
Вы можете создать текстовое поле с помощью класса Tkinter Entry следующим образом:
txt = Entry(window, width=10)
Затем вы можете добавить его в окно, используя функцию grid.
Наше окно будет выглядеть так:
from tkinter import *


def clicked():
    lbl.configure(text="Я же просил...")


window = Tk()
window.title("Добро пожаловать в приложение PythonRu")
window.geometry('400x250')
lbl = Label(window, text="Привет")
lbl.grid(column=0, row=0)
txt = Entry(window,width=10)
txt.grid(column=1, row=0)
btn = Button(window, text="Не нажимать!", command=clicked)
btn.grid(column=2, row=0)
window.mainloop()
Полученный результат будет выглядеть так:
 Теперь, если вы нажмете кнопку, она покажет то же самое старое сообщение, но что же будет с отображением введенного текста в виджет
 Entry?
Во-первых, вы можете получить текст ввода, используя функцию get. Мы можем записать код для выбранной функции таким образом:
def clicked():
    res = "Привет {}".format(txt.get())
    lbl.configure(text=res)
Если вы нажмете на кнопку — появится текст «Привет » вместе с введенным текстом в виджете записи. Вот полный код:
from tkinter import *


def clicked():
    res = "Привет {}".format(txt.get())
    lbl.configure(text=res)


window = Tk()
window.title("Добро пожаловать в приложение PythonRu")
window.geometry('400x250')
lbl = Label(window, text="Привет")
lbl.grid(column=0, row=0)
txt = Entry(window,width=10)
txt.grid(column=1, row=0)
btn = Button(window, text="Клик!", command=clicked)
btn.grid(column=2, row=0)
window.mainloop()
Запустите вышеуказанный код и проверьте результат:
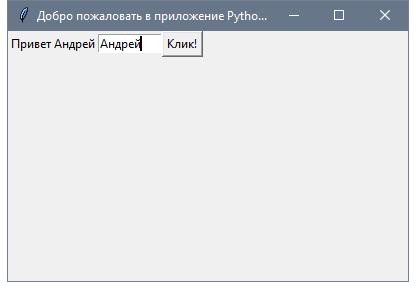 Прекрасно!
Каждый раз, когда мы запускаем код, нам нужно нажать на виджет ввода, чтобы настроить фокус на ввод текста, но как насчет автоматической настройки фокуса?
Установка фокуса виджета ввода
Здесь все очень просто, ведь все, что нам нужно сделать, — это вызвать функцию focus:
txt.focus()
Когда вы запустите свой код, вы заметите, что виджет ввода в фокусе, который дает возможность сразу написать текст.
Отключить виджет ввода
Чтобы отключить виджет ввода, отключите свойство состояния:
txt = Entry(window,width=10, state='disabled')
 Теперь вы не сможете ввести какой-либо текст.
Добавление виджета Combobox
Чтобы добавить виджет поля с выпадающем списком, используйте класс Combobox из ttk следующим образом:
from tkinter.ttk import Combobox


combo = Combobox(window)
Затем добавьте свои значения в поле со списком.
from tkinter import *
from tkinter.ttk import Combobox


window = Tk()
window.title("Добро пожаловать в приложение PythonRu")
window.geometry('400x250')
combo = Combobox(window)
combo['values'] = (1, 2, 3, 4, 5, "Текст")
combo.current(1)  # установите вариант по умолчанию
combo.grid(column=0, row=0)
window.mainloop()
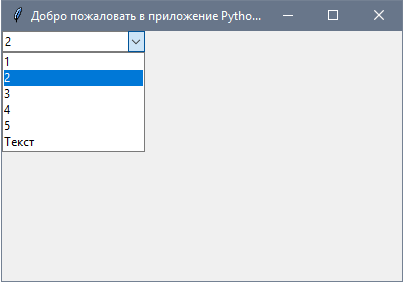 Как видите с примера, мы добавляем элементы
 combobox, используя значения tuple.
Чтобы установить выбранный элемент, вы можете передать индекс нужного элемента текущей функции.
Чтобы получить элемент select, вы можете использовать функцию get вот таким образом:
combo.get()
Добавление виджета Checkbutton (чекбокса)
С целью создания виджета checkbutton, используйте класс Checkbutton:
from tkinter.ttk import Checkbutton


chk = Checkbutton(window, text='Выбрать')
Кроме того, вы можете задать значение по умолчанию, передав его в параметр var в Checkbutton:
from tkinter import *
from tkinter.ttk import Checkbutton


window = Tk()
window.title("Добро пожаловать в приложение PythonRu")
window.geometry('400x250')
chk_state = BooleanVar()
chk_state.set(True)  # задайте проверку состояния чекбокса
chk = Checkbutton(window, text='Выбрать', var=chk_state)
chk.grid(column=0, row=0)
window.mainloop()
Посмотрите на результат:
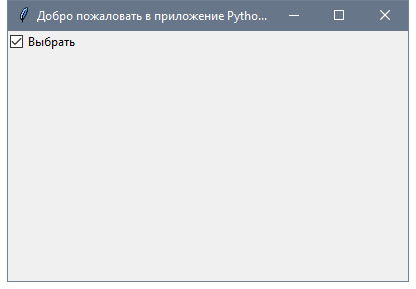
Установка состояния Checkbutton
Здесь мы создаем переменную типа BooleanVar, которая не является стандартной переменной Python, это переменная Tkinter, затем передаем ее классу Checkbutton, чтобы установить состояние чекбокса как True в приведенном выше примере.
Вы можете установить для BooleanVar значение false, что бы чекбокс не был отмечен.
Так же, используйте IntVar вместо BooleanVar и установите значения 0 и 1.
chk_state = IntVar()
chk_state.set(0) # False
chk_state.set(1) # True
Эти примеры дают тот же результат, что и BooleanVar.
Добавление виджетов Radio Button
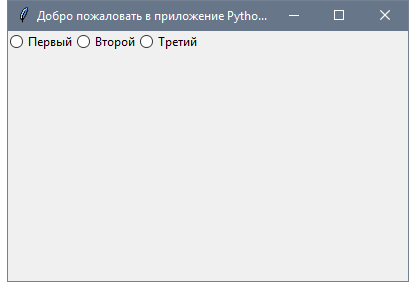
Чтобы добавить radio кнопки, используйте класс RadioButton:
rad1 = Radiobutton(window,text='Первый', value=1)
Обратите внимание, что вы должны установить value для каждой radio кнопки с уникальным значением, иначе они не будут работать.
from tkinter import *
from tkinter.ttk import Radiobutton


window = Tk()
window.title("Добро пожаловать в приложение PythonRu")
window.geometry('400x250')
rad1 = Radiobutton(window, text='Первый', value=1)
rad2 = Radiobutton(window, text='Второй', value=2)
rad3 = Radiobutton(window, text='Третий', value=3)
rad1.grid(column=0, row=0)
rad2.grid(column=1, row=0)
rad3.grid(column=2, row=0)
window.mainloop()
Результатом вышеприведенного кода будет следующий:
 Кроме того, вы можете задать
 command любой из этих кнопок для определенной функции. Если пользователь нажимает на такую кнопку, она запустит код функции.
Вот пример:
rad1 = Radiobutton(window,text='Первая', value=1, command=clicked)

def clicked():
    # Делайте, что нужно
Достаточно легко!
Получение значения Radio Button (Избранная Radio Button)
Чтобы получить текущую выбранную radio кнопку или ее значение, вы можете передать параметр переменной и получить его значение.
from tkinter import *
from tkinter.ttk import Radiobutton


def clicked():
    lbl.configure(text=selected.get())


window = Tk()
window.title("Добро пожаловать в приложение PythonRu")
window.geometry('400x250')
selected = IntVar()
rad1 = Radiobutton(window,text='Первый', value=1, variable=selected)
rad2 = Radiobutton(window,text='Второй', value=2, variable=selected)
rad3 = Radiobutton(window,text='Третий', value=3, variable=selected)
btn = Button(window, text="Клик", command=clicked)
lbl = Label(window)
rad1.grid(column=0, row=0)
rad2.grid(column=1, row=0)
rad3.grid(column=2, row=0)
btn.grid(column=3, row=0)
lbl.grid(column=0, row=1)
window.mainloop()
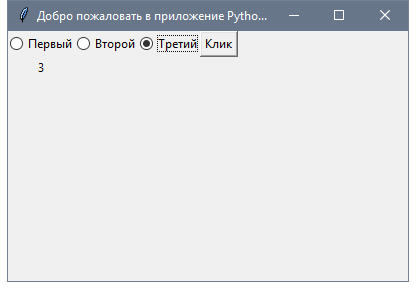 Каждый раз, когда вы выбираете radio button, значение переменной будет изменено на значение кнопки.
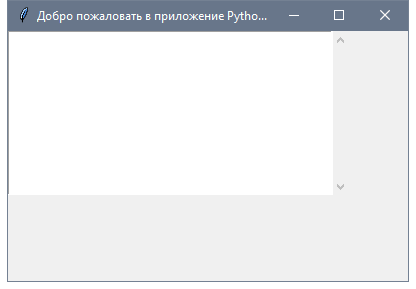
Добавление виджета ScrolledText (текстовая область Tkinter)
Чтобы добавить виджет ScrolledText, используйте класс ScrolledText:
from tkinter import scrolledtext


txt = scrolledtext.ScrolledText(window,width=40,height=10)
Здесь нужно указать ширину и высоту ScrolledText, иначе он заполнит все окно.
from tkinter import *
from tkinter import scrolledtext


window = Tk()
window.title("Добро пожаловать в приложение PythonRu")
window.geometry('400x250')
txt = scrolledtext.ScrolledText(window, width=40, height=10)
txt.grid(column=0, row=0)
window.mainloop()
Результат:
Настройка содержимого Scrolledtext
Используйте метод insert, чтобы настроить содержимое Scrolledtext:
txt.insert(INSERT, 'Текстовое поле')
Удаление/Очистка содержимого Scrolledtext
Чтобы очистить содержимое данного виджета, используйте метод delete:
txt.delete(1.0, END) # мы передали координаты очистки
Отлично!
Создание всплывающего окна с сообщением
Чтобы показать всплывающее окно с помощью Tkinter, используйте messagebox следующим образом:
from tkinter import messagebox


messagebox.showinfo('Заголовок', 'Текст')
Довольно легко! Давайте покажем окно сообщений при нажатии на кнопку пользователем.
from tkinter import *
from tkinter import messagebox


def clicked():
    messagebox.showinfo('Заголовок', 'Текст')


window = Tk()
window.title("Добро пожаловать в приложение PythonRu")
window.geometry('400x250')
btn = Button(window, text='Клик', command=clicked)
btn.grid(column=0, row=0)
window.mainloop()
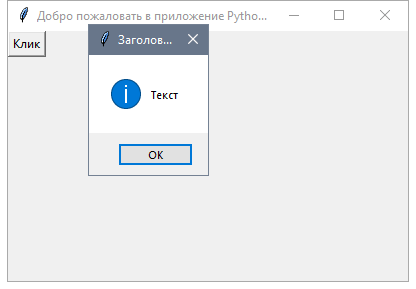 Когда вы нажмете на кнопку, появится информационное окно.
Показ сообщений о предупреждениях и ошибках
Вы можете показать предупреждающее сообщение или сообщение об ошибке таким же образом. Единственное, что нужно изменить—это функция сообщения.
messagebox.showwarning('Заголовок', 'Текст')  # показывает предупреждающее сообщение
messagebox.showerror('Заголовок', 'Текст')  # показывает сообщение об ошибке
Показ диалоговых окон с выбором варианта
Чтобы показать пользователю сообщение “да/нет”, вы можете использовать одну из следующих функций messagebox:
from tkinter import messagebox


res = messagebox.askquestion('Заголовок', 'Текст')
res = messagebox.askyesno('Заголовок', 'Текст')
res = messagebox.askyesnocancel('Заголовок', 'Текст')
res = messagebox.askokcancel('Заголовок', 'Текст')
res = messagebox.askretrycancel('Заголовок', 'Текст')
Вы можете выбрать соответствующий стиль сообщения согласно вашим потребностям. Просто замените строку функции showinfo на одну из предыдущих и запустите скрипт. Кроме того, можно проверить, какая кнопка нажата, используя переменную результата.
Если вы кликнете OK, yes или retry, значение станет True, а если выберете no или cancel, значение будет False.
Единственной функцией, которая возвращает одно из трех значений, является функция askyesnocancel; она возвращает True/False/None.
Добавление SpinBox (Виджет спинбокс)
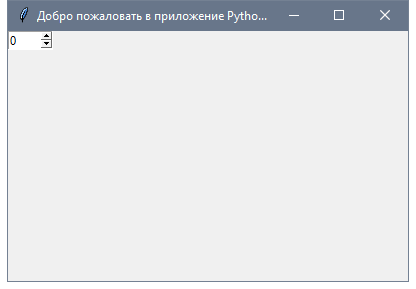
Для создания виджета спинбокса, используйте класс Spinbox:
spin = Spinbox(window, from_=0, to=100)
Таким образом, мы создаем виджет Spinbox, и передаем параметры from и to, чтобы указать диапазон номеров.
Кроме того, вы можете указать ширину виджета с помощью параметра width:
spin = Spinbox(window, from_=0, to=100, width=5)
Проверим пример полностью:
from tkinter import *


window = Tk()
window.title("Добро пожаловать в приложение PythonRu")
window.geometry('400x250')
spin = Spinbox(window, from_=0, to=100, width=5)
spin.grid(column=0, row=0)
window.mainloop()
 Вы можете указать числа для
 Spinbox, вместо использования всего диапазона следующим образом:
spin = Spinbox(window, values=(3, 8, 11), width=5)
Виджет покажет только эти 3 числа: 3, 8 и 11.
Задать значение по умолчанию для Spinbox
В случае, если вам нужно задать значение по умолчанию для Spinbox, вы можете передать значение параметру textvariable следующим образом:
var = IntVar()
var.set(36)
spin = Spinbox(window, from_=0, to=100, width=5, textvariable=var)
Теперь, если вы запустите программу, она покажет 36 как значение по умолчанию для Spinbox.
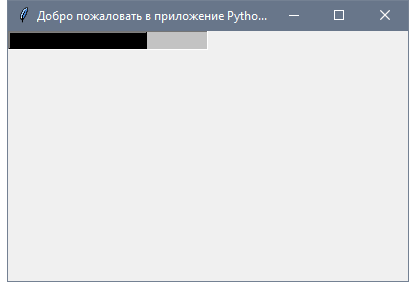
Добавление виджета Progressbar
Чтобы создать данный виджет, используйте класс progressbar :
from tkinter.ttk import Progressbar


bar = Progressbar(window, length=200)
Установите значение progressbar таким образом:
bar['value'] = 70
Вы можете установить это значение на основе любого процесса или при выполнении задачи.
Изменение цвета Progressbar
Изменение цвета Progressbar немного сложно. Сначала нужно создать стиль и задать цвет фона, а затем настроить созданный стиль на Progressbar. Посмотрите следующий пример:
from tkinter import *
from tkinter.ttk import Progressbar
from tkinter import ttk


window = Tk()
window.title("Добро пожаловать в приложение PythonRu")
window.geometry('400x250')
style = ttk.Style()
style.theme_use('default')
style.configure("black.Horizontal.TProgressbar", background='black')
bar = Progressbar(window, length=200, style='black.Horizontal.TProgressbar')
bar['value'] = 70
bar.grid(column=0, row=0)
window.mainloop()
И в результате вы получите следующее:
Добавление поля загрузки файла
Для добавления поля с файлом, используйте класс filedialog:
from tkinter import filedialog


file = filedialog.askopenfilename()
После того, как вы выберете файл, нажмите “Открыть”; переменная файла будет содержать этот путь к файлу. Кроме того, вы можете запросить несколько файлов:
files = filedialog.askopenfilenames()
Указание типа файлов (расширение фильтра файлов)
Возможность указания типа файлов доступна при использовании параметра filetypes, однако при этом важно указать расширение в tuples.
file = filedialog.askopenfilename(filetypes = (("Text files","*.txt"),("all files","*.*")))
Вы можете запросить каталог, используя метод askdirectory :
dir = filedialog.askdirectory()
Вы можете указать начальную директорию для диалогового окна файла, указав initialdir следующим образом:
from os import path
file = filedialog.askopenfilename(initialdir= path.dirname(__file__))
Легко!
Добавление панели меню
Для добавления панели меню, используйте класс menu:
from tkinter import Menu


menu = Menu(window)
menu.add_command(label='Файл')
window.config(menu=menu)
Сначала мы создаем меню, затем добавляем наш первый пункт подменю. Вы можете добавлять пункты меню в любое меню с помощью функции add_cascade() таким образом:
menu.add_cascade(label='Автор', menu=new_item)
Наш код будет выглядеть так:
from tkinter import *
from tkinter import Menu


window = Tk()
window.title("Добро пожаловать в приложение PythonRu")
window.geometry('400x250')
menu = Menu(window)
new_item = Menu(menu)
new_item.add_command(label='Новый')
menu.add_cascade(label='Файл', menu=new_item)
window.config(menu=menu)
window.mainloop()
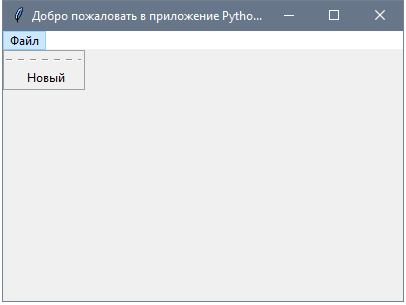 Таким образом, вы можете добавить столько пунктов меню, сколько захотите.
from tkinter import *


window = Tk()
window.title("Добро пожаловать в приложение PythonRu")
window.geometry('400x250')
menu = Menu(window)
new_item = Menu(menu)
new_item.add_command(label='Новый')
new_item.add_separator()
new_item.add_command(label='Изменить')
menu.add_cascade(label='Файл', menu=new_item)
window.config(menu=menu)
window.mainloop()
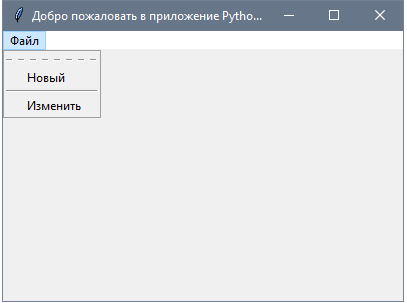 Теперь мы добавляем еще один пункт меню “Изменить” с разделителем меню. Вы можете заметить пунктирную линию в начале, если вы нажмете на эту строку, она отобразит пункты меню в небольшом отдельном окне.
Можно отключить эту функцию, с помощью tearoff подобным образом:
new_item = Menu(menu, tearoff=0)
Просто отредактируйте new_item, как в приведенном выше примере и он больше не будет отображать пунктирную линию.
Вы так же можете ввести любой код, который работает, при нажатии пользователем на любой элемент меню, задавая свойство команды.
new_item.add_command(label='Новый', command=clicked)
Добавление виджета Notebook (Управление вкладкой)
Для удобного управления вкладками реализуйте следующее:
- Для начала, создается элемент управления вкладкой, с помощью класса
Notebook. - Создайте вкладку, используя класс
Frame. - Добавьте эту вкладку в элемент управления вкладками.
- Запакуйте элемент управления вкладкой, чтобы он стал видимым в окне.
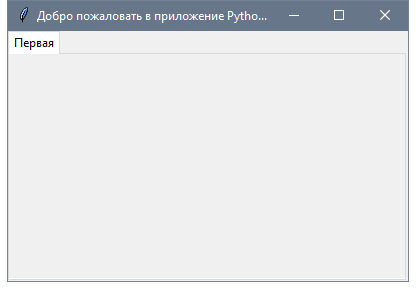
from tkinter import *
from tkinter import ttk


window = Tk()
window.title("Добро пожаловать в приложение PythonRu")
window.geometry('400x250')
tab_control = ttk.Notebook(window)
tab1 = ttk.Frame(tab_control)
tab_control.add(tab1, text='Первая')
tab_control.pack(expand=1, fill='both')
window.mainloop()
 Таким образом, вы можете добавлять столько вкладок, сколько нужно.
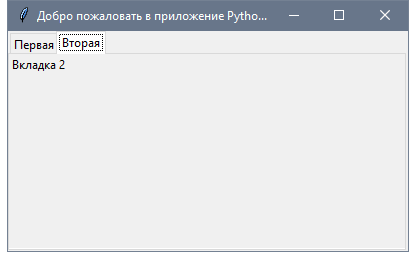
Добавление виджетов на вкладку
После создания вкладок вы можете поместить виджеты внутри этих вкладок, назначив родительское свойство нужной вкладке.
from tkinter import *
from tkinter import ttk


window = Tk()
window.title("Добро пожаловать в приложение PythonRu")
window.geometry('400x250')
tab_control = ttk.Notebook(window)
tab1 = ttk.Frame(tab_control)
tab2 = ttk.Frame(tab_control)
tab_control.add(tab1, text='Первая')
tab_control.add(tab2, text='Вторая')
lbl1 = Label(tab1, text='Вкладка 1')
lbl1.grid(column=0, row=0)
lbl2 = Label(tab2, text='Вкладка 2')
lbl2.grid(column=0, row=0)
tab_control.pack(expand=1, fill='both')
window.mainloop()
Добавление интервала для виджетов (Заполнение)
Вы можете добавить отступы для элементов управления, чтобы они выглядели хорошо организованными с использованием свойств padx иpady.
Передайте padx и pady любому виджету и задайте значение.
lbl1 = Label(tab1, text= 'label1', padx=5, pady=5)
Это очень просто!
В этом уроке мы увидели много примеров GUI Python с использованием библиотеки Tkinter. Так же рассмотрели основные аспекты разработки графического интерфейса Python. Не стоит на этом останавливаться. Нет учебника или книги, которая может охватывать все детали. Надеюсь, эти примеры были полезными для вас.