CSS — простой и доступный инструмент. Однако, он имеет свои ограничения, особенно когда встает вопрос о сопровождении готового кода. Когда нужно модифицировать тысячи строк со стилями, разделенных по нескольким файлам, задача становится проблемой. Для преодоления проблемы созданы препроцессоры CSS, которые позволяют комбинировать стили динамически. Существует несколько вариантов (например, LESS и SASS), сегодня мы рассмотрим LESS.
Использование LESS
Использовать LESS очень просто. Нужно просто добавить две строки в тег head вашего документа HTML. Первая строка содержит название вашего файла LESS, а вторая строка — подключение библиотеки less.js, которую можно скачать с официального сайта.
<link rel="stylesheet/less" type="text/css" href="style.less">
<script src="less.js" type="text/javascript"></script>
Теперь LESS файл будет работать также как и обычный CSS.
Этот метод работает только в современных браузерах и подходит для использования на локальном сервере. Для рабочего сайта необходима предварительная компиляция на веб-сервере или различные инструменты от сторонних производителей.
Синтаксис LESS
В отличие от обычного CSS, LESS больше похож на язык программирования. Он динамический, поэтому логичного ожидать использования в нем переменных, операций и области видимости.
Переменные
При работе с CSS вы вероятно часто сталкивались с ситуацией, когда повторяющееся значение устанавливалось в нескольких блоках по всей таблице стилей.
.class1 {
    background-color: #2d5e8b;
}
.class2 {
    background-color: #fff;
    color: #2d5e8b;
}
.class3 {
    border: 1px solid #2d5e8b;
}
Все прекрасно, пока не придется просеивать 1000 одинаковых участков кода по всей таблице стилей, чтобы поменять значение. При использовании препроцессора LESS такая проблема легко решается с помощью переменных. Переменные позволяют хранить значения, которые можно многократно использовать в таблице стилей.
@color-base: #2d5e8b;

.class1 {
    background-color: @color-base;
}
.class2 {
    background-color: #fff;
    color: @color-base;
}
.class3 {
    border: 1px solid @color-base;
}
В выше приведенном примере в переменной @color-base сохраняется значение #2d5e8b. И когда потребуется изменить цвет, то нужно будет поменять значение только в переменной.
В переменной можно использовать и другие значения:
@font-family: Georgia;
@dot-border: dotted;
@transition: linear;
@opacity: 0.5;
Вложенные правила (nesting)
При работе с обычным CSS кодом, достаточно часто встречается следующая структура кода:
nav {
    height: 40px;
    width: 100%;
    background: #455868;
    border-bottom: 2px solid #283744;
}
nav li {
    width: 600px;
    height: 40px;
}
nav li a {
    color: #fff;
    line-height: 40px;
    text-shadow: 1px 1px 0px #283744;
}
В обычном CSS коде мы выбираем наследников, указывая родителя в каждом наборе правил. В LESS можно улучшить выше приведенный набор правил с помощью вложения наследников в родительский элемент:
nav {
    height: 40px;
    width: 100%;
    background: #455868;
    border-bottom: 2px solid #283744;
    li {
        width: 600px;
        height: 40px;
        a {
            color: #fff;
            line-height: 40px;
            text-shadow: 1px 1px 0px #283744;
        }
    }
}
Также можно использовать псевдо-классы, например :hover, с помощью символа амперсенда &. Допустим, мы хотим добавить :hover к тегу ссылки:
a {
    color: #fff;
    line-height: 40px;
    text-shadow: 1px 1px 0px #283744;
    &:hover {
        background-color: #000;
        color: #fff;
    }
}
Примеси (mixins)
В LESS можно использовать примеси для хранения набора правил и применения их в других наборах. Например:
.gradient {
    background: #eaeaea;
    background: linear-gradient(top, #eaeaea, #cccccc);
}
В выше приведенном примере мы устанавливаем цвет градиента в классе .gradient. Затем, когда нужно добавить градиент, нужно просто вставить .gradient следующим образом:
.box {
    .gradient;
    border: 1px solid #555;
    border-radius: 3px;
}
Класс .box наследует все объявления из .gradient. Поэтому выше приведенное выражение LESS эквивалентно следующему обычному коду CSS:
.box {
    background: #eaeaea;
    background: linear-gradient(top, #eaeaea, #cccccc);
    border: 1px solid #555;
    border-radius: 3px;
}
Примеси с параметрами
Примеси с параметрами почти такие же, как и обычные, но сродни функциям они могут принимать параметры для использования внутри примеси:
.border-radius(@radius) {
    -webkit-border-radius: @radius;
    -moz-border-radius: @radius;
    border-radius: @radius;
}

.sidebar {
    .border-radius(4px);
}
Результат выглядит следующим образом:
.sidebar {
    -webkit-border-radius: 4px;
    -moz-border-radius: 4px;
    border-radius: 4px;
}
Мы также можем выставить значения по умолчанию для параметров:
.border-radius(@radius: 6px) {
    -webkit-border-radius: @radius;
    -moz-border-radius: @radius;
    border-radius: @radius;
}
.sidebar1 {
    .border-radius;
}
.sidebar2 {
    .border-radius(12px);
}
Что в результате дает:
.sidebar1 {
  -webkit-border-radius: 6px;
  -moz-border-radius: 6px;
  border-radius: 6px;
}
.sidebar2 {
  -webkit-border-radius: 12px;
  -moz-border-radius: 12px;
  border-radius: 12px;
}
При работе с CSS3 можно использовать библиотеку LESS ELements, чтобы облегчить свою работу. LESS Elements является коллекцией общих примешиваний CSS3, которые часто используются в стилях, например, border-radius, gradients, drop-shadow и так далее.
Чтобы использовать LESS нужно просто добавить правило @import файл LESS. Нужно только загрузить библиотеку и поместить ее в рабочую директорию.
@import "elements.less";
Теперь можно использовать все классы из elements.less. Например, чтобы добавить скругление углов рамки с радиусом 3px к элементу div, нужно написать:
div {
    .rounded(3px);
}
Операции
Также можно использовать операции в LESS. Доступны сложение, вычитание, умножение и деление.
Допустим, что элемент B в два раза выше элемента A:
@height: 100px

.element-A {
    height: @height;
}
.element-B {
    height: @height * 2;
}
Сначала мы определяем переменную @height и назначаем ее для указания высоты элемента А. В элементе В мы просто умножаем значение переменной на 2. Теперь, когда мы изменяем значение переменной @height, элемент В всегда будет в два раза выше.
Операции с цветом
Операции, которые мы продемонстрировали выше, могут быть использованы для управления цветом. Цвета можно создавать и управлять ими посредством математики:
@color: #888888 - #333333;

h2 {
  color: @color;
}
И скомпилированный код выглядит следующим образом:
h2 {
  color: #555555;
}
Это еще не все, что LESS может делать с цветами. Все становится намного интереснее, когда речь заходит о встроенных функциях для работы с цветом:
lighten(@color, 10%);     // возвращает цвет, который на 10% светлее, чем @color
darken(@color, 10%);      // возвращает цвет, который на 10% темнее, чем @color

saturate(@color, 10%);    // возвращает цвет, который на 10% более насыщенный, чем @color
desaturate(@color, 10%);  // возвращает цвет, который на 10% менее насыщенный, чем @color

fadein(@color, 10%);      // возвращает цвет, который на 10% менее прозрачен, чем @color
fadeout(@color, 10%);     // возвращает цвет, который на 10% более прозрачен, чем @color
fade(@color, 50%);        // возвращает @color с 50%-ной прозрачностью

spin(@color, 10);         // возвращает цвет с оттенком в 10 раз большим, чем @color
spin(@color, -10);        // возвращает цвет с оттенком в 10 раз меньшим, чем @color

mix(@color1, @color2);    // возвращает микс цветов @color1 и @color2
Математические функции
С помощью этих функций вы можете использовать числа в своем коде. Среди этих функций можно выделить round(), ceil(), floor() и percentage(). Передавая числа в эти функции, вы сможете получить округленные числа, числа, округленные по большему и по меньшему значению, а также числа в процентном выражении.
Область видимости (scope)
LESS использует концепцию области видимости. Сначала используются переменные из локального контекста, а если их нет, то происходит поиск в более широкой области видимости.
header {
    @color: black;
    background-color: @color;
    nav {
        @color: blue;
        background-color: @color;
        a {
            color: @color;
        }
    }
}
В приведенном примере header имеет переменную для цвета со значением black, но фон элемента nav будет иметь цвет blue, так как переменная @color находится в локальном контексте.
Каталог оборудования
Lorem ipsum dolor sit amet, consectetur adipiscing elit, sed do eiusmod tempor incididunt ut labore et dolore magna aliqua.
Производители
Lorem ipsum dolor sit amet, consectetur adipiscing elit, sed do eiusmod tempor incididunt ut labore et dolore magna aliqua.
Функциональные группы
Lorem ipsum dolor sit amet, consectetur adipiscing elit, sed do eiusmod tempor incididunt ut labore et dolore magna aliqua.
Command Line Usage
Edit the markdown source for «command-line-usage»
Compile
.lessfiles to.cssusing the command line
Heads up! If the command line isn’t your thing, learn more about GUIs for Less.
Installing
Install with npm
npm install less -g
The -g option installs the lessc command available globally. For a specific version (or tag) you can add @VERSION after our package name, e.g. npm install less@2.7.1 -g.
Installing for Node Development
Alternatively, if you don’t want to use the compiler globally, you may be after
npm i less --save-dev
This will install the latest official version of lessc in your project folder, also adding it to the devDependencies in your project’s package.json.
Beta releases of lessc
Periodically, as new functionality is being developed, lessc builds will be published to npm, tagged as beta. These builds will not be published as a @latest official release, and will typically have beta in the version (use lessc -v to get current version).
Since patch releases are non-breaking we will publish patch releases immediately and alpha/beta/candidate versions will be published as minor or major version upgrades (we endeavour since 1.4.0 to follow semantic versioning).
Server-Side and Command Line Usage
The binary included in this repository, bin/lessc works with Node.js on *nix, OS X and Windows.
Usage: lessc [option option=parameter ...] <source> [destination]
Command Line Usage
lessc [option option=parameter ...] <source> [destination]
If source is set to `-‘ (dash or hyphen-minus), input is read from stdin.
Examples
Compile bootstrap.less to bootstrap.css
lessc bootstrap.less bootstrap.css
Options specific to lessc
For all other options, see Less Options.
Silent
lessc -s
lessc —silent
Stops any warnings from being shown.
Version
lessc -v
lessc --version
Help
lessc --help |
|
lessc -h |
Prints a help message with available options and exits.
Makefile
lessc -M
lessc --depends
Outputs a makefile import dependency list to stdout.
No Color
Deprecated.
lessc --no-color
Clean CSS
In v2 of less, Clean CSS is no longer included as a direct dependency. To use clean css with lessc, use the clean css plugin.
Browser Usage
Edit the markdown source for «using-less-in-the-browser»
Using Less.js in the browser is the easiest way to get started and convenient for developing with Less, but in production, when performance and reliability is important, we recommend pre-compiling using Node.js or one of the many third party tools available.
To start off, link your .less stylesheets with the rel attribute set to «stylesheet/less«:
<link rel="stylesheet/less" type="text/css" href="styles.less" />
Next, download less.js and include it in a <script></script> tag in the <head> element of your page:
<script src="less.js" type="text/javascript"></script>
Setting Options
You can set options either programmatically, by setting them on a less object before the script tag — this then affects all initial link tags and programmatic usage of less.
<script>
  less = {
    env: "development",
    async: false,
    fileAsync: false,
    poll: 1000,
    functions: {},
    dumpLineNumbers: "comments",
    relativeUrls: false,
    rootpath: ":/a.com/"
  };
</script>
<script src="less.js"></script>
The other way is to specify the options on the script tag, e.g.
<script>
  less = {
    env: "development"
  };
</script>
<script src="less.js" data-env="development"></script>
Or for brevity they can be set as attributes on the script and link tags:
<script src="less.js" data-poll="1000" data-relative-urls="false"></script>
<link data-dump-line-numbers="all" data-global-vars='{ "myvar": "#ddffee", "mystr": ""quoted"" }' rel="stylesheet/less" type="text/css" href="less/styles.less">
Browser Support
Less.js supports all modern browsers (recent versions of Chrome, Firefox, Safari, and Edge). While it is possible to use Less on the client side in production, please be aware that there are performance implications for doing so (although the latest releases of Less are quite a bit faster). Also, sometimes cosmetic issues can occur if a JavaScript error occurs. This is a trade off of flexibility vs. speed. For the fastest performance possible for a static web site, we recommend compiling Less on the server side.
There are reasons to use client-side less in production, such as if you want to allow users to tweak variables which will affect the theme and you want to show it to them in real-time — in this instance a user is not worried about waiting for a style to update before seeing it.
Tips
- Make sure you include your stylesheets before the script.
- When you link more than one
.lessstylesheet each of them is compiled independently. So any variables, mixins or namespaces you define in a stylesheet are not accessible in any other. - Due to the same origin policy of browsers, loading external resources requires enabling CORS
Watch Mode
To enable Watch mode, option env must be set to development. Then AFTER the less.js file is included, call less.watch(), like this:
<script>less = { env: 'development'};</script>
<script src="less.js"></script>
<script>less.watch();</script>
Alternatively, you can enable Watch mode temporarily by appending #!watch to the URL.
Modify Variables
Enables run-time modification of Less variables. When called with new values, the Less file is recompiled without reloading. Simple basic usage:
less.modifyVars({
  '@buttonFace': '#5B83AD',
  '@buttonText': '#D9EEF2'
});
Debugging
It is possible to output rules in your CSS which allow tools to locate the source of the rule.
Either specify the option dumpLineNumbers as above or add !dumpLineNumbers:mediaquery to the url.
You can use the mediaquery option with FireLESS (it is identical to the SCSS media query debugging format). Also see FireLess and Less v2. The comment option can be used to display file information and line numbers in the inline compiled CSS code.
Options
Set options in a global less object before loading the less.js script:
<!-- set options before less.js script -->
<script>
  less = {
    env: "development",
    logLevel: 2,
    async: false,
    fileAsync: false,
    poll: 1000,
    functions: {},
    dumpLineNumbers: "comments",
    relativeUrls: false,
    globalVars: {
      var1: '"quoted value"',
      var2: 'regular value'
    },
    rootpath: ":/a.com/"
  };
</script>
<script src="less.js"></script>
Options specific to Less.js in the browser
For all other options, see Less Options.
async
Type: Boolean
Default: false
Whether to request the import files with the async option or not. See fileAsync.
env
Type: String
Default: depends on page URL
Environment to run may be either development or production.
In production, your css is cached in local storage and information messages are not output to the console.
If the document’s URL starts with file:// or is on your local machine or has a non standard port, it will automatically be set to development.
e.g.
less = { env: 'production' };
errorReporting
Type: String
Options: html|console|function
Default: html
Set the method of error reporting when compilation fails.
fileAsync
Type: Boolean
Default: false
Whether to request the import asynchronously when in a page with a file protocol.
functions (Deprecated — use @plugin)
Type: object
User functions, keyed by name.
less = {
    functions: {
        myfunc: function() {
            return less.Dimension(1);
        }
    }
};
and it can be used like a native Less function e.g.
.my-class {
  border-width: unit(myfunc(), px);
}
logLevel
Type: Number
Default: 2
The amount of logging in the javascript console. Note: If you are in the production environment you will not get any logging.
2 - Information and errors
1 - Errors
0 - Nothing
poll
Type: Integer
Default: 1000
The amount of time (in milliseconds) between polls while in watch mode.
relativeUrls
Type: Boolean
Default: false
Optionally adjust URLs to be relative. When false, URLs are already relative to the entry less file.
useFileCache
Type: Boolean
Default: true (previously false in before v2)
Whether to use the per session file cache. This caches less files so that you can call modifyVars and it will not retrieve all the less files again.
If you use the watcher or call refresh with reload set to true, then the cache will be cleared before running.
Less.js Options
Edit the markdown source for «less-options»
Cross-Platform Options
Include Paths
lessc --include-path=PATH1;PATH2 |
{ paths: ['PATH1', 'PATH2'] } |
If the file in an @import rule does not exist at that exact location, Less will look for it at the location(s) passed to this option. You might use this for instance to specify a path to a library which you want to be referenced simply and relatively in the Less files.
Rootpath
lessc -rp=resources/lessc --rootpath=resources/ |
{ rootpath: 'resources/' } |
Allows you to add a path to every generated import and url in your css. This does not affect Less import statements that are processed, just ones that are left in the output css.
For instance, if all the images the css use are in a folder called resources, you can use this option to add this on to the URL’s and then have the name of that folder configurable.
Rewrite URLs
lessc -ru=offlessc --rewrite-urls=off |
{ rewriteUrls: 'off' } |
lessc -ru=alllessc --rewrite-urls=all |
{ rewriteUrls: 'all' } |
lessc -ru=locallessc --rewrite-urls=local |
{ rewriteUrls: 'local' } |
By default URLs are kept as-is (off), so if you import a file in a sub-directory that references an image, exactly the same URL will be output in the css. This option allows you to rewrite URLs in imported files so that the URL is always relative to the base file that has been passed to Less. E.g.
/* main.less */
@import "global/fonts.less";
/* global/fonts.less */
@font-face {
  font-family: 'MyFont';
  src: url('myfont/myfont.woff2') format('woff2');
}
With nothing set or with rewriteUrls: 'off', compiling main.less will output:
/* main.less */
/* global/fonts.less */
@font-face {
  font-family: 'MyFont';
  src: url('myfont/myfont.woff2') format('woff2');
}
With rewriteUrls: 'all', it will output:
/* main.less */
/* global/fonts.less */
@font-face {
  font-family: 'MyFont';
  src: url('./global/myfont/myfont.woff2') format('woff2');
}
With rewriteUrls: 'local', it will only rewrite URLs that are explicitly relative (those starting with a .):
url('./myfont/myfont.woff2') /* becomes */ url('./global/myfont/myfont.woff2')
url('myfont/myfont.woff2') /* stays */ url('myfont/myfont.woff2')
This can be useful in case you’re combining Less with CSS Modules which use similar resolving semantics like Node.js.
You may also want to consider using the data-uri function instead of this option, which will embed images into the css.
Math
Released v3.7.0
lessc -m=[option]lessc --math=[option] |
{ math: '[option]' } |
Less has re-built math options to offer an in-between feature between the previous strictMath setting, which required parentheses all the time, and the default, which performed math in all situations.
In order to cause fewer conflicts with CSS, which now liberally uses the / symbol between values, there is now a math mode that only requires parentheses for division. (This is now the default in Less 4.) «Strict math» has also been tweaked to operate more intuitively, although the legacy behavior is supported.
The four options available for math are:
always(3.x default) — Less does math eagerlyparens-division(4.0 default) — No division is performed outside of parens using/operator (but can be «forced» outside of parens with./operator —./is deprecated)parens|strict— Parens required for all math expressions.strict-legacy(removed in 4.0) — In some cases, math will not be evaluated if any part of the expression cannot be evaluated.
always
Example:
.math {
  a: 1 + 1;
  b: 2px / 2;
  c: 2px ./ 2;
  d: (2px / 2);
}
Outputs:
.math {
  a: 2;
  b: 1px;
  c: 1px;
  d: 1px;
}
parens-division
Example:
.math {
  a: 1 + 1;
  b: 2px / 2;
  c: 2px ./ 2;
  d: (2px / 2);
}
Outputs:
.math {
  a: 2;
  b: 2px / 2;
  c: 1px;
  d: 1px;
}
strict
.math {
  a: 1 + 1;
  b: 2px / 2;
  c: (2px / 2) + (3px / 1);
}
Output:
.math {
  a: 1 + 1;
  b: 2px / 2;
  c: 1px + 3px;
}
strict-legacy
In legacy strictMath mode, mixed expressions outside of parentheses means entire parentheses won’t evaluate. (Probably not what you want.)
.math {
  a: 1 + 1;
  b: 2px / 2;
  c: (2px / 2) + (3px / 1);
}
Output:
.math {
  a: 1 + 1;
  b: 2px / 2;
  c: (2px / 2) + (3px / 1);
}
Strict Math (Deprecated)
This has been replaced by the math option.
Relative URLs (deprecated)
lessc -rulessc --relative-urls |
{ relativeUrls: true } |
Has been replaced by rewriteUrls: "all"
Strict Units
lessc -su=onlessc --strict-units=on |
{ strictUnits: true } |
Defaults to off/false.
Without this option, Less attempts to guess at the output unit when it does maths. For instance
.class {
  property: 1px * 2px;
}
In this case, things are clearly not right — a length multiplied by a length gives an area, but css does not support specifying areas. So we assume that the user meant for one of the values to be a value, not a unit of length and we output 2px.
With strict units on, we assume this is a bug in the calculation and throw an error.
IE8 Compatibility (Deprecated)
lessc --ie-compat |
{ ieCompat: true } |
False by default starting in v3.0.0. Currently only used for the data-uri function to ensure that images aren’t created that are too large for the browser to handle.
Enable Inline JavaScript (Deprecated)
lessc --js |
{ javascriptEnabled: true } |
False by default starting in v3.0.0. Enables evaluation of JavaScript inline in .less files. This created a security problem for some developers who didn’t expect user input for style sheets to have executable code.
Replaced with the @plugin option.
Global Variables
lessc --global-var="color1=red" |
{ globalVars: { color1: 'red' } } |
This option defines a variable that can be referenced by the file. Effectively the declaration is put at the top of your base Less file, meaning it can be used but it also can be overridden if this variable is defined in the file.
Modify Variables
lessc --modify-var="color1=red" |
{ modifyVars: { color1: 'red' } } |
As opposed to the global variable option, this puts the declaration at the end of your base file, meaning it will override anything defined in your Less file.
URL Arguments
lessc --url-args="cache726357" |
{ urlArgs: 'cache726357' } |
This option allows you to specify a argument to go on to every URL. This may be used for cache-busting for instance.
Line Numbers (Deprecated)
lessc --line-numbers=commentslessc --line-numbers=mediaquerylessc --line-numbers=all |
{ dumpLineNumbers: 'comments' } |
Generates inline source-mapping. This was the only option before browsers started supporting sourcemaps.
Pre-Loaded Plugin
See: Pre-Loaded Plugins
Lint
lessc --lint -l |
{ lint: true } |
Runs the less parser and just reports errors without any output.
Compress (Deprecated)
lessc --compress -x |
{ compress: true } |
Compress using less built-in compression. This does an okay job but does not utilise all the tricks of dedicated css compression. In general, we recommend looking at third-party tools that clean and compress CSS after your Less has been transformed to CSS.
Allow Imports from Insecure HTTPS Hosts
lessc --insecure |
{ insecure: true } |
Source Map Options
Most of these options are not applicable to using Less.js in the browser, as you should generate a source map with your pre-compiled Less files.
Generate a Source Map
lessc --source-map |
{ sourceMap: {} } |
Tells less to generate a sourcemap.
Source Map Output Filename
lessc --source-map=file.map |
{ sourceMap: { outputFilename: 'file.map' } } |
Source Map Rootpath
lessc --source-map-rootpath=dev-files/ |
{ sourceMap: { sourceMapRootpath: 'dev-files/' } } |
Specifies a rootpath that should be prepended to each of the less file paths inside the sourcemap and also to the path to the map file specified in your output css.
Because the basepath defaults to the directory of the input less file, the rootpath defaults to the path from the sourcemap output file to the base directory of the input less file.
Use this option if for instance you have a css file generated in the root on your web server but have your source less/css/map files in a different folder. So for the option above you might have
output.css
dev-files/output.map
dev-files/main.less
Source Map Basepath
lessc --source-map-basepath=less-files/ |
{ sourceMap: { sourceMapBasepath: 'less-files/' } } |
This is the opposite of the rootpath option, it specifies a path which should be removed from the output paths. For instance if you are compiling a file in the less-files directory but the source files will be available on your web server in the root or current directory, you can specify this to remove the additional less-files part of the path.
It defaults to the path to the input less file.
Include Less Source in the Source Map
lessc --source-map-include-source |
{ sourceMap: { outputSourceFiles: true } } |
This option specifies that we should include all of the Less files in to the sourcemap. This means that you only need your map file to get to your original source.
This can be used in conjunction with the map inline option so that you do not need to have any additional external files at all.
Source Map Map Inline
lessc --source-map-inline |
{ sourceMap: { sourceMapFileInline: true } } |
This option specifies that the map file should be inline in the output CSS. This is not recommended for production, but for development it allows the compiler to produce a single output file which in browsers that support it, use the compiled css but show you the non-compiled less source.
Source Map URL
lessc --source-map-url=../my-map.json |
{ sourceMap: { sourceMapURL: '../my-map.json' } } |
Allows you to override the URL in the css that points at the map file. This is for cases when the rootpath and basepath options are not producing exactly what you need.
Pre-Loaded Plugins
Edit the markdown source for «plugins»
Loading plugins before parsing begins in Less.js
While the easiest way to use a plugin is using the @plugin at-rule, in a Node.js environment, you can pre-load a global Less.js plugin via the command line or by specifying it in the Less options.
Preprocessing
Pre-loading plugins is necessary if you want to add a Less.js Pre-processor. That is, a plugin that gets called and passed the raw Less source before parsing even starts. An example of this would be a Sass-To-Less Pre-processor plugin.
Note: pre-loading is not necessary for pre-evaluation plugins (after Less source is parsed, but before it is evaluated).
Node.js
Using the Command Line
If you are using lessc, the first thing you need to do is install that plugin. In registries like NPM, we recommend a Less.js plugin is registered with the «less-plugin-» prefix (for easier searching), though that isn’t required. So, for a custom plugin, you might install with:
npm install less-plugin-myplugin
To use the plugin, you can pass this on the command line by simply writing:
lessc --myplugin
Less.js will try to load either the «less-plugin-myplugin» and the «myplugin» modules as plugins whenever there’s an unknown Less option (like «myplugin»).
You can also explicitly specify the plugin with:
lessc --plugin=myplugin
To pass options to the plugin, you can write that in one of two ways.
lessc --myplugin="advanced"
lessc --plugin=myplugin=advanced
Loading a Plugin via Less.js
In Node, require the plugin and pass it to less in an array as an option plugins. E.g.
var LessPlugin = require('less-plugin-myplugin');
less.render(myCSS, { plugins: [LessPlugin] })
  .then(
    function(output) { },
    function(error) { }
  );
Programmatic Usage
Edit the markdown source for «programmatic-usage»
The main entry point into less is the less.render function. This takes the following format
less.render(lessInput, options)
    .then(function(output) {
        // output.css = string of css
        // output.map = string of sourcemap
        // output.imports = array of string filenames of the imports referenced
    },
    function(error) {
    });

// or...

less.render(css, options, function(error, output) {})
The options argument is optional. If you specify a callback then a promise will not be returned, where as if you do not specify a callback a promise will be given.
Under the hood, the callback version is used so that less can be used synchronously.
If you wanted to render a file, you would first read it into a string (to pass to less.render) and then set the filename field on options to be the filename of the main file. less will handle all the processing of the imports.
The sourceMap option is an object which enables you to set sub sourcemap options. Available sub options are: sourceMapURL,sourceMapBasepath,sourceMapRootpath,outputSourceFiles and sourceMapFileInline. Notice that the sourceMap option is not available for the less.js in browser compiler now.
less.render(lessInput)
    .then(function(output) {
        // output.css = string of css
        // output.map = undefined
}
//,
less.render(lessInput, {sourceMap: {}})
    .then(function(output) {
        // output.css = string of css
        // output.map = string of sourcemap
}
//or,
less.render(lessInput, {sourceMap: {sourceMapFileInline: true}})
    .then(function(output) {
        // output.css = string of css n /*# sourceMappingURL=data:application/json;base64,eyJ2ZXJ..= */
        // output.map = undefined
}
Getting Access to the Log
You can add a log listener with the following code
less.logger.addListener({
    debug: function(msg) {
    },
    info: function(msg) {
    },
    warn: function(msg) {
    },
    error: function(msg) {
    }
});
Note: all functions are optional. An error will not be logged, but instead is passed back to the callback or promise in less.render
API
Contributing to Less.js
Edit the markdown source for «developing-less»
Thanks for thinking about contributing! Please read the contributing instructions carefully to avoid wasted work.
- node — http://nodejs.org/
- phantomjs — http://phantomjs.org/download.html
make sure the paths are setup. If you start your favourite command line and type node -v you should see the node compiler. If you run phantomjs -v you should see the phantomjs version number.
- clone your less.js repository locally
- navigate to your local less.js repository and run
npm installthis installs less’ npm dependencies.
Usage
Grunt is used in order to run development commands such as tests, builds, and benchmarks. You can run them either with grunt [command_name] if you have grunt-cli installed globally or with npm run grunt -- [command_name].
If you go to the root of the Less repository you should be able to do npm test (a handy alias for npm run grunt -- test) — this should run all the tests. For the browser specific only, run npm run grunt -- browsertest If you want to try out the current version of less against a file, from here do node bin/lessc path/to/file.less
To debug the browser tests, run npm run grunt -- browsertest-server then go to http://localhost:8088/tmp/browser/ to see the test runner pages.
Optional: To get the current version of the Less compiler do npm -g install less — npm is the node package manager and «-g» installs it to be available globally.
You should now be able to do lessc file.less and if there is an appropriate file.less then it will be compiled and output to the stdout. You can then compare it to running locally (node bin/lessc file.less).
Other grunt commands
npm run grunt -- benchmark— run our benchmark tests to get some numbers on performancenpm run grunt -- stableto create a new releasenpm run grunt -- readmeto generate a new readme.md in the root directory (after each release)
How to Run Less in Other Environments
If you look in the libs folder you will see less, less-node, less-browser. The less folder is pure javascript with no environment
specifics. if you require less/libs/less, you get a function that takes an environment object and an array of file managers. The file
managers are the same file managers that can also be written as a plugin.
var createLess = require("less/libs/less"),
    myLess = createLess(environment, [myFileManager]);
The environment api is specified in less/libs/less/environment/environment-api.js
and the file manager api is specified in less/libs/less/environment/file-manager-api.js.
For file managers we highly recommend setting the prototype as a new AbstractFileManager — this allows you to override what is needed and allows us
to implement new functions without breaking existing file managers. For an example of file managers, see the 2 node implementations, the browser implementation or
the npm import plugin implementation.
Guide
If you look at http://www.gliffy.com/go/publish/4784259, This is an overview diagram of how less works. Warning! It needs updating with v2 changes.
К счастью, сообщество веб-разработчиков решила эту проблему. Теперь у нас есть такие CSS препроцессоры, как Less, Sass и Stylus. Они дают нам ряд преимуществ по сравнению с обычной CSS:
- Переменные, благодаря которым вы сможете определить и легко изменять значения CSS свойств)
- Динамически вычисляемые значения (в CSS мы недавно получили свойство calc).
- Примеси, которые позволяют повторно использовать и комбинировать стили. Они даже поддерживают passing аргументы.
- Функции, которые дают вам ряд полезных утилит для работы с цветом, конвертирования изображений в data-uri и д.р.
Негативный аспект заключается в том, что если вы используете один из процессоров, вам нужно будет скомпилировать обычный CSS файл со стилями, чтобы он работал в браузерах.

1. Установка LESS
Препроцессор Less написан на JavaScript и для работы с ним вам потребуется либо Node.js, либо веб-браузер для запуска. Вы можете подключить less.js на вашем веб-сайте, или скомпилировать все связанные .less стили в режиме реального времени, но это медленно и не рекомендуется. Рекомендуемый способ заключается в компиляции ваших .less стилей в обычный файл CSS для продакшена. Есть ряд бесплатных графических программ, которые могут компилировать .less файлы для вас, но в этой статье мы будем пользоваться Node.js.
Если вы уже установили Node.js, то откройте терминал и установите Less с помощью npm:
npm install -g lessЭто даст вам доступ к команде lessc из любого открытого терминала, что позволит везде компилировать ваши .less файлы в CSS:
lessc styles.less > styles.cssВ результате (если не было ошибок при компиляции) ваш код будет преобразован в обычный CSS, находящийся в файле styles.css. Все, что осталось, — это подключить полученный CSS файл к HTML странице.
2. Переменные
Одной из главных особенностей Less является возможность создавать переменные, как в обычном языке программирования. Они могут хранить значения любого типа, которые вам потребуется часто использовать: цвета, размеры, селекторовы, имена шрифтов, URL, и так далее. Философия этого препроцессора — повторное использование CSS синтаксиса там, где это возможно.
Здесь мы определяем две переменные, содержащие шестнадцатеричные коды: одну для цвета фона и одну для цвета текста. Попереключайтесь между вкладками, чтобы увидеть как Less трансформируется в CSS:
В приведенном выше примере, цвет фона белый, в то время как текст темный. Если, скажем, мы хотим сделать все наоборот, нам достаточно будет просто изменить значения переменных, а не вручную менять каждое вхождение.
Подробнее о переменных вы можете узнать, изучив Использование переменных в LESS. Секреты LESS-переменных.
3. Примеси
LESS позволяет использовать существующий класс, или идентификаторы и применять все их стили непосредственно к другому селектору. Следующий пример внесет ясность:
Подробнее о примесях вы можете узнать, изучив Использование примесей в LESS. Для чего в LESS нужны примеси.
4. Вложенности и Области видимости
Вложенности можно использовать для структурирования таблицы стилей способом, который совпадает с HTML-структурой страницы, снижая вероятность ошибок и конфликтов Вот пример для неупорядоченного списка и его детей:
Так же, как в языках программирования, в Less переменные получают свои значения в зависимости от области видимости. Если значение не указано в конкретной области, LESS будет искать его в верхних блоках до тех пор, пока не найдет ближайшее.
Будучи переведенным на CSS, текст нашего li будет окрашенным, поскольку мы предопределили @text-color в правилах ul rules.
Узнать об этом больше можно в Области видимости.
5. Операции
Вы можете сделать основные арифметические операции для числовых значений и цветов. Допустим, мы хотим, чтобы у двух элементов div, размещенных рядом друг с другом, второй был в два раза шире первого и с другим фоном. LESS знает, что такое единицы измерения и не будет их смешивать.
6. Функции
LESS также имеет свои функции! Давайте взглянем на функцию fadeout, которая уменьшается непрозрачность цвета:
В этом случае, когда мы наводим мышь на div, он становится полупрозрачным, что облегчает навигацию. Есть много других полезных функций для манипулирования цветом, определения размера изображений и даже даже вставку ассетов в таблицы стилей. Смотрите здесь полный список функций LESS.
На этом наша 10-минутка закончилась и вы уже неплохо разбираетель в препроцессоре LESS).

И когда же наконец-то эти разработчики успокоятся и перестанут издеваться над новичками!? Не успел я ещё до конца разобраться с CSS, а мне говорят: «Все настоящие верстальщики уже давно перешли на препроцессоры. Ну какой чистый CSS в преддверии 2020 года!?» Что же делать?
Во-первых, разработчики никогда не перестанут придумывать новые технологии. А профессиональные верстальщики – премного им за это благодарны. Язык таблиц стилей CSS, придумали в то время, когда сайты были примитивными. Но шли годы, сайты становились сложнее и массивнее, но способы верстки оставались прежними. Верстальщики запарились писать похожие участки кода. Невозможно было быстро поменять цвет на сайте. Назрела необходимость в большей автоматизации верстки, так и появились препроцессоры CSS кода. И сегодня мы поговорим об одном из них, препроцессоре LESS.
Компиляция LESS и VS Code
Все что потребуется для компиляции LESS кода – это редактор кода VS Code и расширение Easy Less. Как это работает?
- Создаем файл стилей c расширением .less
- После сохранения, автоматически сгенерируется .css файл в ту же папку.
Каждый раз при сохранении изменений, LESS файлы компилируются в CSS файлы. Браузеры ещё не научились понимать LESS, им нужен CSS код.
Переменные LESS
Наиболее часто используемые свойства выносим в переменные. На сайте обычно используются повторяющиеся цвета и семейства шрифтов. Заносим все цвета в переменные и затем подставляем в правило не код цвета, а переменную. Вы спросите: «В чем прикол? Все равно мне нужно что-то прописывать, какая разница?»
Главная фишка — это быстрая замена цвета. Цвет меняется только один раз, в переменной. Замена цвета в одной переменной, заменит цвет на всех страницах сайта. Только одной этой фишки уже достаточно, чтобы начать использовать LESS.
Объявляем переменные в LESS и сохраняем в них нужные нам значения, названия переменных даем осмысленные.
@primary: #194eb4;

@secondary: #f2b834;

@success: #4cb514;

@black: #000;

@white: #fff;
Теперь пишем обычный код, как мы это делали в CSS, но вместо значений подставляем переменные.
LESS
div {

    padding: 0;

    font-family: Roboto, sans-serif;

    color: @black;

}
После сохранения, компилируется CSS код. Мы не трогаем вообще CSS файл, вся работа ведется в LESS файле. Вы можете заносить любые часто повторяющиеся свойства в переменные.
CSS
div {

    padding: 0;

    font-family: Roboto, sans-serif;

    color: #000;

}
Миксины (mixin) в LESS
Миксины полезны для повторного использования набора свойств – рамок, кнопок, заголовков. Сгруппированный набор свойств, может применяться к разным селекторам.
На сайте несколько однотипных кнопок разного цвета, но с одинаковыми шрифтовыми свойствами. Создаем миксин, который помогает автоматизировать процесс создания кнопок.
.button_font {

    font-family: "DIN Pro Bold";

    text-transform: uppercase;

    font-size: 18px;

}
Примешиваем миксин в свойства селектора кнопки.
.portfolio__button {

    padding: 15px 80px;

    color: #344258;

    .button_font;


}
На выходе получаем:
.portfolio__button {

    padding: 15px 80px;

    color: #344258;

    font-family: "DIN Pro Bold";

    text-transform: uppercase;

    font-size: 18px;

}
Символ амперсанд
Вместо дублирования названия селектора, используем символ амперсанд.
.portfolio__item {

    position: relative;

    background-color: #3c3c3c;

}

    &:hover {

        background-color:  #ccc;

    }

}
CSS
.portfolio__item {

    position: relative;

    background-color:  #3c3c3c;

}

.portfolio__item:hover  {

    background-color:  #ccc;

}
Медиа-запросы в LESS
Можно записывать медиа-запросы прямо внутри селектора.
LESS
.header__title {

    color: #344258;

    font-size: 40px;

    font-family: "DIN Pro", sans-serif;

    padding: 0 20px;

    @media only screen and (max-width : 320px){

    font-size: 22px;

    }

}
CSS
.header__title {

    color: #344258;

    font-size: 40px;

    font-family: "DIN Pro", sans-serif;

    padding: 0 20px;

}

@media only screen and (max-width : 320px) {

    .header__title {

        font-size: 22px;

    }

}
Заключение
Эта статья не раскрывает и 25% всех возможностей, что предлагает LESS. Да это и не нужно, цель статьи – мотивация новичков начать использовать препроцессоры. Начиная с самого простого, постепенно двигаясь к более сложному.
-

Создано 30.08.2019 10:35:01
-
Михаил Русаков

Копирование материалов разрешается только с указанием автора (Михаил Русаков) и индексируемой прямой ссылкой на сайт (http://myrusakov.ru)!
Добавляйтесь ко мне в друзья ВКонтакте: http://vk.com/myrusakov.
Если Вы хотите дать оценку мне и моей работе, то напишите её в моей группе: http://vk.com/rusakovmy.
Если Вы не хотите пропустить новые материалы на сайте,
то Вы можете подписаться на обновления: Подписаться на обновления
Если у Вас остались какие-либо вопросы, либо у Вас есть желание высказаться по поводу этой статьи, то Вы можете оставить свой комментарий внизу страницы.
Если Вам понравился сайт, то разместите ссылку на него (у себя на сайте, на форуме, в контакте):
-
Кнопка:
Она выглядит вот так:
-
Текстовая ссылка:
Она выглядит вот так: Как создать свой сайт
- BB-код ссылки для форумов (например, можете поставить её в подписи):

CSS — простой и доступный инструмент. Однако, он имеет свои ограничения, особенно когда встает вопрос о сопровождении готового кода. Когда нужно модифицировать тысячи строк со стилями, разделенных по нескольким файлам, задача становится проблемой.
Для преодоления проблемы созданы препроцессоры CSS, которые позволяют комбинировать стили динамически. Существует несколько вариантов (например, LESS и SASS), но в данном уроке мы рассмотрим LESS.
Редактор LESS
На момент написания урока существовал единственный редактор, целиком посвященный работе с файлами LESS — ChrunchApp. Данное приложение кросс платформенное, построенное на Adobe Air, его можно запускать на Windows, Mac OSX and Linux.

Для других редакторов (таких как Dreamweaver, Coda, NotePad++ и SublimeText 2) существуют плагины или дополнения, которые позволяют организовать подсветку синтаксиса LESS.
Использование LESS
Использовать LESS очень просто. Нужно просто добавить две строки в тег head вашего документа HTML. Первая строка содержит название вашего файла .less, а вторая строка — подключение библиотеки less.js (ее можно скачать с официального сайта).
<link rel="stylesheet/less" type="text/css" href="style.less">
<script src="less.js" type="text/javascript"></script>
В нашем уроке мы покажем другой способ. Мы будем использовать компилятор LESS: для Windows можно применять WinLess, а для Mac OSX — LESS.app.
Создаем файл .less в рабочей директории. Затем открываем компилятор (WinLESS или LESS.app) и импортируем рабочую директорию в него. компилятор найдет все файлы .less. И все. Теперь, когда бы мы не изменили файл .less, компилятор автоматически будет генерировать обычный код CSS в файл .css, который воспринимается браузером.
Остается только привязать CSS файл к документу HTML:
<link rel="stylesheet/css" type="text/css" href="style.css">
Синтаксис LESS
В отличие от обычного CSS, LESS больше похож на язык программирования. Он динамический, поэтому логичного ожидать использования в нем переменных, операций и области видимости.
Переменные
Сначала рассмотрим переменные.
При работе с CSS вы вероятно часто сталкивались с ситуацией, когда повторяющееся значение устанавливалось в нескольких блоках по всей таблице стилей.
.class1 {
	background-color: #2d5e8b;
}
.class2 {
	background-color: #fff;
	color: #2d5e8b;
}
.class3 {
	border: 1px solid #2d5e8b;
}
Все прекрасно, пока не придется просеивать 1000 одинаковых участков кода по всей таблице стилей, чтобы поменять значение. Такая ситуация может сложиться при работе над большим проектом.
При использовании препроцессора LESS такая проблема легко решается с помощью переменных. Переменные позволяют хранить значения, которые можно многократно использовать в таблице стилей.
@color-base: #2d5e8b;

.class1 {
	background-color: @color-base;
}
.class2 {
	background-color: #fff;
	color: @color-base;
}
.class3 {
	border: 1px solid @color-base;
}
В выше приведенном примере в переменной @color-base сохраняется значение #2d5e8b. И когда потребуется изменить цвет, то нужно будет поменять значение только в переменной.
В переменной можно использовать и другие значения:
@font-family: Georgia
@dot-border: dotted
@transition: linear
@opacity: 0.5
Примешивания
В LESS можно использовать примешивания для хранения набора правил и применения их в других наборах. Например:
.gradients {
	background: #eaeaea;
	background: linear-gradient(top, #eaeaea, #cccccc);
	background: -o-linear-gradient(top, #eaeaea, #cccccc);
	background: -ms-linear-gradient(top, #eaeaea, #cccccc);
	background: -moz-linear-gradient(top, #eaeaea, #cccccc);
	background: -webkit-linear-gradient(top, #eaeaea, #cccccc);
}
В Выше приведенном примере мы устанавливаем цвет градиента в классе .gradients. Затем, когда нужно добавить градиент, нужно просто вставить .gradients следующим образом:
.box {
	.gradients;
	border: 1px solid #555;
	border-radius: 3px;
}
Класс .box наследует все объявления из .gradients. Поэтому выше приведенное выражение LESS эквивалентно следующему обычному коду CSS:
.box {
	background: #eaeaea;
	background: linear-gradient(top, #eaeaea, #cccccc);
	background: -o-linear-gradient(top, #eaeaea, #cccccc);
	background: -ms-linear-gradient(top, #eaeaea, #cccccc);
	background: -moz-linear-gradient(top, #eaeaea, #cccccc);
	background: -webkit-linear-gradient(top, #eaeaea, #cccccc);
	border: 1px solid #555;
	border-radius: 3px;
}
При работе с CSS3 можно использовать библиотеку LESS ELements, чтобы облегчить свою работу. LESS Elements является коллекцией общих примешиваний CSS3, которые часто используются в стилях, например, border-radius, gradients, drop-shadow и так далее.
Чтобы использовать LESS нужно просто добавить правило @import файл LESS. Нужно только загрузить библиотеку и поместить ее в рабочую директорию.
Теперь можно использовать все классы из elements.less. Например, чтобы добавить скругление углов рамки с радиусом 3px к элементу div, нужно написать:
Вложенные правила
При работе с обычным CSS кодом, достаточно часто встречается следующая структура кода:
nav {
	height: 40px;
	width: 100%;
	background: #455868;
	border-bottom: 2px solid #283744;
}
nav li {
	width: 600px;
	height: 40px;
}
nav li a {
	color: #fff;
	line-height: 40px;
	text-shadow: 1px 1px 0px #283744;
}
В обычном CSS коде мы выбираем наследников, указывая родителя в каждом наборе правил.
В LESS можно улучшить выше приведенный набор правил с помощью вложения наследников в родительский элемент:
nav {
	height: 40px;
	width: 100%;
	background: #455868;
	border-bottom: 2px solid #283744;
	li {
		width: 600px;
		height: 40px;
		a {
			color: #fff;
			line-height: 40px;
			text-shadow: 1px 1px 0px #283744;
		}
	}
}
Также можно использовать псевдо-классы, например:hover, с помощью символа амперсенда (&). Допустим, мы хотим добавить :hover к тегу ссылки:
a {
	color: #fff;
	line-height: 40px;
	text-shadow: 1px 1px 0px #283744;
	&:hover {
		background-color: #000;
		color: #fff;
	}
}
Операции
Также можно использовать операции в LESS. Доступны сложение, вычитание, умножение и деление.
Допустим, что элемент B в два раза выше элемента A:
@height: 100px

.element-A {
	height: @height;
}
.element-B {
	height: @height * 2;
}
Сначала мы определяем переменную @height и назначаем ее для указания высоты элемента А.
В элементе В мы просто умножаем значение переменной на 2. Теперь, когда мы изменяем значение переменной @height, элемент В всегда будет в два раза выше.
Область видимости
LESS использует концепцию области видимости. Сначала используются переменные из локального контекста, а если их нет, то происходит поиск в более широкой области видимости.
header {
	@color: black;
	background-color: @color;
	nav {
  		@color: blue;
  		background-color: @color;
  		a {
    		color: @color;
  		}
	}
}
В приведенном примере header имеет переменную для цвета со значением black, но фон элемента nav будет иметь цвет blue, так как переменная @color находится в локальном контексте.
Заключение
LESS — один из препроцессоров CSS. Можно также использовать SASS или Stylus.
В следующих уроках серии мы разберем пример реального использования LESS и некоторые полезные аспекты инструментария.
В этой статье рассмотрим очень простой способ настройки фреймворка Bootstrap 3, посредством изменения LESS переменных в «variable.less».
Подход к разработке, подразумевающий непосредственное подключение исходных стилей Bootstrap 3 к странице, очень удобен, т.к. позволяет нам сразу увидеть результаты изменений в браузере без непосредственной их компиляции.
Это возможно благодаря инструменту «Less.js», который необходимо подключить к странице. Данный скрипт будет преобразовать LESS в CSS на лету.
После того как настройка стилей будет закончена (для продакшена) необходимо будет исходные стили Bootstrap 3 скомпилировать в CSS и подключить их как обычно.
Пошаговая инструкция подключения «bootstrap.less» к странице.
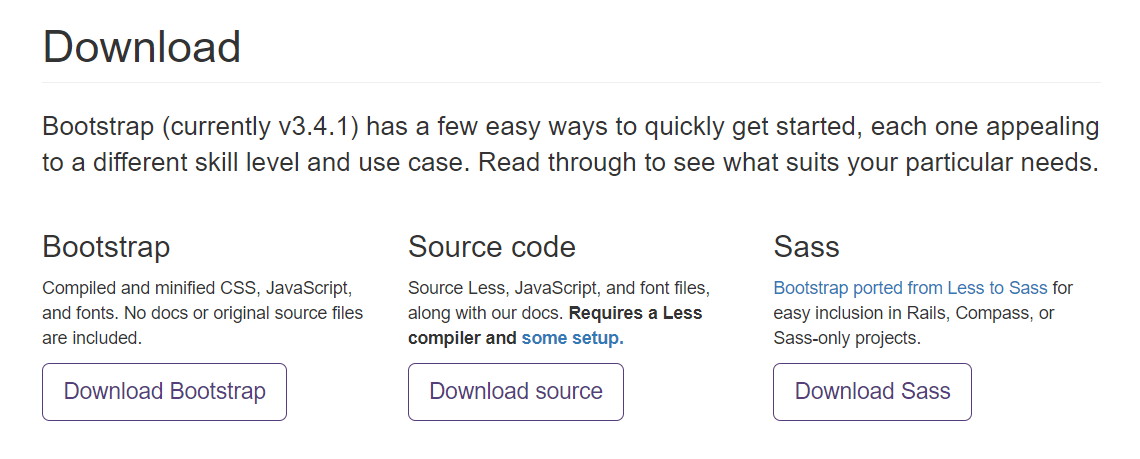
1. Скачать фреймворк Bootstrap 3 с исходными кодами. Для этого на странице https://getbootstrap.com/docs/3.4/getting-started/ нажимаем на кнопку «Download source».
2. После этого распаковываем архив и копируем папку less в ваш каталог стилей.
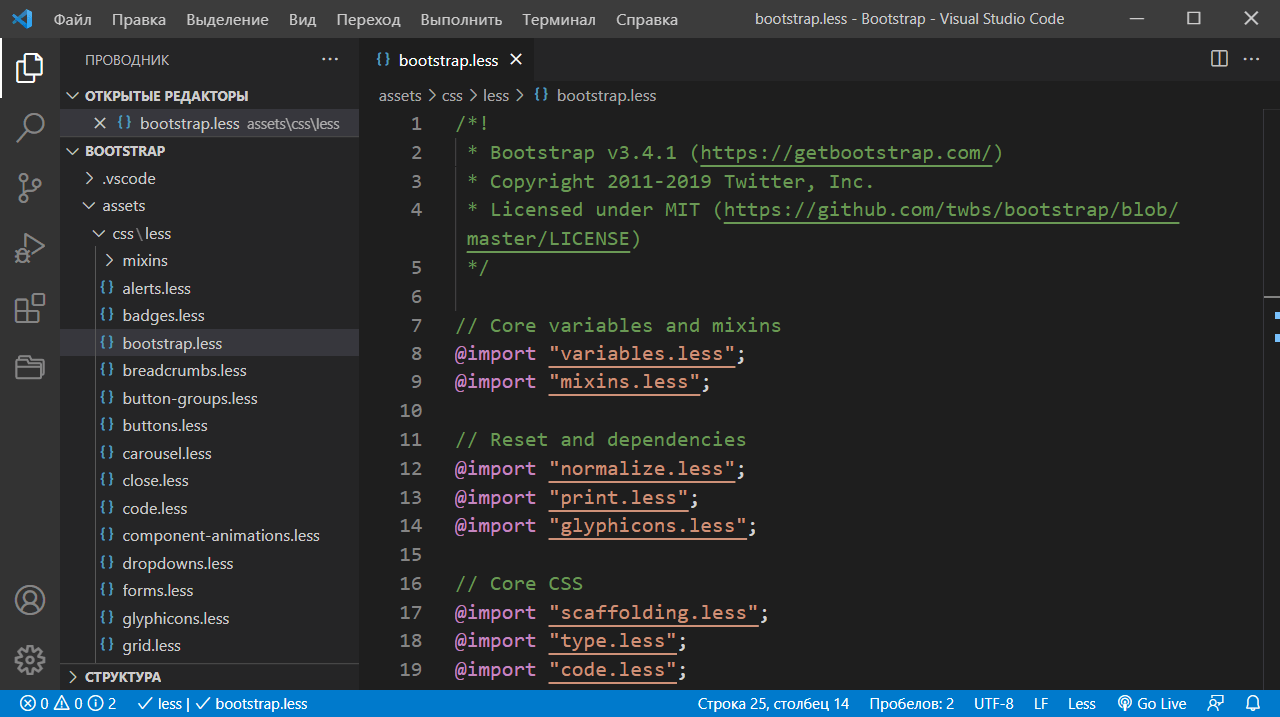
3. Подключаем «bootstrap.less» к HTML странице:
<link rel="stylesheet/less" href="less/bootstrap.less">«bootstrap.less» – это центральный файл, который импортирует в себя содержимое других файлов. Если какие-то стилевые компоненты не нужны, то их можно закомментировать.
4. Скачиваем файл «less.js» с Github и подключаем его к странице:
<script src="js/less.min.js"></script>С CDN:
<script src="https://cdn.jsdelivr.net/npm/less@4.1.1"></script>Пример страницы, к которой подключены исходные коды Bootstrap 3:
<!doctype html>
<html lang="ru">
  <head>
    <meta charset="utf-8">
    <meta http-equiv="X-UA-Compatible" content="IE=edge">
    <meta name="viewport" content="width=device-width, initial-scale=1">
    <title>Bootstrap Project</title>
    <link rel="stylesheet/less" href="assets/css/less/bootstrap.less">
    <script defer src="https://cdn.jsdelivr.net/npm/less@4.1.1"></script>
    <script defer src="https://ajax.googleapis.com/ajax/libs/jquery/3.6.0/jquery.min.js"></script>
    <script defer src="https://stackpath.bootstrapcdn.com/bootstrap/3.4.1/js/bootstrap.min.js" integrity="sha384-aJ21OjlMXNL5UyIl/XNwTMqvzeRMZH2w8c5cRVpzpU8Y5bApTppSuUkhZXN0VxHd" crossorigin="anonymous"></script>
  </head>
  <body>
    <h1>Bootstrap Project</h1>

  </body>
</html>
Изменение стилей Bootstrap
Изменение стилей Bootstrap выполняется посредством редактирования значений LESS переменных. Для удобства все LESS переменные собраны в файле «variables.less».
Рассмотрим несколько примеров.
1. Изменим количество колонок на 24 и padding между колонками на 20px:
//== Grid system
//
//## Define your custom responsive grid.

//** Number of columns in the grid.
@grid-columns:              24;
//** Padding between columns. Gets divided in half for the left and right.
@grid-gutter-width:         20px;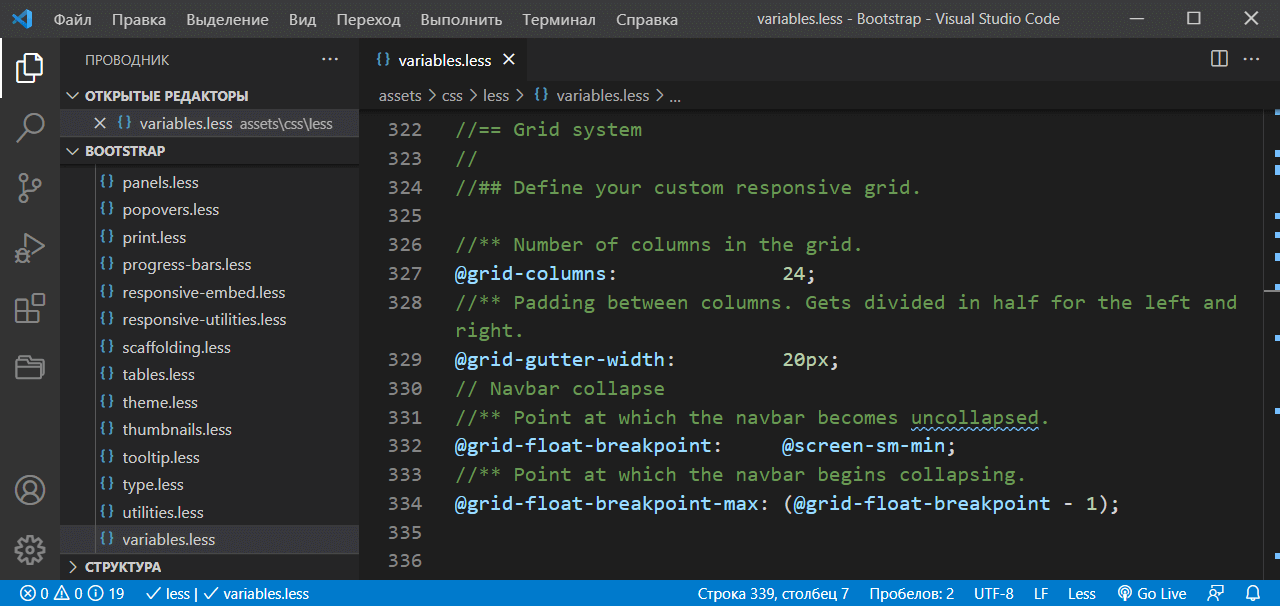
2. Изменим цветовую гамму Bootstrap:
@brand-primary:         darken(#0d6efd, 6.5%); // #337ab7
@brand-success:         #198754;
@brand-info:            #0dcaf0;
@brand-warning:         #ffc107;
@brand-danger:          #dc3545;
После внесения изменений необходимо сохранить файл «variables.less» и перезагрузить страницу. После перезагрузки сразу же увидим результат:
<body>
  <div class="container">
    <h1 class="text-center">Bootstrap Project</h1>
    <div class="row">
      <div class="col-xs-15">
        <div class="alert alert-success" role="alert">...</div>
      </div>
      <div class="col-xs-9">
        <div class="alert alert-info" role="alert">...</div>
      </div>
    </div>
  </div>
</body>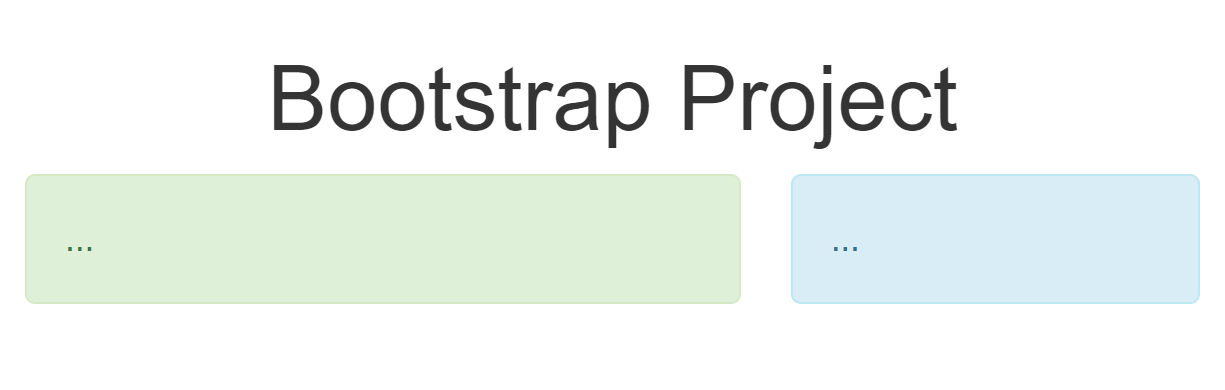
Компиляция LESS в CSS
После настройки всех LESS переменных необходимо преобразовать исходный код в CSS.
Для этого можно воспользоваться инструкцией, представленной в статье: «Сборка Вootstrap 3 проекта с использованием Grunt».
При этом файл «variables.less» следует заменить на свой, в который вы вносили изменения. После чего выполнить команду:
grunt buildПолученный после компиляции файл CSS нужно скопировать в свой проект и подключить к странице:
<!doctype html>
<html lang="ru">
  <head>
    <meta charset="utf-8">
    <meta http-equiv="X-UA-Compatible" content="IE=edge">
    <meta name="viewport" content="width=device-width, initial-scale=1">
    <title>Bootstrap Project</title>
    <link rel="stylesheet" href="assets/css/bootstrap.min.css">
    <script defer src="https://ajax.googleapis.com/ajax/libs/jquery/3.6.0/jquery.min.js"></script>
    <script defer src="/assets/js/bootstrap.min.js"></script>
  </head>
  <body>
    ...
  </body>
</html>