
Хотя большинству людей никогда не понадобится открывать файл .lnk, чтобы отредактировать его, могут быть редкие случаи, когда это необходимо или желательно. Но как открыть и отредактировать файл ярлыка? Сегодняшний пост SuperUser Q & A содержит ответы.
Сегодняшняя сессия Вопросов и Ответов приходит к нам благодаря SuperUser — подразделению Stack Exchange, объединенной группой веб-сайтов вопросов и ответов.
Вопрос
Читатель SuperUser Jez хочет знать, как открывать файлы .lnk, чтобы просматривать «содержимое» и редактировать их при необходимости:
Файл .lnk в Windows — это настоящий файл, предназначенный для ярлыка другого файла, но я действительно хочу просмотреть содержимое самого файла .lnk. Однако я нахожу это буквально невозможным.
Что бы я ни пытался, мои приложения открывают содержимое файла, на который он указывает (перетащите в текстовый или шестнадцатеричный редактор, Файл -> Открыть из текстового или шестнадцатеричного редактора и т. Д.).
Есть ли способ заставить программу открыть файл .lnk вместо того файла, на который он указывает?
Есть ли у Jez способ открыть файлы .lnk и отредактировать их?
Ответ
Авторы SuperUser и 31415, Джулиан Найт и Винаяк ответят за нас. Сначала, и 31415:
Используя HxD Hex Editor , вы можете просто открывать файлы .lnk, если вы не перетаскиваете их.
В качестве обходного пути откройте командную строку и переименуйте файл .lnk с другим несуществующим расширением, например .lne:
- cd / d «X: Папка , содержащая ярлык »
Ren «Некоторые ярлыки. LNK» «Некоторые ярлыки. Lne»После этого вы сможете обрабатывать ярлык как обычный файл. Когда вы закончите, не забудьте переименовать файл с исходным расширением .lnk, чтобы восстановить его обычную функциональность.
Далее следует ответ Джулиана Найта:
Весь смысл файла .lnk заключается в том, что Windows рассматривает его как ссылку на другой файл, поэтому редактировать его должно быть сложно! Возможно, это помогло бы, если бы вы описали, почему вы хотите его редактировать Вы можете изменить настройки файла .lnk, щелкнув правой кнопкой мыши и выбрав Свойства .
Если вы действительно хотите отредактировать его, вам нужен специальный инструмент. Есть несколько из них, в том числе:
- LNK-анализатор
- LnkEditorGUI
- lnkedit
Я не пробовал ничего из этого, просто погуглил их.
Вы также можете редактировать свойства через PowerShell ( из этого предыдущего ответа о переполнении стека ):
- Copy-Item $ sourcepath $ destination ## Получите lnk, который мы хотим использовать в качестве шаблона
$ shell = New-Object -COM WScript.Shell
$ shortcut = $ shell.CreateShortcut ($ destination) ## Открыть lnk
$ shortcut.TargetPath = «C: path to new exe.exe» ## Внести изменения
$ shortcut.Description = «Наша новая ссылка» ## Это поле «Комментарий»
$ shortcut.Save () ## СохранитьПоскольку для этого используется COM-объект Shell, вы также можете сделать это с помощью WSH или даже VBA в Office!
И, наконец, ответ от Винаяк:
Я попробовал это, и это работает для меня на Windows 8.1:
Открытие .lnk файлов в Блокноте:
- Просто перетащите их в окно блокнота. Если вы откроете их через диалоговое окно «Открыть», «Блокнот» откроет исполняемый файл, на который указывает файл .lnk.
Открытие .lnk файлов в HxD Hex Editor :
- Откройте их, как любой другой файл, используя диалоговое окно «Открыть» («Файл» -> «Открыть»).
Открытие .lnk файлов с помощью командной строки:
- Перейдите в папку, содержащую файлы .lnk, и введите команду: «TYPE SHORTCUTNAME.LNK».
Открытие файлов .lnk практически в любой программе:
- Запустите командную строку, перейдите в папку, в которой находится программа, используйте команду: PROGRAM_NAME.EXE «путь к файлу LNK».
Есть что добавить к объяснению? Отключить звук в комментариях. Хотите узнать больше ответов от других опытных пользователей Stack Exchange? Ознакомьтесь с полной веткой обсуждения здесь .
![]()
Download Article
![]()
Download Article
If all of your files suddenly have the .lnk extension, you can’t open apps by clicking their shortcuts, or you’re seeing non-stop errors about .lnk files, the issue might stem from a malware infection or Windows Update gone awry. LNK is the file extension used for Windows shortcuts—the icons and menu items you click to open files, folders, and documents. Broken LNK files may cause headaches, but fortunately, there’s usually an easy fix! This wikiHow article will teach you 6 easy ways to fix problems with LNK files on your Windows PC.
Things You Should Know
- If your icons and shortcuts have changed to LNK files, it may be due to corrupt system files.
- If your LNK errors are due to a virus or malware infection, you can usually fix the issue by running an anti-malware scan in Safe Mode.
- There are several freeware tools available that can easily fix broken LNK files.
-

1
Start your PC in Safe Mode with Networking support. In many cases, a .lnk file extension problem can be caused by a virus or malware.[1]
To properly scan and remove threats from your PC, you’ll want to boot up into Safe Mode with Networking. If you know for sure you don’t have a malware infection, you can skip this method.- If you can access your Windows Settings, you can boot into Safe mode by clicking the Start menu and going to Settings > Update & Security > Recovery > Restart Now. When your PC restarts, go to Troubleshoot > Advanced options > Startup Settings > Restart. When prompted after reboot, press 5 or F5 to start Safe Mode with Networking.[2]
- If you can’t access Settings, reboot your PC to the sign-in screen. Once you’re prompted to log in, hold down Shift as you click Power > Restart. When the PC restarts, go to Troubleshoot > Advanced options > Startup Settings > Restart. When prompted after reboot, press 5 or F5 to start Safe Mode with Networking.
- If you can access your Windows Settings, you can boot into Safe mode by clicking the Start menu and going to Settings > Update & Security > Recovery > Restart Now. When your PC restarts, go to Troubleshoot > Advanced options > Startup Settings > Restart. When prompted after reboot, press 5 or F5 to start Safe Mode with Networking.[2]
-
2
Download Malwarebytes from https://www.malwarebytes.com. Once you’re in Safe Mode, you should be able to open any web browser (such as Edge or Chrome). Malwarebytes has a free malware scanning and removal app that can easily identify these viruses and remove them from Windows. Click Start Free Download to download the installer to your PC.
Advertisement
-
3
Install Malwarebytes. Double-click the MBSetup file you downloaded (it will be in your Downloads folder), then follow the on-screen instructions to install Malwarebytes on your PC. If prompted to install BrowserGuard, choose Skip this for Now.
- Click Done when you’re finished installing. Malwarebytes will then launch automatically.
-
4
Click Scan. You’ll see this below «Scanner» on the welcome screen. Malwarebytes will now check for updates and then scan Windows for viruses and malware. This process can a few minutes or longer, depending on the size of your hard drive and whether updates need to be installed.
-
5
Click View Scan Results. Once the scan is finished, a pop-up will appear at the bottom-right corner of your screen. You’ll see the View Scan Results button on this pop-up.
-
6
Remove the infections. If any threats were detected, Malwarebytes will help you quarantine them. Check all the boxes to select detected threats, then click Quarantine to remove them.
-
7
Restart your PC in Normal mode. Once the scan is done and the threats are quarantined, reboot your PC normally. If your PC was infected with malware or a virus and Malwarebytes was able to fix the problem, this may have solved the issue.
- It’s possible that you’ll still experience .LNK errors even after the threats were removed. If so, try using a broken shortcut fixer or running a registry fix.


Advertisement
-
1
Download the Registry fix for Windows. Usually, .lnk extensions fail to work properly due to a failed Windows Update, missing files or files corrupted by malware. You can download and run .lnk file association fixer to solve this problem. You can download the file for all versions of Windows from https://www.thewindowsclub.com/downloads/lnk-fix-twc.zip.
-
2
Unzip the file. To unzip, right-click the downloaded file, select Extract All, choose a location (such as your desktop), and then click Extract. The new folder will open instantly.
-
3
Right-click «LNK_Fix_TWC.reg» and select Merge. If you’re using Windows 11, you’ll need to select Show more options first. You’ll be asked if you want to continue.
-
4
Click Yes. This applies the registry fix. Once the process is complete, you can restart your PC. This should resolve most .LNK link error problems.


Advertisement
-
1
Open the Control Panel. You may be able to resolve the .LNK errors with a quick System Restore. To open the Control Panel without encountering .LNK errors, follow these steps:
- Press Windows key + R to open the Run dialog.
- Type Control Panel.
- Click OK.
-
2
Open the Recovery panel. If you see it in the window, click Recovery. If not, type recovery into the search bar at the top of the window and click Recovery when it appears.
-
3
Click Open System Restore. It’s the second option.
-
4
Click Next on the System Restore wizard. This displays a list of restore points.
- If you see an error that says you don’t have System Restore configured, you won’t be able to use this method. But don’t worry—you can continue with any of the other methods.
-
5
Select a restore point and click Next. Choose a restore point from a date on which your computer was working well.
- If you click Scan for affected programs with a restore point selected, you’ll see which programs you’ve installed since Windows created that restore point. All of these programs will be removed from your PC if you complete the restore, but your personal files and other programs will be safe.
- If you don’t see a good candidate, check the box next to «Show more restore points» at the bottom.[3]
-
6
Click Next to confirm. A summary will appear.
-
7
Click Finish to start the System Restore. Once the process is complete, your computer will be restored to the selected date.
- If this doesn’t solve the .LNK problem, you can continue to another method.


Advertisement
-
1
Install Glary Utilities 5 from Glarysoft. This freeware tool will scan for broken shortcuts (LNK) files and repair them automatically. To download the program, go to https://www.glarysoft.com/glary-utilities and click the green Download Now button.
-
2
Install the program. Click the downloaded file and follow the on-screen instructions to install.
- Click Finish after installing and the app will launch instantly.
-
3
Click the Advanced Tools tab. It’s at the top of the window.
-
4
Click Shortcuts Fixer. The tool will now scan your computer for any broken .LNK shortcuts. All broken shortcuts will appear in the window.
-
5
Select all broken shortcuts. If not all of the boxes are checked by default, select them now.
-
6
Click the down-arrow next to «Fix Shortcut.» It’s to the right of the «Fix Shortcut» button at the top of the tool.
-
7
Select Fix All Checked. This repairs the links for all of the broken shortcuts.
- If a shortcut cannot be fixed, you’ll see the word «Error» to the right of its name. Also, a checkbox will remain next to the file to indicate that it’s still selected, while the fixed files will no longer have shortcuts.
- You can repair any of the «Error» shortcuts manually by reassociating those .lnk files with the apps or files they are supposed to point to. To do this, click one of the error files, then click Fix Shortcut. Choose the correct file, folder, or app, then click Open to select it.


Advertisement
-
1
Open a Command Prompt as an administrator. You can use your PC’s System File Checker (SFC) to repair problems with corrupted system files. Fixing these system files will often resolve .LNK errors. To avoid potential .LNK errors when opening Command Prompt, follow these steps to open it:
- Press Windows key + R.
- Type cmd but don’t press Enter.
- Press Control + Shift + Enter at the same time.
- Click Yes to open the command prompt.
-
2
Type sfc /scannow and press Enter. This scans your entire PC for corrupt system files. The process can take several minutes or more, depending on the size of your hard drive.
-
3
Follow the on-screen instructions to resolve any issues. If the System


Advertisement
-
1
Open the Registry Editor. To do so without any .LNK errors, follow these steps:
- Press Windows key + R.
- Type regedit and press Enter.
- Click Yes.
-
2
Go to the LNK registry subkey. Here’s an easy way to do this:
- Click the View menu and make sure «Address Bar» is selected. When this feature is on, you’ll see an address bar at the top or bottom of the Registry Editor that says «Computer.»
- Type or paste this key into the address bar: HKEY_CURRENT_USERSoftwareMicrosoftWindowsCurrentVersionExplorerFileExts.lnk
- If that doesn’t work, you can navigate there manually—in the left panel, click HKEY_CURRENT_USER, click Software, click Microsoft, click Windows, click CurrentVersion, click Explorer, click FileExts, then click .lnk.
-
3
Delete the UserChoice subkey. If you see a key with this name beneath «.lnk» in the left panel, right-click it and select Delete.[4]
After that, reboot your PC—the problem should be resolved.


Advertisement
Ask a Question
200 characters left
Include your email address to get a message when this question is answered.
Submit
Advertisement
-
If you still experience .lnk errors after trying these fixes, it’s best to reset your computer. You’ll have the opportunity to keep your personal files or start from scratch.
Thanks for submitting a tip for review!
Advertisement
About This Article
Thanks to all authors for creating a page that has been read 92,711 times.
Is this article up to date?
![]()
Download Article
![]()
Download Article
If all of your files suddenly have the .lnk extension, you can’t open apps by clicking their shortcuts, or you’re seeing non-stop errors about .lnk files, the issue might stem from a malware infection or Windows Update gone awry. LNK is the file extension used for Windows shortcuts—the icons and menu items you click to open files, folders, and documents. Broken LNK files may cause headaches, but fortunately, there’s usually an easy fix! This wikiHow article will teach you 6 easy ways to fix problems with LNK files on your Windows PC.
Things You Should Know
- If your icons and shortcuts have changed to LNK files, it may be due to corrupt system files.
- If your LNK errors are due to a virus or malware infection, you can usually fix the issue by running an anti-malware scan in Safe Mode.
- There are several freeware tools available that can easily fix broken LNK files.
-
1
Start your PC in Safe Mode with Networking support. In many cases, a .lnk file extension problem can be caused by a virus or malware.[1]
To properly scan and remove threats from your PC, you’ll want to boot up into Safe Mode with Networking. If you know for sure you don’t have a malware infection, you can skip this method.- If you can access your Windows Settings, you can boot into Safe mode by clicking the Start menu and going to Settings > Update & Security > Recovery > Restart Now. When your PC restarts, go to Troubleshoot > Advanced options > Startup Settings > Restart. When prompted after reboot, press 5 or F5 to start Safe Mode with Networking.[2]
- If you can’t access Settings, reboot your PC to the sign-in screen. Once you’re prompted to log in, hold down Shift as you click Power > Restart. When the PC restarts, go to Troubleshoot > Advanced options > Startup Settings > Restart. When prompted after reboot, press 5 or F5 to start Safe Mode with Networking.
- If you can access your Windows Settings, you can boot into Safe mode by clicking the Start menu and going to Settings > Update & Security > Recovery > Restart Now. When your PC restarts, go to Troubleshoot > Advanced options > Startup Settings > Restart. When prompted after reboot, press 5 or F5 to start Safe Mode with Networking.[2]
-
2
Download Malwarebytes from https://www.malwarebytes.com. Once you’re in Safe Mode, you should be able to open any web browser (such as Edge or Chrome). Malwarebytes has a free malware scanning and removal app that can easily identify these viruses and remove them from Windows. Click Start Free Download to download the installer to your PC.
Advertisement
-
3
Install Malwarebytes. Double-click the MBSetup file you downloaded (it will be in your Downloads folder), then follow the on-screen instructions to install Malwarebytes on your PC. If prompted to install BrowserGuard, choose Skip this for Now.
- Click Done when you’re finished installing. Malwarebytes will then launch automatically.
-
4
Click Scan. You’ll see this below «Scanner» on the welcome screen. Malwarebytes will now check for updates and then scan Windows for viruses and malware. This process can a few minutes or longer, depending on the size of your hard drive and whether updates need to be installed.
-
5
Click View Scan Results. Once the scan is finished, a pop-up will appear at the bottom-right corner of your screen. You’ll see the View Scan Results button on this pop-up.
-
6
Remove the infections. If any threats were detected, Malwarebytes will help you quarantine them. Check all the boxes to select detected threats, then click Quarantine to remove them.
-
7
Restart your PC in Normal mode. Once the scan is done and the threats are quarantined, reboot your PC normally. If your PC was infected with malware or a virus and Malwarebytes was able to fix the problem, this may have solved the issue.
- It’s possible that you’ll still experience .LNK errors even after the threats were removed. If so, try using a broken shortcut fixer or running a registry fix.
Advertisement
-
1
Download the Registry fix for Windows. Usually, .lnk extensions fail to work properly due to a failed Windows Update, missing files or files corrupted by malware. You can download and run .lnk file association fixer to solve this problem. You can download the file for all versions of Windows from https://www.thewindowsclub.com/downloads/lnk-fix-twc.zip.
-
2
Unzip the file. To unzip, right-click the downloaded file, select Extract All, choose a location (such as your desktop), and then click Extract. The new folder will open instantly.
-
3
Right-click «LNK_Fix_TWC.reg» and select Merge. If you’re using Windows 11, you’ll need to select Show more options first. You’ll be asked if you want to continue.
-
4
Click Yes. This applies the registry fix. Once the process is complete, you can restart your PC. This should resolve most .LNK link error problems.
Advertisement
-
1
Open the Control Panel. You may be able to resolve the .LNK errors with a quick System Restore. To open the Control Panel without encountering .LNK errors, follow these steps:
- Press Windows key + R to open the Run dialog.
- Type Control Panel.
- Click OK.
-
2
Open the Recovery panel. If you see it in the window, click Recovery. If not, type recovery into the search bar at the top of the window and click Recovery when it appears.
-
3
Click Open System Restore. It’s the second option.
-
4
Click Next on the System Restore wizard. This displays a list of restore points.
- If you see an error that says you don’t have System Restore configured, you won’t be able to use this method. But don’t worry—you can continue with any of the other methods.
-
5
Select a restore point and click Next. Choose a restore point from a date on which your computer was working well.
- If you click Scan for affected programs with a restore point selected, you’ll see which programs you’ve installed since Windows created that restore point. All of these programs will be removed from your PC if you complete the restore, but your personal files and other programs will be safe.
- If you don’t see a good candidate, check the box next to «Show more restore points» at the bottom.[3]
-
6
Click Next to confirm. A summary will appear.
-
7
Click Finish to start the System Restore. Once the process is complete, your computer will be restored to the selected date.
- If this doesn’t solve the .LNK problem, you can continue to another method.
Advertisement
-
1
Install Glary Utilities 5 from Glarysoft. This freeware tool will scan for broken shortcuts (LNK) files and repair them automatically. To download the program, go to https://www.glarysoft.com/glary-utilities and click the green Download Now button.
-
2
Install the program. Click the downloaded file and follow the on-screen instructions to install.
- Click Finish after installing and the app will launch instantly.
-
3
Click the Advanced Tools tab. It’s at the top of the window.
-
4
Click Shortcuts Fixer. The tool will now scan your computer for any broken .LNK shortcuts. All broken shortcuts will appear in the window.
-
5
Select all broken shortcuts. If not all of the boxes are checked by default, select them now.
-
6
Click the down-arrow next to «Fix Shortcut.» It’s to the right of the «Fix Shortcut» button at the top of the tool.
-
7
Select Fix All Checked. This repairs the links for all of the broken shortcuts.
- If a shortcut cannot be fixed, you’ll see the word «Error» to the right of its name. Also, a checkbox will remain next to the file to indicate that it’s still selected, while the fixed files will no longer have shortcuts.
- You can repair any of the «Error» shortcuts manually by reassociating those .lnk files with the apps or files they are supposed to point to. To do this, click one of the error files, then click Fix Shortcut. Choose the correct file, folder, or app, then click Open to select it.
Advertisement
-
1
Open a Command Prompt as an administrator. You can use your PC’s System File Checker (SFC) to repair problems with corrupted system files. Fixing these system files will often resolve .LNK errors. To avoid potential .LNK errors when opening Command Prompt, follow these steps to open it:
- Press Windows key + R.
- Type cmd but don’t press Enter.
- Press Control + Shift + Enter at the same time.
- Click Yes to open the command prompt.
-
2
Type sfc /scannow and press Enter. This scans your entire PC for corrupt system files. The process can take several minutes or more, depending on the size of your hard drive.
-
3
Follow the on-screen instructions to resolve any issues. If the System
Advertisement
-
1
Open the Registry Editor. To do so without any .LNK errors, follow these steps:
- Press Windows key + R.
- Type regedit and press Enter.
- Click Yes.
-
2
Go to the LNK registry subkey. Here’s an easy way to do this:
- Click the View menu and make sure «Address Bar» is selected. When this feature is on, you’ll see an address bar at the top or bottom of the Registry Editor that says «Computer.»
- Type or paste this key into the address bar: HKEY_CURRENT_USERSoftwareMicrosoftWindowsCurrentVersionExplorerFileExts.lnk
- If that doesn’t work, you can navigate there manually—in the left panel, click HKEY_CURRENT_USER, click Software, click Microsoft, click Windows, click CurrentVersion, click Explorer, click FileExts, then click .lnk.
-
3
Delete the UserChoice subkey. If you see a key with this name beneath «.lnk» in the left panel, right-click it and select Delete.[4]
After that, reboot your PC—the problem should be resolved.
Advertisement
Ask a Question
200 characters left
Include your email address to get a message when this question is answered.
Submit
Advertisement
-
If you still experience .lnk errors after trying these fixes, it’s best to reset your computer. You’ll have the opportunity to keep your personal files or start from scratch.
Thanks for submitting a tip for review!
Advertisement
About This Article
Thanks to all authors for creating a page that has been read 92,711 times.
Is this article up to date?
У многих пользователей есть ярлыки, указывающие на различные сетевые ресурсы других систем или сервера хранения вашего домена. Если ваша компания мигрирует сервер и изменила имя компьютера, имя общего ресурса или путь к папке, вам необходимо вручную обновить целевые ярлыки, чтобы они указывали на нужный сервер. Хотя структура папок может оставаться неизменной, имя сервера обычно изменяется.
Для ярлыков, указывающих на файл или папку на локальном компьютере, Windows автоматически обновляет ярлыки (используя службу «Отслеживание распределенных ссылок»), когда цель перемещается или переименовывается. Но в случае ярлыков, указывающих на сетевые местоположения, они должны быть сделаны вручную или с помощью программы / сценария.
Обновление путей вручную является утомительной задачей, особенно если у вас есть сотни ярлыков. Если вы ищете информацию о том, как массово обновлять ярлыки целей, эта статья имеет решение.
Изменить цели ярлыка (.lnk) навалом
Вот скрипт PowerShell, который автоматически обновляет цель ярлыка для файлов .lnk в указанной папке. Этот скрипт автоматически обновляет ярлыки, содержащие старое имя сервера или путь, заменяя их новым именем или путем.
$oldPrefix = "\MEDIA"
$newPrefix = "\MEDIA-PC"
$searchPath = "E:Shortcuts"
$shell = new-object -com wscript.shell
write-host "Updating shortcut target" -foregroundcolor red -backgroundcolor black
dir $searchPath -filter *.lnk -recurse | foreach {
$lnk = $shell.createShortcut( $_.fullname )
$oldPath= $lnk.targetPath
$lnkRegex = "^" + [regex]::escape( $oldPrefix )
if ( $oldPath -match $lnkRegex ) {
$newPath = $oldPath -replace $lnkRegex, $newPrefix
write-host "Found: " + $_.fullname -foregroundcolor yellow -backgroundcolor black
write-host " Replace: " + $oldPath
write-host " With: " + $newPath
$lnk.targetPath = $newPath
$lnk.Save()
}
}
- Скопируйте приведенный выше код в Блокнот и сохраните файл как
lnk_change.ps1 - Убедитесь, что вы вводите старые и новые пути в строках 1 2 выше.
- В строке № 3 укажите папку, в которой хранятся ярлыки, для которых вы хотите обновить путь.
- В диалоговом окне «Выполнить» выполните следующую команду:
powershell -noexit -ExecutionPolicy ByPass -File D:Scriptslnk_change.ps1


Это оно. Цели ярлыка теперь обновляются с \MEDIA в \MEDIA-PC,
- Вы также можете использовать полный путь к ресурсу, например,
\MEDIASharedа также\MEDIA-PCSharedFolderкак «старый» и «новый» пути соответственно. - В случае, если имя сервера такое же, но путь к папке изменился, вы должны ввести полные пути в номерах строк 1 2 соответственно — например,
\MEDIASharedв\MEDIASharedFolder
Надеюсь, это поможет!
- Remove From My Forums
-
Вопрос
-
Суть вследующем, случайно наткнулся на такой баг. Когда сохранял зацепил ярлык, потом не глядя в нужную папку сохранил exe файл.
Впринципе не растроился и попробовал перебить с lnk на exe, но вот результата это не дало. Я потом стороним проводником переименовать смог. Но впринципе ведь можно так очень большую пакость сделать. Переименовываеш расширения любого файла в lnk(попутно проверяя есть ли проводники и или же проги со встроеным продником, применяя к ним такую же технику переименования) и все если нет софта то бьешся головой об стенку?
Если мой ответ Вам помог, отметь его, пожалуйста.
-
Изменен тип
28 августа 2009 г. 9:33
-
Изменен тип
Ответы
-
Дело в том, что изначально в свойствах ты видишь полные данные об объекте (файле).
Если ты попытаешь поменять расширение файла на .lnk, то будет выдано предупреждение, и, естественно файл останется в изначальном формате, но будет иметь расширение .lnk. То есть, если раньше файл был, к примеру, text.txt, а стал text.lnk, он не стал быть ярлыком(!) при этом, а остался текстовым файлом, который откроется, например в notepad.
Когда же ты пытаешься снова поменять расширение через описаный тобой способ, то ты не можешь(!!!) поменять расширение, ты фактически меняешь только имя. То есть, даже если ты припишешь text.txt, файл всё равно будет иметь свойства (расширение) ярлыка и будет иметь полное имя text.txt.lnk.
Вообще, чтобы в дальнейшем не путаться с расширениями файлов (например распростарнённый момент — распознавание .iso файла как rar-архив, с пририсовыванием соответствующего значка), следует в Панель управления — Параметры папок (для Виста — Свойства папки) на закладке Вид убрать галочку с пункта «Скрывать расширения для зарегистрированых типов файлов». После этого абсолютно все файлы в Проводнике будут показываться с полным именем (имя + расширение).
Кстати, именно на принципе дефолтного сокрытия расширения файла и основан один из способов распространения троянов. Тебе прислали «картинку» с именем image.jpg, которую ты пытаешься открыть, а фактически файл имеет имя image.jpg.exe, что есть исполняемый файл. Так в ОС появляется вирус (троян или прочая бяка).
В целом, подача была благой, сокрыть расширение от пользователя, чтобы тот не поменял его случайно, к тому же это вовсе не за чем делать, но появилось побочное действие.
Ну и в целом. Не понимаю, зачем вообще менять расширение файла….
С уважением, Максимов Сергей.
-
Помечено в качестве ответа
Красовский Алексей
28 августа 2009 г. 11:27
-
Помечено в качестве ответа
Формат файла .LNK — Это расширение файлов ярлыков в Windows, которые ссылаются на открытие оригинального файла, папки или приложения в другом местонахождении.
Разберем в данной инструкции, как открыть файл .LNK, что это за формат, проверим является ли данное расширение вирусом или подлинным в Windows 11 и 10.
Формат файла .LNK
Файл .LNK является системным файлом ярлыков в Windows и служит для открытия какой-либо папки, файла, запуска приложения или игры. Файл LNK содержит в себе ссылающую информацию о целевом объекте и метаданные, как путь к оригинальному объекту, размер и т.п. Ниже пример, как выглядит формат файла LNK. Это обычные ярлыки со стрелочкой.

Так как формат файла .lnk находится в двоичном формате оболочки, то он становится идеальным средством для проникновения хакерами. По этой причине, смотрите внимательно исходный путь ярлыка в свойствах и метаданные. Ниже пример формата LNK, который запускает сценарий PowerShell. Должен быть целевой путь к оригинальному файлу.

Как открыть файл .lnk в Windows 11/10
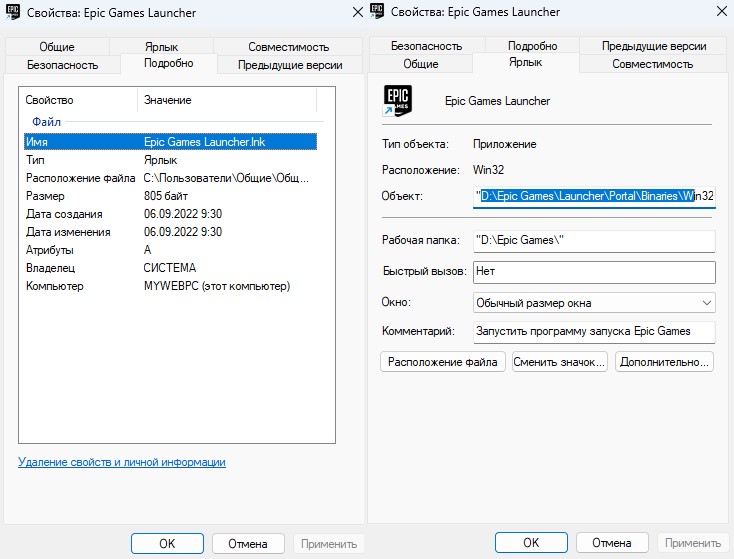
Если у вас появились белые ярлыки на рабочем столе, то вы можете найти оригинал файла в свойствах ярлыка и создать новый ярлык LNK или запустить, открыть оригинал.
- Щелкните правой кнопкой мыши по ярлыку LNK и выберите Свойства
- Перейдите во вкладку Ярлык
- В графе «Объект» вы можете узнать путь к оригинальному файлу
- Скопируйте его и вставьте в проводник, чтобы сразу запустить
- Вы можете также перейти вручную по пути
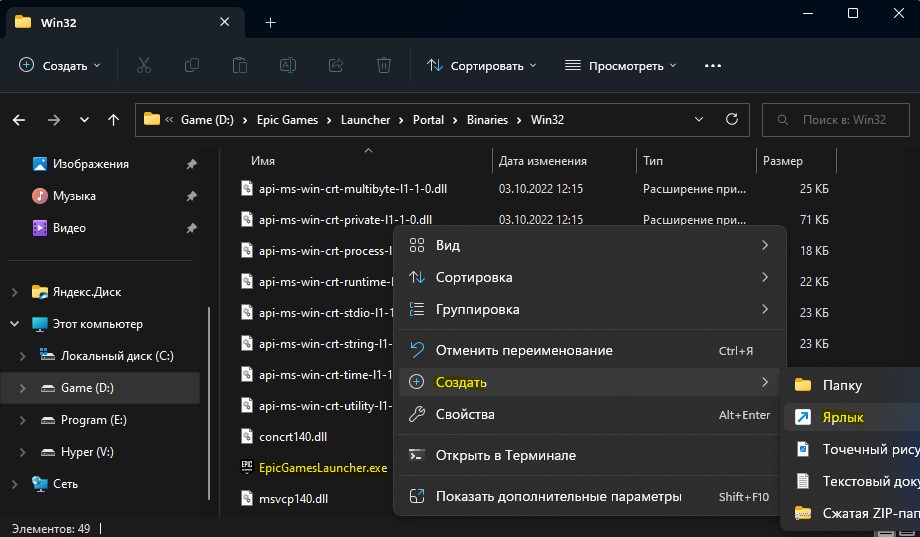
Как создать файл .lnk
Чтобы создать lnk файл, выполните следующие действия:
- Перейдите по пути в свойствах ярлыка (рис. выше)
- В графе Объект перейдите по пути вручную
- Найдите конечный файл и нажмите по нему правой кнопкой мыши
- Выберите Создать > Ярлык
- Формат файла lnk появится на рабочем столе
Смотрите еще:
- Пропали ярлыки с рабочего стола Windows 10
- Как добавить ярлыки на рабочий стол Windows 11
- Объект на который ссылается этот ярлык, перемещен или удален
- Как убрать зеленые галочки на ярлыках рабочего стола Windows 10
- Чем открыть формат файла .VOB для воспроизведения в Windows 10
[ Telegram | Поддержать ]