| Введение | |
| Узнать имя своего хоста | |
| Изменить имя хоста | |
| С помощью hostnamectl | |
| pretty hostname | |
| hosts | |
| alias | |
| На хостинге | |
| Похожие статьи |
Введение
Имя хоста — это уникальная метка, которая идентифицирует машину в сети.
Должна существовать таблица соответствия между hostname и
IP адресом
это нужно для для маршрутизации пакетов.
Хост может иметь несколько имён, но предпочтительным является вариант, когда имя одно.
Существует три класса hostname : static , pretty и transient .
-
static — традиционное имя хоста, которое может быть установлено пользователем и хранится в
/etc/hostname - pretty — имя хоста UTF8 в свободной форме, используемое для представления пользователю. Например HeiHei’ host.
- transient — динамическое имя хоста, поддерживаемое ядром, которое может быть изменено сервером DHCP или mDNS во время выполнения. По умолчанию это то же самое, что и static имя хоста.
Рекомендуется использовать полное доменное имя ( FQDN ) как для static и для transient имен, таких как host.example.com .
Так как CentOS 7 поддреживает только Fully Qualified Domain Names (FQDNs),
советую тщательно проверить hostname, который вы планируете использовать.
Допустимые значения:
- Строчные буквы от a до z
- Цифры от 0 до 9
- Точки и дефисы
- Hostnames может быть от 2 до 63 символов
- Hostnames должен начинаться и заканчиваться цифрой или буквой
Узнать имя своего хоста
Существует несоколько способов узнать имя своего хоста.
Часто для этого достаточно просто посмотреть в терминал
Пример моего терминала
[andrei@localhost Downloads]$
andrei — это имя пользователя
localhost — это имя хоста
Downloads — имя текущей директории
Посмотреть порядок можно выполнив
echo $PS1
[u@h W]$
u — пользователь
h — хост
W — Working Directory — Рабочая диретория
Другие способы
hostname
localhost.localdomain
hostname -f
localhost
uname -n
localhost.localdomain
hostnamectl
Static hostname: localhost.localdomain
Icon name: computer-vm
Chassis: vm
Machine ID: 35e254eda578c54084b96e06d5f285cf
Boot ID: afb44fef8d764f30bb89550849b02fde
Virtualization: kvm
Operating System: CentOS Linux 7 (Core)
CPE OS Name: cpe:/o:centos:centos:7
Kernel: Linux 3.10.0-1160.36.2.el7.x86_64
Изменить имя хоста
С помощью команды hostname
hostname dns-server
hostname
dns-server
Если заново открыть терминал изменения будут видны в командной строке.
[andrei@dns-server~]$
Это имя хоста сохранится только до перезагрузки системы
Если выполнить hostnamectl видно, что
помянелось только динамическое имя хоста
hostnamectl
Static hostname: localhost.localdomain
Transient hostname: dns-server
Icon name: computer-vm
Chassis: vm
Machine ID: cff8a80b9c356243b5238452511a8ade
Boot ID: 64d9ddab85ec4c219ac46c6a2940e628
Virtualization: kvm
Operating System: CentOS Linux 7 (Core)
CPE OS Name: cpe:/o:centos:centos:7
Kernel: Linux 3.10.0-1160.42.2.el7.x86_64
Architecture: x86-64
Если изучить файл
hostname
, также можно увдиеть отсутствие изменений.
cat /etc/hostname
localhost.localdomain
С помощью hostnamectl
hostnamectl set-hostname dns-server.andrei.com
hostname
dns-server.andrei.com
Это постоянное изменение. Т.е. новое имя хоста имеет класс persistent.
cat /etc/hostname
dns-server.andrei.com
pretty name
Чтобы задать pretty name нужно воспользоваться кавычками
hostnamectl set-hostname «andrei’s.host.com»
hostnamectl
Static hostname: andreis.host.com
Pretty hostname: andrei’s.host.com
Icon name: computer-vm
Chassis: vm
Machine ID: cff8a80b9c356243b5238452511a8ade
Boot ID: 64d9ddab85ec4c219ac46c6a2940e628
Virtualization: kvm
Operating System: CentOS Linux 7 (Core)
CPE OS Name: cpe:/o:centos:centos:7
Kernel: Linux 3.10.0-1160.42.2.el7.x86_64
Architecture: x86-64
Появилось pretty hostname а static hostname такое же
, но без запрещенных символов
В /etc/hostname отображается только static hostname
cat /etc/hostname
andreis.host.com
pretty hostname можно увидеть в файле
/etc/machine-info
cat /etc/machine-info
PRETTY_HOSTNAME=»andrei’s.host.com»
hosts
Изучить информацию об именах других хостов можно в файле
hosts
В моём примере в сети есть два хоста:
dns-server.andrei.com
с IP адресом
192.168.56.149
host113.andrei.com с IP адресом
192.168.56.113
Зайдём на него с помощью
ssh
и посмотрим, есть ли у него записи об именах других хостов в сети.
Для наглядности я теперь буду показываеть приглашение терминала чтобы было видно имя хоста.
[andrei@dns-server~]$ ssh andrei@192.168.56.113
Выполним ping по IP
[andrei@host113 ~]$ ping 192.168.56.149
PING 192.168.56.149 (192.168.56.149) 56(84) bytes of data.
64 bytes from 192.168.56.149: icmp_seq=1 ttl=64 time=0.650 ms
64 bytes from 192.168.56.149: icmp_seq=2 ttl=64 time=0.731 ms
^C
— 192.168.56.149 ping statistics —
2 packets transmitted, 2 received, 0% packet loss, time 1000ms
rtt min/avg/max/mdev = 0.650/0.690/0.731/0.048 ms
По IP пингуется успешно
И ping по hostname
[andrei@host113 ~]$ ping dns-server.andrei.com
ping: dns-server.andrei.com: Name or service not known
host113 не знает как разрешить имя
dns-server.andrei.com
Это неудивительно — ведь в файле
hosts
нет про него никаких записей. Проверим содержимое:
[andrei@host113 ~]$ cat /etc/hosts
127.0.0.1 localhost localhost.localdomain localhost4 localhost4.localdomain4
::1 localhost localhost.localdomain localhost6 localhost6.localdomain6
Добавим запись о dns-server.andrei.com
sudo vi !$
127.0.0.1 localhost localhost.localdomain localhost4 localhost4.localdomain4
::1 localhost localhost.localdomain localhost6 localhost6.localdomain6
192.168.56.149 dns-server.andrei.com
Повторим ping
[andrei@host113 ~]$ ping dns-server.andrei.com
PING dns-server.andrei.com (192.168.56.149) 56(84) bytes of data.
64 bytes from dns-server.andrei.com (192.168.56.149): icmp_seq=1 ttl=64 time=0.698 ms
64 bytes from dns-server.andrei.com (192.168.56.149): icmp_seq=2 ttl=64 time=0.735 ms
64 bytes from dns-server.andrei.com (192.168.56.149): icmp_seq=3 ttl=64 time=0.739 ms
^C
— dns-server.andrei.com ping statistics —
3 packets transmitted, 3 received, 0% packet loss, time 2001ms
rtt min/avg/max/mdev = 0.698/0.724/0.739/0.018 ms
Теперь всё работает
alias
Чтобы не писать длинные имена хостов можно придумать alias
Формат следующий
IP FQDN ALIAS
FQDN — Fully Qualified Domain Name — полностью определённое имя домена.
192.168.56.149 dns-server.andrei.com vbdns
[andrei@host113 ~]$ ping vbdns
PING dns-server.andrei.com (192.168.56.149) 56(84) bytes of data.
64 bytes from dns-server.andrei.com (192.168.56.149): icmp_seq=1 ttl=64 time=0.619 ms
64 bytes from dns-server.andrei.com (192.168.56.149): icmp_seq=2 ttl=64 time=0.674 ms
^C
— dns-server.andrei.com ping statistics —
2 packets transmitted, 2 received, 0% packet loss, time 1000ms
rtt min/avg/max/mdev = 0.619/0.646/0.674/0.037 ms
Обратите внимание на dns-server.andrei.com
Хоть пинг и был по алиасу, ответ идёт как от static fqdn
Если поменять порядок так, что vbdns идёт первым а FQDN dns-server.andrei.com вторым, но
dns-server.andrei.com будет считаться алиасом
192.168.56.149 vbdns dns-server.andrei.com
В таком случае ответ будет идти от vbdns
[andrei@host113 ~]$ ping vbdns
Или
[andrei@host113 ~]$ ping dns-server.andrei.com
PING vbdns (192.168.56.149) 56(84) bytes of data.
64 bytes from vbdns (192.168.56.149): icmp_seq=1 ttl=64 time=0.721 ms
64 bytes from vbdns (192.168.56.149): icmp_seq=2 ttl=64 time=1.01 ms
^C
— vbdns ping statistics —
2 packets transmitted, 2 received, 0% packet loss, time 1004ms
rtt min/avg/max/mdev = 0.721/0.866/1.012/0.148 ms
Это может стать важным при работе с сертификатами
На хостинге
Как добавить соответствие IP адреса и домена сайта
| Настройка сети в CentOS | |
| Создать новый интерфейс | |
| CentOS | |
| Компьютерные сети | |
| ip | |
| hostname | |
| DNS | |
| route: Маршруты/Роутер | |
| Firewall | |
| iptables | |
| netstat | |
| iftop: Мониторинг сети | |
| nethogs: Мониторинг сети | |
| tc: Контроль за трафиком | |
| iperf: Измерение скорости сети | |
| uuidgen: uuid для сетевого интерфейса | |
| SCP: обмен файлами; | |
| SSH: удалённый доступ | |
| Сокеты в C |
Это руководство проведет вас через процесс изменения имени хоста в системе CentOS 7.
Имя хоста задается во время установки операционной системы CentOS или если вы запускаете виртуальную машину, оно динамически назначается экземпляру при запуске.
Методы, описанные в этом руководстве, будут работать без перезагрузки вашей системы.
Прежде чем приступить
Прежде чем продолжить это руководство, убедитесь, что вы вошли в систему как пользователь с привилегиями sudo .
Общие сведения об именах хостов
Имя хоста — это метка, которая идентифицирует машину в сети. Вы не должны использовать одно и то же имя хоста на двух разных машинах в одной сети.
Есть три класса hostname : static , pretty и transient .
static— Традиционное имя хоста, которое может быть установлено пользователем и хранится в/etc/hostnameфайле.pretty— Имя хоста в свободной форме UTF8, используемое для представления пользователю. НапримерLinuxize's desktop.transient— Динамическое имя хоста, поддерживаемое ядром, которое может быть изменено сервером DHCP или mDNS во время выполнения. По умолчанию это то же самое, что иstaticимя хоста.
Рекомендуется использовать полностью квалифицированное имя домена ( FQDN ) для обоих static и transient имена , такие как host.example.com .
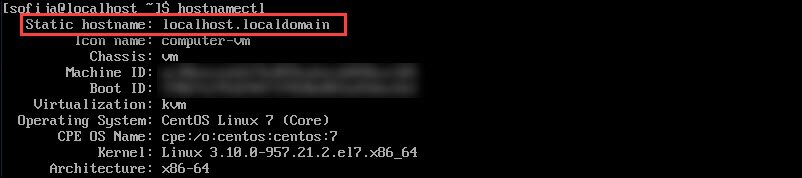
Показать текущее имя хоста
Чтобы просмотреть текущее имя хоста, введите следующую команду:
hostnamectl
Как видно из изображения выше, текущее имя хоста установлено на localhost.localdomain .
Измените имя хоста
Метод 1: с помощью hostnamectl команды
В CentOS 7 мы можем изменить имя хоста системы и соответствующие настройки с помощью команды hostnamectl , синтаксис следующий:
sudo hostnamectl set-hostname host.example.comsudo hostnamectl set-hostname "Your Pretty HostName" --prettysudo hostnamectl set-hostname host.example.com --staticsudo hostnamectl set-hostname host.example.com --transient
Например, если мы хотим изменить статическое имя хоста системы на host.linuxize.com , мы можем использовать следующую команду:
sudo hostnamectl set-hostname host.linuxize.com
Чтобы установить красивое имя хоста Linuxize's desktop , введите:
sudo hostnamectl set-hostname "Linuxize's desktop" --pretty
Команда hostnamectl не производит вывода. В случае успеха возвращается 0, в противном случае — ненулевой код ошибки.
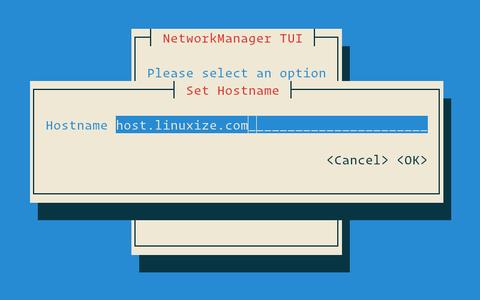
Способ 2: с помощью nmtui команды
nmtui — это текстовый пользовательский интерфейс для NetworkManager, который также можно использовать для изменения имени хоста.
Для запуска nmtui утилиты выполните следующую команду:
sudo nmtui
Используйте клавиши со стрелками для навигации по параметрам, выберите Set system hostname и нажмите Enter :
Установите новое имя хоста:
Нажмите Enter, чтобы подтвердить изменение имени хоста:
Наконец, перезапустите systemd-hostnamed службу, чтобы изменения вступили в силу:
sudo systemctl restart systemd-hostnamed
Метод 3: с помощью nmcli команды
nmcli — это инструмент командной строки для управления NetworkManager, который также можно использовать для изменения имени хоста.
Чтобы просмотреть текущий тип имени хоста:
sudo nmcli general hostname
Чтобы изменить имя хоста, host.linuxize.com используйте следующую команду:
sudo nmcli general hostname host.linuxize.com
Наконец, перезапустите systemd-hostnamed службу, чтобы изменения вступили в силу:
sudo systemctl restart systemd-hostnamed
Проверить изменение
Чтобы убедиться, что имя хоста было успешно изменено, используйте hostnamectl команду:
hostnamectl
Ваше новое имя хоста будет напечатано на консоли:
   Static hostname: host.linuxize.com
   Pretty hostname: Linuxize's desktop
         Icon name: computer-vm
           Chassis: vm
        Machine ID: 52d6807a6ae34327871ae568f7a1387e
           Boot ID: 4f747d0280d3402abed870d18b6e9a7a
    Virtualization: kvm
  Operating System: CentOS Linux 7 (Core)
       CPE OS Name: cpe:/o:centos:centos:7
            Kernel: Linux 3.10.0-693.11.6.el7.x86_64
      Architecture: x86-64
Вывод
В этом руководстве мы показали вам 3 различных метода изменения имени хоста вашего сервера CentOS 7 без перезагрузки компьютера
Это руководство проведет вас через процесс изменения имени хоста в системе CentOS 7.
Имя хоста устанавливается во время установки операционной системы CentOS или если вы запускаете виртуальную машину, оно динамически назначается экземпляру при запуске.
Методы, описанные в этом руководстве, будут работать без перезагрузки системы.
Подготовка
Прежде чем продолжить это руководство, убедитесь, что вы вошли в систему как пользователь с привилегиями sudo .
Общие сведения об именах хостов
Имя хоста — это метка, которая идентифицирует машину в сети. Вы не должны использовать одно и то же имя хоста на двух разных машинах в одной сети.
Существует три класса hostname : static , pretty и transient .
static— традиционное имя хоста, которое может быть установлено пользователем и хранится в/etc/hostname.-
pretty— имя хоста UTF8 в свободной форме, используемое для представления пользователю. НапримерLinuxize's desktop. -
transient— динамическое имя хоста, поддерживаемое ядром, которое может быть изменено сервером DHCP или mDNS во время выполнения. По умолчанию это то же самое, что иstaticимя хоста.
Рекомендуется использовать полное доменное имя ( FQDN ) как для static и для transient имен, таких как host.example.com .
Показать текущее имя хоста
Чтобы просмотреть текущее имя хоста, введите следующую команду:
hostnamectl
Как видно из изображения выше, текущее имя хоста установлено на localhost.localdomain .
Изменить имя хоста
Метод 1. Использование команды hostnamectl
В CentOS 7 мы можем изменить системное имя хоста и связанные с ним настройки с помощью команды hostnamectl , синтаксис следующий:
sudo hostnamectl set-hostname host.example.comsudo hostnamectl set-hostname "Your Pretty HostName" --prettysudo hostnamectl set-hostname host.example.com --staticsudo hostnamectl set-hostname host.example.com --transient
Например, если мы хотим изменить статическое имя хоста системы на host.linuxize.com , мы можем использовать следующую команду:
sudo hostnamectl set-hostname host.linuxize.comЧтобы установить красивое имя хоста для Linuxize's desktop , введите:
sudo hostnamectl set-hostname "Linuxize's desktop" --prettyКоманда hostnamectl не выводит данные. В случае успеха возвращается 0, в противном случае — ненулевой код ошибки.
Метод 2: с помощью команды nmtui
nmtui — это текстовый пользовательский интерфейс для NetworkManager, который также можно использовать для изменения имени хоста.
Для запуска утилиты nmtui выполните следующую команду:
sudo nmtuiИспользуйте клавиши со стрелками для навигации по опциям, выберите Set system hostname и нажмите Enter :

Установите новое имя хоста:
Нажмите Enter, чтобы подтвердить изменение имени хоста:

Наконец, перезапустите службу systemd-hostnamed чтобы изменения вступили в силу:
sudo systemctl restart systemd-hostnamedМетод 3: Использование команды nmcli
nmcli — это инструмент командной строки для управления NetworkManager, который также можно использовать для изменения имени хоста.
Чтобы просмотреть текущий тип имени хоста:
sudo nmcli general hostnameЧтобы изменить имя хоста на host.linuxize.com используйте следующую команду:
sudo nmcli general hostname host.linuxize.comНаконец, перезапустите службу systemd-hostnamed чтобы изменения вступили в силу:
sudo systemctl restart systemd-hostnamedПроверить изменение
Чтобы убедиться, что имя хоста было успешно изменено, используйте команду hostnamectl :
hostnamectlВаше новое имя хоста будет напечатано на консоли:
   Static hostname: host.linuxize.com
   Pretty hostname: Linuxize's desktop
         Icon name: computer-vm
           Chassis: vm
        Machine ID: 52d6807a6ae34327871ae568f7a1387e
           Boot ID: 4f747d0280d3402abed870d18b6e9a7a
    Virtualization: kvm
  Operating System: CentOS Linux 7 (Core)
       CPE OS Name: cpe:/o:centos:centos:7
            Kernel: Linux 3.10.0-693.11.6.el7.x86_64
      Architecture: x86-64
Выводы
В этом руководстве мы показали вам 3 различных метода изменения имени хоста вашего сервера CentOS 7 без перезапуска компьютера.
Не стесняйтесь оставлять комментарии, если у вас есть вопросы.
A hostname is a human-readable string that helps people refer to a computer by a familiar name, rather than by a number or unwieldy descriptors like, «the third one from the bottom of the second-to-last rack.» Often, a hostname is set during the installation process, but there are times when it needs to be changed. On Linux, there are many ways to set a hostname, and this article aims to cover them all.
Before exploring the tools related to hostnames, though, you must understand the different contexts in which the term is used. There are potentially two designators of a system’s hostname: the computer’s administrator (a laptop’s owner, or a server’s root user) and the network (depending on protocols and settings). This factor can lead to confusion, because you might look at your computer’s hostname and see one value, only to find that the same computer is referred to as something different over the network.
There’s a historical reason for this situation. Long ago, before DNS, hosts on a network had to be defined locally in the file /etc/hosts. If there were 31 hosts on a network and a new one was added, then 32 hosts had to update their /etc/hosts file to reflect the correct IP address and corresponding hostname for each of their neighbors. This process didn’t scale well for bigger networked systems such as the World Wide Web (the Internet), and so DNS was invented, and the concept of hostnames largely was abstracted away from local computers to instead be managed by the network.
Today, the important hostname is the one the network uses. The hostname value in /etc/hosts is often set to localhost by default.
With this context in mind, here are all the different ways to manipulate a hostname on Linux.
[ Free download: Advanced Linux commands cheat sheet. ]
Change all three names with hostnamectl
The hostnamectl command from systemd can manipulate three varieties of hostnames:
- Transient: Received from network configuration.
- Static: Provided by the kernel.
- Pretty: Provided by the user.
A transient hostname can change as needed to avoid name collisions. For instance, if you name your computer penguin but there’s already another host with that name on the network, your network hostname becomes penguin-1.
Static and pretty hostnames are a little like local variables: They’re used for activities occurring on the local machine, mostly as a convenience for the user, along with applications that need to know whether they’re running locally or remotely (for example, over a forwarded X session).
When invoked without any arguments, hostnamectl returns the static and pretty names, plus some system information:
$ hostnamectl
   Static hostname: penguin
   Pretty hostname: Penguin VM
         Icon name: computer-vm
           Chassis: vm
        Machine ID: 418d9ce8ead44bbfb6970c0d356b89bf
           Boot ID: fb3a310237ef41f88b1c62c26f19065a
    Virtualization: kvm
  Operating System: Fedora 30 (Workstation Edition)
       CPE OS Name: cpe:/o:fedoraproject:fedora:30
            Kernel: Linux 5.0.9-301.fc30.x86_64
      Architecture: x86-64
$ sudo hostnamectl set-hostname --pretty "Web dev test environment"
$ sudo hostnamectl set-hostname --static webdev-test-env
$ hostnamectl
   Static hostname: webdev-test-env
   Pretty hostname: Web dev test environment
   [...]
Change the static and pretty names in the GUI with GNOME Settings
If you want to set the static and pretty names in a desktop application, use GNOME Settings. To launch GNOME Settings, go to the Activities menu in the upper left corner of your GNOME desktop. Type Settings into the search field, or click the Show Applications icon on the left dock and find Settings in the application icons as shown below:

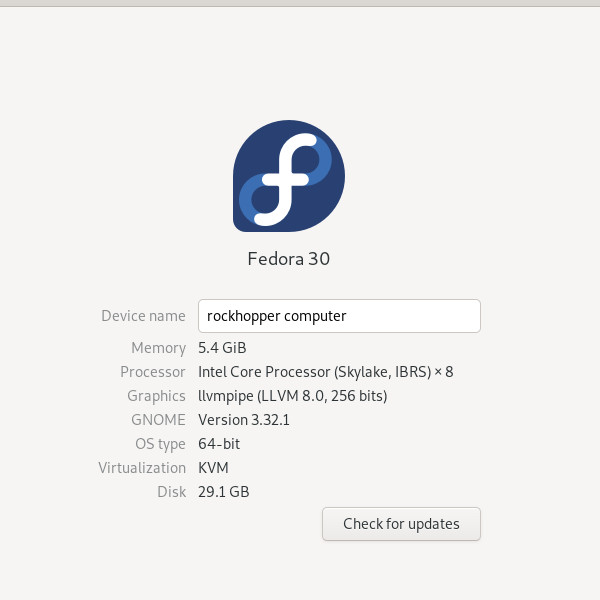
$ hostnamectl
   Static hostname: rockhopper-computer
   Pretty hostname: rockhopper computer
   [...]
Change the static name with cockpit
Fedora, CentOS, and RHEL systems feature a web console application called Cockpit for monitoring and configuring local and remote machines. Using Cockpit, you can change the static hostname for your own machine, or any machine you administer (as long as it has Cockpit enabled).
First, install and enable Cockpit:
$ sudo dnf install cockpit
[...]
$ sudo systemctl enable --now cockpit
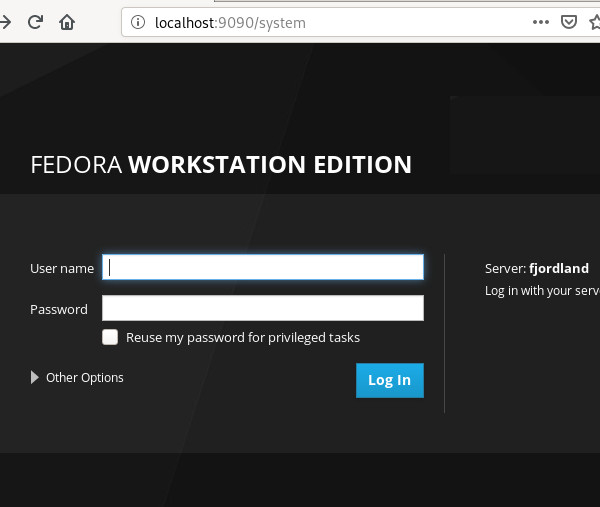
In the web console, click the System tab in the left column. Click the entry for Host name and edit the Pretty Host Name and (static) Real Host Name:
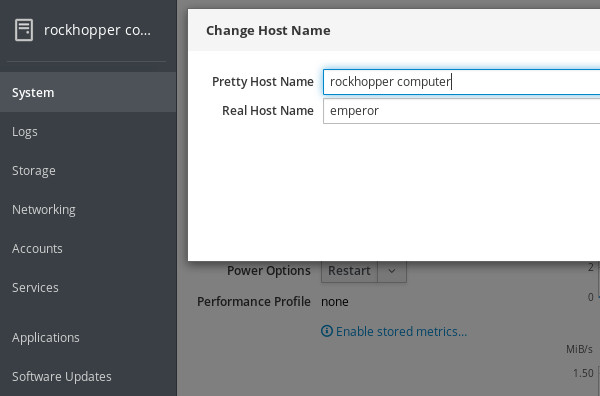
$ sudo echo "galapagos" > /etc/hostname
$ hostnamectl
   Static hostname: snares
   Pretty hostname: rockhopper web console computer
   [...]
Change the static name in the hostname file
You can also set the static hostname manually by editing /etc/hostname. This file contains exactly one line by default. If you have not changed the hostname yet, then that line probably reads localhost.localdomain. If you have used hostnamectl to change the hostname already, then this file reflects that change.
Editing this file manually is not necessarily recommended, because it doesn’t update all the other hostname values the way hostnamectl does. For example:
$ sudo echo "galapagos" > /etc/hostname
$ hostnamectl
   Static hostname: galapagos
   Pretty hostname: rockhopper computer
   Transient hostname: rockhopper-computer
   [...]
Change the static name with nmcli
Another way to change a static hostname is through the command line interface for Network Manager, nmcli:
$ sudo nmcli general hostname emperor
$ hostnamectl
   Static hostname: emperor
   Pretty hostname: rockhopper computer
   Transient hostname: rockhopper-computer
   [...]
Change the transient name with sysctl
The sysctl command allows you to configure kernel parameters while Linux is running (that is, instead of at boot time). Your computer’s transient hostname is a kernel parameter, so you can modify it with this command:
$ sudo sysctl kernel.hostname=humboldt
$ hostnamectl
   Static hostname: emperor
   Pretty hostname: rockhopper computer
   Transient hostname: humboldt
   [...]
Change the transient name with hostname
The hostname command from the util-linux package is a simple tool to query and set the transient hostname.
To query your current hostname:
$ hostname
humboldt
$ sudo hostname fjordland
$ hostnamectl
   Static hostname: emperor
   Pretty hostname: rockhopper computer
Transient hostname: fjordland
Be careful with /etc/hosts
The /etc/hosts file is mostly historic, although it is used by some applications and protocols, and can be a useful method for creating shortcuts to hosts you use often. You can use it to set a hostname, but usually, you’re just creating an alias to localhost at IP address 127.0.0.1 (your computer’s network loopback address).
For example, if you change /etc/hosts from the default entries like this:
$ cat /etc/hosts
127.0.0.1   magellanic magellanic.localdomain magellanic magellanic.localdomain4
::1         magellanic magellanic.localdomain magellanic magellanic.localdomain6
$ ping -c 1 localhost
PING localhost(magellanic (::1)) 56 data bytes
64 bytes from magellanic (::1): icmp_seq=1 ttl=64 time=0.182 ms
[...]
$ ping -c 1 magellanic
PING magellanic(magellanic (::1)) 56 data bytes
64 bytes from magellanic (::1): icmp_seq=1 ttl=64 time=0.181 ms
[...]
$ hostnamectl
   Static hostname: emperor
   Pretty hostname: rockhopper computer
   Transient hostname: fjordland
Follow the conformity convention
As you can tell from the iterations within this article, a computer’s hostname can get confusing should you use too many methods to set it, or if you change it frequently. While nothing enforces uniformity across hostname types, it’s a convention to keep everything the same on each computer.
Choose a memorable name and use it for your pretty name. Let the static and transient names be derived from that. Just as importantly, in a large network, choose meaningful names. For instance, all upper management computers may be named after a D&D monster, while all computers in the IT department may be named after a famous starship, and so on. Using a naming schema helps avoid name collisions and provides context to an otherwise dizzying list of network hosts.
Introduction
A hostname is simply the name a server goes by on a network. Setting a unique hostname is an excellent way to quickly find and identify different servers on your network.
There are three 3 types of hostnames.
- The static hostname is the most important one, and it’s stored in the /etc/hostname file. This hostname is used among machines to identify a particular server.
- The pretty hostname got its name because it allows for more characters and punctuation. It’s more user-friendly, but since it uses non-standard characters, it is not permitted for machine code. The pretty hostname is stored in the /etc/machine-info directory.
- The transient hostname is one maintained in the Linux kernel. It is dynamic, meaning it will be lost after a reboot. This approach might be useful if you have a minor job requiring a temporary hostname, but you don’t want to risk making a permanent change that might be confusing.

Prerequisites
- Server running CentOS 7
- Access to a user account with root privileges
- Terminal window (Menu > Applications > Utilities > Terminal)
- A text editor, like Vim
Step 1: Check Existing Hostname
Before you start, it is advised to check what your current hostname is. Type the following command in the console to find out:
hostnamectlThe output should return the static hostname, as well as a list of other information about your network configuration and operating system.
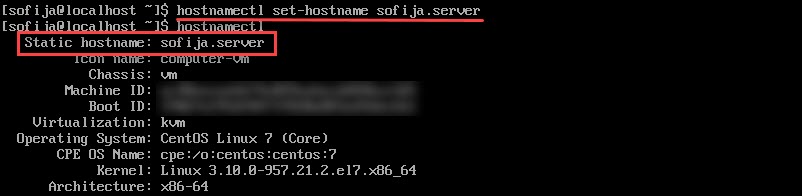
Step 2: Set a New Static Hostname
As CentOS 7 only allows Fully Qualified Domain Names (FQDNs), double-check the hostname you plan to use.
Acceptable values include:
- Lower-case letters a to z
- Numbers 0 to 9
- Periods and hyphens
- Hostnames must be between 2 and 63 characters
- Hostnames must start and end with a number or letter
Type in the following command in the terminal:
hostnamectl set-hostname my.new-hostname.serverNote: Make sure to replace my.new-hostname.server with your chosen hostname.
Step 3: Check the Hostname
Next, verify the hostname by using the following command again:
hostnamectlThe console should display the new hostname.
Step 4: Edit the /etc/hosts File
Start by opening the hosts file by typing:
sudo vim /etc/hostsIn the text editor, look for the line that begins with 127.0.0.1 (the IP address that refers to the system you are working on). It should read:
127.0.0.1 localhost localhost.localdomain localhost 4 localhost4.localdomain4 old.hostnameChange the entry old.hostname to my.new-hostname.server – and spell it the same as in Step 2.
Save the file and exit.
Step 5: Reboot and Check CentOS 7 machine hostname
Restart your system. Open a console window, and run:
hostnamectlIt should display your new hostname.
You can also use your text editor to open and verify your /etc/hostsfile. It should still have your new hostname listed.
Step 6 (Optional): Using a Pretty Hostname
To use a «pretty» hostname type the following command:
hostnamectl set-hostname "My Boss's Hostname"Make sure you have the quotation marks.
Once that completes, check the hostname:
hostnamectl statusThe console should return a list of information. Check the Static hostname and Pretty hostname lines – they should look like this:
Static hostname: mybossshostnamePretty hostname: My Boss's HostnameBy putting the hostname in quotes, you’re telling the system to use the complex characters inside the quotes as a pretty hostname.
This enables you to avoid character restrictions for static hostnames.
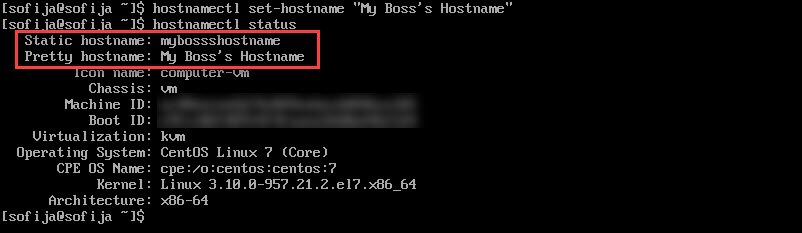
But you still need a FQDN hostname for the machine to understand. Fortunately, CentOS is smart enough to remove or change any unacceptable characters and render the static hostname automatically.
Step 7 (Optional): Setting a Transient Hostname
Fist, open the console and type the following:
sudo hostnamectl -transient set-hostname temporary.hostnameYou can check the hostname in the same way you did earlier, with the hostnamectl or hostnamectl status command.
This change will last until you reboot the machine.
You can use this command with any type of hostname (Static, Pretty, or Transient) as an option with the double-hyphen.
Just use the double-hyphen to indicate what you want:
sudo hostnamectl --prettyset-hostname "Pretty Hostname"or
sudo hostnamectl --staticset-hostname temporary.hostnameConclusion
To set or change a hostname in CentOS 7 is fairly straightforward.
If you are a more advanced user, you can try out other methods as well. One way is editing the /etc/hostname file with a text editor. Alternatively, you can run the nmtui tool at the command prompt, which will launch a little graphical tool to change the hostname.
A guide on how to change or set the hostname is also available for other Linux distributions like Ubuntu 18.04.
This post will help you to learn, «How to change Hostname of CentOS 8 Linux» in 4 very easy ways. Also, I will explain what are the challenges or issues you can face after changing the hostname. We will also talk about, where else you need to change hostname in your environment.
The hostname of any server or system is really important, as it’s used to communicate in the network. let’s deep dive and understand the types, pre-requisite and methods to change the hostname of CentOS.
Table of Contents
- 1 Understanding the CentOS Hostname
- 2 Hostname Rules
- 3 Pre-requisite to set the hostname of CentOS 8
- 4 Check which CentOS version you have —
- 5 How to check hostname in CentOS 8
- 6 4 Ways — to change or set the hostname of CentOS
- 7 Centos — How to change the hostname using command
- 8 How to Change hostname by modifying «hostname» file
- 9 How to Change hostname in CentOS using «nmcli»
- 10 How to Change or set Transient hostname in CentOS (optional)
- 11 How to Change or set the «pretty» hostname in CentOS (optional)
- 12 What else after changing CentOS hostname locally?
- 13 Which services must be restarted, after hostname change?
- 14 Getting «unable to resolve host error», after changing hostname?
- 15 Getting «ping: «hostname»: Name or service not known error.
- 16 Issues in changing hostname in Virtual box
- 17 Video tutorial
- 18 Conclusion
Understanding the CentOS Hostname
There are basically three classes of Hostname known in CentOS —
- The static hostname — is the traditional hostname, which is given by a user to his/her system or machine. Also, it is stored in /etc/hostname file.
- The transient hostname — also called Dynamic hostname, which is managed by the kernel. This value can be changed or set by using DHCP (Dynamic host configuration protocol) or mDNS (multicast Domain name system) at run time. This transient hostname can be useful when you want to change hostname temporarily.
- The pretty hostname — got its name because it supports UTF 8 characters and you can give pretty names to your machine. The pretty hostname is stored in the /etc/machine-info directory. Also, these are more user-friendly hostnames but not recommended and supported by machine code.
Both transient and pretty hostnames are optional. While Static hostname is the mandatory hostname and recognizes a machine on the network.
Hostname Rules
Computer hostname is a unique name, which is assigned to your system. it’ can be up to 64bit characters in length. Also, keep below-mentioned rules in mind, while setting up the hostname for your system.
- Hostnames can consist of letters lowercase (a to z), uppercase (A to Z)
- Hostnames can consist of digits (0 to 9)
- A hyphen (-), comma (,), dot(.) and underscore( _ ) can only be used as a special character in hostnames.
- Hostnames can start or end with a dot (.) and no two dots continuously
- Hostnames letters are not case-sensitive.
- Up to 64 characters are allowed in the hostname
- Try to make your hostname descriptive in case of servers. So, once you log in, you can easily identify it and reduces human errors.
Pre-requisite to set the hostname of CentOS 8
- sudo or root access
- Text editor nano or vim
- CentOS (Version 7 or 8 )
- Terminal
Check which CentOS version you have —
I will be using the root user to run the commands shown in the tutorial. If you have Sudo user rights, You can prepend sudo in front of commands.
As I mentioned in pre-requisite, CentOS is required for this post. So, run cat /etc/os-release command to check your CentOS version.
[root@localhost ~]# cat /etc/os-release

Let’s check current hostname before changing it. There are many ways to check existing hostname, i have listed 3 for you.
1.) — Using Hostname command.
Hostname command will display complete FQDN name, which includes hostname and domain name. Hostname and domain names are separated by «.» period.
# hostname

In the output localhost.localdomain is the default Fully qualified domain name(FQDN), you will get after CentOS installation.
2.) — By Viewing «hostname» file in /etc directory.
# cat /etc/hostname

3.) — With «hostnamectl» command
The Command «hostnamectl» is famous to control the hostname of CentOS Linux system.
# hostnamectl

4 Ways — to change or set the hostname of CentOS
Centos — How to change the hostname using command
Step-1
Run «hostnamectl» command and input your new hostname. For example, i have given «mycentos8» as hostname.
# hostnamectl set-hostname "hostname-you-want"

Step-2
Reboot your system by using any one of the command.
# reboot
or
# init 6
or
shutdown -r
In case you can’t reboot your system, just restart «hostnamed» service. then Login and logout once.
# service systemd-hostnamed restart
Check your hostname after reboot. In this example, i have shown you uptime also, just to make you sure that after reboot, my system has new hostname.

How to Change hostname by modifying «hostname» file
In this method, you just need to edit hostname file exist in /etc directory and reboot system. Basically, method 1 and method2 are same. In method 2, we are just editing this file manually instead of using hostnamectl command.
You can use any of your favourite editor to edit hostname file. In this example, i have used «vi» editor.
[root@mycentos8 ~]# vi /etc/hostname
### check changed hostname in file##
[root@mycentos8 ~]# more /etc/hostname
I have change it from «mycentos8» to «mycentoslinux» in this example.

After reboot, Linux prompt will also change with new name.

Change or set hostname using «nmtui»
Step-1
Run «nmtui» command
[root@mycentoslinux ~]# nmtui
You will see a text user interface for easy interaction. Select «Set system hostname» and then press enter.

Step-2
Input your hostname and select <OK>. Once you are out of «hostname» dialogue box, select <Quit> to leave nmtui interface. For example, I set it «Centos1» as the hostname.

Now time to reboot your system and validate your hostname changes. Also, you can just restart hostnamed service as show in method-1, if you don’t want to reboot.

How to Change hostname in CentOS using «nmcli»
nmcli is a command-line tool that helps to control the network manager. To change hostname using nmcli, run the below-mentioned sequence of commands.
Step1:- Check current hostname
[root@centos1 ~]# nmcli general hostname
Step2:- Set new hostname
[root@centos1 ~]# nmcli general hostname "New-hostname"
Step3:- Restart hostnamed service or restart your system with reboot command.
[root@centos1 ~]# service systemd-hostnamed restart
For example, I have changed my current hostname centos1 to centos8 and restart the hostnamed service to make changes persistent.

How to Change or set Transient hostname in CentOS (optional)
—> Check current transient or kernel hostname
# sysctl kernel.hostname
or
# hostnamectl

—> Set new kernel hostname
# sysctl kernel.hostname=new-hostname

Please make a note —
Transient hostnames are dynamic and not persistent. That’s why, it lasts only till your system reboot.
How to Change or set the «pretty» hostname in CentOS (optional)
If you want to setup a more user friendly or pretty name to your system, then follow these steps
Step1-
Check your current pretty hostname, if set already. For example, i have not setup any pretty hostname yet.
# hostnamectl

Step2-
Setup your hostname, which you think really pretty or user friendly for your system.
# hostnamectl --pretty set-hostname “mention Pretty Hostname”For example, i have set it to «my centos system«
Step3-
Check your pretty hostname

Now when you know all four methods to change the hostname of CentOS and also aware of pretty and transient hostnames. You must understand, the impact of changing the hostname of a system.
What else after changing CentOS hostname locally?
So once you change the hostname of your system, you must also change it in DNS (A records), LDAP/Active directory or hosts files. Wherever you have entries in your environment, you have to reflect the hostname change. For example, Backup, monitoring and configuration management. This will help you to make sure all services are running fine dependent on the hostname of your system. A lot of stuff may break if you ignore making necessary changes.
Which services must be restarted, after hostname change?
There is no defined answer to this because it depends on what all services are running on your system. Many of the services look at servers or the system’s hostname. For example, Apache, Postfix or Sendmail, NFS, any cluster services and the list goes on.
My suggestion would be to check the services running on this particular system or server. Try to grep the hostname parameter in configuration files. Then update new hostname in the configuration file and restart service.
Getting «unable to resolve host error», after changing hostname?
It may happen because everybody talks about changing hostname using commands and editing /etc/hostname file. But you need to keep in mind, that you need to alter /etc/hosts file also, if you are not part of any large network and not using DNS services. if you are using DNS (domain name system) services, then check for nameserver entry in /etc/resolv.conf file.

Getting «ping: «hostname»: Name or service not known error.
To get rid of this error, follow these steps for standalone system.
Step1-
Ping your system with your hostname, to make sure you get «Name or service not known error«. For example, my system’s hostname is centos8.
# Ping centos8

Run hostname command and provide the system name you have set up using methods mentioned in this post. For example, my system’s hostname is «Centos8«
# hostname «your-hostname«

Check ping again, it must start resolving. Also, validate hostname by just running «hostname» command.

Alternatively you can resolve «Name or service not known error« with editing /etc/hosts file.
-> Just open /etc/hosts file in your favourite editor and give IP address and hostname of your system. For example, i have given IP «192.168.126.132» and hostname «Centos8» of my system.
# vi /etc/hosts

Issues in changing hostname in Virtual box
Run below mentioned commands —
1.) Edit /etc/cloud/cloud.cfg file and set preserve_hostname parameter to «true».
2.) Update hostname. For example, Centos8 in my case, Replace it with your hostname and reboot your system.
# hostnamectl set-hostname "Centos8"
# reboot
Video tutorial
If you still have any issue in understanding concept, watch out this video on «How to change Hostname of CentOS 8 Linux«
Conclusion
Still, there are more options to change the hostname of CentOS Linux. But I have explained 4 ways on «How to change Hostname of CentOS 8 Linux», which are more than enough to change any system’s name.
If you are interested in further reading, Visit CentOS website for manuals and admin guides.
Which method you like most and find interesting to change hostname. Please comment and let me know.
Share this post on your social media, if it can help someone in learning.