Файл hosts — текстовый документ, который содержит в себе информацию о домене и IP-адресе, который ему соответствует. Файл hosts появился во времена зарождения Интернета (ARPANET) и служил неким маршрутизатором, пока на замену ему не пришла служба DNS. Но до сих пор он не утратил важности и по-прежнему используется как инструмент, который обладает приоритетом перед обращением к DNS-серверам.
Зачем нужен файл hosts
Предположим: вы зарегистрировали домен и привязали его к Hosting Linux. Но чтобы увидеть сайт, вам нужно дождаться делегирования домена на DNS-серверы. В файле hosts вы можете указать ваш домен и IP-адрес хостинга, а затем открыть браузер и зайти на ваш сайт, не дожидаясь делегирования домена. Также с его помощью вы можете заблокировать на локальном компьютере доступ к определённому сайту, указав соответствующую запись.
Где находится файл hosts
Путь к папке, где лежит файл hosts, зависит от операционной системы, которая установлена на вашем компьютере:
- Windows XP, 2003, Vista, 7, 8, 10 — c:windowssystem32driversetchosts
- Linux, Ubuntu, Unix, BSD — /etc/hosts
- macOS — /private/etc/hosts
Редактировать файл etc hosts нужно от имени администратора, иначе вы не сможете сохранить внесённые изменения.
Как внести изменения в файл hosts
Ниже мы рассмотрим, как редактировать и как сохранить изменения в файле hosts. Важно открыть файл с правами администратора, иначе система не даст вам его сохранить. Выберите вашу операционную систему и следуйте инструкции или посмотрите видеоинструкцию:
Редактирование файла hosts в Windows 7
-
1.
Запустите Блокнот или любой другой редактор от имени администратора. Откройте Пуск, найдите нужный редактор, нажмите по нему правой кнопкой мыши и выберите Запуск от имени администратора:
Как отредактировать файл hosts
-
2.
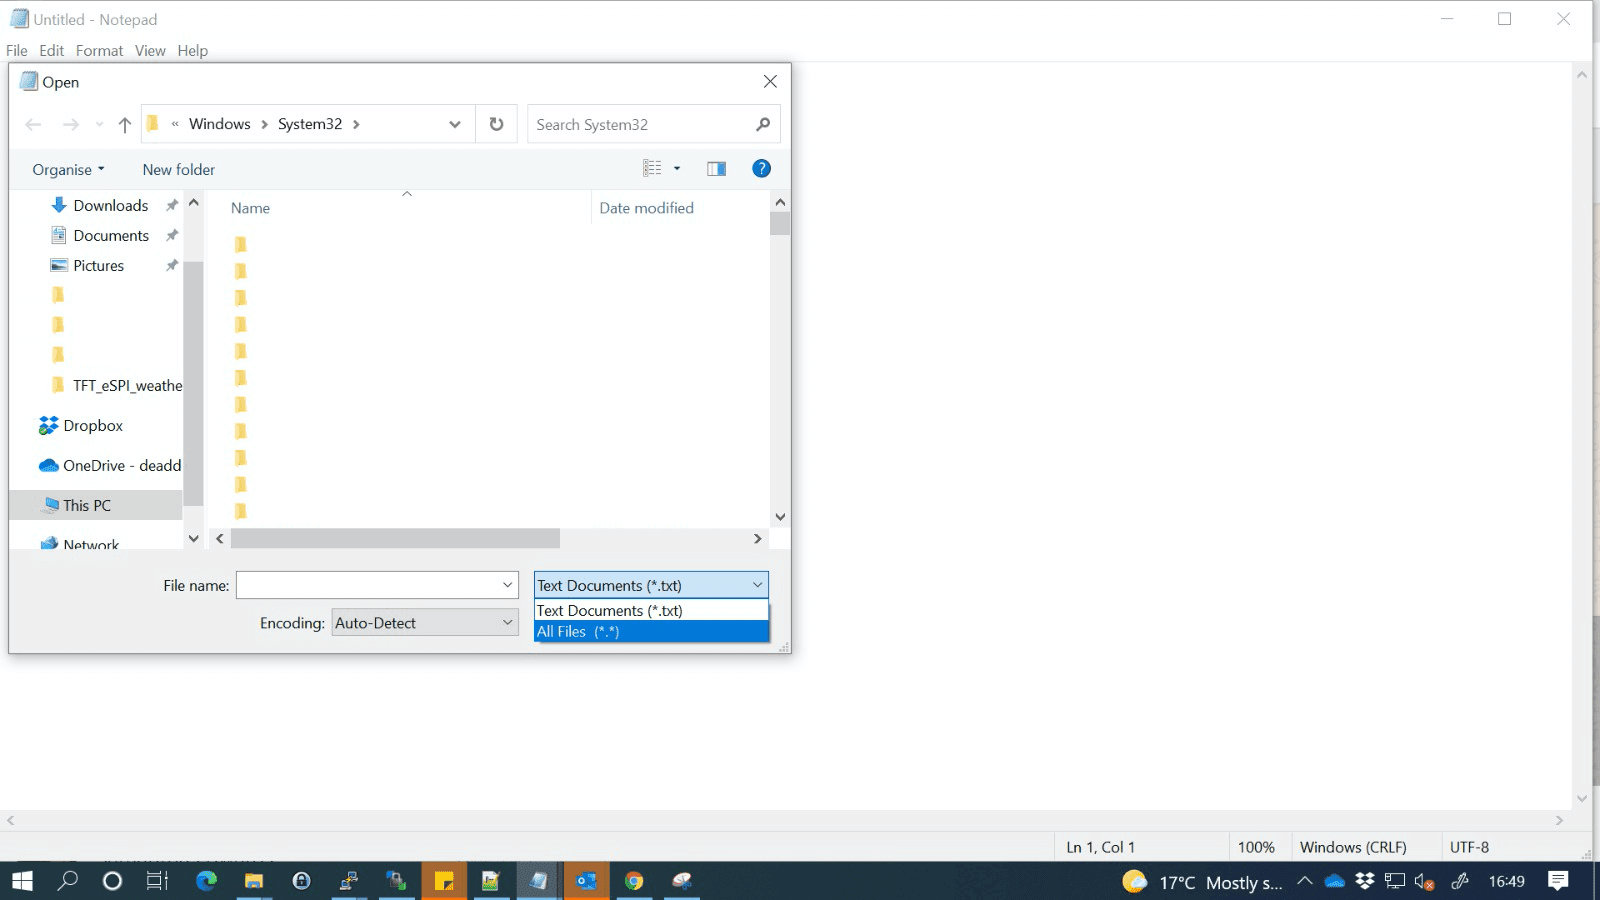
В меню «Файл» нажмите Открыть и перейдите в каталог, в котором расположен файл hosts. Измените тип файла на «Все файлы»:
-
3.
Выберите файл hosts и откройте его.
-
4.
Добавьте в конце файла необходимую запись в формате:
123.123.123.123 faq-reg.ru www.faq-reg.ruГде:
- 123.123.123.123 — IP-адрес вашего сервера или хостинга,
- faq-reg.ru — имя вашего домена.
-
5.
Сохраните изменения в файле.
Теперь вы можете открыть ваш сайт в браузере, не дожидаясь обновления DNS-серверов.
Редактирование файла hosts в Windows 8, 10
Чтобы изменить файл hosts в виндовс 10 (8), выполните следующие действия:
-
1.
Запустите Блокнот или любой другой редактор от имени администратора. Для этого найдите его в Пуске, нажмите по нему правой кнопкой мыши и выберите Запуск от имени администратора:
-
2.
В меню «Файл» нажмите Открыть и перейдите в каталог, где находится файл hosts . Измените тип файла на «Все файлы»:
-
3.
Выберите файл hosts и откройте его.
-
4.
Добавьте в конце файла необходимую запись в формате:
123.123.123.123 faq-reg.ru www.faq-reg.ruГде:
-
123.123.123.123 — IP-адрес вашего сервера или хостинга,
-
faq-reg.ru — имя вашего домена.
-
-
5.
Сохраните изменения в файле.
Теперь вы можете открыть ваш сайт в браузере, не дожидаясь обновления DNS-серверов.
Редактирование файла hosts в Linux, Unix
В Linux файл hosts находится в папке etc. Чтобы отредактировать его:
-
1.
Введите в терминал linux команду hosts:
-
2.
Добавьте в конце файла необходимую запись в формате:
123.123.123.123 faq-reg.ru www.faq-reg.ruГде:
-
123.123.123.123 — IP-адрес вашего сервера или хостинга,
-
faq-reg.ru — имя вашего домена.
-
-
3.
Сохраните изменения в файле.
Теперь вы можете открыть ваш сайт в браузере, не дожидаясь обновления DNS-серверов.
Файл hosts в Ubuntu редактируется так же, как и во всех Unix-системах.
Редактирование файла hosts в MacOS
Файл hosts в Mac OS расположен в каталоге: /private/etc/hosts. Чтобы изменить его:
-
1.
Запустите терминал с помощью горячих клавиш: Command (⌘) + T или через Spotlight.
-
2.
Введите команду:
Нажмите Enter:
-
3.
Добавьте в конце файла необходимую запись в формате:
123.123.123.123 faq-reg.ru www.faq-reg.ruГде:
-
123.123.123.123 — IP-адрес вашего сервера или хостинга,
-
faq-reg.ru — имя вашего домена.
-
-
4.
Сохраните изменения в файле.
Теперь вы можете открыть ваш сайт в браузере, не дожидаясь обновления DNS-серверов.
Видеосправка. Как изменить файл hosts
Также вы можете заблокировать определенный сайт через файл hosts, воспользовавшись инструкцией ниже:
Блокировка доступа к сайту через файл hosts
Доступ к сайту также можно ограничить для локального компьютера. Для этого укажите адрес страницы (домен) в файле hosts. Заблокировать IP нежелательного сайта не требуется. Блокировка осуществляется по локальному хосту с фиксированным IP (127.0.0.1):
-
1.
Откройте файл hosts от имени администратора на своём ПК.
-
2.
В указанной на скриншоте строке укажите IP-адрес 127.0.0.1 и через пробел адрес нежелательного сайта. Чтобы заблокировать несколько сайтов, повторите действие в следующей строке. В примере ниже в файле hosts отказано в доступе (заблокирован доступ) к сайтам «vk.com» и «youtube.com»:
-
3.
Сохраните изменения.
Готово! Доступ к сайтам будет ограничен на определенном ПК.
Оригинальный файл hosts и как его восстановить
Скачать содержимое файла hosts можно на разных ресурсах. Но мы не рекомендуем делать это, так как файл может быть заражен.
Файл hosts по умолчанию есть в каждой операционной системе, но он может быть скрыт для просмотра. Следуя инструкциям выше, вы сможете его открыть и отредактировать. Если вы удалили его, то просто создайте текстовый файл без расширения в нужной папке.
По умолчанию файл hosts выглядит следующим образом:
Для Windows
# Copyright (c) 1993-2006 Microsoft Corp.

#

# This is a sample HOSTS file used by Microsoft TCP/IP for Windows.
#
# This file contains the mappings of IP addresses to host names. Each
# entry should be kept on an individual line. The IP address should
# be placed in the first column followed by the corresponding host name.
# The IP address and the host name should be separated by at least one
# space.
#
# Additionally, comments (such as these) may be inserted on individual
# lines or following the machine name denoted by a '#' symbol.
#
# For example:
#
#      102.54.94.97     rhino.acme.com          # source server
#       38.25.63.10     x.acme.com              # x client host
# localhost name resolution is handle within DNS itself.
#       127.0.0.1       localhost
#       ::1             localhost
Для Linux
127.0.0.1       localhost

127.0.1.1      user

# The following lines are desirable for IPv6 capable hosts
::1     ip6-localhost ip6-loopback
fe00::0 ip6-localnet
ff00::0 ip6-mcastprefix
ff02::1 ip6-allnodes
ff02::2 ip6-allrouters
где user (во второй строке) — это имя вашего компьютера.
Для MacOS
##

# Host Database

#

# localhost is used to configure the loopback interface
# when the system is booting.  Do not change this entry.
##
127.0.0.1  localhost
255.255.255.255  broadcasthost
::1             localhost
Удалите текущее содержимое из файла hosts, вставьте текст по умолчанию и сохраните изменения.
Теперь вы знаете, как должен выглядеть файл hosts и как с ним работать.
On a Windows machine, there’s a system running on the local wampserver, but while the application is running on localhost, the URL says otherwise.
While I would expect the URL to be like this based on the directory structure:
http://localhost/pro/include/db_report.php
The developer has managed to do this:
http://ap-mispro/pro/include/db_report.php
So instead of localhost, the URL says ap-mispro.
And both URLs work fine.
How is the second URL made? I tried checking out the wampmanager.ini and wampmanager.tpl but maybe I didn’t know what to look for?
asked Jul 15, 2013 at 10:44
![]()
user961627user961627
12.2k40 gold badges134 silver badges210 bronze badges
WINDOWS + WAMP solution
Step 1
Go to C:wampbinapacheApache2.2.17conf
open httpd.conf file and change #Include conf/extra/httpd-vhosts.conf
to
Include conf/extra/httpd-vhosts.conf
i.e. uncomment the line so that it can includes the virtual hosts file.
Step 2
Go to C:wampbinapacheApache2.2.17confextra
and open httpd-vhosts.conf file and add the following code
<VirtualHost myWebsite.local>
    DocumentRoot "C:/wamp/www/myWebsite/"
    ServerName myWebsite.local
    ServerAlias myWebsite.local
    <Directory "C:/wamp/www/myWebsite/">
        Order allow,deny
        Allow from all
    </Directory>
</VirtualHost>
change myWebsite.local and C:/wamp/www/myWebsite/ as per your requirements.
Step 3
Open hosts file in C:/Windows/System32/drivers/etc/ and add the following line ( Don’t delete anything )
127.0.0.1 myWebsite.local
change myWebsite.local as per your name requirements
Step 4
restart your server. That’s it
WINDOWS + XAMPP solution
Same steps as that of WAMP just change the paths according to XAMPP which corresponds to path in WAMP
answered May 29, 2014 at 12:23
![]()
Abhishek GoelAbhishek Goel
18k10 gold badges86 silver badges65 bronze badges
7
Copy the hosts file and add 127.0.0.1 and name which you want to show or run at the browser link. For example:
127.0.0.1 abc
Then run abc/ as a local host in the browser.

![]()
Smart Manoj
4,8254 gold badges30 silver badges56 bronze badges
answered Apr 13, 2016 at 14:15
![]()
ADEEL AHMADADEEL AHMAD
2713 silver badges2 bronze badges
0
They are probably using a virtual host (http://www.keanei.com/2011/07/14/creating-virtual-hosts-with-wamp/)
You can go into your Apache configuration file (httpd.conf) or your virtual host configuration file (recommended) and add something like:
<VirtualHost *:80>
    DocumentRoot /www/ap-mispro
    ServerName ap-mispro

    # Other directives here
</VirtualHost>
And when you call up http://ap-mispro/ you would see whatever is in C:/wamp/www/ap-mispro (assuming default directory structure). The ServerName and DocumentRoot do no have to have the same name at all. Other factors needed to make this work:
- You have to make sure httpd-vhosts.conf is included by httpd.conf for your changes in that file to take effect.
- When you make changes to either file, you have to restart Apache to see your changes.
- You have to change your hosts file
http://en.wikipedia.org/wiki/Hosts_(file) for your computer to know
where to go when you typehttp://ap-misprointo your browser. This
change to your hosts file will only apply to your computer — not
that it sounds like you are trying from anyone else’s.
There are plenty more things to know about virtual hosts but this should get you started.
answered Jul 15, 2013 at 17:14
![]()
Sarah KempSarah Kemp
2,6703 gold badges21 silver badges29 bronze badges
answered Feb 21, 2015 at 5:31
![]()
KaranKaran
5476 silver badges17 bronze badges
1
for new version of Wamp
<VirtualHost *:80>
  ServerName domain.local
  DocumentRoot C:/wamp/www/domain/
  <Directory "C:/wamp/www/domain/">
      Options +Indexes +FollowSymLinks +MultiViews
      AllowOverride All
      Require local
  </Directory>
</VirtualHost>
answered Nov 16, 2016 at 8:28
![]()
Ali HasanAli Hasan
1762 silver badges10 bronze badges
After another hour or two I can actually answer my own question.
Someone on another forum mentioned that you need to keep a mention of plain ol’ localhost in the httpd-vhost.conf file, so here’s what I ended up with in there:
ServerName localhost

DocumentRoot "c:/wamp/www/"
DocumentRoot "C:/wamp/www/pocket/"
ServerName pocket.clickng.com
ServerAlias pocket.clickng.com
ErrorLog "logs/pocket.clickng.com-error.log"
CustomLog "logs/pocket.clickng.com-access.log" common
<Directory "C:/wamp/www/pocket/">
    Options Indexes FollowSymLinks Includes
    AllowOverride All
    Order allow,deny
    Allow from all
</Directory>
Exit WAMP, restart — good to go. Hope this helps someone else 
answered Feb 4, 2017 at 15:17
![]()
go to C:WindowsSystem32driversetc and open hosts file and add
this
127.0.0.1    example.com
127.0.0.1    www.example.com
then go to C:xamppapacheconfextra open httpd-ajp.conf file and add
<VirtualHost *:80>
    DocumentRoot "C:/xampp/htdocs/pojectroot"
    ServerName example.com
    ServerAlias www.example.com
    <Directory "C:/xampp/htdocs/projectroot">
        AllowOverride All
        Require all granted
    </Directory>
</VirtualHost>
answered Sep 5, 2018 at 5:51
![]()
WINDOWS + MAMP solution
Step 1
Go to S:MAMPenter code here
binapacheconf
open httpd.conf file and change
#Include conf/extra/httpd-vhosts.conf
to
Include conf/extra/httpd-vhosts.conf
i.e. uncomment the line so that it can includes the virtual hosts file.
Step 2
Go to S:MAMPbinapacheconfextra
and open httpd-vhosts.conf file and add the following code
<VirtualHost myWebsite.local>
    DocumentRoot "S:MAMPhtdocs/myWebsite/"
    ServerName myWebsite.local
    ServerAlias myWebsite.local
    <Directory "S:MAMPhtdocsmyWebsite/">
        Order allow,deny
        Allow from all
    </Directory>
</VirtualHost>
change myWebsite.local and S:MAMPhtdocs/myWebsite/ as per your requirements.
Step 3
Open hosts file in C:/Windows/System32/drivers/etc/ and add the following line ( Don’t delete anything )
127.0.0.1 myWebsite.local
change myWebsite.local as per your name requirements
Step 4
restart your server. That’s it
answered Apr 2, 2020 at 22:01
![]()
asbelarasbelar
291 silver badge5 bronze badges
This method will work for xamp/wamp/lamp
- 1st go to your server directory, for example, C:xamp
- 2nd go to apache/conf/extra and open httpd-vhosts.conf
- 3rd add following code to this file
 <VirtualHost myWebsite.local>
        DocumentRoot "C:/wamp/www/php-bugs/"
        ServerName php-bugs.local
        ServerAlias php-bugs.local
        <Directory "C:/wamp/www/php-bugs/">
            Order allow,deny
            Allow from all
        </Directory>
    </VirtualHost>
For DocumentRoot and Directory add your local directory
For ServerName and ServerAlias give your server a name
-
Finally go to C:/Windows/System32/drivers/etc and open hosts file
add127.0.0.1 php-bugs.localand nothing else -
For the finishing touch restart your server
For Multile local domain add another section of code into httpd-vhosts.conf
 <VirtualHost myWebsite.local>
        DocumentRoot "C:/wamp/www/php-bugs2/"
        ServerName php-bugs.local2
        ServerAlias php-bugs.local2
        <Directory "C:/wamp/www/php-bugs2/">
            Order allow,deny
            Allow from all
        </Directory>
    </VirtualHost>
and add your host into host file 127.0.0.1 php-bugs.local2
answered Dec 19, 2019 at 11:54
![]()
Как правило, файл hosts нужен для того, чтобы настроить соответствие между доменом и конкретным IP-адресом.
В этой статье подробно рассмотрим, как работает файл hosts и как внести в него изменения.
Что такое файл hosts и зачем он нужен
Файл hosts — это текстовый документ, содержащий информацию о домене и IP-адресе, который ему соответствует.
Зачем нужен файл hosts? К примеру, он понадобится в случае, когда вы зарегистрировали домен и привязали его к хостингу, но процесс делегирования на DNS-серверы еще не завершился. Чтобы открыть сайт, не дожидаясь делегирования, можно указать домен и IP-адрес хостинга в файле hosts.
Кроме того, hosts можно использовать, если вам нужно настроить запрет доступа к какому-либо сайту на вашем компьютере. Чтобы это сделать, для сайта понадобится прописать некорректный IP.
Как внести изменения в файл hosts и где он находится
Для внесения изменений можно использовать любой текстовый редактор. Например, для ОС Windows — Блокнот, Linux — VIM или Nano, macOS — TextEdit. Обращаем внимание: чтобы редактировать и сохранять изменения в файле hosts, необходимо его открыть с правами администратора.
Расположение файла зависит от вашей операционной системы:
| ОС | Путь к папке |
|---|---|
| Windows XP, 2003, Vista, 7, 8, 10 | c:windowssystem32driversetchosts |
| Linux, Ubunta, Unix, BSD | /etc/hosts |
| macOS | /private/etc/hosts |
Рассмотрим подробно внесение изменений в каждой из вышеуказанных операционных систем.
Как изменить файл hosts в Windows 10
- Откройте «Мой компьютер» и перейдите или введите в адресную строку проводника следующий путь к файлу hosts: c:windowssystem32driversetchosts.
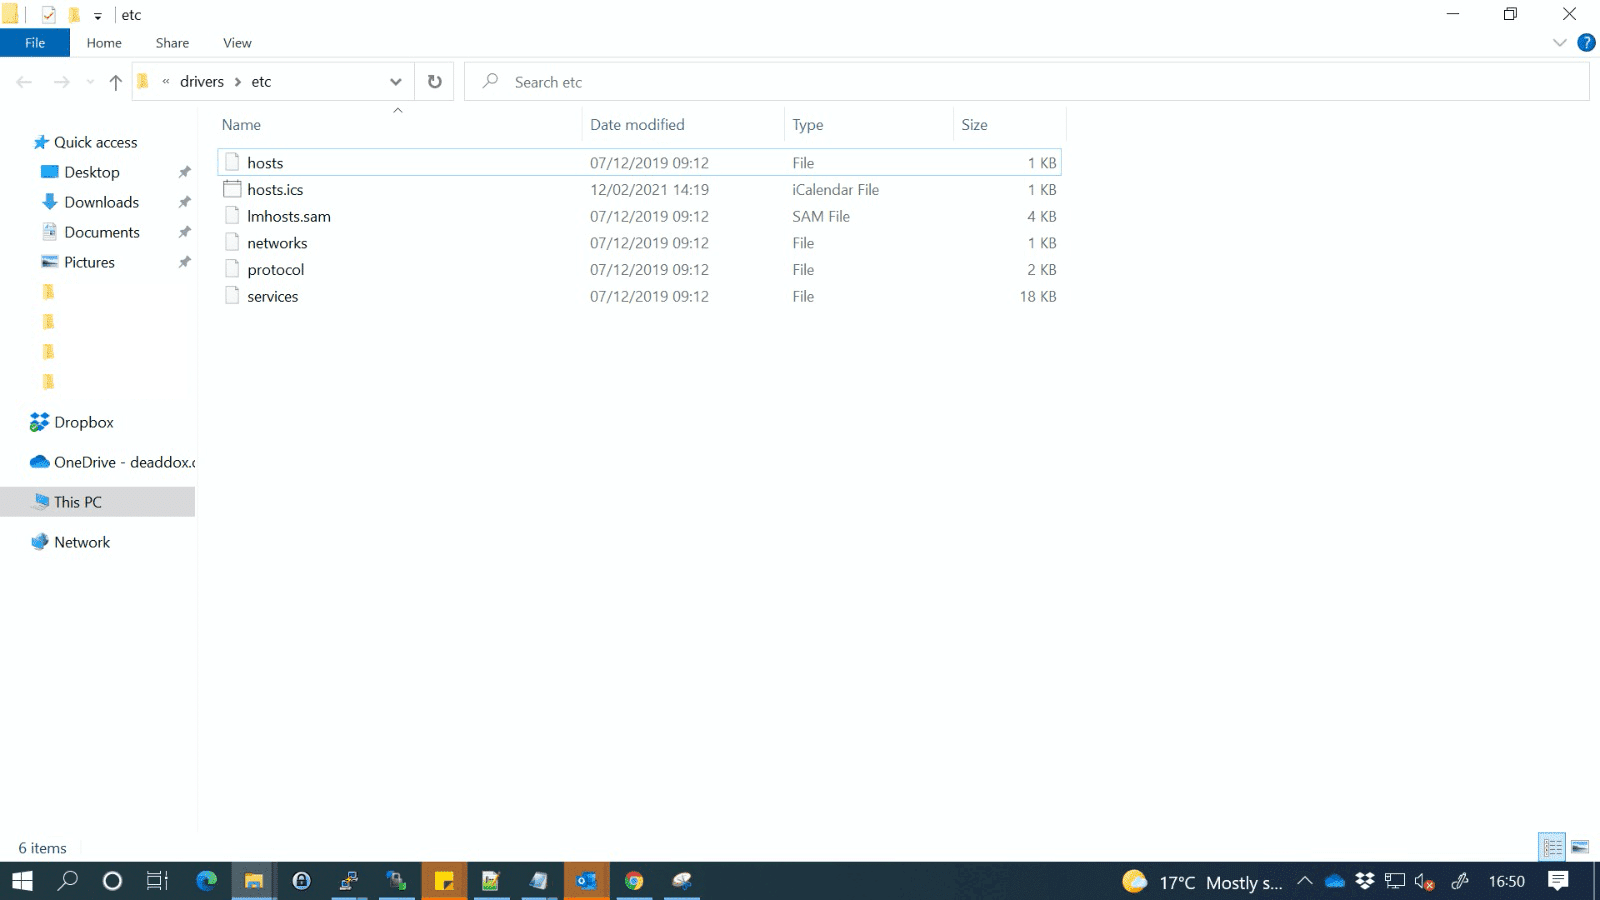
- В папке etc должен быть файл hosts. Нажмите на него правой кнопкой мыши и выберите «Открыть с помощью — Блокнот».
- Перед вами откроется содержимое файла hosts. Введите нужный вам IP и домен как на примере ниже, где 111.111.111.111 – IP, yourdomain.ru – домен.

- Сохраните изменения. Для этого в левом углу нажмите «Файл — Сохранить».
Как отредактировать файл hosts в Linux
Чтобы внести изменения в файл hosts в Linux нужно перейти в папку etc. Для этого:
- Откройте терминал Linux и введите команду:
sudo nano /etc/hosts

- У вас должен открыться файл, который обычно выглядит так:
127.0.0.1 localhost

127.0.1.1 ваш_компьютер
# The following lines are desirable for IPv6 capable hosts

::1 ip6-localhost ip6-loopback

fe00::0 ip6-localnet

ff00::0 ip6-mcastprefix

ff02::1 ip6-allnodes

ff02::2 ip6-allrouters
- Добавьте в конец запись в следующем формате:
111.111.111.111 yourdomain.ru www.yourdomain.ruГде в данном случае: 111.111.111.111 – IP-адрес, yourdomain.ru – ваше доменное имя.
- Проверьте настройки. Для этого в терминале задайте следующую команду:
ping yourdomain.com - Сохраните изменения.
Как отредактировать файл hosts в macOS
Где находится hosts macOS? Файл hosts размещается на macOS в каталоге /private/etc/hosts. Чтобы внести в него изменения:
- Откройте Терминал с помощью сочетания клавиш Command+T или через Finder.
- В терминале задайте следующую команду:
sudo nano /etc/hosts - Затем введите ваш пароль пользователя.
- В конце файла укажите нужный IP и домен, например:
111.111.111.111 yourdomain.ru - Сохраните изменения и закройте редактор. Это можно сделать с помощью сочетания клавиш Command+Y и нажатия Enter для подтверждения.
Мы разобрали как отредактировать файл в популярных операционных системах. Теперь вы можете открыть ваш сайт в браузере, не дожидаясь обновления DNS-серверов.
Блокировка доступа к сайту через файл hosts
Каждый браузер, прежде чем открыть какой-либо сайт, обращается за данными к файлу hosts, в который также можно внести информацию, чтобы доступ к ресурсу был запрещен.
Зачем это нужно? Причины могут быть самые разные. К примеру, родители могут таким образом настроить ограничение для ребенка, чтобы он не посещал вредоносные сайты и не смотрел нежелательный контент. Или работодатель может таким образом запретить доступ к развлекательным сайтам для своих сотрудников в рабочее время.
Hosts — это своего рода инструмент, который помогает администрировать и следить за ресурсами компьютера в глобальной сети.
Как заблокировать сайт через Hosts
Чтобы настроить блокировку в Windows, нужно снова найти и открыть сам файл по тому же пути, о котором мы уже писали выше: c:windowssystem32driversetc. Файл hosts необходимо открыть через программу «Блокнот» и не забудьте, что важно это делать от имени администратора.
Заблокировать сайты получится, когда вы внесете в файл hosts следующие цифры: 127.0.0.1. Это локальный адрес файла на компьютере. После этого нужно ввести сами адреса сайтов без указания http/https. Сайты необходимо указать через пробел между локальным адресом и доменным именем.
Как это работает? После того, как вы внесете этот адрес рядом с физическим адресом веб-сайта, запрос операционной системы будет приходить сам по себе, при этом сайт, который вы указали в файле hosts после, будет исключен.
На финальном этапе вам нужно только сохранить изменения.
Можно ли все вернуть обратно?
Если вам нужно разблокировать сайты, к которым вы ограничили доступ, это возможно. Есть два варианта:
- Скачать готовый файл hosts для вашей ОС. Это не самый безопасный способ, поэтому будьте предельно внимательны и скачивайте только если вы уверены, что файл не заражен и он не навредит вашему устройству.
- Восстановить значения файла hosts по умолчанию. Как это сделать – рассказываем дальше.
Как восстановить оригинальный файл hosts Windows 10
По умолчанию файл hosts должен выглядеть на Windows 10 следующим образом:
# Copyright (c) 1993-2006 Microsoft Corp.
#
# This is a sample HOSTS file used by Microsoft TCP/IP for Windows.

#

# This file contains the mappings of IP addresses to host names. Each

# entry should be kept on an individual line. The IP address should

# be placed in the first column followed by the corresponding host name.

# The IP address and the host name should be separated by at least one

# space.

#

# Additionally, comments (such as these) may be inserted on individual

# lines or following the machine name denoted by a '#' symbol.

#

# For example:

#

#      102.54.94.97     rhino.acme.com          # source server

#       38.25.63.10     x.acme.com              # x client host

# localhost name resolution is handle within DNS itself.

#       127.0.0.1 localhost

#       ::1 localhost
Чтобы восстановить его на вашем компьютере, следуйте инструкции:
- Скопируйте указанные выше данные и откройте «Блокнот».
- Вставьте скопированные ранее данные.
- Чтобы сохранить файл, выберите «Файл — Сохранить как».
- Пропишите название hosts с расширением old.
- Оригинальный файл необходимо сохранить по следующему адресу с заменой на старый: %WinDir%System32DriversEtc.
Заключение
Нет сомнений, что hosts – важнейший файл любой операционной системы. Именно он сопоставляет IP-адреса с доменными именами. Можно сказать, что этот файл является аналогом современных DNS-адресов.
Безусловно, разные ситуации требуют вносить изменения в важные программные файлы, но стоит быть максимально осторожными, когда вы это делаете, поскольку один неверный шаг может повлечь необратимые последствия. Мы рекомендуем перед началом редактирования сохранить оригинальный файл hosts, чтобы в любой момент была возможность его восстановить.
The Domain Name System (DNS) is the key to locating a website on the Internet. With so much at stake, making changes to your DNS records can be a nerve-wracking experience.
Fortunately, there is a way to test DNS-related changes without editing your live records. By modifying your local hosts file, you can preview how your domains will function on a new server without putting your live site at risk.
In this post, we’ll explore what hosts files are and share some reasons why you may want to modify them. We’ll then show you how to edit hosts files on Windows 10. Let’s get started!
An Introduction to the Hosts File
A hosts file is a local plain text file that maps your server or hostnames to Internet Protocol (IP) addresses. Every time Windows 10 connects over a network using a hostname, it’ll refer to the hosts file. If Windows finds an entry in this file, then it’ll contact the specified server.
If it doesn’t find a relevant hostname, Windows 10 will resolve the hostname using a Domain Name Service (DNS). This is the process used to obtain the server IP address behind a domain name.
Each hosts file entry has its own line, with the numerical IP address, a space or a tab character, and finally the hostname or domain. Let’s look at an example of a hosts file entry:
120.0.0.0 example.com #Example
In the above example, the first section denotes the IP address where this request will be redirected to (120.0.0.0). The second section designates the location that we want to redirect a request from (example.com). The final section specifies a comment for this entry. We‘re using a hashtag to tell Windows 10 to ignore the comment when reading the local hosts file.
After adding the domain information, your system will resolve to the IP address you specified. In the above example, we’re associating the domain name example.com with the IP address 120.0.0.0.
It’s worth noting that some software employs its own techniques to look up hostnames. This means there’s always a chance that it may ignore the hosts file completely.
DNS is the key to locating a website. 🔑 With so much at stake, making changes to your DNS records can be a nerve-wracking experience. 😰 Learn how to safely modify your host files in this guide 👇Click to Tweet
What Happens When You Modify a Hosts File?
When you modify your hosts file, it causes your local machine to look directly at the IP address specified by you. For example, if you wanted to point mywebsite.com to the IP address 1.2.3.4.5, you’d add the following:
1.2.3.4.5 mywebsite.com
Now, every time you try to visit mywebsite.com, you’ll find yourself at 1.2.3.4.5 instead. By editing your hosts file, you can override the DNS for a domain on your specific machine only.
In this post, we’ll be focusing on opening your hosts file and adding individual entries. However, it is also possible to replace this file entirely. This can be an easy way to block malicious or spammy websites in bulk. There are even sites that have published ready-made lists of IP addresses associated with advertisements, hijackers, page counters, and other unwanted connections.
You can download one of these pre-prepared lists and copy/paste its contents into your existing hosts file. Alternatively, you might replace your native hosts file with the newly-downloaded file. If you do opt for the latter, then we recommend keeping a copy of your original file, just in case you encounter any strange behavior with its replacement.
Why You May Want To Modify the Windows 10 Hosts File
You can use your hosts file to test DNS-related changes without having to alter your DNS records. For example, imagine you’ve migrated to a new server. Before updating your DNS settings, it’s a good idea to verify how your domains will look and function on this new server.
However, if you enter your current domain name, then it’ll resolve to your old server. In this scenario, you can modify your hosts file to point the domain to the new server’s IP.
This file can also help test how your website looks on a different server when your DNS hasn’t propagated yet. At Kinsta we provide a temporary URL (sitename.kinsta.cloud), but this cannot mimic everything. For example, by default, a CDN won’t work on a temporary URL.
You can also use the hosts file to block certain websites. This can be useful for employers who want to ensure that their staff isn’t wasting time on unauthorized sites such as Facebook, Twitter, or YouTube.
While there are fewer technical ways to block access to unauthorized websites, many of these methods are relatively easy to reverse. For example, a tech-savvy child may have little problems bypassing parental controls, but modifying the hosts file requires a higher level of technical knowledge.
You might take this a step further and block all websites that serve up advertisements. If you map the addresses of all the major ad providers to an unused internal IP address, then Windows 10 will be unable to resolve these addresses. You can then enjoy the web, advertisement-free.
Finally, some malicious third parties may set up redirects by altering your hosts file. This is known as a hosts file hijack. If you’re encountering strange redirects, then it may be worth checking your hosts file for suspicious entries.
How To Make Firefox Honor the Windows 10 Hosts File
If you’re using Firefox for Windows, then Mozilla’s browser resolves IP addresses slightly differently compared to the other major browsers. By default, Firefox uses DNS-over-HTTPS (DoH).
This is a protocol for performing remote DNS resolution via HTTPS. With this setting enabled, Firefox will use the DOH server as the primary name resolver, rather than checking your local hosts file or DNS resolver.
As a result, the website displayed will always point to the IP address that the Internet deems authoritative for that domain. Even if you edit your hosts file, your changes won’t have any effect if the DoH server returns a working IP address.
There are plenty of great web browsers that are compatible with Windows 10 and that honor the hosts file out-of-the-box. However, if you want to stick with Mozilla Firefox, you can always disable DoH.
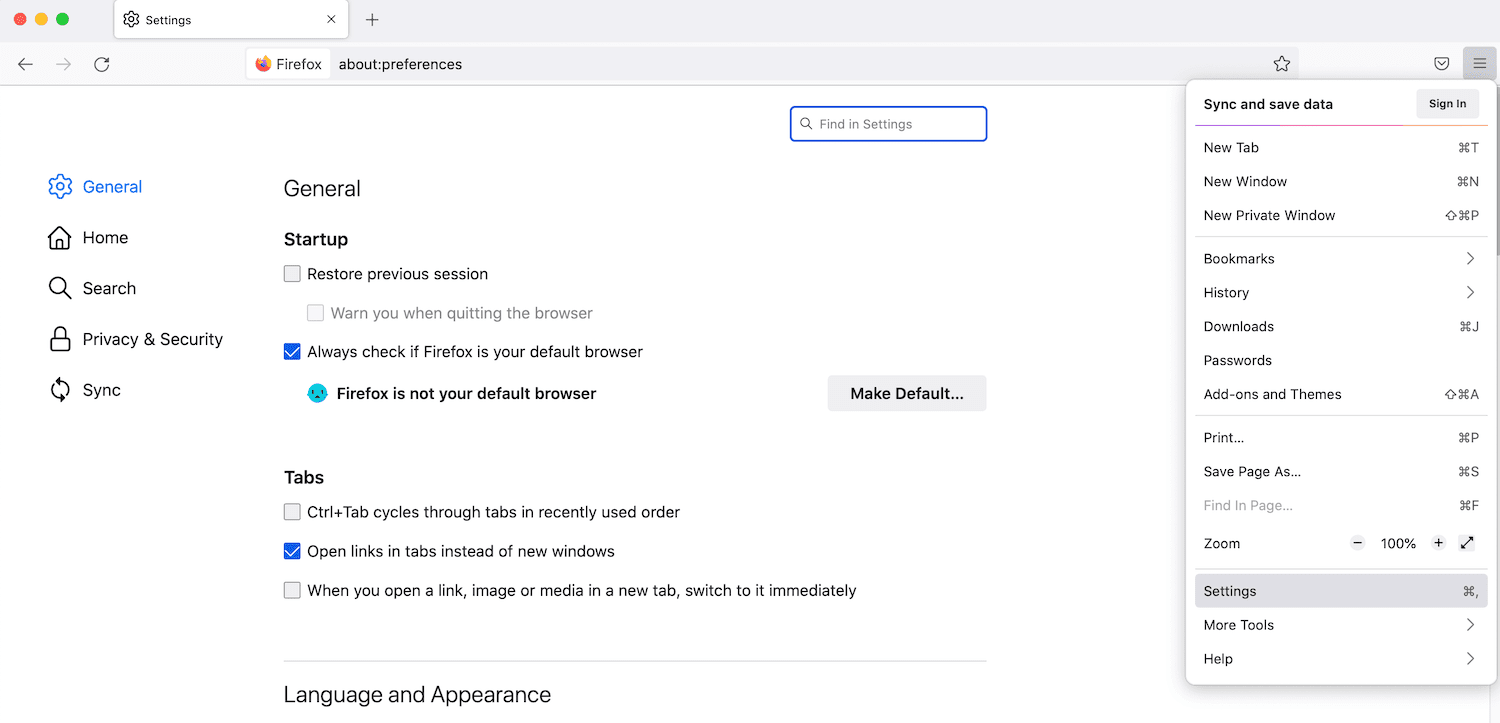
To start, select the Menu button in the Mozilla Firefox browser and go to Settings.
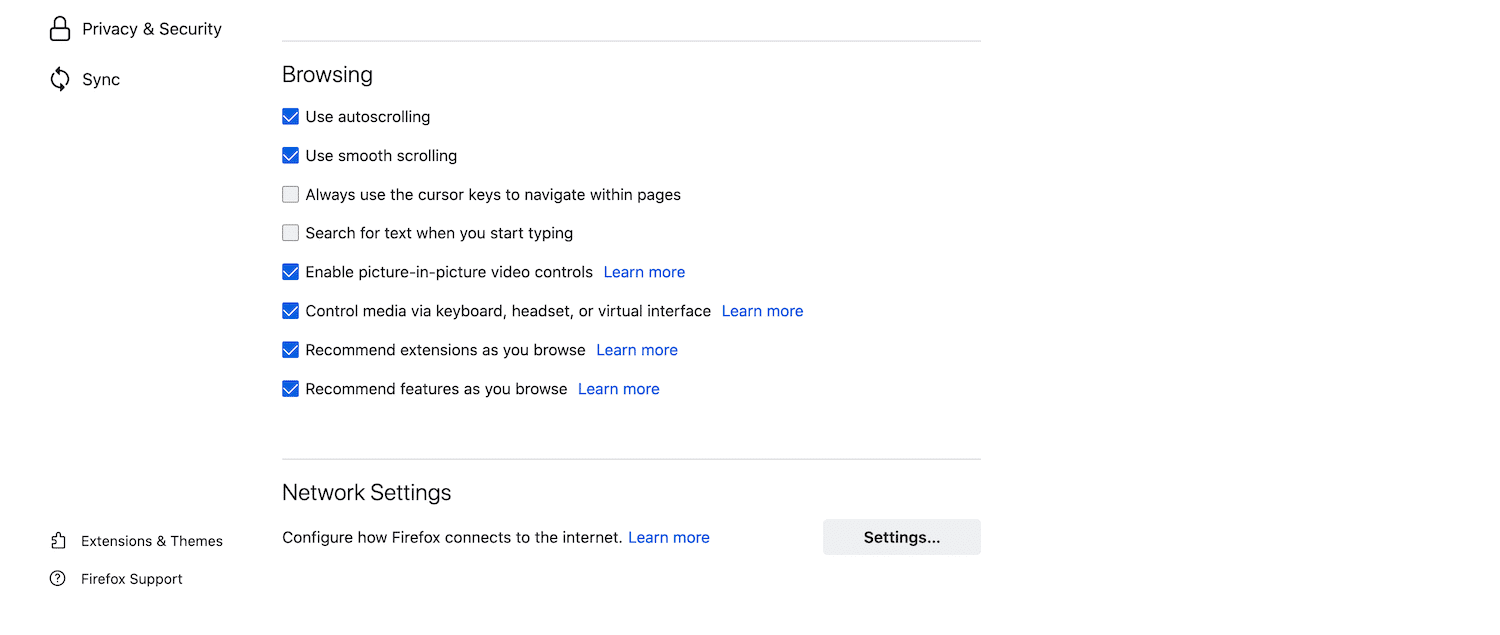
In the subsequent tab, make sure General is selected. Then, scroll to the Network Settings section and click on Settings.
In the popup that appears, scroll to Enable DNS over HTTPS. Then, uncheck the accompanying box.
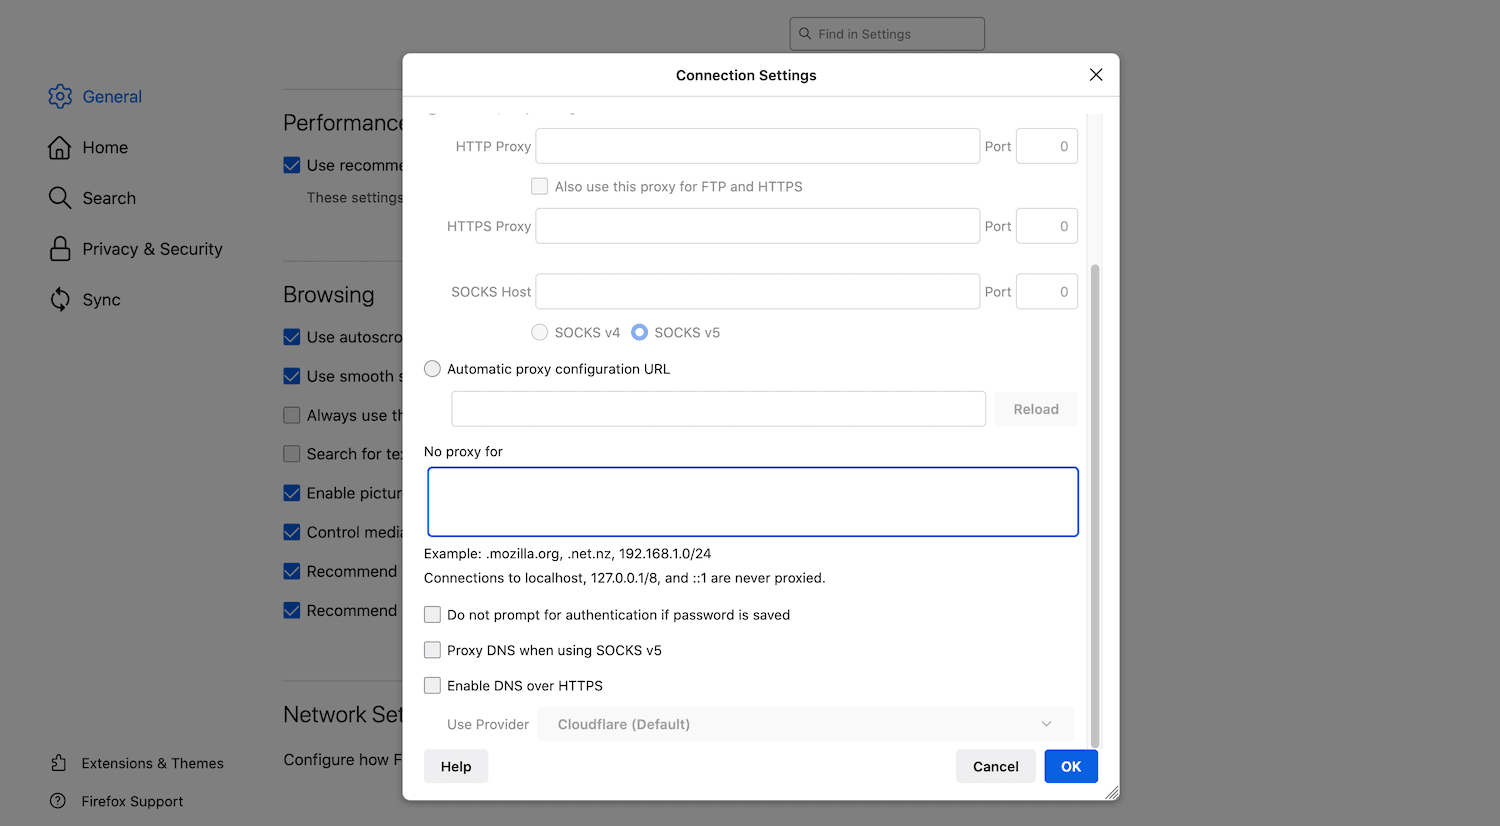
To save your changes, click on OK and then exit this window. From this point onwards, Firefox will honor any custom addresses that you add to your Windows 10 hosts file.
How To Edit Your Windows 10 Hosts File (In 3 Steps)
There are many reasons why you might need to edit this important file. Regardless of whether you want to block advertising networks, verify a new domain, or perform other DNS-related tests, the process will be exactly the same.
Let’s look at how to add custom addresses to the Windows 10 hosts file.
1. Find Your IP Address
Often, you’ll want to change how Windows 10 resolves the IP address of a site that you own. To make this modification, you’ll need to know your website’s IP address.
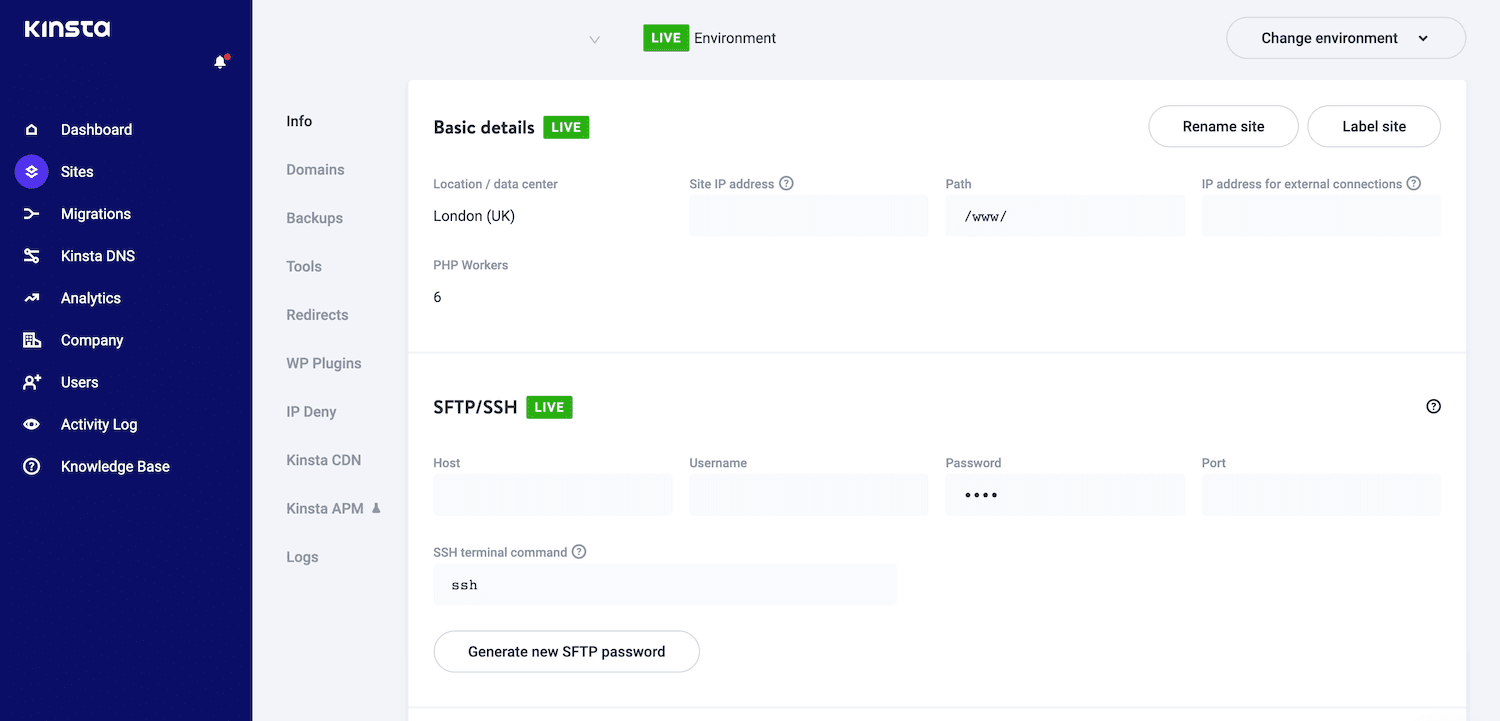
If you’re a Kinsta customer, you can retrieve this information easily using the MyKinsta dashboard.
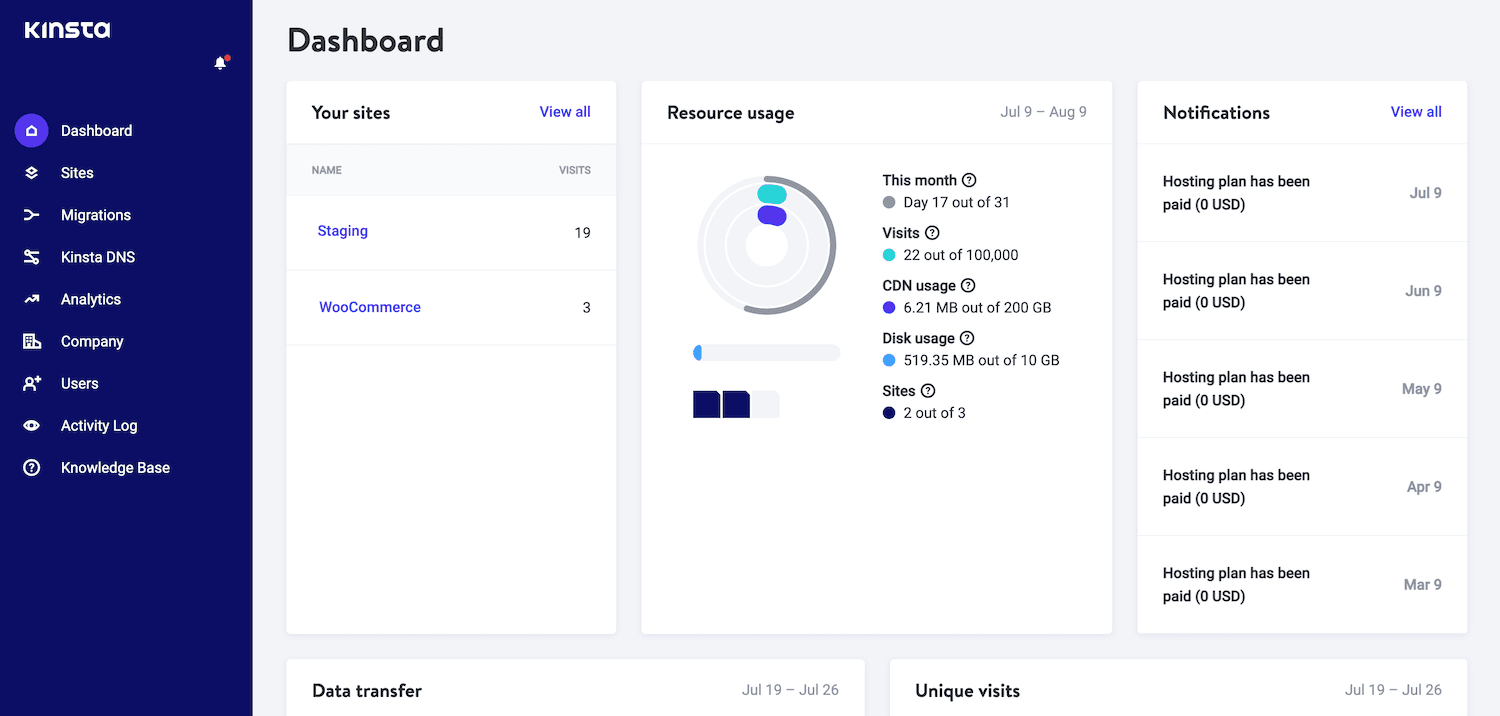
Find the domain that you want to work with and click on it. On the next screen, you’ll find some information about this domain, including your IP address.
Alternatively, you might want to modify how Windows 10 resolves a third-party IP address. You can retrieve any website’s IP address using tracert.
Tracert is typically used as a network diagnostic tool to help resolve network connectivity issues. However, you can also use it to trace the paths a data packet takes from its source to its destination, which will reveal the IP address of the destination website.
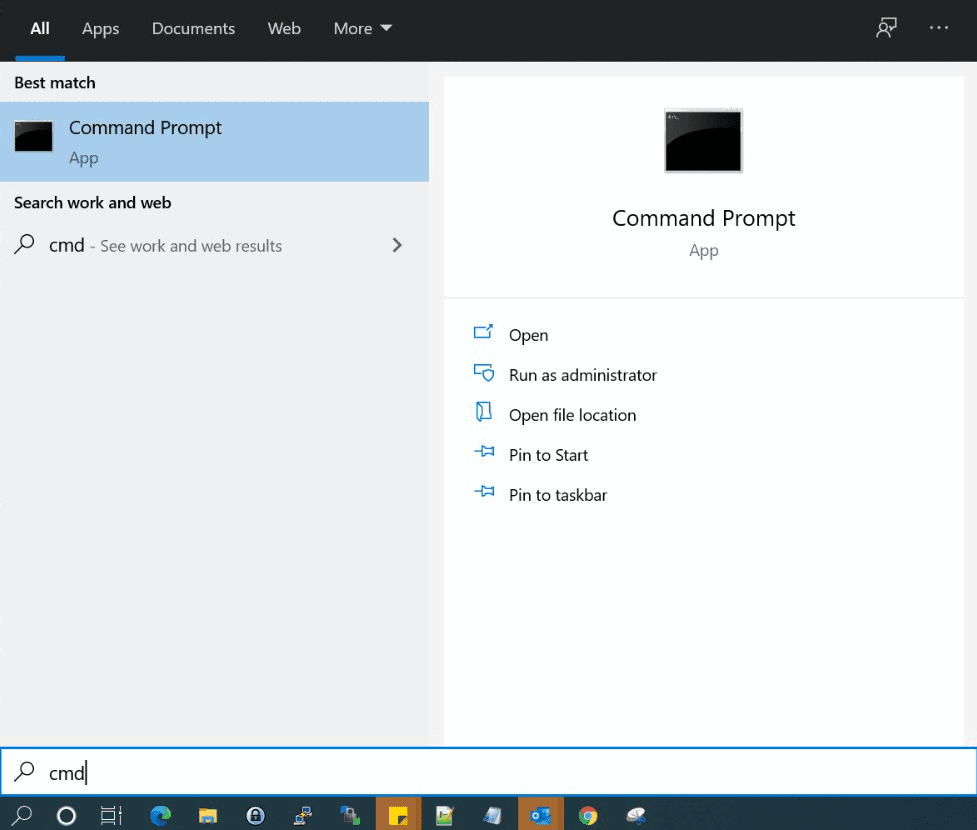
To launch tracert, click on the Start icon, then type command prompt into the search bar.
When the command prompt icon appears, give it a click. In the subsequent window, type tracert followed by the URL of the website in question, for example:
tracert website.com
Next, press the Enter key on your keyboard. The command prompt will then display the IP address of website.com in a bracket alongside the URL.
2. Run Notepad as an Administrator
In Windows XP and earlier, editing your hosts file was relatively straightforward. You could simply add an exception to your antivirus, open the hosts file in the Notepad application, and then make your changes.
However, Windows 10 added some security measures to prevent users from accidentally modifying this important file. This makes sense, as editing the hosts file could potentially make your favorite websites inaccessible. In the worst-case scenario, it might even make the Internet unusable on your machine.
In Windows 10, the hosts information is stored in a plain text file in the internal System32 folder. While you should have no problems opening this file, when you try to save your edits you might encounter the following error: “You don’t have permission to save in this location. Contact the administrator to obtain permission”.
If you want to save your changes, you’ll need administrator access. The quickest way to gain this is to use a text application that has elevated privileges. In this post, we’ll be using Notepad.
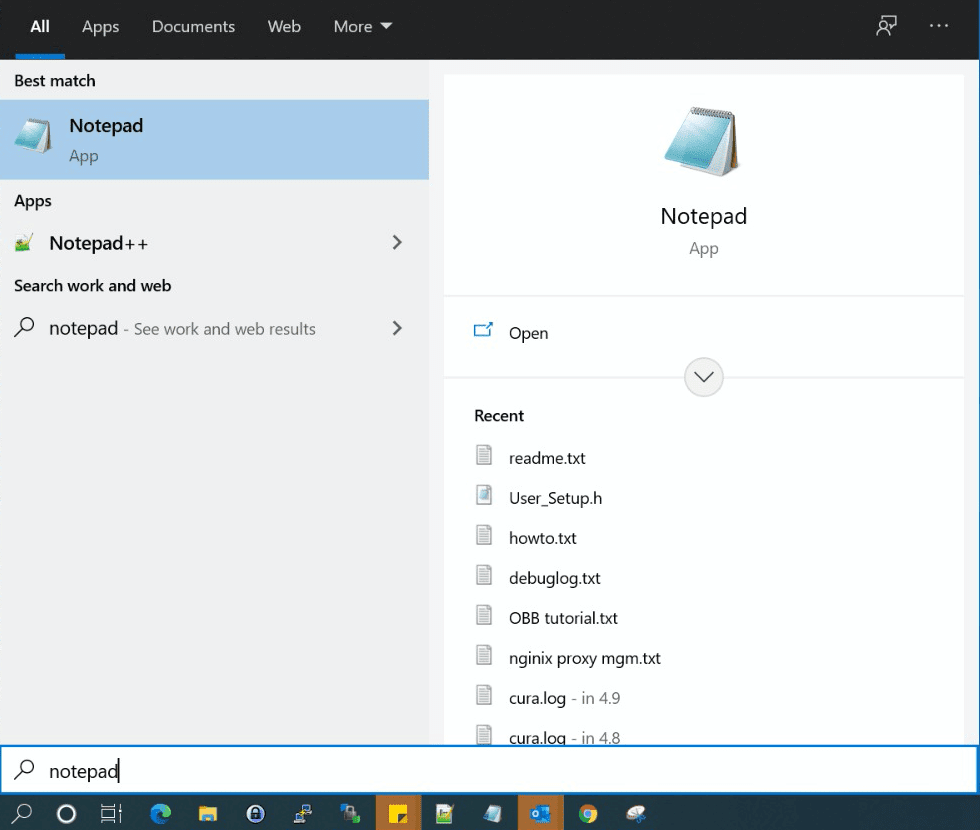
To start, press the Windows key and type Notepad into the search field.
Next, right-click on Notepad and select Run as Administrator. Windows 10 will now ask whether you want to allow this application to make changes to your device. Select Yes.

This launches a privileged instance of the Notepad application. Note that you may be asked to enter an administrative password in order to re-authenticate yourself.
3. Make Your Changes
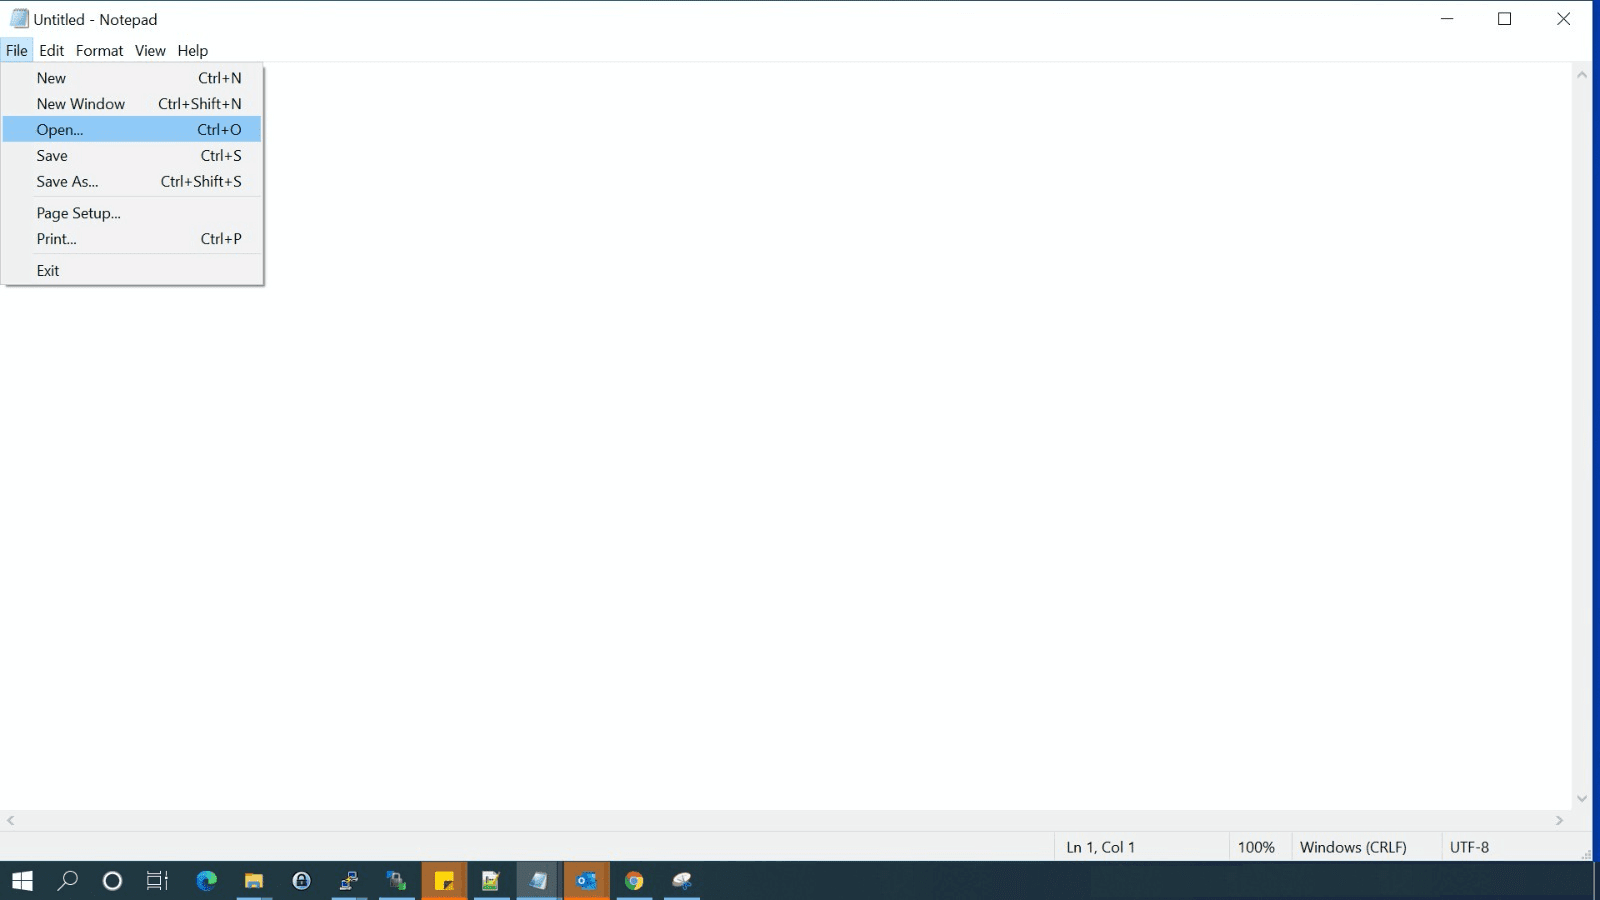
Once you have Notepad open in administrator mode, you’re ready to edit the hosts file. In the Notepad toolbar, select File > Open.
Then, navigate to C:WindowsSystem32driversetchosts. Alternatively, you can copy/paste this file path into the address bar and then press Enter.
If you don’t see the hosts file in your /etc directory, you may need to change the file filter type. In Notepad, open the File name dropdown and choose All Files.
Once you have the hosts file in your sights, you’re ready to edit. If this is your first time opening this file, you’ll see some text describing the file’s purpose and how to make modifications, for example:
# This file contains the mappings of IP addresses to host names. Each

# entry should be kept on an individual line. The IP address should

# be placed in the first column followed by the corresponding host name.

# The IP address and the host name should be separated by at least one

# space.
You can now add your custom IP address and hostname to the end of this file. If you’re adding multiple entries, remember to place each entry on a separate line. Once you’re happy with your changes, you can save and close the hosts file.
To make sure your computer recognizes your edits, it’s a good idea to flush the DNS cache. If you don’t currently have a command prompt window open, click on the Windows button and search for command prompt. In the subsequent window, type the following:
ipconfig /flushdnsTo flush the DNS cache, press the Enter key. Once this process is complete, Windows 10 should be using your new hosts file settings. Alternatively, restarting your computer should have the same effect.
How To Lock Your Hosts File on Windows 10
By default, you cannot edit the hosts file without administrator privileges. However, it isn’t impossible to acquire these privileges, especially for tech-savvy individuals.
If you’re worried about unauthorized edits, you can add an extra layer of security to your hosts file. For example, you might be using the hosts file to prevent staff from accessing social media sites and you’re concerned about them bypassing your restrictions. You might also be worried about hosts file hijack attacks.
In these scenarios, you might want to consider locking your hosts file. While this security precaution isn’t bullet-proof, it will dissuade third parties from tampering with the file.
To lock your hosts file, navigate to C:WindowsSystem32driversetchosts. Then, right-click on the file and select Properties.
In the Properties window, mark the hosts file as Read-only. This will lock the file and prevent anyone from modifying it.
If you want to remove this lock at any point, simply navigate back to the Properties window. You can then remove this Read-only restriction.
How To Reset Your Windows 10 Hosts File
You can always remove individual entries from your hosts file. Simply open the file in Notepad and delete the line in question.
However, sometimes you may need to revert your hosts file to its original state. For example, you might have made multiple adjustments to your file and don’t particularly want to unpick each of these changes manually. You may also be encountering strange redirects, which suggests that your hosts file has become corrupted.
To reset your hosts file back to its original state, open your File Explorer. In the address bar, either type or copy/paste the following:
%systemroot% system32driversetcThen, press the Enter key on your keyboard. At this point, we recommend renaming your original hosts file. This file will then serve as a backup, just in case you encounter any issues with your new hosts file.You may be required to take ownership of this file first, depending on how privileges are configured on your computer.
The next step is creating a new default hosts file. To achieve this, create a text file in the %WinDir%system32driversetc directory, and name this file hosts.
You can now copy/paste the text from Windows’ default hosts file, which is provided by Microsoft:
# Copyright (c) 1993-2009 Microsoft Corp.

#

# This is a sample HOSTS file used by Microsoft TCP/IP for Windows.

#

# This file contains the mappings of IP addresses to host names. Each

# entry should be kept on an individual line. The IP address should

# be placed in the first column followed by the corresponding host name.

# The IP address and the host name should be separated by at least one

# space.

#

# Additionally, comments (such as these) may be inserted on individual

# lines or following the machine name denoted by a '#' symbol.

#

# For example:

#

# 102.54.94.97 rhino.acme.com # source server

# 38.25.63.10 x.acme.com # x client host

# localhost name resolution is handled within DNS itself.

# 127.0.0.1 localhost

# ::1 localhost
Save this file. As always, you may need to reset your computer or flush your DNS cache in order for these changes to take effect.
Worried about testing DNS-related changes? 😅Don’t sweat it. 😄 Learn how to use your local hosts file to preview edits without putting your site at risk 👇Click to Tweet
Summary
Making changes to your DNS records can feel like a stressful endeavor. However, as we discussed in this article, you can safely test your local hosts file without putting your live records at risk. In Windows 10, you can do this by finding your IP address, running Notepad as an administrator, then making your changes.
If you enjoyed this tutorial, then you’ll love our support. All of our hosting plans include 24/7 support from our world-class WordPress developers and engineers. We can provide the help you need to succeed, regardless of whether it’s 2:00 a.m. or 2:00 p.m.
Get all your applications, databases and WordPress sites online and under one roof. Our feature-packed, high-performance cloud platform includes:
- Easy setup and management in the MyKinsta dashboard
- 24/7 expert support
- The best Google Cloud Platform hardware and network, powered by Kubernetes for maximum scalability
- An enterprise-level Cloudflare integration for speed and security
- Global audience reach with up to 35 data centers and 275 PoPs worldwide
Test it yourself with $20 off your first month of Application Hosting or Database Hosting. Explore our plans or talk to sales to find your best fit.
The Domain Name System (DNS) is the key to locating a website on the Internet. With so much at stake, making changes to your DNS records can be a nerve-wracking experience.
Fortunately, there is a way to test DNS-related changes without editing your live records. By modifying your local hosts file, you can preview how your domains will function on a new server without putting your live site at risk.
In this post, we’ll explore what hosts files are and share some reasons why you may want to modify them. We’ll then show you how to edit hosts files on Windows 10. Let’s get started!
An Introduction to the Hosts File
A hosts file is a local plain text file that maps your server or hostnames to Internet Protocol (IP) addresses. Every time Windows 10 connects over a network using a hostname, it’ll refer to the hosts file. If Windows finds an entry in this file, then it’ll contact the specified server.
If it doesn’t find a relevant hostname, Windows 10 will resolve the hostname using a Domain Name Service (DNS). This is the process used to obtain the server IP address behind a domain name.
Each hosts file entry has its own line, with the numerical IP address, a space or a tab character, and finally the hostname or domain. Let’s look at an example of a hosts file entry:
120.0.0.0 example.com #Example
In the above example, the first section denotes the IP address where this request will be redirected to (120.0.0.0). The second section designates the location that we want to redirect a request from (example.com). The final section specifies a comment for this entry. We‘re using a hashtag to tell Windows 10 to ignore the comment when reading the local hosts file.
After adding the domain information, your system will resolve to the IP address you specified. In the above example, we’re associating the domain name example.com with the IP address 120.0.0.0.
It’s worth noting that some software employs its own techniques to look up hostnames. This means there’s always a chance that it may ignore the hosts file completely.
DNS is the key to locating a website. 🔑 With so much at stake, making changes to your DNS records can be a nerve-wracking experience. 😰 Learn how to safely modify your host files in this guide 👇Click to Tweet
What Happens When You Modify a Hosts File?
When you modify your hosts file, it causes your local machine to look directly at the IP address specified by you. For example, if you wanted to point mywebsite.com to the IP address 1.2.3.4.5, you’d add the following:
1.2.3.4.5 mywebsite.com
Now, every time you try to visit mywebsite.com, you’ll find yourself at 1.2.3.4.5 instead. By editing your hosts file, you can override the DNS for a domain on your specific machine only.
In this post, we’ll be focusing on opening your hosts file and adding individual entries. However, it is also possible to replace this file entirely. This can be an easy way to block malicious or spammy websites in bulk. There are even sites that have published ready-made lists of IP addresses associated with advertisements, hijackers, page counters, and other unwanted connections.
You can download one of these pre-prepared lists and copy/paste its contents into your existing hosts file. Alternatively, you might replace your native hosts file with the newly-downloaded file. If you do opt for the latter, then we recommend keeping a copy of your original file, just in case you encounter any strange behavior with its replacement.
Why You May Want To Modify the Windows 10 Hosts File
You can use your hosts file to test DNS-related changes without having to alter your DNS records. For example, imagine you’ve migrated to a new server. Before updating your DNS settings, it’s a good idea to verify how your domains will look and function on this new server.
However, if you enter your current domain name, then it’ll resolve to your old server. In this scenario, you can modify your hosts file to point the domain to the new server’s IP.
This file can also help test how your website looks on a different server when your DNS hasn’t propagated yet. At Kinsta we provide a temporary URL (sitename.kinsta.cloud), but this cannot mimic everything. For example, by default, a CDN won’t work on a temporary URL.
You can also use the hosts file to block certain websites. This can be useful for employers who want to ensure that their staff isn’t wasting time on unauthorized sites such as Facebook, Twitter, or YouTube.
While there are fewer technical ways to block access to unauthorized websites, many of these methods are relatively easy to reverse. For example, a tech-savvy child may have little problems bypassing parental controls, but modifying the hosts file requires a higher level of technical knowledge.
You might take this a step further and block all websites that serve up advertisements. If you map the addresses of all the major ad providers to an unused internal IP address, then Windows 10 will be unable to resolve these addresses. You can then enjoy the web, advertisement-free.
Finally, some malicious third parties may set up redirects by altering your hosts file. This is known as a hosts file hijack. If you’re encountering strange redirects, then it may be worth checking your hosts file for suspicious entries.
How To Make Firefox Honor the Windows 10 Hosts File
If you’re using Firefox for Windows, then Mozilla’s browser resolves IP addresses slightly differently compared to the other major browsers. By default, Firefox uses DNS-over-HTTPS (DoH).
This is a protocol for performing remote DNS resolution via HTTPS. With this setting enabled, Firefox will use the DOH server as the primary name resolver, rather than checking your local hosts file or DNS resolver.
As a result, the website displayed will always point to the IP address that the Internet deems authoritative for that domain. Even if you edit your hosts file, your changes won’t have any effect if the DoH server returns a working IP address.
There are plenty of great web browsers that are compatible with Windows 10 and that honor the hosts file out-of-the-box. However, if you want to stick with Mozilla Firefox, you can always disable DoH.
To start, select the Menu button in the Mozilla Firefox browser and go to Settings.
In the subsequent tab, make sure General is selected. Then, scroll to the Network Settings section and click on Settings.
In the popup that appears, scroll to Enable DNS over HTTPS. Then, uncheck the accompanying box.
To save your changes, click on OK and then exit this window. From this point onwards, Firefox will honor any custom addresses that you add to your Windows 10 hosts file.
How To Edit Your Windows 10 Hosts File (In 3 Steps)
There are many reasons why you might need to edit this important file. Regardless of whether you want to block advertising networks, verify a new domain, or perform other DNS-related tests, the process will be exactly the same.
Let’s look at how to add custom addresses to the Windows 10 hosts file.
1. Find Your IP Address
Often, you’ll want to change how Windows 10 resolves the IP address of a site that you own. To make this modification, you’ll need to know your website’s IP address.
If you’re a Kinsta customer, you can retrieve this information easily using the MyKinsta dashboard.
Find the domain that you want to work with and click on it. On the next screen, you’ll find some information about this domain, including your IP address.
Alternatively, you might want to modify how Windows 10 resolves a third-party IP address. You can retrieve any website’s IP address using tracert.
Tracert is typically used as a network diagnostic tool to help resolve network connectivity issues. However, you can also use it to trace the paths a data packet takes from its source to its destination, which will reveal the IP address of the destination website.
To launch tracert, click on the Start icon, then type command prompt into the search bar.
When the command prompt icon appears, give it a click. In the subsequent window, type tracert followed by the URL of the website in question, for example:
tracert website.com
Next, press the Enter key on your keyboard. The command prompt will then display the IP address of website.com in a bracket alongside the URL.
2. Run Notepad as an Administrator
In Windows XP and earlier, editing your hosts file was relatively straightforward. You could simply add an exception to your antivirus, open the hosts file in the Notepad application, and then make your changes.
However, Windows 10 added some security measures to prevent users from accidentally modifying this important file. This makes sense, as editing the hosts file could potentially make your favorite websites inaccessible. In the worst-case scenario, it might even make the Internet unusable on your machine.
In Windows 10, the hosts information is stored in a plain text file in the internal System32 folder. While you should have no problems opening this file, when you try to save your edits you might encounter the following error: “You don’t have permission to save in this location. Contact the administrator to obtain permission”.
If you want to save your changes, you’ll need administrator access. The quickest way to gain this is to use a text application that has elevated privileges. In this post, we’ll be using Notepad.
To start, press the Windows key and type Notepad into the search field.
Next, right-click on Notepad and select Run as Administrator. Windows 10 will now ask whether you want to allow this application to make changes to your device. Select Yes.
This launches a privileged instance of the Notepad application. Note that you may be asked to enter an administrative password in order to re-authenticate yourself.
3. Make Your Changes
Once you have Notepad open in administrator mode, you’re ready to edit the hosts file. In the Notepad toolbar, select File > Open.
Then, navigate to C:WindowsSystem32driversetchosts. Alternatively, you can copy/paste this file path into the address bar and then press Enter.
If you don’t see the hosts file in your /etc directory, you may need to change the file filter type. In Notepad, open the File name dropdown and choose All Files.
Once you have the hosts file in your sights, you’re ready to edit. If this is your first time opening this file, you’ll see some text describing the file’s purpose and how to make modifications, for example:
# This file contains the mappings of IP addresses to host names. Each

# entry should be kept on an individual line. The IP address should

# be placed in the first column followed by the corresponding host name.

# The IP address and the host name should be separated by at least one

# space.
You can now add your custom IP address and hostname to the end of this file. If you’re adding multiple entries, remember to place each entry on a separate line. Once you’re happy with your changes, you can save and close the hosts file.
To make sure your computer recognizes your edits, it’s a good idea to flush the DNS cache. If you don’t currently have a command prompt window open, click on the Windows button and search for command prompt. In the subsequent window, type the following:
ipconfig /flushdnsTo flush the DNS cache, press the Enter key. Once this process is complete, Windows 10 should be using your new hosts file settings. Alternatively, restarting your computer should have the same effect.
How To Lock Your Hosts File on Windows 10
By default, you cannot edit the hosts file without administrator privileges. However, it isn’t impossible to acquire these privileges, especially for tech-savvy individuals.
If you’re worried about unauthorized edits, you can add an extra layer of security to your hosts file. For example, you might be using the hosts file to prevent staff from accessing social media sites and you’re concerned about them bypassing your restrictions. You might also be worried about hosts file hijack attacks.
In these scenarios, you might want to consider locking your hosts file. While this security precaution isn’t bullet-proof, it will dissuade third parties from tampering with the file.
To lock your hosts file, navigate to C:WindowsSystem32driversetchosts. Then, right-click on the file and select Properties.
In the Properties window, mark the hosts file as Read-only. This will lock the file and prevent anyone from modifying it.
If you want to remove this lock at any point, simply navigate back to the Properties window. You can then remove this Read-only restriction.
How To Reset Your Windows 10 Hosts File
You can always remove individual entries from your hosts file. Simply open the file in Notepad and delete the line in question.
However, sometimes you may need to revert your hosts file to its original state. For example, you might have made multiple adjustments to your file and don’t particularly want to unpick each of these changes manually. You may also be encountering strange redirects, which suggests that your hosts file has become corrupted.
To reset your hosts file back to its original state, open your File Explorer. In the address bar, either type or copy/paste the following:
%systemroot% system32driversetcThen, press the Enter key on your keyboard. At this point, we recommend renaming your original hosts file. This file will then serve as a backup, just in case you encounter any issues with your new hosts file.You may be required to take ownership of this file first, depending on how privileges are configured on your computer.
The next step is creating a new default hosts file. To achieve this, create a text file in the %WinDir%system32driversetc directory, and name this file hosts.
You can now copy/paste the text from Windows’ default hosts file, which is provided by Microsoft:
# Copyright (c) 1993-2009 Microsoft Corp.

#

# This is a sample HOSTS file used by Microsoft TCP/IP for Windows.

#

# This file contains the mappings of IP addresses to host names. Each

# entry should be kept on an individual line. The IP address should

# be placed in the first column followed by the corresponding host name.

# The IP address and the host name should be separated by at least one

# space.

#

# Additionally, comments (such as these) may be inserted on individual

# lines or following the machine name denoted by a '#' symbol.

#

# For example:

#

# 102.54.94.97 rhino.acme.com # source server

# 38.25.63.10 x.acme.com # x client host

# localhost name resolution is handled within DNS itself.

# 127.0.0.1 localhost

# ::1 localhost
Save this file. As always, you may need to reset your computer or flush your DNS cache in order for these changes to take effect.
Worried about testing DNS-related changes? 😅Don’t sweat it. 😄 Learn how to use your local hosts file to preview edits without putting your site at risk 👇Click to Tweet
Summary
Making changes to your DNS records can feel like a stressful endeavor. However, as we discussed in this article, you can safely test your local hosts file without putting your live records at risk. In Windows 10, you can do this by finding your IP address, running Notepad as an administrator, then making your changes.
If you enjoyed this tutorial, then you’ll love our support. All of our hosting plans include 24/7 support from our world-class WordPress developers and engineers. We can provide the help you need to succeed, regardless of whether it’s 2:00 a.m. or 2:00 p.m.
Get all your applications, databases and WordPress sites online and under one roof. Our feature-packed, high-performance cloud platform includes:
- Easy setup and management in the MyKinsta dashboard
- 24/7 expert support
- The best Google Cloud Platform hardware and network, powered by Kubernetes for maximum scalability
- An enterprise-level Cloudflare integration for speed and security
- Global audience reach with up to 35 data centers and 275 PoPs worldwide
Test it yourself with $20 off your first month of Application Hosting or Database Hosting. Explore our plans or talk to sales to find your best fit.
Файл hosts используется для сопоставления доменных имен (имен хостов) с IP-адресами. Это простой текстовый файл, используемый всеми операционными системами, включая Linux, Windows и macOS.
Файл hosts имеет приоритет над DNS. Когда вы вводите доменное имя веб-сайта, который вы хотите посетить, доменное имя должно быть преобразовано в соответствующий IP-адрес. Операционная система сначала проверяет свой файл hosts на наличие соответствующего домена, и, если запись для домена отсутствует, она запрашивает у настроенных DNS-серверов разрешение указанного имени домена. Это влияет только на компьютер, на котором вносятся изменения, а не на то, как домен разрешается во всем мире.
Использование файла hosts для сопоставления домена с IP-адресом особенно полезно, когда вы хотите протестировать свой веб-сайт без изменения настроек DNS домена. Например, вы переносите свой веб-сайт на новый сервер и хотите проверить его работоспособность, прежде чем указывать домен на новый сервер. Файл hosts также можно использовать для блокировки веб-сайтов на вашем компьютере.
Формат файла хостов
Записи в файле hosts имеют следующий формат:
IPAddress DomainName [DomainAliases]
IP-адрес и доменные имена должны быть разделены хотя бы одним пробелом или табуляцией. Строки, начинающиеся с, # являются комментариями и игнорируются.
Чтобы добавить запись в файл hosts, просто откройте файл в текстовом редакторе. Ниже приведен пример файла hosts:
# Static table lookup for hostnames.
# See hosts(5) for details.

127.0.1.1 linuxize.desktop linuxize
127.0.0.1 localhost
Изменения в файле hosts вступают в силу немедленно, за исключением случаев, когда записи DNS кэшируются приложениями.
Чтобы отменить изменения, просто откройте файл и удалите добавленные вами строки.
Изменить файл хостов в Linux
В Linux полный путь к файлу /etc/hosts .
Приведенные ниже инструкции действительны для всех дистрибутивов Linux, включая Ubuntu, CentOS, RHEL, Debian и Linux Mint:
-
В окне терминала откройте файл hosts с помощью вашего любимого текстового редактора :
sudo nano /etc/hostsПри появлении запроса введите свой пароль sudo.
-
Прокрутите вниз до конца файла и добавьте новые записи:


Изменить файл хостов в Windows
В Windows полный путь к файлу c:WindowsSystem32Driversetchosts . Приведенные ниже инструкции действительны для Windows 10 и Windows 8.
-
Нажмите клавишу Windows и введите Блокнот в поле поиска.
-
Щелкните правой кнопкой мыши значок «Блокнот» и выберите «Запуск от имени администратора».
-
В Блокноте нажмите Файл, затем Открыть. В поле Имя файла вставьте
c:WindowsSystem32driversetchosts. -
Прокрутите вниз до конца файла и добавьте новые записи:
-
Сохраните изменения, нажав
File>Save.

Изменить файл хостов в macOS
В macOS полный путь к файлу /etc/hosts . Приведенные ниже инструкции действительны для всех версий MacOS.
-
В окне терминала откройте файл hosts с помощью вашего любимого текстового редактора:
sudo nano /etc/hostsПри появлении запроса введите свой административный пароль.
-
Прокрутите вниз до конца файла и добавьте новые записи:
-
Сохраните изменения и очистите кэш DNS:
dscacheutil -flushcache

Вывод
Файл hosts позволяет вам установить IP-адрес данного доменного имени.
Файл hosts. Секреты и правильное использование.
Что такое файл hosts? Таким вопросом задаются пользователи, которые делают свои первые шаги в освоении компьютера. Такой файл существует практически во всех операционных системах (включая мобильные ОС). В данной статье вы узнаете много интересного о его функциях и возможностях. Любой пользователь ПК должен иметь хоть какое либо представление о файле хост.
Содержание
- 1 Файл Hosts. Что это?
- 1.1 Где находится файл hosts?
- 1.2 Происхождение и принцип работы
- 1.3 Оригинальные файлы hosts. Содержание файлов hosts по умолчанию
- 1.4 Синтаксис или правила редактирования файла hosts
- 1.5 Как изменить файл hosts?
- 1.6 Как использовать файл hosts в своих целях?
- 1.7 Как создать свой File Hosts?
- 1.8 Итоги
Файл Hosts. Что это?
Мало кто из пользователей персональных компьютеров знают о существовании такого файла. А между тем, знающие люди используют этот файл в своих целях. Например те кто пишут вирусы. Они с помощью редактирования файла Hosts блокируют доступ к определенным сайтам. Не так давно было много жалоб пользователей, которые не могли зайти на свою страницу в социальной сети ВКонтакте, Одноклассники и так далее. Именно файл хост использовался во многих случаях для блокировки этих сайтов.
Файл hosts — это текстовый файл, который содержит базу данных доменных имен (URL’ов) сопоставляемых их IP адресам. Адрес любого домена первоначально имеет свой ip-адрес. На одном ip-адресе может быть расположено несколько сайтов с разными доменами (url адресами). По умолчанию в файле hosts прописан лишь один ip-адрес — 127.0.0.1, зарезервированный для локального (вашего) компьютера, который именуется как localhost.
Где находится файл hosts?
В разных версиях Windows, а также других ОС, хост файл располагался в разных директориях. Для наглядности приведу таблицу из Википедии, в которой указано расположение файла в разных ОС.
| Операционная система | Версии | Расположение |
|---|---|---|
| UNIX и UNIX-подобные | /etc/hosts |
|
| Windows | 95, 98, ME | %windir% |
| NT, 2000, XP, 2003, Vista, 7, 8, 10 | %SystemRoot%system32driversetchosts, его расположение может быть переопределено в ключе реестра HKEY_LOCAL_MACHINESYSTEMCurrentControlSetservicesTcpipParametersDataBasePath, в котором содержится путь к папке. | |
| Windows Mobile | Ветка реестра HKEY_LOCAL_MACHINECommTcpipHosts | |
| Mac OS< | 9 и более ранние | Системная папка: Preferences или просто в системной папке |
| Mac OS X и iOS | Все версии Mac OS 10 | /private/etc/hosts или /etc/hosts (/etc на OS X — символьная ссылка к /private/etc) |
| Novell NetWare | SYS:etchosts |
|
| OS/2 и eComStation | "bootdrive":mptnetc |
|
| Symbian OS | 6.1—8.1 | C:systemdatahosts |
| 9.1+ | Z:private10000882hosts |
|
| Android | /system/etc/hosts |
Происхождение и принцип работы
Когда и как появился файл хостс? С самого начала появления компьютеров и локальной сети, для удобства пользователей, хостам присваивались имена.
Хост (от англ. host — «хозяин, принимающий гостей») — любое устройство, предоставляющее сервисы формата «клиент-сервер» в режиме сервера по каким-либо интерфейсам и уникально определённое на этих интерфейсах. В более частном случае, под хостом могут понимать любой компьютер, сервер, подключённый к локальной или глобальной сети.
Чтобы сопоставить имя хоста с ip адресом отправлялся запрос на главный хост, который в ответ направлял список всех имен и адресов к ним. Host file регулярно рассылался всем подключенным к сети компьютерам. Со временем, из-за развития глобальной сети значительно возросло количество пользователей, а значит и хостов и серверов. Файл хост стал разрастаться и стали появляться огромные задержки при регистрации и получении имен новыми компьютерами в сети. Проблему помогла решить служба доменных имен — DNS.
DNS (англ. Domain Name System — система доменных имён) — компьютерная распределённая система для получения информации о доменах. Чаще всего используется для получения IP-адреса по имени хоста (компьютера или устройства)
Необходимость в рассылке файла hosts компьютерам отпала. Теперь когда пользователь в адресной строке браузера набирает url-адрес какого либо сайта, происходит следующее:
- Так как запрос к файлу hosts имеет приоритет перед DNS службой, браузер сначала обращается именно к нашему файлу и проверяет не совпадает ли ip адрес запрашиваемого сайта с ip адресом localhost, то есть 128.0.0.1
- Если не совпадает, то проверяется файл hosts на наличие запрашиваемого адреса.
- Если адрес (имя хоста) в наличии, то идет переход по указанному хосту (ip-адресу)
- Если запрашиваемый адрес не найден, то сначала идет обращение к кешу DNS распознавателя, а потом уже соответственно к DNS серверу
- Если запрашиваемый сайт существует, то DNS сервер преобразовывает url адрес сайта в ip адрес и браузер уже переходит по данному ip адресу и загружает его содержимое.
Здесь важное замечание — в отличие от DNS сервера, файл hosts полностью контролируется пользователем (администратором) компьютера и имеет приоритет перед DNS.
Давайте узнаем, что вообще содержится в этом файле.
Оригинальные файлы hosts. Содержание файлов hosts по умолчанию
Как бы странно это не звучало, но пустой файл хост это тоже правильный оригинальный файл. Вы это сами поймете когда дальше в статье узнаете про правила редактирования данного файла. А пока все же приведу то содержание, которое идет как говорится с коробки.
Нажмите на спойлеры, для раскрытия.
Windows XP
# Copyright (c) 1993-1999 Microsoft Corp.
#
# This is a sample HOSTS file used by Microsoft TCP/IP for Windows.
#
# This file contains the mappings of IP addresses to host names. Each
# entry should be kept on an individual line. The IP address should
# be placed in the first column followed by the corresponding host name.
# The IP address and the host name should be separated by at least one
# space.
#
# Additionally, comments (such as these) may be inserted on individual
# lines or following the machine name denoted by a '#' symbol.
#
# For example:
#
# 102.54.94.97 rhino.acme.com
# source server
# 38.25.63.10 x.acme.com # x client host
# 127.0.0.1 localhost
Windows Vista
# Copyright (c) 1993-2006 Microsoft Corp.
#
# This is a sample HOSTS file used by Microsoft TCP/IP for Windows.
#
# This file contains the mappings of IP addresses to host names. Each
# entry should be kept on an individual line. The IP address should
# be placed in the first column followed by the corresponding host name.
# The IP address and the host name should be separated by at least one
# space.
#
# Additionally, comments (such as these) may be inserted on individual
# lines or following the machine name denoted by a '#' symbol.
#
# For example:
#
# 102.54.94.97 rhino.acme.com # source server
# 38.25.63.10 x.acme.com # x client host
# 127.0.0.1 localhost
# ::1 localhost
Windows 7, 8, 10
# Copyright (c) 1993-2009 Microsoft Corp.
#
# This is a sample HOSTS file used by Microsoft TCP/IP for Windows.
#
# This file contains the mappings of IP addresses to host names. Each
# entry should be kept on an individual line. The IP address should
# be placed in the first column followed by the corresponding host name.
# The IP address and the host name should be separated by at least one
# space.
#
# Additionally, comments (such as these) may be inserted on individual
# lines or following the machine name denoted by a '#' symbol.
#
# For example:
#
# 102.54.94.97 rhino.acme.com # source server
# 38.25.63.10 x.acme.com # x client host
# localhost name resolution is handled within DNS itself.
# 127.0.0.1 localhost
# ::1 localhost
Синтаксис или правила редактирования файла hosts
- Каждый элемент должен располагаться на отдельной строке т.е. при дописывании нового адреса обязательно переходим на новую строку (жмем Enter);
- IP-адрес должен начинаться с первой позиции строки (скажем так в начале предложения), за ним (в той же строке) должно следовать соответствующий адрес ресурса (имя хоста);
- IP-адрес и имя ресурса должны быть разделены между собой хотя бы одним пробелом;
Комментарии должны разделяться символом # (решётка); - Если комментарии используются в строках соответствия доменных имен, они должны следовать за именем узла и отделяться от него символом # (решётка);
Все что идет в одной строке после решетки # это не правила. Это просто комментарии и они ничего не значат и не делают.
Как изменить файл hosts?
Рассмотрим изменение файла hosts на примере Windows 10. В Windows 10 этот файл расположен в директории: C:WindowsSystem32driversetc 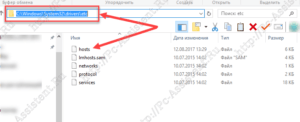
Если такого файла там нет, то нужно в параметрах папок установить галочку в опцию Показывать скрытые файлы, папки и диски. О том как это сделать мы писали в этой публикации.
Файл hosts не имеет своего расширения, но его можно редактировать с помощью простого блокнота. Для этого:
Иногда может понадобиться запуск Блокнота с правами администратора.
Как использовать файл hosts в своих целях?
Мы с вами разобрались как изменить файл hosts, а также ознакомились с правилами его редактирования. Теперь приведу вам пару примеров по использованию хост файла для своей пользы.
Например можно уменьшить количество запросов к DNS серверам тех сайтов, которые вы ежедневно, часто посещаете. Это ускорит их загрузку. Пусть это будут поисковики yandex.ru, google.ru
- Откройте файл hosts в программе блокнот (либо в любом другом текстовом редакторе).
- В самом конце добавьте вот такие строчки:
216.58.206.3 google.ru
216.58.206.14 google.com
77.88.55.55 yandex.ru - Сохраните изменения.
Для такого трюка нам понадобятся только IP адреса нужных нам сайтов. Их можно узнать с помощью сервиса 2ip.ru
Здесь мы воспользовались тем, что файл хост имеет приоритет перед DNS серверами. Другими словами браузер проверив хост файл и увидев там адрес сайта, сразу переходит на страницу не обращаясь к DNS-кешу.
Также мы можем и заблокировать доступ к нежелательному для нас сайту. Пусть это будет сайт FaceBook. Для этого нужно в конце файла дописать строки:127.0.0.1 www.facebook.com
127.0.0.1 facebook.com
Теперь сайт facebook не будет у вас открываться в браузере.
В итоге после сделанных изменений файл hosts будет выглядеть вот так:
Спойлер (Нажмите чтобы раскрыть)
# Copyright (c) 1993-2009 Microsoft Corp.
#
# This is a sample HOSTS file used by Microsoft TCP/IP for Windows.
#
# This file contains the mappings of IP addresses to host names. Each
# entry should be kept on an individual line. The IP address should
# be placed in the first column followed by the corresponding host name.
# The IP address and the host name should be separated by at least one
# space.
#
# Additionally, comments (such as these) may be inserted on individual
# lines or following the machine name denoted by a '#' symbol.
#
# For example:
#
# 102.54.94.97 rhino.acme.com # source server
# 38.25.63.10 x.acme.com # x client host
# localhost name resolution is handled within DNS itself.
# 127.0.0.1 localhost
# ::1 localhost
216.58.206.3 google.ru
216.58.206.14 google.com
77.88.55.55 yandex.ru
127.0.0.1 www.facebook.com
127.0.0.1 facebook.com
Часто вирусы используют ваш хост файл для блокировки популярных социальных сетей, сайтов компаний выпускающих антивирусные программы и поисковиков. Вирус, проникая в вашу операционную систему, добавляет туда строки для блокировки ресурсов. Поэтому, если у вас вдруг, не получается заходить на популярные интернет ресурсы, то не лишним будет проверить содержание вашего хост файла. При проверке обязательно прокрутите ползунок вертикальной прокрутки до самого низа. Часто вирусы добавляют правила после многочисленных пробелов либо переводов строки.
Часто вирусы также меняет атрибуты самого файла, а именно устанавливает атрибуты Системный и Скрытый (о том как снять эти атрибуты подробно было описано в этой статье). Из-за этого возможно вы не найдете файл hosts в папке C:WINDOWSsystem32driversetc, но это можно исправить сняв атрибуты.
Как создать свой File Hosts?
Если вы, все таки, не смогли найти у себя на компьютере файл хост, то его можно создать самому. Для этого:
- Создайте простой текстовый файл с расширением .txt.
- Далее нажмите на файле правой кнопкой мыши и выберите из контекстного меню пункт Переименовать.
- Назовите файл hosts и удалите в конце названия расширение .txt(если вы, при переименовании не видите расширение файла, то прочтите вот эту статью).
- Теперь осталось добавить в него содержание и сохранить файл в директории C:WINDOWSsystem32driversetc (в зависимости от ОС директория будет разная)
Итоги
Статья получилась объемная, но зато очень полезная для начинающих пользователей персонального компьютера. Будет круто, если кто ни будь использует полученные из публикации знания на практике. Жду ваших комментариев!
Если вам понравилась эта статья, то пожалуйста, оцените её и поделитесь ею со своими друзьями на своей странице в социальной сети.
 (8 оценок, среднее: 5,00 из 5)
![]() Загрузка…
Загрузка…