About username changes
You can change your username to another username that is not currently in use. If the username you want is not available, consider other names or unique variations. Using a number, hyphen, or an alternative spelling might help you find a similar username that’s still available.
If you hold a trademark for the username, you can find more information about making a trademark complaint on our Trademark Policy page.
If you do not hold a trademark for the name, you can choose another username or keep your current username. GitHub Support cannot release the unavailable username for you. For more information, see «Changing your username.»
After changing your username, your old username becomes available for anyone else to claim. Most references to your repositories under the old username automatically change to the new username. However, some links to your profile won’t automatically redirect.
GitHub cannot set up redirects for:
- @mentions using your old username
- Links to gists that include your old username
If you’re a member of an enterprise with managed users, you cannot make changes to your username. For more information, see «Types of GitHub accounts.»
If the account namespace includes any public repositories that contain an action listed on GitHub Marketplace, or that had more than 100 clones or more than 100 uses of GitHub Actions in the week prior to you renaming your account, GitHub permanently retires the old owner name and repository name combination (OLD-OWNER/REPOSITORY-NAME) when you rename your account. If you try to create a repository using a retired owner name and repository name combination, you will see the error: «The repository <REPOSITORY_NAME> has been retired and cannot be reused.»
If the account namespace includes any packages or container images stored in a GitHub Packages registry, GitHub transfers the packages and container images to the new namespace. By renaming your account, you may break projects that depend on these packages. If the namespace includes any container images that are public and have more than 5,000 downloads, the full former name of these container images (OLD-NAMESPACE/IMAGE-NAME) is permanently retired when you rename the account to ensure the container image name cannot be reused in the future.
Repository references
After you change your username, GitHub will automatically redirect references to your repositories.
- Web links to your existing repositories will continue to work. This can take a few minutes to complete after you make the change.
- Command line pushes from your local repository clones to the old remote tracking URLs will continue to work.
If the new owner of your old username creates a repository with the same name as your repository, that will override the redirect entry and your redirect will stop working. Because of this possibility, we recommend you update all existing remote repository URLs after changing your username. For more information, see «Managing remote repositories.»
Links to your previous profile page
After changing your username, links to your previous profile page, such as https://github.com/previoususername, will return a 404 error. We recommend updating any links to your account on GitHub.com from elsewhere, such as your LinkedIn or Twitter profile.
Your Git commits
Git commits that were associated with your GitHub-provided noreply email address won’t be attributed to your new username and won’t appear in your contributions graph. If your Git commits are associated with another email address you’ve added to your GitHub account, including the ID-based GitHub-provided noreply email address, they’ll continue to be attributed to you and appear in your contributions graph after you’ve changed your username. For more information on setting your email address, see «Setting your commit email address.»
Your gists
After changing your username, the URLs to any public or secret gists will also change and previous links to these will return a 404 error. We recommend updating the links to these gists anywhere you may have shared them.
Changing your username
-
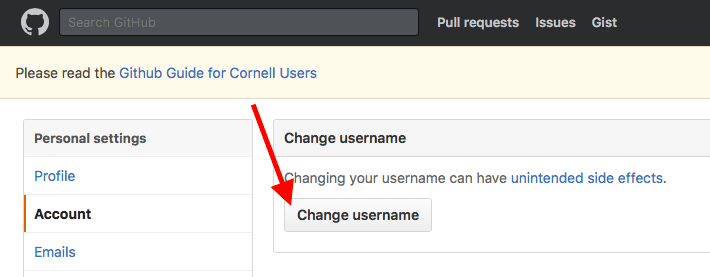
In the upper-right corner of any page, click your profile photo, then click Settings.

-
In the left sidebar, click Account.
-
In the «Change username» section, click Change username.
-
Read the warnings about changing your username. If you still want to change your username, click I understand, let’s change my username.
-
Type a new username.
-
If the username you’ve chosen is available, click Change my username. If the username you’ve chosen is unavailable, you can try a different username or one of the suggestions you see.


Further reading
- «Why are my commits linked to the wrong user?»
- «GitHub Username Policy»

Your Github login username could be changed to another username that is not in use. You might have to consider some unique usernames if the username you want is not available. You can use the different signs like hyphens, numbers, or alternative spellings to get a similar username that is still available.
Your old GitHub login username can be claimed by anyone after you have changed your username. Except for some links to your profile that wouldn’t redirect automatically, most of the other references to your repositories that were under the old username are changed automatically to the new username.
Redirects cannot be set up for:
- @mentions that use your old username
- The links to gits that include your old username
Steps To Change Your Github Login Username
- First, click your profile photo, then click Settings.
- In the left sidebar, click Account.
- Under the «Change username» section, click on Change username.
- Make sure that you read the warnings about changing your username and then click I understand, let’s change my username.
- Type a new username.
- Make sure that the username that you have chosen is available and then click Change my username.
Where To Make Changes

- Go to the GitHub account settings and change the username.
- If you are using GitHub Pages, you could just change the name of your “username.github.io” repository
- Other services that point to your “username.github.io” repository address should now be updated.
- You might want to sign in and reconnect your repositories when using Netlify.
- You can sign in to Travis CI and other integrations as it will update your username there.
- Make sure that your local files and repository links are updated and the changes to GitHub are pushed back.
- With your updated GitHub link redeploy any websites that you may have.
- You can then fix any links around the web to your profile, Gists, or your repositories.
Local File Updates
We have for you some suggestions for strings, which you can use to search and replace your username.
- github.com/username ( you get the references to your GitHub page in READMEs or in website copy)
- username.github.io ( you will get links to your GitHub Page)
- git@github.com:username ( you get Git config remote ssh URLs)
- travis-ci.com/username (Travis badges in READMEs)
- shields.io/github/…/username ( the shield badges would be in READMEs, types include stars, tags, contributors, and more)
You can use this command for each string after you identify where the above strings are located:
grep -rnw -e ‘foobar’
It will search all files for strings matching the whole (w) pattern (e) recursively (r) provided and prefix results with the line numbers (n) so you can find them easily.
Your Github login username could be changed to another username that is not in use. You might have to consider some unique usernames if the username you want is not available. You can use the different signs like hyphens, numbers, or alternative spellings to get a similar username that is still available.
Your old GitHub login username can be claimed by anyone after you have changed your username. Except for some links to your profile that wouldn’t redirect automatically, most of the other references to your repositories that were under the old username are changed automatically to the new username.
Redirects cannot be set up for:
- @mentions that use your old username
- The links to gits that include your old username
Steps To Change Your Github Login Username
- First, click your profile photo, then click Settings.
- In the left sidebar, click Account.
- Under the «Change username» section, click on Change username.
- Make sure that you read the warnings about changing your username and then click I understand, let’s change my username.
- Type a new username.
- Make sure that the username that you have chosen is available and then click Change my username.
Where To Make Changes
- Go to the GitHub account settings and change the username.
- If you are using GitHub Pages, you could just change the name of your “username.github.io” repository
- Other services that point to your “username.github.io” repository address should now be updated.
- You might want to sign in and reconnect your repositories when using Netlify.
- You can sign in to Travis CI and other integrations as it will update your username there.
- Make sure that your local files and repository links are updated and the changes to GitHub are pushed back.
- With your updated GitHub link redeploy any websites that you may have.
- You can then fix any links around the web to your profile, Gists, or your repositories.
Local File Updates
We have for you some suggestions for strings, which you can use to search and replace your username.
- github.com/username ( you get the references to your GitHub page in READMEs or in website copy)
- username.github.io ( you will get links to your GitHub Page)
- git@github.com:username ( you get Git config remote ssh URLs)
- travis-ci.com/username (Travis badges in READMEs)
- shields.io/github/…/username ( the shield badges would be in READMEs, types include stars, tags, contributors, and more)
You can use this command for each string after you identify where the above strings are located:
grep -rnw -e ‘foobar’
It will search all files for strings matching the whole (w) pattern (e) recursively (r) provided and prefix results with the line numbers (n) so you can find them easily.
GitHub — это крупнейшее хранилище Git репозиториев, а так же центр сотрудничества для миллионов разработчиков и проектов.
Огромный процент всех репозиториев хранится на GitHub, а многие проекты с открытым исходным кодом используют его ради Git хостинга, баг-трекера, рецензирования кода и других вещей.
Так что, пока всё это не часть открытого Git проекта, наверняка вы захотите, или вам придётся взаимодействовать с GitHub при профессиональном использовании Git.
Эта глава про эффективное использование GitHub.
Мы разберём регистрацию, управление учётной записью, создание и использование Git репозиториев, как вносить вклад в чужие проекты и как принимать чужой вклад в собственный проект, а так же программный интерфейс GitHub и ещё множество мелочей, который облегчат вам жизнь.
Если вас не интересует использование GitHub для размещения собственных проектов или сотрудничества с другими проектами, размещёнными на нём, вы можете смело перейти к главе Инструменты Git.
Настройка и конфигурация учетной записи
Первым делом нужно создать бесплатную учётную запись.
Просто зайдите на https://github.com, выберите имя которое ещё не занято, укажите адрес электронной почты и пароль, а затем нажмите большую зелёную кнопку «Sign up for GitHub».
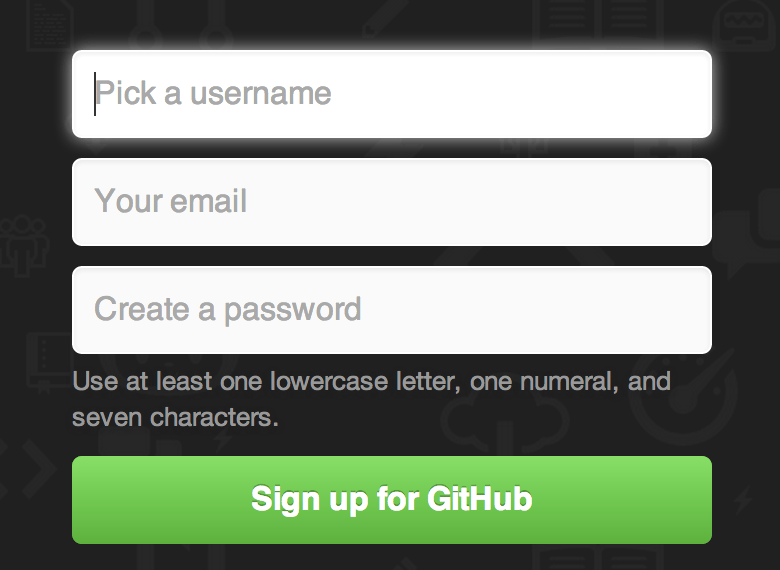
Рисунок 81. Форма регистрации на GitHub
Далее вы попадёте на страницу с тарифными планами, её пока можно проигнорировать.
GitHub вышлет письмо для проверки вашего электронного адреса.
Сделайте этот шаг, он достаточно важный (как мы увидим далее).
|
Примечание |
GitHub предоставляет почти все свои функции для бесплатных учётных записей, за исключением некоторых расширенных возможностей. |
Клик на расположенном в верхнем левом углу экрана логотипе, изображающем гибрид кота и осьминога (его называют осьмикот), откроет панель управления.
Теперь все готово для работы с GitHub.
Доступ по SSH
На данный момент вы можете подключаться к репозиториям Git используя протокол https:// авторизуясь при помощи только что созданного логина и пароля.
Однако для того чтобы просто клонировать публично доступный проект, вам необязательно авторизовываться на сайте, но тем не менее, только что созданный аккаунт понадобится в то время, когда вы захотите загрузить (push) сделанные вами изменения.
Если же вы хотите использовать SSH доступ, в таком случае вам понадобится добавить публичный SSH ключ.
(Если же у вас нет публичного SSH ключа, вы можете его сгенерировать)
Откройте настройки вашей учётной записи при помощи ссылки, расположенной в верхнем правом углу окна:

Рисунок 82. Ссылка «Настройка учётной записи» («Account settings»)
Выберите секцию слева под названием «Ключи SSH» («SSH keys»).

Рисунок 83. Ссылка («SSH keys»)
Затем нажмите на кнопку «Добавить ключ SSH» («Add an SSH key»), задайте имя ключа, а так же скопируйте и вставьте сам публичный ключ из ~/.ssh/id_rsa.pub (ну или как бы у вас не назывался этот файл) в текстовое поле, затем нажмите «Добавить ключ» («Add key»).
|
Примечание |
Задавайте такое имя SSH ключа, которое вы в состоянии запомнить. |
Ваш аватар
Следующий шаг, если хотите — замена аватара, который был сгенерирован для вас, на вами выбранный аватар.
Пожалуйста зайдите во вкладку «Профиль» («Profile»), она расположена над вкладкой «Ключи SSH» и нажмите «Загрузить новую картинку» («Upload new picture»).
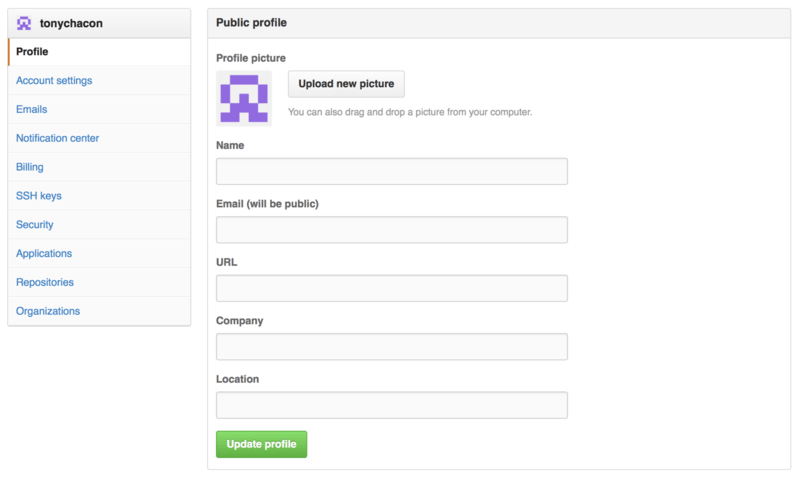
Рисунок 84. Ссылка «Профиль» («Profile»)
Выберем логотип Git с жёсткого диска и отредактируем картинку под желаемый размер.
![]()
Рисунок 85. Редактирование аватара
После загрузки каждый сможет увидеть ваш аватар рядом с вашим именем пользователя.
Если вы используете такой популярный сервис как Gravatar (часто используется для учётных записей WordPress), тот же самый аватар будет использован «по умолчанию».
Ваши почтовые адреса
GitHub использует ваш почтовый адрес для привязки ваших Git коммитов к вашей учётной записи.
Если вы используете несколько почтовых адресов в своих коммитах и хотите, чтобы GitHub работал с ними корректно, то вам нужно будет добавить все используемые почтовые адреса в секцию под названием «Почтовые адреса» («Emails»), расположенную на вкладке «Администрирование» («Admin»).
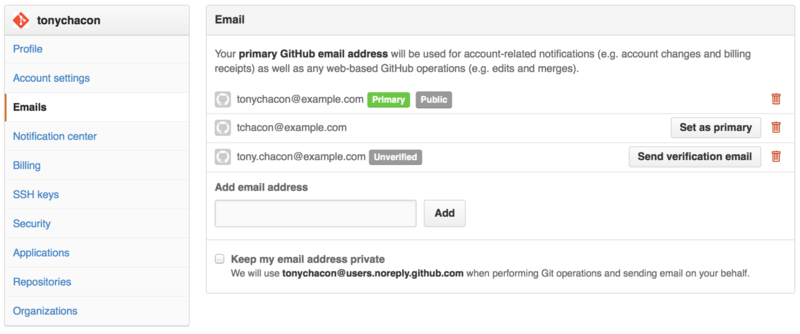
Рисунок 86. Почтовые адреса
Как можно видеть на рисунке Почтовые адреса, у почтовых адресов имеются несколько состояний.
Верхний почтовый адрес подтверждён и является основным для пользователя, это тот самый адрес, куда будут направляться оповещения, а также остальные уведомления.
Второй адрес тоже подтверждён, и так же может быть назначен в качестве основного.
Последний адрес не подтверждён, это значит, что вы не можете использовать его в качестве основного и получать на него уведомления.
При отправке коммита в любой из репозиториев, GitHub распознает один из указанных почтовых адресов и автоматически привяжет этот коммит к вашей учетной записи.
Двухфакторная аутентификация
В качестве дополнительной меры безопасности, вы можете настроить «Двухфакторную аутентификацию» («Two-factor Authentication» или «2FA»).
Двухфакторная аутентификация — механизм, который становится все более и более популярным методом по снижению риска скомпрометировать вашу учётную запись в ситуации, когда пароль от вашей учётной записи, по тем или иным причинам, стал известен злоумышленникам.
Активация этого механизма заставит GitHub запрашивать у вас оба пароля при авторизации, поэтому даже в ситуациях, когда ваш основной пароль скомпрометирован, злоумышленник все равно не получит доступ к вашей учётной записи.
Вы сможете найти настройку «Двухфакторной аутентификации» («Two-factor Authentication») в секции «Безопасность» («Security») вкладки «Настройка учётной записи» («Account settings»).
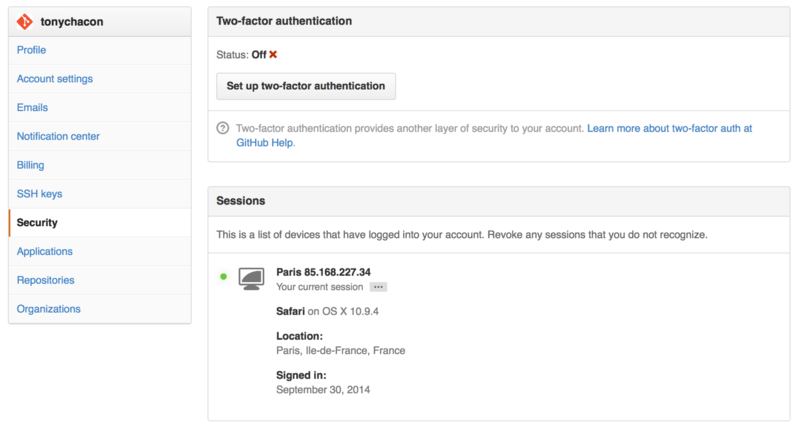
Рисунок 87. Двухфакторная аутентификация («Two-factor Authentication»)
При нажатии на кнопку «Настроить двухфакторную аутентификацию» («Set up two-factor authentication») вы будете перенаправлены на страницу, где вам нужно будет настроить использование мобильного приложения для генерации вторичного кода проверки (так называемый «одноразовый пароль основанный на времени»), так же можно настроить GitHub таким образом, чтобы он отправлял вам СМС с кодом в момент, когда вам нужно авторизоваться на сайте.
После того, как вы выберете предпочитаемый вами метод и выполните предлагаемые инструкции, ваша учётная запись будет в большей безопасности, и вам будет предоставляться дополнительный код во время авторизации на сайте.