First Option: Use this option in case you have permission to edit the php.ini file.
The upload_max_filesize and the post_max_size settings in the php.ini need to changed to support larger files than the php default allowed size.
set upload_max_filesize to the maximum size of file which need to be uploaded.
post_max_size should be set to greater than upload_max_filesize to handle the file and the size of form post variables part of file upload form.
In case multiple files are uploaded in the file upload form at a time, the post_max_size should be set to (upload_max_filesize * no of files)+ size of post variables.
upload_max_filesize=30M
post_max_size=31M
No need to update memory_limit and max_execution_time php settings, in case file is just moved using the move_uploaded_file to the final path in file upload php script.
But if the file upload script is processing the file or reading the file to a variable or doing any other processing which use memory and time etc, memory_limit and max_execution_time should be set.
Set memory_limit to amount of memory needed for the php script to run and max_execution_time to the time in seconds required to run the script.
memory_limit = 100M
max_execution_time = 120
Restart the webserver after the php.ini is changed for it to take effect.
Second Option: Use this option in case you do not have permission to update the global php.ini settings or to improve security.
Copy the upload php scripts to a new Child folder say «Upload» and create a file «.user.ini» in the new folder. Also make sure to update the file upload form action attribute to post to the new Script under the «Upload» Folder.
Add below settings to the newly created file. «.user.ini».
upload_max_filesize=30M
post_max_size=31M

;below are optional
memory_limit = 100M
max_execution_time = 120
«user_ini.filename» php.ini setting can updated to give the user setting file another name.
This option improves the security as the upload_max_filesize, post_max_size,memory_limit, max_execution_time are changed only for the
scripts in the new folder and will not impact php settings for scripts in other folders and prevents any unwanted resource utilization by bad scripts.
Please refer below links for more information on «.user.ini» settings
https://www.php.net/manual/en/configuration.changes.modes.php
https://www.php.net/manual/en/ini.list.php
https://www.php.net/manual/en/configuration.file.per-user.php
Restart the webserver for the new .user.ini changes to take effect.
Note:
The memory_limit and max_execution_time setting can also be set in the php upload script using ini_set and set_time_limit function instead of updating php.ini file .
If this option is used, not need to update the memory_limit and max_execution_time setting in the ini file.
Add below to the top of the php file upload script
ini_set('memory_limit', '100M');
set_time_limit(120);
By default, Apache has a file upload size limit of 2MB. If you need to upload larger files such as multimedia video, audio and images, you need to increase file upload size in Apache. Here’s how to set max file upload size and increase file upload size in Apache.
Here are the steps to increase file upload size in Apache. We will use the server directive LimitRequestBody to define the file size limit. After you increase file upload size limit in Apache, you may want to use a reporting software to monitor the key metrics about your website/application such as signups, traffic, sales, revenue, etc. using dashboards & charts, to ensure everything is working well.
1. Open .htaccess file
You will typically find .htaccess file in your site’s root folder (e.g /var/www/html/). You can open it using vi editor
$ sudo vim /var/www/html/.htaccess
2. Increase File Upload Size Limit
Let’s say your uploads are stored at /var/www/example.com/wp-uploads and you want to limit the file upload size to 5MB. Add the following line to your .htaccess file.
<Directory "/var/www/example.com/wp-uploads">
LimitRequestBody 5242880
</Directory>
In the above configuration, when we use LimitRequestBody directive, we need to specify the file size in bytes. You can also add the above line to your Apache server configuration file httpd.conf.
Bonus Read:How to Password Protect Directory in Apache
3. Restart Apache Server
Restart Apache Server to apply changes
$ sudo service apache2 restart
That’s it! Now you can upload larger files in Apache/Wordpress. In case the uploaded file is larger than file size limit, server will show an error, and you can once again, increase file upload size in Apache. BTW, if you allow image uploads to your website, you might want to prevent image hotlinking in Apache.
You can also use the same trick to reduce or limit the file upload size in Apache, so that malicious attackers don’t bring down your server by uploading really large files.
By the way, if you want to create dashboards & charts to monitor your business or website, you can try Ubiq. We offer a 14-day free trial.
Related posts:
- About Author
Ошибка HTTP 413 Request Entity Too Large появляется, когда пользователь пытается загрузить на сервер слишком большой файл. Размер определяется относительно лимита, который установлен в конфигурации. Изменить его может только администратор сервера.
Что делать, если вы пользователь
Если вы видите ошибку 413, когда пытаетесь загрузить файл на чужом сайте, то вам нужно уменьшить размер передаваемых данных. Вот несколько ситуаций.
- Если вы пытались загрузить одновременно несколько файлов (форма позволяет так делать), попробуйте загружать их по одному.
- Если не загружается изображение, уменьшите его размер перед загрузкой на сервер. Можно сделать это с помощью онлайн-сервисов — например, Tiny PNG.
- Если не загружается видео, попробуйте сохранить его в другом формате и уменьшить размер. Можно сделать это с помощью онлайн-сервисов — я использую Video Converter.
- Если не загружается PDF-документ, уменьшите его размер. Можно сделать это с помощью онлайн-сервисов — я обычно использую PDF.io.
Универсальный вариант — архивация файла со сжатием. Ошибка сервера 413 появляется только в том случае, если вы пытаетесь одновременно загрузить слишком большой объем данных. Поэтому и выход во всех ситуациях один — уменьшить размер файлов.
Комьюнити теперь в Телеграм
Подпишитесь и будьте в курсе последних IT-новостей
Подписаться
Исправление ошибки сервера 413 владельцем сайта
Если вы владелец сайта, который при загрузке файлов выдает ошибку 413, то необходимо изменить конфигурацию сервера. Порядок действий зависит от используемых технологий.
Чтобы понять, что стало причиной ошибки, нужно посмотреть логи. Это поможет сэкономить время. Вот подробная инструкция, которая рассказывает, как посмотреть логи в панели управления Timeweb. В зависимости от того, какая информация будет в логах, вы поймете, как исправлять ошибку 413.
Увеличение разрешенного размера для загрузки файлов на Nginx и Apache
На Nginx максимально допустимый размер файла задан в параметре client_max_body_size. По умолчанию он равен 1 МБ. Если запрос превышает установленное значение, пользователь видит ошибку 413 Request Entity Too Large.
Параметр client_max_body_size находится в файле nginx.conf. Для его изменения нужен текстовый редактор — например, vi.
Подключитесь к серверу через SSH и выполните в консоли следующую команду:
Во встроенном редакторе vi откроется файл nginx.conf. В разделе http добавьте или измените следующую строку:
client_max_body_size 20M;
Сохраните и закройте файл. Затем проверьте конфигурацию файла:
Перезагрузите сервер следующей командой:
После перезагрузки будет действовать новая конфигурация с увеличенным лимитом на размер загружаемого файла.
На Apache опция, устанавливающая максимально допустимый размер загружаемого файла, называется LimitRequestBody. По умолчанию лимит не установлен (равен 0).
На CentOS главный конфиг располагается по адресу /etc/httpd/conf/httpd.conf. На Debian/Ubuntu — по адресу /etc/apache2/apache2.conf.
Значение задается в байтах:
LimitRequestBody 33554432
Эта запись выставляет максимально допустимый размер 32 МБ.
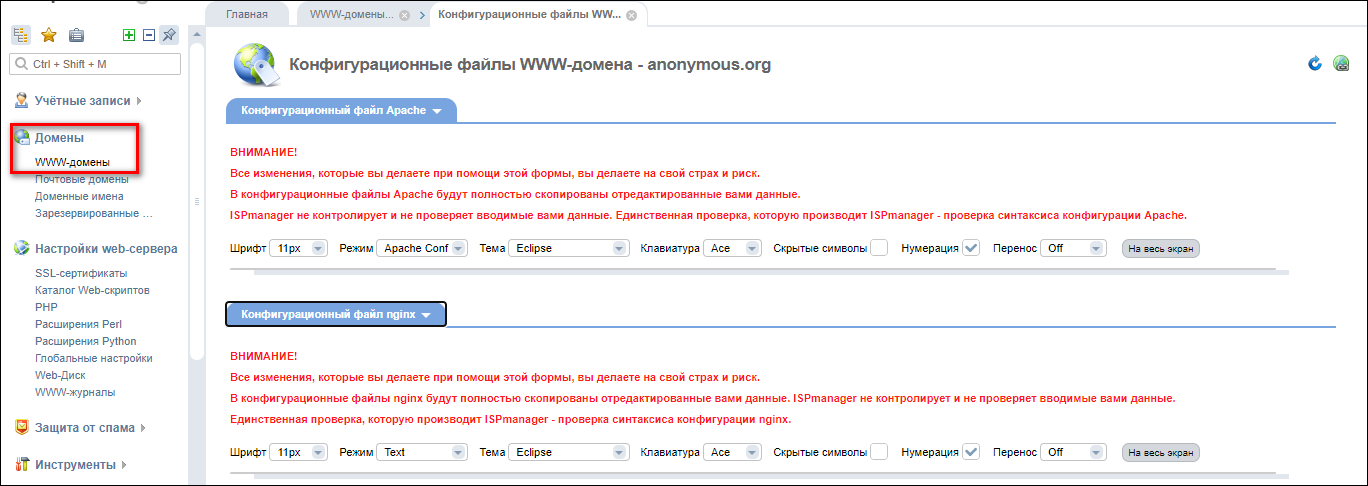
Изменить конфиги можно также через панель управления. Я пользуюсь ISPmanager, поэтому покажу на ее примере.
- Раскройте раздел «Домены» и перейдите на вкладку «WWW-домены».
- Выберите домен, на котором появляется ошибка, и нажмите на кнопку «Конфиг».
Появится вкладка с конфигами Apache и Nginx. Вы можете редактировать их вручную, устанавливая лимит на размер загружаемого файла.
Исправление ошибки на WordPress
На WordPress ошибку можно исправить двумя способами.
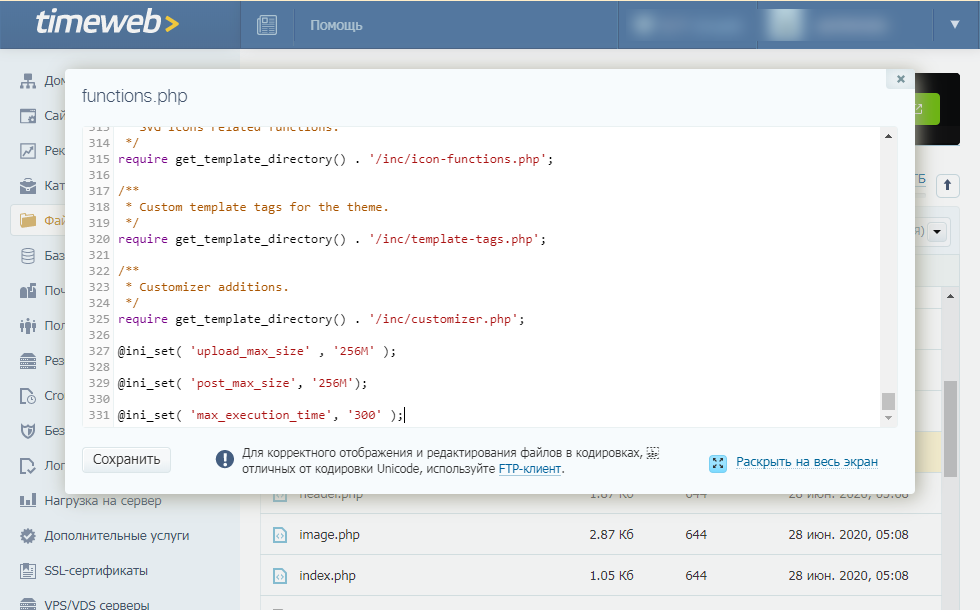
Способ первый — изменение разрешенного размера в файле functions.php. Этот файл отвечает за добавление функций и возможностей — например, меню навигации.
- Откройте файловый менеджер.
- Перейдите в папку public.html.
- Откройте директорию wp-content/themes.
- Выберите тему, которая используется на сайте с WordPress.
- Скачайте файл functions.php и откройте его через любой текстовый редактор.
В панели управления на Timeweb можно также воспользоваться встроенным редактором или IDE — путь будет такой же, как указан выше: public.html/wp-content/themes/ваша тема/functions.php.
В конце файла functions.php добавьте следующий код:
@ini_set( 'upload_max_size' , '256M' );

@ini_set( 'post_max_size', '256M');

@ini_set( 'max_execution_time', '300' );
Сохраните изменения и загрузите модифицированный файл обратно на сервер. Проверьте, появляется ли ошибка 413.
Второй способ — изменение файла .htaccess. Это элемент конфигурации, который способен переопределять конфигурацию сервера в плане авторизации, кэширования и даже оптимизации. Найти его можно через файловый менеджер в папке public.html.
Скачайте файл на компьютер, на всякий случай сделайте резервную копию. Затем откройте .htaccess в текстовом редакторе и после строчки #END WORDPRESS вставьте следующий код:
php_value upload_max_filesize 999M

php_value post_max_size 999M

php_value max_execution_time 1600

php_value max_input_time 1600
Сохраните файл и загрузите его обратно на сервер с заменой исходного файла. То же самое можно сделать через встроенный редактор или IDE в панели управления Timeweb.
Исправление ошибки при использовании PHP-скрипта
Если файлы загружаются с помощью PHP-скрипта, то для исправления ошибки 413 нужно отредактировать файл php.ini. В нем нас интересуют три директивы.:
- upload_max_filesize — в ней указан максимально допустимый размер загружаемого файла (значение в мегабайтах);
- post_max_size — максимально допустимый размер данных, отправляемых методом POST (значение в мегабайтах);
- max_execution_time — максимально допустимое время выполнения скрипта (значение в секундах).
Например, если я хочу, чтобы пользователи могли загружать файлы размером до 20 МБ, то я делаю так:
max_execution_time = 90

post_max_size = 20M

upload_max_filesize = 20M
Если все значения указаны верно, то файлы с допустимым размером будут загружаться на сервер без ошибок.
То же самое можно сделать через панель управления. Например, в ISPmanager порядок будет такой:
- Авторизуйтесь с root-правами.
- В левом меню раскройте раздел «Настройки web-сервера» и перейдите на вкладку «PHP».
- Выберите используемую версию и нажмите на кнопку «Изменить».
На экране появится список параметров. Они отсортированы по алфавиту. Установите необходимые значения для параметров max_execution_time, post_max_size и upload_max_filesize. Изменения применяются автоматически.
Apache is a free and open-source cross-platform very popular, secure, efficient and extensible HTTP server. As a server administrator, one should always have greater control over client request behavior, for example the size of files a user can upload and download from a server.
Read Also: 13 Apache Web Server Security and Hardening Tips
This may be useful for avoiding certain kinds of denial-of-service attacks and many other issues. In this short article, we will show how to limit the size of uploads in Apache web server.
Read Also: How to Limit File Upload Size in Nginx
The directive LimitRequestBody is used to limit the total size of the HTTP request body sent from the client. You can use this directive to specifies the number of bytes from 0 (meaning unlimited) to 2147483647 (2GB) that are allowed in a request body. You can set it in the context of server, per-directory, per-file or per-location.
For example, if you are permitting file upload to a particular location, say /var/www/example.com/wp-uploads and wish to restrict the size of the uploaded file to 5M = 5242880Bytes, add the following directive into your .htaccess or httpd.conf file.
<Directory "/var/www/example.com/wp-uploads">
	LimitRequestBody  5242880
</Directory>
Save the file and reload the HTTPD server to effect the recent changes using following command.
# systemctl restart httpd 	#systemd
OR
# service httpd restart 	#sysvinit
From now on, if a user tries to upload a file into the directory /var/www/example.com/wp-uploads whose size exceeds the above limit, the server will return an error response instead of servicing the request.
Reference: Apache LimitRequestBody Directive.
You may also find these following guides for Apache HTTP server useful:
- How to Check Which Apache Modules are Enabled/Loaded in Linux
- 3 Ways to Check Apache Server Status and Uptime in Linux
- How to Monitor Apache Performance using Netdata on CentOS 7
- How to Change Apache HTTP Port in Linux
That’s it! In this article, we have explained how to limit the size of uploads in Apache web server. Do you have any queries or information to share, use the comment form below.
If You Appreciate What We Do Here On TecMint, You Should Consider:
TecMint is the fastest growing and most trusted community site for any kind of Linux Articles, Guides and Books on the web. Millions of people visit TecMint! to search or browse the thousands of published articles available FREELY to all.
If you like what you are reading, please consider buying us a coffee ( or 2 ) as a token of appreciation.
We are thankful for your never ending support.


