![]()
Изменить размер изображения онлайн
JPG, PNG, WEBP, GIF, BMP, TIFF
Зачем изменять размер изображения?
При отображении или публикации изображения онлайн нам часто требуется изменить размер изображения чтобы оно полностью поместилось на экране средства просмотра или для изменения размера файла. В частности, может потребоваться уменьшить изображение при отправке в качестве вложения электронной почты или размещения на веб-сайте. Социальные платформы, такие как Facebook и Instagram с собственными ограничениями на размер изображения, также не являются исключением в этом отношении.
Теперь важно понимать, как изменить размер фотографии без потери качества. Технически, изменение размера изменяет информацию о пикселях. Например, когда ширина и высота изображения уменьшаются, любая избыточная информация о пикселях удаляється. Чтобы увеличить изображение, программа изменения размера изображения должна добавить новые пиксели на основе исходных пикселей, что приводит к размытому изображению. Таким образом, суть изменения размера изображения без потери качества состоит в том, чтобы сделать снимок с самым высоким разрешением и уменьшить его размер.
Существует большое разнообразие программного обеспечения для редактирования изображений со всеми видами функций, такими как 3D-рендеринг, обработка изображений с помощью искусственного интеллекта и т. д. Почти все эти инструменты предлагают базовые функции редактирования изображений, включая изменение размера изображений. Однако современное программное обеспечение может быть дорогим и трудным в использовании из-за потребности в обучении. Для большинства пользователей, ищущих бесплатное и простое в использовании приложение для изменения размера фотографий онлайн, ResizePixel может быть решением.
Приложение ResizePixel предоставляет простой, но мощный сервис для изменения размера изображения в пикселях. Вы можете изменить размер PNG, JPG, GIF, WEBP, TIFF и BMP изображений с удобной опцией сохранения исходного соотношения сторон. Чтобы сделать файл изображения еще меньше, попробуйте изменить размер изображения в КБ/МБ. Измените размер изображения онлайн всего за несколько кликов, не устанавливая дополнительного программного обеспечения, и все в одном!
Как изменить размер изображения?
- Чтобы изменить размер изображения онлайн, загрузите изображение с вашего устройства на веб-сайт ResizePixel.
- После этого введите новую ширину и высоту в пикселях, к которым нужно изменить размер изображения.
- Примените новый размер и скачайте окончательное изображение на странице загрузки.
Бесплатно и безопасно
ResizePixel — бесплатное приложение для изменения размера фотографий, где простота является важной функцией. Это простой в использовании, адаптированный к смартфонам и безопасный сервис для изменения размера фотографий без ущерба для конфиденциальности. Мы не собираем и не распространяем загруженные фотографии третьим лицам.
На чтение 6 мин Просмотров 193к. Опубликовано 29.12.2016
Если перед вами встала задача, как уменьшить размер файла JPG, то давайте попробуем вместе разобраться в данной ситуации. Очень часто, размер изображения нужно уменьшить, для того, чтобы фотографии или картинки не занимали много места на диске. Многие пользователи, часто отправляют большое количество фотографий по электронной почте, но как правило, на всех почтовых серверах присутствует ограничение по объему информации в одном письме.
Из-за этого, многие люди не могут отправить изображения в электронном сообщении, тем самым впадают в ступор и не знают, как выйти из ситуации. Так же если вы грузите файлы изображений в облачный сервис или передаете по сети, то быстрее это будет происходить, если изображение будет иметь маленький вес. Поэтому, файлы необходимо уменьшать в размерах при этом постараться не испортить качество изображения.
Содержание
- Что такое файл JPG.
- Как уменьшить размер изображения стандартными средствами Windows ?
- Как уменьшить размер файла JPG при помощи программ Microsoft Office.
- Уменьшаем размер JPG файла при помощи онлайн сервисов.
- Уменьшаем размер изображения при помощи редактора Snagit.
- Заключение.
Что такое файл JPG.
JPEG (произносится «джейпег», англ. Joint Photographic Experts Group) – наиболее популярный растровый формат изображения. Файлы, которые содержат изображения имеют расширение JPG
Если обратить внимание, то названия многих графических изображений на вашем компьютере имеют вид («название фото».jpg или «название фото».jpeg ). Расширение .jpg является самым популярным.
Файлы JPG прекрасно сжимаются как с потерей качества, так и без. Соответственно, все зависит от того, что хочет получить пользователь в конечном результате. Существует огромное количество программ и онлайн сервисов, для сжатия изображений. Поэтому, давайте рассмотрим, как уменьшить размер файла JPG, разными способами и программами. Для того, чтобы определить исходный вес изображения, нужно нажать на нем правой кнопкой мыши и выбрать «Свойства».
Как уменьшить размер изображения стандартными средствами Windows ?
Если изменять размер изображения вам приходится не часто, то для таких целей подойдет стандартная программа Paint. Её функционала будет достаточно для наших целей. Так Paint позволяет выполнять следующие функции:
- Возможность добавить различный текст к изображению;
- Заливка отдельных элементов;
- Возможность обрезать ненужные фрагменты;
- Вставка другого изображения и другое.
Если вы выполняете редактирование изображения, при этом добавляете новые элементы, то его размер будет меняться.
Для того, чтобы уменьшить размер файла jpg при помощи графического редактора Paint, следуем инструкции ниже.
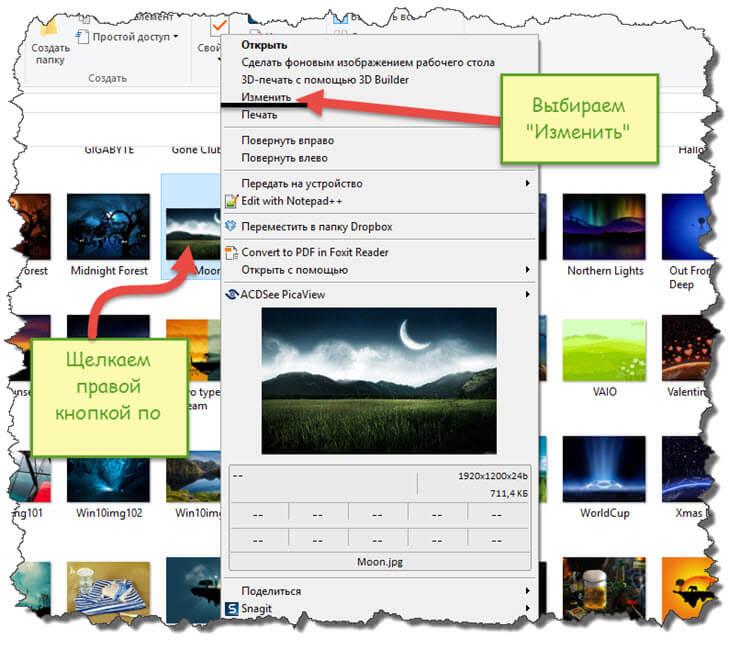
- Выбираем нужный файл изображения и щелкаем на нем правой кнопкой мыши. Из появившегося меню выбираем пункт «Изменить». Откроется автоматически редактор Paint.

- Ищем на панели инструментов кнопку «Изменить размер»;

- Откроется окно, в котором нам с вами нужно указать новый размер изображения. Изменение размера доступно в процентах и пикселях.
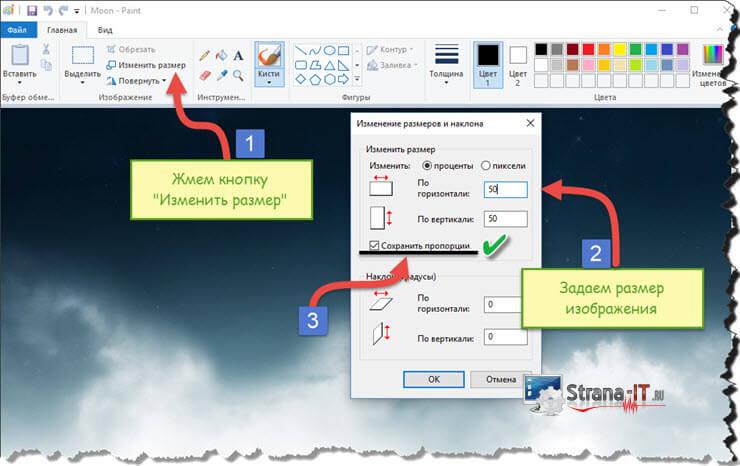
Совет! Если изображение сильно большое, то можно выставить размер, 1024×768. Так же подбирайте правильное соотношение длины и ширины в противном случае изображение будет выглядеть не совсем корректно.
Как уменьшить размер файла JPG при помощи программ Microsoft Office.
Так как пакет программ MS Office установлен на большинстве компьютеров пользователей. То воспользуемся данным средством для редактирования размера файла JPG.
Обратите внимание! В составе вашего пакета Microsoft Office, должна быть программа MS Picture Manager

Для того, чтобы разобраться, как уменьшить размер файла JPG с помощью MS Picture Manager, делаем следующие действия:
- Открываем программу.
- Добавляем изображение или на нужном файле выбираем открыть с помощью MS Picture Manager.

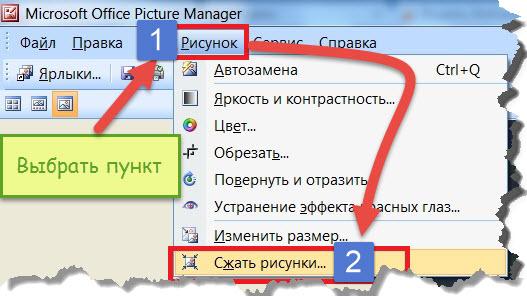
- В панели инструментов ищем пункт «Изображение» и в выпадающем списке жмем кнопку «Сжать изображение». Далее регулируем процент сжатия изображения.
Совет! Чем сильнее будет сжато изображение, тем хуже будет его качество. Поэтому выбирайте золотую середину.
Уменьшаем размер JPG файла при помощи онлайн сервисов.
Если вам не подходят выше описанные способы или необходимо сжимать очень большое количество изображений, то можно воспользоваться онлайн сервисами по сжатию картинок. Один из таких сервисов https://tinypng.com
С его помощью, вы сможете уменьшить размер изображения до максимально возможного, при этом программа сама выполнить все действия за вас. Вам необходимо будет только добавить изображение в онлайн сервис.
Обратите внимание! После сжатия, вам будет наглядно представлено, на сколько процентов уменьшился вес картинки после обработки.
После добавления картинки или фотографии, программа автоматически проанализирует файл, и если возможно, сожмет его. При этом размер изображения, длина и ширина, остается не измененным. Сервис tinypng.com работает с разными форматами графических изображений, поэтому подойдет многим пользователям.
Еще один онлайн сервис, позволяющий изменить размер файла с изображением — irfanview.com. Сервис поддерживает работу с различными форматами изображений. В отличие от tinypng.com , пользователь сам выбирает настройки для создаваемого изображения.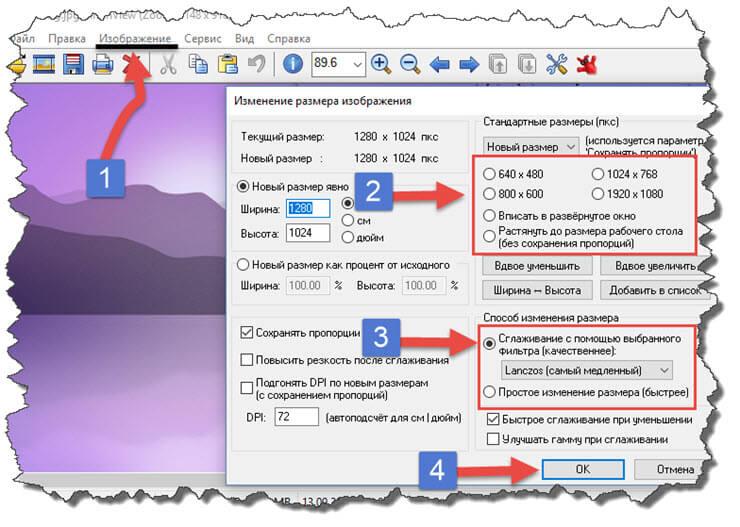
Можно установить размер изображения вручную или же выбрать из предложенных вариантов.
Для более качественного сжатия, программа имеет различные фильтры. В параметрах сохранения, так же можно выставить значения, которые уменьшат размер выходного файла.
Уменьшаем размер изображения при помощи редактора Snagit.
Не так давно, я писал статью, как сделать скриншот экрана, в данной статье я затрагивал рассмотрение программы Snagit, которая умеет делать не только скриншоты экрана, но и редактировать полученные изображения. Данная программа прекрасно подойдет для наших целей, сейчас я вам покажу и расскажу, как уменьшить размер файла JPG при помощи редактора Snagit.
Предлагаю выполнять все по пунктам.
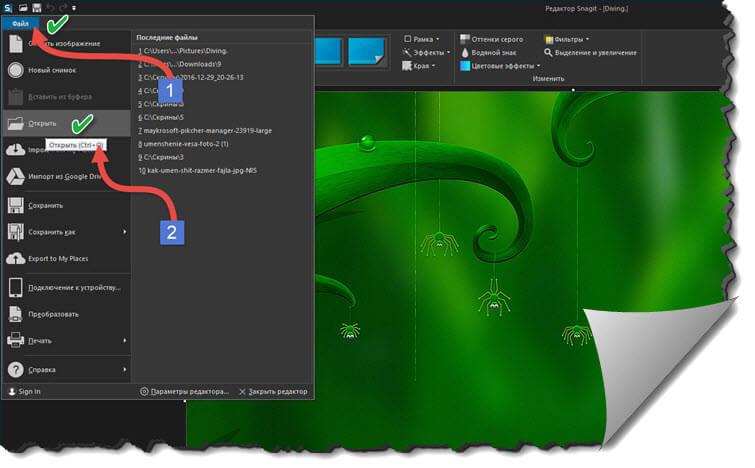
- Открываем редактор Snagit;
- В панели меню жмем «Файл» и в выпавшем списке выбираем «Открыть»;

- Выбираем нужное изображение;
- Далее в панели меню открываем вкладку «Изображение» и в панели инструментов жмем «Изменить размер»;

- В открывшемся меню выставляем нужный размер изображения;
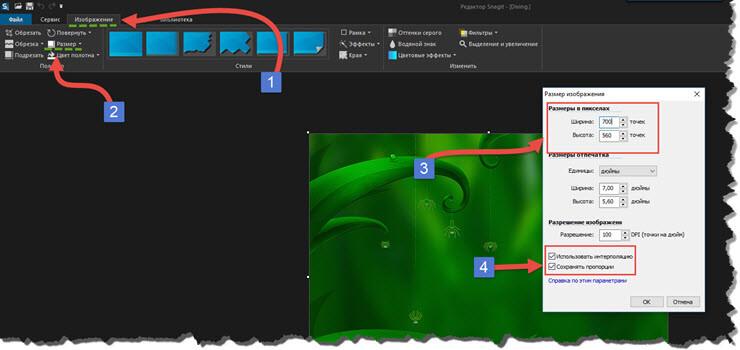
Обратите внимание! Чтобы изображение изменило размер пропорционально, оставьте галочку «Сохранять пропорции».
- После сохраните изображение используя меню «Файл» — «Сохранить как».
После изменения размера изображения, файл будет иметь более меньший вес. Для того, чтобы его еще уменьшить, рекомендую использовать онлайн сервисы, описанные выше.
Заключение.
Сегодня мы с вами рассмотрели, как уменьшить размер файла JPG. Теперь, вы без труда сможете изменить размер изображения и его вес. Это поможет вам сохранить место на жестком диске компьютера, флешке или карте памяти телефона. Так же сжатые файлы будут быстрее передаваться по сети. Как видите, в большинстве случаев, можно изменить размер файла без потери качества.
Представим, что для вас стал актуальным вопрос о том, как изменить размер картинки без фотошопа? Вы при этом в интернете, и вам необходимо обрезать фото или картинку для анкеты. Вы правильно поступите, если сидя у компьютера, или с планшетником, или со смартфоном в руках, зайдете на сайт.
Ведь на этом ресурсе можно воспользоваться приложением по обрезке фото онлайн. Обращаем внимание на то, что приложение поддерживает форматы gif, bmp, jpg, png. Оно находится в блоке «Работа с изображениями» под названием «Обрезка изображений».
И, выполняя здесь несложные операции, мы изменяем размер изображения. Ведь, как и все прочее в рамках сервиса, данное приложение очень просто в использовании. Оно предоставляет возможность получить качественный результат очень быстро.
Мы с его помощью изменяем размер фото. Мы обрезаем его. А для этого необходимо всего-то произвести загрузку нужного изображения, выбрать нужный для обрезки фрагмент и нажать клавишу «Вырезать», предварительно получив информацию о размерах будущей картинки. То есть процесс предусматривает процентное увеличение или уменьшение изображения. Всегда есть возможность посмотреть, как ты обрезал фото, а потом сохранить его.
Какие еще возможности предоставляет приложение
Когда мы изменяем размер фото онлайн, то это вовсе не означает, что весь процесс, который занимает считанные секунды, сводится к тому, чтобы просто обрезать картинку онлайн.
Тот, кто работает с изображением, может еще потратить дополнительно (но буквально считанные) секунды, чтобы при необходимости повернуть фото или отразить его зеркально. Но и этим все вовсе не ограничивается. Можно также добавить красивые эффекты или рамку. И всего-то требуется сделать несколько кликов.
Нет ничего удивительного в том, что пользователями сайта являются люди самых разных профессий, возраста и даже увлечений. Все потому, что некоторые предпочитают не искать нужное им приложение на разных интернет-ресурсах. А указанный онлайн-сервис тем и хорош для многих, что в нем сосредоточены самые разные, но часто используемые приложения.
И многие из числа тех, кто проводят массу времени в мировой паутине (в том числе и для того, чтобы изменить фото), попадают на сайт вполне закономерно. Будь он дизайнер или вебмастер, журналист или автомобилист. Ведь сюда ведут многие ссылки в интернете, да и сервис всем доступен без регистрации.
Сервис к тому же бесплатный. Его можно использовать при подготовке фото и музыки для блогов и сайтов. Ко всему нет необходимости в загрузке файлов, установке и последующем обновлении программ.
Это положительно оценивает и тот, кто занимается профессионально фотографией, и тот, для кого проводить время с фотоаппаратом – просто большое увлечение. Ведь на сайте есть для них подходящее приложение. Например, для того, кто мучается вопросом, как изменить размер изображения?
Зачем нужна такая функция
Причина, по которой тот или иной пользователь интернета вынужден искать для применения фоторедактор онлайн, может быть разной. Но, как показывает опыт, обычно это вызвано именно необходимостью быстро изменить размер фото.
И это обычно бывает так. Допустим, кому-то необходимо загрузить редактируемое изображение на сайт. К примеру, как аватарку «ВКонтакте». Как правило, на большинстве ресурсах в глобальной сети для изображений, которые заливают на сервис, предусмотрено ограничение по его габаритам. А это в конкретном случае означает, что необходимо изменить размер фото онлайн.
Без этого никак не обойтись. Однако ограничение предусмотрено не только для габаритов. Ограничение распространяется также и на вес изображения. То есть проблема требует такого решения, когда нужно уменьшить фото. А это очень просто сделать, используя фоторедактор онлайн.
А вот к функции «увеличить фото» прибегают тогда, когда необходимо увеличить размеры изображения. Также как и уменьшение фото, эта функция находит применение, когда кто-то очень часто обрабатывает изображение.
Для более детальной характеристики популярного сервиса следует упомянуть и про такую «фишку», как фотографии в стиле Instagram. То есть с данном случае сервис предоставляет возможность не только изменить размер, но и придать желаемый вид фотографиям. Причем мы говорим про те случаи, когда у вас при себе нет мобильного устройства и аккаунта в Инстаграм.
Уверяем, что на персональном компьютере заниматься обработкой фотографий намного удобней и приятней. Функция «фото в стиле Инстаграм» действует точно так же, как и обрезка фотографий онлайн. Это означает следующее: вам необходимо загрузить фотографию, наложить эффекты и потом сохранить на свой компьютер. Так, в частности, можно сделать эффект старой фотографии из обычного снимка.
Отзывы
| нормально |
| Fretyyj |
| Класс! |
| легко и просто, c меня лайк)) |
| просто супер !!! спасибо! |
| Спасибо большое!!! |
| Сайт топ! Спас меня от тупых программ) |
| Супер! |
| Спасибо,очень удобно и просто. |
| спасибо большое за сайт все удобно советую |
![]()
Download Article
Learn how to change a JPEG’s resolution and file size for email, websites, and more
![]()
Download Article
- Using an Image Resizing Website
- Using Paint in Windows
- Using Preview in Mac OS X
- Using an iPhone, iPad, or iPod Touch
- Using an Android Device
- Q&A
- Warnings
|
|
|
|
|
|
If you’re emailing a JPEG or uploading one to a website, you’ll want to know how to resize it to fit your needs. But what if you’re not super tech-savvy? Look no further. We’ve put together a total guide for resizing JPEGs—whether you use Windows, Mac, a mobile device, or a web browser like Google Chrome. We’ll cover everything from tweaking image resolution to shrinking the file size so your images load faster and take up less space on your computer. Keep reading to learn how to resize JPEGs the easy way.
Things You Should Know
- Use a browser to upload your JPEG to a resizing website. Most sites let you adjust resolution, crop your images, and adjust compression to minimize the file size.
- In Windows, open your JPEG using Paint, click “Select All,” and adjust the height and width by percentage or pixel length. Then select “Save As” and choose “JPEG.”
- On Macs, open your JPEG in Preview, click “Tools” and “Adjust Size.” Adjust the height and width by percent or pixel length, click “OK,” and click “Save,”
- On mobile, download and open an image resizing app, then select your image. Adjust height and width using onscreen sliders, or input specific pixel lengths.
-

1
Visit an image resizing website like PicResize.com. Many sites will let you quickly upload and resize any image file, including JPEG files. Some allow you to resize multiple images at once. Search «resize jpeg» to find a bunch of different options. Resizing using a website is easier to do on a desktop computer than on a mobile device.[1]
Other popular options websites for resizing images include:- resizeyourimage.com
- resizeimage.net
-
2
Upload the JPG file you want to resize. Most resizing sites allow you to upload virtually any type of image file. Click the «Choose File,» «Upload image,» or «Browse» button to find the image file on your computer that you want to resize.[2]
- If the image you want to resize is on another website, download it to your computer first. Then upload it to the resizing website.
Advertisement
-
3
Use the site’s resizing controls to change the size of the image. Each website has a different set of controls to adjust the image size. Usually, you’ll see buttons or sliders for adjusting height and width, cropping the image, and undoing your changes.[3]
- You may also be able to enter the exact dimensions you want the resized image to be. You may also be able to adjust the image size by a specific percentage.
- Making your image smaller will decrease the file size. The image quality will also decrease, but this won’t be obvious unless you zoom in.
- Making an image larger will increase the file size. It will also result in a noticeably lower-quality picture.
-
4
Select your compression (if available). Some resizing websites allow you to set a compression level. Higher compression will result in a smaller file size, but will also lead to a decrease in image quality. Look for a quality slider or drop-down menu to change the final quality.[4]
- Not all resizing websites allow you to adjust image quality.
-
5
Download the resized image. Once you’ve set your size and quality settings, you can resize and download the image. Click the «Resize» button to load the new image. You’ll likely be shown a preview of the changes before the image file is downloaded to your computer.[5]
- When downloading a resized image, save it with a different name to avoid overwriting the original. This will allow you to go back to the original image and make changes again as needed.


Advertisement
-
1
Make a copy of the image file. Before resizing your image in Paint, make a copy of the file so that you don’t lose the original. This will allow you to do the process again later if you aren’t happy with the results.[6]
- To make a copy of the image file, right-click on it and select «Copy.» Right-click a blank area in the same folder and select «Paste» to create a copy of the image.
-
2
Open the image in Paint.[7]
Paint is a free image editor that comes with every version of Windows. Right-click on the image file and select «Edit» to open it in Paint.[8]
- You can also open Paint first, then click “File” and “Open” to search for the image you want to edit.
-
3
Click the «Resize» button.[9]
You can find this in the Home tab, or you can press Ctrl+W. This will open the «Resize and Skew» window.[10]
-
4
Use the «Resize» fields to change the size of the image.[11]
You can choose to resize by percentage or by pixels. If you select «Pixels,» you can enter the exact size that you want the resized image to be. You can enter percentages larger than «100» to make the image bigger than the original.[12]
- By default, Paint will maintain the original aspect ratio, and entering a value in one field will automatically change the value in the other. This keeps the image from stretching or squishing during the resize. You can uncheck «Maintain aspect ratio» if you want to be able to define both the Horizontal and Vertical fields independently.
- Making an image larger than the original will result in a blocky final image.
-
5
Click «OK» to see your resized image. Once you click «OK,» your image will be resized according to the values you entered. There is no preview available, so you’ll need to apply the changes to see them.[13]
- If you aren’t happy with the outcome, press Ctrl+Z to undo the resize changes you made. You can also click the «Undo» button at the very top of the window next.
-
6
Save your resized image. Once you’re satisfied with the new size, you can save the changes to the file. Select «Save» from the File tab.[14]
- You can also click “Save As” to create a new file and choose where to save it. Make sure to select “JPEG” as the format when using “Save As.”


Advertisement
-
1
Make a copy of your image file. It’s always a good idea to create a backup of your original image file before making changes to its size. This will allow you to revert to the original in case something goes wrong or you don’t like the end result. Select the image file, press ⌘ Command+C, and then press ⌘ Command+V to make a copy in the same location.[15]
-
2
Open the image in the Preview application. Usually, this will open by default when you double-click the file. If the image opens in something else, you can right-click the file and select «Open With» and then «Preview.»[16]
-
3
Click the Tools menu and select «Adjust Size.» This will open a new window that will allow you to resize the image.[17]
-
4
Click the drop-down menu to select the units you want to use. You can select «Pixels,» «Percentage,» and other units for scaling the image. Select «Pixels» to dictate the exact size of the resized image, or select “Percentage” to resize it by a specific proportion.[18]
- For example, resizing your image to “50%” will decrease it to half its original size, while “200%” will double its size.
-
5
Enter the new width or height that you want the image to be. The two fields are linked, and changing one will change the other to keep the image proportions correct. This will prevent stretching or squishing of the image. If you want to freely resize both fields, uncheck «Scale proportionally» to unlink the two.[19]
- Making the image smaller will reduce the file size. It will also decrease the image quality, but this won’t be obvious unless you zoom in.
- Making the image bigger will increase the file size. The image quality will decrease noticeably, so don’t enlarge it too much unless you’re comfortable with a blocky/blurry image.
-
6
Check out the new file size. You’ll be able to see what the new file size will be at the bottom of the window before you apply your changes. This is useful if you’re resizing the image to fit the file size limitations of email or other online services.[20]
-
7
Click «OK» to apply the changes. The image will be resized according to the settings you entered. If you aren’t happy with the results, press ⌘ Command+Z to undo the changes and revert to the original size.[21]
-
8
Save your file. If you are happy with the new size, you can save your changes to the file. Click the «File» menu and select «save» to save your changes.[22]


Advertisement
-
1
Install an app that allows you to resize images. There is no built-in way to resize a picture on iOS devices, but there are a variety of apps that can perform the task for you. You can download these apps from your iOS device’s App Store.[23]
Some of the more popular apps include:- Image Size
- Image Resizer+
- Desqueeze
-
2
Open the app and select the photo you want to resize. You’ll likely be prompted to give the app access to your photos. This is necessary for the app to be able to browse the photos stored on your device. Find the photo you want to resize and tap it to open it.[24]
-
3
Select the «Resize» menu. Most apps have various tools you can choose from, including resizing. Tap the «Resize» button to begin resizing the image.[25]
-
4
Enter a new size for the image. Different apps will have different interfaces, but in most cases, you can select from a variety of preset sizes or you can enter a specific resolution. The width and height will automatically change together so that the original proportions are maintained.[26]
- If you don’t mind if the image gets stretched or squished, you can tap the chainlink or padlock button to enter different values into each field.
-
5
Save your resized image to your camera roll. After resizing the image, tap the «Save» or “Download” button to save it to your camera roll. You’ll be able to find it in your Photos app like you would any other image on your iOS device.[27]


Advertisement
-
1
Download an app that can resize pictures. Android devices do not come with an app for resizing images, but there are countless third-party apps available that can do so. You can download these apps from the Google Play Store. Some of the most popular image resizing apps include:[28]
- Image Size
- Photo & Picture Resizer
- Resize Me!
- Image Shrink
-
2
Open the downloaded app and give it access to your photos. When you launch the app for the first time, you may be prompted to give the app access to your stored photos. This is essential so that the app can load photos stored on your device.[29]
-
3
Open the photo you want to resize. Use the app to navigate to the photo that you want to resize. The process will vary depending on the app, but generally, you can tap the «Select photo» button on the app’s main menu to open your device’s stored photos.[30]
-
4
Select the resize tool. After opening the image, you’ll likely need to select the «Resize» tool in the app. Again, the process will vary for this depending on the app you are using.[31]
-
5
Select the size you want to make the image. You’ll be shown the original size in both pixels and file size. Depending on the app, you may be able to select from preset image sizes, or enter a specific size. When entering a custom size, you can just enter one value and the other value will scale accordingly.[32]
-
6
Save your resized image. Depending on the app, the resized image may be saved automatically, or you may need to manually tap the «Save» button. The original image will not be changed.[33]
- Each app will store its resized images in a different location. Generally, you’ll be able to find the pictures by opening your Pictures folder and then opening the folder named after the app.


Advertisement
Add New Question
-
Question
How do I change the resolution in Paint?

In the bottom of the screen, you’ll see a section saying (A number) x (A numper) PX. That is your resolution size. you can drag the squares of the corner of the canvas and the resolution number will increase/ decrease. Change to desired size.
-
Question
When I open and save in paint, without doing image size reduction, the file size reduces by 50 percent. Does this cause a loss in resolution?
When you open and save a JPEG using Paint, the file is trans-coded so that Paint can read it. For example, if your image has 16bit encode for color, then it might reduce resolution by 50 percent.
-
Question
How can I resize several JPEGs at once?
You should be able to use any of the suggested websites to work with multiple JPEGs at once, although you may be limited to a certain number at a time.
Ask a Question
200 characters left
Include your email address to get a message when this question is answered.
Submit
Advertisement
-
It’s best to only resize a JPEG to a smaller size.
-
Your JPEG will lose quality if you resize it to a larger size.
-
If you make a JPEG larger, you’ll stretch the pixels and the photo will appear blurry and low quality.
Advertisement
About This Article
Article SummaryX
1. Visit an image resizing website.
2. Upload the image.
3. Select your desired size.
4. Select compression (if available).
5. Download the resized image.
Did this summary help you?
Thanks to all authors for creating a page that has been read 2,226,794 times.
Did this article help you?
![]()
Download Article
Learn how to change a JPEG’s resolution and file size for email, websites, and more
![]()
Download Article
- Using an Image Resizing Website
- Using Paint in Windows
- Using Preview in Mac OS X
- Using an iPhone, iPad, or iPod Touch
- Using an Android Device
- Q&A
- Warnings
|
|
|
|
|
|
If you’re emailing a JPEG or uploading one to a website, you’ll want to know how to resize it to fit your needs. But what if you’re not super tech-savvy? Look no further. We’ve put together a total guide for resizing JPEGs—whether you use Windows, Mac, a mobile device, or a web browser like Google Chrome. We’ll cover everything from tweaking image resolution to shrinking the file size so your images load faster and take up less space on your computer. Keep reading to learn how to resize JPEGs the easy way.
Things You Should Know
- Use a browser to upload your JPEG to a resizing website. Most sites let you adjust resolution, crop your images, and adjust compression to minimize the file size.
- In Windows, open your JPEG using Paint, click “Select All,” and adjust the height and width by percentage or pixel length. Then select “Save As” and choose “JPEG.”
- On Macs, open your JPEG in Preview, click “Tools” and “Adjust Size.” Adjust the height and width by percent or pixel length, click “OK,” and click “Save,”
- On mobile, download and open an image resizing app, then select your image. Adjust height and width using onscreen sliders, or input specific pixel lengths.
-
1
Visit an image resizing website like PicResize.com. Many sites will let you quickly upload and resize any image file, including JPEG files. Some allow you to resize multiple images at once. Search «resize jpeg» to find a bunch of different options. Resizing using a website is easier to do on a desktop computer than on a mobile device.[1]
Other popular options websites for resizing images include:- resizeyourimage.com
- resizeimage.net
-
2
Upload the JPG file you want to resize. Most resizing sites allow you to upload virtually any type of image file. Click the «Choose File,» «Upload image,» or «Browse» button to find the image file on your computer that you want to resize.[2]
- If the image you want to resize is on another website, download it to your computer first. Then upload it to the resizing website.
Advertisement
-
3
Use the site’s resizing controls to change the size of the image. Each website has a different set of controls to adjust the image size. Usually, you’ll see buttons or sliders for adjusting height and width, cropping the image, and undoing your changes.[3]
- You may also be able to enter the exact dimensions you want the resized image to be. You may also be able to adjust the image size by a specific percentage.
- Making your image smaller will decrease the file size. The image quality will also decrease, but this won’t be obvious unless you zoom in.
- Making an image larger will increase the file size. It will also result in a noticeably lower-quality picture.
-
4
Select your compression (if available). Some resizing websites allow you to set a compression level. Higher compression will result in a smaller file size, but will also lead to a decrease in image quality. Look for a quality slider or drop-down menu to change the final quality.[4]
- Not all resizing websites allow you to adjust image quality.
-
5
Download the resized image. Once you’ve set your size and quality settings, you can resize and download the image. Click the «Resize» button to load the new image. You’ll likely be shown a preview of the changes before the image file is downloaded to your computer.[5]
- When downloading a resized image, save it with a different name to avoid overwriting the original. This will allow you to go back to the original image and make changes again as needed.
Advertisement
-
1
Make a copy of the image file. Before resizing your image in Paint, make a copy of the file so that you don’t lose the original. This will allow you to do the process again later if you aren’t happy with the results.[6]
- To make a copy of the image file, right-click on it and select «Copy.» Right-click a blank area in the same folder and select «Paste» to create a copy of the image.
-
2
Open the image in Paint.[7]
Paint is a free image editor that comes with every version of Windows. Right-click on the image file and select «Edit» to open it in Paint.[8]
- You can also open Paint first, then click “File” and “Open” to search for the image you want to edit.
-
3
Click the «Resize» button.[9]
You can find this in the Home tab, or you can press Ctrl+W. This will open the «Resize and Skew» window.[10]
-
4
Use the «Resize» fields to change the size of the image.[11]
You can choose to resize by percentage or by pixels. If you select «Pixels,» you can enter the exact size that you want the resized image to be. You can enter percentages larger than «100» to make the image bigger than the original.[12]
- By default, Paint will maintain the original aspect ratio, and entering a value in one field will automatically change the value in the other. This keeps the image from stretching or squishing during the resize. You can uncheck «Maintain aspect ratio» if you want to be able to define both the Horizontal and Vertical fields independently.
- Making an image larger than the original will result in a blocky final image.
-
5
Click «OK» to see your resized image. Once you click «OK,» your image will be resized according to the values you entered. There is no preview available, so you’ll need to apply the changes to see them.[13]
- If you aren’t happy with the outcome, press Ctrl+Z to undo the resize changes you made. You can also click the «Undo» button at the very top of the window next.
-
6
Save your resized image. Once you’re satisfied with the new size, you can save the changes to the file. Select «Save» from the File tab.[14]
- You can also click “Save As” to create a new file and choose where to save it. Make sure to select “JPEG” as the format when using “Save As.”
Advertisement
-
1
Make a copy of your image file. It’s always a good idea to create a backup of your original image file before making changes to its size. This will allow you to revert to the original in case something goes wrong or you don’t like the end result. Select the image file, press ⌘ Command+C, and then press ⌘ Command+V to make a copy in the same location.[15]
-
2
Open the image in the Preview application. Usually, this will open by default when you double-click the file. If the image opens in something else, you can right-click the file and select «Open With» and then «Preview.»[16]
-
3
Click the Tools menu and select «Adjust Size.» This will open a new window that will allow you to resize the image.[17]
-
4
Click the drop-down menu to select the units you want to use. You can select «Pixels,» «Percentage,» and other units for scaling the image. Select «Pixels» to dictate the exact size of the resized image, or select “Percentage” to resize it by a specific proportion.[18]
- For example, resizing your image to “50%” will decrease it to half its original size, while “200%” will double its size.
-
5
Enter the new width or height that you want the image to be. The two fields are linked, and changing one will change the other to keep the image proportions correct. This will prevent stretching or squishing of the image. If you want to freely resize both fields, uncheck «Scale proportionally» to unlink the two.[19]
- Making the image smaller will reduce the file size. It will also decrease the image quality, but this won’t be obvious unless you zoom in.
- Making the image bigger will increase the file size. The image quality will decrease noticeably, so don’t enlarge it too much unless you’re comfortable with a blocky/blurry image.
-
6
Check out the new file size. You’ll be able to see what the new file size will be at the bottom of the window before you apply your changes. This is useful if you’re resizing the image to fit the file size limitations of email or other online services.[20]
-
7
Click «OK» to apply the changes. The image will be resized according to the settings you entered. If you aren’t happy with the results, press ⌘ Command+Z to undo the changes and revert to the original size.[21]
-
8
Save your file. If you are happy with the new size, you can save your changes to the file. Click the «File» menu and select «save» to save your changes.[22]
Advertisement
-
1
Install an app that allows you to resize images. There is no built-in way to resize a picture on iOS devices, but there are a variety of apps that can perform the task for you. You can download these apps from your iOS device’s App Store.[23]
Some of the more popular apps include:- Image Size
- Image Resizer+
- Desqueeze
-
2
Open the app and select the photo you want to resize. You’ll likely be prompted to give the app access to your photos. This is necessary for the app to be able to browse the photos stored on your device. Find the photo you want to resize and tap it to open it.[24]
-
3
Select the «Resize» menu. Most apps have various tools you can choose from, including resizing. Tap the «Resize» button to begin resizing the image.[25]
-
4
Enter a new size for the image. Different apps will have different interfaces, but in most cases, you can select from a variety of preset sizes or you can enter a specific resolution. The width and height will automatically change together so that the original proportions are maintained.[26]
- If you don’t mind if the image gets stretched or squished, you can tap the chainlink or padlock button to enter different values into each field.
-
5
Save your resized image to your camera roll. After resizing the image, tap the «Save» or “Download” button to save it to your camera roll. You’ll be able to find it in your Photos app like you would any other image on your iOS device.[27]
Advertisement
-
1
Download an app that can resize pictures. Android devices do not come with an app for resizing images, but there are countless third-party apps available that can do so. You can download these apps from the Google Play Store. Some of the most popular image resizing apps include:[28]
- Image Size
- Photo & Picture Resizer
- Resize Me!
- Image Shrink
-
2
Open the downloaded app and give it access to your photos. When you launch the app for the first time, you may be prompted to give the app access to your stored photos. This is essential so that the app can load photos stored on your device.[29]
-
3
Open the photo you want to resize. Use the app to navigate to the photo that you want to resize. The process will vary depending on the app, but generally, you can tap the «Select photo» button on the app’s main menu to open your device’s stored photos.[30]
-
4
Select the resize tool. After opening the image, you’ll likely need to select the «Resize» tool in the app. Again, the process will vary for this depending on the app you are using.[31]
-
5
Select the size you want to make the image. You’ll be shown the original size in both pixels and file size. Depending on the app, you may be able to select from preset image sizes, or enter a specific size. When entering a custom size, you can just enter one value and the other value will scale accordingly.[32]
-
6
Save your resized image. Depending on the app, the resized image may be saved automatically, or you may need to manually tap the «Save» button. The original image will not be changed.[33]
- Each app will store its resized images in a different location. Generally, you’ll be able to find the pictures by opening your Pictures folder and then opening the folder named after the app.
Advertisement
Add New Question
-
Question
How do I change the resolution in Paint?
In the bottom of the screen, you’ll see a section saying (A number) x (A numper) PX. That is your resolution size. you can drag the squares of the corner of the canvas and the resolution number will increase/ decrease. Change to desired size.
-
Question
When I open and save in paint, without doing image size reduction, the file size reduces by 50 percent. Does this cause a loss in resolution?
When you open and save a JPEG using Paint, the file is trans-coded so that Paint can read it. For example, if your image has 16bit encode for color, then it might reduce resolution by 50 percent.
-
Question
How can I resize several JPEGs at once?
You should be able to use any of the suggested websites to work with multiple JPEGs at once, although you may be limited to a certain number at a time.
Ask a Question
200 characters left
Include your email address to get a message when this question is answered.
Submit
Advertisement
-
It’s best to only resize a JPEG to a smaller size.
-
Your JPEG will lose quality if you resize it to a larger size.
-
If you make a JPEG larger, you’ll stretch the pixels and the photo will appear blurry and low quality.
Advertisement
About This Article
Article SummaryX
1. Visit an image resizing website.
2. Upload the image.
3. Select your desired size.
4. Select compression (if available).
5. Download the resized image.
Did this summary help you?
Thanks to all authors for creating a page that has been read 2,226,794 times.
Did this article help you?
Вы не знаете, как изменить размер изображения? Это очень простая задача, так как все, что вам нужно, уже установлено на вашем компьютере. Прочитайте это руководство, и вы узнаете, как изменять размер фотографии с помощью 5 простых инструментов.
- Способ 1. Как изменить размер картинки с помощью Microsoft Paint
- Способ 2. Как изменить размер изображения с помощью MS Photo Gallery
- Способ 3. Как изменить размер изображения с помощью Photoscape
- Способ 4. Как изменить размер изображения с помощью IrfanView
- Способ 5. Как изменить размер изображения онлайн
- Найдите и запустите MS Paint. Он предустановлен на всех версиях операционной системы Windows. Пуск> Все программы> Стандартные> Paint:

- Перетяните изображение в окно Paint или используйте Меню> Открыть (Ctrl + O).
- В главном меню программы найдите пункт «Изменить размер» и выберите его:

- Откроется панель изменения размеров и пропорций изображения. Значение вы можете указать в пикселях. Не забудьте установить флажок «Сохранять пропорции». Иначе изображение будет деформировано:

- Чтобы увеличить размер картинки, нажмите кнопку «ОК» и сохраните фотографию.
Советы:
- Если не получается задать нужные размеры фотографии, не растягивая ее, вы можете использовать инструмент «Обрезка», чтобы удалить ненужные края. Как это сделать, описано в пункте 3;
- Чтобы быстрее открыть фотографию, кликните по ней правой кнопкой мыши и выберите из контекстного меню пункт «Открыть с помощью Paint»;
- Лучше всего сохранять изображение в том же формате, что и оригинал.
- Если Microsoft Photo Gallery не установлена на вашем компьютере (Пуск> Фотогалерея), вам необходимо скачать и установить его как часть Windows Essentials 2012;
- Запустите MS Photo Gallery и найдите свой графический файл;
- Кликните по нему правой кнопкой мыши и выберите пункт «Изменить размер…»:

- Выберите готовый пресет: «Малый 640 пикселей», «Средний 1024», «Большой 1280» и т.д.

- Нажмите «Изменить размер и сохранить». После того, как увеличите размер картинки, изображение будет размещено в той же папке, в ней также останется оригинал.
Советы:
- Если нужно задать точный размер изображения, в выпадающем меню выберите пункт «Пользовательский» и установите размер для большей стороны фотографии;
- Чтобы изменить размер нескольких фотографий одновременно, выберите их, удерживая нажатой клавишу Ctrl.
Можно увеличить размер картинки в Фотошопе. Или использовать для этого Photoscape.
- Загрузите Photoscape и установите его. Запустите программу;
- Перейдите на вкладку «Редактор» и найдите фотографию, которую хотите изменить:

- В нижней части изображения находится кнопка «Изменить размер», нажмите на нее.
- Задайте новый размер фотографий. Убедитесь, что опция «Сохранять соотношение сторон» включена и нажмите кнопку «OK»:

- Сохраните отредактированное изображение.
Советы:
- Если необходимо изменить размер нескольких изображений, используйте вкладку «Пакетный редактор». Добавьте папку и измените размер всех фотографий в ней;
- Если вы не знаете точный размер, можно задать «Процент» от исходного размера.
- Установите IrfanView — отличный инструмент для просмотра и увеличения размера картинки;
- Добавьте фотографию, перетянув ее в окно программы, или нажав первую кнопку в панели инструментов:

- Перейдите на вкладку «Изображение», выберите «Изменить размер /пропорции» (Ctrl + R);
- Установите новый размер в пикселях, сантиметрах, дюймах, или в процентах от исходного изображения:

- Сохраните изображение.
Советы:
- Вы можете использовать стандартные размеры: 640 на 480 пикселей, 800 на 600 пикселей, 1024 на 768 пикселей и т.д.;
- Чтобы сохранить высокое качество фотографий, убедитесь, что для параметра DPI задано значение не менее 300.
- Чтобы увеличить размер картинки онлайн, перейдите на сайт PicResize.
- Нажмите кнопку «Browse», чтобы выбрать фотографию. Нажмите «Continue»:

- Выберите процент от исходного изображения, например на 50% меньше. Инструмент отобразит размер изображения на выходе. В качестве альтернативы можно ввести точный размер, выбрав в выпадающем меню пункт «Custom Size»:

- Затем нажмите «I’m Done, Resize my Picture» и немного подождите;
- После этого вы сможете просмотреть новое изображение. Сохраните его на ПК или опубликуйте его в социальных сетях:

Советы:
- Вы можете увеличить размер картинки из интернета, не сохраняя ее на свой компьютер. Просто измените «From Computer» на «From URL»;
- Можно ограничить размер изображения определенным значением, и инструмент автоматически настроит его качество;
- С помощью PicResize вы также можете выполнить пакетное изменение размеров изображений. В меню «Tools» выберите «Resize Bulk Photos», добавьте несколько файлов и измените размеры изображений.
Мы надеемся, что наши советы помогли вам успешно справиться с этой задачей.