[This article was first published on stevenmortimer.com, and kindly contributed to R-bloggers]. (You can report issue about the content on this page here)
Want to share your content on R-bloggers? click here if you have a blog, or here if you don’t.

The R community is a diverse and inclusive group. About a month ago (June 2020)
GitHub announced it would start to remove references to ‘master’ across its
sites and I’m surprised the R community hasn’t jumped on the opportunity to
be on the bleeding edge of this change. I think we can all take a very quick and
very small step forward in removing divisive language in tech by changing the default
branch name in R package repositories to ‘main’ instead of ‘master’. There are a
wealth of other posts/tutorials that others have written. Here is a small sampling
listed in order of publishing date:
- Easily rename your Git default branch from master to main by Scott Hanselman
- Git: Renaming the “master” branch by Richard Walters
- How To: Safely Rename master Branch on GitHub by Jake Jarvis
Eugene Shen even made a small web app to automate the entire process for you that is
available at: (https://eyqs.ca/tools/rename/).
I thought I’d share the 5 simple steps that I tested and used to make the change in under 1
minute. Yes, you can do this in under a minute, so what’s stopping you? If you
are concerned about compatibility, GitHub is providing updates on their
renaming efforts here: https://github.com/github/renaming.
Below are screenshots to walk you through each step. In addition, there is a block
of code with all Terminal commands in one place at the end of this post
here and GitHub repo here:
https://github.com/StevenMMortimer/master-to-main.
- Step 1 – Move the master branch to ‘main’
- Step 2 – Push ‘main’ to remote repo
- Step 3 – Point HEAD to ‘main’ branch
- Step 4 – Change default branch to ‘main’ on GitHub site
- Step 5 – Delete ‘master’ branch on the remote repo
Step 1 – Move the ‘master’ branch to ‘main’
Run the following command which creates a branch called ‘main’ using the history
from ‘master’. Using the argument -m will transfer all of the commit history on
the ‘master’ branch to your new ‘main’ branch so nothing gets lost.
git branch -m master main
Step 2 – Push ‘main’ to remote repo
Remember that git is version control software on your local machine and GitHub
is the remote server that stores your code. For this reason, you’ll have to push
your new ‘main’ branch up to GitHub and tell the local branch to start tracking
the remote branch with the same name.
git push -u origin main
Step 3 – Point HEAD to ‘main’ branch
At this stage if ‘master’ was your default branch you cannot remove it without
first changing HEAD, the pointer to the current branch reference. This following
command will point it to ‘main’.
git symbolic-ref refs/remotes/origin/HEAD refs/remotes/origin/main
All three steps are shown in the screenshot below:

At this point you can take a breather. You’re on the home stretch! If you want
to check that things are going as planned then you’re welcome to run the following
that should show the HEAD is pointing to main which now frees you up to delete ‘master’.
Note: When you enter this command in your Terminal you will have to type :q to
exit it. Not CTRL+C, ESC, etc.
git branch -a

Step 4 – Change default branch to ‘main’ on GitHub site
At this point you’ve succesfully transitioned everything to the ‘main’ branch, but
you can’t delete the ‘master’ branch without changing the default branch in GitHub
to something other than ‘master’. This is the only step that requires you to leave
the Terminal and navigate in your browser to your GitHub repository. From there,
click "Settings" -> "Branches" on the left rail and change the default branch to
‘main’. I’ve included some screenshots below and GitHub provides instructions for
doing this here: https://docs.github.com/en/github/administering-a-repository/setting-the-default-branch.


Step 5 – Delete ‘master’ branch on the remote repo
Now that the local ‘master’ is gone and there’s nothing pointing to it on Github
you can delete it with the following command:
git push origin --delete master

That’s it! You’re done! You should no longer see “master” or “remotes/origin/master” locally
or on your GitHub repository. If you want to check, you can always run the following:
git branch -a

Feel free to let me know if this worked for you or if you had issues! Note:
I take no responsibility for messing up your git repo. In case this wasn’t clear
enough, all instructions are available in its own repo here: https://github.com/StevenMMortimer/master-to-main.
All commands
# Step 1
# create main branch locally, taking the history from master
git branch -m master main

# Step 2
# push the new local main branch to the remote repo (GitHub)
git push -u origin main

# Step 3
# switch the current HEAD to the main branch
git symbolic-ref refs/remotes/origin/HEAD refs/remotes/origin/main

# Step 4
# change the default branch on GitHub to main
# https://docs.github.com/en/github/administering-a-repository/setting-the-default-branch

# Step 5
# delete the master branch on the remote
git push origin --delete master
[This article was first published on stevenmortimer.com, and kindly contributed to R-bloggers]. (You can report issue about the content on this page here)
Want to share your content on R-bloggers? click here if you have a blog, or here if you don’t.
The R community is a diverse and inclusive group. About a month ago (June 2020)
GitHub announced it would start to remove references to ‘master’ across its
sites and I’m surprised the R community hasn’t jumped on the opportunity to
be on the bleeding edge of this change. I think we can all take a very quick and
very small step forward in removing divisive language in tech by changing the default
branch name in R package repositories to ‘main’ instead of ‘master’. There are a
wealth of other posts/tutorials that others have written. Here is a small sampling
listed in order of publishing date:
- Easily rename your Git default branch from master to main by Scott Hanselman
- Git: Renaming the “master” branch by Richard Walters
- How To: Safely Rename master Branch on GitHub by Jake Jarvis
Eugene Shen even made a small web app to automate the entire process for you that is
available at: (https://eyqs.ca/tools/rename/).
I thought I’d share the 5 simple steps that I tested and used to make the change in under 1
minute. Yes, you can do this in under a minute, so what’s stopping you? If you
are concerned about compatibility, GitHub is providing updates on their
renaming efforts here: https://github.com/github/renaming.
Below are screenshots to walk you through each step. In addition, there is a block
of code with all Terminal commands in one place at the end of this post
here and GitHub repo here:
https://github.com/StevenMMortimer/master-to-main.
- Step 1 – Move the master branch to ‘main’
- Step 2 – Push ‘main’ to remote repo
- Step 3 – Point HEAD to ‘main’ branch
- Step 4 – Change default branch to ‘main’ on GitHub site
- Step 5 – Delete ‘master’ branch on the remote repo
Step 1 – Move the ‘master’ branch to ‘main’
Run the following command which creates a branch called ‘main’ using the history
from ‘master’. Using the argument -m will transfer all of the commit history on
the ‘master’ branch to your new ‘main’ branch so nothing gets lost.
git branch -m master main
Step 2 – Push ‘main’ to remote repo
Remember that git is version control software on your local machine and GitHub
is the remote server that stores your code. For this reason, you’ll have to push
your new ‘main’ branch up to GitHub and tell the local branch to start tracking
the remote branch with the same name.
git push -u origin main
Step 3 – Point HEAD to ‘main’ branch
At this stage if ‘master’ was your default branch you cannot remove it without
first changing HEAD, the pointer to the current branch reference. This following
command will point it to ‘main’.
git symbolic-ref refs/remotes/origin/HEAD refs/remotes/origin/main
All three steps are shown in the screenshot below:
At this point you can take a breather. You’re on the home stretch! If you want
to check that things are going as planned then you’re welcome to run the following
that should show the HEAD is pointing to main which now frees you up to delete ‘master’.
Note: When you enter this command in your Terminal you will have to type :q to
exit it. Not CTRL+C, ESC, etc.
git branch -a
Step 4 – Change default branch to ‘main’ on GitHub site
At this point you’ve succesfully transitioned everything to the ‘main’ branch, but
you can’t delete the ‘master’ branch without changing the default branch in GitHub
to something other than ‘master’. This is the only step that requires you to leave
the Terminal and navigate in your browser to your GitHub repository. From there,
click "Settings" -> "Branches" on the left rail and change the default branch to
‘main’. I’ve included some screenshots below and GitHub provides instructions for
doing this here: https://docs.github.com/en/github/administering-a-repository/setting-the-default-branch.
Step 5 – Delete ‘master’ branch on the remote repo
Now that the local ‘master’ is gone and there’s nothing pointing to it on Github
you can delete it with the following command:
git push origin --delete master
That’s it! You’re done! You should no longer see “master” or “remotes/origin/master” locally
or on your GitHub repository. If you want to check, you can always run the following:
git branch -a
Feel free to let me know if this worked for you or if you had issues! Note:
I take no responsibility for messing up your git repo. In case this wasn’t clear
enough, all instructions are available in its own repo here: https://github.com/StevenMMortimer/master-to-main.
All commands
# Step 1
# create main branch locally, taking the history from master
git branch -m master main

# Step 2
# push the new local main branch to the remote repo (GitHub)
git push -u origin main

# Step 3
# switch the current HEAD to the main branch
git symbolic-ref refs/remotes/origin/HEAD refs/remotes/origin/main

# Step 4
# change the default branch on GitHub to main
# https://docs.github.com/en/github/administering-a-repository/setting-the-default-branch

# Step 5
# delete the master branch on the remote
git push origin --delete master
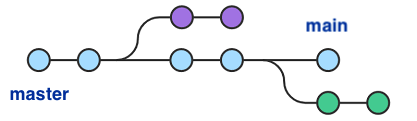
If you’ve been using Git for a while, you’ve probably come across the term master. You might’ve seen it when you run git status or git branch.
It’s a somewhat old-fashioned phrase and you may well be wondering where it comes from or how you can change it. Whether you’re a command-line user or a fan of GitHub, you can change branch names and even set the default branch name to something appropriate to your needs.
What Is the Default Branch?
Every brand new Git repository has a default branch, even if it doesn’t really branch off anything! Branches are simply commit references, and there’s always a HEAD reference pointing to the current branch.
Historically, Git has named that default branch master. Although you can rename it, many people stick with the default, so you’ll see lots of projects using master as their default branch.
Branch Naming and Why Master Is Being Phased Out
Recent versions of Git (2.28 and later) produce the following hint when you create a new repository using git init:
Using ‘master’ as the name for the initial branch. This default branch name is subject to change. To configure the initial branch name to use in all of your new repositories, which will suppress this warning, call: git config —global init.defaultBranch <name> Names commonly chosen instead of ‘master’ are ‘main’, ‘trunk’ and ‘development’. The just-created branch can be renamed via this command: git branch -m <name>
The master/slave terminology has a long history in computing, especially in reference to hardware such as disk drives. Other version control systems such as BitKeeper, a predecessor to Git, have also used the term. However, the term has become somewhat outdated for its association with colonialism.
The Git maintainers have worked with the wider development community to address these concerns. Aside from any offense it may cause, master isn’t a particularly descriptive name anyway. It implies a relationship with some other, unnamed entity, but it doesn’t represent the unique status of the initial branch. Many people consider the name main to do a better job of describing this branch and its typical usage.
The name main is short, translates easily, and is in common use. The fact that it begins with the same two letters as master may help if you need to retrain your muscle memory.
How to Make the Change Using Command Line Git
As Git itself explains, you can configure the default branch name with the following command:
git config --global init.defaultBranch main
The —global ensures this setting applies to all repositories created by the current user.
Once set, new repositories will use the new default name:
 $ git init
Initialized empty Git repository in /private/tmp/bar/.git/
$ git status -sb
## No commits yet on main
Note that you can also rename a branch at any time using the -m option, e.g.
git branch -m main
One day, Git may make this change for you, by using the name main by default, for all new repositories. It’s still useful to know how to change it yourself, and you may have a personal or team preference for a name other than main.
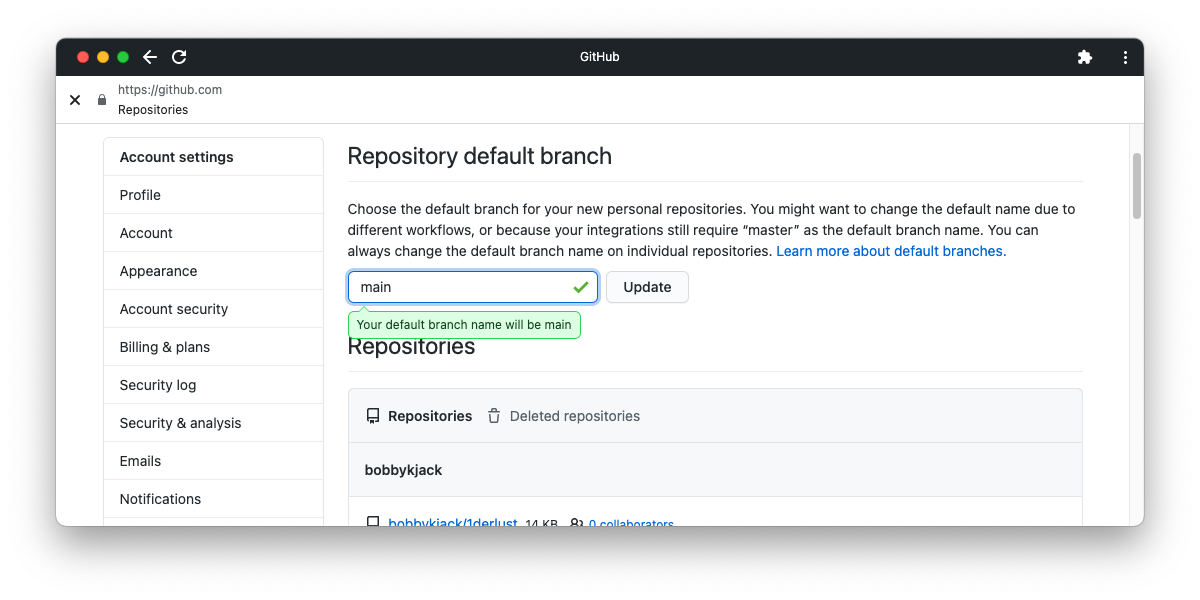
How to Set the Default Branch Name in GitHub
Branches created on GitHub are now automatically named main instead of master. However, you can still change the name of this default by following these steps:
- Open Settings via your profile photo in the top-right.
- Click Repositories in the left-hand menu.
- Under the Repository default branch section, choose an alternative name.
- Click Update.
Take Control of Git’s Default Branch Name
Git has historically named its default branch master, but you don’t have to keep it that way!
Whether you think an alternative is more inclusive, easier to understand, or simply shorter to type, it’s easy to change. The default branch is just one tiny part of Git’s enormous repertoire. To take your Git skill from beginner to advanced, check out our comprehensive guide next.
If you’ve been using Git for a while, you’ve probably come across the term master. You might’ve seen it when you run git status or git branch.
It’s a somewhat old-fashioned phrase and you may well be wondering where it comes from or how you can change it. Whether you’re a command-line user or a fan of GitHub, you can change branch names and even set the default branch name to something appropriate to your needs.
What Is the Default Branch?
Every brand new Git repository has a default branch, even if it doesn’t really branch off anything! Branches are simply commit references, and there’s always a HEAD reference pointing to the current branch.
Historically, Git has named that default branch master. Although you can rename it, many people stick with the default, so you’ll see lots of projects using master as their default branch.
Branch Naming and Why Master Is Being Phased Out
Recent versions of Git (2.28 and later) produce the following hint when you create a new repository using git init:
Using ‘master’ as the name for the initial branch. This default branch name is subject to change. To configure the initial branch name to use in all of your new repositories, which will suppress this warning, call: git config —global init.defaultBranch <name> Names commonly chosen instead of ‘master’ are ‘main’, ‘trunk’ and ‘development’. The just-created branch can be renamed via this command: git branch -m <name>
The master/slave terminology has a long history in computing, especially in reference to hardware such as disk drives. Other version control systems such as BitKeeper, a predecessor to Git, have also used the term. However, the term has become somewhat outdated for its association with colonialism.
The Git maintainers have worked with the wider development community to address these concerns. Aside from any offense it may cause, master isn’t a particularly descriptive name anyway. It implies a relationship with some other, unnamed entity, but it doesn’t represent the unique status of the initial branch. Many people consider the name main to do a better job of describing this branch and its typical usage.
The name main is short, translates easily, and is in common use. The fact that it begins with the same two letters as master may help if you need to retrain your muscle memory.
How to Make the Change Using Command Line Git
As Git itself explains, you can configure the default branch name with the following command:
git config --global init.defaultBranch main
The —global ensures this setting applies to all repositories created by the current user.
Once set, new repositories will use the new default name:
 $ git init
Initialized empty Git repository in /private/tmp/bar/.git/
$ git status -sb
## No commits yet on main
Note that you can also rename a branch at any time using the -m option, e.g.
git branch -m main
One day, Git may make this change for you, by using the name main by default, for all new repositories. It’s still useful to know how to change it yourself, and you may have a personal or team preference for a name other than main.
How to Set the Default Branch Name in GitHub
Branches created on GitHub are now automatically named main instead of master. However, you can still change the name of this default by following these steps:
- Open Settings via your profile photo in the top-right.
- Click Repositories in the left-hand menu.
- Under the Repository default branch section, choose an alternative name.
- Click Update.
Take Control of Git’s Default Branch Name
Git has historically named its default branch master, but you don’t have to keep it that way!
Whether you think an alternative is more inclusive, easier to understand, or simply shorter to type, it’s easy to change. The default branch is just one tiny part of Git’s enormous repertoire. To take your Git skill from beginner to advanced, check out our comprehensive guide next.
Управление ветками
Теперь, когда вы уже попробовали создавать, объединять и удалять ветки, пора познакомиться с некоторыми инструментами для управления ветками, которые вам пригодятся, когда вы начнёте использовать ветки постоянно.
Команда git branch делает несколько больше, чем просто создаёт и удаляет ветки.
При запуске без параметров, вы получите простой список имеющихся у вас веток:
$ git branch
  iss53
* master
  testing
Обратите внимание на символ *, стоящий перед веткой master: он указывает на ветку, на которой вы находитесь в настоящий момент (т. е. ветку, на которую указывает HEAD).
Это означает, что если вы сейчас сделаете коммит, ветка master переместится вперёд в соответствии с вашими последними изменениями.
Чтобы посмотреть последний коммит на каждой из веток, выполните команду git branch -v:
$ git branch -v
  iss53   93b412c Fix javascript issue
* master  7a98805 Merge branch 'iss53'
  testing 782fd34 Add scott to the author list in the readme
Опции --merged и --no-merged могут отфильтровать этот список для вывода только тех веток, которые слиты или ещё не слиты в текущую ветку.
Чтобы посмотреть те ветки, которые вы уже слили с текущей, можете выполнить команду git branch --merged:
$ git branch --merged
  iss53
* master
Ветка iss53 присутствует в этом списке потому что вы ранее слили её в master.
Те ветки из этого списка, перед которыми нет символа *, можно смело удалять командой git branch -d; наработки из этих веток уже включены в другую ветку, так что ничего не потеряется.
Чтобы увидеть все ветки, содержащие наработки, которые вы пока ещё не слили в текущую ветку, выполните команду git branch --no-merged:
$ git branch --no-merged
  testing
Вы увидите оставшуюся ветку.
Так как она содержит ещё не слитые наработки, попытка удалить её командой git branch -d приведёт к ошибке:
$ git branch -d testing
error: The branch 'testing' is not fully merged.
If you are sure you want to delete it, run 'git branch -D testing'.
Если вы действительно хотите удалить ветку вместе со всеми наработками, используйте опцию -D, как указано в подсказке.
|
Подсказка |
Если в качестве аргумента не указан коммит или ветка, то опции Вы всегда можете указать дополнительный аргумент для вывода той же информации, но относительно указанной ветки предварительно не извлекая и не переходя на неё. |
Переименование ветки
|
Внимание |
Не переименовывайте ветки, которые всё ещё используются другими участниками. |
Предположим, у вас есть ветка с именем bad-branch-name, и вы хотите изменить её на corrected-branch-name, сохранив при этом всю историю.
Вместе с этим, вы также хотите изменить имя ветки на удалённом сервере (GitHub, GitLab или другой сервер).
Как это сделать?
Переименуйте ветку локально с помощью команды git branch --move:
$ git branch --move bad-branch-name corrected-branch-nameВетка bad-branch-name будет переименована в corrected-branch-name, но это изменение пока только локальное.
Чтобы все остальные увидели исправленную ветку в удалённом репозитории, отправьте её туда:
$ git push --set-upstream origin corrected-branch-nameТеперь проверим, где мы сейчас находимся:
$ git branch --all
* corrected-branch-name
  main
  remotes/origin/bad-branch-name
  remotes/origin/corrected-branch-name
  remotes/origin/main
Обратите внимание, что текущая ветка corrected-branch-name, которая также присутствует и на удалённом сервере.
Однако, старая ветка всё ещё по-прежнему там, но её можно удалить с помощью команды:
$ git push origin --delete bad-branch-nameТеперь старое имя ветки полностью заменено исправленным.
Изменение имени главной ветки
|
Предупреждение |
Изменение имени ветки, например master/main/mainline/default, сломает интеграции, службы, вспомогательные утилиты и скрипты сборки, которые использует ваш репозиторий. |
Переименуйте локальную ветку master в main с помощью следующей команды:
$ git branch --move master mainПосле этого, локальной ветки master больше не существует, потому что она была переименована в ветку main.
Чтобы все остальные могли видеть новую ветку main, вам нужно отправить её в общий репозиторий.
Это делает переименованную ветку доступной в удалённом репозитории.
$ git push --set-upstream origin mainВ итоге, состояние репозитория становится следующим:
$ git branch --all
* main
  remotes/origin/HEAD -> origin/master
  remotes/origin/main
  remotes/origin/master
Ваша локальная ветка master исчезла, так как она заменена веткой main.
Ветка main доступна в удалённом репозитории.
Старая ветка master всё ещё присутствует в удалённом репозитории.
Остальные участники будут продолжать использовать ветку master в качестве основы для своей работы, пока вы не совершите ряд дополнительных действий.
Теперь, для завершения перехода на новую ветку перед вами стоят следующие задачи:
-
Все проекты, которые зависят от текущего, должны будут обновить свой код и/или конфигурацию.
-
Обновите конфигурацию всех запускаемых тестов.
-
Исправьте скрипты сборки и публикации артефактов.
-
Поправьте настройки репозитория на сервере: задайте новую ветку по умолчанию, обновите правила слияния, а также прочие настройки, которые зависят от имени веток.
-
Обновите документацию, исправив ссылки, указывающие на старую ветку.
-
Слейте или отмените запросы на слияние изменений, нацеленные на старую ветку.
После того, как вы выполнили все эти задачи и уверены, что ветка main работает так же, как ветка master, вы можете удалить ветку master:
$ git push origin --delete masterI have a master branch and a main branch in git-hub. This was not intentional I realized that I have been pushing with master so everything went to master branch. However git-hub is now using main instead of master as first position. How can I move my master branch into main branch?
asked May 19, 2021 at 11:36
![]()
There are multipe ways to achieve this, but with pure git it can be done as follows:
#Change to the main branch
git checkout main
#Rebase the main branch on top of the current master. In easy words, go to the last point the two branches have in common, then add all the changes master did in the meanwhile and then add the changes done to main. If main is empty this is equivalent to
# git checkout master; git branch -D main; git checkout -b main
#which deletes the current main and then copies master over to main
git rebase master
# push back to GitHub (--force, because rabse does not add a commit, but changes the status, so push will be rejected without it)
git push --force
answered May 19, 2021 at 12:02
![]()
FloLieFloLie
1,8001 gold badge7 silver badges19 bronze badges
1
You can delete or rename a branch through the github web interface by visiting
https://github.com/YourName/YourRepo/branches
At time of writing you can access that page from the front page of your repository through the branches link:

And you can click the writing implement buttons to rename their associated branch:

It is worth noting that deleting and renaming branches through github is just as potentially destructive as doing it with CLI git or a GUI git client. You can of course re-push branches from your local clone, but you should make sure that clone is up to date before proceeding if you feel unsure.
answered May 19, 2021 at 13:12
![]()
spkrtnspkrtn
1,22410 silver badges17 bronze badges
Create a PR from master to main in the GitHub Webinterface.
If you want to do it local:
git checkout main
git merge master
git push
answered May 19, 2021 at 11:39
![]()
Set local master to track remote main:
git branch --set-upstream-to origin/main master
For first pull it will show error refusing to merge unrelated histories so you can pull with git pull origin main --allow-unrelated-histories
answered Dec 14, 2022 at 19:48
![]()
ms2rms2r
1642 silver badges15 bronze badges
Push it into the main branch in GitHub.
answered May 19, 2021 at 11:40
![]()