Одним из изменений дизайна в watchOS 7 является удаление жеста Force Touch. Часы больше не будут определять жесткие нажатия на дисплее. Apple обновила многие приложения, которые ранее скрывали кнопки в контекстном меню Force Touch, чтобы вместо этого отображать эти элементы управления в виде экранных кнопок.
Это также влияет на то, как изменить макет главного экрана. В предыдущей версии watchOS вы могли переключаться между списком и сеткой, просто нажимая на главном экране. Теперь вам нужно погрузиться в приложение «Настройки».
Удаление Force Touch в watchOS 7 происходит спустя год после того, как Apple отказалась от функциональности 3D Touch в iOS 13. Это предвещало удаление чувствительного к давлению оборудования 3D Touch в iPhone 11 и iPhone 11 Pro.
Нетрудно представить, что в будущих Apple Watch также появится датчик Force Touch. Это может сделать более тонкие панели дисплея и освободить место для других внутренних компонентов, а также обеспечить экономию затрат Apple. Следующее поколение Apple Watch, как ожидается, будет представлено осенью.
В watchOS 6 и более ранних выпусках вы могли сильно нажимать на сотовую сетку, чтобы показать переключение представления списка. Это больше невозможно в watchOS 7, так как система больше не различает длительное нажатие и устойчивое давление. Попытка старого способа перейти к просмотру списка в watchOS 7 просто заставит ваши приложения покачиваться и переходить в режим редактирования ячеистой сети.
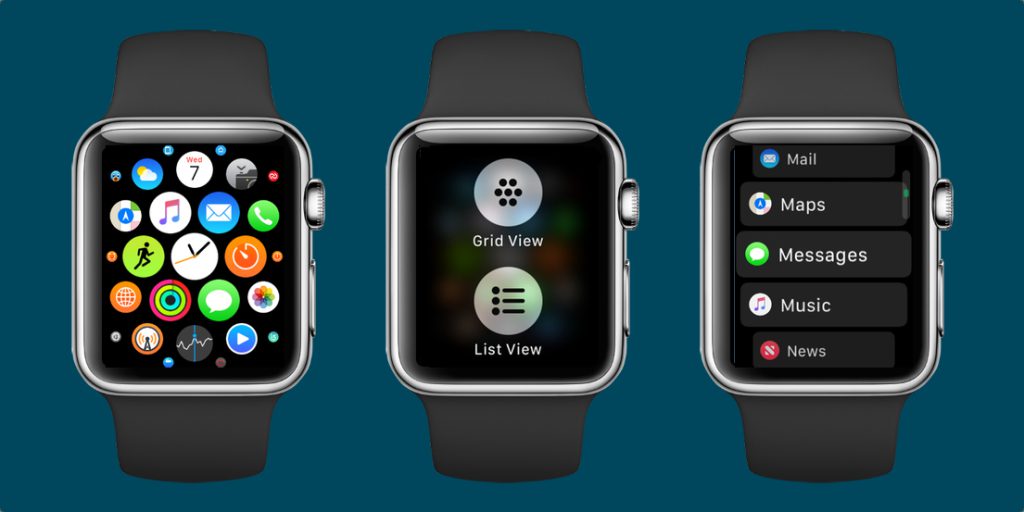
Таким образом, в watchOS 7 представление сетки или представление списка теперь является явным предпочтением в настройках:

Разбудите свои Apple Watch и нажмите на цифровую корону, чтобы перейти на домашний экран с сотовой сеткой. Нажмите на приложение «Настройки». Прокрутите вниз и выберите «Вид приложения». Выберите «Вид списка» в меню «Макет приложения».
Теперь вы можете выйти из настроек и увидеть макет списка. Вы можете переключиться обратно, вернувшись в Настройки и выбрав макет Grid View.
Эти параметры макета домашнего экрана являются хорошим примером того, как удаление Force Touch имеет заметные последствия для часов. Раньше переключение между сеткой и представлением списка казалось простым переключением: просто нажмите на сотовую сетку и в крайнем случае посмотрите алфавитный список. Теперь в watchOS 7 с опцией, скрытой глубже в системе, это больше похоже на преднамеренный выбор: хотите ли вы постоянно использовать список или сетку?
![]() |
|
7 июня 2017 14
В watchOS 4 не только добавили новые циферблаты и поработали над стандартными приложениями.
Как оказалось, в новой прошивке для Apple Watch можно изменить порядок отображения программ и сделать из них список.
Как это сделать
Шаг 1. Переключитесь на рабочий стол, нажав колесико Digital Crown.
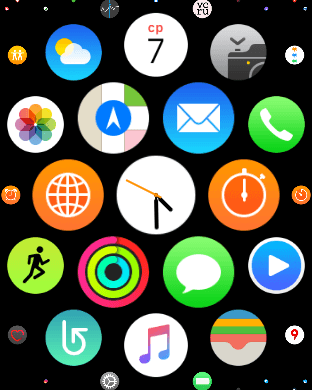
Шаг 2. Нажмите сильнее на экран рабочего стола.

Шаг 3. Выберите «Вид списком».
…
PROFIT!
Теперь перед вами отображаются приложения в виде списка, по алфавиту. Управление происходит свайпами вверх-вниз, либо поворотом Digital Crown.
 (3 голосов, общий рейтинг: 5.00 из 5)
🤓 Хочешь больше? Подпишись на наш Telegram.
![]()
iPhones.ru
Удобно.
- watchOS 4,
- инструкции
![]()
Артём Баусов
@Dralker
Главный по новостям, кликбейту и опечаткам. Люблю электротехнику и занимаюсь огненной магией.
Telegram: @TemaBausov
Отображение приложений на Apple Watch можно назвать особенным, потому что производитель создал для часов уникальный интерфейс. Например, приложение «Часы» занимает центральное место в куче значков и отображается крупным планом. Приложение окружено меньшими значками приложений и еще меньшими значками рядом с ними.
![]()
♥ ПО ТЕМЕ: Как использовать Dock на Apple Watch для переключения между приложениями.
Когда вы проводите пальцем по экрану, то заметите, что размер значков меняется в зависимости от их положения. Это приятный эффект, но его можно и отключить. В результате все значки будут отображаться одинакового размера, что позволит их легче найти на маленьком экране Apple Watch. Кроме того, есть возможность просматривать приложения Apple Watch в виде списка.
♥ ПО ТЕМЕ: Для чего нужен режим «Театр» (иконка с масками) в Apple Watch.
1. Откройте «Настройки» на Apple Watch.
2. Перейдите к разделу «Универсальный доступ».
![]()
3. Коснитесь параметра «Уменьшение движения».
4. Установите переключатель «Уменьшение движения» в положение Включено.
![]()
С этого момента элементы на экране будут меньше двигаться, а все значки станут одинакового размера.
Было и стало:
![]()
Вы также можете включить или отключить эту опцию через приложение Apple Watch на вашем iPhone. На смартфоне перейдите по пути Мои часы → Универсальный доступ → Уменьшение движения и включите одноименную опцию.
♥ ПО ТЕМЕ: 3 вида фонарика в Apple Watch: для чего нужны, как включить и выключить.
Как показать приложения Apple Watch в виде списка?
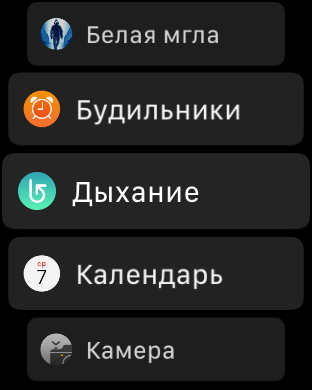
Начиная с watchOS 4, можно отображать приложения Apple Watch в виде списка, а не сетки значков. Для этого нажмите на колесико Digital Crown, чтобы перейти на домашний экран. Теперь нажмите и удерживайте палец на дисплее, чтобы появилось меню выбора вариантов отображения значков. Вам нужен вариант «Вид списком».
![]()
![]()
Приложения на экране сразу же будут перечислены в виде списка.
Эти же параметры можно изменить по пути: Настройки → Просмотр приложений.
![]()
![]()
Смотрите также:
- Как звонить с помощью Apple Watch. Настройка и особенности функции.
- Digital Touch, или как на Apple Watch отправлять анимационные рисунки, пульс (биение сердца), поцелуй и т.д.
- Как настроить автоматическую смену циферблатов Apple Watch в зависимости от времени и места.
What to Know
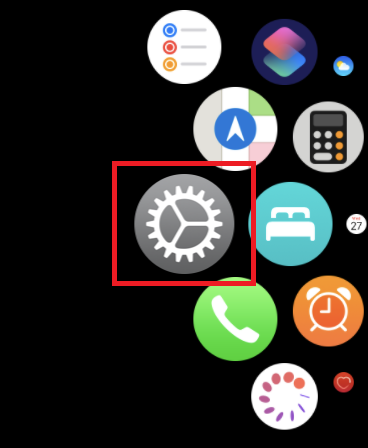
- To access Settings, press the Digital Crown > tap the gray and white gear icon.
- Settings include Time, Airplane Mode, Bluetooth, Do Not Disturb, Brightness, Text, Sound & Haptics, and Passcode.
This article explains how to customize your Apple Watch through the settings feature. The instructions apply to all Apple Watch models.
How to Get to Settings on Apple Watch
Even without third-party apps, the watch provides many base features that can be controlled through its Settings interface.
To access Settings, press the Digital Crown to go to the Home screen, then tap the gray and white gear icon. Each option presented in this interface is described below and listed in the order in which it appears on the device.
As you select each option, you’ll find new commands and features to try out.
Depending on the model of your watch, some of the menu options may look different, but the steps for changing settings are basically the same on all Apple Watches.
Change the Time
You can change the time shown on your watch face through this option, moving it up to 60 minutes ahead using the wheel and the accompanying Set button. If you’re often late for meetings, or anything else, this self-induced psychological trick may be what you need to get where you need to be a few minutes early or on time.
This only affects the time shown on the face, not the value used by alerts, notifications, and alarms on your watch. Those functions use the actual time.
Set Your Watch to Airplane Mode
This section contains a single button that toggles Airplane Mode off and on. When activated, all wireless transmission on the watch is disabled, including Wi-Fi, Bluetooth, and cellular communications such as phone calls and data.
Airplane Mode comes in handy while in flight, as well as any other situation where you’d like to stifle all communication methods without powering off your device.
When enabled, an orange airplane icon displays toward the top of the watch screen.
Turn Bluetooth On or Off
Your Apple Watch can be paired with Bluetooth-enabled accessories such as headphones or a speaker. Any Bluetooth devices that are in pairing mode and within range of your watch appear on this screen. A Bluetooth device can be paired by selecting its respective name and entering a key or pin number if requested.
The Bluetooth screen contains two sections, one for standard devices and another for those specific to tracking your health stats. One commonly used purpose of the Apple Watch lies in its ability to monitor such data, including your heart rate and daily activity.
To disconnect a Bluetooth pairing, select the information icon next to its name and tap Forget Device.
Use the Do Not Disturb Function
This section contains only an on/off button. Do Not Disturb mode ensures that all calls, messages, and other alerts are silenced on the watch. This can also be toggled on and off from the Control Center, accessible by swiping up while viewing the watch face and tapping the half-moon icon.
While active, this icon is consistently visible toward the top of the screen.
Apple Watch General Settings
The General settings section contains sub-sections, each outlined below.
About
The About section provides important information about the device, including the device name, number of songs, number of photos, number of apps, original capacity (in GB), available capacity, watchOS version, model number, serial number, MAC address, Bluetooth address, and SEID.
This section is often overlooked but can be useful when troubleshooting an issue on the watch or a problem with external connectivity. It can also be used to determine how much space remains for apps, photos, and audio files.
Orientation
The Orientation settings allow you to specify which arm you plan to wear your Apple Watch as well as which side the Digital Crown (also known as the Home Button) is located.
In the Wrist heading, tap Left or Right to coincide with your desired arm. If you flipped your device around so that the Home button is on the left side, tap Left under the Digital Crown heading so that the device functions as expected.
Wake Screen
To conserve battery life, the Apple Watch’s default behavior is for its display to go dark whenever the device isn’t in use. The multiple settings found in the Wake Screen section allow you to control how your watch wakes from its power-saving slumber and what happens when it does.
Toward the top of the screen is a button labeled Wake Screen on Wrist Raise, enabled by default. When active, raising your wrist causes the watch display to turn on. To disable this feature, tap the button so that its color changes from green to gray.
Below this button is a setting titled On Screen Raise Show Last App, containing the following options:
- While In Session: Only shows an app upon wrist raise during the current session.
- Within 2 Minutes of Last Use: The default option shows an app that was used in the past 120 seconds.
- Within 1 Hour of Last Use: Shows an app that was used within the past 60 minutes once you raise your wrist.
- Always: Shows the most recent app that was open each time you raise your wrist.
The final Wake Screen setting, labeled On Tap, controls how long the display remains active after tapping its face. It also contains two options: Wake for 15 seconds (default) and Wake for 70 seconds.
Wrist Detection
This security-driven setting can detect when your watch is not on your wrist. It automatically locks the device and requires your passcode to access its interface.
While not recommended, you can disable this feature by tapping the accompanying button once.
Nightstand Mode
The Apple Watch can sit comfortably on its side while connected to the standard charger, making it an ideal nightstand alarm clock when it’s not on your wrist.
Enabled by default, Nightstand Mode displays the date and time horizontally as well as the alarms that you may have set. The watch display brightens slightly as it gets closer to the time your alarm will go off, intended to ease you into waking up.
To disable Nightstand Mode, select the button at the top of this section once so that it’s no longer green.
Accessibility
The watch’s accessibility settings help those who may be visually or hearing impaired get the most from their device.
Each accessibility-related feature described below is disabled by default and must be individually activated through this settings interface.
- VoiceOver: Activates an integrated screen reader that guides you through the main features of the watch and its built-in apps such as Calendar, Mail, and Messages. The VoiceOver reader is available in over two dozen languages.
- Zoom: Enables a virtual magnifying glass that enlarges the display by up to fifteen times.
- Reduce Motion: When active, the movement of major screen elements, including the Home screen icons, is simplified and tied closely to your navigation gestures.
- On/Off Labels: Accompanies all on/off buttons with a label clearly stating whether that setting or option is currently active.
Siri
As is the case on Apple’s other portable devices, like the iPad and iPhone, Siri is available on the Apple Watch to serve as a virtual personal assistant on your wrist. The main difference is that while Siri is voice-activated on the watch, it responds through text rather than speaking to you like it would on a phone or tablet.
To talk to Siri, wake the watch display through one of the methods mentioned above and speak the words, Hey Siri. You can also access the Siri interface by holding the Digital Crown (Home) button until the words What can I help you with? appear.
The Siri settings section contains one option, a button that toggles the feature’s availability on the watch. It is enabled by default and can be deactivated by tapping this button once.
Regulatory
The Regulatory section doesn’t contain any configurable settings. Instead, it lists information about the device, including the model number, FCC ID, and country-specific compliance details.
Reset
The Reset section of the Watch settings interface may contain one button, but it’s probably the most powerful. Labeled Erase All Content and Settings, selecting this option resets the phone to its default state. This will not, however, remove Activation Lock. You need to unpair the watch if you’d like to remove that.
Brightness & Text Size Choices
Due to the relatively small screen size of the Apple Watch, being able to tweak its appearance is sometimes necessary, especially when viewing the contents in poor lighting conditions.
The Brightness & Text Size settings contain sliders that allow you to adjust the screen brightness, the size of verbiage in all apps that support Dynamic Text, and a button that toggles an overarching bold font off and on.
Sound & Haptics Settings
The Sound & Haptics settings control the volume level of all alerts using the slider at the top of the screen. Scroll down to the Haptic Strength slider to dictate the intensity of the taps that you feel on your wrist when there is an alert.
Also found in this section are the following buttons, interspersed with the above slider controls:
- Silent Mode: Audio alarms and alerts are muted when this option is enabled.
- Prominent Haptic: When this option is turned on, an extra tap is added to all common alerts.
- Tap to Speak Time: Enabled by default, this setting causes the watch to audibly announce the current time when you tap the Mickey or Minnie Mouse character on the watch face.
Passcode Protections
Your watch’s passcode is important, as it safeguards from unwanted eyes accessing your private messages, data, and other sensitive information.
The Passcode settings section allows you to disable the passcode feature (not recommended), change your current four-digit code, and enable or disable the Unlock with iPhone feature. The Unlock with iPhone feature causes the watch to automatically unlock when you unlock your phone, as long as the watch is on your wrist at the time.
Change Your Apple Watch’s Name: Learn more
Thanks for letting us know!
Get the Latest Tech News Delivered Every Day
Subscribe
What to Know
- To access Settings, press the Digital Crown > tap the gray and white gear icon.
- Settings include Time, Airplane Mode, Bluetooth, Do Not Disturb, Brightness, Text, Sound & Haptics, and Passcode.
This article explains how to customize your Apple Watch through the settings feature. The instructions apply to all Apple Watch models.
How to Get to Settings on Apple Watch
Even without third-party apps, the watch provides many base features that can be controlled through its Settings interface.
To access Settings, press the Digital Crown to go to the Home screen, then tap the gray and white gear icon. Each option presented in this interface is described below and listed in the order in which it appears on the device.
As you select each option, you’ll find new commands and features to try out.
Depending on the model of your watch, some of the menu options may look different, but the steps for changing settings are basically the same on all Apple Watches.
Change the Time
You can change the time shown on your watch face through this option, moving it up to 60 minutes ahead using the wheel and the accompanying Set button. If you’re often late for meetings, or anything else, this self-induced psychological trick may be what you need to get where you need to be a few minutes early or on time.
This only affects the time shown on the face, not the value used by alerts, notifications, and alarms on your watch. Those functions use the actual time.
Set Your Watch to Airplane Mode
This section contains a single button that toggles Airplane Mode off and on. When activated, all wireless transmission on the watch is disabled, including Wi-Fi, Bluetooth, and cellular communications such as phone calls and data.
Airplane Mode comes in handy while in flight, as well as any other situation where you’d like to stifle all communication methods without powering off your device.
When enabled, an orange airplane icon displays toward the top of the watch screen.
Turn Bluetooth On or Off
Your Apple Watch can be paired with Bluetooth-enabled accessories such as headphones or a speaker. Any Bluetooth devices that are in pairing mode and within range of your watch appear on this screen. A Bluetooth device can be paired by selecting its respective name and entering a key or pin number if requested.
The Bluetooth screen contains two sections, one for standard devices and another for those specific to tracking your health stats. One commonly used purpose of the Apple Watch lies in its ability to monitor such data, including your heart rate and daily activity.
To disconnect a Bluetooth pairing, select the information icon next to its name and tap Forget Device.
Use the Do Not Disturb Function
This section contains only an on/off button. Do Not Disturb mode ensures that all calls, messages, and other alerts are silenced on the watch. This can also be toggled on and off from the Control Center, accessible by swiping up while viewing the watch face and tapping the half-moon icon.
While active, this icon is consistently visible toward the top of the screen.
Apple Watch General Settings
The General settings section contains sub-sections, each outlined below.
About
The About section provides important information about the device, including the device name, number of songs, number of photos, number of apps, original capacity (in GB), available capacity, watchOS version, model number, serial number, MAC address, Bluetooth address, and SEID.
This section is often overlooked but can be useful when troubleshooting an issue on the watch or a problem with external connectivity. It can also be used to determine how much space remains for apps, photos, and audio files.
Orientation
The Orientation settings allow you to specify which arm you plan to wear your Apple Watch as well as which side the Digital Crown (also known as the Home Button) is located.
In the Wrist heading, tap Left or Right to coincide with your desired arm. If you flipped your device around so that the Home button is on the left side, tap Left under the Digital Crown heading so that the device functions as expected.
Wake Screen
To conserve battery life, the Apple Watch’s default behavior is for its display to go dark whenever the device isn’t in use. The multiple settings found in the Wake Screen section allow you to control how your watch wakes from its power-saving slumber and what happens when it does.
Toward the top of the screen is a button labeled Wake Screen on Wrist Raise, enabled by default. When active, raising your wrist causes the watch display to turn on. To disable this feature, tap the button so that its color changes from green to gray.
Below this button is a setting titled On Screen Raise Show Last App, containing the following options:
- While In Session: Only shows an app upon wrist raise during the current session.
- Within 2 Minutes of Last Use: The default option shows an app that was used in the past 120 seconds.
- Within 1 Hour of Last Use: Shows an app that was used within the past 60 minutes once you raise your wrist.
- Always: Shows the most recent app that was open each time you raise your wrist.
The final Wake Screen setting, labeled On Tap, controls how long the display remains active after tapping its face. It also contains two options: Wake for 15 seconds (default) and Wake for 70 seconds.
Wrist Detection
This security-driven setting can detect when your watch is not on your wrist. It automatically locks the device and requires your passcode to access its interface.
While not recommended, you can disable this feature by tapping the accompanying button once.
Nightstand Mode
The Apple Watch can sit comfortably on its side while connected to the standard charger, making it an ideal nightstand alarm clock when it’s not on your wrist.
Enabled by default, Nightstand Mode displays the date and time horizontally as well as the alarms that you may have set. The watch display brightens slightly as it gets closer to the time your alarm will go off, intended to ease you into waking up.
To disable Nightstand Mode, select the button at the top of this section once so that it’s no longer green.
Accessibility
The watch’s accessibility settings help those who may be visually or hearing impaired get the most from their device.
Each accessibility-related feature described below is disabled by default and must be individually activated through this settings interface.
- VoiceOver: Activates an integrated screen reader that guides you through the main features of the watch and its built-in apps such as Calendar, Mail, and Messages. The VoiceOver reader is available in over two dozen languages.
- Zoom: Enables a virtual magnifying glass that enlarges the display by up to fifteen times.
- Reduce Motion: When active, the movement of major screen elements, including the Home screen icons, is simplified and tied closely to your navigation gestures.
- On/Off Labels: Accompanies all on/off buttons with a label clearly stating whether that setting or option is currently active.
Siri
As is the case on Apple’s other portable devices, like the iPad and iPhone, Siri is available on the Apple Watch to serve as a virtual personal assistant on your wrist. The main difference is that while Siri is voice-activated on the watch, it responds through text rather than speaking to you like it would on a phone or tablet.
To talk to Siri, wake the watch display through one of the methods mentioned above and speak the words, Hey Siri. You can also access the Siri interface by holding the Digital Crown (Home) button until the words What can I help you with? appear.
The Siri settings section contains one option, a button that toggles the feature’s availability on the watch. It is enabled by default and can be deactivated by tapping this button once.
Regulatory
The Regulatory section doesn’t contain any configurable settings. Instead, it lists information about the device, including the model number, FCC ID, and country-specific compliance details.
Reset
The Reset section of the Watch settings interface may contain one button, but it’s probably the most powerful. Labeled Erase All Content and Settings, selecting this option resets the phone to its default state. This will not, however, remove Activation Lock. You need to unpair the watch if you’d like to remove that.
Brightness & Text Size Choices
Due to the relatively small screen size of the Apple Watch, being able to tweak its appearance is sometimes necessary, especially when viewing the contents in poor lighting conditions.
The Brightness & Text Size settings contain sliders that allow you to adjust the screen brightness, the size of verbiage in all apps that support Dynamic Text, and a button that toggles an overarching bold font off and on.
Sound & Haptics Settings
The Sound & Haptics settings control the volume level of all alerts using the slider at the top of the screen. Scroll down to the Haptic Strength slider to dictate the intensity of the taps that you feel on your wrist when there is an alert.
Also found in this section are the following buttons, interspersed with the above slider controls:
- Silent Mode: Audio alarms and alerts are muted when this option is enabled.
- Prominent Haptic: When this option is turned on, an extra tap is added to all common alerts.
- Tap to Speak Time: Enabled by default, this setting causes the watch to audibly announce the current time when you tap the Mickey or Minnie Mouse character on the watch face.
Passcode Protections
Your watch’s passcode is important, as it safeguards from unwanted eyes accessing your private messages, data, and other sensitive information.
The Passcode settings section allows you to disable the passcode feature (not recommended), change your current four-digit code, and enable or disable the Unlock with iPhone feature. The Unlock with iPhone feature causes the watch to automatically unlock when you unlock your phone, as long as the watch is on your wrist at the time.
Change Your Apple Watch’s Name: Learn more
Thanks for letting us know!
Get the Latest Tech News Delivered Every Day
Subscribe
Помимо настройки циферблатов Apple Watch с различными усложнениями для более персонализированного опыта, у меня есть привычка время от времени настраивать вид приложения. Иногда размещение всех приложений в «Списке» помогает мне. В других случаях, просто переставив значки приложений, вид приложения немного обновится. Если вам еще только предстоит разблокировать этот изящный способ взлома Apple Watch, следуйте инструкциям, чтобы узнать, как настроить вид приложения Apple Watch по своему вкусу.
watchOS позволяет выбирать из двух типов представлений: список и сетка. В то время как представление списка выстраивает все установленные приложения в порядке Apple-pie (также известном как представление с прокруткой по алфавиту), представление сетки (также известное как представление сота) размещает значки приложений в шестиугольной сетке. Более того, представление сетки предлагает вам гибкость, чтобы поместить круглые значки приложений часов в желаемое место для индивидуального внешнего вида.
Переключение между сеткой и списком на Apple Watch
В watchOS довольно легко переключаться между списком и сеткой.
- Запустите приложение «Настройки» на Apple Watch.
2. Теперь нажмите «Просмотр приложений».
3. Затем выберите предпочтительный вид:
- Просмотр списка: размещение приложений в алфавитном порядке.
- Просмотр в виде сетки: приложения размещаются в шестиугольной сетке. По умолчанию он выбран.
Заметка:
- Стоит отметить, что Apple немного изменила процесс переключения между списком и сеткой в watchOS 7 из-за удаления Force Touch.
- В watchOS 6 или более ранней версии вы могли просто коснуться и удерживать главный экран Apple Watch, а затем выбрать предпочтительный вид. Это было довольно просто в эпоху Force Touch.
Переключение между списком и сеткой с помощью приложения Watch на iPhone
Изменить вид приложения так же просто, используя приложение Watch для iOS.
- Запустите приложение Watch на своем iPhone.
2. Теперь убедитесь, что в левом нижнем углу экрана выбрана вкладка «Мои часы».
3. Затем нажмите «Просмотр приложений».
4. Затем выберите желаемый вид, и изменение вступит в силу немедленно.
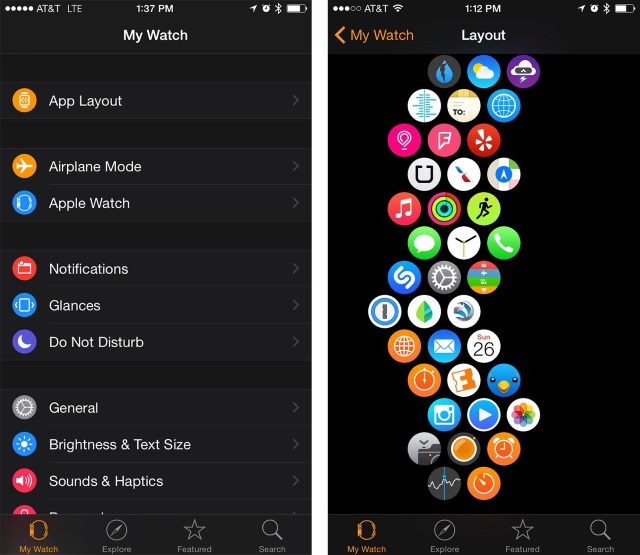
Изменение порядка приложений Apple Watch в виде сетки с помощью iPhone
Хотя watchOS не предлагает возможности точной настройки представления списка, вы можете изменить порядок приложений в виде сетки с помощью приложения Watch на iPhone.
- Откройте приложение Watch на вашем iPhone, а затем нажмите на App View.
2. Теперь убедитесь, что выбран вид сетки. Затем нажмите «Расположение».
3. Наконец, нажмите и удерживайте значок приложения и поместите его в нужное место. Что ж, вы можете оставить все свои любимые игры на одной стороне и разместить свои приложения для тренировок / счетчики расходов на другой стороне для быстрого доступа.
После того, как вы настроили макет приложения, выйдите из настройки. Теперь проверьте изменения на своих Apple Watch.
Точная настройка просмотра приложений Apple Watch с легкостью
Таким образом, вы можете настроить вид приложения Apple Watch. Теперь, когда вы знаете, как это работает, извлеките из него максимум удовольствия, чтобы избавиться от монотонности. watchOS 7 предлагает широкий спектр новых функций, включая состояние батареи, встроенное отслеживание сна и частный MAC-адрес. Сообщите мне те, которые оказались вашими фаворитами, и чего вы ожидаете от watchOS 8?

Искать определенное приложение на экране Apple Watch, в особенности если вы любитель пользоваться большим количеством различных средств из App Store, может быть по-настоящему трудно и раздражающе. А неприятнее всего, что ждать помощи от поиска Spotlight не приходится — на «умных часах» Apple он просто не предусмотрен. Однако отчаиваться не стоит, ведь есть целых пять проверенных способов организации иконок на домашнем экране Apple Watch, которые значительно облегчают жизнь.
Переставьте иконки Apple Watch в определенную форму
Существует множество удобных форм, в которые можно скомпоновать приложения на домашнем экране Apple. Все их придумали обычные пользователи, так же как и вы бившиеся с проблемой неудобства в поиске конкретных приложений. Особую популярность получили следующие три формы:
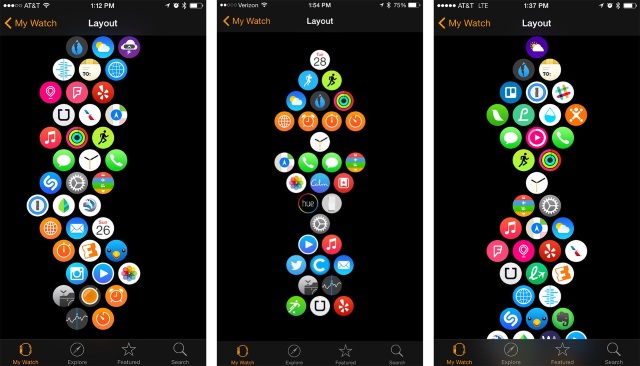
Расставив иконки подобным образом, вы получите возможность видеть практически все приложения на одном экране, без необходимости прокручивать экран или изменять масштаб колесом Digital Crown. Каждый владелец Apple Watch вправе изменить форму под себя, например, установив поближе к центру приложения, используемые ежедневно, а на край убрать средства, которые открываются достаточно редко.
Организуйте приложения по группам
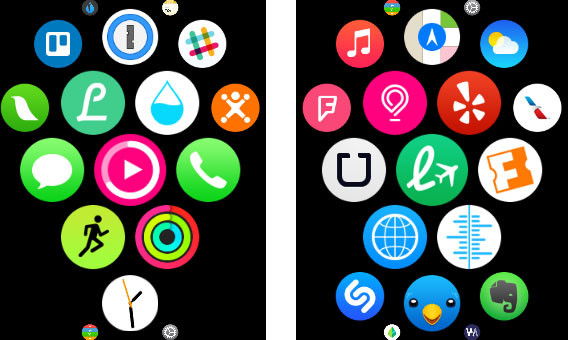 Этот совет практически является продолжением предыдущего, поскольку подразумевает установку всех схожих по тематике приложений в группу. Например, если вы используете несколько приложения для отслеживания своей активности, поместите их вокруг штатного средства Активность и уже через несколько часов вы будете включать нужно приложение на автомате.
Поместите часы в центр экрана
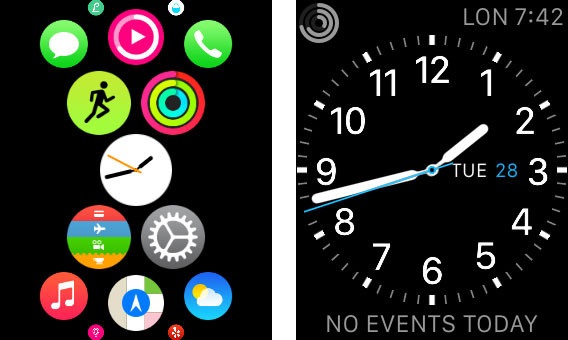 Установка иконки приложения Часы в центре домашнего экрана Apple Watch дает два серьезных преимущества. Во-первых, постоянно используемое приложение становится легче открыть, поскольку оно обособленно от прочих средств. А, во-вторых, все новые приложения, которые вы устанавливаете на Apple Watch будут появляться слева или справа от иконки часов, тем самым вы сэкономите себе много времени.
Удалите лишнее
 Многие пользователи страдают от неудобства в навигации по домашнему экрану не из-за плохой организации, а из-за огромного количества лишних приложений, установленных на часах. Поэтому одним из шагов, которые необходимо сделать для достижения идеального домашнего экрана является глобальная чистка. Смело удаляйте все приложения, которыми вы не пользуетесь, а если они когда-либо и понадобятся, то установить их можно будет с iPhone за считаные секунды.
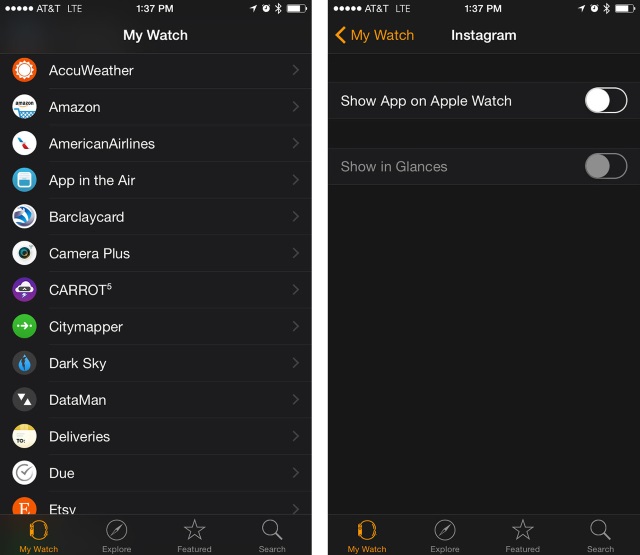
Меняйте положение иконок прямо на своем iPhone
 Многие не знают об этой уникальной возможности, но менять положение иконок на домашнем экране Apple Watch можно (и нужно) из приложения-компаньона на iPhone. Процесс в таком случае пойдет не только в разы быстрее, но и станет значительно удобнее, поскольку с большого экрана смартфона организовывать расстановку иконок приложений «умных часов» намного легче.
Смотрите также:
- Как измерить пульс при помощи Apple Watch?
- Как узнать количество пройденных шагов на Apple Watch?
- Как отключить звуковые сигналы и оповещения на Apple Watch?
- Как очистить все уведомления на Apple Watch?
- Как перевести время на несколько минут вперед на Apple Watch?
✅ Подписывайтесь на нас в Telegram, ВКонтакте, и Яндекс.Дзен.
Многие из приложений, которые вы используете на своем iPhone, iPad или iPod Touch, также имеют версии для Apple Watch. Некоторые из этих приложений будут иметь ограниченную функциональность на часах из-за характера использования этого устройства, но, тем не менее, их можно будет носить на запястье.
Вы можете получить доступ к приложениям на Apple Watch, нажав кнопку с короной на боковой стороне устройства. В зависимости от того, как в настоящее время настроено отображение ваших приложений, эти приложения могут отображаться в виде сетки значков приложений или их можно отсортировать в список.
Если вы обнаружите, что трудно найти нужное приложение в виде сетки или если вы не можете сразу увидеть достаточно своих приложений в виде списка, возможно, вы ищете способ изменить это.
В нашем руководстве ниже показано, как переключаться между представлением сетки и представлением списка на Apple Watch, если вы хотите, чтобы ваши приложения сортировались по-другому.
- Откройте приложение Watch на своем iPhone.
- Выберите вкладку Мои часы.
- Выберите «Просмотр приложения».
- Выберите желаемый вариант.
Наше руководство продолжается ниже с дополнительной информацией о переключении представлений приложений на Apple Watch, включая изображения этих шагов.
Как переключить параметры отображения приложений на Apple Watch (Руководство с изображениями)
Действия, описанные в этой статье, были выполнены на iPhone 13 с iOS 15.0.2. Я использую Apple Watch 7 с WatchOS версии 8.3. Эти же действия будут работать на других версиях iPhone и iOS, а также на некоторых других моделях часов.
Шаг 1. Откройте приложение iPhone Watch.
Шаг 2. Коснитесь вкладки «Мои часы» в нижнем левом углу экрана.
Шаг 3. Выберите параметр «Просмотр приложения» в верхней части меню.
Шаг 4: Коснитесь круга под сеткой или списком, в зависимости от того, какой вариант вы хотите использовать.
вы можете продолжить чтение ниже, чтобы узнать больше об изменении просмотра приложений на часах.
Дополнительная информация о том, как переключаться между сеткой и списком на Apple Watch
Приведенные выше шаги показали, как настроить вид приложения с помощью приложения Watch по умолчанию, установленного на вашем iPhone.
Однако, если вы предпочитаете выполнять эти действия на самих часах, а не на iPhone, вы можете это сделать. Эти шаги обсуждают, как:
- Нажмите кнопку заводной головки на боковой стороне часов.
- Щелкните значок шестеренки, чтобы открыть настройки.
- Прокрутите вниз и выберите Просмотр приложений.
- Коснитесь желаемого варианта.
После того, как вы выбрали другой вид приложения, оно обновится автоматически. Затем вы можете нажать кнопку с короной на боковой стороне устройства, чтобы увидеть текущий вид приложения и решить, хотите ли вы таким образом просматривать приложения и перемещаться по ним со своих Apple Watch.
Если вы выберете опцию Grid View в приложении Watch, в нижней части экрана появится кнопка «Расположение». Если вы нажмете эту кнопку, вы увидите текущий макет приложений для часов. Если вы нажмете и удерживаете одно из приложений в этой сетке, вы можете перетащить его в другое место. Это позволяет вам изменить порядок и расположение приложений для часов, чтобы вам было проще переходить к наиболее часто используемым приложениям.
Если вы выберете список приложений, они будут отсортированы в алфавитном порядке при нажатии кнопки с короной.
Последний способ изменить представления приложений на Apple Watch — нажать кнопку с короной, чтобы перейти к текущему представлению приложения, а затем нажать и удерживать имя или значок приложения. Это вызовет экран, на котором вы также можете выбрать представление приложения. Также есть опция «Редактировать приложения», при нажатии которой вы можете удалить некоторые приложения на часах. Приложения, которые можно удалить, будут отмечены крестиком в верхнем левом углу. Обратите внимание, что это удалит только приложение с часов, а не с iPhone. Вы можете выйти из режима редактирования приложения, нажав кнопку с заводной головкой на боковой стороне часов.