От автора: приветствую вас, уважаемые коллеги и любители WordPress 🙂 Все мы хотим видеть наш сайт в ТОПе поисковых систем и иногда этого можно достичь вовсе без денежных вложений, достаточно написать уникальный контент и правильно оформить его. Одной из составляющих правильного оформления являются мета теги. Итак, давайте поговорим о том, как прописать мета теги в WordPress.
Для новичков давайте напомним, что за мета теги нас интересуют. А интересны нам 3 тега, которые отвечают за заголовок страницы — title (его мы видим в названии вкладки в браузере), за описание страницы — description и ключевые слова — keywords. Последние два (description и keywords) можно увидеть только в исходном коде страницы.
Наиболее важным мета тегом здесь является title (название страницы). Именно поэтому на него стоит обратить особое внимание при создании статьи (страницы) в WordPress. В идеале желательно, чтобы title содержал ключевую фразу, под которую пишется та или иная статья.
Относительно мета тегов description и keywords, то на данный момент их роль сведена к минимуму. Раньше их вес был достаточно серьезным при ранжировании сайтов, но сейчас поисковики практически не учитывают их при ранжировании (есть даже мнение, что они не учитываются вовсе).
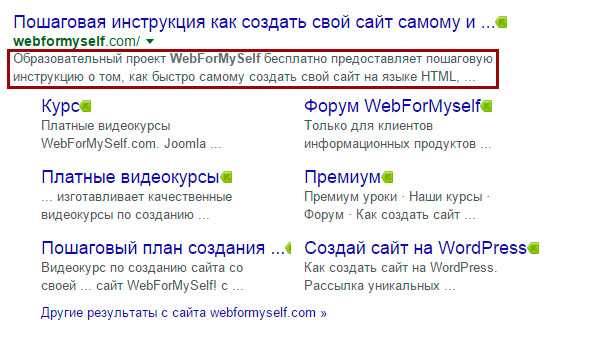
Однако пренебрегать ими не стоит. Во всяком случае я рекомендовал бы вам обратить внимание на описание страницы — мета тег description. Дело в том, что его содержимое может быть вполне взято поисковиком и использовано в качестве сниппета — небольшого фрагмента текста, который мы видим в качестве описания сайта в результатах поисковой выдачи.

Бесплатный курс «Создание тем на WordPress. Быстрый старт»
Изучите курс и узнайте, как создавать уникальные темы на WordPress с нестандартной структурой страниц
Скачать курс
Как видите, мета теги — штука нужная и полезная, поэтом к их заполнению стоит подходить серьезно, во всяком случае к мета тегу заголовка страницы. Как же прописать мета теги в WordPress? Сделать это на самом деле просто. Давайте узнаем как добавить мета теги в WordPress.
Прописать и использовать теги нам поможет замечательный плагин для WordPress All in One Seo. Если у вас он пока не установлен, тогда скорее установите его или другой его аналог (Yoast SEO, Platinum SEO Pack и т.п.).
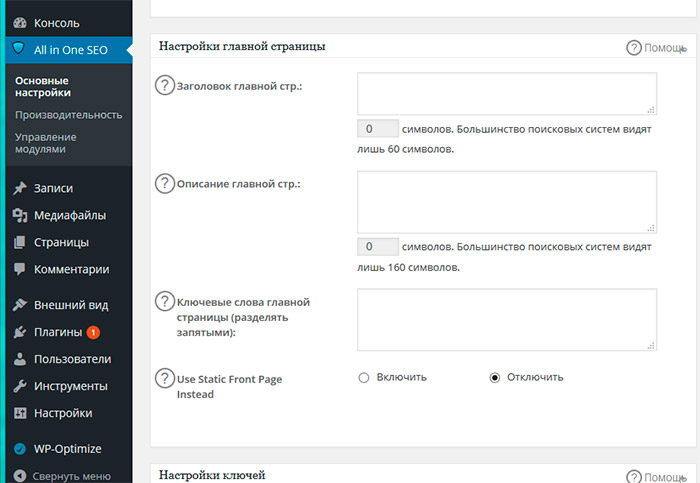
Первое, с чего стоит начать — главная страница вашего сайта. Главная страница — это, так сказать, лицо сайта, ведь именно с нее большинство посетителей начинают знакомство с сайтом. Именно поэтому важно заполнить все meta теги для нее. Идем в основные настройки плагина WordPress All in One Seo и находим там целый блок настроек, отвечающий за стартовую страницу сайта WordPress.
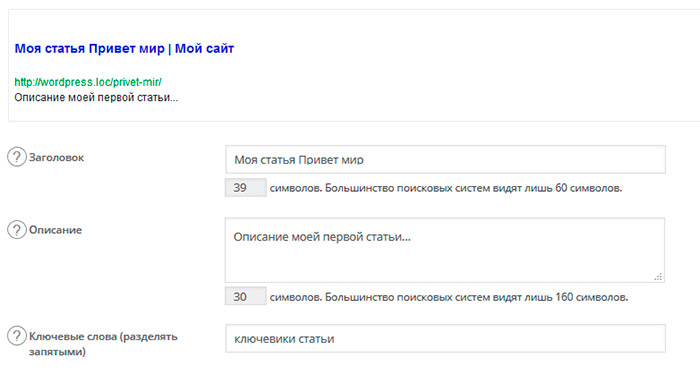
Давайте заполним поля заголовка, описания и ключевиков. Я впишу что-то произвольное.

Сохраним изменения и посмотрим результат на главной странице сайта. Во вкладке мы должны увидеть прописанный только что заголовок, а в исходном коде и прочие данные.

Отлично, с главной страницей все понятно. А что делать со статьями, тем самым контентом, который является ключевым для любого сайта? Благодаря плагину со статьями все проще простого. Откроем любую имеющуюся статью или создадим новую. После установки плагина All in One Seo вы должны увидеть много новых полей, которые идут после визуального редактора, в котором мы набираем текст статей.
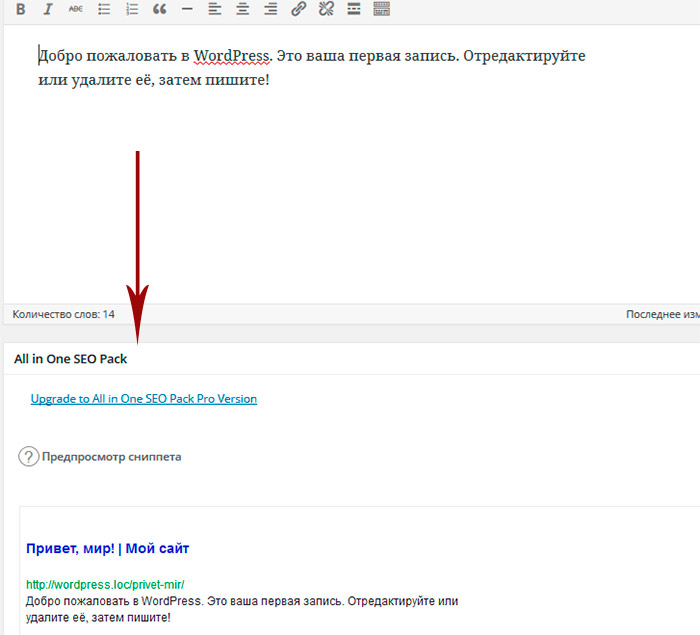
Заполним мета теги статьи необходимой информацией, которую после сохранения обязательно должны увидеть в исходном коде страницы, на которой опубликована статья.
Как видим, ничего сложного в том, чтобы прописать мета теги в WordPress — нет. Немного усилий с вашей стороны и поисковики уже могут чуть более благосклонно смотреть на ваш сайт. Если вам интересна тема WordPress, тогда больше уроков вы можете найти здесь. Ну а у меня на этом все. Удачи!
Бесплатный курс «Создание тем на WordPress. Быстрый старт»
Изучите курс и узнайте, как создавать уникальные темы на WordPress с нестандартной структурой страниц
Скачать курс

WordPress-Ученик
12 фишек без которых Вы не создадите полноценный сайт на WordPress!
Смотреть
Languages:
English •
Русский •
(Add your language)
Contents
- 1 Что такое Мета Тэги?
- 1.1 Почему Мета-теги пропали ?
- 1.2 Являются ли мета-теги необходимыми?
- 2 Putting Meta Tags Back In
- 2.1 Generic Meta Tags
- 2.2 Using Meta Tag Plugins
- 3 Meta Tag Resources
Когда поисковик исследует ваш сайт, он собирает информацию из названия, заголовки, содержания и мета-тегов, таких как описание или ключевые слова. Он сравнивает слова в каждом из этих разделов и «котировка» сайта зависит от того, насколько хорошо информация совпадает. У нас есть больше информации о том, как максимально полно использовать мета теги ниже.
Важно, чтобы разработчики веб-сайтов поняли, что «‘установка по умолчанию WordPress не содержат описание и ключевые слова данных мета-тегов «‘. Мета теги могут быть добавлены вручную, путем внесения изменений в файлы шаблонов Темы , или с помощью Плагинов WordPress..
Что такое Мета Тэги?
Слово » meta » означает «информация о». «»Мета Теги» » были созданы изначально для предоставления краткой информации о сайте. Мета-теги перечисляют информацию о веб-странице, такую как автор, ключевые слова, описание, тип документа, авторские права и другие основные сведения.
Это пример мета-тега description («описание»):
<meta name="description" content="Это
описание фразы или короткий параграф о
статье или записи (посте)." />
Наиболее распространёные мета теги. Примеры :
<meta name="resource-type" content="document" />
<meta http-equiv="content-type" content="text/html; charset=US-ASCII" />
<meta http-equiv="content-language" content="en-us" />
<meta name="author" content="Harriet Smith" />
<meta name="contact" content="harrietsmith@harrietsmith.us" />
<meta name="copyright" content="Copyright (c)1997-2004
Harriet Smith. All Rights Reserved." />
<meta name="description" content="Story about my dog
giving birth to puppies." />
<meta name="keywords" content="stories, tales, harriet, smith,
harriet smith, storytelling, day, life, dog, birth, puppies, happy" />
Почему Мета-теги пропали ?
В установке по умолчанию, WordPress не включают в себя мета-тегов, таких как описание и ключевые слова. Почему? Хорошо, давайте посмотрим на приведенные выше теги.
Вообще,метатеги размещаются в блоке head, может быть несколько метатегов.Атрибуты метатегов имеют вид «имя=значение». Причём, атрибут content описывает значение стоящего перед ним атрибута.
Так, в приведённом выше примере второй тег задает кодировку страницы и третий тег задает язык.
В частности, этот пример устанавливает кодировку, в которой будет стиль английского языка, как в Соединенных Штатах, с использованием набора символов ASCII. Это означает, что страница, вероятно,будет иметь написание, как «center», а не «centre» и «humor», а не «humour». Это также дает информацию в браузер, чтобы определять символы не как китайские.
Далее,атрибуты author и contact information описывают конкретного человека; арибут description
содержит информацию уникальную информацию о конкретной записи (посте); keywords — содержит слова,имеющиеся в данной записи (посте). Вы понимаете структуру?
Все это уникальная информация. WordPress может сделать некоторые магические вещи, но он не может читать ваши мысли. Если вы хотите предоставить поисковым системам более полную информацию, которая является специфичной для ваших веб-страниц, вы должны добавить данные мета-тегов самостоятельно.
Являются ли мета-теги необходимыми?
Хороший вопрос. Раньше мета-теги были более полезными, обеспечивая важную информацию для интернет-браузера. Когда браузеры стали более изощренными,необходимость в мета тегах отпала, чтобы выяснить ,например, что ваш сайт написан на английском или китайском языке.
A good question to ask is if meta tags are still necessary. They used to be more helpful, providing important information to the Internet browser. As browsers became more sophisticated, they stopped needing a lot of hand holding in order to figure out if your site is in English or Chinese.
Но Google больше не использует мета-теги в рейтинге результатов поиска и google подтверждает это здесь Webmaster Central Blog.
Some search engines don’t use the meta tag information any more because many people abused it. In fact, meta tags may not represent the content of your site, but, it still doesn’t hurt your status with search engines if you make use of these little bits of information, and do so truthfully. Furthermore, Google does still use the meta description tag in some situations as part of the snippet of your site displayed in search results.
Without a doubt, content is the biggest contributor to search engine page ranking, so if you want to raise your rankings, make sure you have quality content.
Covering all the reasons meta tags are and aren’t important to search engines is beyond the scope of this article. In the Resource section below are some links to more information on meta tags and their impact on search engines.
Putting Meta Tags Back In
To add meta tags to your site, simply add them to the header.php template file in your WordPress Theme, specifically in the head section near the link for the style sheet. At the top you will see the DOCTYPE tag and below that you will see a couple more tags and then the <title> tag, looking something like this:
<title><?php bloginfo('name'); ?><?php wp_title(); ?></title>
Below this line you can add your meta tags. You can add meta tag information such as the content, language, author, contact, and copyright, since these are basically the same on every page of your site.
But what about the ‘dynamic’ types of information such as description and keywords? This information is unique to every web page on your site. Putting them in the header.php means the information won’t change throughout your site.
What you need is something to dynamically add keywords and descriptions on a per-post basis. To add a description, keywords, and other meta tags that are unique to each post or Page generated, you have two choices: you can add them as generic references or you can use plugins.
Generic Meta Tags
If you have a clear purpose for your website, then you can use that information to create generic meta tags and place these in your header. Let’s say Harriet Smith is a veterinarian, and enjoys sharing her animal stories on her WordPress blog.
A description meta tag that would describe all of her posts might be:
<meta name="description" content="Special stories and
tales about dogs, cats, birds, ferrets, and other
domestic animals as told by Harriet Smith,
veterinarian. Stories include tales of animal
bravery and courage, life and death, companionship,
and the wonderful joy animals and pets bring to
their human partners." />
If Harriet writes a story about a dog giving birth in the middle of a hurricane, and accompanying the dog were two humans who risked their lives to stay with the dog during the delivery, the descriptive words of bravery and courage, life and death, pets and human, would surely apply. Another story about an animal that returns home to its owner after missing for 5 years might also be described with the words of bravery, courage, life, death, and companionship.
From these two stories, Harriet could create a good generic set of keywords:
<meta name="keywords" content="stories, tales,
harriet, smith, harriet smith, storytelling, veterinarian,
vets, animal doctor, bravery, brave, courage, life, lives,
death, dying, pets, human, companionship, dog, cat, birds,
ferrets, pets, pet, birth, puppies" />
With these generic description and keywords meta tags, Harriet’s website would be accurately described and that should please just about any search engine.
This is the manual style of adding a description, but WordPress can make this easier for you. Add your description, similar to above, in your Admin > Options > General panel. The description is entered in the line designated as Tagline. Then paste in the following in your head area.
<meta name="description" content="<?php bloginfo('description'); ?>" />
WordPress will automatically generate the description. Note: Some Themes use this tag in the header just below the title of the blog or site. If you don’t want it there, remove or comment out the tag in the header area.
To get more sophisticated, you can add a conditional tag query that asks «If this is a single post view, show the post title; if this is a multi-post view, show the blog name and description.» The conditional tag query looks like this:
<meta name="description" content="<?php if ( is_single() ) {
        single_post_title('', true);
    } else {
        bloginfo('name'); echo " - "; bloginfo('description');
    }
    ?>" />
Using Meta Tag Plugins
There are several Plugins that allow the blog administrator to set the keywords, description, and other meta tags to be unique on each post. These plugins make use of the Custom Fields in the Write Post Panel. You can find meta tag Plugins in the Official WordPress Plugin Directory.
Using Meta Tag Plugins allows you to customize each of your meta tags, and to choose the ones you want to add, or not, on a per-post basis. This allows your meta information to better describe each page.
Meta Tag Resources
Here are some sites that will help you learn more about meta tags, how they work, and why you should or shouldn’t use them.
- Google does not use the keywords meta tag in web ranking
- UC Berkeley’s Guide to Search Engines
- Search Engine Watch’s How to Use HTML Meta Tags
- WebDeveloper’s Back to Basics: Meta Tags
- W3 Organization’s Global Structure of an HTML Document and Meta Tags
- header.php code and tutorial outputs the correct robots, googlebot, and msnbot meta depending on page, single, home, archive.
- Meta Tags for SEO- A Complete Guide
-
1.
Зачем добавлять мета-теги в WordPress? -
2.
Установка Yoast SEO для добавления meta-тегов -
3.
Как добавить мета-теги на страницу/запись WordPress -
4.
Как добавить мета-тег в код главной страницы своего сайта WordPress -
5.
Как добавить мета-теги на страницы архивов категорий WordPress
Как добавить мета-теги в WordPress для лучшей SEO оптимизации сайта? Такие мета теги, как Title, Descriptions используются поисковыми системами для ранжирования страниц и статей. В этой статье мы покажем, как правильно добавить мета-теги на главную страницу и внутренние страницы сайта.
Мета теги Title, Descriptions позволяют поисковым системам более точно определить тему статьи и ранжировать её.
Title – это заголовок вашей страницы (может отличаться от H1). Заголовок страницы, который выводится первой (после URL в Google) строчкой в сниппете. Наличие ключевого слова в нем – обязательно.
Descriptions – описание страницы. Важно заполнять описание страницы, так как оно выводится в сниппете под title. Качественно составленное описание страницы не только улучшает ваши SEO показатели, но и увеличивает CTR страницы, если описание заинтересует пользователя.
Многие могут вспомнить мета-тег Keywords. Как пишет Яндекс в своей документации, Keywords может учитываться при определении соответствия страницы поисковым запросам. Google заявил, что не учитывает этот мета-тег и рекомендует веб-мастерам не тратить на него время. Bing и Yahoo также сообщили, что не учитывают данный мета-тег в выдаче.

Мета-теги являются HTML-тегами и находятся в Header вашего сайта. SEO плагины WordPress позволяют легко добавить мета-теги на страницы вашего сайта.
Добавить мета-тег Keywords с помощью Yoast SEO больше нельзя, начиная с версии 6.3.
Установка Yoast SEO для добавления meta-тегов
Если вы ещё не установили на свой сайт Yoast SEO, то воспользуйтесь нашей инструкцией по установке плагинов WordPress.
После установки у вас сразу же будет доступна возможность прописывать мета-теги для сайта WordPress, а также заполнить Open Graph для социальных сетей.
В ранних версиях нужно было зайти в основные настройки плагина и включить возможность заполнения мета-тегов, но сейчас эта опция включена “из коробки”, поэтому останавливаться на этом мы не будем.
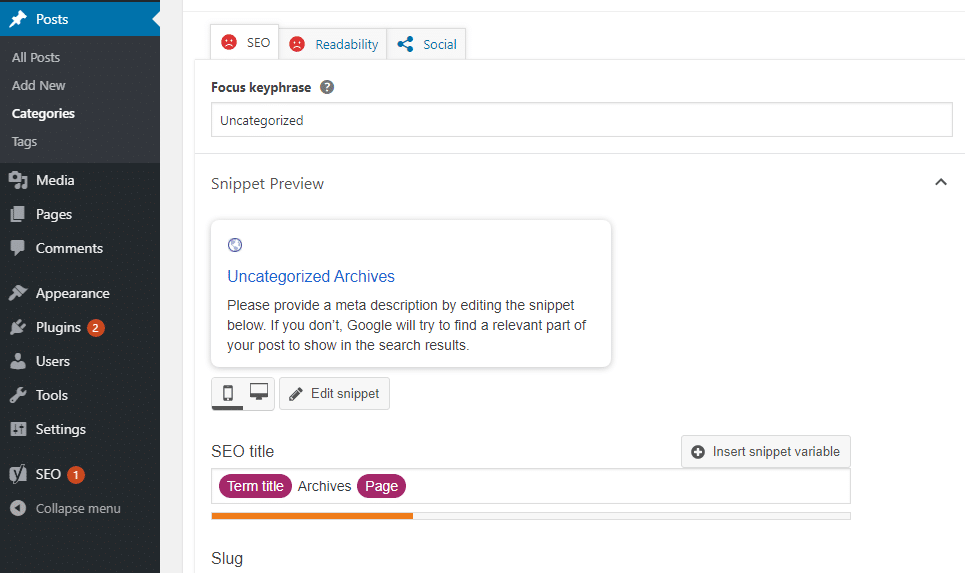
Как добавить мета-теги на страницу/запись WordPress
Зайдите на страницу или запись, к который вы хотите добавить title, descriptions, keywords.
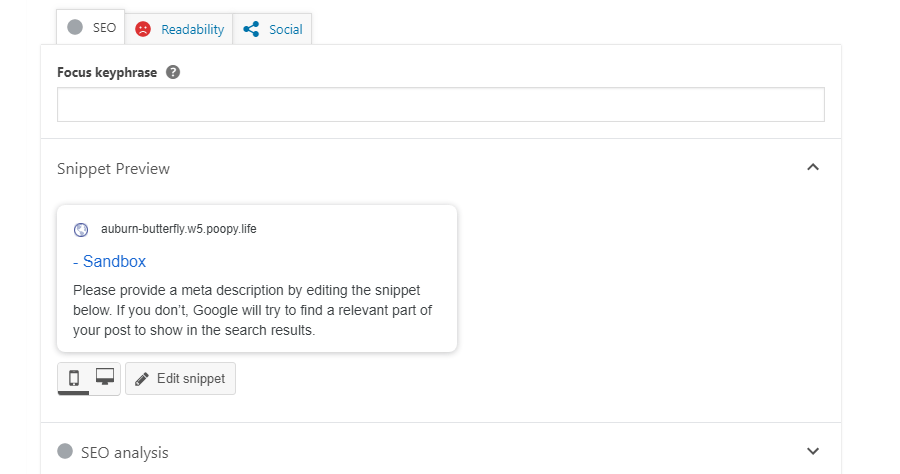
Прокрутите вниз страницы до окна Yoast SEO. Вы увидите следующее окно:

Вы видите SEO настройки страницы. В поле “Фокусное ключевое слово” вписывается то ключевое слово, под которое заточена статья. Не нужно путать это поле с заполнением мета-теги Keywords.
Ниже вы видите, как выглядит на данный момент сниппет в мобильной версии поиска Google. Вы также можете выбрать показ сниппета в результатах поиска на ПК.
Нажмите кнопку “Изменить сниппет”, чтобы заполнить title (заголовок) и description (описание).

Для изменения нам доступны следующие мета-теги в WordPress:
- SEO-заголовок – Title;
- Мета-описание – description.
По умолчанию SEO-заголовок страницы формируется по шаблону. Данный шаблон идет по умолчанию, но его можно изменить в настройках сайта. Также вы можете стереть его и вписать свой.
Ярлык или же URL записи старайтесь делать как можно короче и вписывайте в него основную ключевую фразу.
Мета-описание страницы можно также формировать по шаблону, но это лучше делать для шаблонных, однотипных страниц. Для статей и страниц для каждой страницы нужно писать своё уникальное описание. Постарайтесь заинтересовать человека, ведь кроме как с помощью заголовка и описания вы никак не выделяетесь в выдаче. Используйте ключевые фразы.

Вы можете заметить, что под SEO-заголовком и Мета-описанием есть полоса, которая в зависимости от размера текста окрашивается в разные цвета. Старайтесь максимально заполнить данную строку, но оставаться в зеленой зоне.
Благодаря заполнению фокусного ключевого слова мы видим, как Google будет выделять слова в нашем сниппете при поиске.
Таким образом мы смогли добавить в код страницы/записи мета-теги в WordPress. Обновите страницу, чтобы сохранить изменения.
Как добавить мета-тег в код главной страницы своего сайта WordPress
SEO-оптимизация главной страницы является важной частью продвижения сайта, ведь на главная страница часто продвигается под высококонкурентные запросы.
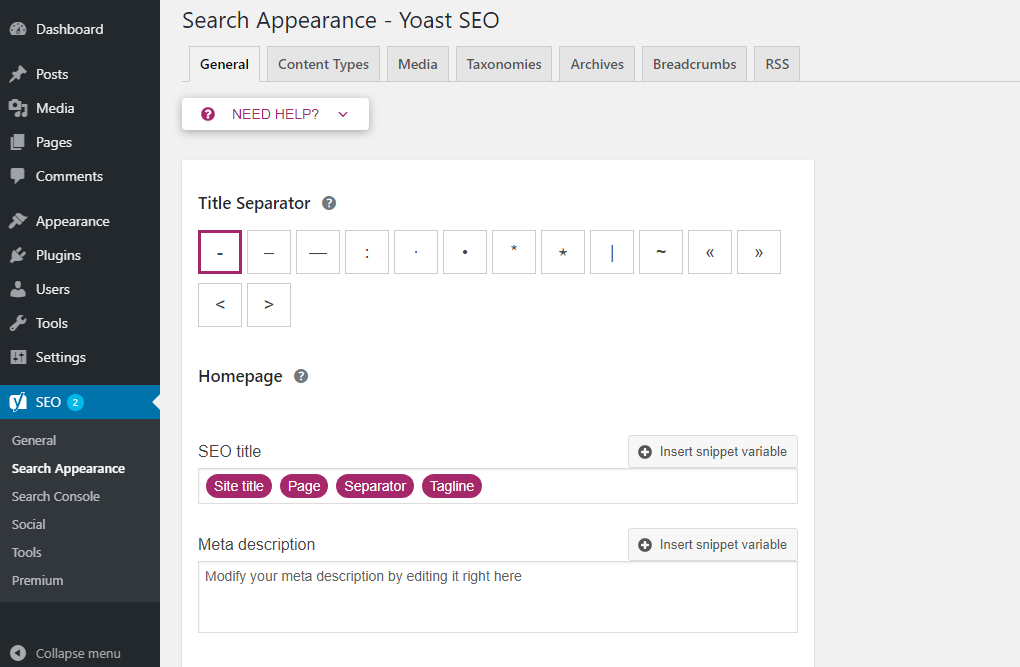
Чтобы добавить мета-теги на главную страницу в WordPress, перейдите в раздел SEO -> Отображение в поисковой выдаче -> Общие. Здесь вы видите привычные поля для заполнения мета-тегов для главной страницы.

Не забудьте сохранить изменения, чтобы мета-теги появились на главной странице WordPress.
Если для главной страницы и для страницы блога (вывода статей) вы используете разные страницы, то на данной страницы вы увидите следующий текст:

Данные сообщения означают, что у на роль главной страницы назначена не страница с последними статьями, а созданная вручную страница. Нажмите на ссылку в конце предложения и вас перенаправит на редактирование главной страницы. Там вы сможете заполнить мета-теги WordPress, как мы рассказывали выше в разделе добавления мета-тегов для страниц/записей.
Как добавить мета-теги на страницы архивов категорий WordPress
SEO-оптимизация страницы категорий (Рубрик) позволит более эффективно продвигать сайт, если человек ищет много статей по одной теме.
Зайдите в раздел Записи -> Рубрики, далее нажмите изменить у той категории, для который вы хотите написать мета-теги.

Откроется страница редактирования категорий. Прокрутите вниз до окна Yoast SEO.

Как вы видите, это точно такое же окно, как и при редактировании страниц, поэтому нажмите “Изменить сниппет” и заполните SEO-заголовок и Мета-описание.
Не забудьте сохранить изменения.
Таким же способом вы можете заполнять мета-данные для других категорий и тэгов.
Мы надеемся, что данная статья помогла вам понять, как добавить мета-теги в WordPress с помощью Yoast SEO. Если у вас появятся вопросы, пишите их в комментарии, мы всегда рады помочь!
Если вы нашли ошибку, пожалуйста, выделите фрагмент текста и нажмите Ctrl+Enter.

Мета теги WordPress, для чего вообще нам нужны эти теги? В первую очередь для оптимизации, для того что бы поисковые системы нас понимали, понимали то о чем данная страница. От настроек Title, Description, Keywords зависит как нас будут индексировать и будут ли индексировать вообще.
Если говорить о важности настроек мета тегов, то они стоят на первом месте любой оптимизации абсолютно любого сайта в интернете. Сразу же после установки WordPress на локальный компьютер или хостинг, стоит задуматься о WordPress мета тегах, что бы потом не пришлось все переделывать по несколько раз.
Что же давайте разберем для чего нужны Title, Description, Keywords и как их можно легко настроить с помощью плагина WordPress.
Перед тем как говорить о настройках для начала разберем суть этих тегов:
Что такое <title> и для чего он нужен?
Тег title обязательный, он не отображается на самой веб-странице, но несет огромную роль в формировании этой самой страницы. Тайтл показывает пользователю о чем сайт и конкретно данная страница, при сохранении в браузере тайтл сайта и будет сохранен как название этого файла. Поисковые системы при выдаче в поиске вашего ресурса отображают именно тайтл вашей страницы как ссылку на данный ресурс.
Что такое description и для чего он нужен?
Мета тег description существует для краткого описания вашей страницы. Его содержимое используется поисковиками для создания сниппета. Это служебная информация которая не отображается на странице сайта. Тег влияет на позицию выдачи поисковиков и именно он позволяет потенциальному посетителю принять решение переходить на ваш сайт или нет.

- То что написано в title.
- То что написано в description.
Что такое keywords и для чего он нужен?
Keywords так же является мета тегом, в него вбиваются слова по которым вас будут находить через поиск. Таких слов рекомендуется использовать около 30 штук. Именно от правильно выбранных поисковых слов зависит эффективность продвижения вашего сайта в поисковых системах.
Как настроить мета теги WordPress — Title, Description, Keywords
Для удобной и быстрой настройки Title, Description, Keywords в WordPress можно использовать один из плагинов который называется Yoast SEO или All in One SEO Pack, они отлично справляются с задачей, добавляя в WordPress мета теги и много других полезных SEO настроек.
Установить плагин можно с админки WP. После установки и активации All in One SEO Pack к вашей админ панели будет прикреплено дополнительное меню с одноименным названием.
К тому же, данные плагины могут генерировать xml карту сайта, но вы скорее всего будете пользоваться другим инструментом. Так же плагины помогут вам создать файл robots, для чего он нужен можно прочесть тут.
Плагины обладают огромным функционалом, в данный момент нас интересует только настройка Title, Description и Keywords.
Итак, после установки плагина All in One SEO Pack помимо дополнительного меню настроек в админ панели нам добавляется еще один очень важный инструмент. При редактировании или написании страниц или статей в редакторе в самом низу появляются дополнительные настройки.

Теперь при написании любой статьи мы сразу же будем проставлять нужные нам заголовки, описания и ключевые слова, не правда ли очень удобно. Очень быстро и удобно можно задать мета теги WordPress сайта.
Так же это можно делать с меню выбора статей для редактирования: заходим в Записи/Все записи и видим также изменения.

Как видите мы можем настроить наши теги еще и таким способом. Главная страница настраивается с помощью меню All in One SEO/Основные настройки.
Этого урока по WordPress вы узнали для чего существуют Title, Description, Keywords и как их очень легко настроить, другие возможности All in One SEO Pack, мы рассмотрим в другой статье, перейти→.

Многие владельцы сайтов на WordPress после добавления ресурса на Яндекс.Вебмастер встречают сообщение — «Отсутствуют мета-теги <description>». А это не очень хорошо сказывается на индексации. Разработчики знают об этой проблеме, но ничего предпринимают, ссылаясь на то, что мета-теги устарели, но нам в любом случае приходится придерживаться рекомендаций поисковых систем.

Существует несколько способов решения этого требования
Первый, — правка исходного кода CMS, но на это у многих не хватает опыта, и к тому же после обновления системы измененные файлы могут быть заменены на оригинальные.
Второй, — установка плагина. Конечно, установка дополнительных плагинов замедляет работу системы, в плагинах находят уязвимости, возрастает нагрузка на сервер и так далее, но это самый простой путь.
Для примера я взял плагин Easy WP Meta Description. У нас наиболее популярен плагин All in One SEO Pack. Зачастую в настройках плагина включают автоматическое формирование мета тегов (описания страницы), но любой вебмастер скажет, что для правильного формирования тегов нужен как минимум искусственный интеллект.
Установка плагина происходит точно так же, как и остальных, далее его нужно активировать.
Никаких настроек у плагина нет, что даже к лучшему, поскольку плагин ничего будет формировать без нашего ведома.
Открываем страницу материала, под окном редактора появилось еще одно окно — Easy WP Meta Description.

В это окно и нужно прописать мета-теги, но прописать их нужно правильно, чтобы воспринимали поисковики.
Так описание не рекомендуется делать более 250 символов, причем «ударными» являются первые 150. Описание не должно дублировать заголовок (желательно), а для описания рекомендую заглянуть в «подбор слов» от Яндекс Директ — https://wordstat.yandex.ru/
Пример, вроде похожие сочетания прогноз астрологов и астрологический прогноз, но первому словосочетанию всего 4 700 запросов в месяц, а по второму уже более 50 000.

Также желательно сделать заголовок удобочитаемым и понятным, не стараясь «напихать» в него как можно больше ключевых слов, например – Персональный астрологический прогноз на 2018 год от Ивана Ивановича.
Не забудьте проделать то же самое с главной страницей и категориями, если они есть.
Если вернутся к автоматическому созданию мета-тегов, плагин, скорее всего, возьмет кусок текста, который не будет нести никакого смысла.
Также WordPress «из коробки» не поддерживает ключевые слова, это решается также установкой плагина, можно выбрать уже упоминавшийся All in One либо Meta Keywords Generator, решать вам. Установка плагина и работа с плагином практически не отличается от описанного выше.
Данный материал ни в коем случае не является каким-либо руководством по продвижению сайта, он предназначен для тех, кто решил заниматься своим сайтом самостоятельно (сейчас таких все больше), но не знает, с чего начать. А начинать нужно с того, чтобы в кабинете вебмастера у поисковой системы было как можно меньше претензий к вашему сайту.
Оптимизируйте свой сайт для поисковых систем и социальных сетей с помощью дополнительных опций и инструментов поисковой оптимизации.
Эта функция доступна для сайтов с тарифными планами WordPress.com Business или eCommerce. Если на вашем сайте действует один из устаревших тарифных планов, этот раздел доступен для плана Pro.
Содержание
Метаописание главной страницы
Метаописание — это обзор содержимого вашего сайта. Иногда поисковые системы используют эти данные, чтобы определить соответствие сайта конкретным поисковым запросам.
Этот параметр метаописания применяется только к главной странице вашего сайта. Для доступа к метаописанию главной страницы откройте настройки трафика в разделе Инструменты → Маркетинг → Посещаемость и найдите поле Метаописание главной страницы:
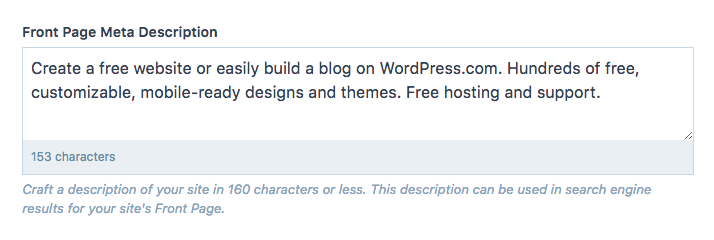
Обратите внимание, что длина текста на странице результатов поиска ограничена 160 символами.
Метаописание записи и страницы
Обычно поисковые системы сохраняют содержимое записи или страницы и используют его в качестве описания на странице результатов поиска.
Вы можете нестандартно настроить своё метаописание, чтобы оно привлекало внимание читателя и могло повысить рейтинг записи или страницы на поисковой странице.
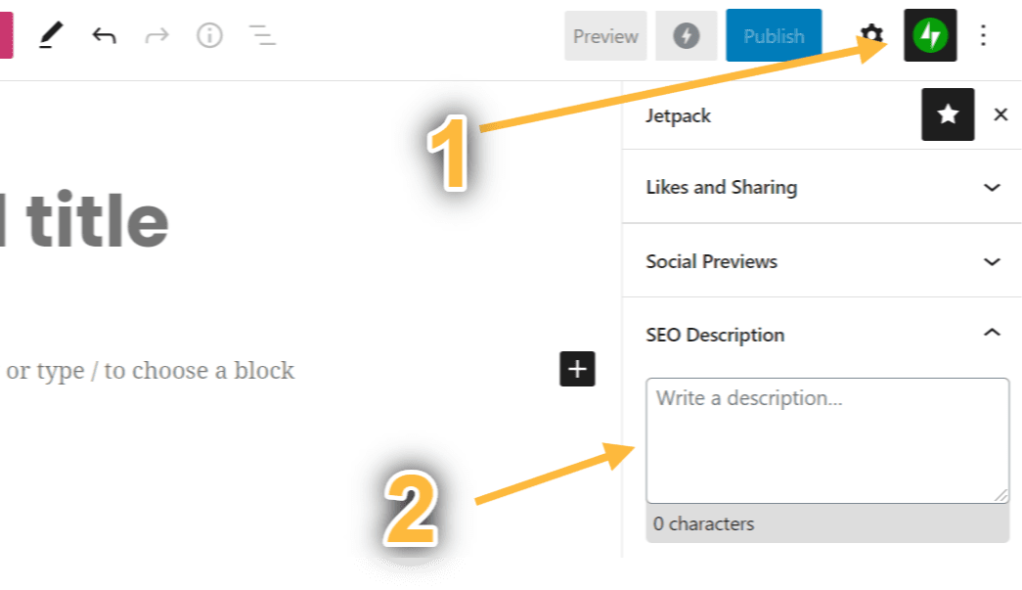
Чтобы настроить описание, щёлкните значок Jetpack (в виде молнии) в правом верхнем углу экрана редактора. Затем введите нужное описание в поле Описание возможностей поисковой оптимизации:
Описание изменится во всех поисковых системах в течение нескольких часов после сохранения записи или страницы. Тем не менее поисковые системы могут отображать описание, взятое непосредственно из содержимого, если они сочтут его более точным, чем пользовательское описание возможностей поисковой оптимизации. Описание, используемое для страницы или записи, может даже отличаться в зависимости от поискового запроса.
Структура заголовков страниц
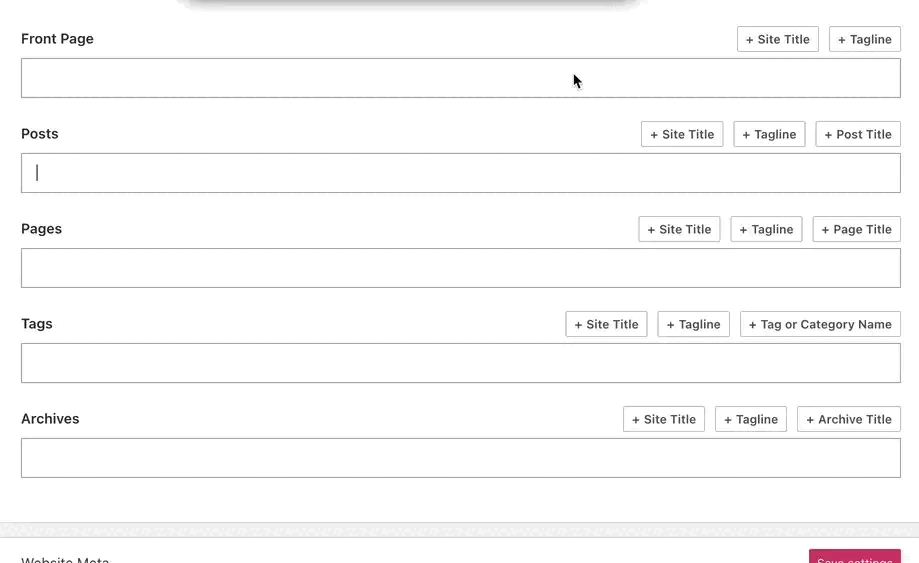
С помощью структуры заголовков страниц можно определить, как ваше содержимое будет отображаться в результатах поиска и на сайтах социальных сетей, когда вы ищете своё содержимое или делитесь ссылками на него.
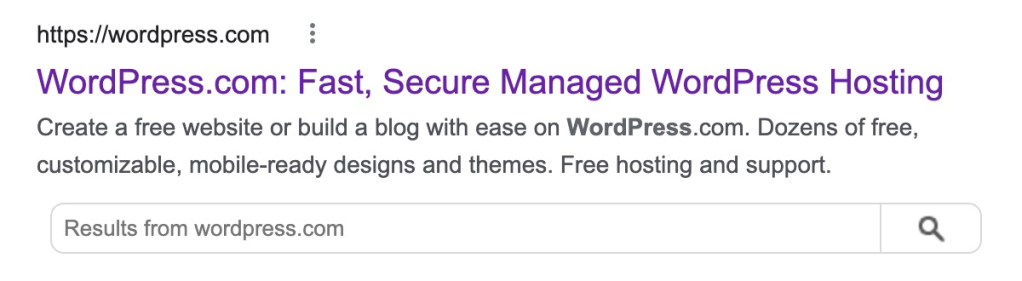
На изображении выше мы видим название сайта (WordPress.com), разделитель (:) и ключевую фразу (Fast, Secure Managed WordPress Hosting — быстрый и надежный управляемый хостинг WordPress).
Вы можете изменять порядок отображения элементов в заголовках и добавлять пользовательские разделители между ними.
Для доступа к редактору Структура заголовков страниц выполните следующие действия.
- В консоли перейдите в раздел Инструменты → Маркетинг → Посещаемость.
- Прокрутите страницу вниз и найдите раздел Структура заголовков страниц.
- Используйте доступные кнопки, например Заголовок сайта, Ключевая фраза, Заголовок записи и т. п., для соответствующих типов содержимого. Выбранные элементы будут автоматически назначены для предварительного просмотра, когда кто-то делится вашим содержимым или ищет его. Не вводите пользовательский текст в этом разделе, если не желаете, чтобы он отображался для всех ваших записей, страниц или другого выбранного типа содержимого.
- Щёлкните поле и введите свои собственные разделители (символы) между элементами, например двоеточие [:], косую черту [/], дефис [—], тильду [~] и т. д.
- При необходимости элементы можно удалять с помощью клавиш Delete или Backspace.
- Нажмите кнопку Сохранить настройки для сохранения изменений.
Предварительный просмотр публикаций в социальных сетях
С помощью функции Предварительный просмотр в социальных сетях перед публикацией записи или страницы можно узнать, как она будет выглядеть на странице результатов поиска и в социальных сетях.
Для этого в правом верхнем углу окна редактора щёлкните значок Jetpack (в виде молнии) и найдите раздел Предварительный просмотр в социальных сетях. Нажмите кнопку Предпросмотр, чтобы открыть модальное окно Предварительный просмотр в социальных сетях.

Функция Предварительный просмотр в социальных сетях использует данные, указанные как метаописание. Таким образом, вы узнаете, как ваша запись будет выглядеть в Google Поиске, на Facebook и в Twitter.

Метатеги в WordPress сообщают поисковым системам, о чем ваша веб-страница. В этой статье показано, как добавить мета-теги к постам WordPress с помощью трех различных плагинов мета-тегов.
Но сначала, что такое мета-теги?
Что такое метатеги?
Метатеги в WordPress — это фрагменты HTML-кода, которые сообщают поисковым системам, о чем веб-страница. Они называются «мета», потому что являются самореферентными: мета-теги описывают саму страницу.
Метатеги не так важны, как раньше, потому что поисковые системы теперь гораздо лучше понимают содержание веб-страницы.
Существует три основных типа метатегов: тег title, тег meta description и тег keyword.
На заре существования поисковых систем тегом keyword активно злоупотребляли веб-спамеры, пытаясь занять более высокое место в рейтинге путем заполнения своих страниц ключевыми словами. В результате поисковые системы больше не обращают внимания на метатег ключевых слов.
Google больше не использует тег keyword. В основном это связано с тем, что алгоритмы сейчас настолько совершенны, что могут понять, о чем веб-страница, не полагаясь на теги ключевых слов.
Но теги title и meta description по-прежнему используются. При этом метаописание , которое вы предоставите для своей веб-страницы, не обязательно будет использоваться в результатах поиска. По данным Moz, более чем в 60% результатов поиска Google переписывает метаописание:

Тег title содержит заголовок, который поисковые системы показывают в результатах поиска.
Вы задаетесь вопросом, зачем поисковым системам нужен тег title, если у страницы уже есть заголовок (заголовок H1).
Причина, по которой вам может понадобиться тег title, отличный от названия вашей страницы, заключается в том, что поисковые системы ограничены в том, сколько места у них есть для отображения названия веб-страницы.
Другими словами, если вы используете заголовок вашей страницы, он, скорее всего, будет слишком длинным и будет отсечен в результатах поиска. А это плохо сказывается на показателе кликов (CTR).
Для результатов поиска на настольных компьютерах Google отображает до 60 символов (сюда входят пробелы между буквами).
Зачем нужны метатеги?
Основное преимущество метатегов заключается в том, что они позволяют вам контролировать заголовок вашей веб-страницы, когда она появляется в результатах поиска. Насколько я знаю, Google никогда не переписывает тег title.
Тег title важен, поскольку именно заголовок вашего сниппета SERP убеждает поисковика нажать на ваш результат поиска .
Поисковые сниппеты, достигшие высокого показателя кликов (CTR), продвигаются выше в результатах поиска. Поэтому заголовок вашего сниппета SERP (также известный как SEO-заголовок) влияет на ранжирование вашей страницы.
В двух словах: метатеги помогают вам контролировать информацию о вашей веб-странице, которую поисковые системы показывают в результатах поиска.
Добавление метатегов на ваш сайт
По умолчанию WordPress не содержит метатегов title, description и keyword. Поэтому вам необходимо добавить их самостоятельно.
Когда речь заходит о добавлении мета-тегов на ваш сайт, в Интернете появляется множество статей, в которых говорится о необходимости добавить мета-теги в файл header.php вашей темы WordPress.
Но это создаст метатеги только для вашего сайта в целом , а не для отдельных страниц.
И поскольку ваш сайт, вероятно, содержит десятки, если не сотни, веб-страниц на разные темы, добавление метатегов на ваш сайт будет не очень полезным. Это все равно, что сделать сотню фотографий из отпуска и пометить их все «Летние каникулы 2019» — не очень полезно!
Помните: в поисковых системах ранжируются именно страницы, а не веб-сайты.
Так же как и страницы, на которые мы должны добавить мета-теги.
Существует два типа плагинов, которые можно использовать для добавления метатегов в WordPress:
- плагин метатегов
- SEO плагин
Плагины метатегов позволяют вставлять метатеги для отдельных веб-страниц или постов.
Но они не дают вам никаких рекомендаций по SEO требованиям к вашим тегам. Например, Google устанавливает максимальное количество символов, допустимое как для тега title, так и для тега meta description. Плагины
SEO
, с другой стороны, сообщат вам, когда вы превысите максимально допустимое количество символов для вашего тега.
Поэтому я настоятельно рекомендую вам использовать SEO-плагин для добавления мета-тегов на ваши веб-страницы.
В оставшейся части этой статьи я покажу вам, как добавить мета-теги на ваш сайт WordPress с помощью следующих трех SEO-плагинов:
- Yoast SEO
- All-In-One SEO
- RankMath
#1 — Добавление метатегов с помощью Yoast SEO
Сначала скачайте бесплатную версию плагина Yoast SEO. Плагин Yoast SEO имеет более 5 миллионов активных установок и, на момент написания статьи, последний раз обновлялся 7 дней назад.
Затем перейдите в свою приборную панель WordPress и нажмите на Plugins > Add New и затем нажмите на Upload Plugin :

На следующем экране нажмите «Choose file»:

Затем найдите zip-файл плагина на жестком диске, выберите его и нажмите «Open»:

На следующем экране нажмите «Установить сейчас»:

После установки плагина нажмите на кнопку ‘Активировать плагин’:

Выполните шаги по настройке Yoast SEO. Затем перейдите к существующей записи блога и прокрутите страницу вниз, пока не найдете модуль Yoast SEO:

В поле с надписью ‘Focus keyphrase’ введите основное ключевое слово вашей статьи. Это ключевое слово должно присутствовать в «заголовке страницы» статьи и в «слоге» статьи (часть URL, которая идет после вашего доменного имени).
В поле ‘SEO Title’ напишите заголовок, который вы хотите видеть в результатах поиска. SEO-заголовок не обязательно должен совпадать с заголовком страницы (обычно он короче).
Вы заметите, что Yoast дает вам возможность отображать ваш SEO-заголовок на мобильном или настольном компьютере:

Google дает вам больше символов для SEO-заголовка в мобильных результатах поиска, чем в настольных.
По умолчанию Yoast показывает ваш SEO-заголовок в мобильной версии.
Но нажмите на результат для рабочего стола, чтобы увидеть, как ваш заголовок будет отображаться в результатах поиска для рабочего стола:

В этом случае SEO-заголовок был усечен или сокращен. Это связано с тем, что Google допускает только 60 символов для заголовка настольного SEO (он допускает 78 символов для заголовка мобильного SEO).
Мой заголовок подходит для мобильного поиска, но не для настольного. Поэтому я убрал несколько символов, чтобы заголовок правильно отображался как на мобильных, так и на настольных компьютерах:

Всегда выполняйте эту проверку для каждой новой записи в блоге: убедитесь, что SEO-заголовок правильно отображается в результатах поиска как на мобильных, так и на настольных компьютерах.
Вот как добавить мета-теги в Yoast SEO.
#2 — Добавление метатегов с помощью AIOSEO
All-In-One SEO (AIOSEO) — еще один популярный плагин.SEO для WordPress. Он имеет более 2 миллионов активных установок и на момент написания статьи был последний раз обновлен 3 часа назад.
Сначала загрузите бесплатную версию плагина AIOSEO.
Выполните шаги по установке и активации, которые я показал выше для плагина Yoast SEO.
Затем перейдите к одной из записей вашего блога и прокрутите вниз, пока не увидите модуль AIOSEO .
AIOSEO обрабатывает метатеги иначе, чем Yoast SEO. Акцент в AISEO сделан на том, чтобы предоставить вам множество вариантов вставки предопределенных тегов в поле метатега title:

На скриншоте выше я выбрал тег ‘post title’, а затем плагин вставил в поле тега title все название статьи (и, как вы можете видеть, я превысил рекомендуемые 60 символов).
Чтобы создать свой собственный SEO-заголовок, адаптированный для результатов поиска, выберите опцию ‘post title’ из выпадающего меню, и плагин отобразит все, что вы введете в поле ‘Post Title’:

В AISEO процедура создания мета-описания очень похожа на процедуру создания SEO-заголовка.
Выберите опцию ‘post excerpt’ — это позволит вам ввести ваш SEO-заголовок в свободной форме (вместо того, чтобы поле было заполнено текстом по умолчанию на основе различных тегов):

Обратите внимание, что в правом верхнем углу у вас есть возможность просмотреть фрагмент в настольной или мобильной версии .
#3 — Добавьте мета-теги с помощью RankMath
RankMath — еще один популярный SEO-плагин.
Это гораздо более новое дополнение, чем Yoast или AIOSEO, но оно быстро набирает популярность. Сейчас он имеет 600 000 активных установок и (на момент написания статьи) был недавно обновлен 2 часа назад.
Скачайте плагин RankMath, а затем выполните те же шаги по установке и активации, которые я описал для Yoast SEO.
Еще раз откройте запись в блоге и прокрутите вниз, пока не увидите модуль RankMath.
Опции мета-тегов RankMath аналогичны опциям в Yoast SEO:
- напишите ваш SEO-заголовок так, как вы хотите, чтобы он отображался
- введите мета-описание
- введите первичное ключевое слово (а затем выберите другие вторичные ключевые слова, предложенные RankMath).

Какой плагин Meta Tag Plugin следует использовать?
Из этих трех плагинов для мета-тегов я использую RankMath, и это то, что я ищу.
RankMath — это мощный SEO-плагин. А в бесплатной версии больше возможностей для SEO, чем в бесплатной версии Yoast SEO.
Одним из приятных моментов в RankMath является то, что он предлагает (на основе содержания вашего сообщения) ключевые слова для вашего тега ключевых слов. Он выставляет вам оценку из 100 баллов в зависимости от того, сколько релевантных ключевых слов вы добавили в тег ключевых слов.
Помните, что Google заявил, что больше не смотрит на метатег keyword и не использует его в качестве фактора ранжирования. Но все же нелишним будет оптимизировать свой пост под второстепенные ключевые слова.
Заключение
Метатеги в WordPress предоставляют поисковым системам информацию о ваших веб-страницах. Раньше они были гораздо важнее, чем сегодня.
До разработки алгоритмов, которые понимают онлайн-контент, поисковым системам требовались метатеги ключевых слов, чтобы понять, о чем страница.
Но это уже не так. А Google, например, больше не использует тег ключевого слова.
Учитывая это, есть два мета-тега, которые по-прежнему важны: тег title и тег meta description.
Эти два тега позволяют вам управлять тем, как ваш сниппет отображается в результатах поиска. Из этих двух тегов тег title является наиболее важным, поскольку то, что вы вводите в это поле, Google отображает в SERPs.
То, что вы вводите в тег метаописания, с другой стороны, имеет чуть меньшее значение, поскольку Google переписывает метаописание примерно в 60% результатов поиска.
If you’re not adding meta descriptions to your website, you’re missing out on a big chance to attract and convert new visitors. It may not seem like a big deal, but a targeted snippet that appears in search engine results can make a huge difference. Without one, you could be losing clicks.
Meta descriptions are the short snippets that appear on search results pages like Google and Bing. You can customize them to better describe each page, drawing in new users and making your search results stand out from competing websites.
Adding a meta description can be as easy as filling out a box or inserting a line of code.
Ready to get more clicks? We’ll show you how to add a meta description in WordPress with and without a plugin.
Prefer to watch the video version?
What is a Meta Description?
Search engines like Google use a robot called a web crawler to index your site. The info this gives them allows them to display it properly in search results, so you can be found when people search for relevant keywords.
But since this program is just, well, a program, it doesn’t automatically know what your site is about. You have to tell it using different elements such as sitemaps, schema markup, and meta tags, just to name a few. That’s why a meta description is so important.

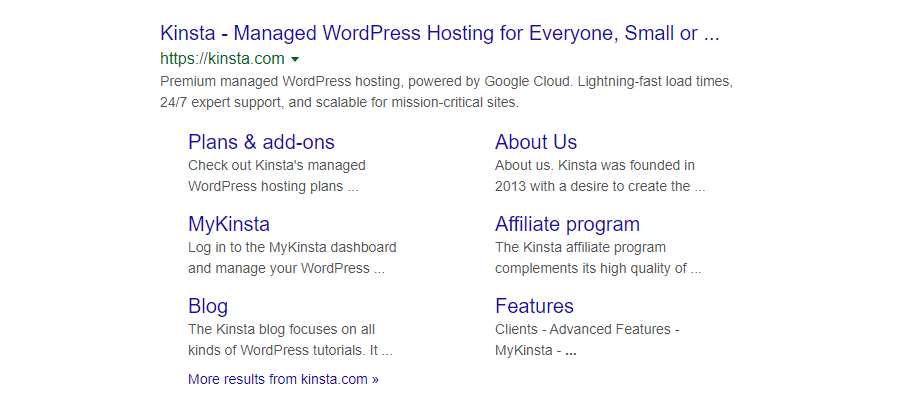
Users see a page’s meta description below the title in the search results. The meta description is meant to inform them about the content and purpose of a webpage so they can decide whether to click on it or not. In this example, you can also see sitelinks:
Google’s crawlers are better than they once were. In fact, they can now extract a title and meta description automatically, and figure out a page’s topic without you having to manually define keywords.
If you don’t write your own meta description, Google will generate one for you by pulling content from the page. But you could be missing out on a chance to convince people to click on the link with a targeted snippet customized to earn conversions.
How Meta Descriptions Impact Your SEO
Meta descriptions actually don’t have a direct effect on your SEO ranking, yet Google still advises to create unique ones for each page of your site. It’s the keywords found naturally in your content that are important for SEO.
What meta descriptions do impact is click-through rate (CTR), or how many people decide to click on your site.
Think about the last time you Googled something. What made you pick a certain link? It was probably the title, the description, or both that convinced you.
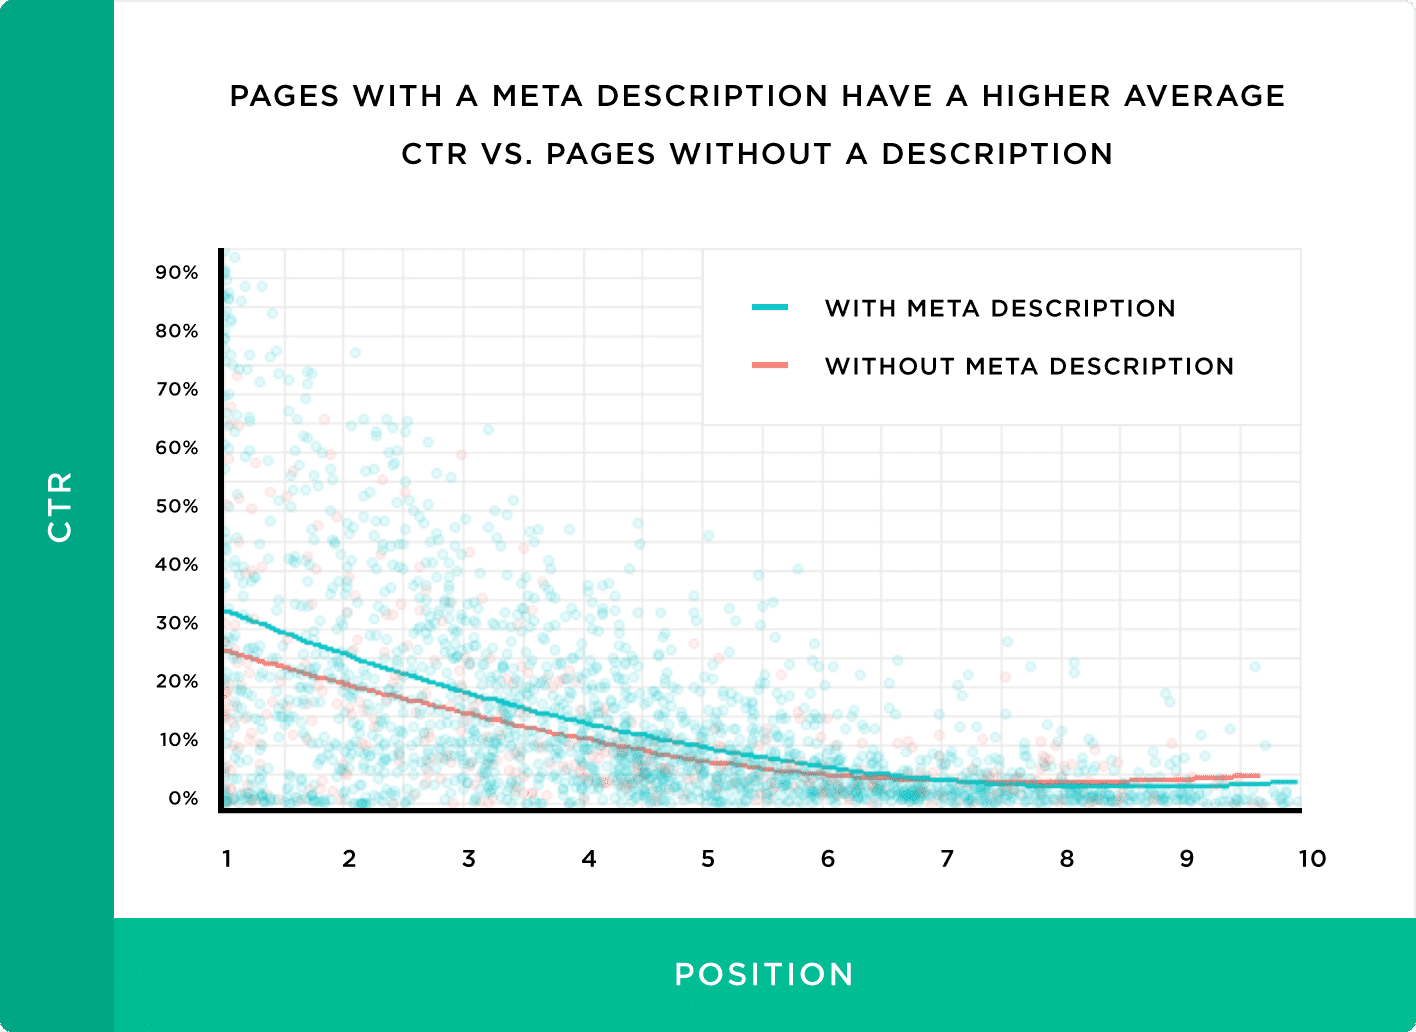
According to Backlinko, unique meta descriptions have a major impact on CTR:
“Writing unique meta descriptions for each page can increase your site’s organic CTR. We found that pages with a meta description had a 5.8% higher CTR compared to pages without a description.”
Search engines may automatically generate a snippet, but if that description doesn’t do a good job conveying what your content is about, people will ignore it and choose another website.
Writing your own meta descriptions ensures that you have more control over what people see.
I said “more control”, not “total control.” Google won’t always use your meta description, though.
Sometimes it will show parts of a page’s content that’s more relevant to a user’s search. But in most cases, it prefers to fall back to the snippet you provided rather than using an auto-generated one.
A well-written meta description plays a big part in attracting and converting visitors. It may not directly affect SEO, but it will gain you more interested visitors, and higher CTR does give your rankings a boost.
Meta Description vs Meta Keyword
Metadata as a whole is a set of HTML tags that tell search engines and web crawlers what your site is about. These include the title, description, and keywords.
You already know that a meta description is the HTML element that describes a webpage’s content and purpose.
Meta keywords are a relic of an older internet. In other words, they’ve been deprecated and are no longer in use. In the past, they were used to tell search engines what topics a page covered, similar to how you tag a social media or blog post.
However, once people realized that you could put any unrelated keyword in and get free traffic from topics your site had nothing to do with (hello “free porn” and “free mp3”), search engines removed support for the feature. You can still add meta keywords, but for the most popular search engines, it won’t do anything.
Now, Google examines a website’s content using more sophisticated web crawlers that can automatically figure out what topics are related to the content you write about on a page. It completely ignores the meta keywords attribute.
Instead of using meta keywords, improving SEO is now about optimizing natural keyword usage within your content and address other technical aspects like the speed of your site.
5 Tip For Writing and Optimizing a Meta Description in WordPress
When it comes to meta descriptions, there are no hard and fast rules to follow. But there are still some best practices you should keep in mind. These can help you rise above the competition and increase your click-through rate.
Let’s go over each of these best practices, so you can write better meta descriptions.
Prefer to watch the video version?
1. Ideal Snippet Length
You can’t make your snippet an unlimited length. If you exceed a certain number of characters, it will be truncated. Your meta descriptions can be as short as you want but don’t go over 155-160 characters, or it’s likely to be cut off abruptly. That doesn’t look good.

2. Focus on a Keyword
It’s a good idea to include a keyword in every snippet you write. If you’re creating a snippet for a blog post, you can target the same keyword you wrote the article with. Otherwise, do some keyword research and choose one that’s aligned with your goals.
Including a keyword will help you structure your description in a compelling way. Plus, Google sometimes highlights keywords that match users’ search terms. Targeting a popular keyword and including it in your description may result in bold, noticeable text.
3. Write Clear, Cohesive, and Captivating Descriptions
Your meta description is like a free advertisement, so take it as a chance to convert potential visitors. Address the reader directly, pulling them in by posing a question or problem, then outlining the benefits of clicking your link. Use vivid imagery, eye-grabbing statements, or information-rich sentences.
Most importantly, earn your click by proving that your website has exactly what people are looking for. Do you have the best services or products, or the information they’ve been searching for? What do you have to offer that your competitors don’t?
Ensure that your snippet is high-quality and free of awkward phrasing, repetition, or grammatical errors that could turn people away.
Consider including a call to action, like “save money”, “read our review”, or “learn more about meta tags”. Avoid awkward-sounding CTAs like “click here”, however. Many sites opt to skip the call to action and focus on providing valuable information; see what sounds right to you.

Lastly, make it clear what will happen when your link is clicked. Will they be reading a blog post, browsing the store, or landing on a features page? It should be obvious where they’re going and what they’ll find when they get there.
4. Avoid Duplicate Snippets
Meta descriptions present a free chance to reach out to potential customers and convert them, so don’t waste it by creating duplicate or carbon copy snippets, meta descriptions that are the same or nearly the same across multiple webpages.
When you have hundreds or thousands of pages on your site, it may seem like a good idea to just use a template and swap out a few details. But duplicate descriptions just don’t look good, especially when they cover more than a handful of pages. People will quickly tune out your website’s results.
A default meta description is better than a bad one. If you don’t have the time to add a carefully written, compelling snippet to every single page, it’s better to let Google do the work and focus on a few key pages.
5. Don’t Be Deceptive
Meta descriptions may not improve your SEO, but they can certainly damage your click-through rate if you engage in deliberately deceptive behavior.
Ensure that your description is accurate. Just be honest about what people are clicking on first and foremost. Don’t lie about what a page contains.
Avoid keyword stuffing. It’s awkward to read and will result in reduced CTR, plus it might get you penalized or result in Google ignoring your custom description entirely.
Keep these tips in mind and you’ll create better meta descriptions.
Writing Meta Descriptions for Specific Pages
The techniques for crafting a meta description are similar at their core, but each type of page needs its own special touch. The way you write a snippet for a blog post, homepage, and product page varies quite a bit.
Here are some tips for writing a meta description for a few key types of pages.
Homepage Meta Descriptions
Homepage descriptions get special treatment. This is the face of your website, so you have to make it count. Many websites write a short, one-sentence pitch, never even reaching the 160-character limit.

Your job here is to sell your brand. Hit hard with a short, snappy, well-written piece that explains concisely what you do and why they should choose you. This goes for similar pages just as your About and Mission Statement.
Blog Post Meta Descriptions
For primarily informational pages such as blog posts, you may not want your description to read like a blatant advertisement. Of course, you are making a pitch and can include a call to action, but focus on the information.
When people go looking for a solution to a problem, they don’t want to be advertised to. They want answers. Tell people what they’ll learn when they click this link, and prove that you know what you’re talking about.

Category Pages Meta Descriptions
There are also category pages to consider. This is a hard one to write for. Most searches won’t turn up a category archive, but you shouldn’t miss out on an opportunity to create a compelling, converting snippet.
Your best bet is to entice people by giving them a hint of the type of posts they’ll find in this category, and get them in a reading mood.

For news-based websites and ecommerce stores, category pages play a key role as they can be crucial pages able to score higher rankings and more traffic if well optimized.
Product Page Meta Descriptions
Speaking of online stores… Product pages will pop up in the search results when people are looking to buy something and fast.
Instead of promoting your website, focus on the individual product. Use similar tactics: write something that quickly explains what this is and why they need it.
You might also include specifications such as price and other product info.

You should ideally be writing a unique meta description for every product. It might be tempting to just use a template and swap out the product name, but this generic approach won’t do as well as a hand-written pitch.
How to Add a Meta Description with Yoast SEO
If you want to add custom meta descriptions to your site, your best bet is installing an SEO plugin. Any popular SEO plugin will make it easy for you to write snippets for all of your pages and blog posts.
While it’s possible to add them manually, it means editing site files. On some setups, this might be impossible without FTP access, which complicates things even further. Plus, there’s no easy way to add individual descriptions to each page without a plugin. All the simplest solutions only set a default snippet for the whole site.
For most people, it’s best to just install a WordPress plugin instead of dealing with the headache.
You can use a simple and direct plugin like WP Meta SEO or a more fully-featured SEO suite. Some popular SEO plugins include Yoast SEO and The SEO Framework. Since Yoast is the most widely used, we’ll show you how to add a meta description with that one.
Let’s install Yoast now. You can either visit its plugin repository page or log in to your WordPress backend and head over to Plugins > Add New. Search for Yoast and download it, or upload the zip file you installed earlier.
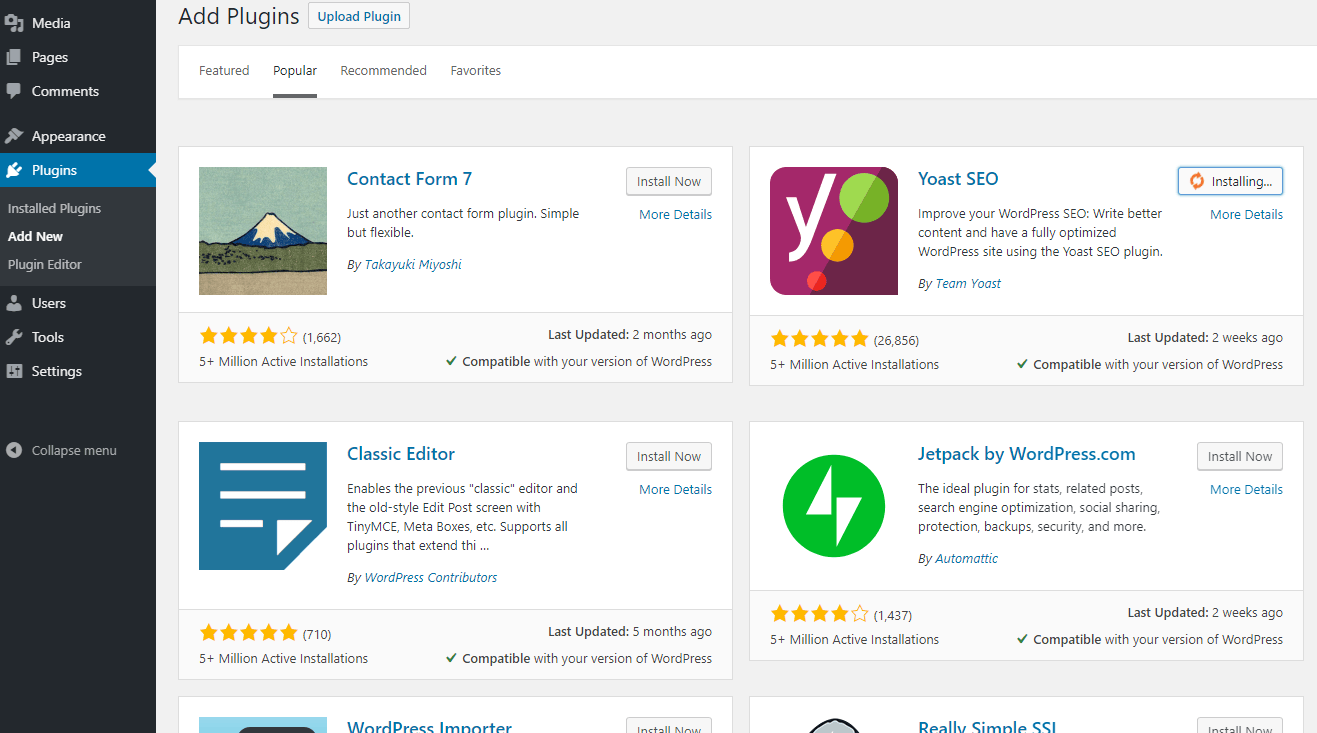
Then just activate the plugin in Plugins > Installed Plugins to get it working.
Add a Meta Description to Posts and Pages with Yoast SEO
Yoast will add a new SEO tab to your admin backend. You can go here to configure settings, including defaults and how your pages look on social media. But to get to the individual meta description editor, you’ll need to open up an existing post or page or create a new one.
Scroll down below the editing area and you’ll see the new Yoast section. Click Edit Snippet and start typing in the Meta Description section. The bar at the bottom will turn green once you’ve hit the optimal character length. You can also add dynamic variables that will display elements like title or category.
That’s all you need to do to create a custom meta description for any post or page on your website.
Add a Meta Description to Your Homepage with Yoast SEO
Adding a snippet for your homepage works a little differently than normal in Yoast. Go to SEO > Search Appearance.
Right there you’ll see the Homepage section, with the normal editor UI. Just write a description and title as you did before.
Remember that writing a homepage snippet is a sales pitch for your site as a whole. Describe your company or blog, what you do, and what you have to offer. When you’re finished, click Save Changes.
With that, your homepage search results should soon update to show its new meta description.
Add a Default Meta Description with Yoast SEO
What if you want to add a default meta description that appears whenever you fail to set a custom one? That’s easy. Under SEO > Search Appearance > Content Types (check the tabs at the top of the Search Appearance page), you’ll see two drop-downs, one for posts and one for pages.
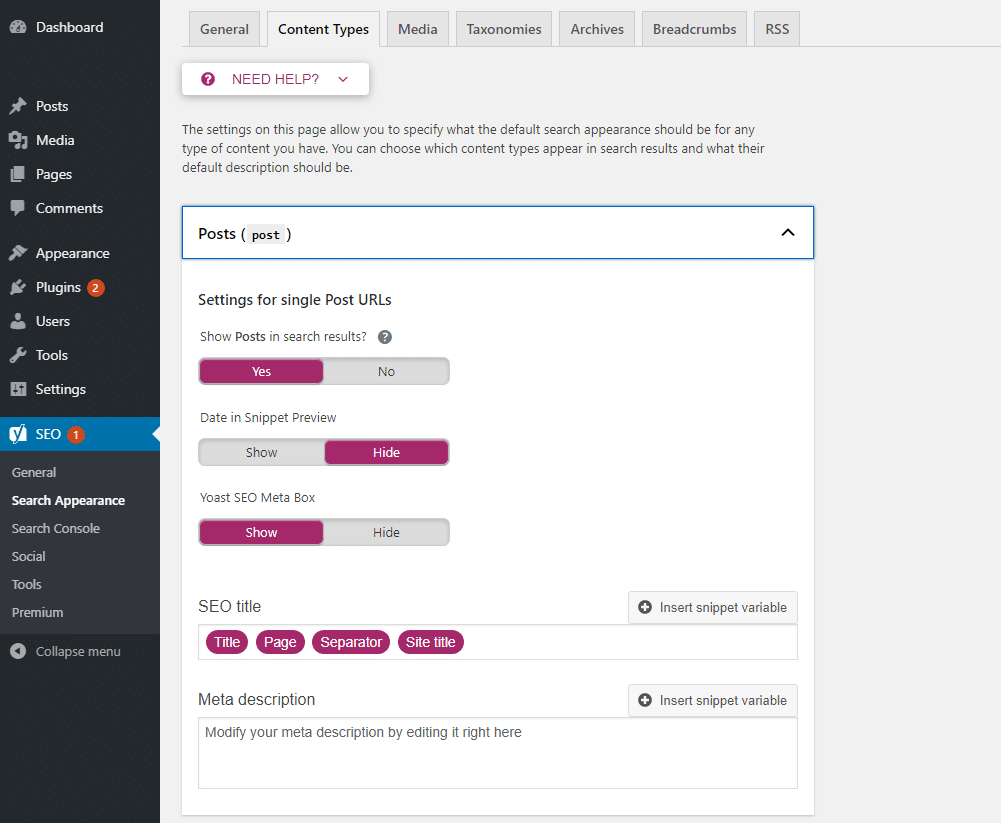
These also use the typical metadata editor, so go ahead and add a default snippet for posts and pages.
Now when you create a new post or page, the meta description will automatically use the info you put here. That way, if you publish a blog post and forget to add a snippet, it will just fall back to what you put here.
If you like basing them off a template, you could also paste it here, and it will appear on the editing screen ready to be filled out when you make a new post.
Add Meta Description for Category Archives with Yoast SEO
What about your category pages? These small archives don’t have a lot of text content, which can confuse Google and cause it to display a broken or strange-looking snippet. You can add a short excerpt yourself to avoid this.
Go to SEO > Search Appearance > Taxonomies and create your description in the editor. Or you can go to Posts > Categories and write up a new one for each individual category archive page.
This snippet doesn’t need to be too complicated. You can still make a small pitch like “Discover dozens of (category) posts here”, but you don’t need to be as stringent since it’s unlikely that this page will pop up frequently in search results.
That wraps up everything you’ll need to know about adding meta descriptions with Yoast.
How to Add a Meta Description Without a Plugin
If you don’t want to install an SEO plugin to create custom meta descriptions, you can instead edit your theme files. However, it can be a bit of a pain, especially if you want to add descriptions to individual pages.
Downloading a plugin will probably be easier for you. But if you really don’t want to, here’s how to do it manually.
Before editing any files on your site, make sure to do a backup. It’s also a good idea to create a child theme, as it protects your site if you make a mistake and doesn’t reset your changes when WordPress updates.
We’ll create some generic meta tags that will apply to every page on your site. First, you’ll want to go to Settings > General. Under Tagline, write the meta description you want to represent your site.

Next, go to Appearance > Theme Editor. If you can’t see it, you may need to access your header.php using FTP.
Look in the sidebar and find Theme Header (header.php) and click to edit it. Paste in this code anywhere between <head> and </head>.
<meta name="description" content="" />This will add the tagline to every page on your site.
Obviously, this isn’t very desirable for your blog posts. You’re more likely to get clicks if people know what each post is about, rather than getting a generic description.
Using this code, search engines will just grab content from the post to use in the meta description like normal.
<meta name="description" content="<?php if ( is_single() ) {
        single_post_title('', true);
    } else {
        bloginfo('name'); echo " - "; bloginfo('description');
    }
With these two pieces of programming, you’ll get a tailored description on your generic pages like the homepage and category archives, but your posts will have a normal snippet.
What if you want to add individual descriptions for each page? This tends to get a lot more complicated, and it’s best to just use a plugin for that. But you can do it with a conditional tag or with custom fields.
Meta descriptions are powerful tools in your hands to increase your click-through rate. Learn how to add them to your #WordPress site and improve your conversions! ✍️🎯Click to Tweet
Summary
Without targeted, precisely written meta descriptions, you could be missing out on clicks and conversions. Letting Google generate snippets is hit or miss. By writing your own, you get an opportunity to “make a pitch” and ensure that users can make a fully informed decision.
As research shows, custom meta descriptions are able to increase your CTR up to 5.8%, which is a good outcome considering the little resources you might need to craft them out. In fact, to add a meta description in WordPress, you can either edit your WordPress files manually or use an SEO plugin to get control over your snippets.
I know, custom meta descriptions may require more time than you anticipated, but it’s an activity worth doing for the long-term results.
Get all your applications, databases and WordPress sites online and under one roof. Our feature-packed, high-performance cloud platform includes:
- Easy setup and management in the MyKinsta dashboard
- 24/7 expert support
- The best Google Cloud Platform hardware and network, powered by Kubernetes for maximum scalability
- An enterprise-level Cloudflare integration for speed and security
- Global audience reach with up to 35 data centers and 275 PoPs worldwide
Test it yourself with $20 off your first month of Application Hosting or Database Hosting. Explore our plans or talk to sales to find your best fit.
If you’re not adding meta descriptions to your website, you’re missing out on a big chance to attract and convert new visitors. It may not seem like a big deal, but a targeted snippet that appears in search engine results can make a huge difference. Without one, you could be losing clicks.
Meta descriptions are the short snippets that appear on search results pages like Google and Bing. You can customize them to better describe each page, drawing in new users and making your search results stand out from competing websites.
Adding a meta description can be as easy as filling out a box or inserting a line of code.
Ready to get more clicks? We’ll show you how to add a meta description in WordPress with and without a plugin.
Prefer to watch the video version?
What is a Meta Description?
Search engines like Google use a robot called a web crawler to index your site. The info this gives them allows them to display it properly in search results, so you can be found when people search for relevant keywords.
But since this program is just, well, a program, it doesn’t automatically know what your site is about. You have to tell it using different elements such as sitemaps, schema markup, and meta tags, just to name a few. That’s why a meta description is so important.
Users see a page’s meta description below the title in the search results. The meta description is meant to inform them about the content and purpose of a webpage so they can decide whether to click on it or not. In this example, you can also see sitelinks:
Google’s crawlers are better than they once were. In fact, they can now extract a title and meta description automatically, and figure out a page’s topic without you having to manually define keywords.
If you don’t write your own meta description, Google will generate one for you by pulling content from the page. But you could be missing out on a chance to convince people to click on the link with a targeted snippet customized to earn conversions.
How Meta Descriptions Impact Your SEO
Meta descriptions actually don’t have a direct effect on your SEO ranking, yet Google still advises to create unique ones for each page of your site. It’s the keywords found naturally in your content that are important for SEO.
What meta descriptions do impact is click-through rate (CTR), or how many people decide to click on your site.
Think about the last time you Googled something. What made you pick a certain link? It was probably the title, the description, or both that convinced you.
According to Backlinko, unique meta descriptions have a major impact on CTR:
“Writing unique meta descriptions for each page can increase your site’s organic CTR. We found that pages with a meta description had a 5.8% higher CTR compared to pages without a description.”
Search engines may automatically generate a snippet, but if that description doesn’t do a good job conveying what your content is about, people will ignore it and choose another website.
Writing your own meta descriptions ensures that you have more control over what people see.
I said “more control”, not “total control.” Google won’t always use your meta description, though.
Sometimes it will show parts of a page’s content that’s more relevant to a user’s search. But in most cases, it prefers to fall back to the snippet you provided rather than using an auto-generated one.
A well-written meta description plays a big part in attracting and converting visitors. It may not directly affect SEO, but it will gain you more interested visitors, and higher CTR does give your rankings a boost.
Meta Description vs Meta Keyword
Metadata as a whole is a set of HTML tags that tell search engines and web crawlers what your site is about. These include the title, description, and keywords.
You already know that a meta description is the HTML element that describes a webpage’s content and purpose.
Meta keywords are a relic of an older internet. In other words, they’ve been deprecated and are no longer in use. In the past, they were used to tell search engines what topics a page covered, similar to how you tag a social media or blog post.
However, once people realized that you could put any unrelated keyword in and get free traffic from topics your site had nothing to do with (hello “free porn” and “free mp3”), search engines removed support for the feature. You can still add meta keywords, but for the most popular search engines, it won’t do anything.
Now, Google examines a website’s content using more sophisticated web crawlers that can automatically figure out what topics are related to the content you write about on a page. It completely ignores the meta keywords attribute.
Instead of using meta keywords, improving SEO is now about optimizing natural keyword usage within your content and address other technical aspects like the speed of your site.
5 Tip For Writing and Optimizing a Meta Description in WordPress
When it comes to meta descriptions, there are no hard and fast rules to follow. But there are still some best practices you should keep in mind. These can help you rise above the competition and increase your click-through rate.
Let’s go over each of these best practices, so you can write better meta descriptions.
Prefer to watch the video version?
1. Ideal Snippet Length
You can’t make your snippet an unlimited length. If you exceed a certain number of characters, it will be truncated. Your meta descriptions can be as short as you want but don’t go over 155-160 characters, or it’s likely to be cut off abruptly. That doesn’t look good.
2. Focus on a Keyword
It’s a good idea to include a keyword in every snippet you write. If you’re creating a snippet for a blog post, you can target the same keyword you wrote the article with. Otherwise, do some keyword research and choose one that’s aligned with your goals.
Including a keyword will help you structure your description in a compelling way. Plus, Google sometimes highlights keywords that match users’ search terms. Targeting a popular keyword and including it in your description may result in bold, noticeable text.
3. Write Clear, Cohesive, and Captivating Descriptions
Your meta description is like a free advertisement, so take it as a chance to convert potential visitors. Address the reader directly, pulling them in by posing a question or problem, then outlining the benefits of clicking your link. Use vivid imagery, eye-grabbing statements, or information-rich sentences.
Most importantly, earn your click by proving that your website has exactly what people are looking for. Do you have the best services or products, or the information they’ve been searching for? What do you have to offer that your competitors don’t?
Ensure that your snippet is high-quality and free of awkward phrasing, repetition, or grammatical errors that could turn people away.
Consider including a call to action, like “save money”, “read our review”, or “learn more about meta tags”. Avoid awkward-sounding CTAs like “click here”, however. Many sites opt to skip the call to action and focus on providing valuable information; see what sounds right to you.
Lastly, make it clear what will happen when your link is clicked. Will they be reading a blog post, browsing the store, or landing on a features page? It should be obvious where they’re going and what they’ll find when they get there.
4. Avoid Duplicate Snippets
Meta descriptions present a free chance to reach out to potential customers and convert them, so don’t waste it by creating duplicate or carbon copy snippets, meta descriptions that are the same or nearly the same across multiple webpages.
When you have hundreds or thousands of pages on your site, it may seem like a good idea to just use a template and swap out a few details. But duplicate descriptions just don’t look good, especially when they cover more than a handful of pages. People will quickly tune out your website’s results.
A default meta description is better than a bad one. If you don’t have the time to add a carefully written, compelling snippet to every single page, it’s better to let Google do the work and focus on a few key pages.
5. Don’t Be Deceptive
Meta descriptions may not improve your SEO, but they can certainly damage your click-through rate if you engage in deliberately deceptive behavior.
Ensure that your description is accurate. Just be honest about what people are clicking on first and foremost. Don’t lie about what a page contains.
Avoid keyword stuffing. It’s awkward to read and will result in reduced CTR, plus it might get you penalized or result in Google ignoring your custom description entirely.
Keep these tips in mind and you’ll create better meta descriptions.
Writing Meta Descriptions for Specific Pages
The techniques for crafting a meta description are similar at their core, but each type of page needs its own special touch. The way you write a snippet for a blog post, homepage, and product page varies quite a bit.
Here are some tips for writing a meta description for a few key types of pages.
Homepage Meta Descriptions
Homepage descriptions get special treatment. This is the face of your website, so you have to make it count. Many websites write a short, one-sentence pitch, never even reaching the 160-character limit.
Your job here is to sell your brand. Hit hard with a short, snappy, well-written piece that explains concisely what you do and why they should choose you. This goes for similar pages just as your About and Mission Statement.
Blog Post Meta Descriptions
For primarily informational pages such as blog posts, you may not want your description to read like a blatant advertisement. Of course, you are making a pitch and can include a call to action, but focus on the information.
When people go looking for a solution to a problem, they don’t want to be advertised to. They want answers. Tell people what they’ll learn when they click this link, and prove that you know what you’re talking about.
Category Pages Meta Descriptions
There are also category pages to consider. This is a hard one to write for. Most searches won’t turn up a category archive, but you shouldn’t miss out on an opportunity to create a compelling, converting snippet.
Your best bet is to entice people by giving them a hint of the type of posts they’ll find in this category, and get them in a reading mood.
For news-based websites and ecommerce stores, category pages play a key role as they can be crucial pages able to score higher rankings and more traffic if well optimized.
Product Page Meta Descriptions
Speaking of online stores… Product pages will pop up in the search results when people are looking to buy something and fast.
Instead of promoting your website, focus on the individual product. Use similar tactics: write something that quickly explains what this is and why they need it.
You might also include specifications such as price and other product info.
You should ideally be writing a unique meta description for every product. It might be tempting to just use a template and swap out the product name, but this generic approach won’t do as well as a hand-written pitch.
How to Add a Meta Description with Yoast SEO
If you want to add custom meta descriptions to your site, your best bet is installing an SEO plugin. Any popular SEO plugin will make it easy for you to write snippets for all of your pages and blog posts.
While it’s possible to add them manually, it means editing site files. On some setups, this might be impossible without FTP access, which complicates things even further. Plus, there’s no easy way to add individual descriptions to each page without a plugin. All the simplest solutions only set a default snippet for the whole site.
For most people, it’s best to just install a WordPress plugin instead of dealing with the headache.
You can use a simple and direct plugin like WP Meta SEO or a more fully-featured SEO suite. Some popular SEO plugins include Yoast SEO and The SEO Framework. Since Yoast is the most widely used, we’ll show you how to add a meta description with that one.
Let’s install Yoast now. You can either visit its plugin repository page or log in to your WordPress backend and head over to Plugins > Add New. Search for Yoast and download it, or upload the zip file you installed earlier.
Then just activate the plugin in Plugins > Installed Plugins to get it working.
Add a Meta Description to Posts and Pages with Yoast SEO
Yoast will add a new SEO tab to your admin backend. You can go here to configure settings, including defaults and how your pages look on social media. But to get to the individual meta description editor, you’ll need to open up an existing post or page or create a new one.
Scroll down below the editing area and you’ll see the new Yoast section. Click Edit Snippet and start typing in the Meta Description section. The bar at the bottom will turn green once you’ve hit the optimal character length. You can also add dynamic variables that will display elements like title or category.
That’s all you need to do to create a custom meta description for any post or page on your website.
Add a Meta Description to Your Homepage with Yoast SEO
Adding a snippet for your homepage works a little differently than normal in Yoast. Go to SEO > Search Appearance.
Right there you’ll see the Homepage section, with the normal editor UI. Just write a description and title as you did before.
Remember that writing a homepage snippet is a sales pitch for your site as a whole. Describe your company or blog, what you do, and what you have to offer. When you’re finished, click Save Changes.
With that, your homepage search results should soon update to show its new meta description.
Add a Default Meta Description with Yoast SEO
What if you want to add a default meta description that appears whenever you fail to set a custom one? That’s easy. Under SEO > Search Appearance > Content Types (check the tabs at the top of the Search Appearance page), you’ll see two drop-downs, one for posts and one for pages.
These also use the typical metadata editor, so go ahead and add a default snippet for posts and pages.
Now when you create a new post or page, the meta description will automatically use the info you put here. That way, if you publish a blog post and forget to add a snippet, it will just fall back to what you put here.
If you like basing them off a template, you could also paste it here, and it will appear on the editing screen ready to be filled out when you make a new post.
Add Meta Description for Category Archives with Yoast SEO
What about your category pages? These small archives don’t have a lot of text content, which can confuse Google and cause it to display a broken or strange-looking snippet. You can add a short excerpt yourself to avoid this.
Go to SEO > Search Appearance > Taxonomies and create your description in the editor. Or you can go to Posts > Categories and write up a new one for each individual category archive page.
This snippet doesn’t need to be too complicated. You can still make a small pitch like “Discover dozens of (category) posts here”, but you don’t need to be as stringent since it’s unlikely that this page will pop up frequently in search results.
That wraps up everything you’ll need to know about adding meta descriptions with Yoast.
How to Add a Meta Description Without a Plugin
If you don’t want to install an SEO plugin to create custom meta descriptions, you can instead edit your theme files. However, it can be a bit of a pain, especially if you want to add descriptions to individual pages.
Downloading a plugin will probably be easier for you. But if you really don’t want to, here’s how to do it manually.
Before editing any files on your site, make sure to do a backup. It’s also a good idea to create a child theme, as it protects your site if you make a mistake and doesn’t reset your changes when WordPress updates.
We’ll create some generic meta tags that will apply to every page on your site. First, you’ll want to go to Settings > General. Under Tagline, write the meta description you want to represent your site.
Next, go to Appearance > Theme Editor. If you can’t see it, you may need to access your header.php using FTP.
Look in the sidebar and find Theme Header (header.php) and click to edit it. Paste in this code anywhere between <head> and </head>.
<meta name="description" content="" />This will add the tagline to every page on your site.
Obviously, this isn’t very desirable for your blog posts. You’re more likely to get clicks if people know what each post is about, rather than getting a generic description.
Using this code, search engines will just grab content from the post to use in the meta description like normal.
<meta name="description" content="<?php if ( is_single() ) {
        single_post_title('', true);
    } else {
        bloginfo('name'); echo " - "; bloginfo('description');
    }
With these two pieces of programming, you’ll get a tailored description on your generic pages like the homepage and category archives, but your posts will have a normal snippet.
What if you want to add individual descriptions for each page? This tends to get a lot more complicated, and it’s best to just use a plugin for that. But you can do it with a conditional tag or with custom fields.
Meta descriptions are powerful tools in your hands to increase your click-through rate. Learn how to add them to your #WordPress site and improve your conversions! ✍️🎯Click to Tweet
Summary
Without targeted, precisely written meta descriptions, you could be missing out on clicks and conversions. Letting Google generate snippets is hit or miss. By writing your own, you get an opportunity to “make a pitch” and ensure that users can make a fully informed decision.
As research shows, custom meta descriptions are able to increase your CTR up to 5.8%, which is a good outcome considering the little resources you might need to craft them out. In fact, to add a meta description in WordPress, you can either edit your WordPress files manually or use an SEO plugin to get control over your snippets.
I know, custom meta descriptions may require more time than you anticipated, but it’s an activity worth doing for the long-term results.
Get all your applications, databases and WordPress sites online and under one roof. Our feature-packed, high-performance cloud platform includes:
- Easy setup and management in the MyKinsta dashboard
- 24/7 expert support
- The best Google Cloud Platform hardware and network, powered by Kubernetes for maximum scalability
- An enterprise-level Cloudflare integration for speed and security
- Global audience reach with up to 35 data centers and 275 PoPs worldwide
Test it yourself with $20 off your first month of Application Hosting or Database Hosting. Explore our plans or talk to sales to find your best fit.
When crawling your website, search engines try to gather as much information as possible. In addition to looking to the title, headings, body of text, URL, and other on-page SEO elements, search engines also look for data that isn’t visible to the front-end user. This data is known as meta tags.

According to Google, meta tags are another way site owners can tell search engines about their sites. These tags might contain the meta description, author, type of document, language, copyright, and any other relevant information about the site. It’s important to note that keyword meta tags haven’t been a ranking factor since 2009 so you don’t have to worry about those. Just focus on adding keywords to optimize your on-page elements.
Because the default installation of WordPress does not contain meta tag data, site owners must add this data themselves. They can do so manually by adding meta tags in their theme’s template files or by using WordPress plugins. Let’s walk through each method below.
![Download Now: How to Launch a WordPress Website [Free Guide + Checklist]](https://no-cache.hubspot.com/cta/default/53/b5ae83fa-3a09-487e-a43a-4833bf87ab87.png)
Manually adding meta tags in WordPress is relatively simple. For this demo, we’ll use the example from the WordPress Codex. Imagine you’re Harriet Smith, a veterinarian who blogs about their animal stories on WordPress. You want to add the following generic meta tags to your site:
<meta name="resource-type" content="document" />
<meta http-equiv="content-type" content="text/html; charset=US-ASCII" />
<meta http-equiv="content-language" content="en-us" />
<meta name="author" content="Harriet Smith" />
<meta name="contact" content="harrietsmith@harrietsmith.us" />
<meta name="copyright" content="Copyright (c)1997-2004
Harriet Smith. All Rights Reserved." />
<meta name="description" content="Special stories and
tales about dogs, cats, birds, ferrets, and other
domestic animals as told by Harriet Smith,
veterinarian. Stories include tales of animal
bravery and courage, life and death, companionship,
and the wonderful joy animals and pets bring to
their human partners." />
To do so, follow this step-by-step guide.
1. Log in to the control panel of your hosting account and open the File Manager.
2. Click the public_html folder on the left hand side of your screen.
Image Source
3. Click the wp-content folder.
4. Find the folder labelled “themes.”
Image Source
5. Click the folder with your theme’s name.
6. Right-click the header.php template and select Edit from the drop-down menu.
7. Add your meta tags in the head section (between the <head></head> tag.
8. Save your changes.
Image Source
While manually adding meta tags is a relatively simple process, it only works if you have a clear purpose for your website like Harriet. In that case, you can use basic information to create generic meta tags and place these in your header.
If your site covers a wider range of topics, then you’ll need to set unique meta tags for each post and page. You can do so using a plugin.
How to Add Meta Tags in WordPress Using a Plugin
With a plugin, you can add generic and unique meta tags to your WordPress site. We’ll walk through how to add them using the Meta Tag Manager plugin. If you’re using another plugin, check out its documentation for exact steps.
1. First, log into your WordPress dashboard.
2. Click Plugins > Add New.
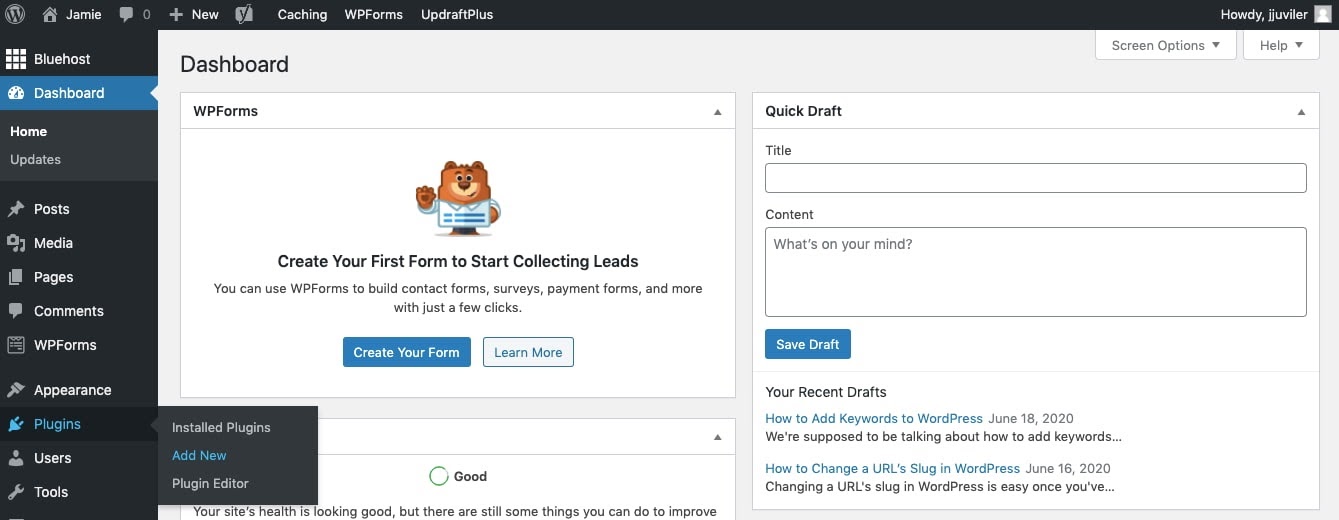
3. Search for “Meta Tag Manager.” When the search result appears, click Install Now and Activate.
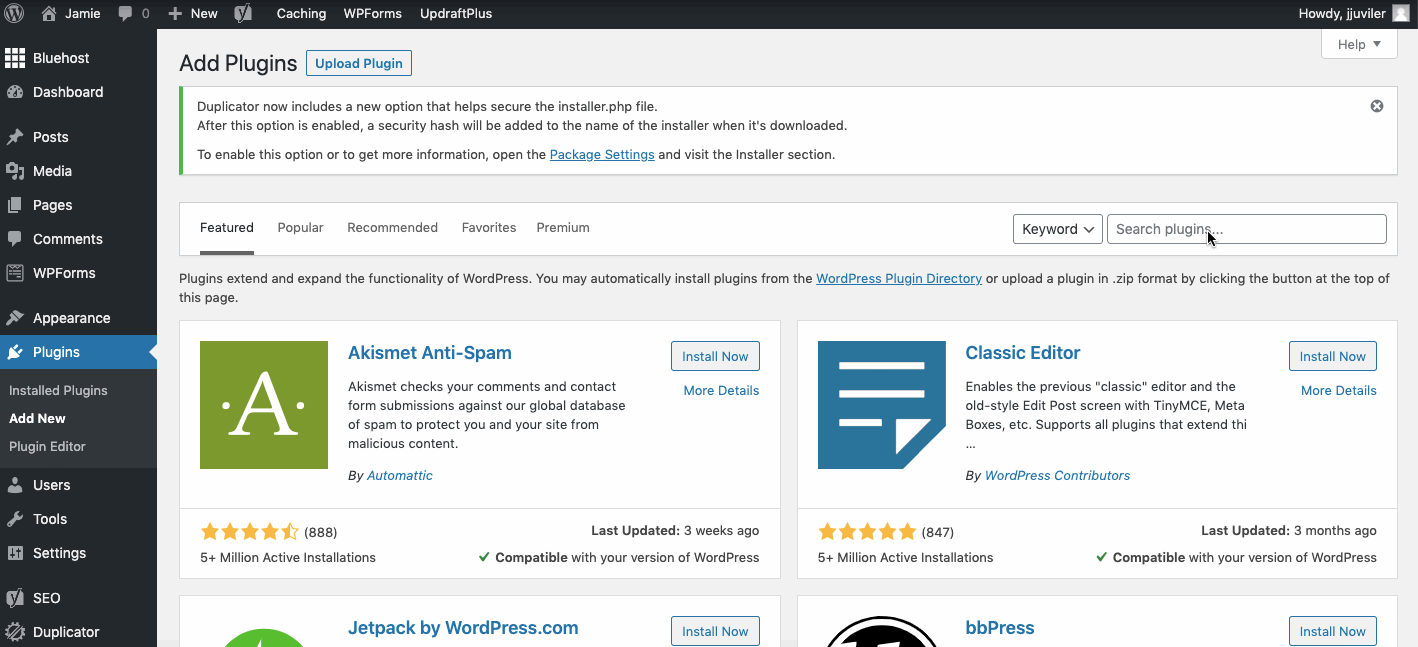
4. You’ll be automatically redirected to the tab containing all installed plugins on your site. At the top of the screen, you should see a message confirming the plugin has been activated.
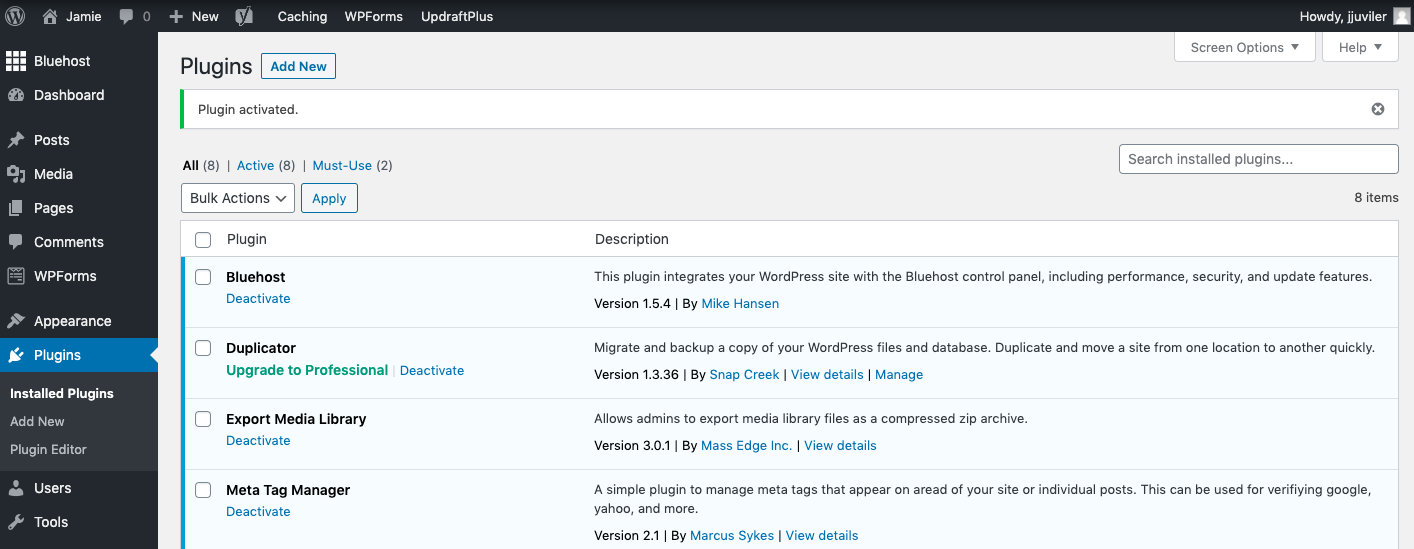
5. Navigate to Settings > Meta Tag Manager.

6. Now you can begin creating global meta tags and assigning them to different areas on your site. Let’s say you want to add an author meta tag for all posts on my site. You’d configure the settings as shown below.
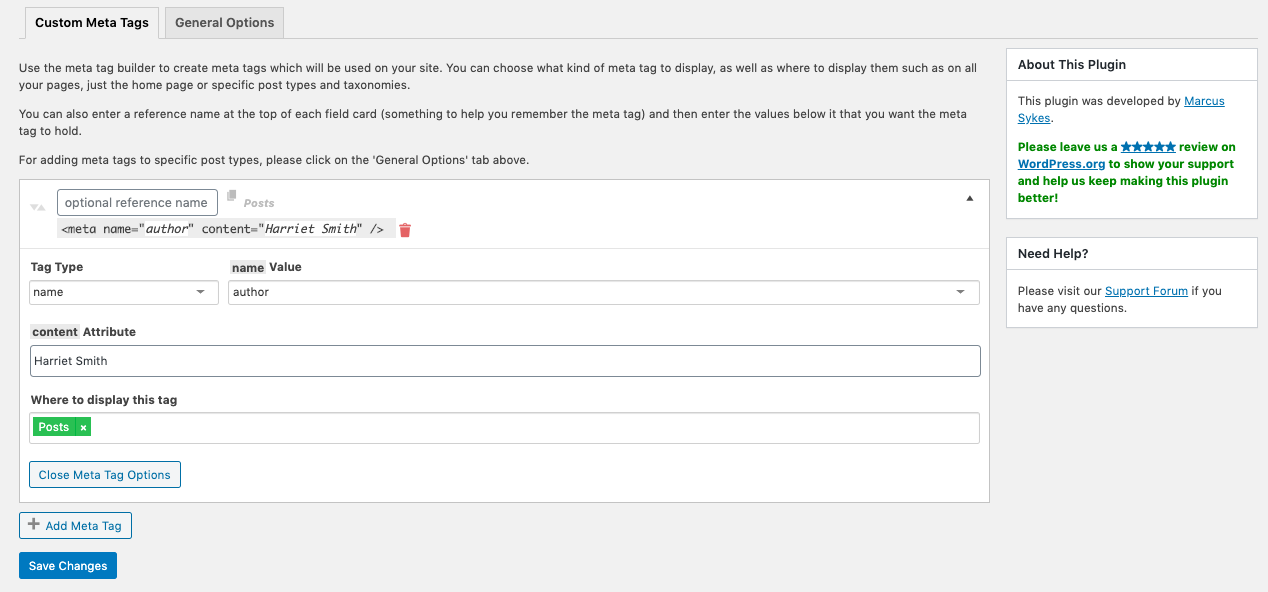
7. Then, switch over to the General Options page and make sure that posts, pages, and media are listed in the field labelled “Post Type Support.” That way, when editing a post, page, or media file, you can add meta tags that will only be displayed on that specific item.

8. When editing in this way, the Meta Tag Manager will appear as an individual meta box, as shown below.

In the demo below, you’ll see that I’m in the post editor. I scroll past the Yoast SEO meta box to the Meta Tag Manager meta box and add a meta description tag that’s unique to this specific post.
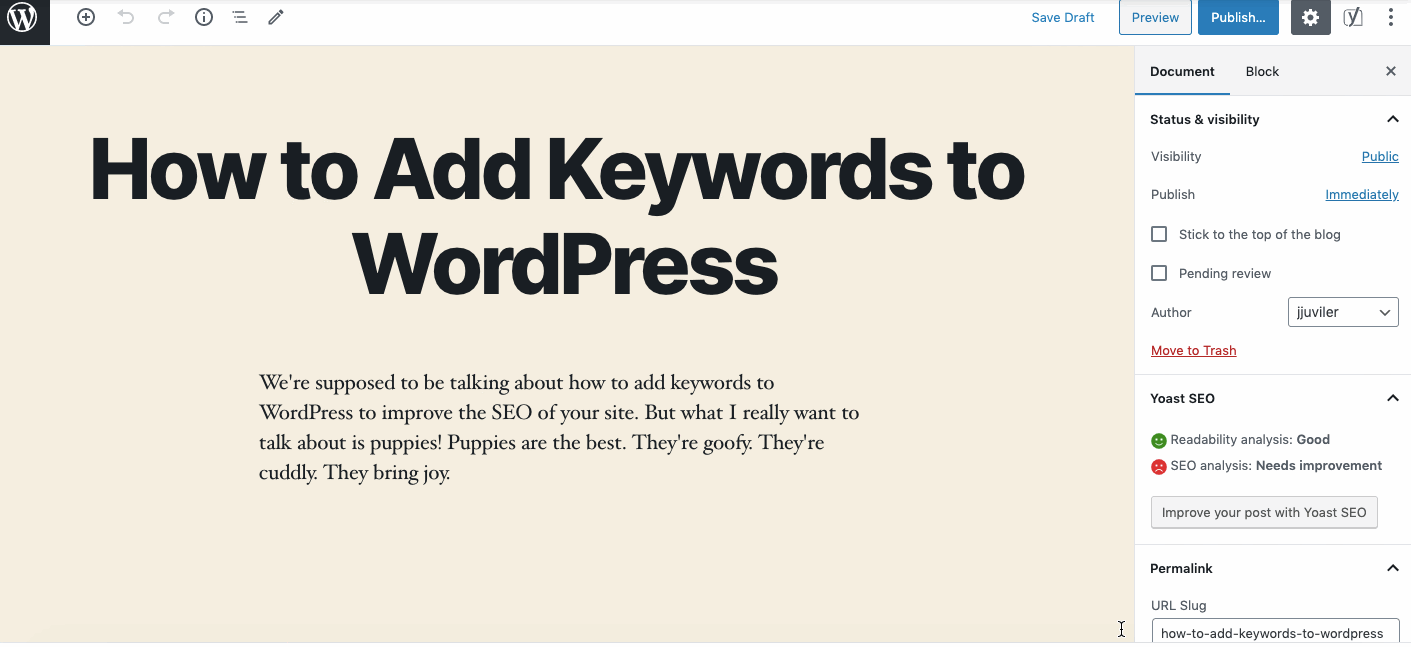
Following the same process, you can add unique meta tags to all your posts and pages.
Adding Meta Information to Your Site
To provide search engines with as much information about your WordPress website as possible, you can add generic meta tags in your theme’s header. Or you can use a meta tag plugin to create and manage global meta tags as well as custom meta tags for your individual posts and pages. Pick the method that works best for you and your site.