A volume label, sometimes called a volume name, is a unique name assigned to a hard drive, disc, or other media. It’s not required in Windows, but it’s often useful to give a name to a drive to help identify its use in the future.
A drive’s volume label can be changed at any time, but is usually set during the formatting of the drive.
Volume Label Restrictions
Certain restrictions apply when assigning volume labels, depending on which file system is on the drive—NTFS or FAT:
NTFS Drives
- Maximum of 32 characters
- No tabs
FAT Drives
- Maximum of 11 characters
- No * ? . , ; : / | + = < > [ ]
- No tabs
Spaces are allowed in the volume label no matter which of the two file systems is used.
The only other important difference between volume labels in NTFS vs FAT file systems is that a label on an NTFS formatted drive will retain its case, while one on a FAT drive will be stored as uppercase no matter how it was entered.
For example, a label entered as Music will be displayed as Music on NTFS drives but will be displayed as MUSIC on FAT drives.
Understanding Volume Label Changes
Changing the volume label is helpful to distinguish volumes from one another. For example, you might have one called Backup and another labeled Movies so it’s easy to quickly identify which volume is used for file backups and which one just has your movie collection.
There are two ways to find the volume label in Windows, and three ways to change it. You can do so through File Explorer (by opening windows and menus) or with the command line via Command Prompt. You can also change it through the Windows Registry, but it’s not the quickest or easiest method.
How to Find the Volume Label
To find the volume label with Command Prompt requires a simple command called the vol command.
The next best method is to look through the volumes listed in Disk Management. Next to each drive is a letter and name; the name is the volume label. See How to Open Disk Management if you need help getting there.
Another method that works in most versions of Windows, is to open File Explorer yourself and read what name is displayed next to the drive. One quick way to do this is through the WIN+E keyboard combination—the shortcut to open File Explorer, This PC, Computer, or My Computer, depending on your version of Windows.
As you can see, this lists the drives plugged into your computer. Like with Disk Management, the volume label is identified next to the drive letter.
If you don’t see the drives after using that hotkey, select This PC from the left side of File Explorer, or enter that as the path at the top of the window.
How to Change the Volume Label
Renaming a volume is easy to do from both Command Prompt and through File Explorer or Disk Management.
Open Disk Management and right-click the drive you want renamed. Choose Properties and then, in the General tab, erase what’s there and type what you’d prefer it to be.
Changing the Volume Label From Disk Management (Windows 11).
You can do the same thing in File Explorer: right-click whatever drive you want renamed, and then go into Properties to adjust it.
See How to Change a Drive Letter if you’d like to do that through Disk Management. The steps are similar to changing the volume label, but not exactly the same.
Like viewing the label from Command Prompt, you can also change it, but the label command is used instead. With an elevated Command Prompt open, type the following to change the volume label:
label z: External
As you can see in this example, the volume label of the Z drive is changed to External. Adjust that command to be whatever works for your situation, changing the letter to your drive’s letter and the name to whatever you want it renamed to.
If you’re changing it on the «main» hard drive that has Windows installed on it—for example, the C drive—you can run a command like this:
label c: Windows
To change a volume label from the registry, you have to make a few registry keys and modify a registry value. It’s pretty straightforward, but definitely not as quick to do as the above methods.
Here’s what to do:
-
Open Registry Editor.
-
From the HKEY_LOCAL_MACHINE hive, navigate to the following key:
SOFTWAREMicrosoftWindowsCurrentVersionExplorer -
Make a new key called DriveIcons if one doesn’t already exist.
-
Select that key, and then make another key inside it, and name it the letter of the volume you’re wanting to change the label for.
For example, as you’ll see in the image below, I made mine read F since that’s the name of my hard drive I want to change the volume label on.
-
Make yet another key inside that one that’s called DefaultLabel.
Take special care to avoid spaces in this step and in Step 3. Those keys have to be labeled exactly as shown above, without spaces, or the registry tweak won’t work.
-
Select the DefaultLabel key to see its (Default) value off to the right. Double-click or double-tap that value to open the Edit String window.
-
Enter whatever volume label you want, and then press OK to save the changes.
-
Exit Registry Editor and restart your computer for the changes to take effect.
Don’t want to restart? Another way to make the changes show up is to restart File Explorer. Here’s how: open Task Manager and end the explorer.exe process, and then use the Run new task option (File > Run new task if you’re not using Windows 11) to start a new instance of explorer by entering explorer.exe in that box.
More About Volume Labels
The volume label is stored in the disk parameter block, which is part of the volume boot record.
Viewing and changing one is also possible with a free partition software program, but it’s much easier with the methods described above because they don’t require that you download a third-party program.
Frequently Asked Questions
- How do you enter the current volume label for drive C? If you see a message stating “Enter current volume label for drive C” while making changes to your hard drive, find the correct label for the drive that you’re trying to modify by opening Command Prompt, typing vol c: > Enter. Enter the label information in the prompt.
- What is the volume label on a flash drive? The volume label is the name you assigned to the flash drive when it was first formatted. When plugged into a computer, the flash drive displays the volume label.
Thanks for letting us know!
Get the Latest Tech News Delivered Every Day
Subscribe
 Если вас не устраивают буквы дисков, назначенные автоматически Windows 10 или они изменились после переустановки/обновления системы, вы можете легко их изменить. Это относится как к жестким дискам и SSD (а точнее, разделам на них), так и USB накопителям (но по ним есть и отдельная инструкция: Как изменить букву флешки в Windows).
В этой инструкции два простых способа изменить букву диска Windows 10 встроенными средствами ОС. Учитывайте, что букву системного раздела диска (диск C:) изменить таким образом не получится. Также может быть полезным: Windows не видит второй диск или раздел диска после установки или обновления.
Прежде чем приступить, хочу обратить ваше внимание на один момент: если вы меняете букву диска, на который устанавливались (с помощью установщиков) какие-либо программы, либо перемещались системные файлы и папки, то после изменения буквы что-то может перестать запускаться или работать ожидаемым образом, так как ссылки в реестре Windows 10 и других расположениях будут указывать на старую букву диска.
- Изменить букву диска в управлении дисками
- В командной строке
- Видео инструкция
Изменение буквы диска в утилите «Управление дисками» Windows 10
Один из самых простых способов изменить букву диска в Windows 10 — использовать встроенную системную утилиту «Управление дисками» (о других таких инструментах: Встроенные утилиты Windows, о которых многие не знают).
Шаги по изменению буквы диска будут следующими:
- Нажмите клавиши Win+R (Win — клавиша с эмблемой Windows) на клавиатуре, введите diskmgmt.msc в окно «Выполнить» и нажмите Enter. Второй способ открыть управление дисками — нажать правой кнопкой мыши по кнопке Пуск и выбрать нужный пункт контекстного меню.
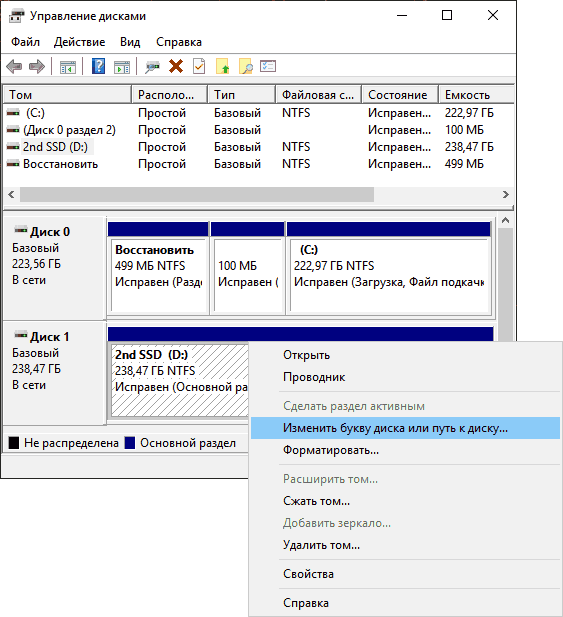
- Нажмите правой кнопкой мыши по тому диску (раздела диска), букву которого нужно изменить и выберите пункт «Изменить букву диска или путь к диску». Контекстное меню можно вызывать как в списке дисков в верхней части «Управления дисками», так и в нижней части, где присутствует графическое представление разделов на диске.

- В следующем окне выберите текущую букву диска и нажмите кнопку «Изменить».

- Укажите желаемую новую букву диска и нажмите «Ок».

- Подтвердите изменение буквы (появится несколько предупреждений о том, что смена буквы диска может привести к проблемам с запуском программ).


В случае, если вам нужно поменять буквы между двумя дисками, например, D изменить на E, а E — на D (аналогично и для других букв и устройств):
- Удалите букву диска E (в управлении дисками выбрать «Изменить букву диска или путь к диску», выбрать букву, нажать «Удалить»).
- Назначьте диску D букву E.
- Назначьте диску без буквы (который был E) букву D.
Обычно, этого метода изменения буквы диска бывает достаточно, однако есть и еще один способ: всё это можно сделать с помощью командной строки.
Изменение буквы диска с помощью командной строки в DISKPART
Изменение буквы раздела диска в утилите командной строки DISKPART — не слишком сложная задача. Но если вы начинающий пользователь и не уверены, что понимаете описание и логику производимых действий, рекомендую быть очень осторожными или отказаться от этого метода: есть вероятность получения проблем с доступом к важным данным (они никуда не исчезнут, но потребуются дополнительные действия, чтобы снова увидеть диск в проводнике).
Чтобы изменить букву диска Windows 10 с помощью командной строки, выполните следующие действия:
- Запустите командную строку от имени администратора.
- По порядку используйте следующие команды (после ввода команды нажимаем Enter для её выполнения).
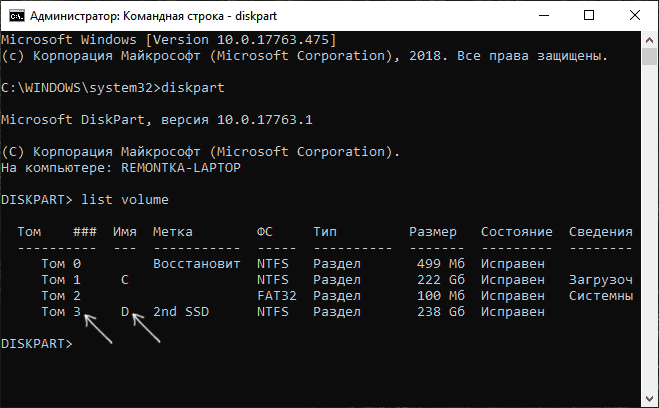
- diskpart
- list volume (в результате выполнения этой команды обратите внимание на номер тома, букву которого нам нужно изменить, далее — N).

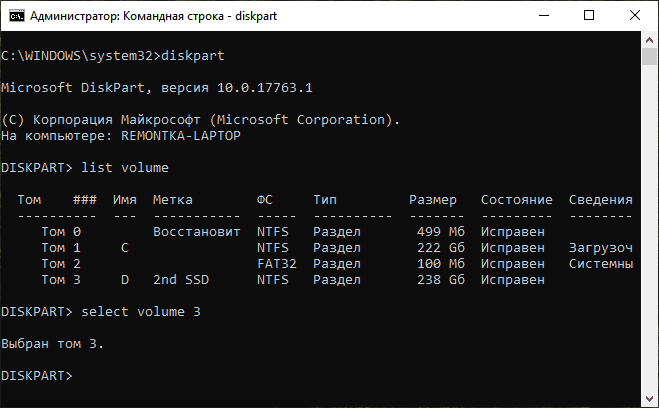
- select volume N (этой командой мы выбираем по номеру тот раздел, над которым будут производиться дальнейшие команды).
- assign letter=БУКВА (задаем свободную букву на своё усмотрение, старая автоматически будет удалена с этого раздела диска).
- exit
- Закройте командную строку.

Готово, буква диска изменена. Если вам нужно назначить букву диска, которая на настоящий момент занята другим разделом, то сначала удалите её, выбрав раздел (как в 5-й команде) и используя команду remove letter=удаляемая_буква, затем проделайте шаги 5-6 для назначения освободившейся буквы, а в завершение назначьте тем же самым образом новую букву разделу, с которого она была удалена (иначе он не будет отображаться в проводнике).
Видео инструкция
Надеюсь, инструкция была полезной, если же что-то не получается или остаются вопросы — задавайте в комментариях, я постараюсь помочь. Дополнительные материалы к изучению: Как очистить диск C от ненужных файлов, Как увеличить диск C за счет диска D.
На чтение 6 мин. Просмотров 10.5k. Опубликовано 25.06.2019
Содержание
- Определение метки тома, ограничения и многое другое
- Ограничения на объемные метки
- Как просмотреть или изменить метку тома
- Как изменить метку тома
- Подробнее о метках тома
Определение метки тома, ограничения и многое другое
Метка тома, иногда называемая именем тома , представляет собой уникальное имя, назначаемое жесткому диску, диску или другому носителю. В Windows метка тома не требуется, но часто бывает полезно дать имя диску, чтобы определить его использование в будущем.
Метка тома диска может быть изменена в любое время, но обычно устанавливается во время форматирования диска.
Ограничения на объемные метки
При назначении меток тома применяются определенные ограничения в зависимости от того, какая файловая система находится на диске – NTFS или FAT:
Метка тома на дисках NTFS:
- Максимум 32 символа
- Нет вкладок
Метка тома на дисках FAT:
- Максимум 11 символов
- Нет *? , ,; :/ | + = []
- Нет вкладок
В метке тома допускаются пробелы независимо от того, какая из двух файловых систем используется.
Единственное другое важное различие между метками томов в файловых системах NTFS и FAT заключается в том, что метка тома на диске, отформатированном в NTFS, сохранит свой регистр, а метка тома на диске FAT будет храниться в верхнем регистре независимо от того, как он был введен.
Например, метка тома, введенная как Музыка , будет отображаться как Музыка на дисках NTFS, но будет отображаться как MUSIC на дисках FAT.
Как просмотреть или изменить метку тома
Изменение метки тома помогает отличать тома друг от друга. Например, у вас может быть один с именем Резервное копирование , а другой с пометкой Фильмы , чтобы можно было быстро определить, какой том используется для резервного копирования файлов, а какой просто содержит вашу коллекцию фильмов.
Есть два способа найти метку тома в Windows и три способа ее изменить. Это можно сделать через проводник Windows (открыв окна и меню) или с помощью командной строки через командную строку. Вы также можете изменить метку тома через реестр Windows, но это не самый быстрый и не самый простой способ.
Как найти метку тома
Самый простой способ найти метку тома – с помощью командной строки. Есть простая команда, называемая командой vol, которая делает это действительно простым. Подробнее читайте в нашем руководстве «Как найти метку тома или серийный номер диска».
Следующий лучший способ – просмотреть тома, перечисленные в разделе «Управление дисками». Рядом с каждым диском есть буква и имя; Название – это метка тома. Посмотрите, как открыть Управление дисками, если вам нужна помощь, чтобы добраться туда.
Другой метод, который работает в большинстве версий Windows, – это открыть Windows Explorer самостоятельно и прочитать, какое имя отображается рядом с диском. Один из быстрых способов сделать это – нажать комбинацию клавиш WIN + E – ярлык для открытия Этот ПК , Компьютер или . Мой компьютер , в зависимости от вашей версии Windows.

Как видите, в этом списке перечислены диски, подключенные к вашему компьютеру. Как и при управлении дисками, метка тома указывается рядом с буквой диска.
Как изменить метку тома
Переименование тома легко сделать как из командной строки, так и через Windows Explorer или Disk Management.
Откройте Управление дисками и щелкните правой кнопкой мыши диск, который вы хотите переименовать. Выберите Свойства , а затем на вкладке Общие удалите все, что там есть, и добавьте собственную метку тома.

Вы можете сделать то же самое в Windows Explorer с помощью ярлыка WIN + E . Щелкните правой кнопкой мыши по любому диску, который вы хотите переименовать, и перейдите в Свойства , чтобы настроить его.
См. Как изменить букву диска, если вы хотите сделать это через Управление дисками. Шаги аналогичны изменению метки тома, но не полностью совпадают.
Как и при просмотре метки тома из командной строки, вы также можете изменить ее, но вместо нее используется команда метка .
В открытой командной строке введите следующее, чтобы изменить метку тома:
ярлык z: Seagate

Как вы можете видеть в этом примере, метка тома диска Z изменяется на Seagate . Настройте эту команду так, чтобы она соответствовала вашей ситуации, изменив букву на букву вашего диска и имя на любое, которое вы хотите переименовать.
Если вы меняете метку тома «основного» жесткого диска, на котором установлена Windows, вам может потребоваться открыть командную строку с повышенными правами, прежде чем она заработает. Как только вы это сделаете, вы можете запустить команду, как это:
ярлык c: Windows
Чтобы изменить метку тома из реестра, вам нужно создать несколько разделов реестра и изменить значение реестра.Это довольно просто, но определенно не так быстро, как описанные выше методы.

Вот что нужно сделать:
-
Откройте редактор реестра.
-
От куста HKEY_LOCAL_MACHINE перейдите к следующему ключу:
SOFTWARE Microsoft Windows CurrentVersion Explorer
-
Создайте новый ключ с именем DriveIcons , если он еще не существует.
-
Нажмите или коснитесь этой клавиши, чтобы выбрать ее, а затем введите в нее другую клавишу и назовите ее буквой тома, для которого вы хотите изменить метку.
Например, на изображении выше я заставил мой прочитать F , так как это имя моего жесткого диска, на котором я хочу изменить метку тома.
-
Сделайте еще один ключ внутри того, который называется DefaultLabel .
-
Нажмите клавишу DefaultLabel , чтобы ее значение (По умолчанию) было справа. Дважды щелкните или дважды нажмите это значение, чтобы открыть окно Изменить строку .
-
Нажмите ОК , чтобы сохранить изменения.
-
Закройте редактор реестра и перезагрузите компьютер, чтобы изменения вступили в силу.
Не хотите перезапустить? Еще один способ внести изменения – перезапустить Explorer. Это можно сделать, открыв диспетчер задач и завершив процесс explorer.exe , а затем воспользовавшись параметром Файл> Запустить новое задание , чтобы запустить новый экземпляр проводника – введите explorer.exe в этом поле, чтобы сделать это.
Будьте осторожны, чтобы избежать пробелов в Шаге 3 и Шаге 5. Эти ключи должны быть помечены в точности так, как показано выше, без пробелов, иначе настройка реестра не будет работать.
Подробнее о метках тома
Метка тома хранится в блоке параметров диска, который является частью загрузочной записи тома.
Просмотр и изменение меток тома также возможны с помощью бесплатной программы для работы с разделами, но это намного проще с помощью методов, описанных выше, поскольку они не требуют загрузки сторонней программы.