Время прочтения
3 мин
Просмотры 14K
motd — message of the day, сообщение отображаемое при входе в Linux-систему (на примере Ubuntu).
Раньше файл, содержащий приветствие располагался в /etc/motd, сейчас же это набор скриптов, располагающихся в каталоге /etc/update-motd.d/:
# ls -alh /etc/update-motd.d/
total 56K
drwxr-xr-x  2 root root 4,0K янв 22  2020 .
drwxr-xr-x 98 root root 4,0K окт 27 15:31 ..
-rwxr-xr-x  1 root root 1,2K апр  9  2018 00-header
-rwxr-xr-x  1 root root 1,2K апр  9  2018 10-help-text
lrwxrwxrwx  1 root root   46 янв 22  2020 50-landscape-sysinfo -> /usr/share/landscape/landscape-sysinfo.wrapper
-rwxr-xr-x  1 root root 4,2K авг 20  2018 50-motd-news
-rwxr-xr-x  1 root root  604 мар 21  2018 80-esm
-rwxr-xr-x  1 root root 3,0K мар 21  2018 80-livepatch
-rwxr-xr-x  1 root root   97 ноя 12  2018 90-updates-available
-rwxr-xr-x  1 root root  299 июн  3  2019 91-release-upgrade
-rwxr-xr-x  1 root root  129 ноя 12  2018 95-hwe-eol
-rwxr-xr-x  1 root root  111 сен 20  2018 97-overlayroot
-rwxr-xr-x  1 root root  142 ноя 12  2018 98-fsck-at-reboot
-rwxr-xr-x  1 root root  144 ноя 12  2018 98-reboot-required
Порядок отображения, как правило, в порядке заданных приоритетов — 00, 10 и тп…
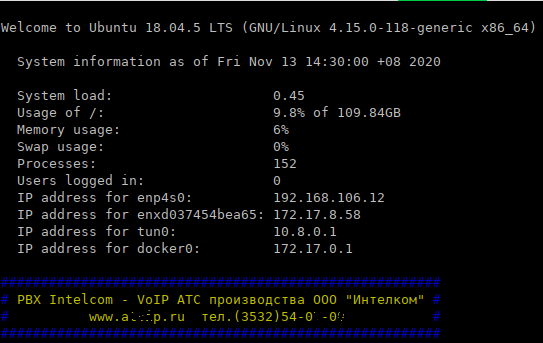
В результате выполнения отображается:
Welcome to Ubuntu 18.04.5 LTS (GNU/Linux 4.15.0-118-generic x86_64)

 * Documentation:  https://help.ubuntu.com
 * Management:     https://landscape.canonical.com
 * Support:        https://ubuntu.com/advantage

  System information as of Fri Nov 13 14:30:00 +08 2020

  System load:                    0.45
  Usage of /:                     9.8% of 109.84GB
  Memory usage:                   6%
  Swap usage:                     0%
  Processes:                      152
  Users logged in:                0
  IP address for enp4s0:          192.168.106.12
  IP address for enxd037454bea65: 172.17.8.58
  IP address for tun0:            10.8.0.1
  IP address for docker0:         172.17.0.1

 * Introducing self-healing high availability clustering for MicroK8s!
   Super simple, hardened and opinionated Kubernetes for production.

     https://microk8s.io/high-availability

 * Canonical Livepatch is available for installation.
   - Reduce system reboots and improve kernel security. Activate at:
     https://ubuntu.com/livepatch

Могут быть обновлены 233 пакета.
174 обновления касаются безопасности системы.

New release '20.04.1 LTS' available.
Run 'do-release-upgrade' to upgrade to it.

Last login: Fri Nov 13 08:21:33 2020 from 85.192.x.214
Много лишнего для нас — не так ли?
Я отключу часть и добавлю своё приветствие.
Создам файл и сделаю его исполняемым.
# touch /etc/update-motd.d/99-intelcom
# chmod 755 /etc/update-motd.d/99-intelcom
Теперь открываю его в любом редакторе и добавляю:
#!/bin/bash
echo -e '33[34m#######################################################
#33[33m PBX Intelcom - VoIP АТС производства ООО "Интелком" 33[34m#
#33[33m          www.a*p.ru  тел.(3532)54-0X-0Y           33[34m#
#######################################################33[0m'
Где -e — включить поддержку вывода Escape последовательностей, 33[34m и 33[33m — цвета текста, 33[0m — сброс цветов.
Доступны такие цвета текста:
33[30m — чёрный;
33[31m — красный;
33[32m — зелёный;
33[33m — желтый;
33[34m — синий;
33[35m — фиолетовый;
33[36m — голубой;
33[37m — серый.
И такие цвета фона:
33[40m — чёрный;
33[41m — красный;
33[42m — зелёный;
33[43m — желтый;
33[44m — синий;
33[45m — фиолетовый;
33[46m — голубой;
33[47m — серый;
33[0m — сбросить все до значений по умолчанию.
Просмотреть результат можно командой sudo run-parts /etc/update-motd.d или cat /var/run/motd.dynamic.
00-header — содержит само приветствие Welcome to Ubuntu 18.04.5 LTS (GNU/Linux 4.15.0-118-generic x86_64)
10-help-text — ссылки на информацию и сапппорт
50-landscape-sysinfo ведет к сприпту для получения системной информации
50-motd-news — какие-то новости
80-livepatch — информация про Livepatch
80-esm — информация об Extended Security Maintenance — Расширенное обслуживание системы безопасности
Далее скрипты об обновлениях, перезагрузке и тд…
Для отключения ненужных сообщений просто задаю им права 400.
Welcome to Ubuntu 18.04.5 LTS (GNU/Linux 4.15.0-118-generic x86_64)
-rwxr-xr-x  1 root root 1,2K апр  9  2018 00-header
-r--------  1 root root 1,2K апр  9  2018 10-help-text
lrwxrwxrwx  1 root root   46 сен 30 13:45 50-landscape-sysinfo -> /usr/share/landscape/landscape-sysinfo.wrapper
-r--------  1 root root 4,9K авг 14 02:59 50-motd-news
-r--------  1 root root  604 мар 22  2018 80-esm
-r--------  1 root root 3,0K мар 22  2018 80-livepatch
-r--------  1 root root   97 июн 27  2018 90-updates-available
-r--------  1 root root  299 мая 19  2017 91-release-upgrade
-rwxr-xr-x  1 root root  165 фев 17  2020 92-unattended-upgrades
-rwxr-xr-x  1 root root  129 июн 27  2018 95-hwe-eol
-rwxr-xr-x  1 root root  111 окт 27  2017 97-overlayroot
-rwxr-xr-x  1 root root  142 июн 27  2018 98-fsck-at-reboot
-rwxr-xr-x  1 root root  144 июн 27  2018 98-reboot-required
-rwxr-xr-x  1 root root  324 ноя 13 13:36 99-intelcom
В итоге у меня получилось:
Настраиваем динамический motd в Debian GNU/Linux 8
После регистрации пользователя в Linux-системе, как правило, отображается так называемое «сообщение дня» — message of the day или сокращённо motd.
В Debian GNU/Linux 8 (Jessie) это сообщение имеет «грустный» вид.
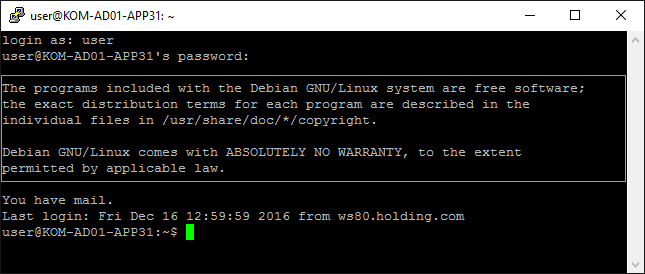
Попробуем сделать это сообщение информативней и полезней для администратора.
Создадим специальный каталог, который будет содержать наши скрипты, которые будут использоваться для генерации динамического motd.
# mkdir /etc/update-motd.d
Создадим в этом каталоге файл скрипта и сделаем его исполняемым:
# touch /etc/update-motd.d/99-mymotd-generator
# chmod a+x /etc/update-motd.d/99-mymotd-generator
Отредактируем наш скрипт:
# nano /etc/update-motd.d/99-mymotd-generator
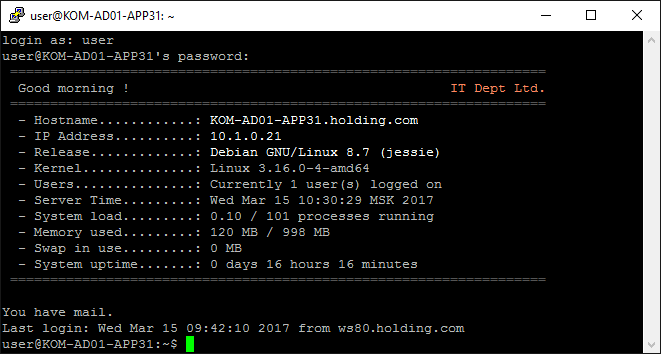
Наполним файл скрипта содержимым «по вкусу». Например я взял вариант из проекта riespandi — Dynamic SSH Banner и немного его подправил под свои нужды. В итоге получилось примерно следующее:
- 99-mymotd-generator
-
#!/bin/sh
#
# Text Color Variables http://misc.flogisoft.com/bash/tip_colors_and_formatting
tcLtG="33[00;37m"    # LIGHT GRAY
tcDkG="33[01;30m"    # DARK GRAY
tcLtR="33[01;31m"    # LIGHT RED
tcLtGRN="33[01;32m"  # LIGHT GREEN
tcLtBL="33[01;34m"   # LIGHT BLUE
tcLtP="33[01;35m"    # LIGHT PURPLE
tcLtC="33[01;36m"    # LIGHT CYAN
tcW="33[01;37m"      # WHITE
tcRESET="33[0m"
tcORANGE="33[38;5;209m"
#
# Time of day
HOUR=$(date +"%H")
if [ $HOUR -lt 12  -a $HOUR -ge 0 ]; then TIME="morning"
elif [ $HOUR -lt 17 -a $HOUR -ge 12 ]; then TIME="afternoon"
else TIME="evening"
fi
#
# System uptime
uptime=`cat /proc/uptime | cut -f1 -d.`
upDays=$((uptime/60/60/24))
upHours=$((uptime/60/60%24))
upMins=$((uptime/60%60))
MEMORY1=`free -t -m | grep "buffers/cache" | awk '{print $3" MB";}'`
MEMORY2=`free -t -m | grep "Mem" | awk '{print $2" MB";}'`
#
# System + Memory
SYS_LOADS=`cat /proc/loadavg | awk '{print $1}'`
SWAP_USED=`free -m | tail -n 1 | awk '{print $3}'`
NUM_PROCS=`ps aux | wc -l`
IPADDRESS=`hostname --all-ip-addresses`
#
echo $tcDkG "==================================================================="
echo $tcLtG " Good $TIME !                                       $tcORANGE IT Dept Ltd."
echo $tcDkG "==================================================================="
echo $tcLtG " - Hostname............:$tcW `hostname -f`"
echo $tcLtG " - IP Address..........:$tcW $IPADDRESS"
echo $tcLtG " - Release.............:$tcW $(lsb_release -s -d)"
echo $tcLtG " - Kernel..............: `uname -a | awk '{print $1" "$3" "$12}'`"
echo $tcLtG " - Users...............: Currently `users | wc -w` user(s) logged on"
echo $tcLtG " - Server Time.........: `date`"
echo $tcLtG " - System load.........: $SYS_LOADS / $NUM_PROCS processes running"
echo $tcLtG " - Memory used.........: $MEMORY1 / $MEMORY2"
echo $tcLtG " - Swap in use.........: $SWAP_USED MB"
echo $tcLtG " - System uptime.......: $upDays days $upHours hours $upMins minutes"
echo $tcDkG "==================================================================="
echo $tcRESET ""
Сохраним скрипт, удалим статический motd-файл и вместо него создадим символическую ссылку на файл /var/run/motd, который будет обновляться при каждом входе в систему нами скриптом.
# rm -f /etc/motd
# ln -sf /var/run/motd /etc/motd
После проделанных изменений войдём в систему локально или через SSH и проверим результат:
Если всё сделано, а результата нет, то возможно стоит проверить настройки PAM.
За вызов механизма обновления motd при входе в систему отвечают настройки в файлах политик PAM.
Например в файле nano /etc/pam.d/sshd за это отвечают 2 строчки вызова библиотеки pam_motd.so
- sshd
-
...
session    optional     pam_motd.so  motd=/run/motd.dynamic
session    optional     pam_motd.so noupdate
...
Дополнительные источники информации:
 Автор первичной редакции:
Алексей Максимов
Время публикации: 15.03.2017 10:00
Back in the old days, before graphical interfaces, system administrators would leave a message for users by using the Message of the Day «MOTD» file. These days the motd still exists but is rarely ever used. I personally haven’t seen someone use the motd file since 2011, when Bob the Unix admin retired at the age of 71. He was still sharp as a tack, but I digress. The motd option is still available in most modern Linux systems. In this fun article we will show you how to set the motd and even create a nice custom login banner with ascii art and system information.
Setting a Basic Text MOTD in Linux
You can easily set a basic text based message of the day by editing the /etc/motd file. Any text that you place in the file will be displayed upon login by any user.
Example:
$ cat /etc/motd
 #######################################
 # THIS IS A TEST MESSAGE IN /etc/motd #
 #######################################
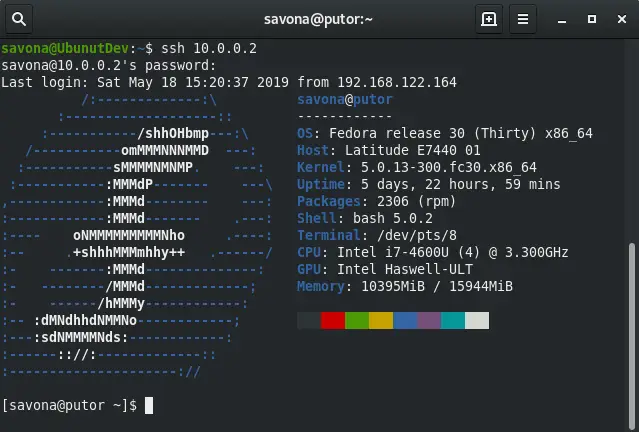
Now when someone logs in via the terminal or ssh they will see the message.
$ ssh 10.0.0.2
 [email protected]'s password:
  #######################################
  # THIS IS A TEST MESSAGE IN /etc/motd #
  #######################################
 Last login: Fri May 17 19:41:58 2019 from 192.168.122.164
This should work on any Unix or Linux machine regardless of distro. I have tested it on Ubuntu 18.04.2, Fedora 30, CentOS 7 and Red Hat 8.
Custom Login Script in Etc Profile
Another, more flexible, option is to create a script and place it in the /etc/profile.d/ folder. Any script in this folder will run when a user logs in.
Using a script in /etc/profile.d allows you almost limitless possibilities. I used an ascii art generator to create my server name, then added some color to it, and made this nifty little login banner. I later added the lastlog and uptime commands to show me some information about the server.
Here is an example of the script I made running when I log into my server named Fenrir.
How to Make Ascii Art Login Banner
If you are interested in making something like the above, follow these steps.
Use an online ascii art generator to create your desired art and copy all of the characters to the clipboard. Create a file and paste in the characters copied above and save the file.
Now run the following command and replace filename with the name of the file you created in the previous step. This will generate your login script.
echo '#!/bin/bash'; while IFS= read -r line; do echo "echo '$line'"; done < filename > mymotd.sh
Now copy mymotd.sh to /etc/profile.d and make it executable.
sudo cp mymotd.sh /etc/profile.d/ && chmod +x /etc/profile.d/mymotd.sh
Now when you log in, you will see the banner in your terminal. You can modify this file anyway you like.
Using neofetch To Create a Custom Login Banner
The neofetch utility is a command line tool that displays the distribution logo and system information for whatever system it is installed on. You can use this as a neat way to create a custom login banner.
Installing neofetch Utility
You can install neofetch easily with most package managers.
To install neofetch on Fedora:
$ sudo dnf install neofetch
To install neofetch on Ubuntu:
sudo apt-get install neofetch
Using neofetch
Although neofetch has a ton of options, you only need to invoke it without any arguments to get a nice looking ascii logo and some system information (as seen above).
$ neofetch
To use neofetch as your login banner simply run the following command to create a script that runs at login.
sudo bash -c $'echo "neofetch" >> /etc/profile.d/mymotd.sh && chmod +x /etc/profile.d/mymotd.sh'
The Ubuntu/Debian Specify Method
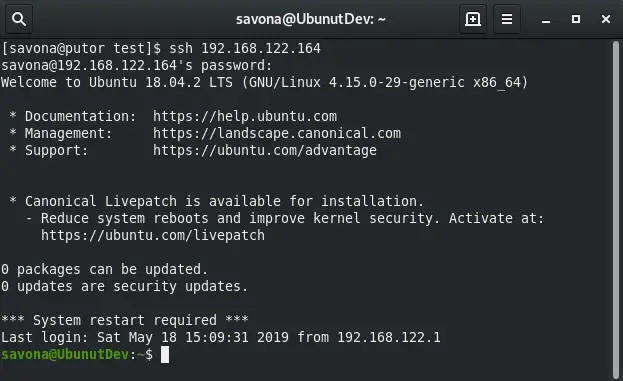
Ubuntu and Debian users can use a method that is specific to these distributions. Ubuntu uses scripts in the /etc/update-motd.d directory to show you information when you login by default. Here is a screenshot from a fresh Ubuntu 18 install.
You can edit or add a file to the /etc/update-motd.d folder to run different scripts. To create a custom login banner or motd you can simply use the techniques above and place your scripts here. Each script starts with a double digit number that determines the run order. For example 00 runs first, 99 runs last.
[email protected]:/etc/update-motd.d# ls -l
 total 44
 -rwxr-xr-x 1 root root 1220 Apr  9  2018 00-header
 -rwxr-xr-x 1 root root 1157 Apr  9  2018 10-help-text
 -rwxr-xr-x 1 root root 4264 Aug 20  2018 50-motd-news
 -rwxr-xr-x 1 root root  604 Mar 21  2018 80-esm
 -rwxr-xr-x 1 root root 3017 Mar 21  2018 80-livepatch
 -rwxr-xr-x 1 root root   97 Jun 27  2018 90-updates-available
 -rwxr-xr-x 1 root root  299 May 18  2017 91-release-upgrade
 -rwxr-xr-x 1 root root  129 Jun 27  2018 95-hwe-eol
 -rwxr-xr-x 1 root root  142 Jun 27  2018 98-fsck-at-reboot
 -rwxr-xr-x 1 root root  144 Jun 27  2018 98-reboot-required
Conclusion
Creating a custom login banner or motd is a lot of fun and looks pretty cool. You can also use it the old fashioned way to show users important information they need to know. Bob the Unix admin used the motd to tell people when the system would be down for maintenance or to scold users who did something he didn’t approve of.
I hope I covered everything in this article. If you have any questions or comments you can leave them below. Have fun!
Resources and Links
- Neofetch Project on Github
- MOTD on Wikipedia
Ubuntu’s Message Of The Day, or MOTD, is the name given to the welcome screen users see when they login to a Ubuntu server using a remote terminal.
Welcome to Ubuntu 14.04.3 LTS (GNU/Linux 3.13.0-24-generic x86_64)

 * Documentation https://helpubuntu.com/
Welcome to Ubuntu 22.04.1 LTS (GNU/Linux 5.15.0-52-generic x86_64)

 * Documentation:  https://help.ubuntu.com
 * Management:     https://landscape.canonical.com
 * Support:        https://ubuntu.com/advantage
The output looks like a basic text file but is a collection of modular shell scripts running. In this entry, I explain how to add, edit and remove parts of the MOTD and apply color text and ASCII art. The process covered works with Ubuntu 14.04+ and is tested on Ubuntu 22.04.

MOTD scripts?
As I mentioned, the MOTD comprises a collection of shell scripts that run in sequential order. Locating these scripts is at /etc/update-motd.d/, so let’s look inside.
$ ls /etc/update-motd.d/

00-header             85-fwupd                   91-release-upgrade      98-fsck-at-reboot
10-help-text          88-esm-announce            92-unattended-upgrades  98-reboot-required
50-landscape-sysinfo  90-updates-available       95-hwe-eol
50-motd-news          91-contract-ua-esm-status  97-overlayroot
The filenames use names with an NN-description syntax, where NN is the ascending start order.
The 00-header file is the starter script.
A look into one of the files shows they are indeed shell scripts.
$ cat /etc/update-motd.d/00-header

#!/bin/sh
#
#    00-header - create the header of the MOTD
#    Copyright (C) 2009-2010 Canonical Ltd.
#
#    Authors: Dustin Kirkland <[email protected]>
#    ...

[ -r /etc/lsb-release ] && . /etc/lsb-release

if [ -z "$DISTRIB_DESCRIPTION" ] && [ -x /usr/bin/lsb_release ]; then
	# Fall back to using the very slow lsb_release utility
	DISTRIB_DESCRIPTION=$(lsb_release -s -d)
fi

printf "Welcome to %s (%s %s %s)n" "$DISTRIB_DESCRIPTION" "$(uname -o)" "$(uname -r)" "$(uname -m)"
You can also run the script from terminal.
$ /etc/update-motd.d/./00-header

Welcome to Ubuntu 22.04.1 LTS (GNU/Linux 5.15.0-52-generic x86_64)
Disabling MOTD scripts
Turning off one or more scripts is simple as removing the execute permissions bit from the target. Here we will turn off the script that posts the Documentation link.
$ cd /etc/update-motd.d/
$ sudo chmod -x 10-help-text
Use the run-parts command to see your changes.
$ sudo run-parts /etc/update-motd.d

Welcome to Ubuntu 22.04.1 LTS (GNU/Linux 5.15.0-52-generic x86_64)

  System information as of...
And if you wish to return the script to the MOTD, re-add its execute bit.
$ sudo chmod +x 10-help-text
$ run-parts /etc/update-motd.d

Welcome to Ubuntu 22.04.1 LTS (GNU/Linux 5.15.0-52-generic x86_64)

 * Documentation:  https://help.ubuntu.com
 * Management:     https://landscape.canonical.com
 * Support:        https://ubuntu.com/advantage

  System information as of...
Editing MOTD scripts
I don’t recommend editing the system-installed scripts directly. Instead, I think it’s better to disable, duplicate and edit the copy. This way, you can always revert to the original script if necessary.
Here let’s change the 00-header to simplify its version output. But first, we need to copy and disable the system original.
$ cd /etc/update-motd.d/
$ sudo cp 00-header 01-header-custom
$ sudo chmod -x 00-header
Edit the custom header to make some modifications.
$ sudo nano 01-header-custom
Replace the line Welcome to line with something simpler.
 1[ -r /etc/lsb-release ] && . /etc/lsb-release
 2
 3if [ -z "$DISTRIB_DESCRIPTION" ] && [ -x /usr/bin/lsb_release ]; then
 4        # Fall back to using the very slow lsb_release utility
 5        DISTRIB_DESCRIPTION=$(lsb_release -s -d)
 6fi
 7
 8# Comment out the original message
 9#printf "Welcome to %s (%s %s %s)n" "$DISTRIB_DESCRIPTION" "$(uname -o)" "$(uname -r)" "$(uname -m)"
10
11# Replacement message
12printf "Welcome to %sn" "$DISTRIB_DESCRIPTION"
A little explainer on the code, printf runs the print format command, %s is where to output the string value of $DISTRIB_DESCRIPTION and n is to print a new line.
Save and exit.
$ sudo run-parts /etc/update-motd.d

Welcome to Ubuntu 22.04.1 LTS

 * Documentation:  https://help.ubuntu.com
 * Management:     https://landscape.canonical.com
 * Support:        https://ubuntu.com/advantage
If you want to revert your changes to the default, overwrite it with the original system file.
$ sudo cp 00-header 01-header-custom
$ sudo run-parts /etc/update-motd.d

Welcome to Ubuntu 22.04.1 LTS (GNU/Linux 5.15.0-52-generic x86_64)

 * Documentation:  https://help.ubuntu.com
 * Management:     https://landscape.canonical.com
 * Support:        https://ubuntu.com/advantage
Creating MOTD scripts
Adding new scripts to the MOTD is a simple process. Let’s start with a hello world example. First, we will create a script with the name 30-hello-world, which launches after the 00-header and 10-help-text scripts.
$ cd /etc/update-motd.d/
$ sudo nano 30-hello-world
Add the following to the file. We use the printf command to handle text output while n tells the shell to print a new line.
1#!/bin/sh
2printf "nHello world.n"
Save and exit. Now add the execute permission and test the file.
$ sudo chmod +x 30-hello-world
$ sudo run-parts /etc/update-motd.d

Welcome to Ubuntu 22.04.1 LTS (GNU/Linux 5.15.0-52-generic x86_64)

 * Documentation:  https://help.ubuntu.com
 * Management:     https://landscape.canonical.com
 * Support:        https://ubuntu.com/advantage

Hello world.
Color the text
I use the tput command included in a default Ubuntu install for color support. It allows you to color text and apply styles, centering, cursor movement and clear the screen. For our purposes of coloring text, tput supports the adjustment of both foreground and background colors using ANSI escape codes.
Set the foreground. Note that x is a numeric placeholder for a color code value.
Set the background.
Resets the colours to the terminal defaults.
tput x colour codes.
0black1red2green3yellow4blue5magenta6cyan7white
So tput setaf 7 sets the foreground to white, and then tput setab 2 sets a green background. tput setaf 4 would set the foreground to blue.
Tput relies on the $TERM user environment variable to determine the terminal type.
Unfortunately, this variable only appears once when a user logs on after the display of the MOTD. So whenever we use tput, we need to force it to use xterm using the type of terminal -T argument.
$ sudo nano 30-hello-world
Append the marked echo command to the file, save and test.
1#!/bin/sh
2printf "nHello world.n"
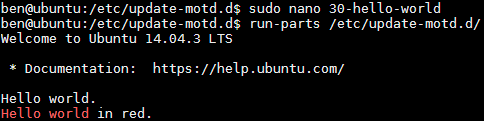
3echo "$(tput -T xterm setaf 1)Hello world$(tput -T xterm sgr0) in red."
Now, if you run sudo run-parts /etc/update-motd.d, you’ll see the words Hello world in red and the remaining text the terminal default colors.
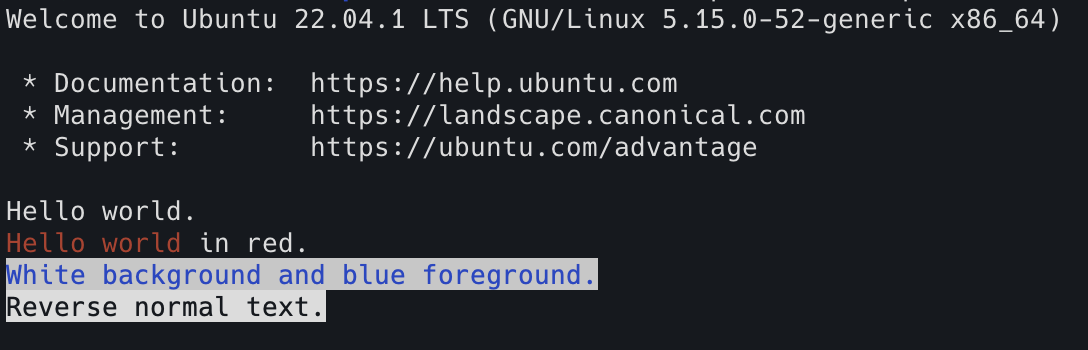
Now edit the file again and append the following, save and test.
1#!/bin/sh
2printf "nHello world.n"
3echo "$(tput -T xterm setaf 1)Hello world$(tput -T xterm sgr0) in red."
4echo "$(tput -T xterm setaf 4)$(tput -T xterm setab 7)White background and blue foreground.$(tput -T xterm sgr0)"
5echo "$(tput -T xterm rev)Reverse normal text.$(tput -T xterm sgr0)"
$ sudo run-parts /etc/update-motd.d
To learn more about what you can do using the tput command, I’d recommend the following guides.
- Terminal codes – Bash Hackers Wiki
- LinuxCommand.org: tput
Printing text files
Outputting a text file is a simple process, and there are a few ways of doing it. I generally save the text file into the /etc/update-motd.d and use the cat command from within a script to display it onscreen.
Copy, paste, and save this Tux logo I sourced from Chris.com.
$ sudo nano /etc/update-motd.d/tux.asc
 1            a8888b.
 2           d888888b.
 3           8P"YP"Y88
 4           8|o||o|88
 5           8'    .88
 6           8`._.' Y8.
 7          d/      `8b.
 8         dP   .    Y8b.
 9        d8:'  "  `::88b
10       d8"         'Y88b
11      :8P    '      :888
12       8a.   :     _a88P
13     ._/"Yaa_:   .| 88P|
14jgs      YP"    `| 8P  `.
15a:f  /     .___.d|    .'
16     `--..__)8888P`._.'
Create a 20-display-logo file, add and save the following script.
$ sudo nano /etc/update-motd.d/20-display-logo
1#!/bin/sh
2printf "n$(cat /etc/update-motd.d/tux.asc)n"
Finally, apply the execute bit and test out the changes.
$ sudo chmod +x /etc/update-motd.d/20-display-logo
$ sudo run-parts /etc/update-motd.d

Welcome to Ubuntu 22.04.1 LTS (GNU/Linux 5.15.0-52-generic x86_64)

 * Documentation:  https://help.ubuntu.com
 * Management:     https://landscape.canonical.com
 * Support:        https://ubuntu.com/advantage

            a8888b.
           d888888b.
           8P"YP"Y88
           8|o||o|88
           8'    .88
           8`._.' Y8.
          d/      `8b.
         dP   .    Y8b.
        d8:'  "  `::88b
       d8"         'Y88b
      :8P    '      :888
       8a.   :     _a88P
     ._/"Yaa_:   .| 88P|
jgs      YP"    `| 8P  `.
a:f  /     .___.d|    .'
     `--..__)8888P`._.'

Hello world.
Hello world in red.
White background and blue foreground.
Reverse normal text.
Now feel free to use what you have learned to clean up the modifications and produce a more excellent login.
You’ll probably want to delete 30-hello-world.
$ sudo rm /etc/update-motd.d/30-hello-world
Perfect and that is it for this guide, I hope it was useful.

I have this in my Ubuntu SSH Banner Message:
Welcome to Ubuntu 13.10 (GNU/Linux 3.4.43+ armv7l)

 * Documentation:  https://help.ubuntu.com/
No mail.
Last login: Mon Dec  2 08:25:39 2013
I’d like to have something like the standard Ubuntu Server:
Welcome to Ubuntu 12.04.1 LTS (GNU/Linux 3.2.0-29-virtual x86_64)

 * Documentation:  https://help.ubuntu.com/

  System information as of Fri Sep 28 09:48:57 UTC 2012

  System load:  0.08              Processes:           20
  Usage of /:   12.4% of 57.97GB   Users logged in:     0
  Memory usage: 5%                IP address for eth0: 10.123.161.58
  Swap usage:   0%

  Graph this data and manage this system at https://landscape.canonical.com/

31 packages can be updated.
20 updates are security updates.

Last login: Thu Sep 21 19:18:35 2012 from 122.181.4.42
How could I get this, please?
Thanks in advance!
asked Dec 2, 2013 at 17:56
![]()
CostalesCostales
2,2153 gold badges21 silver badges35 bronze badges
It looks like the /etc/update-motd.d directory can no longer have links to the scripts. (This happened to the Cronjob directories a number of release back, and is part of the security stuff I would guess).
If you list the directory (ls -l /etc/update-motd.d) you will see the following
50-landscape-sysinfo -> /usr/share/landscape/landscape-sysinfo.wrapper
If you want the System information back just copy the script into /etc/update-motd.d with the following command.
$ sudo cp /usr/share/landscape/landscape-sysinfo.wrapper /etc/update-motd.d/52-landscape-sysinfo
Note that when landscape fixes the problem you will get two copy of the script and then you can just delete the file.
![]()
answered Feb 3, 2014 at 22:50
![]()
MarkMark
4015 silver badges4 bronze badges
The text displayed (Message of the Day, MOTD) is created by running in numerical order the scripts in /etc/update-motd.d and joining together the output. I’m not certain which package contains the difference between the server and desktop versions, but you should be able to edit those scripts, or add new ones to create whatever message you want.
answered Dec 2, 2013 at 18:16
![]()
chronitischronitis
11.9k2 gold badges41 silver badges31 bronze badges
You can output things manually by
sudo run-parts /etc/update-motd.d/
Normally the only way to update the file is by triggering pam_motd and on ‘standard’ ubuntu systems the services ‘login’ and ‘sshd’ do that.
Look at
grep pam_motd /etc/pam.d/*
if you want to know more. If you want to update /etc/motd you can redirect the output there:
run-parts /etc/update-motd.d/ | sudo tee /etc/motd
To speed up logins you can switch from libpam-motd to update-motd. Update-motd uses a cronjob instead of triggering the update on login. sudo apt-get remove libpam-motd; sudo apt-get install update-motd
Hope that helps somebody.
answered Jun 14, 2016 at 21:07
![]()
Ingo BaabIngo Baab
711 silver badge1 bronze badge
1
Introduction
When you log on to a Linux system, you’re presented with a Message of the Day (MOTD). In early versions, this was a static message, read from a single file, but with recent releases of Ubuntu and other variations of Linux, it now contains dynamic information generated from a set of scripts. The idea behind the MOTD is to show SSH users pertinent information about the system and other policies that may govern usage of the system.
Default MOTD
The default MOTD looks somewhat like this:
Welcome to Ubuntu 20.04.3 LTS (GNU/Linux 5.4.0-91-generic x86_64)


 * Documentation:  https://help.ubuntu.com

 * Management:     https://landscape.canonical.com

 * Support:        https://ubuntu.com/advantage


 System information disabled due to load higher than 1.0


23 updates can be applied immediately.

9 of these updates are standard security updates.

To see these additional updates run: apt list --upgradable


The programs included with the Ubuntu system are free software;

the exact distribution terms for each program are described in the

individual files in /usr/share/doc/*/copyright.


Ubuntu comes with ABSOLUTELY NO WARRANTY, to the extent permitted by

applicable law.
The information comes from various scripts located in /etc/update-modt.d/ and the /etc/legal file. The scripts execute based on the first two digits of the name. 14 scripts make up the default MOTD. The motd-news service controls the data and its updates.
MOTD News
The MOTD also imports news from a remote URL, controlled by /etc/default/motd-news. To disable dynamic news, edit this file and change ENABLED=1 to ENABLED=0
Disabling the MOTD Per User
To disable the MOTD on a per user basis, add a blank file to the home directory of the user. Name the file .hushlogin. Create it by running:
touch $HOME/.hushlogin
and the MOTD stops showing when the specific user logs in.
Removing Parts of the MOTD
To remove pieces of the MOTD, you can delete the corresponding script in /etc/update-motd.d/ or set the execute bit to off by running chmod -x followed by the script name.
Adding Your Own Custom MOTD
Adding your own message of the day is easy. Create a file in /etc/update-motd.d/. The filename must be two digits followed by a hyphen and then a common name or reference for your script. Files should not contain an extension. The file can be any executable type your system is capable of running, usually defined by the she bang on the first line.
Example Custom MOTD
To make the message of the day fun, add a Chuck Norris quote. The example uses PHP as the scripting language.
Add PHP scripting capabilities:
apt install -y php-cli
Disable all other MOTD scripts
chmod -x /etc/default/motd-news/*
Create a new script:
nano /etc/default/motd-news/05-chuck-norris
Add code to retrieve a quote from the public API containing Chuck Norris quotes:
#!/usr/bin/php

<?php


$handle = fopen("https://api.chucknorris.io/jokes/random", "rb");

$contents = stream_get_contents($handle);

fclose($handle);

$json = json_decode($contents);

print PHP_EOL;

print $json->value . PHP_EOL;

print PHP_EOL;
The script retrieves a random JSON payload, places it in to a JSON array and then prints a new line above and below the quote.
Ensure the script has the execute bit flipped:
chmod +x /etc/default/motd-news/05-chuck-norris
Log out and log back in and you should see a random Chuck Norris quote in your message of the day.
Conclusion
The flexibility of dynamic message of the day provides lots of options. Enable or disable certain scripts to show load, users, package, required reboots, or even create your own custom scripts to display pertinent information or custom text related to your environment or system and user base.
References
- Ubuntu update-motd man page
Приветственное сообщение, показываемое пользователю при входе в систему через терминал, независимо от того, идет ли он через удаленный вход по SSH или напрямую через TTY или терминал, является частью motd также известен как «Mэссе Oж
Тон Dай »демон. В motd сообщение можно настроить в соответствии с индивидуальными потребностями каждого пользователя или администратора, изменив /etc/motd файл или сценарий в /etc/update-motd.d каталог.
В этом уроке вы узнаете:
- Как добавить дополнительную информацию в
motdсообщение - Как изменить
motdсообщение - Как отключить выбранные части
motdдемон - Как полностью отключить
motdсообщение

По умолчанию Ubuntu 18.04 motd сообщение.
Требования к программному обеспечению и используемые условные обозначения
| Критерии | Требования |
|---|---|
| Операционная система | Ubuntu 18.04 Bionic Beaver |
| Программного обеспечения | N / A |
| Другой | привилегированный доступ к вашей системе Linux как root или через судо команда |
| Условные обозначения |
# — требует данных команды linux для выполнения с привилегиями root либо непосредственно как пользователь root, либо с использованием судо команда$ — требует данных команды linux для выполнения от имени обычного непривилегированного пользователя. |
Другие версии этого руководства
Ubuntu 20.04 (Фокальная ямка)
Как добавить дополнительную информацию в сообщение motd
По умолчанию можно добавить дополнительную информацию. motd сообщение, создав собственный /etc/motd файл. Например, давайте добавим сообщение по умолчанию с Добро пожаловать, пользователь Ubuntu сообщение.
Откройте терминал или консоль TTY и введите следующее команда linux:
$ sudo sh -c 'echo "Добро пожаловать, пользователь Ubuntu"> / etc / motd'

Повторно авторизуйтесь и подтвердите заказ motd текст, добавленный к сообщению Ubuntu по умолчанию.
Как изменить сообщение motd
Изменение /etc/motd file — это быстрый и эффективный способ быстро изменить приветственное сообщение. Однако для более сложной конфигурации рекомендуется настраивать MOTD с помощью сценариев, расположенных в /etc/update-motd.d каталог.
Сообщение дня является модульным, поэтому разделено на различные сценарии, выполняемые в порядке от наименьшего к наибольшему числовому значению как часть префикса имени файла сценария. Следующие скрипты находятся внутри /etc/update-motd.d каталог как часть по умолчанию motd конфигурация демона:
$ ls /etc/update-motd.d/ 00-заголовок 50-пейзаж-sysinfo 80-esm 90-обновления-доступны 95-hwe-eol 98-fsck-at-reboot. 10-help-text 50-motd-news 80-livepatch 91-release-upgrade 97-overlayroot 98-reboot-required.
Каждому сценарию назначаются разрешения для исполняемого файла. Не стесняйтесь изменять любой из приведенных выше сценариев, чтобы он лучше соответствовал motd вывод сообщения в вашу системную среду.
В качестве упражнения давайте настроим motd сообщение для отображения общей системной информации, использования жесткого диска и информации о погоде. Начнем с отключения скриптов по умолчанию.
В зависимости от ваших потребностей вы можете выборочно отключить один или несколько скриптов, удалив разрешения для исполняемых файлов. В нашем примере мы отключим все скрипты и создадим новый 01-на заказ сценарий.
- Отключить все текущие скрипты демона MOTD по умолчанию
- Установить предварительные условия
- Создайте новый скрипт, например.
/etc/update-motd.d/01-customсо следующими bash скрипт:#! / bin / sh. echo "ОБЩАЯ СИСТЕМНАЯ ИНФОРМАЦИЯ" /usr/bin/screenfetch. эхо. echo "ИСПОЛЬЗОВАНИЕ СИСТЕМНОГО ДИСКА" экспорт TERM = xterm; inxi -D. эхо. echo "ТЕКУЩАЯ ПОГОДА В МЕСТОПОЛОЖЕНИИ" # Показать информацию о погоде. Измените название города в соответствии с вашим местоположением. ansiweather -l братислава. - Сделайте этот скрипт исполняемым
$ sudo chmod -x /etc/update-motd.d/*
$ sudo apt install inxi screenfetch ansiweather.
$ sudo chmod + x /etc/update-motd.d/01-custom.
Все сделано. На этом этапе просто повторно войдите в систему на своем сервере или рабочем столе Ubuntu 18.04 и подтвердите новую информацию MOTD.

Информация о настраиваемом сообщении дня на сервере Ubuntu 18.04
Как отключить сообщение motd
Как уже было показано ранее, системный администратор может отключить одну или несколько частей вывода сообщения MOTD, удалив разрешения для исполняемых файлов каждого соответствующего сценария MOTD. Чтобы полностью отключить все скрипты, выполните:
$ sudo chmod -x /etc/update-motd.d/*
Другой вариант — отключить отображение сообщения MOTD для каждого пользователя путем создания скрытого .hushlogin в каталоге пользователя. Пример:
$ touch $ HOME / .hushlogin.
Подпишитесь на новостную рассылку Linux Career Newsletter, чтобы получать последние новости, вакансии, советы по карьере и рекомендуемые руководства по настройке.
LinuxConfig ищет технических писателей, специализирующихся на технологиях GNU / Linux и FLOSS. В ваших статьях будут представлены различные руководства по настройке GNU / Linux и технологии FLOSS, используемые в сочетании с операционной системой GNU / Linux.
Ожидается, что при написании статей вы сможете идти в ногу с технологическим прогрессом в вышеупомянутой технической области. Вы будете работать независимо и сможете выпускать не менее 2 технических статей в месяц.