 Обновлено: 23.06.2019
Опубликовано: 25.10.2017
Тематические термины: MTU, Windows, Linux, Роутер.
Рассмотрим процесс смены значения MTU для операционных систем семейства Windows и Linux, а также роутерах.
Для Windows
Командная строка
Реестр
Linux
Разово
Постоянно
Роутер
Читайте также
Windows
Командная строка
Открываем командную строку от имени администратора.
Вводим команду для просмотра текущего значения MTU и названия сетевого интерфейса:
netsh interface ipv4 show subinterfaces
Получаем, примерно, следующее:
MTU Состояние определения носителя Вх. байт Исх. байт Интерфейс
—— ————— ——— ——— ————-
1500 1 81324794839 5376993884 Ethernet
* где 1500 — значение MTU (по умолчанию для сетей Etnernet); Ethernet — название интерфейса.
Меняем MTU следующей командой:
netsh interface ipv4 set subinterface «Ethernet» mtu=1492 store=persistent
* где Ethernet — название сетевого интерфейса, которое мы получили предыдущей командой; 1492 — новое значение MTU
Реестр
Открываем реестр (команда regedit) и переходим по ветке HKEY_LOCAL_MACHINESYSTEMCurrentControlSetControlClass{4D36E972-E325-11CE-BFC1-08002bE10318.
Внутри будут находиться другие ветки с названиями 0000, 0001, 0002 и так далее. Необходимо пройтись по каждой и найти ключ DriverDesc со значением, похожим на название нашего сетевого адаптера и записать значение ключа NetCfgInstanceId, например:

Переходим в ветку HKEY_LOCAL_MACHINESYSTEMCurrentControlSetServicesTcpipParametersInterfaces. Находим ветку с нашим идентификатором, который мы записали и меняем ключ MTU (при его отсутствии, создаем — тип DWORD):

Чтобы настройки применились выключаем и снова включаем сетевой интерфейс или перезагружаем компьютер.
Linux
Для примера, рассмотрим наиболее популярные дистрибутивы — CentOS и Ubuntu.
Разово
Разово (до перезагрузки) для данных двух систем настройку можно выполнить одной командой:
ip link set mtu 1400 dev eth0
* где 1400 — новое значение MTU; eth0 — сетевой интерфейс, для которого поменяли максимальный размер пакетов.
или в старых системах:
ifconfig eth0 mtu 1400
Постоянно (permanently)
Для систем на базе Debian (Ubuntu) и Red Hat (CentOS) процедура немного отличается.
Ubuntu
Открываем настройку сетевых интерфейсов:
vi /etc/network/interfaces
К нужному адаптеру добавляем строчку:
iface eth0 inet static
…
mtu 9000
Перезапускаем сеть:
systemctl restart networking
CentOS
Открываем конфигурационный файл для соответствующего сетевого интерфейса:
vi /etc/sysconfig/network-scripts/ifcfg-eth0
Добавляем строку:
…
MTU=»9000″
Перезапускаем сетевую службу:
systemctl restart network
Роутер
Смена MTU на роутерах различных производителей выполняется, примерно, по одному и тому же принципу — зайти на веб-интерфейс для настройки маршрутизатора, найти раздел с настройкой сети Интернет, задать значение MTU.
Например, для большинства устройств TP-Link: Network — WAN:

Читайте также
Как посмотреть значение MTU
![]()
Была ли полезна вам эта инструкция?
Да Нет
MTU (сокращение от Maximum Transmission Unit) – это максимальный размер пакета, который может быть передан через сетевой интерфейс. Все устройства, включая серверы и коммутаторы/маршрутизаторы, участвующие в обмене данными, должны иметь одинаковый размер MTU. Большой размер MTU имеет меньше накладных расходов, в то время как меньший размер MTU имеет меньшую задержку.
Размер MTU по умолчанию в большинстве сетей Ethernet составляет 1500 байтов. Однако вы можете изменить его в соответствии с требованиями. В этой статье мы объясним, как изменить размер MTU в Linux.
Предпосылки
- Система Ubuntu 20.04
- Пользователь с привилегиями sudo
Примечание
Команды, обсуждаемые в этой статье, были протестированы на Ubuntu 20.04 LTS (Focal Fossa). Те же команды действительны и для дистрибутива Debian.
Чтобы просмотреть текущий размер MTU вашего интерфейса Ethernet, используйте команду ifconfig следующим образом:
$ ifconfig | grep mtu
Приведенные ниже выходные данные показывают, что текущий размер MTU интерфейса ens33 составляет 1500.
В качестве альтернативы вы также можете использовать команду ip с параметром a для просмотра текущего размера MTU:
Временное изменение размера MTU – с помощью команды ifconfig
Мы можем использовать команду ifconfig, чтобы изменить размер MTU сетевого интерфейса системы. Однако помните, что это изменение сохраняется после перезагрузки и возвращается к значению по умолчанию, то есть 1500.
Чтобы изменить размер MTU интерфейса, используйте следующий синтаксис:
$ ifconfig <Interface_name> mtu <mtu_size> up
Например, чтобы изменить размер MTU интерфейса с именем ens33 на 1000 байт, команда будет выглядеть так:
$ ifconfig ens33 mtu 1000 up
После выполнения указанной выше команды размер MTU мгновенно изменяется. Это изменение даже не требует перезапуска службы.
Вы можете проверить новый размер MTU, выполнив следующую команду в Терминале:
Из вышеприведенного вывода вы можете убедиться, что размер MTU теперь изменился до 1000 байт. Однако, как упоминалось ранее, это изменение не сохранится после перезагрузки. Размер MTU вернется к своему значению по умолчанию 1500 после перезагрузки.
Постоянное изменение размера MTU
Команда ifconfig мгновенно изменяет размер MTU, но это изменение не сохраняется после перезагрузки системы. В следующем разделе мы увидим, как навсегда изменить размер MTU.
При динамической IP-адресации размер MTU устанавливается DHCP. Поэтому потребуется настроить файл конфигурации DHCP, расположенный в /etc/dhcp/dhclient.conf . Для статического IP-адреса мы внесем изменения в файл конфигурации сетевого интерфейса, расположенный в /etc/network/interfaces.
Использование файла /etc/dhcp/dhclient.conf
Если в вашей системе работает DHCP-сервер и сетевые интерфейсы настроены на получение от него IP-адресов, используйте файл /etc/dhcp/dhclient.conf для изменения размера MTU.
Отредактируйте nano /etc/dhcp/dhclient.conf, используя следующую команду:
$ sudo nano /etc/dhcp/dhclient.conf
Затем добавьте следующие строки под “send host-name = gethostname ();” в строку:
default interface-mtu <mtu_size>;

supersede interface-mtu <mtu_size>;
Например, чтобы установить размер MTU равным 1400, мы добавим:
default interface-mtu 1400;

supersede interface-mtu 1400;
Если у вас несколько интерфейсов и вы хотите изменить размер MTU только для одного интерфейса, заключите его в фигурные скобки следующим образом:
interface "interface_name" {

default interface-mtu <mtu_size>;

supersede interface-mtu <mtu_size>;

}
После того, как вы настроили файл, сохраните и закройте его. Теперь перезапустите сетевую службу, используя следующую команду в терминале:
$ sudo service networking restart
Также вызовите интерфейс, используя следующую команду:
$ sudo ifup <interface_name>
Обязательно замените <interface_name> фактическим сетевым интерфейсом в вашей системе, например, ens33, eth0, eth1 и т. д.
В нашем случае это будет:
$ sudo ifup ens33
Теперь введите следующую команду в Терминале, чтобы проверить, успешно ли изменился размер MTU.
$ sudo ifconfig | grep mtu
Из выходных данных вы можете видеть, что размер MTU был изменен на 1400.
Использование файла /etc/network/interfaces
Если ваш сетевой интерфейс настроен на получение статического IP-адреса, вы можете изменить размер MTU, настроив файл / etc / network / interfaces .
Отредактируйте файл /etc/network/interfaces с помощью следующей команды в Терминале:
$ sudo nano /etc/network/interfaces
Добавьте в файл следующую строку:
post-up /sbin/ifconfig <interface-name> mtu <mtu_size>
Обязательно замените <interface-name> фактическим именем интерфейса, а <mtu_size> размером MTU, который вы хотите установить на сетевом интерфейсе.
Например, чтобы изменить размер MTU интерфейса с именем ens33 на 1300 байт, команда будет выглядеть так:
post-up /sbin/ifconfig ens33 mtu 1300 up
После того, как вы настроили файл, сохраните и закройте его.
Теперь перезапустите сетевые службы, используя следующую команду в Терминале:
$ sudo service networking restart
Также вызовите интерфейс, используя следующую команду:
$ sudo ifup <interface_name>
Обязательно замените <interface_name> фактическим сетевым интерфейсом в вашей системе, например, ens33, eth0, eth1 и т. Д.
В нашем случае это будет:
$ sudo ifup ens33
Теперь введите следующую команду в Терминале, чтобы проверить, успешно ли изменился размер MTU.
Из выходных данных видно, что размер MTU был изменен на 1300. Это изменение останется постоянным и не изменится даже после перезагрузки.
Вот и все! Следуя описанным выше процедурам, вы можете временно или навсегда изменить размер MTU сетевого интерфейса в вашей системе Linux. Надеемся это поможет!
Если вы нашли ошибку, пожалуйста, выделите фрагмент текста и нажмите Ctrl+Enter.
28.05.2020

Сегодня в статье поговорим Как узнать и поменять значение MTU в Linux/Ubuntu/Debian.
MTU — maximum transmission unit — максимальный размер пакет или фрейма в байтах, который может быть отправлен единовременно без фрагментации.
Узнать значение и поменять MTU в Linux
Узнать значение MTU для всех интерфейсов можно выполнив в консоли команду ip link
ip link | grep mtu1: lo: <LOOPBACK,UP,LOWER_UP> mtu 65536 qdisc noqueue state UNKNOWN mode DEFAULT group default qlen 1000
10: eth0@if11: <BROADCAST,MULTICAST,UP,LOWER_UP> mtu 1500 qdisc noqueue state UP mode DEFAULT group default qlen 1000Чаще всего встречается 1500 — это значение по умолчанию для Ethernet интерфейсов.
Поменять MTU на сервере с Ubuntu/Debian можно так:
sudo ip link set dev eth0 mtu 1400или так для старых систем:
sudo ifconfig eth0 mtu 1400После данной команды начинает использоваться значение 1400, а вот после перезагрузки это значение MTU сбросится в дефолтное
Для постоянной смены MTU в Ubuntu
Открываем настройку сетевых интерфейсов:
sudo nano /etc/network/interfacesК нужному адаптеру добавляем строчку со значением MTU. Вот пример настройки:
auto lo
iface lo inet loopback
auto eth0
iface eth0 inet static
address 10.5.5.2
netmask 255.255.255.0
gateway 10.5.5.1
mtu 1400
Перезапускаем сеть:
systemctl restart networkingЗначение теперь будет применяться даже после перезагрузки.
Меняем значение MTU при помощи Netplan
Вот еще один пример как можно сменить значение MTU, но уже через утилиту Netplan на Ubuntu 18.04/20.04
network:
    ethernets:
        ens3:
            mtu: 1400
            addresses:
            - 198.18.12.15/24
            - 2a01:d0:c353:183::15/64
            dhcp4: false
            gateway4: 198.18.12.1
            gateway6: 2a01:d0:c353:183::1
            nameservers:
                addresses:
                - 198.18.12.3
                - 2a01:d0:c353:183::3
                search: []
    version: 2
Если есть вопросы, то пишем в комментариях.
Также можете вступить в Телеграм канал, ВКонтакте или подписаться на Twitter. Ссылки в шапке страницы.
Заранее всем спасибо!!!
RSS
Добавление RSS-ленты на главную страницу этого сайта не поддерживается, так как это может привести к зацикливанию, замедляющему работу вашего сайта. Попробуйте использовать другой блок, например блок Последние записи, для отображения записей сайта.
Если вы нашли ошибку, пожалуйста, выделите фрагмент текста и нажмите Ctrl+Enter.
MTU — maximum transmission unit -максимальный размер пакет или фрейма в байтах, который может быть отправлен единовременно без фрагментации. Узнать значение и поменять MTU в Linux можно используя утилиту ip. Чтобы изменения сохранялись после перезагрузки требуется продублировать новое значение в сетевых настройках.
Узнать значение MTU для всех интерфейсов можно выполнив в консоли команду ip link
ip link
1: lo: <LOOPBACK,UP,LOWER_UP> mtu 65536 qdisc noqueue state UNKNOWN mode DEFAULT group default qlen 1
link/loopback 00:00:00:00:00:00 brd 00:00:00:00:00:00
2: eth0: <BROADCAST,MULTICAST,UP,LOWER_UP> mtu 1500 qdisc pfifo_fast state UP mode DEFAULT group default qlen 1000
link/ether 54:52:00:91:96:85 brd ff:ff:ff:ff:ff:ff
Чаще всего встречается 1500 — это значение по умолчанию для Ethernet интерфейсов.
Поменять MTU на сервере с Debian можно так:
ip link set dev eth0 mtu 1400
При этом начинает использоваться значение 1400, после перезагрузки эти изменения не сохранятся.
Чтобы сделать их постоянными нужно отредактировать файл /etc/network/interfaces
Для CentOS это скрипты /etc/sysconfig/network-scripts/*, для других систем иначе — для Debian также возможны варианты, но чаще всего это /etc/network/interfaces
К нужному интерфейсу достаточно дописать mtu 1400 отдельной строкой
Затем выполнить
ifdown $IFACE && ifup $IFACE
IFACE при этом заменить именем интерфейса, таким как eth0
Если настройки сети выдаются DHCP, то секция примет такой вид:
iface eth0 inet dhcp
pre-up /sbin/ifconfig $IFACE mtu 1454
Для сервера, к которому нет доступа по SSH MTU можно узнать экспериментальным путем. Значение может потребоваться при поиске сетевых неполадок.
Это делается за счет опции -M do утилиты ping.
ICMP пакеты при этом будут отправляться с заданным MTU, из ответа будет видно реальное значение.
ping -c 1 -s $((1600-28)) -M do ya.ru
PING ya.ru (87.250.250.242) 1572(1600) bytes of data.
ping: local error: Message too long, mtu=1500
— ya.ru ping statistics —
1 packets transmitted, 0 received, +1 errors, 100% packet loss, time 0ms
28 байт вычитается, поскольку они отданы под хэдеры IP и ICMP.
При установке 1500 байт PING проходит успешно.
ping -c 1 -s $((1500-28)) -M do ya.ru
PING ya.ru (87.250.250.242) 1472(1500) bytes of data.
1480 bytes from ya.ru (87.250.250.242): icmp_seq=1 ttl=57 time=32.0 ms
— ya.ru ping statistics —
1 packets transmitted, 1 received, 0% packet loss, time 0ms
rtt min/avg/max/mdev = 32.040/32.040/32.040/0.000 ms
Читайте про iface inet — директиву, которую можно увидеть в /etc/network/interfaces
MTU (Stands for Maximum Transmission Unit) is the maximum size of the packet that can be transmitted from a network interface. All the devices including servers and switches/routers involved in communication should have the same MTU size. Large MTU size has less overhead associated with it while the smaller MTU has less delay.
The default MTU size in most of the Ethernet networks is 1500 bytes. However, you can change it as per the requirements.
Here at LinuxAPT, as part of our Server Management Services, we regularly help our Customers to fix Linux related queries.
In this context, we shall look into how to change MTU size in Linux.
More information about MTU in Linux ?
MTU (Maximum Transmission Unit) is related to TCP/IP networking in Linux/BSD/UNIX oses. It refers to the size (in bytes) of the largest datagram that a given layer of a communications protocol can pass at a time.
The default MTU size on Linux is 1500 bytes.
How to view the Current MTU Size ?
In order to view the current MTU size of your ethernet interface, use the ifconfig command as follows:
$ ifconfig | grep mtu
The output will show the current MTU size of the interface.
Alternatively, you can also use the “ip a” command to view the current MTU size:
$ ip a | grep mtu
How to temprarily modify the MTU Size – Using ifconfig command ?
We can use the ifconfig command to change the MTU size of a system’s network interface. However, remember that this change does survive a reboot and returns to the default value i.e. 1500.
To change the MTU size of an interface, use the following syntax:
$ ifconfig <Interface_name> mtu <mtu_size> up
For instance, to change the MTU size of an interface named ens33 to 1000 bytes, the command would be:
$ ifconfig ens33 mtu 1000 up
After running the above command, the MTU size changes instantaneously. This change even does not require a service restart.
You can verify the new MTU size by running the following command in Terminal:
$ ifconfig | grep mtu
How to Permanently change the MTU Size in Linux ?
The ifconfig command instantaneously changes the MTU size but this change does not survive a system reboot. Here, we will see how to permanently change the MTU size.
In dynamic IP addressing, the MTU size is set by DHCP. So will need to configure the DHCP configuration file located at /etc/dhcp/dhclient.conf. For static IP address, we will make changes in the network interface configuration file located at /etc/network/interfaces.
How to use /etc/dhcp/dhclient.conf file?
If the DHCP server is running on your system and the network interfaces are configured to receive the IP addresses from it, then use /etc/dhcp/dhclient.conf file to change the MTU size.
i. Edit the nano /etc/dhcp/dhclient.conf using the following command:
$ sudo nano /etc/dhcp/dhclient.conf
ii. Then add the following lines below the “send host-name = gethostname(); line:
default interface-mtu <mtu_size>;
supersede interface-mtu <mtu_size>;
For instance, to set the MTU size to 1400, we will add:
default interface-mtu 1400;
supersede interface-mtu 1400;
iii. If you have multiple interfaces and you want to change the MTU size of just one interface, then enclose it in the braces as follows:
interface "interface_name" {
default interface-mtu <mtu_size>;
supersede interface-mtu <mtu_size>;
}
iv. Once you have configured the file, save, and close it.
v. Now restart the networking service using the following command in Terminal:
$ sudo service networking restart
vi. Also, bring up the interface using the following command:
$ sudo ifup <interface_name>
Make sure to replace the <interface_name> with the actual network interface on your system e.g ens33, eth0, eth1, etc.
In our case, it would be:
$ sudo ifup ens33
vii. Now issue the following command in Terminal to verify if the MTU size has changed successfully.
$ sudo ifconfig | grep mtu
How to use /etc/network/interfaces file ?
If your network interface is configured to obtain a static IP address, then you can change the MTU size by configuring the /etc/network/interfaces file.
i. Edit the /etc/network/interfaces file using the following command in Terminal:
$ sudo nano /etc/network/interfaces
ii. Append the below line in the file:
post-up /sbin/ifconfig <interface-name> mtu <mtu_size>
Make sure to replace <interface-name> with the actual interface name and <mtu_size> with the MTU size you want to set on the network interface.
For instance, to change the MTU size of an interface named ens33 to 1300 bytes, the command would be:
post-up /sbin/ifconfig ens33 mtu 1300 up
iii. Once you have configured the file, save, and close it.
iv. Now restart the networking services using the following command in Terminal:
$ sudo service networking restart
v. Also, bring up the interface using the following command:
$ sudo ifup <interface_name>
Make sure to replace the <interface_name> with the actual network interface on your system e.g. ens33, eth0, eth1, etc.
In our case, it would be:
$ sudo ifup ens33
vi. Now issue the following command in Terminal to verify if the MTU size has changed successfully.
$ ip a | grep mtu
[Need urgent assistance to fix Ubuntu related errors? We can help you. ]
Dear Friends in this tutorial we will how to set MTU size in Linux and we will also know what is MTU and why it MTU size is must for Linux? So, let’s start and see steps by steps this process.
What is MTU in Linux?
MTU stand for (Maximum Transmission Unit) it’s a size of largest protocol data unit that can communicated in single network layer transaction. MTU depends on underlying network capabilities and must be adjusted manually or automatically to not exceed these capabilities.
For more details about MTU you can Click Here
Why MTU size is must in Linux?
Large packets occupy a slow link for more time than a smaller packet, causing greater delays to subsequent packets, and increasing network delay and delay variation. For example, a 1500-byte packet, the largest allowed by Ethernet at the network layer, ties up a 14.4k modem for about one second.
How to set MTU size in Linux with ficonfig command?
We can set MTU using ifconfig command or ip command. If we don’t have ifconfig command and our Linux is base Operating System, then we can us ip command. Like below: –
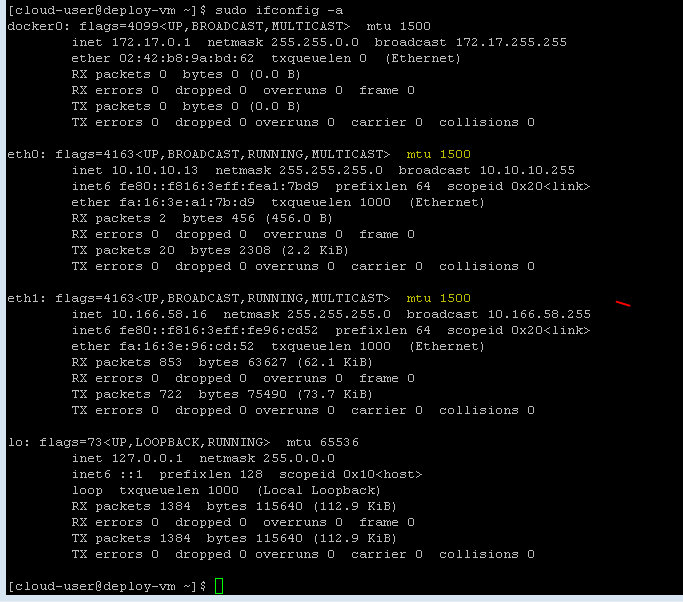
First of we can check current MTU size with ifconfig commands.
[cloud-user@deploy-vm ~]$ sudo ifconfig -a
 docker0: flags=4099  mtu 1500
         inet 172.17.0.1  netmask 255.255.0.0  broadcast 172.17.255.255
         ether 02:42:b8:9a:bd:62  txqueuelen 0  (Ethernet)
         RX packets 0  bytes 0 (0.0 B)
         RX errors 0  dropped 0  overruns 0  frame 0
         TX packets 0  bytes 0 (0.0 B)
         TX errors 0  dropped 0 overruns 0  carrier 0  collisions 0
 eth0: flags=4163  mtu 1600
         inet 10.10.10.13  netmask 255.255.255.0  broadcast 10.10.10.255
         inet6 fe80::f816:3eff:fea1:7bd9  prefixlen 64  scopeid 0x20

         ether fa:16:3e:a1:7b:d9  txqueuelen 1000  (Ethernet)
         RX packets 2  bytes 456 (456.0 B)
         RX errors 0  dropped 0  overruns 0  frame 0
         TX packets 20  bytes 2308 (2.2 KiB)
         TX errors 0  dropped 0 overruns 0  carrier 0  collisions 0
 eth1: flags=4163  mtu 1600
         inet 10.166.58.16  netmask 255.255.255.0  broadcast 10.166.58.255
         inet6 fe80::f816:3eff:fe96:cd52  prefixlen 64  scopeid 0x20

         ether fa:16:3e:96:cd:52  txqueuelen 1000  (Ethernet)
         RX packets 633  bytes 48331 (47.1 KiB)
         RX errors 0  dropped 0  overruns 0  frame 0
         TX packets 568  bytes 59074 (57.6 KiB)
         TX errors 0  dropped 0 overruns 0  carrier 0  collisions 0
 lo: flags=73  mtu 65536
         inet 127.0.0.1  netmask 255.0.0.0
         inet6 ::1  prefixlen 128  scopeid 0x10
         loop  txqueuelen 1000  (Local Loopback)
         RX packets 912  bytes 75951 (74.1 KiB)
         RX errors 0  dropped 0  overruns 0  frame 0
         TX packets 912  bytes 75951 (74.1 KiB)
         TX errors 0  dropped 0 overruns 0  carrier 0  collisions 0
 [cloud-user@deploy-vm ~]$
In above output you can see MTU size is 1600 on eth0 and eth1 interface. Now we need to set 1500 MTU on eth0 and eth1. So, we can use below commands.
[cloud-user@deploy-vm ~]$ sudo ifconfig eth0 mtu 1500
[cloud-user@deploy-vm ~]$ sudo ifconfig eth1 mtu 1500
Now we can verify with ifconfig command our changes is completed or not?
You can see in above output we have successfully changed MTU size of eth0 and eth1 from 1600 to 1500 MTU.
How to set MTU with ip command?
If don’t have
ifconfig tools, then we can use ip command to change MTU size like below.
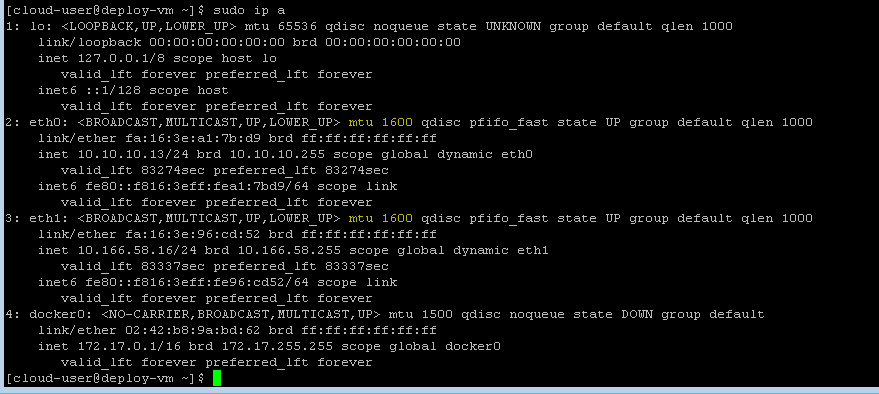
First, we can verify current MTU size with IP command.
[cloud-user@deploy-vm ~]$ ip a
 1: lo:  mtu 65536 qdisc noqueue state UNKNOWN group default qlen 1000
     link/loopback 00:00:00:00:00:00 brd 00:00:00:00:00:00
     inet 127.0.0.1/8 scope host lo
        valid_lft forever preferred_lft forever
     inet6 ::1/128 scope host
        valid_lft forever preferred_lft forever
 2: eth0:  mtu 1500 qdisc pfifo_fast state UP group default qlen 1000
     link/ether fa:16:3e:a1:7b:d9 brd ff:ff:ff:ff:ff:ff
     inet 10.10.10.13/24 brd 10.10.10.255 scope global dynamic eth0
        valid_lft 84910sec preferred_lft 84910sec
     inet6 fe80::f816:3eff:fea1:7bd9/64 scope link
        valid_lft forever preferred_lft forever
 3: eth1:  mtu 1500 qdisc pfifo_fast state UP group default qlen 1000
     link/ether fa:16:3e:96:cd:52 brd ff:ff:ff:ff:ff:ff
     inet 10.166.58.16/24 brd 10.166.58.255 scope global dynamic eth1
        valid_lft 84973sec preferred_lft 84973sec
     inet6 fe80::f816:3eff:fe96:cd52/64 scope link
        valid_lft forever preferred_lft forever
 4: docker0:  mtu 1500 qdisc noqueue state DOWN group default
     link/ether 02:42:b8:9a:bd:62 brd ff:ff:ff:ff:ff:ff
     inet 172.17.0.1/16 brd 172.17.255.255 scope global docker0
        valid_lft forever preferred_lft forever
 [cloud-user@deploy-vm ~]$
You can see
in above output we have 1500 MTU in eth0 and eth1 interface.
Now I am going to change is from 1500 MTU to 1600 MTU with ip command like below: –
[cloud-user@deploy-vm ~]$
[cloud-user@deploy-vm ~]$ sudo ip link set mtu 1600 eth0
[cloud-user@deploy-vm ~]$ sudo ip link set mtu 1600 eth1
[cloud-user@deploy-vm ~]$
Now we can verify our MTU size is changed or not with ip a command like below: –
You can see in above output we have successfully changed MTU size with ip command.
Now verify the MTU packet size with ping commands.
[root@urcloud ~]# ping -M do -s 8980 10.167.30.3
PING 10.167.30.3 (10.167.30.3) 8980(9008) bytes of data.
ping: local error: Message too long, mtu=9000
ping: local error: Message too long, mtu=9000
ping: local error: Message too long, mtu=9000
^C
--- 10.167.30.3 ping statistics ---
3 packets transmitted, 0 received, +3 errors, 100% packet loss, time 1999ms
[root@urcloud ~]# ping -M do -s 8960 10.167.30.3
PING 10.167.30.3 (10.167.30.3) 8960(8988) bytes of data.
8968 bytes from 10.167.30.3: icmp_seq=1 ttl=64 time=0.259 ms
8968 bytes from 10.167.30.3: icmp_seq=2 ttl=64 time=0.269 ms
8968 bytes from 10.167.30.3: icmp_seq=3 ttl=64 time=0.209 ms
^C
--- 10.167.30.3 ping statistics ---
3 packets transmitted, 3 received, 0% packet loss, time 2000ms
rtt min/avg/max/mdev = 0.209/0.245/0.269/0.031 ms
[root@urcloud ~]#
That’s all, in this tutorial we have seen how to set MTU in Linux.
Network configuration after CentOS 7 minimal installation
Contents
- Introduction
- Requirements
-
Basics
- Setting/changing the hostname
- Finding your network interface
- Disable network managers and/or wicd
- Configuring an interface
- Setting up a second IP address or Virtual IP address
- Howto set MTU for a connection
- Setting up DNS
-
Wireless
- ndiswrapper
- Configure your wireless interface
- WPA supplicant
-
Configure laptops for multiple locations
- Map your physical interfaces to logical interfaces
- Define tests to select networks
- Result
- Bonus script
-
See also
- Ubuntu resources
- External resources
Introduction
You can configure a network interface from the command line. You can configure your network client hosts with the command line by using commands to change your current settings or by editing a number of system files. This has several advantages over network managers in the GUI.
This guide had been developed for Ubuntu and Debian, other distributions can use a similar setup, but be aware that file locations may differ.
Requirements
An editor. This guide will use vi, but you can replace it with any other editor of your liking, gedit, nano, gvim, pico, emacs..
Have a working internet connection during the installation. We need to install packages and those are fetched from the online repositories.
Backup any files we touch. Just easier to recover when you have a backup.
Read this guide in full before actually configuring your network.
Basics
Setting/changing the hostname
The hostname command allows you to directly query, or set, the hostname from the command line.
You can see your current hostname by running hostname. To set the hostname directly you can run hostname newname as root. If you do this however, make sure you change the /etc/hosts file first. This is needed because otherwise you will need to boot into single user mode and change your hostname in /etc/hosts. This is because sudo requires DNS lookups in certain cases and it cannot resolve your newly set hostname.. To circumvent this you need to add the new name to the hosts file prior to setting the hostname and remove it once that action has succeeded.
sudo vi /etc/hosts
127.0.1.1 ubuntu newname
Set the hostname to newname.
sudo hostname newname
# or
echo newname | sudo tee /etc/hostname
Now you can remove the old hostname
sudo vi /etc/hosts
127.0.1.1 newname
When your system boots it will automatically read the hostname from the file /etc/hostname. You can add hostname and IP addresses to the file /etc/hosts for static lookups.
Finding your network interface
When setting up your network you will need to know the network interface cards on your computer. The interface name of cards for different vendors may be different, which is why this step is needed.
ls /sys/class/net
# or
ip addr
This will list the interface names for all NICs on your computer. It will probably include eth0 (hardwired NIC), lo (loopback interface for the localhost), and something for your wireless card (like wifi0, or wlan0).
Disable network managers and/or wicd
Configuring your network via the CLI will likely interfere with Network Manager or wicd. To counter this, disable the startup script of either application or completely remove the packages. Be aware that the rest of this guide will require packages which need to be installed from the online repositories.
## Network manager
# Stop the current process
sudo /etc/init.d/NetworkManager stop
# Start: sudo /etc/init.d/NetworkManager start

# The inofficial way:
sudo chmod -x /etc/init.d/NetworkManager
# Reverse: sudo chmod +x /etc/init.d/NetworkManager
# The official way:
sudo update-rc.d -f NetworkManager remove
# Reverse: sudo update-rc.d -f NetworkManager defaults 50

# Or remove the network manager package.
sudo aptitude purge network-manager
# Reverse: sudo aptitude install network-manager

## wicd
# Stop the current process
sudo /etc/init.d/wicd stop
# Start: sudo /etc/init.d/wicd start

# The inofficial way:
sudo chmod -x /etc/init.d/wicd
# Reverse: sudo chmod +x /etc/init.d/wicd

# The official way:
sudo update-rc.d -f wicd remove
# Reverse: sudo update-rc.d -f wicd defaults 20

# Or remove the wicd package.
sudo aptitude purge network-manager
# Reverse: sudo aptitude install network-manager
Note: At some point Ubuntu started using upstart instead of the /sbin/init/ daemon. Thus if the first command above does not stop Network Manager, try this.
sudo stop network-manager
Configuring an interface
- Word of wisdom
-
We will use eth0 in this example, your interface can be named differently, see Finding your network interface.
If you have disabled the either wicd or the network manager you probably don’t have a network connection anymore. Connect via a regular UTP cable to your router, and assuming you have DHCP enabled do the following:
sudo ip link set dev eth0 down
sudo dhclient eth0
This will bring your eth0 up by using DHCP. Your network is now configured (for the time being).
If you don’t have DHCP enabled configure your network by issueing the commands below, the gateway address is the IP address of your router. And your IP should be in the same range as the router is.
sudo ip addr add 192.168.1.14/24 dev eth0
sudo ip link set dev eth0 up
sudo ip route add default via 192.168.1.1
These commands configure your interface but these changes will not survive a reboot, since the information is not stored anyhwere. This is where the interfaces file comes in handy. To configure a interface permanently you’ll need to edit the interfaces file, /etc/network/interfaces.
sudo vi /etc/network/interfaces
## To configure a dynamic IP address
auto eth0
iface eth0 inet dhcp

## Or configure a static IP
auto eth0
iface eth0 inet static
  address 192.168.1.14
  gateway 192.168.1.1
  netmask 255.255.255.0
  network 192.168.1.0
  broadcast 192.168.1.255
For these settings to take effect you need to restart your networking services.
sudo /etc/init.d/networking restart
Setting up a second IP address or Virtual IP address
If you need to set up a second ip address you need to edit the /etc/network/interfaces.
sudo vi /etc/network/interfaces
auto eth0:1
iface eth0:1 inet static
  address 192.168.1.24
  netmask 255.255.255.0
  network 192.168.1.1
  broadcast 192.168.1.255
  gateway 192.168.1.1
For these new settings to take effect you need to restart networking services using the following command
sudo /etc/init.d/networking restart
Howto set MTU for a connection
You can set the MTU for an interface, you could do this by using the mtu keyword in the interface file or by using the ip link command.
iface eth0 inet dhcp
  # via mtu keyword
  mtu 1492
  # Via ip link command
  pre-up /sbin/ip link set $IFACE mtu 1492
The above example sets the MTU for device eth0 to 1492, the usual MTU for a PPPoE ISP connection. This however is only needed if connections seem to hang otherwise (with the default of 1500).
This tip was found on http://glasnost.beeznest.org/articles/290.
Setting up DNS
To cause your machine to consult with a particular server for name lookups you simply add their addresses to /etc/resolv.conf.
For example a machine which should perform lookups from the DNS server at IP address 192.168.1.1 would have a resolv.conf file looking like this
sudo vi /etc/resolv.conf
enter the following details
search example.com
domain example.com
nameserver 192.168.1.1
Wireless
We will not use un-encrypted wireless connections, but will make use of WEP/WPA/WPA2. Deviations from security/encryption method is an exercise left for the user. We also assume the network SSID is being broadcast.
Enabling wireless networking on your PC is pretty straight forward. If your network card is supported out of the box, then there are very little issues. If your card is not supported out of the box, you may need to use ndiswrapper, which will require the Windows drivers fo your card.
ndiswrapper
* Install a Windows driver with ndiswrapper for Dapper or ndiswrapper for 8.04 and up
# Ubuntu 6.06 (Dapper) and earlier
sudo aptitude install ndiswrapper-utils
# Ubuntu 8.04 and up (Hardy/Intrepid/Jaunty/Karmic)
sudo aptitude install ndiswrapper-utils-1.9

# All versions
sudo ndiswrapper -i /path/to/windows/driver.inf
sudo ndiswrapper -m
- More information about ndiswrapper
-
https://help.ubuntu.com/community/WifiDocs/Driver/Ndiswrapper
ndiswrapper --help
man ndiswrapper
Configure your wireless interface
In the examples I will use wlan0 as your wireless card, this could be different on your machine! I will do the examples with a dynamic IP address (DHCP), the same principles applies to staticly configured IP’s.
Open the interfaces file
sudo vi /etc/network/interfaces
auto wlan0
iface wlan0 inet dhcp
pre-up  /etc/init.d/wpa.sh start
post-down /etc/init.d/wpa.sh stop
The pre-up command is run before the interface goes up. The post-down command is run after the interface goes down. There are also post-up and pre-down commands. E.g. You could use post-up to mount disks after an interface goes up. In this case we start wpa_supplicant before we enable the interface and we stop wpa_supplicant after we bring the interface down.
WPA supplicant
- Before you start
-
") Before proceeding any further, it might be worthwhile to check whether your Wi-Fi Card is supported. Please see the wpa_supplicant website for more details. This will save you lots of time and frustration.
Before proceeding any further, it might be worthwhile to check whether your Wi-Fi Card is supported. Please see the wpa_supplicant website for more details. This will save you lots of time and frustration.
Install wpa_supplicant
sudo aptitude install wpasupplicant
Creating the password
You probably have given your wireless network a name (the ESSID or SSID), in this example we will use ubuntuwifi for our wireless network, our password will be OpenSesame. The SSID and password needs to be configured on your wireless router, how to do that is up to the reader. If you have problems coming up with a password, please have a look here.
If you are using WEP encryption (which is not advised) you may skip this step.
$ wpa_passphrase ubuntuwifi OpenSesame
network={
        ssid="ubuntuwifi"
        #psk="OpenSesame"
        psk=24f87a7583001eb7cea2394bbdb04eb2d3641f0b907dd31bd286be628c1841f8
}
Adding your network
Open the /etc/wpa_supplicant file and define your network.
sudo vi /etc/wpa_supplicant.conf
#
#  Please see /usr/share/doc/wpasupplicant/wpa_supplicant.conf.gz
#  for more complete configuration parameters.
#
ctrl_interface=/var/run/wpa_supplicant
ctrl_interface_group=0

eapol_version=2
ap_scan=1
fast_reauth=1
country=NL

### Associate with any open access point
###  Scans/ESSID changes can be done with wpa_cli
network={
  ssid=""
  key_mgmt=NONE
  priority=1
}

# WEP
network={
  ssid="ubuntuwifi"
  scan_ssid=1
  key_mgmt=NONE
  wep_key0="OpenSesame"
  wep_key1="OpenOtherSesame"
  # Use the correct key..
  wep_tx_keyidx=0
  priority=5
}

# WPA/WPA2
network={
  ssid="ubuntuwifi"
  scan_ssid=1
  psk=24f87a7583001eb7cea2394bbdb04eb2d3641f0b907dd31bd286be628c1841f8
  priority=5
  ## The configuration items listed below do not need to be set, the defaults are
  ## pretty 'let us do it for you'.
  ## See /usr/share/doc/wpasupplicant/wpa_supplicant.conf.gz for more information.
  # key_mgmt=WPA-PSK
  # proto=WPA RSN
  # pairwise=CCMP TKIP
  # group=CCMP TKIP
}
Please beware, if you use WPA, remove the WEP section and vice versa.
The priority in this file determines to which network you will connect if more then 2 configured networks are available. This will always be the network with the highest priority.
WPA start script
Create the WPA startup script /etc/init.d/wpa.sh
sudo vi /etc/init.d/wpa.sh
#!/bin/bash
### BEGIN INIT INFO
# Provides:          wpa
# Required-Start:    $network $syslog $local_fs
# Required-Stop:     $network $syslog $local_fs
# Default-Start:     2 3 4 5
# Default-Stop:      0 1 6
# Short-Description: Start/stop script for wpa supplicant
# Description:       Custom start/stop script for wpa_supplicant.
### END INIT INFO

SELF=`basename $0`
WPA=wpa_supplicant
PROGRAM=/sbin/${WPA}
CONF=/etc/${WPA}.conf
INTERFACE=wlan0
DRIVER=wext
DAEMONMODE="-B"
LOGFILE=/var/log/$WPA.log

function start() {

    # TODO: Support multiple interfaces and drivers
    OPTIONS="-c $CONF -i $INTERFACE -D $DRIVER $DAEMONMODE"

    ## You can remove this if you are running 8.10 and up.
    # Ubuntu 8.10 and up doesn't need the -w anymore..
    # And the logfile option is not valid on 8.04 and lower
    local ver=$(lsb_release -sr | sed -e 's/.//g');
    [ $ver -lt 810 ] && OPTIONS="$OPTIONS -w" && LOGFILE=""
    ##

    # Log to a file
    [ -n "$LOGFILE" ] && OPTIONS="$OPTIONS -f $LOGFILE"

    echo " * Starting wpa supplicant"
    eval $PROGRAM $OPTIONS
}

function stop() {
    echo " * Stopping wpa supplicant"
    wpa_cli -i $INTERFACE terminate
    #pkill $PROGRAM ## alternative method
}

function debug() {
    stop
    DAEMONMODE="-ddd"
    start
}

function restart() {
    stop
    start
}

function status() {
    pgrep -lf $PROGRAM
}

function usage() {
    echo "Usage: $SELF <start|stop|status|debug>"
    return 2
}

case $1 in
    start|stop|debug|restart|status) $1 ;;
    *) usage ;;
esac
Make the start script executable.
sudo chmod +x /etc/init.d/wpa.sh
You can now start WPA supplicant as a service or in debugging mode:
# Service
/etc/init.d/wpa.sh start
# Debugging
/etc/init.d/wpa.sh debug
Make sure the script gets run on boot and stopped at shutdown
sudo update-rc.d wpa.sh defaults
With wpa_cli you can make changes to your wpa_supplicant config file and reload these changes:
sudo wpa_cli
Enter help to see what you can do with wpa_cli. Some of the options are: reconfigure, disconnect, reconnect, reassociate. These options speak for themself.
For more information about wpa_supplicant, please have a look at their respective manpages:
man wpa_supplicant
man wpa_supplicant.conf
man wpa_cli
man wpa_gui # Only when you have installed the wpagui package
gzip -dc /usr/share/doc/wpasupplicant/wpa_supplicant.conf.gz | less
Now that you have setup everything, you can try to connect to your network by restarting networking
sudo /etc/init.d/networking restart
You could also reboot your machine if you prefer that.
Configure laptops for multiple locations
When you have a laptop you don’t want to configure it to only be able to have a internet connection at only one location. You probably go to work and use a wired connection, you goto to coffeeshop and use the wifi hotspot overthere and at home you have another network configuration. That is exactly what we are going to configure now.
Guessnet, ifplugd and wpa_supplicant
Install guessnet and ifplugd
sudo aptitude install guessnet ifplugd
Configure ifplugd. Define which interfaces need to be hotplug and adjust the arguments. You should remove the -q.
sudo vi /etc/default/ifplugd
# Just an example
INTERFACES="eth0 wlan0"
#ARGS="-q -f -u0 -d10 -w -I"
ARGS="-f -u0 -d10 -w -I"
# Override ARGS for a particular interface
# This is for an Intel Corporation PRO/Wireless 3945ABG [Golan] Network Connection (rev 02)
ARGS_wlan0="-F -u0 -d10 -w -I"
SUSPEND_ACTION=stop
Some cards do not really play well with the defaults of Ubuntu, adjust where needed.
- More information for ifplugd
-
See ifplugd for more information. And their respective man pages
man ifplugd
man ifplugd.conf
You will need the wpa.sh script mentioned earlier in this guide and you will need to make sure it will be started and stopped:
# Start wpa_supplicant at boot
sudo ln -s /etc/init.d/wpa.sh /etc/rc2.d/S19wpa
sudo ln -s /etc/init.d/wpa.sh /etc/rc3.d/S19wpa

# Kill wpa_supplicant at shutdown
sudo ln -s /etc/init.d/wpa.sh /etc/rc5.d/K21wpa
sudo ln -s /etc/init.d/wpa.sh /etc/rc6.d/K21wpa
Map your physical interfaces to logical interfaces
First, we are going to make a mapping for eth0 and wlan0 and said which mapped interface could be used for each physical interface:
mapping eth0
  # Tell ifupdown to use guessnet to determine which network we can use
  script guessnet-ifupdown
  # Default location
  map default: missing-cable
  # How verbose we are
  map verbose: false
  map debug: false
  # Our different networks, order decides which network is picked
  # if two or more networks are available at the same time.
  map officelan homelan aruba missing-cable

mapping wlan0
  script guessnet-ifupdown
  map default: missing-cable
  map verbose: false
  map debug: false
  map workwifi homewifi wifi-open missing-cable
Normally ifupdown configures the interfaces, but now we’ve told it to use guessnet to determine the network being used.
Define tests to select networks
As you will see with the officelan, homelan and aruba examples below we will execute tests to see wheter a peer is present based on the MAC address. The simplest solution for this is to check whether your gateway is present. You can find out the MAC address of your gateway by running the ip neigh command. You need to be connected with your network for this.
$ ip neigh
192.168.1.254 dev eth0 lladdr 00:24:17:47:xx:xx
This my default gateway, has IP address 192.168.1.254 and 00:24:17:47:xx:xx as a MAC address. This gives us the needed information to define the test.
test peer address 192.168.1.254 mac 00:24:17:47:xx:xx source 192.168.1.14
You don’t need to specify the source IP address, but in certain cases this is required. I always add it so I don’t have to worry about it in case I do need it.
So let’s define our fixed networks using the peer tests:
# Work
# Obfuscated some details about my work enviroment
iface officelan inet static
  # Test to see if our gateway is present with MAC address 00:00:xx:xx:xx:xx
  # from source address 194.134.x.x
  test peer address 194.134.x.x mac 00:00:xx:xx:xx:xx source 194.134.x.x
  address 194.134.x.x
  netmask 255.255.255.0
  gateway 194.134.x.x
  # Set our DNS, this is used by the resolvconf package
  dns-domain euronet.nl
  dns-search euronet.nl orange.nl wanadoo.nl online.nl euro.net
  dns-nameservers 194.134.5.5 194.134.0.97
  # (post|pre)-(up|down) actions, which are optional
  # Mount samba shares at work after we brought the interface up
  post-up /home/my_user/bin/mount_smb start
  # And disable to mounts before we shut the interface down
  pre-down /home/my_user/bin/mount_smb stop
  # Which interface has preference, eth0 or wlan0, this is needed if you
  # are connected via both interfaces.
  metric 1

# One happy island (very nice weather ;))
iface aruba inet dhcp
  test peer address 192.168.1.1 mac 00:08:5C:89:xx:xx source 192.168.1.4
  dns-domain opperschaap.net
  dns-search opperschaap.net euronet.nl wanadoo.nl online.nl euro.net

# Home
iface homelan inet static
  test peer address 192.168.1.254 mac 00:24:17:47:xx:xx source 192.168.1.14
  address 192.168.1.14
  netmask 255.255.255.0
  gateway 192.168.1.1
  dns-domain opperschaap.net
  dns-search opperschaap.net euronet.nl wanadoo.nl online.nl euro.net
  dns-nameservers 194.134.5.5 194.134.0.97
  # At home, wireless has precedence over our fixed network
  metric 2
For wireless networks you can also use the peer test, but there is a simpler way to see if you can connect to a wireless network. Test to see if the ESSID is present:
  test wireless essid ubuntuwifi
  # In case of spaces in the ESSID
  test wireless essid "ubuntu wifi"
- Spaces in the ESSID
- In older versions of guessnet you didn’t need to use quotes around the ESSID, but later versions do require it.
# Wifi at work
iface workwifi inet dhcp
  # Use this if we can find Online Wireless network
  test wireless essid "Online Wireless"
  dns-domain euronet.nl
  dns-search euronet.nl orange.nl wanadoo.nl online.nl sf6800.euronet.nl euro.net
  dns-nameservers 194.134.5.5 194.134.0.97
  # This interface has a lesser precedence over eth0
  metric 2

# Wifi at home
iface homewifi inet static
  test wireless essid ubuntuwifi
  address 192.168.1.114
  netmask 255.255.255.0
  gateway 192.168.1.1
  dns-domain opperschaap.net
  dns-search opperschaap.net euronet.nl wanadoo.nl online.nl
  dns-nameservers 194.134.5.5 194.134.0.97
  # This interface is used in case we are both connected via wifi and
  # wired LAN
  metric 1

# Connect to any open network
iface wifi-open inet dhcp
  # Any ESSID is valid
  wireless-essid any
  # Is the wireless work open? Yes, then use this mapping
  test wireless open
  # Set the DNS
  dns-domain opperschaap.net
  dns-search opperschaap.net euronet.nl wanadoo.nl online.nl
  dns-nameservers 194.134.5.5 194.134.0.97
To see what kind of other test you can run to determine which network you are in, please have a look at the manpage of guessnet.
man guessnet
Use of metrics
Some of you might have noticed a metric statement for some of the interfaces. I do this because when you are connected via both wireless and wired networks, some things may go «bad» with the routing table. When you define a metric for these two interfaces you will tell the routing table which interface has preference over the other. The lowest metric has priority over the higher metric.
Or as I explained in a ubuntuforum post: The problem is that without the metric you will have 2 interfaces used for the same destinations. It will use either interface, which causes problems with the routing table.
By setting a metric you can avoid this, since the higher metric is more «expensive» to use. So the OS will use the interfaces with the lowest metric if it needs to route traffic. In case the lower metric interface is shutdown it will use the higher metric interface since it is the only interface which can be used to route traffic towards that particular network/destination.
See also http://en.wikipedia.org/wiki/Metrics_%28networking%29
The problem could also be solved by adding static routes, but that is used mostly to make sure specific networks/hosts are routed via a different interface then the default. You then force only those hosts to use link B even though normally the OS would use link A.
Result
When we put all the configuration segments together you will get a interfaces file which looks like this
auto lo
iface lo inet loopback
address 127.0.0.1
netmask 255.0.0.0

mapping eth0
  script guessnet-ifupdown
  map default: missing-cable
  map verbose: false
  map debug: false
  map officelan homelan aruba missing-cable

mapping wlan0
  script guessnet-ifupdown
  map default: missing-cable
  map verbose: false
  map debug: false
  map workwifi homewifi wifi-open missing-cable

# Work
iface officelan inet static
  test peer address 194.134.x.x mac 00:00:xx:xx:xx:xx source 194.134.x.x
  address 194.134.x.x
  netmask 255.255.255.0
  gateway 194.134.x.x
  dns-domain euronet.nl
  dns-search euronet.nl orange.nl wanadoo.nl online.nl euro.net
  dns-nameservers 194.134.5.5 194.134.0.97
  post-up /home/my_user/bin/mount_smb start
  pre-down /home/my_user/bin/mount_smb stop
  metric 1

# One happy island (very nice weather ;))
iface aruba inet dhcp
  test peer address 192.168.1.1 mac 00:08:5C:89:xx:xx source 192.168.1.4
  dns-domain opperschaap.net
  dns-search opperschaap.net euronet.nl wanadoo.nl online.nl euro.net

# Home
iface homelan inet static
  test peer address 192.168.1.254 mac 00:24:17:47:xx:xx source 192.168.1.14
  address 192.168.1.14
  netmask 255.255.255.0
  gateway 192.168.1.1
  dns-domain opperschaap.net
  dns-search opperschaap.net euronet.nl wanadoo.nl online.nl euro.net
  dns-nameservers 194.134.5.5 194.134.0.97
  metric 2

# Wifi at work
iface workwifi inet dhcp
  # Use this if we can find Online Wireless network
  test wireless essid "Online Wireless"
  dns-domain euronet.nl
  dns-search euronet.nl orange.nl wanadoo.nl online.nl sf6800.euronet.nl euro.net
  dns-nameservers 194.134.5.5 194.134.0.97
  # This interface has a lesser precedence over eth0
  metric 2

# Wifi at home
iface homewifi inet static
  test wireless essid ubuntuwifi
  address 192.168.1.114
  netmask 255.255.255.0
  gateway 192.168.1.1
  dns-domain opperschaap.net
  dns-search opperschaap.net euronet.nl wanadoo.nl online.nl
  dns-nameservers 194.134.5.5 194.134.0.97
  # This interface is used in case we are both connected via wifi and
  # wired LAN
  metric 1

# Connect to any open network
iface wifi-open inet dhcp
  # Any ESSID is valid
  wireless-essid any
  # Is the wireless work open? Yes, then use this mapping
  test wireless open
  # Set the DNS
  dns-domain opperschaap.net
  dns-search opperschaap.net euronet.nl wanadoo.nl online.nl
  dns-nameservers 194.134.5.5 194.134.0.97
You can now test if it all works like intended.
/etc/init.d/networking stop
/etc/init.d/wpa.sh stop
/etc/init.d/ifplugd stop
If you enter ip addr you will only see the lo interface being active.
1: lo: <LOOPBACK,UP,LOWER_UP> mtu 16436 qdisc noqueue state UNKNOWN
2: eth0: <BROADCAST,MULTICAST> mtu 1500 qdisc pfifo_fast state DOWN qlen 1000
And start all the required daemons:
/etc/init.d/ifplugd start
/etc/init.d/wpa.sh start
/etc/init.d/networking start
And now you will see your interfaces configured properly
$ ip a
1: lo: <LOOPBACK,UP,LOWER_UP> mtu 16436 qdisc noqueue state UNKNOWN
2: eth0: <BROADCAST,MULTICAST,UP,LOWER_UP> mtu 1500 qdisc pfifo_fast state UP qlen 1000
Done.
Bonus script
This script will be a stop/start script for your complete network, which can be used when you want to enable networking after you have suspended your laptop or for other reasons
INT="eth0 wlan0"

stop() {
    /etc/init.d/networking stop
    /etc/init.d/wpa.sh stop
    /etc/init.d/ifplugd stop
    for i in $INT ; do
        ip link set dev "$i" down &>/dev/null
    done

}

start() {
    /etc/init.d/ifplugd start
    /etc/init.d/wpa.sh start
    /etc/init.d/networking start
}

restart() {
    stop
    sleep 5
    start
}

$1
See also
Ubuntu resources
-
http://ubuntuforums.org/showthread.php?t=124153 — This guide on the Ubuntu forums.
-
http://ubuntuforums.org/showthread.php?t=1055393 — Setting hostname gone wrong.
External resources
-
http://www.linuxhomenetworking.com/wiki/index.php/Quick_HOWTO_:_Ch03_:_Linux_Networking — networking for Linux explained
-
http://wiki.debian.org/WPA — Debian wiki and configuring WPA
-
http://www.aaron-spettl.de/ubuntu/dynamische-netzwerkkonfiguration.php — This guide in German
-
http://vollink.com/gary/deb_wifi.html — Debian and Wireless networking (broken link)
-
http://wiki.fok.nl/index.php/Dig/linux/wireless — This guide in Dutch, rewrite of the Ubuntu forums thread (Dutch)
CategoryNetworking CategoryWireless CategoryCommandLine
NetworkConfigurationCommandLine/Automatic (last edited 2015-07-18 12:02:04 by peter-hentrich)
В компьютерных сетях термин MTU (Maximum transmission unit, максимальная единица передачи) означает максимальный размер одного пакета, который может быть передан протоколом без фрагментации. Пакеты большего размера (чем размер MTU), будут разбиваться на более мелкие и передаваться за несколько раз — этот процесс называется фрагментация. При большом количестве фрагментированных пакетов может снижаться скорость передачи данных по сети, а в некоторых системах, может запрещаться передача фрагментированных пакетов, в результате чего сетевая связность между системами может нарушиться. Особенно часто такое поведение может наблюдаться при дополнительном шифровании трафика, например, при построении крипто-туннелей.
Любое устройство которое взаимодействует по сети имеет по умолчанию установленное производителем значение MTU. При этом, для каждой сетевой топологии может быть установлено свое значение размера MTU.
В таблице ниже приведены размеры MTU по умолчанию для различных сетевых сред:
| Network |
MTU (bytes) |
|
16 Mbps Token Ring |
17914 |
|
4 Mbps Token Ring |
4464 |
|
FDDI |
4352 |
|
Ethernet |
1500 |
|
IEEE 802.3/802.2 |
1492 |
|
PPPoE (WAN Miniport) |
1480 |
|
X.25 |
576 |
Из таблицы выше следует, что в наиболее сейчас популярных сетях Ethernet по умолчанию используется MTU равный 1500.
Как изменить MTU в Linux?
Чтобы определить текущие значения MTU, которое установлено на сетевом интерфейсе Linux, необходимо выполить команду:
ip linkРезультат выполнения команды показан на рисунке ниже. Там же можно увидеть, что для интерфейса eth0 установлено MTU 1500. Для того, чтобы изменить MTU для текущего состояния интерфейса, необходимо выполнить команду (для сетевого интерфейса с именем eth0)
ip link set mtu 9000 dev eth0После выполнения данной команды (возможно потребуется запуск из под su), значение MTU для интерфейса изменится (см скриншот ниже). 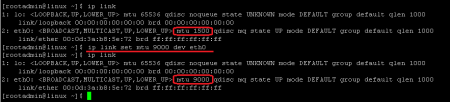
Чтобы новое значение MTU применялось при старте системы, и не требовалось устанавливать его вручную при каждом запуске, необходимо внести изменения в файл конфигурации сетевого интерфейса.
Для этого:
в CentOS:
в конфигурационном файле /etc/sysconfig/network-scripts/ifcfg-eth0: необходимо дописать строку:
MTU=9000и перезапустить сетевую службу, выполнив команду:
systemctl restart networkв Ubuntu:
в конфигурационном файле размещенном в папке /etc/netplan/ необходимо дописать строку:
mtu: 9000Например, так как показано на скриншоте: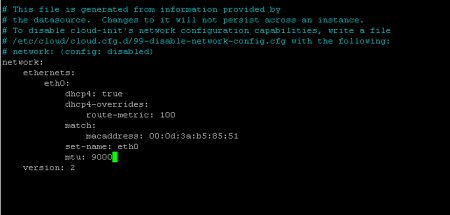 И перезапустить netplan, выполнив команду:
netplan applyПосле выполненных команд, установленное значение MTU на интерфейсах будет установлено по умолчанию.