Как обрезать скриншот на компьютере

Под редакцией
3 Июня 2022
Редактировать скриншот можно как при помощи стандартных предустановленных программ, так и посредством выбора специального софта. В первом случае получится только обрезать скрин, добавить текст, стрелки и другие примитивные графические объекты. Во втором случае можно использовать более прогрессивный софт и получать больше инструментов, чтобы отредактировать снимок экрана. Поговорим о том, как обрезать скриншот на компьютере каждым из этих способов и какие комбинации клавиш можно использовать для упрощения процесса.
Стандартный способ: кнопка PrtScr и программа Paint
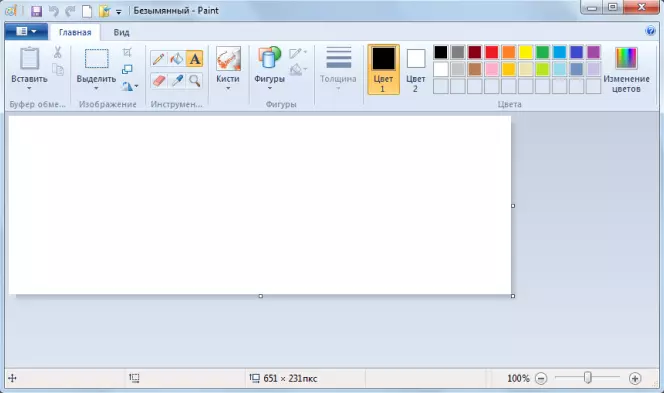
Главный принцип процесса заключается в сохранении скриншота в буфер обмена и в дальнейшей обрезке снимка экрана в стандартной программе Paint.
Как это сделать:
- Если вы хотите сразу редактировать скриншот на Windows 10, нажмите на кнопку PrtScr – снимок экрана попадет в буфер обмена. Если необходимо сначала сделать несколько скриншотов и только потом их обрезать, используйте горячие клавиши – например, Win + PrtScr. В последнем случае компьютер автоматически сохранит снимок экрана в формате PNG. Его можно будет найти в папке Снимки экрана, вложенной в стандартную папку Изображения.
- Откройте программу Paint и перенесите туда созданный скриншот. Если он находится в буфере обмена – используйте комбинацию клавиш Ctrl + V. Если же нужно поместить на рабочее поле ранее сохраненные скриншоты, то перетащите их в окно программы или нажмите на кнопку Открыть, после чего укажите путь к нужным изображениям.
- Выделите область изображения, которую нужно оставить и нажмите на кнопку Обрезать. После этого вы сможете сохранить обрезанный скриншот в одном из предложенных форматов, предварительно указав путь к папке, в которой будет храниться изображение.
Альтернативный вариант – обрезать скриншот в Ворде. Это особенно удобно при вставке скриншота сразу на страницу текстового редактора. Для обрезки изображения необходимо щелкнуть на него, а затем на вкладку Работа с рисунками в верхней части страницы. Здесь нужно нажать на кнопку Размер и выбрать инструмент Обрезка. На изображении появятся границы – сужая их, вы будете обрезать все выходящее за пределы.

Программа помогает быстро сохранять уже обрезанные скриншоты или полные снимки экрана на ПК и ноутбуках, а также использовать расширенные настройки и инструменты для редактирования изображения в высоком качестве.
Movavi Screen Recorder подходит для компьютеров на базе Windows и MacOS – проблем с софтом не возникает даже при установке на Mac или MacBook. Достаточно выбрать версию, скачать установочный файл и запустить программу. Обычно это занимает не более 1-2 минут.
Как сделать скриншот с помощью программы:
Шаг 1.
После установки программы значок скриншота появится на панели управления – чтобы сделать снимок экрана, нажмите на него или на клавишу F8.

Шаг 2.
Выделите рамкой область экрана, которая должна войти в готовый скриншот. Если вы хотите снять весь экран – зажмите Пробел и кликните мышью на любой пустой участок области стола.
Шаг 3.
Нажмите на кнопку Сохранить, чтобы записать файл в память компьютера. По умолчанию скриншот будет сохраняться в папке Movavi Screen Recorder, вложенной в Мои видеозаписи. Вы можете указать другой путь для сохранения файла в настройках.
Параллельно с созданием уже обрезанного скриншота программа позволяет изменять изображение без предварительного сохранения и переноса в рабочее окно. Сразу после того, как вы создадите скриншот выделенной области, вы сможете добавить текст и графические объекты, изменить настройки сохранения и отредактировать изображение по своему усмотрению.
Как обрезать скриншот на телефоне

Обрезать скриншот на телефоне можно при помощи стандартных и установленных приложений. Все будет зависеть от марки смартфона и установленной операционной системы. Рассмотрим процессы обрезки скриншотов на iPhone и на телефонах с ОС Android.
Как обрезать скриншот на iPhone
Достаточно открыть альбом и использовать предустановленные инструменты. С их помощью можно не только обрезать скриншот, но и провести базовое редактирование изображения.
Как это сделать:
- Откройте приложение Фото и выберите нужное изображение.
- В правом верхнем углу нажмите на кнопку Править, а затем на значок Обрезать и повернуть в нижней части экрана.
- Поместите нужную область в появившуюся рамку, передвигая ее или перетягивая границы, после чего нажмите на кнопку Готово.
Если результат вам не понравится, нажмите на кнопку Отмена и пройдите всю процедуру еще раз. При необходимости скриншот можно дополнительно отредактировать, изменить его положение и соотношение сторон.
Как обрезать скриншот на телефоне с ОС Android
Алгоритм зависит от модели телефона. На некоторых устройствах кнопка Изменить появляется сразу после создания скриншота. На других необходимо перейти в раздел Галерея и открыть нужное изображение.
Как обрезать скриншот:
- Откройте нужное изображение в разделе Галерея.
- Нажмите на кнопку Изменить, а затем на кнопку Обрезать.
- Установите границы нужного фрагмента и нажмите на кнопку ОК.
После этого вы сможете сохранить изображение или поделиться им в социальных сетях, в зависимости от возможностей вашего телефона. Если вы остались недовольны результатом – отмените действия и попробуйте обрезать скриншот еще раз.
Скриншот можно обрезать на компьютере, ноутбуке и смартфоне путем использования стандартных инструментов или установленных программ. Самые простые способы позволяют только удалить с изображения лишние, вырезав нужный фрагмент.
Более функциональные программы также открывают возможность для редактирования скриншотов, добавления текста и графики, изменения яркости снимка экрана. Лучший способ обрезать скриншот и добавить визуальные эффекты – программа Movavi Screen Recorder, которая позволяет редактировать изображение еще до его сохранения в памяти устройства.
-

1
Press and hold the Volume Down and Power buttons simultaneously. After 1-2 seconds the screen will flash indicated a screenshot was taken.
- The key combination may vary depending on your phone or tablet. On some Android models, you’ll have to hold the Home and Power buttons.
- If you’re using Android 9.0 or later, you can also take a screenshot by holding down the power button until a menu appears, and then tapping Screenshot.[1]
- If you only need to crop or draw on your screenshot, you may be able to do this immediately after you take the screenshot on Android. Simply click the pencil icon on the preview of the screenshot to draw on it or the crop symbol to change the size of the screenshot before you save it.
-
2
Open Photos. It’s the white icon with a multicolored flower inside (labeled Photos or Google Photos).[2]
- If you don’t have Google Photos on your Android, you can download it now from the Play Store.
Advertisement
-
3
Tap the screenshot to open it.
-
4
Tap the edit button. It’s the second icon at the bottom (the three lines with sliders) of Google Photos.
-
5
Select a filter. If you’d like to apply one of Google Photos’ preset color/lighting filters, select an option from the row at the bottom of the screen. Swipe left across the examples and tap the one you want to use.
-
6
Tap
to crop and/or rotate photo.
- Crop: The screenshot is surrounded by a border with white dots at each corner. Drag the dots until only the part of the image you want to keep is surrounded. The crop will happen automatically (though you can drag the dots back outward to undo your changes.
- Rotate: Tap the curved arrow icon at the bottom-right corner until the image appears as you like.
-
7
Tap Done to save your changes. If you’d like to edit the colors and lighting effects, continue with this method.
-
8
Tap the edit button. It’s at the bottom of the screen (the one with sliders and knobs). This opens the lighting and color options.
-
9
Adjust the lighting and color. Use the sliders to adjust the lighting and color of the screenshot if desired.
- Slide the “Light” slider left to make the image darker, or right to increase its brightness.
- Slide the “Color” slider left to decrease the intensity of the colors, or right to make the colors very saturated.
-
10
Tap Save when you’re finished. If you didn’t make any changes (or don’t want to save them), tap the X at the top-left corner, and tap Discard if prompted.


Advertisement
-
1
Press and hold the Volume Down and Power buttons simultaneously. After 1-2 seconds the screen will flash indicated a screenshot was taken. The image will be saved to your gallery.
- The key combination may vary depending on your phone or tablet. On some Android models, you’ll have to hold the Home and Power buttons.
- If you use Google Photos on your Galaxy, see this method instead.
- If you only need to crop or draw on your screenshot, you may be able to do this immediately after you take the screenshot on Android. Simply click the pencil icon on the preview of the screenshot to draw on it or the crop symbol to change the size of the screenshot before you save it.
-
2
Open the Gallery app. The icon usually has a yellow flower, and you’ll find it in the app drawer.
- If you see a preview of the screenshot right after you take it, you can tap it to open it in the editor without having to open the Gallery.
-
3
Tap the screenshot to open it. Several options will appear along the bottom of the screen.
- The remaining settings will vary depending on your version of the Gallery app, as well as which model of Galaxy you own.
-
4
Tap Edit (the pencil icon) or the icon with three-bars. The option you see will look different depending on your version.[3]
- If you already see some editing tools at the bottom of the screen, you won’t need to complete this step.
-
5
Crop the screenshot. Tap the crop icon (a square with two longer lines at two of its corners) at the bottom of the screen, or the Adjustment option. Drag the box to surround only the part of the screenshot you want to keep, and then tap SAVE or the check mark.[4]
-
6
Rotate the screenshot. To do this, tap the ⁝ menu at the top-right corner, then select Rotate Left or Rotate Right as needed.
-
7
Make additional edits as needed. The remaining options vary by model, but you’ll usually find options to choose a filter (usually under Effect), adjust colors (often called Tone), and draw on the image using a tool called Drawing.
-
8
Tap SAVE when you’re finished editing. This saves the changes to your screenshot.


Advertisement
-
1
Press the Home and Power buttons simultaneously to take a screenshot. The screen will flash briefly and a preview of the screenshot will appear at the bottom-left corner of the screen.
- If your iPhone doesn’t have a Home button, you can take a screenshot by pressing the Power and Volume-Up buttons.
-
2
Tap the screenshot preview. It’s the small image at the bottom-left corner. This opens the screenshot in the Markup tool, which displays several editing icons at the bottom.
- The preview will only stay at the bottom-left corner for a few seconds before disappearing. If it disappears before you tap it, follow these steps to open it in the Markup tool:[5]
- Open the Photos app.
- Tap the screenshot.
- Tap Edit at the top-right corner.
- Tap the three dots icon.
- Tap Markup (the icon of a marker at the bottom).
- The preview will only stay at the bottom-left corner for a few seconds before disappearing. If it disappears before you tap it, follow these steps to open it in the Markup tool:[5]
-
3
Drag the blue borders to crop the screenshot. Drag the blue lines to surround only the part of the screenshot you want to save, if desired.
-
4
Draw on the screenshot. Here’s how:
- Tap one of the drawing tools (the marker, highlighter, and pencil icons at the bottom-left corner) to select it.
- Tap the tool again to choose a line width and weight.
- Tap the filled-in circle to select a color.
- Use your finger to draw on or highlight certain areas.
- Tap the drawing tool you select at the bottom-left corner to return to the tools list.
- If you made a mistake in your drawing, tap the pencil eraser tool at the bottom and then tap the error to delete it.
-
5
Tap the Text tool to type on the photo. If you don’t see the “T” at the bottom of the screen, tap the + at the bottom-right corner to expand more options, and then tap Text.
- Tap the filled-in circle to choose a text color.
- Tap aA icon to choose a font face, size, and alignment.
-
6
Add shapes to the screenshot. Tap the + at the bottom-right corner, then tap the square, circle, chat bubble, or arrow to add these shapes to the screenshot.
- Use the filled-in circle at the bottom to select a color.
-
7
Add your signature. If you need to sign the screenshot, here’s how you can do that:
- Tap the + at the bottom-right corner
- Tap Signature.
- Use your finger to sign your name at the bottom (or select your signature if you’ve already created one).
- Tap Done at the top.
- If your signature doesn’t appear, tap Signature again, then tap your signature to place it.
- Drag your signature to the desired position.
-
8
Use the magnifying glass. If you’d like to increase the size of one area of the screenshot, tap the + and select Magnifier. You can then use your fingers to position or change the size of the enlarged area.
-
9
Tap Done when you’re finished editing. It’s at the top of the screen. A menu will expand at the bottom.
-
10
Tap Save to Photos. This saves the screenshot to the Photos app.


Advertisement
-
1
Press the Home and Power buttons simultaneously to take a screenshot. The screen will flash briefly and a preview of the screenshot will appear at the bottom-left corner of the screen.
- If your iPhone doesn’t have a Home button, you can take a screenshot by pressing the Power and Volume-Up buttons.
-
2
Open the Photos app. Your screenshot is saved to this location by default.
-
3
Tap the screenshot to open it.
-
4
Tap the “Edit” button. This button is located in the upper right corner of the screenshot and will bring up a variety of editing tools.
-
5
Tap the Magic Wand icon to make auto changes. This button is in the upper right corner of the screen and will automatically make color and lightning adjustments to the screenshot.
-
6
Tap the Dial icon to adjust color, light, and balance. This button appears in the bottom toolbar and will bring up 3 menus: “Light”, “Color”, and “B&W”.
- Each category will have a submenu with a number of options that can be adjusted with a slider.
-
7
Tap the “Filter” icon to add artistic filters. This icon is represented by 3 overlapping circles and is located on the bottom toolbar.
- Filters like Mono, Tonal, and Noir will add a black and white stylized filter.
- Filters like Fade or Instant will give the screenshot a washed out, retro look.
-
8
Tap the “Rotation Icon” to crop, zoom, or rotate the screenshot. This icon is located on the right of the bottom toolbar.
- Tap and drag the corners of the picture space to crop the picture.
- Adjust the slider to manually rotate the photo or press the “Rotate” icon (square with a curved arrow) to automatically rotate 90 degrees.
- Reverse pinch the photo to zoom.
-
9
Tap “Done” to keep your changes. This button appears in the lower right corner after changes have been made.
- You can undo your changes by tapping “Cancel” in the lower left corner and selecting “Discard Changes”.
- You can undo changes after saving by selecting “Revert” which appears in place of the “Done” button.


Advertisement
-
1
Type “Snipping Tool” into the search bar. You can usually open the search bar by clicking the circle or magnifying glass to the right of the Start menu.
- Microsoft plans to discontinue the Snipping Tool in a future release. This tool will be replaced by Windows Snip and Sketch.
-
2
Click Snipping Tool in the search results.
-
3
Click New. It’s at the top-left corner of the window. The screen will appear slightly faded and mouse cursor will change to a selection tool.
-
4
Click and drag the mouse to select the area you want to screenshot. When you release the cursor, the image will be captured and open in the Snipping Tool.
-
5
Click the pen to if you want to draw on the screenshot. It’s at the top of the tool. You can use this to write simple notes or circle areas of interest.
- To select a color, click the small arrow next to the icon, then choose a color.
-
6
Click the highlighter tool to highlight parts of the screenshot. You can then click and drag the tool to highlight text.
-
7
Click the eraser tool to remove changes. With the eraser tool selected, click a pen or highlighter marked to remove it.
-
8
Click File menu when you’re ready to save. It’s at the top-left corner of the tool.
-
9
Click Save As.
-
10
Type a name for your screenshot and click Save. This saves your edited screenshot.


Advertisement
-
1
Open Snip & Sketch. Snip & Sketch will be replacing the Snipping Tool as the default screenshot tool.
- If you have the app installed, type snip into the Windows search bar, then click Snip & Sketch in the search results.
- If you don’t have the app, you can install it now for free from the Microsoft Store.
- You must have the most up-to-date version of Windows to use Snip & Sketch.
-
2
Click New. It’s at the top-left corner of the tool if the window is expanded, or the bottom-left corner if the window is smaller. [6]
-
3
Take a screenshot. Choose one of these three options:
- To capture a square or rectangular area of the screen, click the rectangle with a dot at the top-center part of the tool, then draw a square around the desired area.
- To draw a freehand line around the area you want to capture, click the curved line shape with a dot (the second icon in the bar at the top), and then trace around the area you want to capture.
- To capture the entire screen, just click the rectangle with darkened corners (the third icon in bar at the top).
-
4
Use the drawing tools. Click the pen, pencil, or highlighter tool near the top-center part of Snip & Sketch to select a drawing tool, then tap the tool again to select a color and line weight. Use the mouse to draw on the image.[7]
-
5
Crop the screenshot. Click the crop symbol (the square with a diagonal line in the row at the top-center part of the screen), then draw a box around the area you want to keep. Click the check mark at the top-right corner to crop.
-
6
Click the disk to save your w.ork It’s near the top-right corner. This opens the Save As dialog, where you can choose a new location and filename for your screenshot and then click Save.


Advertisement
-
1
Press ⎙ PrtScr on your keyboard. This key will copy the contents of your screen to your clipboard.
- If your keyboard doesn’t have this key, you can use the one on the on-screen keyboard. Here’s how:
- Click the circle or magnifying glass to the right of the Start menu to open the search bar.
- Type on screen keyboard, and then click On-Screen Keyboard in the search results.
- Click the PrtScn key.
- If your keyboard doesn’t have this key, you can use the one on the on-screen keyboard. Here’s how:
-
2
Press ⊞ Win+R and type “mspaint” into the text field that appears. The Windows Run tool will launch Microsoft Paint upon pressing “OK”.
-
3
Press Ctrl+V to paste your screenshot into paint.
- You can also paste by right-clicking the paint area and selecting «Paste».
-
4
Click «Rotate» and select a rotation option. This button is located in the “Image” section of the toolbar and will open a menu to with different rotation options, such as vertical, horizontal, or 90 degree rotation.
-
5
Click «Resize» to change the image size. This button is located in the «Image» section of the toolbar and will open a window to set a new window size. Enter a new size value (e.g. 200% size) and press “OK”.
- You can select to adjust the size by pixel or percentage. Use pixel adjustments if you need a more precise change.
- Changing the size to be larger than the original will result in a loss of picture quality.
-
6
Crop your screenshot. Click the «Select» option from “Image” section of the toolbar. Click and drag to select the area of the screenshot you want to use then click the «Crop» button the right of the “Select” tool.
-
7
Click the “A” button to add text to your screenshot. This button is located in the tools section on the toolbar. Click and drag to select a text area and type to enter your desired text.[8]
-
8
Click the brush icon or select a shape to make markings on the screenshot. Both options can be selected from the “Shapes” section. Brushes can be used for freehand marking and shapes will make markings in the shape selected.
- You can change the color of the shapes and markers by selecting a color palette from the “Color” section.
-
9
Open the “File” menu and select “Save As” to save your changes. You will be prompted to name the screenshot and browse for a save location. Clicking “Save” will confirm your changes.


Advertisement
-
1
Press ⇧ Shift+⌘ Command+3 to take a screenshot. A screenshot will be taken of your current screen and saved to your desktop.
- If you’d like to capture a single window, press ⇧ Shift+⌘ Command+4, press the space bar, then click the window you want to capture.[9]
- To take a screenshot of a certain part of the screen, press ⇧ Shift+⌘ Command+4, and then click and drag the mouse to select the desired part of the screen.
- If you’d like to capture a single window, press ⇧ Shift+⌘ Command+4, press the space bar, then click the window you want to capture.[9]
-
2
Double-click the new file on your desktop. It’s the new image file that contains date and time you took the screenshot.
- If your images open with a different app, press ⌘ Command as you click the file, select Open With and choose Preview.
-
3
Rotate the image. You can click the rotate button (the rectangle with a curved arrow near the top of Preview) to rotate the image 90 degrees.
-
4
Adjust the size of the image. Click the Tools menu at the top of the screen, and then select Adjust Size. This allows you to change the height, width, and resolution as needed.
-
5
Crop the screenshot. If you want to save just part of the screenshot, click the selection tool (the dotted box near the top-left corner), and then click and drag the area you want to keep. Once selected, click the Tools menu at the top of the screen, and then Crop to cut out everything but the selected area.
-
6
Adjust the colors and brightness. If you want to get crafty, click the Tools menu and select Adjust Color. You can use the sliders to adjust the exposure, contrast, highlights, shadows, saturation, temperature, tint, and sharpness.
- Your screenshot will reflect your changes as you make them, allowing you to experiment and find the right mix of settings.
- Exposure, contrast, highlights, and shadows will affect the brightness and black/white balance of the colors.
- Saturation, temperature, and tint will affect the intensity of the colors.
-
7
Add text, shapes, and drawings.[10]
- Click the A button near the top-right corner to open the text tool, and then click anywhere on the screenshot to type.
- Click the pen tool to draw.
- Click the icon of a square and rectangle to insert shapes like triangles and circles.
-
8
Click the File menu when you’re finished. It’s at the top-left corner of the screen.
-
9
Click Save.
-
10
Enter a file name and click Save. Your edited screenshot is now saved.


Advertisement
Ask a Question
200 characters left
Include your email address to get a message when this question is answered.
Submit
Advertisement
Thanks for submitting a tip for review!
About This Article
Article SummaryX
1. Take the screenshot.
2. Open Google Photos.
3. Tap the screenshot.
4. Tap the edit button.
5. Use filters and tools.
6. Tap Done.
Did this summary help you?
Thanks to all authors for creating a page that has been read 192,857 times.
Is this article up to date?
-
1
Press and hold the Volume Down and Power buttons simultaneously. After 1-2 seconds the screen will flash indicated a screenshot was taken.
- The key combination may vary depending on your phone or tablet. On some Android models, you’ll have to hold the Home and Power buttons.
- If you’re using Android 9.0 or later, you can also take a screenshot by holding down the power button until a menu appears, and then tapping Screenshot.[1]
- If you only need to crop or draw on your screenshot, you may be able to do this immediately after you take the screenshot on Android. Simply click the pencil icon on the preview of the screenshot to draw on it or the crop symbol to change the size of the screenshot before you save it.
-
2
Open Photos. It’s the white icon with a multicolored flower inside (labeled Photos or Google Photos).[2]
- If you don’t have Google Photos on your Android, you can download it now from the Play Store.
Advertisement
-
3
Tap the screenshot to open it.
-
4
Tap the edit button. It’s the second icon at the bottom (the three lines with sliders) of Google Photos.
-
5
Select a filter. If you’d like to apply one of Google Photos’ preset color/lighting filters, select an option from the row at the bottom of the screen. Swipe left across the examples and tap the one you want to use.
-
6
Tap
to crop and/or rotate photo.
- Crop: The screenshot is surrounded by a border with white dots at each corner. Drag the dots until only the part of the image you want to keep is surrounded. The crop will happen automatically (though you can drag the dots back outward to undo your changes.
- Rotate: Tap the curved arrow icon at the bottom-right corner until the image appears as you like.
-
7
Tap Done to save your changes. If you’d like to edit the colors and lighting effects, continue with this method.
-
8
Tap the edit button. It’s at the bottom of the screen (the one with sliders and knobs). This opens the lighting and color options.
-
9
Adjust the lighting and color. Use the sliders to adjust the lighting and color of the screenshot if desired.
- Slide the “Light” slider left to make the image darker, or right to increase its brightness.
- Slide the “Color” slider left to decrease the intensity of the colors, or right to make the colors very saturated.
-
10
Tap Save when you’re finished. If you didn’t make any changes (or don’t want to save them), tap the X at the top-left corner, and tap Discard if prompted.
Advertisement
-
1
Press and hold the Volume Down and Power buttons simultaneously. After 1-2 seconds the screen will flash indicated a screenshot was taken. The image will be saved to your gallery.
- The key combination may vary depending on your phone or tablet. On some Android models, you’ll have to hold the Home and Power buttons.
- If you use Google Photos on your Galaxy, see this method instead.
- If you only need to crop or draw on your screenshot, you may be able to do this immediately after you take the screenshot on Android. Simply click the pencil icon on the preview of the screenshot to draw on it or the crop symbol to change the size of the screenshot before you save it.
-
2
Open the Gallery app. The icon usually has a yellow flower, and you’ll find it in the app drawer.
- If you see a preview of the screenshot right after you take it, you can tap it to open it in the editor without having to open the Gallery.
-
3
Tap the screenshot to open it. Several options will appear along the bottom of the screen.
- The remaining settings will vary depending on your version of the Gallery app, as well as which model of Galaxy you own.
-
4
Tap Edit (the pencil icon) or the icon with three-bars. The option you see will look different depending on your version.[3]
- If you already see some editing tools at the bottom of the screen, you won’t need to complete this step.
-
5
Crop the screenshot. Tap the crop icon (a square with two longer lines at two of its corners) at the bottom of the screen, or the Adjustment option. Drag the box to surround only the part of the screenshot you want to keep, and then tap SAVE or the check mark.[4]
-
6
Rotate the screenshot. To do this, tap the ⁝ menu at the top-right corner, then select Rotate Left or Rotate Right as needed.
-
7
Make additional edits as needed. The remaining options vary by model, but you’ll usually find options to choose a filter (usually under Effect), adjust colors (often called Tone), and draw on the image using a tool called Drawing.
-
8
Tap SAVE when you’re finished editing. This saves the changes to your screenshot.
Advertisement
-
1
Press the Home and Power buttons simultaneously to take a screenshot. The screen will flash briefly and a preview of the screenshot will appear at the bottom-left corner of the screen.
- If your iPhone doesn’t have a Home button, you can take a screenshot by pressing the Power and Volume-Up buttons.
-
2
Tap the screenshot preview. It’s the small image at the bottom-left corner. This opens the screenshot in the Markup tool, which displays several editing icons at the bottom.
- The preview will only stay at the bottom-left corner for a few seconds before disappearing. If it disappears before you tap it, follow these steps to open it in the Markup tool:[5]
- Open the Photos app.
- Tap the screenshot.
- Tap Edit at the top-right corner.
- Tap the three dots icon.
- Tap Markup (the icon of a marker at the bottom).
- The preview will only stay at the bottom-left corner for a few seconds before disappearing. If it disappears before you tap it, follow these steps to open it in the Markup tool:[5]
-
3
Drag the blue borders to crop the screenshot. Drag the blue lines to surround only the part of the screenshot you want to save, if desired.
-
4
Draw on the screenshot. Here’s how:
- Tap one of the drawing tools (the marker, highlighter, and pencil icons at the bottom-left corner) to select it.
- Tap the tool again to choose a line width and weight.
- Tap the filled-in circle to select a color.
- Use your finger to draw on or highlight certain areas.
- Tap the drawing tool you select at the bottom-left corner to return to the tools list.
- If you made a mistake in your drawing, tap the pencil eraser tool at the bottom and then tap the error to delete it.
-
5
Tap the Text tool to type on the photo. If you don’t see the “T” at the bottom of the screen, tap the + at the bottom-right corner to expand more options, and then tap Text.
- Tap the filled-in circle to choose a text color.
- Tap aA icon to choose a font face, size, and alignment.
-
6
Add shapes to the screenshot. Tap the + at the bottom-right corner, then tap the square, circle, chat bubble, or arrow to add these shapes to the screenshot.
- Use the filled-in circle at the bottom to select a color.
-
7
Add your signature. If you need to sign the screenshot, here’s how you can do that:
- Tap the + at the bottom-right corner
- Tap Signature.
- Use your finger to sign your name at the bottom (or select your signature if you’ve already created one).
- Tap Done at the top.
- If your signature doesn’t appear, tap Signature again, then tap your signature to place it.
- Drag your signature to the desired position.
-
8
Use the magnifying glass. If you’d like to increase the size of one area of the screenshot, tap the + and select Magnifier. You can then use your fingers to position or change the size of the enlarged area.
-
9
Tap Done when you’re finished editing. It’s at the top of the screen. A menu will expand at the bottom.
-
10
Tap Save to Photos. This saves the screenshot to the Photos app.
Advertisement
-
1
Press the Home and Power buttons simultaneously to take a screenshot. The screen will flash briefly and a preview of the screenshot will appear at the bottom-left corner of the screen.
- If your iPhone doesn’t have a Home button, you can take a screenshot by pressing the Power and Volume-Up buttons.
-
2
Open the Photos app. Your screenshot is saved to this location by default.
-
3
Tap the screenshot to open it.
-
4
Tap the “Edit” button. This button is located in the upper right corner of the screenshot and will bring up a variety of editing tools.
-
5
Tap the Magic Wand icon to make auto changes. This button is in the upper right corner of the screen and will automatically make color and lightning adjustments to the screenshot.
-
6
Tap the Dial icon to adjust color, light, and balance. This button appears in the bottom toolbar and will bring up 3 menus: “Light”, “Color”, and “B&W”.
- Each category will have a submenu with a number of options that can be adjusted with a slider.
-
7
Tap the “Filter” icon to add artistic filters. This icon is represented by 3 overlapping circles and is located on the bottom toolbar.
- Filters like Mono, Tonal, and Noir will add a black and white stylized filter.
- Filters like Fade or Instant will give the screenshot a washed out, retro look.
-
8
Tap the “Rotation Icon” to crop, zoom, or rotate the screenshot. This icon is located on the right of the bottom toolbar.
- Tap and drag the corners of the picture space to crop the picture.
- Adjust the slider to manually rotate the photo or press the “Rotate” icon (square with a curved arrow) to automatically rotate 90 degrees.
- Reverse pinch the photo to zoom.
-
9
Tap “Done” to keep your changes. This button appears in the lower right corner after changes have been made.
- You can undo your changes by tapping “Cancel” in the lower left corner and selecting “Discard Changes”.
- You can undo changes after saving by selecting “Revert” which appears in place of the “Done” button.
Advertisement
-
1
Type “Snipping Tool” into the search bar. You can usually open the search bar by clicking the circle or magnifying glass to the right of the Start menu.
- Microsoft plans to discontinue the Snipping Tool in a future release. This tool will be replaced by Windows Snip and Sketch.
-
2
Click Snipping Tool in the search results.
-
3
Click New. It’s at the top-left corner of the window. The screen will appear slightly faded and mouse cursor will change to a selection tool.
-
4
Click and drag the mouse to select the area you want to screenshot. When you release the cursor, the image will be captured and open in the Snipping Tool.
-
5
Click the pen to if you want to draw on the screenshot. It’s at the top of the tool. You can use this to write simple notes or circle areas of interest.
- To select a color, click the small arrow next to the icon, then choose a color.
-
6
Click the highlighter tool to highlight parts of the screenshot. You can then click and drag the tool to highlight text.
-
7
Click the eraser tool to remove changes. With the eraser tool selected, click a pen or highlighter marked to remove it.
-
8
Click File menu when you’re ready to save. It’s at the top-left corner of the tool.
-
9
Click Save As.
-
10
Type a name for your screenshot and click Save. This saves your edited screenshot.
Advertisement
-
1
Open Snip & Sketch. Snip & Sketch will be replacing the Snipping Tool as the default screenshot tool.
- If you have the app installed, type snip into the Windows search bar, then click Snip & Sketch in the search results.
- If you don’t have the app, you can install it now for free from the Microsoft Store.
- You must have the most up-to-date version of Windows to use Snip & Sketch.
-
2
Click New. It’s at the top-left corner of the tool if the window is expanded, or the bottom-left corner if the window is smaller. [6]
-
3
Take a screenshot. Choose one of these three options:
- To capture a square or rectangular area of the screen, click the rectangle with a dot at the top-center part of the tool, then draw a square around the desired area.
- To draw a freehand line around the area you want to capture, click the curved line shape with a dot (the second icon in the bar at the top), and then trace around the area you want to capture.
- To capture the entire screen, just click the rectangle with darkened corners (the third icon in bar at the top).
-
4
Use the drawing tools. Click the pen, pencil, or highlighter tool near the top-center part of Snip & Sketch to select a drawing tool, then tap the tool again to select a color and line weight. Use the mouse to draw on the image.[7]
-
5
Crop the screenshot. Click the crop symbol (the square with a diagonal line in the row at the top-center part of the screen), then draw a box around the area you want to keep. Click the check mark at the top-right corner to crop.
-
6
Click the disk to save your w.ork It’s near the top-right corner. This opens the Save As dialog, where you can choose a new location and filename for your screenshot and then click Save.
Advertisement
-
1
Press ⎙ PrtScr on your keyboard. This key will copy the contents of your screen to your clipboard.
- If your keyboard doesn’t have this key, you can use the one on the on-screen keyboard. Here’s how:
- Click the circle or magnifying glass to the right of the Start menu to open the search bar.
- Type on screen keyboard, and then click On-Screen Keyboard in the search results.
- Click the PrtScn key.
- If your keyboard doesn’t have this key, you can use the one on the on-screen keyboard. Here’s how:
-
2
Press ⊞ Win+R and type “mspaint” into the text field that appears. The Windows Run tool will launch Microsoft Paint upon pressing “OK”.
-
3
Press Ctrl+V to paste your screenshot into paint.
- You can also paste by right-clicking the paint area and selecting «Paste».
-
4
Click «Rotate» and select a rotation option. This button is located in the “Image” section of the toolbar and will open a menu to with different rotation options, such as vertical, horizontal, or 90 degree rotation.
-
5
Click «Resize» to change the image size. This button is located in the «Image» section of the toolbar and will open a window to set a new window size. Enter a new size value (e.g. 200% size) and press “OK”.
- You can select to adjust the size by pixel or percentage. Use pixel adjustments if you need a more precise change.
- Changing the size to be larger than the original will result in a loss of picture quality.
-
6
Crop your screenshot. Click the «Select» option from “Image” section of the toolbar. Click and drag to select the area of the screenshot you want to use then click the «Crop» button the right of the “Select” tool.
-
7
Click the “A” button to add text to your screenshot. This button is located in the tools section on the toolbar. Click and drag to select a text area and type to enter your desired text.[8]
-
8
Click the brush icon or select a shape to make markings on the screenshot. Both options can be selected from the “Shapes” section. Brushes can be used for freehand marking and shapes will make markings in the shape selected.
- You can change the color of the shapes and markers by selecting a color palette from the “Color” section.
-
9
Open the “File” menu and select “Save As” to save your changes. You will be prompted to name the screenshot and browse for a save location. Clicking “Save” will confirm your changes.
Advertisement
-
1
Press ⇧ Shift+⌘ Command+3 to take a screenshot. A screenshot will be taken of your current screen and saved to your desktop.
- If you’d like to capture a single window, press ⇧ Shift+⌘ Command+4, press the space bar, then click the window you want to capture.[9]
- To take a screenshot of a certain part of the screen, press ⇧ Shift+⌘ Command+4, and then click and drag the mouse to select the desired part of the screen.
- If you’d like to capture a single window, press ⇧ Shift+⌘ Command+4, press the space bar, then click the window you want to capture.[9]
-
2
Double-click the new file on your desktop. It’s the new image file that contains date and time you took the screenshot.
- If your images open with a different app, press ⌘ Command as you click the file, select Open With and choose Preview.
-
3
Rotate the image. You can click the rotate button (the rectangle with a curved arrow near the top of Preview) to rotate the image 90 degrees.
-
4
Adjust the size of the image. Click the Tools menu at the top of the screen, and then select Adjust Size. This allows you to change the height, width, and resolution as needed.
-
5
Crop the screenshot. If you want to save just part of the screenshot, click the selection tool (the dotted box near the top-left corner), and then click and drag the area you want to keep. Once selected, click the Tools menu at the top of the screen, and then Crop to cut out everything but the selected area.
-
6
Adjust the colors and brightness. If you want to get crafty, click the Tools menu and select Adjust Color. You can use the sliders to adjust the exposure, contrast, highlights, shadows, saturation, temperature, tint, and sharpness.
- Your screenshot will reflect your changes as you make them, allowing you to experiment and find the right mix of settings.
- Exposure, contrast, highlights, and shadows will affect the brightness and black/white balance of the colors.
- Saturation, temperature, and tint will affect the intensity of the colors.
-
7
Add text, shapes, and drawings.[10]
- Click the A button near the top-right corner to open the text tool, and then click anywhere on the screenshot to type.
- Click the pen tool to draw.
- Click the icon of a square and rectangle to insert shapes like triangles and circles.
-
8
Click the File menu when you’re finished. It’s at the top-left corner of the screen.
-
9
Click Save.
-
10
Enter a file name and click Save. Your edited screenshot is now saved.
Advertisement
Ask a Question
200 characters left
Include your email address to get a message when this question is answered.
Submit
Advertisement
Thanks for submitting a tip for review!
About This Article
Article SummaryX
1. Take the screenshot.
2. Open Google Photos.
3. Tap the screenshot.
4. Tap the edit button.
5. Use filters and tools.
6. Tap Done.
Did this summary help you?
Thanks to all authors for creating a page that has been read 192,857 times.
Is this article up to date?
Мы все делаем скриншоты на наших телефонах, чтобы сохранить какие-то воспоминания или что-то быстро сохранить. Иногда нам также нужно мгновенно поделиться этими скриншотами с другими и что-то добавить к ним. В таком сценарии мы должны знать приемы добавления вещей на скриншоты, включая текст, аннотации, а также их обрезку. Итак, сегодня я делюсь несколькими способами редактирования скриншотов на Android. Читать дальше!
Также читайте | 5 различных трюков, чтобы сделать снимок экрана на любом Android-смартфоне
Вы можете редактировать снимки экрана на своем телефоне двумя способами: либо через встроенное приложение «Галерея», либо через сторонний фоторедактор. Например, вы, возможно, уже знаете, что Google Фото предлагает отличные возможности редактирования, а также есть некоторые другие приложения, которые предлагают эту функцию. Давайте познакомимся с ними подробно.
1. Использование встроенного редактора
На телефонах Android есть несколько приложений Галереи по умолчанию, которые предлагают инструменты для редактирования фотографий. Поэтому, когда мы делаем снимок экрана, он показывает вариант редактирования, и, нажав на него, вы попадете на страницу редактирования. Там вы можете добавить текст, обрезать его или отметить что-то в нем.
Здесь мы используем стандартный телефон Android, поэтому мы покажем, как вы можете редактировать скриншот в приложении по умолчанию, например, в Google Фото:
1. Сделайте снимок экрана на стандартном телефоне Android, используя ярлык: одновременно нажмите кнопку питания и кнопку уменьшения громкости.
2. Когда он будет захвачен, вы увидите три варианта: Редактировать, удалять и делиться.
3. Нажмите «Изменить», и вы попадете в редактор Google Фото. Кроме того, вы можете открыть фотографию в Фото и нажать на Редактировать оттуда.
4. Там, на нижней панели инструментов, вы увидите различные параметры редактирования, такие как: Настройка, обрезка и многое другое.
5. Нажмите «Еще», чтобы просмотреть наиболее часто используемые параметры, такие как Разметка, Добавление текстатак далее.
Вот как вы можете обрезать, редактировать или добавлять текст к снимку экрана с помощью Google Фото на Android.
Также читайте | Как создавать фильмы с вашими фотографиями с помощью Google Фото
2. Приложение iMarkup
Это стороннее приложение, которое вы можете загрузить из Play Store, чтобы редактировать свои скриншоты, а также другие изображения. Вот как использовать это приложение:
1. Загрузите и установите приложение iMarkup на свой телефон Android.
Скачать iMarkup
2. Теперь откройте приложение и нажмите «Импортировать фотографию, чтобы начать отмечать».
3. Разрешите разрешение на хранение, а затем выберите снимок экрана, который вы хотите отредактировать.
4. Теперь вы увидите несколько вариантов внизу. панель инструментов для редактирования фотографии, например «Текст», «Обрезка», «Наклейка», «Рисование» и т. д.
5. Нажмите на любую опцию и начните добавлять вещи. Интересной особенностью этого приложения является «Мозаика», которая может размыть часть изображения.
Когда вы закончите добавлять вещи, нажмите на галочку в нижнем углу, и все. Ваш отредактированный снимок экрана будет сохранен, и вы сможете поделиться им с другими.
3. Добавьте текстовое приложение
Это еще одно приложение, которое позволяет редактировать скриншоты на вашем телефоне. Кроме того, это приложение не только предлагает добавить текст с несколькими доступными классными шрифтами, но также имеет некоторые дополнительные функции. Вот как использовать приложение:
1. Загрузите и установите приложение на свой телефон.
Скачать Добавить текст
2. Откройте приложение и разрешите доступ к хранилищу.
3. На экране приветствия нажмите «Галерея» или выберите фотографию, отображаемую на главном экране.
4. После этого фотография откроется в редакторе, и вы увидите множество опций, таких как «Добавить текст», «Фото», «Форма», «Наклейка», «Форма», «Заменить фон», «Эффекты» и т. д.
5. Нажмите на любую опцию, чтобы начать добавление. Когда вы закончите редактирование, нажмите на стрелку в правом верхнем углу, а затем нажмите «Сохранить изображение».
Это приложение предлагает несколько замечательных инструментов, таких как замена фона, эффекты, изменение размера, поворот и т. д. Вы также можете поделиться отредактированной фотографией непосредственно в таких приложениях, как WhatsApp, Instagram и т. д.
Итак, это были способы редактирования скриншотов на Android. Вы можете использовать любое стороннее приложение для лучшего и большего количества функций редактирования фотографий и других таких советов, следите за обновлениями с нами!
Редактирование скриншотов

После того, как вы сохраняете скриншот онлайн, сервис PasteNow.ru на некоторое время запоминает вас в
качестве владельца скриншота. Длительность этого периода зависит от того, как часто вы посещаете наш
сайт (при этом период продлевается) и от настроек вашего браузера (см. подробнее про
Cookies).
В течение этого времени, пока сайт вас помнит, вы можете удалить скриншот, изменить его название или
отредактировать изображение – все эти опции доступны на странице просмотра скриншота, куда вы
попадаете сразу после его сохранения:

Обратите внимание: для пользователя, не являющегося владельцем скриншота, эти опции будут недоступны
и не будут отображаться.
Изменение названия скриншота
Каждому скриншоту при его сохранении автоматически присваивается название, которое будет отображаться на
странице просмотра скриншота. При желании его можно изменить. Для этого:
-
Нажмите иконку справа от названия
скриншота; - На месте названия появится текстовое поле для его редактирования; введите новое название;
-
С помощью клавиши Enter на клавиатуре или кликнув на иконку
сохраните новое название.
 справа от названия
Удаление скриншота
Для удаления скриншота нужно нажать кнопку «Удалить скриншот».
Важно: скриншот будет удалён полностью, окончательно и бесповоротно (возможно, в будущем в сервисе
появится возможность восстановить ранее удалённые скриншоты).
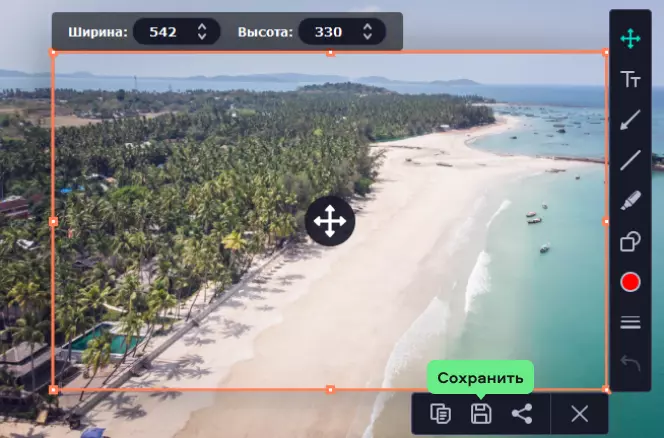
Редактирование скриншота
Для изменения изображения сохранённого скриншота нужно прейти в специальный редактор, нажав кнопку
«Редактировать скриншот».
В редакторе вы увидите ваш скриншот в центре и три основных панели:
-
В верхней панели расположена ссылка для возврата на страницу просмотра скриншота, а
также опции для изменения названия скриншота и для его удаления (они работают также, как описано
выше). -
Правая панель используется для изменения масштаба просмотра редактируемого
изображения. Также вы можете изменить масштаб с помощью колеса мыши. Важно: здесь речь идёт
исключительно о масштабе, в котором вы будете видеть скриншот в редакторе; это никак не связано с
реальными размерами изображения. -
Левая панель состоит из двух частей:
-
Кнопка «Сохранить изменения» . Она станет
доступной для нажатия, когда вы внесёте какое-нибудь изменение в изображение.
Важно: после того, как вы внесёте необходимые изменения в изображение,
необходимо нажать эту кнопку прежде, чем покинуть страницу редактора. В ином случае все ваши
изменения будут утеряны! -
Набор инструментов непосредственно для редактирования скриншота. Далее более подробно о
каждом инструменте.
-
Кнопка «Сохранить изменения»
 . Она станет
Инструмент: Отмена изменений


Первая кнопка отменяет все изменения, внесённые в изображение; Вторая – одно последнее
изменение.
Отмена изменений после нажатия кнопки «Сохранить изменения» невозможна.
Инструмент: Обрезать изображение

Позволяет обозначить на скриншоте область, содержащую то, что вы хотите показать кому-либо, и удалить
остальную часть изображения вокруг этой области.
Как использовать: после включения инструмента (т.е. после нажатия на него) нужно растянуть рамку обрезки
до желаемого размера (нажать левую кнопку мыши на изображении и, не отпуская, сдвинуть указатель до
нужного положения, затем отпустить). После растягивания рамки её можно скорректировать, перетягивая за
чёрные точки по краям.
Для выключения инструмента нужно кликнуть по любому месту вне выделенной области (также любой инструмент
можно выключить кнопкой Esc на клавиатуре).
Инструмент: Закрашенный прямоугольник

Закрашивает указанную прямоугольную область сплошным цветом (см. инструмент
цвет).
Для указания области растяните её мышкой. После появления закрашенного прямоугольника инструмент не
выключается, и вы можете нарисовать ещё несколько таких же прямоугольников.
Для выключения инструмента кликните мышкой в любое место на странице.
Инструмент: Рамка

Создаёт тонкую прямоугольную рамку. Работает полностью аналогично закрашенному прямоугольнику.
Инструмент: Карандаш

Позволяет нарисовать произвольную линию текущим цветом (см. инструмент цвет).
Включите инструмент, нажмите левую кнопку мыши на изображении и, не отпуская, начинайте двигать мышь.
Одиночный клик по изображению нарисует круглую точку.
Поэтому для выключения инструмента нужно кликнуть куда-нибудь вне изображения, нажать Esc или выбрать
другой инструмент.
Инструмент: Линия

Рисует тонкую прямую линию (отрезок) текущим цветом (см. инструмент цвет).
Просто растяните её мышкой, аналогично прямоугольникам.
Инструмент: Стрелка

Работает аналогично линии, но на конце появляется небольшая стрелка.
Инструмент: Надпись

Позволяет разместить текст поверх изображения.
Включите инструмент, затем нажмите мышкой на изображении в том месте, где будет левый край надписи. В
появившейся рамке введите текст.
Подтвердить ввод можно кликнув мышкой вне текстовой области, либо клавишей Enter на клавиатуре. Клавишей
Esc можно отменить создание надписи.
До подтверждения надпись также можно переместить путём перетягивания за чёрную точку в верхнем левом
углу рамки для ввода текста.
Инструмент: Цензура (Пикселизация)

Позволяет замаскировать указанную область, сделать её нечитаемой.
Просто включите инструмент и растяните рамку для обозначения области.
Инструмент: Выбор цвета

Позволяет выбрать текущий цвет, который будет использоваться при рисовании фигур инструментами закрашенный прямоугольник, рамка, карандаш, линия, стрелка
и надпись.
Просто нажмите на инструмент и выберите другой цвет в появившемся окошке с вариантами цветов. Другие
цвета и оттенки, не представленные в этом окошке, недоступны.
Текущий цвет можно переключить во время использования других инструментов.