Меняем текстовое содержимое элемента
Мы нашли нужный элемент и вывели в консоль его текстовое содержимое. Но для нашей задачи это содержимое нужно изменить. Как это сделать? Присвоим свойству textContent новое значение.
Возьмём абзац с текстом:
И перезапишем его текстовое содержимое:
Обратите внимание, что строки с текстом нужно заключать в кавычки.
Когда инструкция выполнится, текст внутри абзаца изменится:
Когда мы присваиваем свойству textContent новое значение, оно полностью заменяет собой старое. Как и в случае с переключением классов, JavaScript не влияет на исходную разметку, а меняет текст прямо в браузере пользователя.
Свойство textContent предназначено только для текста, если записать туда HTML-теги, браузер их не поймёт.
Как быстро редактировать текст на странице с помощью консоли разработчика Chrome

При работе с контентом на сайте часто требуется вносить изменения или править различные текстовые блоки прямо на странице. В большинстве случаев это можно сделать через выделение элемента и правку в коде.
Однако существует специальная команда document.designMode = ‘on’ которая позволяет окно браузера с содержимым страницы с легкостью превратить в текстовый редактор.
That feeling when you first discovered `document.designMode` pic.twitter.com/bxA1otzCjN
— Tomek Sułkowski (@sulco) September 27, 2019
Для вызова команды вам потребуется произвести несколько несложных действий:
- Откройте на нужной странице консоль администратора (вызывается нажатием клавиши F12 или Ctrl+Shift+I);
- В появившемся окне выберите вкладку консоль;
- Укажите команду document.designMode = ‘on’ ;
- Далее нажмите Enter и приступайте к изменению контента на странице — установите курсор в нужном фрагменте текста и вносите любые правки.

Обратите внимание, что все изменения локальны и видны только вам. При перезагрузке страницы они исчезнут.
Для чего будет полезна команда:
- изменять тексты и подменять данные на сайте;
- тестировать различные текстовые блоки и элементы — заголовки, лид-параграфы, абзацы, врезки, сноски;
- проверять различные форматы написания текста и быстро принимать решения;
- быстро править тексты и отправлять скриншоты заинтересованным участникам — разработчикам, копирайтерам или дизайнерам;
- создавать фейковые скриншоты с содержимым страницы.
Если вам интересно узнать больше о возможностях консоли администратора Chrome, то рекомендую посмотреть запись Chrome Dev Summit 2016.
Хотите еще больше похожих выступлений? Посетите официальную страницу саммита. Здесь вы найдете ссылки на записи других выступлений за все предыдущие года.
Надеюсь, материал оказался полезным. Обязательно пишите ваши комментарии или делитесь ссылкой на статью с коллегами и друзьями.
Как пользоваться вкладкой Elements
Инструменты разработчика в браузерах очень мощные. Они помогут отредактировать страницу прямо в браузере, даже не особо зная, что такое HTML. Можно заменять текст, картинки, передвигать целые блоки на лету, т.е. прямо в браузере, не сохраняя никаких файлов. Правда, эти изменения носят временный характер: при обновлении страницы изменения пропадают.
Инструменты отлично подходят, когда хочется “попробовать, как это выглядит”.
В этой статье мы пользуемся браузером Google Chrome, но в других браузерах всё работает схожим образом.
Поменять текст
Чтобы заменить любой текст на странице, достаточно кликнуть правой клавишей мыши по нужному тексту и выбрать “Просмотреть код”. Откроется код этого элемента, где вы сразу увидите нужный текст. Кликните по нему дважды, чтобы заменить. При нажатии на Enter вы увидите, что текст поменялся и на странице.
Попробуйте повторить приём ниже. Где пробовать.
Поменять картинку
Чтобы заменить картинку, нужно найти её путь: обычно это какая-то длинная ссылка внутри элемента с названием img. Довольно просто, ничем не отличается от смены текста.
В примере ниже мы задумали у второго урока поставить такую же картинку, как у первого. Попробуйте повторить приём ниже. Где пробовать.
Обратите внимание на прикольную фичу: при наведении на ссылку Chrome показывает миниатюрку картинки, которая лежит по этой ссылке. Мелочь, а приятно.
Найти блок вёрстки
Весь HTML устроен иерархически: большие элементы на странице складываются из элементов поменьше, а те, в свою очередь, тоже делятся на части и так пока не дойдёт дело до самых простых элементов на странице — текста, картинок и прямоугольников. Например, на странице Энциклопедии Девмана есть строка, в которой лежит 3 списка из рубрик энциклопедии.
Видно, что они “вложены” в строку — при желании их можно “свернуть”:
При наведении на строчки элементы на странице будут выделяться синим. Чтобы выделить весь элемент поднимайтесь “наверх” по коду, пока он не выделится целиком. Если выделилось слишком много, то вы поднялись слишком высоко, теперь спускайтесь обратно. Перемещайтесь по элементам, пока не найдете нужный.
Найденный элемент можно отредактировать прямо в браузере, выбрав в контекстном меню Edit as HTML . Правда, в файл изменения не попадут. Ещё можно разом скопировать весь блок с вложенными в него элементами или даже удалить их все. О том как это сделать читайте ниже.
С инструментами разработчика любой блок на странице сайта найти проще простого, но вот повторить трюк с текстовым редактором и HTML файлом будет куда сложнее. Ориентируйтесь по названию тега, его классам и его родителям. Например:
С помощью инструментов разработчика вы поняли, что вам нужен элемент <div js-article-content»> . Значит в файле надо искать тег div с классами row и js-article-content и с родителями body и article . Задача сильно упростится, если в редакторе свернуть часть кода, в англоязычном интерфейсе этот приём называется code folding .
Помните, что на странице может быть много одинаковых с виду элементов, с одинаковым тегом и классами. Ориентируйтесь прежде всего на родителей — внутри каких элементов он находится. Начинайте поиск с тега <body> — этот элемент на странице всегда один и находится на самом верху.
В коде теги ищут по их родителям
Скопировать элемент
Если вы уже нашли элемент через инструменты разработчика, то кликните по нему правой кнопкой мыши и в выпадающем меню выберите Copy outerHTML . HTML разметка скопирована в буфер обмена, теперь можете вставить её в текстовый редактор.
Удалить элемент
Чтобы удалить элемент, нужно так же кликнуть по нему правой кнопкой мыши и выбрать “Просмотреть код”. Далее выберите его целиком. Когда вы выберете нужный элемент — жмите Delete .
В этой гифке мы задумали удалить вторую статью “Как установить Python”. Попробуйте повторить приём ниже. Где пробовать.
В гифке видно, как мы “поднимаемся” наверх, выделяя всё больше. Как только “поднялись” достаточно — свернули всё, что внутри с помощью “стрелочки” слева. Стало видно, что некие li — это элементы списка (на самом деле это list item), а в некоем ul лежит весь список (это unordered list).
Попробуйте бесплатные уроки по Python
Получите крутое код-ревью от практикующих программистов с разбором ошибок и рекомендациями, на что обратить внимание — бесплатно.

3 февраля, 2023 в 1:41 дп
Добрый день! Задался вопросом, как редактировать текст на сайте в режиме онлайн. То есть, чтобы не лазить в код и прочее. Наверное, отличная штука для предварительного просмотра и внесения изменений. Кто знает – как это лучше всего сделать (быстро и просто). Заранее благодарен.
Известно несколько приемов редактирования текстов и других элементов на любом сайте в режиме онлайн. Ниже подробно опишу все популярные и рабочие способы, как это сделать быстро и без напряга, в том числе через код элемента в Google Chrome.
Консоль разработчика (через «Просмотреть код») в Google Chrome
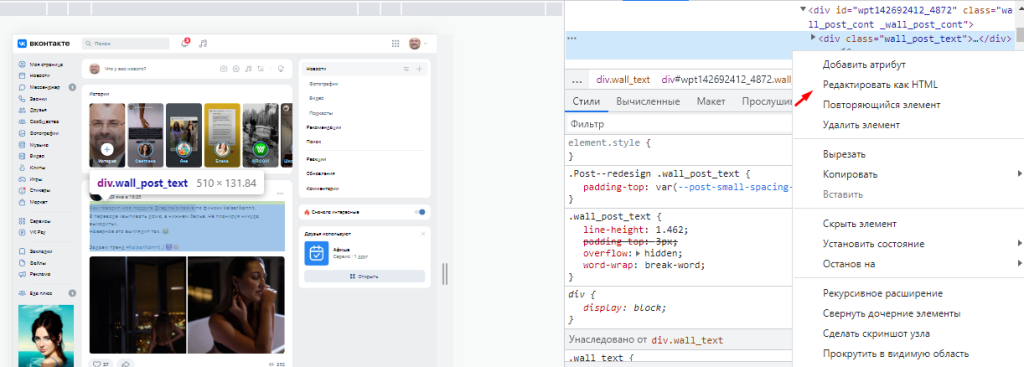
Это самый простой и быстрый способ. Просто выделяете любой текст или его часть, которую хотите редактировать. Затем жмете правую кнопку мыши и выбираете «Просмотреть код».

Откроется блок в правой части страницы, в который можно вносить изменения. Кликаете правой клавишей мыши на выделенный фрагмент и выбираете «Редактировать как HTML».
Рассмотрим на примере. Допустим, вы зашли в группу «Барахолка». Увидели пост о продаже автомобиля «Газель» с ценой и прочими характеристиками.

Ради шутки внесли изменения. Взяли и поменяли стоимость на 16 р – потом сделали скрин и отправили другу, который ищет такую машину по дешевой цене.

Таким же способом вы сможете изменять все элементы на любом сайте.
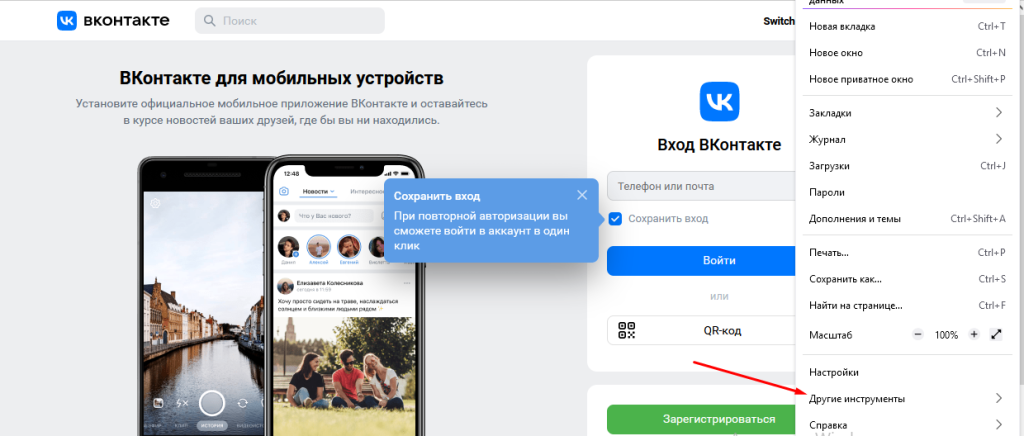
Firefox и инструменты веб-разработчика
Если вы работаете в Firefox, то можете аналогичным способом редактировать контент на любой web-page в пару кликов.
Пошаговая инструкция:
1. Откройте браузер и конкретную страницу.
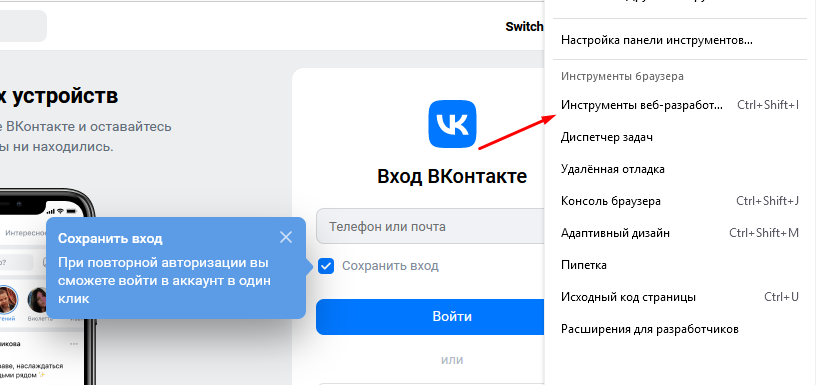
2. Кликните на три линии наверху и выберите «Другие инструменты» в раскрывшемся окне.
3. Нажмите «Инструменты веб-разработчика».
4. Это должно открыть специальную панель в нижней части окна браузера для просмотра исходного кода страницы и редактирования текста или других элементов.
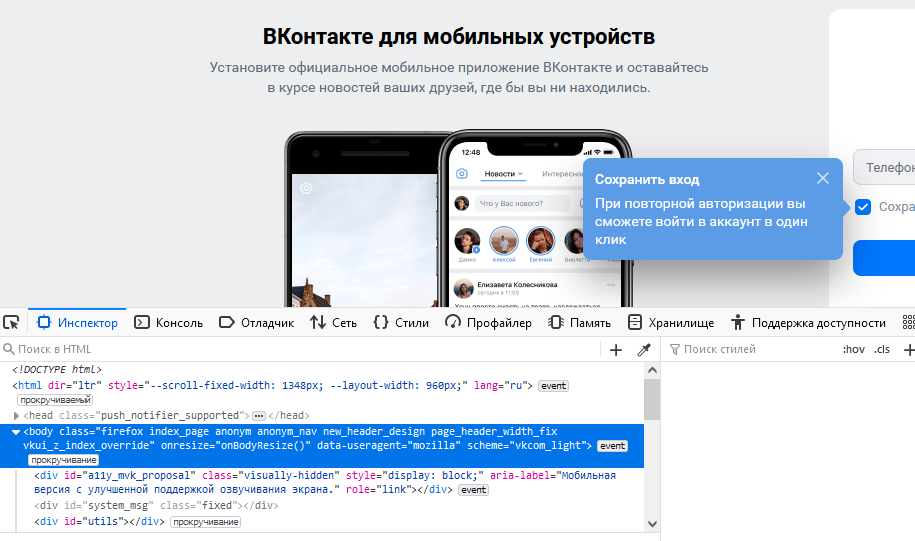
5. Активируйте курсор слева в панели. Используйте его, чтобы выделять элементы, которые надо редактировать.

6. Приступайте к редактированию элементов.
Когда внесете все необходимые изменения, то кликните в любом пустом месте экрана и закройте инспектор панели.
Inspect Element (расширение для Google Chrome)
Есть такой инструмент для временного редактирования элементов на сайте, который поддерживается большинством web-браузеров, – называется Inspect Element. Широко используется разработчиками, дизайнерами и другие специалистами для тестирования web-ресурса, без рисков что-то сломать в верстке. Ниже подробно расскажу, что такое Inspect и как его использовать для временного редактирования кода.
Inspect Element – это отдельное расширение от Google Chrome. Позволяет видеть и редактировать коды HTML, Javascript и CSS конкретного сайта. Например, легко изменять цвета, шрифты и многое другое. Установить его можно из магазина Хрома по этой ссылке.
Разработчики чаще всего используют Inspect для временного редактирования кода. Это полезно, потому что можно сразу тестить изменения в своем браузере в рамках одного сеанса. Это означает, что получится определить причины практически любых ошибок в коде, не рискуя нарушить функциональность сайта или вызвать дополнительные проблемы.
Как работать в Inspect
Подробная инструкция по работе:
- Установите расширение с официальной страницы.
- Перейдите на сайт, который хотите редактировать.
- Кликните на расширения и выберите Inspect.

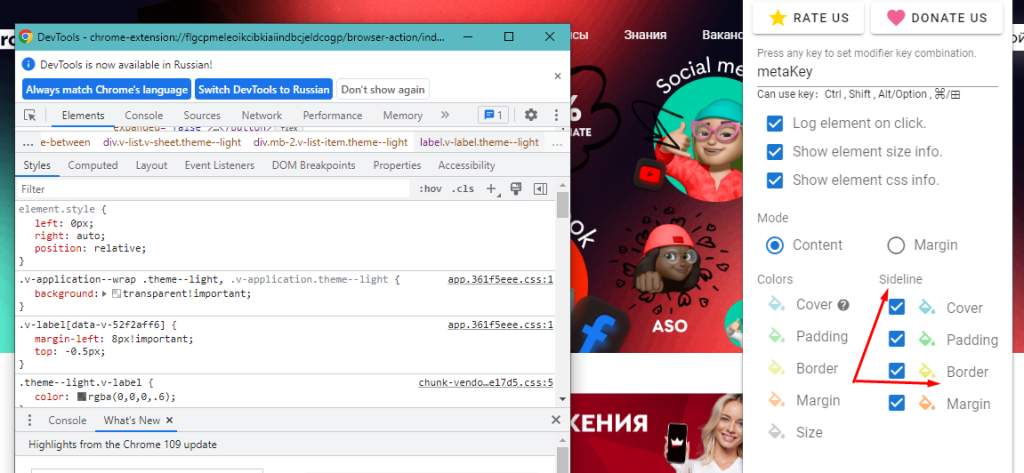
- Щелкните на тот элемент, который хотите изменить в режиме онлайн. Например, выбрав Border Sideline.
Кто и для чего может использовать изменение содержимого страницы через код элемента?
Этот инструмент можно использовать для разных задач, поэтому он облюбован специалистами различных сфер деятельности. Кому же он приглянулся?
- Web-дизайнеры. Они могут использовать инструменты разработчика перед реализацией цветовых элементов, общего дизайна или макетов, установкой адаптивной верстки – короче, для предварительного анализа. Например, внести какие-то изменения, сделать скрин и отправить заказчику. Если последнему понравится, то приступают уже к настоящим изменениям.
- Маркетологи. Они применяют инструмент для принятия конкретных маркетинговых решений. Например, анализируют с помощью этого инструмента сайт конкурента, чтобы протестить элементы, которые могут увеличить конверсию.
- Разработчики. Быстро проверяют изменения, которые необходимо внести.

5 февраля, 2023 в 2:14 дп
Всем привет. Провести изменения можно на любом сайте независимо от движка, просто кликаем правой кнопкой мыши на выделенном элементе и переходим в код. При этом можно править не только текст, но и картинки. В принципе можно провести полную замену исходного кода. Это простая и крутая штука, но требуются хотя бы минимальные знания в CSS/Html.
- Ответ изменён 5 дней, 15 часов назад пользователем
 Devaka-ne-rabotaet.

5 февраля, 2023 в 2:28 дп
Не совсем разделяю вышеописанный метод, поскольку работать через код – не самый удобный вариант. Лично сам пользуюсь консолью для разработчиков от Гугла. Функциональный редактор, который позволяет быстро редактировать содержимое на сайте.
Чтобы проще понять суть, расскажу алгоритм действий:
- На интересующем сайте вызвать консоль админа. Для этого нужно нажать F12.
- В открывшемся окне выбрать вкладку Console.
- В нижнем поле прописать следующий код – «document.desighnMode = ‘on’».
- После этого наводим мышкой на любой элемент и проводим необходимые изменения.
В таком формате можно менять практически все: шрифты, цвет, контент, проверять формы написания. Именно таким методом пользуются мошенники, когда делают скрины с отредактированной фейковой информацией.

6 февраля, 2023 в 2:55 дп
Зачем усложнять себе жизнь какими-то условными обозначениями или знанием языков программирования в поисках нужного куска в коде. Можно жить проще:
- на странице выделить необходимый элемент
- нажать правую клавишу мышки и выбрать опцию «посмотреть код»
- далее будет представлен интересующий фрагмент
- еперь можно править все, что пожелается
- Конечное же, после перезагрузки страницы все изменения исчезнут. Это удобный и быстрый вариант для проверки шрифтов или других нововведений на сайте.

6 февраля, 2023 в 2:56 дп
В силу своей работы всегда допиливаю страницы. При этом требуется замена шрифтов, картинок, цвета и самого текстового контента, соответственно, смена элементов через код мне близка как никому. По поводу вариантов, указанных выше, могу сказать, что они рабочие и имеют право на существование, здесь уже кому как удобнее.
Для мелких корректировок я просто выделяю нужный элемент и провожу правку через правую кнопку мыши. Что касается более глобальных изменений, то, конечно же, лучше работать в полноразмерном редакторе, через консоль администратора.

6 февраля, 2023 в 2:57 дп
Доброго времени суток. Я за консоль разработчика в Chrome – это наиболее удобный и быстрый вариант любых правок на сайте. Например, таким образом, быстро делаю нужные правки в коде текста, картинок или дополнительных параметров, которые отвечают за внешний вид всего контента. Ранее делала все через правую кнопку, а также команду document.designMode = ‘on’ и была уверена, что использую наиболее эффективные варианты, но как оказалось, это не так.

6 февраля, 2023 в 2:59 дп
Зачем изобретать велосипед – нажми Ctrl+Shift+I или F12 и делай любые правки. Все просто, понятно и не нужно быть супер профессионалом, чтобы прописать пару кодов для желаемого результата. В то же время, если нужно провести правки на своем сайте, то зачем вообще мучить себя, когда можно быстро провести изменения из самого движка.
How can I replace text with CSS using a method like this:
.pvw-title img[src*="IKON.img"] { visibility:hidden; }
Instead of ( img[src*="IKON.img"] ), I need to use something that can replace text instead.
I have to use [ ] to get it to work.
<div class="pvw-title">Facts</div>
I need to replace «Facts«.
![]()
Penny Liu
13.8k5 gold badges74 silver badges91 bronze badges
asked Oct 25, 2011 at 21:58
![]()
4
Or maybe you could wrap ‘Facts’ round a <span> as follows:
.pvw-title span {
  display: none;
}
.pvw-title:after {
  content: 'whatever it is you want to add';
}
<div class="pvw-title"><span>Facts</span></div>![]()
Abrar Jahin
13.7k23 gold badges108 silver badges158 bronze badges
answered Dec 18, 2012 at 21:03
![]()
Matthew CachiaMatthew Cachia
4,3361 gold badge13 silver badges16 bronze badges
10
Obligatory: This is a hack: CSS isn’t the right place to do this, but in some situations — eg, you have a third party library in an iframe that can only be customized by CSS — this kind of hack is the only option.
You can replace text through CSS. Let’s replace a green button that has the word ‘hello’ with a red button that has the word ‘goodbye’, using CSS.
Before:

After:

See http://jsfiddle.net/ZBj2m/274/ for a live demo:
Here’s our green button:
<button>Hello</button>

button {
  background-color: green;
  color: black;
  padding: 5px;
}
Now let’s hide the original element, but add another block element afterwards:
button {
  visibility: hidden;
}
button:after {
  content:'goodbye';
  visibility: visible;
  display: block;
  position: absolute;
  background-color: red;
  padding: 5px;
  top: 2px;
}
Note:
- We explicitly need to mark this as a block element, ‘after’ elements are inline by default
- We need to compensate for the original element by adjusting the pseudo-element’s position.
- We must hide the original element and display the pseudo element using
visibility. Notedisplay: noneon the original element doesn’t work.
answered Jan 10, 2013 at 15:55
![]()
mikemaccanamikemaccana
103k93 gold badges372 silver badges470 bronze badges
9
If you’re willing to use pseudo elements and let them insert content, you can do the following. It doesn’t assume knowledge of the original element and doesn’t require additional markup.
.element {
  text-indent: -9999px;
  line-height: 0; /* Collapse the original line */
}

.element::after {
  content: "New text";
  text-indent: 0;
  display: block;
  line-height: initial; /* New content takes up original line height */
}
JSFiddle Example
answered Feb 26, 2014 at 22:14
![]()
James van DykeJames van Dyke
4,6903 gold badges27 silver badges25 bronze badges
10
Based on
mikemaccana’s answer,
this worked for me
button {
  position: absolute;
  visibility: hidden;
}

button:before {
  content: "goodbye";
  visibility: visible;
}<button>original</button>§ Absolute positioning
an element that is positioned absolutely is taken out of the flow and thus
takes up no space when placing other elements.
![]()
Flimm
129k44 gold badges244 silver badges254 bronze badges
answered Jun 18, 2013 at 3:51
![]()
1
This is simple, short, and effective. No additional HTML is necessary.
.pvw-title { color: transparent; }

.pvw-title:after {
        content: "New Text To Replace Old";
        color: black; /* set color to original text color */
        margin-left: -30px;
        /* margin-left equals length of text we're replacing */
    }
I had to do this for replacing link text, other than home, for WooCommerce breadcrumbs
Sass/Less
body.woocommerce .woocommerce-breadcrumb > a[href$="/shop/"] {
    color: transparent;
    &:after {
        content: "Store";
        color: grey;
        margin-left: -30px;
    }
}
CSS
body.woocommerce .woocommerce-breadcrumb > a[href$="/shop/"] {
    color: transparent;
}

body.woocommerce .woocommerce-breadcrumb > a[href$="/shop/"]&:after {
    content: "Store";
    color: @child-color-grey;
    margin-left: -30px;
}
![]()
answered Apr 16, 2015 at 18:16
![]()
9ete9ete
3,6421 gold badge34 silver badges32 bronze badges
You can’t, well, you can.
.pvw-title:after {
  content: "Test";
}
This will insert content after the current content of the element. It doesn’t actually replace it, but you can choose for an empty div, and use CSS to add all the content.
But while you more or less can, you shouldn’t. Actual content should be put in the document. The content property is mainly intended for small markup, like quotation marks around text that should appear quoted.
answered Oct 25, 2011 at 22:02
![]()
GolezTrolGolezTrol
113k17 gold badges182 silver badges207 bronze badges
3
In order to use after and hide the original content, you can use this hack:
.pvw-title {
  font-size: 0;
}
.pvw-title:after {
  font-size: 1rem;
  content: 'I am a totally different piece of text!';
}
<div class="pvw-title">Facts</div>Setting font-size to 0 makes the text disappear without removing the actual element from the viewport. Therefore, the :after selector works and should show on all browsers.
answered Jun 29, 2021 at 22:42
![]()
ThatkookooguyThatkookooguy
6,5191 gold badge31 silver badges53 bronze badges
Try using :before and :after. One inserts text after HTML is rendered, and the other inserts before HTML is rendered. If you want to replace text, leave button content empty.
This example sets the button text according to the size of the screen width.
<meta name="viewport" content="width=device-width, initial-scale=1">

<style>
  button:before {
    content: 'small screen';
  }
  @media screen and (min-width: 480px) {
    button:before {
      content: 'big screen';
    }
  }
</style>
<body>
  <button type="button">xxx</button>
  <button type="button"></button>
</body>
Button text:
-
With
:beforebig screenxxx
big screen
-
With
:afterxxxbig screen
big screen
![]()
answered Sep 12, 2016 at 17:14
![]()
live-lovelive-love
46.3k22 gold badges228 silver badges197 bronze badges
I had better luck setting the font-size: 0 of the outer element, and the font-size of the :after selector to whatever I needed.
answered Mar 3, 2017 at 16:34
![]()
jeromejerome
4,70913 gold badges52 silver badges70 bronze badges
2
If you just want to show different texts or images, keep the tag empty and write your content in multiple data attributes like that <span data-text1="Hello" data-text2="Bye"></span>.
Display them with one of the pseudo classes :before {content: attr(data-text1)}
Now you have a bunch of different ways to switch between them. I used them in combination with media queries for a responsive design approach to change the names of my navigation to icons.
jsfiddle demonstration and examples
It may not perfectly answer the question, but it satisfied my needs and maybe others too.
![]()
answered Aug 7, 2016 at 10:26
![]()
RobbendebieneRobbendebiene
3,8453 gold badges26 silver badges32 bronze badges
Text replacement with pseudo-elements and CSS visibility
HTML
<p class="replaced">Original Text</p>
CSS
.replaced {
    visibility: hidden;
    position: relative;
}

.replaced:after {
    visibility: visible;
    position: absolute;
    top: 0;
    left: 0;
    content: "This text replaces the original.";
}
![]()
answered Aug 16, 2018 at 0:25
![]()
Ahsan AftabAhsan Aftab
1812 silver badges6 bronze badges
The simplest way I found is by making the element font-size: 0px, then overwrite it with any font size when creating :after pseudo. Example below:
.pvw-title {
    font-size:0px;
}

.pvw-title:after {
        content: "Hello";
        font-size:15px !important;
}
answered Feb 26, 2021 at 19:44
![]()
ASammourASammour
8179 silver badges12 bronze badges
This worked for me with inline text. It was tested in Firefox, Safari, Chrome, and Opera.
<p>Lorem ipsum dolor sit amet, consectetur <span>Some Text</span> adipiscing elit.</p>

span {
    visibility: hidden;
    word-spacing: -999px;
    letter-spacing: -999px;
}

span:after {
    content: "goodbye";
    visibility: visible;
    word-spacing: normal;
    letter-spacing: normal;
}
![]()
answered Aug 2, 2013 at 22:39
![]()
1
I use this trick:
.pvw-title {
    text-indent: -999px;
}
.pvw-title:after {
    text-indent: 0px;
    float: left;
    content: 'My New Content';
}
I’ve even used this to handle internationalization of pages by just changing a base class…
.translate-es .welcome {
    text-indent: -999px;
}
.translate-es .welcome:after {
    text-indent: 0px;
    float: left;
    content: '¡Bienvenidos!';
}
answered Jul 5, 2015 at 12:16
![]()
Pete OKPete OK
1191 silver badge3 bronze badges
1
Try this way:
IDENTIFIER {
    visibility: hidden;
    position: relative;
}
IDENTIFIER::after {
    visibility: visible;
    position: absolute;
    top: 0;
    left: 0;
    content: "NEW_CONTENT";
}
answered Aug 31, 2021 at 1:45
![]()
1
This implements a checkbox as a button which shows either Yes or No depending on its ‘checked’ state. So it demonstrates one way of replacing text using CSS without having to write any code.
It will still behave like a checkbox as far as returning (or not returning) a POST value, but from a display point of view it looks like a toggle button.
The colours may not be to your liking, they’re only there to illustrate a point.
The HTML is:
<input type="checkbox" class="yesno" id="testcb" /><label for="testcb"><span></span></label>
…and the CSS is:
/* --------------------------------- */
/* Make the checkbox non-displayable */
/* --------------------------------- */
input[type="checkbox"].yesno {
    display:none;
}
/* --------------------------------- */
/* Set the associated label <span>   */
/* the way you want it to look.      */
/* --------------------------------- */
input[type="checkbox"].yesno+label span {
    display:inline-block;
    width:80px;
    height:30px;
    text-align:center;
    vertical-align:middle;
    color:#800000;
    background-color:white;
    border-style:solid;
    border-width:1px;
    border-color:black;
    cursor:pointer;
}
/* --------------------------------- */
/* By default the content after the  */
/* the label <span> is "No"          */
/* --------------------------------- */
input[type="checkbox"].yesno+label span:after {
    content:"No";
}
/* --------------------------------- */
/* When the box is checked the       */
/* content after the label <span>    */
/* is "Yes" (which replaces any      */
/* existing content).                */
/* When the box becomes unchecked the*/
/* content reverts to the way it was.*/
/* --------------------------------- */
input[type="checkbox"].yesno:checked+label span:after {
    content:"Yes";
}
/* --------------------------------- */
/* When the box is checked the       */
/* label <span> looks like this      */
/* (which replaces any existing)     */
/* When the box becomes unchecked the*/
/* layout reverts to the way it was. */
/* --------------------------------- */
input[type="checkbox"].yesno:checked+label span {
    color:green;
    background-color:#C8C8C8;
}
I’ve only tried it on Firefox, but it’s standard CSS so it ought to work elsewhere.
answered Nov 12, 2015 at 15:05
![]()
Using a pseudo element, this method doesn’t require knowledge of the original element and doesn’t require any additional markup.
#someElement{
    color: transparent; /* You may need to change this color */
    position: relative;
}
#someElement:after { /* Or use :before if that tickles your fancy */
    content: "New text";
    color: initial;
    position: absolute;
    top: 0;
    left: 0;
}
![]()
answered May 16, 2015 at 17:08
![]()
VinVin
1,6254 gold badges26 silver badges33 bronze badges
I had an issue where I had to replace the text of link, but I couldn’t use JavaScript nor could I directly change the text of a hyperlink as it was compiled down from XML. Also, I couldn’t use pseudo elements, or they didn’t seem to work when I had tried them.
Basically, I put the text I wanted into a span and put the anchor tag underneath it and wrapped both in a div. I basically moved the anchor tag up via CSS and then made the font transparent. Now when you hover over the span, it «acts» like a link. A really hacky way of doing this, but this is how you can have a link with different text…
This is a fiddle of how I got around this issue
My HTML
<div class="field">
    <span>This is your link text</span><br/>
    <a href="//www.google.com" target="_blank">This is your actual link</a>
</div>
My CSS
 div.field a {
     color: transparent;
     position: absolute;
     top:1%;
 }
 div.field span {
     display: inline-block;
 }
The CSS will need to change based off your requirements, but this is a general way of doing what you are asking.
![]()
answered Mar 21, 2015 at 20:48
![]()
AlmightyWhyAlmightyWhy
4666 silver badges11 bronze badges
1
I found a solution like this where a word, «Dark», would be shortened to just «D» on a smaller screen width. Basically you just make the font size of the original content 0 and have the shortened form as a pseudo element.
In this example the change happens on hover instead:
span {
  font-size: 12px;
}

span:after {
  display: none;
  font-size: 12px;
  content: 'D';
  color: red;
}

span:hover {
  font-size: 0px;
}

span:hover:after {
  display: inline;
}<span>Dark</span>![]()
answered Dec 28, 2019 at 21:11
![]()
StefanBobStefanBob
4,7522 gold badges31 silver badges38 bronze badges
After eight years, I faced the same challenge when trying to use the Stylish browser extension to change something on a website (not mine). And this time I made it work by looking at the source code using «inspect element» and created the CSS code based on that.
This it what it looked like before:
<table>
  <tbody>
    <tr>
      <td role="gridcell">
        <span title="In progress" style="background-color: #e2047a;color:White;margin:2px;border-radius:2px;padding-left: 2px; padding-right: 2px;text-align: center;width: 45px; display: block;overflow: hidden;text-overflow: ellipsis;">In progress</span>
      </td>
    </tr>
  </tbody>
</table>
This is the same piece of the HTML and the CSS I used to modify the style:
td span[style="background-color: #e2047a;color:White;margin:2px;border-radius:2px;padding-left: 2px; padding-right: 2px;text-align: center;width: 45px; display: block;overflow: hidden;text-overflow: ellipsis;"] {
  width: 100px!important;
}
<table>
<tbody>
<tr>
<td role="gridcell">
<span title="In progress" style="background-color: #e2047a;color:White;margin:2px;border-radius:2px;padding-left: 2px; padding-right: 2px;text-align: center;width: 45px; display: block;overflow: hidden;text-overflow: ellipsis;">In progress</span>
</td>
</tr>
</tbody>
</table>You can run the code above and you will see that it works (tested in Chrome).
This is simply what I wanted back in the days when I asked this question.
I was using some sort of community blog/Myspace similar stuff and the only thing you had when styling your profile was their CSS editor, and that’s why I wanted to select it based on the style.
I found the answer here:
-
Advanced CSS Selector — Select based on styling
-
CSS selector by inline style attribute
![]()
answered Jan 2, 2020 at 11:26
![]()
MokiTaMokiTa
4,5903 gold badges15 silver badges16 bronze badges
Unlike what I see in every single other answer, you don’t need to use pseudo elements in order to replace the content of a tag with an image
<div class="pvw-title">Facts</div>
div.pvw-title { /* No :after or :before required */
content: url("your URL here");
}
answered Jul 21, 2017 at 23:43
![]()
EsteckaEstecka
3781 silver badge15 bronze badges
2
Well, as many said this is a hack. However, I’d like to add more up-to-date hack, which takes an advantage of flexbox and rem, i.e.
- You don’t want to manually position this text to be changed, that’s why you’d like to take an advantage of
flexbox - You don’t want to use
paddingand/ormarginto the text explicitly usingpx, which for different screen sizes on different devices and browsers might give different output
Here’s the solution, in short flexbox makes sure that it’s automatically positioned perfectly and rem is more standardized (and automated) alternative for pixels.
CodeSandbox with code below and output in a form of a screenshot, do please read a note below the code!
h1 {
background-color: green;
color: black;
text-align: center;
visibility: hidden;
}
h1:after {
background-color: silver;
color: yellow;
content: "This is my great text AFTER";
display: flex;
justify-content: center;
margin-top: -2.3rem;
visibility: visible;
}
h1:before {
color: blue;
content: "However, this is a longer text to show this example BEFORE";
display: flex;
justify-content: center;
margin-bottom: -2.3rem;
visibility: visible;
}
Note: for different tags you might need different values of rem, this one has been justified for h1 and only on large screens. However with @media you could easily extend this to mobile devices.

answered Jun 12, 2020 at 20:38
![]()
Example
<!DOCTYPE html>
<html>
<head>
<title>Devnote</title>
<style>
.replacedValue {
visibility: hidden;
position: relative;
}
.replacedValue:after {
visibility: visible;
position: absolute;
top: 0;
left: 0;
content: "Devnote is developer answer solve. devnote.in";
}
</style>
</head>
<body>
<p class="replacedValue">Old Text Here</p>
</body>
</html>
Output
Devnote is developer answer solve. devnote.in
answered Dec 9, 2020 at 11:07
![]()
Fefar RaviFefar Ravi
7087 silver badges17 bronze badges
This isn’t really possible without tricks. Here is a way that works by replacing the text with an image of text.
.pvw-title{
text-indent: -9999px;
background-image: url(text_image.png)
}
This type of thing is typically done with JavaScript. Here is how it can be done with jQuery:
$('.pvw-title').text('new text');
![]()
answered Oct 25, 2011 at 22:06
![]()
Nathan ManousosNathan Manousos
13k2 gold badges27 silver badges37 bronze badges
4
The way to make this work is to add line-height to the CSS content. This will make the block to be seen above the hidden, thus this will not hide the changed text.
Example with use before:
.pvw-title span {
display: none;
}
.pvw-title:before {
content: 'Whatever it is you want to add';
line-height: 1.5em
}
![]()
answered Jan 2, 2019 at 10:25
![]()
How can I replace text with CSS using a method like this:
.pvw-title img[src*="IKON.img"] { visibility:hidden; }
Instead of ( img[src*="IKON.img"] ), I need to use something that can replace text instead.
I have to use [ ] to get it to work.
<div class="pvw-title">Facts</div>
I need to replace «Facts«.
![]()
Penny Liu
13.8k5 gold badges74 silver badges91 bronze badges
asked Oct 25, 2011 at 21:58
![]()
4
Or maybe you could wrap ‘Facts’ round a <span> as follows:
.pvw-title span {
display: none;
}
.pvw-title:after {
content: 'whatever it is you want to add';
}<div class="pvw-title"><span>Facts</span></div>![]()
Abrar Jahin
13.7k23 gold badges108 silver badges158 bronze badges
answered Dec 18, 2012 at 21:03
![]()
Matthew CachiaMatthew Cachia
4,3361 gold badge13 silver badges16 bronze badges
10
Obligatory: This is a hack: CSS isn’t the right place to do this, but in some situations — eg, you have a third party library in an iframe that can only be customized by CSS — this kind of hack is the only option.
You can replace text through CSS. Let’s replace a green button that has the word ‘hello’ with a red button that has the word ‘goodbye’, using CSS.
Before:
After:
See http://jsfiddle.net/ZBj2m/274/ for a live demo:
Here’s our green button:
<button>Hello</button>
button {
background-color: green;
color: black;
padding: 5px;
}
Now let’s hide the original element, but add another block element afterwards:
button {
visibility: hidden;
}
button:after {
content:'goodbye';
visibility: visible;
display: block;
position: absolute;
background-color: red;
padding: 5px;
top: 2px;
}
Note:
- We explicitly need to mark this as a block element, ‘after’ elements are inline by default
- We need to compensate for the original element by adjusting the pseudo-element’s position.
- We must hide the original element and display the pseudo element using
visibility. Notedisplay: noneon the original element doesn’t work.
answered Jan 10, 2013 at 15:55
![]()
mikemaccanamikemaccana
103k93 gold badges372 silver badges470 bronze badges
9
If you’re willing to use pseudo elements and let them insert content, you can do the following. It doesn’t assume knowledge of the original element and doesn’t require additional markup.
.element {
text-indent: -9999px;
line-height: 0; /* Collapse the original line */
}
.element::after {
content: "New text";
text-indent: 0;
display: block;
line-height: initial; /* New content takes up original line height */
}
JSFiddle Example
answered Feb 26, 2014 at 22:14
![]()
James van DykeJames van Dyke
4,6903 gold badges27 silver badges25 bronze badges
10
Based on
mikemaccana’s answer,
this worked for me
button {
position: absolute;
visibility: hidden;
}
button:before {
content: "goodbye";
visibility: visible;
}<button>original</button>§ Absolute positioning
an element that is positioned absolutely is taken out of the flow and thus
takes up no space when placing other elements.
![]()
Flimm
129k44 gold badges244 silver badges254 bronze badges
answered Jun 18, 2013 at 3:51
![]()
1
This is simple, short, and effective. No additional HTML is necessary.
.pvw-title { color: transparent; }
.pvw-title:after {
content: "New Text To Replace Old";
color: black; /* set color to original text color */
margin-left: -30px;
/* margin-left equals length of text we're replacing */
}
I had to do this for replacing link text, other than home, for WooCommerce breadcrumbs
Sass/Less
body.woocommerce .woocommerce-breadcrumb > a[href$="/shop/"] {
color: transparent;
&:after {
content: "Store";
color: grey;
margin-left: -30px;
}
}
CSS
body.woocommerce .woocommerce-breadcrumb > a[href$="/shop/"] {
color: transparent;
}
body.woocommerce .woocommerce-breadcrumb > a[href$="/shop/"]&:after {
content: "Store";
color: @child-color-grey;
margin-left: -30px;
}
![]()
answered Apr 16, 2015 at 18:16
![]()
9ete9ete
3,6421 gold badge34 silver badges32 bronze badges
You can’t, well, you can.
.pvw-title:after {
content: "Test";
}
This will insert content after the current content of the element. It doesn’t actually replace it, but you can choose for an empty div, and use CSS to add all the content.
But while you more or less can, you shouldn’t. Actual content should be put in the document. The content property is mainly intended for small markup, like quotation marks around text that should appear quoted.
answered Oct 25, 2011 at 22:02
![]()
GolezTrolGolezTrol
113k17 gold badges182 silver badges207 bronze badges
3
In order to use after and hide the original content, you can use this hack:
.pvw-title {
font-size: 0;
}
.pvw-title:after {
font-size: 1rem;
content: 'I am a totally different piece of text!';
}<div class="pvw-title">Facts</div>Setting font-size to 0 makes the text disappear without removing the actual element from the viewport. Therefore, the :after selector works and should show on all browsers.
answered Jun 29, 2021 at 22:42
![]()
ThatkookooguyThatkookooguy
6,5191 gold badge31 silver badges53 bronze badges
Try using :before and :after. One inserts text after HTML is rendered, and the other inserts before HTML is rendered. If you want to replace text, leave button content empty.
This example sets the button text according to the size of the screen width.
<meta name="viewport" content="width=device-width, initial-scale=1">
<style>
button:before {
content: 'small screen';
}
@media screen and (min-width: 480px) {
button:before {
content: 'big screen';
}
}
</style>
<body>
<button type="button">xxx</button>
<button type="button"></button>
</body>
Button text:
-
With
:beforebig screenxxx
big screen
-
With
:afterxxxbig screen
big screen
![]()
answered Sep 12, 2016 at 17:14
![]()
live-lovelive-love
46.3k22 gold badges228 silver badges197 bronze badges
I had better luck setting the font-size: 0 of the outer element, and the font-size of the :after selector to whatever I needed.
answered Mar 3, 2017 at 16:34
![]()
jeromejerome
4,70913 gold badges52 silver badges70 bronze badges
2
If you just want to show different texts or images, keep the tag empty and write your content in multiple data attributes like that <span data-text1="Hello" data-text2="Bye"></span>.
Display them with one of the pseudo classes :before {content: attr(data-text1)}
Now you have a bunch of different ways to switch between them. I used them in combination with media queries for a responsive design approach to change the names of my navigation to icons.
jsfiddle demonstration and examples
It may not perfectly answer the question, but it satisfied my needs and maybe others too.
![]()
answered Aug 7, 2016 at 10:26
![]()
RobbendebieneRobbendebiene
3,8453 gold badges26 silver badges32 bronze badges
Text replacement with pseudo-elements and CSS visibility
HTML
<p class="replaced">Original Text</p>
CSS
.replaced {
visibility: hidden;
position: relative;
}
.replaced:after {
visibility: visible;
position: absolute;
top: 0;
left: 0;
content: "This text replaces the original.";
}
![]()
answered Aug 16, 2018 at 0:25
![]()
Ahsan AftabAhsan Aftab
1812 silver badges6 bronze badges
The simplest way I found is by making the element font-size: 0px, then overwrite it with any font size when creating :after pseudo. Example below:
.pvw-title {
font-size:0px;
}
.pvw-title:after {
content: "Hello";
font-size:15px !important;
}
answered Feb 26, 2021 at 19:44
![]()
ASammourASammour
8179 silver badges12 bronze badges
This worked for me with inline text. It was tested in Firefox, Safari, Chrome, and Opera.
<p>Lorem ipsum dolor sit amet, consectetur <span>Some Text</span> adipiscing elit.</p>
span {
visibility: hidden;
word-spacing: -999px;
letter-spacing: -999px;
}
span:after {
content: "goodbye";
visibility: visible;
word-spacing: normal;
letter-spacing: normal;
}
![]()
answered Aug 2, 2013 at 22:39
![]()
1
I use this trick:
.pvw-title {
text-indent: -999px;
}
.pvw-title:after {
text-indent: 0px;
float: left;
content: 'My New Content';
}
I’ve even used this to handle internationalization of pages by just changing a base class…
.translate-es .welcome {
text-indent: -999px;
}
.translate-es .welcome:after {
text-indent: 0px;
float: left;
content: '¡Bienvenidos!';
}
answered Jul 5, 2015 at 12:16
![]()
Pete OKPete OK
1191 silver badge3 bronze badges
1
Try this way:
IDENTIFIER {
visibility: hidden;
position: relative;
}
IDENTIFIER::after {
visibility: visible;
position: absolute;
top: 0;
left: 0;
content: "NEW_CONTENT";
}
answered Aug 31, 2021 at 1:45
![]()
1
This implements a checkbox as a button which shows either Yes or No depending on its ‘checked’ state. So it demonstrates one way of replacing text using CSS without having to write any code.
It will still behave like a checkbox as far as returning (or not returning) a POST value, but from a display point of view it looks like a toggle button.
The colours may not be to your liking, they’re only there to illustrate a point.
The HTML is:
<input type="checkbox" class="yesno" id="testcb" /><label for="testcb"><span></span></label>
…and the CSS is:
/* --------------------------------- */
/* Make the checkbox non-displayable */
/* --------------------------------- */
input[type="checkbox"].yesno {
display:none;
}
/* --------------------------------- */
/* Set the associated label <span> */
/* the way you want it to look. */
/* --------------------------------- */
input[type="checkbox"].yesno+label span {
display:inline-block;
width:80px;
height:30px;
text-align:center;
vertical-align:middle;
color:#800000;
background-color:white;
border-style:solid;
border-width:1px;
border-color:black;
cursor:pointer;
}
/* --------------------------------- */
/* By default the content after the */
/* the label <span> is "No" */
/* --------------------------------- */
input[type="checkbox"].yesno+label span:after {
content:"No";
}
/* --------------------------------- */
/* When the box is checked the */
/* content after the label <span> */
/* is "Yes" (which replaces any */
/* existing content). */
/* When the box becomes unchecked the*/
/* content reverts to the way it was.*/
/* --------------------------------- */
input[type="checkbox"].yesno:checked+label span:after {
content:"Yes";
}
/* --------------------------------- */
/* When the box is checked the */
/* label <span> looks like this */
/* (which replaces any existing) */
/* When the box becomes unchecked the*/
/* layout reverts to the way it was. */
/* --------------------------------- */
input[type="checkbox"].yesno:checked+label span {
color:green;
background-color:#C8C8C8;
}
I’ve only tried it on Firefox, but it’s standard CSS so it ought to work elsewhere.
answered Nov 12, 2015 at 15:05
![]()
Using a pseudo element, this method doesn’t require knowledge of the original element and doesn’t require any additional markup.
#someElement{
color: transparent; /* You may need to change this color */
position: relative;
}
#someElement:after { /* Or use :before if that tickles your fancy */
content: "New text";
color: initial;
position: absolute;
top: 0;
left: 0;
}
![]()
answered May 16, 2015 at 17:08
![]()
VinVin
1,6254 gold badges26 silver badges33 bronze badges
I had an issue where I had to replace the text of link, but I couldn’t use JavaScript nor could I directly change the text of a hyperlink as it was compiled down from XML. Also, I couldn’t use pseudo elements, or they didn’t seem to work when I had tried them.
Basically, I put the text I wanted into a span and put the anchor tag underneath it and wrapped both in a div. I basically moved the anchor tag up via CSS and then made the font transparent. Now when you hover over the span, it «acts» like a link. A really hacky way of doing this, but this is how you can have a link with different text…
This is a fiddle of how I got around this issue
My HTML
<div class="field">
<span>This is your link text</span><br/>
<a href="//www.google.com" target="_blank">This is your actual link</a>
</div>
My CSS
div.field a {
color: transparent;
position: absolute;
top:1%;
}
div.field span {
display: inline-block;
}
The CSS will need to change based off your requirements, but this is a general way of doing what you are asking.
![]()
answered Mar 21, 2015 at 20:48
![]()
AlmightyWhyAlmightyWhy
4666 silver badges11 bronze badges
1
I found a solution like this where a word, «Dark», would be shortened to just «D» on a smaller screen width. Basically you just make the font size of the original content 0 and have the shortened form as a pseudo element.
In this example the change happens on hover instead:
span {
font-size: 12px;
}
span:after {
display: none;
font-size: 12px;
content: 'D';
color: red;
}
span:hover {
font-size: 0px;
}
span:hover:after {
display: inline;
}<span>Dark</span>![]()
answered Dec 28, 2019 at 21:11
![]()
StefanBobStefanBob
4,7522 gold badges31 silver badges38 bronze badges
After eight years, I faced the same challenge when trying to use the Stylish browser extension to change something on a website (not mine). And this time I made it work by looking at the source code using «inspect element» and created the CSS code based on that.
This it what it looked like before:
<table>
  <tbody>
    <tr>
      <td role="gridcell">
        <span title="In progress" style="background-color: #e2047a;color:White;margin:2px;border-radius:2px;padding-left: 2px; padding-right: 2px;text-align: center;width: 45px; display: block;overflow: hidden;text-overflow: ellipsis;">In progress</span>
      </td>
    </tr>
  </tbody>
</table>This is the same piece of the HTML and the CSS I used to modify the style:
td span[style="background-color: #e2047a;color:White;margin:2px;border-radius:2px;padding-left: 2px; padding-right: 2px;text-align: center;width: 45px; display: block;overflow: hidden;text-overflow: ellipsis;"] {
width: 100px!important;
}<table>
<tbody>
<tr>
<td role="gridcell">
<span title="In progress" style="background-color: #e2047a;color:White;margin:2px;border-radius:2px;padding-left: 2px; padding-right: 2px;text-align: center;width: 45px; display: block;overflow: hidden;text-overflow: ellipsis;">In progress</span>
</td>
</tr>
</tbody>
</table>You can run the code above and you will see that it works (tested in Chrome).
This is simply what I wanted back in the days when I asked this question.
I was using some sort of community blog/Myspace similar stuff and the only thing you had when styling your profile was their CSS editor, and that’s why I wanted to select it based on the style.
I found the answer here:
-
Advanced CSS Selector — Select based on styling
-
CSS selector by inline style attribute
![]()
answered Jan 2, 2020 at 11:26
![]()
MokiTaMokiTa
4,5903 gold badges15 silver badges16 bronze badges
Unlike what I see in every single other answer, you don’t need to use pseudo elements in order to replace the content of a tag with an image
<div class="pvw-title">Facts</div>

    div.pvw-title { /* No :after or :before required */
        content: url("your URL here");
    }
answered Jul 21, 2017 at 23:43
![]()
EsteckaEstecka
3781 silver badge15 bronze badges
2
Well, as many said this is a hack. However, I’d like to add more up-to-date hack, which takes an advantage of flexbox and rem, i.e.
- You don’t want to manually position this text to be changed, that’s why you’d like to take an advantage of
flexbox - You don’t want to use
paddingand/ormarginto the text explicitly usingpx, which for different screen sizes on different devices and browsers might give different output
Here’s the solution, in short flexbox makes sure that it’s automatically positioned perfectly and rem is more standardized (and automated) alternative for pixels.
CodeSandbox with code below and output in a form of a screenshot, do please read a note below the code!
h1 {
  background-color: green;
  color: black;
  text-align: center;
  visibility: hidden;
}
h1:after {
  background-color: silver;
  color: yellow;
  content: "This is my great text AFTER";
  display: flex;
  justify-content: center;
  margin-top: -2.3rem;
  visibility: visible;
}
h1:before {
  color: blue;
  content: "However, this is a longer text to show this example BEFORE";
  display: flex;
  justify-content: center;
  margin-bottom: -2.3rem;
  visibility: visible;
}
Note: for different tags you might need different values of rem, this one has been justified for h1 and only on large screens. However with @media you could easily extend this to mobile devices.
answered Jun 12, 2020 at 20:38
![]()
Example
<!DOCTYPE html>
<html>
<head>
   <title>Devnote</title>
    <style>
        .replacedValue {
            visibility: hidden;
            position: relative;
        }
        .replacedValue:after {
            visibility: visible;
            position: absolute;
            top: 0;
            left: 0;
            content: "Devnote is developer answer solve. devnote.in";
        }
    </style>
</head>
<body>
    <p class="replacedValue">Old Text Here</p>
</body>
</html>
Output
Devnote is developer answer solve. devnote.in
answered Dec 9, 2020 at 11:07
![]()
Fefar RaviFefar Ravi
7087 silver badges17 bronze badges
This isn’t really possible without tricks. Here is a way that works by replacing the text with an image of text.
.pvw-title{
    text-indent: -9999px;
    background-image: url(text_image.png)
}
This type of thing is typically done with JavaScript. Here is how it can be done with jQuery:
$('.pvw-title').text('new text');
![]()
answered Oct 25, 2011 at 22:06
![]()
Nathan ManousosNathan Manousos
13k2 gold badges27 silver badges37 bronze badges
4
The way to make this work is to add line-height to the CSS content. This will make the block to be seen above the hidden, thus this will not hide the changed text.
Example with use before:
.pvw-title span {
  display: none;
}

.pvw-title:before {
  content: 'Whatever it is you want to add';
  line-height: 1.5em
}
![]()
answered Jan 2, 2019 at 10:25
![]()
Перейти к содержимому
Поправить текст отлаживаемой веб-страницы можно прямо в браузере не прибегая к правкам HTML-кода, используя стандартную функцию консоли для редактирования содержимого страницы.
При работе с контентом на сайте часто требуется вносить изменения или править различные текстовые блоки прямо на странице. В большинстве случаев это можно сделать через выделение элемента и правку в коде.
Однако существует специальная команда document.designMode = 'on' которая позволяет окно браузера с содержимым страницы с легкостью превратить в текстовый редактор.
That feeling when you first discovered `document.designMode` pic.twitter.com/bxA1otzCjN
— Tomek Sułkowski (@sulco) September 27, 2019
Для вызова команды вам потребуется произвести несколько несложных действий:
- Откройте на нужной странице консоль администратора (вызывается нажатием клавиши F12 или Ctrl+Shift+I);
- В появившемся окне выберите вкладку консоль;
- Укажите команду
document.designMode = 'on'; - Далее нажмите
Enterи приступайте к изменению контента на странице — установите курсор в нужном фрагменте текста и вносите любые правки.

Обратите внимание, что все изменения локальны и видны только вам. При перезагрузке страницы они исчезнут.
Для чего будет полезна команда:
- изменять тексты и подменять данные на сайте;
- тестировать различные текстовые блоки и элементы — заголовки, лид-параграфы, абзацы, врезки, сноски;
- проверять различные форматы написания текста и быстро принимать решения;
- быстро править тексты и отправлять скриншоты заинтересованным участникам — разработчикам, копирайтерам или дизайнерам;
- создавать фейковые скриншоты с содержимым страницы.
Если вам интересно узнать больше о возможностях консоли администратора Chrome, то рекомендую посмотреть запись Chrome Dev Summit 2016.
Хотите еще больше похожих выступлений? Посетите официальную страницу саммита. Здесь вы найдете ссылки на записи других выступлений за все предыдущие года.
Надеюсь, материал оказался полезным. Обязательно пишите ваши комментарии или делитесь ссылкой на статью с коллегами и друзьями.
Что важного в диджитал на этой неделе?
Каждую субботу я отправляю письмо с новостями, ссылками на исследования и статьи, чтобы вы не пропустили ничего важного в интернет-маркетинге за неделю.
Узнать подробнее →
Статьи по теме:
- Как убрать фон с картинки без специальных программ и навыков
- Как настроить отслеживание конверсий в Google Реклама с помощью Google Tag Manager
- Как добавить UTM-метки в Google Ads в шаблон отслеживания
- Как перенести ресурс Google Analytics из одного аккаунта в другой
- Конструктор сайтов Тильда: возможности и ограничения работы из личного опыта по сборке сайта
Метки #инструменты
Инструменты разработчика в браузерах очень мощные. Они помогут отредактировать страницу прямо в браузере, даже не особо зная, что такое HTML. Можно заменять текст, картинки, передвигать целые блоки на лету, т.е. прямо в браузере, не сохраняя никаких файлов. Правда, эти изменения носят временный характер: при обновлении страницы изменения пропадают.
Инструменты отлично подходят, когда хочется “попробовать, как это выглядит”.
В этой статье мы пользуемся браузером Google Chrome, но в других браузерах всё работает схожим образом.
Поменять текст
Чтобы заменить любой текст на странице, достаточно кликнуть правой клавишей мыши по нужному тексту и выбрать “Просмотреть код”. Откроется код этого элемента, где вы сразу увидите нужный текст. Кликните по нему дважды, чтобы заменить. При нажатии на Enter вы увидите, что текст поменялся и на странице.
Попробуйте повторить приём ниже. Где пробовать.

Поменять картинку
Чтобы заменить картинку, нужно найти её путь: обычно это какая-то длинная ссылка внутри элемента с названием img. Довольно просто, ничем не отличается от смены текста.
В примере ниже мы задумали у второго урока поставить такую же картинку, как у первого. Попробуйте повторить приём ниже. Где пробовать.
Обратите внимание на прикольную фичу: при наведении на ссылку Chrome показывает миниатюрку картинки, которая лежит по этой ссылке. Мелочь, а приятно.
Найти блок вёрстки
Весь HTML устроен иерархически: большие элементы на странице складываются из элементов поменьше, а те, в свою очередь, тоже делятся на части и так пока не дойдёт дело до самых простых элементов на странице — текста, картинок и прямоугольников. Например, на странице Энциклопедии Девмана есть строка, в которой лежит 3 списка из рубрик энциклопедии.
Видно, что они “вложены” в строку — при желании их можно “свернуть”:
При наведении на строчки элементы на странице будут выделяться синим. Чтобы выделить весь элемент поднимайтесь “наверх” по коду, пока он не выделится целиком. Если выделилось слишком много, то вы поднялись слишком высоко, теперь спускайтесь обратно. Перемещайтесь по элементам, пока не найдете нужный.
Найденный элемент можно отредактировать прямо в браузере, выбрав в контекстном меню Edit as HTML. Правда, в файл изменения не попадут. Ещё можно разом скопировать весь блок с вложенными в него элементами или даже удалить их все. О том как это сделать читайте ниже.
С инструментами разработчика любой блок на странице сайта найти проще простого, но вот повторить трюк с текстовым редактором и HTML файлом будет куда сложнее. Ориентируйтесь по названию тега, его классам и его родителям. Например:
<body>
    <article>
        ...
        <div class="row js-article-content">
С помощью инструментов разработчика вы поняли, что вам нужен элемент <div class="row js-article-content">. Значит в файле надо искать тег div с классами row и js-article-content и с родителями body и article. Задача сильно упростится, если в редакторе свернуть часть кода, в англоязычном интерфейсе этот приём называется code folding.
Помните, что на странице может быть много одинаковых с виду элементов, с одинаковым тегом и классами. Ориентируйтесь прежде всего на родителей — внутри каких элементов он находится. Начинайте поиск с тега <body> — этот элемент на странице всегда один и находится на самом верху.
В коде теги ищут по их родителям
Скопировать элемент
Если вы уже нашли элемент через инструменты разработчика, то кликните по нему правой кнопкой мыши и в выпадающем меню выберите Copy outerHTML. HTML разметка скопирована в буфер обмена, теперь можете вставить её в текстовый редактор.
Удалить элемент
Чтобы удалить элемент, нужно так же кликнуть по нему правой кнопкой мыши и выбрать “Просмотреть код”. Далее выберите его целиком. Когда вы выберете нужный элемент — жмите Delete.
В этой гифке мы задумали удалить вторую статью “Как установить Python”. Попробуйте повторить приём ниже. Где пробовать.
В гифке видно, как мы “поднимаемся” наверх, выделяя всё больше. Как только “поднялись” достаточно — свернули всё, что внутри с помощью “стрелочки” слева. Стало видно, что некие li — это элементы списка (на самом деле это list item), а в некоем ul лежит весь список (это unordered list).
Попробуйте бесплатные уроки по Python
Получите крутое код-ревью от практикующих программистов с разбором ошибок и рекомендациями, на что обратить внимание — бесплатно.
Переходите на страницу учебных модулей «Девмана» и выбирайте тему.
![]()
Загрузить PDF
![]()
Загрузить PDF
Ни один шутник не откажется от возможности временно изменить способ отображения сайта на компьютере, не говоря уже о множестве практических применений, которые эта возможность открывает. Какие бы цели вы ни преследовали — шутливые, утилитарные или, не дай бог, зловредные, — изменить отображение сайта довольно просто.
-
1
Найдите ссылку на букмарклет, изменяющий текущий сайт. Самый простой способ сделать это — ввести в Google запрос: «изменить текущий сайт букмарклет» (без кавычек). Найдите подходящую ссылку среди результатов поиска.[1]
-
2
Перетащите ее на панель закладок. Отредактируйте сайт, на котором вы нашли ссылку. Для этого просто щелкните по ней или перетащите на панель закладок. Это позволит вам использовать ссылку на любом сайте.
-
3
Используйте ссылку. Откройте страницу, которую хотите изменить, и нажмите на закладку. И хотя это не принесет заметного эффекта, теперь вы сможете открыть программный код страницы и отредактировать его по своему усмотрению.[2]
Реклама


-
1
Найдите текст или фотографию, которую хотите изменить. Откройте страницу в Chrome, которую хотите отредактировать. Если вы хотите отредактировать текст, выделите слова, которые хотите изменить, и щелкните по ним правой кнопкой мыши. Если вы хотите отредактировать фотографию, просто щелкните по ней правой кнопкой мыши.[3]
- Чтобы отредактировать фотографию, вам нужно будет загрузить другое фото и заменить на него текущее. Для этого вам нужно заменить URL-адрес в исходном коде новым URL-адресом.
-
2
Откройте инспектор кода. Щелкните правой кнопкой мыши по странице, чтобы отобразить контекстное меню. Нажмите на «Просмотреть код». Внутри текущей страницы откроется новое окно с HTML кодом.[4]
- Если ваш компьютер работает под управлением ОС Windows, откройте инспектор кода, нажав F12.
-
3
Найдите текст, который хотите изменить, в инспекторе кода. Текст, выделенный в инспекторе, будет выделен и на исходном сайте. При редактировании изображения в инспекторе будет выделен большой фрагмент текста с подчеркнутым URL-адресом в конце.
-
4
Измените код. Если вы хотите изменить текст, просто отредактируйте выделенные слова. Если вы хотите изменить фотографию, замените ссылку на фото другой ссылкой, не касаясь остальной части кода.
- Если допустите ошибку, нажмите Command+Z на Mac или Control+Z на Windows, чтобы отменить изменение.
-
5
Завершите редактирование. Нажмите «Enter» и закройте инспектор кода. Теперь на странице сайта будет отображен текст или изображение, которое вы добавили. Естественно, сама страница не была отредактирована, и при ее обновлении все внесенные вами изменения пропадут.
Реклама


-
1
Включите меню «Разработка». Нажмите на меню «Safari» в верхней части экрана. Выберите «Настройки», а затем «Дополнения» из меню в верхней части окна «Настройки». Установите флажок рядом с параметром «Показывать меню “Разработка” в строке меню» в нижней части окна. Меню «Разработка» появится в строке меню между опциями «Закладка» и «Окно».[5]
-
2
Найдите текст или фотографию, которую хотите изменить. Перейдите на страницу, которую хотите отредактировать. Если вы хотите отредактировать текст, выделите слова, которые хотите изменить, и щелкните по ним правой кнопкой мыши. Если вы хотите отредактировать фотографию, просто щелкните по ней правой кнопкой мыши.
- Чтобы отредактировать фотографию, вам нужно будет загрузить другое фото и заменить на него текущее. Для этого вам нужно заменить URL-адрес в исходном коде новым URL-адресом.
-
3
Откройте инспектор кода. Щелкните по странице правой кнопкой мыши, чтобы отобразить контекстное меню. Нажмите на «Исследовать элемент». Внутри текущей страницы откроется новое окно с HTML кодом.
- Окно «Просмотреть код» можно также открыть, раскрыв меню «Разработка» и выбрав пункт «Подключить веб-инспектор». Найдите искомый текст, нажав Command+F на Mac или Control+F в Windows и введя текст, который хотите изменить. Стоит отметить, что это более окольный путь, чем предыдущий способ.
- Чтобы открыть инспектор кода, используйте сочетание клавиш Alt+Command+I на Mac или клавишу F12 на Windows.
-
4
Измените код. Если вы хотите изменить текст, просто отредактируйте выделенные слова. Если вы хотите изменить фотографию, замените ссылку на фото другой ссылкой, не касаясь остальной части кода.[6]
- Если допустите ошибку, нажмите Command+Z на Mac или Control+Z на Windows, чтобы отменить изменение.
-
5
Завершите редактирование. Нажмите «Enter» и закройте инспектор кода. Теперь на странице сайта будет отображен текст или изображение, которое вы добавили. Естественно, сама страница не была отредактирована, и при ее обновлении все внесенные вами изменения пропадут.
Реклама


Об этой статье
Эту страницу просматривали 68 727 раз.
Была ли эта статья полезной?
HTML
<!DOCTYPE html>
<html lang=»ru»>
<head>
<meta charset=»utf-8″>
<link rel=»stylesheet» href=»setting.css»>
<link rel=»stylesheet» href=»style.css»>
<title>FlashNews!</title>
</head>
<body class=»page light-theme»>
<header class=»page-header»>
<div class=»container»>
<a class=»header-link» href=»#»>На главную</a>
<button class=»theme-button» type=»button»>Изменить тему</button>
</div>
</header>
<main class=»inner-main»>
<div class=»container»>
<h1 class=»inner-heading»>Подпишитесь на нашу рассылку</h1>
<p class=»subscription-message»>Обещаем присылать вам новости не чаще одного раза в день, причём только самые интересные и важные.</p>
<form action=»https://echo.htmlacademy.ru/courses» method=»post» class=»subscription»>
<div class=»subscription-inner»>
<label class=»subscription-label» for=»subscription-email»>email</label>
<input type=»email» class=»subscription-email» placeholder=»keks@flashnews.ru» value=»» required id=»subscription-email»>
</div>
<button class=»button subscription-button» type=»submit»>Подписаться</button>
</form>
<section class=»news-list list-tiles-view»>
<h2 class=»news-list-heading»>Или почитайте ещё немного новостей</h2>
<article class=»new-block»>
<img src=»img/new-graph.jpg» alt=»Новая библиотека»>
<div class=»new-block-text»>
<h3>Новая библиотека для создания графиков</h3>
<p>Теперь вы можете создать дашборд за считанные секунды.</p>
<time datetime=»2019-10-16″>16 октября 2019</time>
</div>
</article>
<article class=»new-block»>
<img src=»img/new-robot.jpg» alt=»Что там у роботов?»>
<div class=»new-block-text»>
<h3>Что там у роботов?</h3>
<p>В робототехнике происходит много интересного, эта новость могла бы быть об этом, но нет.</p>
<time datetime=»2019-10-15″>15 октября 2019</time>
</div>
</article>
</section>
</div>
</main>
<footer class=»page-footer»>
<div class=»container»>
<p>© FlashNews!</p>
<a class=»footer-logo»>
<img src=»img/white-logo.svg» alt=»Логотип портала FlashNews!»>
</a>
</div>
</footer>
<script src=»script.js»></script>
</body>
</html>