В современных десктопных и (в особенности) мобильных процессорах применяется целый ряд энергосберегающих технологий: ODCM, CxE, EIST и др. Сегодня нас будет интересовать, пожалуй, самая высокоуровневая из них: гибкое управление частотой и напряжением процессорного ядра во время работы — Cool ‘n’ Quiet, PowerNow! у AMD и Enhanced SpeedStep (EIST) у Intel.
Чаще всего пользователю компьютера или ноутбука достаточно просто включить (поставить галочку) поддержку той или иной технологии в BIOS и/или операционной системе — никакой тонкой настройки обычно не предусмотрено, хотя, как показывает практика, она может оказаться весьма полезной. В этой статье я расскажу о том, как можно управлять рабочим напряжением ядра процессора из операционной системы (на примере Intel Pentium M и FreeBSD), и зачем это может понадобиться.
Несмотря на большое количество руководств, редко где встретишь обстоятельное описание технологии Enhanced SpeedStep с точки зрения операционной системы (а не конечного пользователя), особенно на русском языке, поэтому значительная часть статьи посвящена деталям реализации и носит в некоторой степени теоретический характер.
Надеюсь, статья окажется полезной не только пользователям FreeBSD: мы также немного коснемся GNU/Linux, Windows и Mac OS X. Впрочем, в данном случае конкретная операционная система имеет второстепенное значение.
Предисловие
В прошлом году я проапгрейдил процессор в своем стареньком ноутбуке: поставил Pentium M 780 вместо штатного 735-го, добил до максимума, так сказать. Ноут стал больше греться под нагрузкой (за счет возросшего на 10 Вт тепловыделения); я не особо обращал на это внимание (разве что на всякий случай почистил и смазал кулер), но в один прекрасный день, во время длительной компиляции компьютер… просто выключился (температура таки-достигла критических ста градусов). Я вывел значение системной переменной hw.acpi.thermal.tz0.temperature в трей, чтобы понаблюдать за температурой и, если что, вовремя прервать «тяжелую» задачу. Но через какое-то время я потерял бдительность (температура всегда оставалась в пределах нормы), и все повторилось. В этот момент я решил, что больше не хочу ни постоянно опасаться аварийного выключения во время длительной нагрузки CPU и держать руку на Ctrl-C, ни насиловать процессор.
Обычно изменение штатного напряжения подразумевает его повышение с целью обеспечить стабильную работу процессора при разгоне (т.е. на повышенной частоте). Грубо говоря, каждому значению напряжения соответствует некоторый диапазон частот, на которых он может работать, и задача оверклокера — найти максимальную частоту, на которой процессор еще не «глючит». В нашем случае задача стоит в некотором смысле симметричная: для известной частоты (точнее, как мы вскоре выясним, набора частот) найти наименьшее напряжение, обеспечивающее стабильную работу CPU. Понижать же рабочую частоту не хочется, чтобы не потерять в производительности — ноут и так уже далеко не топовый. Кроме того, понижать напряжение выгоднее.
Немного теории
Как известно, тепловыделение процессора пропорционально его емкости, частоте и квадрату напряжения (кому интересно, почему это так, могут попробовать вывести зависимость самостоятельно, рассмотрев процессор как набор элементарных CMOS-инверторов (логических отрицателей), либо сходить по ссылкам: раз, два, три).
Современные мобильные процессоры могут потреблять до 50-70 Вт, которые в итоге рассеивают в тепло. Это очень много (вспомните лампы накаливания), особенно для ноутбука, который в автономном режиме под нагрузкой будет «кушать» аккумулятор как та свинья апельсины. В условиях ограниченного пространства тепло, скорее всего, придется отводить активно, а это означает дополнительный расход энергии на вращение вентилятора кулера (возможно, нескольких).
Естественно, такое положение дел никого не устраивало, и производители процессоров стали думать, как бы оптимизировать энергопотребление (и, соответственно, теплоотдачу), а заодно и предотвратить процессор от перегрева. Интересующимся рекомендую к прочтению ряд замечательных статей Дмитрия Беседина, а я тем временем перейду непосредственно к делу.
Немного истории
Впервые технология SpeedStep (версия 1.1) появилась во втором поколении третьих пентиумов (производимые по .18 мкм техпроцессу мобильные Coppermine для ноутбуков, 2000 г.), которые в зависимости от нагрузки или источника питания компьютера — сеть или аккумулятор — могли переключаться между высокой и низкой частотами за счет переменного множителя. В экономном режиме процессор потреблял примерно вдвое меньше энергии.
С переходом на .13 мкм техпроцесс технология получает номер версии 2.1 и становится «улучшенной» (enhanced) — теперь процессор умеет понижать не только частоту, но и напряжение. Версия 2.2 — адаптация для архитектуры NetBurst, а к третьей версии (платформа Centrino) технология станет официально называться Enhanced Intel SpeedStep (EIST).
Версия 3.1 (2003 г.) впервые применяется в первом и втором поколениях процессоров Pentium M (ядра Banias и Dothan). Частота варьировалась (сначала — лишь переключалась между двумя значениями) от 40% до 100% от базовой, с шагом 100 МГц (для Banias) или 133 МГц (для Dothan, наш случай). Одновременно Intel вводит динамическое управление емкостью кэша второго уровня (L2), что позволяет еще лучше оптимизировать энергопотребление. Версия 3.2 (Enhanced EIST) — адаптация для многоядерных процессоров с общим L2-кэшем. (Небольшой FAQ от Intel по технологии SpeedStep.)
Теперь, вместо того, чтобы слепо следовать многочисленным howto и туториалам, скачаем pdf’ку и попробуем разобраться в принципе работы EST (я буду дальше использовать эту аббревиатуру, т.к. она универсальнее и короче).
Как работает EST
Итак, EST позволяет управлять производительностью и энергопотреблением процессора, причем динамически, во время его работы. В отличие от более ранних реализаций, которые требовали аппаратной поддержки (в чипсете) для изменения рабочих параметров процессора, EST позволяет программно, т.е. средствами BIOS или операционной системы, изменять множитель (отношение частоты процессора к частоте шины) и напряжение ядра (Vcc) в зависимости от нагрузки, типа источника питания компьютера, температурного режима CPU и/или настроек (политики) ОС.
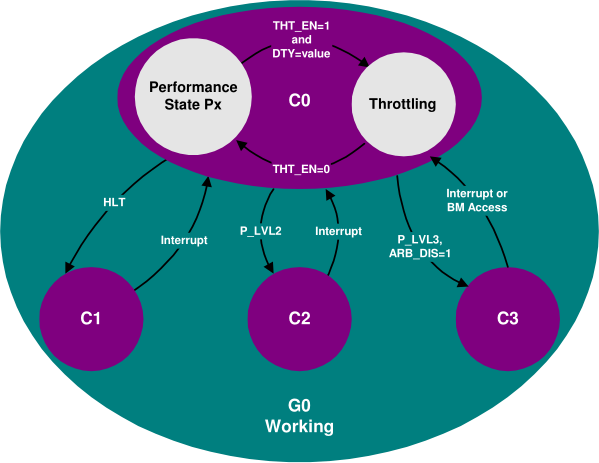
Во время работы процессор находится в одном из нескольких состояний (power states): T (throttle), S (sleep), C (idle), P (performance), переключаясь между ними по определенным правилам (с. 386 спецификации ACPI 5.0).
Каждый процессор, присутствующий в системе, должен быть описан в таблице DSDT, чаще всего в пространстве имен _PR, и обычно предоставляет ряд методов, через которые происходит взаимодействие с операционной системой (драйвером PM), и которые описывают возможности процессора (_PDC, _PPC), поддерживаемые состояния (_CST, _TSS, _PSS) и управление ими (_PTC, _PCT). Нужные значения для каждого CPU (если он входит в т.н. CPU support package) определяются BIOS’ом материнской платы, который заполняет соответствующие таблицы и методы ACPI (с. 11 pdf’ки) при загрузке машины.
EST управляет работой процессора в P-состоянии (P-state), они-то и будут нас интересовать. К примеру, Pentium M поддерживает шесть P-состояний (см. рис. 1.1 и таб. 1.6 pdf’ки), отличающихся напряжением и частотой:

В общем случае, когда процессор заранее неизвестен, единственным более-менее надежным (и рекомендуемым Intel) методом работы с ним является ACPI. С конкретным процессором можно взаимодействовать напрямую, минуя ACPI, — через регистры MSR (Model-Specific Register), в том числе и непосредственно из командной строки: начиная с версии 7.2, во FreeBSD для этого используется утилита cpucontrol(8).
Узнать, поддерживает ли ваш процессор EST, можно взглянув на 16-й бит в регистре IA_32_MISC_ENABLE (0x1A0), он должен быть установлен:
# kldload cpuctl
# cpucontrol -m 0x1a0 /dev/cpuctl0 | (read _ msr hi lo ; echo $((lo >> 16 & 1)))
1
Аналогичная команда для GNU/Linux (потребуется пакет msr-tools):
# modprobe msr
# echo $((`rdmsr -c 0x1a0` >> 16 & 1))
1
Переход между состояниями происходит при записи в регистр IA32_PERF_CTL (0x199). Узнать текущий режим работы можно прочитав регистр IA32_PERF_STATUS (0x198), который обновляется динамически (таб. 1.4 pdf’ки). В дальнейшем префикс IA32_ я буду для краткости опускать.
Попробуем для начала прочитать текущее значение PERF_STATUS:
# cpucontrol -m 0x198 /dev/cpuctl0
MSR 0x198: 0x0612112b 0x06000c20
Из документации следует, что текущее состояние кодируется в нижних 16 битах (если выполнить команду несколько раз, их значение может меняться — это означает, что EST работает). Если посмотреть внимательнее на остальные биты, в них тоже явно не мусор. Погуглив, можно выяснить, что же они означают.
Структура регистра PERF_STATUS
Данные, читаемые из PERF_STATUS, представляются следующей структурой (положим, что данные хранятся как little-endian):
struct msr_perf_status {
	unsigned curr_psv	: 16;		/* Current PSV */
	unsigned status	: 8;		/* Status flags */
	unsigned min_mult	: 8;		/* Minimum multiplier */
	unsigned max_psv	: 16;		/* Maximum PSV */
	unsigned init_psv	: 16;		/* Power-on PSV */
};
Три 16-битных поля — это так называемые Performance State Values (PSV), их структуру мы рассмотрим ниже: текущее значение PSV, максимальное (зависит от процессора) и значение на старте системы (при включении). Текущее значение (curr_psv), очевидно, меняется при изменении режима работы, максимальное (max_psv) обычно остается постоянным, стартовое значение (init_psv) не меняется: как правило, оно равно максимальному значению для десктопов и серверов, но минимальному для мобильных CPU. Минимальный множитель (min_mult) для процессоров Intel почти всегда равен шести. Поле status содержит значение некоторых флагов, например, при наступлении событий EST или THERM (т.е. в момент изменения P-состояния или перегрева процессора, соответственно).
Теперь, когда мы знаем назначение всех 64 бит регистра PERF_STATUS, мы можем расшифровать прочитанное выше слово: 0x0612112b 0x06000c20 ⇒ PSV на старте 0x0612, максимальное значение 0x112b, минимальный множитель 6 (как и ожидалось), флаги сброшены, текущее значение PSV = 0x0c20. Что именно означают эти 16 бит?
Структура Performance State Value (PSV)
Знать и понимать, что из себя представляет PSV, очень важно, ведь именно в таком виде задаются режимы работы процессора.
struct psv {
	unsigned vid 	: 6;	/* Voltage Identifier */
	unsigned _reserved1	: 2;
	unsigned freq	: 5;	/* Frequency Identifier */
	unsigned _reserved2	: 1;
	unsigned nibr	: 1;	/* Non-integer bus ratio */
	unsigned slfm	: 1;	/* Dynamic FSB frequency (Super-LFM) */
};
Dynamic FSB frequency switching указывает пропускать каждый второй такт FSB, т.е. вдвое понижать рабочую частоту; эта возможность впервые реализована в процессорах Core 2 Duo (ядро Merom) и нас не касается, как и Non-integer bus ratio — специальный режим, поддерживаемый некоторыми процессорами, позволяющий, как следует из названия, более тонко управлять их частотой.
К собственно технологии EST имеют отношения два поля — идентификаторы частоты (Frequency Identifier, Fid), который численно равен множителю, и напряжения (Voltage Identifier, Vid), который соответствует уровню напряжения (он же обычно и наименее документирован).
Идентификатор напряжения (Voltage Identifier)
Intel весьма неохотно раскрывает информацию (обычно требуется подписать NDA) о том, как именно кодируется идентификатор напряжения для каждого процессора. Но для большинства популярных CPU, к счастью, эта формула известна; в частности, для нашего Pentium M (и многих других): Vcc = Vid0 + (Vid × Vstep), где Vcc — текущее (действительное) напряжение, Vid0 — базовое напряжение (когда Vid == 0), Vstep — шаг. Таблица для некоторых популярных процессоров (все значения в милливольтах):
| Процессор | Vid0 | Vstep | Vboot | Vmin | Vmax |
|---|---|---|---|---|---|
| Pentium M | 700,0 | 16,0 | xxxx,x | xxx,x | xxxx,x |
| E6000, E4000 | 825,0 | 12,5 | 1100,0 | 850,0 | 1500,0 |
| E8000, E7000 | 825,0 | 12,5 | 1100,0 | 850,0 | 1362,5 |
| X9000 | 712,5 | 12,5 | 1200,0 | 800,0 | 1325,0 |
| T9000 | 712,5 | 12,5 | 1200,0 | 750,0 | 1300,0 |
| P9000, P8000 | 712,5 | 12,5 | 1200,0 | 750,0 | 1300,0 |
| Q9000D, Q8000D | 825,0 | 12,5 | 1100,0 | 850,0 | 1362,5 |
| Q9000M | 712,5 | 12,5 | 1200,0 | 850,0 | 1300,0 |
Множитель (т.е. Fid) записывается в PSV сдвинутым на 8 бит влево, младшие шесть бит занимает Vid. Т.к. в нашем случае остальными битами можно пренебречь, то PSV, частота процессора, системной шины и физическое напряжение связаны простой формулой (для Pentium M):
![]()
Теперь рассмотрим регистр управления (PERF_CTL). Запись в него должна производиться следующим образом: сначала считывается текущее значение (64-битное слово целиком), в нем изменяются нужные биты, и записывается обратно в регистр (т.н. read-modify-write).
Структура регистра PERF_CTL
struct msr_perf_ctl {
	unsigned psv	: 16;	/* Requested PSV */
	unsigned _reserved1	: 16;
	unsigned ida_diseng	: 1;	/* IDA disengage */
	unsigned _reserved2	: 31;
};
IDA (Intel Dynamic Acceleration) disengage-бит позволяет временно отключать адаптивное (opportunistic) управление частотой на процессорах Intel Core 2 Duo T7700 и более поздних, — опять же, нас не интересует. Младшие 16 бит (PSV) — режим, в который мы «просим» перейти процессор.
Таблица _PSS
Таблица _PSS представляет собой массив состояний (Package в терминологии ACPI) или метод, который возвращает такой массив; каждое состояние (P-state) в свою очередь определяется следующей структурой (с. 409 спецификации ACPI):
struct Pstate {
	unsigned CoreFrequency;	/* Core CPU operating frequency, MHz */
	unsigned Power;		/* Maximum power dissipation, mW */
	unsigned Latency;		/* Worst-case latency of CPU unavailability during transition, µs */
	unsigned BusMasterLatency;	/* Worst-case latency while Bus Masters are unable to access memory, µs */
	unsigned Control;		/* Value to be written to the PERF_CTL to switch to this state */
	unsigned Status;		/* Value (should be equal to the one read from PERF_STATUS) */
};
Таким образом, каждое P-состояние характеризуется какой-то рабочей частотой ядра, максимальной рассеиваемой мощностью, транзитными задержками (фактически это время перехода между состояниями, в течении которых недоступны CPU и память), наконец, самое интересное: PSV, которое соответствует данному состоянию и которое надо записать в PERF_CTL, чтобы в это состояние перейти (Control). Чтобы убедиться, что процессор успешно перешел в новое состояние, нужно прочитать регистр PERF_STATUS и сравнить со значением, записанным в поле Status.
EST-драйвер операционной системы может «знать» про некоторые процессоры, т.е. сумеет ими управлять и без поддержки ACPI. Но это редкость, особенно в наши дни (хотя для undervolting’а на Linux, где-то до версии 2.6.20, надо было патчить таблицы в драйвере, и еще в 2011 г. этот метод был весьма распространен).
Стоит отметить, что EST-драйвер может работать даже в случае отсутствия таблицы _PSS и неизвестного процессора, т.к. максимальное и минимальное значения можно узнать из PERF_STATUS (при этом, очевидно, число P-состояний вырождается в два).
Довольно теории. Что с этим всем делать?
Теперь, когда мы знаем 1) назначение всех битов в нужных словах MSR, 2) как именно кодируется PSV для нашего процессора, и 3) где в DSDT искать нужные настройки, самое время составить таблицу частот и напряжений по умолчанию. Сдампим DSDT и поищем там таблицу _PSS. Для Pentium M 780 она должна выглядеть как-то так:
Default _PSS values
    Name (_PSS, Package (0x06) {	// Всего определено 6 состояний (P-states)
        Package (0x06) {
            0x000008DB,			// 2267 MHz (cf. Fid × FSB clock)
            0x00006978,			// 27000 mW
            0x0000000A,			// 10 µs (соответствует спецификации)
            0x0000000A,			// 10 µs
            0x0000112B,			// 0x11 = 17 (множитель, Fid), 0x2b = 43 (Vid)
            0x0000112B
        },
        Package (0x06) {
            0x0000074B,			// 1867 MHz (82% от максимальной)
            0x000059D8,			// 23000 mW
            0x0000000A,
            0x0000000A,
            0x00000E25,			// Fid = 14, Vid = 37
            0x00000E25
        },
        Package (0x06) {
            0x00000640,			// 1600 MHz (71% от максимальной)
            0x00005208,			// 21000 mW
            0x0000000A,
            0x0000000A,
            0x00000C20,			// Fid = 12, Vid = 32
            0x00000C20
        },
        Package (0x06) {
            0x00000535,			// 1333 MHz (59% от максимальной)
            0x00004650,			// 18000 mW
            0x0000000A,
            0x0000000A,
            0x00000A1C,			// Fid = 10, Vid = 28
            0x00000A1C
        },
        Package (0x06) {
            0x0000042B,			// 1067 MHz (47% от максимальной)
            0x00003E80,			// 16000 mW
            0x0000000A,
            0x0000000A,
            0x00000817,			// Fid = 8, Vid = 23
            0x00000817
        },
        Package (0x06) {
            0x00000320,			// 800 MHz (35% от максимальной)
            0x000032C8,			// 13000 mW
            0x0000000A,
            0x0000000A,
            0x00000612,			// Fid = 6, Vid = 18
            0x00000612
        }
    })
Итак, мы знаем дефолтные Vid для каждого P-уровня: 43, 37, 32, 28, 23, 18, что соответствует напряжениям от 1388 mV до 988 mV. Суть undervolting’а в том, что наверняка эти напряжения несколько выше, чем реально необходимо для устойчивой работы процессора. Попробуем определить «границы дозволенного».
Я написал для этого простой shell-скрипт, который постепенно понижает Vid и выполняет несложный цикл (демон powerd(8) перед этим, разумеется, необходимо прибить). Таким образом я определил напряжения, позволяющие процессору хотя бы не виснуть, затем прогнал несколько раз тест Super Pi и пересборку ядра; уже позже я поднял значение Vid для двух максимальных частот еще на один пункт, иначе gcc изредка вылетал из-за ошибки illegal instruction. В результате всех экспериментов в течении нескольких дней получился такой набор “стабильных” Vid: 30, 18, 12, 7, 2, 0.
Анализ результатов
Теперь, когда мы эмпирически определили минимальные безопасные напряжения, интересно сравнить их с исходными:
| Частота, МГц (множитель) | Vidold | Vidnew | Изменение Vcc |
|---|---|---|---|
| 2267 (17) | 43 | 30 | -15% |
| 1867 (14) | 37 | 18 | -24% |
| 1600 (12) | 32 | 12 | -26% |
| 1333 (10) | 28 | 7 | -29% |
| 1067 (8) | 23 | 2 | -31% |
| 800 (6) | 18 | 0 | -29% |
Понижение максимального напряжения даже на 15% принесло довольно ощутимые результаты: длительная нагрузка не только не приводит больше к перегреву процессора и аварийному отключению, температура вообще теперь почти никогда не превышает 80°C. Прогнозируемое время работы от аккумулятора в «офисном» режиме, судя по acpiconf -i 0, увеличилось с 1 ч. 40 м. до 2 ч. 25 м. (Не ахти как много, но литий-ионные элементы со временем «устают», а аккумулятор я не менял с момента покупки ноутбука лет семь тому назад.)
Теперь надо сделать так, чтобы настройки применялись автоматически. Можно, например, модифицировать драйвер cpufreq(4), чтобы значения PSV брались из собственной таблицы, а не через ACPI. Но это неудобно уже хотя бы тем, что нужно не забывать патчить драйвер при обновлении системы, да и вообще — больше похоже на грязный хак, чем на решение. Можно, наверное, еще как-то пропатчить powerd(8), что плохо примерно по тем же причинам. Можно просто запускать скрипт, понижая напряжение прямой записью в MSR (что, собственно, я и делал для определения «стабильных» напряжений), но тогда придется помнить о и самостоятельно обрабатывать переходы между состояниями (не только P-states, вообще любыми, например, при выходе ноутбука из сна). Тоже не дело.
Если мы получаем значения PSV через ACPI, то логичнее всего изменить именно таблицу _PSS в DSDT. К счастью, BIOS для этого ковырять не придется: FreeBSD умеет загружать DSDT из файла (про модификацию таблиц ACPI на Хабре уже не раз писали, поэтому сейчас подробно на этом останавливаться не будем). Заменяем нужные поля в DSDT:
Undervolting patch for _PSS
@@ -7385,8 +7385,8 @@
             0x00006978,
             0x0000000A,
             0x0000000A,
-            0x0000112B,
-            0x0000112B
+            0x0000111D,
+            0x0000111D
         },

         Package (0x06)
@@ -7395,8 +7395,8 @@
             0x000059D8,
             0x0000000A,
             0x0000000A,
-            0x00000E25,
-            0x00000E25
+            0x00000E12,
+            0x00000E12
         },

         Package (0x06)
@@ -7405,8 +7405,8 @@
             0x00005208,
             0x0000000A,
             0x0000000A,
-            0x00000C20,
-            0x00000C20
+            0x00000C0C,
+            0x00000C0C
         },

         Package (0x06)
@@ -7415,8 +7415,8 @@
             0x00004650,
             0x0000000A,
             0x0000000A,
-            0x00000A1C,
-            0x00000A1C
+            0x00000A07,
+            0x00000A07
         },

         Package (0x06)
@@ -7425,8 +7425,8 @@
             0x00003E80,
             0x0000000A,
             0x0000000A,
-            0x00000817,
-            0x00000817
+            0x00000802,
+            0x00000802
         },

         Package (0x06)
@@ -7435,8 +7435,8 @@
             0x000032C8,
             0x0000000A,
             0x0000000A,
-            0x00000612,
-            0x00000612
+            0x00000600,
+            0x00000600
         }
     })
Компилируем новый AML-файл (байткод ACPI) и модифицируем /boot/loader.conf так, чтобы FreeBSD загружала нашу модифицированную DSDT вместо дефолтной:
acpi_dsdt_load="YES"
acpi_dsdt_name="/root/undervolt.aml"
Вот, в общем, и все. Единственное, не забудьте закомментировать эти две строчки в /boot/loader.conf, если будете менять процессор.
Даже если вы не собираетесь понижать штатные напряжения, умение настраивать управление состояниями процессора (не только P-states) может пригодиться. Ведь нередко бывает, что «кривой» BIOS заполняет таблицы неверно, не полностью, или не заполняет их вовсе (например потому, что стоит не поддерживающий EST целерон, а производитель официально не предусматривает его замену). В этом случае вам придется проделать всю работу самостоятельно. Обратите внимание, что добавить одну лишь таблицу _PSS может оказаться недостаточно; так, C-states задаются таблицей _CST, и кроме того, может потребоваться описать сами процедуры управления (Performance Control, _PCT). К счастью, это несложно и довольно подробно, с примерами, описано в восьмой главе спецификации ACPI.
Undervolting в GNU/Linux
По правде говоря, сначала я думал, что мне достаточно будет прочитать Gentoo Undervolting Guide и просто адаптировать его для FreeBSD. Это оказалось не так-то просто, ибо документ на поверку оказался на редкость бестолковым (что вообще-то странно для Gentoo Wiki). К сожалению, на их новом сайте я ничего похожего не нашел, пришлось довольствоваться старой копией; и хотя я понимаю, что это руководство во многом потеряло актуальность, я все же его немного покритикую. 
Мне почему-то сразу,
без объявления войны,
предлагают патчить ядро (во FreeBSD, на минуточку, нам вообще никакой системный код модифицировать не пришлось). Забивать во внутренности драйвера или записывать в какие-то init-скрипты значения неких «безопасных» напряжений, непонятно кем и каким образом полученные, из специальной таблицы (в которой Pentium M 780 издевательски представлен строкой, состоящей из одних вопросительных знаков). Следовать советам, среди которых есть написанные людьми, которые явно вообще не понимают, о чем говорят. А главное, совершенно неясно, почему и как именно эти магические замены одних цифр на другие работают; не предлагается способа «потрогать» EST, прежде чем что-то патчить и пересобирать ядро, ни разу не упоминаются регистры MSR и работа с ними из командной строки. Не рассматривается модификация таблиц ACPI как альтернативный и более предпочтительный вариант.
На ThinkWiki руководство чуть получше (и поновее), но не намного. Еще более лаконично выглядит страница ArchWiki. Вот эта строчка доставляет особенно:
# echo 34 26 18 12 8 5 > /sys/devices/system/cpu/cpu0/cpufreq/phc_vidsТак и просятся лостовские «4, 8, 15, 16, 23, 42» (правда, в обратном порядке, что несколько портит шутку).
Пожалуй, самое толковое описание всего процесса для Linux у Пата Эрлея, ссылку на которое я давал выше.
Undervolting в Windows и Mac OS X
Про Windows особо говорить смысла нет: есть и софт, и обсуждения на форумах, поэтому я просто оставлю здесь пару ссылок.
Макось довольно плотно взаимодействует с (и рассчитывает на корректную работу) ACPI, и модификация таблиц — один из основных методов ее настройки под конкретное железо. Поэтому первое, что приходит в голову — точно так же сдампить и пропатчить свою DSDT. Альтернативный метод: google://IntelEnhancedSpeedStep.kext, например, раз, два, три.
Еще одна «чудесная» утилита (к счастью, уже устаревшая) предлагает купить за $10 возможность менять напряжение и частоту.
Что еще почитать
Для FreeBSD: тема на форуме, а также небезызвестное обсуждение в рассылке; исходное письмо Александра Мотина для удобства викифицировано. Для Linux можно начать с неплохой статьи в ArchWiki.
Для тех, кто хочет углубиться в тему, кроме официальной документации производителей процессоров и приведенных в тексте ссылок, вот здесь — отличная подборка материалов (исследовательских статей, презентаций) по широкому кругу вопросов управления энергопотреблением (осторожно, Comic Sans).
Be it a laptop or a desktop PC, the performance of your CPU is crucial to the way the device works, and can impact just about everything you do. Although overclocking is the most common CPU tweak that enthusiasts perform, modern chips can also benefit from undervolting.
Contents
- What is CPU undervolting?
- Undervolting vs underclocking vs overclocking
- Is undervolting the CPU safe?
- Prepare for undervolting
- How to undervolt your CPU using Throttlestop
- How to undervolt your CPU with AMD Ryzen Master
Undervolting the processor involves lowering its operating voltage. This can be done by just about anyone through the use of software. Lowering your CPU’s voltage should result in a few benefits, such as lower power consumption and temperatures, without affecting its performance in any major way — and in some cases it might even improve it. If you want to learn how to undervolt your CPU, keep reading — we’ll walk you through it in a few easy steps.
Jacob Roach / Digital Trends
What is CPU undervolting?
Undervolting your CPU refers to the process of lowering the amount of power that your processor receives. On paper, this may not sound like a good idea, but it actually brings more benefits than it brings risks. When done correctly, undervolting can help your processor function well without getting overwhelmed, and this, in turn, affects the performance of your entire computer.
As your CPU draws less power, you gain more than just small savings on your next power bill. Undervolting also lowers the temperatures generated by your processor, may potentially reduce the strain on it over time, and for laptop users, it may have beneficial effects on your battery life.
Undervolting is typically mostly done on Intel processors. This is because modern AMD CPUs, such as the Ryzen 5000 series, have a different architecture. As a result, they often have lower power requirements than Intel, to begin with. However, if you have an AMD CPU that is running a little hot, you could still try the steps we will go over below.
The processor is not the only component you can undervolt. You can also undervolt graphics cards (GPU) to achieve similar results — lower power consumption, lower temperatures, and stable performance. It’s okay to undervolt both the CPU and the GPU, but this is done separately and in different programs. If you want to tackle that next, check out our guide on undervolting the graphics card.
Undervolting your CPU is a fairly easy process, although at first, it might seem daunting — if only due to the vast number of options available in the software that’s most commonly used for it. However, with our guide, anyone can do it.

Undervolting vs underclocking vs overclocking
If you’re not very familiar with the term, undervolting may be easy to confuse with underclocking or even overclocking your CPU, but all three of these things are different.
Underclocking refers to lowering your processor’s frequency. While this does usually result in lower temperatures and power draw, it doesn’t actually do anything good for your computer’s performance. As you lower the clock speed, your CPU will be forced to throttle its own performance and won’t put out the kind of performance you’d like to see.
Overclocking is the exact opposite of underclocking, meaning you’re pushing your computer’s clock speed past its base frequency. Most modern processors come with a base frequency and boost/turbo frequency, but overclockers can hit speeds even higher than the advertised numbers. When done correctly, this can improve your processor’s performance at the cost of higher power consumption and higher thermals. To some extent, you can undervolt while overclocking, but your mileage may vary.
Overclocking should be done carefully. Not every processor supports overclocking, and you should approach it with a degree of caution on the ones that do support it. We have a handy guide that helps you choose whether you should overclock your CPU, and once you decide to go ahead and do it, make sure to follow our tutorial on how to overclock your processor.

Is undervolting the CPU safe?
Undervolting your CPU is usually safe. That is not to say that it can’t be done wrong, though. If you happen to undervolt your processor too much, your computer may experience instability, crashes, and lowered performance. Most common issues include the blue screen of death (BSOD) and freezes.
Undervolting is a bit of an art form — you should never do too much all at once. It’s better to take things step by step and slowly work your way toward a certain voltage than to overdo it and accidentally cause a crash.
Fortunately, undervolting your CPU can easily be reverted if something goes wrong. You’ll simply have to redo the steps and adjust the voltage to a slightly higher number until your computer is stable once again.
In many cases, instead of being risky, undervolting is actually the safest thing to do. Laptops and small-form PCs are a good example of why undervolting is helpful. As the components are packed closely together, temperatures are often an issue, and overheating happens all too often. Undervolting your CPU can be one of the ways to address that problem, and if it works, you’ll be giving your processor a boost to its lifespan and its performance.
Prepare for undervolting
You’re free to try out a few different programs for undervolting, and we’ll go over all of them in our full guide below. However, regardless of the method you use to undervolt, the preparation and monitoring will always be the same. In order to know how much you can undervolt your CPU, and to know whether you were able to achieve an improvement, you should first test your processor.
Step 1: Download a benchmarking program. You will use it periodically throughout and after your undervolting attempts.
A good way to test your CPU is to use CPU-Z, but there are other programs that can do this as well, so feel free to use software of your own choice. Make sure that it will be able to put your processor through a stress test.

Step 2: Open up CPU-Z and then move on to downloading another program: HWMonitor. This program will help you keep track of both your temperatures and your voltage while you tinker with it.
Step 3: With HWMonitor running, run your CPU-Z benchmark and take note of the figures that HWMonitor will be showing.
You want to take special note of the temperatures of all your cores as well as the maximum voltage they reach during the benchmark. It’s best to write this down so that you don’t forget. This will be your starting point from which you will begin your undervolting journey.
With both programs running, move on to the next section of our guide, in which we will show you all the ways to undervolt your CPU.
How to undervolt your CPU using Throttlestop
If you’ve decided to give undervolting a try, follow all the steps below to achieve the desired results. All you’ll need is a computer with an internet connection to download the program we will use for undervolting. In this section, we’ll cover using TechPowerUp’s tool called Throttlestop.
Throttlestop mainly works on Intel, but in theory, it should work on AMD too. If you’re running into issues on your AMD processor and can’t get the program to work, check out our other options below.
Step 1: First, you need to set up Throttlestop. Download it directly from TechPowerUp’s website. The program is only available on Windows, and usually, two versions are available: Beta and the latest stable version. It’s better to use the stable version if you’re unfamiliar with the program.
Unzip the file and run Throttlestop.exe. You will be presented with a warning stating that the software can make significant changes to your CPU. It’s true that it can, but we’re not going to do anything particularly dangerous, so press OK and proceed.
Step 2: Once you run Throttlestop, you’ll see many options as well as an overview of your processor’s current temperatures. Unless you’ve ever tried undervolting before, these settings will be your baseline — this is what your processor came out of the box with.
It’s worth noting that as you proceed, you’ll be making changes to these settings, but it’s quite easy to go back to this initial state.
You can revert the changes at any time by locating your Throttlestop folder and finding the file named «Throttlestop.ini». To go back to your previous settings, simply delete or rename the file, shut down your computer, and then start it up again.
For now, let’s undervolt.

Step 3: In the main Throttlestop window, on the left side, locate Speed Shift — EPP and tick that option. On Intel processors, this enables the Speed Shift technology, also known as Hardware Controlled Performance. It’s responsible for improving performance and responsiveness by letting the processor quickly switch to the best voltage/frequency option given the current workload.
Locate FIVR and press it. This will open up a new window with a whole lot of settings. We’re only going to need to tweak a few.

Step 4: In the middle column titled «FIVR Control,» locate CPU Core Voltage and tick the first option right underneath: Unlock Adjustable Voltage. Other than that, we’re also going to tweak CPU Core, CPU Cache, and Intel GPU. Unsurprisingly, if you’re trying to use this program on an AMD processor, this last option may be greyed out or unavailable to you.
Start by ticking some necessary boxes. Make sure CPU Core is selected, and also Adaptive a little under that. The next step will be to start undervolting.

Step 5: In order to undervolt your CPU, you need to adjust the Offset Voltage. You should be doing this in small increments and the final amount depends on your processor. Older CPUs can struggle with a bigger undervolt. Meanwhile, modern processors such as Intel Alder Lake and similar generations can handle a bigger power adjustment, especially seeing as they consume a whole lot more power in the first place.
You can start by adjusting the millivolt (mV) value by a larger amount. This will depend on your chip, but -50mV should be a safe starting point. If your PC proves to function well with that, you can go back and redo these steps to lower the voltage even further.
Once you’ve adjusted the offset voltage, switch the selection at the top to CPU Cache and adjust the undervolt to the same value as CPU Core. Lastly, pick Intel GPU and undervolt it slightly if you want: Anywhere in the 25-50mV range should be fine. However, it’s okay to skip Intel GPU if you experience stability issues later on, as it doesn’t do very much for your temperatures and voltage compared to the other settings.
Once you’ve adjusted everything, press Apply. If your computer doesn’t immediately crash (which can happen, but don’t worry if it does — you’ll just have to go easy on it next time), you should also select OK — Save Voltages Immediately and click Apply once again.
Step 6: It’s time to put your new voltages to the test and see whether your laptop or desktop remains stable when undervolted.
Run your CPU-Z benchmark and watch the temperatures/voltages in HWMonitor carefully. Compare these values to the ones you achieved prior to undervolting. You should already see an improvement.
If your computer makes it through the benchmark without crashing, you can perform a few more quick tests to ensure everything is fine:
* If you’re using a laptop, run the benchmark with the laptop unplugged (using up battery life)
* Restart the computer, put it to sleep, and wake it up
* Run every piece of software you usually have open. If you tend to play games while using Discord and Google Chrome, do that, but make sure you’re doing a lot of it — really try to stress your PC.
Assuming everything went fine, you can go back and repeat the above steps. This time, undervolt in smaller 5-10mV increments. You’ll eventually hit a wall and start experiencing crashes as you test your computer (or even before that point). This means it’s time to go back, bring your voltage slightly higher, and stick to the last point where everything was stable even when your computer was performing at 100%.
Step 7: This is an optional step that only applies to laptop users. However, if you’re on a desktop, you can consider doing this too if you feel you have any need for it.
You might want to set up two profiles for your Throttlestop: One for when your computer is plugged into the wall socket and one when you’re running on battery. As mentioned above, these undervolting values may be different and you may have to scale up or down depending on whether you’re plugged in or not. As such, it’s useful to have two different profiles to make sure you’re undervolting correctly.
You can set up the profiles by going back to the main Throttlestop window and clicking Options. Desktop users might want to do this for various reasons, but mostly, this applies to laptop users with a concern for their battery life.
In Options, on the right-hand side, you’ll find AC Profile and Battery Profile. Tick both boxes. Leave your AC Profile as number one and adjust your Battery Profile to number two. Click OK to save. Throttlestop will automatically adjust these profiles based on whether your computer is plugged in or not.
Now, when you go back into FIVR, you’ll be able to choose settings for each profile. Your AC Profile should be the one with the highest performance and the lowest undervolt. For your Battery Life profile, you can and should undervolt as much as possible in order to save battery life.

Step 8: For all its virtues, Throttlestop does have some flaws. To name one, it doesn’t automatically run these profiles when you start up your PC again. It also stays in the taskbar instead of the notification area unless you change a couple of settings. In this final step, you’ll set up Throttlestop to be always on, but minimized.
In the main Throttlestop window, click on Task Bar on the left side. Next, access Options, and select Start Minimized. Lastly, select Minimize on Close, and save with OK.
To make sure Throttlestop is on whenever you power up your PC, you’ll need to play with some Windows settings instead of the app itself. To do so, click the Windows logo on your taskbar or press the Windows key on your keyboard. Type in Task Scheduler into the search bar. Right-click the app and select Run As Administrator.
In the Windows Task Scheduler, navigate to Create Basic Task on the right-hand side. Name it Throttlestop and click Next when you’re ready.
On the left-hand side, click on Trigger. Choose When I Log On. Click Next and switch to Action, then select Start A Program, and navigate to your Throttlestop.exe file. Click Open. Select the option that will make it so that the properties dialogue for the task will open when you click Finish.
Enter Properties and make sure you select Run With Highest Privileges. Click OK to save. From now on, Throttlestop will open at startup and execute these settings each and every time.

How to undervolt your CPU with AMD Ryzen Master
If you own an AMD processor, Throttlestop may not work for you. Fortunately, you can still undervolt your processor if you so wish, but you’ll have to use a different program: AMD Ryzen Master. You can download it directly from AMD.
Before you download it and try to undervolt your processor, make sure that your CPU is supported. Any processor older than the Ryzen 2000 series will not work with this program. In addition, if you’re using a laptop equipped with an APU, you won’t be able to use this either.
AMD Ryzen Master is a program that lets you overclock, adjust power modes, overclock the integrated GPU, stress test your CPU and RAM, and more. Undervolting in AMD Ryzen Master is an intuitive process, and it’s a fair deal less scary than overclocking.
AMD fans can also use the automated overclocking and undervolting tool Clock Tuner, by 1usmus, for similar results.
Step 1: In the main Ryzen Master screen, navigate toward the bottom-left corner and switch to Basic View. You can play around with the settings in this full overview, but Basic Mode gives you access to what you need: CPU voltage. You can also switch between profiles if you’d like to have separate settings for each one.

AMD
Step 2: From here, undervolting is easy. Open up CPU-Z and HWMonitor, check your current voltages and temperatures while running a CPU benchmark, and write down the values.
Go back into Ryzen Master and try to lower the CPU Voltage (Volt) value. Much like with Throttlestop, you can start bigger with -50mV. Click Apply & Test to check whether this voltage works for your PC. You should also test it for yourself by running the benchmark yet again, tracking voltage and temperatures, and keeping a keen eye out for any crashes.
If the new setting works out, go back in and lower it in 5-10mV increments until you’re starting to experience issues or you’re satisfied with it. Click Apply & Test after each attempt and run all your tests to make sure the voltage is actually sustainable under duress.
Once you’re all done, you won’t have to re-apply these settings each time. They will stay this way until you decide to change them. You can always reset the settings by clicking Default in the top-right corner of the AMD Ryzen Master Basic View.
Keeping an eye on your CPU’s temperatures is an important step in undervolting and overclocking. For more help on monitoring your processor, check out our guide on how to check your CPU temperature.
![]()
Today’s tech news, curated and condensed for your inbox
Check your inbox!
Please provide a valid email address to continue.
This email address is currently on file. If you are not receiving newsletters, please check your spam folder.
Sorry, an error occurred during subscription. Please try again later.
Editors’ Recommendations
-
The best Samsung Galaxy Book 3 Ultra pre-order deal we’ve found
-
How to use WhatsApp Web
-
Great, hackers are now using ChatGPT to create malware
-
16-inch HP Spectre x360 2-in-1 laptop is $450 off for a limited time
-
Hogwarts Legacy PC: best settings, ray tracing, DLSS, and more
Be it a laptop or a desktop PC, the performance of your CPU is crucial to the way the device works, and can impact just about everything you do. Although overclocking is the most common CPU tweak that enthusiasts perform, modern chips can also benefit from undervolting.
Contents
- What is CPU undervolting?
- Undervolting vs underclocking vs overclocking
- Is undervolting the CPU safe?
- Prepare for undervolting
- How to undervolt your CPU using Throttlestop
- How to undervolt your CPU with AMD Ryzen Master
Undervolting the processor involves lowering its operating voltage. This can be done by just about anyone through the use of software. Lowering your CPU’s voltage should result in a few benefits, such as lower power consumption and temperatures, without affecting its performance in any major way — and in some cases it might even improve it. If you want to learn how to undervolt your CPU, keep reading — we’ll walk you through it in a few easy steps.
Jacob Roach / Digital Trends
What is CPU undervolting?
Undervolting your CPU refers to the process of lowering the amount of power that your processor receives. On paper, this may not sound like a good idea, but it actually brings more benefits than it brings risks. When done correctly, undervolting can help your processor function well without getting overwhelmed, and this, in turn, affects the performance of your entire computer.
As your CPU draws less power, you gain more than just small savings on your next power bill. Undervolting also lowers the temperatures generated by your processor, may potentially reduce the strain on it over time, and for laptop users, it may have beneficial effects on your battery life.
Undervolting is typically mostly done on Intel processors. This is because modern AMD CPUs, such as the Ryzen 5000 series, have a different architecture. As a result, they often have lower power requirements than Intel, to begin with. However, if you have an AMD CPU that is running a little hot, you could still try the steps we will go over below.
The processor is not the only component you can undervolt. You can also undervolt graphics cards (GPU) to achieve similar results — lower power consumption, lower temperatures, and stable performance. It’s okay to undervolt both the CPU and the GPU, but this is done separately and in different programs. If you want to tackle that next, check out our guide on undervolting the graphics card.
Undervolting your CPU is a fairly easy process, although at first, it might seem daunting — if only due to the vast number of options available in the software that’s most commonly used for it. However, with our guide, anyone can do it.
Undervolting vs underclocking vs overclocking
If you’re not very familiar with the term, undervolting may be easy to confuse with underclocking or even overclocking your CPU, but all three of these things are different.
Underclocking refers to lowering your processor’s frequency. While this does usually result in lower temperatures and power draw, it doesn’t actually do anything good for your computer’s performance. As you lower the clock speed, your CPU will be forced to throttle its own performance and won’t put out the kind of performance you’d like to see.
Overclocking is the exact opposite of underclocking, meaning you’re pushing your computer’s clock speed past its base frequency. Most modern processors come with a base frequency and boost/turbo frequency, but overclockers can hit speeds even higher than the advertised numbers. When done correctly, this can improve your processor’s performance at the cost of higher power consumption and higher thermals. To some extent, you can undervolt while overclocking, but your mileage may vary.
Overclocking should be done carefully. Not every processor supports overclocking, and you should approach it with a degree of caution on the ones that do support it. We have a handy guide that helps you choose whether you should overclock your CPU, and once you decide to go ahead and do it, make sure to follow our tutorial on how to overclock your processor.
Is undervolting the CPU safe?
Undervolting your CPU is usually safe. That is not to say that it can’t be done wrong, though. If you happen to undervolt your processor too much, your computer may experience instability, crashes, and lowered performance. Most common issues include the blue screen of death (BSOD) and freezes.
Undervolting is a bit of an art form — you should never do too much all at once. It’s better to take things step by step and slowly work your way toward a certain voltage than to overdo it and accidentally cause a crash.
Fortunately, undervolting your CPU can easily be reverted if something goes wrong. You’ll simply have to redo the steps and adjust the voltage to a slightly higher number until your computer is stable once again.
In many cases, instead of being risky, undervolting is actually the safest thing to do. Laptops and small-form PCs are a good example of why undervolting is helpful. As the components are packed closely together, temperatures are often an issue, and overheating happens all too often. Undervolting your CPU can be one of the ways to address that problem, and if it works, you’ll be giving your processor a boost to its lifespan and its performance.
Prepare for undervolting
You’re free to try out a few different programs for undervolting, and we’ll go over all of them in our full guide below. However, regardless of the method you use to undervolt, the preparation and monitoring will always be the same. In order to know how much you can undervolt your CPU, and to know whether you were able to achieve an improvement, you should first test your processor.
Step 1: Download a benchmarking program. You will use it periodically throughout and after your undervolting attempts.
A good way to test your CPU is to use CPU-Z, but there are other programs that can do this as well, so feel free to use software of your own choice. Make sure that it will be able to put your processor through a stress test.
Step 2: Open up CPU-Z and then move on to downloading another program: HWMonitor. This program will help you keep track of both your temperatures and your voltage while you tinker with it.
Step 3: With HWMonitor running, run your CPU-Z benchmark and take note of the figures that HWMonitor will be showing.
You want to take special note of the temperatures of all your cores as well as the maximum voltage they reach during the benchmark. It’s best to write this down so that you don’t forget. This will be your starting point from which you will begin your undervolting journey.
With both programs running, move on to the next section of our guide, in which we will show you all the ways to undervolt your CPU.
How to undervolt your CPU using Throttlestop
If you’ve decided to give undervolting a try, follow all the steps below to achieve the desired results. All you’ll need is a computer with an internet connection to download the program we will use for undervolting. In this section, we’ll cover using TechPowerUp’s tool called Throttlestop.
Throttlestop mainly works on Intel, but in theory, it should work on AMD too. If you’re running into issues on your AMD processor and can’t get the program to work, check out our other options below.
Step 1: First, you need to set up Throttlestop. Download it directly from TechPowerUp’s website. The program is only available on Windows, and usually, two versions are available: Beta and the latest stable version. It’s better to use the stable version if you’re unfamiliar with the program.
Unzip the file and run Throttlestop.exe. You will be presented with a warning stating that the software can make significant changes to your CPU. It’s true that it can, but we’re not going to do anything particularly dangerous, so press OK and proceed.
Step 2: Once you run Throttlestop, you’ll see many options as well as an overview of your processor’s current temperatures. Unless you’ve ever tried undervolting before, these settings will be your baseline — this is what your processor came out of the box with.
It’s worth noting that as you proceed, you’ll be making changes to these settings, but it’s quite easy to go back to this initial state.
You can revert the changes at any time by locating your Throttlestop folder and finding the file named «Throttlestop.ini». To go back to your previous settings, simply delete or rename the file, shut down your computer, and then start it up again.
For now, let’s undervolt.
Step 3: In the main Throttlestop window, on the left side, locate Speed Shift — EPP and tick that option. On Intel processors, this enables the Speed Shift technology, also known as Hardware Controlled Performance. It’s responsible for improving performance and responsiveness by letting the processor quickly switch to the best voltage/frequency option given the current workload.
Locate FIVR and press it. This will open up a new window with a whole lot of settings. We’re only going to need to tweak a few.
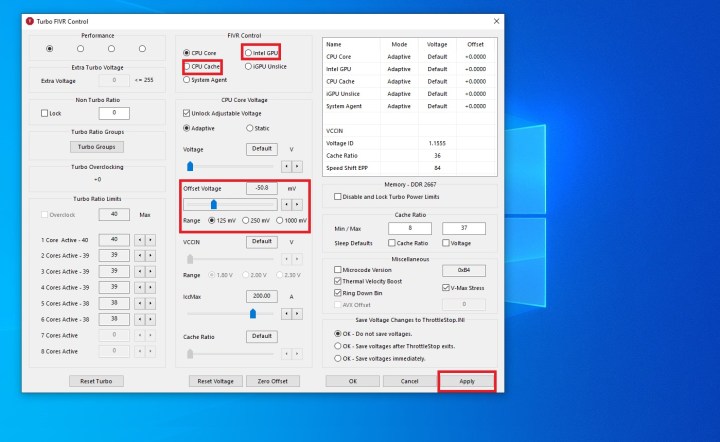
Step 4: In the middle column titled «FIVR Control,» locate CPU Core Voltage and tick the first option right underneath: Unlock Adjustable Voltage. Other than that, we’re also going to tweak CPU Core, CPU Cache, and Intel GPU. Unsurprisingly, if you’re trying to use this program on an AMD processor, this last option may be greyed out or unavailable to you.
Start by ticking some necessary boxes. Make sure CPU Core is selected, and also Adaptive a little under that. The next step will be to start undervolting.
Step 5: In order to undervolt your CPU, you need to adjust the Offset Voltage. You should be doing this in small increments and the final amount depends on your processor. Older CPUs can struggle with a bigger undervolt. Meanwhile, modern processors such as Intel Alder Lake and similar generations can handle a bigger power adjustment, especially seeing as they consume a whole lot more power in the first place.
You can start by adjusting the millivolt (mV) value by a larger amount. This will depend on your chip, but -50mV should be a safe starting point. If your PC proves to function well with that, you can go back and redo these steps to lower the voltage even further.
Once you’ve adjusted the offset voltage, switch the selection at the top to CPU Cache and adjust the undervolt to the same value as CPU Core. Lastly, pick Intel GPU and undervolt it slightly if you want: Anywhere in the 25-50mV range should be fine. However, it’s okay to skip Intel GPU if you experience stability issues later on, as it doesn’t do very much for your temperatures and voltage compared to the other settings.
Once you’ve adjusted everything, press Apply. If your computer doesn’t immediately crash (which can happen, but don’t worry if it does — you’ll just have to go easy on it next time), you should also select OK — Save Voltages Immediately and click Apply once again.
Step 6: It’s time to put your new voltages to the test and see whether your laptop or desktop remains stable when undervolted.
Run your CPU-Z benchmark and watch the temperatures/voltages in HWMonitor carefully. Compare these values to the ones you achieved prior to undervolting. You should already see an improvement.
If your computer makes it through the benchmark without crashing, you can perform a few more quick tests to ensure everything is fine:
* If you’re using a laptop, run the benchmark with the laptop unplugged (using up battery life)
* Restart the computer, put it to sleep, and wake it up
* Run every piece of software you usually have open. If you tend to play games while using Discord and Google Chrome, do that, but make sure you’re doing a lot of it — really try to stress your PC.
Assuming everything went fine, you can go back and repeat the above steps. This time, undervolt in smaller 5-10mV increments. You’ll eventually hit a wall and start experiencing crashes as you test your computer (or even before that point). This means it’s time to go back, bring your voltage slightly higher, and stick to the last point where everything was stable even when your computer was performing at 100%.
Step 7: This is an optional step that only applies to laptop users. However, if you’re on a desktop, you can consider doing this too if you feel you have any need for it.
You might want to set up two profiles for your Throttlestop: One for when your computer is plugged into the wall socket and one when you’re running on battery. As mentioned above, these undervolting values may be different and you may have to scale up or down depending on whether you’re plugged in or not. As such, it’s useful to have two different profiles to make sure you’re undervolting correctly.
You can set up the profiles by going back to the main Throttlestop window and clicking Options. Desktop users might want to do this for various reasons, but mostly, this applies to laptop users with a concern for their battery life.
In Options, on the right-hand side, you’ll find AC Profile and Battery Profile. Tick both boxes. Leave your AC Profile as number one and adjust your Battery Profile to number two. Click OK to save. Throttlestop will automatically adjust these profiles based on whether your computer is plugged in or not.
Now, when you go back into FIVR, you’ll be able to choose settings for each profile. Your AC Profile should be the one with the highest performance and the lowest undervolt. For your Battery Life profile, you can and should undervolt as much as possible in order to save battery life.
Step 8: For all its virtues, Throttlestop does have some flaws. To name one, it doesn’t automatically run these profiles when you start up your PC again. It also stays in the taskbar instead of the notification area unless you change a couple of settings. In this final step, you’ll set up Throttlestop to be always on, but minimized.
In the main Throttlestop window, click on Task Bar on the left side. Next, access Options, and select Start Minimized. Lastly, select Minimize on Close, and save with OK.
To make sure Throttlestop is on whenever you power up your PC, you’ll need to play with some Windows settings instead of the app itself. To do so, click the Windows logo on your taskbar or press the Windows key on your keyboard. Type in Task Scheduler into the search bar. Right-click the app and select Run As Administrator.
In the Windows Task Scheduler, navigate to Create Basic Task on the right-hand side. Name it Throttlestop and click Next when you’re ready.
On the left-hand side, click on Trigger. Choose When I Log On. Click Next and switch to Action, then select Start A Program, and navigate to your Throttlestop.exe file. Click Open. Select the option that will make it so that the properties dialogue for the task will open when you click Finish.
Enter Properties and make sure you select Run With Highest Privileges. Click OK to save. From now on, Throttlestop will open at startup and execute these settings each and every time.
How to undervolt your CPU with AMD Ryzen Master
If you own an AMD processor, Throttlestop may not work for you. Fortunately, you can still undervolt your processor if you so wish, but you’ll have to use a different program: AMD Ryzen Master. You can download it directly from AMD.
Before you download it and try to undervolt your processor, make sure that your CPU is supported. Any processor older than the Ryzen 2000 series will not work with this program. In addition, if you’re using a laptop equipped with an APU, you won’t be able to use this either.
AMD Ryzen Master is a program that lets you overclock, adjust power modes, overclock the integrated GPU, stress test your CPU and RAM, and more. Undervolting in AMD Ryzen Master is an intuitive process, and it’s a fair deal less scary than overclocking.
AMD fans can also use the automated overclocking and undervolting tool Clock Tuner, by 1usmus, for similar results.
Step 1: In the main Ryzen Master screen, navigate toward the bottom-left corner and switch to Basic View. You can play around with the settings in this full overview, but Basic Mode gives you access to what you need: CPU voltage. You can also switch between profiles if you’d like to have separate settings for each one.
AMD
Step 2: From here, undervolting is easy. Open up CPU-Z and HWMonitor, check your current voltages and temperatures while running a CPU benchmark, and write down the values.
Go back into Ryzen Master and try to lower the CPU Voltage (Volt) value. Much like with Throttlestop, you can start bigger with -50mV. Click Apply & Test to check whether this voltage works for your PC. You should also test it for yourself by running the benchmark yet again, tracking voltage and temperatures, and keeping a keen eye out for any crashes.
If the new setting works out, go back in and lower it in 5-10mV increments until you’re starting to experience issues or you’re satisfied with it. Click Apply & Test after each attempt and run all your tests to make sure the voltage is actually sustainable under duress.
Once you’re all done, you won’t have to re-apply these settings each time. They will stay this way until you decide to change them. You can always reset the settings by clicking Default in the top-right corner of the AMD Ryzen Master Basic View.
Keeping an eye on your CPU’s temperatures is an important step in undervolting and overclocking. For more help on monitoring your processor, check out our guide on how to check your CPU temperature.
![]()
Today’s tech news, curated and condensed for your inbox
Check your inbox!
Please provide a valid email address to continue.
This email address is currently on file. If you are not receiving newsletters, please check your spam folder.
Sorry, an error occurred during subscription. Please try again later.
Editors’ Recommendations
-
The best Samsung Galaxy Book 3 Ultra pre-order deal we’ve found
-
How to use WhatsApp Web
-
Great, hackers are now using ChatGPT to create malware
-
16-inch HP Spectre x360 2-in-1 laptop is $450 off for a limited time
-
Hogwarts Legacy PC: best settings, ray tracing, DLSS, and more
На чтение 4 мин. Просмотров 10k. Опубликовано 06.10.2011
CPU Core Adjuist
Опция позволяет увеличить напряжение питания, подающееся на процессор на значение 0.2V.
Значения опции:
None (или Normal) – номинальное напряжение питания;
+0.2V – увеличить напряжение питания на 0.2 Вольта. Иногда существует возможность увеличивать напряжение на указанный процент от номинального значения напряжения питания.
CPU Core Voltage
Даная опция предназначена для изменения напряжения питания ядра процессора.
Значения опции:
Значения параметра (зависят от модели материнской платы);
Auto (или Normal или Default или Disabled) – автоматическое определение необходимого напряжения, исходя из типа и тактовой частоты процессора.
Данная опция может встретиться также под следующими названиями:
Adjust CPU VID
Adjust CPU Voltage
Adjust Extra CPU Voltage
CPU Core
CPU Vcore
CPU Vcore Adjust
CPU VCore Offset
CPU VCore Offset +0.1V
CPU Vcore Offset Voltage
CPU Vcore Over Voltage Setting
CPU Vcore Select
CPU VCore Voltage
CPU Voltage
CPU Voltage Adjust
CPU Voltage Control
CPU Voltage Regulator
Hammer Vid control
NPT Vid Control
VCore Voltage
Vcore Voltage Control
VCore Voltage Select
CPU to NB HT Voltage
Опция позволяет увеличить напряжение питания, подающееся на шину HyperTransport, которая используется в качестве системной шины в процессорах, начиная с Athlon 64 и Sempron.
Значения опции:
Auto (или Normal) – номинальное напряжение питания;
Значения параметра (зависят от модели материнской платы).
Данная опция может встретиться также под следующими названиями:
1.2V HT Voltage
Adjust Extra NB<—>CPU HT Vcore
CPU HT Voltage Adjust
HT CPU<->nForce SPP
HT nForce SPP<->MCP
HT nForce SPP<->MCP Voltage
HT Voltage
LDT Voltage Select
NB <-> SB HT Voltage
NB to SB HT Voltage
NB/SB HT Voltage
CPU Vcore
Опция носит информативный характер и предназначена для отображения информации о напряжении питания ядра процессора.
Данная опция может встретиться также под следующими названиями:
Vcore
CPU Vcore Select
Указывает BIOS, какое напряжение должно подаваться для питания ядра процессора.
CPU Vio
Даная опция предназначена для изменения напряжении питания цепей ввода/вывода процессора.
Значения опции:
Значения параметра (зависят от модели материнской платы);
Auto – автоматическое определение необходимого напряжения.
Данная опция может встретиться также под следующими названиями:
Vio
CPU Voltage Dumper
Включение данной опции позволяет компенсировать недостаток напряжения питания в случае роста энергопотребления процессора.
Значения опции:
Enabled – включить опцию;
Disabled – не использовать данную функцию.
Данная опция может встретиться также под следующими названиями:
CPU Load Line Rate (mV/A)
Load-Line Calibration
CPU Voltage (Volt)
Опция позволяет увеличить напряжение питания, подающееся на процессор на определенное значение.
Значения опции:
Default – номинальное напряжение питания;
Default+0.3V – увеличение номинального напряжения на 0.3 Вольта;
Default+0.2V – увеличение номинального напряжения на 0.2 Вольта;
Default+0.1V – увеличение номинального напряжения на 0.1 Вольта.
CPU Vtt
Даная опция предназначена для изменения дополнительного напряжения питания процессора (напряжением питания системной шины — напряжения питания терминаторов).
Значения опции:
Значения параметра (зависят от модели материнской платы);
Auto – автоматическое определение необходимого напряжения.
Данная опция может встретиться также под следующими названиями:
CPU FSB
CPU Termination Voltage
CPU VTT Voltage
FSB Termination Voltage
Vtt
VTT
VTT Voltage
VTT Voltage Select
Vcore Over Voltage
Опция позволяет увеличить напряжение питания, подающееся на процессор на 0.1 Вольт.
Значения опции:
Auto – автоматическое определение необходимого напряжения;
Enabled – увеличить напряжение питания на 0.1 Вольта;
Disabled – номинальное напряжение питания
Данная опция может встретиться также под следующими названиями:
VCore Overvoltage 100mv
VID CMOS Setting
С помощью данной опции можно изменить идентификатор напряжения питания ядра процессора. Идентификатор напряжения питания ядра процессора содержит информацию о напряжении питания ядра ЦП.
Значения опции: зависят от модели материнской платы.
Voltages Control
Выбор способа установки напряжения питания всех компонентов системного блока.
Значения опции:
Auto Detect – автоматическая установка напряжения питания компонентов;
User Define – ручная установка напряжения питания компонентов.
Как изменить напряжение на процессоре
Для увеличения производительности компьютера рекомендуют менять параметры работы центрального процессора. Один из важных пунктов настройки ЦП – смена напряжения, подаваемого на это устройство.

Вам понадобится
- — Clock Gen;
- — CPU-Z.
Инструкция
Если вы хотите использовать для увеличения производительности центрального процессора дополнительные утилиты, то воспользуйтесь программой Clock Gen. Скачайте именно ту версию, которая рассчитана на работу с моделью вашей материнской платы. Учтите, что вам все равно придется открывать меню BIOS, чтобы изменить напряжение на процессоре.
Выполните вход в BIOS, перезагрузив компьютер и нажав клавишу Delete. Перейдите в меню Advanced Chipset Setup или просто Advanced. Найдите параметр CPU Voltage и увеличьте его значение. Не поднимайте слишком сильно напряжение. Нажмите клавишу F10 и дождитесь загрузки операционной системы.
Теперь запустите приложение Clock Gen. Путем изменения положения ползунков, расположенных напротив пунктов AGP и FSB, измените значения множителя центрального процессора и частоты его шины. После установки нужных параметров нажмите кнопку Save.
Установите и запустите приложение CPU-Z. Выполните проверку состояния центрального процессора. Убедитесь в том, что это устройство работает стабильно. Помните, что установленного напряжения может быть недостаточно для сильного увеличения производительности ЦП.
Если вы не желаете использовать дополнительные программы, то вновь откройте меню Advanced Chipset Setup. Найдите пункт, отображающий частоту шины центрального процессора. Увеличьте ее значение. Если вы не хотите изменять частоту шины, то увеличьте на один пункт значение множителя ЦП.
Перезагрузите компьютер и воспользуйтесь утилитой CPU-Z для оценки производительности и стабильности процессора. Обязательно периодически повышайте напряжение на процессоре. Добейтесь идеального соотношения его производительности и напряжения, подаваемого на это оборудование. При чрезмерном повышении напряжения могут перестать работать другие устройства, например интегрированная звуковая карта.
Видео по теме
Войти на сайт
или
Забыли пароль?
Еще не зарегистрированы?
This site is protected by reCAPTCHA and the Google Privacy Policy and Terms of Service apply.