Как изменить название «Мои документы»
В каждой операционной системе семейства Windows есть стандартные папки. К ним относится и папка «Мои документы». По умолчанию в ней сохраняются документы различных офисных приложений, некоторые компоненты видеоигр. Название «Мои документы» — стандартное для всех версий операционных систем Windows. Хотя в некоторых версиях она может называться просто «Документы». Если вас чем-то не устраивает такое имя папки, его можно поменять на другое.

Вам понадобится
- — Компьютер с ОС Windows (XP, Windows 7).
Инструкция
Переименовывать необходимо именно папку. На рабочем столе, как правило, находится не папка, а ярлык, который позволяет быстро открыть ее. Папка с документами находится обычно в другом месте. Если на вашем компьютере установлена операционная система Windows 7, то переименовывать «Мои документы» следует так. Откройте ваш системный диск (по умолчанию С, другая буква системному диску присваивается крайне редко).
Далее откройте папку «Пользователи». В ней находится еще две папки: «Общие» и «Администратор». Кликните по «Администратор», а в ней найдите «Мои документы», после чего щелкните по ней правой кнопкой мышки. Появится контекстное меню. В этом меню выберите «Переименовать». Затем введите новое имя папки, нажмите клавишу Enter, и она будет переименована.
Даже после переименования папки ярлык на рабочем столе будет иметь старое имя. Удалите этот ярлык. Затем нажмите по папке «Мои документы» правой кнопкой мышки. Наведите курсор мышки на строку «Отправить». Появится дополнительное меню, в котором выберите «Рабочий стол, создать ярлык».
Для переименования папки «Мои документы» на операционной системе Windows ХР проделайте следующие шаги. Откройте системный диск, после чего — Documents and Settings. Выберите папку, которая соответствует имени вашей учетной записи. Дальше, соответственно, отыщите «Мои документы». Операция переименования ничем не отличается от случая с Windows 7. В контекстном меню просто необходимо выбрать «Переименовать», после чего задать новое имя этой папке.
Полезный совет
В операционной системе Windows ХР в «Мои документы» находится еще несколько папок с личными файлами пользователя (музыка, рисунки и др.). Переименования системной папки никак не затрагивает ее содержимое, так что можно делать это без опасений.
Источники:
- как найти папку мои документы
Войти на сайт
или
Забыли пароль?
Еще не зарегистрированы?
This site is protected by reCAPTCHA and the Google Privacy Policy and Terms of Service apply.
Updated: 12/05/2021 by

Below are steps on how you can rename a file, shortcut, or directory. Click one of the following links to automatically navigate to the correct operating system.
Note
You must have write or modify permissions to a file, folder, or directory to rename it. In some cases, you may need administrator privileges in the operating system to rename.
How to rename in Microsoft Windows
Windows users can rename their files and directories using one of the following methods. We’ve listed the following recommendations in what we believe to be the easiest methods of renaming a file. These methods work for most types of files, including text, photos, documents, and others.
Tip
This also works for removing spaces in a file name.
Note
Renaming a folder containing files may cause problems if that folder contains files that are required by a program. For example, if the program is looking for a folder named «data» and you rename it to «other» the program would no longer know where data files are located.

Method one
- Highlight the file or folder.
- Right-click the file with your mouse and select Rename from the menu that appears.
Tip
In Windows 11, select Show more options in the right-click menu to see the Rename option.
Method two
- Highlight the file or folder.
- Press F2 on the keyboard.
Method three
- Highlight the file or folder.
- Click File at the top of the window and select Rename from the list of available options.
Tip
File Explorer in Windows 11 does not have a file menu like previous versions of Windows. Instead, click the Rename ![]() icon in the menu bar at the top.
icon in the menu bar at the top.
Method four
- Highlight the file or folder.
- Once highlighted, wait a few seconds and click the file name again. A box should appear surrounding the file or folder name, and you can rename the file.
Note
If you don’t wait long enough and click the file or folder too fast, it can open it rather than allowing you to rename it.
Renaming multiple files or folders at once
- Open Explorer.
- In Explorer, select all the files you want to rename.
- How to select or highlight multiple files and folders.
- Once the files are selected, press F2 to edit the file name and type the new name for the files. For example, typing «test» renames the files to test, test(1), test(2), test(3), etc. If you have file extensions displayed, make sure to also type the name of the file extension.
Microsoft Windows users can also rename any file using the Windows command line.
How to rename in MS-DOS and the Windows command line

MS-DOS and Windows command (CMD) line users can change the name of a file or directory using the ren or rename command. Below are examples of how this command can be used. Additional information about these commands is found by clicking the command links above.
- How to get to an MS-DOS prompt or Windows command line.
Renaming a file
The following example renames the file test.txt to hope.txt.
rename test.txt hope.txt
If the test.txt file is not located in your current directory, you must specify the file’s path as a prefix to the file name. For example, if the file is in the «computer» directory, type a command similar to the following example.
rename c:computertest.txt hope.txt
Renaming a file with a space
If a file or directory has a space, it must be surrounded with quotes. Otherwise, you get the «The syntax of the command is incorrect» error. To rename the file «computer hope.txt» to «example file.txt«, your command would resemble the following example.
rename "computer hope.txt" "example file.txt"
Renaming multiple files with one command
To rename multiple files at once, you must utilize some form of wild character. Below are examples of how this could be done.
The following example renames all the files in the current directory that end with .rtf to .txt files.
rename *.rtf *.txt
In this next example, the command renames a file with an unknown character in the file name to something that can be read. The «?» used in the following example is the wild character for an unknown character.
rename h?pe.txt hope.txt
Renaming a directory
Renaming a directory in MS-DOS is much like renaming a file. Use the ren or rename command to rename the directory. Because you cannot have a file and directory of the same name, you don’t need to worry about mistakenly renaming a file instead of a directory. The only exception is if you’re using wild characters.
Note
Renaming a directory containing files may cause problems if that directory contains files required by a program. For example, if the program is looking for a directory named «data» and you rename it to «other,» the program would no longer know where data files are located.
The following example renames the computer directory to hope.
rename computer hope
Rename the directory «computer hope» to «example directory». Whenever dealing with a file or directory with a space, it must be surrounded with quotes. Otherwise, you get the «The syntax of the command is incorrect» error.
rename "computer hope" "example directory"
Rename in a batch file
To rename files in a batch file, you can use any of the rename commands or examples shown in the MS-DOS and Windows command line section.
How to rename in macOS
Apple macOS users can rename their files and directories using one of the following methods. We’ve listed the following recommendations in what we believe to be the easiest methods of renaming a file.
First recommendation
In the macOS Finder, select the file by clicking the file once and then press return on the keyboard. After pressing return, type the new name of the file.
Second recommendation
Select the file or icon you want to rename. Click and then hover over the file name until it is highlighted. Once highlighted, this indicates the file can be renamed.
Third recommendation
Using the Terminal, you can also rename any file. See our Linux and Unix users section for steps on renaming a file using the mv command.
How to rename in the Linux and Unix command line
For detailed information about renaming files in Linux, see the Linux mv command.
How to rename in Google Chrome OS
With the Google Chrome OS on a Chromebook, you can rename your files and directories using one of the following methods. We’ve listed the following recommendations in what we believe to be the easiest methods of renaming a file.
First recommendation
Highlight the file by clicking the file once. Press Ctrl+Enter on the keyboard and then type the new name of the file.
Second recommendation
Right-click the file by pressing two fingers on the touchpad at the same time. In the right-click menu, click Rename and then type the new file name.
How to rename a document in Word or Excel
- Open the document you want to rename.
- Click File, then click Save As.
- In the Filename box, type the new name.
- Click Save. At this point, you can delete the old file or keep it as a backup.
Updated: 12/05/2021 by
Below are steps on how you can rename a file, shortcut, or directory. Click one of the following links to automatically navigate to the correct operating system.
Note
You must have write or modify permissions to a file, folder, or directory to rename it. In some cases, you may need administrator privileges in the operating system to rename.
How to rename in Microsoft Windows
Windows users can rename their files and directories using one of the following methods. We’ve listed the following recommendations in what we believe to be the easiest methods of renaming a file. These methods work for most types of files, including text, photos, documents, and others.
Tip
This also works for removing spaces in a file name.
Note
Renaming a folder containing files may cause problems if that folder contains files that are required by a program. For example, if the program is looking for a folder named «data» and you rename it to «other» the program would no longer know where data files are located.
Method one
- Highlight the file or folder.
- Right-click the file with your mouse and select Rename from the menu that appears.
Tip
In Windows 11, select Show more options in the right-click menu to see the Rename option.
Method two
- Highlight the file or folder.
- Press F2 on the keyboard.
Method three
- Highlight the file or folder.
- Click File at the top of the window and select Rename from the list of available options.
Tip
File Explorer in Windows 11 does not have a file menu like previous versions of Windows. Instead, click the Rename ![]() icon in the menu bar at the top.
icon in the menu bar at the top.
Method four
- Highlight the file or folder.
- Once highlighted, wait a few seconds and click the file name again. A box should appear surrounding the file or folder name, and you can rename the file.
Note
If you don’t wait long enough and click the file or folder too fast, it can open it rather than allowing you to rename it.
Renaming multiple files or folders at once
- Open Explorer.
- In Explorer, select all the files you want to rename.
- How to select or highlight multiple files and folders.
- Once the files are selected, press F2 to edit the file name and type the new name for the files. For example, typing «test» renames the files to test, test(1), test(2), test(3), etc. If you have file extensions displayed, make sure to also type the name of the file extension.
Microsoft Windows users can also rename any file using the Windows command line.
How to rename in MS-DOS and the Windows command line
MS-DOS and Windows command (CMD) line users can change the name of a file or directory using the ren or rename command. Below are examples of how this command can be used. Additional information about these commands is found by clicking the command links above.
- How to get to an MS-DOS prompt or Windows command line.
Renaming a file
The following example renames the file test.txt to hope.txt.
rename test.txt hope.txt
If the test.txt file is not located in your current directory, you must specify the file’s path as a prefix to the file name. For example, if the file is in the «computer» directory, type a command similar to the following example.
rename c:computertest.txt hope.txt
Renaming a file with a space
If a file or directory has a space, it must be surrounded with quotes. Otherwise, you get the «The syntax of the command is incorrect» error. To rename the file «computer hope.txt» to «example file.txt«, your command would resemble the following example.
rename "computer hope.txt" "example file.txt"
Renaming multiple files with one command
To rename multiple files at once, you must utilize some form of wild character. Below are examples of how this could be done.
The following example renames all the files in the current directory that end with .rtf to .txt files.
rename *.rtf *.txt
In this next example, the command renames a file with an unknown character in the file name to something that can be read. The «?» used in the following example is the wild character for an unknown character.
rename h?pe.txt hope.txt
Renaming a directory
Renaming a directory in MS-DOS is much like renaming a file. Use the ren or rename command to rename the directory. Because you cannot have a file and directory of the same name, you don’t need to worry about mistakenly renaming a file instead of a directory. The only exception is if you’re using wild characters.
Note
Renaming a directory containing files may cause problems if that directory contains files required by a program. For example, if the program is looking for a directory named «data» and you rename it to «other,» the program would no longer know where data files are located.
The following example renames the computer directory to hope.
rename computer hope
Rename the directory «computer hope» to «example directory». Whenever dealing with a file or directory with a space, it must be surrounded with quotes. Otherwise, you get the «The syntax of the command is incorrect» error.
rename "computer hope" "example directory"
Rename in a batch file
To rename files in a batch file, you can use any of the rename commands or examples shown in the MS-DOS and Windows command line section.
How to rename in macOS
Apple macOS users can rename their files and directories using one of the following methods. We’ve listed the following recommendations in what we believe to be the easiest methods of renaming a file.
First recommendation
In the macOS Finder, select the file by clicking the file once and then press return on the keyboard. After pressing return, type the new name of the file.
Second recommendation
Select the file or icon you want to rename. Click and then hover over the file name until it is highlighted. Once highlighted, this indicates the file can be renamed.
Third recommendation
Using the Terminal, you can also rename any file. See our Linux and Unix users section for steps on renaming a file using the mv command.
How to rename in the Linux and Unix command line
For detailed information about renaming files in Linux, see the Linux mv command.
How to rename in Google Chrome OS
With the Google Chrome OS on a Chromebook, you can rename your files and directories using one of the following methods. We’ve listed the following recommendations in what we believe to be the easiest methods of renaming a file.
First recommendation
Highlight the file by clicking the file once. Press Ctrl+Enter on the keyboard and then type the new name of the file.
Second recommendation
Right-click the file by pressing two fingers on the touchpad at the same time. In the right-click menu, click Rename and then type the new file name.
How to rename a document in Word or Excel
- Open the document you want to rename.
- Click File, then click Save As.
- In the Filename box, type the new name.
- Click Save. At this point, you can delete the old file or keep it as a backup.
Содержание
- Переименование папки пользователя в Windows 10
- Порядок изменения имени учетной записи
- Предотвращение возможных ошибок после смены имени
- Вопросы и ответы

Потребность сменить имя пользователя может возникнуть по разным причинам. Чаще всего это приходится делать из-за программ, которые сохраняют свою информацию в папку пользователя и чувствительны к наличию русских букв в учетной записи. Но встречаются случаи, когда людям просто не нравится название аккаунта. Как бы там ни было, есть способ, позволяющий изменить название папки пользователя и всего профиля. Именно о том, как осуществить подобное на Windows 10 мы и расскажем сегодня.
Обратите внимание на то, что все действия, которые будут описаны далее, выполняются на системном диске. Поэтому мы настоятельно рекомендуем создать для подстраховки точку восстановления. В случае какой-либо ошибки вы сможете всегда вернуть систему в исходное состояние.
Сперва мы рассмотрим правильный порядок действий, позволяющих переименовать папку пользователя, а затем расскажем о том, как избежать негативных последствий, которые могут быть вызваны сменой имени учетной записи.
Порядок изменения имени учетной записи
Все описанные действия необходимо выполнять в совокупности, иначе в дальнейшем могут возникать неполадки с работой некоторых приложений и ОС в целом.
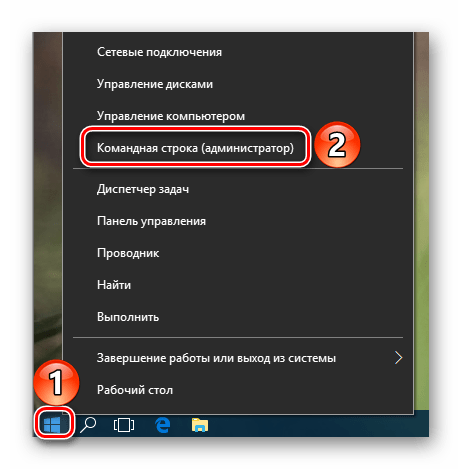
- Сперва нажмите правой кнопкой мышки на «Пуск» в нижнем левом углу экрана. Затем в контекстном меню выберите строчку, которая отмечена на изображении ниже.
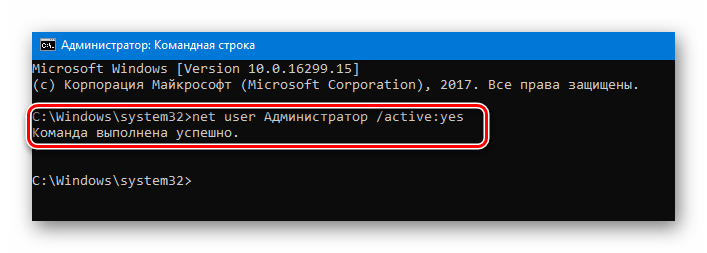
- Откроется командная строка, в которую необходимо ввести следующее значение:
net user Администратор /active:yesЕсли же вы пользуетесь английской версией Windows 10, тогда команда будет иметь немного другой вид:
net user Administrator /active:yesПосле ввода нажмите на клавиатуре «Enter».
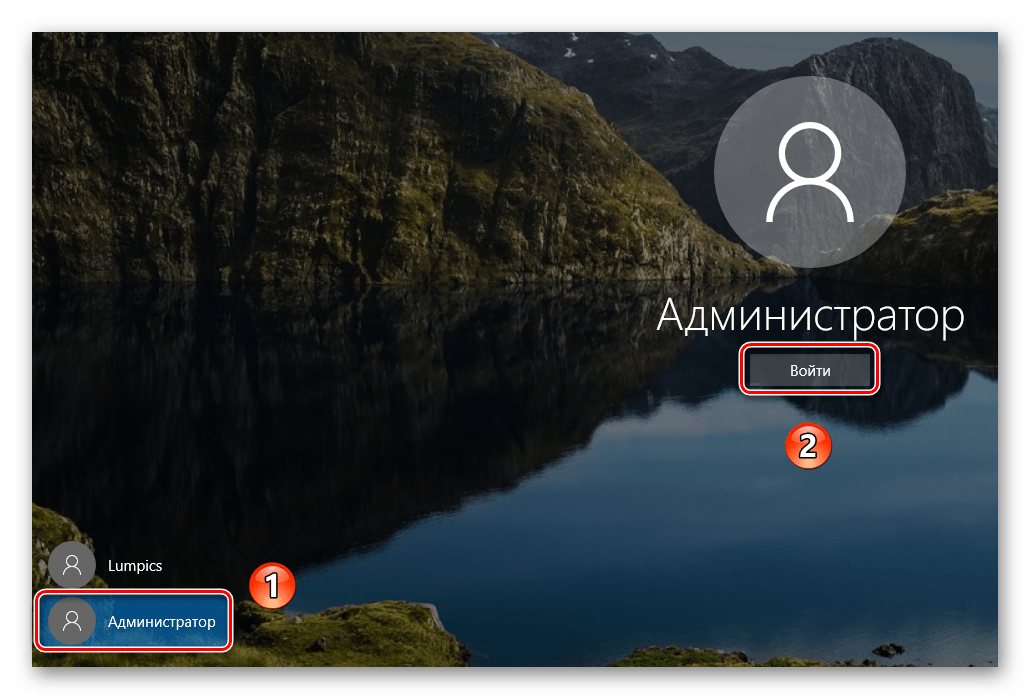
- Указанные действия позволят активировать встроенный профиль администратора. Он по умолчанию присутствует во всех системах Windows 10. Теперь необходимо переключиться на активированный аккаунт. Для этого нужно сменить пользователя любым удобным для вас способом. Как вариант, нажмите вместе клавиши «Alt+F4» и в выпадающем меню выберите пункт «Смена пользователя». О других методах можете узнать из отдельной статьи.
- В стартовом окне кликните по новому профилю «Администратор» и нажмите кнопку «Войти» в центре экрана.
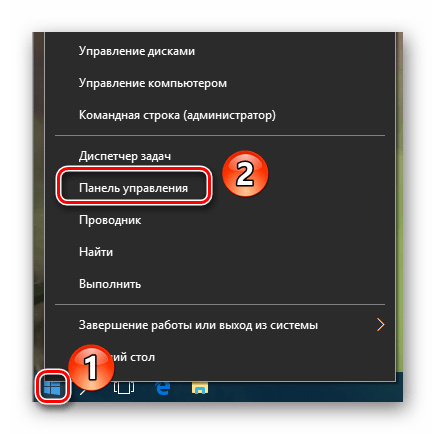
- Если вход с указанного аккаунта осуществлялся вами первый раз, нужно будет подождать некоторое время, пока Windows завершит начальные настройки. Это длится, как правило, всего несколько минут. После того как ОС загрузится, вам необходимо снова нажать по кнопке «Пуск» ПКМ и выбрать «Панель управления».

В некоторых редакция Windows 10 указанной строки может не быть, поэтому для открытия «Панели» можете использовать любой другой аналогичный способ.
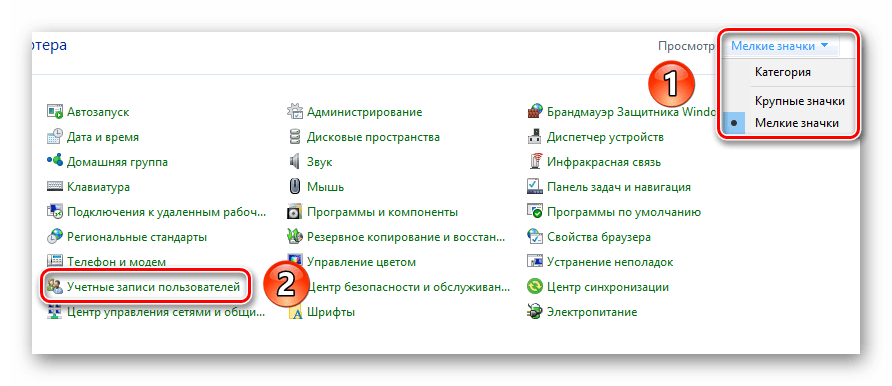
- Для удобства переключите отображения ярлыков в режим «Мелкие значки». Сделать это можно в выпадающем меню в верхней правой области окна. Затем зайдите в раздел «Учетные записи пользователей».
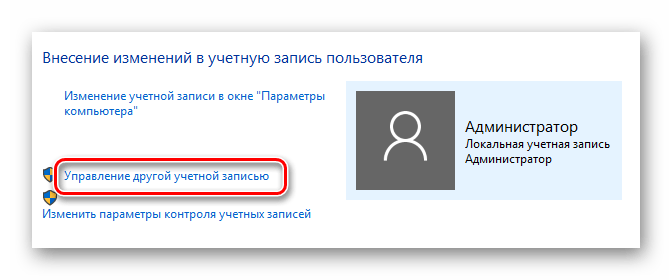
- В следующем окне кликните по строке «Управление другой учетной записью».
- Далее нужно выбрать тот профиль, для которого будет изменено имя. Нажимаем на соответствующей области ЛКМ.
- В результате появится окно управления выбранным профилем. Вверху вы увидите строку «Изменить имя учетной записи». Жмем на нее.
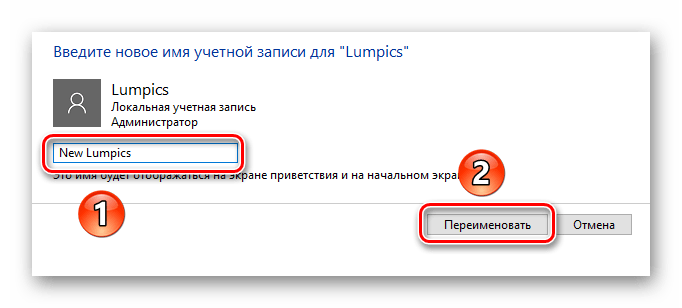
- В поле, которое будет расположено в центре следующего окна, вводим новое название. Затем жмем кнопку «Переименовать».
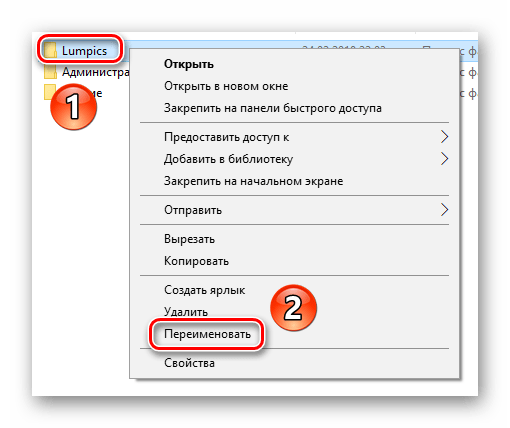
- Теперь зайдите на диск «C» и откройте в его корне каталог «Пользователи» или «Users».
- На том каталоге, который соответствует имени пользователя, нажмите ПКМ. Затем выберите из появившегося меню строку «Переименовать».
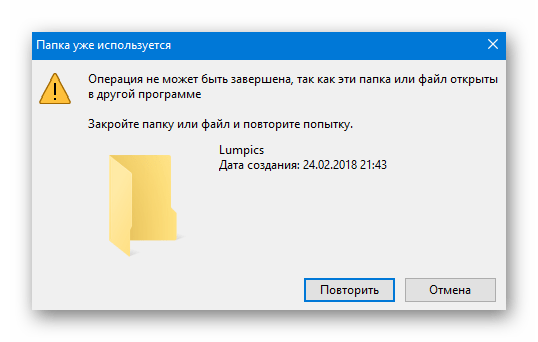
- Обратите внимание, что иногда у вас может возникнуть подобная ошибка.

Это значит, что некоторые процессы в фоновом режиме еще используют файлы из папки пользователя на другой учетной записи. В таких ситуациях вам достаточно просто перезагрузить компьютер/ноутбук любым способом и повторить предыдущий пункт.
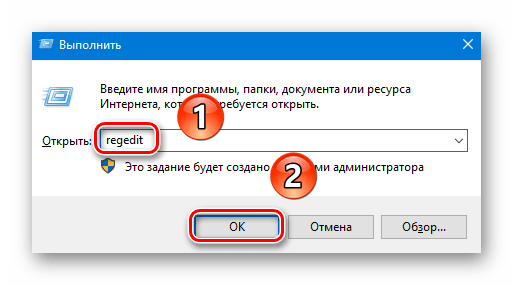
- После того как папка на диске «С» будет переименована, вам необходимо открыть реестр. Для этого нажмите одновременно клавиши «Win» и «R», после чего введите параметр
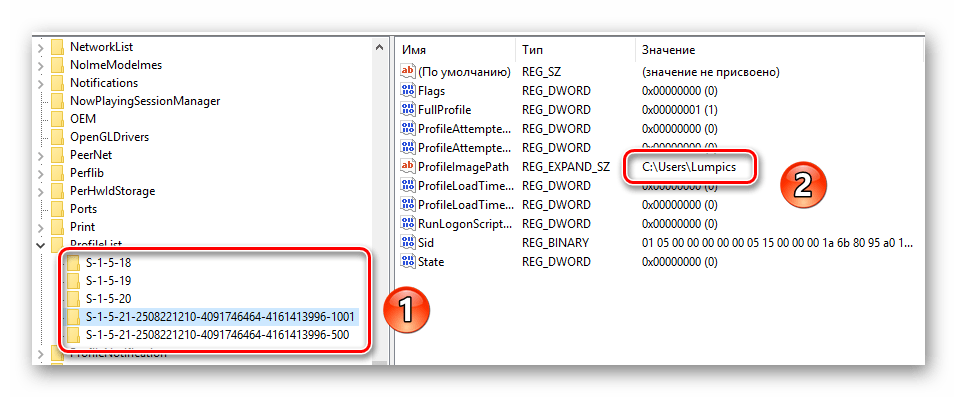
regeditв поле открывшегося окна. Затем нажмите «OK» в этом же окне либо «Enter» на клавиатуре. - На экране появится окно редактора реестра. Слева вы увидите дерево папок. Необходимо с помощью него открыть следующий каталог:
HKEY_LOCAL_MACHINESOFTWAREMicrosoftWindows NTCurrentVersionProfileList - В папке «ProfileList» будут находиться несколько каталогов. Нужно просмотреть каждый из них. Искомой папкой является та, в которой указано старое имя пользователя в одном из параметров. Приблизительно это выглядит так, как на скриншоте ниже.
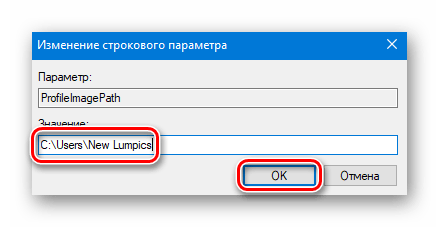
- После того как нашли такую папку, откройте в ней файл «ProfileImagePath» двойным нажатием ЛКМ. В нем необходимо заменить старое название учетной записи на новое. Затем нажмите «OK» в этом же окошке.
- Теперь можете закрыть все открытые ранее окна.
Подробнее: Переключение между учетными записями пользователей в Windows 10

Подробнее: 6 способов запустить «Панель управления»


На этом процесс переименования завершен. Теперь вы можете выходить из учетной записи «Администратор» и заходить под своим новым именем. Если в дальнейшем активированный профиль вам не понадобится, тогда откройте командную строку и введите следующий параметр:
net user Administrator /active:no
Предотвращение возможных ошибок после смены имени
После того как вы войдете под новым именем, необходимо позаботиться о том, чтобы не возникали ошибки в дальнейшей работе системы. Они могут быть связаны с тем, что многие программы сохраняют часть своих файлов в папку пользователя. Затем они периодически обращаются к ней. Так как папка носит уже другое название, возможны неполадки в работе такого ПО. Для исправления ситуация нужно сделать следующее:
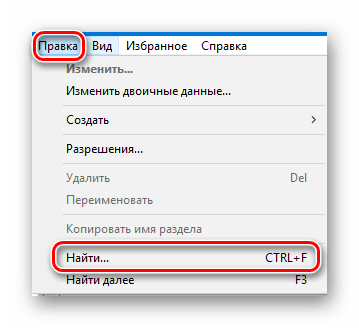
- Откройте редактор реестра, как было описано в пункте 14 предыдущем разделе статьи.
- В верхней части окна нажмите на строку «Правка». В открывшемся меню кликните по пункту «Найти».
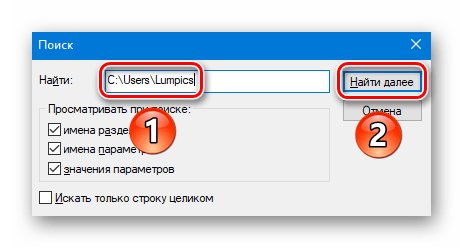
- Появится небольшое окно с параметрами поиска. В единственное поле введите путь к старой папке пользователя. Она выглядит примерно так:
C:UsersИмя папкиТеперь нажмите кнопку «Найти далее» в этом же окошке.
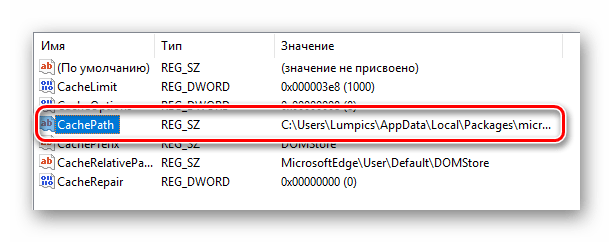
- Файлы реестра, которые содержат указанную строку, будут автоматически выделяться в правой части окна серым цветом. Необходимо открыть такой документ двойным нажатием ЛКМ по его названию.
- В нижней строке «Значение» нужно изменить старое имя пользователя на новое. Остальные данные ни в коем случае не трогайте. Делайте правки аккуратно и без ошибок. После внесенных изменений нажмите «OK».
- Затем нажмите на клавиатуре «F3» для продолжения поиска. Подобным образом вам нужно изменить значение во всех файлах, которые удастся найти. Делать это необходимо до тех пор, пока на экране не появится сообщение об окончании поиска.


Проделав такие манипуляции, вы укажите папкам и системным функциям путь к новой папке пользователя. В результате все приложения и сама ОС в дальнейшем будут работать без ошибок и сбоев.
На этом наша статья подошла к концу. Надеемся, вы внимательно следовали всем инструкциям и результат оказался положительным.
Еще статьи по данной теме: