Руководство для начинающих
В этом руководстве даётся начальное введение в nginx и описываются
некоторые простые задачи, которые могут быть решены с его помощью.
Предполагается, что nginx уже установлен на компьютере читателя.
Если нет, см. Установка nginx.
В этом руководстве описывается, как запустить и остановить nginx
и перезагрузить его конфигурацию,
объясняется, как устроен конфигурационный файл, и описывается,
как настроить nginx для раздачи статического содержимого, как
настроить прокси-сервер на nginx, и как связать nginx с приложением
FastCGI.
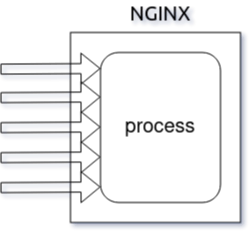
У nginx есть один главный и несколько рабочих процессов.
Основная задача главного процесса — чтение и проверка конфигурации
и управление рабочими процессами.
Рабочие процессы выполняют фактическую обработку запросов.
nginx использует
модель, основанную на событиях, и зависящие от операционной системы
механизмы для эффективного распределения запросов между рабочими процессами.
Количество рабочих процессов задаётся в конфигурационном файле и
может быть фиксированным для данной конфигурации или автоматически
устанавливаться равным числу доступных процессорных ядер (см.
worker_processes).
Как работают nginx и его модули, определяется в конфигурационном файле.
По умолчанию, конфигурационный файл называется nginx.conf
и расположен в каталоге
/usr/local/nginx/conf,
/etc/nginx или
/usr/local/etc/nginx.
Запуск, остановка, перезагрузка конфигурации
Чтобы запустить nginx, нужно выполнить исполняемый файл.
Когда nginx запущен, им можно управлять, вызывая исполняемый файл с
параметром -s.
Используйте следующий синтаксис:
nginx -s сигнал
Где сигнал может быть одним из нижеследующих:
-
stop— быстрое завершение -
quit— плавное завершение -
reload— перезагрузка конфигурационного файла -
reopen— переоткрытие лог-файлов
Например, чтобы остановить процессы nginx с ожиданием окончания
обслуживания текущих запросов рабочими процессами, можно выполнить
следующую команду:
nginx -s quit
Команда должна быть выполнена под тем же
пользователем, под которым был запущен nginx.
Изменения, сделанные в конфигурационном файле,
не будут применены, пока команда перезагрузить конфигурацию не будет
вручную отправлена nginx’у или он не будет перезапущен.
Для перезагрузки конфигурации выполните:
nginx -s reload
Получив сигнал, главный процесс проверяет правильность синтаксиса нового
конфигурационного файла и пытается применить конфигурацию, содержащуюся
в нём.
Если это ему удаётся, главный процесс запускает новые рабочие процессы
и отправляет сообщения старым рабочим процессам с требованием завершиться.
В противном случае, главный процесс откатывает изменения и продолжает
работать со старой конфигурацией.
Старые рабочие процессы, получив команду завершиться,
прекращают принимать новые запросы и продолжают обслуживать текущие запросы
до тех пор, пока все такие запросы не будут обслужены.
После этого старые рабочие процессы завершаются.
Посылать сигналы процессам nginx можно также средствами Unix,
такими как утилита kill.
В этом случае сигнал отправляется напрямую процессу с данным ID.
ID главного процесса nginx записывается по умолчанию в файл
nginx.pid в каталоге
/usr/local/nginx/logs или
/var/run.
Например, если ID главного процесса равен 1628, для отправки сигнала QUIT,
который приведёт к плавному завершению nginx, нужно выполнить:
kill -s QUIT 1628
Для просмотра списка всех запущенных процессов nginx может быть использована
утилита ps, например, следующим образом:
ps -ax | grep nginx
Дополнительную информацию об отправке сигналов процессам nginx
можно найти в Управление nginx.
Структура конфигурационного файла
nginx состоит из модулей, которые настраиваются директивами, указанными
в конфигурационном файле.
Директивы делятся на простые и блочные.
Простая директива состоит из имени и параметров, разделённых пробелами,
и оканчивается точкой с запятой (;).
Блочная директива устроена так же, как и простая директива, но
вместо точки с запятой после имени и параметров следует набор дополнительных
инструкций, помещённых внутри фигурных скобок
({ и }).
Если у блочной директивы внутри фигурных скобок можно задавать другие
директивы, то она называется контекстом (примеры:
events,
http,
server
и
location).
Директивы, помещённые в конфигурационном файле вне любого контекста,
считаются находящимися в контексте
main.
Директивы events и http
располагаются в контексте main, server —
в http, а location — в
server.
Часть строки после символа # считается комментарием.
Раздача статического содержимого
Одна из важных задач конфигурации nginx — раздача
файлов, таких как изображения или статические HTML-страницы.
Рассмотрим пример, в котором в зависимости от запроса файлы будут
раздаваться из разных локальных каталогов: /data/www,
который содержит HTML-файлы, и /data/images,
содержащий файлы с изображениями.
Для этого потребуется отредактировать конфигурационный файл и настроить
блок
server
внутри блока http
с двумя блоками location.
Во-первых, создайте каталог /data/www и положите в него файл
index.html с любым текстовым содержанием, а также
создайте каталог /data/images и положите в него несколько
файлов с изображениями.
Далее, откройте конфигурационный файл.
Конфигурационный файл по умолчанию уже включает в себя несколько
примеров блока server, большей частью закомментированных.
Для нашей текущей задачи лучше закомментировать все такие блоки и
добавить новый блок server:
http {
    server {
    }
}
В общем случае конфигурационный файл может содержать несколько блоков
server,
различаемых по портам, на
которых они
слушают,
и по
имени сервера.
Определив, какой server будет обрабатывать запрос,
nginx сравнивает URI, указанный в заголовке запроса, с параметрами директив
location, определённых внутри блока
server.
В блок server добавьте блок location
следующего вида:
location / {
    root /data/www;
}
Этот блок location задаёт “/”
в качестве префикса, который сравнивается с URI из запроса.
Для подходящих запросов добавлением URI к пути, указанному в директиве
root,
то есть, в данном случае, к /data/www, получается
путь к запрашиваемому файлу в локальной файловой системе.
Если есть совпадение с несколькими блоками location,
nginx выбирает блок с самым длинным префиксом.
В блоке location выше указан самый короткий префикс,
длины один,
и поэтому этот блок будет использован, только если не будет совпадения
ни с одним из остальных блоков location.
Далее, добавьте второй блок location:
location /images/ {
    root /data;
}
Он будет давать совпадение с запросами, начинающимися с
/images/
(location / для них тоже подходит, но указанный там префикс
короче).
Итоговая конфигурация блока server должна выглядеть
следующим образом:
server {
    location / {
        root /data/www;
    }

    location /images/ {
        root /data;
    }
}
Это уже работающая конфигурация сервера, слушающего на стандартном порту 80
и доступного на локальном компьютере по адресу
http://localhost/.
В ответ на запросы, URI которых начинаются с /images/,
сервер будет отправлять файлы из каталога /data/images.
Например, на запрос
http://localhost/images/example.png nginx отправит
в ответ файл /data/images/example.png.
Если же этот файл не существует, nginx отправит ответ, указывающий на
ошибку 404.
Запросы, URI которых не начинаются на /images/, будут
отображены на каталог /data/www.
Например, в результате запроса
http://localhost/some/example.html в ответ будет
отправлен файл /data/www/some/example.html.
Чтобы применить новую конфигурацию, запустите nginx, если он ещё не запущен,
или отправьте сигнал reload главному процессу nginx,
выполнив:
nginx -s reload
В случае если что-то работает не как ожидалось, можно попытаться выяснить
причину с помощью файловaccess.logиerror.log
из каталога
/usr/local/nginx/logsили
/var/log/nginx.
Настройка простого прокси-сервера
Одним из частых применений nginx является использование его в качестве
прокси-сервера, то есть сервера, который принимает запросы, перенаправляет их
на проксируемые сервера, получает ответы от них и отправляет их клиенту.
Мы настроим базовый прокси-сервер, который будет обслуживать запросы
изображений из локального каталога и отправлять все остальные запросы на
проксируемый сервер.
В этом примере оба сервера будут работать в рамках одного
экземпляра nginx.
Во-первых, создайте проксируемый сервер, добавив ещё один блок
server в конфигурационный файл nginx со следующим
содержимым:
server {
    listen 8080;
    root /data/up1;

    location / {
    }
}
Это будет простой сервер, слушающий на порту 8080
(ранее директива listen не указывалась, потому что
использовался стандартный порт 80) и отображающий все
запросы на каталог /data/up1 в локальной файловой
системе.
Создайте этот каталог и положите в него файл index.html.
Обратите внимание, что директива root помещена в контекст
server.
Такая директива root будет использована, когда директива
location, выбранная для выполнения запроса, не содержит
собственной директивы root.
Далее, используйте конфигурацию сервера из предыдущего раздела
и видоизмените её, превратив в конфигурацию прокси-сервера.
В первый блок location добавьте директиву
proxy_pass,
указав протокол, имя и порт проксируемого сервера в качестве параметра
(в нашем случае это http://localhost:8080):
server {
    location / {
        proxy_pass http://localhost:8080;
    }

    location /images/ {
        root /data;
    }
}
Мы изменим второй блок
location, который на данный момент отображает запросы
с префиксом /images/ на файлы из каталога
/data/images так, чтобы он подходил для запросов изображений
с типичными расширениями файлов.
Изменённый блок location выглядит следующим образом:
location ~ .(gif|jpg|png)$ {
    root /data/images;
}
Параметром является регулярное выражение, дающее совпадение со всеми
URI, оканчивающимися на .gif, .jpg или
.png.
Регулярному выражению должен предшествовать символ ~.
Соответствующие запросы будут отображены на каталог /data/images.
Когда nginx выбирает блок location,
который будет обслуживать запрос, то вначале он проверяет
директивы location,
задающие префиксы, запоминая location с самым
длинным подходящим префиксом, а затем проверяет регулярные выражения.
Если есть совпадение с регулярным выражением, nginx выбирает соответствующий
location, в противном случае берётся запомненный ранее
location.
Итоговая конфигурация прокси-сервера выглядит следующим образом:
server {
    location / {
        proxy_pass http://localhost:8080/;
    }

    location ~ .(gif|jpg|png)$ {
        root /data/images;
    }
}
Этот сервер будет фильтровать запросы, оканчивающиеся на
.gif, .jpg или .png,
и отображать их на каталог /data/images (добавлением URI к
параметру директивы root) и перенаправлять все остальные
запросы на проксируемый сервер, сконфигурированный выше.
Чтобы применить новую конфигурацию, отправьте сигнал reload
nginx’у, как описывалось в предыдущих разделах.
Существует множество
других директив для дальнейшей настройки прокси-соединения.
Настройка проксирования FastCGI
nginx можно использовать для перенаправления запросов на FastCGI-серверы.
На них могут исполняться приложения, созданные с использованием
разнообразных фреймворков и языков программирования, например, PHP.
Базовая конфигурация nginx для работы с проксируемым FastCGI-сервером
включает в себя использование директивы
fastcgi_pass
вместо директивы proxy_pass,
и директив fastcgi_param
для настройки параметров, передаваемых FastCGI-серверу.
Представьте, что FastCGI-сервер доступен по адресу
localhost:9000.
Взяв за основу конфигурацию прокси-сервера из предыдущего раздела,
замените директиву proxy_pass на директиву
fastcgi_pass и измените параметр на
localhost:9000.
В PHP параметр SCRIPT_FILENAME используется для
определения имени скрипта, а в параметре QUERY_STRING
передаются параметры запроса.
Получится следующая конфигурация:
server {
    location / {
        fastcgi_pass  localhost:9000;
        fastcgi_param SCRIPT_FILENAME $document_root$fastcgi_script_name;
        fastcgi_param QUERY_STRING    $query_string;
    }

    location ~ .(gif|jpg|png)$ {
        root /data/images;
    }
}
Таким образом будет настроен сервер, который будет перенаправлять
все запросы, кроме запросов статических изображений, на проксируемый
сервер, работающий по адресу localhost:9000,
по протоколу FastCGI.
A young Russian developer named Igor Sysoev was frustrated by older web servers’ inability to handle more than 10 thousand concurrent requests. This is a problem referred to as the C10k problem. As an answer to this, he started working on a new web server back in 2002.
NGINX was first released to the public in 2004 under the terms of the 2-clause BSD license. According to the March 2021 Web Server Survey, NGINX holds 35.3% of the market with a total of 419.6 million sites.
Thanks to tools like NGINXConfig by DigitalOcean and an abundance of pre-written configuration files on the internet, people tend to do a lot of copy-pasting instead of trying to understand when it comes to configuring NGINX.

I’m not saying that copying code is bad, but copying code without understanding is a big «no no».
Also NGINX is the kind of software that should be configured exactly according to the requirements of the application to be served and available resources on the host.
That’s why instead of copying blindly, you should understand and then fine tune what you’re copying – and that’s where this handbook comes in.
After going through the entire book, you should be able to:
- Understand configuration files generated by popular tools as well as those found in various documentation.
- Configure NGINX as a web server, a reverse proxy server, and a load balancer from scratch.
- Optimize NGINX to get maximum performance out of your server.
Prerequisites
- Familiarity with the Linux terminal and common Unix programs such as
ls,cat,ps,grep,find,nproc,ulimitandnano. - A computer powerful enough to run a virtual machine or a $5 virtual private server.
- Understanding of web applications and a programming language such as JavaScript or PHP.
Table of Contents
- Introduction to NGINX
- How to Install NGINX
- How to Provision a Local Virtual Machine
- How to Provision a Virtual Private Server
- How to Install NGINX on a Provisioned Server or Virtual Machine
- Introduction to NGINX’s Configuration Files
- How to Configure a Basic Web Server
- How to Write Your First Configuration File
- How to Validate and Reload Configuration Files
- How to Understand Directives and Contexts in NGINX
- How to Serve Static Content Using NGINX
- Static File Type Handling in NGINX
- How to Include Partial Config Files
- Dynamic Routing in NGINX
- Location Matches
- Variables in NGINX
- Redirects and Rewrites
- How to Try for Multiple Files
- Logging in NGINX
- How to Use NGINX as a Reverse Proxy
- Node.js With NGINX
- PHP With NGINX
- How to Use NGINX as a Load Balancer
- How To Optimize NGINX for Maximum Performance
- How to Configure Worker Processes and Worker Connections
- How to Cache Static Content
- How to Compress Responses
- How to Understand the Main Configuration File
- How To Configure SSL and HTTP/2
- How To Configure SSL
- How to Enable HTTP/2
- How to Enable Server Push
- Conclusion
Project Code
You can find the code for the example projects in the following repository:
fhsinchy/nginx-handbook-projects
Project codes used in “The NGINX Handbook” . Contribute to fhsinchy/nginx-handbook-projects development by creating an account on GitHub.
![]() fhsinchyGitHub
fhsinchyGitHub

Introduction to NGINX
NGINX is a high performance web server developed to facilitate the increasing needs of the modern web. It focuses on high performance, high concurrency, and low resource usage. Although it’s mostly known as a web server, NGINX at its core is a reverse proxy server.
NGINX is not the only web server on the market, though. One of its biggest competitors is Apache HTTP Server (httpd), first released back on 1995. In spite of the fact that Apache HTTP Server is more flexible, server admins often prefer NGINX for two main reasons:
- It can handle a higher number of concurrent requests.
- It has faster static content delivery with low resource usage.
I won’t go further into the whole Apache vs NGINX debate. But if you wish to learn more about the differences between them in detail, this excellent article from Justin Ellingwood may help.
In fact, to explain NGINX’s request handling technique, I would like to quote two paragraphs from Justin’s article here:
Nginx came onto the scene after Apache, with more awareness of the concurrency problems that would face sites at scale. Leveraging this knowledge, Nginx was designed from the ground up to use an asynchronous, non-blocking, event-driven connection handling algorithm.
Nginx spawns worker processes, each of which can handle thousands of connections. The worker processes accomplish this by implementing a fast looping mechanism that continuously checks for and processes events. Decoupling actual work from connections allows each worker to concern itself with a connection only when a new event has been triggered.
If that seems a bit complicated to understand, don’t worry. Having a basic understanding of the inner workings will suffice for now.
NGINX is faster in static content delivery while staying relatively lighter on resources because it doesn’t embed a dynamic programming language processor. When a request for static content comes, NGINX simply responds with the file without running any additional processes.
That doesn’t mean that NGINX can’t handle requests that require a dynamic programming language processor. In such cases, NGINX simply delegates the tasks to separate processes such as PHP-FPM, Node.js or Python. Then, once that process finishes its work, NGINX reverse proxies the response back to the client.

NGINX is also a lot easier to configure thanks to a configuration file syntax inspired from various scripting languages that results in compact, easily maintainable configuration files.
How to Install NGINX
Installing NGINX on a Linux-based system is pretty straightforward. You can either use a virtual private server running Ubuntu as your playground, or you can provision a virtual machine on your local system using Vagrant.
For the most part, provisioning a local virtual machine will suffice and that’s the way I’ll be using in this article.
How to Provision a Local Virtual Machine
For those who doesn’t know, Vagrant is an open-source tool by Hashicorp that allows you to provision virtual machines using simple configuration files.
For this approach to work, you’ll need VirtualBox and Vagrant, so go ahead and install them first. If you need a little warm up on the topic, this tutorial may help.
Create a working directory somewhere in your system with a sensible name. Mine is ~/vagrant/nginx-handbook directory.
Inside the working directory create a file named Vagrantfile and put following content in there:
Vagrant.configure("2") do |config|

    config.vm.hostname = "nginx-handbook-box"

    config.vm.box = "ubuntu/focal64"

    config.vm.define "nginx-handbook-box"

    config.vm.network "private_network", ip: "192.168.20.20"

    config.vm.provider "virtualbox" do |vb|
      vb.cpus = 1
      vb.memory = "1024"
      vb.name = "nginx-handbook"
    end

  end
This Vagrantfile is the configuration file I talked about earlier. It contains information like name of the virtual machine, number of CPUs, size of RAM, the IP address, and more.
To start a virtual machine using this configuration, open your terminal inside the working directory and execute the following command:
vagrant up

# Bringing machine 'nginx-handbook-box' up with 'virtualbox' provider...
# ==> nginx-handbook-box: Importing base box 'ubuntu/focal64'...
# ==> nginx-handbook-box: Matching MAC address for NAT networking...
# ==> nginx-handbook-box: Checking if box 'ubuntu/focal64' version '20210415.0.0' is up to date...
# ==> nginx-handbook-box: Setting the name of the VM: nginx-handbook
# ==> nginx-handbook-box: Clearing any previously set network interfaces...
# ==> nginx-handbook-box: Preparing network interfaces based on configuration...
#     nginx-handbook-box: Adapter 1: nat
#     nginx-handbook-box: Adapter 2: hostonly
# ==> nginx-handbook-box: Forwarding ports...
#     nginx-handbook-box: 22 (guest) => 2222 (host) (adapter 1)
# ==> nginx-handbook-box: Running 'pre-boot' VM customizations...
# ==> nginx-handbook-box: Booting VM...
# ==> nginx-handbook-box: Waiting for machine to boot. This may take a few minutes...
#     nginx-handbook-box: SSH address: 127.0.0.1:2222
#     nginx-handbook-box: SSH username: vagrant
#     nginx-handbook-box: SSH auth method: private key
#     nginx-handbook-box: Warning: Remote connection disconnect. Retrying...
#     nginx-handbook-box: Warning: Connection reset. Retrying...
#     nginx-handbook-box:
#     nginx-handbook-box: Vagrant insecure key detected. Vagrant will automatically replace
#     nginx-handbook-box: this with a newly generated keypair for better security.
#     nginx-handbook-box:
#     nginx-handbook-box: Inserting generated public key within guest...
#     nginx-handbook-box: Removing insecure key from the guest if it's present...
#     nginx-handbook-box: Key inserted! Disconnecting and reconnecting using new SSH key...
# ==> nginx-handbook-box: Machine booted and ready!
# ==> nginx-handbook-box: Checking for guest additions in VM...
# ==> nginx-handbook-box: Setting hostname...
# ==> nginx-handbook-box: Configuring and enabling network interfaces...
# ==> nginx-handbook-box: Mounting shared folders...
#     nginx-handbook-box: /vagrant => /home/fhsinchy/vagrant/nginx-handbook

vagrant status

# Current machine states:

# nginx-handbook-box           running (virtualbox)
The output of the vagrant up command may differ on your system, but as long as vagrant status says the machine is running, you’re good to go.
Given that the virtual machine is now running, you should be able to SSH into it. To do so, execute the following command:
vagrant ssh nginx-handbook-box

# Welcome to Ubuntu 20.04.2 LTS (GNU/Linux 5.4.0-72-generic x86_64)
# vagrant@nginx-handbook-box:~$
If everything’s done correctly you should be logged into your virtual machine, which will be evident by the vagrant@nginx-handbook-box line on your terminal.
This virtual machine will be accessible on http://192.168.20.20 on your local machine. You can even assign a custom domain like http://nginx-handbook.test to the virtual machine by adding an entry to your hosts file:
# on mac and linux terminal
sudo nano /etc/hosts

# on windows command prompt as administrator
notepad c:windowssystem32driversetchosts
Now append the following line at the end of the file:
192.168.20.20 nginx-handbook.test
Now you should be able to access the virtual machine on http://nginx-handbook.test URI in your browser.
You can stop or destroy the virtual machine by executing the following commands inside the working directory:
# to stop the virtual machine
vagrant halt

# to destroy the virtual machine
vagrant destroy
If you want to learn about more Vagrant commands, this cheat sheet may come in handy.
Now that you have a functioning Ubuntu virtual machine on your system, all that is left to do is install NGINX.
How to Provision a Virtual Private Server
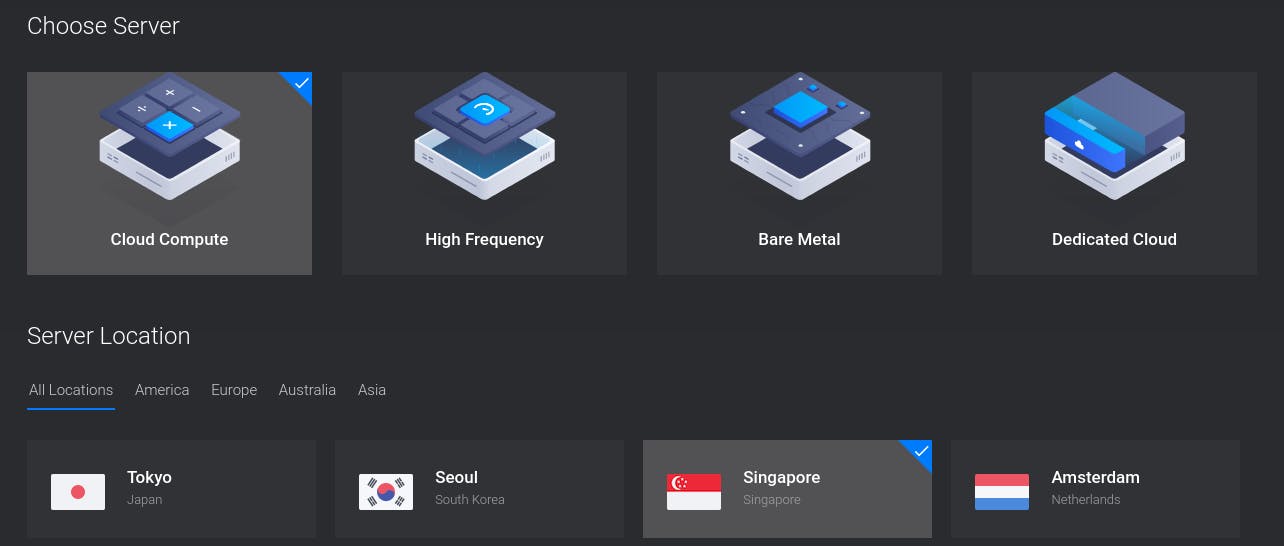
For this demonstration, I’ll use Vultr as my provider but you may use DigitalOcean or whatever provider you like.
Assuming you already have an account with your provider, log into the account and deploy a new server:

On DigitalOcean, it’s usually called a droplet. On the next screen, choose a location close to you. I live in Bangladesh which is why I’ve chosen Singapore:
On the next step, you’ll have to choose the operating system and server size. Choose Ubuntu 20.04 and the smallest possible server size:
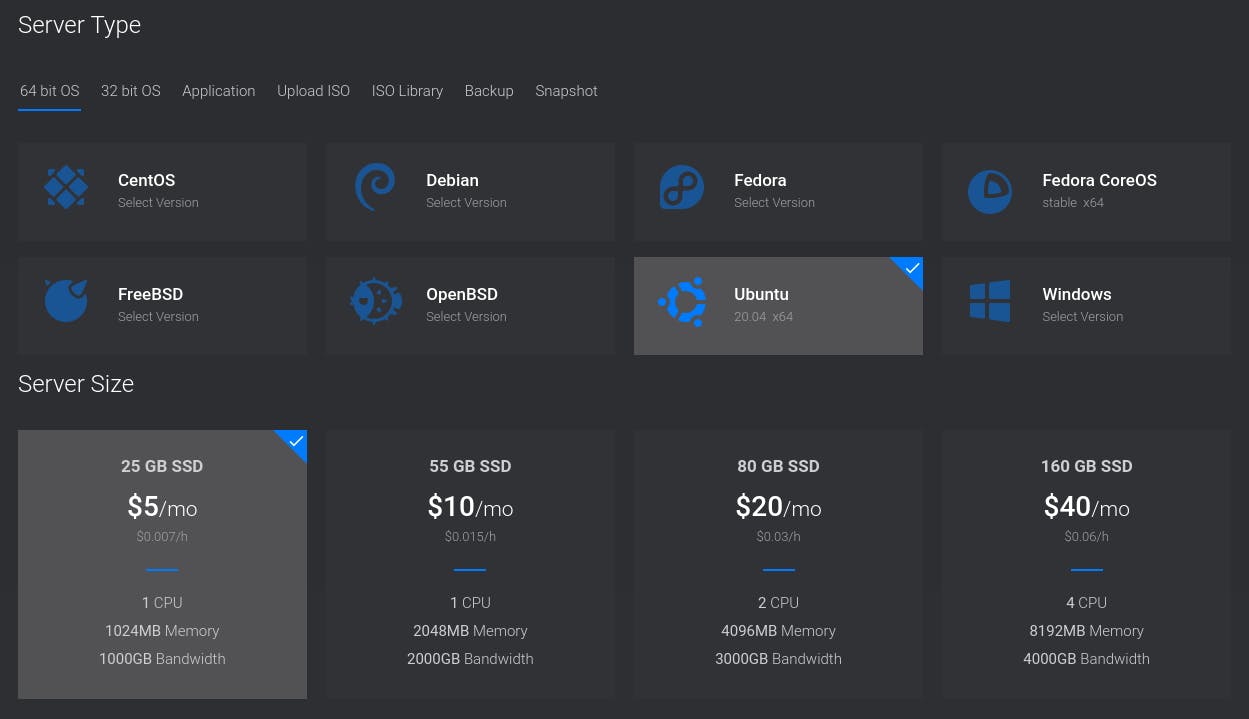
Although production servers tend to be much bigger and more powerful than this, a tiny server will be more than enough for this article.
Finally, for the last step, put something fitting like nginx-hadnbook-demo-server as the server host and label. You can even leave them empty if you want.
Once you’re happy with your choices, go ahead and press the Deploy Now button.
The deployment process may take some time to finish, but once it’s done, you’ll see the newly created server on your dashboard:
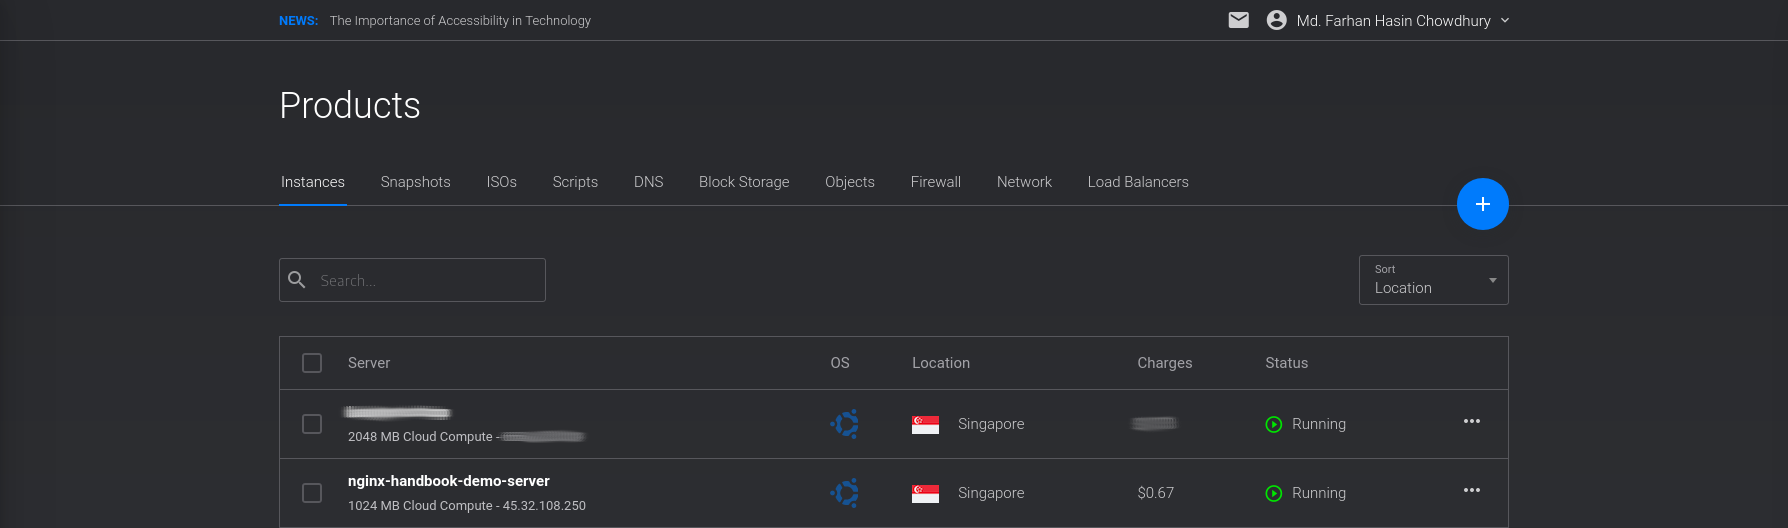
Also pay attention to the Status – it should say Running and not Preparing or Stopped. To connect to the server, you’ll need a username and password.
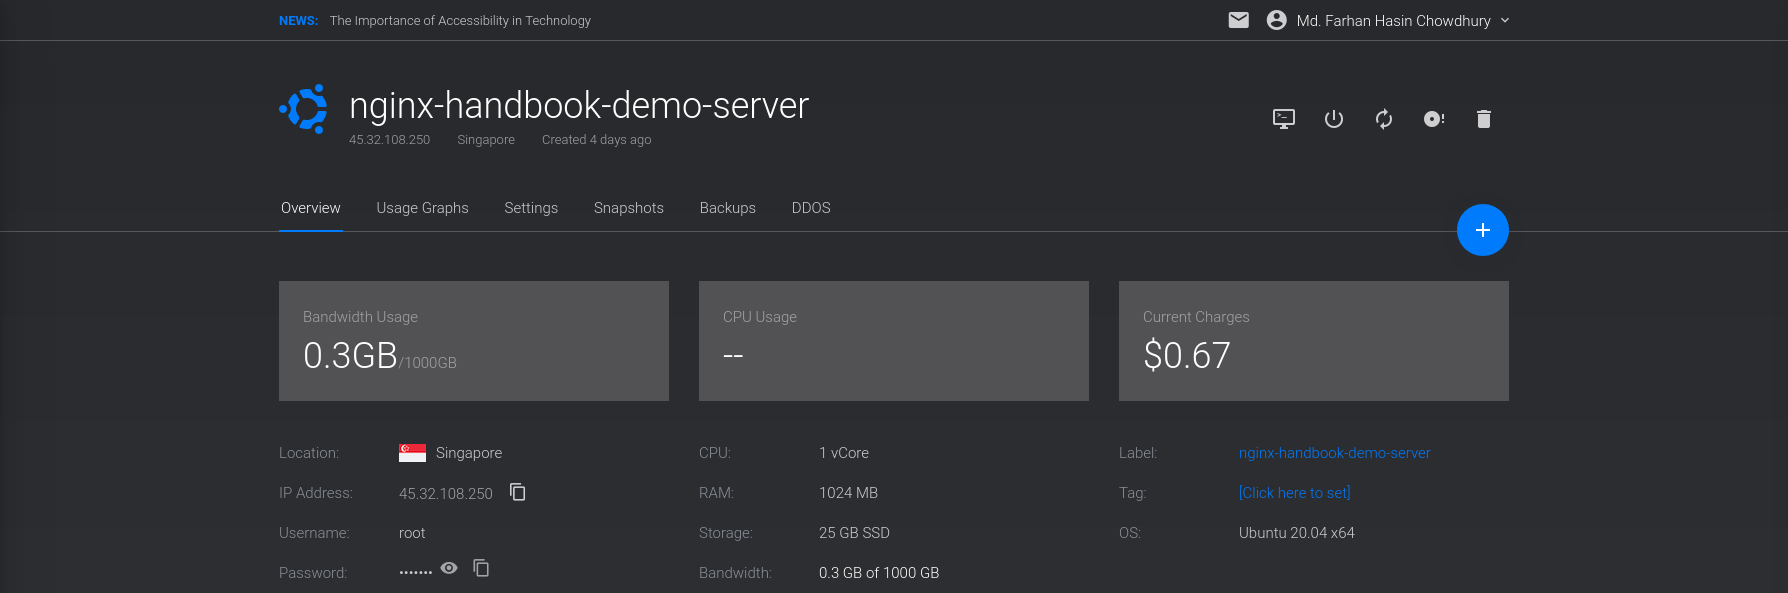
Go into the overview page for your server and there you should see the server’s IP address, username, and password:
The generic command for logging into a server using SSH is as follows:
ssh <username>@<ip address>
So in the case of my server, it’ll be:
ssh root@45.77.251.108

# Are you sure you want to continue connecting (yes/no/[fingerprint])? yes
# Warning: Permanently added '45.77.251.108' (ECDSA) to the list of known hosts.

# root@45.77.251.108's password:
# Welcome to Ubuntu 20.04.2 LTS (GNU/Linux 5.4.0-65-generic x86_64)

# root@localhost:~#
You’ll be asked if you want to continue connecting to this server or not. Answer with yes and then you’ll be asked for the password. Copy the password from the server overview page and paste that into your terminal.
If you do everything correctly you should be logged into your server – you’ll see the root@localhost line on your terminal. Here localhost is the server host name, and may differ in your case.
You can access this server directly by its IP address. Or if you own any custom domain, you can use that also.
Throughout the article you’ll see me adding test domains to my operating system’s hosts file. In case of a real server, you’ll have to configure those servers using your DNS provider.
Remember that you’ll be charged as long as this server is being used. Although the charge should be very small, I’m warning you anyways. You can destroy the server anytime you want by hitting the trash icon on the server overview page:

If you own a custom domain name, you may assign a sub-domain to this server. Now that you’re inside the server, all that is left to is install NGINX.
How to Install NGINX on a Provisioned Server or Virtual Machine
Assuming you’re logged into your server or virtual machine, the first thing you should do is performing an update. Execute the following command to do so:
sudo apt update && sudo apt upgrade -y
After the update, install NGINX by executing the following command:
sudo apt install nginx -yOnce the installation is done, NGINX should be automatically registered as a systemd service and should be running. To check, execute the following command:
sudo systemctl status nginx

# ● nginx.service - A high performance web server and a reverse proxy server
#      Loaded: loaded (/lib/systemd/system/nginx.service; enabled; vendor preset: enabled)
#      Active: active (running)
If the status says running, then you’re good to go. Otherwise you may start the service by executing this command:
sudo systemctl start nginxFinally for a visual verification that everything is working properly, visit your server/virtual machine with your favorite browser and you should see NGINX’s default welcome page:

NGINX is usually installed on the /etc/nginx directory and the majority of our work in the upcoming sections will be done in here.
Congratulations! Bow you have NGINX up and running on your server/virtual machine. Now it’s time to jump head first into NGINX.
Introduction to NGINX’s Configuration Files
As a web server, NGINX’s job is to serve static or dynamic contents to the clients. But how that content are going to be served is usually controlled by configuration files.
NGINX’s configuration files end with the .conf extension and usually live inside the /etc/nginx/ directory. Let’s begin by cding into this directory and getting a list of all the files:
cd /etc/nginx

ls -lh

# drwxr-xr-x 2 root root 4.0K Apr 21  2020 conf.d
# -rw-r--r-- 1 root root 1.1K Feb  4  2019 fastcgi.conf
# -rw-r--r-- 1 root root 1007 Feb  4  2019 fastcgi_params
# -rw-r--r-- 1 root root 2.8K Feb  4  2019 koi-utf
# -rw-r--r-- 1 root root 2.2K Feb  4  2019 koi-win
# -rw-r--r-- 1 root root 3.9K Feb  4  2019 mime.types
# drwxr-xr-x 2 root root 4.0K Apr 21  2020 modules-available
# drwxr-xr-x 2 root root 4.0K Apr 17 14:42 modules-enabled
# -rw-r--r-- 1 root root 1.5K Feb  4  2019 nginx.conf
# -rw-r--r-- 1 root root  180 Feb  4  2019 proxy_params
# -rw-r--r-- 1 root root  636 Feb  4  2019 scgi_params
# drwxr-xr-x 2 root root 4.0K Apr 17 14:42 sites-available
# drwxr-xr-x 2 root root 4.0K Apr 17 14:42 sites-enabled
# drwxr-xr-x 2 root root 4.0K Apr 17 14:42 snippets
# -rw-r--r-- 1 root root  664 Feb  4  2019 uwsgi_params
# -rw-r--r-- 1 root root 3.0K Feb  4  2019 win-utf
Among these files, there should be one named nginx.conf. This is the the main configuration file for NGINX. You can have a look at the content of this file using the cat program:
cat nginx.conf

# user www-data;
# worker_processes auto;
# pid /run/nginx.pid;
# include /etc/nginx/modules-enabled/*.conf;

# events {
#     worker_connections 768;
#     # multi_accept on;
# }

# http {

#     ##
#     # Basic Settings
#     ##

#     sendfile on;
#     tcp_nopush on;
#     tcp_nodelay on;
#     keepalive_timeout 65;
#     types_hash_max_size 2048;
#     # server_tokens off;

#     # server_names_hash_bucket_size 64;
#     # server_name_in_redirect off;

#     include /etc/nginx/mime.types;
#     default_type application/octet-stream;

#     ##
#     # SSL Settings
#     ##

#     ssl_protocols TLSv1 TLSv1.1 TLSv1.2 TLSv1.3; # Dropping SSLv3, ref: POODLE
#     ssl_prefer_server_ciphers on;

#     ##
#     # Logging Settings
#     ##

#     access_log /var/log/nginx/access.log;
#     error_log /var/log/nginx/error.log;

#     ##
#     # Gzip Settings
#     ##

#     gzip on;

#     # gzip_vary on;
#     # gzip_proxied any;
#     # gzip_comp_level 6;
#     # gzip_buffers 16 8k;
#     # gzip_http_version 1.1;
#     # gzip_types text/plain text/css application/json application/javascript text/xml application/xml application/xml+rss text/javascript;

#     ##
#     # Virtual Host Configs
#     ##

#     include /etc/nginx/conf.d/*.conf;
#     include /etc/nginx/sites-enabled/*;
# }


# #mail {
# #    # See sample authentication script at:
# #    # http://wiki.nginx.org/ImapAuthenticateWithApachePhpScript
# #
# #    # auth_http localhost/auth.php;
# #    # pop3_capabilities "TOP" "USER";
# #    # imap_capabilities "IMAP4rev1" "UIDPLUS";
# #
# #    server {
# #        listen     localhost:110;
# #        protocol   pop3;
# #        proxy      on;
# #    }
# #
# #    server {
# #        listen     localhost:143;
# #        protocol   imap;
# #        proxy      on;
# #    }
# #}
Whoa! That’s a lot of stuff. Trying to understand this file at its current state will be a nightmare. So let’s rename the file and create a new empty one:
# renames the file
sudo mv nginx.conf nginx.conf.backup

# creates a new file
sudo touch nginx.conf
I highly discourage you from editing the original nginx.conf file unless you absolutely know what you’re doing. For learning purposes, you may rename it, but later on, I’ll show you how you should go about configuring a server in a real life scenario.
How to Configure a Basic Web Server
In this section of the book, you’ll finally get your hands dirty by configuring a basic static web server from the ground up. The goal of this section is to introduce you to the syntax and fundamental concepts of NGINX configuration files.
How to Write Your First Configuration File
Start by opening the newly created nginx.conf file using the nano text editor:
sudo nano /etc/nginx/nginx.confThroughout the book, I’ll be using nano as my text editor. You may use something more modern if you want to, but in a real life scenario, you’re most likely to work using nano or vim on servers instead of anything else. So use this book as an opportunity to sharpen your nano skills. Also the official cheat sheet is there for you to consult whenever you need.
After opening the file, update its content to look like this:
events {

}

http {

    server {

        listen 80;
        server_name nginx-handbook.test;

        return 200 "Bonjour, mon ami!n";
    }

}
If you have experience building REST APIs then you may guess from the return 200 "Bonjour, mon ami!n"; line that the server has been configured to respond with a status code of 200 and the message «Bonjour, mon ami!».
Don’t worry if you don’t understand anything more than that at the moment. I’ll explain this file line by line, but first let’s see this configuration in action.
How to Validate and Reload Configuration Files
After writing a new configuration file or updating an old one, the first thing to do is check the file for any syntax mistakes. The nginx binary includes an option -t to do just that.
sudo nginx -t

# nginx: the configuration file /etc/nginx/nginx.conf syntax is ok
# nginx: configuration file /etc/nginx/nginx.conf test is successful
If you have any syntax errors, this command will let you know about them, including the line number.
Although the configuration file is fine, NGINX will not use it. The way NGINX works is it reads the configuration file once and keeps working based on that.
If you update the configuration file, then you’ll have to instruct NGINX explicitly to reload the configuration file. There are two ways to do that.
- You can restart the NGINX service by executing the
sudo systemctl restart nginxcommand. - You can dispatch a
reloadsignal to NGINX by executing thesudo nginx -s reloadcommand.
The -s option is used for dispatching various signals to NGINX. The available signals are stop, quit, reload and reopen. Among the two ways I just mentioned, I prefer the second one simply because it’s less typing.
Once you’ve reloaded the configuration file by executing the nginx -s reload command, you can see it in action by sending a simple get request to the server:
curl -i http://nginx-handbook.test

# HTTP/1.1 200 OK
# Server: nginx/1.18.0 (Ubuntu)
# Date: Wed, 21 Apr 2021 10:03:33 GMT
# Content-Type: text/plain
# Content-Length: 18
# Connection: keep-alive

# Bonjour, mon ami!
The server is responding with a status code of 200 and the expected message. Congratulations on getting this far! Now it’s time for some explanation.
How to Understand Directives and Contexts in NGINX
The few lines of code you’ve written here, although seemingly simple, introduce two of the most important terminologies of NGINX configuration files. They are directives and contexts.
Technically, everything inside a NGINX configuration file is a directive. Directives are of two types:
- Simple Directives
- Block Directives
A simple directive consists of the directive name and the space delimited parameters, like listen, return and others. Simple directives are terminated by semicolons.
Block directives are similar to simple directives, except that instead of ending with semicolons, they end with a pair of curly braces { } enclosing additional instructions.
A block directive capable of containing other directives inside it is called a context, that is events, http and so on. There are four core contexts in NGINX:
events { }– Theeventscontext is used for setting global configuration regarding how NGINX is going to handle requests on a general level. There can be only oneeventscontext in a valid configuration file.http { }– Evident by the name,httpcontext is used for defining configuration regarding how the server is going to handle HTTP and HTTPS requests, specifically. There can be only onehttpcontext in a valid configuration file.server { }– Theservercontext is nested inside thehttpcontext and used for configuring specific virtual servers within a single host. There can be multipleservercontexts in a valid configuration file nested inside thehttpcontext. Eachservercontext is considered a virtual host.main– Themaincontext is the configuration file itself. Anything written outside of the three previously mentioned contexts is on themaincontext.
You can treat contexts in NGINX like scopes in other programming languages. There is also a sense of inheritance among them. You can find an alphabetical index of directives on the official NGINX docs.
I’ve already mentioned that there can be multiple server contexts within a configuration file. But when a request reaches the server, how does NGINX know which one of those contexts should handle the request?
The listen directive is one of the ways to identify the correct server context within a configuration. Consider the following scenario:
http {
    server {
        listen 80;
        server_name nginx-handbook.test;

        return 200 "hello from port 80!n";
    }


    server {
        listen 8080;
        server_name nginx-handbook.test;

        return 200 "hello from port 8080!n";
    }
}
Now if you send a request to http://nginx-handbook.test:80 then you’ll receive «hello from port 80!» as a response. And if you send a request to http://nginx-handbook.test:8080, you’ll receive «hello from port 8080!» as a response:
curl nginx-handbook.test:80

# hello from port 80!

curl nginx-handbook.test:8080

# hello from port 8080!
These two server blocks are like two people holding telephone receivers, waiting to respond when a request reaches one of their numbers. Their numbers are indicated by the listen directives.
Apart from the listen directive, there is also the server_name directive. Consider the following scenario of an imaginary library management application:
http {
    server {
        listen 80;
        server_name library.test;

        return 200 "your local library!n";
    }


    server {
        listen 80;
        server_name librarian.library.test;

        return 200 "welcome dear librarian!n";
    }
}
This is a basic example of the idea of virtual hosts. You’re running two separate applications under different server names in the same server.
If you send a request to http://library.test then you’ll get «your local library!» as a response. If you send a request to http://librarian.library.test, you’ll get «welcome dear librarian!» as a response.
curl http://library.test

# your local library!

curl http://librarian.library.test

# welcome dear librarian!
To make this demo work on your system, you’ll have to update your hosts file to include these two domain names as well:
192.168.20.20   library.test
192.168.20.20   librarian.library.test
Finally, the return directive is responsible for returning a valid response to the user. This directive takes two parameters: the status code and the string message to be returned.
How to Serve Static Content Using NGINX
Now that you have a good understanding of how to write a basic configuration file for NGINX, let’s upgrade the configuration to serve static files instead of plain text responses.
In order to serve static content, you first have to store them somewhere on your server. If you list the files and directory on the root of your server using ls, you’ll find a directory called /srv in there:
ls -lh /

# lrwxrwxrwx   1 root    root       7 Apr 16 02:10 bin -> usr/bin
# drwxr-xr-x   3 root    root    4.0K Apr 16 02:13 boot
# drwxr-xr-x  16 root    root    3.8K Apr 21 09:23 dev
# drwxr-xr-x  92 root    root    4.0K Apr 21 09:24 etc
# drwxr-xr-x   4 root    root    4.0K Apr 21 08:04 home
# lrwxrwxrwx   1 root    root       7 Apr 16 02:10 lib -> usr/lib
# lrwxrwxrwx   1 root    root       9 Apr 16 02:10 lib32 -> usr/lib32
# lrwxrwxrwx   1 root    root       9 Apr 16 02:10 lib64 -> usr/lib64
# lrwxrwxrwx   1 root    root      10 Apr 16 02:10 libx32 -> usr/libx32
# drwx------   2 root    root     16K Apr 16 02:15 lost+found
# drwxr-xr-x   2 root    root    4.0K Apr 16 02:10 media
# drwxr-xr-x   2 root    root    4.0K Apr 16 02:10 mnt
# drwxr-xr-x   2 root    root    4.0K Apr 16 02:10 opt
# dr-xr-xr-x 152 root    root       0 Apr 21 09:23 proc
# drwx------   5 root    root    4.0K Apr 21 09:59 root
# drwxr-xr-x  26 root    root     820 Apr 21 09:47 run
# lrwxrwxrwx   1 root    root       8 Apr 16 02:10 sbin -> usr/sbin
# drwxr-xr-x   6 root    root    4.0K Apr 16 02:14 snap
# drwxr-xr-x   2 root    root    4.0K Apr 16 02:10 srv
# dr-xr-xr-x  13 root    root       0 Apr 21 09:23 sys
# drwxrwxrwt  11 root    root    4.0K Apr 21 09:24 tmp
# drwxr-xr-x  15 root    root    4.0K Apr 16 02:12 usr
# drwxr-xr-x   1 vagrant vagrant   38 Apr 21 09:23 vagrant
# drwxr-xr-x  14 root    root    4.0K Apr 21 08:34 var
This /srv directory is meant to contain site-specific data which is served by this system. Now cd into this directory and clone the code repository that comes with this book:
cd /srv

sudo git clone https://github.com/fhsinchy/nginx-handbook-projects.git
Inside the nginx-handbook-projects directory there should a directory called static-demo containing four files in total:
ls -lh /srv/nginx-handbook-projects/static-demo

# -rw-r--r-- 1 root root 960 Apr 21 11:27 about.html
# -rw-r--r-- 1 root root 960 Apr 21 11:27 index.html
# -rw-r--r-- 1 root root 46K Apr 21 11:27 mini.min.css
# -rw-r--r-- 1 root root 19K Apr 21 11:27 the-nginx-handbook.jpg
Now that you have the static content to be served, update your configuration as follows:
events {

}

http {

    server {

        listen 80;
        server_name nginx-handbook.test;

        root /srv/nginx-handbook-projects/static-demo;
    }

}
The code is almost the same, except the return directive has now been replaced by a root directive. This directive is used for declaring the root directory for a site.
By writing root /srv/nginx-handbook-projects/static-demo you’re telling NGINX to look for files to serve inside the /srv/nginx-handbook-projects/static-demo directory if any request comes to this server. Since NGINX is a web server, it is smart enough to serve the index.html file by default.
Let’s see if this works or not. Test and reload the updated configuration file and visit the server. You should be greeted with a somewhat broken HTML site:

Although NGINX has served the index.html file correctly, judging by the look of the three navigation links, it seems like the CSS code is not working.
You may think that there is something wrong in the CSS file. But in reality, the problem is in the configuration file.
Static File Type Handling in NGINX
To debug the issue you’re facing right now, send a request for the CSS file to the server:
curl -I http://nginx-handbook/mini.min.css

# HTTP/1.1 200 OK
# Server: nginx/1.18.0 (Ubuntu)
# Date: Wed, 21 Apr 2021 12:17:16 GMT
# Content-Type: text/plain
# Content-Length: 46887
# Last-Modified: Wed, 21 Apr 2021 11:27:06 GMT
# Connection: keep-alive
# ETag: "60800c0a-b727"
# Accept-Ranges: bytes
Pay attention to the Content-Type and see how it says text/plain and not text/css. This means that NGINX is serving this file as plain text instead of as a stylesheet.
Although NGINX is smart enough to find the index.html file by default, it’s pretty dumb when it comes to interpreting file types. To solve this problem update your configuration once again:
events {

}

http {

    types {
        text/html html;
        text/css css;
    }

    server {

        listen 80;
        server_name nginx-handbook.test;

        root /srv/nginx-handbook-projects/static-demo;
    }
}
The only change we’ve made to the code is a new types context nested inside the http block. As you may have already guessed from the name, this context is used for configuring file types.
By writing text/html html in this context you’re telling NGINX to parse any file as text/html that ends with the html extension.
You may think that configuring the CSS file type should suffice as the HTML is being parsed just fine – but no.
If you introduce a types context in the configuration, NGINX becomes even dumber and only parses the files configured by you. So if you only define the text/css css in this context then NGINX will start parsing the HTML file as plain text.
Validate and reload the newly updated config file and visit the server once again. Send a request for the CSS file once again, and this time the file should be parsed as a text/css file:
curl -I http://nginx-handbook.test/mini.min.css

# HTTP/1.1 200 OK
# Server: nginx/1.18.0 (Ubuntu)
# Date: Wed, 21 Apr 2021 12:29:35 GMT
# Content-Type: text/css
# Content-Length: 46887
# Last-Modified: Wed, 21 Apr 2021 11:27:06 GMT
# Connection: keep-alive
# ETag: "60800c0a-b727"
# Accept-Ranges: bytes
Visit the server for a visual verification, and the site should look better this time:

If you’ve updated and reloaded the configuration file correctly and you’re still seeing the old site, perform a hard refresh.
How to Include Partial Config Files
Mapping file types within the types context may work for small projects, but for bigger projects it can be cumbersome and error-prone.
NGINX provides a solution for this problem. If you list the files inside the /etc/nginx directory once again, you’ll see a file named mime.types.
ls -lh /etc/nginx

# drwxr-xr-x 2 root root 4.0K Apr 21  2020 conf.d
# -rw-r--r-- 1 root root 1.1K Feb  4  2019 fastcgi.conf
# -rw-r--r-- 1 root root 1007 Feb  4  2019 fastcgi_params
# -rw-r--r-- 1 root root 2.8K Feb  4  2019 koi-utf
# -rw-r--r-- 1 root root 2.2K Feb  4  2019 koi-win
# -rw-r--r-- 1 root root 3.9K Feb  4  2019 mime.types
# drwxr-xr-x 2 root root 4.0K Apr 21  2020 modules-available
# drwxr-xr-x 2 root root 4.0K Apr 17 14:42 modules-enabled
# -rw-r--r-- 1 root root 1.5K Feb  4  2019 nginx.conf
# -rw-r--r-- 1 root root  180 Feb  4  2019 proxy_params
# -rw-r--r-- 1 root root  636 Feb  4  2019 scgi_params
# drwxr-xr-x 2 root root 4.0K Apr 17 14:42 sites-available
# drwxr-xr-x 2 root root 4.0K Apr 17 14:42 sites-enabled
# drwxr-xr-x 2 root root 4.0K Apr 17 14:42 snippets
# -rw-r--r-- 1 root root  664 Feb  4  2019 uwsgi_params
# -rw-r--r-- 1 root root 3.0K Feb  4  2019 win-utf
Let’s have a look at the content of this file:
cat /etc/mime.types

# types {
#     text/html                             html htm shtml;
#     text/css                              css;
#     text/xml                              xml;
#     image/gif                             gif;
#     image/jpeg                            jpeg jpg;
#     application/javascript                js;
#     application/atom+xml                  atom;
#     application/rss+xml                   rss;

#     text/mathml                           mml;
#     text/plain                            txt;
#     text/vnd.sun.j2me.app-descriptor      jad;
#     text/vnd.wap.wml                      wml;
#     text/x-component                      htc;

#     image/png                             png;
#     image/tiff                            tif tiff;
#     image/vnd.wap.wbmp                    wbmp;
#     image/x-icon                          ico;
#     image/x-jng                           jng;
#     image/x-ms-bmp                        bmp;
#     image/svg+xml                         svg svgz;
#     image/webp                            webp;

#     application/font-woff                 woff;
#     application/java-archive              jar war ear;
#     application/json                      json;
#     application/mac-binhex40              hqx;
#     application/msword                    doc;
#     application/pdf                       pdf;
#     application/postscript                ps eps ai;
#     application/rtf                       rtf;
#     application/vnd.apple.mpegurl         m3u8;
#     application/vnd.ms-excel              xls;
#     application/vnd.ms-fontobject         eot;
#     application/vnd.ms-powerpoint         ppt;
#     application/vnd.wap.wmlc              wmlc;
#     application/vnd.google-earth.kml+xml  kml;
#     application/vnd.google-earth.kmz      kmz;
#     application/x-7z-compressed           7z;
#     application/x-cocoa                   cco;
#     application/x-java-archive-diff       jardiff;
#     application/x-java-jnlp-file          jnlp;
#     application/x-makeself                run;
#     application/x-perl                    pl pm;
#     application/x-pilot                   prc pdb;
#     application/x-rar-compressed          rar;
#     application/x-redhat-package-manager  rpm;
#     application/x-sea                     sea;
#     application/x-shockwave-flash         swf;
#     application/x-stuffit                 sit;
#     application/x-tcl                     tcl tk;
#     application/x-x509-ca-cert            der pem crt;
#     application/x-xpinstall               xpi;
#     application/xhtml+xml                 xhtml;
#     application/xspf+xml                  xspf;
#     application/zip                       zip;

#     application/octet-stream              bin exe dll;
#     application/octet-stream              deb;
#     application/octet-stream              dmg;
#     application/octet-stream              iso img;
#     application/octet-stream              msi msp msm;

#     application/vnd.openxmlformats-officedocument.wordprocessingml.document    docx;
#     application/vnd.openxmlformats-officedocument.spreadsheetml.sheet          xlsx;
#     application/vnd.openxmlformats-officedocument.presentationml.presentation  pptx;

#     audio/midi                            mid midi kar;
#     audio/mpeg                            mp3;
#     audio/ogg                             ogg;
#     audio/x-m4a                           m4a;
#     audio/x-realaudio                     ra;

#     video/3gpp                            3gpp 3gp;
#     video/mp2t                            ts;
#     video/mp4                             mp4;
#     video/mpeg                            mpeg mpg;
#     video/quicktime                       mov;
#     video/webm                            webm;
#     video/x-flv                           flv;
#     video/x-m4v                           m4v;
#     video/x-mng                           mng;
#     video/x-ms-asf                        asx asf;
#     video/x-ms-wmv                        wmv;
#     video/x-msvideo                       avi;
# }
The file contains a long list of file types and their extensions. To use this file inside your configuration file, update your configuration to look as follows:
events {

}

http {

    include /etc/nginx/mime.types;

    server {

        listen 80;
        server_name nginx-handbook.test;

        root /srv/nginx-handbook-projects/static-demo;
    }

}
The old types context has now been replaced with a new include directive. Like the name suggests, this directive allows you to include content from other configuration files.
Validate and reload the configuration file and send a request for the mini.min.css file once again:
curl -I http://nginx-handbook.test/mini.min.css

# HTTP/1.1 200 OK
# Server: nginx/1.18.0 (Ubuntu)
# Date: Wed, 21 Apr 2021 12:29:35 GMT
# Content-Type: text/css
# Content-Length: 46887
# Last-Modified: Wed, 21 Apr 2021 11:27:06 GMT
# Connection: keep-alive
# ETag: "60800c0a-b727"
# Accept-Ranges: bytes
In the section below on how to understand the main configuration file, I’ll demonstrate how include can be used to modularize your virtual server configurations.
Dynamic Routing in NGINX
The configuration you wrote in the previous section was a very simple static content server configuration. All it did was match a file from the site root corresponding to the URI the client visits and respond back.
So if the client requests files existing on the root such as index.html, about.html or mini.min.css NGINX will return the file. But if you visit a route such as http://nginx-handbook.test/nothing, it’ll respond with the default 404 page:

In this section of the book, you’ll learn about the location context, variables, redirects, rewrites and the try_files directive. There will be no new projects in this section but the concepts you learn here will be necessary in the upcoming sections.
Also the configuration will change very frequently in this section, so do not forget to validate and reload the configuration file after every update.
Location Matches
The first concept we’ll discuss in this section is the location context. Update the configuration as follows:
events {

}

http {

    server {

        listen 80;
        server_name nginx-handbook.test;

        location /agatha {
            return 200 "Miss Marple.nHercule Poirot.n";
        }
    }
}
We’ve replaced the root directive with a new location context. This context is usually nested inside server blocks. There can be multiple location contexts within a server context.
If you send a request to http://nginx-handbook.test/agatha, you’ll get a 200 response code and list of characters created by Agatha Christie.
curl -i http://nginx-handbook.test/agatha

# HTTP/1.1 200 OK
# Server: nginx/1.18.0 (Ubuntu)
# Date: Wed, 21 Apr 2021 15:59:07 GMT
# Content-Type: text/plain
# Content-Length: 29
# Connection: keep-alive

# Miss Marple.
# Hercule Poirot.
Now if you send a request to http://nginx-handbook.test/agatha-christie, you’ll get the same response:
curl -i http://nginx-handbook.test/agatha-christie

# HTTP/1.1 200 OK
# Server: nginx/1.18.0 (Ubuntu)
# Date: Wed, 21 Apr 2021 15:59:07 GMT
# Content-Type: text/plain
# Content-Length: 29
# Connection: keep-alive

# Miss Marple.
# Hercule Poirot.
This happens because, by writing location /agatha, you’re telling NGINX to match any URI starting with «agatha». This kind of match is called a prefix match.
To perform an exact match, you’ll have to update the code as follows:
events {

}

http {

    server {

        listen 80;
        server_name nginx-handbook.test;

        location = /agatha {
            return 200 "Miss Marple.nHercule Poirot.n";
        }
    }

}
Adding an = sign before the location URI will instruct NGINX to respond only if the URL matches exactly. Now if you send a request to anything but /agatha, you’ll get a 404 response.
curl -I http://nginx-handbook.test/agatha-christie

# HTTP/1.1 404 Not Found
# Server: nginx/1.18.0 (Ubuntu)
# Date: Wed, 21 Apr 2021 16:14:29 GMT
# Content-Type: text/html
# Content-Length: 162
# Connection: keep-alive

curl -I http://nginx-handbook.test/agatha

# HTTP/1.1 200 OK
# Server: nginx/1.18.0 (Ubuntu)
# Date: Wed, 21 Apr 2021 16:15:04 GMT
# Content-Type: text/plain
# Content-Length: 29
# Connection: keep-alive
Another kind of match in NGINX is the regex match. Using this match you can check location URLs against complex regular expressions.
events {

}

http {

    server {

        listen 80;
        server_name nginx-handbook.test;

        location ~ /agatha[0-9] {
        	return 200 "Miss Marple.nHercule Poirot.n";
        }
    }

}
By replacing the previously used = sign with a ~ sign, you’re telling NGINX to perform a regular expression match. Setting the location to ~ /agatha[0-9] means NIGINX will only respond if there is a number after the word «agatha»:
curl -I http://nginx-handbook.test/agatha

# HTTP/1.1 404 Not Found
# Server: nginx/1.18.0 (Ubuntu)
# Date: Wed, 21 Apr 2021 16:14:29 GMT
# Content-Type: text/html
# Content-Length: 162
# Connection: keep-alive

curl -I http://nginx-handbook.test/agatha8

# HTTP/1.1 200 OK
# Server: nginx/1.18.0 (Ubuntu)
# Date: Wed, 21 Apr 2021 16:15:04 GMT
# Content-Type: text/plain
# Content-Length: 29
# Connection: keep-alive
A regex match is by default case sensitive, which means that if you capitalize any of the letters, the location won’t work:
curl -I http://nginx-handbook.test/Agatha8

# HTTP/1.1 404 Not Found
# Server: nginx/1.18.0 (Ubuntu)
# Date: Wed, 21 Apr 2021 16:14:29 GMT
# Content-Type: text/html
# Content-Length: 162
# Connection: keep-alive
To turn this into case insensitive, you’ll have to add a * after the ~ sign.
events {

}

http {

    server {

        listen 80;
        server_name nginx-handbook.test;

        location ~* /agatha[0-9] {
        	return 200 "Miss Marple.nHercule Poirot.n";
        }
    }

}
That will tell NGINX to let go of type sensitivity and match the location anyways.
curl -I http://nginx-handbook.test/agatha8

# HTTP/1.1 200 OK
# Server: nginx/1.18.0 (Ubuntu)
# Date: Wed, 21 Apr 2021 16:15:04 GMT
# Content-Type: text/plain
# Content-Length: 29
# Connection: keep-alive

curl -I http://nginx-handbook.test/Agatha8

# HTTP/1.1 200 OK
# Server: nginx/1.18.0 (Ubuntu)
# Date: Wed, 21 Apr 2021 16:15:04 GMT
# Content-Type: text/plain
# Content-Length: 29
# Connection: keep-alive
NGINX assigns priority values to these matches, and a regex match has more priority than a prefix match.
events {

}

http {

    server {

        listen 80;
        server_name nginx-handbook.test;

		location /Agatha8 {
        	return 200 "prefix matched.n";
        }

        location ~* /agatha[0-9] {
        	return 200 "regex matched.n";
        }
    }

}
Now if you send a request to http://nginx-handbook.test/Agatha8, you’ll get the following response:
curl -i http://nginx-handbook.test/Agatha8

# HTTP/1.1 200 OK
# Server: nginx/1.18.0 (Ubuntu)
# Date: Thu, 22 Apr 2021 08:08:18 GMT
# Content-Type: text/plain
# Content-Length: 15
# Connection: keep-alive

# regex matched.
But this priority can be changed a little. The final type of match in NGINX is a preferential prefix match. To turn a prefix match into a preferential one, you need to include the ^~ modifier before the location URI:
events {

}

http {

    server {

        listen 80;
        server_name nginx-handbook.test;

		location ^~ /Agatha8 {
        	return 200 "prefix matched.n";
        }

        location ~* /agatha[0-9] {
        	return 200 "regex matched.n";
        }
    }

}
Now if you send a request to http://nginx-handbook.test/Agatha8, you’ll get the following response:
curl -i http://nginx-handbook.test/Agatha8

# HTTP/1.1 200 OK
# Server: nginx/1.18.0 (Ubuntu)
# Date: Thu, 22 Apr 2021 08:13:24 GMT
# Content-Type: text/plain
# Content-Length: 16
# Connection: keep-alive

# prefix matched.
This time, the prefix match wins. So the list of all the matches in descending order of priority is as follows:
| Match | Modifier |
|---|---|
| Exact | = |
| Preferential Prefix | ^~ |
| REGEX | ~ or ~* |
| Prefix | None |
Variables in NGINX
Variables in NGINX are similar to variables in other programming languages. The set directive can be used to declare new variables anywhere within the configuration file:
set $<variable_name> <variable_value>;

# set name "Farhan"
# set age 25
# set is_working true
Variables can be of three types
- String
- Integer
- Boolean
Apart from the variables you declare, there are embedded variables within NGINX modules. An alphabetical index of variables is available in the official documentation.
To see some of the variables in action, update the configuration as follows:
events {

}

http {

    server {

        listen 80;
        server_name nginx-handbook.test;

        return 200 "Host - $hostnURI - $urinArgs - $argsn";
    }

}
Now upon sending a request to the server, you should get a response as follows:
# curl http://nginx-handbook.test/user?name=Farhan

# Host - nginx-handbook.test
# URI - /user
# Args - name=Farhan
As you can see, the $host and $uri variables hold the root address and the requested URI relative to the root, respectively. The $args variable, as you can see, contains all the query strings.
Instead of printing the literal string form of the query strings, you can access the individual values using the $arg variable.
events {

}

http {

    server {

        listen 80;
        server_name nginx-handbook.test;

        set $name $arg_name; # $arg_<query string name>

        return 200 "Name - $namen";
    }

}
Now the response from the server should look like as follows:
curl http://nginx-handbook.test?name=Farhan

# Name - Farhan
The variables I demonstrated here are embedded in the ngx_http_core_module. For a variable to be accessible in the configuration, NGINX has to be built with the module embedding the variable. Building NGINX from source and usage of dynamic modules is slightly out of scope for this article. But I’ll surely write about that in my blog.
Redirects and Rewrites
A redirect in NGINX is same as redirects in any other platform. To demonstrate how redirects work, update your configuration to look like this:
events {

}

http {

    include /etc/nginx/mime.types;

    server {

        listen 80;
        server_name nginx-handbook.test;

        root /srv/nginx-handbook-projects/static-demo;

        location = /index_page {
                return 307 /index.html;
        }

        location = /about_page {
                return 307 /about.html;
        }
    }
}
Now if you send a request to http://nginx-handbook.test/about_page, you’ll be redirected to http://nginx-handbook.test/about.html:
curl -I http://nginx-handbook.test/about_page

# HTTP/1.1 307 Temporary Redirect
# Server: nginx/1.18.0 (Ubuntu)
# Date: Thu, 22 Apr 2021 18:02:04 GMT
# Content-Type: text/html
# Content-Length: 180
# Location: http://nginx-handbook.test/about.html
# Connection: keep-alive
As you can see, the server responded with a status code of 307 and the location indicates http://nginx-handbook.test/about.html. If you visit http://nginx-handbook.test/about_page from a browser, you’ll see that the URL will automatically change to http://nginx-handbook.test/about.html.
A rewrite directive, however, works a little differently. It changes the URI internally, without letting the user know. To see it in action, update your configuration as follows:
events {

}

http {

    include /etc/nginx/mime.types;

    server {

        listen 80;
        server_name nginx-handbook.test;

        root /srv/nginx-handbook-projects/static-demo;

        rewrite /index_page /index.html;

        rewrite /about_page /about.html;
    }
}
Now if you send a request to http://nginx-handbook/about_page URI, you’ll get a 200 response code and the HTML code for about.html file in response:
curl -i http://nginx-handbook.test/about_page

# HTTP/1.1 200 OK
# Server: nginx/1.18.0 (Ubuntu)
# Date: Thu, 22 Apr 2021 18:09:31 GMT
# Content-Type: text/html
# Content-Length: 960
# Last-Modified: Wed, 21 Apr 2021 11:27:06 GMT
# Connection: keep-alive
# ETag: "60800c0a-3c0"
# Accept-Ranges: bytes

# <!DOCTYPE html>
# <html lang="en">
# <head>
#     <meta charset="UTF-8">
#     <meta http-equiv="X-UA-Compatible" content="IE=edge">
#     <meta name="viewport" content="width=device-width, initial-scale=1.0">
#     <title>NGINX Handbook Static Demo</title>
#     <link rel="stylesheet" href="mini.min.css">
#     <style>
#         .container {
#             max-width: 1024px;
#             margin-left: auto;
#             margin-right: auto;
#         }
#
#         h1 {
#             text-align: center;
#         }
#     </style>
# </head>
# <body class="container">
#     <header>
#         <a class="button" href="index.html">Index</a>
#         <a class="button" href="about.html">About</a>
#         <a class="button" href="nothing">Nothing</a>
#     </header>
#     <div class="card fluid">
#         <img src="./the-nginx-handbook.jpg" alt="The NGINX Handbook Cover Image">
#     </div>
#     <div class="card fluid">
#         <h1>this is the <strong>about.html</strong> file</h1>
#     </div>
# </body>
# </html>
And if you visit the URI using a browser, you’ll see the about.html page while the URL remains unchanged:

Apart from the way the URI change is handled, there is another difference between a redirect and rewrite. When a rewrite happens, the server context gets re-evaluated by NGINX. So, a rewrite is a more expensive operation than a redirect.
How to Try for Multiple Files
The final concept I’ll be showing in this section is the try_files directive. Instead of responding with a single file, the try_files directive lets you check for the existence of multiple files.
events {

}

http {

    include /etc/nginx/mime.types;

    server {

        listen 80;
        server_name nginx-handbook.test;

        root /srv/nginx-handbook-projects/static-demo;

        try_files /the-nginx-handbook.jpg /not_found;

        location /not_found {
                return 404 "sadly, you've hit a brick wall buddy!n";
        }
    }
}
As you can see, a new try_files directive has been added. By writing try_files /the-nginx-handbook.jpg /not_found; you’re instructing NGINX to look for a file named the-nginx-handbook.jpg on the root whenever a request is received. If it doesn’t exist, go to the /not_found location.
So now if you visit the server, you’ll see the image:

But if you update the configuration to try for a non-existent file such as blackhole.jpg, you’ll get a 404 response with the message «sadly, you’ve hit a brick wall buddy!».
Now the problem with writing a try_files directive this way is that no matter what URL you visit, as long as a request is received by the server and the the-nginx-handbook.jpg file is found on the disk, NGINX will send that back.

And that’s why try_files is often used with the $uri NGINX variable.
events {

}

http {

    include /etc/nginx/mime.types;

    server {

        listen 80;
        server_name nginx-handbook.test;

        root /srv/nginx-handbook-projects/static-demo;

        try_files $uri /not_found;

        location /not_found {
                return 404 "sadly, you've hit a brick wall buddy!n";
        }
    }
}
By writing try_files $uri /not_found; you’re instructing NGINX to try for the URI requested by the client first. If it doesn’t find that one, then try the next one.
So now if you visit http://nginx-handbook.test/index.html you should get the old index.html page. The same goes for the about.html page:

But if you request a file that doesn’t exist, you’ll get the response from the /not_found location:
curl -i http://nginx-handbook.test/nothing

# HTTP/1.1 404 Not Found
# Server: nginx/1.18.0 (Ubuntu)
# Date: Thu, 22 Apr 2021 20:01:57 GMT
# Content-Type: text/plain
# Content-Length: 38
# Connection: keep-alive

# sadly, you've hit a brick wall buddy!
One thing that you may have already noticed is that if you visit the server root http://nginx-handbook.test, you get the 404 response.
This is because when you’re hitting the server root, the $uri variable doesn’t correspond to any existing file so NGINX serves you the fallback location. If you want to fix this issue, update your configuration as follows:
events {

}

http {

    include /etc/nginx/mime.types;

    server {

        listen 80;
        server_name nginx-handbook.test;

        root /srv/nginx-handbook-projects/static-demo;

        try_files $uri $uri/ /not_found;

        location /not_found {
                return 404 "sadly, you've hit a brick wall buddy!n";
        }
    }
}
By writing try_files $uri $uri/ /not_found; you’re instructing NGINX to try for the requested URI first. If that doesn’t work then try for the requested URI as a directory, and whenever NGINX ends up into a directory it automatically starts looking for an index.html file.
Now if you visit the server, you should get the index.html file just right:
The try_files is the kind of directive that can be used in a number of variations. In the upcoming sections, you’ll encounter a few other variations but I would suggest that you do some research on the internet regarding the different usage of this directive by yourself.
Logging in NGINX
By default, NGINX’s log files are located inside /var/log/nginx. If you list the content of this directory, you may see something as follows:
ls -lh /var/log/nginx/

# -rw-r----- 1 www-data adm     0 Apr 25 07:34 access.log
# -rw-r----- 1 www-data adm     0 Apr 25 07:34 error.log
Let’s begin by emptying the two files.
# delete the old files
sudo rm /var/log/nginx/access.log /var/log/nginx/error.log

# create new files
sudo touch /var/log/nginx/access.log /var/log/nginx/error.log

# reopen the log files
sudo nginx -s reopen
If you do not dispatch a reopen signal to NGINX, it’ll keep writing logs to the previously open streams and the new files will remain empty.
Now to make an entry in the access log, send a request to the server.
curl -I http://nginx-handbook.test

# HTTP/1.1 200 OK
# Server: nginx/1.18.0 (Ubuntu)
# Date: Sun, 25 Apr 2021 08:35:59 GMT
# Content-Type: text/html
# Content-Length: 960
# Last-Modified: Sun, 25 Apr 2021 08:35:33 GMT
# Connection: keep-alive
# ETag: "608529d5-3c0"
# Accept-Ranges: bytes

sudo cat /var/log/nginx/access.log

# 192.168.20.20 - - [25/Apr/2021:08:35:59 +0000] "HEAD / HTTP/1.1" 200 0 "-" "curl/7.68.0"
As you can see, a new entry has been added to the access.log file. Any request to the server will be logged to this file by default. But we can change this behavior using the access_log directive.
events {

}

http {

    include /etc/nginx/mime.types;

    server {

        listen 80;
        server_name nginx-handbook.test;

        location / {
            return 200 "this will be logged to the default file.n";
        }

        location = /admin {
            access_log /var/logs/nginx/admin.log;

            return 200 "this will be logged in a separate file.n";
        }

        location = /no_logging {
            access_log off;

            return 200 "this will not be logged.n";
        }
    }
}
The first access_log directive inside the /admin location block instructs NGINX to write any access log of this URI to the /var/logs/nginx/admin.log file. The second one inside the /no_logging location turns off access logs for this location completely.
Validate and reload the configuration. Now if you send requests to these locations and inspect the log files, you should see something like this:
curl http://nginx-handbook.test/no_logging
# this will not be logged

sudo cat /var/log/nginx/access.log
# empty

curl http://nginx-handbook.test/admin
# this will be logged in a separate file.

sudo cat /var/log/nginx/access.log
# empty

sudo cat /var/log/nginx/admin.log
# 192.168.20.20 - - [25/Apr/2021:11:13:53 +0000] "GET /admin HTTP/1.1" 200 40 "-" "curl/7.68.0"

curl  http://nginx-handbook.test/
# this will be logged to the default file.

sudo cat /var/log/nginx/access.log
# 192.168.20.20 - - [25/Apr/2021:11:15:14 +0000] "GET / HTTP/1.1" 200 41 "-" "curl/7.68.0"
The error.log file, on the other hand, holds the failure logs. To make an entry to the error.log, you’ll have to make NGINX crash. To do so, update your configuration as follows:
events {

}

http {

    include /etc/nginx/mime.types;

    server {

        listen 80;
        server_name nginx-handbook.test;

        return 200 "..." "...";
    }

}
As you know, the return directive takes only two parameters – but we’ve given three here. Now try reloading the configuration and you’ll be presented with an error message:
sudo nginx -s reload

# nginx: [emerg] invalid number of arguments in "return" directive in /etc/nginx/nginx.conf:14
Check the content of the error log and the message should be present there as well:
sudo cat /var/log/nginx/error.log

# 2021/04/25 08:35:45 [notice] 4169#4169: signal process started
# 2021/04/25 10:03:18 [emerg] 8434#8434: invalid number of arguments in "return" directive in /etc/nginx/nginx.conf:14
Error messages have levels. A notice entry in the error log is harmless, but an emerg or emergency entry has to be addressed right away.
There are eight levels of error messages:
debug– Useful debugging information to help determine where the problem lies.info– Informational messages that aren’t necessary to read but may be good to know.notice– Something normal happened that is worth noting.warn– Something unexpected happened, however is not a cause for concern.error– Something was unsuccessful.crit– There are problems that need to be critically addressed.alert– Prompt action is required.emerg– The system is in an unusable state and requires immediate attention.
By default, NGINX records all level of messages. You can override this behavior using the error_log directive. If you want to set the minimum level of a message to be warn, then update your configuration file as follows:
events {

}

http {

    include /etc/nginx/mime.types;

    server {

        listen 80;
        server_name nginx-handbook.test;

    	error_log /var/log/error.log warn;

        return 200 "..." "...";
    }

}
Validate and reload the configuration, and from now on only messages with a level of warn or above will be logged.
cat /var/log/nginx/error.log

# 2021/04/25 11:27:02 [emerg] 12769#12769: invalid number of arguments in "return" directive in /etc/nginx/nginx.conf:16
Unlike the previous output, there are no notice entries here. emerg is a higher level error than warn and that’s why it has been logged.
For most projects, leaving the error configuration as it is should be fine. The only suggestion I have is to set the minimum error level to warn. This way you won’t have to look at unnecessary entries in the error log.
But if you want to learn more about customizing logging in NGINX, this link to the official docs may help.
How to Use NGINX as a Reverse Proxy
When configured as a reverse proxy, NGINX sits between the client and a back end server. The client sends requests to NGINX, then NGINX passes the request to the back end.
Once the back end server finishes processing the request, it sends it back to NGINX. In turn, NGINX returns the response to the client.
During the whole process, the client doesn’t have any idea about who’s actually processing the request. It sounds complicated in writing, but once you do it for yourself you’ll see how easy NGINX makes it.
Let’s see a very basic and impractical example of a reverse proxy:
events {

}

http {

    include /etc/nginx/mime.types;

    server {
        listen 80;
        server_name nginx.test;

        location / {
                proxy_pass "https://nginx.org/";
        }
    }
}
Apart from validating and reloading the configuration, you’ll also have to add this address to your hosts file to make this demo work on your system:
192.168.20.20 nginx.testNow if you visit http://nginx.test, you’ll be greeted by the original https://nginx.org site while the URI remains unchanged.
You should be even able to navigate around the site to an extent. If you visit http://nginx.test/en/docs/ you should get the http://nginx.org/en/docs/ page in response.
So as you can see, at a basic level, the proxy_pass directive simply passes a client’s request to a third party server and reverse proxies the response to the client.
Node.js With NGINX
Now that you know how to configure a basic reverse proxy server, you can serve a Node.js application reverse proxied by NGINX. I’ve added a demo application inside the repository that comes with this article.
I’m assuming that you have experience with Node.js and know how to start a Node.js application using PM2.
If you’ve already cloned the repository inside /srv/nginx-handbook-projects then the node-js-demo project should be available in the /srv/nginx-handbook-projects/node-js-demo directory.
For this demo to work, you’ll need to install Node.js on your server. You can do that following the instructions found here.
The demo application is a simple HTTP server that responds with a 200 status code and a JSON payload. You can start the application by simply executing node app.js but a better way is to use PM2.
For those of you who don’t know, PM2 is a daemon process manager widely used in production for Node.js applications. If you want to learn more, this link may help.
Install PM2 globally by executing sudo npm install -g pm2. After the installation is complete, execute following command while being inside the /srv/nginx-handbook-projects/node-js-demo directory:
pm2 start app.js

# [PM2] Process successfully started
# ┌────┬────────────────────┬──────────┬──────┬───────────┬──────────┬──────────┐
# │ id │ name               │ mode     │ ↺    │ status    │ cpu      │ memory   │
# ├────┼────────────────────┼──────────┼──────┼───────────┼──────────┼──────────┤
# │ 0  │ app                │ fork     │ 0    │ online    │ 0%       │ 21.2mb   │
# └────┴────────────────────┴──────────┴──────┴───────────┴──────────┴──────────┘
Alternatively you can also do pm2 start /srv/nginx-handbook-projects/node-js-demo/app.js from anywhere on the server. You can stop the application by executing the pm2 stop app command.
The application should be running now but should not be accessible from outside of the server. To verify if the application is running or not, send a get request to http://localhost:3000 from inside your server:
curl -i localhost:3000

# HTTP/1.1 200 OK
# X-Powered-By: Express
# Content-Type: application/json; charset=utf-8
# Content-Length: 62
# ETag: W/"3e-XRN25R5fWNH2Tc8FhtUcX+RZFFo"
# Date: Sat, 24 Apr 2021 12:09:55 GMT
# Connection: keep-alive
# Keep-Alive: timeout=5

# { "status": "success", "message": "You're reading The NGINX Handbook!" }
If you get a 200 response, then the server is running fine. Now to configure NGINX as a reverse proxy, open your configuration file and update its content as follows:
events {

}

http {
    listen 80;
    server_name nginx-handbook.test

    location / {
        proxy_pass http://localhost:3000;
    }
}
Nothing new to explain here. You’re just passing the received request to the Node.js application running at port 3000. Now if you send a request to the server from outside you should get a response as follows:
curl -i http://nginx-handbook.test

# HTTP/1.1 200 OK
# Server: nginx/1.18.0 (Ubuntu)
# Date: Sat, 24 Apr 2021 14:58:01 GMT
# Content-Type: application/json
# Transfer-Encoding: chunked
# Connection: keep-alive

# { "status": "success", "message": "You're reading The NGINX Handbook!" }
Although this works for a basic server like this, you may have to add a few more directives to make it work in a real world scenario depending on your application’s requirements.
For example, if your application handles web socket connections, then you should update the configuration as follows:
events {

}

http {
    listen 80;
    server_name nginx-handbook.test

    location / {
        proxy_pass http://localhost:3000;
        proxy_http_version 1.1;
        proxy_set_header Upgrade $http_upgrade;
        proxy_set_header Connection 'upgrade';
    }
}
The proxy_http_version directive sets the HTTP version for the server. By default it’s 1.0, but web socket requires it to be at least 1.1. The proxy_set_header directive is used for setting a header on the back-end server. Generic syntax for this directive is as follows:
proxy_set_header <header name> <header value>So, by writing proxy_set_header Upgrade $http_upgrade; you’re instructing NGINX to pass the value of the $http_upgrade variable as a header named Upgrade – same for the Connection header.
If you would like to learn more about web socket proxying, this link to the official NGINX docs may help.
Depending on the headers required by your application, you may have to set more of them. But the above mentioned configuration is very commonly used to serve Node.js applications.
PHP With NGINX
PHP and NGINX go together like bread and butter. After all the E and the P in the LEMP stack stand for NGINX and PHP.
I’m assuming you have experience with PHP and know how to run a PHP application.
I’ve already included a demo PHP application in the repository that comes with this article. If you’ve already cloned it in the /srv/nginx-handbook-projects directory, then the application should be inside /srv/nginx-handbook-projects/php-demo.
For this demo to work, you’ll have to install a package called PHP-FPM. To install the package, you can execute following command:
sudo apt install php-fpm -yTo test out the application, start a PHP server by executing the following command while inside the /srv/nginx-handbook-projects/php-demo directory:
php -S localhost:8000

# [Sat Apr 24 16:17:36 2021] PHP 7.4.3 Development Server (http://localhost:8000) started
Alternatively you can also do php -S localhost:8000 /srv/nginx-handbook-projects/php-demo/index.php from anywhere on the server.
The application should be running at port 8000 but it can not be accessed from the outside of the server. To verify, send a get request to http://localhost:8000 from inside your server:
curl -I localhost:8000

# HTTP/1.1 200 OK
# Host: localhost:8000
# Date: Sat, 24 Apr 2021 16:22:42 GMT
# Connection: close
# X-Powered-By: PHP/7.4.3
# Content-type: application/json

# {"status":"success","message":"You're reading The NGINX Handbook!"}
If you get a 200 response then the server is running fine. Just like the Node.js configuration, now you can simply proxy_pass the requests to localhost:8000 – but with PHP, there is a better way.
The FPM part in PHP-FPM stands for FastCGI Process Module. FastCGI is a protocol just like HTTP for exchanging binary data. This protocol is slightly faster than HTTP and provides better security.
To use FastCGI instead of HTTP, update your configuration as follows:
events {

}

http {

      include /etc/nginx/mime.types;

      server {

          listen 80;
          server_name nginx-handbook.test;
          root /srv/nginx-handbook-projects/php-demo;

          index index.php;

          location / {
              try_files $uri $uri/ =404;
          }

          location ~ .php$ {
              fastcgi_pass unix:/var/run/php/php7.4-fpm.sock;
              fastcgi_param REQUEST_METHOD $request_method;
              fastcgi_param SCRIPT_FILENAME $realpath_root$fastcgi_script_name;
      }
   }
}
Let’s begin with the new index directive. As you know, NGINX by default looks for an index.html file to serve. But in the demo-project, it’s called index.php. So by writing index index.php, you’re instructing NGINX to use the index.php file as root instead.
This directive can accept multiple parameters. If you write something like index index.php index.html, NGINX will first look for index.php. If it doesn’t find that file, it will look for an index.html file.
The try_files directive inside the first location context is the same as you’ve seen in a previous section. The =404 at the end indicates the error to throw if none of the files are found.
The second location block is the place where the main magic happens. As you can see, we’ve replaced the proxy_pass directive by a new fastcgi_pass. As the name suggests, it’s used to pass a request to a FastCGI service.
The PHP-FPM service by default runs on port 9000 of the host. So instead of using a Unix socket like I’ve done here, you can pass the request to http://localhost:9000 directly. But using a Unix socket is more secure.
If you have multiple PHP-FPM versions installed, you can simply list all the socket file locations by executing the following command:
sudo find / -name *fpm.sock

# /run/php/php7.4-fpm.sock
# /run/php/php-fpm.sock
# /etc/alternatives/php-fpm.sock
# /var/lib/dpkg/alternatives/php-fpm.sock
The /run/php/php-fpm.sock file refers to the latest version of PHP-FPM installed on your system. I prefer using the one with the version number. This way even if PHP-FPM gets updated, I’ll be certain about the version I’m using.
Unlike passing requests through HTTP, passing requests through FPM requires us to pass some extra information.
The general way of passing extra information to the FPM service is using the fastcgi_param directive. At the very least, you’ll have to pass the request method and the script name to the back-end service for the proxying to work.
The fastcgi_param REQUEST_METHOD $request_method; passes the request method to the back-end and the fastcgi_param SCRIPT_FILENAME $realpath_root$fastcgi_script_name; line passes the exact location of the PHP script to run.
At this state, your configuration should work. To test it out, visit your server and you should be greeted by something like this:

Well, that’s weird. A 500 error means NGINX has crashed for some reason. This is where the error logs can come in handy. Let’s have a look at the last entry in the error.log file:
tail -n 1 /var/log/nginx/error.log

# 2021/04/24 17:15:17 [crit] 17691#17691: *21 connect() to unix:/var/run/php/php7.4-fpm.sock failed (13: Permission denied) while connecting to upstream, client: 192.168.20.20, server: nginx-handbook.test, request: "GET / HTTP/1.1", upstream: "fastcgi://unix:/var/run/php/php7.4-fpm.sock:", host: "nginx-handbook.test"
Seems like the NGINX process is being denied permission to access the PHP-FPM process.
One of the main reasons for getting a permission denied error is user mismatch. Have a look at the user owning the NGINX worker process.
ps aux | grep nginx

# root         677  0.0  0.4   8892  4260 ?        Ss   14:31   0:00 nginx: master process /usr/sbin/nginx -g daemon on; master_process on;
# nobody     17691  0.0  0.3   9328  3452 ?        S    17:09   0:00 nginx: worker process
# vagrant    18224  0.0  0.2   8160  2552 pts/0    S+   17:19   0:00 grep --color=auto nginx
As you can see, the process is currently owned by nobody. Now inspect the PHP-FPM process.
# ps aux | grep php

# root       14354  0.0  1.8 195484 18924 ?        Ss   16:11   0:00 php-fpm: master process (/etc/php/7.4/fpm/php-fpm.conf)
# www-data   14355  0.0  0.6 195872  6612 ?        S    16:11   0:00 php-fpm: pool www
# www-data   14356  0.0  0.6 195872  6612 ?        S    16:11   0:00 php-fpm: pool www
# vagrant    18296  0.0  0.0   8160   664 pts/0    S+   17:20   0:00 grep --color=auto php
This process, on the other hand, is owned by the www-data user. This is why NGINX is being denied access to this process.
To solve this issue, update your configuration as follows:
user www-data;

events {

}

http {

      include /etc/nginx/mime.types;

      server {

          listen 80;
          server_name nginx-handbook.test;
          root /srv/nginx-handbook-projects/php-demo;

          index index.php;

          location / {
              try_files $uri $uri/ =404;
          }

          location ~ .php$ {
              fastcgi_pass unix:/var/run/php/php7.4-fpm.sock;
              fastcgi_param REQUEST_METHOD $request_method;
              fastcgi_param SCRIPT_FILENAME $realpath_root$fastcgi_script_name;
      }
   }
}
The user directive is responsible for setting the owner for the NGINX worker processes. Now inspect the the NGINX process once again:
# ps aux | grep nginx

# root         677  0.0  0.4   8892  4264 ?        Ss   14:31   0:00 nginx: master process /usr/sbin/nginx -g daemon on; master_process on;
# www-data   20892  0.0  0.3   9292  3504 ?        S    18:10   0:00 nginx: worker process
# vagrant    21294  0.0  0.2   8160  2568 pts/0    S+   18:18   0:00 grep --color=auto nginx
Undoubtedly the process is now owned by the www-data user. Send a request to your server to check if it’s working or not:
# curl -i http://nginx-handbook.test

# HTTP/1.1 200 OK
# Server: nginx/1.18.0 (Ubuntu)
# Date: Sat, 24 Apr 2021 18:22:24 GMT
# Content-Type: application/json
# Transfer-Encoding: chunked
# Connection: keep-alive

# {"status":"success","message":"You're reading The NGINX Handbook!"}
If you get a 200 status code with a JSON payload, you’re good to go.
This simple configuration is fine for the demo application, but in real-life projects you’ll have to pass some additional parameters.
For this reason, NGINX includes a partial configuration called fastcgi_params. This file contains a list of the most common FastCGI parameters.
cat /etc/nginx/fastcgi_params

# fastcgi_param  QUERY_STRING       $query_string;
# fastcgi_param  REQUEST_METHOD     $request_method;
# fastcgi_param  CONTENT_TYPE       $content_type;
# fastcgi_param  CONTENT_LENGTH     $content_length;

# fastcgi_param  SCRIPT_NAME        $fastcgi_script_name;
# fastcgi_param  REQUEST_URI        $request_uri;
# fastcgi_param  DOCUMENT_URI       $document_uri;
# fastcgi_param  DOCUMENT_ROOT      $document_root;
# fastcgi_param  SERVER_PROTOCOL    $server_protocol;
# fastcgi_param  REQUEST_SCHEME     $scheme;
# fastcgi_param  HTTPS              $https if_not_empty;

# fastcgi_param  GATEWAY_INTERFACE  CGI/1.1;
# fastcgi_param  SERVER_SOFTWARE    nginx/$nginx_version;

# fastcgi_param  REMOTE_ADDR        $remote_addr;
# fastcgi_param  REMOTE_PORT        $remote_port;
# fastcgi_param  SERVER_ADDR        $server_addr;
# fastcgi_param  SERVER_PORT        $server_port;
# fastcgi_param  SERVER_NAME        $server_name;

# PHP only, required if PHP was built with --enable-force-cgi-redirect
# fastcgi_param  REDIRECT_STATUS    200;
As you can see, this file also contains the REQUEST_METHOD parameter. Instead of passing that manually, you can just include this file in your configuration:
user www-data;

events {

}

http {

      include /etc/nginx/mime.types;

      server {

          listen 80;
          server_name nginx-handbook.test;
          root /srv/nginx-handbook-projects/php-demo;

          index index.php;

          location / {
              try_files $uri $uri/ =404;
          }

          location ~ .php$ {
              fastcgi_pass unix:/var/run/php/php7.4-fpm.sock;
              fastcgi_param SCRIPT_FILENAME $realpath_root$fastcgi_script_name;
              include /etc/nginx/fastcgi_params;
      }
   }
}
Your server should behave just the same. Apart from the fastcgi_params file, you may also come across the fastcgi.conf file which contains a slightly different set of parameters. I would suggest that you avoid that due to some inconsistencies with its behavior.
How to Use NGINX as a Load Balancer
Thanks to the reverse proxy design of NGINX, you can easily configure it as a load balancer.
I’ve already added a demo to the repository that comes with this article. If you’ve already cloned the repository inside the /srv/nginx-handbook-projects/ directory then the demo should be in the /srv/nginx-handbook-projects/load-balancer-demo/ directory.
In a real life scenario, load balancing may be required on large scale projects distributed across multiple servers. But for this simple demo, I’ve created three very simple Node.js servers responding with a server number and 200 status code.
For this demo to work, you’ll need Node.js installed on the server. You can find instructions in this link to help you get it installed.
Apart from this, you’ll also need PM2 for daemonizing the Node.js servers provided in this demo.
If you haven’t already, install PM2 by executing sudo npm install -g pm2. After the installation finishes, execute the following commands to start the three Node.js servers:
pm2 start /srv/nginx-handbook-projects/load-balancer-demo/server-1.js

pm2 start /srv/nginx-handbook-projects/load-balancer-demo/server-2.js

pm2 start /srv/nginx-handbook-projects/load-balancer-demo/server-3.js

pm2 list

# ┌────┬────────────────────┬──────────┬──────┬───────────┬──────────┬──────────┐
# │ id │ name               │ mode     │ ↺    │ status    │ cpu      │ memory   │
# ├────┼────────────────────┼──────────┼──────┼───────────┼──────────┼──────────┤
# │ 0  │ server-1           │ fork     │ 0    │ online    │ 0%       │ 37.4mb   │
# │ 1  │ server-2           │ fork     │ 0    │ online    │ 0%       │ 37.2mb   │
# │ 2  │ server-3           │ fork     │ 0    │ online    │ 0%       │ 37.1mb   │
# └────┴────────────────────┴──────────┴──────┴───────────┴──────────┴──────────┘
Three Node.js servers should be running on localhost:3001, localhost:3002, localhost:3003 respectively.
Now update your configuration as follows:
events {

}

http {

    upstream backend_servers {
        server localhost:3001;
        server localhost:3002;
        server localhost:3003;
    }

    server {

        listen 80;
        server_name nginx-handbook.test;

        location / {
            proxy_pass http://backend_servers;
        }
    }
}
The configuration inside the server context is the same as you’ve already seen. The upstream context, though, is new. An upstream in NGINX is a collection of servers that can be treated as a single backend.
So the three servers you started using PM2 can be put inside a single upstream and you can let NGINX balance the load between them.
To test out the configuration, you’ll have to send a number of requests to the server. You can automate the process using a while loop in bash:
while sleep 0.5; do curl http://nginx-handbook.test; done

# response from server - 2.
# response from server - 3.
# response from server - 1.
# response from server - 2.
# response from server - 3.
# response from server - 1.
# response from server - 2.
# response from server - 3.
# response from server - 1.
# response from server - 2.
You can cancel the loop by hitting Ctrl + C on your keyboard. As you can see from the responses from the server, NGINX is load balancing the servers automatically.
Of course, depending on the project scale, load balancing can be a lot more complicated than this. But the goal of this article is to get you started, and I believe you now have a basic understanding of load balancing with NGINX. You can stop the three running server by executing pm2 stop server-1 server-2 server-3 command (and it’s a good idea here).
How to Optimize NGINX for Maximum Performance
In this section of the article, you’ll learn about a number of ways to get the maximum performance from your server.
Some of these methods will be application-specific, which means they’ll probably need tweaking considering your application requirements. But some of them will be general optimization techniques.
Just like the previous sections, changes in configuration will be frequesnt in this one, so don’t forget to validate and reload your configuration file every time.
How to Configure Worker Processes and Worker Connections
As I’ve already mentioned in a previous section, NGINX can spawn multiple worker processes capable of handling thousands of requests each.
sudo systemctl status nginx

# ● nginx.service - A high performance web server and a reverse proxy server
#      Loaded: loaded (/lib/systemd/system/nginx.service; enabled; vendor preset: enabled)
#      Active: active (running) since Sun 2021-04-25 08:33:11 UTC; 5h 45min ago
#        Docs: man:nginx(8)
#    Main PID: 3904 (nginx)
#       Tasks: 2 (limit: 1136)
#      Memory: 3.2M
#      CGroup: /system.slice/nginx.service
#              ├─ 3904 nginx: master process /usr/sbin/nginx -g daemon on; master_process on;
#              └─16443 nginx: worker process
As you can see, right now there is only one NGINX worker process on the system. This number, however, can be changed by making a small change to the configuration file.
worker_processes 2;

events {

}

http {

    server {

        listen 80;
        server_name nginx-handbook.test;

        return 200 "worker processes and worker connections configuration!n";
    }
}
The worker_process directive written in the main context is responsible for setting the number of worker processes to spawn. Now check the NGINX service once again and you should see two worker processes:
sudo systemctl status nginx

# ● nginx.service - A high performance web server and a reverse proxy server
#      Loaded: loaded (/lib/systemd/system/nginx.service; enabled; vendor preset: enabled)
#      Active: active (running) since Sun 2021-04-25 08:33:11 UTC; 5h 54min ago
#        Docs: man:nginx(8)
#     Process: 22610 ExecReload=/usr/sbin/nginx -g daemon on; master_process on; -s reload (code=exited, status=0/SUCCESS)
#    Main PID: 3904 (nginx)
#       Tasks: 3 (limit: 1136)
#      Memory: 3.7M
#      CGroup: /system.slice/nginx.service
#              ├─ 3904 nginx: master process /usr/sbin/nginx -g daemon on; master_process on;
#              ├─22611 nginx: worker process
#              └─22612 nginx: worker process
Setting the number of worker processes is easy, but determining the optimal number of worker processes requires a bit more work.
The worker processes are asynchronous in nature. This means that they will process incoming requests as fast as the hardware can.
Now consider that your server runs on a single core processor. If you set the number of worker processes to 1, that single process will utilize 100% of the CPU capacity. But if you set it to 2, the two processes will be able to utilize 50% of the CPU each. So increasing the number of worker processes doesn’t mean better performance.
A rule of thumb in determining the optimal number of worker processes is number of worker process = number of CPU cores.
If you’re running on a server with a dual core CPU, the number of worker processes should be set to 2. In a quad core it should be set to 4…and you get the idea.
Determining the number of CPUs on your server is very easy on Linux.
nproc

# 1
I’m on a single CPU virtual machine, so the nproc detects that there’s one CPU. Now that you know the number of CPUs, all that is left to do is set the number on the configuration.
That’s all well and good, but every time you upscale the server and the CPU number changes, you’ll have to update the server configuration manually.
NGINX provides a better way to deal with this issue. You can simply set the number of worker processes to auto and NGINX will set the number of processes based on the number of CPUs automatically.
worker_processes auto;

events {

}

http {

    server {

        listen 80;
        server_name nginx-handbook.test;

        return 200 "worker processes and worker connections configuration!n";
    }
}
Inspect the NGINX process once again:
sudo systemctl status nginx

# ● nginx.service - A high performance web server and a reverse proxy server
#      Loaded: loaded (/lib/systemd/system/nginx.service; enabled; vendor preset: enabled)
#      Active: active (running) since Sun 2021-04-25 08:33:11 UTC; 6h ago
#        Docs: man:nginx(8)
#     Process: 22610 ExecReload=/usr/sbin/nginx -g daemon on; master_process on; -s reload (code=exited, status=0/SUCCESS)
#    Main PID: 3904 (nginx)
#       Tasks: 2 (limit: 1136)
#      Memory: 3.2M
#      CGroup: /system.slice/nginx.service
#              ├─ 3904 nginx: master process /usr/sbin/nginx -g daemon on; master_process on;
#              └─23659 nginx: worker process
The number of worker processes is back to one again, because that’s what is optimal for this server.
Apart from the worker processes there is also the worker connection, indicating the highest number of connections a single worker process can handle.
Just like the number of worker processes, this number is also related to the number of your CPU core and the number of files your operating system is allowed to open per core.
Finding out this number is very easy on Linux:
ulimit -n

# 1024
Now that you have the number, all that is left is to set it in the configuration:
worker_processes auto;

events {
    worker_connections 1024;
}

http {

    server {

        listen 80;
        server_name nginx-handbook.test;

        return 200 "worker processes and worker connections configuration!n";
    }
}
The worker_connections directive is responsible for setting the number of worker connections in a configuration. This is also the first time you’re working with the events context.
In a previous section, I mentioned that this context is used for setting values used by NGINX on a general level. The worker connections configuration is one such example.
How to Cache Static Content
The second technique for optimizing your server is caching static content. Regardless of the application you’re serving, there is always a certain amount of static content being served, such as stylesheets, images, and so on.
Considering that this content is not likely to change very frequently, it’s a good idea to cache them for a certain amount of time. NGINX makes this task easy as well.
worker_processes auto;

events {
    worker_connections 1024;
}

http {

    include /env/nginx/mime.types;

    server {

        listen 80;
        server_name nginx-handbook.test;

        root /srv/nginx-handbook-demo/static-demo;

        location ~* .(css|js|jpg)$ {
            access_log off;

            add_header Cache-Control public;
            add_header Pragma public;
            add_header Vary Accept-Encoding;
            expires 1M;
        }
    }
}
By writing location ~* .(css|js|jpg)$ you’re instructing NGINX to match requests asking for a file ending with .css, .js and .jpg.
In my applications, I usually store images in the WebP format even if the user submits a different format. This way, configuring the static cache becomes even easier for me.
You can use the add_header directive to include a header in the response to the client. Previously you’ve seen the proxy_set_header directive used for setting headers on an ongoing request to the backend server. The add_header directive on the other hand only adds a given header to the response.
By setting the Cache-Control header to public, you’re telling the client that this content can be cached in any way. The Pragma header is just an older version of the Cache-Control header and does more or less the same thing.
The next header, Vary, is responsible for letting the client know that this cached content may vary.
The value of Accept-Encoding means that the content may vary depending on the content encoding accepted by the client. This will be clarified further in the next section.
Finally the expires directive allows you to set the Expires header conveniently. The expires directive takes the duration of time this cache will be valid. By setting it to 1M you’re telling NGINX to cache the content for one month. You can also set this to 10m or 10 minutes, 24h or 24 hours, and so on.
Now to test out the configuration, sent a request for the the-nginx-handbook.jpg file from the server:
curl -I http://nginx-handbook.test/the-nginx-handbook.jpg

# HTTP/1.1 200 OK
# Server: nginx/1.18.0 (Ubuntu)
# Date: Sun, 25 Apr 2021 15:58:22 GMT
# Content-Type: image/jpeg
# Content-Length: 19209
# Last-Modified: Sun, 25 Apr 2021 08:35:33 GMT
# Connection: keep-alive
# ETag: "608529d5-4b09"
# Expires: Tue, 25 May 2021 15:58:22 GMT
# Cache-Control: max-age=2592000
# Cache-Control: public
# Pragma: public
# Vary: Accept-Encoding
# Accept-Ranges: bytes
As you can see, the headers have been added to the response and any modern browser should be able to interpret them.
How to Compress Responses
The final optimization technique that I’m going to show today is a pretty straightforward one: compressing responses to reduce their size.
worker_processes auto;

events {
    worker_connections 1024;
}

http {
    include /env/nginx/mime.types;

    gzip on;
    gzip_comp_level 3;

    gzip_types text/css text/javascript;

    server {

        listen 80;
        server_name nginx-handbook.test;

        root /srv/nginx-handbook-demo/static-demo;

        location ~* .(css|js|jpg)$ {
            access_log off;

            add_header Cache-Control public;
            add_header Pragma public;
            add_header Vary Accept-Encoding;
            expires 1M;
        }
    }
}
If you’re not already familiar with it, GZIP is a popular file format used by applications for file compression and decompression. NGINX can utilize this format to compress responses using the gzip directives.
By writing gzip on in the http context, you’re instructing NGINX to compress responses. The gzip_comp_level directive sets the level of compression. You can set it to a very high number, but that doesn’t guarantee better compression. Setting a number between 1 — 4 gives you an efficient result. For example, I like setting it to 3.
By default, NGINX compresses HTML responses. To compress other file formats, you’ll have to pass them as parameters to the gzip_types directive. By writing gzip_types text/css text/javascript; you’re telling NGINX to compress any file with the mime types of text/css and text/javascript.
Configuring compression in NGINX is not enough. The client has to ask for the compressed response instead of the uncompressed responses. I hope you remember the add_header Vary Accept-Encoding; line in the previous section on caching. This header lets the client know that the response may vary based on what the client accepts.
As an example, if you want to request the uncompressed version of the mini.min.css file from the server, you may do something like this:
curl -I http://nginx-handbook.test/mini.min.css

# HTTP/1.1 200 OK
# Server: nginx/1.18.0 (Ubuntu)
# Date: Sun, 25 Apr 2021 16:30:32 GMT
# Content-Type: text/css
# Content-Length: 46887
# Last-Modified: Sun, 25 Apr 2021 08:35:33 GMT
# Connection: keep-alive
# ETag: "608529d5-b727"
# Expires: Tue, 25 May 2021 16:30:32 GMT
# Cache-Control: max-age=2592000
# Cache-Control: public
# Pragma: public
# Vary: Accept-Encoding
# Accept-Ranges: bytes
As you can see, there’s nothing about compression. Now if you want to ask for the compressed version of the file, you’ll have to send an additional header.
curl -I -H "Accept-Encoding: gzip" http://nginx-handbook.test/mini.min.css

# HTTP/1.1 200 OK
# Server: nginx/1.18.0 (Ubuntu)
# Date: Sun, 25 Apr 2021 16:31:38 GMT
# Content-Type: text/css
# Last-Modified: Sun, 25 Apr 2021 08:35:33 GMT
# Connection: keep-alive
# ETag: W/"608529d5-b727"
# Expires: Tue, 25 May 2021 16:31:38 GMT
# Cache-Control: max-age=2592000
# Cache-Control: public
# Pragma: public
# Vary: Accept-Encoding
# Content-Encoding: gzip
As you can see in the response headers, the Content-Encoding is now set to gzip meaning this is the compressed version of the file.
Now if you want to compare the difference in file size, you can do something like this:
cd ~
mkdir compression-test && cd compression-test

curl http://nginx-handbook.test/mini.min.css > uncompressed.css

curl -H "Accept-Encoding: gzip" http://nginx-handbook.test/mini.min.css > compressed.css

ls -lh

# -rw-rw-r-- 1 vagrant vagrant 9.1K Apr 25 16:35 compressed.css
# -rw-rw-r-- 1 vagrant vagrant  46K Apr 25 16:35 uncompressed.css
The uncompressed version of the file is 46K and the compressed version is 9.1K, almost six times smaller. On real life sites where stylesheets can be much larger, compression can make your responses smaller and faster.
How to Understand the Main Configuration File
I hope you remember the original nginx.conf file you renamed in an earlier section. According to the Debian wiki, this file is meant to be changed by the NGINX maintainers and not by server administrators, unless they know exactly what they’re doing.
But throughout the entire article, I’ve taught you to configure your servers in this very file. In this section, however, I’ll who you how you should configure your servers without changing the nginx.conf file.
To begin with, first delete or rename your modified nginx.conf file and bring back the original one:
sudo rm /etc/nginx/nginx.conf

sudo mv /etc/nginx/nginx.conf.backup /etc/nginx/nginx.conf

sudo nginx -s reload
Now NGINX should go back to its original state. Let’s have a look at the content of this file once again by executing the sudo cat /etc/nginx/nginx.conf file:
user www-data;
worker_processes auto;
pid /run/nginx.pid;
include /etc/nginx/modules-enabled/*.conf;

events {
	worker_connections 768;
	# multi_accept on;
}

http {

	##
	# Basic Settings
	##

	sendfile on;
	tcp_nopush on;
	tcp_nodelay on;
	keepalive_timeout 65;
	types_hash_max_size 2048;
	# server_tokens off;

	# server_names_hash_bucket_size 64;
	# server_name_in_redirect off;

	include /etc/nginx/mime.types;
	default_type application/octet-stream;

	##
	# SSL Settings
	##

	ssl_protocols TLSv1 TLSv1.1 TLSv1.2 TLSv1.3; # Dropping SSLv3, ref: POODLE
	ssl_prefer_server_ciphers on;

	##
	# Logging Settings
	##

	access_log /var/log/nginx/access.log;
	error_log /var/log/nginx/error.log;

	##
	# Gzip Settings
	##

	gzip on;

	# gzip_vary on;
	# gzip_proxied any;
	# gzip_comp_level 6;
	# gzip_buffers 16 8k;
	# gzip_http_version 1.1;
	# gzip_types text/plain text/css application/json application/javascript text/xml application/xml application/xml+rss text/javascript;

	##
	# Virtual Host Configs
	##

	include /etc/nginx/conf.d/*.conf;
	include /etc/nginx/sites-enabled/*;
}


#mail {
#	# See sample authentication script at:
#	# http://wiki.nginx.org/ImapAuthenticateWithApachePhpScript
#
#	# auth_http localhost/auth.php;
#	# pop3_capabilities "TOP" "USER";
#	# imap_capabilities "IMAP4rev1" "UIDPLUS";
#
#	server {
#		listen     localhost:110;
#		protocol   pop3;
#		proxy      on;
#	}
#
#	server {
#		listen     localhost:143;
#		protocol   imap;
#		proxy      on;
#	}
#}
You should now be able to understand this file without much trouble. On the main context user www-data;, the worker_processes auto; lines should be easily recognizable to you.
The line pid /run/nginx.pid; sets the process ID for the NGINX process and include /etc/nginx/modules-enabled/*.conf; includes any configuration file found on the /etc/nginx/modules-enabled/ directory.
This directory is meant for NGINX dynamic modules. I haven’t covered dynamic modules in this article so I’ll skip that.
Now inside the the http context, under basic settings you can see some common optimization techniques applied. Here’s what these techniques do:
sendfile on;disables buffering for static files.tcp_nopush on;allows sending response header in one packet.tcp_nodelay on;disables Nagle’s Algorithm resulting in faster static file delivery.
The keepalive_timeout directive indicates how long to keep a connection open and the types_hash_maxsize directive sets the size of the types hash map. It also includes the mime.types file by default.
I’ll skip the SSL settings simply because we haven’t covered them in this article. We’ve already discussed the logging and gzip settings. You may see some of the directives regarding gzip as commented. As long as you understand what you’re doing, you may customize these settings.
You use the mail context to configure NGINX as a mail server. We’ve only talked about NGINX as a web server so far, so I’ll skip this as well.
Now under the virtual hosts settings, you should see two lines as follows:
##
# Virtual Host Configs
##

include /etc/nginx/conf.d/*.conf;
include /etc/nginx/sites-enabled/*;
These two lines instruct NGINX to include any configuration files found inside the /etc/nginx/conf.d/ and /etc/nginx/sites-enabled/ directories.
After seeing these two lines, people often take these two directories as the ideal place to put their configuration files, but that’s not right.
There is another directory /etc/nginx/sites-available/ that’s meant to store configuration files for your virtual hosts. The /etc/nginx/sites-enabled/ directory is meant for storing the symbolic links to the files from the /etc/nginx/sites-available/ directory.
In fact there is an example configuration:
ln -lh /etc/nginx/sites-enabled/

# lrwxrwxrwx 1 root root 34 Apr 25 08:33 default -> /etc/nginx/sites-available/default
As you can see, the directory contains a symbolic link to the /etc/nginx/sites-available/default file.
The idea is to write multiple virtual hosts inside the /etc/nginx/sites-available/ directory and make some of them active by symbolic linking them to the /etc/nginx/sites-enabled/ directory.
To demonstrate this concept, let’s configure a simple static server. First, delete the default virtual host symbolic link, deactivating this configuration in the process:
sudo rm /etc/nginx/sites-enabled/default

ls -lh /etc/nginx/sites-enabled/

# lrwxrwxrwx 1 root root 41 Apr 25 18:01 nginx-handbook -> /etc/nginx/sites-available/nginx-handbook
Create a new file by executing sudo touch /etc/nginx/sites-available/nginx-handbook and put the following content in there:
server {
    listen 80;
    server_name nginx-handbook.test;

    root /srv/nginx-handbook-projects/static-demo;
}
Files inside the /etc/nginx/sites-available/ directory are meant to be included within the main http context so they should contain server blocks only.
Now create a symbolic link to this file inside the /etc/nginx/sites-enabled/ directory by executing the following command:
sudo ln -s /etc/nginx/sites-available/nginx-handbook /etc/nginx/sites-enabled/nginx-handbook

ls -lh /etc/nginx/sites-enabled/

# lrwxrwxrwx 1 root root 34 Apr 25 08:33 default -> /etc/nginx/sites-available/default
# lrwxrwxrwx 1 root root 41 Apr 25 18:01 nginx-handbook -> /etc/nginx/sites-available/nginx-handbook
Before validating and reloading the configuration file, you’ll have to reopen the log files. Otherwise you may get a permission denied error. This happens because the process ID is different this time as a result of swapping the old nginx.conf file.
sudo rm /var/log/nginx/*.log

sudo touch /var/log/nginx/access.log /var/log/nginx/error.log

sudo nginx -s reopen
Finally, validate and reload the configuration file:
sudo nginx -t

# nginx: the configuration file /etc/nginx/nginx.conf syntax is ok
# nginx: configuration file /etc/nginx/nginx.conf test is successful

sudo nginx -s reload
Visit the server and you should be greeted with the good old The NGINX Handbook page:

If you’ve configured the server correctly and you’re still getting the old NGINX welcome page, perform a hard refresh. The browser often holds on to old assets and requires a little cleanup.
How To Configure SSL and HTTP/2
HTTP/2 is the newest version of the wildly popular Hyper Text Transport Protocol. Based on Google’s experimental SPDY protocol, HTTP/2 provides better performance by introducing features like full request and response multiplexing, better compression of header fields, server push and request prioritization.
Some of the notable features of HTTP/2 is as follows:
- Binary Protocol — While HTTP/1.x was a text based protocol, HTTP/2 is a binary protocol resulting in less error during data transfer process.
- Multiplexed Streams — All HTTP/2 connections are multiplexed streams meaning multiple files can be transferred in a single stream of binary data.
- Compressed Header — HTTP/2 compresses header data in responses resulting in faster transfer of data.
- Server Push — This capability allows the server to send linked resources to the client automatically, greatly reducing the number of requests to the server.
- Stream Prioritization — HTTP/2 can prioritize data streams based on their type resulting in better bandwidth allocation where necessary.
If you want to learn more about the improvements in HTTP/2 this article by Kinsta may help.
While a significant upgrade over its predecessor, HTTP/2 is not as widely adapted as it should have been. In this section, I’ll introduce you to some of the new features mentioned previously and I’ll also show you how to enable HTTP/2 on your NGINX powered web server.
For this section, I’ll be using the static-demo project. I’m assuming you’ve already cloned the repository inside /srv/nginx-handbook-projects directory. If you haven’t, this is the time to do so. Also, this section has to be done on a virtual private server instead of a virtual machine.
For simplicity, I’ll use the /etc/nginx/sites-available/default file as my configuration. Open the file using nano or vi if you fancy that.
nano /etc/nginx/sites-available/defaultUpdate the file’s content as follows:
server {
        listen 80;
        server_name nginx-handbook.farhan.dev;

        root /srv/nginx-handbook-projects/static-demo;
}
As you can see, the /srv/nginx-handbook-projects/static-demo; directory has been set as the root of this site and nginx-handbook.farhan.dev has been set as the server name. If you do not have a custom domain set up, you can use your server’s IP address as the server name here.
nginx -t

# nginx: the configuration file /etc/nginx/nginx.conf syntax is ok
# nginx: configuration file /etc/nginx/nginx.conf test is successful

nginx -s reload
Test the configuration by executing nginx -t and reload the configuration by executing nginx -s reload commands.
Finally visit your server and you should be greeted with a simple static HTML page.

One of the pre-requisite to have HTTP/2 working on your server is to have a valid SSL certificate. Lets do that first.
How To Configure SSL
For those of you who may not know, an SSL certificate is what allows a server to make the move from HTTP to HTTPS. These certificates are issued by a certificate authority (CA). Most of the authorities charge a fee for issuing certificates but nonprofit authorities such as Let’s Encrypt, issues certificates for free.
If you want to understand the theory of SSL in a bit more detail, this article on the Cloudflare Learning Center may help.
Thanks to open-source tools like Certbot, installing a free certificate is dead easy. Head over to certbot.eff.org link. Now select the software and system that powers your server.

I’m running NGINX on Ubuntu 20.04 and if you’ve been in line with this article, you should have the same combination.
After selecting your combination of software and system, you’ll be forwarded to a new page containing step by step instructions for installing certbot and a new SSL certificate.
The installation steps for certbot may differ from system to system but rest of the instructions should remain same. On Ubuntu, the recommended way is to use snap.
snap install --classic certbot

# certbot 1.14.0 from Certbot Project (certbot-eff✓) installed

certbot --version

# certbot 1.14.0
Certbot is now installed and ready to be used. Before you install a new certificate, make sure the NGINX configuration file contains all the necessary server names. Such as, if you want to install a new certificate for yourdomain.tld and www.yourdomain.tld, you’ll have to include both of them in your configuration.
Once you’re happy with your configuration, you can install a newly provisioned certificate for your server. To do so, execute the certbot program with --nginx option.
certbot --nginx

# Saving debug log to /var/log/letsencrypt/letsencrypt.log
# Plugins selected: Authenticator nginx, Installer nginx
# Enter email address (used for urgent renewal and security notices)
#  (Enter 'c' to cancel): shovik.is.here@gmail.com

# - - - - - - - - - - - - - - - - - - - - - - - - - - - - - - - - - - - - - - - -
# Please read the Terms of Service at
# https://letsencrypt.org/documents/LE-SA-v1.2-November-15-2017.pdf. You must
# agree in order to register with the ACME server. Do you agree?
# - - - - - - - - - - - - - - - - - - - - - - - - - - - - - - - - - - - - - - - -
# (Y)es/(N)o: Y

# - - - - - - - - - - - - - - - - - - - - - - - - - - - - - - - - - - - - - - - -
# Would you be willing, once your first certificate is successfully issued, to
# share your email address with the Electronic Frontier Foundation, a founding
# partner of the Let's Encrypt project and the non-profit organization that
# develops Certbot? We'd like to send you email about our work encrypting the web,
# EFF news, campaigns, and ways to support digital freedom.
# - - - - - - - - - - - - - - - - - - - - - - - - - - - - - - - - - - - - - - - -
# (Y)es/(N)o: N
# Account registered.

# Which names would you like to activate HTTPS for?
# - - - - - - - - - - - - - - - - - - - - - - - - - - - - - - - - - - - - - - - -
# 1: nginx-handbook.farhan.dev
# - - - - - - - - - - - - - - - - - - - - - - - - - - - - - - - - - - - - - - - -
# Select the appropriate numbers separated by commas and/or spaces, or leave input
# blank to select all options shown (Enter 'c' to cancel):
# Requesting a certificate for nginx-handbook.farhan.dev
# Performing the following challenges:
# http-01 challenge for nginx-handbook.farhan.dev
# Waiting for verification...
# Cleaning up challenges
# Deploying Certificate to VirtualHost /etc/nginx/sites-enabled/default
# Redirecting all traffic on port 80 to ssl in /etc/nginx/sites-enabled/default

# - - - - - - - - - - - - - - - - - - - - - - - - - - - - - - - - - - - - - - - -
# Congratulations! You have successfully enabled
# https://nginx-handbook.farhan.dev
# - - - - - - - - - - - - - - - - - - - - - - - - - - - - - - - - - - - - - - - -

# IMPORTANT NOTES:
#  - Congratulations! Your certificate and chain have been saved at:
#    /etc/letsencrypt/live/nginx-handbook.farhan.dev/fullchain.pem
#    Your key file has been saved at:
#    /etc/letsencrypt/live/nginx-handbook.farhan.dev/privkey.pem
#    Your certificate will expire on 2021-07-30. To obtain a new or
#    tweaked version of this certificate in the future, simply run
#    certbot again with the "certonly" option. To non-interactively
#    renew *all* of your certificates, run "certbot renew"
#  - If you like Certbot, please consider supporting our work by:

#    Donating to ISRG / Let's Encrypt:   https://letsencrypt.org/donate
#    Donating to EFF:                    https://eff.org/donate-le
You’ll be asked for an emergency contact email address, license agreement and if you would like to receive emails from them or not.
The certbot program will automatically read the server names from your configuration file and show you a list of them. If you have multiple virtual hosts on your server, certbot will recognize them as well.
Finally if the installation is successful, you’ll be congratulated by the program. To verify if everything’s working or not, visit your server with HTTPS this time:
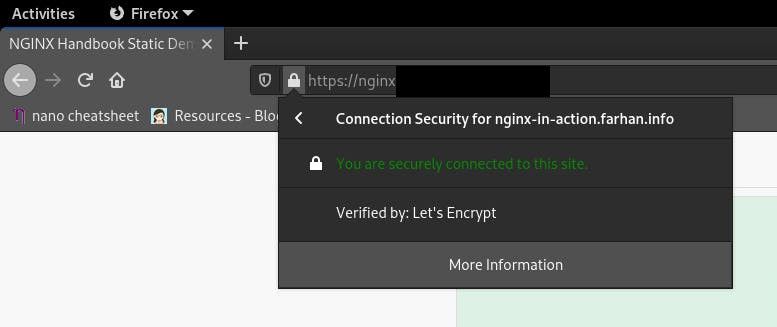
As you can see, HTTPS has been enabled successfully and you can confirm that the certificate is verified by Let’s Encrypt authority. Later on, if you add new virtual hosts to this server with new domains or sub domains, you’ll have to reinstall the certificates.
It’s also possible to install wildcard certificate such as *.yourdomain.tld for some supported DNS managers. Detailed instructions can be found on the previously shown installation instruction page.
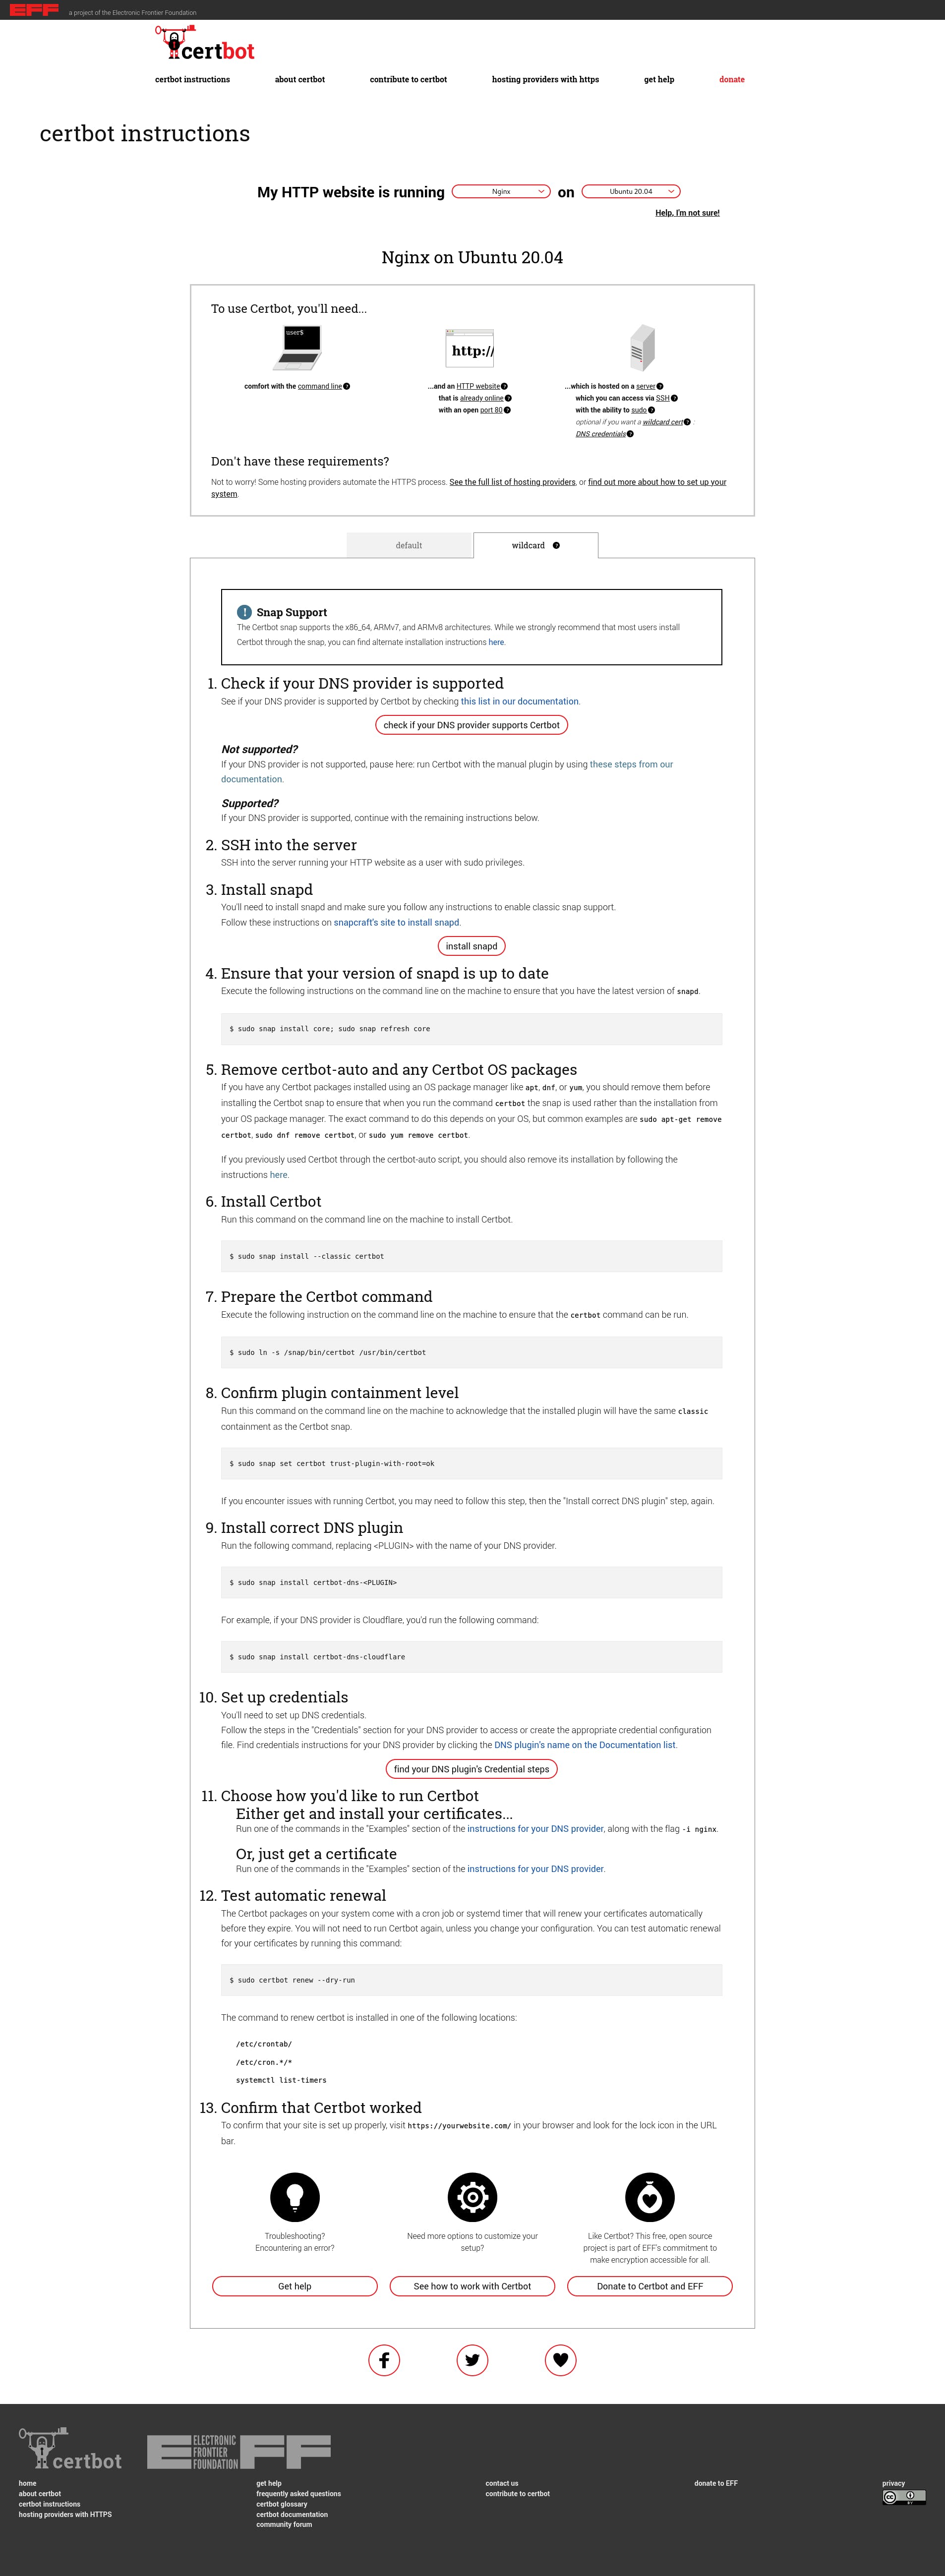
A newly installed certificate will be valid for 90 days. After that, a renewal will be required. Certbot does the renewal automatically. You can execute certbot renew command with the --dry-run option to test out the auto renewal feature.
certbot renew --dry-run

# Saving debug log to /var/log/letsencrypt/letsencrypt.log

# - - - - - - - - - - - - - - - - - - - - - - - - - - - - - - - - - - - - - - - -
# Processing /etc/letsencrypt/renewal/nginx-handbook.farhan.dev.conf
# - - - - - - - - - - - - - - - - - - - - - - - - - - - - - - - - - - - - - - - -
# Cert not due for renewal, but simulating renewal for dry run
# Plugins selected: Authenticator nginx, Installer nginx
# Account registered.
# Simulating renewal of an existing certificate for nginx-handbook.farhan.dev
# Performing the following challenges:
# http-01 challenge for nginx-handbook.farhan.dev
# Waiting for verification...
# Cleaning up challenges

# - - - - - - - - - - - - - - - - - - - - - - - - - - - - - - - - - - - - - - - -
# new certificate deployed with reload of nginx server; fullchain is
# /etc/letsencrypt/live/nginx-handbook.farhan.dev/fullchain.pem
# - - - - - - - - - - - - - - - - - - - - - - - - - - - - - - - - - - - - - - - -

# - - - - - - - - - - - - - - - - - - - - - - - - - - - - - - - - - - - - - - - -
# Congratulations, all simulated renewals succeeded:
#   /etc/letsencrypt/live/nginx-handbook.farhan.dev/fullchain.pem (success)
# - - - - - - - - - - - - - - - - - - - - - - - - - - - - - - - - - - - - - - - -
The command will simulate a certificate renewal to test if it’s correctly set up or not. If it succeeds you’ll be congratulated by the program. This step ends the procedure of installing an SSL certificate on your server.
To understand what certbot did behind the scenes, open up the /etc/nginx/sites-available/default file once again and see how its content has been altered.
server {

    server_name nginx-handbook.farhan.dev;

    root /srv/nginx-handbook-projects/static-demo;

    listen [::]:443 ssl ipv6only=on; # managed by Certbot
    listen 443 ssl; # managed by Certbot
    ssl_certificate /etc/letsencrypt/live/nginx-handbook.farhan.dev/fullchain.pem; # managed by Certbot
    ssl_certificate_key /etc/letsencrypt/live/nginx-handbook.farhan.dev/privkey.pem; # managed by Certbot
    include /etc/letsencrypt/options-ssl-nginx.conf; # managed by Certbot
    ssl_dhparam /etc/letsencrypt/ssl-dhparams.pem; # managed by Certbot

}
server {
    if ($host = nginx-handbook.farhan.dev) {
        return 301 https://$host$request_uri;
    } # managed by Certbot


    listen 80;
    listen [::]:80;

    server_name nginx-handbook.farhan.dev;
    return 404; # managed by Certbot
}
As you can see, certbot has added quite a few lines here. I’ll explain the notable ones.
server {
    # ...
    listen [::]:443 ssl ipv6only=on; # managed by Certbot
    listen 443 ssl; # managed by Certbot
    # ...
}
Like the 80 port, 443 is widely used for listening to HTTPS requests. By writing listen 443 ssl; certbot is instructing NGINX to listen for any HTTPS request on port 443. The listen [::]:443 ssl ipv6only=on; line is for handling IPV6 connections.
server {
    # ...
    ssl_certificate /etc/letsencrypt/live/nginx-handbook.farhan.dev/fullchain.pem; # managed by Certbot
    ssl_certificate_key /etc/letsencrypt/live/nginx-handbook.farhan.dev/privkey.pem; # managed by Certbot
    include /etc/letsencrypt/options-ssl-nginx.conf; # managed by Certbot
    ssl_dhparam /etc/letsencrypt/ssl-dhparams.pem; # managed by Certbot
    # ...
}
The ssl_certificate directive is used for indicating the location of the certificate and the private key file on your server. The /etc/letsencrypt/options-ssl-nginx.conf; includes some common directives necessary for SSL.
Finally the ssl_dhparam indicates to the file defining how OpenSSL is going to perform Diffie–Hellman key exchange. If you want to learn more about the purpose of /etc/letsencrypt/ssl-dhparams.pem; file, this stack exchange thread may help you.
server {
    if ($host = nginx-handbook.farhan.dev) {
        return 301 https://$host$request_uri;
    } # managed by Certbot


    listen 80;
    listen [::]:80;

    server_name nginx-handbook.farhan.dev;
    return 404; # managed by Certbot
}
This newly added server block is responsible for redirecting any HTTP requests to HTTPS disabling HTTP access completely.
How To Enable HTTP/2
Once you’ve successfully installed a valid SSL certificate on your server, you’re ready to enable HTTP/2. SSL is a prerequisite for HTTP/2, so right off the bat you can see, security is not optional in HTTP/2.
HTTP/2 support for NGINX is provided by the ngx_http_v2_module module. Pre-built binaries of NGINX on most of the systems come with this module baked in. If you’ve built NGINX from source however, you’ll have to include this module manually.
Before upgrading to HTTP/2, send a request to your server and see the current protocol version.
curl -I -L https://nginx-handbook.farhan.dev

# HTTP/1.1 200 OK
# Server: nginx/1.18.0 (Ubuntu)
# Date: Sat, 01 May 2021 10:46:36 GMT
# Content-Type: text/html
# Content-Length: 960
# Last-Modified: Fri, 30 Apr 2021 20:14:48 GMT
# Connection: keep-alive
# ETag: "608c6538-3c0"
# Accept-Ranges: bytes
As you can see, by default the server is on HTTP/1.1 protocol. On the next step, we’ll update the configuration file as necessary for enabling HTTP/2.
To enable HTTP/2 on your server, open the /etc/nginx/sites-available/default file once again. Find wherever it says listen [::]:443 ssl ipv6only=on; or listen 443 ssl; and update them to listen [::]:443 ssl http2 ipv6only=on; and listen 443 ssl http2; respectively.
server {

    server_name nginx-handbook.farhan.dev;

    root /srv/nginx-handbook-projects/static-demo;

    listen [::]:443 ssl http2 ipv6only=on; # managed by Certbot
    listen 443 ssl http2; # managed by Certbot
    ssl_certificate /etc/letsencrypt/live/nginx-handbook.farhan.dev/fullchain.pem; # managed by Certbot
    ssl_certificate_key /etc/letsencrypt/live/nginx-handbook.farhan.dev/privkey.pem; # managed by Certbot
    include /etc/letsencrypt/options-ssl-nginx.conf; # managed by Certbot
    ssl_dhparam /etc/letsencrypt/ssl-dhparams.pem; # managed by Certbot

}
server {
    if ($host = nginx-handbook.farhan.dev) {
        return 301 https://$host$request_uri;
    } # managed by Certbot


    listen 80;
    listen [::]:80;

    server_name nginx-handbook.farhan.dev;
    return 404; # managed by Certbot
}
Test the configuration file by executing niginx -t and reload the configuration by executing nginx -s reload commands. Now send a request to your server again.
curl -I -L https://nginx-handbook.farhan.dev

# HTTP/2 200
# server: nginx/1.18.0 (Ubuntu)
# date: Sat, 01 May 2021 09:03:10 GMT
# content-type: text/html
# content-length: 960
# last-modified: Fri, 30 Apr 2021 20:14:48 GMT
# etag: "608c6538-3c0"
# accept-ranges: bytes
As you can see, HTTP/2 has been enabled for any client supporting the new protocol.
How to Enable Server Push
Server push is one of the many features that HTTP/2 brings to the table. Which means the server can push files to the client without the client having to request for them. In a HTTP/1.x server, a typical request for static content may look like as follows:
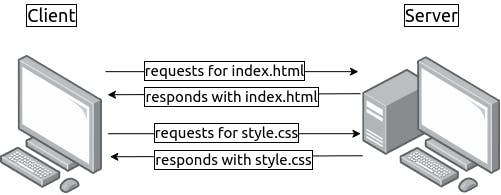
But on a server push enabled HTTP/2 server, it may look like as follows:
On a single request for the index.html file the server responds with the style.css file as well, minimizing the number of requests in the process.
In this section, I’ll use an open-source HTTP client named Nghttp2 for testing the server.
apt install nghttp2-client -y

# Reading package lists... Done
# Building dependency tree
# Reading state information... Done
# The following additional packages will be installed:
#   libev4 libjansson4 libjemalloc2
# The following NEW packages will be installed:
#   libev4 libjansson4 libjemalloc2 nghttp2-client
# 0 upgraded, 4 newly installed, 0 to remove and 0 not upgraded.
# Need to get 447 kB of archives.
# After this operation, 1,520 kB of additional disk space will be used.
# Get:1 http://archive.ubuntu.com/ubuntu focal/main amd64 libjansson4 amd64 2.12-1build1 [28.9 kB]
# Get:2 http://archive.ubuntu.com/ubuntu focal/universe amd64 libjemalloc2 amd64 5.2.1-1ubuntu1 [235 kB]
# Get:3 http://archive.ubuntu.com/ubuntu focal/universe amd64 libev4 amd64 1:4.31-1 [31.2 kB]
# Get:4 http://archive.ubuntu.com/ubuntu focal/universe amd64 nghttp2-client amd64 1.40.0-1build1 [152 kB]
# Fetched 447 kB in 1s (359 kB/s)
# Selecting previously unselected package libjansson4:amd64.
# (Reading database ... 107613 files and directories currently installed.)
# Preparing to unpack .../libjansson4_2.12-1build1_amd64.deb ...
# Unpacking libjansson4:amd64 (2.12-1build1) ...
# Selecting previously unselected package libjemalloc2:amd64.
# Preparing to unpack .../libjemalloc2_5.2.1-1ubuntu1_amd64.deb ...
# Unpacking libjemalloc2:amd64 (5.2.1-1ubuntu1) ...
# Selecting previously unselected package libev4:amd64.
# Preparing to unpack .../libev4_1%3a4.31-1_amd64.deb ...
# Unpacking libev4:amd64 (1:4.31-1) ...
# Selecting previously unselected package nghttp2-client.
# Preparing to unpack .../nghttp2-client_1.40.0-1build1_amd64.deb ...
# Unpacking nghttp2-client (1.40.0-1build1) ...
# Setting up libev4:amd64 (1:4.31-1) ...
# Setting up libjemalloc2:amd64 (5.2.1-1ubuntu1) ...
# Setting up libjansson4:amd64 (2.12-1build1) ...
# Setting up nghttp2-client (1.40.0-1build1) ...
# Processing triggers for man-db (2.9.1-1) ...
# Processing triggers for libc-bin (2.31-0ubuntu9.2) ...

nghttp --version

# nghttp nghttp2/1.40.0
Lets test by sending a request to the server without server push.
nghttp --null-out --stat https://nginx-handbook.farhan.dev/index.html

# id  responseEnd requestStart  process code size request path
#  13      +836us       +194us    642us  200  492 /index.html

nghttp --null-out --stat --get-assets https://nginx-handbook.farhan.dev/index.html

# id  responseEnd requestStart  process code size request path
#  13      +836us       +194us    642us  200  492 /index.html
#  15     +3.11ms      +2.65ms    457us  200  45K /mini.min.css
#  17     +3.23ms      +2.65ms    578us  200  18K /the-nginx-handbook.jpg
On the first request --null-out means discard downloaded data and --stat means print statistics on terminal. On the second request --get-assets means also download assets such as stylesheets, images and scripts linked to this files. As a result you can tell by the requestStart times, the css file and image was downloaded shortly after the html file was downloaded.
Now, lets enable server push for stylesheets and images. Open /etc/nginx/sites-available/default file and update its content as follows:
server {

    server_name nginx-handbook.farhan.dev;

    root /srv/nginx-handbook-projects/static-demo;

    listen [::]:443 ssl http2 ipv6only=on; # managed by Certbot
    listen 443 ssl http2; # managed by Certbot
    ssl_certificate /etc/letsencrypt/live/nginx-handbook.farhan.dev/fullchain.pem; # managed by Certbot
    ssl_certificate_key /etc/letsencrypt/live/nginx-handbook.farhan.dev/privkey.pem; # managed by Certbot
    include /etc/letsencrypt/options-ssl-nginx.conf; # managed by Certbot
    ssl_dhparam /etc/letsencrypt/ssl-dhparams.pem; # managed by Certbot

    location = /index.html {
        http2_push /mini.min.css;
        http2_push /the-nginx-handbook.jpg;
    }

    location = /about.html {
        http2_push /mini.min.css;
        http2_push /the-nginx-handbook.jpg;
    }

}
server {
    if ($host = nginx-handbook.farhan.dev) {
        return 301 https://$host$request_uri;
    } # managed by Certbot


    listen 80;
    listen [::]:80;

    server_name nginx-handbook.farhan.dev;
    return 404; # managed by Certbot
}
Two location blocks have been added to exactly match /index.html and /about.html locations. The http2_push directive is used for sending back additional response. Now whenever NGINX receives a request for one of these two locations, it’ll automatically send back the css and image file.
Test the configuration by executing nginx -t and reload the configuration by executing nginx -s reload commands.
nginx -t

# nginx: the configuration file /etc/nginx/nginx.conf syntax is ok
# nginx: configuration file /etc/nginx/nginx.conf test is successful

nginx -s reload
Now send another request to the server using nghttp and do not include --get-assets option.
nghttp --null-out --stat https://nginx-handbook.farhan.dev/index.html

# id  responseEnd requestStart  process code size request path
#  13     +1.49ms       +254us   1.23ms  200  492 /index.html
#   2     +1.56ms *    +1.35ms    212us  200  45K /mini.min.css
#   4     +1.71ms *    +1.39ms    318us  200  18K /the-nginx-handbook.jpg
As you can see, although the assets were not requested, the server has sent them to the client. Looking at the time measurements, process time has gone down and the three responses ended almost simultaneously.
This was a very simple example of server push but depending on the necessities of your project, this configuration can become much complex. This article by Owen Garrett on the official NGINX blog can help you with more complex server push configuration.
Conclusion
I would like to thank you from the bottom of my heart for the time you’ve spent on reading this article. I hope you’ve enjoyed your time and have learned all the essentials of NGINX.
Apart from this one, I’ve written full-length handbooks on other complicated topics available for free on freeCodeCamp.
These handbooks are part of my mission to simplify hard to understand technologies for everyone. Each of these handbooks takes a lot of time and effort to write.
If you’ve enjoyed my writing and want to keep me motivated, consider leaving starts on GitHub and endorse me for relevant skills on LinkedIn. I also accept sponsorship so you may consider buying me a coffee if you want to.
I’m always open to suggestions and discussions on Twitter or LinkedIn. Hit me with direct messages.
In the end, consider sharing the resources with others, because
Sharing knowledge is the most fundamental act of friendship. Because it is a way you can give something without loosing something. — Richard Stallman
Till the next one, stay safe and keep learning.
Learn to code for free. freeCodeCamp’s open source curriculum has helped more than 40,000 people get jobs as developers. Get started
Состояние перевода: На этой странице представлен перевод статьи nginx. Дата последней синхронизации: 18 июля 2022. Вы можете помочь синхронизировать перевод, если в английской версии произошли изменения.
nginx (произносится «э́нжин-э́кс» или «э́нжин-и́кс») — это свободный высокопроизводительный HTTP-сервер с открытым исходным кодом, а также обратный прокси и IMAP/POP3 прокси-сервер, написанный Игорем Сысоевым в 2005 году. nginx получил широкое распространение благодаря своей стабильности, богатой функциональности, простой настройке и низкому потреблению ресурсов.
Данная статья описывает установку nginx и интеграцию с PHP через #FastCGI.
Установка
Установите пакет nginx-mainline (основная ветка: новые возможности, обновления и исправления ошибок) или nginx (стабильная ветка; только исправления серьёзных ошибок).
Рекомендуется использовать основную (mainline) ветку. Основная причина для использования стабильной ветки — возможная несовместимость со сторонними модулями или непреднамеренное появление ошибок при реализации новых функций.
Примечание: Все модули nginx, доступные в официальных репозиториях, в качестве зависимости требуют пакет nginx (а не nginx-mainline). Возможно, стоит просмотреть список модулей на наличие тех, которые вам могут понадобиться, прежде чем принимать решение о выборе между nginx и nginx-mainline. Модули для nginx-mainline можно найти в пользовательском репозитории Arch.
Если для обеспечения дополнительной безопасности вы хотите установить nginx в chroot-окружении, смотрите раздел #Установка в chroot.
Запуск
Запустите/включите службу nginx.service.
Страница по умолчанию, доступная по адресу http://127.0.0.1 располагается в /usr/share/nginx/html/index.html.
Настройка
Первые шаги по настройке и использованию nginx описаны в официальном руководстве для начинающих. Вы можете настроить сервер, редактируя файлы в /etc/nginx/; главный файл настроек расположен в /etc/nginx/nginx.conf.
Более подробную информацию можно прочитать на странице Nginx Configuration Examples и в официальной документации.
Приведенные далее примеры покрывают большинство типичных потребностей. Предполагается, что вы используете стандартное место расположения веб-документов (/usr/share/nginx/html). Если это не так, замените путь на свой.
Пример настройки
/etc/nginx/nginx.conf
user http;
worker_processes auto;
worker_cpu_affinity auto;

events {
    multi_accept on;
    worker_connections 1024;
}

http {
    charset utf-8;
    sendfile on;
    tcp_nopush on;
    tcp_nodelay on;
    server_tokens off;
    log_not_found off;
    types_hash_max_size 4096;
    client_max_body_size 16M;

    # MIME
    include mime.types;
    default_type application/octet-stream;

    # журналы
    access_log /var/log/nginx/access.log;
    error_log /var/log/nginx/error.log warn;

    # загрузка дополнительных файлов конфигурации
    include /etc/nginx/conf.d/*.conf;
    include /etc/nginx/sites-enabled/*;
}
Основные настройки
Процессы и соединения
Вы должны выбрать подходящее значение для worker_processes. Этот параметр определяет сколько одновременных соединений сможет принимать nginx и сколько процессоров он сможет при этом использовать. Как правило, это значение устанавливают равным количеству аппаратных потоков в системе. Однако, начиная с версий 1.3.8 и 1.2.5, в качестве значения worker_processes вы также можете задать auto, при этом nginx попытается автоматически подобрать оптимальное значение (источник).
Максимальное количество одновременных соединений, которое nginx сможет принимать, вычисляется как max_clients = worker_processes * worker_connections.
Запуск под другим пользователем
По умолчанию запускается мастер-процесс nginx от имени root, а он в свою очередь запускает рабочие процессы от имени пользователя http. Для запуска рабочих процессов от имени другого пользователя измените значение директивы user в файле nginx.conf:
/etc/nginx/nginx.conf
user пользователь [группа];
Если группа не указана, будет использоваться группа, совпадающая с указанным именем пользователя.
Совет: Можно запустить nginx без прав root через systemd. Смотрите #Запуск без привилегий через systemd.
Блоки server
Посредством добавления блоков server в файл настроек возможно обслуживать сразу несколько доменов одновременно. Эти блоки работают аналогично «VirtualHosts» в Apache.
Смотрите также примеры в официальной документации.
В этом примере сервер принимает запросы для двух доменов: domainname1.dom и domainname2.dom:
/etc/nginx/nginx.conf
...
server {
    listen 80;
    listen [::]:80;
    server_name domainname1.dom;
    root /usr/share/nginx/domainname1.dom/html;
    location / {
        index index.php index.html index.htm;
    }
}

server {
    listen 80;
    listen [::]:80;
    server_name domainname2.dom;
    root /usr/share/nginx/domainname2.dom/html;
    ...
}
Перезапустите службу nginx.service, чтобы изменения вступили в силу.
Примечание: Убедитесь, что указанные домены существуют и указывают на IP-адрес устройства, на котором запущен nginx. Вы можете настроить DNS-сервер, например BIND или dnsmasq, или посмотрите варианты разрешения имён в локальной сети.
Управление блоками server
Для удобства можно поместить разные блоки server в разные файлы. Это также позволит включать и отключать отдельные сайты.
Создайте следующие каталоги:
# mkdir /etc/nginx/sites-available
# mkdir /etc/nginx/sites-enabled
Внутри каталога sites-available создайте файл, содержащий один или несколько блоков server:
/etc/nginx/sites-available/example.conf
server {
    listen 443 ssl http2;
    listen [::]:443 ssl http2;

    ...
}
В файле nginx.conf конце блока http добавьте строку include sites-enabled/*;:
/etc/nginx/nginx.conf
http {
    ...
    include sites-enabled/*;
}
Чтобы включить сайт, в каталоге sites-enabled создайте символическую ссылку на связанный с ним файл:
# ln -s /etc/nginx/sites-available/example.conf /etc/nginx/sites-enabled/example.conf
А чтобы отключить сайт, удалите её:
# unlink /etc/nginx/sites-enabled/example.conf
Перезапустите службу nginx.service или перезагрузите конфигурацию (reload), чтобы изменения вступили в силу.
TLS
openssl предоставляет поддержку TLS/SSL и установлен по умолчанию на установленных Arch.
Совет:
- Перед тем как настраивать SSL, вы можете почитать документацию ngx_http_ssl_module
- Let’s Encrypt — это бесплатный, автоматизированный и открытый центр сертификации. Есть плагин для получения доверенных SSL-сертификатов прямо из командной строки и автоматической настройки.
- На сайте Mozilla есть полезная статья про TLS, а также инструмент, помогающий составить безопасную конфигурацию.
Создайте секретный ключ и самоподписанный сертификат. Это подходит для большинства случаев, в которых не требуется CSR:
# cd /etc/nginx/
# openssl req -new -x509 -nodes -newkey rsa:4096 -keyout nginx.key -out nginx.crt -days 1095
# chmod 400 nginx.key
# chmod 444 nginx.crt
Примечание: Опция -days является необязательной, а RSA keysize можно уменьшить до 2048 (по умолчанию).
Если же вам нужно создать CSR, то следуйте данным инструкциям по созданию ключа, вместо приведённых выше:
# openssl genpkey -algorithm RSA -pkeyopt rsa_keygen_bits:4096 -out nginx.key
# chmod 400 nginx.key
# openssl req -new -sha256 -key nginx.key -out nginx.csr
# openssl x509 -req -days 1095 -in nginx.csr -signkey nginx.key -out nginx.crt
В качестве отправкой точки для создания конфигурации TLS в /etc/nginx/nginx.conf можно использовать генератор настроек SSL от Mozilla.
Перезапустите службу nginx, чтобы изменения вступили в силу.
Пользовательские каталоги
Чтобы сделать Apache-подобные адреса вида ~пользователь, указывающие на пользовательские каталоги ~/public_html, используйте подобную конфигурацию. (Примечание: если вы планируете использовать PHP, то связанный с ним location должен стоять первым.)
/etc/nginx/nginx.conf
...
server {
    ...
    # Обработка файлов PHP в пользовательских каталогах, например http://example.com/~user/test.php
    location ~ ^/~(.+?)(/.+.php)$ {
        alias          /home/$1/public_html$2;
        fastcgi_pass   unix:/run/php-fpm/php-fpm.sock;
        fastcgi_index  index.php;
        include        fastcgi.conf;
    }

    # Пользовательские каталоги, например http://example.com/~user/
    location ~ ^/~(.+?)(/.*)?$ {
        alias     /home/$1/public_html$2;
        index     index.html index.htm;
        autoindex on;
    }
    ...
}
...
Подробнее о настройке PHP в nginx смотрите в разделе #Реализация PHP.
Перезапустите службу nginx.service, чтобы изменения вступили в силу.
FastCGI
FastCGI или просто FCGI — это протокол, являющийся интерфейсом между веб-сервером и интерактивными программами. Это модифицированный CGI (Common Gateway Interface), главная цель которого — снизить накладные расходы, связанные со взаимодействием веб сервера и CGI программ, тем самым позволяя серверу обрабатывать большее количество запросов одновременно.
Технология FastCGI встроена в nginx для работы со многими внешними инструментами, например, Perl, PHP и Python.
Реализация PHP
В качестве FastCGI-сервера для PHP рекомендуется использовать PHP-FPM.
Установите пакет php-fpm и проверьте корректность настроек PHP.
Основным конфигурационным файлом PHP-FPM является /etc/php/php-fpm.conf. Включите и запустите systemd службу php-fpm.
Примечание:
- Если вы запускаете nginx под другим пользователем, убедитесь, что Unix-сокет PHP-FPM доступен этому пользователю, или используйте TCP-сокет.
- Если вы запускаете nginx в изолированном окружении (к примеру, chroot находится в
/srv/nginx-jail, веб-документы расположены в/srv/nginx-jail/www), то вы должны в/etc/php/php-fpm.confдобавить опцииchroot /srv/nginx-jailиlisten = /srv/nginx-jail/run/php-fpm/php-fpm.sockвнутри секции пула (по умолчанию это[www]). Создайте каталог для файла сокета, если его нет. Более того, для модулей, которые динамически связаны с зависимостями, вам нужно будет скопировать эти зависимости в chroot (например, для php-imagick вам нужно будет скопировать в chroot библиотеки ImageMagick, но не сам imagick.so).
Настройка nginx
Внутри каждого блока server, который обслуживает веб-приложение PHP, должен находиться блок location [1], например:
/etc/nginx/sites-available/example.conf
server {
    root /usr/share/nginx/html;

    location / {
        index index.html index.htm index.php;
    }

    location ~ .php$ {
        # 404
        try_files $fastcgi_script_name =404;

        # default fastcgi_params
        include fastcgi_params;

        # fastcgi settings
        fastcgi_pass			unix:/run/php-fpm/php-fpm.sock;
        fastcgi_index			index.php;
        fastcgi_buffers			8 16k;
        fastcgi_buffer_size		32k;

        # fastcgi params
        fastcgi_param DOCUMENT_ROOT	$realpath_root;
        fastcgi_param SCRIPT_FILENAME	$realpath_root$fastcgi_script_name;
        #fastcgi_param PHP_ADMIN_VALUE	"open_basedir=$base/:/usr/lib/php/:/tmp/";
    }
}
Если требуется обрабатывать другие расширения наряду с PHP (например .html и .htm):
location ~ [^/].(php|html|htm)(/|$) {
    ...
}
Все расширения, обрабатываемые в php-fpm должны быть также явно добавлены в
/etc/php/php-fpm.d/www.conf:
security.limit_extensions = .php .html .htm
Примечание: Аргумент fastcgi_pass должен быть определен как TCP-сокет или сокет Unix выбранным FastCGI сервером в его конфигурационном файле. По умолчанию для php-fpm используется сокет
fastcgi_pass unix:/run/php-fpm/php-fpm.sock;
Вы можете использовать также общий TCP-сокет:
fastcgi_pass 127.0.0.1:9000;
Однако, доменные сокеты Unix должны работать быстрее.
Совет: Если несколько блоков server используют одну и ту же конфигурацию PHP-FPM, можно вынести общие настройки в отдельный файл для удобства, например php_fastcgi.conf:
/etc/nginx/php_fastcgi.conf
location ~ .php$ {
    # 404
    try_files $fastcgi_script_name =404;

    # default fastcgi_params
    include fastcgi_params;

    # fastcgi settings
    ...
}
И затем подключать этот файл в тех блоках server, в которых нужна обработка PHP:
/etc/nginx/sites-available/example.conf
server {
    server_name example.com;
    ...

    include /etc/nginx/php_fastcgi.conf;
}
Проверка конфигурации
Перезапустите службы php-fpm и nginx после изменения настроек, чтобы изменения вступили в силу.
Чтобы проверить работу FastCGI, создайте новый файл .php внутри каталога веб-документов, содержащий:
<?php
  phpinfo();
?>
При открытии файла в браузере должна отобразиться информационная страница с текущими настройками PHP.
Реализация CGI
Эта реализация нужна для CGI-приложений.
fcgiwrap
Установите fcgiwrap. Настроить его можно путём редактирования юнита fcgiwrap.socket. Включите и запустите fcgiwrap.socket.
Несколько рабочих потоков
Если вы хотите породить несколько рабочих потоков, вам рекомендуется использовать multiwatchAUR, который умеет отслеживать упавшие подпроцессы и перезапускать их. Вам нужно использовать spawn-fcgi, чтобы создать доменный сокет Unix, так как multiwatch не может обрабатывать сокеты, созданные systemd, однако, fcgiwrap сама по себе не вызывает никаких проблем, если вызывается непосредственно из юнит-файла.
Сделайте замещение файла юнита fcgiwrap.service (и юнита fcgiwrap.socket, если он есть), и отредактируйте строку ExecStart в соответствии с вашими нуждами. В примере показан юнит файл, который использует multiwatchAUR. Убедитесь, что fcgiwrap.socket не включен и не запущен, потому что он будет конфликтовать с этим юнитом:
/etc/systemd/system/fcgiwrap.service
[Unit]
Description=Simple CGI Server
After=nss-user-lookup.target

[Service]
ExecStartPre=/bin/rm -f /run/fcgiwrap.socket
ExecStart=/usr/bin/spawn-fcgi -u http -g http -s /run/fcgiwrap.sock -n -- /usr/bin/multiwatch -f 10 -- /usr/sbin/fcgiwrap
ExecStartPost=/usr/bin/chmod 660 /run/fcgiwrap.sock
PrivateTmp=true
Restart=on-failure

[Install]
WantedBy=multi-user.target
Выберите подходящий -f 10, чтобы изменить количество порождаемых подпроцессов.
Важно: Строка ExecStartPost требуется из-за странного поведения, которое я наблюдаю при использовании опции -M 660 для spawn-fcgi. Устанавливается неправильный режим. Может это баг?
Настройка nginx
В каталоге /etc/nginx скопируйте файл fastcgi_params в fcgiwrap_params. В файле fcgiwrap_params удалите строки, которые устанавливают SCRIPT_NAME и DOCUMENT_ROOT.
Внутри каждого блока server CGI-приложения должен находиться вложенный блок location:
location ~ .cgi$ {
     include       fcgiwrap_params;
     fastcgi_param DOCUMENT_ROOT /srv/www/cgi-bin/;
     fastcgi_param SCRIPT_NAME   myscript.cgi;
     fastcgi_pass  unix:/run/fcgiwrap.sock;
}
Сокетом по умолчанию для fcgiwrap является /run/fcgiwrap.sock.
Вместо параметров DOCUMENT_ROOT и SCRIPT_NAME можно использовать более короткую альтернативу fastcgi_param SCRIPT_FILENAME /srv/www/cgi-bin/myscript.cgi. При её использовании не понадобится копировать fastcgi_params в fcgiwrap_params и удалять строки DOCUMENT_ROOT and SCRIPT_NAME.
Важно: Если используются SCRIPT_NAME и DOCUMENT_ROOT, fcgiwrap будет отклонять любые другие fastcgi_param, установленные в nginx. Вы должны использовать SCRIPT_FILENAME для того, чтобы другие параметры (например, PATH_INFO) могли быть установлены через конфигурацию Nginx. Подробнее на GitHub.
Если вы продолжаете получать ошибку 502 - bad Gateway, проверьте, передаёт ли ли ваше CGI-приложение mime-тип содержимого. Для html это должно быть Content-type: text/html.
Если вы получаете ошибки 403, убедитесь, что CGI-файл доступен для чтения и выполнения пользователю http и что каждая родительская папка доступна ему для чтения.
Установка в chroot
Установка nginx в chroot добавляет дополнительный уровень безопасности. Для максимальной безопасности chroot должен включать только файлы, необходимые для запуска сервера nginx, при этом все файлы должны иметь по возможности максимально ограниченные права доступа. Например, как можно больше файлов должно принадлежать пользователю root, а таким каталогам, как /usr/bin должен быть установлен запрет на чтение и запись.
Arch поставляется с пользователем http и группой по умолчанию, от имени которых запускается сервер. Измененный корневой каталог будет находиться в /srv/http.
Существует perl-скрипт для создания chroot-окружения, который доступен в jail.pl gist. Вы можете либо использовать его, либо следовать дальнейшим инструкциям из этой статьи. Скрипт требует прав суперпользователя для работы. Вам нужно будет раскомментировать строку, перед тем, как он сможет выполнять какие-либо изменения.
Создание необходимых устройств
Для nginx нужны /dev/null, /dev/random и /dev/urandom. Чтобы установить их в chroot мы создадим каталог /dev и добавим устройства с помощью mknod. Избегайте монтирования всех устройств в /dev: тогда, даже если chroot будет скомпрометирован, атакующий должен будет выбраться из chroot-окружения чтобы добраться до важных устройств, например /dev/sda1.
Совет: Убедитесь, что /src/http примонтирован без опции no-dev
Совет: Смотрите mknod(1) и ls -l /dev/{null,random,urandom}, чтобы лучше понять опции mknod.
# export JAIL=/srv/http
# mkdir $JAIL/dev
# mknod -m 0666 $JAIL/dev/null c 1 3
# mknod -m 0666 $JAIL/dev/random c 1 8
# mknod -m 0444 $JAIL/dev/urandom c 1 9
Создание необходимых каталогов
Для работы nginx требует определенный набор файлов. Перед тем, как их копировать, создайте для них соответствующие каталоги. Предполагается, что ваш корневой каталог веб-документов nginx находится в /srv/http/www.
# mkdir -p $JAIL/etc/nginx/logs
# mkdir -p $JAIL/usr/{lib,bin}
# mkdir -p $JAIL/usr/share/nginx
# mkdir -p $JAIL/var/{log,lib}/nginx
# mkdir -p $JAIL/www/cgi-bin
# mkdir -p $JAIL/{run,tmp}
# cd $JAIL; ln -s usr/lib lib
# cd $JAIL; ln -s usr/lib lib64
# cd $JAIL/usr; ln -s lib lib64
Затем смонтируйте $JAIL/tmp и $JAIL/run как tmpfs-ы. Размер должен быть ограничен, чтобы быть уверенным, что атакующий не сможет занять всю доступную RAM.
# mount -t tmpfs none $JAIL/run -o 'noexec,size=1M'
# mount -t tmpfs none $JAIL/tmp -o 'noexec,size=100M'
Для того, чтобы монтирование выполнялось автоматически при загрузке системы, добавьте следующие записи в /etc/fstab:
/etc/fstab
 tmpfs   /srv/http/run   tmpfs   rw,noexec,relatime,size=1024k   0       0
 tmpfs   /srv/http/tmp   tmpfs   rw,noexec,relatime,size=102400k 0       0
Заполнение chroot
Сначала скопируйте простые файлы.
# cp -r /usr/share/nginx/* $JAIL/usr/share/nginx
# cp -r /usr/share/nginx/html/* $JAIL/www
# cp /usr/bin/nginx $JAIL/usr/bin/
# cp -r /var/lib/nginx $JAIL/var/lib/nginx
Теперь скопируйте нужные библиотеки. Используйте ldd, чтобы отобразить их и скопируйте все файлы в правильное место. Копирование предпочтительнее, чем создание жестких ссылок, потому, что даже если атакующий получит права записи в файлы, они не смогут уничтожить или изменить системные файлы вне chroot-окружения.
$ ldd /usr/bin/nginx
linux-vdso.so.1 (0x00007fffc41fe000)
libpthread.so.0 => /usr/lib/libpthread.so.0 (0x00007f57ec3e8000)
libcrypt.so.1 => /usr/lib/libcrypt.so.1 (0x00007f57ec1b1000)
libstdc++.so.6 => /usr/lib/libstdc++.so.6 (0x00007f57ebead000)
libm.so.6 => /usr/lib/libm.so.6 (0x00007f57ebbaf000)
libpcre.so.1 => /usr/lib/libpcre.so.1 (0x00007f57eb94c000)
libssl.so.1.0.0 => /usr/lib/libssl.so.1.0.0 (0x00007f57eb6e0000)
libcrypto.so.1.0.0 => /usr/lib/libcrypto.so.1.0.0 (0x00007f57eb2d6000)
libdl.so.2 => /usr/lib/libdl.so.2 (0x00007f57eb0d2000)
libz.so.1 => /usr/lib/libz.so.1 (0x00007f57eaebc000)
libGeoIP.so.1 => /usr/lib/libGeoIP.so.1 (0x00007f57eac8d000)
libgcc_s.so.1 => /usr/lib/libgcc_s.so.1 (0x00007f57eaa77000)
libc.so.6 => /usr/lib/libc.so.6 (0x00007f57ea6ca000)
/lib64/ld-linux-x86-64.so.2 (0x00007f57ec604000)
Для файлов, находящихся в /usr/lib, вы можете воспользоваться следующей командой:
# cp $(ldd /usr/bin/nginx | grep /usr/lib | sed -sre 's/(.+)(/usr/lib/S+).+/2/g') $JAIL/usr/lib
А для ld-linux-x86-64.so — следующей командой:
# cp /lib64/ld-linux-x86-64.so.2 $JAIL/lib
Примечание: Не пытайтесь скопировать linux-vdso.so — это не настоящая библиотека и ее не существует в /usr/lib.
Копируйте другие необходимые библиотеки и системные файлы.
# cp /usr/lib/libnss_* $JAIL/usr/lib
# cp -rfvL /etc/{services,localtime,nsswitch.conf,nscd.conf,protocols,hosts,ld.so.cache,ld.so.conf,resolv.conf,host.conf,nginx} $JAIL/etc
Создайте файлы пользователей и групп в chroot-окружении. Таким образом, в chroot-окружении будут доступны только указанные пользователи, и никакая информация о пользователях из основной системы не будет доступна атакующему, получившему доступ в chroot-окружение.
$JAIL/etc/group
http:x:33:
nobody:x:99:
$JAIL/etc/passwd
http:x:33:33:http:/:/bin/false
nobody:x:99:99:nobody:/:/bin/false
$JAIL/etc/shadow
http:x:14871::::::
nobody:x:14871::::::
$JAIL/etc/gshadow
http:::
nobody:::
# touch $JAIL/etc/shells
# touch $JAIL/run/nginx.pid
Наконец, сделайте права доступа максимально ограниченными. Как можно больше должно принадлежать суперпользователю и быть закрытым для записи.
# chown -R root:root $JAIL/

# chown -R http:http $JAIL/www
# chown -R http:http $JAIL/etc/nginx
# chown -R http:http $JAIL/var/{log,lib}/nginx
# chown http:http $JAIL/run/nginx.pid

# find $JAIL/ -gid 0 -uid 0 -type d -print | xargs chmod -rw
# find $JAIL/ -gid 0 -uid 0 -type d -print | xargs chmod +x
# find $JAIL/etc -gid 0 -uid 0 -type f -print | xargs chmod -x
# find $JAIL/usr/bin -type f -print | xargs chmod ug+rx
# find $JAIL/ -group http -user http -print | xargs chmod o-rwx
# chmod +rw $JAIL/tmp
# chmod +rw $JAIL/run
Если ваш сервер будет принимать входящие соединения на 80 порту (или любому другому порту в диапазоне [1-1023]), дайте исполняемому файлу внутри chroot права на использование этих портов без прав суперпользователя.
# setcap 'cap_net_bind_service=+ep' $JAIL/usr/bin/nginx
Отредактируйте nginx.service для запуска chroot
Сделайте замещение файла юнита nginx.service — тогда обновление nginx не изменит ваш файл .service.
Юнит systemd должен быть настроен так, чтобы запускать nginx в chroot от имени пользователя http и хранить pid-файл в chroot.
Примечание: Я не уверен, нужно ли хранить pid-файл в chroot.
/etc/systemd/system/nginx.service
[Unit]
Description=A high performance web server and a reverse proxy server
After=syslog.target network.target

[Service]
Type=forking
PIDFile=/srv/http/run/nginx.pid
ExecStartPre=/usr/bin/chroot --userspec=http:http /srv/http /usr/bin/nginx -t -q -g 'pid /run/nginx.pid; daemon on; master_process on;'
ExecStart=/usr/bin/chroot --userspec=http:http /srv/http /usr/bin/nginx -g 'pid /run/nginx.pid; daemon on; master_process on;'
ExecReload=/usr/bin/chroot --userspec=http:http /srv/http /usr/bin/nginx -g 'pid /run/nginx.pid; daemon on; master_process on;' -s reload
ExecStop=/usr/bin/chroot --userspec=http:http /srv/http /usr/bin/nginx -g 'pid /run/nginx.pid;' -s quit

[Install]
WantedBy=multi-user.target
Примечание: Обновление nginx с помощью pacman не обновит установленную в chroot копию. Вы должны вручную выполнять обновления, повторяя указанные выше шаги по переносу файлов. Не забудьте также обновить библиотеки, которые использует nginx.
Теперь вы можете спокойно удалить nginx, установленный вне chroot.
# pacman -Rsc nginx
Если вы не удалили nginx, установленный вне chroot, проверьте, что работающий процесс nginx — это действительно именно тот, что в находится chroot. Для этого посмотрите, куда указывает символическая ссылка /proc/PID/root: она должна указывать на /srv/http, а не на /.
# ps -C nginx | awk '{print $1}' | sed 1d | while read -r PID; do ls -l /proc/$PID/root; done
Советы и рекомендации
Запуск без привилегий через systemd
Создайте drop-in файл для службы nginx.service и пропишите в нём секцию [Service] с опцими User и (опционально) Group, чтобы запустить службу от имени указанного вами непривилегированного пользователя:
/etc/systemd/system/nginx.service.d/user.conf
[Service]
User=пользователь
Group=группа
Также можно запретить повышение привилегий:
/etc/systemd/system/nginx.service.d/user.conf
[Service]
...
NoNewPrivileges=yes
Совет: Подробнее о повышающих безопасность опциях можно почитать в systemd.exec(5).
После этого нужно убедиться, что пользователь имеет доступ ко всем необходимым ресурсам. Следуйте инструкциям, описанным в следующих разделах, и затем запустите nginx.
Совет: Аналогичные настройки можно применить и для сервера FastCGI.
Порт
По умолчанию Linux запрещает не-root процессам слушать порты ниже 1024. Можно использовать порт выше 1024:
/etc/nginx/nginx.conf
server {
        listen 8080;
}
Совет: Если вы хотите, чтобы nginx всё равно был доступен на порту 80 или 443, можно настроить межсетевой экран для перенаправления запросов с порта 80 или 444 на порт, который использует nginx.
Или можно выдать процессу nginx привилегию CAP_NET_BIND_SERVICE, которая позволит ему использовать порты ниже 1024:
/etc/systemd/system/nginx.service.d/user.conf
[Service]
...
CapabilityBoundingSet=
CapabilityBoundingSet=CAP_NET_BIND_SERVICE
AmbientCapabilities=
AmbientCapabilities=CAP_NET_BIND_SERVICE
Или можно использовать активацию сокетов systemd. В этом случае systemd будет прослушивать порты и, когда будет установлено соединение, запустит nginx, передав сокет в качестве дескриптора файла. Это означает, что процессу nginx не нужны особые привилегии, так как сокет уже существует на момент запуска. Этот подход опирается на использование внутренней переменной окружения, которую nginx использует для передачи сокетов [2], и поэтому официально не поддерживается. Вместо установки CapabilityBoundingSet и AmbientCapabilities переопределите переменную окружения NGINX, чтобы сообщить процессу nginx, какие файловые дескрипторы будут передаваться сокетам:
/etc/systemd/system/nginx.service.d/user.conf
[Service]
...
Environment=NGINX=3:4;
На каждый прослушиваемый порт будет приходиться один сокет, начиная с файлового дескриптора 3, поэтому в данном примере мы говорим nginx ожидать два сокета. Теперь создайте юнит nginx.socket, указав, какие порты прослушивать:
/etc/systemd/system/nginx.socket
[Socket]
ListenStream=0.0.0.0:80
ListenStream=0.0.0.0:443
After=network.target
Requires=network.target

[Install]
WantedBy=sockets.target
Сокеты будут передаваться в порядке, определённом в этом юните, поэтому порт 80 будет файловым дескриптором 3, а порт 443 — файловым дескриптором 4. Если вы ранее включали или запускали службу nginx.service, вам нужно остановить её и включить вместо неё nginx.socket. При запуске системы nginx не будет запущен, но запустится, когда вы зайдете на сайт в браузере. Благодаря этому можно дополнительно защитить службу; например, во многих случаях вы можете установить PrivateNetwork=True в файле службы, блокируя nginx от внешней сети, поскольку сокета, созданного systemd, достаточно для обслуживания веб-сайта. Обратите внимание, что при этом в журналы службы nginx будет выведено предупреждение: 2020/08/29 19:33:20 [notice] 254#254: using inherited sockets from "3:4;"
PID-файл
По умолчанию nginx использует /run/nginx.pid. Нужно будет создать каталог, в котором пользователь будет иметь право записи, и перенастроить запись PID-файла туда. Например, можно использовать systemd-tmpfiles:
/etc/tmpfiles.d/nginx.conf
d /run/nginx 0775 root группа - -
Примените изменения:
# systemd-tmpfiles --create
Отредактируйте параметры службы, связанные с PID-файлом:
/etc/systemd/system/nginx.service.d/user.conf
[Service]
...
PIDFile=/run/nginx/nginx.pid
ExecStart=
ExecStart=/usr/bin/nginx -g 'pid /run/nginx/nginx.pid; error_log stderr;'
ExecReload=
ExecReload=/usr/bin/nginx -s reload -g 'pid /run/nginx/nginx.pid;'
/var/lib/nginx/*
Некоторые каталоги в каталоге /var/lib/nginx должны быть инициализированы путём запуска nginx от имени root. Для этого не обязательно запускать весь сервер, nginx сделает это при проверке конфигурации. Так что просто запустите её — и готово.
Права каталогов и файлов журналов
После запуска проверки конфигурации будет создан журнал, принадлежащий root. Удалите журналы в /var/log/nginx.
Пользователю, от имени которого будет работать служба, nginx нужно выдать разрешение на запись в /var/log/nginx. Для этого может понадобиться изменить права и/или владельца каталога.
Альтернативный скрипт для systemd
В systemd есть встроенная возможность запуска через chroot. [3]. Для примера используем такие настройки пользователя, группы и pid:
/etc/nginx/nginx.conf
user http;
pid /run/nginx.pid;
Абсолютный путь к файлу настроек будет /srv/http/etc/nginx/nginx.conf.
/etc/systemd/system/nginx.service
[Unit]
Description=nginx (Chroot)
After=syslog.target network.target

[Service]
Type=forking
PIDFile=/srv/http/run/nginx.pid
RootDirectory=/srv/http
ExecStartPre=/usr/bin/nginx -t -c /etc/nginx/nginx.conf
ExecStart=/usr/bin/nginx -c /etc/nginx/nginx.conf
ExecReload=/usr/bin/nginx -c /etc/nginx/nginx.conf -s reload
ExecStop=/usr/bin/nginx -c /etc/nginx/nginx.conf -s stop

[Install]
WantedBy=multi-user.target
Указывать стандартный путь к файлу настроек необязательно, nginx по умолчанию использует -c /etc/nginx/nginx.conf, но, возможно, явное прописывание является хорошей идеей.
Также можно запускать только ExecStart внутри chroot с параметром RootDirectoryStartOnly заданным как yes (смотрите systemd.service(5)) или запустить его до того, как точка монтирования станет эффективной или будет доступен путь systemd (смотрите systemd.path(5)).
/etc/systemd/system/nginx.path
[Unit]
Description=nginx (Chroot) path
[Path]
PathExists=/srv/http/site/Public_html
[Install]
WantedBy=default.target
Включите созданный юнит nginx.path и в юните nginx.service измените строку WantedBy=default.target на WantedBy=nginx.path.
Параметр PIDFile в файле юнита позволяет systemd следить за процессом (требуется абсолютный путь). Если это нежелательно, вы можете изменить тип на oneshot и удалить упоминание pid-файла из файла юнита.
Nginx beautifier
nginxbeautifierAUR — это инструмент командной строки, используемый для улучшения и форматирования конфигурационных файлов nginx.
Более удобное управление заголовками
Nginx имеет довольно неинтуитивную систему управления HTTP-заголовками: они могут быть определены только в одном контексте, любые другие заголовки игнорируются. Чтобы исправить это, можно установить модуль headers-more-nginx.
Установите пакет nginx-mod-headers-more. Модуль будет установлен в каталог /usr/lib/nginx/modules.
Чтобы загрузить модуль, добавьте следующее в начало основного конфигурационного файла nginx.
/etc/nginx/nginx.conf
load_module "/usr/lib/nginx/modules/ngx_http_headers_more_filter_module.so";
...
Решение проблем
Валидация конфигурации
# nginx -t
nginx: the configuration file /etc/nginx/nginx.conf syntax is ok
nginx: configuration file /etc/nginx/nginx.conf test is successful
Ошибка: Страница, которую вы ищете, временно недоступна. Пожалуйста, попробуйте позже. (502 Bad Gateway)
Это из-за того, что сервер FastCGI не запущен или используемый сокет имеет неправильные права доступа.
Попробуйте этот ответ, чтобы исправить 502 ошибку.
В Arch Linux, файлом настройки, упомянутом по ссылке выше, является /etc/php/php-fpm.conf.
Ошибка: No input file specified
1. Убедитесь, что переменная open_basedir в /etc/php/php.ini содержит путь, который соответствует аргументу root в nginx.conf (обычно /usr/share/nginx/). Если в качестве FastCGI-сервера используется PHP-FPM, можно попробовать добавить fastcgi_param PHP_ADMIN_VALUE "open_basedir=$document_root/:/tmp/:/proc/"; в тот блок location, который используется для обработки php-файлов.
2. Другой причиной может быть то, что задан неправильный аргумент root в секции location ~ .php$ в nginx.conf. Убедитесь, что root указывает на ту же директорию, что и в location / на том же сервере. Либо вы можете просто задать параметр root глобально, не переопределяя его в каких-либо location секциях.
3. Проверьте права доступа: например, пользователь/группа http, биты разрешений 755 для каталогов и 644 для файлов. Имейте в виду, что все родительские каталоги тоже должны иметь корректные права доступа. Как массово изменить права всего дерева каталогов, описано в разделе Разрешения и атрибуты файлов#Массовое изменение разрешений.
4. Возможно, у вас не установлена переменная SCRIPT_FILENAME, содержащая полный путь до ваших скриптов. Если конфигурация nginx (fastcgi_param SCRIPT_FILENAME) правильная, то эта ошибка означает, что php не смог загрузить запрашиваемый скрипт. Часто это просто оказывается ошибкой прав доступа, и вы можете запустить php-cgi с правами root:
# spawn-fcgi -a 127.0.0.1 -p 9000 -f /usr/bin/php-cgi
или вам следует создать группу и пользователя для запуска php-cgi:
# groupadd www
# useradd -g www www
# chmod +w /srv/www/nginx/html
# chown -R www:www /srv/www/nginx/html
# spawn-fcgi -a 127.0.0.1 -p 9000 -u www -g www -f /usr/bin/php-cgi
5. Если вы используете chroot, убедитесь, что опция chroot в файле /etc/php-fpm/php-fpm.d/www.conf имеет корректное значение.
Warning: Could not build optimal types_hash
Если при запуске nginx.service в журнале появляется такое сообщение:
[warn] 18872#18872: could not build optimal types_hash, you should increase either types_hash_max_size: 1024 or types_hash_bucket_size: 64; ignoring types_hash_bucket_size
то попробуйте увеличить значения этих параметров в блоке http [4] [5]:
/etc/nginx/nginx.conf
http {
    types_hash_max_size 4096;
    server_names_hash_bucket_size 128;
    ...
}
Cannot assign requested address
Полный текст ошибки в статусе юнита nginx.service:
[emerg] 460#460: bind() to A.B.C.D:443 failed (99: Cannot assign requested address)
Даже если файл юнита nginx настроен на запуск после network.target с помощью systemd, nginx может попытаться прослушивать адрес, который настроен, но ещё не добавлен ни к одному интерфейсу. Убедиться, что проблема именно в этом, можно, попытавшись запустить nginx вручную (тем самым показав, что IP-адрес настроен правильно). Настройка nginx на прослушивание всех адресов решит эту проблему. Если же в вашем случае обязательно требуется прослушивание конкретного адреса, одним из возможных решений является перенастройка systemd.
Чтобы запустить nginx только после того, как все настроенные сетевые устройства будут запущены и получат IP-адреса, добавьте network-online.target к строке After= в файле nginx.service и запустите/включите systemd-networkd-wait-online.service.
Смотрите также
- Использование WebDAV с nginx
- nginx configuration pitfalls
- Very good in-depth 2014 look at nginx security and Reverse Proxying
- Installing LEMP (nginx, PHP, MySQL with MariaDB engine and PhpMyAdmin) in Arch Linux
- Certbot (Русский)#Nginx
NGINX Basics
Go to the Table of Contents or What’s next? section.
- ≡ NGINX Basics
- Directories and files
- Commands
- Processes
- CPU pinning
- Shutdown of worker processes
- Configuration syntax
- Comments
- End of lines
- Variables, Strings, and Quotes
- Directives, Blocks, and Contexts
- External files
- Measurement units
- Regular expressions with PCRE
- Enable syntax highlighting
- Connection processing
- Event-Driven architecture
- Multiple processes
- Simultaneous connections
- HTTP Keep-Alive connections
- sendfile, tcp_nodelay, and tcp_nopush
- Request processing stages
- Server blocks logic
- Handle incoming connections
- Matching location
- rewrite vs return
- URL redirections
- try_files directive
- if, break, and set
- root vs alias
- internal directive
- External and internal redirects
- allow and deny
- uri vs request_uri
- Compression and decompression
- What is the best NGINX compression gzip level?
- Hash tables
- Server names hash table
- Log files
- Conditional logging
- Manually log rotation
- Error log severity levels
- How to log the start time of a request?
- How to log the HTTP request body?
- NGINX upstream variables returns 2 values
- Reverse proxy
- Passing requests
- Trailing slashes
- Passing headers to the backend
- Importance of the Host header
- Redirects and X-Forwarded-Proto
- A warning about the X-Forwarded-For
- Improve extensibility with Forwarded
- Response headers
- Load balancing algorithms
- Backend parameters
- Upstream servers with SSL
- Round Robin
- Weighted Round Robin
- Least Connections
- Weighted Least Connections
- IP Hash
- Generic Hash
- Other methods
- Rate limiting
- Variables
- Directives, keys, and zones
- Burst and nodelay parameters
- NAXSI Web Application Firewall
- OWASP ModSecurity Core Rule Set (CRS)
- Core modules
- ngx_http_geo_module
- 3rd party modules
- ngx_set_misc
- ngx_http_geoip_module
Directories and files
If you compile NGINX with default parameters all files and directories are available from
/usr/local/nginxlocation.
For upstream NGINX packaging paths can be as follows (it depends on the type of system/distribution):
-
/etc/nginx— is the default configuration root for the NGINX service- other locations:
/usr/local/etc/nginx,/usr/local/nginx/conf
- other locations:
-
/etc/nginx/nginx.conf— is the default configuration entry point used by the NGINX services, includes the top-level http block and all other configuration contexts and files- other locations:
/usr/local/etc/nginx/nginx.conf,/usr/local/nginx/conf/nginx.conf
- other locations:
-
/usr/share/nginx— is the default root directory for requests, containshtmldirectory and basic static files- other locations:
html/in root directory
- other locations:
-
/var/log/nginx— is the default log (access and error log) location for NGINX- other locations:
logs/in root directory
- other locations:
-
/var/cache/nginx— is the default temporary files location for NGINX- other locations:
/var/lib/nginx
- other locations:
-
/etc/nginx/conf— contains custom/vhosts configuration files- other locations:
/etc/nginx/conf.d,/etc/nginx/sites-enabled(I can’t stand this debian/apache-like convention)
- other locations:
-
/var/run/nginx— contains information about NGINX process(es)- other locations:
/usr/local/nginx/logs,logs/in root directory
- other locations:
See also Installation and Compile-Time Options — Files and Permissions.
Commands
🔖 Use reload option to change configurations on the fly — Base Rules — P2
nginx -h— shows the helpnginx -v— shows the NGINX versionnginx -V— shows the extended information about NGINX: version, build parameters, and configuration argumentsnginx -t— tests the NGINX configurationnginx -c <filename>— sets configuration file (default:/etc/nginx/nginx.conf)nginx -p <directory>— sets prefix path (default:/etc/nginx/)nginx -T— tests the NGINX configuration and prints the validated configuration on the screennginx -s <signal>— sends a signal to the NGINX master process:stop— discontinues the NGINX process immediatelyquit— stops the NGINX process after it finishes processing
inflight requestsreload— reloads the configuration without stopping processesreopen— instructs NGINX to reopen log files
nginx -g <directive>— sets global directives out of configuration file
Some useful snippets for management of the NGINX daemon:
-
testing configuration:
/usr/sbin/nginx -t -c /etc/nginx/nginx.conf
/usr/sbin/nginx -t -q -g 'daemon on; master_process on;' # ; echo $?

/usr/local/etc/rc.d/nginx status
-
starting daemon:
/usr/sbin/nginx -g 'daemon on; master_process on;'

service nginx start
systemctl start nginx

/usr/local/etc/rc.d/nginx start

# You can also start NGINX from start-stop-daemon script:
/sbin/start-stop-daemon --quiet --start --exec /usr/sbin/nginx --background --retry QUIT/5 --pidfile /run/nginx.pid
-
stopping daemon:
# graceful shutdown (waiting for the worker processes to finish serving current requests)
/usr/sbin/nginx -s quit
# fast shutdown (kill connections immediately)
/usr/sbin/nginx -s stop

service nginx stop
systemctl stop nginx

/usr/local/etc/rc.d/nginx stop

# You can also stop NGINX from start-stop-daemon script:
/sbin/start-stop-daemon --quiet --stop --retry QUIT/5 --pidfile /run/nginx.pid
-
reloading daemon:
/usr/sbin/nginx -g 'daemon on; master_process on;' -s reload

service nginx reload
systemctl reload nginx

/usr/local/etc/rc.d/nginx reload

kill -HUP $(cat /var/run/nginx.pid)
kill -HUP $(pgrep -f "nginx: master")
-
restarting daemon:
service nginx restart
systemctl restart nginx

/usr/local/etc/rc.d/nginx restart
Something about testing configuration:
You cannot test half-baked configurations. For example, you defined a server section for your domain in a separate file. Any attempt to test such a file will throw errors. The file has to be complete in all respects.
Configuration syntax
🔖 Organising Nginx configuration — Base Rules — P2
🔖 Format, prettify and indent your Nginx code — Base Rules — P2
NGINX uses a micro programming language in the configuration files. This language’s design is heavily influenced by Perl and Bourne Shell. Configuration syntax, formatting and definitions follow a so-called C-style convention. For me, NGINX configuration has a simple and very transparent structure.
Comments
NGINX configuration files don’t support comment blocks, they only accept # at the beginning of a line for a comment.
End of lines
Lines containing directives must end with a semicolon (;), otherwise NGINX will fail to load the configuration and report an error.
Variables, Strings, and Quotes
Variables start with $ and that get set automaticaly for each request. The ability to set variables at runtime and control logic flow based on them is part of the rewrite module and not a general feature of NGINX. By default, we cannot modify built-in variables like $host or $request_uri.
There are some directives that do not support variables, e.g.
access_log(is really the exception because can contain variables with restrictions) orerror_log. Variables probably can’t be (and shouldn’t be because they are evaluated in the run-time during the processing of each request and rather costly compared to plain static configuration) declared anywhere, with very few exceptions:rootdirective can contains variables,server_namedirective only allows strict$hostnamebuilt-in value as a variable-like notation (but it’s more like a magic constant). If you use variables inifcontext, you can only set them inifconditions (and maybe rewrite directives). Don’t try to use them elsewhere.
To assign value to the variable you should use a set directive:
See
if,break, andsetsection to learn more about variables.
Some interesting things about variables:
Make sure to read the agentzh’s Nginx Tutorials — it’s about NGINX tips & tricks. This guy is a NGINX Guru and creator of the OpenResty. In these tutorials he describes, amongst other things, variables in great detail. I also recommend nginx built-in variables post.
- the most variables in NGINX only exist at runtime, not during configuration time
- the scope of variables spreads out all over configuration
- variable assignment occurs when requests are actually being served
- variable have exactly the same lifetime as the corresponding request
- each request does have its own version of all those variables’ containers (different containers values)
- requests do not interfere with each other even if they are referencing a variable with the same name
- the assignment operation is only performed in requests that access location
Strings may be inputted without quotes unless they include blank spaces, semicolons or curly braces, then they need to be escaped with backslashes or enclosed in single/double quotes.
Quotes are required for values which are containing space(s) and/or some other special characters, otherwise NGINX will not recognize them. You can either quote or -escape some special characters like " " or ";" in strings (characters that would make the meaning of a statement ambiguous). So the following instructions are the same:
# 1)
add_header My-Header "nginx web server;";

# 2)
add_header My-Header nginx web server;;
Variables in quoted strings are expanded normally unless the $ is escaped.
Directives, Blocks, and Contexts
Read this great article about the NGINX configuration inheritance model by Martin Fjordvald.
Configuration options are called directives. We have four types of directives:
-
standard directive — one value per context:
-
array directive — multiple values per context:
error_log /var/log/nginx/localhost/localhost-error.log warn;
-
action directive — something which does not just configure:
rewrite ^(.*)$ /msie/$1 break;
-
try_filesdirective:try_files $uri $uri/ /test/index.html;
Valid directives begin with a variable name and then state an argument or series of arguments separated by spaces.
Directives are organised into groups known as blocks or contexts. Generally, context is a block directive that can have other directives inside braces. It appears to be organised in a tree-like structure, defined by sets of brackets — { and }.
The curly braces actually denote a new configuration context.
As a general rule, if a directive is valid in multiple nested scopes, a declaration in a broader context will be passed on to any child contexts as default values. The children contexts can override these values at will.
Directives placed in the configuration file outside of any contexts are considered to be in the global/main context.
Special attention should be paid to some strange behavior associated with some directives. For more information please see Set the HTTP headers with add_header and proxy_*_header directives properly rule.
Directives can only be used in the contexts that they were designed for. NGINX will error out on reading a configuration file with directives that are declared in the wrong context.
If you want to review all directives see alphabetical index of directives.
Contexts can be layered within one another (a level of inheritance). Their structure looks like this:
Global/Main Context
        |
        |
        +-----» Events Context
        |
        |
        +-----» HTTP Context
        |          |
        |          |
        |          +-----» Server Context
        |          |          |
        |          |          |
        |          |          +-----» Location Context
        |          |
        |          |
        |          +-----» Upstream Context
        |
        |
        +-----» Mail Context
The most important contexts are shown in the following description. These will be the ones that you will be dealing with for the most part:
-
global— contains global configuration directives; is used to set the settings for NGINX globally and is the only context that is not surrounded by curly braces -
events— configuration for the events module; is used to set global options for connection processing; contains directives that affect connection processing are specified -
http— controls all the aspects of working with the HTTP module and holds directives for handling HTTP and HTTPS traffic; directives in this context can be grouped into:- HTTP client directives
- HTTP file I/O directives
- HTTP hash directives
- HTTP socket directives
-
server— defines virtual host settings and describes a logical separation of a set of resources associated with a particular domain or IP address -
location— define directives to handle client request and indicates a URI that comes either from the client or from an internal redirect -
upstream— define a pool of back-end servers that NGINX can proxy the request; commonly used for defining either a web server cluster for load balancing
NGINX also provides other contexts (e.g. used for mapping) such as:
-
map— is used to set the value of a variable depending on the value of another variable. It provides a mapping of one variable’s values to determine what the second variable should be set to -
geo— is used to specify a mapping. However, this mapping is specifically used to categorize client IP addresses. It sets the value of a variable depending on the connecting IP address -
types— is used to map MIME types to the file extensions that should be associated with them -
if— provide conditional processing of directives defined within, execute the instructions contained if a given test returnstrue -
limit_except— is used to restrict the use of certain HTTP methods within a location context
Look also at the graphic below. It presents the most important contexts with reference to the configuration:

For HTTP, NGINX lookup starts from the http block, then through one or more server blocks, followed by the location block(s).
External files
include directive may appear inside any contexts to perform conditional inclusion. It attaching another file, or files matching the specified mask:
include /etc/nginx/proxy.conf;

# or:
include /etc/nginx/conf/*.conf;
You cannot use variables in NGINX config file includes. This is because includes are processed before any variables are evaluated.
See also this:
Variables should not be used as template macros. Variables are evaluated in the run-time during the processing of each request, so they are rather costly compared to plain static configuration. Using variables to store static strings is also a bad idea. Instead, a macro expansion and «include» directives should be used to generate configs more easily and it can be done with the external tools, e.g. sed + make or any other common template mechanism.
Measurement units
It is recommended to always specify a suffix for the sake of clarity and consistency.
Sizes can be specified in:
- without a suffix: Bytes
korK: KilobytesmorM: MegabytesgorG: Gigabytes
Time intervals can be specified in:
- without a suffix: Seconds
ms: Millisecondss: Secondsm: Minutesh: Hoursd: Daysw: WeeksM: Months (30 days)y: Years (365 days)
proxy_read_timeout 20; # =20s, default
Some of the time intervals can be specified only with a seconds resolution. You should also remember about this:
Multiple units can be combined in a single value by specifying them in the order from the most to the least significant, and optionally separated by whitespace. For example,
1h 30mspecifies the same time as90mor5400s.
Regular expressions with PCRE
🔖 Enable PCRE JIT to speed up processing of regular expressions — Performance — P2
Before start reading next chapters you should know what regular expressions are and how they works (they are not a black magic really). I recommend two great and short write-ups about regular expressions created by Jonny Fox:
- Regex tutorial — A quick cheatsheet by examples
- Regex cookbook — Top 10 Most wanted regex
Why? Regular expressions can be used in both the server_name and location (also in other) directives, and sometimes you must have a great skills of reading them. I think you should create the most readable regular expressions that do not become spaghetti code — impossible to debug and maintain.
NGINX uses the PCRE library to perform complex manipulations with your location blocks and use the powerful rewrite directive. To use a regular expression for string matching, it first needs to be compiled, which is usually done at the configuration phase.
You can also enable pcre_jit to dynamic translation during execution (at run time) rather than prior to execution. This option can improve performance, however, in some cases pcre_jit may have a negative effect. So, before enabling it, I recommend you to read this great document: PCRE Performance Project.
Below is also something interesting about regular expressions and PCRE:
- Learn PCRE in Y minutes
- PCRE Regex Cheatsheet
- Regular Expression Cheat Sheet — PCRE
- Regex cheatsheet
- Regular expressions in Perl
- Regexp Security Cheatsheet
- A regex cheatsheet for all those regex haters (and lovers)
You can also use external tools for testing regular expressions. For more please see online tools chapter.
If you’re good at it, check these very nice and brainstorming regex challenges:
- RegexGolf
- Regex Crossword
Enable syntax highlighting
vi/vim
# 1) Download vim plugin for NGINX:

# Official NGINX vim plugin:
mkdir -p ~/.vim/syntax/

wget "http://www.vim.org/scripts/download_script.php?src_id=19394" -O ~/.vim/syntax/nginx.vim

# Improved NGINX vim plugin (incl. syntax highlighting) with Pathogen:
mkdir -p ~/.vim/{autoload,bundle}/

curl -LSso ~/.vim/autoload/pathogen.vim https://tpo.pe/pathogen.vim
echo -en "nexecute pathogen#infect()n" >> ~/.vimrc

git clone https://github.com/chr4/nginx.vim ~/.vim/bundle/nginx.vim

# 2) Set location of NGINX config files:
cat > ~/.vim/filetype.vim << __EOF__
au BufRead,BufNewFile /etc/nginx/*,/etc/nginx/conf.d/*,/usr/local/nginx/conf/*,*/conf/nginx.conf if &ft == '' | setfiletype nginx | endif
__EOF__
It may be interesting for you: Highlight insecure SSL configuration in Vim.
Sublime Text
Install cabal — system for building and packaging Haskell libraries and programs (on Ubuntu):
add-apt-repository -y ppa:hvr/ghc
apt-get update

apt-get install -y cabal-install-1.22 ghc-7.10.2

# Add this to the main configuration file of your shell:
export PATH=$HOME/.cabal/bin:/opt/cabal/1.22/bin:/opt/ghc/7.10.2/bin:$PATH
source $HOME/.<shellrc>

cabal update
-
nginx-lint:git clone https://github.com/temoto/nginx-lint cd nginx-lint && cabal install --global
-
sublime-nginx+SublimeLinter-contrib-nginx-lint:Bring up the Command Palette and type
install. Among the commands you should see Package Control: Install Package. Typenginxto install sublime-nginx and after that do the above again for install SublimeLinter-contrib-nginx-lint: typeSublimeLinter-contrib-nginx-lint.
Processes
🔖 Adjust worker processes — Performance — P3
🔖 Improve debugging by disable daemon, master process, and all workers except one — Debugging — P4
NGINX has one master process and one or more worker processes. It has also cache loader and cache manager processes but only if you enable caching.
The main purposes of the master process is to read and evaluate configuration files, as well as maintain the worker processes (respawn when a worker dies), handle signals, notify workers, opens log files, and, of course binding to ports.
Master process should be started as root user, because this will allow NGINX to open sockets below 1024 (it needs to be able to listen on port 80 for HTTP and 443 for HTTPS).
To defines the number of worker processes you should set
worker_processesdirective.
The worker processes do the actual processing of requests and get commands from master process. They runs in an event loop (registering events and responding when one occurs), handle network connections, read and write content to disk, and communicate with upstream servers. These are spawned by the master process, and the user and group will as specified (unprivileged).
The worker processes spend most of the time just sleeping and waiting for new events (they are in
Sstate intop).
The following signals can be sent to the NGINX master process:
| SIGNAL | NUM | DESCRIPTION |
|---|---|---|
TERM, INT |
15, 2 | quick shutdown |
QUIT |
3 | graceful shutdown |
KILL |
9 | halts a stubborn process |
HUP |
1 | configuration reload, start new workers, gracefully shutdown the old worker processes |
USR1 |
10 | reopen the log files |
USR2 |
12 | upgrade executable on the fly |
WINCH |
28 | gracefully shutdown the worker processes |
There’s no need to control the worker processes yourself. However, they support some signals too:
| SIGNAL | NUM | DESCRIPTION |
|---|---|---|
TERM, INT |
15, 2 | quick shutdown |
QUIT |
3 | graceful shutdown |
USR1 |
10 | reopen the log files |
CPU pinning
Moreover, it is important to mention about worker_cpu_affinity directive (it’s only supported on GNU/Linux). CPU affinity is used to control which CPUs NGINX utilizes for individual worker processes. By default, worker processes are not bound to any specific CPUs. What’s more, system might schedule all worker processes to run on the same CPU which may not be efficient enough.
CPU affinity is represented as a bitmask (given in hexadecimal), with the lowest order bit corresponding to the first logical CPU and the highest order bit corresponding to the last logical CPU.
Here you will find an amazing explanation of this. There is a worker_cpu_affinity configuration generator for NGINX. After all, I would recommend to let the OS scheduler to do the work because there is no reason to ever set it up during normal operation.
Shutdown of worker processes
This should come in useful if you want to tweak NGINX’s shutdown process, particularly if other servers or load balancers are relying upon predictable restart times or if it takes a long time to close worker processes.
The worker_shutdown_timeout directive configures a timeout to be used when gracefully shutting down worker processes. When the timer expires, NGINX will try to close all the connections currently open to facilitate shutdown.
NGINX’s Maxim Dounin explains:
The
worker_shutdown_timeoutdirective is not expected to delay shutdown if there are no active connections. It was introduced to limit possible time spent in shutdown, that is, to ensure fast enough shutdown even if there are active connections.
When a worker process enters the «exiting» state, it does a few things:
- mark itself as an exiting process
- set a shutdown timer, if
worker_shutdown_timeoutis defined - close listening sockets
- close idle connections
Then, if the shutdown timer was set, after the worker_shutdown_timeout interval, all connections are closed.
By default, NGINX to wait for and process additional data from a client before fully closing a connection, but only if heuristics suggests that a client may be sending more data.
Sometimes, you can see nginx: worker process is shutting down in your log file. The problem occurs when reloading the configuration — where NGINX usually exits the existing worker processes gracefully, but at times, it takes hours to close these processes. Every config reload may dropping a zombie workers, permanently eating up all of your system’s memory. In this case, fast shutdown of worker processes might be a solution.
In addition, setting worker_shutdown_timeout also solve the issue:
worker_shutdown_timeout 60s;
Test connection timeouts and how long your request is processed by a server, next adjust the worker_shutdown_timeout value to these values. 60 seconds is a value with a solid supply and nothing valid should last longer than that.
In my experience, if you have multiple workers in a shutting down state, maybe you should first look at the loaded modules that may cause problems with hanging worker processes.
Connection processing
NGINX supports a variety of connection processing methods which depends on the platform used.
In general there are four types of event multiplexing:
select— is anachronism and not recommended but installed on all platforms as a fallbackpoll— is anachronism and not recommended
And the most efficient implementations of non-blocking I/O:
epoll— recommend if you’re using GNU/Linuxkqueue— recommend if you’re using BSD (it is technically superior toepoll)
The select method can be enabled or disabled using the --with-select_module or --without-select_module configuration parameter. Similarly, the poll method can be enabled or disabled using the --with-poll_module or --without-poll_module configuration parameter.
epollis an efficient method of processing connections available on Linux 2.6+.kqueueis an efficient method of processing connections available on FreeBSD 4.1+, OpenBSD 2.9+, and NetBSD 2.0+.
There is normally no need to specify it explicitly, because NGINX will by default use the most efficient method. But if you want to set this:
There are also great resources (also makes comparisons) about them:
- Kqueue: A generic and scalable event notification facility
- poll vs select vs event-based
- select/poll/epoll: practical difference for system architects
- Scalable Event Multiplexing: epoll vs. kqueue
- Async IO on Linux: select, poll, and epoll
- A brief history of select(2)
- Select is fundamentally broken
- Epoll is fundamentally broken
- I/O Multiplexing using epoll and kqueue System Calls
- Benchmarking BSD and Linux
- The C10K problem
Look also at libevent benchmark (read about libevent – an event notification library):

This infographic comes from daemonforums — An interesting benchmark (kqueue vs. epoll).
You may also view why big players uses NGINX on FreeBSD instead of on GNU/Linux:
- FreeBSD NGINX Performance
- Why did Netflix use NGINX and FreeBSD to build their own CDN?
NGINX means connections as follows (the following status information is provided by ngx_http_stub_status_module):
-
Active connections — the current number of active (open) client connections including waiting connections and connections to backends
- accepts — the total number of accepted client connections
- handled — the total number of handled connections. Generally, the parameter value is the same as
acceptsunless some resource limits have been reached (for example, theworker_connectionslimit) - requests — the total number of client requests
-
Reading — the current number of connections where NGINX is reading the request header
-
Writing — the current number of connections where NGINX is writing the response back to the client (reads request body, processes request, or writes response to a client)
-
Waiting — the current number of idle client connections waiting for a request, i.e. connection still opened waiting for either a new request, or the keepalive expiration (actually it is Active — (Reading + Writing))
Waiting connections those are keepalive connections. They are usually not a problem but if you want to reduce them set the lower value of the
keepalive_timeoutdirective.
Be sure to recommend to read this:
Writing connections counter increasing might indicate one of the following:
- crashed or killed worker processes. This is unlikely in your case though, as this would also result in other values growing as well, notably
Waiting- a real socket leak somewhere. These usually results in sockets in
CLOSE_WAITstate (in a waiting state for the FIN packet terminating the connection), try looking atnetstatoutput withoutgrep -v CLOSE_WAITfilter. Leaked sockets are reported by NGINX during graceful shutdown of a worker process (for example, after a configuration reload) — if there are any leaked sockets, NGINX will writeopen socket ... left in connection ...alerts to the error logTo further investigate things, please do the following:
- upgrade to the latest mainline versions, without any 3rd party modules, and check if you are able to reproduce the issue
- try disabling HTTP/2 to see if it fixes the issue
- check if you are seeing
open socket ... left in connection ...(socket leaks) alerts on configuration reload
See also Debugging socket leaks (from this handbook).
Event-Driven architecture
Thread Pools in NGINX Boost Performance 9x! — this official article is an amazing explanation about thread pools and generally about handling connections. I also recommend Inside NGINX: How We Designed for Performance & Scale. Both are really great.
NGINX uses Event-Driven architecture which heavily relies on Non-Blocking I/O. One advantage of non-blocking/asynchronous operations is that you can maximize the usage of a single CPU as well as memory because is that your thread can continue it’s work in parallel. The end result is that even as load increases, memory and CPU usage remain manageable.
There is a perfectly good and brief summary about non-blocking I/O and multi-threaded blocking I/O by Werner Henze. I also recommend asynchronous vs non-blocking by Daniel Earwicker.
Take a look at this simple drawing:

This infographic comes from Kansas State Polytechnic website.
Blocking I/O system calls (a) do not return until the I/O is complete. Nonblocking I/O system calls return immediately. The process is later notified when the I/O is complete.
There are forms of I/O and examples of POSIX functions:
| Blocking | Non-blocking | Asynchronous |
|---|---|---|
write, read |
write, read + poll/select |
aio_write, aio_read |
Look also what the official documentation says about it:
It’s well known that NGINX uses an asynchronous, event‑driven approach to handling connections. This means that instead of creating another dedicated process or thread for each request (like servers with a traditional architecture), it handles multiple connections and requests in one worker process. To achieve this, NGINX works with sockets in a non‑blocking mode and uses efficient methods such as epoll and kqueue.
Because the number of full‑weight processes is small (usually only one per CPU core) and constant, much less memory is consumed and CPU cycles aren’t wasted on task switching. The advantages of such an approach are well‑known through the example of NGINX itself. It successfully handles millions of simultaneous requests and scales very well.
I must not forget to mention here about Non-Blocking and 3rd party modules (also from official documentation):
Unfortunately, many third‑party modules use blocking calls, and users (and sometimes even the developers of the modules) aren’t aware of the drawbacks. Blocking operations can ruin NGINX performance and must be avoided at all costs.
To handle concurrent requests with a single worker process NGINX uses the reactor design pattern. Basically, it’s a single-threaded but it can fork several processes to utilize multiple cores.
However, NGINX is not a single threaded application. Each of worker processes is single-threaded and can handle thousands of concurrent connections. Workers are used to get request parallelism across multiple cores. When a request blocks, that worker will work on another request.
NGINX does not create a new process/thread for each connection/requests but it starts several worker threads during start. It does this asynchronously with one thread, rather than using multi-threaded programming (it uses an event loop with asynchronous I/O).
That way, the I/O and network operations are not a very big bottleneck (remember that your CPU would spend a lot of time waiting for your network interfaces, for example). This results from the fact that NGINX only use one thread to service all requests. When requests arrive at the server, they are serviced one at a time. However, when the code serviced needs other thing to do it sends the callback to the other queue and the main thread will continue running (it doesn’t wait).
Now you see why NGINX can handle a large amount of requests perfectly well (and without any problems).
For more information take a look at following resources:
- Asynchronous, Non-Blocking I/O
- Asynchronous programming. Blocking I/O and non-blocking I/O
- Blocking I/O and non-blocking I/O
- Non-blocking I/O
- About High Concurrency, NGINX architecture and internals
- A little holiday present: 10,000 reqs/sec with Nginx!
- Nginx vs Apache: Is it fast, if yes, why?
- How is Nginx handling its requests in terms of tasks or threading?
- Why nginx is faster than Apache, and why you needn’t necessarily care
- How we scaled nginx and saved the world 54 years every day
Finally, look at these great preview:

Both infographic comes from Inside NGINX: How We Designed for Performance & Scale.
Multiple processes
NGINX uses only asynchronous I/O, which makes blocking a non-issue. The only reason NGINX uses multiple processes is to make full use of multi-core, multi-CPU, and hyper-threading systems. NGINX requires only enough worker processes to get the full benefit of symmetric multiprocessing (SMP).
From official documentation:
The NGINX configuration recommended in most cases — running one worker process per CPU core — makes the most efficient use of hardware resources.
NGINX uses a custom event loop which was designed specifically for NGINX — all connections are processed in a highly efficient run-loop in a limited number of single-threaded processes called workers. Worker processes accept new requests from a shared listen socket and execute a loop. There’s no specialized distribution of connections to the workers in NGINX; this work is done by the OS kernel mechanisms which notifies a workers.
Upon startup, an initial set of listening sockets is created. workers then continuously accept, read from and write to the sockets while processing HTTP requests and responses. — from The Architecture of Open Source Applications — NGINX.
Multiplexing works by using a loop to increment through a program chunk by chunk operating on one piece of data/new connection/whatever per connection/object per loop iteration. It is all based on events multiplexing like epoll() or kqueue(). Within each worker NGINX can handle many thousands of concurrent connections and requests per second.
See Nginx Internals presentation as a lot of great stuff about the internals of the NGINX.
NGINX does not fork a process or thread per connection (like Apache) so memory usage is very conservative and extremely efficient in the vast majority of cases. NGINX is a faster and consumes less memory than Apache and performs very well under load. It is also very friendly for CPU because there’s no ongoing create-destroy pattern for processes or threads.
Finally and in summary:
- uses Non-Blocking «Event-Driven» architecture
- uses the single-threaded reactor pattern to handle concurrent requests
- uses highly efficient loop for connection processing
- is not a single threaded application because it starts multiple worker processes (to handle multiple connections and requests) during start
Simultaneous connections
Okay, so how many simultaneous connections can be processed by NGINX?
worker_processes * worker_connections = max connections
According to this: if you are running 4 worker processes with 4,096 worker connections per worker, you will be able to serve 16,384 connections. Of course, these are the NGINX settings limited by the kernel (number of connections, number of open files, or number of processes).
At this point, I would like to mention about Understanding socket and port in TCP. It is a great and short explanation. I also recommend to read Theoretical maximum number of open TCP connections that a modern Linux box can have.
I’ve seen some admins does directly translate the sum of worker_processes and worker_connections into the number of clients that can be served simultaneously. In my opinion, it is a mistake because certain of clients (e.g. browsers which have different values for this) opens a number of parallel connections (see this to confirm my words). Clients typically establish 4-8 TCP connections so that they can download resources in parallel (to download various components that compose a web page, for example, images, scripts, and so on). This increases the effective bandwidth and reduces latency.
That is a HTTP/1.1 limit (6-8) of concurrent HTTP calls. The best solution to improve performance (without upgrade the hardware and use cache at the middle (e.g. CDN, Varnish)) is using HTTP/2 (RFC 7540 [IETF]) instead of HTTP/1.1.
HTTP/2 multiplex many HTTP requests on a single connection. When HTTP/1.1 has a limit of 6-8 roughly, HTTP/2 does not have a standard limit but say: «It is recommended that this value (
SETTINGS_MAX_CONCURRENT_STREAMS) be no smaller than 100» (RFC 7540). That number is better than 6-8.
Additionally, you must know that the worker_connections directive includes all connections per worker (e.g. connection structures are used for listen sockets, internal control sockets between NGINX processes, connections with proxied servers, and for upstream connections), not only incoming connections from clients.
Be aware that every worker connection (in the sleeping state) needs 256 bytes of memory, so you can increase it easily.
The number of connections is especially limited by the maximum number of open files (RLIMIT_NOFILE) on your system (you can read about file descriptors and file handlers on this great explanation). The reason is that the operating system needs memory to manage each open file, and memory is a limited resource. This limitation only affects the limits for the current process. The limits of the current process are bequeathed to children processes too, but each process has a separate count.
To change the limit of the maximum file descriptors (that can be opened by a single worker process) you can also edit the worker_rlimit_nofile directive. With this, NGINX provides very powerful dynamic configuration capabilities with no service restarts.
The number of file descriptors is not the only one limitation of the number of connections — remember also about the kernel network (TCP/IP stack) parameters and the maximum number of processes.
I don’t like this piece of the NGINX documentation. Maybe I’m missing something but it says the worker_rlimit_nofile is a limit on the maximum number of open files for worker processes. I believe it is associated to a single worker process.
If you set RLIMIT_NOFILE to 25,000 and worker_rlimit_nofile to 12,000, NGINX sets (only for workers) the maximum open files limit as a worker_rlimit_nofile. But the master process will have a set value of RLIMIT_NOFILE. Default value of worker_rlimit_nofile directive is none so by default NGINX sets the initial value of maximum open files from the system limits.
# On GNU/Linux (or /usr/lib/systemd/system/nginx.service):
grep "LimitNOFILE" /lib/systemd/system/nginx.service
LimitNOFILE=5000

grep "worker_rlimit_nofile" /etc/nginx/nginx.conf
worker_rlimit_nofile 256;

   PID       SOFT HARD
 24430       5000 5000
 24431        256 256
 24432        256 256
 24433        256 256
 24434        256 256

# To check fds on FreeBSD:
sysctl kern.maxfiles kern.maxfilesperproc kern.openfiles
kern.maxfiles: 64305
kern.maxfilesperproc: 57870
kern.openfiles: 143
This is also controlled by the OS because the worker is not the only process running on the server. It would be very bad if your workers used up all of the file descriptors available to all processes, don’t set your limits so that is possible.
In my opinion, relying on the RLIMIT_NOFILE (and alternatives on other systems) than worker_rlimit_nofile value is more understandable and predictable. To be honest, it doesn’t really matter which method is used to set, but you should keep a constant eye on the priority of the limits.
If you don’t set the
worker_rlimit_nofiledirective manually, then the OS settings will determine how many file descriptors can be used by NGINX.
I think that the chance of running out of file descriptors is minimal, but it might be a big problem on a high traffic websites.
Ok, so how many fds are opens by NGINX?
- one file handler for the client’s active connection
- one file handler for the proxied connection (that will open a socket handling these requests to remote or local host/process)
- one file handler for opening file (e.g. static file)
- other file handlers for internal connections, shared libraries, log files, and sockets
Also important is:
NGINX can use up to two file descriptors per full-fledged connection.
Look also at these diagrams:
-
1 file handler for connection with client and 1 file handler for static file being served by NGINX:
# 1 connection, 2 file handlers +-----------------+ +----------+ | | | | 1 | | | CLIENT <---------------> NGINX | | | | ^ | +----------+ | | | | 2 | | | | | | | | | +------v------+ | | | STATIC FILE | | | +-------------+ | +-----------------+ -
1 file handler for connection with client and 1 file handler for a open socket to the remote or local host/process:
# 2 connections, 2 file handlers +-----------------+ +----------+ | | +-----------+ | | 1 | | 2 | | | CLIENT <---------------> NGINX <---------------> BACKEND | | | | | | | +----------+ | | +-----------+ +-----------------+ -
2 file handlers for two simultaneous connections from the same client (1, 4), 1 file handler for connection with other client (3), 2 file handlers for static files (2, 5), and 1 file handler for a open socket to the remote or local host/process (6), so in total it is 6 file descriptors:
# 4 connections, 6 file handlers

                  4
      +-----------------------+
      |              +--------|--------+
+-----v----+         |        |        |
|          |    1    |        v        |  6
|  CLIENT <-----+---------> NGINX <---------------+
|          |    |    |        ^        |    +-----v-----+
+----------+    |    |        |        |    |           |
              3 |    |      2 | 5      |    |  BACKEND  |
+----------+    |    |        |        |    |           |
|          |    |    |        |        |    +-----------+
|  CLIENT  <----+    | +------v------+ |
|          |         | | STATIC FILE | |
+----------+         | +-------------+ |
                     +-----------------+
In the first two examples: we can take that NGINX needs 2 file handlers for full-fledged connection (but still uses 2 worker connections). In the third example NGINX can take still 2 file handlers for every full-fledged connection (also if client uses parallel connections).
So, to conclude, I think that the correct value of worker_rlimit_nofile per all connections of worker should be greater than worker_connections.
In my opinion, the safe value of worker_rlimit_nofile (and system limits) is:
# 1 file handler for 1 connection:
worker_connections + (shared libs, log files, event pool, etc.) = worker_rlimit_nofile

# 2 file handlers for 1 connection:
(worker_connections * 2) + (shared libs, log files, event pool, etc.) = worker_rlimit_nofile
That is probably how many files can be opened by each worker and should have a value greater than to the number of connections per worker (according to the above formula).
In the most articles and tutorials we can see that this parameter has a value similar to the maximum number (or even more) of all open files by the NGINX. If we assume that this parameter applies to each worker separately these values are altogether excessive.
However, after a deeper reflection they are rational because they allow one worker to use all the file descriptors so that they are not confined to other workers if something happens to them. Remember though that we are still limited by the connections per worker. May I remind you that any connection opens at least one file.
So, moving on, the maximum number of open files by the NGINX should be:
(worker_processes * worker_connections * 2) + (shared libs, log files, event pool, etc.) = max open files
To serve 16,384 connections by all workers (4,096 connections for each worker), and bearing in mind about the other handlers used by NGINX, a reasonably value of max files handlers in this case may be 35,000. I think it’s more than enough.
Given the above to change/improve the limitations you should:
-
Edit the maximum, total, global number of file descriptors the kernel will allocate before choking (this step is optional, I think you should change this only for a very very high traffic):
# Find out the system-wide maximum number of file handles:
sysctl fs.file-max

# Shows the current number of all file descriptors in kernel memory:
#   first value:  <allocated file handles>
#  second value:  <unused-but-allocated file handles>
#   third value:  <the system-wide maximum number of file handles> # fs.file-max
sysctl fs.file-nr

# Set it manually and temporarily:
sysctl -w fs.file-max=150000

# Set it permanently:
echo "fs.file-max = 150000" > /etc/sysctl.d/99-fs.conf

# And load new values of kernel parameters:
sysctl -p       # for /etc/sysctl.conf
sysctl --system # for /etc/sysctl.conf and all of the system configuration files
-
Edit the system-wide value of the maximum file descriptor number that can be opened by a single process:
-
for non-systemd systems:
# Set the maximum number of file descriptors for the users logged in via PAM:
#   /etc/security/limits.conf
nginx       soft    nofile    35000
nginx       hard    nofile    35000
-
for systemd systems:
# Set the maximum number (hard limit) of file descriptors for the services started via systemd:
#   /etc/systemd/system.conf          - global config (default values for all units)
#   /etc/systemd/user.conf            - this specifies further per-user restrictions
#   /lib/systemd/system/nginx.service - default unit for the NGINX service
#   /etc/systemd/system/nginx.service - for your own instance of the NGINX service
[Service]
# ...
LimitNOFILE=35000

# Reload a unit file and restart the NGINX service:
systemctl daemon-reload && systemct restart nginx
-
-
Adjusts the system limit on number of open files for the NGINX worker. The maximum value can not be greater than
LimitNOFILE(in this example: 35,000). You can change it at any time:# Set the limit for file descriptors for a single worker process (change it as needed): # nginx.conf within the main context worker_rlimit_nofile 10000; # You need to reload the NGINX service: nginx -s reload
To show the current hard and soft limits applying to the NGINX processes (with nofile, LimitNOFILE, or worker_rlimit_nofile):
for _pid in $(pgrep -f "nginx: [master,worker]") ; do

  echo -en "$_pid "
  grep "Max open files" /proc/${_pid}/limits | awk '{print $4" "$5}'

done | xargs printf '%6s %10st%sn%6s %10st%sn' "PID" "SOFT" "HARD"
or use the following:
# To determine the OS limits imposed on a process, read the file /proc/$pid/limits. # $pid corresponds to the PID of the process: for _pid in $(pgrep -f "nginx: [master,worker]") ; do echo -en ">>> $_pid\n" cat /proc/$_pid/limits done
To list the current open file descriptors for each NGINX process:
for _pid in $(pgrep -f "nginx: [master,worker]") ; do _fds=$(find /proc/${_pid}/fd/*) _fds_num=$(echo "$_fds" | wc -l) echo -en "nn##### PID: $_pid ($_fds_num fds) #####nn" # List all files from the proc/{pid}/fd directory: echo -en "$_fdsnn" # List all open files (log files, memory mapped files, libs): lsof -as -p $_pid | awk '{if(NR>1)print}' done
You should also remember about the following rules:
-
worker_rlimit_nofileserves to dynamically change the maximum file descriptors the NGINX worker processes can handle, which is typically defined with the system’s soft limit (ulimit -Sn) -
worker_rlimit_nofileworks only at the process level, it’s limited to the system’s hard limit (ulimit -Hn) -
if you have SELinux enabled, you will need to run
setsebool -P httpd_setrlimit 1so that NGINX has permissions to set its rlimit. To diagnose SELinux denials and attempts you can usesealert -a /var/log/audit/audit.log, oraudit2whyandaudit2allowtools
To sum up this example:
- each of the NGINX processes (master + workers) have the ability to create up to 35,000 files
- for all workers, the maximum number of file descriptors is 140,000 (
LimitNOFILEper worker) - for each worker, the initial/current number of file descriptors is 10,000 (
worker_rlimit_nofile)
nginx: master process = LimitNOFILE (35,000)
_ nginx: worker process = LimitNOFILE (35,000), worker_rlimit_nofile (10,000)
_ nginx: worker process = LimitNOFILE (35,000), worker_rlimit_nofile (10,000)
_ nginx: worker process = LimitNOFILE (35,000), worker_rlimit_nofile (10,000)
_ nginx: worker process = LimitNOFILE (35,000), worker_rlimit_nofile (10,000)
= master (35,000), all workers:
- 140,000 by LimitNOFILE
- 40,000 by worker_rlimit_nofile
Look also at this great article about Optimizing Nginx for High Traffic Loads.
HTTP Keep-Alive connections
🔖 Activate the cache for connections to upstream servers — Performance — P2
Before starting this section I recommend to read the following articles:
- HTTP Keepalive Connections and Web Performance
- Optimizing HTTP: Keep-alive and Pipelining
- Evolution of HTTP — HTTP/0.9, HTTP/1.0, HTTP/1.1, Keep-Alive, Upgrade, and HTTPS
The original model of HTTP, and the default one in HTTP/1.0, is short-lived connections. Each HTTP request is completed on its own connection; this means a TCP handshake happens before each HTTP request, and these are serialized. The client creates a new TCP connection for each transaction (and the connection is torn down after the transaction completes).
HTTP Keep-Alive connection or persistent connection is the idea of using a single TCP connection to send and receive multiple HTTP requests/responses (Keep Alive’s work between requests), as opposed to opening a new connection for every single request/response pair.
When using keep alive the browser does not have to make multiple connections (keep in mind that establishing connections is expensive) but uses the already established connection and controls how long that stays active/open. So, the keep alive is a way to reduce the overhead of creating the connection, as, most of the time, a user will navigate through the site etc. (plus the multiple requests from a single page, to download css, javascript, images etc.).
It takes a 3-way handshake to establish a TCP connection, so, when there is a perceivable latency between the client and the server, keepalive would greatly speed things up by reusing existing connections.
This mechanism hold open the TCP connection between the client and the server after an HTTP transaction has completed. It’s important because NGINX needs to close connections from time to time, even if you configure NGINX to allow infinite keep alive timeouts and a huge amount of acceptable requests per connection, to return results and as well errors and success messages.

Persistent connection model keeps connections opened between successive requests, reducing the time needed to open new connections. The HTTP pipelining model goes one step further, by sending several successive requests without even waiting for an answer, reducing much of the latency in the network.

This infographic comes from Mozilla MDN — Connection management in HTTP/1.x.
However, at present, browsers are not using pipelined HTTP requests. For more information please see Why is pipelining disabled in modern browsers?.
Look also at this example that shows how a Keep-Alive header could be used:
Client Proxy Server
| | |
+- Keep-Alive: timeout=600 -->| |
| Connection: Keep-Alive | |
| +- Keep-Alive: timeout=1200 -->|
| | Connection: Keep-Alive |
| | |
| |<-- Keep-Alive: timeout=300 --+
| | Connection: Keep-Alive |
|<- Keep-Alive: timeout=5000 -+ |
| Connection: Keep-Alive | |
| | |
NGINX official documentation says:
All connections are independently negotiated. The client indicates a timeout of 600 seconds (10 minutes), but the proxy is only prepared to retain the connection for at least 120 seconds (2 minutes). On the link between proxy and server, the proxy requests a timeout of 1200 seconds and the server reduces this to 300 seconds. As this example shows, the timeout policies maintained by the proxy are different for each connection. Each connection hop is independent.
Keepalive connections reduce overhead, especially when SSL/TLS is in use but they also have drawbacks; even when idling they consume server resources, and under heavy load, DoS attacks can be conducted. In such cases, using non-persistent connections, which are closed as soon as they are idle, can provide better performance. So, Keep-Alives will improve SSL/TLS performance by quite a big deal if clients are doing multiple requests but if you don’t have the resources to handle them then they kill your servers.
NGINX closes keepalive connections when the
worker_connectionslimit is reached (connections are kept in the cache till the origin server closes them).
To better understand how Keep-Alive works, please see amazing explanation by Barry Pollard.
NGINX provides the two layers to enable Keep-Alive:
Client layer
-
the maximum number of keepalive requests a client can make over a given connection, which means a client can make e.g. 256 successfull requests inside one keepalive connection:
# Default: 100 keepalive_requests 256;
-
server will close connection after this time. A higher number may be required when there is a larger amount of traffic to ensure there is no frequent TCP connection re-initiated. If you set it lower, you are not utilizing keep-alives on most of your requests slowing down client:
# Default: 75s keepalive_timeout 10s; # Or tell the browser when it should close the connection by adding an optional second timeout # in the header sent to the browser (some browsers do not care about the header): keepalive_timeout 10s 25s;
Increase this to allow the keepalive connection to stay open longer, resulting in faster subsequent requests. However, setting this too high will result in the waste of resources (mainly memory) as the connection will remain open even if there is no traffic, potentially: significantly affecting performance. I think this should be as close to your average response time as possible. You could also decrease little by little the timeout (75s -> 50s, then later 25s…) and see how the server behaves.
Upstream layer
-
the number of idle keepalive connections that remain open for each worker process. The connections parameter sets the maximum number of idle keepalive connections to upstream servers that are preserved in the cache of each worker process (when this number is exceeded, the least recently used connections are closed):
# Default: disable keepalive 32;
NGINX, by default, only talks on HTTP/1.0 to the upstream servers. To keep TCP connection alive both upstream section and origin server should be configured to not finalise the connection.
Please keep in mind that keepalive is a feature of HTTP 1.1, NGINX uses HTTP 1.0 per default for upstreams.
Connection won’t be reused by default because keepalive in the upstream section means no keepalive (each time you can see TCP stream number increases per every request to origin server).
HTTP keepalive enabled in NGINX upstream servers reduces latency thus improves performance and it reduces the possibility that the NGINX runs out of ephemeral ports.
The connections parameter should be set to a number small enough to let upstream servers process new incoming connections as well.
Update your upstream configuration to use keepalive:
upstream bk_x8080 { ... # Sets the maximum number of idle keepalive connections to upstream servers # that are preserved in the cache of each worker process. keepalive 16; }
And enable the HTTP/1.1 protocol in all upstream requests:
server { ... location / { # Default is HTTP/1, keepalive is only enabled in HTTP/1.1: proxy_http_version 1.1; # Remove the Connection header if the client sends it, # it could be "close" to close a keepalive connection: proxy_set_header Connection ""; proxy_pass http://bk_x8080; } } ... }
There are two basic cases when keeping connections alive is really beneficial:
- fast backends, which produce responses is a very short time, comparable to a TCP handshake
- distant backends, when a TCP handshake takes a long time, comparable to a backend response time
Look at the test:
- without keepalive for upstream:
wrk -c 500 -t 6 -d 60s -R 15000 -H "Host: example.com" https://example.com/ Running 1m test @ https://example.com/ 6 threads and 500 connections Thread Stats Avg Stdev Max +/- Stdev Latency 24.13s 10.68s 49.55s 59.06% Req/Sec 679.21 42.44 786.00 78.95% 228421 requests in 1.00m, 77.98MB read Socket errors: connect 0, read 0, write 0, timeout 1152 Non-2xx or 3xx responses: 4 Requests/sec: 3806.96 Transfer/sec: 1.30MB
- with keepalive for upstream:
wrk -c 500 -t 6 -d 60s -R 15000 -H "Host: example.com" https://example.com/ Running 1m test @ https://example.com/ 6 threads and 500 connections Thread Stats Avg Stdev Max +/- Stdev Latency 23.40s 9.53s 47.25s 60.67% Req/Sec 0.86k 50.19 0.94k 60.00% 294148 requests in 1.00m, 100.41MB read Socket errors: connect 0, read 0, write 0, timeout 380 Requests/sec: 4902.24 Transfer/sec: 1.67MB
sendfile, tcp_nodelay, and tcp_nopush
Before you start reading please review:
- Nginx optimization, understanding SENDFILE, TCP_NODELAY and TCP_NOPUSH
- Nginx Tutorial #2: Performance
As you’re making these changes, keep careful watch on your network traffic and see how each tweak impacts congestion.
sendfile
By default, NGINX handles file transmission itself and copies the file into the buffer before sending it. Enabling the
sendfiledirective eliminates the step of copying the data into the buffer and enables direct copying data from one file descriptor to another.
Normally, when a file needs to be sent, the following steps are required:
malloc— allocate a local buffer for storing object dataread— retrieve and copy the object into the local bufferwrite— copy the object from the local buffer into the socket buffer
Look at this great explanation (from Nginx Tutorial #2: Performance):
This involves two context switches (read, write) which make a second copy of the same object unnecessary. As you may see, it is not the optimal way. Thankfully, there is another system call that improves sending files, and it’s called (surprise, surprise!):
sendfile(2). This call retrieves an object to the file cache, and passes the pointers (without copying the whole object) straight to the socket descriptor. Netflix states that usingsendfile(2)increased the network throughput from 6Gbps to 30Gbps.
When a file is transferred by a process, the kernel first buffers the data and then sends the data to the process buffers. The process, in turn, sends the data to the destination.
NGINX employs a solution that uses the sendfile system call to perform a zero-copy data flow from disk to socket and saves context switching from userspace on read/write. sendfile tell how NGINX buffers or reads the file (trying to stuff the contents directly into the network slot, or buffer its contents first).
This method is an improved method of data transfer, in which data is copied between file descriptors within the OS kernel space, that is, without transferring data to the application buffers. No additional buffers or data copies are required, and the data never leaves the kernel memory address space.
In my opinion enabling this really won’t make any difference unless NGINX is reading from something which can be mapped into the virtual memory space like a file (i.e. the data is in the cache). But please… do not let me influence you — you should in the first place be keeping an eye on this document: Optimizing TLS for High–Bandwidth Applications in FreeBSD [pdf].
By default NGINX disable the use of sendfile:
# http, server, location, if in location contexts # To turn on sendfile (my recommendation): sendfile on; # To turn off sendfile: sendfile off; # default
Look also at sendfile_max_chunk directive. NGINX documentation say:
When set to a non-zero value, limits the amount of data that can be transferred in a single
sendfile()call. Without the limit, one fast connection may seize the worker process entirely.
On fast local connection sendfile() in Linux may send tens of megabytes per one syscall blocking other connections. sendfile_max_chunk allows to limit the maximum size per one sendfile() operation. So, with this NGINX can reduce the maximum time spent in blocking sendfile() calls, since NGINX won’t try to send the whole file at once, but will do it in chunks. For example:
sendfile on; sendfile_max_chunk 512k;
tcp_nodelay
I recommend to read The Caveats of TCP_NODELAY and Rethinking the TCP Nagle Algorithm [pdf]. These great papers describes very interesting topics about TCP_NODELAY and TCP_NOPUSH.
tcp_nodelay is used to manage Nagle’s algorithm which is one mechanism for improving TCP efficiency by reducing the number of small packets sent over the network. If you set tcp_nodelay on;, NGINX adds the TCP_NODELAY options when opening a new socket.
The option only affects keep-alive connections. Otherwise there is 100ms delay when NGINX sends response tail in the last incomplete TCP packet. Additionally, it is enabled on SSL connections, for unbuffered proxying, and for WebSocket proxying.
Maybe you should think about enabling Nagle’s algorithm (tcp_nodelay off;) but it really depends on what is your specific workload and dominant traffic patterns on a service. tcp_nodelay on; is more reasonable for the modern web, the whole delay business of TCP was reasonable for terminals. Typically LANs have less issues with traffic congestion as compared to the WANs. The Nagle algorithm is most effective if TCP/IP traffic is generated sporadically by user input, not by applications using stream oriented protocols like a HTTP traffic.
So, for me, the recipe is simple:
- bulk sends or HTTP traffic
- applications that require lower latency
- non-interactive type of traffic
There is no need for using Nagle’s algorithm.
You should also know the Nagle’s algorithm author’s interesting comment:
If you’re doing bulk file transfers, you never hit that problem. If you’re sending enough data to fill up outgoing buffers, there’s no delay. If you send all the data and close the TCP connection, there’s no delay after the last packet. If you do send, reply, send, reply, there’s no delay. If you do bulk sends, there’s no delay. If you do send, send, reply, there’s a delay.
The real problem is ACK delays. The 200ms «ACK delay» timer is a bad idea that someone at Berkeley stuck into BSD around 1985 because they didn’t really understand the problem. A delayed ACK is a bet that there will be a reply from the application level within 200ms. TCP continues to use delayed ACKs even if it’s losing that bet every time.
I think if you are dealing with non-interactive type of traffic or bulk transfers such as HTTP/web traffic then enabling TCP_NODELAY to disable Nagle’s algorithm may be useful (is the default behavior of the NGINX). This is especially relevant if you’re running applications or environments that only sometimes have highly interactive traffic and chatty protocols.
By default NGINX enable the use of TCP_NODELAY option:
# http, server, location contexts # To turn on tcp_nodelay and at the same time to disable Nagle’s algorithm # (my recommendation, unless you turn tcp_nopush on): tcp_nodelay on; # default # To turn off tcp_nodelay and at the same time to enable Nagle’s algorithm: tcp_nodelay off;
tcp_nopush
This option is only available if you are using sendfile (NGINX uses tcp_nopush for requests served with sendfile). It causes NGINX to attempt to send its HTTP response head in one packet, instead of using partial frames. This is useful for prepending headers before calling sendfile, or for throughput optimization.
Normally, using
tcp_nopushalong withsendfileis very good. However, there are some cases where it can slow down things (specially from cache systems), so, run your own tests and find if it’s useful in that way.
tcp_nopush enables TCP_CORK (more specifically, the TCP_NOPUSH socket option on FreeBSD or the TCP_CORK socket option on Linux) which aggressively accumulates data and which tells TCP to wait for the application to remove the cork before sending any packets.
If TCP_NOPUSH/TCP_CORK (are not the same!) is enabled in a socket, it will not send data until the buffer fills to a fixed limit (allows application to control building of packet, e.g pack a packet with full HTTP response). To read more about it and get into the details of this option please read TCP_CORK: More than you ever wanted to know.
Once, I read that tcp_nopush is opposite to tcp_nodelay. I don’t agree with that because, as I understand it, the first one aggregates data based on buffer pressure instead whereas Nagle’s algorithm aggregates data while waiting for a return ACK, which the latter option disables.
It may appear that tcp_nopush and tcp_nodelay are mutually exclusive but if all directives are turned on, NGINX manages them very wisely:
- ensure packages are full before sending them to the client
- for the last packet,
tcp_nopushwill be removed, allowing TCP to send it immediately, without the 200ms delay
And let’s also remember (take a look at Tony Finch notes — this guy developed a kernel patch for FreeBSD which makes TCP_NOPUSH work like TCP_CORK):
- on Linux,
sendfile()depends on theTCP_CORKsocket option to avoid undesirable packet boundaries - FreeBSD has a similar option called
TCP_NOPUSH - when
TCP_CORKis turned off any buffered data is sent immediately, but this is not the case forTCP_NOPUSH
By default NGINX disable the use of TCP_NOPUSH option:
# http, server, location contexts # To turn on tcp_nopush (my recommendation): tcp_nopush on; # To turn off tcp_nopush: tcp_nopush off; # default
Mixing all together
There are many opinions on this. My recommendation is to set all to on. However, I quote an interesting comment (Mixing sendfile, tcp_nodelay and tcp_nopush illogical?) that should dispel any doubts:
When set indicates to always queue non-full frames. Later the user clears this option and we transmit any pending partial frames in the queue. This is meant to be used alongside
sendfile()to get properly filled frames when the user (for example) must write out headers with awrite()call first and then usesendfileto send out the data parts.TCP_CORKcan be set together withTCP_NODELAYand it is stronger thanTCP_NODELAY.
Summarizing:
tcp_nodelay on;is generaly at the odds withtcp_nopush on;as they are mutually exclusive- NGINX has special behavior that if you have
sendfile on;, it usesTCP_NOPUSHfor everything but the last package - and then turns
TCP_NOPUSHoff and enablesTCP_NODELAYto avoid 200ms ACK delay
So in fact, the most important changes are listed below:
sendfile on; tcp_nopush on; # with this, the tcp_nodelay does not really matter
Request processing stages
When building filtering rules (e.g. with
allow/deny) you should always remember to test them and to know what happens at each of the phases (which modules are used). For additional information about the potential problems, look at allow and deny section and Take care about your ACL rules — Hardening — P1.
There can be altogether 11 phases when NGINX handles (processes) a request:
-
NGX_HTTP_POST_READ_PHASE— first phase, read the request header- example modules: ngx_http_realip_module
-
NGX_HTTP_SERVER_REWRITE_PHASE— implementation of rewrite directives defined in a server block; to change request URI using PCRE regular expressions, return redirects, and conditionally select configurations- example modules: ngx_http_rewrite_module
-
NGX_HTTP_FIND_CONFIG_PHASE— replace the location according to URI (location lookup) -
NGX_HTTP_REWRITE_PHASE— URI transformation on location level- example modules: ngx_http_rewrite_module
-
NGX_HTTP_POST_REWRITE_PHASE— URI transformation post-processing (the request is redirected to a new location)- example modules: ngx_http_rewrite_module
-
NGX_HTTP_PREACCESS_PHASE— authentication preprocessing request limit, connection limit (access restriction)- example modules: ngx_http_limit_req_module, ngx_http_limit_conn_module, ngx_http_realip_module
-
NGX_HTTP_ACCESS_PHASE— verification of the client (the authentication process, limiting access)- example modules: ngx_http_access_module, ngx_http_auth_basic_module
-
NGX_HTTP_POST_ACCESS_PHASE— access restrictions check post-processing phase, the certification process, processingsatisfy anydirective- example modules: ngx_http_access_module, ngx_http_auth_basic_module
-
NGX_HTTP_PRECONTENT_PHASE— generating content- example modules: ngx_http_try_files_module
-
NGX_HTTP_CONTENT_PHASE— content processing- example modules: ngx_http_index_module, ngx_http_autoindex_module, ngx_http_gzip_module
-
NGX_HTTP_LOG_PHASE— log processing- example modules: ngx_http_log_module
You may feel lost now (me too…) so I let myself put this great and simple preview:

This infographic comes from Inside NGINX official library.
On every phase you can register any number of your handlers. Each phase has a list of handlers associated with it.
I recommend to read a great explanation about HTTP request processing phases in Nginx and, of course, official Development guide. I have also prepared a simple diagram that can help you understand what modules are used in each phase. It also contains short descriptions from official development guide:

Server blocks logic
NGINX does have server blocks (like a virtual hosts in an Apache) that use
listendirective to bind to TCP sockets andserver_namedirective to identify virtual hosts.
It’s a short example of two server block contexts with several regular expressions:
http { index index.html; root /var/www/example.com/default; server { listen 10.10.250.10:80; server_name www.example.com; access_log logs/example.access.log main; root /var/www/example.com/public; location ~ ^/(static|media)/ { ... } location ~* /[0-9][0-9](-.*)(.html)$ { ... } location ~* .(jpe?g|png|gif|ico)$ { ... } location ~* (?<begin>.*app)/(?<end>.+.php)$ { ... } ... } server { listen 10.10.250.11:80; server_name "~^(api.)?example.com api.de.example.com"; access_log logs/example.access.log main; location ~ ^(/[^/]+)/api(.*)$ { ... } location ~ ^/backend/id/([a-z].[a-z]*) { ... } ... } }
Handle incoming connections
🔖 Define the listen directives with address:port pair — Base Rules — P1
🔖 Prevent processing requests with undefined server names — Base Rules — P1
🔖 Never use a hostname in a listen or upstream directives — Base Rules — P1
🔖 Use exact names in a server_name directive if possible — Performance — P2
🔖 Separate listen directives for 80 and 443 ports — Base Rules — P3
🔖 Use only one SSL config for the listen directive — Base Rules — P3
NGINX uses the following logic to determining which virtual server (server block) should be used:
-
Match the
address:portpair to thelistendirective — that can be multiple server blocks withlistendirectives of the same specificity that can handle the requestNGINX use the
address:portcombination for handle incoming connections. This pair is assigned to thelistendirective.The
listendirective can be set to:-
an IP address/port combination (
127.0.0.1:80;) -
a lone IP address, if only address is given, the port
80is used (127.0.0.1;) — becomes127.0.0.1:80; -
a lone port which will listen to every interface on that port (
80;or*:80;) — becomes0.0.0.0:80; -
the path to a UNIX domain socket (
unix:/var/run/nginx.sock;)
If the
listendirective is not present then either*:80is used (runs with the superuser privileges), or*:8000otherwise.To play with
listendirective NGINX must follow the following steps:-
NGINX translates all incomplete
listendirectives by substituting missing values with their default values (see above) -
NGINX attempts to collect a list of the server blocks that match the request most specifically based on the
address:port -
If any block that is functionally using
0.0.0.0, will not be selected if there are matching blocks that list a specific IP -
If there is only one most specific match, that server block will be used to serve the request
-
If there are multiple server blocks with the same level of matching, NGINX then begins to evaluate the
server_namedirective of each server block
Look at this short example:
# From client side: GET / HTTP/1.0 Host: api.random.com # From server side: server { # This block will be processed: listen 192.168.252.10; # --> 192.168.252.10:80 ... } server { listen 80; # --> *:80 --> 0.0.0.0:80 server_name api.random.com; ... }
-
-
Match the
Hostheader field against theserver_namedirective as a string (the exact names hash table) -
Match the
Hostheader field against theserver_namedirective with a
wildcard at the beginning of the string (the hash table with wildcard names starting with an asterisk)
If one is found, that block will be used to serve the request. If multiple matches are found, the longest match will be used to serve the request.
- Match the
Hostheader field against theserver_namedirective with a
wildcard at the end of the string (the hash table with wildcard names ending with an asterisk)
If one is found, that block is used to serve the request. If multiple matches are found, the longest match will be used to serve the request.
- Match the
Hostheader field against theserver_namedirective as a regular expression
The first
server_namewith a regular expression that matches theHostheader will be used to serve the request.
-
If all the
Hostheaders doesn’t match, then direct to thelistendirective marked asdefault_server(makes the server block answer all the requests that doesn’t match any server block) -
If all the
Hostheaders doesn’t match and there is nodefault_server,
direct to the first server with alistendirective that satisfies first step -
Finally, NGINX goes to the
locationcontext
This list is based on Mastering Nginx — The virtual server section.
Matching location
🔖 Make an exact location match to speed up the selection process — Performance — P3
For each request, NGINX goes through a process to choose the best location block that will be used to serve that request.
The location block enables you to handle several types of URIs/routes (Layer 7 routing based on URL), within a server block. Syntax looks like:
location optional_modifier location_match { ... }
location_match in the above defines what NGINX should check the request URI against. The optional_modifier below will cause the associated location block to be interpreted as follows (the order doesn’t matter at this moment):
-
(none): if no modifiers are present, the location is interpreted as a prefix match. To determine a match, the location will now be matched against the beginning of the URI -
=: is an exact match, without any wildcards, prefix matching or regular expressions; forces a literal match between the request URI and the location parameter -
~: if a tilde modifier is present, this location must be used for case sensitive matching (RE match) -
~*: if a tilde and asterisk modifier is used, the location must be used for case insensitive matching (RE match) -
^~: assuming this block is the best non-RE match, a carat followed by a tilde modifier means that RE matching will not take place
And now, a short introduction to determines location priority:
-
the exact match is the best priority (processed first); ends search if match
-
the prefix match is the second priority; there are two types of prefixes:
^~and(none), if this match used the^~prefix, searching stops -
the regular expression match has the lowest priority; there are two types of prefixes:
~and~*; in the order they are defined in the configuration file -
if regular expression searching yielded a match, that result is used, otherwise, the match from prefix searching is used
So, look at this example, it comes from the Nginx documentation — ngx_http_core_module:
location = / {
# Matches the query / only.
[ configuration A ]
}
location / {
# Matches any query, since all queries begin with /, but regular
# expressions and any longer conventional blocks will be
# matched first.
[ configuration B ]
}
location /documents/ {
# Matches any query beginning with /documents/ and continues searching,
# so regular expressions will be checked. This will be matched only if
# regular expressions don't find a match.
[ configuration C ]
}
location ^~ /images/ {
# Matches any query beginning with /images/ and halts searching,
# so regular expressions will not be checked.
[ configuration D ]
}
location ~* .(gif|jpg|jpeg)$ {
# Matches any request ending in gif, jpg, or jpeg. However, all
# requests to the /images/ directory will be handled by
# Configuration D.
[ configuration E ]
}
To help you understand how does location match works:
- Nginx location match tester
- Nginx location match visible
- NGINX Regular Expression Tester
The process of choosing NGINX location block is as follows (a detailed explanation):
- NGINX searches for an exact match. If a
=modifier (e.g.location = foo { ... }) exactly matches the request URI, this specific location block is chosen right away
- this block is processed
- match-searching stops
- Prefix-based NGINX location matches (no regular expression). Each location will be checked against the request URI. If no exact (meaning no
=modifier) location block is found, NGINX will continue with non-exact prefixes. It starts with the longest matching prefix location for this URI, with the following approach:
-
In case the longest matching prefix location has the
^~modifier (e.g.location ^~ foo { ... }), NGINX will stop its search right away and choose this location- the block of the longest (most explicit) of those matches is processed
- match-searching stops
-
Assuming the longest matching prefix location doesn’t use the
^~modifier, the match is temporarily stored and the process continues
I’m not sure about the order. In the official documentation it is not clearly indicated and external guides explain it differently. It seems logical to check the longest matching prefix location first.
- As soon as the longest matching prefix location is chosen and stored, NGINX continues to evaluate the case-sensitive (e.g.
location ~ foo { ... }) and insensitive regular expression (e.g.location ~* foo { ... }) locations. The first regular expression location that fits the URI is selected right away to process the request
- the block of the first matching regex found (when parsing the config-file top-to-bottom) is processed
- match-searching stops
- If no regular expression locations are found that match the request URI, the previously stored prefix location (e.g.
location foo { ... }) is selected to serve the request
location /kind of a catch all location- the block of the longest (most explicit) of those matches is processed
- match-searching stops
You should also know, that the non-regex match-types are fully declarative — order of definition in the config doesn’t matter — but the winning regex-match (if processing even gets that far) is entirely based on its order of entry in the config file.
In order, to better understand how this process work, please see this short cheatsheet that will allow you to design your location blocks in a predictable way:

I recommend to use external tools for testing regular expressions. For more please see online tools chapter.
Ok, so here’s a more complicated configuration:
server { listen 80; server_name xyz.com www.xyz.com; location ~ ^/(media|static)/ { root /var/www/xyz.com/static; expires 10d; } location ~* ^/(media2|static2) { root /var/www/xyz.com/static2; expires 20d; } location /static3 { root /var/www/xyz.com/static3; } location ^~ /static4 { root /var/www/xyz.com/static4; } location = /api { proxy_pass http://127.0.0.1:8080; } location / { proxy_pass http://127.0.0.1:8080; } location /backend { proxy_pass http://127.0.0.1:8080; } location ~ logo.xcf$ { root /var/www/logo; expires 48h; } location ~* .(png|ico|gif|xcf)$ { root /var/www/img; expires 24h; } location ~ logo.ico$ { root /var/www/logo; expires 96h; } location ~ logo.jpg$ { root /var/www/logo; expires 48h; } }
And look the table with the results:
| URL | LOCATIONS FOUND | FINAL MATCH |
|---|---|---|
/ |
1) prefix match for / |
/ |
/css |
1) prefix match for / |
/ |
/api |
1) exact match for /api |
/api |
/api/ |
1) prefix match for / |
/ |
/backend |
1) prefix match for /2) prefix match for /backend |
/backend |
/static |
1) prefix match for / |
/ |
/static/header.png |
1) prefix match for /2) case sensitive regex match for ^/(media|static)/ |
^/(media|static)/ |
/static/logo.jpg |
1) prefix match for /2) case sensitive regex match for ^/(media|static)/ |
^/(media|static)/ |
/media2 |
1) prefix match for /2) case insensitive regex match for ^/(media2|static2) |
^/(media2|static2) |
/media2/ |
1) prefix match for /2) case insensitive regex match for ^/(media2|static2) |
^/(media2|static2) |
/static2/logo.jpg |
1) prefix match for /2) case insensitive regex match for ^/(media2|static2) |
^/(media2|static2) |
/static2/logo.png |
1) prefix match for /2) case insensitive regex match for ^/(media2|static2) |
^/(media2|static2) |
/static3/logo.jpg |
1) prefix match for /static32) prefix match for /3) case sensitive regex match for logo.jpg$ |
logo.jpg$ |
/static3/logo.png |
1) prefix match for /static32) prefix match for /3) case insensitive regex match for .(png|ico|gif|xcf)$ |
.(png|ico|gif|xcf)$ |
/static4/logo.jpg |
1) priority prefix match for /static42) prefix match for / |
/static4 |
/static4/logo.png |
1) priority prefix match for /static42) prefix match for / |
/static4 |
/static5/logo.jpg |
1) prefix match for /2) case sensitive regex match for logo.jpg$ |
logo.jpg$ |
/static5/logo.png |
1) prefix match for /2) case insensitive regex match for .(png|ico|gif|xcf)$ |
.(png|ico|gif|xcf)$ |
/static5/logo.xcf |
1) prefix match for /2) case sensitive regex match for logo.xcf$ |
logo.xcf$ |
/static5/logo.ico |
1) prefix match for /2) case insensitive regex match for .(png|ico|gif|xcf)$ |
.(png|ico|gif|xcf)$ |
rewrite vs return
Generally there are two ways of implementing redirects in NGINX: with rewrite and return directives.
These directives (comes from the ngx_http_rewrite_module) are very useful but (from the NGINX documentation) the only 100% safe things which may be done inside if in a location context are:
return ...;rewrite ... last;
Anything else may possibly cause unpredictable behaviour, including potential SIGSEGV.
rewrite directive
The rewrite directives are executed sequentially in order of their appearance in the configuration file. It’s slower (but still extremely fast) than a return and returns HTTP 302 in all cases, irrespective of permanent.
The rewrite directive just changes the request URI, not the response of request. Importantly only the part of the original url that matches the regex is rewritten. It can be used for temporary url changes.
I sometimes used rewrite to capture elementes in the original URL, change or add elements in the path, and in general when I do something more complex:
location / { ... rewrite ^/users/(.*)$ /user.php?username=$1 last; # or: rewrite ^/users/(.*)/items$ /user.php?username=$1&page=items last; }
You must know that rewrite returns only code 301 or 302.
rewrite directive accept optional flags:
-
break— basically completes processing of rewrite directives, stops processing, and breakes location lookup cycle by not doing any location lookup and internal jump at all-
if you use
breakflag insidelocationblock:- no more parsing of rewrite conditions
- internal engine continues to parse the current
locationblock
Inside a location block, with
break, NGINX only stops processing anymore rewrite conditions. -
if you use
breakflag outsidelocationblock:- no more parsing of rewrite conditions
- internal engine goes to the next phase (searching for
locationmatch)
Outside a location block, with
break, NGINX stops processing anymore rewrite conditions.
-
-
last— basically completes processing of rewrite directives, stops processing, and starts a search for a new location matching the changed URI-
if you use
lastflag insidelocationblock:- no more parsing of rewrite conditions
- internal engine starts to look for another location match based on the result of the rewrite result
- no more parsing of rewrite conditions, even on the next location match
Inside a location block, with last, NGINX stops processing anymore rewrite conditions and then starts to look for a new matching of location block. NGINX also ignores any rewrites in the new location block.
-
if you use
lastflag outsidelocationblock:- no more parsing of rewrite conditions
- internal engine goes to the next phase (searching for
locationmatch)
Outside a location block, with
last, NGINX stops processing anymore rewrite conditions.
-
-
redirect— returns a temporary redirect with the 302 HTTP response code -
permanent— returns a permanent redirect with the 301 HTTP response code
Note:
- that outside location blocks,
lastandbreakare effectively the same - processing of rewrite directives at server level may be stopped via
break, but the location lookup will follow anyway
This explanation is based on the awesome answer by Pothi Kalimuthu to nginx url rewriting: difference between break and last.
Official documentation has a great tutorials about Creating NGINX Rewrite Rules and Converting rewrite rules. I also recommend Clean Url Rewrites Using Nginx.
Finally, look at the difference between last and break flags in action:
lastdirective:

breakdirective:

This infographic comes from Internal rewrite — nginx by Ivan Dabic.
return directive
🔖 Use return directive for URL redirection (301, 302) — Base Rules — P2
🔖 Use return directive instead of rewrite for redirects — Performance — P2
The other way is a return directive. It’s faster than rewrite because there is no regexp that has to be evaluated. It’s stops processing and returns HTTP 301 (by default) to a client (tells NGINX to respond directly to the request), and the entire url is rerouted to the url specified.
I use return directive in the following cases:
-
force redirect from http to https:
server { ... return 301 https://example.com$request_uri; }
-
redirect from www to non-www and vice versa:
server { ... # It's only example. You shouldn't use 'if' statement in the following case: if ($host = www.example.com) { return 301 https://example.com$request_uri; } }
-
close the connection and log it internally:
server { ... return 444; }
-
send 4xx HTTP response for a client without any other actions:
server { ... if ($request_method = POST) { return 405; } # or: if ($invalid_referer) { return 403; } # or: if ($request_uri ~ "^/app/(.+)$") { return 403; } # or: location ~ ^/(data|storage) { return 403; } }
-
and sometimes for reply with HTTP code without serving a file or response body:
server { ... # NGINX will not allow a 200 with no response body (200's need to be with a resource in the response. # '204 No Content' is meant to say "I've completed the request, but there is no body to return"): return 204 "it's all okay"; # Or without body: return 204; # Because default Content-Type is application/octet-stream, browser will offer to "save the file". # If you want to see reply in browser you should add properly Content-Type: # add_header Content-Type text/plain; }
To the last example: be careful if you’re using such a configuration to do a healthcheck. While a 204 HTTP code is semantically perfect for a healthcheck (success indication with no content), some services do not consider it a success.
URL redirections
🔖 Use return directive for URL redirection (301, 302) — Base Rules — P2
🔖 Use return directive instead of rewrite for redirects — Performance — P2
HTTP allows servers to redirect a client request to a different location. This is useful when moving content to a new URL, when deleting pages or when changing domain names or merging websites.
URL redirection is done for various reasons:
- for URL shortening
- to prevent broken links when web pages are moved
- to allow multiple domain names belonging to the same owner to refer to a single web site
- to guide navigation into and out of a website
- for privacy protection
- for hostile purposes such as phishing attacks or malware distribution
It comes from Wikipedia — URL redirection.
I recommend to read:
- Redirections in HTTP
- 301 101: How Redirects Work
- Modify 301/302 response body (from this handbook)
- Redirect POST request with payload to external endpoint (from this handbook)
try_files directive
We have one more very interesting and important directive: try_files (from the ngx_http_core_module). This directive tells NGINX to check for the existence of a named set of files or directories (checks files conditionally breaking on success).
I think the best explanation comes from the official documentation:
try_fileschecks the existence of files in the specified order and uses the first found file for request processing; the processing is performed in the current context. The path to a file is constructed from the file parameter according to the root and alias directives. It is possible to check directory’s existence by specifying a slash at the end of a name, e.g.$uri/. If none of the files were found, an internal redirect to the uri specified in the last parameter is made.
Generally it may check files on disk, redirect to proxies or internal locations, and return error codes, all in one directive.
Take a look at the following example:
server { ... root /var/www/example.com; location / { try_files $uri $uri/ /frontend/index.html; } location ^~ /images { root /var/www/static; try_files $uri $uri/ =404; } ...
-
default root directory for all locations is
/var/www/example.com -
location /— matches all locations without more specific locations, e.g. exact names-
try_files $uri— when you receive a URI that’s matched by this block try$urifirstFor example:
https://example.com/tools/en.js— NGINX will try to check if there’s a file inside/toolscalleden.js, if found it, serve it in the first place. -
try_files $uri $uri/— if you didn’t find the first condition try the URI as a directoryFor example:
https://example.com/backend/— NGINX will try first check if a file calledbackendexists, if can’t find it then goes to second check$uri/and see if there’s a directory calledbackendexists then it will try serving it. -
try_files $uri $uri/ /frontend/index.html— if a file and directory not found, NGINX sends/frontend/index.html
-
-
location ^~ /images— handle any query beginning with/imagesand halts searching-
default root directory for this location is
/var/www/static -
try_files $uri— when you receive a URI that’s matched by this block try$urifirstFor example:
https://example.com/images/01.gif— NGINX will try to check if there’s a file inside/imagescalled01.gif, if found it, serve it in the first place. -
try_files $uri $uri/— if you didn’t find the first condition try the URI as a directoryFor example:
https://example.com/images/— NGINX will try first check if a file calledimagesexists, if can’t find it then goes to second check$uri/and see if there’s a directory calledimagesexists then it will try serving it. -
try_files $uri $uri/ =404— if a file and directory not found, NGINX sendsHTTP 404(Not Found)
-
On the other hand, try_files is relatively primitive. When encountered, NGINX will look for any of the specified files physically in the directory matched by the location block. If they don’t exist, NGINX does an internal redirect to the last entry in the directive.
Additionally, think about dont’t check for the existence of directories:
# Use this to take out an extra filesystem stat(): try_files $uri @index; # Instead of this: try_files $uri $uri/ @index;
if, break and set
🔖 Avoid checks server_name with if directive — Performance — P2
The ngx_http_rewrite_module also provides additional directives:
-
break— stops processing, if is specified inside thelocation, further processing of the request continues in this location:# It's useful for: if ($slow_resp) { limit_rate 50k; break; }
-
if— you can useifinside aserverbut not the other way around, also notice that you shouldn’t useifinsidelocationas it may not work as desired. For example,ifstatements aren’t a good way of setting custom headers because they may cause statements outside the if block to be ignored. The NGINX docs says:There are cases where you simply cannot avoid using an
if, for example if you need to test a variable which has no equivalent directive.You should also remember about this:
The
ifcontext in NGINX is provided by the rewrite module and this is the primary intended use of this context. Since NGINX will test conditions of a request with many other purpose-made directives,ifshould not be used for most forms of conditional execution. This is such an important note that the NGINX community has created a page called if is evil (yes, it’s really evil and in most cases not needed).A long time ago I found this:
That’s actually not true and shows you don’t understand the problem with it. When the
ifstatement ends withreturndirective, there is no problem and it’s safe to use.On the other hand, official documentation say:
Directive if has problems when used in location context, in some cases it doesn’t do what you expect but something completely different instead. In some cases it even segfaults. It’s generally a good idea to avoid it if possible.
-
set— sets a value for the specified variable. The value can contain text, variables, and their combination
Example of usage if and set directives:
# It comes from: https://gist.github.com/jrom/1760790: if ($request_uri = /) { set $test A; } if ($host ~* example.com) { set $test "${test}B"; } if ($http_cookie !~* "auth_token") { set $test "${test}C"; } if ($test = ABC) { proxy_pass http://cms.example.com; break; }
root vs alias
Placing a
rootoraliasdirective in a location block overrides therootoraliasdirective that was applied at a higher scope.
With alias you can map to another file name. With root forces you to name your file on the server. In the first case, NGINX replaces the string prefix e.g /robots.txt in the URL path with e.g. /var/www/static/robots.01.txt and then uses the result as a filesystem path. In the second, NGINX inserts the string e.g. /var/www/static/ at the beginning of the URL path and then uses the result as a file system path.
Look at this. There is a difference, when the alias is for a whole directory will work:
location ^~ /data/ { alias /home/www/static/data/; }
But the following code won’t do:
location ^~ /data/ { root /home/www/static/data/; }
This would have to be:
location ^~ /data/ { root /home/www/static/; }
The root directive is typically placed in server and location blocks. Placing a root directive in the server block makes the root directive available to all location blocks within the same server block.
This directive tells NGINX to take the request url and append it behind the specified directory. For example, with the following configuration block:
server { server_name example.com; listen 10.250.250.10:80; index index.html; root /var/www/example.com; location / { try_files $uri $uri/ =404; } location ^~ /images { root /var/www/static; try_files $uri $uri/ =404; } }
NGINX will map the request made to:
http://example.com/images/logo.pnginto the file path/var/www/static/images/logo.pnghttp://example.com/contact.htmlinto the file path/var/www/example.com/contact.htmlhttp://example.com/about/us.htmlinto the file path/var/www/example.com/about/us.html
Like you want to forward all requests which start /static and your data present in /var/www/static you should set:
- first path:
/var/www - last path:
/static - full path:
/var/www/static
location <last path> { root <first path>; ... }
NGINX documentation on the alias directive suggests that it is better to use root over alias when the location matches the last part of the directive’s value.
The alias directive can only be placed in a location block. The following is a set of configurations for illustrating how the alias directive is applied:
server { server_name example.com; listen 10.250.250.10:80; index index.html; root /var/www/example.com; location / { try_files $uri $uri/ =404; } location ^~ /images { alias /var/www/static; try_files $uri $uri/ =404; } }
NGINX will map the request made to:
http://example.com/images/logo.pnginto the file path/var/www/static/logo.pnghttp://example.com/images/ext/img.pnginto the file path/var/www/static/ext/img.pnghttp://example.com/contact.htmlinto the file path/var/www/example.com/contact.htmlhttp://example.com/about/us.htmlinto the file path/var/www/example.com/about/us.html
When location matches the last part of the directive’s value it is better to use the root directive (it seems like an arbitrary style choice because authors don’t justify that instruction at all). Look at this example from the official documentation:
location /images/ { alias /data/w3/images/; } # Better solution: location /images/ { root /data/w3; }
internal directive
This directive specifies that the location block is internal. In other words,
the specified resource cannot be accessed by external requests.
On the other hand, it specifies how external redirections, i.e. locations like http://example.com/app.php/some-path should be handled; while set, they should return 404, only allowing internal redirections. In brief, this tells NGINX it’s not accessible from the outside (it doesn’t redirect anything).
Conditions handled as internal redirections are listed in the documentation for internal directive. Specifies that a given location can only be used for internal requests and are the following:
- requests redirected by the
error_page,index,random_index, andtry_filesdirectives - requests redirected by the
X-Accel-Redirectresponse header field from an upstream server - subrequests formed by the
include virtualcommand of thengx_http_ssi_module module, by thengx_http_addition_modulemodule directives, and byauth_requestandmirrordirectives - requests changed by the
rewritedirective
Example 1:
error_page 404 /404.html; location = /404.html { internal; }
Example 2:
The files are served from the directory /srv/hidden-files by the path prefix /hidden-files/. Pretty straightforward. The internal declaration tells NGINX that this path is accessible only through rewrites in the NGINX config, or via the X-Accel-Redirect header in proxied responses.
To use this, just return an empty response which contains that header. The content of the header should be the location you want to redirect to:
location /hidden-files/ { internal; alias /srv/hidden-files/; }
Example 3:
Another use case for internal redirects in NGINX is to hide credentials. Often you need to make requests to 3rd party services. For example, you want to send text messages or access a paid maps server. It would be the most efficient to send these requests directly from your JavaScript front end. However, doing so means you would have to embed an access token in the front end. This means savvy users could extract this token and make requests on your account.
An easy fix is to make an endpoint in your back end which initiates the actual request. We could make use of an HTTP client library inside the back end. However, this will again tie up workers, especially if you expect a barrage of requests and the 3rd party service is responding very slowly.
location /external-api/ { internal; set $redirect_uri "$upstream_http_redirect_uri"; set $authorization "$upstream_http_authorization"; # For performance: proxy_buffering off; # Pass on secret from backend: proxy_set_header Authorization $authorization; # Use URI determined by backend: proxy_pass $redirect_uri; }
Examples 2 and 3 (both are great!) comes from How to use internal redirects in NGINX.
There is a limit of 10 internal redirects per request to prevent request processing cycles that can occur in incorrect configurations. If this limit is reached, the error HTTP 500 Internal Server Error is returned. In such cases, the
rewrite or internal redirection cyclemessage can be seen in the error log.
Look also at Authentication Based on Subrequest Result from the official documentation.
External and internal redirects
External redirects originate directly from the client. So, if the client fetched https://example.com/directory it would be directly fall into preceding location block.
Internal redirect means that it doesn’t send a 302 response to the client, it simply performs an implicit rewrite of the url and attempts to process it as though the user typed the new url originally.
The internal redirect is different from the external redirect defined by HTTP response code 302 and 301, client browser won’t update its URI addresses.
To begin rewriting internally, we should explain the difference between redirects and internal rewrite. When source points to a destination that is out of source domain that is what we call redirect as your request will go from source to outside domain/destination.
With internal rewrite you would be, basically, doing the same only the destination is local path under same domain and not the outside location.
There is also great explanation about internal redirects:
The internal redirection (e.g. via the
echo_execorrewritedirective) is an operation that makes NGINX jump from one location to another while processing a request (are very similar togotostatement in the C language). This «jumping» happens completely within the server itself.
There are two different kinds of internal requests:
-
internal redirects — redirects the client requests internally. The URI is
changed, and the request may therefore match another location block and
become eligible for different settings. The most common case of internal
redirects is when using therewritedirective, which allows you to rewrite the
request URI -
sub-requests — additional requests that are triggered internally to generate (insert or append to the body of the original request) content that is complementary to the main request (
additionorssimodules)
allow and deny
🔖 Take care about your ACL rules — Hardening — P1
🔖 Reject unsafe HTTP methods — Hardening — P1
Both comes from the ngx_http_access_module module and allows limiting access to certain client addresses. You can combining allow/deny rules.
denywill always return 403 error code.
The easiest path would be to start out by denying all access, then only granting access to those locations you want. For example:
location / { # without 'satisfy any' both should be passed: satisfy any; allow 192.168.0/0/16; deny all; # sh -c "echo -n 'user:' >> /etc/nginx/.secret" # sh -c "openssl passwd -apr1 >> /etc/nginx/.secret" auth_basic "Restricted Area"; auth_basic_user_file /etc/nginx/.secret; root /usr/share/nginx/html; index index.html index.htm; }
Putting satisfy any; in your configuration tells NGINX to accept either http authentication, or IP restriction. By default, when you define both, it will expect both.
See also this answer:
As you’ve found, it isn’t advisable to but the auth settings at the server level because they will apply to all locations. While it is possible to turn basic auth off there doesn’t appear to be a way to clear an existing IP whitelist.
A better solution would be to add the authentication to the / location so that it isn’t inherited by /hello.
The problem comes if you have other locations that require the basic auth and IP whitelisting in which case it might be worth considering moving the auth components to an include file or nesting them under /.
Both directives may work unexpectedly! Look at the following example:
server { server_name example.com; deny all; location = /test { return 200 "it's all okay"; more_set_headers 'Content-Type: text/plain'; } }
If you generate a reqeust:
curl -i https://example.com/test
HTTP/2 200
date: Wed, 11 Nov 2018 10:02:45 GMT
content-length: 13
server: Unknown
content-type: text/plain
it's all okay
Why? Look at Request processing stages chapter. That’s because NGINX process request in phases, and rewrite phase (where return belongs) goes before access phase (where deny works).
uri vs request_uri
🔖 Use
$request_urito avoid using regular expressions — Performance — P2
$request_uri is the original request (for example /foo/bar.php?arg=baz includes arguments and can’t be modified) but $uri refers to the altered URI so $uri is not equivalent to $request_uri.
See this great and short explanation by Richard Smith:
The
$urivariable is set to the URI that NGINX is currently processing — but it is also subject to normalisation, including:
- removal of the
?and query string- consecutive
/characters are replace by a single/- URL encoded characters are decoded
The value of
$request_uriis always the original URI and is not subject to any of the above normalisations.Most of the time you would use
$uri, because it is normalised. Using$request_uriin the wrong place can cause URL encoded characters to become doubly encoded.
Both excludes the schema (https:// and the port (implicit 443) in both examples above) as defined by RFC 2616 — http URL [IETF] for the URL:
http_URL = "http(s):" "//" host [ ":" port ] [ abs_path [ "?" query ]]
Take a look at the following table:
| URL | $request_uri |
$uri |
|---|---|---|
https://example.com/foo |
/foo |
/foo |
https://example.com/foo/bar |
/foo/bar |
/foo/bar |
https://example.com/foo/bar/ |
/foo/bar/ |
/foo/bar/ |
https://example.com/foo/bar? |
/foo/bar? |
/foo/bar |
https://example.com/foo/bar?do=test |
/foo/bar?do=test |
/foo/bar |
https://example.com/rfc2616-sec3.html#sec3.2 |
/rfc2616-sec3.html |
/rfc2616-sec3.html |
Another way to repeat the location is to use the proxy_pass directive which is quite easy:
location /app/ { proxy_pass http://127.0.0.1:5000; # or: proxy_pass http://127.0.0.1:5000/api/app/; }
| LOCATION | proxy_pass |
REQUEST | RECEIVED BY UPSTREAM |
|---|---|---|---|
/app/ |
http://localhost:5000/api$request_uri |
/app/foo?bar=baz |
/api/webapp/foo?bar=baz |
/app/ |
http://localhost:5000/api$uri |
/app/foo?bar=baz |
/api/webapp/foo |
Compression and decompression
🔖 Mitigation of CRIME/BREACH attacks — Hardening Rules — P2
By default, NGINX compresses responses only with MIME type text/html using the gzip method. So, if you send request with Accept-Encoding: gzip header you will not see the Content-Encoding: gzip in the response.
To enable gzip compression:
To compress responses with other MIME types, include the gzip_types directive and list the additional types:
gzip_types text/plain text/css text/xml text/javascript application/x-javascript application/xml;
Remember: by default, NGINX doesn’t compress image files using its per-request gzip module.
I also highly recommend you read this (it’s interesting observation about gzip and performance by Barry Pollard):
To be honest gzip is not very processor intensive these days and gzipping on the fly (and then unzipping in the browser) is often the norm. It’s something web browsers are very good at.
So unless you are getting huge volumes of traffic you’ll probably not notice any performance or CPU load impact due to on the fly gzipping for most web files.
To test HTTP and Gzip compression I recommend two external tools:
- HTTP Compression Test
- HTTP Gzip Compression Test
NGINX also compress large files and avoid the temptation to compress smaller files (such as images, executables, etc.), because very small files barely benefit from compression. You can tell NGINX not to compress files smaller than e.g. 128 bytes:
For more information see Finding the Nginx gzip_comp_level Sweet Spot.
Compressing resources on-the-fly adds CPU-load and latency (wait for the compression to be done) every time a resource is served. NGINX also provides static compression with static module. It is better, for 2 reasons:
- you don’t have to gzip for each request
- you can use a higher gzip level
For example:
# Enable static gzip compression: location ^~ /assets/ { gzip_static on; ... }
You should put the gzip_static on; inside the blocks that configure static files, but if you’re only running one site, it’s safe to just put it in the http block.
NGINX does not automatically compress the files for you. You will have to do this yourself.
To compress files manually:
cd assets/ while IFS='' read -r -d '' _fd; do gzip -N4c ${_fd} > ${_fd}.gz done < <(find . -maxdepth 1 -type f -regex ".*.(css|js|jpg|gif|png|jpeg)" -print0)
So, for example, to service a request for /foo/bar/file, NGINX tries to find and send the file /foo/bar/file.gz that directly, so no extra CPU-cost or latency is added to your requests, speeding up the serving of your app.
What is the best NGINX compression gzip level?
The level of gzip compression simply determines how compressed the data is on a scale from 1-9, where 9 is the most compressed. The trade-off is that the most compressed data usually requires the most work to compress/decompress but look also at this great answer. Author explains that the level of gzip compression doesn’t affect the difficulty to decompress.
I think the ideal compression level seems to be between 4 and 6. The following directive set how much files will be compressed:
Hash tables
Before start reading this chapter I recommend Hash tables explained.
To assist with the rapid processing of requests, NGINX uses hash tables. NGINX hash, though in principle is same as typical hash lists, but it has significant differences.
They are not meant for applications that add and remove elements dynamicall but are specifically designed to hold set of init time elements arranged in hash list. All elements that are put in the hash list are known while creating the hash list itself. No dynamic addtion or deletion is possible here.
This hash table is constructed and compiled during restart or reload and afterwards it’s running very fast. Main purpose seems to be speeding up the lookup of one time added elements.
Look at the Setting up hashes from official documentation:
To quickly process static sets of data such as server names, map directive’s values, MIME types, names of request header strings, NGINX uses hash tables. During the start and each re-configuration NGINX selects the minimum possible sizes of hash tables such that the bucket size that stores keys with identical hash values does not exceed the configured parameter (hash bucket size). The size of a table is expressed in buckets. The adjustment is continued until the table size exceeds the hash max size parameter. Most hashes have the corresponding directives that allow changing these parameters.
I also recommend Optimizations section and nginx — Hashing scheme explanation.
Some important information (based on this amazing research by brablc):
-
the general recommendation would be to keep both values as small as possible and as less collisions as possible (during startup and with each reconfiguration, NGINX selects the smallest possible size for the hash tables)
-
it depends on your setup, you can reduce the number of server from the table and
reloadthe NGINX instead ofrestart -
if NGINX gave out communication about the need for increasing
hash_max_sizeorhash_bucket_size, then it is first necessary to increase the first parameter -
bigger
hash_max_sizeuses more memory, biggerhash_bucket_sizeuses more CPU cycles during lookup and more transfers from main memory to cache. If you have enough memory increasehash_max_sizeand try to keephash_bucket_sizeas low as possible -
each hash table entry consumes space in a bucket. The space required is the length of the key (with some overhead to store the domain’s actual length as well), e.g. domain name
Since
stage.api.example.comis 21 characters, all entries consume at least 24 bytes in a bucket, and most consume 32 bytes or more. -
as you increase the number of entries, you have to increase the size of the hash table and/or the number of hash buckets in the table
If NGINX complains increase
hash_max_sizefirst as long as it complains. If the number exceeds some big number (32769 for instance), increasehash_bucket_sizeto multiple of default value on your platform as long as it complains. If it does not complain anymore, decreasehash_max_sizeback as long as it does not complain. Now you have the best setup for your set of server names (each set of server names may need different setup). -
with a hash bucket size of 64 or 128, a bucket is full after 4 or 5 entries hash to it
-
hash_max_sizeis not related to number of server names directly, if number of servers doubles, you may need to increasehash_max_size10 times or even more to avoid collisions. If you cannot avoid them, you have to increasehash_bucket_size -
if you have
hash_max_sizeless than 10000 and smallhash_bucket_size, you can expect long loading time because NGINX would try to find optimal hash size in a loop (see src/core/ngx_hash.c) -
if you have
hash_max_sizebigger than 10000, there will be only 1000 loops performed before it would complain
Server names hash table
The hash with the names of servers are controlled by the following directives (inside http context):
-
server_names_hash_max_size— sets the maximum size of the server names hash tables; default value: 512 -
server_names_hash_bucket_size— sets the bucket size for the server names hash tables; default values: 32, 64, or 128 (the default value depends on the size of the processor’s cache line)Parameter
server_names_hash_bucket_sizeis always equalized to the size, multiple to the size of the line of processor cache.
If server name is defined as too.long.server.name.example.com then NGINX will fail to start and display the error message like:
nginx: [emerg] could not build server_names_hash, you should increase server_names_hash_bucket_size: 64
To fix this, you should reload the NGINX or increase the server_names_hash_bucket_size directive value to the next power of two (in this case to 128).
If a large number of server names are defined, and NGINX complained with the following error:
nginx: [emerg] could not build the server_names_hash, you should increase either server_names_hash_max_size: 512 or server_names_hash_bucket_size: 32
Try to set the server_names_hash_max_size to a number close to the number of server names. Only if this does not help, or if NGINX’s start time is unacceptably long, try to increase the server_names_hash_bucket_size parameter.
Log files
🔖 Use custom log formats — Debugging — P4
Log files are a critical part of the NGINX management. It writes information about client requests in the access log right after the request is processed (in the last phase: NGX_HTTP_LOG_PHASE).
By default:
- the access log is located in
logs/access.log, but I suggest you take it to/var/log/nginxdirectory - data is written in the predefined
combined/mainformat access.logstores record of each request and log format is fully configurableerror.logcontains important operational messages
It is the equivalent to the following configuration:
# In nginx.conf (default log format): http { ... log_format main '$remote_addr - $remote_user [$time_local] "$request" ' '$status $body_bytes_sent "$http_referer" ' '"$http_user_agent" "$http_x_forwarded_for"'; # but I suggest you change: log_format main '$remote_addr - $remote_user [$time_local] ' '"$request_method $scheme://$host$request_uri ' '$server_protocol" $status $body_bytes_sent ' '"$http_referer" "$http_user_agent" ' '$request_time'; }
For more information please see Configuring Logging.
Set
access log off;to completely turns off logging.
If you don’t want 404 errors to show in your NGINX error logs, you should set
log_not_found off;.
If you want to enable logging of subrequests into
access_log, you should setlog_subrequest on;and change the default logging format (you have to log$urito see the difference). There is great explanation about how to identify subrequests in NGINX log files.
I also recommend to read:
- ngx_http_log_module
- ngx_http_upstream_module
Conditional logging
Sometimes certain entries are there just to fill up the logs or are cluttering them. I sometimes exclude requests — by client IP or whatever else — when I want to debug log files more effective.
So, in this example, if the $error_codes variable’s value is 0 — then log nothing (default action), but if 1 (e.g. 404 or 503 from backend) — to save this request to the log:
# Define map in the http context: http { ... map $status $error_codes { default 1; ~^[23] 0; } ... # Add if condition to the access log: access_log /var/log/nginx/example.com-access.log combined if=$error_codes; }
Manually log rotation
🔖 Configure log rotation policy — Base Rules — P1
NGINX will re-open its logs in response to the USR1 signal:
cd /var/log/nginx mv access.log access.log.0 kill -USR1 $(cat /var/run/nginx.pid) && sleep 1 # >= gzip-1.6: gzip -k access.log.0 # With any version: gzip < access.log.0 > access.log.0.gz # Test integrity and remove if test passed: gzip -t access.log.0 && rm -fr access.log.0
Error log severity levels
You can’t specify your own format, but in NGINX build-in several level’s of
error_log-ing.
The following is a list of all severity levels:
| TYPE | DESCRIPTION |
|---|---|
debug |
information that can be useful to pinpoint where a problem is occurring |
info |
informational messages that aren’t necessary to read but may be good to know |
notice |
something normal happened that is worth noting |
warn |
something unexpected happened, however is not a cause for concern |
error |
something was unsuccessful, contains the action of limiting rules (default) |
crit |
important problems that need to be addressed |
alert |
severe situation where action is needed promptly |
emerg |
the system is in an unusable state and requires immediate attention |
For example: if you set crit error log level, messages of crit, alert, and emerg levels are logged.
For debug logging to work, NGINX needs to be built with
--with-debug.
Default values for the error level:
- in the main section —
error - in the HTTP section —
crit - in the server section —
crit
How to log the start time of a request?
The most logging information requires the request to complete (status code, bytes sent, durations, etc). If you want to log the start time of a request in NGINX you should apply a patch that exposes request start time as a variable.
The $time_local variable contains the time when the log entry is written so when the HTTP request header is read, NGINX does a lookup of the associated virtual server configuration. If the virtual server is found, the request goes through six phases:
- server rewrite phase
- location phase
- location rewrite phase (which can bring the request back to the previous phase)
- access control phase
try_filesphase- log phase
Since the log phase is the last one, $time_local variable is much more close to the end of the request than it’s start.
How to log the HTTP request body?
Nginx doesn’t parse the client request body unless it really needs to, so it usually does not fill the $request_body variable.
The exceptions are when:
- it sends the request to a proxy
- or a fastcgi server
So you really need to either add the proxy_pass or fastcgi_pass directives to your block.
# 1) Set log format: log_format req_body_logging '$remote_addr - $remote_user [$time_local] ' '"$request" $status $body_bytes_sent ' '"$http_referer" "$http_user_agent" "$request_body"'; # 2) Limit the request body size: client_max_body_size 1k; client_body_buffer_size 1k; client_body_in_single_buffer on; # 3) Put the log format: server { ... location /api/v4 { access_log logs/access_req_body.log req_body_logging; proxy_pass http://127.0.0.1; ... } location = /post.php { access_log /var/log/nginx/postdata.log req_body_logging; fastcgi_pass php_cgi; ... } }
For this, you can also use echo module. To log a request body, what we need is to use the echo_read_request_body directive and the $request_body variable (contains the request body of the echo module).
echo_read_request_bodyexplicitly reads request body so that the$request_bodyvariable will always have non-empty values (unless the body is so big that it has been saved by NGINX to a local temporary file).
http { log_format req_body_logging '$request_body'; access_log /var/log/nginx/access.log req_body_logging; ... server { location / { echo_read_request_body; ... } ... } }
NGINX upstream variables returns 2 values
For example:
upstream_addr 192.168.50.201:8080 : 192.168.50.201:8080
upstream_bytes_received 427 : 341
upstream_connect_time 0.001 : 0.000
upstream_header_time 0.003 : 0.001
upstream_response_length 0 : 0
upstream_response_time 0.003 : 0.001
upstream_status 401 : 200
Below is a short description of each of them:
$upstream_addr— keeps the IP address and port, or the path to the UNIX-domain socket of the upstream server. If several servers were contacted during request processing, their addresses are separated by commas, e.g.192.168.1.1:80, 192.168.1.2:80, unix:/tmp/sock. If an internal redirect from one server group to another happens, initiated byX-Accel-Redirectorerror_page, then the server addresses from different groups are separated by colons, e.g.192.168.1.1:80, 192.168.1.2:80, unix:/tmp/sock : 192.168.10.1:80, 192.168.10.2:80$upstream_cache_status— keeps the status of accessing a response cache (0.8.3). The status can be eitherMISS,BYPASS,EXPIRED,STALE,UPDATING,REVALIDATED, orHIT$upstream_connect_time— time spent on establishing a connection with an upstream server$upstream_cookie_— cookie with the specified name sent by the upstream server in theSet-Cookieresponse header field (1.7.1). Only the cookies from the response of the last server are saved$upstream_header_time— time between establishing a connection and receiving the first byte of the response header from the upstream server$upstream_http_— keep server response header fields. For example, theServerresponse header field is available through the$upstream_http_servervariable. The rules of converting header field names to variable names are the same as for the variables that start with the$http_prefix. Only the header fields from the response of the last server are saved$upstream_response_length— keeps the length of the response obtained from the upstream server (0.7.27); the length is kept in bytes. Lengths of several responses are separated by commas and colons like addresses in the$upstream_addrvariable$upstream_response_time— time between establishing a connection and receiving the last byte of the response body from the upstream server$upstream_status— keeps status code of the response obtained from the upstream server. Status codes of several responses are separated by commas and colons like addresses in the$upstream_addrvariable
Official documentation say:
[…] If several servers were contacted during request processing, their addresses are separated by commas. […] If an internal redirect from one server group to another happens, initiated by “X-Accel-Redirect” or error_page, then the server addresses from different groups are separated by colons
This means that it made multiple requests to a backend, most likely you either have a bare proxy_pass host that resolves to different IPs (frequently the case with something like Amazon ELB as an origin), are you have a configured upstream that has multiple servers. Unless disabled, the proxy module will make round robin attempts against all healthy backends. This can be configured from proxy_next_upstream_* directives.
For example if this is not the desired behavior, you can just do (specifies in which cases a request should be passed to the next server):
# One should bear in mind that passing a request to the next server is only possible # if nothing has been sent to a client yet. That is, if an error or timeout occurs # in the middle of the transferring of a response, fixing this is impossible. proxy_next_upstream off;
For more information please see ngx_http_upstream_module and proxy_next_upstream.
Reverse proxy
After reading this chapter, please see: Rules: Reverse Proxy.
This is one of the greatest feature of the NGINX. In simplest terms, a reverse proxy is a server that comes in-between internal applications and external clients, forwarding client requests to the appropriate server. It takes a client request, passes it on to one or more servers, and subsequently delivers the server’s response back to the client.
Official NGINX documentation says:
Proxying is typically used to distribute the load among several servers, seamlessly show content from different websites, or pass requests for processing to application servers over protocols other than HTTP.
You can also read a very good explanation about What’s the difference between proxy server and reverse proxy server.
A reverse proxy can off load much of the infrastructure concerns of a high-volume distributed web application.

This infographic comes from Jenkins with NGINX — Reverse proxy with https.
This allow you to have NGINX reverse proxy requests to unicorns, mongrels, webricks, thins, or whatever you really want to have run your servers.
Reverse proxy gives you number of advanced features such as:
- load balancing, failover, and transparent maintenance of the backend servers
- increased security (e.g. SSL termination, hide upstream configuration)
- increased performance (e.g. caching, load balancing)
- simplifies the access control responsibilities (single point of access and maintenance)
- centralised logging and auditing (single point of maintenance)
- add/remove/modify HTTP headers
In my opinion, the two most important things related to the reverse proxy are:
- the way of requests forwarded to the backend
- the type of headers forwarded to the backend
If we talking about security of the proxy server look at this recommendations about Guidelines on Securing Public Web Servers [NIST]. This document is a good starting point. Is old but still has interesting solutions and suggestions.
There is a great explanation about the benefits of improving security through the use of a reverse proxy server.
A reverse proxy gives you a couple things that may make your server more secure:
- a place to monitor and log what is going on separate from the web server
- a place to filter separate from your web server if you know that some area of your system is vulnerable. Depending on the proxy you may be able to filter at the application level
- another place to implement ACLs and rules if you cannot be expressive enough for some reason on your web server
- a separate network stack that will not be vulnerable in the same ways as your web server. This is particularly true if your proxy is from a different vendor
- a reverse proxy with no filtering does not automatically protect you against everything, but if the system you need to protect is high-value then adding a reverse proxy may be worth the costs support and performance costs
Another great answer about best practices for reverse proxy implementation:
In my experience some of the most important requirements and mitigations, in no particular order, are:
- make sure that your proxy, back-end web (and DB) servers cannot establish direct outbound (internet) connections (including DNS and SMTP, and particularly HTTP). This means (forward) proxies/relays for required outbound access, if required
- make sure your logging is useful (§9.1 in the above), and coherent. You may have logs from multiple devices (router, firewall/IPS/WAF, proxy, web/app servers, DB servers). If you can’t quickly, reliably and deterministically link records across each device together, you’re doing it wrong. This means NTP, and logging any or all of: PIDs, TIDs, session-IDs, ports, headers, cookies, usernames, IP addresses and maybe more (and may mean some logs contain confidential information)
- understand the protocols, and make deliberate, informed decisions: including cipher/TLS version choice, HTTP header sizes, URL lengths, cookies. Limits should be implemented on the reverse-proxy. If you’re migrating to a tiered architecture, make sure the dev team are in the loop so that problems are caught as early as possible
- run vulnerability scans from the outside, or get someone to do it for you. Make sure you know your footprint and that the reports highlight deltas, as well as the theoretical TLS SNAFU du-jour
- understand the modes of failure. Sending users a bare default «HTTP 500 — the wheels came off» when you have load or stability problems is sloppy
- monitoring, metrics and graphs: having normal and historic data is invaluable when investigating anomalies, and for capacity planning
- tuning: from TCP time-wait to listen backlog to SYN-cookies, again you need to make make deliberate, informed decisions
- follow basic OS hardening guidelines, consider the use of chroot/jails, host-based IDS, and other measures, where available
Passing requests
🔖 Use pass directive compatible with backend protocol — Reverse Proxy — P1
When NGINX proxies a request, it sends the request to a specified proxied server, fetches the response, and sends it back to the client.
It is possible to proxy requests to:
-
an HTTP servers (e.g. NGINX, Apache, or other) with
proxy_passdirective:upstream bk_front { server 192.168.252.20:8080 weight=5; server 192.168.252.21:8080 } server { location / { proxy_pass http://bk_front; } location /api { proxy_pass http://192.168.21.20:8080; } location /info { proxy_pass http://localhost:3000; } location /ra-client { proxy_pass http://10.0.11.12:8080/guacamole/; } location /foo/bar/ { proxy_pass http://www.example.com/url/; } ... }
-
a non-HTTP servers (e.g. PHP, Node.js, Python, Java, or other) with
proxy_passdirective (as a fallback) or directives specially designed for this:-
fastcgi_passwhich passes a request to a FastCGI server (PHP FastCGI Example):server { ... location ~ ^/.+.php(/|$) { fastcgi_pass 127.0.0.1:9000; include /etc/nginx/fcgi_params; } ... }
-
uwsgi_passwhich passes a request to a uWSGI server (Nginx support uWSGI):server { location / { root html; uwsgi_pass django_cluster; uwsgi_param UWSGI_SCRIPT testapp; include /etc/nginx/uwsgi_params; } ... }
-
scgi_passwhich passes a request to an SCGI server:server { location / { scgi_pass 127.0.0.1:4000; include /etc/nginx/scgi_params; } ... }
-
memcached_passwhich passes a request to a Memcached server:server { location / { set $memcached_key "$uri?$args"; memcached_pass memc_instance:4004; error_page 404 502 504 = @memc_fallback; } location @memc_fallback { proxy_pass http://backend; } ... }
-
redis_passwhich passes a request to a Redis server (HTTP Redis):server { location / { set $redis_key $uri; redis_pass redis_instance:6379; default_type text/html; error_page 404 = /fallback; } location @fallback { proxy_pass http://backend; } ... }
-
The proxy_pass and other *_pass directives specifies that all requests which match the location block should be forwarded to the specific socket, where the backend app is running.
However, more complex apps may need additional directives:
proxy_pass— seengx_http_proxy_moduledirectives explanationfastcgi_pass— seengx_http_fastcgi_moduledirectives explanationuwsgi_pass— seengx_http_uwsgi_moduledirectives explanationscgi_pass— seengx_http_scgi_moduledirectives explanationmemcached_pass— seengx_http_memcached_moduledirectives explanationredis_pass— seengx_http_redis_moduledirectives explanation
Trailing slashes
🔖 Be careful with trailing slashes in proxy_pass directive — Reverse Proxy — P3
If you have something like:
location /public/ { proxy_pass http://bck_testing_01; }
And go to http://example.com/public, NGINX will automatically redirect you to http://example.com/public/.
Look also at this example:
location /foo/bar/ { # proxy_pass http://example.com/url/; proxy_pass http://192.168.100.20/url/; }
If the URI is specified along with the address, it replaces the part of the request URI that matches the location parameter. For example, here the request with the /foo/bar/page.html URI will be proxied to http://www.example.com/url/page.html.
If the address is specified without a URI, or it is not possible to determine the part of URI to be replaced, the full request URI is passed (possibly, modified).
Here is an example with trailing slash in location, but no trailig slash in proxy_pass:
location /foo/ { proxy_pass http://127.0.0.1:8080/bar; }
See how bar and path concatenates. If one go to http://yourserver.com/foo/path/id?param=1 NGINX will proxy request to http://127.0.0.1/barpath/id?param=1.
As stated in NGINX documentation if proxy_pass used without URI (i.e. without path after server:port) NGINX will put URI from original request exactly as it was with all double slashes, ../ and so on.
Look also at the configuration snippets: Using trailing slashes.
Below are additional examples:
| LOCATION | PROXY_PASS | REQUEST | RECEIVED BY UPSTREAM |
|---|---|---|---|
/app/ |
http://localhost:5000/api/ |
/app/foo?bar=baz |
/api/foo?bar=baz |
/app/ |
http://localhost:5000/api |
/app/foo?bar=baz |
/apifoo?bar=baz |
/app |
http://localhost:5000/api/ |
/app/foo?bar=baz |
/api//foo?bar=baz |
/app |
http://localhost:5000/api |
/app/foo?bar=baz |
/api/foo?bar=baz |
/app |
http://localhost:5000/api |
/appfoo?bar=baz |
/apifoo?bar=baz |
In other words:
You usually always want a trailing slash, never want to mix with and without trailing slash, and only want without trailing slash when you want to concatenate a certain path component together (which I guess is quite rarely the case). Note how query parameters are preserved.
Passing headers to the backend
🔖 Set the HTTP headers with add_header and proxy_*_header directives properly — Base Rules — P1
🔖 Remove support for legacy and risky HTTP headers — Hardening — P1
🔖 Always pass Host, X-Real-IP, and X-Forwarded headers to the backend — Reverse Proxy — P2
🔖 Use custom headers without X- prefix — Reverse Proxy — P3
By default, NGINX redefines two header fields in proxied requests:
-
the
Hostheader is re-written to the value defined by the$proxy_hostvariable. This will be the IP address or name and port number of the upstream, directly as defined by theproxy_passdirective -
the
Connectionheader is changed toclose. This header is used to signal information about the particular connection established between two parties. In this instance, NGINX sets this tocloseto indicate to the upstream server that this connection will be closed once the original request is responded to. The upstream should not expect this connection to be persistent
When NGINX proxies a request, it automatically makes some adjustments to the request headers it receives from the client:
-
NGINX drop empty headers. There is no point of passing along empty values to another server; it would only serve to bloat the request
-
NGINX, by default, will consider any header that contains underscores as invalid. It will remove these from the proxied request. If you wish to have NGINX interpret these as valid, you can set the
underscores_in_headersdirective toon, otherwise your headers will never make it to the backend server. Underscores in header fields are allowed (RFC 7230, sec. 3.2.), but indeed uncommon
It is important to pass more than just the URI if you expect the upstream server handle the request properly. The request coming from NGINX on behalf of a client will look different than a request coming directly from a client.
Please read Managing request headers from the official wiki.
In NGINX does support arbitrary request header field. Last part of a variable name is the field name converted to lower case with dashes replaced by underscores:
$http_name_of_the_header_key
If you have X-Real-IP = 127.0.0.1 in header, you can use $http_x_real_ip to get 127.0.0.1.
Use the proxy_set_header directive to sets headers that sends to the backend servers.
HTTP headers are used to transmit additional information between client and server.
add_headersends headers to the client (browser) and will work on successful requests only, unless you set upalwaysparameter.proxy_set_headersends headers to the backend server. If the value of a header field is an empty string then this field will not be passed to a proxied server.
It’s also important to distinguish between request headers and response headers. Request headers are for traffic inbound to the webserver or backend app. Response headers are going the other way (in the HTTP response you get back using client, e.g. curl or browser).
Ok, so look at the following short explanation about proxy directives (for more information about valid header values please see this rule):
-
proxy_http_version— defines the HTTP protocol version for proxying, by default it it set to 1.0. For Websockets and keepalive connections you need to use the version 1.1: -
proxy_cache_bypass— sets conditions under which the response will not be taken from a cache:proxy_cache_bypass $http_upgrade;
-
proxy_intercept_errors— means that any response with HTTP code 300 or greater is handled by theerror_pagedirective and ensures that if the proxied backend returns an error status, NGINX will be the one showing the error page (as opposed to the error page on the backend side). If you want certain error pages still being delivered from the upstream server, then simply don’t specify theerror_page <code>on the reverse proxy (without this, NGINX will forward the error page coming from the upstream server to the client):proxy_intercept_errors on; error_page 404 /404.html; # from proxy # To bypass error intercepting (if you have proxy_intercept_errors on): # 1 - don't specify the error_page 404 on the reverse proxy # 2 - go to the @debug location error_page 500 503 504 @debug; location @debug { proxy_intercept_errors off; proxy_pass http://backend; }
-
proxy_set_header— allows redefining or appending fields to the request header passed to the proxied server-
UpgradeandConnection— these header fields are required if your application is using Websockets:proxy_set_header Upgrade $http_upgrade; proxy_set_header Connection "upgrade";
-
Host— the$hostvariable in the following order of precedence contains: host name from the request line, or host name from the Host request header field, or the server name matching a request: NGINX usesHostheader forserver_namematching. It does not use TLS SNI. This means that for an SSL server, NGINX must be able to accept SSL connection, which boils down to having certificate/key. The cert/key can be any, e.g. self-signed:proxy_set_header Host $host;
-
X-Real-IP— forwards the real visitor remote IP address to the proxied server:proxy_set_header X-Real-IP $remote_addr;
-
X-Forwarded-For— is the conventional way of identifying the originating IP address of the user connecting to the web server coming from either a HTTP proxy or load balancer:proxy_set_header X-Forwarded-For $proxy_add_x_forwarded_for;
-
X-Forwarded-Proto— identifies the protocol (HTTP or HTTPS) that a client used to connect to your proxy or load balancer:proxy_set_header X-Forwarded-Proto $scheme;
-
X-Forwarded-Host— defines the original host requested by the client:proxy_set_header X-Forwarded-Host $host;
-
X-Forwarded-Port— defines the original port requested by the client:proxy_set_header X-Forwarded-Port $server_port;
-
If you want to read about custom headers, take a look at Why we need to deprecate x prefix for HTTP headers? and this great answer by BalusC.
Importance of the Host header
🔖 Set and pass Host header only with $host variable — Reverse Proxy — P2
The Host header tells the webserver which virtual host to use (if set up). You can even have the same virtual host using several aliases (domains and wildcard-domains). This why the host header exists. The host header specifies which website or web application should process an incoming HTTP request.
In NGINX, $host equals $http_host, lowercase and without the port number (if present), except when HTTP_HOST is absent or is an empty value. In that case, $host equals the value of the server_name directive of the server which processed the request.
But look at this:
An unchanged
Hostrequest header field can be passed with$http_host. However, if this field is not present in a client request header then nothing will be passed. In such a case it is better to use the$hostvariable — its value equals the server name in theHostrequest header field or the primary server name if this field is not present.
For example, if you set Host: MASTER:8080, $host will be «master» (while $http_host will be MASTER:8080 as it just reflects the whole header).
Look also at $10k host header and What is a Host Header Attack?.
Redirects and X-Forwarded-Proto
🔖 Don’t use X-Forwarded-Proto with $scheme behind reverse proxy — Reverse Proxy — P1
This header is very important because it prevent a redirect loop. When used inside HTTPS server block each HTTP response from the proxied server will be rewritten to HTTPS. Look at the following example:
- Client sends the HTTP request to the Proxy
- Proxy sends the HTTP request to the Server
- Server sees that the URL is
http:// - Server sends back 3xx redirect response telling the Client to connect to
https:// - Client sends an HTTPS request to the Proxy
- Proxy decrypts the HTTPS traffic and sets the
X-Forwarded-Proto: https - Proxy sends the HTTP request to the Server
- Server sees that the URL is
http://but also sees thatX-Forwarded-Protois https and trusts that the request is HTTPS - Server sends back the requested web page or data
This explanation comes from Purpose of the X-Forwarded-Proto HTTP Header.
In step 6 above, the Proxy is setting the HTTP header X-Forwarded-Proto: https to specify that the traffic it received is HTTPS. In step 8, the Server then uses the X-Forwarded-Proto to determine if the request was HTTP or HTTPS.
You can read about how to set it up correctly here:
- Set correct scheme passed in X-Forwarded-Proto
- Don’t use X-Forwarded-Proto with $scheme behind reverse proxy — Reverse Proxy — P1
A warning about the X-Forwarded-For
🔖 Set properly values of the X-Forwarded-For header — Reverse Proxy — P1
I think we should just maybe stop for a second. X-Forwarded-For is a one of the most important header that has the security implications.
Where a connection passes through a chain of proxy servers, X-Forwarded-For can give a comma-separated list of IP addresses with the first being the furthest downstream (that is, the user).
The HTTP X-Forwarded-For accepts two directives as mentioned above and described below:
<client>— it is the IP address of the client<proxy>— it is the proxies that request has to go through. If there are multiple proxies then the IP addresses of each successive proxy is listed
Syntax:
X-Forwarded-For: <client>, <proxy1>, <proxy2>
X-Forwarded-For should not be used for any Access Control List (ACL) checks because it can be spoofed by attackers. Use the real IP address for this type of restrictions. HTTP request headers such as X-Forwarded-For, True-Client-IP, and X-Real-IP are not a robust foundation on which to build any security measures, such as access controls.
Set properly values of the X-Forwarded-For header (from this handbook) — see this for more detailed information on how to set properly values of the X-Forwarded-For header.
But that’s not all. Behind a reverse proxy, the user IP we get is often the reverse proxy IP itself. If you use other HTTP server working between proxy and app server you should also set the correct mechanism for interpreting values of this header.
I recommend to read this amazing explanation by Nick M.
-
Pass headers from proxy to the backend layer:
- Always pass Host, X-Real-IP, and X-Forwarded headers to the backend
- Set properly values of the X-Forwarded-For header (from this handbook)
-
NGINX (backend) — modify the
set_real_ip_fromandreal_ip_headerdirectives:For this, the
http_realip_modulemust be installed (--with-http_realip_module).First of all, you should add the following lines to the configuration:
# Add these to the set_real_ip.conf, there are the real IPs where your traffic # is coming from (front proxy/lb): set_real_ip_from 192.168.20.10; # IP address of master set_real_ip_from 192.168.20.11; # IP address of slave # You can also add an entire subnet: set_real_ip_from 192.168.40.0/24; # Defines a request header field used to send the address for a replacement, # in this case we use X-Forwarded-For: real_ip_header X-Forwarded-For; # The real IP from your client address that matches one of the trusted addresses # is replaced by the last non-trusted address sent in the request header field: real_ip_recursive on; # Include it to the appropriate context: server { include /etc/nginx/set_real_ip.conf; ... }
-
NGINX — add/modify and set log format:
log_format combined-1 '$remote_addr forwarded for $http_x_real_ip - $remote_user [$time_local] ' '"$request" $status $body_bytes_sent ' '"$http_referer" "$http_user_agent"'; # or: log_format combined-2 '$remote_addr - $remote_user [$time_local] "$request" ' '$status $body_bytes_sent "$http_referer" ' '"$http_user_agent" "$http_x_forwarded_for"'; access_log /var/log/nginx/example.com/access.log combined-1;
This way, e.g. the
$_SERVER['REMOTE_ADDR']will be correctly filled up in PHP fastcgi. You can test it with the following script:# tls_check.php <?php echo '<pre>'; print_r($_SERVER); echo '</pre>'; exit; ?>
And send request to it:
curl -H Cache-Control: no-cache -ks https://example.com/tls-check.php?${RANDOM} | grep "HTTP_X_FORWARDED_FOR|HTTP_X_REAL_IP|SERVER_ADDR|REMOTE_ADDR" [HTTP_X_FORWARDED_FOR] => 172.217.20.206 [HTTP_X_REAL_IP] => 172.217.20.206 [SERVER_ADDR] => 192.168.10.100 [REMOTE_ADDR] => 192.168.10.10
Improve extensibility with Forwarded
Since 2014, the IETF has approved a standard header definition for proxy, called Forwarded, documented here [IETF] and here that should be use instead of X-Forwarded headers. This is the one you should use reliably to get originating IP in case your request is handled by a proxy. Official NGINX documentation also gives you how to Using the Forwarded header.
In general, the proxy headers (Forwarded or X-Forwarded-For) are the right way to get your client IP only when you are sure they come to you via a proxy. If there is no proxy header or no usable value in, you should default to the REMOTE_ADDR server variable.
Response headers
🔖 Set the HTTP headers with add_header and proxy_*_header directives properly — Base Rules — P1
add_header directive allows you to define an arbitrary response header (mostly for informational/debugging purposes) and value to be included in all response codes which are equal to:
- 2xx series: 200, 201, 204, 206
- 3xx series: 301, 302, 303, 304, 307, 308
For example:
add_header Custom-Header Value;
To change (adding or removing) existing headers you should use a headers-more-nginx-module module.
There is one thing you must watch out for if you use add_header directive (also applies to proxy_*_header directives). See the following explanations:
- Nginx add_header configuration pitfall
- Be very careful with your add_header in Nginx! You might make your site insecure
This situation is described in the official documentation:
There could be several
add_headerdirectives. These directives are inherited from the previous level if and only if there are noadd_headerdirectives defined on the current level.
However — and this is important — as you now have defined a header in your server context, all the remaining headers defined in the http context will no longer be inherited. Means, you’ve to define them in your server context again (or alternatively ignore them if they’re not important for your site).
At the end, summary about directives to manipulate headers:
proxy_set_headeris to sets or remove a request header (and pass it or not to the backend)add_headeris to add header to responseproxy_hide_headeris to hide a response header
We also have the ability to manipulate request and response headers using the headers-more-nginx-module module:
more_set_headers— replaces (if any) or adds (if not any) the specified output headersmore_clear_headers— clears the specified output headersmore_set_input_headers— very much likemore_set_headersexcept that it operates on input headers (or request headers)more_clear_input_headers— very much likemore_clear_headersexcept that it operates on input headers (or request headers)
The following figure describes the modules and directives responsible for manipulating HTTP request and response headers:

Load balancing algorithms
Load Balancing is in principle a wonderful thing really. You can find out about it when you serve tens of thousands (or maybe more) of requests every second. Of course, load balancing is not the only reason — think also about maintenance tasks without downtime.
Generally load balancing is a technique used to distribute the workload across multiple computing resources and servers. I think you should always use this technique also if you have a simple app or whatever else what you’re sharing with other.
The configuration is very simple. NGINX includes a ngx_http_upstream_module to define backends (groups of servers or multiple server instances). More specifically, the upstream directive is responsible for this.
upstreamdefines the load balancing pool, only provide a list of servers, some kind of weight, and other parameters related to the backend layer.
Backend parameters
🔖 Tweak passive health checks — Load Balancing — P3
🔖 Don’t disable backends by comments, use down parameter — Load Balancing — P4
Before we start talking about the load balancing techniques you should know something about server directive. It defines the address and other parameters of a backend servers.
This directive accepts the following options:
-
weight=<num>— sets the weight of the origin server, e.g.weight=10 -
max_conns=<num>— limits the maximum number of simultaneous active connections from the NGINX proxy server to an upstream server (default value:0= no limit), e.g.max_conns=8- if you set
max_conns=4the 5th will be rejected - if the server group does not reside in the shared memory (
zonedirective), the limitation works per each worker process
- if you set
-
max_fails=<num>— the number of unsuccessful attempts to communicate with the backend (default value:1,0disables the accounting of attempts), e.g.max_fails=3; -
fail_timeout=<time>— the time during which the specified number of unsuccessful attempts to communicate with the server should happen to consider the server unavailable (default value:10 seconds), e.g.fail_timeout=30s; -
zone <name> <size>— defines shared memory zone that keeps the group’s configuration and run-time state that are shared between worker processes, e.g.zone backend 32k; -
backup— if server is marked as a backup server it does not receive requests unless both of the other servers are unavailable -
down— marks the server as permanently unavailable
Upstream servers with SSL
Setting up SSL termination on NGINX is also very simple using the SSL module. For this you need to use upstream module, and proxy module also. A very good case study is also given here.
For more information please read Securing HTTP Traffic to Upstream Servers from the official documentation.
Round Robin
It’s the simpliest load balancing technique. Round Robin has the list of servers and forwards each request to each server from the list in order. Once it reaches the last server, the loop again jumps to the first server and start again.
upstream bck_testing_01 { # with default weight for all (weight=1) server 192.168.250.220:8080; server 192.168.250.221:8080; server 192.168.250.222:8080; }

Weighted Round Robin
In Weighted Round Robin load balancing algorithm, each server is allocated with a weight based on its configuration and ability to process the request.
This method is similar to the Round Robin in a sense that the manner by which requests are assigned to the nodes is still cyclical, albeit with a twist. The node with the higher specs will be apportioned a greater number of requests.
upstream bck_testing_01 { server 192.168.250.220:8080 weight=3; server 192.168.250.221:8080; # default weight=1 server 192.168.250.222:8080; # default weight=1 }

Least Connections
This method tells the load balancer to look at the connections going to each server and send the next connection to the server with the least amount of connections.
upstream bck_testing_01 { least_conn; # with default weight for all (weight=1) server 192.168.250.220:8080; server 192.168.250.221:8080; server 192.168.250.222:8080; }
For example: if clients D10, D11 and D12 attempts to connect after A4, C2 and C8 have already disconnected but A1, B3, B5, B6, C7 and A9 are still connected, the load balancer will assign client D10 to server 2 instead of server 1 and server 3. After that, client D11 will be assign to server 1 and client D12 will be assign to server 2.

Weighted Least Connections
This is, in general, a very fair distribution method, as it uses the ratio of the number of connections and the weight of a server. The server in the cluster with the lowest ratio automatically receives the next request.
upstream bck_testing_01 { least_conn; server 192.168.250.220:8080 weight=3; server 192.168.250.221:8080; # default weight=1 server 192.168.250.222:8080; # default weight=1 }
For example: if clients D10, D11 and D12 attempts to connect after A4, C2 and C8 have already disconnected but A1, B3, B5, B6, C7 and A9 are still connected, the load balancer will assign client D10 to server 2 or 3 (because they have a least active connections) instead of server 1. After that, client D11 and D12 will be assign to server 1 because it has the biggest weight parameter.

IP Hash
The IP Hash method uses the IP of the client to create a unique hash key and associates the hash with one of the servers. This ensures that a user is sent to the same server in future sessions (a basic kind of session persistence) except when this server is unavailable. If one of the servers needs to be temporarily removed, it should be marked with the down parameter in order to preserve the current hashing of client IP addresses.
This technique is especially helpful if actions between sessions has to be kept alive e.g. products put in the shopping cart or when the session state is of concern and not handled by shared memory of the application.
upstream bck_testing_01 { ip_hash; # with default weight for all (weight=1) server 192.168.250.220:8080; server 192.168.250.221:8080; server 192.168.250.222:8080; }

Generic Hash
This technique is very similar to the IP Hash but for each request the load balancer calculates a hash that is based on the combination of a text string, variable, or a combination you specify, and associates the hash with one of the servers.
upstream bck_testing_01 { hash $request_uri; # with default weight for all (weight=1) server 192.168.250.220:8080; server 192.168.250.221:8080; server 192.168.250.222:8080; }
For example: load balancer calculate hash from the full original request URI (with arguments). Clients A4, C7, C8 and A9 sends requests to the /static location and will be assign to server 1. Similarly clients A1, C2, B6 which get /sitemap.xml resource they will be assign to server 2. Clients B3 and B5 sends requests to the /api/v4 and they will be assign to server 3.

Other methods
It is similar to the Generic Hash method because you can also specify a unique hash identifier but the assignment to the appropriate server is under your control. I think it’s a somewhat primitive method and I wouldn’t say it is a full load balancing technique, but in some cases it is very useful.
Mainly this helps reducing the mess on the configuration made by a lot of
locationblocks with similar configurations.
First of all, create a map:
map $request_uri $bck_testing_01 { default "192.168.250.220:8080"; /api/v4 "192.168.250.220:8080"; /api/v3 "192.168.250.221:8080"; /static "192.168.250.222:8080"; /sitemap.xml "192.168.250.222:8080"; }
And add proxy_pass directive:
server { ... location / { proxy_pass http://$bck_testing_01; } ... }
Rate limiting
🔖 Limit concurrent connections — Hardening — P1
**🔖 Use limit_conn to improve limiting the download speed — Performance — P3
NGINX has a default module to setup rate limiting. For me, it’s one of the most useful protect feature but sometimes really hard to understand.
I think, in case of doubt, you should read up on the following documents:
- Rate Limiting with NGINX and NGINX Plus
- NGINX rate-limiting in a nutshell
- NGINX Rate Limiting
- How to protect your web site from HTTP request flood, DoS and brute-force attacks
Rate limiting rules are useful for:
- traffic shaping
- traffic optimising
- slow down the rate of incoming requests
- protect http requests flood
- protect against slow http attacks
- prevent consume a lot of bandwidth
- mitigating ddos attacks
- protect brute-force attacks
Variables
NGINX has following variables (unique keys) that can be used in a rate limiting rules. For example:
| VARIABLE | DESCRIPTION |
|---|---|
$remote_addr |
client address |
$binary_remote_addr |
client address in a binary form, it is smaller and saves space then remote_addr |
$server_name |
name of the server which accepted a request |
$request_uri |
full original request URI (with arguments) |
$query_string |
arguments in the request line |
Please see official documentation for more information about variables.
Directives, keys, and zones
NGINX also provides following keys:
| KEY | DESCRIPTION |
|---|---|
limit_req_zone |
stores the current number of excessive requests |
limit_conn_zone |
stores the maximum allowed number of connections |
And directives:
| DIRECTIVE | DESCRIPTION |
|---|---|
limit_req |
in combination with a limit_conn_zone sets the shared memory zone and the maximum burst size of requests |
limit_conn |
in combination with a limit_req_zone sets the shared memory zone and the maximum allowed number of (simultaneous) connections to the server per a client IP |
Keys are used to store the state of each IP address and how often it has accessed a limited object. This information are stored in shared memory available from all NGINX worker processes.
You can enable the dry run mode with
limit_req_dry_run on;. In this mode, requests processing rate is not limited, however, in the shared memory zone, the number of excessive requests is accounted as usual.
Both keys also provides response status parameters indicating too many requests or connections with specific http code (default 503).
limit_req_status <value>limit_conn_status <value>
For example, if you want to set the desired logging level for cases when the server limits the number of connections:
# Add this to http context: limit_req_status 429; # Set your own error page for 429 http code: error_page 429 /rate_limit.html; location = /rate_limit.html { root /usr/share/www/http-error-pages/sites/other; internal; }
And create this file:
cat > /usr/share/www/http-error-pages/sites/other/rate_limit.html << __EOF__ HTTP 429 Too Many Requests __EOF__
Rate limiting rules also have zones that lets you define a shared space in which to count the incoming requests or connections.
All requests or connections coming into the same space will be counted in the same rate limit. This is what allows you to limit per URL, per IP, or anything else. In HTTP/2 and SPDY, each concurrent request is considered a separate connection.
The zone has two required parts:
<name>— is the zone identifier<size>— is the zone size
Example:
<key> <variable> zone=<name>:<size>;
State information for about 16,000 IP addresses takes 1 megabyte. So 1 kilobyte zone has 16 IP addresses.
The range of zones is as follows:
-
http context
-
server context
server { ... zone=<name>; -
location directive
location /api { ... zone=<name>;
All rate limiting rules (definitions) should be added to the NGINX
httpcontext.
Remember also about this answer:
If your are loading a website, you are not loading only this site, but assets as well. Nginx will think of them as independent connections. You have 10r/s defined and a burst size of 5. Therefore after 10 Requests/s the next requests will be delayed for rate limiting purposes. If the burst size (5) gets exceeded the following requests will receive a 503 error.
limit_req_zone key lets you set rate parameter (optional) — it defines the rate limited URL(s).
See also examples (all comes from this handbook):
- Limiting the rate of requests with burst mode
- Limiting the rate of requests with burst mode and nodelay
- Limiting the rate of requests per IP with geo and map
- Limiting the number of connections
Burst and nodelay parameters
For enable queue you should use limit_req or limit_conn directives (see above). limit_req also provides optional parameters:
| PARAMETER | DESCRIPTION |
|---|---|
burst=<num> |
sets the maximum number of excessive requests that await to be processed in a timely manner; maximum requests as rate * burst in burst seconds |
nodelay |
it imposes a rate limit without constraining the allowed spacing between requests; default NGINX would return 503 response and not handle excessive requests |
nodelayparameters are only useful when you also set aburst.
Without nodelay NGINX would wait (no 503 response) and handle excessive requests with some delay.
NAXSI Web Application Firewall
- NAXSI
- NAXSI, a web application firewall for Nginx
NAXSI is an open-source, high performance, low rules maintenance WAF for NGINX and is usually referred to as a Positive model application Firewall. It is an open-source WAF (Web Application Firewall), providing high performances, and low rules maintenance Web Application Firewall module.
OWASP ModSecurity Core Rule Set (CRS)
- OWASP Core Rule Set
- OWASP Core Rule Set — Official documentation
The OWASP ModSecurity Core Rule Set (CRS) is a set of generic attack detection rules for use with ModSecurity or compatible web application firewalls. The CRS aims to protect web applications from a wide range of attacks, including the OWASP Top Ten, with a minimum of false alerts.
Core modules
ngx_http_geo_module
Documentation:
ngx_http_geo_module
This module makes available variables, whose values depend on the IP address of the client. When combined with GeoIP module allows for very elaborate rules serving content according to the geolocation context.
By default, the IP address used for doing the lookup is $remote_addr, but it is possible to specify an another variable.
If the value of a variable does not represent a valid IP address then the
255.255.255.255address is used.
Performance
Look at this (from official documentation):
Since variables are evaluated only when used, the mere existence of even a large number of declared
geovariables does not cause any extra costs for request processing.
This module (watch out: don’t mistake this module for the GeoIP) builds in-memory radix tree when loading configs. This is the same data structure as used in routing, and lookups are really fast. If you have many unique values per networks, then this long load time is caused by searching duplicates of data in array. Otherwise, it may be caused by insertions to a radix tree.
Examples
See Use geo/map modules instead of allow/deny from this handbook.
# The variable created is $trusted_ips: geo $trusted_ips { default 0; 192.0.0.0/24 0; 8.8.8.8 1; } server { if ( $trusted_ips = 1 ) { return 403; } ... }
If the value of a variable does not represent a valid IP address then the
255.255.255.255address is used.
You can also test IP ranges, for example:
# Create geo-ranges.conf: 127.0.0.0-127.255.255.255 loopback; # Add geo definition: geo $geo_ranges { ranges; default default; include geo-ranges.conf; 10.255.0.0-10.255.255.255 internal; }
3rd party modules
Not all external modules can work properly with your currently NGINX version. You should read the documentation of each module before adding it to the modules list. You should also to check what version of module is compatible with your NGINX release. What’s more, be careful before adding modules on production. Some of them can cause strange behaviors, increased memory and CPU usage, and also reduce the overall performance of NGINX.
Before installing external modules please read Event-Driven architecture section to understand why poor quality 3rd party modules may reduce NGINX performance.
If you have running NGINX on your server, and if you want to add new modules, you’ll need to compile them against the same version of NGINX that’s currently installed (
nginx -v) and to make new module compatible with the existing NGINX binary, you need to use the same compile flags (nginx -V). For more please see How to Compile Dynamic NGINX Modules.
If you use, e.g.
--with-stream=dynamic, then all thosestream_xxxmodules must also be built as NGINX dynamic modules. Otherwise you would definitely see those linker errors.
ngx_set_misc
Documentation:
ngx_set_misc
ngx_http_geoip_module
Documentation:
ngx_http_geoip_modulengx_http_geoip2_module
This module allows real-time queries against the Max Mind GeoIP database. It uses the old version of API, still very common on OS distributions. For using the new version of GeoIP API, see geoip2 module.
The Max Mind GeoIP database is a map of IP network address assignments to geographical locales that can be useful — though approximate — in identifying the physical location with which an IP host address is associated on a relatively granular level.
Performance
The GeoIP module sets multiple variables and by default NGINX parses and loads geoip data into memory once the config file only on (re)start or SIGHUP.
GeoIP lookups come from a distributed database rather than from a dynamic server, so unlike DNS, the worst-case performance hit is minimal. Additionally, from a performance point of view, you should not worry, as geoip database are stored in memory (at the reading configuration phase) and NGINX doing lookups very fast.
GeoIP module creates (and assigns values to) variables based on the IP address of the request client and one of Maxmind GeoIP databases. One of the common uses is to set the country of the end-user as a NGINX variable.
Variables in NGINX are evaluated only on demand. If $geoip_* variable was not used during the request processing, then geoip db was not lookuped. So, if you don’t call the geoip variable on your app the geoip module wont be executed at all. The only inconvenience of using really large geobases is config reading time.
Examples
See Restricting access by geographical location from this handbook.