Posted Feb 11 2016 at 06:29PM
When to transition from OpenGL to Vulkan
With the availability of Vulkan there are now two open graphics APIs that target similar platforms. This brings up the questions which API to choose for new applications, or what to do with existing applications. Just because Vulkan is newer, it doesn’t mean it is always better, nor that OpenGL became an inferior choice over night.
Will the application benefit from Vulkan?
In this section we will discuss 5 important scenarios to consider to help you decide if it makes sense to port from OpenGL to Vulkan. After all, if you do all this work, you do want to see a benefit from it!
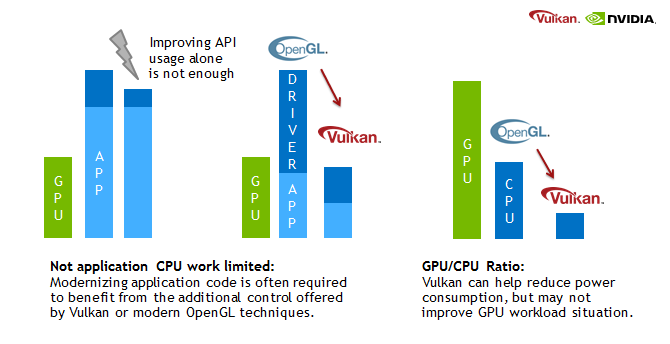
- Rendering rate not limited by other CPU work. Vulkan’s design allows great reduction in CPU time spent in the driver, therefore check whether your application is actually driver-bound and not application-limited. The latter is often the case for code-bases that have traditional scene-graph traversal which mapped well to the original OpenGL state machine.
- Balanced GPU/CPU usage ratio. There are no fundamentally different GPU features in Vulkan versus OpenGL. As a consequence, if the GPU workload dominates the rendering time in your application, and is expected to stay that way (growing problem size with new hardware generations…), Vulkan may not offer any speed-up to you. Or differently phrased, do you have a good use-case for the additional CPU time gained with moving to Vulkan (or indirect effects such as potentially lower CPU power usage)?
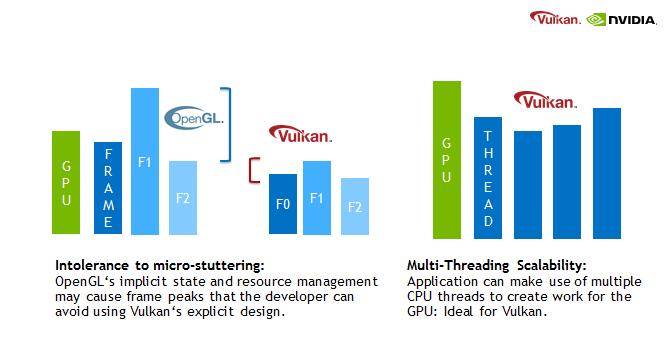
- Intolerance to missed frames or micro stuttering. If your application is sensitive to stuttering, then Vulkan’s explicit design could allow you to manage state and resources better than internal driver heuristics, by controlling explicitly when expensive operations happen during rendering of a scene.
- Application’s work load is partitioned well across multiple threads. Vulkan excels in creating work for the GPU spread over many CPU threads. If your application is targeting that, or already scaling well across CPU threads, and you have exhausted modern OpenGL techniques, then Vulkan can improve the situation.
- Off-screen GPU compute and graphics work. Vulkan does not need to “display” anything. It can be used without a window by design, and therefore is also suited for general purpose GPU acceleration.
Vulkan shines when the application is designed around its concepts from the ground up. Concepts like re-using API objects, rather than building state on the fly, potentially re-using entire command sequences and so on. Just like OpenGL has its fast paths, Vulkan has as well. Any API can be used or abused to reach a certain goal.
With this in mind, OpenGL is still a great option for a lot of use-cases. It does come at a much lower complexity and maintenance burden, while in many cases still providing great overall performance. Enabling the developer to focus on solving actual graphics and compute problems instead of writing a lot of supplementary Vulkan code.
What to consider for maintaining a Vulkan-based renderer?

- Complexity. In OpenGL getting something on the screen is by far easier. Even without classic fixed function, just rendering full-screen effects or image-processing takes only few lines of code. Vulkan’s level of verbosity to get to the first pixel on the screen is far higher. As hinted in the previous blog posts on resource bindings or memory management, these additional complexities will require more code to be written. Especially for people new to graphics, it may be better to use OpenGL or rendering middleware that hides this complexity and focus on the actual task.
-
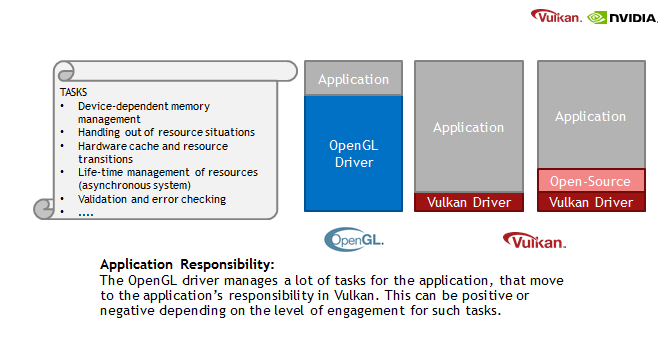
Responsibility. OpenGL does a lot in the background, from very simple things such as error checking, compiling high-level shaders, to avoiding deletion of resources that are still used by the GPU (which operates asynchronously) or managing internal resource allocation and hardware cache flushing. Another example is the handling of out of memory situation, where the OpenGL driver implicitly splits up workloads or moves allocations between dedicated/system memory. This code now moves from the driver into the application domain. Developers may also need to replace middleware that was OpenGL only with their own code. While Vulkan doesn’t have the “state-bleeding” issue that OpenGL has for middle-ware, resource management may be a new topic for developers. Owning a larger portion of the graphics code responsibilities has its own benefits, as it makes developers more independent and gives them more control over when what happens in the graphics pipeline.
-
Portability. Vulkan being so low-level means that getting the best out of different hardware architectures will very likely require dedicated code-paths. This is fundamentally not that different to the reality of using extensions in OpenGL, but a reminder that Vulkan doesn’t magically do away with it. It provides a much higher base-level in terms of capabilities, and a concise set of function entry points, but differences in the hardware capabilities and preferred operations will still manifest themselves.
All these statements should not be read as “OpenGL is without flaws”, however OpenGL may indeed be just fine for a lot of use cases. While the heuristics in OpenGL drivers can come at a cost, they have also been able to cover many use-cases over the years.
To improve the situation, Khronos and members companies (especially Valve) have sponsored the development of several open-source Vulkan tools. The reference compiler that generates SPIR-V is already public and a toolkit that covers shader library and command-line use was created by Google. Other tools will follow, for example validation and debug layers that can be used on top of any Vulkan driver.
Khronos has developed an extensive conformance suite, which will guarantee a base level of quality for Vulkan drivers across vendors. Each Vulkan driver will go through conformance testing from the very beginning. Furthermore Khronos has granted many developers, who have helped the OpenGL eco-system in the past, early access so they can make several popular libraries and middleware Vulkan ready.
NVIDIA’s Vulkan driver will allow running Vulkan within an OpenGL context and displaying images generated by Vulkan through OpenGL. NVIDIA will also allow GLSL shaders to be loaded by Vulkan, as well as of course SPIR-V shaders. These two features together allow for rapid prototyping by developers to gauge the impact of replacing OpenGL with Vulkan in sections of existing code, and enable developers to ship applications using Vulkan even when going all-Vulkan is not feasible.
In a follow up post we go into some more technical details how OpenGL can be used in a Vulkan way to make the transition a smoother process.

GLOVE — GL Over Vulkan

GLOVE (GL Over Vulkan) is a cross-platform software library that acts as an intermediate layer between an OpenGL ES application and Vulkan.
GLOVE is focused towards embedded systems and is comprised of OpenGL ES and EGL implementations, which translate at runtime all OpenGL ES / EGL calls & ESSL shaders to Vulkan commands & SPIR-V shader respectively and finally relays them to the underlying Vulkan driver.
GLOVE has been designed towards facilitating developers to easily build and integrate new features, allowing at the same time its further extension, portability and interoperability. Currently, GLOVE supports OpenGL ES 2.0 and EGL 1.4 on Linux, Android, MS Windows and MacOS platforms, but the modular design can be easily extended to encompass implementations of other client APIs as well.
GLOVE is considered as a work-in-progress and is open-sourced under the LGPL v3 license through which it is provided as free software with unlimited use for educational and research purposes.
Future planned extensions of GLOVE include the support for OpenGL ES 3.x and OpenGL applications.
Prerequisites
The minimum Vulkan loader version must be 1.0.24.
Optionally, GLOVE supports the VK_KHR_maintenance1 extension, used for OpenGL to Vulkan Coordinates conversion (left handed to right handed coordinate system).
Tested with the following configurations
GLOVE has been successfully tested with GLOVE demos with the following configurations
| GL version | Graphics Card | Vulkan Driver | Vulkan API | OS | Windows Platform | Status |
|---|---|---|---|---|---|---|
| ES 2.0 | Intel Ivybridge Desktop | Mesa 17.3.3 | 1.0.54 | Ubuntu 16.04 | XCB | success |
| ES 2.0 | Intel HD Graphics 530 (Skylake GT2) | Mesa 18.0.5 | 1.0.57 | Ubuntu 16.04 | XCB | success |
| ES 2.0 | Intel HD Graphics 630 (Kabylake GT2) | Mesa 18.0.5 | 1.0.61 | Ubuntu 16.04 | XCB | success |
| ES 2.0 | Intel Ivybridge Desktop | Mesa 17.3.3 | 1.0.54 | Ubuntu 16.04 | WAYLAND | success |
| ES 2.0 | Intel HD Graphics 530 (Skylake GT2) | Mesa 18.0.5 | 1.0.57 | Ubuntu 16.04 | WAYLAND | success |
| ES 2.0 | Radeon RX 550 Series | Mesa 18.0.5 | 1.0.61 | Ubuntu 16.04 | XCB | success |
| ES 2.0 | Radeon RX 550 Series | AMDGPU-Pro v18.40 | 1.1.77 | Ubuntu 16.04 | XCB | success |
| ES 2.0 | GeForce 940M | NVIDIA 396.51 | 1.1.70 | Ubuntu 16.04 | XCB | success |
| ES 2.0 | GeForce GTX 670 | NVIDIA 396.54 | 1.1.70 | Ubuntu 18.04 | XCB | success |
| ES 2.0 | Mali-G71 | ARM 482.381.3347 | 1.0.26 | Android 7.0 | Android | success |
| ES 2.0 | Mali-G71 | ARM 485.111.1108 | 1.0.65 | Android 8.0 | Android | success |
| ES 2.0 | GeForce GTX 1050 | NVIDIA 416.83 | 1.1.84 | Windows 10 | Windows | success |
| ES 2.0 | Intel Iris Graphics 6100 | MoltenVK v1.0.38 | 1.1.126 | macOS Catalina | MacOS | success |
| ES 2.0 | Intel HD Graphics 530 (Skylake GT2) | Mesa v19.3.2 | 1.2.31 | OpenSUSE Tumbleweed | XCB | success |
| ES 2.0 | Intel HD Graphics 530 (Skylake GT2) | Mesa v19.3.2 | 1.2.31 | OpenSUSE Tumbleweed | WAYLAND | success |
Software Design
You can find a short description on GLOVE’s software design as well as «How To extend GLOVE» guidelines in the GLOVE Design Document.
Contribution
GLOVE project is considered as work in progress, therefore contributions are more than welcome! Guidelines of how to contribute to GLOVE can be found here.
Installation Instructions
Download the Repository
To create your local git repository:
git clone https://github.com/Think-Silicon/GLOVE.git
Required Packages
Required Packages for Linux Distributions
To install all required packages:
For Ubuntu
sudo apt-get install git cmake extra-cmake-modules libvulkan-dev vulkan-utils build-essential libx11-xcb-dev
Optionally «mesa-vulkan-drivers» package is needed if no other Vulkan driver is available.
The compiler minimum version that this project is built with, is GCC 4.9.3, although earlier versions may work.
For OpenSUSE
sudo zypper install -t pattern devel_C_C++
sudo zypper install cmake extra-cmake-modules libX11-devel
To install packages libvulkan1 vulkan-headers vulkan-loader vulkan tools follow the directions in the links below
https://software.opensuse.org/package/libvulkan1
https://software.opensuse.org/package/vulkan-loader
https://software.opensuse.org/package/vulkan-headers
https://software.opensuse.org/package/vulkan-tools
Required Packages for MS Windows
To compile GLOVE on Windows, you need
- MS Visual Studio 2019 (Download here), with CMake enabled
- Python3 (Download here)
Vulkan SDK
To facilitate running and debugging GLOVE on MS Windows, it is recommended to download Vulkan SDK .
Required Packages for MacOS
Python3 and cmake are required for MacOS. You can install them via homebrew with the following commands
brew install cmake
brew install python3
MoltenVK
GLOVE has been tested in macOS, using MoltenVK (Vulkan to Metal middleware), which creates the necessary Vulkan headers and Vulkan loader (libMoltenVK.dylib). Instructions on how to build MoltenVk can be found here.
External Repositories Dependencies
Khronos glslang repository is mandatory for compiling, validating and generating SPIR-V from ESSL shaders.
Google googletest repository is used for unit testing.
To get and build the above projects:
python3.x update_external_sources.py
ATTENTION: Python 3 is supported only, so you need to install python 3.x version
Linux Users can also use the equivalent bash shell script, as follows
./update_external_sources.sh
Building
View the Building Instructions for detailed instructions on how to configure and build GLOVE on the supported platforms.
Known Issues
GLOVE is considered as work-in-progress, therefore there are known issues that have to be resolved or improved.
You can see a detailed list of issues in the Known Issues List.
Demos
A demo SDK that contains fully commented, highly optimized C applications (accompanied by the ESSL shader source code) is available with GLOVE. These demos demonstrate some simple rendering techniques with different geometry complexities, as they were designed with the restrictions of low-power embedded platforms in mind.
See details in Demos README.
Benchmarking
GLOVE is aiming to take advantage of Vulkan in terms of performance. Our preliminary results are very promising and further major performance upgrades are also in progress. Instructions to use some available benchmarks for testing can be found in the Benchmarking README.
Credits
Full Credit list at Credits page.
Введение.
В Linux для видеокарт AMD используется несколько реализаций Vulkan-драйвера, эта заметка призвана решить задачу, когда угораздило работать с программами, включая тестирование, требующими конкретный Vulkan-драйвер или его версию. В Linux есть простая возможность явно указывать какой драйвер задействовать для той или иной программы в отдельности.
Основные Vulkan-драйверы:
- RADV — Radeon Vulkan Driver — это свободный драйвер, входящий в Mesa, что делает его основным Vulkan-драйвером для подавляющего числа дистрибутивов Linux. Развивается под покровительством компании Valve. Отличается высокой производительностью, реализацией различных оптимизационных техник и продвинутым компилятором шейдеров ACO. В его развитии основной упор сделан на производительности игр, в особенности трансляции вызовов DX в Vulkan.
- AMDVLK — AMD Open Source Driver For Vulkan — официальный свободный драйвер от AMD. Не входит в состав Mesa и поставляется отдельным пакетом. Практически полностью аналогичен их проприетарному Vulkan-драйверу, входящему в состав AMDGPU Pro. Ключевое отличие заключается в использовании разных шейдерных компиляторов: свободный использует LLVM, закрытый — собственный. В виду официального статуса, ряд профессиональных программ и ранних портов игр (в основном от Feral Interactive) ориентировались только на AMDVLK, тем самым выдавая несколько более высокую производительность, чем на RADV. Причём существуют единичные программы, работающие исключительно с AMDVLK.
- Lavapipe — предназначен для программной отрисовки 2D и 3D графики силами центрального процессора, что позволяет работать с графикой без наличия отдельного видеочипа. Был создан в качестве замены менее производительного LLVMpipe, базирующегося на OpenGL, который, в свою очередь, постепенно выходит из оборота и заменяется Vulkan.
Для Debian и Ubuntu, включая деривативы, RADV и Lavapipe входят в пакет mesa-vulkan-drivers. Пакет AMDVLK можно брать из официального репозитория: https://github.com/GPUOpen-Drivers/AMDVLK/releases
Выбор драйвера определяется специальным json-скриптом. Для RADV и Lavapipe скрипты располагаются в /usr/share/vulkan/icd.d/, а для AMDVLK — в /etc/vulkan/icd.d/. Тем самым для использования того или иного драйвера должен быть задействован определённый скрипт:
- radeon_icd — включает использование RADV.
- amd_icd64 — AMDVLK.
- lvp_icd — Lavapipe.
Пример содержимого:
{
"ICD": {
"api_version": "1.2.182",
"library_path": "/usr/lib/x86_64-linux-gnu/libvulkan_radeon.so"
},
"file_format_version": "1.0.0"
}
Суффикс i686 означает, что драйвер для 32-битных программ, а x86_64 — 64-битных.
Библиотеки находятся здесь: /usr/lib/x86_64-linux-gnu/
- libvulkan_radeon.so
- amdvlk64.so
- libvulkan_lvp.so
Применение.
Выбор драйвера определяется переменной VK_ICD_FILENAMES. Чтобы задействовать желаемый драйвер, необходимо передать ей путь до соответствующего скрипта.
Пример запуска Unreal Engine 4 с драйвером AMDVLK:
env VK_ICD_FILENAMES=/etc/vulkan/icd.d/amd_icd64.json '/home/$USER/UnrealEngine/Engine/Binaries/Linux/UE4Editor'Подобным образом можно запускать любую программу с желаемым драйвером.
В виду того, что для переменной есть возможность указать собственный скрипт, можно использовать Vulkan-библиотеки различных версий, что очень полезно для того же тестирования.
Бонус.
При использовании Mesa 21.x игра War Thunder (на момент 2021 года) не могла запуститься. Проблема оказалась в том, что по какой-то причине она предпочитала задействовать драйвер Lavapipe, который предназначен для программной отрисовки средствами процессора, вместо штатного RADV, что приводило к ошибке:
WARNING: lavapipe is not a conformant vulkan implementation, testing use only.
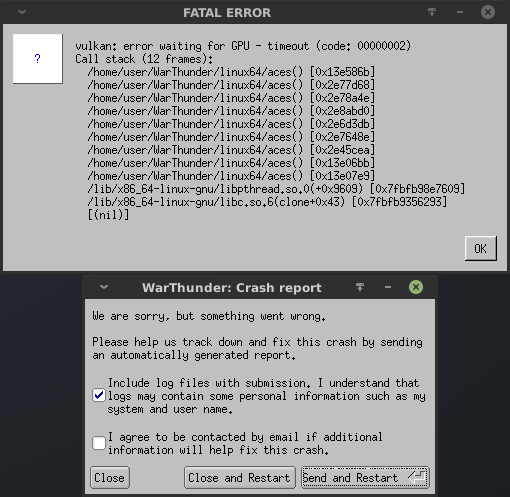
Call stack (12 frames)
Чтобы это решить, необходимо вручную включить использование драйвера RADV. Пример:
env VK_ICD_FILENAMES=/usr/share/vulkan/icd.d/radeon_icd.x86_64.json /home/$USER/WarThunder/linux64/aces
Таким образом игра успешно запустится.
Yes, it’s possible if the Vulkan implementation and the OpenGL implementation both have the appropriate extensions available.
Here is a screenshot from an example app in the Vulkan Samples repository which uses OpenGL to render a simple shadertoy to a texture, and then uses that texture in a Vulkan rendered window.

Although your question seems to suggest you want to do the reverse (render to something using Vulkan and then display the results using OpenGL), the same concepts apply…. populate a texture in one API, use synchronization to ensure the GPU work is complete, and then use the texture in the other API. You can also do the same thing with buffers, so for instance you could use Vulkan for compute operations and then use the results in an OpenGL render.
Requirements
Doing this requires that both the OpenGL and Vulkan implementations support the required extensions, however, according to this site, these extensions are widely supported across OS versions and GPU vendors, as long as you’re working with a recent (> 1.0.51) version of Vulkan.
You need the the External Objects extension for OpenGL and the External Memory/Fence/Sempahore extensions for Vulkan.
The Vulkan side of the extensions allow you to allocate memory, create semaphores or fences while marking the resulting objects as exportable. The corresponding GL extensions allow you to take the objects and manipulate them with new GL commands which allow you to wait on fences, signal and wait on semaphores, or use Vulkan allocated memory to back an OpenGL texture. By using such a texture in an OpenGL framebuffer, you can pretty much render whatever you want to it, and then use the rendered results in Vulkan.
Export / Import example code
For example, on the Vulkan side, when you’re allocating memory for an image you can do this…
vk::Image image;
... // create the image as normal
vk::MemoryRequirements memReqs = device.getImageMemoryRequirements(image);
vk::MemoryAllocateInfo memAllocInfo;
vk::ExportMemoryAllocateInfo exportAllocInfo{
  vk::ExternalMemoryHandleTypeFlagBits::eOpaqueWin32
};
memAllocInfo.pNext = &exportAllocInfo;
memAllocInfo.allocationSize = memReqs.size;
memAllocInfo.memoryTypeIndex = context.getMemoryType(
  memReqs.memoryTypeBits, vk::MemoryPropertyFlagBits::eDeviceLocal);
vk::DeviceMemory memory;
memory = device.allocateMemory(memAllocInfo);
device.bindImageMemory(image, memory, 0);
HANDLE sharedMemoryHandle = device.getMemoryWin32HandleKHR({
  texture.memory, vk::ExternalMemoryHandleTypeFlagBits::eOpaqueWin32
});
This is using the C++ interface and is using the Win32 variation of the extensions. For Posix platforms there are alternative methods for getting file descriptors instead of WIN32 handles.
The sharedMemoryHandle is the value that you’ll need to pass to OpenGL, along with the actual allocation size. On the GL side you can then do this…
// These values should be populated by the vulkan code
HANDLE sharedMemoryHandle;
GLuint64 sharedMemorySize;

// Create a 'memory object' in OpenGL, and associate it with the memory
// allocated in vulkan
GLuint mem;
glCreateMemoryObjectsEXT(1, mem);
glImportMemoryWin32HandleEXT(mem, sharedMemorySize,
  GL_HANDLE_TYPE_OPAQUE_WIN32_EXT, sharedMemoryHandle);

// Having created the memory object we can now create a texture and use
// the memory object for backing it
glCreateTextures(GL_TEXTURE_2D, 1, &color);
// The internalFormat here should correspond to the format of
// the Vulkan image.  Similarly, the w & h values should correspond to
// the extent of the Vulkan image
glTextureStorageMem2DEXT(color, 1, GL_RGBA8, w, h, mem, 0 );
Synchronization
The trickiest bit here is synchronization. The Vulkan specification requires images to be in certain states (layouts) before corresponding operations can be performed on them. So in order to do this properly (based on my understanding), you would need to…
- In Vulkan, create a command buffer that transitions the image to ColorAttachmentOptimal layout
- Submit the command buffer so that it signals a semaphore that has similarly been exported to OpenGL
- In OpenGL, use the
glWaitSemaphoreEXTfunction to cause the GL driver to wait for the transition to complete.- Note that this is a GPU side wait, so the function will not block at all. It’s similar to
glWaitSync(as opposed toglClientWaitSync)in this regard.
- Note that this is a GPU side wait, so the function will not block at all. It’s similar to
- Execute your GL commands that render to the framebuffer
- Signal a different exported Semaphore on the GL side with the
glSignalSemaphoreEXTfunction - In Vulkan, execute another image layout transition from ColorAttachmentOptimal to ShaderReadOnlyOptimal
- Submit the transition command buffer with the wait semaphore set to the one you just signaled from the GL side.
That’s would be an optimal path. Alternatively, the quick and dirty method would be to do the vulkan transition, and then execute queue and device waitIdle commands to ensure the work is done, execute the GL commands, followed by glFlush & glFinish commands to ensure the GPU is done with that work, and then resume your Vulkan commands. This is more of a brute force approach and will likely produce poorer performance than doing the proper synchronization.
This is the second post of the OpenGL and Vulkan interoperability series, where I explain some EXT_external_objects and EXT_external_objects_fd use cases with examples taken by the Piglit tests I’ve written to test the extensions as part of my work for Igalia‘s graphics team.
We are going to see a very simple case of Vulkan/GL interoperability where an image is allocated using Vulkan and filled using OpenGL. This case is implemented in Piglit’s vk-image-overwrite test for images of different formats.
The vk-image-overwrite test:
- Allocates an image using Vulkan.
- Creates an OpenGL texture from the Vulkan allocated image memory.
- Fills the texture with blue color using OpenGL.
- Compares the texture values in a shader with blue: when the input color is blue the fragment is painted green when not it is painted red.
- Checks if all pixels are green and if yes the test passes, if at least one non-green pixel is found it fails
- The rendering/check is repeated for many images of different formats and tiling modes.
Step 1: Image allocation (Vulkan)
In tests/spec/ext_external_objects/vk_image_overwrite.c (see links below to checkout the code from Gitlab), we allocate each image in function run_subtest:
|
if (!vk_set_image_props(piglit_width, piglit_height, d, num_samples, num_levels, vk_gl_format[case_num].vkformat, vk_gl_format[case_num].tiling, 0)) { piglit_report_subtest_result(PIGLIT_SKIP, «%s: Unsupported image format.», vk_gl_format[case_num].name); return PIGLIT_SKIP; } if (!vk_create_ext_image(&vk_core, &vk_img_props, &vk_img_obj)) { piglit_report_subtest_result(PIGLIT_FAIL, «%s: Failed to create external Vulkan image.», vk_gl_format[case_num].name); return PIGLIT_FAIL; } |
Functions prefixed as vk_ can be found in tests/spec/ext_external_objects/vk.[hc] and are Vulkan helper functions. As the name implies vk_set_image_properties just set the image properties. The important function is vk_create_ext_image that allocates an external Vulkan image (which is an image whose memory can be accessed by OpenGL):
|
bool vk_create_ext_image(struct vk_ctx *ctx, struct vk_image_props *props, struct vk_image_obj *img) { VkExternalMemoryImageCreateInfo ext_img_info; VkImageCreateInfo img_info; memset(&ext_img_info, 0, sizeof ext_img_info); ext_img_info.sType = VK_STRUCTURE_TYPE_EXTERNAL_MEMORY_IMAGE_CREATE_INFO; ext_img_info.handleTypes = VK_EXTERNAL_MEMORY_HANDLE_TYPE_OPAQUE_FD_BIT_KHR; memset(&img_info, 0, sizeof img_info); img_info.sType = VK_STRUCTURE_TYPE_IMAGE_CREATE_INFO; img_info.pNext = &ext_img_info; [...] |
In the snippet above I’ve used an extra Vulkan structure VkExternalMemoryImageCreateInfo when I filled VkImageCreateInfo and then I allocated the image calling the helper function alloc_memory (see vk.c) here:
|
1 2 3 4 5 6 7 8 9 10 11 12 13 14 15 16 17 18 19 20 21 22 23 24 25 26 27 28 29 30 31 32 |
static VkDeviceMemory alloc_memory(struct vk_ctx *ctx, const VkMemoryRequirements *mem_reqs, VkMemoryPropertyFlagBits prop_flags) { VkExportMemoryAllocateInfo exp_mem_info; VkMemoryAllocateInfo mem_alloc_info; VkDeviceMemory mem; memset(&exp_mem_info, 0, sizeof exp_mem_info); exp_mem_info.sType = VK_STRUCTURE_TYPE_EXPORT_MEMORY_ALLOCATE_INFO; exp_mem_info.handleTypes = VK_EXTERNAL_MEMORY_HANDLE_TYPE_OPAQUE_FD_BIT; memset(&mem_alloc_info, 0, sizeof mem_alloc_info); mem_alloc_info.sType = VK_STRUCTURE_TYPE_MEMORY_ALLOCATE_INFO; mem_alloc_info.pNext = &exp_mem_info; mem_alloc_info.allocationSize = mem_reqs->size; mem_alloc_info.memoryTypeIndex = get_memory_type_idx(ctx->pdev, mem_reqs, prop_flags); if (mem_alloc_info.memoryTypeIndex == UINT32_MAX) { fprintf(stderr, «No suitable memory type index found.n»); return VK_NULL_HANDLE; } if (vkAllocateMemory(ctx->dev, &mem_alloc_info, 0, &mem) != VK_SUCCESS) return VK_NULL_HANDLE; return mem; } |
Here again a secondary VkExportMemoryAllocateInfo struct was necessary in order to set the VK_EXTERNAL_MEMORY_HANDLE_TYPE_OPAQUE_FD_BIT to the VkMemoryAllocateInfo struct.
Step 2: Creating an OpenGL texture from the Vulkan allocated image (Interoperability)
First of all, I had to import the Vulkan memory in OpenGL, in other words create a GL memory object from a Vulkan memory object. For that I used the function gl_create_mem_obj_from_vk_mem from tests/spec/ext_external_objects/interop.[hc] (which is the file that contains all the interoperability helper functions):
|
1 2 3 4 5 6 7 8 9 10 11 12 13 14 15 16 17 18 19 20 21 22 23 24 25 26 27 28 29 30 31 32 33 34 35 |
bool gl_create_mem_obj_from_vk_mem(struct vk_ctx *ctx, struct vk_mem_obj *vk_mem_obj, GLuint *gl_mem_obj) { VkMemoryGetFdInfoKHR fd_info; int fd; PFN_vkGetMemoryFdKHR _vkGetMemoryFdKHR = (PFN_vkGetMemoryFdKHR)vkGetDeviceProcAddr(ctx->dev, «vkGetMemoryFdKHR»); if (!_vkGetMemoryFdKHR) { fprintf(stderr, «vkGetMemoryFdKHR not foundn»); return false; } memset(&fd_info, 0, sizeof fd_info); fd_info.sType = VK_STRUCTURE_TYPE_MEMORY_GET_FD_INFO_KHR; fd_info.memory = vk_mem_obj->mem; fd_info.handleType = VK_EXTERNAL_MEMORY_HANDLE_TYPE_OPAQUE_FD_BIT; if (_vkGetMemoryFdKHR(ctx->dev, &fd_info, &fd) != VK_SUCCESS) { fprintf(stderr, «Failed to get the Vulkan memory FD»); return false; } glCreateMemoryObjectsEXT(1, gl_mem_obj); glImportMemoryFdEXT(*gl_mem_obj, vk_mem_obj->mem_sz, GL_HANDLE_TYPE_OPAQUE_FD_EXT, fd); if (!glIsMemoryObjectEXT(*gl_mem_obj)) return false; return glGetError() == GL_NO_ERROR; } |
In this snippet, I took the Linux file descriptor that corresponds to the Vulkan memory and its size from Vulkan, and I’ve created an OpenGL object using the EXT_memory_object_fd import function glImportMemoryFdEXT to assign the object id to the memory. Then I checked that this newly created object is a valid OpenGL memory object.
After that, I had to “tell” OpenGL that this object will correspond to a GL texture. Creating a texture from external memory is quite similar with creating a texture from some internal storage:
|
1 2 3 4 5 6 7 8 9 10 11 12 13 14 15 16 17 18 19 20 21 22 23 24 25 26 27 28 29 30 31 32 33 34 35 36 37 38 39 40 41 42 43 |
bool gl_gen_tex_from_mem_obj(const struct vk_image_props *props, GLenum tex_storage_format, GLuint mem_obj, uint32_t offset, GLuint *tex) { GLint filter; GLuint target = gl_get_target(props); const struct sized_internalformat *format = get_sized_internalformat(tex_storage_format); GLint tiling = props->tiling == VK_IMAGE_TILING_LINEAR ? GL_LINEAR_TILING_EXT : GL_OPTIMAL_TILING_EXT; glGenTextures(1, tex); glBindTexture(target, *tex); glTexParameteri(target, GL_TEXTURE_TILING_EXT, tiling); switch (target) { case GL_TEXTURE_1D: assert(props->depth == 1); glTexStorageMem1DEXT(target, props->num_levels, tex_storage_format, props->w, mem_obj, offset); break; case GL_TEXTURE_2D: assert(props->depth == 1); glTexStorageMem2DEXT(target, props->num_levels, tex_storage_format, props->w, props->h, mem_obj, offset); break; case GL_TEXTURE_3D: glTexStorageMem3DEXT(target, props->num_levels, tex_storage_format, props->w, props->h, props->depth, mem_obj, offset); break; default: fprintf(stderr, «Invalid GL texture targetn»); return false; } } |
The GL call glTexStorageMem*DEXT that is introduced in EXT_memory_object creates a texture like glTexStorage would if the object was “internal”.
Something important when creating textures from external memory objects is to set the appropriate tiling mode calling glTexParameteri before calling glTexStorageMem*DEXT. This is because the external texture will become immutable at creation and changing the tiling mode in an immutable object is forbidden! The tiling mode should match the one used in Vulkan (default is optimal).
After this point, the texture was ready to be used by OpenGL.
Step 3: Rendering to texture (OpenGL)
I rendered to texture as I would do using an ordinary 2D texture render target. For simplicity I rendered all the pixels blue.
|
1 2 3 4 5 6 7 8 9 10 11 12 13 14 15 16 17 18 19 20 21 22 23 24 25 26 27 28 29 30 31 32 33 34 |
static bool gl_draw_texture(enum fragment_type fs_type, uint32_t w, uint32_t h) { glBindTexture(gl_target, gl_tex); glBindFramebuffer(GL_FRAMEBUFFER, gl_fbo); glBindRenderbuffer(GL_RENDERBUFFER, gl_rbo); glRenderbufferStorage(GL_RENDERBUFFER, GL_DEPTH24_STENCIL8, w, h); glBindRenderbuffer(GL_RENDERBUFFER, 0); glFramebufferRenderbuffer(GL_FRAMEBUFFER, GL_DEPTH_STENCIL_ATTACHMENT, GL_RENDERBUFFER, gl_rbo); glFramebufferTexture2D(GL_FRAMEBUFFER, GL_COLOR_ATTACHMENT0, gl_target, gl_tex, 0); if (!check_bound_fbo_status()) return false; glClearColor(1.0, 1.0, 0.0, 1.0); glClear(GL_COLOR_BUFFER_BIT | GL_DEPTH_BUFFER_BIT); glEnable(GL_DEPTH_TEST); glBindFramebuffer(GL_FRAMEBUFFER, 0); glDisable(GL_DEPTH_TEST); glClearColor(0.0, 0.0, 1.0, 1.0); glClear(GL_COLOR_BUFFER_BIT); return glGetError() == GL_NO_ERROR; } |
In the snippet above I used the Vulkan-memory texture as the color attachment of a previously generated FBO. Then I cleared the framebuffer color to blue.
Step 4: Checking that the pixels have the correct color
Next thing I did was to check if the pixels are actually blue using a pixel shader. The shader compares each pixel’s color with an expected color passed as a uniform to the shader if the colors match the fragment is painted green else red. The uniform was necessary only because I wanted to check different format images (int, float, uint) and so I couldn’t hardcode the blue. 🙂
|
1 2 3 4 5 6 7 8 9 10 11 12 13 14 15 16 17 18 19 |
#define MAKE_FS(SAMPLER, VEC4) «#version 130n» «in vec2 tex_coords;n» «uniform « #SAMPLER » tex; n» «uniform « #VEC4 » expected_color;n» «out vec4 color;n» «void main() n» «{n» » « #VEC4 » sampled_color = texture(tex, tex_coords);n» » « #VEC4 » res = » #VEC4 » (abs(expected_color — sampled_color));n» » res.x += res.y + res.z + res.w;n» » color = mix(vec4(1.0, 0.0, 0.0, 1.0), vec4(0.0, 1.0, 0.0, 1.0), step(0, -float(res.x)));n» «}n» static const char *fs[] = { MAKE_FS(sampler2D, vec4), MAKE_FS(isampler2D, ivec4), MAKE_FS(usampler2D, uvec4), }; |
(I used the MAKE_FS macro to allow different formats and I used different expected colors depending on the number of bits and if they were int or float and signed or unsigned (see run_subtest of vk_image_overwrite.c for more).
Step 5: Checking the result with some piglit helper functions
After having rendered a green or green/red quad in step 4, I used some simple piglit helper functions to check if all pixels are green. That was necessary because the purpose of the test was to validate that we can overwrite a Vulkan allocated image with OpenGL. I used one of the piglit_probe_* functions that can probe the color of one or more pixels for that. When the color was green the test passed when it was red it was failing. And that was all. Below I am going to explain some other parts of the test because they might be useful to understand parts of the follow-up examples.
Other details of the piglit test
All interoperability tests of the series are inside the tests/spec/ext_external_objects directory. The Vulkan helper functions used above (of the form vk_) can be found in tests/spec/ext_external_objects/vk.[hc] and the interoperability helper functions in tests/spec/ext_external_objects/interop.[hc]
Piglit provides some callbacks that are very similar in concept to the freeglut callbacks. In most tests, I only fill piglit_init that initializes the OpenGL context, and piglit_display that is similar to GlutDisplayFunc callback and contains the operations that are related to the rendering.
Functions vk_init and gl_init initialize Vulkan and OpenGL data structures we need for all the subtests of the test respectively. piglit_require_extension is set to enable the other potentially required extensions.
To check if the OpenGL and Vulkan devices are compatible, we used the extended GetUnsignedBytei_v and GetUnsignedBytev to query the IDs of the device and the driver and see if they match each other as it is specified in EXT_external_objects. (I think that code was written by Juan A. Suarez Romero who also helped with the tests, credits!)
|
1 2 3 4 5 6 7 8 9 10 11 12 13 14 15 16 17 18 19 20 21 |
bool gl_check_vk_compatibility(const struct vk_ctx *ctx) { GLubyte deviceUUID[GL_UUID_SIZE_EXT]; GLubyte driverUUID[GL_UUID_SIZE_EXT]; /* FIXME: we select the first device so make sure you’ve * exported VK_ICD_FILENAMES */ glGetUnsignedBytei_vEXT(GL_DEVICE_UUID_EXT, 0, deviceUUID); glGetUnsignedBytevEXT(GL_DRIVER_UUID_EXT, driverUUID); if ((strncmp((const char *)deviceUUID, (const char *)ctx->deviceUUID, GL_UUID_SIZE_EXT) != 0) || (strncmp((const char* )driverUUID, (const char* )ctx->driverUUID, GL_UUID_SIZE_EXT) != 0)) { fprintf(stderr, «Mismatch in device/driver UUIDn»); return false; } return glGetError() == GL_NO_ERROR; } |
Note that for simplicity here we assumed that the user has only one Vulkan device. In later versions I detect the first device that supports graphics pipelines.
Links:
[1]: EXT_external_objects extension: https://www.khronos.org/registry/OpenGL/extensions/EXT/EXT_external_objects.txt
[2]: EXT_external_objects_fd extension: https://www.khronos.org/registry/OpenGL/extensions/EXT/EXT_external_objects_fd.txt
[3]: Piglit Code: https://gitlab.freedesktop.org/mesa/piglit
[4]: Samuel Iglesias Gonsálvez’s posts on Piglit: https://blogs.igalia.com/siglesias/2015/06/12/piglit-v-how-to-contribute-to-piglit-and-table-of-contents/
Previous posts in these series:
[1]: [OpenGL and Vulkan Interoperability on Linux] Part 1: Introduction https://eleni.mutantstargoat.com/hikiko/gl-vk-interop-intro/
See you next time!
![]()