Изменить или сбросить пароль от пользователя phpMyAdmin можно:
- по SSH. Этот способ подойдёт, если вы забыли пароль пользователя, под которым подключаетесь к phpMyAdmin.
- через интерфейс phpMyAdmin. Подойдёт, если вы знаете пароль и вам нужно его сменить.
В статье мы расскажем про оба способа.
Для сброса пароля по SSH вам понадобится доступ к root-пользователю MySQL. Если вы потеряли root-доступ к серверу баз данных, воспользуйтесь инструкцией.
Учётная запись, под которой вы подключаетесь к phpMyAdmin, — это обычный пользователь mySQL. Ниже мы расскажем, как сменить забытый пароль от такой учётной записи.
Как поменять пароль phpMyAdmin по SSH
-
1.
Подключитесь к серверу по SSH.
-
2.
Подключитесь к серверу баз данных командой:
Mysql -uroot -p’password’Вместо password напишите пароль от root-пользователя MySQL.
-
3.
Узнайте версию MySQL при помощи команды:
-
4.
Используйте одну из команд в зависимости от версии MySQL:
5.7.6 и выше:
ALTER USER 'username' IDENTIFIED BY 'password';5.7.5 и ниже:
SET PASSWORD FOR 'username'@'localhost' = PASSWORD('password');Вместо username введите имя пользователя, вместо password введите ваш новый пароль.
-
5.
Перезагрузите таблицы привилегий командой:
Готово, вы сменили пароль от пользователя phpMyAdmin.
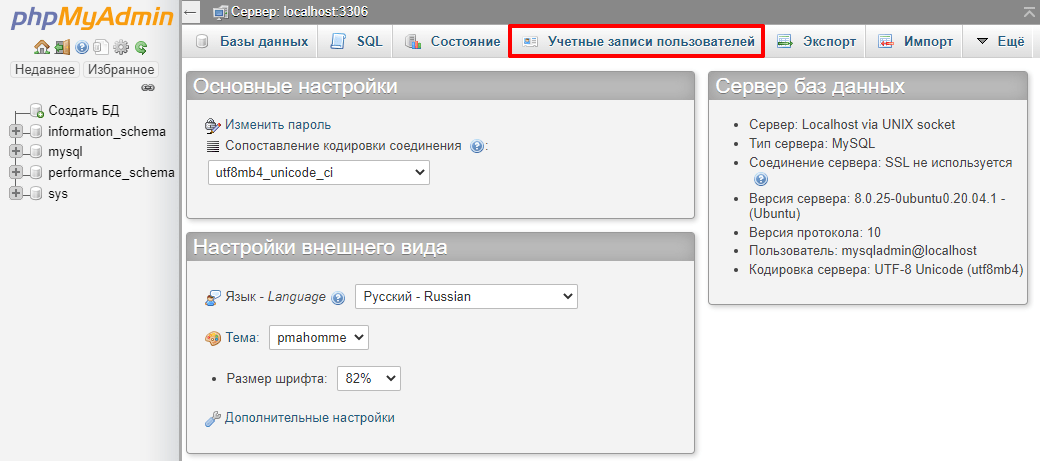
Как поменять пароль в phpMyAdmin
При помощи приложения можно поменять пароль как от учётной записи, под которой вы авторизованы, так и для других учётных записей MySQL.
-
1.
Войдите в веб-интерфейс.
-
2.
Нажмите Учетные записи пользователей:

-
3.
Напротив нужного имени нажмите Редактировать привилегии:
-
4.
Вверху страницы нажмите Изменить пароль:
-
5.
Введите пароль и подтвердите его, затем нажмите Вперёд:


Готово, пароль от учётной записи изменён.
Стандартные доступы phpMyAdmin
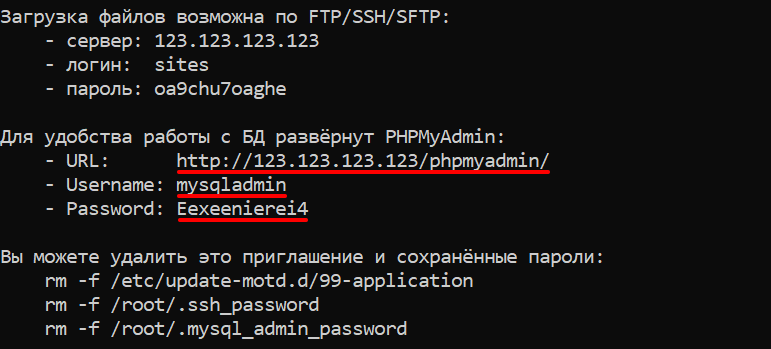
На облачных серверах REG.RU с шаблонами LEMP и LAMP phpMyAdmin устанавливается автоматически. При подключении к такому серверу по SSH вы увидите приветственное окно с доступами:
phpMyAdmin default password

От автора: Не подскажете, который час, месяц, день недели и год? А зачем вам? Да забыл свой новый пароль на базу данных! Тогда вам лучше с собой календарь носить или прочитать нашу статью о том, как изменить пароль MySQL.
Зачем менять пароль в MySQL
И в самом деле, зачем менять пароль? Пока все и так в целости и сохранности, никто не посягает на безопасность моей БД. Так говорил один мой знакомый, а на следующий день обнаружил, что не может «отомкнуть» своим «супернадежным» паролем админку собственного сайта, развернутого на основе одной из CMS. Только на следующий день благодаря помощи нанятых админов ему удалось «прорваться» на собственный ресурс. Когда недалеко «гром грянул», то большая часть остальных знакомых и друзей начали массово в MySQL изменять пароль root.
Надеюсь, этот случай также станет для вас чужим примером, на котором следует учиться. Поэтому рассмотрим все средства, с помощью которых в этой СУБД можно установить более надежный пароль.
Учетные записи в phpMyAdmin
Программная оболочка phpMyAdmin имеет на своем «борту» множество полезных средств для администрирования СУБД. В том числе и для управления правами пользователей, настройками их привилегий.
Чтобы узнать, под какой учетной записью вы вошли на сервер баз данных, перейдите на главную страницу приложения (если вы зашли в другой раздел административной части). Для этого нажмите на значок логотипа программы, расположенный в верхнем левом углу.

Бесплатный курс по PHP программированию
Освойте курс и узнайте, как создать веб-приложение на PHP с полного нуля
Получить курс сейчас!

В виджете «Сервер баз данных» (верхний правый угол основной страницы phpMyAdmin) указана пользовательская запись, «под которой» вы находитесь сейчас в СУБД. Это пригодится, если нужно срочно изменить пароль MySQL, а имя учетной записи не знаете или забыли. Всякое может быть! Ну, как в случае с паролем, который описан в начале статьи 🙂

Теперь переходим в раздел «Пользователи», который находится в основном меню сверху. Здесь в таблице «Обзор учетных записей» выбираем нужную учетку (ставим слева галочку), а затем жмем на ссылку «Редактирование привилегий».

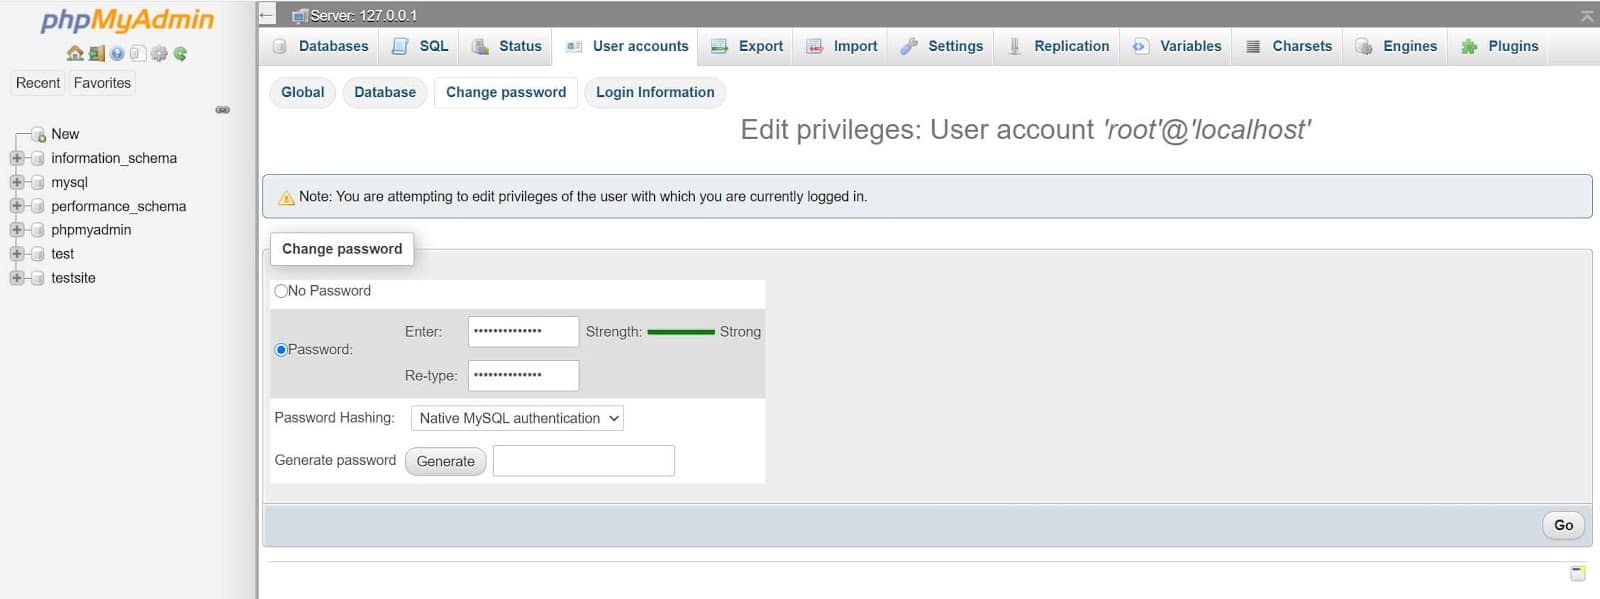
Во всплывающем окне «Редактирование привилегий: Пользователь ‘root’@’localhost’» переходим ниже по настройкам к пункту «Изменить пароль». Во второе поле вводим значение пароля и повторяем его рядом.
Если нужно в MySQL сменить пароль root срочно, тогда воспользуйтесь опцией случайного генерирования его значений. Для этого нажмите на кнопку «Генерировать», и в окошке рядом появится сгенерированный программой пароль.

Эта функция является удобной тем, что сгенерированный пароль автоматически подставляется в поля для ввода нового значения и подтверждения. Чтобы внесенные изменения вступили в силу, нужно нажать «ОК». Новый пароль будет запрошен системой СУБД после перезапуска сервера MySQL.
Если вы воспользовались опцией генерирования случайного сочетания символов, чтобы в MySQL сменить пароль root, то советую его значение где-нибудь сохранить. Так как этот пароль не является ассоциативным для вас.
Средства командной строки
Для начала поиграем в «шпионские игры». Чур, я Джеймс Бонд! Извините, наверное, не наигрался в детстве :). Но что-то в этом есть немного таинственного и «разведчиского».
В общем, с помощью CMD выведем все пароли и учетные записи пользователей, зарегистрированные на сервере MySQL. Для этого мы войдем в таблицу системной БД и сделаем выборку. Эти сведения также могут нам пригодиться, чтобы в MySQL сменить пароль.
Пошаговая схема «взлома»:
Запускаем CMD.
Запускаем «экзешник» MySQL под своей учеткой и паролем:
|
Z:usrlocalmysql—5.5binmysql.exe —u root |

Бесплатный курс по PHP программированию
Освойте курс и узнайте, как создать веб-приложение на PHP с полного нуля
Получить курс сейчас!
В случае удачного «захода» внизу отобразится информация, что вы в командном мониторе СУБД. Затем указывается версия сервера и всякая другая неинтересная для настоящего шпиона информация.
Теперь нам нужно попасть в системную БД. Сначала выделяем ее с помощью команды USE:
Выполним запрос на выборку данных из системной таблицы user. И перед тем, в MySQL как установить пароль root, посмотрим, какие еще учетные записи существуют на сервере:
|
select user,host,password from user; |

Для дальнейших экспериментов нам потребуется новый пользователь. Создадим его через интерфейс phpMyAdmin (вкладка «Пользователи» в основном меню). Задаем ему имя, хост (локальный), пароль и повторяем пароль. И жмем на «Добавить пользователя».

Мы рассмотрим, как изменить пароль root MySQL, на примере нового пользователя. Смотрите, кто появился! Вован, сколько дней не виделись. Ты как раз вовремя.

После создания «Вована» заходим на сервер баз данных через командную строку под своим логином. Затем выделяем системную БД и опять выводим список всех учетных записей и их пароли.

В таблице появился новый пользователь vovan . Но как сменить пароль MySQL, если для этого пользователя он выводится в виде очень длинной цепочки символов? Это потому, что к его значению применено хеширование. Вы главное не волнуйтесь. Сейчас мы этого Вована «обеспоролим».
Вот запрос на установку для учетной записи vovan пустого пароля:
|
UPDATE mysql.user SET Password=PASSWORD(») WHERE User=‘vovan’ AND Host=‘localhost’; |
Введите этот запрос в окно CMD и запустите на выполнение (нажмите «Enter»). После чего снова посмотрим на нашу таблицу юзеров сервера MySQL.

О, чудо! Вован «беспарольным» остался. Таким образом можно не только Вована «обработать», но и более «серьезных» пользователей. Это еще один способ, как можно поменять пароль root MySQL. Тогда код запроса будет выглядеть следующим образом:
|
UPDATE mysql.user SET Password=PASSWORD(‘new_пароль’) WHERE User=‘root’ AND Host=‘localhost’; |
Вот теперь можно смело менять пароли и направо, и налево. Главное, чтобы задаваемые пароли были надежными, и не на основе «календарика»
Бесплатный курс по PHP программированию
Освойте курс и узнайте, как создать веб-приложение на PHP с полного нуля
Получить курс сейчас!
Хотите изучить MySQL?
Посмотрите курс по базе данных MySQL!
Смотреть
Staying secure online has never been more important, especially for businesses. Password selection and maintenance both play an essential role in security. Unfortunately, they often get neglected, especially on local installations such as XAMPP.
However, local software can be just as vulnerable to malicious activity, and by default XAMPP typically ships without a root password for the MySQL database. Adding one and changing it regularly can help keep your data secure and prevent the loss of hours of hard work.
In this article, we’ll explain why you might want to change your XAMPP MySQL password. Then we’ll walk you through three different methods you can use. Let’s get started!
Why You Might Want to Change Your MySQL Password
There are several reasons why you might want (or need) to change your MySQL password. First and most important: when you install XAMPP on your computer, the password for the “root” user is left empty. This means that there is no security on this account by default.
The root user is essentially the administrator account—it has unrestricted access to all commands and files in the system. As such, having no password protection for this user is a major security hole. Anyone could log in to the user account and edit files on your local installation.
Apart from that, it’s also a smart security practice to change your passwords periodically. Doing so helps prevent malicious activity, particularly if you use the same password in multiple places. Regularly changing passwords can help offset issues that might arise without this practice.
Finally, you may have simply forgotten your password and, as a result, can’t access files or functions that you need on your local XAMPP WordPress installation. Whatever the reason, being able to change MySQL passwords is a valuable skill that could come in handy.
How to Change Your MySQL Password in XAMPP (3 Methods)
As with most WordPress tasks, there are multiple ways to change the MySQL password. The method you should use will depend on exactly what you need to do and what interface you’re most comfortable with: the command line, a Graphical User Interface (GUI), or text files. With that in mind, let’s take a look at three ways to change your MySQL password in XAMPP.
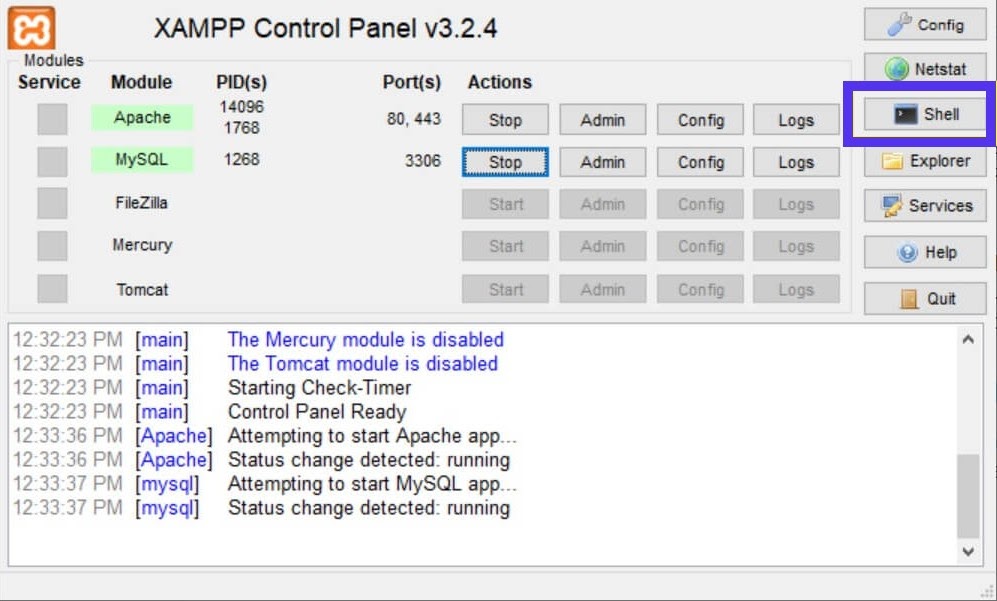
1. Change Your MySQL Password Using the XAMPP Shell
Using the XAMPP shell is generally going to be the simplest and quickest method for changing your MySQL password. It does involve using the command line, which can seem daunting at first.
However, it’s actually fairly straightforward. This is also the method you’ll want to use if you’ve forgotten your existing MySQL password and need to reset it.
Note that these commands are the same whether you’re using Windows or macOS. Since this is a unique shell specific to XAMPP, any typical differences between the platforms won’t apply.
To get started, launch your XAMPP Control Panel and click on the Shell button on the right-hand side.
This will open up a new window with a command prompt. Enter the following command and press the Enter/Return key:
mysqladmin -u root passwordThe shell will prompt you to enter a new password. Press Enter/Return again, and you’ll be asked to confirm the new password.
Once you’ve done that, you’re finished and can close the shell window.
2. Change Your XAMPP MySQL Password via phpMyAdmin
The second method involves using the phpMyAdmin GUI to change your XAMPP MySQL password. This technique is relatively simple, but generally not as quick as the command line method.
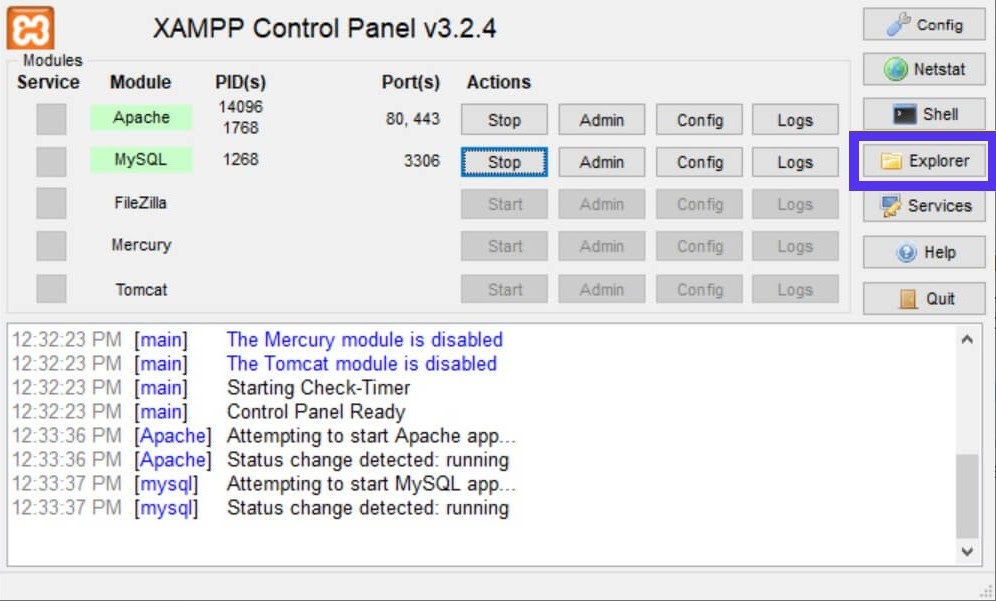
First, you need to access the phpMyAdmin interface. Pull up the XAMPP Control Panel and click on Admin in the MySQL row:
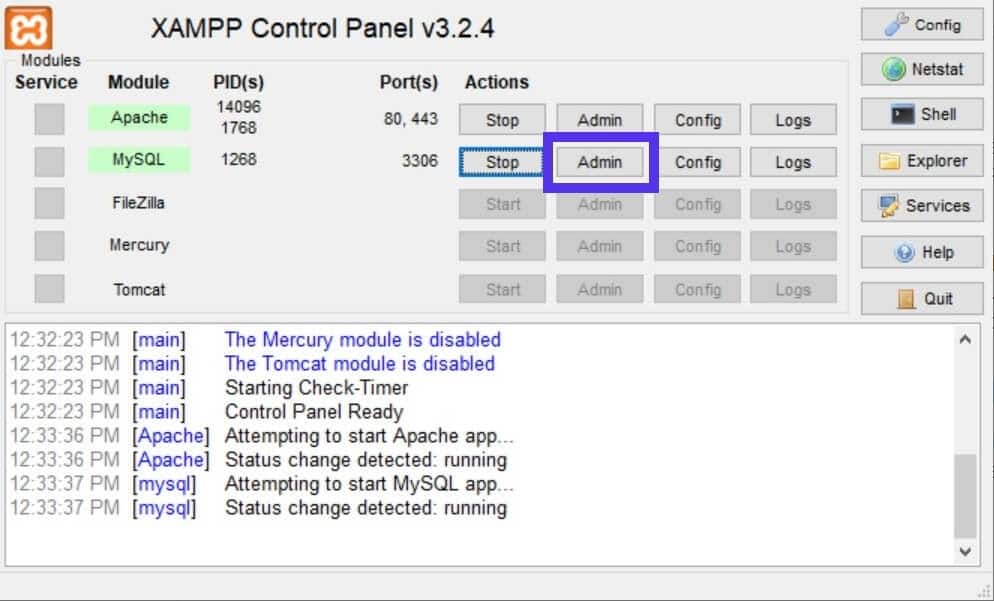
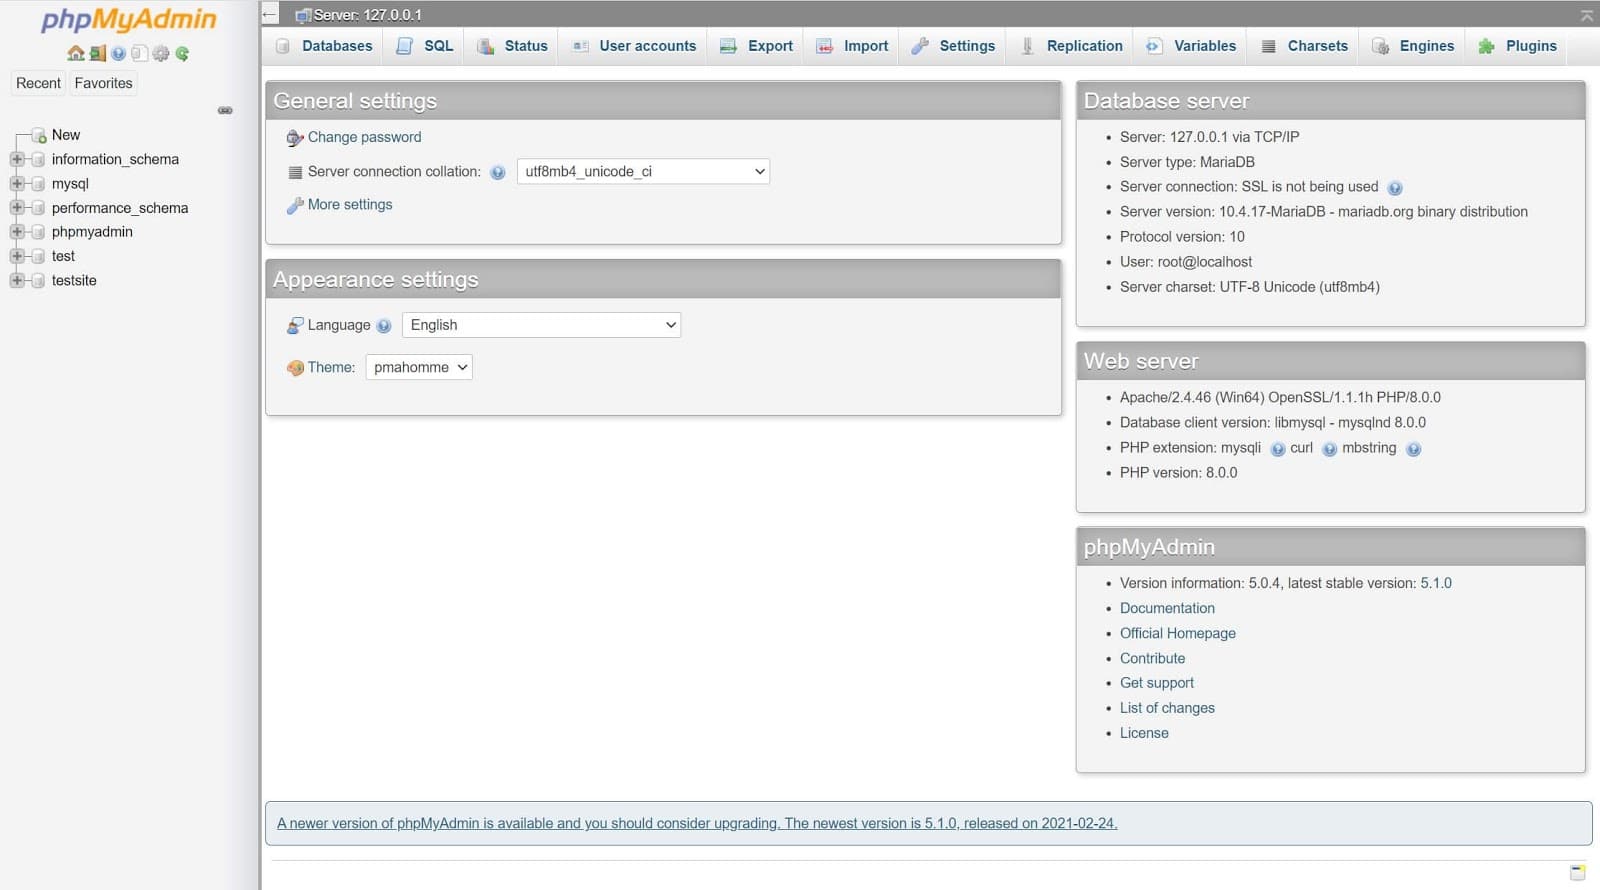
PhpMyAdmin will open in a browser window:
If you’re asked to log in, use the username “root” and enter your root password. If you haven’t set one yet, you can leave it blank.
Next, navigate to the User accounts section in the main menu bar, and locate the root user for localhost in the list:
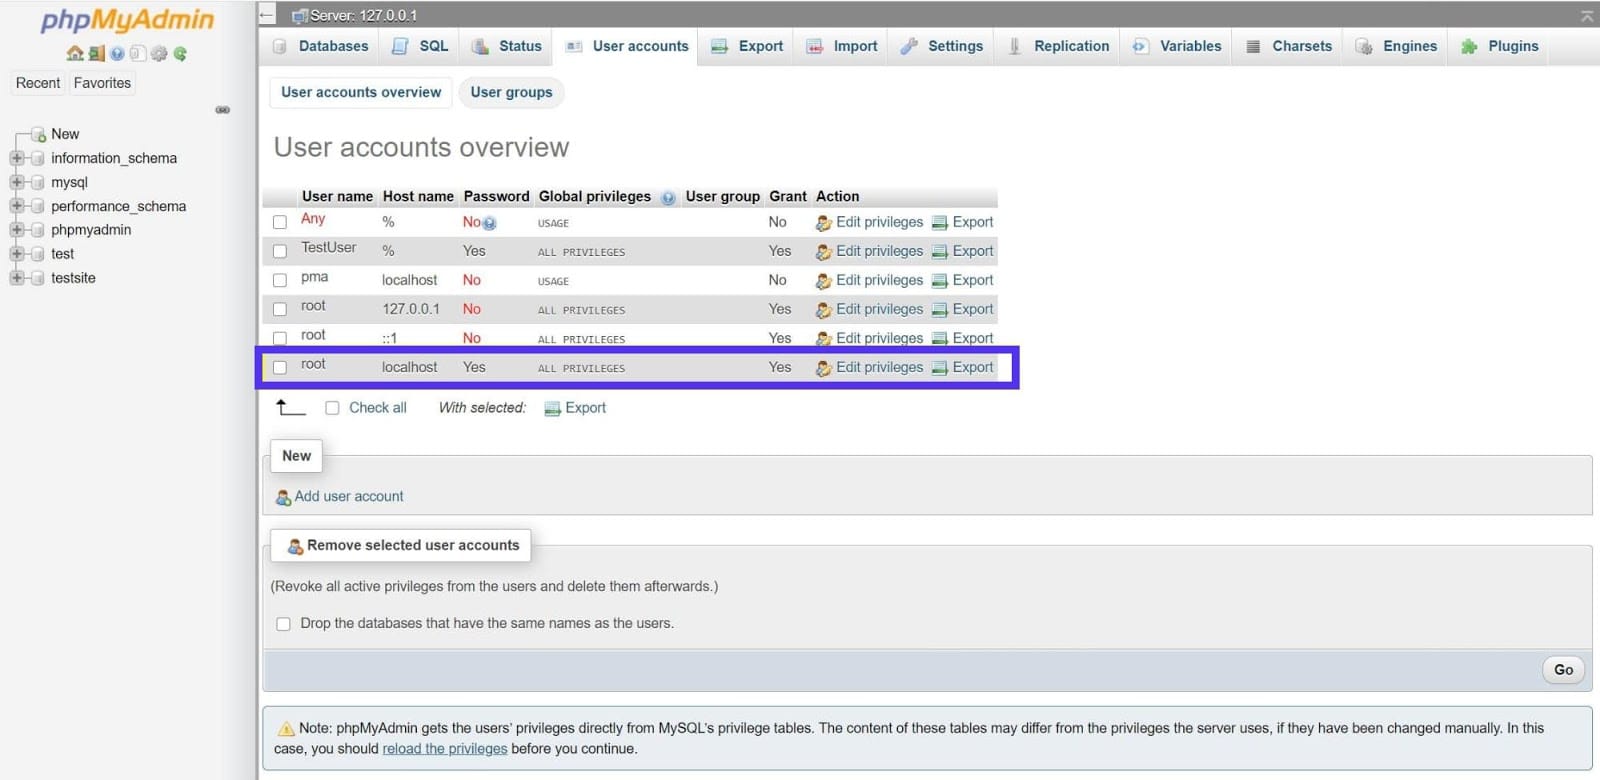
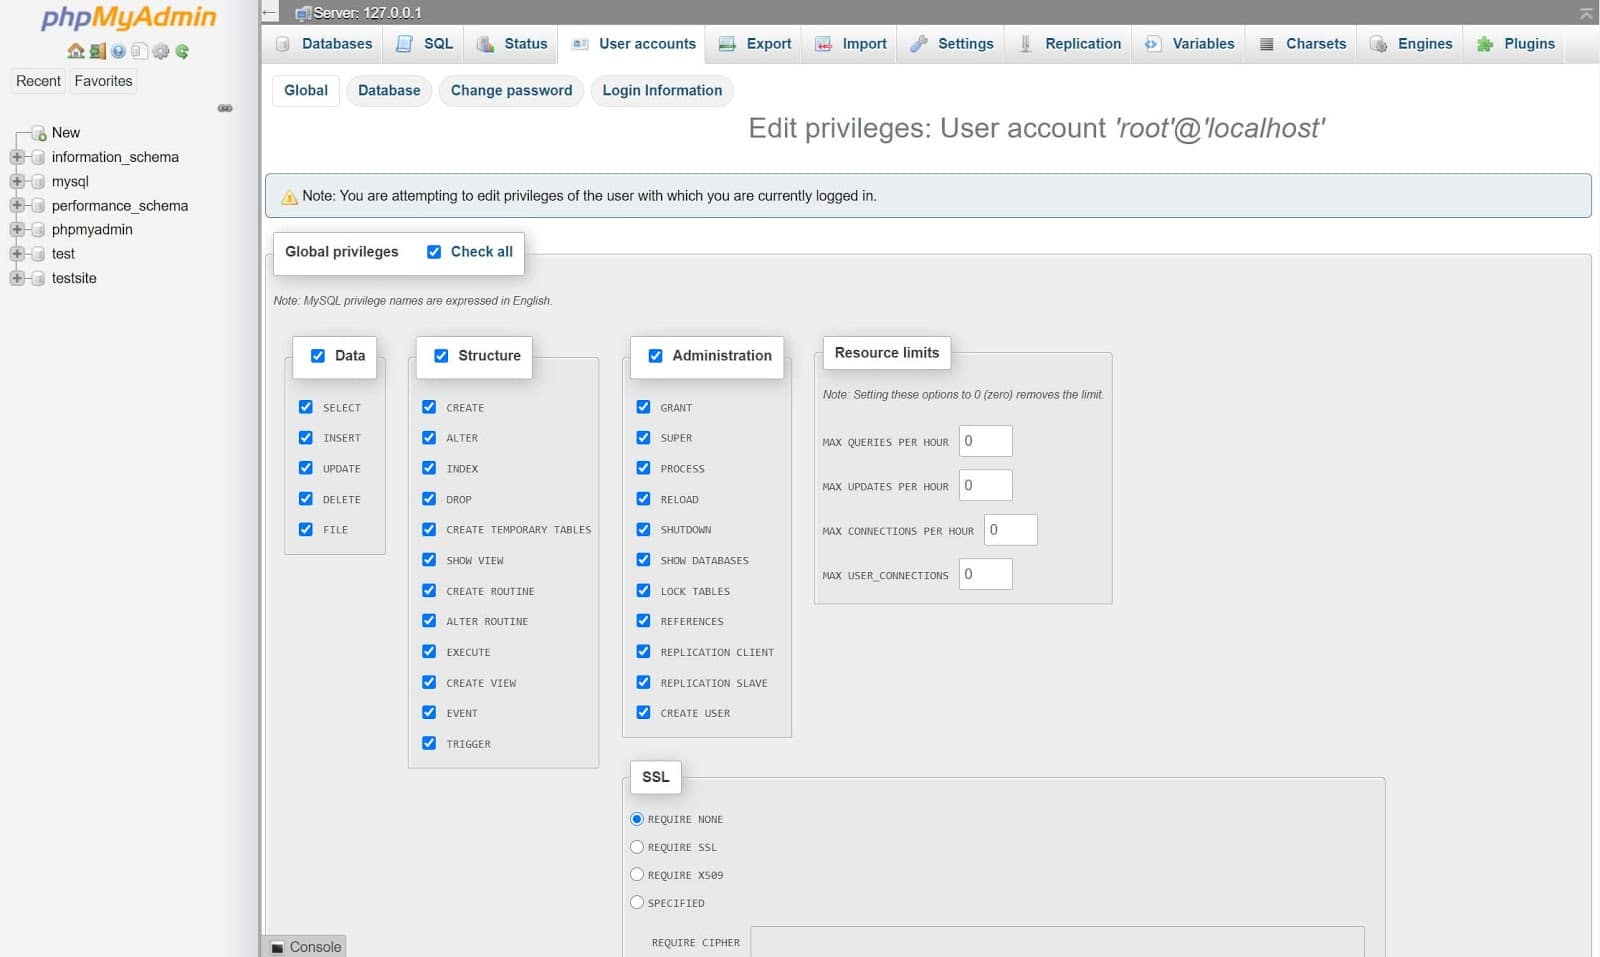
Next, you can click on Edit privileges beside the root user, then select Change password at the top of the page.
On the next screen, simply enter the password you want to use:
When you’re finished, you can click on the Go button in the bottom-right to save the change. That’s it!
3. Change Your XAMPP MySQL Password by Editing the config.inc.php File
If you find yourself in a situation where you know your password is correct, but it isn’t working for whatever reason, this is the method for you. It involves opening up a text file and editing the password directly in it.
First, open the XAMPP Control Panel and click on the Explorer button on the right-hand side of the window:
This will launch a file browser in the XAMPP folder. Next, you can open the phpMyAdmin folder and locate the config.inc.php file:
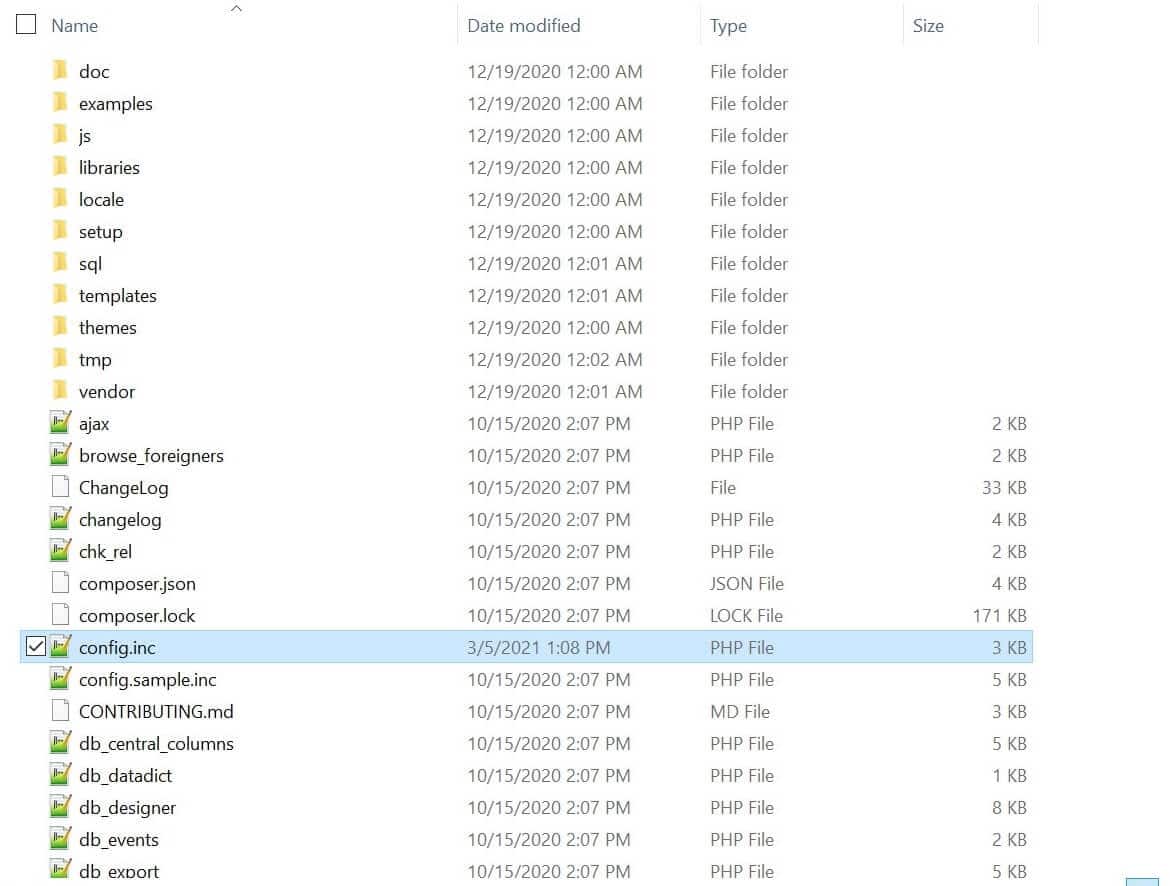
The config.inc.php file in Windows.
You can open this file in your favorite text editor, or simply double-click on it to open it in the default program.
The line you’re looking for is $cfg['Servers'][$i]['password'] = 'YourPassword';. Here’s what it looks like:

Once you locate it, you can enter your desired password between the single quotes, and then save the file. That’s all there is to it!
Summary
Whether you’ve forgotten your XAMPP MySQL password or you want to take your security up a notch, there are multiple methods you can use to change it. Updating your password helps keep your data secure, and provides an additional layer of defense against malicious activity.
In this article, we covered how to change your MySQL password on an XAMPP installation using three methods, which include using the command line, going through the phpMyAdmin GUI, and editing a file directly. You can choose whichever one suits your workflow best.
If you take security seriously and want to ensure that all of your WordPress sites are protected, consider hosting with Kinsta. Our plans offer the security, speed, and support your site needs to operate at its best.
Get all your applications, databases and WordPress sites online and under one roof. Our feature-packed, high-performance cloud platform includes:
- Easy setup and management in the MyKinsta dashboard
- 24/7 expert support
- The best Google Cloud Platform hardware and network, powered by Kubernetes for maximum scalability
- An enterprise-level Cloudflare integration for speed and security
- Global audience reach with up to 35 data centers and 275 PoPs worldwide
Test it yourself with $20 off your first month of Application Hosting or Database Hosting. Explore our plans or talk to sales to find your best fit.
Staying secure online has never been more important, especially for businesses. Password selection and maintenance both play an essential role in security. Unfortunately, they often get neglected, especially on local installations such as XAMPP.
However, local software can be just as vulnerable to malicious activity, and by default XAMPP typically ships without a root password for the MySQL database. Adding one and changing it regularly can help keep your data secure and prevent the loss of hours of hard work.
In this article, we’ll explain why you might want to change your XAMPP MySQL password. Then we’ll walk you through three different methods you can use. Let’s get started!
Why You Might Want to Change Your MySQL Password
There are several reasons why you might want (or need) to change your MySQL password. First and most important: when you install XAMPP on your computer, the password for the “root” user is left empty. This means that there is no security on this account by default.
The root user is essentially the administrator account—it has unrestricted access to all commands and files in the system. As such, having no password protection for this user is a major security hole. Anyone could log in to the user account and edit files on your local installation.
Apart from that, it’s also a smart security practice to change your passwords periodically. Doing so helps prevent malicious activity, particularly if you use the same password in multiple places. Regularly changing passwords can help offset issues that might arise without this practice.
Finally, you may have simply forgotten your password and, as a result, can’t access files or functions that you need on your local XAMPP WordPress installation. Whatever the reason, being able to change MySQL passwords is a valuable skill that could come in handy.
How to Change Your MySQL Password in XAMPP (3 Methods)
As with most WordPress tasks, there are multiple ways to change the MySQL password. The method you should use will depend on exactly what you need to do and what interface you’re most comfortable with: the command line, a Graphical User Interface (GUI), or text files. With that in mind, let’s take a look at three ways to change your MySQL password in XAMPP.
1. Change Your MySQL Password Using the XAMPP Shell
Using the XAMPP shell is generally going to be the simplest and quickest method for changing your MySQL password. It does involve using the command line, which can seem daunting at first.
However, it’s actually fairly straightforward. This is also the method you’ll want to use if you’ve forgotten your existing MySQL password and need to reset it.
Note that these commands are the same whether you’re using Windows or macOS. Since this is a unique shell specific to XAMPP, any typical differences between the platforms won’t apply.
To get started, launch your XAMPP Control Panel and click on the Shell button on the right-hand side.
This will open up a new window with a command prompt. Enter the following command and press the Enter/Return key:
mysqladmin -u root passwordThe shell will prompt you to enter a new password. Press Enter/Return again, and you’ll be asked to confirm the new password.
Once you’ve done that, you’re finished and can close the shell window.
2. Change Your XAMPP MySQL Password via phpMyAdmin
The second method involves using the phpMyAdmin GUI to change your XAMPP MySQL password. This technique is relatively simple, but generally not as quick as the command line method.
First, you need to access the phpMyAdmin interface. Pull up the XAMPP Control Panel and click on Admin in the MySQL row:
PhpMyAdmin will open in a browser window:
If you’re asked to log in, use the username “root” and enter your root password. If you haven’t set one yet, you can leave it blank.
Next, navigate to the User accounts section in the main menu bar, and locate the root user for localhost in the list:
Next, you can click on Edit privileges beside the root user, then select Change password at the top of the page.
On the next screen, simply enter the password you want to use:
When you’re finished, you can click on the Go button in the bottom-right to save the change. That’s it!
3. Change Your XAMPP MySQL Password by Editing the config.inc.php File
If you find yourself in a situation where you know your password is correct, but it isn’t working for whatever reason, this is the method for you. It involves opening up a text file and editing the password directly in it.
First, open the XAMPP Control Panel and click on the Explorer button on the right-hand side of the window:
This will launch a file browser in the XAMPP folder. Next, you can open the phpMyAdmin folder and locate the config.inc.php file:
The config.inc.php file in Windows.
You can open this file in your favorite text editor, or simply double-click on it to open it in the default program.
The line you’re looking for is $cfg['Servers'][$i]['password'] = 'YourPassword';. Here’s what it looks like:
Once you locate it, you can enter your desired password between the single quotes, and then save the file. That’s all there is to it!
Summary
Whether you’ve forgotten your XAMPP MySQL password or you want to take your security up a notch, there are multiple methods you can use to change it. Updating your password helps keep your data secure, and provides an additional layer of defense against malicious activity.
In this article, we covered how to change your MySQL password on an XAMPP installation using three methods, which include using the command line, going through the phpMyAdmin GUI, and editing a file directly. You can choose whichever one suits your workflow best.
If you take security seriously and want to ensure that all of your WordPress sites are protected, consider hosting with Kinsta. Our plans offer the security, speed, and support your site needs to operate at its best.
Get all your applications, databases and WordPress sites online and under one roof. Our feature-packed, high-performance cloud platform includes:
- Easy setup and management in the MyKinsta dashboard
- 24/7 expert support
- The best Google Cloud Platform hardware and network, powered by Kubernetes for maximum scalability
- An enterprise-level Cloudflare integration for speed and security
- Global audience reach with up to 35 data centers and 275 PoPs worldwide
Test it yourself with $20 off your first month of Application Hosting or Database Hosting. Explore our plans or talk to sales to find your best fit.
I’ve setup wamp server on window. Then, I use MySQL root password by cmd. As a result, when I access phpMyAdmin site, Access denied appeared (Default user for phpMyAdmin is root and password is blank/empty). So, how could I change config variables in phpMyAdmin with new password of root.
I’ve searched for solution on Internet, someone advise me add some line to config.inc.php as:
$cfg['Servers'][$i]['auth_type'] = 'config';
$cfg['Servers'][$i]['user'] = 'root';
$cfg['Servers'][$i]['password'] = 'Changed';
$cfg['Servers'][$i]['AllowNoPasswordRoot'] = false;
But, It seem not work. Thanks.
![]()
Bud Damyanov
29.4k6 gold badges42 silver badges52 bronze badges
asked May 28, 2014 at 9:28
![]()
11
Explain what video describe to resolve problem
After Changing Password of root (Mysql Account). Accessing to phpmyadmin page will be denied because phpMyAdmin use root/»(blank) as default username/password. To resolve this problem, you need to reconfig phpmyadmin. Edit file config.inc.php in folder %wamp%appsphpmyadmin4.1.14 (Not in %wamp%)
$cfg['Servers'][$i]['verbose'] = 'mysql wampserver';
$cfg['Servers'][$i]['auth_type'] = 'config';
$cfg['Servers'][$i]['user'] = 'root';
$cfg['Servers'][$i]['password'] = 'changed';
$cfg['Servers'][$i]['host'] = '127.0.0.1';
$cfg['Servers'][$i]['connect_type'] = 'tcp';
$cfg['Servers'][$i]['compress'] = false;
$cfg['Servers'][$i]['extension'] = 'mysqli';
$cfg['Servers'][$i]['AllowNoPassword'] = false;
If you have more than 1 DB server, add «i++» to file and continue add new config as above
![]()
Aron
15.6k3 gold badges31 silver badges64 bronze badges
answered May 28, 2014 at 17:19
![]()
Tiep PhanTiep Phan
12.2k3 gold badges37 silver badges41 bronze badges
5
You can change the mysql root password by logging in to the database directly (mysql -h your_host -u root) then run
SET PASSWORD FOR root@localhost = PASSWORD('yourpassword');
answered May 28, 2014 at 9:51
![]()
3
0) go to phpmyadmin don’t select any db
1) Click «Privileges». You’ll see all the users on MySQL’s privilege tables.
2) Check the user «root» whose Host value is localhost, and click the «Edit Privileges» icon.
3) In the «Change password» field, click «Password» and enter a new password.
4) Retype the password to confirm. Then click «Go» to apply the settings.
answered Jun 2, 2015 at 22:41
![]()
Mahmoud ZaltMahmoud Zalt
29.8k7 gold badges83 silver badges82 bronze badges
Change It like this, It worked for me. Hope It helps.
firs I did
$cfg['Servers'][$i]['verbose'] = 'mysql wampserver';
//$cfg['Servers'][$i]['auth_type'] = 'cookie';
$cfg['Servers'][$i]['auth_type'] = 'config';
$cfg['Servers'][$i]['user'] = 'root';
$cfg['Servers'][$i]['password'] = 'changed';
/* Server parameters */
$cfg['Servers'][$i]['host'] = '127.0.0.1';
$cfg['Servers'][$i]['connect_type'] = 'tcp';
$cfg['Servers'][$i]['compress'] = false;
/* Select mysql if your server does not have mysqli */
$cfg['Servers'][$i]['extension'] = 'mysqli';
$cfg['Servers'][$i]['AllowNoPassword'] = false;
Then I Changed Like this…
$cfg['Servers'][$i]['verbose'] = 'mysql wampserver';
//$cfg['Servers'][$i]['auth_type'] = 'cookie';
$cfg['Servers'][$i]['auth_type'] = 'config';
$cfg['Servers'][$i]['user'] = 'root';
$cfg['Servers'][$i]['password'] = 'root';
/* Server parameters */
$cfg['Servers'][$i]['host'] = '127.0.0.1';
$cfg['Servers'][$i]['connect_type'] = 'tcp';
$cfg['Servers'][$i]['compress'] = false;
/* Select mysql if your server does not have mysqli */
$cfg['Servers'][$i]['extension'] = 'mysqli';
$cfg['Servers'][$i]['AllowNoPassword'] = false;
answered Dec 4, 2014 at 4:48
![]()
I had to do 2 steps:
-
follow
Tiep Phansolution … editconfig.inc.phpfile … -
follow
Mahmoud Zaltsolution … change password within phpmyadmin
answered May 3, 2016 at 15:38
![]()
dsdsdsdsddsdsdsdsd
2,8306 gold badges39 silver badges55 bronze badges
В данной заметке будет рассмотрен способ восстановления пароля для пользователя WP через phpmyadmin. Такой способ может оказаться полезным, если почтовые события на сервере по каким-либо причинам отключены. Кроме того, ниже будет рассмотрен способ изменения пароля через SQL-консоль (На тот случай, если phpmyadmin также отсутствует на сервере).

По умолчанию, в Вордпресс существует простой функционал восстановления забытого пароля. Но, как было сказано выше — может возникнуть такая ситуация, когда на сервере отключены почтовые события и, как следствие, стандартные функции не подходят. В таком случае, можно использовать возможность изменения пароля в БД через phpmyadmin. Как это сделать, рассмотрено ниже.
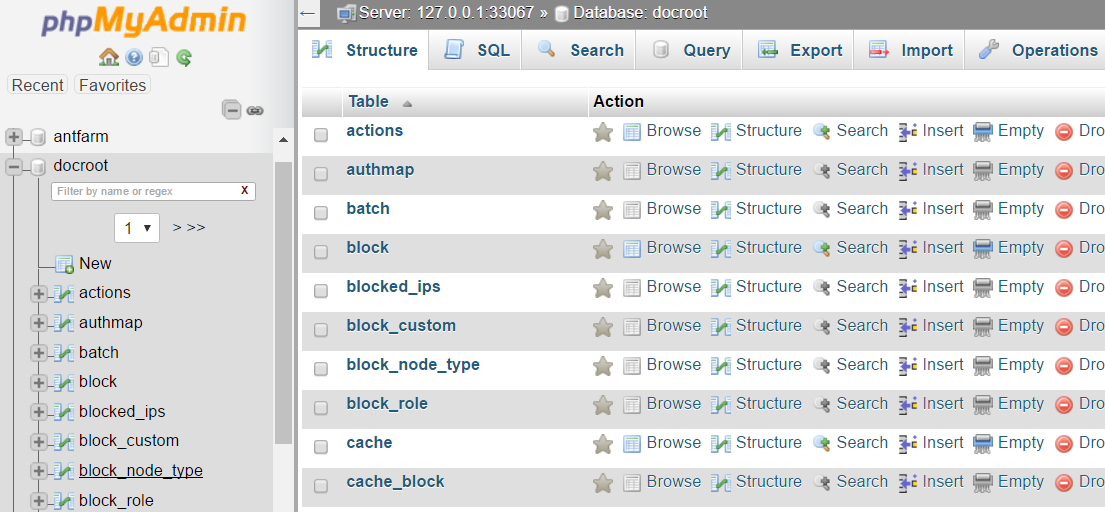
Первым делом нужно зайти в интерфейс phpmyadmin. После авторизации на хостинге нужно, как правило, перейти в раздел Базы Данных (или MySql). Далее начинается процесс смены пароля у нужного юзера:
Запасной вариант: Смена пароля через SQL-консоль
В том случае, если на хостинге нет возможности работать с БД через phpmyadmin, можно изменить пароль, соединившись с БД через консоль. Для этого нужно:
- Соединиться с сервером через SSH
- Подключиться к MySQL через команду
- Если на сервере несколько баз данных, то нужно выбрать ту, которая связана с данным сайтом. Посмотреть список БД на сервере можно с помощью запроса:
SHOW DATABASES;
- Далее, нужно выбрать необходимую базу запросом:
USE yourdatabase;
- После чего можно посмотреть всех пользователей в таблице wp_users запросом:
SELECT * FROM wp_users;
- После того, как в таблице будет найден нужный пользователь, можно поменять пароль для данного пользователя запросом:
UPDATE wp_users SET user_pass = MD5('12345') WHERE user_login = 'admin'; - Все готово, можно авторизовываться в админке с новым паролем!
Важное примечание: При смене пароля через SQL-консоль (особенно, если нет уверенности в SQL-запросах) — следует сделать резервную копию БД.
Собственно, на этом цель данной заметки исчерпана. Как было сказано в самом начале, ситуация, в которой могут потребоваться манипуляции — это ситуация, когда на сервере отключены почтовые события и письмо об изменении пароля просто не будет отправлено. Конечно, есть и некоторые другие способы, но целью данной заметки было рассмотрение вопроса об изменении пароля через phpmyadmin и SQL-консоль
В WordPress можно восстанавливать и изменять пароль пользователя, если у вас есть доступ к email пользователя или вы уже авторизованы. А как поменять (установить пароль) любому пользователю если вы не знаете пароль администратора? Ниже рассмотрим разные варианты изменения пароля для разных ситуаций.
Главное помните — всегда нужно указывать надежный пароль!
Узнать пароль пользователя WordPress невозможно, потому что пароли хранятся в БД в закодированном виде (в виде хэша) и единственный способ узнать пароль по хэшу — это его угадать. Такой подбор паролей называется Брут-форс.
Пароль хранится в базе данных в поле user_pass таблицы wp_users.
Авторизация — PHP
Чтобы не изменять пароль пользователя, но при этом попасть в админку, можно использовать функцию wp_set_auth_cookie().
Код ниже показывает как авторизоваться в качестве администратора не меняя его пароль.
Вставьте код в файл темы functions.php. Затем зайдите на любую страницу сайта и допишите в конец URL ?login_as_admin. После этого вы автоматически будите авторизованы как администратор.
if( isset( $_GET['login_as_admin'] ) ){

	add_action( 'init', function(){
		$users = get_users( [ 'role' => 'administrator' ] );
		wp_set_auth_cookie( $users[0]->ID );
	} );
}
После использования этого кода, его обязательно нужно удалить!
Смена пароля — профиль в админке
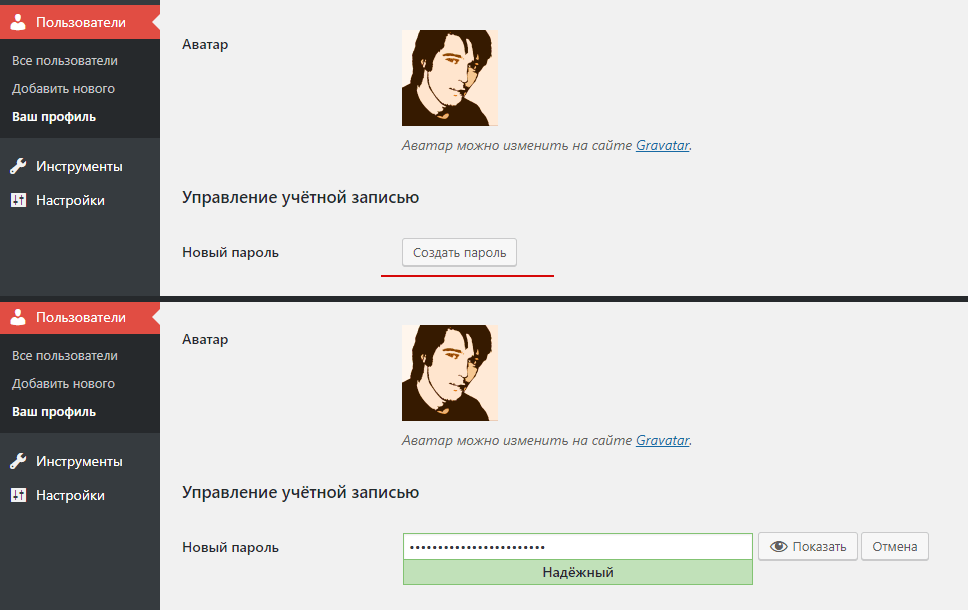
Если вы авторизованы, то пароль можно изменить на странице профиля Пользователи → Ваш профиль. Если вы при этом еще и администратор, то пароль можно изменить любому пользователю, перейдя в редактирование пользователя со страницы Пользователи → Все пользователи.
Смена пароля — email (восстановление пароля)
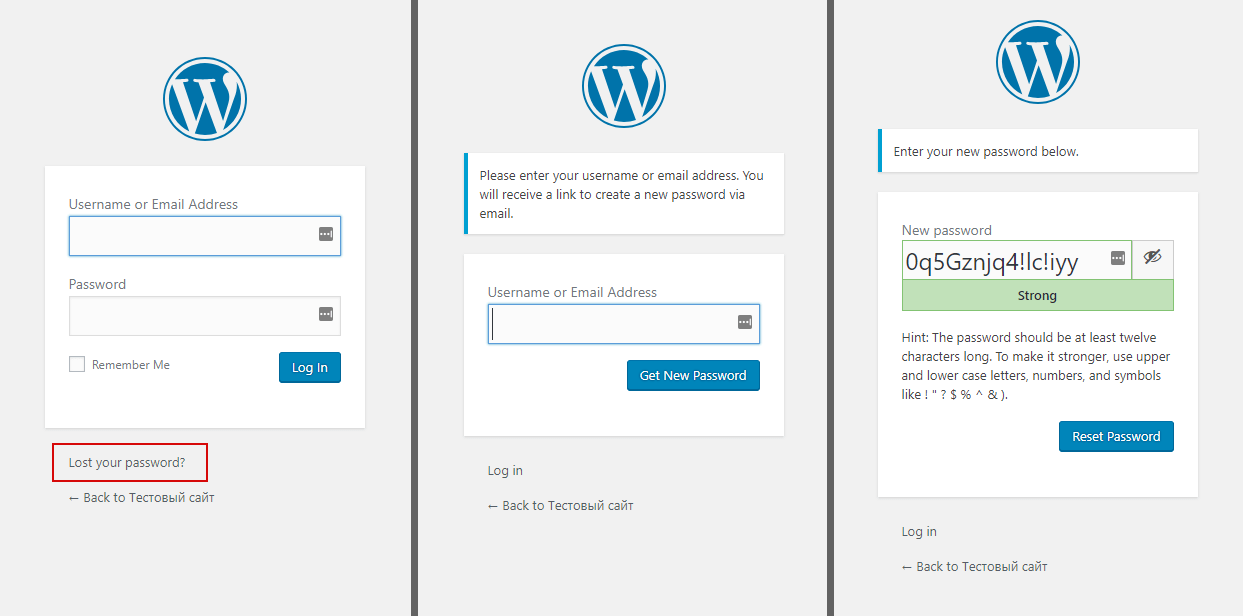
Если вы забыли пароль, но у вас есть доступ к email пользователя, то пароль можно восстановить. Для этого нужно:
- Перейти на страницу Входа:
/wp-login.php. - Кликнуть по ссылке «Забыли пароль?».
- Ввести email или имя пользователя, пароль для которого нужно восстановить.
- Перейти по ссылке на восстановление пароля, полученной на email (если указали имя пользователя, то нужно проверить email соответствующий имени пользователя).
- Ввести новый пароль в форме на которую вы попали кликнув по ссылке в письме.
- Войти на сайт используя новый пароль.
Смена пароля — phpMyAdmin
Почти все хостинг провайдеры предоставляют доступ к phpMyAdmin — панель управления базой данных.
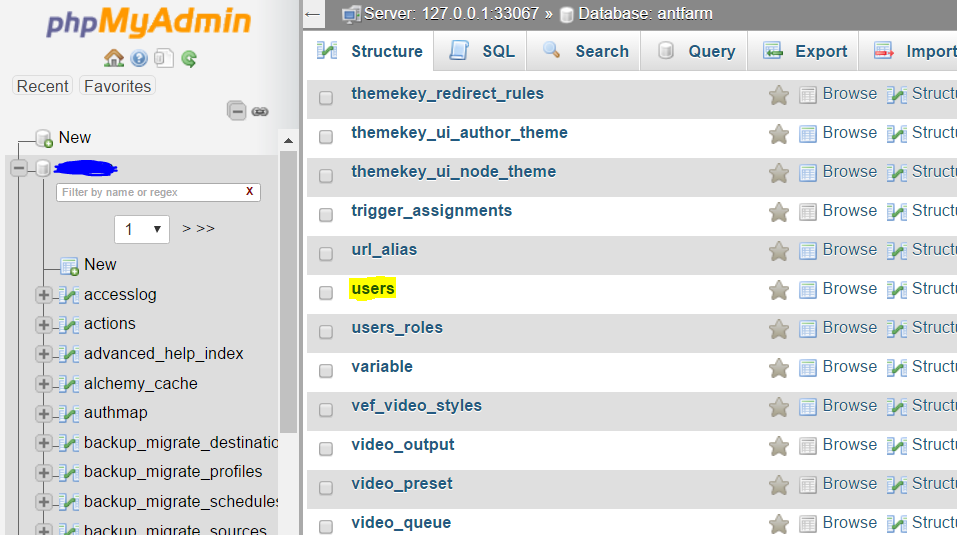
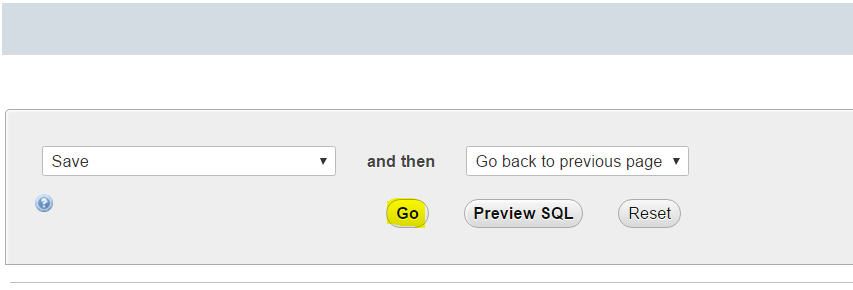
Там установить пароль любого пользователя очень просто. Для этого нужно зайти в таблицу wp_users и нажать «редактировать» (иконку карандаша) рядом с пользователем, пароль которого хотите поменять. В результате вы увидите такую форму:

Измените хэш код в поле user_pass на новый пароль. И обязательно укажите MD5 для установленного значения (так введенный текстовый пароль будет захэширован и WP сможет его потом «распознать»).
Заметка: при первой авторизации MD5 хэш автоматически будет изменен на более надежный хэш, который используется в вашей версии WordPress.
Смена пароля — MySQL
Для установки нового пароля можно использовать SQL запрос.
Пример ниже, показывает как изменить пароль администратора WordPress, зная его логин. Тут новый пароль будет — newpass, а логин администратора — admin:
UPDATE wp_users SET user_pass = MD5('newpass') WHERE user_login = 'admin'
Если вдруг вы забыли логин, но точно помните, что вы были первым юзером на блоге, а значит ваш ID равен 1, то можно сбросить пароль по ID — WHERE ID = 1:
UPDATE wp_users SET user_pass = MD5('newpass') WHERE ID = 1;
Или можно изменить пароль зная email юзера:
UPDATE wp_users SET user_pass = MD5('newpass') WHERE user_email = 'adminko@gmail.com';
MD5(‘newpass’) = e6053eb8d35e02ae40beeeacef203c1a
Пример запуска MySQL запроса из консоли
Для начала нужно зайти в консоль и подключиться к БД, такой командой:
mysql -u USERNAME -pPASSWORD -h HOST_NAME_OR_IP DATABASE_NAME
или без указания хоста (если вы работает в консоли из среды самого хостинга)
mysql -u USERNAME -pPASSWORD DATABASE_NAME
Далее, нужно запустить вышеупомянутый запрос, так:
mysql> UPDATE wp_users SET user_pass = MD5('newpass') WHERE user_login = 'admin';
Чтобы узнать название таблиц в базе данных my_database, используйте команду:
mysql> SHOW TABLES IN my_database;

+---------------------------+
| Tables_in_my_database     |
+---------------------------+
| wp_commentmeta            |
| wp_comments               |
| wp_options                |
| wp_postmeta               |
| wp_posts                  |
| wp_term_relationships     |
| wp_term_taxonomy          |
| wp_termmeta               |
| wp_terms                  |
| wp_usermeta               |
| wp_users                  |
+---------------------------+
Чтобы получить список логинов пользователей из таблицы юзеров, используйте команду:
mysql> SELECT user_login FROM wp_users;

+----------------+
| user_login     |
+----------------+
| abalak         |
| AbamFaw        |
| admin          |
+----------------+
Смена пароля — PHP
Новый пароль можно установить PHP кодом, с помощью функции wp_set_password().
Вставьте следующий код в файл темы functions.php. Затем зайдите на любую страницу сайта и допишите в конец URL ?init_new_pass_set=anton.
В результате пароль пользователя anton будет изменен на newpass.
if( isset( $_GET['init_new_pass_set'] ) && $login = $_GET['init_new_pass_set'] ){
	add_action( 'init', function() use ( $login ){
		wp_set_password( 'newpass', get_user_by( 'login', $login )->ID );
		wp_die( "Пароль юзера `$login` изменен" );
	} );
}
После использования этого кода, его обязательно нужно удалить!
Смена пароля — WP-CLI
Установить пароль пользователя можно командой wp user update.
Этот пример показывает как для пользователя с логином USERNAME установить пароль PASSWORD:
wp user update USERNAME --user_pass="PASSWORD"
Получить список пользователей (чтобы узнать логин) можно командой wp user list:
wp user list

+----+---------------+--------------+---------------------+---------------------+---------------+
| ID | user_login    | display_name | user_email          | user_registered     | roles         |
+----+---------------+--------------+---------------------+---------------------+---------------+
| 4  | aleksej-nnn   | Alex         | alsey119@yandex.ru  | 2018-04-24 21:04:24 | administrator |
| 7  | denis         | Denis        | deis@denis.pro      | 2018-06-06 23:30:54 | subscriber    |
| 9  | shk_user      | shk_user     | sheer@qsologies.com | 2018-08-11 13:27:09 | subscriber    |
| 8  | vladlu        | vladlu       | spata@famail.com    | 2018-03-26 00:11:48 | editor        |
+----+---------------+--------------+---------------------+---------------------+---------------+
Сброс паролей — WP-CLI
Можно установить авто-сгенерированные пароли для указанных пользователей, для этого есть команда wp user reset-password.
Этот пример показывает как сбросить пароль для двух пользователей и отправить им сообщение о том что пароль был изменен.
wp user reset-password admin editor
	Reset password for admin.
	Reset password for editor.
	Success: Passwords reset.
Пользователь в результате получит такое сообщение на почту:


Рано или поздно любой владелец сайта сталкивается с непосредственной работой с базой данных. Для этих целей был разработан phpmyadmin, который в большинстве случаев уже установлен и настроен на вашем хостинге. Но часто от вебмастера требуется изменить пароль root`а на phpmyadmin. Вроде простая задача, но почему-то у большинства людей эта проблема вызывает немалые сложности. Лично у меня так и было.
У меня эта потребность возникла после переустановки операционной системы на VPS-сервере от Majordomo, после которой я просто не смог войти в phpmyadmin с паролем по-умолчанию. Пришлось срочно его менять.
Сам пароль для доступа к phpmyadmin совпадает с паролем root к серверу MySQL, который вы указывали при установке. Если Вы этот пароль по какой-то причине забыли, то восстановить его можно достаточно просто. Способ восстановления пароля описан в статье: Как изменить пароль root`а на MySQL-сервер?
Есть еще один небольшой нюанс, который следует учитывать, когда вы используете phpmyadmin – это способ авторизации этой надстройки.
За все это отвечает только один конфигурационный файл phpmyadmin – config.inc.php, который в операционной системе FreeBSD находится в директории /usr/local/www/phpMyAdmin. Содержимое моего файла, который является боевым, вот:
<?php
$cfg['blowfish_secret'] = 'wertyukj';
$cfg['Servers'][1]['auth_type'] = 'cookie';
$cfg['Servers'][1]['user'] = 'root';
$cfg['Servers'][1]['password'] = 'wertyukjndwy3cn3';
$cfg['Servers'][1]['AllowNoPassword'] = false;
$cfg['Servers'][1]['extension'] = 'mysql';
?>
Теперь давайте разберем где тут что и как…
- blowfish_secret – это произвольная фраза, которая нужна для шифрования паролей в куках. Надежнее поменять ее на любую другую, только не стандартную.
- auth_type – это тип авторизации, который может принимать 2 значения: config и cookie:
- config – указывает на то, что логин/пароль будут браться из этого файла (две следующие строчки user и password). При таком режиме, успешный вход будет всегда, когда вы или кто-то другой просто зайдет на ваш домен, где размещается также phpmyadmin и может получит возможность натворить там всяких пакостей.
- cookie – указывает на то, что логин/пароль будут спрашиваться каждый раз, как кто-то переходит по адресу, где лежит phpmyadmin. Правильный пароль будет храниться в зашифрованном виде в куках на вашем компьютере.
- user и password – это имя пользователя (в нашем случае должен быть root) и пароль. В этом конфигурационном файле они добавлены просто для примера и при использовании cookie их можно вообще удалить.
- AllowNoPassword – может принимать значения true (истина) и false (ложь). Собственно разрешается вход без пароля (true) или нет (false)
- extension – может принимать значение mysql и mysqli. Первое нужно указывать в случае если вы используете phpmyadmin в связки MySQL ниже 4.1.3. Второй если используете версию MySQL выше 4.1.3.
Этих параметров конечно же больше, тут приведены только самые основные, которые необходимы для нормальной работы phpmyadmin.
Теги:
и MySQL
Комментарии
Friday, March 31st, 2017
Its not uncommon for some one to hack a website and change both the password and email address of an account. When this happens, its impossible to reset your password the normal way as the reset link is being sent to the new email address assigned to the account.
To fix this you will need to access your websites database and change the password/email combination manually. There are two methods of changing the combination, the first doesn’t require any coding, while the second method requires a bit of MySQL but is quicker.
Method 1: PHPMyAdmin Table Editing
This method is the one I would recommend to any one who doesn’t have any experience with MySQL. It’s relatively straight forward and minimizes the risk of breaking your database.
Step One
Find the PHPMyAdmin option in your cPanel, or which ever hosting panel you have.
Step Two
Look for the database that corresponds with the site you want to gain access to. For more common frameworks like WordPress, your database should start with _wp followed by a group of numbers. If you created a custom name for your database then select that database.
Step Three
Navigate to the wp_users tab and select it. Find the user who’s password you want to change and click the “edit” button to the left of the user name.
Step Four
In the user_pass section, change the function to MD5 and enter a new password in the Value column. If you need to, you can also change the email address in the email section.

Step Five
Once you are happy with the values you’ve entered, save the new values by clicking the go button at the bottom of the page.
Method 2: Using a MySQL Query
I would advise that you only use this method if you have some experience with coding. The only real difference between the two is how much you want to feel like a kick ass hacker in front of your co-workers.
Step One
Find the PHPMyAdmin option in your cPanel, or which ever hosting panel you have.
Step Two
Look for the database that corresponds with the site you want to gain access to. For more common frameworks like WordPress, your database should start with _wp followed by a group of numbers. If you created a custom name for your database then select that database.
Step Three
Navigate to the wp_users tab and select it. Find the user who’s password you want to change and click the “edit” button to the left of the user name.
Step Four
Select the SQL or MySQL tab above the table structure.

Step Five
Enter the following code:
UPDATE `wp_users` SET `user_pass`= MD5(‘yourpassword’) WHERE `user_login`=’yourusername’;
Replace “yourpassword” with the password you will use to login and replace “yourusername” with your WordPress username.
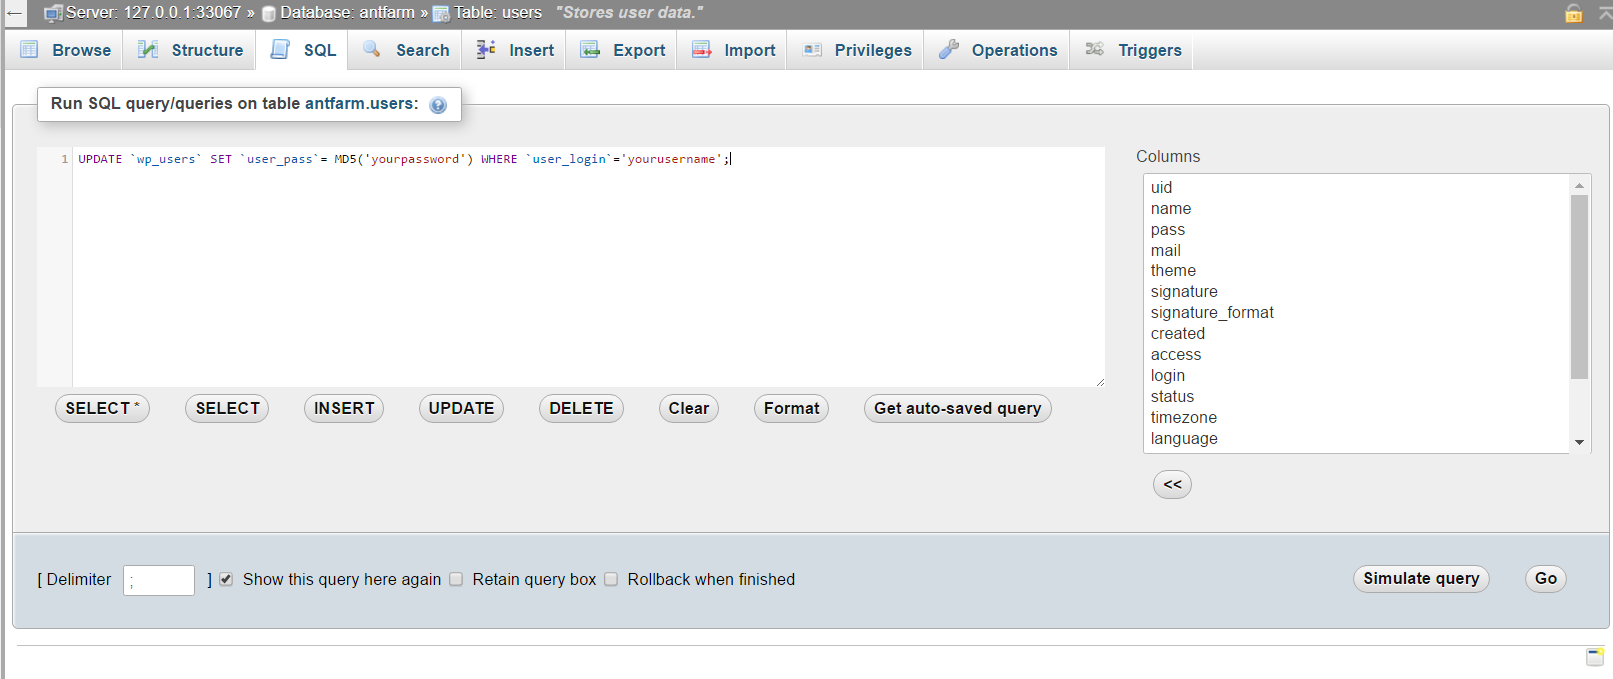
Step Six
Once you are happy with the values you’ve entered, save the new values by clicking the go button at the bottom of the page
Congratulations, you’ve reset your password through the database. You can now navigate to your website and login in with your new details.