Если вы часто скачиваете кино из Интернета или загружаете собственные клипы на YouTube и другие сайты, вы наверняка сталкивались с искажением картинки в видеофайлах.
Возможно, вы были разочарованы сплющенным и растянутым изображением в фильме, который долго искали. Или были неприятно удивлены черной рамкой, которая появляется вокруг изображения после загрузки клипа на сайт. Причина таких проблем кроется в неправильном соотношении сторон кадра, установленном при сохранении видеофайла. Стоит исправить эту ошибку – и видео будет радовать глаз правильными пропорциями и отсутствием ненужных элементов вроде черного обрамления картинки.
Яснее не стало? Прочтите нашу статью, и вы не только узнаете, что такое соотношение сторон видео, но и научитесь выявлять и исправлять проблемы, связанные с неправильным значением этого параметра.
Что такое пропорции видео?
Видеоряд любого фильма или клипа состоит из большого числа одинаковых по размеру кадров, размер каждого из которых характеризуется двумя величинами: шириной (длиной кадра по горизонтали) и высотой (длиной кадра по вертикали). Так вот, пропорция ширины и высоты кадра – и есть соотношение сторон видео. Эта величина обозначается двумя цифрами, разделенными двоеточием (2:1, 4:3 и т. д.).

Вариантов соотношения сторон существует немало, однако на сегодня наиболее распространены два: 4:3 и 16:9 (см. рисунок). Поскольку соотношение сторон 16:9 наиболее близко к тому, как человек видит окружающее пространство, именно этот формат сегодня наиболее популярен. Определенную популярность также набирает соотношение сторон 21:9 – для мониторов с ультрашироким экраном.
Как узнать соотношение сторон видеоклипа?
Когда мы говорим о соотношении сторон видеоклипа, обычно мы имеем в виду характеристику DAR (Display Aspect Ratio) – соотношение сторон, с которым запись отображается на экране. DAR зависит от двух величин:
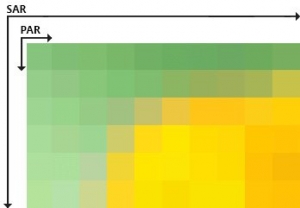
Pixel Aspect Ratio (PAR) – соотношение сторон пикселя. Поскольку в современном цифровом видео, как правило, используются только квадратные пиксели, для большинства «компьютерных» видеофайлов эта величина всегда будет равна 1:1.
Storage Aspect Ratio (SAR) – отношение количества пикселей по горизонтали к количеству пикселей по вертикали (эти цифры указаны в разрешении видеофайла).
Умножив PAR на SAR, мы получаем DAR – фактическое соотношение сторон видеоклипа.
Разберем на примере. Допустим, нам нужно узнать соотношение сторон видеоклипа в формате AVI с разрешением 640 × 480. Чтобы вычислить SAR, нам нужно разделить ширину видеофайла (640) на высоту (480) до простой дроби. Получаем 4/3. Поскольку, как мы уже выяснили, PAR нашего видео равно единице, соотношение 4:3 и будет являться соотношением сторон видеоклипа.
К слову, значения DAR и SAR совпадают не всегда. Например, в стандартах VCD и DVD видеозаписи кодируются с использованием неквадратных пикселей, соотношение сторон которых не равно 1:1. Чтобы разобраться, давайте посчитаем DAR для DVD-видео с распространенным разрешением 720 × 576. В этом случае SAR будет равно 5:4, а PAR, согласно стандарту, – 16:15. Перемножив эти значения, получим все то же соотношение сторон 4:3.
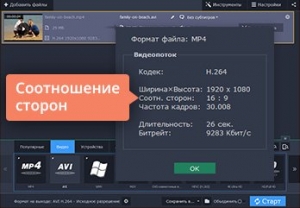
Нет времени считать вручную? Если у вас установлен Movavi Конвертер Видео, вам повезло – эта умная программа сделает все за вас! Просто загрузите свое видео в конвертер, кликните по нему правой кнопкой мыши, выберите пункт Свойства файла, и вы увидите нужные цифры.
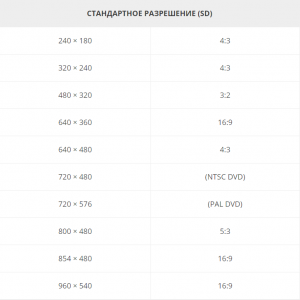
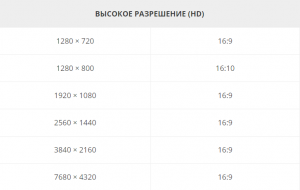
Какие бывают стандартные разрешения и какие соотношения сторон для них используются?
Наиболее часто используемые разрешения и соотношения сторон для них приведены в следующей таблице.
Какое соотношение сторон рекомендуется для YouTube?
Тут все просто: на сайте популярного видеохостинга соотношение сторон составляет 16:9, в противном случае к видео добавляются черные полосы.
Как выявить проблемы неправильного соотношения сторон?
При проигрывании видео, сохраненного с неверным соотношением сторон, вы увидите в кадре один из следующих дефектов:
Искажение пропорций. Изображение выглядит вытянутым или, напротив, сплющенным.
Нежелательные черные полосы по вертикали или горизонтали либо черную рамку вокруг изображения на видео.

Иногда такие проблемы возникают из-за неправильных настроек дисплея проигрывающего устройства. Однако если все настройки верны, а изображение на экране вас по-прежнему не радует, нужно поменять соотношение сторон самого видеофайла – в Movavi Конвертере Видео это можно сделать легко и быстро. Достаточно поставить программу на компьютер и выполнить несколько простых шагов.
Как исправить пропорции видео при помощи Movavi Конвертера Видео?
- Запустите Movavi Конвертер Видео.
- Нажмите Добавить файлы, а затем Добавить видео. Загрузите «проблемное» видео в программу.
- Раскройте вкладку Видео в нижней части интерфейса и выберите любой профиль нужного формата. После этого нажмите на кнопку со значком шестеренки.
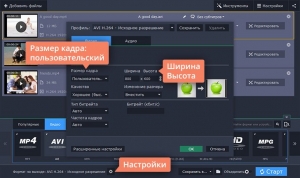
- В диалоговом окне выберите в списке Размер кадра пункт Пользовательский. Перейдите к полям Ширина и Высота в правой части, нажмите на значке с изображением скрепки, чтобы разблокировать поля, и введите подходящие значения.
- В списке Изменение размера выберите опцию Кадрировать, чтобы убрать черную рамку вокруг изображения. В списке Качество вы можете выбрать нужный вам вариант.
- Нажмите Старт – и через несколько минут сможете наслаждаться видео с нужными пропорциями.
Нажмите и удерживайте клавишу Shift, возьмите угловую точку и перетащите внутрь, чтобы изменить размер области выделения. Поскольку при масштабировании вы удерживаете клавишу Shift, соотношение сторон (такое же, как у исходной фотографии) остается точно таким же.
Где коррекция пропорций пикселя Photoshop?
Где соотношение сторон в фотошопе? Выберите «Вид» > «Соотношение сторон пикселя» > «Квадрат». При этом соотношение сторон пикселей устанавливается равным 1:1, что делает изображение менее широким. Выберите «Изображение» > «Размер изображения».
Как изменить соотношение сторон пикселя?
Отрегулируйте соотношение сторон в пикселях для неподвижного изображения или исходного клипа.
- В режиме расширенного просмотра нажмите «Активы проекта».
- Выберите неподвижное изображение или исходный клип.
- Выберите «Файл» > «Интерпретировать кадры».
- В разделе «Соотношение сторон пикселей» выберите «Использовать соотношение сторон пикселей из файла», чтобы использовать исходное соотношение сторон файла.
Как вы поддерживаете соотношение сторон?
В HTML поместите плеер в контейнер. В CSS для , добавьте процентное значение для padding-bottom и установите относительное положение, это сохранит соотношение сторон контейнера. Значение заполнения определяет соотношение сторон. т.е. 56.25% = 16:9.
Как изменить соотношение сторон JPEG?
На вкладке «Главная» нажмите кнопку «Изменить размер», расположенную в разделе «Изображение». Выберите поле «Сохранить соотношение сторон», затем нажмите «Проценты» или «Пиксели», чтобы изменить способ изменения размера изображения.
Каково соотношение сторон пикселя по умолчанию в Photoshop?
Но по умолчанию Photoshop будет использовать соотношение сторон 1.0 пикселя.
Какое соотношение сторон у 1920 × 1080?
Какое соотношение сторон 1920 × 1080? 1920 x 1080 — это соотношение сторон 16: 9.
Каким должно быть соотношение сторон моего пикселя?
Пиксели компьютерного видео имеют соотношение сторон пикселя 1:1 (квадратное). Стандарты видео, такие как DV NTSC, определяют кадр с соотношением сторон 4: 3 как 720 × 480 пикселей, что приводит к более узким прямоугольным пикселям. Пиксели DV NTSC имеют соотношение сторон пикселя 0.91 (неквадратное).
Как изменить соотношение сторон?
Изменить соотношение сторон можно с панели управления видеокарты или с помощью собственного элемента управления монитора. Перейдите в панель управления видеокартой, щелкнув правой кнопкой мыши экран компьютера и выбрав настройки графики (пример: Intel Graphics Settings).
Что такое соотношение 16 и 9 в пикселях?
Обычные разрешения в соотношении 16: 9 — 1920 x 1080 пикселей и 1280 x 720 пикселей.
Как изменить соотношение сторон фотографии?
Обрезать изображение до соотношения сторон
- Щелкните Загрузить изображение и выберите изображение, которое хотите обрезать.
- На шаге 2 нажмите кнопку «Фиксированное соотношение сторон», затем введите это соотношение, например 5 и 2, и нажмите «Изменить».
- Перетащите прямоугольник на изображение, чтобы выбрать нужную область.
- При необходимости переместите выделение и нажмите «Обрезать».
Как избавиться от соотношения сторон?
Перейдите в Изображение > Обрезать. Соотношение сторон кадрированного изображения остается таким же, как и у исходной фотографии. Чтобы удалить контур выделения, либо вернитесь в меню «Выбор» и выберите «Отменить выделение», либо используйте сочетание клавиш Ctrl+D (Win)/Command+D (Mac).
Какое у меня должно быть разрешение в Photoshop?
Общепринятое значение — 300 пикселей / дюйм. При печати изображения с разрешением 300 пикселей / дюйм пиксели сжимаются достаточно близко друг к другу, чтобы все выглядело резким. На самом деле 300 обычно немного больше, чем вам нужно.
Как изменить соотношение сторон в Photoshop без кадрирования?
По умолчанию Photoshop обычно обрезает ваше изображение до другого размера, который имеет то же соотношение сторон, что и исходное изображение, но вы можете настроить это. Для этого используйте раскрывающееся меню рядом с панелью «Параметры инструмента», чтобы выбрать «Без ограничений», а не «Использовать соотношение фотографий».
- Adobe Premiere Pro User Guide
- Beta releases
- Beta Program Overview
- Premiere Pro Beta Home
- Getting started
- Get started with Adobe Premiere Pro
- What’s new in Premiere Pro
- Release Notes | Premiere Pro
- Keyboard shortcuts in Premiere Pro
- Accessibility in Premiere Pro
- Long Form and Episodic Workflow Guide
- Frequently asked questions
- Hardware and operating system requirements
- Hardware recommendations
- System requirements
- GPU and GPU Driver requirements
- GPU Accelerated Rendering & Hardware Encoding/Decoding
- Creating projects
- Start a new project
- Open projects
- Move and delete projects
- Work with multiple open projects
- Work with Project Shortcuts
- Backward compatibility of Premiere Pro projects
- Open and edit Premiere Rush projects in Premiere Pro
- Best Practices: Create your own project templates
- Workspaces and workflows
- Workspaces
- FAQ | Import and export in Premiere Pro
- Working with Panels
- Windows touch and gesture controls
- Use Premiere Pro in a dual-monitor setup
- Capturing and importing
- Capturing
- Capturing and digitizing footage
- Capturing HD, DV, or HDV video
- Batch capturing and recapturing
- Setting up your system for HD, DV, or HDV capture
- Importing
- Transfer files
- Importing still images
- Importing digital audio
- Importing from Avid or Final Cut
- Importing AAF project files from Avid Media Composer
- Importing XML project files from Final Cut Pro 7 and Final Cut Pro X
- Supported file formats
- Support for Blackmagic RAW
- Digitizing analog video
- Working with timecode
- Capturing
- Editing
- Edit video
- Sequences
- Create and change sequences
- Change sequence settings
- Add clips to sequences
- Rearrange clips in a sequence
- Find, select, and group clips in a sequence
- Edit from sequences loaded into the Source Monitor
- Simplify sequences
- Rendering and previewing sequences
- Working with markers
- Source patching and track targeting
- Scene edit detection
- Video
- Create and play clips
- Trimming clips
- Synchronizing audio and video with Merge Clips
- Render and replace media
- Undo, history, and events
- Freeze and hold frames
- Working with aspect ratios
- Audio
- Overview of audio in Premiere Pro
- Audio Track Mixer
- Adjusting volume levels
- Edit, repair, and improve audio using Essential Sound panel
- Automatically duck audio
- Remix audio
- Monitor clip volume and pan using Audio Clip Mixer
- Audio balancing and panning
- Advanced Audio — Submixes, downmixing, and routing
- Audio effects and transitions
- Working with audio transitions
- Apply effects to audio
- Measure audio using the Loudness Radar effect
- Recording audio mixes
- Editing audio in the timeline
- Audio channel mapping in Premiere Pro
- Use Adobe Stock audio in Premiere Pro
- Advanced editing
- Multi-camera editing workflow
- Set up and use Head Mounted Display for immersive video in Premiere Pro
- Editing VR
- Best Practices
- Best Practices: Mix audio faster
- Best Practices: Editing efficiently
- Editing workflows for feature films
- Video Effects and Transitions
- Overview of video effects and transitions
- Effects
- Types of effects in Premiere Pro
- Apply and remove effects
- Effect presets
- Automatically reframe video for different social media channels
- Color correction effects
- Change duration and speed of clips
- Adjustment Layers
- Stabilize footage
- Transitions
- Applying transitions in Premiere Pro
- Modifying and customizing transitions
- Morph Cut
- Titles, Graphics, and Captions
- Overview of the Essential Graphics panel
- Titles
- Create a title
- Graphics
- Create a shape
- Draw with the Pen tool
- Align and distribute objects
- Change the appearance of text and shapes
- Apply gradients
- Add Responsive Design features to your graphics
- Install and use Motion Graphics templates
- Replace images or videos in Motion Graphics templates
- Use data-driven Motion Graphics templates
- Captions
- Speech to Text
- Download language packs for transcription
- Working with captions
- Check spelling and Find and Replace
- Export text
- Speech to Text in Premiere Pro | FAQ
- Best Practices: Faster graphics workflows
- Retiring the Legacy Titler in Premiere Pro | FAQ
- Upgrade Legacy titles to Source Graphics
- Animation and Keyframing
- Adding, navigating, and setting keyframes
- Animating effects
- Use Motion effect to edit and animate clips
- Optimize keyframe automation
- Moving and copying keyframes
- Viewing and adjusting effects and keyframes
- Compositing
- Compositing, alpha channels, and adjusting clip opacity
- Masking and tracking
- Blending modes
- Color Correction and Grading
- Overview: Color workflows in Premiere Pro
- Auto Color
- Get creative with color using Lumetri looks
- Adjust color using RGB and Hue Saturation Curves
- Correct and match colors between shots
- Using HSL Secondary controls in the Lumetri Color panel
- Create vignettes
- Looks and LUTs
- Lumetri scopes
- Display Color Management
- HDR for broadcasters
- Enable DirectX HDR support
- Exporting media
- Export video
- Export Preset Manager
- Workflow and overview for exporting
- Quick export
- Exporting for the Web and mobile devices
- Export a still image
- Exporting projects for other applications
- Exporting OMF files for Pro Tools
- Export to Panasonic P2 format
- Export settings
- Export settings reference
- Basic Video Settings
- Encoding Settings
- Best Practices: Export faster
- Collaboration: Frame.io, Productions, and Team Projects
- Collaboration in Premiere Pro
- Frame.io
- Install and activate Frame.io
- Use Frame.io with Premiere Pro and After Effects
- Integrate Adobe Workfront and Frame.io
- Frequently asked questions
- Productions
- Using Productions
- How clips work across projects in a Production
- Best Practices: Working with Productions
- Team Projects
- Get started with Team Projects
- Create a Team Project
- Add and manage media in Team Projects
- Invite and manage collaborators in a team project
- Share and manage changes with collaborators
- View auto-saves and versions of Team Projects
- Archive, restore, or delete Team Projects
- Working with other Adobe applications
- After Effects and Photoshop
- Dynamic Link
- Audition
- Prelude
- Organizing and Managing Assets
- Working in the Project panel
- Organize assets in the Project panel
- Playing assets
- Search assets
- Creative Cloud Libraries
- Sync Settings in Premiere Pro
- Consolidate, transcode, and archive projects
- Managing metadata
- Best Practices
- Best Practices: Learning from broadcast production
- Best Practices: Working with native formats
- Improving Performance and Troubleshooting
- Set preferences
- Reset and restore preferences
- Working with Proxies
- Proxy overview
- Ingest and Proxy Workflow
- Check if your system is compatible with Premiere Pro
- Premiere Pro for Apple silicon
- Eliminate flicker
- Interlacing and field order
- Smart rendering
- Control surface support
- Best Practices: Working with native formats
- Knowledge Base
- Known issues
- Fixed issues
- Fix Premiere Pro crash issues
- Green and pink video in Premiere Pro or Premiere Rush
- How do I manage the Media Cache in Premiere Pro?
- Fix errors when rendering or exporting
- Troubleshoot issues related to playback and performance in Premiere Pro
- Monitoring Assets and Offline Media
- Monitoring assets
- Using the Source Monitor and Program Monitor
- Using the Reference Monitor
- Offline media
- Working with offline clips
- Creating clips for offline editing
- Relinking offline medInstia
- Monitoring assets
An aspect ratio specifies the ratio of width to height. Video and still picture frames have a frame aspect ratio. The pixels that make up the frame have a pixel aspect ratio (sometimes referred to as PAR). Different video recording standards use different aspect ratios. For example, you record video for television in either a 4:3 or 16:9 frame aspect ratio. For more information, see Frame aspect ratio.
When a project is created in Premiere Pro, you set the frame and pixel aspect. Once these ratios are set, you cannot change them for that project. However, you can change the aspect ratio of a sequence. You can also use assets created with different aspect ratios in the project.
Premiere Pro automatically tries to compensate for the pixel aspect ratio of source files. If an asset still appears distorted, you can manually specify its pixel aspect ratio. Reconcile pixel aspect ratios before reconciling frame aspect ratios, because an incorrect frame aspect ratio can result from a misinterpreted pixel aspect ratio.
Types of aspect ratios
Commonly used aspect ratios are:
Widescreen (16:9)
It is the standard aspect ratio commonly shared by online videos, documentaries, and films. It captures a large amount of data with details.
")
Vertical (9:16)
It is the video recorded on your phone.
Fullscreen (4:3)
It is the aspect ratio that was used on television before widescreen was used. It focused on a particular element at a time.
Square (1:1)
It is a perfect square ratio that is commonly used on Instagram.
")
Anamorphic (2.40:1)
It is a wide widescreen often used in movies. It is similar to 16:9 but the top and bottom are cropped. This effect gives it a cinematic feel.
Set the aspect ratio
To set the aspect ratio of a sequence:
-
Go to the Settings tab of the New Sequence dialog box.
-
Under Video, enter the Frame Size(height) and horizontal(width). Premiere Pro automatically generates the aspect ratio.
-
Fill out the respective fields, name the sequence, and click OK.
The aspect ratio for the sequence has been set.
Frame aspect ratio
Frame aspect ratio describes the ratio of width to height in the dimensions of an image. Video and still picture frames have a frame aspect ratio.
For example, DV NTSC has a frame aspect ratio of 4:3 (or 4.0 width by 3.0 height). A typical widescreen frame has a frame aspect ratio of 16:9. Many cameras that have a widescreen mode can record using the 16:9 aspect ratio. Many films have been shot using even wider aspect ratios.
ratio (right)
In Premiere Pro, you can implement the letterboxing or the pan and scan technique by using Motion effect properties such as Position and Scale.
Letterboxing
When you import clips shot in one frame aspect ratio into a project that uses another frame aspect ratio, you decide how to reconcile the different values. This placement leaves black bands above and below the movie frame, called letterboxing.
For example, two common techniques are used for showing a 16:9 movie on a 4:3 standard television. You can fit the entire width of the 16:9 movie frame within the 4:3 television frame.
Pan and scan
Pan and scan is an alternative method to use a project with another frame aspect ratio. Only a part of the frame is retained, while the rest is lost.
For example, another technique to show a 16:9 movie on a 4:3 standard television is to fill the 4:3 frame vertically with the entire height of the 16:9 frame. Then, you pan the horizontal position of the 16:9 frame within the narrower 4:3 frame so that important action always remains inside the 4:3 frame.
Pixel aspect ratio
Pixel aspect ratio describes the ratio of width to height of a single pixel in a frame. The pixels that make up a frame have a pixel aspect ratio (sometimes referred to as PAR). Pixel aspect ratios vary because different video systems make various assumptions about the number of pixels that are required to fill a frame.
For example, many computer video standards define a 4:3 aspect ratio frame as 640×480 pixels high, which results in square pixels. The computer video pixels have a pixel aspect ratio of 1:1 (square). Video standards such as DV NTSC define a 4:3 aspect ratio frame as 720×480 pixels, which result in narrower, rectangular pixels. The DV NTSC pixels have a pixel aspect ratio of 0.91 (nonsquare). DV pixels, which are always rectangular, are vertically oriented in systems producing NTSC video and horizontally oriented in systems producing PAL video. Premiere Pro displays clip pixel aspect ratio next to the clip image thumbnail in the Project panel.
A. 4:3 square-pixel image displayed on 4:3 square-pixel
(computer) monitor B. 4:3 square-pixel image
interpreted correctly for display on 4:3 non-square pixel (TV) monitor C. 4:3 square-pixel image
interpreted incorrectly for display on 4:3 non-square pixel (TV)
monitor
The
clean aperture is the portion of the image that is free from artifacts
and distortions that appear at the edges of an image. The production
aperture is the entire image.
Distorted images
If you display rectangular pixels on a square-pixel monitor without alteration, images appear distorted. For example, circles distort into ovals. However, when displayed on a broadcast monitor, the images appear correctly proportioned because broadcast monitors use rectangular pixels. Premiere Pro can display and output clips of various pixel aspect ratios without distortion. Premiere Pro attempts to automatically reconcile them with the pixel aspect ratio of your project.
You could occasionally encounter a distorted clip if Premiere Pro interprets pixel aspect ratio incorrectly. You can correct the distortion of an individual clip by manually specifying the source clip pixel aspect ratio in the Interpret Footage dialog box.
Use assets with various aspect ratios
When an asset is imported, Premiere Pro attempts to preserve the frame aspect ratio, pixel aspect ratio, and frame dimensions so the asset does not appear cropped or distorted.
For assets that contain metadata, these calculations are automatic and precise. For example:
- When you capture or import NTSC footage with the ATSC frame size of 704×480, the D1 frame size of 720×486, or the DV frame size of 720×480, the pixel aspect ratio is set to D1/DV NTSC (0.91).
- When you capture or import footage with the HD frame size of 1440×1080, the pixel aspect ratio is set to HD 1080 Anamorphic (1.33).
- When you capture or import PAL footage with the D1 or DV resolution of 720×576, the pixel aspect ratio is set to D1/DV PAL (1.094).
For other frame sizes, Premiere Pro assumes that the asset was designed with square pixels and changes the pixel aspect ratio and frame dimensions to preserve the image aspect ratio. If the imported asset is distorted, you can change the pixel aspect ratio manually.
Assets in a sequence
When you drag an asset into a sequence, the asset is placed at the center of the program frame by default. Depending on its frame size, the resulting image could be too small or over cropped for the needs of the project. Premiere Pro can change its scale automatically when you drag an asset into a sequence, or you can change it manually.
It is always important to interpreted files correctly. You can read asset frame dimensions and pixel aspect ratio near the preview thumbnail and in the Video Info column of the Project panel. You can also find this data in the asset Properties dialog box, the Interpret Footage dialog box, and the Info panel.
Aspect ratio distortion in sequences
The sequence settings preset you choose when you create a sequence sets the frame and pixel aspect ratios for the sequence. You can’t change aspect ratios after you create the sequence, but you can change the pixel aspect ratio that Premiere Pro assumes for individual assets.
For example, if a square-pixel asset generated by a graphic looks distorted in Premiere Pro, you can correct its pixel aspect ratio to make it look right. By ensuring that all files are interpreted correctly, you can combine footage with different ratios in the same project. Then you can generate output that doesn’t distort the resulting images.
Correct aspect ratio misinterpretations
Correct individual aspect ratio misinterpretations
To correct individual aspect ratio interpretation, do the following:
-
Right-click the still image in the Project panel.
-
Select Clip > Modify > Interpret Footage.
If you select a clip on the Timeline panel or Program monitor, the option is unavailable.
-
Select one of the following in the Pixel Aspect Ratio section:
Use Pixel Aspect Ratio From File
Uses the original aspect ratio saved with the still image.
Conform To
Lets you choose from a list of standard aspect ratios.
Modify clip When using Photoshop to generate images for use in video projects, it’s best to use the Photoshop preset named for the video format you’ll use. Using the preset ensures that your images are generated with the correct aspect ratio.
Common pixel aspect ratios
|
Pixel aspect ratio |
When to use |
|
|
Square pixels |
1.0 |
Footage has a 640×480 or 648×486 frame size, |
|
D1/DV NTSC |
0.91 |
Footage has a 720×486 or 720×480 frame size, |
|
D1/DV NTSC Widescreen |
1.21 |
Footage has a 720×486 or 720×480 frame size, |
|
D1/DV PAL |
1.09 |
Footage has a 720×576 frame size, and the |
|
D1/DV PAL Widescreen |
1.46 |
Footage has a 720×576 frame size, and the |
|
Anamorphic 2:1 |
2.0 |
Footage was shot using an anamorphic film |
|
HDV 1080/DVCPRO HD 720, HD Anamorphic 1080 |
1.33 |
Footage has a 1440×1080 or 960×720 frame |
|
DVCPRO HD 1080 |
1.5 |
Footage has a 1280×1080 frame size, and |
As the other answers note, you will need to manually resize the image non-proportionally. The details will depend on exactly what you’re trying to do.
Unfortunately your question doesn’t seem entirely clear on this — I suspect it’s a terminology issue — but what I assume is that you have a 256 × 155 pixel image intended for viewing on a widescreen PAL television display with non-square (1.46:1*) pixels, and you want to scale it so that, after scaling and exporting, it looks the same on a display with square pixels as the original was intended to look on the non-square-pixel display.
If so, the easiest solution is to scale the image width by a factor of 1.46. To do this:
-
Turn off pixel aspect ratio correction, if enabled. You say you already know how to do that, so I won’t need to cover it (or spend time figuring out how to do it myself).
-
Select Image > Image Size from the menu to open the image size dialog.
-
Click the chain link icon next to the «Width» and «Height» boxes to turn off aspect ratio lock; now you should be able to change the width of the image without the height also changing.
-
Set the image width to 146%. (That is, first change the width unit to «Percent» from the drop-down menu, and then enter «146» in the text box.)
-
Optionally, choose your preferred resampling method, or leave it as the default. (You may want to experiment with this to see which method looks best for your images.) Then click «OK».
Your image should now be scaled from 256 pixels to 256 × 1.46 ≈ 374 pixels wide, and still be 155 pixels tall, and should hopefully look the same on your screen (with square pixels) as it did in the original video.
BTW, not that 374 × 155 pixels is a pretty tiny image by modern display standards, so you might want to scale it up at the same time. While you can do this in two steps, you’ll probably get better results by doing the aspect ratio correction and upscaling at the same time. So, for example, instead of scaling the image width by 164% and height by 100%, you could scale the width by 2 × 164% = 328% and height by 200%.
*) You wrote «1:1.46» in your question, but all the sources I’ve checked say that PAL pixels are wider than they’re tall, so it presumably should be 1.46:1. If the pixel aspect ratio for your image actually is 1:1.46, you should scale the image height up by 146% instead.
Ps. While trying to make sure I had the scaling ratio the right way around, I fell into a fairly deep rabbit hole of multiple contradictory sources on what the actual PAL Widescreen pixel aspect ratio is. Some say it’s 1.46, some say it’s 1.42, and some, like Wikipedia, list both.
Apparently the inconsistency (mostly) comes down to the fact that old analog TV formats have both horizontal and vertical overscan, meaning that the image area normally visible on the screen is smaller, and possibly a different shape, than the full transmitted image — and digital video formats based on the old analog standards inherited this whole complicated mess. So you end up with different screen aspect ratios depending on whether you count the overscan area or not, and while one would think that this shouldn’t affect the pixel aspect ratios (which, after all, are supposed to just determine the pixel shape needed to make a circle on the screen look round and not oval), apparently it sometimes does, perhaps due to mistakes in standards or by people interpreting them.
What also particularly confuses me is that, as far as I can tell, the claimed pixel dimensions of your images (256 × 155 px) don’t match up with any of the standard PAL video formats, which typically have storage aspect ratios (i.e. width / height in pixels) between 1.22 and 1.25.
Your images, meanwhile, apparently have a storage aspect ratio of 256 / 155 ≈ 1.65, which is actually fairly close to a typical widescreen display aspect ratio of 16:9 ≈ 1.78 or 16:10 = 1.6, assuming that the pixels are square. So perhaps my original assumption is wrong, and you do in fact have a picture with square pixels, and are trying to convert it to a video format with non-square pixels.
Anyway, whatever the case, the general solution is still always the same: use the image size dialog and remember to turn off the aspect ratio lock. Then you’ll just need to figure out either the correct scaling ratio (and use «percent» mode) or the actual target pixel size that you want, and scale your image to that. And check that it looks correct afterwards.
ПЕРЕД ТЕМ КАК НАЧАТЬ ЧТО-НИБУДЬ ПИСАТЬ НА ФОРУМЕ:
1. Прочитайте ПРАВИЛА ФОРУМА полностью.
2. Перед тем как задать вопрос посмотрите раздел FAQ (часто задаваемых вопросов) там собралась куча самых популярных тем с ответами!
3. Перед тем как задать вопрос воспользуйтесь ПОИСКОМ, возможно ваша тема уже поднималась.
4. Если вы не знаете как оформлять свое сообщение, выкладывать скриншоты, то загляните в МАНУАЛ
5. БАН + ПЕРЕНОС В КОРЗИНУ ТЕМЫ И СООБЩЕНИЯ СОДЕРЖАЩИЕ В СЕБЕ:
-
- рекламу и саморекламу, рекламу в подписях -
- вопросы о взломах,кейгенах, ключах, где их найти и прочее -
- дубликаты тем, аналогичные вопросы, посты, темы - все это удаляется -
- посты и новые темы не в том разделе - удаление этого поста или темы -
- удаляются темы, названия которых не содержит смысловой нагрузки (названия типа: "помогите!","проблема" и тд) -
- вопросы где скачать/найти и программу
|
|
Есть 15-ти минутный проект. Состоит в основном из материала с размером 1440 на 1080. Но на момент когда он делался, в свойствах проекта было установлено 1920 на 1080. При импорте файлов в вегас у них в свойствах автоматом выставлялся Aspect Ratio 1,3333 (HDV 1080), что расстягивало файлы по горизонтали до заполнения окна. Теперь, когда свойства проекта выставлены как нужно (1440 на 1080) — появились чёрные полосы сверху и снизу, т.к. Aspect Ratio у всех вложенных файлов остался по-прежнему 1,3333 (HDV 1080). 1. Вручную заходить в свойства каждого фрагмента на таймлайне и выставлять 1.000 (Square) будет довольно таки долго. Есть какой-то способ решить эту проблему быстрее? 2. Ради интереса загружал эти видеофайлы (1440 на 1080) в вегас с заранее установленными свойствами проекта. И АбсолютнО при любых настройках у этих видеофайлов Aspect Ratio всегда выставляется 1,3333. Автоматом. Даже когда сам проект 1440 на 1080. Причём такой проблемы у видеофайлов с соотношением 1920 на 1080 нету, там всегда квадрат. Это косяк программы, такие кривые видеофайлы или мой косяк? Настройки вегаса почти все по дефолту. 3. У этих же видеофайлов, при загрузке в вегас, частота кадров становится 120! Что круто тормозит работу. MediaInfo видит 30 кадров в секунду. Проверял в AE, всё в норме. 30fps. Тот же вопрос, что и во 2ом пункте. Старался максимально подробно описать проблему. Надеюсь на вашу помощь. ) |
|
|
Администратор запретил публиковать записи. |
|
Ты можешь попробовать импортировать сам проект .veg |
|
|
Ветеринар форума, педиатр всея Руси. Администратор запретил публиковать записи. |
|
Спасибо, работает |
|
|
Администратор запретил публиковать записи. |
|
В смысле причиной? Pan/crop остался от старых настроек. Можно поствить автокадрирование в вегасе, может быть помогло, не проверял. Про это прочитай статью здесь на сайте (это последняя тема в разделе вегаса) |
|
|
Ветеринар форума, педиатр всея Руси. Администратор запретил публиковать записи. |
|
Вопросов больше нет. Ещё раз спасибо ) |
|
|
Администратор запретил публиковать записи. |
|