Getting Started Guide
Editing Plymouth
You can edit Plymouth with a simple text editor for animations and images. This is Ubuntu version agnostic.

- Get Template
- Customize Template
- Set Custom Theme
Make a template
First you will get a template that covers all the basic aspects of a Plymouth. Change my-theme to your own personal them name.
sudo cp --recursive /lib/plymouth/themes/ubuntu-logo ~/themes/my-theme
Customize file names
Now you can change some names to help identify our theme from others.
sudo mv ubuntu-logo.plymouth my-theme.plymouth
sudo mv ubuntu-logo.script my-theme.script
sudo mv ubuntu-logo.grub my-theme.grub
sudo mv ubuntu_logo16.png my_theme16.png
sudo mv ubuntu_logo.png my_theme.png
Edit image files
Use your image editor of choice to alter the png images. I like GIMP for quick edits.
gimp my_theme.png my_theme16.png
gimp progress_dot_on.png progress_dot_off.png
gimp progress_dot_on16.png progress_dot_off16.png
Here is an example of my alterations:


Edit the configuration files.
-
Set up theme information file.
gedit my-theme.plymouthEdit lines 2, 7, and 8 and change ubuntu logo to you theme name.
[Plymouth Theme] Name=My Theme Description=A theme that features a blank background with a logo. ModuleName=script [script] ImageDir=/lib/plymouth/themes/my-theme ScriptFile=/lib/plymouth/themes/my-theme/my-theme.script -
Start-up terminal color. (Optional)
gedit my-theme.grubChange it from purple to something else.
Edit line 1 with RGB color code.
A good site to help you is Color-Hex. I am just going to make mine black.
if background_color 0,0,0; then clear fi -
The script file to apply theme changes
gedit my-theme.scriptThere is many different aspects to this file that you can change to customize your plymouth boot theme. If you wish to do more advanced changes you should study it. I am only showing how to change the background color, logo, and status indicator.
Edit lines 169, 170, 174, and 180 to change the background gradient and images you edited earlier.
Window.SetBackgroundTopColor (0.66, 0.66, 0.66);       #top
Window.SetBackgroundBottomColor (0.146, 0.146, 0.146); #bottom

bits_per_pixel = Window.GetBitsPerPixel ();
if (bits_per_pixel == 4) {
    logo_filename = "my_theme16.png";
    progress_dot_off_filename = "progress_dot_off16.png";
    progress_dot_on_filename = "progress_dot_on16.png";
    password_field_filename = "password_field16.png";
    question_field_filename = "password_field16.png";
} else {
    logo_filename = "my_theme.png";
    progress_dot_off_filename = "progress_dot_off.png";
    progress_dot_on_filename = "progress_dot_on.png";
    password_field_filename = "password_field.png";
    question_field_filename = "password_field.png";
}
Send your theme folder
cp --recursive ~/themes/my-theme /lib/plymouth/themes
Set Plymouth configuration to use theme.
sudo ln -sf /lib/plymouth/themes/my-theme/my-theme.plymouth /etc/alternatives/default.plymouth
sudo ln -sf /lib/plymouth/themes/my-theme/my-theme.grub /etc/alternatives/default.plymouth.grub
18.04+
sudo update-initramfs -u
Restart to watch it in action.

Contents
- Quick Facts
-
Options
- Daemon
-
Startup
- Splash Theme
-
Testing
- Checking Plymouth Can Run in the Initramfs
- Checking Plymouth Can Run Early in Boot
- Running Plymouth «post-boot»
-
Debugging
- Toggling to Traditional Text-based Boot
- Enabling Debugging
- Plymouth Logs
- Tips
-
Additional
- «plymouth ask-question»
- «plymouth ask-for-password»
- Special FSCK messages
- See Also
Plymouth is the application which provides the graphical «splash» screen when booting and shutting down an Ubuntu system.
Note that on Ubuntu, Plymouth is considered to be the «owner» of the console device (/dev/console) so no application should attempt to modify terminal attributes for this device at boot or shutdown.
Quick Facts
Plymouth:
- Uses KMS (Kernel Mode Setting) (where possible) and the framebuffer to set the screen resolution.
- Comprises 3 components:
-
A daemon (server) process called plymouthd
- The daemon is responsible for the graphical display, animation and logging.
-
A client application called plymouth
- The client sends commands to the daemon
-
A library libply.so to allow applications to be written to talk to the daemon
-
(The plymouth command is linked to libply.so for this reason).
-
-
- Supports themes.
-
Is scriptable (see package plymouth-theme-script)
- Runs at system startup and system shutdown:
- Boot
-
plymouthd is generally started in the initramfs
-
(see file /usr/share/initramfs-tools/scripts/init-top/plymouth)
-
-
plymouthd is stopped at the point the Display Manager is starting
-
(see Upstart job configuration file file /etc/init/plymouth-stop.conf).
-
-
- Shutdown
-
plymouthd is started by Upstart
-
(see Upstart job configuration file file /etc/init/plymouth.conf).
-
-
- Boot
-
Writes a log to /var/log/boot.log.
Options
Daemon
plymouthd runs in one of four modes which are set by specifing the appropriate command-line option:
-
—mode=boot
-
—mode=shutdown
-
—mode=suspend
-
—mode=resume
This allows Plymouth to display potentially different content based on whether the system is starting or stopping.
Startup
The plymouthd daemon attempts to read the following files at startup (the first file it finds takes precedence over any other):
- General configuration
-
/etc/plymouth/plymouthd.conf (unused on Ubuntu)
-
/lib/plymouth/plymouthd.defaults (unused on Ubuntu)
-
- Splash Theme
-
/lib/plymouth/themes/default.plymouth
-
Splash Theme
Contents of /lib/plymouth/themes/default.plymouth:
  [Plymouth Theme]
  Name=Ubuntu Logo
  Description=A theme that features a blank background with a logo.
  ModuleName=script

  [script]
  ImageDir=/lib/plymouth/themes/ubuntu-logo
  ScriptFile=/lib/plymouth/themes/ubuntu-logo/ubuntu-logo.script
This tells plymouthd to use the «script» splash plugin. This plugin allows the graphical splash experience to be scripted using Plymouths own scripting language (hence the name).
The «script» splash plugin exists as /lib/plymouth/script.so (source code: src/plugins/splash/script/script.c)
-
«ImageDir» tells plymouthd which directory contains the images used by the «Ubuntu Logo» theme.
-
«ScriptFile» is the full path to the Plymouth script which creates the splash experience.
Testing
Checking Plymouth Can Run in the Initramfs
-
Add «break=init» to the kernel command-line and boot.
- Chroot to the real filesystem:
-
chroot /root
Some warning messages will be displayed, but they can be ignored:
    bash: cannot set terminal process group (-1): Inappropriate ioctl for device
    bash: no job control in this shell
-
- Start the daemon:
-
plymouthd --tty=`tty` --mode=boot --kernel-command-line="quiet splash"
-
- Check that the daemon is running:
-
plymouth --ping && echo plymouth is running || echo plymouth NOT running
-
- Tell the daemon to display the splash screen:
-
plymouth show-splash
-
If this works, to exit the splash screen you’ll have to type the following «blind» (and note that backspace won’t work, but CONTROL-c will):
plymouth exit
To shutdown your system:
- Remount the disk read-only:
-
mount -oremount,ro /
-
- Power off the system.
Note that «shutdown -h now or «halt» cannot be used since Upstart is not running in this scenario.
Checking Plymouth Can Run Early in Boot
-
Add «init=/bin/sh» to the kernel command-line and boot.
- A warning message will be displayed, but can be ignored:
-
/bin/sh: 0: can't access tty: job control turned off
-
- Start the daemon:
-
plymouthd --tty=`tty` --mode=boot --kernel-command-line="quiet splash"
-
- Check the daemon is running
-
plymouth --ping && echo plymouth is running || echo plymouth NOT running
-
- Tell the daemon to display the splash screen:
-
plymouth show-splash
-
If this works, to exit the splash screen you’ll have to type the following «blind» (and not that backspace won’t work, but CONTROL-c will):
plymouth exit
To shutdown your system:
- Flush any pending data:
-
sync;sync;sync
-
- Remount disk read-only:
-
mount -oremount,ro /
-
- Power off the system.
Note that «shutdown -h now or «halt» cannot be used since Upstart is not running in this scenario.
Running Plymouth «post-boot»
You can experiment with Plymouth after your system has booted. To start the Plymouth daemon:
- Boot system and login as usual
-
") [RECOMMENDED] Install plymouth-x11 package (allows you to see the boot screen in an X11 window)
[RECOMMENDED] Install plymouth-x11 package (allows you to see the boot screen in an X11 window) -
sudo apt-get install plymouth-x11
-
-
Start a terminal (such as gnome-terminal)
- Start the Plymouth daemon by running the following:
-
sudo plymouthd —debug —tty=`tty` —no-daemon
-
Plymouth is now running, so we can have some fun:
-
To check if Plymouth really is running:
-
sudo plymouth —ping && echo plymouth is running || echo plymouth NOT running
-
- To show a message on our «boot» screen
-
Start another gnome-terminal terminal/tab
-
Run the following to show the Plymouth window:
-
sudo plymouth show-splash
-
- Display a message
-
sudo plymouth message —text=»hello world»
-
-
- A slightly more useful example
- Show the splash screen
-
sudo plymouth show-splash
-
- Stop the graphical progress indicator
-
sudo plymouth pause-progress
-
- Display a message
-
sudo plymouth message —text=»pausing boot — press ‘c’ or space bar to continue»
-
- Wait for the user to type either ‘c’, ‘C’ or space (no return required)
-
sudo plymouth watch-keystroke —keys=»cC » —command=»tee /tmp/c_key_pressed»
-
- Change the on-screen message
-
sudo plymouth message —text=»resuming boot»
-
- Resume the graphical progress indicator
-
sudo plymouth unpause-progress
-
- Show the splash screen
Note that when you run the «show-splash» command, two windows pop up. This is because Plymouth simulates a dual-monitor setup.
To stop the Plymouth daemon:
-
sudo plymouth —quit
Debugging
![]() This section is for advanced users only.
This section is for advanced users only.
Toggling to Traditional Text-based Boot
If you want to see the text-based boot messages (which use the Plymouth «details» plugin, press the ESCAPE key at any point when Plymouth is running. Note that the ESCAPE key acts as a toggle, so you can keep switching between graphical and text mode as required.
To have the boot start in «text mode» as early as possible, remove «splash» from the kernel command-line in grub.
To make the change permanent, update /etc/default/grub and run «sudo update-grub».
Updating the grub configuration manually is a potentially dangerous operation and can result in a machine that fails to boot without intervention. Do not attempt it unless you understand exactly what you are doing.
Enabling Debugging
You can set Plymouth to overlay internal debug messages (which will also be logged to a file) by adding the following command-line option to grub:
-
plymouth:debug
For example, if you are running Ubuntu Natty (11.04) or Oneiric (11.10):
- Power on system.
-
Hold down the CONTROL key until the Grub boot menu appears.
-
Type «e» to edit the default kernel command-line.
-
Use the arrow keys to go to the end of the line which starts «linux /boot/vmlinuz …».
-
Add a space character, followed by «plymouth:debug».
Notes:-
If you’re interested in the overall boot, you may wish to remove the «quiet» keyword too)
-
-
Type CONTROL+x to boot
-
Once the system has booted, you can view all the Plymouth debug output in file var/log/plymouth-debug.log.
For older releases such as Maverick (10.10), hold down the SHIFT key rather than the CONTROL key to access the grub boot menu.
Notes:
- If you are using the live CD, the process is slightly different:
- Power on system
- Hold down the SHIFT key until ISOLINUX «boot:» prompt appears
-
Type, «live plymouth:debug»
Plymouth Logs
Plymouth will log all output sent to the console to a file. By default, the data is logged to file /var/log/boot.log. If Plymouth is running in debug mode, debug messages are logged to /var/log/plymouth-debug.log.
Note that plymouthd buffers all messages until told that the disk partition on which the logs are to be written (in other words the partition containing /var/log/) is writeable.
The Upstart job /etc/init/plymouth-log.conf is used to accomplish this by calling:
plymouth update-root-fs --read-write
Tips
-
Take care if you add «console=» options to your kernel command line since plymouthd will honour those over its own
-
«—tty=TTY» option!
-
Additional
«plymouth ask-question»
Used to prompt the user for an answer, echoing the answer text as it is typed. The answer is by default echoed to stdout to allow it to be piped to another command which expects to read the password on its stdin. Example:
  plymouth ask-question --prompt "what is your name? " |
    command-to-process-answer --read-from-stdin
Similar functionality is provided by a combination of «plymouth message» and «plymouth watch-keystroke».
«plymouth ask-for-password»
Used to prompt the user for a password securely (password text is not echoed). The password the user enters is by default echoed to stdout to allow it to be piped to another command which expects to read the password on its stdin. Example:
  plymouth ask-for-password --prompt "specify password: " |
    command-to-read-password-and-do-secret-things --read-from-stdin
Special FSCK messages
The Ubuntu Plymouth theme supports a «special» message that allows mountall to display fsck progress messages («fsck is 20% complete»). You can make use of this functionality by using a special message format:
sudo plymouth --update=fsck:sda1:27
This will display a message like:
Checking disk 1 of 1 (27% complete)
See Also
-
BootGraphicsArchitecture
CategoryBoot
Вы, наверное, уже знаете, как настроить рабочий стол Ubuntu. Но что, если вы ищете способ настроить заставку Ubuntu? Хотите изменить логотип выбранного вами рабочего стола?
Вот как можно изменить заставку на старых системах Ubuntu, а также на компьютерах с Ubuntu 16.04 LTS и более поздними версиями.
Как изменился заставка
Во времена Ubuntu 10.04 настройка заставки (изображение, которое появляется при загрузке компьютера) означала редактирование содержимого / user / images / share / xsplash. Однако в Ubuntu 16.04 LTS и более поздних версиях этот каталог заставки перемещен.
Кредит изображения: Скриншоты Linux через Flickr
Более поздние версии Ubuntu имели местоположение как / lib / plymouth / themes. Начиная с Ubuntu 16.04 LTS это местоположение было перемещено в / usr / share / plymouth / themes.
Инструмент Plymouth по сути управляет заставкой и может использоваться для установки нового изображения.
Несколько лет спустя все изменилось. Теперь у нас есть удобное приложение, которое помогает управлять текущим заставкой: Plymouth Themes.
Прежде чем приступить к установке новых инструментов, убедитесь, что у вас есть новый заставочный образ. Это может быть фотография — вероятно, что-то очень похожее на Ubuntu, например, снимок природы — или пользовательский рисунок. Если у вас его еще нет, есть несколько мест, где вы можете найти пользовательскую графику заставки онлайн. Возможно, вы хотите, чтобы всплеск совпадал или дополнял фон вашего рабочего стола?
Кроме того, вы можете создать свой собственный экран-заставку с нуля. Это может быть не так просто, как кажется, и требует, чтобы на вашем компьютере Linux были установлены правильные графические инструменты. GIMP, безусловно, вариант, так как работает в Adobe Photoshop в Wine.
Установить Плимут Темы
Когда ваша замена заставки Ubuntu готова, пришло время установить инструмент, необходимый для ее включения. В терминале установите plymouth-themes:
sudo apt установить plymouth-themes
После установки будет создан новый каталог в / usr / share / plymouth / themes. Загляни внутрь. Вы найдете все, что включает в себя текущий экран-заставку: логотипы, счетчики и сценарии. Если вы обновили предыдущую версию Ubuntu и были потрясены отсутствием настраиваемой заставки, этот каталог будет выглядеть знакомо. В основном, та же самая структура используется.
Это упрощает перенос старых тем.
Обновление и перемещение старых тем заставки
Если вы использовали Ubuntu в течение некоторого времени с собственным заставкой, вам нужно переместить существующие темы. Проверьте их. Если они на пустом месте, вы можете перенести их в новый каталог.
Начните с изучения старого каталога тем и проверки содержимого. Вы можете сделать это в вашем файловом менеджере или в терминале. Последнее является хорошим вариантом, чтобы получить представление о размере файла:
ls -ltrd / lib / plymouth / themes
Вы можете оставить старые файлы темы позади, когда вы перемещаете их. Перейти к
cd / lib / plymouth / themes
… Затем используйте команду mv, чтобы переместить каталог темы, который вы хотите сохранить, один за другим.
милливольт [theThemeDirectory] / USR / доли / Плимут / темы
Обратите внимание, что некоторые старые темы могут нуждаться в настройке, поскольку они, вероятно, включают рекурсивные ссылки на местоположение старого файла. Вам понадобится текстовый редактор, чтобы исправить это, например, vim или nano.
В новом месте назначения найдите каждый из файлов темы .plymouth и откройте в текстовом редакторе. В терминале используйте:
sudo nano / usr / share / plymouth / themes /[theme_name]/[theme_name].Плимут
Найдите ссылку на путь к файлу, затем измените его с
/ Библиотека / плимут
в
/ USR / доли / плимут
Используйте CTRL + X, чтобы сохранить и выйти из файла.
Хотите больше тем заставки Ubuntu?
Различные места в Интернете предоставляют темы, ориентированные на Ubuntu, для вашего компьютера. Например, GNOME-Look.org содержит большую коллекцию тем, сгруппированных по использованию. Это включает в себя Плимут Темы раздела, Кроме того, посетите DeviantArt и найдите «темы Плимута» и загрузите те, которые вам нравятся. Они обычно не более 3 МБ.
Обычно темы содержат установочный скрипт. Например, я скачал тема Ubuntu-видения с GNOME-Look.org для настройки заставки.
Процедура была следующей:
- Скачать тему
- Извлечь в домашний каталог
- Найти скрипт установки
- Откройте терминал и запустите, используя ./install_script_name
- Выберите любые параметры для заставки
После этого вам нужно изменить имя файла и путь к файлу в файле конфигурации default.plymouth. Этот последний шаг имеет решающее значение, поскольку он обеспечивает использование новой темы. В терминале введите
sudo nano default.plymouth
Отредактируйте два пути к файлам для ImageDir и ScriptFile, убедившись, что они оба указывают на предполагаемую тему. Кроме того, ScriptFile должен указывать на правильный файл .script в каталоге темы.
Сохраните файл и выйдите (CTRL + X), затем перезагрузите компьютер. Следите за новым заставкой Ubuntu!
Вручную установите новый заставки Ubuntu
Если у темы нет сценария установки, вам необходимо вручную добавить его в каталог plymouth / themes.
Извлеките тему и скопируйте ее в каталог / usr / share / plymouth / themes. Что бы вы ни использовали в качестве нового заставки, вам нужно установить его в качестве нового по умолчанию:
альтернативы обновления sudo —install /usr/share/plymouth/themes/default.plymouth default.plymouth /usr/share/plymouth/themes/»path/to-your-plymouth.plymouth «100
Затем откройте файл default.plymouth в текстовом редакторе, как описано выше, и отредактируйте пути к файлам.
Наконец, обновите initramfs, виртуальную файловую систему, которая является частью процедуры загрузки:
sudo update-initramfs -u
Теперь, когда вы перезагрузите Ubuntu, вы увидите новый экран-заставку.
А как насчет логотипов?
Что если вы хотите изменить только логотип Ubuntu? Это так же просто. Начните с открытия каталога usr / share / plymouth / themes и поиска каталога, содержащего логотип.
Затем создайте копию файла, на тот случай, если вы захотите вернуть его в какой-то момент:
ср [logo_file].png [logo_file_backup].png
Как вы поступите дальше, зависит от вас. Возможно, вы хотите использовать исходную графику в качестве ссылки? В этом случае откройте файл в предпочитаемом вами редакторе изображений и внесите необходимые изменения. В противном случае просто создайте новое изображение с такими же размерами и сохраните его в том же каталоге. Убедитесь, что имя файла нового логотипа совпадает с именем старого логотипа.
Нужна новая заставка в Ubuntu? Это как!
Вы, наверное, уже знаете, как изменить тему рабочего стола в выбранной вами среде рабочего стола Ubuntu. Однако заставки немного сложнее. Напомним:
- Найти или спроектировать новый экран-заставку
- Установить plymouth-themes
- Переместите старую тему (ы) заставки
- Восстановить старую ссылку на заставку
- Установить новую тему по умолчанию
- Обновить initramfs
Если вы новичок в Ubuntu, эти шаги могут показаться немного незнакомыми. Тем не менее, здесь нет ничего такого простого. Это также проще, чем менять заставку в Windows 10! В конечном счете, подобный хак показывает, как настраивается Linux.
Ищете больше способов настроить Linux? Почему бы не узнать, как сделать Linux похожим на Windows?
Сегодня займемся кастомизацией системы, и вместо вывода сообщений при загрузки системы установим тему Plymouth. Plymouth будет выводить картинку когда система будет загружатся, согласитесь, иногда хочется что бы ваша система выглядела более красивой и современной. Тем более, если вам необходимо взглянуть что там загружается то вы всегда сможете переключится на вывод сообщений нажав на “ESC”. Plymouth лишь выводит вместо сообщений картинку, часто эта картинка может быть анимированной.
Темы Plymouth можно скачать с сайта gnome-look.org из раздела который так и называется “Plymouth Themes”. Обычно с темой идет и описания как ее установить. Но, мы рассмотрим один из универсальных способов, правда не всегда срабатывает, так что решать вам. Если к теме идет инструкция, рекомендую воспользоваться именной ей. Устанавливать тему Plymouth мы будем в Ubuntu 20.04, но, данная инструкция подойдет и для Debian.
И так, переходим к установки темы Plymouth, как уже говорилось выше, скачиваем понравившуюся тему Plymouth с сайта gnome-look.org, затем распаковываем ее и перемещаем в каталог/usr/share/plymouth/themes. Для перемещения темы Plymouth рекомендую сразу воспользоваться терминалом, вы можете либо переместить тему, либо скопировать, это не столь важно. Для примера я возьму тему plexus, вы же выбираете ту, которая именно вам придется по вкусу, благо, есть из чего выбирать. Далее как уже говорилось выше, распаковываем данную тему и перемещаем ее в нужную папку. Распаковать архив можно либо используя графическую утилиту, например “Ark” либо из терминала выполнив команду:
tar -xf имя файла.tar.xz
Далее копируем используя команду “cp”:
sudo cp -r plexus /usr/share/plymouth/themes/

Устанавливаем тему Plymouth в Ubuntu/Debian
После перемещения выполняем следующую команду:
sudo update-alternatives --install /usr/share/plymouth/themes/default.plymouth default.plymouth /usr/share/plymouth/themes/plexus/plexus.plymouth 100
Не забудьте заменить в команде имя вашей темы, которую собираетесь установить. В данном случае это имя каталога “plexus” и имя файла, который лежит в данном каталоге “plexus.plymouth“:

Выполним еще команду, где нужно будет указать номер нашей темы:
sudo update-alternatives --config default.plymouth

Выбираем из списка нашу тему, указав ее номер. Теперь осталось выполнить последную команду, после чего перезагружаем компьютер и наслаждаемся установленной темой Plymouth:
sudo update-initramfs -u

После перезагрузки вы увидите установленную тему Plymouth. В моем же случае эта тема plexus:

Заключение
Все выше упомянутые действия вы совершаете на свой страх и риск, но, чаще всего данная операция по установке новой тему Plymouth проходит нормально. Но, могут быть и последствия, например, бывали случае, когда тема Plymouth не устанавливалась. В любом случае, перед любым изменением системы рекомендуется делать ее снимок, что бы можно было восстановиться в случае возникновения каких либо неисправностей в работе вашей системы. На youtube канале имеется видео инструкция по установке данной темы, для перехода к видео нажмите на данную ссылку.
А на этом сегодня все. Надеюсь данная статья будет вам полезна.
Журнал Cyber-X
You probably already know how to customize the Ubuntu desktop. But what if you’re looking for a way to customize your Ubuntu splash screen? Want to tweak the logo of your chosen desktop environment?
Here’s how to change Ubuntu splash screen on older Ubuntu systems as well as PCs running Ubuntu 20.04 LTS and later.
How Changing the Ubuntu Splash Screen Has Changed
Around the time of Ubuntu 10.04, tweaking the splash screen (that image that appears as the computer boots) meant editing the contents of /user/images/share/xsplash. However, in Ubuntu 16.04 LTS and later, this splash screen directory has moved.
More recent versions of Ubuntu had the location as /lib/plymouth/themes. As of Ubuntu 16.04 LTS, that location has been moved, to /usr/share/plymouth/themes.
The Plymouth tool essentially manages the splash screen and can be used to set a new image.
Several years later, things have changed. We now have a handy app that helps to manage the current splash screen: Plymouth Themes.
While the following steps are suitable for all versions since Ubuntu 16.04 LTS, the steps and images demonstrate how to change the boot screen in Ubuntu 20.04 LTS.
Find or Design Your Own Ubuntu Splash Screen Replacement
Before you start installing new tools, make sure you have a new splash image to hand. This might be a photo—probably something very Ubuntu-esque, like a nature snap—or a custom graphic. If you don’t have one already, there are several places where you can find custom splash screen graphics online. Perhaps you want the splash to match, or compliment, your desktop background?
Alternatively, you could create your own splash screen from scratch. This might not be as easy as it sounds, and requires you to have the right graphics tools installed on your Linux computer. GIMP is certainly an option, as is running Adobe Photoshop in Wine.
Install Plymouth Themes
With your Ubuntu splash screen replacement ready, it’s time to install the tool that you need to enable it. In the terminal, install plymouth-themes:
sudo apt install plymouth-themes
Once installed, a new directory will be created at /usr/share/plymouth/themes. Look inside. You’ll find everything that comprises the current splash screen: logos, spinners, and scripts. If you’ve upgraded from a previous version of Ubuntu and been dismayed by the lack of a custom splash screen, this directory will look familiar. Basically, the exact same structure is used.
This makes it simple for you to migrate your old themes.
Update and Move Old Ubuntu Splash Screen Themes
If you have been using Ubuntu for some time with a custom splash screen, you’ll need to move your existing themes. Check them over. If they’re up to scratch, you can migrate them to the new directory.
Begin by investigating the old theme directory and checking the contents. You can do this in your file manager, or in the terminal. The latter is a good option to get an idea of the file size:
ls -ltrd /lib/plymouth/themes
You can leave the old theme files behind when you move them. Go to
cd /lib/plymouth/themes
…then use the mv command to move the theme directory you wish to keep, one by one.
mv [theThemeDirectory] /usr/share/plymouth/themes
Note that some old themes may need tweaking, as they likely include recursive references to the old file location. You’ll need a text editor to fix this, such as vim or nano.
In the new destination, find each of the .plymouth theme files, and open into a text editor. In the terminal, use:
sudo nano /usr/share/plymouth/themes/[theme_name]/[theme_name].plymouth
Find the reference to the file path, then change it from
/lib/plymouth
to
/usr/share/plymouth
Use CTRL + X to save and exit the file.
Want More Ubuntu Splash Screen Themes?
Various locations online provide Ubuntu-focused themes for your computer. GNOME-Look.org, for instance, has a great collection of themes, grouped by use. This includes a Plymouth Themes section. Alternatively, visit DeviantArt and search for «plymouth themes» and download the ones you like. They’re usually no more than 3MB.
Usually, themes feature an installation script. For example, this example uses the Circle Plymouth Theme to customize the splash screen.

The procedure to change the splash screen in Ubuntu 20.04 LTS is as follows:
- Download theme
- Extract to the Home directory
- Find the install script
- Open a terminal and run using ./install_script_name
- Select the preferred option for the splash screen
The plymouth-themes tool should then automatically apply the new splash screen. If everything is working correctly, it should also display a demonstration of your changes to the Ubuntu startup screen.
To check, you can open the default.plymouth configuration file in the terminal:
sudo nano default.plymouth
Check the two file paths for ImageDir and ScriptFile and ensure they both point to the intended theme file locations.

Save the file and exit (CTRL + X) then reboot your PC. Watch out for the new Ubuntu Splash screen!
Manually Install a New Ubuntu Splash Screen
If the theme doesn’t have an installation script, you’ll need to manually add it to the plymouth/themes directory.
Extract the theme and copy it to the /usr/share/plymouth/themes directory. Whatever you’re using as a new splash screen, you’ll need to set it as the new default:
sudo update-alternatives --install /usr/share/plymouth/themes/default.plymouth default.plymouth /usr/share/plymouth/themes/"path/to-your-plymouth.plymouth" 100
Next, open the default.plymouth file in a text editor as described above and edit the filepaths.
Finally, update the initramfs, a virtual file system that is part of the boot procedure:
sudo update-initramfs -u
Now, when you reboot Ubuntu, you’ll see the brand-new splash screen.
How to Change the Boot Screen Logo in Ubuntu
What if you only wanted to edit your Ubuntu logo? This is just as simple. Begin by opening the usr/share/plymouth/themes directory and finding the directory containing the logo.
Then, make a copy of file, just in case you want it back at some point:
cp [logo_file].png [logo_file_backup].png
How you proceed next is up to you. Perhaps you want to use the original graphic as a reference? In this case, open the file in your preferred image editor, and make necessary changes. Otherwise, simply create a new image, with the same dimensions, and save it in the same directory. Ensure the new logo’s file name is the same as the old logo.
This Is How You Change the Ubuntu Boot Splash Screen
You probably already know how to change the desktop theme in your chosen Ubuntu desktop environment. Splash screens are a little trickier, however. To recap:
- Find or design a new splash screen
- Install plymouth-themes
- Select your splash screen
- Confirm the file path references are correct
- For manual installations, you should also update initramfs
If you’re new to Ubuntu, these steps might seem a little unfamiliar. However, there’s nothing here that isn’t straightforward. It’s also far simpler than changing the splash screen in Windows 10! Ultimately, a custom hack like this shows how configurable Linux is.
Looking for more customizations? Did you know you can make Linux look like Windows?
You probably already know how to customize the Ubuntu desktop. But what if you’re looking for a way to customize your Ubuntu splash screen? Want to tweak the logo of your chosen desktop environment?
Here’s how to change Ubuntu splash screen on older Ubuntu systems as well as PCs running Ubuntu 20.04 LTS and later.
How Changing the Ubuntu Splash Screen Has Changed
Around the time of Ubuntu 10.04, tweaking the splash screen (that image that appears as the computer boots) meant editing the contents of /user/images/share/xsplash. However, in Ubuntu 16.04 LTS and later, this splash screen directory has moved.
More recent versions of Ubuntu had the location as /lib/plymouth/themes. As of Ubuntu 16.04 LTS, that location has been moved, to /usr/share/plymouth/themes.
The Plymouth tool essentially manages the splash screen and can be used to set a new image.
Several years later, things have changed. We now have a handy app that helps to manage the current splash screen: Plymouth Themes.
While the following steps are suitable for all versions since Ubuntu 16.04 LTS, the steps and images demonstrate how to change the boot screen in Ubuntu 20.04 LTS.
Find or Design Your Own Ubuntu Splash Screen Replacement
Before you start installing new tools, make sure you have a new splash image to hand. This might be a photo—probably something very Ubuntu-esque, like a nature snap—or a custom graphic. If you don’t have one already, there are several places where you can find custom splash screen graphics online. Perhaps you want the splash to match, or compliment, your desktop background?
Alternatively, you could create your own splash screen from scratch. This might not be as easy as it sounds, and requires you to have the right graphics tools installed on your Linux computer. GIMP is certainly an option, as is running Adobe Photoshop in Wine.
Install Plymouth Themes
With your Ubuntu splash screen replacement ready, it’s time to install the tool that you need to enable it. In the terminal, install plymouth-themes:
sudo apt install plymouth-themes
Once installed, a new directory will be created at /usr/share/plymouth/themes. Look inside. You’ll find everything that comprises the current splash screen: logos, spinners, and scripts. If you’ve upgraded from a previous version of Ubuntu and been dismayed by the lack of a custom splash screen, this directory will look familiar. Basically, the exact same structure is used.
This makes it simple for you to migrate your old themes.
Update and Move Old Ubuntu Splash Screen Themes
If you have been using Ubuntu for some time with a custom splash screen, you’ll need to move your existing themes. Check them over. If they’re up to scratch, you can migrate them to the new directory.
Begin by investigating the old theme directory and checking the contents. You can do this in your file manager, or in the terminal. The latter is a good option to get an idea of the file size:
ls -ltrd /lib/plymouth/themes
You can leave the old theme files behind when you move them. Go to
cd /lib/plymouth/themes
…then use the mv command to move the theme directory you wish to keep, one by one.
mv [theThemeDirectory] /usr/share/plymouth/themes
Note that some old themes may need tweaking, as they likely include recursive references to the old file location. You’ll need a text editor to fix this, such as vim or nano.
In the new destination, find each of the .plymouth theme files, and open into a text editor. In the terminal, use:
sudo nano /usr/share/plymouth/themes/[theme_name]/[theme_name].plymouth
Find the reference to the file path, then change it from
/lib/plymouth
to
/usr/share/plymouth
Use CTRL + X to save and exit the file.
Want More Ubuntu Splash Screen Themes?
Various locations online provide Ubuntu-focused themes for your computer. GNOME-Look.org, for instance, has a great collection of themes, grouped by use. This includes a Plymouth Themes section. Alternatively, visit DeviantArt and search for «plymouth themes» and download the ones you like. They’re usually no more than 3MB.
Usually, themes feature an installation script. For example, this example uses the Circle Plymouth Theme to customize the splash screen.
The procedure to change the splash screen in Ubuntu 20.04 LTS is as follows:
- Download theme
- Extract to the Home directory
- Find the install script
- Open a terminal and run using ./install_script_name
- Select the preferred option for the splash screen
The plymouth-themes tool should then automatically apply the new splash screen. If everything is working correctly, it should also display a demonstration of your changes to the Ubuntu startup screen.
To check, you can open the default.plymouth configuration file in the terminal:
sudo nano default.plymouth
Check the two file paths for ImageDir and ScriptFile and ensure they both point to the intended theme file locations.
Save the file and exit (CTRL + X) then reboot your PC. Watch out for the new Ubuntu Splash screen!
Manually Install a New Ubuntu Splash Screen
If the theme doesn’t have an installation script, you’ll need to manually add it to the plymouth/themes directory.
Extract the theme and copy it to the /usr/share/plymouth/themes directory. Whatever you’re using as a new splash screen, you’ll need to set it as the new default:
sudo update-alternatives --install /usr/share/plymouth/themes/default.plymouth default.plymouth /usr/share/plymouth/themes/"path/to-your-plymouth.plymouth" 100
Next, open the default.plymouth file in a text editor as described above and edit the filepaths.
Finally, update the initramfs, a virtual file system that is part of the boot procedure:
sudo update-initramfs -u
Now, when you reboot Ubuntu, you’ll see the brand-new splash screen.
How to Change the Boot Screen Logo in Ubuntu
What if you only wanted to edit your Ubuntu logo? This is just as simple. Begin by opening the usr/share/plymouth/themes directory and finding the directory containing the logo.
Then, make a copy of file, just in case you want it back at some point:
cp [logo_file].png [logo_file_backup].png
How you proceed next is up to you. Perhaps you want to use the original graphic as a reference? In this case, open the file in your preferred image editor, and make necessary changes. Otherwise, simply create a new image, with the same dimensions, and save it in the same directory. Ensure the new logo’s file name is the same as the old logo.
This Is How You Change the Ubuntu Boot Splash Screen
You probably already know how to change the desktop theme in your chosen Ubuntu desktop environment. Splash screens are a little trickier, however. To recap:
- Find or design a new splash screen
- Install plymouth-themes
- Select your splash screen
- Confirm the file path references are correct
- For manual installations, you should also update initramfs
If you’re new to Ubuntu, these steps might seem a little unfamiliar. However, there’s nothing here that isn’t straightforward. It’s also far simpler than changing the splash screen in Windows 10! Ultimately, a custom hack like this shows how configurable Linux is.
Looking for more customizations? Did you know you can make Linux look like Windows?
Plymouth — свободный графический экран загрузки для Linux. Приложение использует Direct Rendering Manager и Kernel Mode-Setting.
Разработка Plymouth началась в мае 2007 года под руководством Рэя Строда, но стал развиваться лишь в 2008 году, когда был внедрён в Fedora 10. Позднее он был внедрён в Mandriva Linux 2010, сменил Usplash и XSplash вUbuntu с версии 10.04.
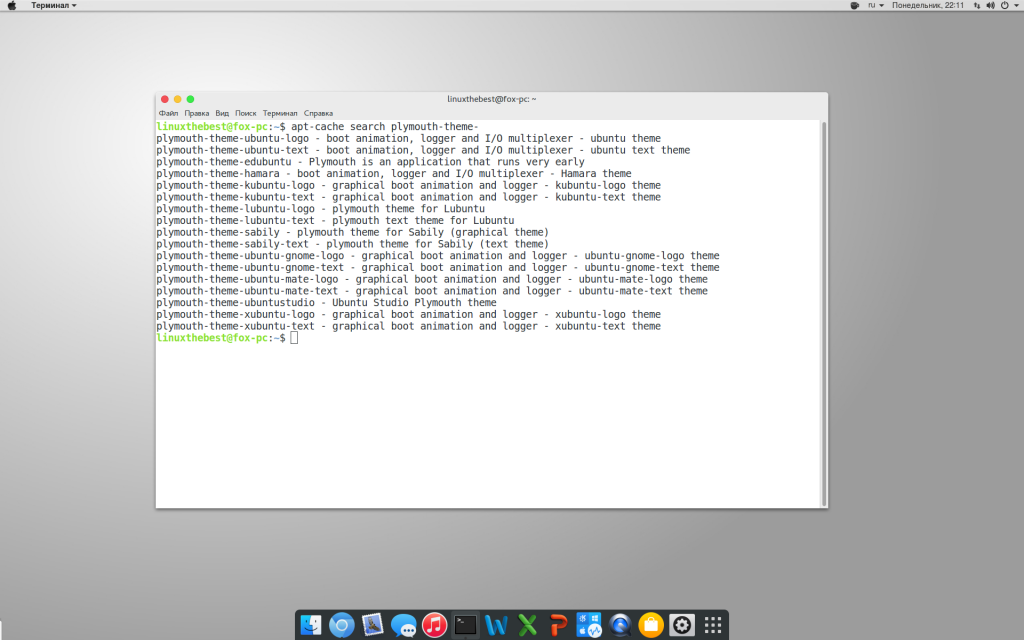
Можно установить стандартную тему любого из дистрибутивов набрав в терминале
apt-cache search plymouth-theme-
и увидим вот такую картину
Чтобы установить любую из этих тем нужно набрать в терминале
sudo apt install plymouth-theme-ubuntu-gnome-logo
sudo apt install plymouth-theme-ubuntu-gnome-text
И изменяем с помощью
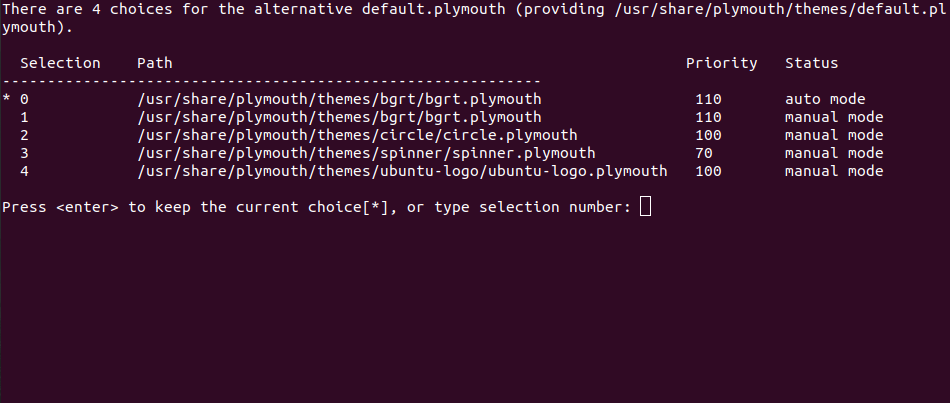
sudo update-alternatives --config default.plymouth
Нам предложат выбрать из трех вариантов. Выбираем нашу установленную тему цифрой и далее обновляем конфигурацию
sudo update-initramfs -u
А все очень просто.
На сайте gnome-look.org слева в разделе «Plymouth Themes», есть очень большое количество тем, но они за 2015 год, то есть для Ubuntu 14.04/Linux Mint 17, но мы можем изменить нашу скачанную тему для нашей Ubuntu 16.04/Linux Mint, сейчас объясню почему, в Ubuntu 14.04/Linux Mint 17 по умолчанию темы plymouth были в директории /lib/plymouth/themes/, но с приходом Ubuntu 16.04 все немного изменилось, и сейчас темы расположены по адресу /usr/share/plymouth/themes/, поэтому нам нужно изменить для начала нашу тему.

Итак Вы выбрали и скачали тему(я скачал тему под названием Anon-Pun2), идем в директорию куда Вы скачали тему, и правой кнопкой мышки нажимаем и выбираем «Извлечь сюда», после извлечения заходим в папку с темой и находим там файл под названием «название темы.plymouth»(в моем случае это — Anon-Pun2.plymouth), открываем с помощью любого редактора(например gedit)
[Plymouth Theme]
Name=Anon-Pun2
Description=A theme that features a background with a logo.
ModuleName=script[script]
ImageDir=/lib/plymouth/themes/Anon-Pun2/
ScriptFile=/lib/plymouth/themes/Anon-Pun2/Anon-Pun2.script
Вот что мы видим, а теперь просто берем и меняем пути с /lib/ на /usr/share/
[Plymouth Theme]
Name=Anon-Pun2
Description=A theme that features a background with a logo.
ModuleName=script[script]
ImageDir=/usr/share/plymouth/themes/Anon-Pun2/
ScriptFile=/usr/share/plymouth/themes/Anon-Pun2/Anon-Pun2.script
Нажимаем «Сохранить», все больше нам не понадобится этот файл.
Чтобы дальше нам быстрее работать, открываем терминал и переходим в директорию загрузки
cd Загрузки/Anon-Pun2-Boot/
По-умолчанию в теме что я скачал двойная вложеность(может у Вас и не будет), то есть после распаковки у меня есть директория Anon-Pun2-Boot, а уже в ней сама тема под названием Anon-Pun2.
И копируем(почему копируем? можем просто переместить, ну на всякий случай) в папку с темами plymouth
sudo cp -a Anon-Pun2 /usr/share/plymouth/themes
далее обновляем дефолтные темы
sudo update-alternatives --install '/usr/share/plymouth/themes/default.plymouth' default.plymouth /usr/share/plymouth/themes/Anon-Pun2/Anon-Pun2.plymouth 100
sudo update-alternatives --config default.plymouth
Нажимаем цифру нашей темы
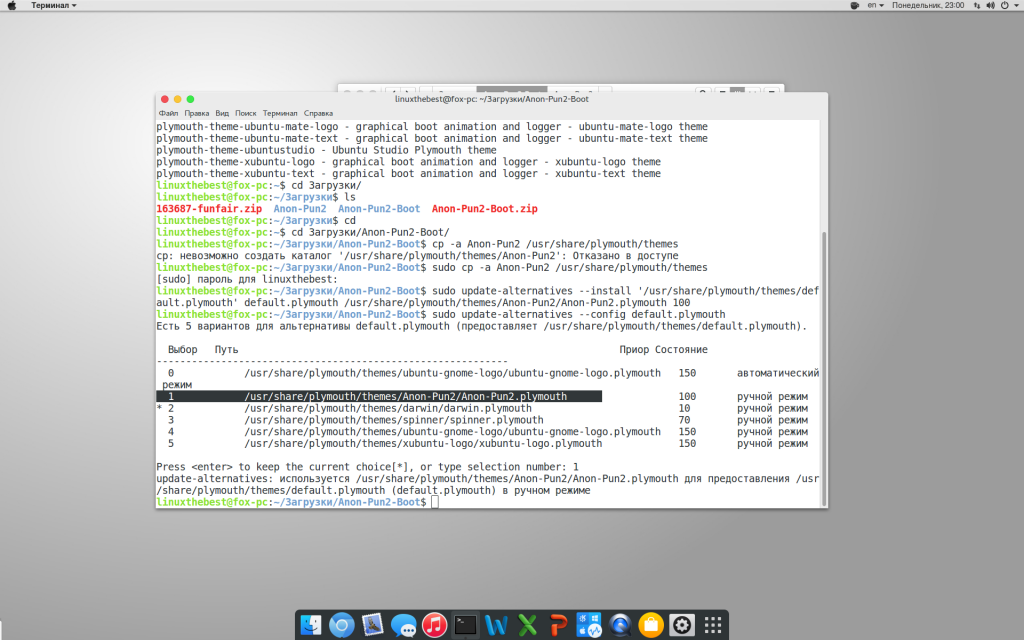
sudo update-initramfs -u
И последняя команда обновит конфигурацию системы
А если вы установили драйвер Nvidia, то у вас наверняка поламалась заставка загрузки системы, поэтому предлагаю прочитать статью «Восстановить заставку Plymouth после установки проприетарного драйвера Nvidia«.
Вот и все, надеюсь я кому-то помог в этом простом решении проблемы.
114800cookie-checkКак изменить тему загрузки системы(plymouth)
Автор публикации

Ubuntu*Pack / ualinux.com
Комментарии: 1033Публикации: 956Регистрация: 10-06-2016