Do you have Personal GitHub and Work related GitHub account? I’m sure you do. Most of the fortune 500 companies are now using GitHub as their official code repository.
By default /<Users>/.gitconfig file is used for all related information during commit.
This is how .gitconfig file looks like:
[user]
    name = Crunchify
    email = email [at] crunchify.com
[pull]
    rebase = false
[commit]
    gpgSign = false
[gui]
    pruneduringfetch = true
[smartgit "submodule"]
    fetchalways = true
    update = true
    initializenew = true
[push]
    recurseSubmodules = check
As you see above, there is tag called [user] all git clients including smartGit picks up that username, email and will push using that setting.
This is a big problem for your Work and Personal Github or Bitbucket account. You need to be very careful before committing to each repository.
By default hidden .gitconfig file is use for both account and there is no way you could separate out different .gitconfig file for each account 🙁
If you have any of below questions then you are at right place:
- Setting your commit username and email address in Git
- Set GitHub email address on a per repository basis
- GIT – different config for different repository
- How can I change the author (name / email) of a commit?
- How to Change Author Name and Email of Commits on macOS?
- GitHub change email for repository
In this tutorial we will go over steps on how to use different setting for different repositories:
Step-1
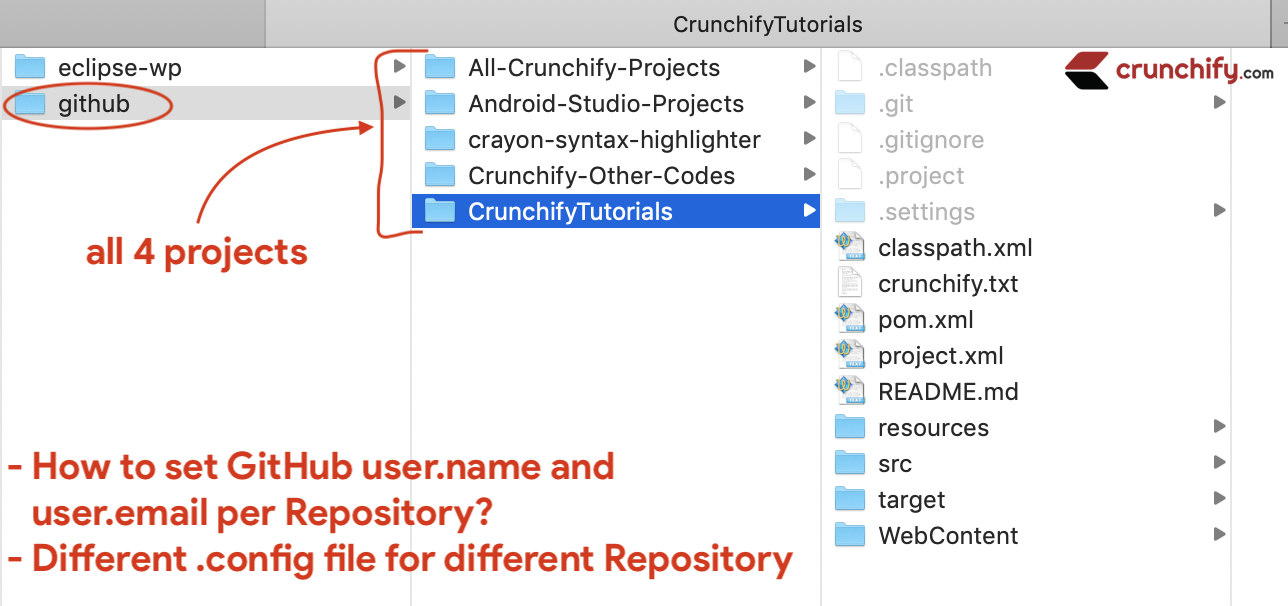
Clone your Work repository and Private repository to your laptop/desktop. Here is example I’ve shown total 5 Crunchify repositories.
We will use different username and email for each repository.
Step-2
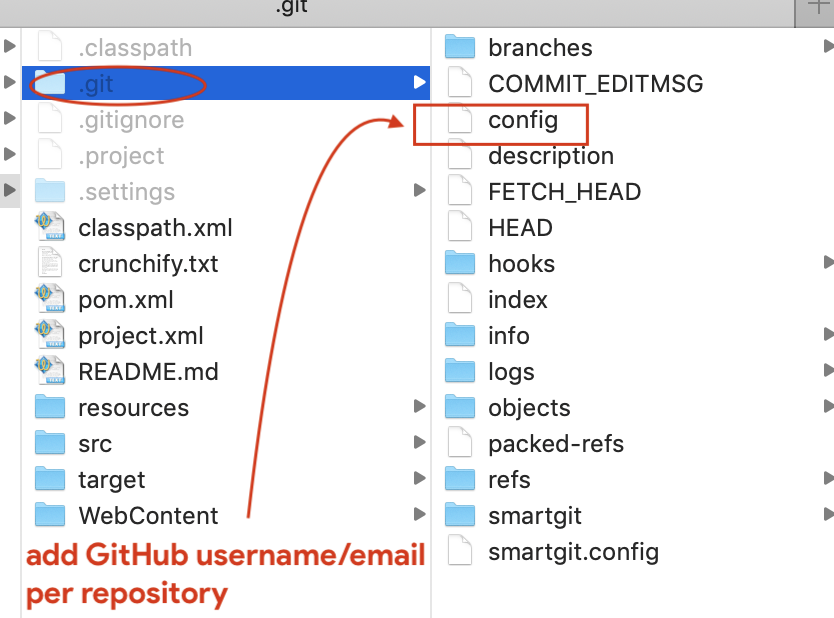
- Go to repository
- Click on hidden folder
.git - Open
configfile
Step-3
Add [user] tag with username and email info. Here is a sample.
config file:
[core]
    repositoryformatversion = 0
    filemode = true
    bare = false
    logallrefupdates = true
    ignorecase = true
    precomposeunicode = true
[remote "origin"]
    url = https://github.com/Crunchify/CrunchifyTutorials
    fetch = +refs/heads/*:refs/remotes/origin/*
[branch "master"]
    remote = origin
    merge = refs/heads/master
[user]
    name = Crunchify, LLC
    email = email [at] crunchify.com
Using command line also you could to change the file.
- Open macOS Terminal.
- Change the current working directory to the local repository
- This is a repository where you want to configure the name that is associated with your Git commits.
- Execute command:
git config user.email "email [at] crunchify.com" - Execute command:
git config user.name "Crunchify, LLC"
That’s it.
Now you could use different username/email for each separate github or bitbucket repository.
Join the Discussion
If you liked this article, then please share it on social media. Still have any questions about an article, leave us a comment.
Share:
I’m an Engineer by profession, Blogger by passion & Founder of Crunchify, LLC, the largest free blogging & technical resource site for beginners. Love SEO, SaaS, #webperf, WordPress, Java. With over 16 millions+ pageviews/month, Crunchify has changed the life of over thousands of individual around the globe teaching Java & Web Tech for FREE.
Reader Interactions
GitHub — это крупнейшее хранилище Git репозиториев, а так же центр сотрудничества для миллионов разработчиков и проектов.
Огромный процент всех репозиториев хранится на GitHub, а многие проекты с открытым исходным кодом используют его ради Git хостинга, баг-трекера, рецензирования кода и других вещей.
Так что, пока всё это не часть открытого Git проекта, наверняка вы захотите, или вам придётся взаимодействовать с GitHub при профессиональном использовании Git.
Эта глава про эффективное использование GitHub.
Мы разберём регистрацию, управление учётной записью, создание и использование Git репозиториев, как вносить вклад в чужие проекты и как принимать чужой вклад в собственный проект, а так же программный интерфейс GitHub и ещё множество мелочей, который облегчат вам жизнь.
Если вас не интересует использование GitHub для размещения собственных проектов или сотрудничества с другими проектами, размещёнными на нём, вы можете смело перейти к главе Инструменты Git.
Настройка и конфигурация учетной записи
Первым делом нужно создать бесплатную учётную запись.
Просто зайдите на https://github.com, выберите имя которое ещё не занято, укажите адрес электронной почты и пароль, а затем нажмите большую зелёную кнопку «Sign up for GitHub».

Рисунок 81. Форма регистрации на GitHub
Далее вы попадёте на страницу с тарифными планами, её пока можно проигнорировать.
GitHub вышлет письмо для проверки вашего электронного адреса.
Сделайте этот шаг, он достаточно важный (как мы увидим далее).
|
Примечание |
GitHub предоставляет почти все свои функции для бесплатных учётных записей, за исключением некоторых расширенных возможностей. |
Клик на расположенном в верхнем левом углу экрана логотипе, изображающем гибрид кота и осьминога (его называют осьмикот), откроет панель управления.
Теперь все готово для работы с GitHub.
Доступ по SSH
На данный момент вы можете подключаться к репозиториям Git используя протокол https:// авторизуясь при помощи только что созданного логина и пароля.
Однако для того чтобы просто клонировать публично доступный проект, вам необязательно авторизовываться на сайте, но тем не менее, только что созданный аккаунт понадобится в то время, когда вы захотите загрузить (push) сделанные вами изменения.
Если же вы хотите использовать SSH доступ, в таком случае вам понадобится добавить публичный SSH ключ.
(Если же у вас нет публичного SSH ключа, вы можете его сгенерировать)
Откройте настройки вашей учётной записи при помощи ссылки, расположенной в верхнем правом углу окна:

Рисунок 82. Ссылка «Настройка учётной записи» («Account settings»)
Выберите секцию слева под названием «Ключи SSH» («SSH keys»).
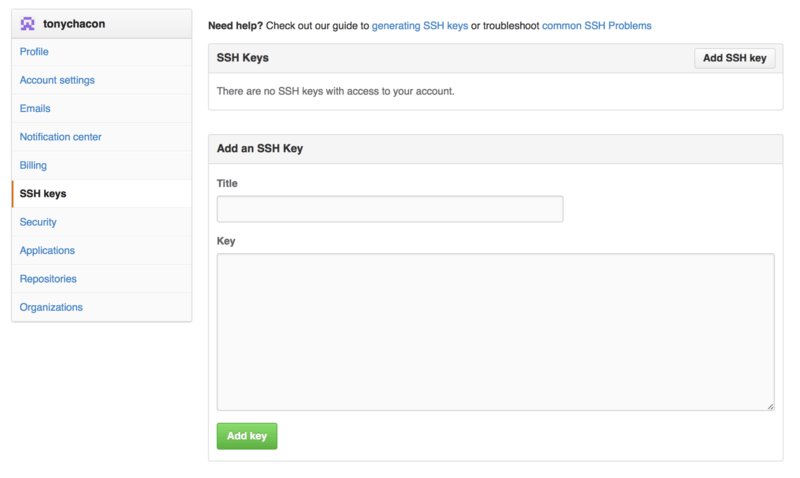
Рисунок 83. Ссылка («SSH keys»)
Затем нажмите на кнопку «Добавить ключ SSH» («Add an SSH key»), задайте имя ключа, а так же скопируйте и вставьте сам публичный ключ из ~/.ssh/id_rsa.pub (ну или как бы у вас не назывался этот файл) в текстовое поле, затем нажмите «Добавить ключ» («Add key»).
|
Примечание |
Задавайте такое имя SSH ключа, которое вы в состоянии запомнить. |
Ваш аватар
Следующий шаг, если хотите — замена аватара, который был сгенерирован для вас, на вами выбранный аватар.
Пожалуйста зайдите во вкладку «Профиль» («Profile»), она расположена над вкладкой «Ключи SSH» и нажмите «Загрузить новую картинку» («Upload new picture»).
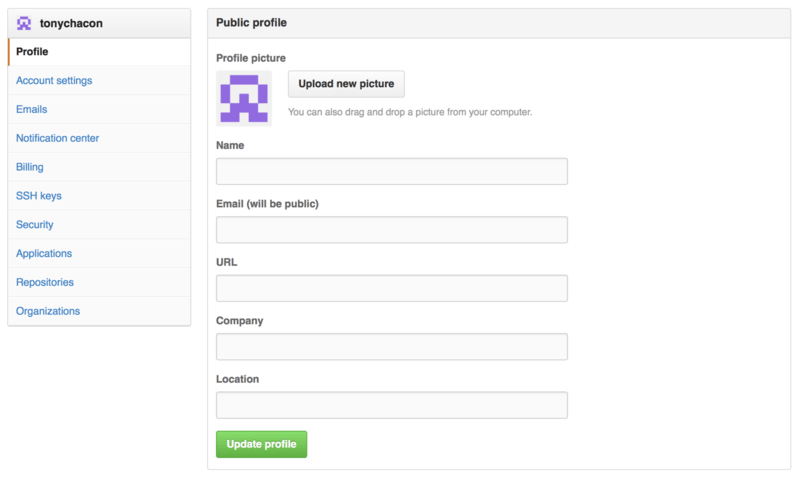
Рисунок 84. Ссылка «Профиль» («Profile»)
Выберем логотип Git с жёсткого диска и отредактируем картинку под желаемый размер.
Рисунок 85. Редактирование аватара
После загрузки каждый сможет увидеть ваш аватар рядом с вашим именем пользователя.
Если вы используете такой популярный сервис как Gravatar (часто используется для учётных записей WordPress), тот же самый аватар будет использован «по умолчанию».
Ваши почтовые адреса
GitHub использует ваш почтовый адрес для привязки ваших Git коммитов к вашей учётной записи.
Если вы используете несколько почтовых адресов в своих коммитах и хотите, чтобы GitHub работал с ними корректно, то вам нужно будет добавить все используемые почтовые адреса в секцию под названием «Почтовые адреса» («Emails»), расположенную на вкладке «Администрирование» («Admin»).

Рисунок 86. Почтовые адреса
Как можно видеть на рисунке Почтовые адреса, у почтовых адресов имеются несколько состояний.
Верхний почтовый адрес подтверждён и является основным для пользователя, это тот самый адрес, куда будут направляться оповещения, а также остальные уведомления.
Второй адрес тоже подтверждён, и так же может быть назначен в качестве основного.
Последний адрес не подтверждён, это значит, что вы не можете использовать его в качестве основного и получать на него уведомления.
При отправке коммита в любой из репозиториев, GitHub распознает один из указанных почтовых адресов и автоматически привяжет этот коммит к вашей учетной записи.
Двухфакторная аутентификация
В качестве дополнительной меры безопасности, вы можете настроить «Двухфакторную аутентификацию» («Two-factor Authentication» или «2FA»).
Двухфакторная аутентификация — механизм, который становится все более и более популярным методом по снижению риска скомпрометировать вашу учётную запись в ситуации, когда пароль от вашей учётной записи, по тем или иным причинам, стал известен злоумышленникам.
Активация этого механизма заставит GitHub запрашивать у вас оба пароля при авторизации, поэтому даже в ситуациях, когда ваш основной пароль скомпрометирован, злоумышленник все равно не получит доступ к вашей учётной записи.
Вы сможете найти настройку «Двухфакторной аутентификации» («Two-factor Authentication») в секции «Безопасность» («Security») вкладки «Настройка учётной записи» («Account settings»).
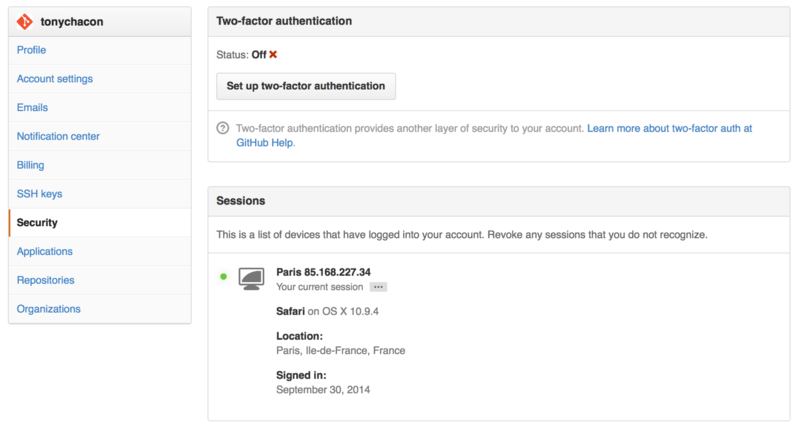
Рисунок 87. Двухфакторная аутентификация («Two-factor Authentication»)
При нажатии на кнопку «Настроить двухфакторную аутентификацию» («Set up two-factor authentication») вы будете перенаправлены на страницу, где вам нужно будет настроить использование мобильного приложения для генерации вторичного кода проверки (так называемый «одноразовый пароль основанный на времени»), так же можно настроить GitHub таким образом, чтобы он отправлял вам СМС с кодом в момент, когда вам нужно авторизоваться на сайте.
После того, как вы выберете предпочитаемый вами метод и выполните предлагаемые инструкции, ваша учётная запись будет в большей безопасности, и вам будет предоставляться дополнительный код во время авторизации на сайте.
I have a project hosted in Git stash (now rebranded as Bitbucket Server). It is built using Jenkins.
Now I made a typo while installing my Git locally.
Like @ab.example instead of @abc.example
After every build, Jenkins sends email notifications and it picks up my incorrect email address from Git commit and tries to send it.
Even after I have changed the email address in my local Git, I still see Jenkins sending the emails to the old incorrect address.
How can I fix this?
asked Jun 14, 2016 at 7:29
2
Locally set email-address (separately for each repository)
-
Open Git Bash.
-
Change the current working directory to the local repository in which you want to set your Git config email.
-
Set your email address with the following command:
git config user.email "your_email@abc.example"
- Confirm that you have set your email address correctly with the following command.
git config user.email
Globally set email-address (only used when nothing is set locally)
-
Open Git Bash.
-
Set your email address with the following command:
git config --global user.email "your_email@abc.example"
- Confirm that you have set your email address:
git config --global user.email
Or using environment variables
GIT_COMMITTER_EMAIL=your_email@abc.exampleGIT_AUTHOR_EMAIL=your_email@abc.example
PD: Info from GitHub official guide
answered Jun 14, 2016 at 7:39
MarcMarc
5,4541 gold badge15 silver badges10 bronze badges
5
According to the git documentation, all you should have to do is re-run
$ git config --global user.name "John Doe"
$ git config --global user.email johndoe@example.com
Then just check to make sure the change took effect
$ git config --list
This is listed in the Pro Git book, written by Scott Chacon and Ben Straub
1.6 Getting Started — First-Time Git Setup
answered Aug 4, 2018 at 4:23
use
«git -c user.name=»your name» -c user.email=youremail@email.com
commit —amend —reset-author»
answered Mar 1, 2019 at 9:23
user3143487user3143487
2253 silver badges6 bronze badges
To set your global username/email configuration:
-
Open the command line.
-
Set your username:
git config --global user.name "FIRST_NAME LAST_NAME" -
Set your email address:
git config --global user.email "MY_NAME@example.com"
To set repository-specific username/email configuration:
-
From the command line, change into the repository directory.
-
Set your username:
git config user.name "FIRST_NAME LAST_NAME" -
Set your email address:
git config user.email "MY_NAME@example.com" -
Verify your configuration by displaying your configuration file:
cat .gitconfig
For more information and for other version control systems .. => SeeThis
awgtek
1,27115 silver badges23 bronze badges
answered May 1, 2020 at 6:52
EndriyasEndriyas
5166 silver badges12 bronze badges
Edit your email directly in the JENKINS_HOME/users/YOUR_NAME/config.xml configuration file and restart the Jenkins server
answered Nov 9, 2018 at 13:49
The commands explained set the email in the .git/config locally:
[core]
    repositoryformatversion = 0
    filemode = true
    bare = false
    logallrefupdates = true
[remote "origin"]
        url = https://username:password@git.mydomain.io/username/repo.git
        fetch = +refs/heads/*:refs/remotes/origin/*
[branch "master"]
        remote = origin
        merge = refs/heads/master
[branch "beta"]
        remote = origin
        merge = refs/heads/beta
[user]
        email = pippo.caio@sempronio.io
answered Jul 6, 2022 at 9:51
gdmgdm
7,5313 gold badges40 silver badges70 bronze badges
As a basic refresher for most working on multiple coding projects or git-scm hosted accounts changing from one git account to another begs the question:
How do I see or change my Git (or github) username (usually email address)?
How to show your Git username – the basics
Use one of these methods:
- git config -get [user.name | user.email]
- git config –list
- or, open your git config file directly
Let’s examine each of these show your git username basics:
#1 – Use the command, git config -get [user.name | user.email]
git config user.nameThis returns
Christian ScreenAnd if you enter git config user.email from the terminal from anywhere with your git initiated directory such as
git config user.emailthis will return
cscreen@aiteamsuperstars.com#2 – Use the command, ‘git config –list’
This approach shows all of the key configurations from your git config file, so entering the command from the terminal:
git config --listwill return the following:
credential.helper=osxkeychain
user.name=Christian Screen
user.email=cscreen@aiteamsuperstars.com

core.repositoryformatversion=0
core.filemode=true
core.bare=false
core.logallrefupdates=true
core.ignorecase=true
core.precomposeunicode=true
remote.origin.url=https://github.com/aicglabs/datalakehouse.git
#3 – Use the ‘open your git config file directly’ approach via the terminal
If the above approaches for some reason did not work then open the file for reading/editing in your terminal window or favorite editor. Terminal window review and editing is recommended to avoid issues. Use the following command to view the global git settings:
vi ~/.gitconfigThis will open the VimEditor and your .gitconfig file should look something like this:
[user]
        name = Christian Screen
        email = cscreen@aiteamsuperstars.com
Since this is your ‘global’ git user information (using the user home director path, ~/) you could have a different settings in other projects you might be working on.
NB: I find it best that if you have a specific project you are contributing to and need to use different credentials for the contribution, you should clone the project and then within the project use the command line to change your user.name and user.email just for that local git repository clone project to not impact your global settings. This would look like this from the command line (notice the –global is missing):
git config user.name "Christian Contribution Project"
git config user.email "christian@personalemail.com"
Read below if you’d like to see how to change your global Git username or email address.
How to change your Git username – the basics
Changing your Git username is fairly straightforward. In your terminal window enter the following:
git config --global user.name "Christian The Architect"You can then view the change directly in the ~/.gitconfig file or just use the ~/.gitconfig file to edit the user.name key/value pair directly in the Vim Editor as you see here:
vi ~/.gitconfigSince this is again your global Git config file, be sure edit it carefully. Remember in the Vi(m) Editor, use the ‘Esc’ key and then type ‘wq’ and then press the ‘Return’ or ‘Enter’ key to write/save the file and exit.
How to change your Git email address – the basics
You can change your email address with the same process and command as you would your username using these commands from the terminal:
git config --global user.email "cscreen@aiteamsuperstars.com"View any of your global changes (those made with the –global flag) using either command below:
cat ~/.gitconfig
vi ~/.gitconfig
Hopefully you’ll have success remembering these basic Git commands.


