Любой посещаемый сайт, состоит из множества различных элементов, таких как шапка, основная колонка, левая колонка и подвал сайта.
Что такое футер сайта.
Футер, он же, подвал сайта — это нижняя часть вашего веб-сайта, которая появляется после основного содержимого. Обычно он присутствует на всех страницах вашего сайта.

Эта часть сайта расположена далеко внизу и часто игнорируется большинством веб-мастеров. Однако есть несколько способов использовать эту область, сделав ее более полезной для ваших пользователей, для SEO и для вашего бизнеса.
Большинство популярных тем WordPress имеют область виджетов для подвала сайта, которую легко редактировать. Вы также можете осторожно отредактировать файл шаблона footer.php в своей теме, чтобы удалить нежелательные ссылки из этой области.
Редактирование виджетов в футере в WordPress
Многие популярные темы WordPress имеют области виджетов для подвала сайта.
Вы можете использовать эти области виджетов для добавления текста, изображений или для добавления различных ссылок, включая ссылку на вашу политику конфиденциальности.
Добавить текст и изображения довольно просто. Вам просто нужно перейти в меню Внешний вид, перейти в Виджеты и добавить виджет Текст, Изображение или Галерея в область виджетов футера.

Чтобы добавить виджет, просто перетащите его в область Footer. Если вы плаваете с термином Виджет, то вы можете прочитать урок, по работе с виджетами.
Обратите внимание, что у многих тем будет несколько областей футера, и они могут использовать их по-разному.
Так, например, на скриншоте выше, сайт содержит три отдельных области (левая область, середина, правая область), и виджет на всю ширину.
Но в различных темах, комплектация может различаться.
После добавления виджетов, вы можете предварительно просмотреть свой веб-сайт, чтобы убедиться, что они отображаются там, где вы хотите.
Добавление ссылок в область виджетов футера
Вы также можете добавить ссылки на разные страницы, категории или на страницу с политикой конфиндициальности в области подвала сайта.
Для этого, в WordPress есть свой инструмент, для управления навигацией. Просто перейдите на страницу Внешний вид, Меню.

WordPress попросит вас указать имя для вашего нового меню. Введите имя, которое поможет вам легко идентифицировать это меню, а затем нажмите кнопку «Создать меню».

Теперь ваше меню готово, и вы можете добавлять в него ссылки. Просто выберите страницы, записи, рубрики и добавьте их в свое меню.

Когда вы закончите, нажмите кнопку «Сохранить меню», чтобы сохранить изменения.
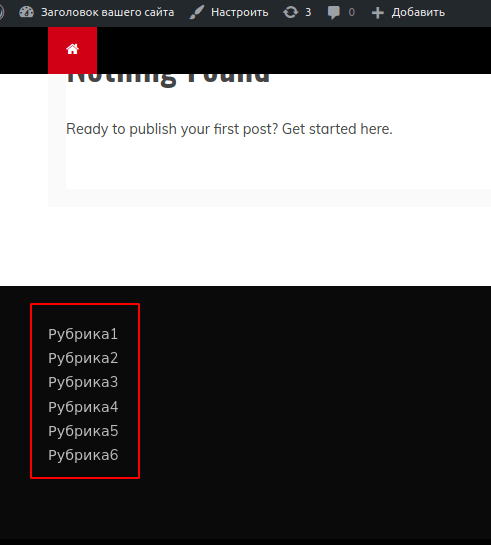
Теперь ваше меню готово и вы можете добавить его в область виджетов в подвале сайта. Для этого перейдите на страницу Внешний вид — Виджеты в админке WordPress, а затем добавьте виджет Меню навигации в область футера.
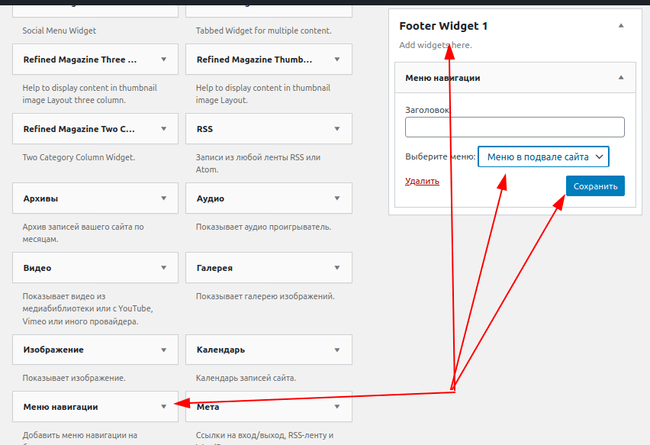
В настройках виджета, из раскрывающегося списка, выберите меню навигации подвала, которое вы только что создали, и нажмите кнопку «Сохранить».
Теперь вы можете посетить свой веб-сайт, и на нем вы увидите, только что добавленное меню.
Если ваша тема позволяет, то вы можете создать несколько меню навигации и добавить столько виджетов в меню навигации в подвал своего сайта, сколько вам нужно.
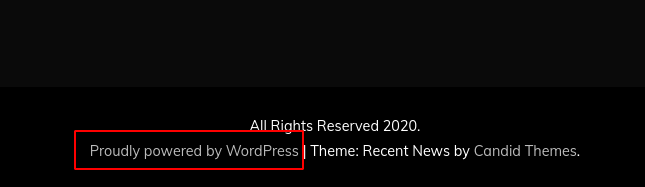
Удаление текста «Powered by WordPress» из футера сайта.
Когда вы впервые устанавливаете WordPress, ваш сайт может иметь текст в подвале — Powered by WordPress (Работает на WordPress). Этот текст или ссылка находится не в виджете, поэтому часто непонятно, как эту надпись удалить или изменить.
Большинство PRO версий тем WordPress, позволяют легко изменить этот текст. Для этого перейдите в меню Внешний вид, далее выберите пункт Настроить. Ищите возможность отредактировать подвал вашего сайта:
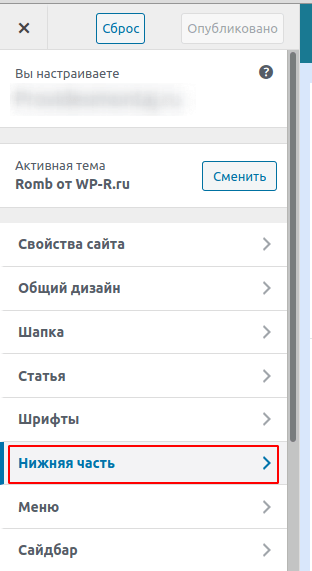
В этом примере я использую тему Romb. В ней, для изменения текста в нижней части сайта, мне нужно перейти в раздел Нижняя часть. Теперь у меня появилась возможность изменить текст подвала сайта:
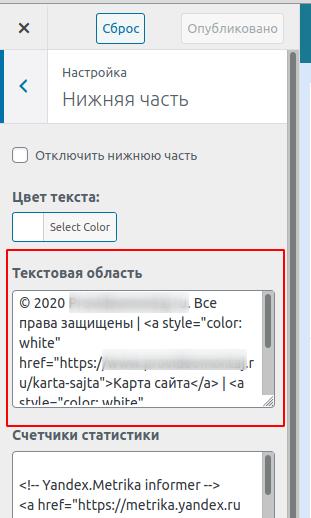
Закончив редактирование текста, для того чтобы изменения вступили в силу, не забудьте нажать кнопку «Опубликовать» в верхней части экрана.
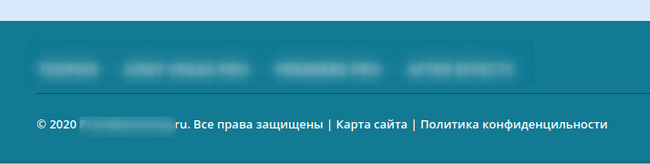
Перейдите на свой сайт, и вы увидите измененный вами футер:
Ручное редактирование текст футера.
Что делать, если в вашей теме нет возможности редактировать текст футера с помощью настройщика?
В этом случае вам необходимо отредактировать файл footer.php. Это файл шаблона, который хранится в папке вашей темы WordPress и отвечает за отображение подвала вашего сайта, для этой конкретной темы.
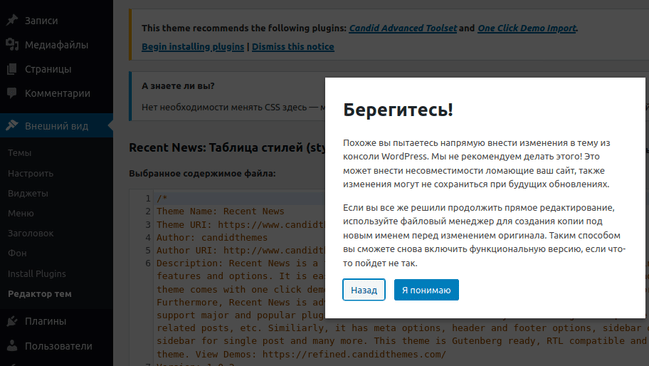
Самый простой способ отредактировать это — встроенный редактор файлов темы.
Для этого, на панели управления вашим сайтом, перейдите в меню Редактор тем. WordPress выдаст вам предупреждение. Действительно, если редактировать необдуманно, то можно «поломать» свой сайт. Впрочем, это не страшно, если перед этим вы сделаете резервную копию своего сайта.
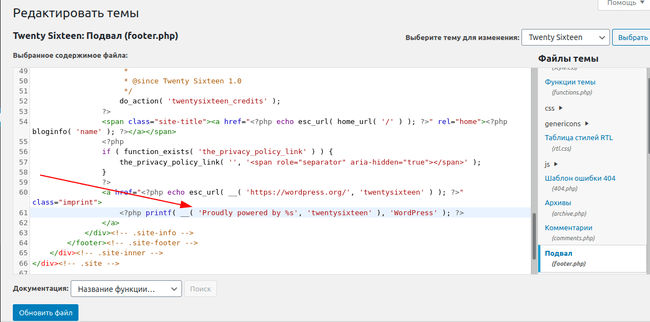
Нажав кнопку Я понимаю, найдите в правой части файл footer.php (или Подвал).
Просто кликните по нему, и файл откроется во встроенном редакторе кода.
Теперь вам нужно найти строку Сайт работает на WordPress. Хотя в вашей теме, она может быть несколько другой. И обязательно кликните на кнопку Обновить файл. Вот как это выглядит в теме Twenty Sixteen:
Добавление кода в подвал сайта
Иногда вам может потребоваться добавить фрагменты кода в подвал вашего сайта. Например, вы хотите поставить код Google Analytics.
Самый простой способ сделать это — установить и активировать плагин Insert Headers and Footers.
После установки и активации плагина, в админке WordPress перейдите в Настройки и выберите Insert Headers and Footers. Скопируйте и вставьте код в поле Scripts in Footer:
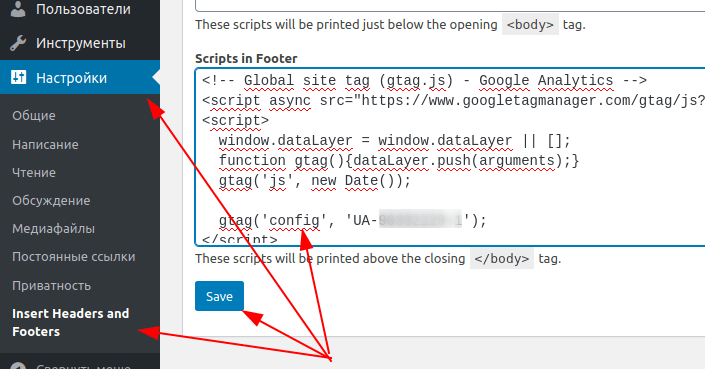
Не забудьте сохранить изменения.
Заключение.
Теперь вы знаете, как можно создать меню в подвале сайта, как там разместить произвольные ссылки, и как разместить код в нижней части сайта.
А если у вас остались вопросы, то задавайте их в разделе с комментариями.
Вступление: В прошлой статье мы познакомились с подвалом footer WordPress, и его стандартным видом, заданным в файле рабочей темы. В этой статье продолжим знакомство с футером WordPress, а конкретно, изменим внешний вид футера WordPress без установки сторонних плагинов системы.
Вопрос, нужно ли менять футер своего сайта, встает перед каждым владельцем сайта индивидуально. Если вам нравится футер, который сверстал автор шаблона, нравятся его цвета и авторские ссылки, нравится шрифт в футере и количество модулей в нем, то задумываться об изменении подвала вашего сайта незачем. А вот если вам, что-то не нравится в вашем подвале, читаем дальше.
Для начала, составлю список, что можно поменять в футере WordPress, и от этого списка покажу как изменить футер WordPress сайта.
Что можно поменять в подвале WordPress
Давайте подумаем, что в принципе можно поменять в подвале сайта WordPress:
- Поменять цвет, шрифт и другие элементы внешнего вида футера;
- Убрать ссылки автора шаблона;
- Добавить или убрать места для виджетов сайта;
- Удалить футер сайта.
Теперь по пунктам.
Изменить футер WordPress: Убрать ссылки автора шаблона
Футер это традиционное место авторского копирайта. Многие пользователи WordPress, избавляются от ссылок копирайта. Зачем это делать? Я писал об этом несколько статей, лучше обратиться к ним. В них подробно описано, зачем удалять ссылки копирайта и как это делать несколькими способами.
- Как убирать ссылки автора темы WordPress
- Плагин TAC WordPress ищет и удаляет зашифрованные ссылки в темах сайта
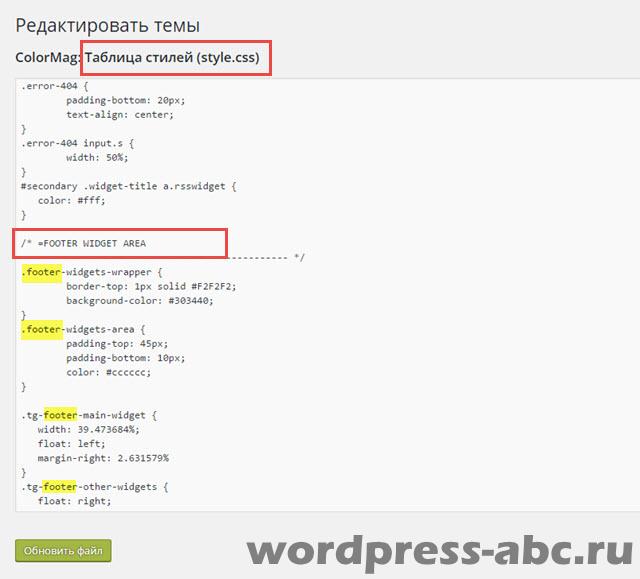
Поменять цвет, шрифт и другие элементы внешнего вида футера
Внешний вид футера, а именно цвета фона, шрифты, рамки и т.п. задается в таблице стилей CSS. Чтобы посмотреть их, из административной панели сайта, входим в редакторе сайта (Внешний вид→Редактор) и открываем файл таблица стилей (style.css).
Примечание: С появлением на WordPress редактора Theme Customizer не нужно править файлы шаблона “на живую”. Все сохраняемые изменения стилей вы можете сделать на вкладке “Дополнительные стили” в настройках рабочего шаблона.
Не правим ничего в редакторе, а копируем файл и переносим его для редактирования в текстовой редактор типа Notepad++. Здесь можно изучить и редактировать любой файл сайта. Для безопасности сохраняем оригинал файла на компьютере, он может понадобиться для возвращения к исходному файлу, в случае неудачных правок и изменений.
В файле таблица стилей (style.css). Ищем раздел относящейся к футеру сайта.
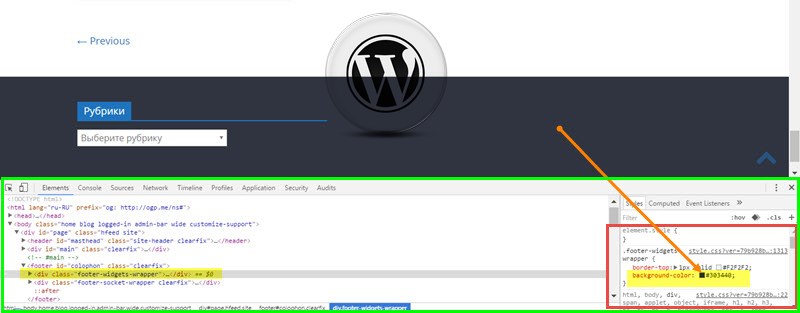
 Если вы не читаете таблицы CSS «с листа» поступаем следующим образом:
- Открываем сайт в окне браузера (пример на Chrome);
- Наводим мышь на место футера, который хотим что-то изменить, пусть это буде фон подвала;
- Кликнем по этому месту правой кнопкой мыши и выбираем в окне команду типа «Смотреть код»;
- Внизу или справа экрана (всё зависит от настроек) откроется окно с кодом части страницы, а также откроются таблицы CSS этой части страницы, в нашем случае футера;
Далее, прямо в окне меняем фон или шрифт, который вам не нравится. Сразу смотрим результат изменения в окне браузера. Если нравится, копируем кусок CSS кода с изменениями.
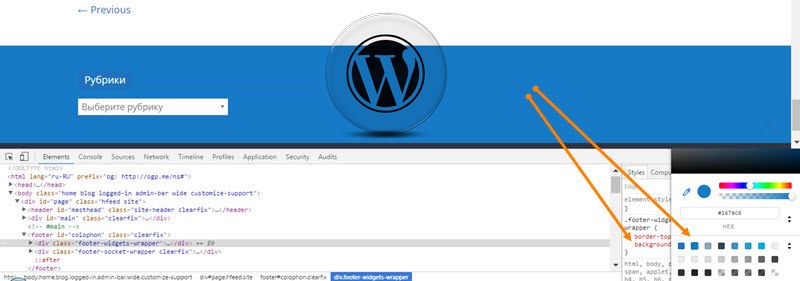
Этот скопированный кусок кода нужно:
- Вставить в файл
style.cssвместо старого кода (не рекомендую); - Если в шаблоне предусмотрена настройка CSS стиля, вставить этот кусок кода туда (Custom CSS). Сейчас на всех переведенных шаблонах эта настройка называется “Дополнительные стили”;
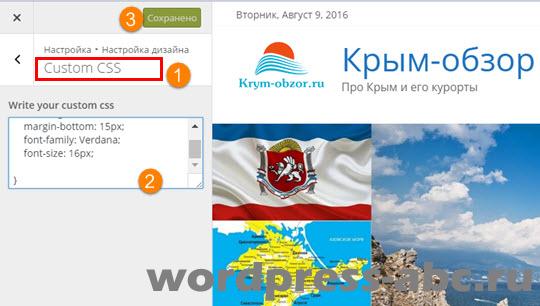
- Если вы используете плагин JetPack, то таблицу стилей можно редактировать на вкладке Внешний вид→Редактировать CSS, если вы включили соответствующий модуль JetPack.
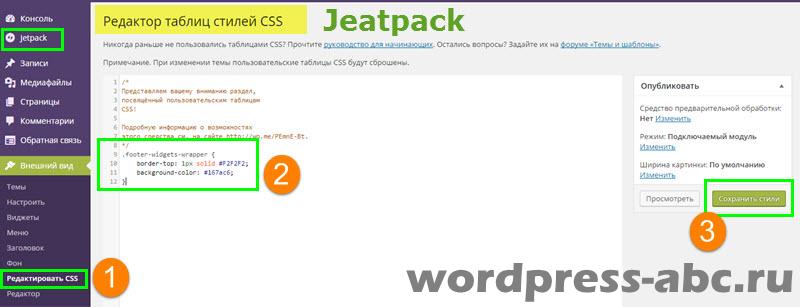
Сохраняемся и смотрим результат.
Выводы
Как видите изменить футер WordPress не сложно, но есть один нюанс, который, не забываем при изменении шаблона WordPress:
Все изменения в рабочем шаблоне сайта сделанные в редакторе внешнего вида пропадут, вернее, вернутся в исходное состояние, после обновления шаблона. Правда, это не относится к варианту изменения шаблона при использовании дочерней темы.
Как удалить и добавить виджеты в футер WordPress, а так же как удалить футер с отдельных его страниц сайта, расскажу в следующей статье: Как удалить виджеты в футере WordPress.
©www.wordpress-abc.ru
Еще статьи
Похожие посты:
Since a WordPress footer is so useful, at some point, you must learn about the footer, how it works, what’s possible in terms of editing it, and how to remove preset footer content that’s not relevant to your brand. That’s why we want to show you how to edit a footer in WordPress, along with a full explanation of a footer’s benefits and what can go into one.
Website footers have a long history of containing whatever information doesn’t fit within a website’s main menu. From links to support documents and social media pages, various elements go rather well in a footer.
Let’s get started!
Check Out Our Video Guide to Editing the WordPress Footer
What Is a WordPress Footer?
Footers aren’t exclusive to WordPress. Most website builders and content management systems offer the ability to include a footer. However, WordPress offers its unique footer functionality, along with a preset footer design that generally comes with the theme you install.
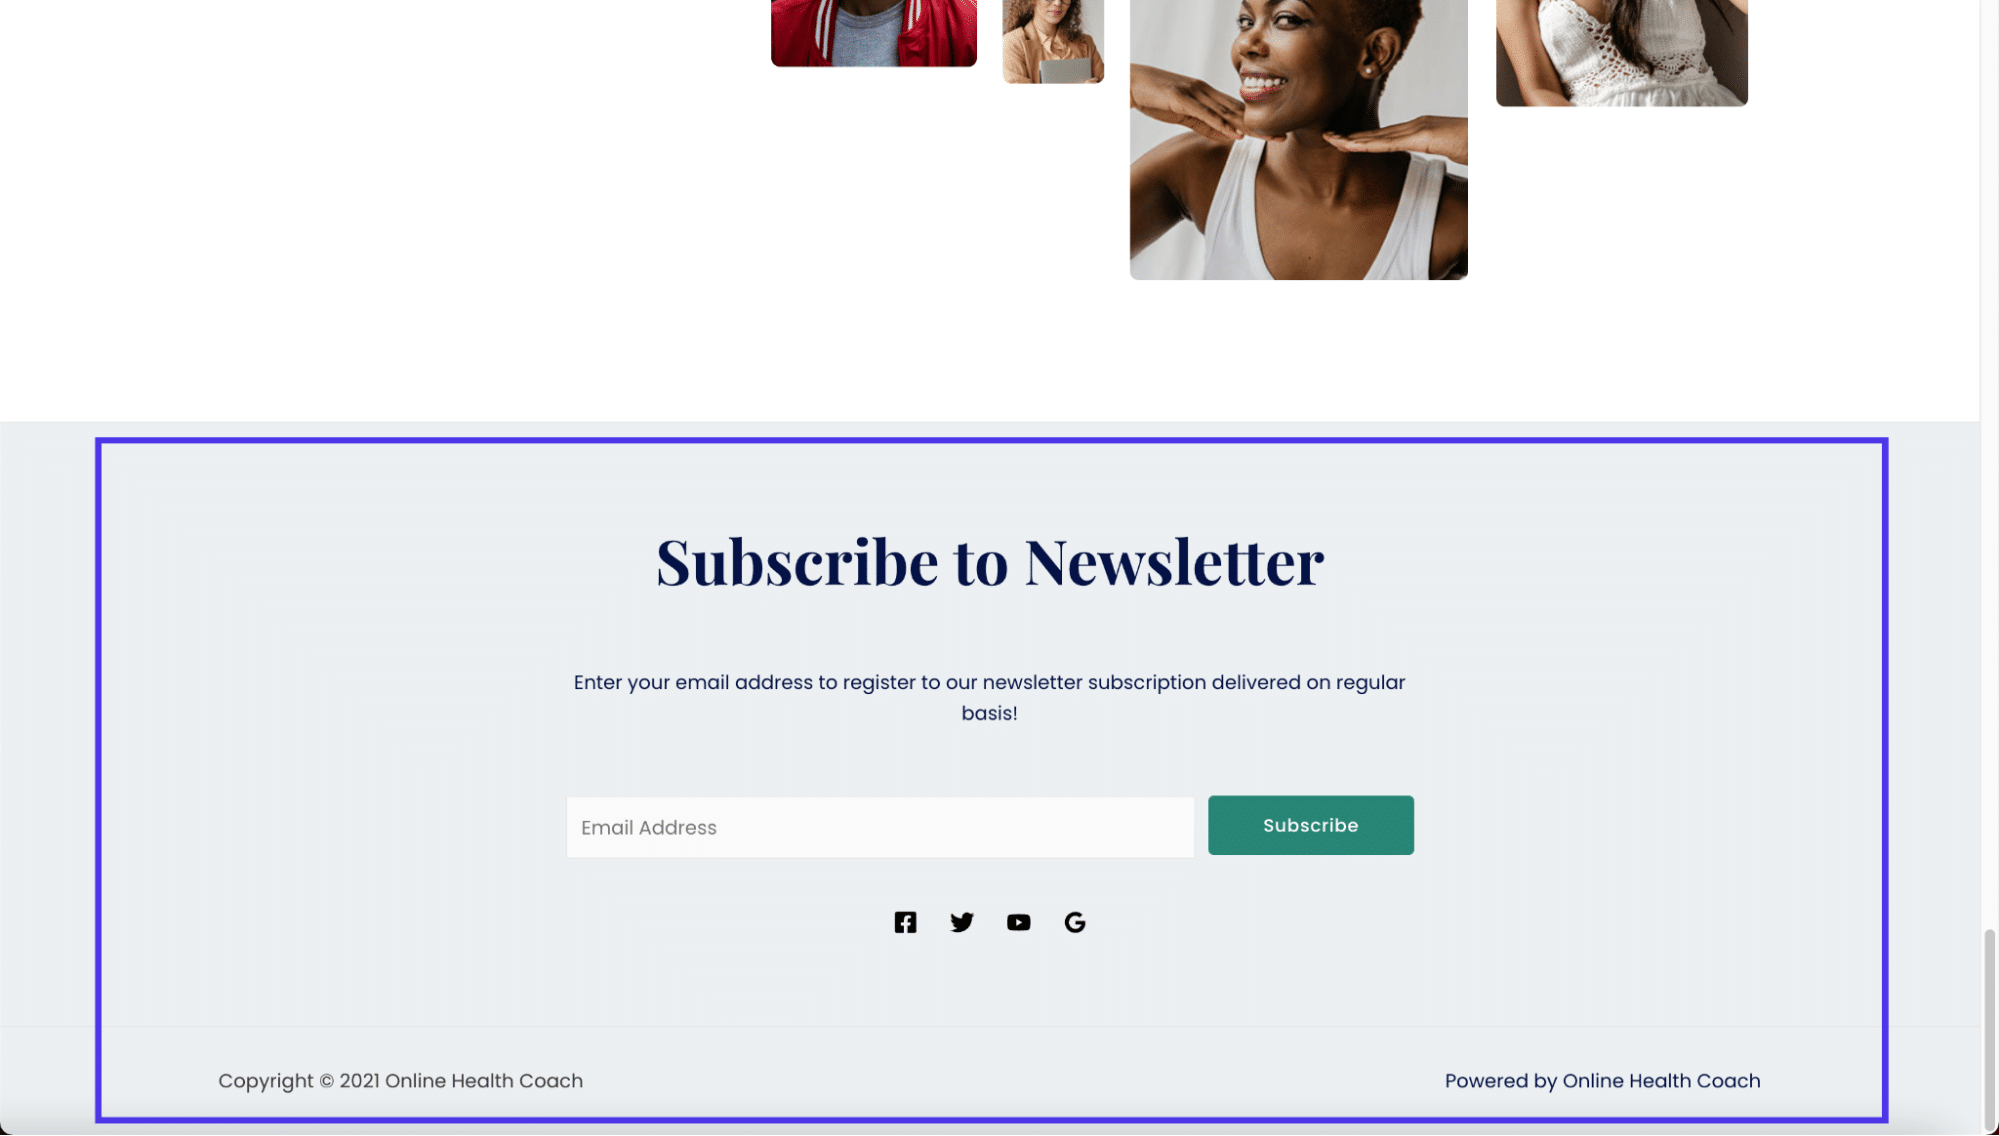
A WordPress footer sits at the base of your website. It’s a static content area that shows up at the very bottom, regardless of which page a user lands on. Although not as visited as the header, the footer is still extremely important to provide users with social media buttons, customer support links, and contact information.
Overall, if you make a website on WordPress, you can expect to see a footer placed in your design by default. WordPress has a core file built into its system specifically to manage the footer (footer.php).
Footers come in all shapes and sizes, and you can edit them to include different colors, fonts, and backgrounds. You can also insert content elements within the footer, such as blog post lists, security badges, and even forms and images.
Website footers: extremely useful, but potentially confusing to edit. 🥴 Learn how to get started here ⬇️Click to Tweet
The footer is like the conclusion to your entire website. It shows essential links and information for those interested in and dug deep into your content. Finally, the footer completes the overall design of your site, much like the final slide in a slideshow presentation or the conclusion to a speech.
Reasons To Have (and Edit) a WordPress Footer
It’s tempting to forget about your footer or leave it as the last item you design. Many people even want to remove their footers since they don’t see much value in them. This isn’t the greatest plan. The footer does have value, even if it’s not viewed or clicked on as much as your main menu or primary content areas.
To give you an idea of what makes a footer valuable, here’s a list of all the reasons to have one and learn how to edit a footer in WordPress to fit your brand.
- The WordPress footer offers a static module shown on every page of your website, making it more visible than a standard page that disappears when someone clicks away.
- It completes the website’s design, both visually and in your WordPress files. It tells WordPress where to end its code and indicates to users when the content ends. Not to mention, it makes for a cleaner interface.
- Many internet users have come to expect specific links and content in the footer, so they’ll go directly to the footer to find them. Think support links and social media buttons.
- The footer provides more conversion and engagement opportunities, like a call to action at the end of a blog post. You can add forms, links to other content, or even a company tagline.
- It’s a place to include important links that may not make the cut for the main menu.
Now that we know the benefits of using a footer, the big question of what to place in the footer comes into play. All themes differ, but it’s common to see a “Powered by WordPress” message in the footer after installing a new theme.
Other times, theme developers might include their own premade designs or messages about who made the theme.

None of that’s bad, but the goal is to customize your WordPress footer to link to your valuable pages, include content related to your brand, and clear out the default content like messages from theme developers or WordPress. It’s also wise to adjust the styling to match your branding with custom fonts and colors.
So, what are some elements to put inside your WordPress footer?
- Forms for users to subscribe to your newsletter messages or blog updates
- Links to customer support resources, like FAQs, knowledgebase articles, and forums
- Icon links to download digital products like apps and podcasts
- A list of upcoming events
- A list of recent blog post articles
- Links to loyalty and affiliate programs
- Links to informational pages, like an About Us or Career page
- Badges and icons to promote your reputation, past awards, or site security
- Social media icons that link to the pages
- A full sitemap for easier navigation throughout your website
- Legal statements like copyright claims, privacy policies, and terms and conditions
- Contact information such as your address, locations, phone number, and business hours, or a contact form
- A search box for improved navigation
- Any other additional pages that don’t fit in your main menu but still need a place on your site
How To Edit a Footer in WordPress (Self-Hosted Version)
There are a handful of tactics to edit the footer of a WordPress.org (self-hosted) website. In the following sections, we’ll talk about editing a footer in WordPress using the theme customizer, widgets, plugins, and code. As a bonus, we’ll discuss managing the WordPress footer with a visual page builder like Elementor.
Edit WordPress Footer with Theme Customizer
The fastest and most efficient way to edit a WordPress footer is by utilizing the built-in WordPress Theme Customizer. The Theme Customizer settings vary depending on your chosen theme, but the customizer itself is always located in the exact location on the WordPress dashboard.
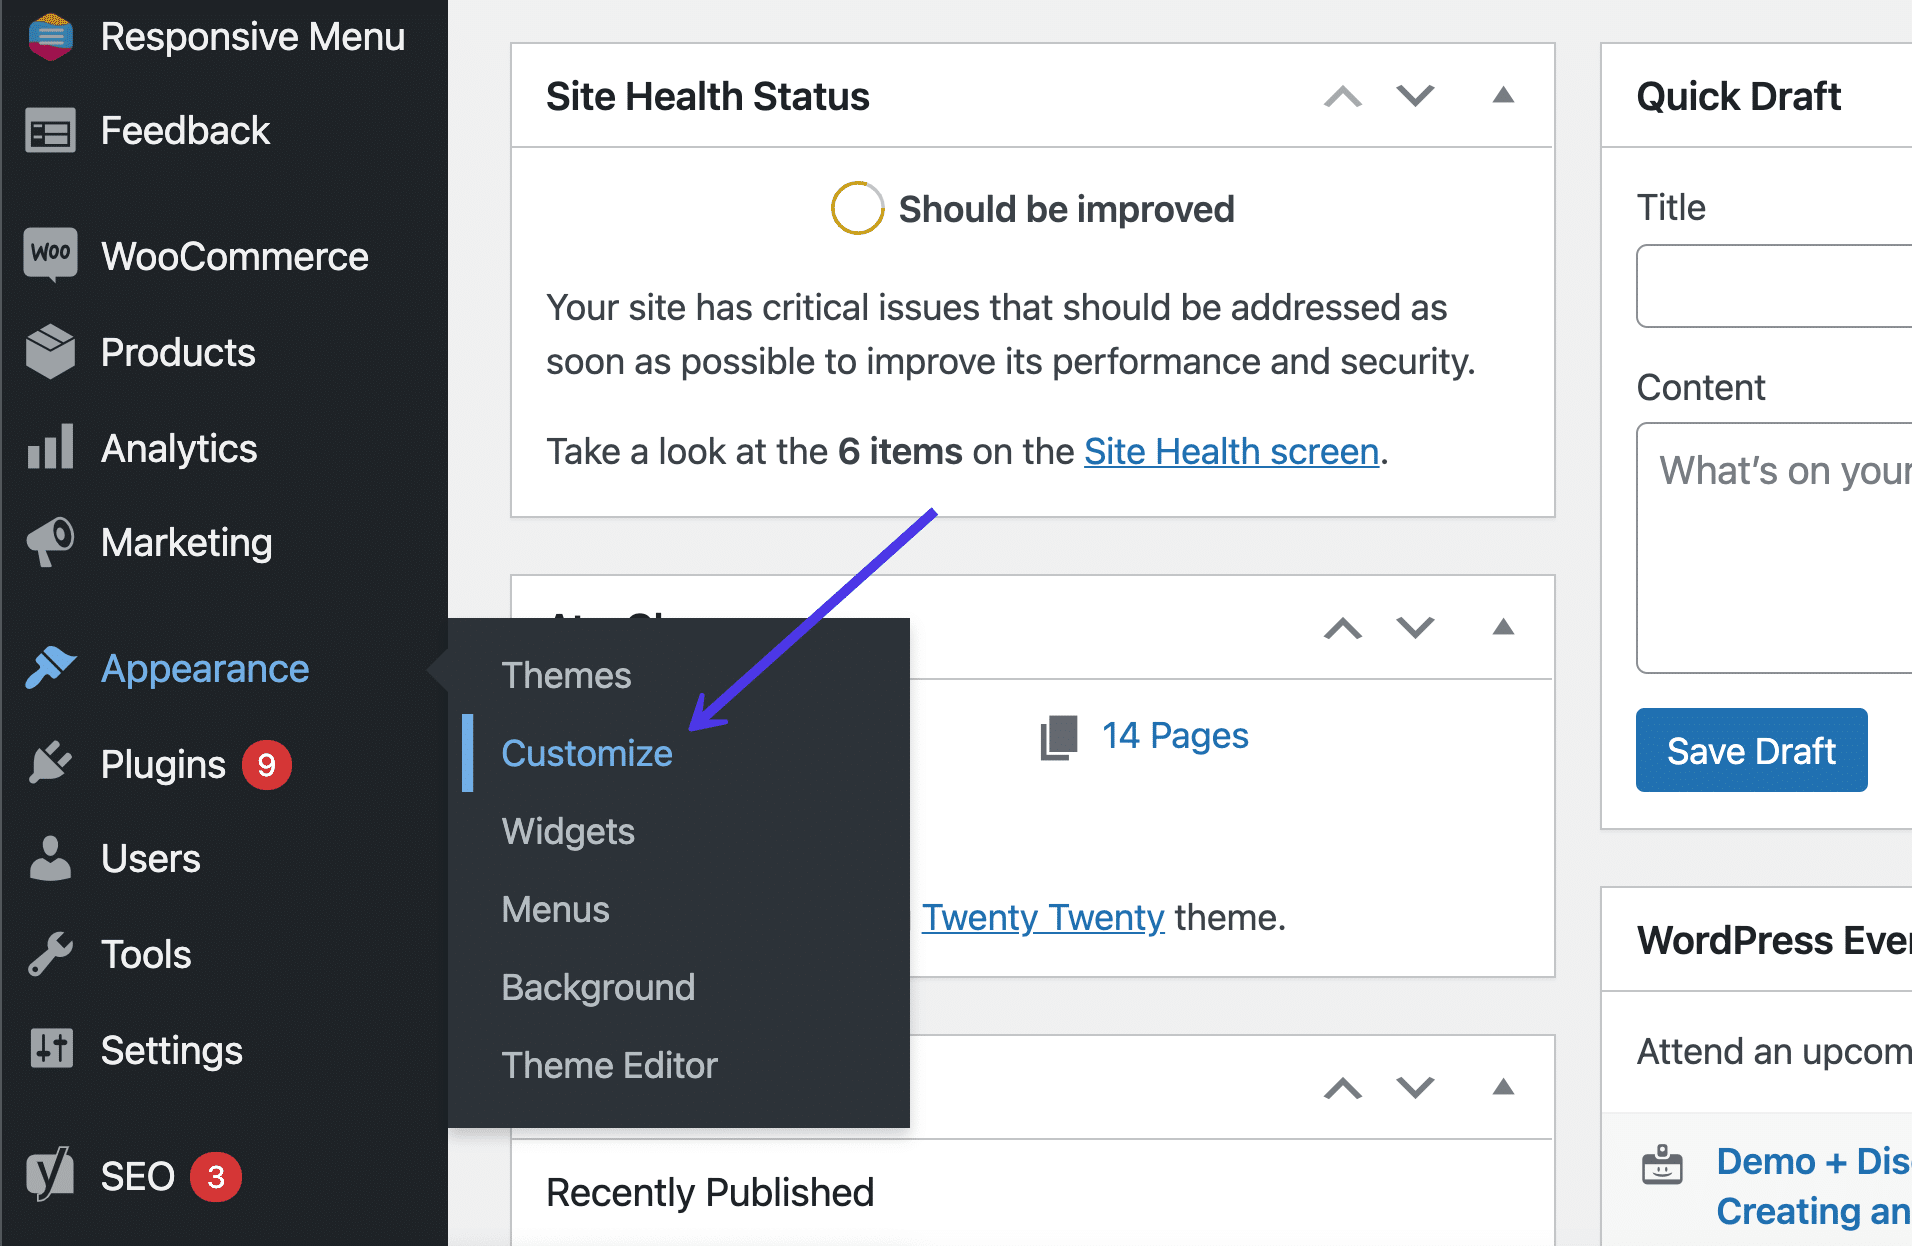
To begin the process, go to the dashboard and click on Appearance and then Themes.
Then, click the Customize button underneath the currently active theme.
Feel free to swap out themes to see how the footers change from theme to theme.
As a slightly faster alternative, you can also click on Appearance > Customize, which brings you directly to the WordPress Theme Customizer for the active theme.
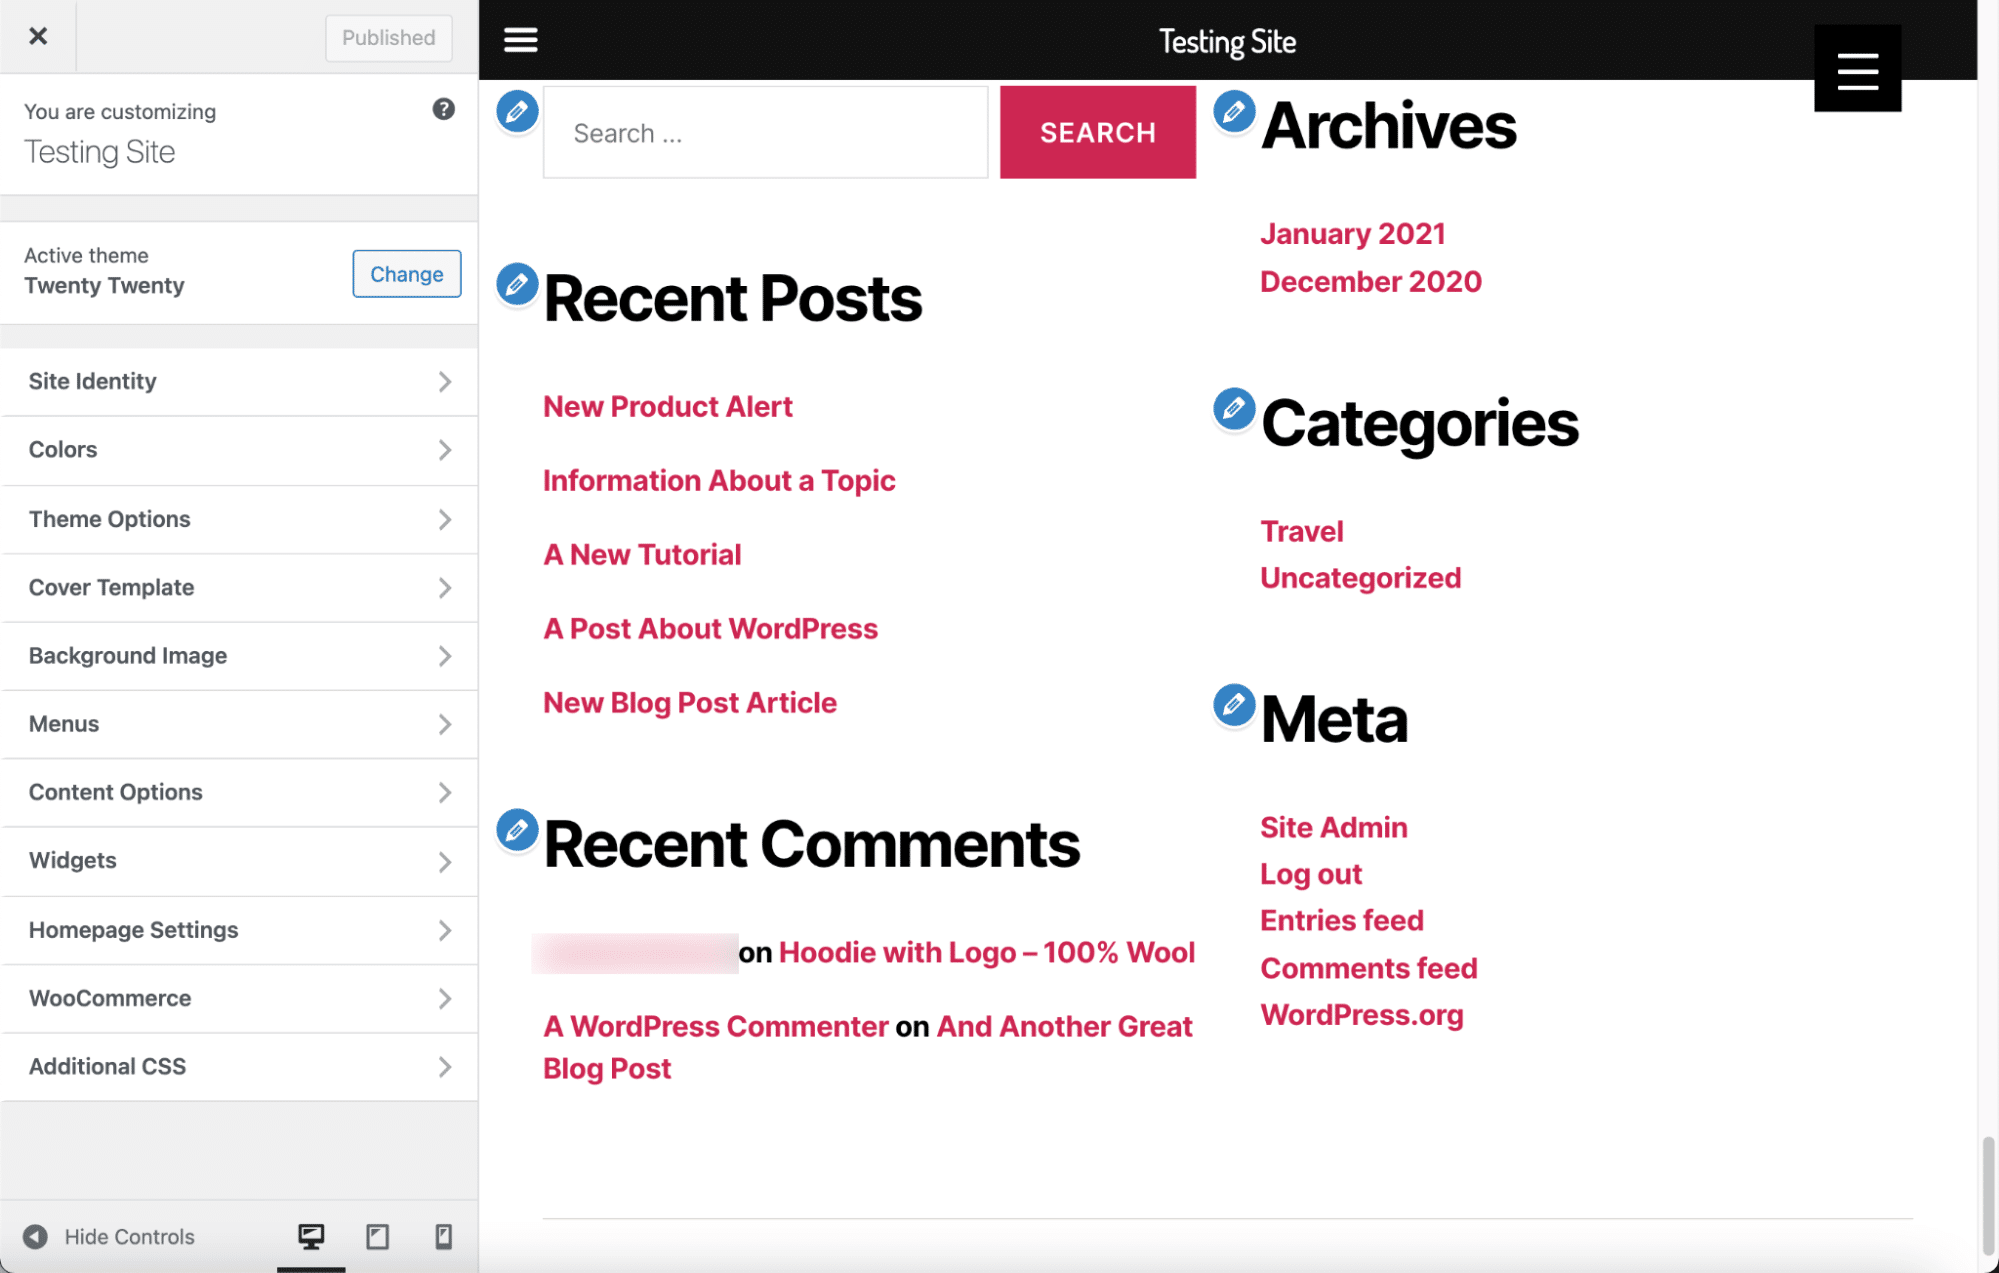
The WordPress Theme Customizer presents a visual of your website on the right side and several menu items on the left that lead to settings and customization tools. Again, every theme has varying customization options, so your screen may look a little different than what’s in our screenshots.
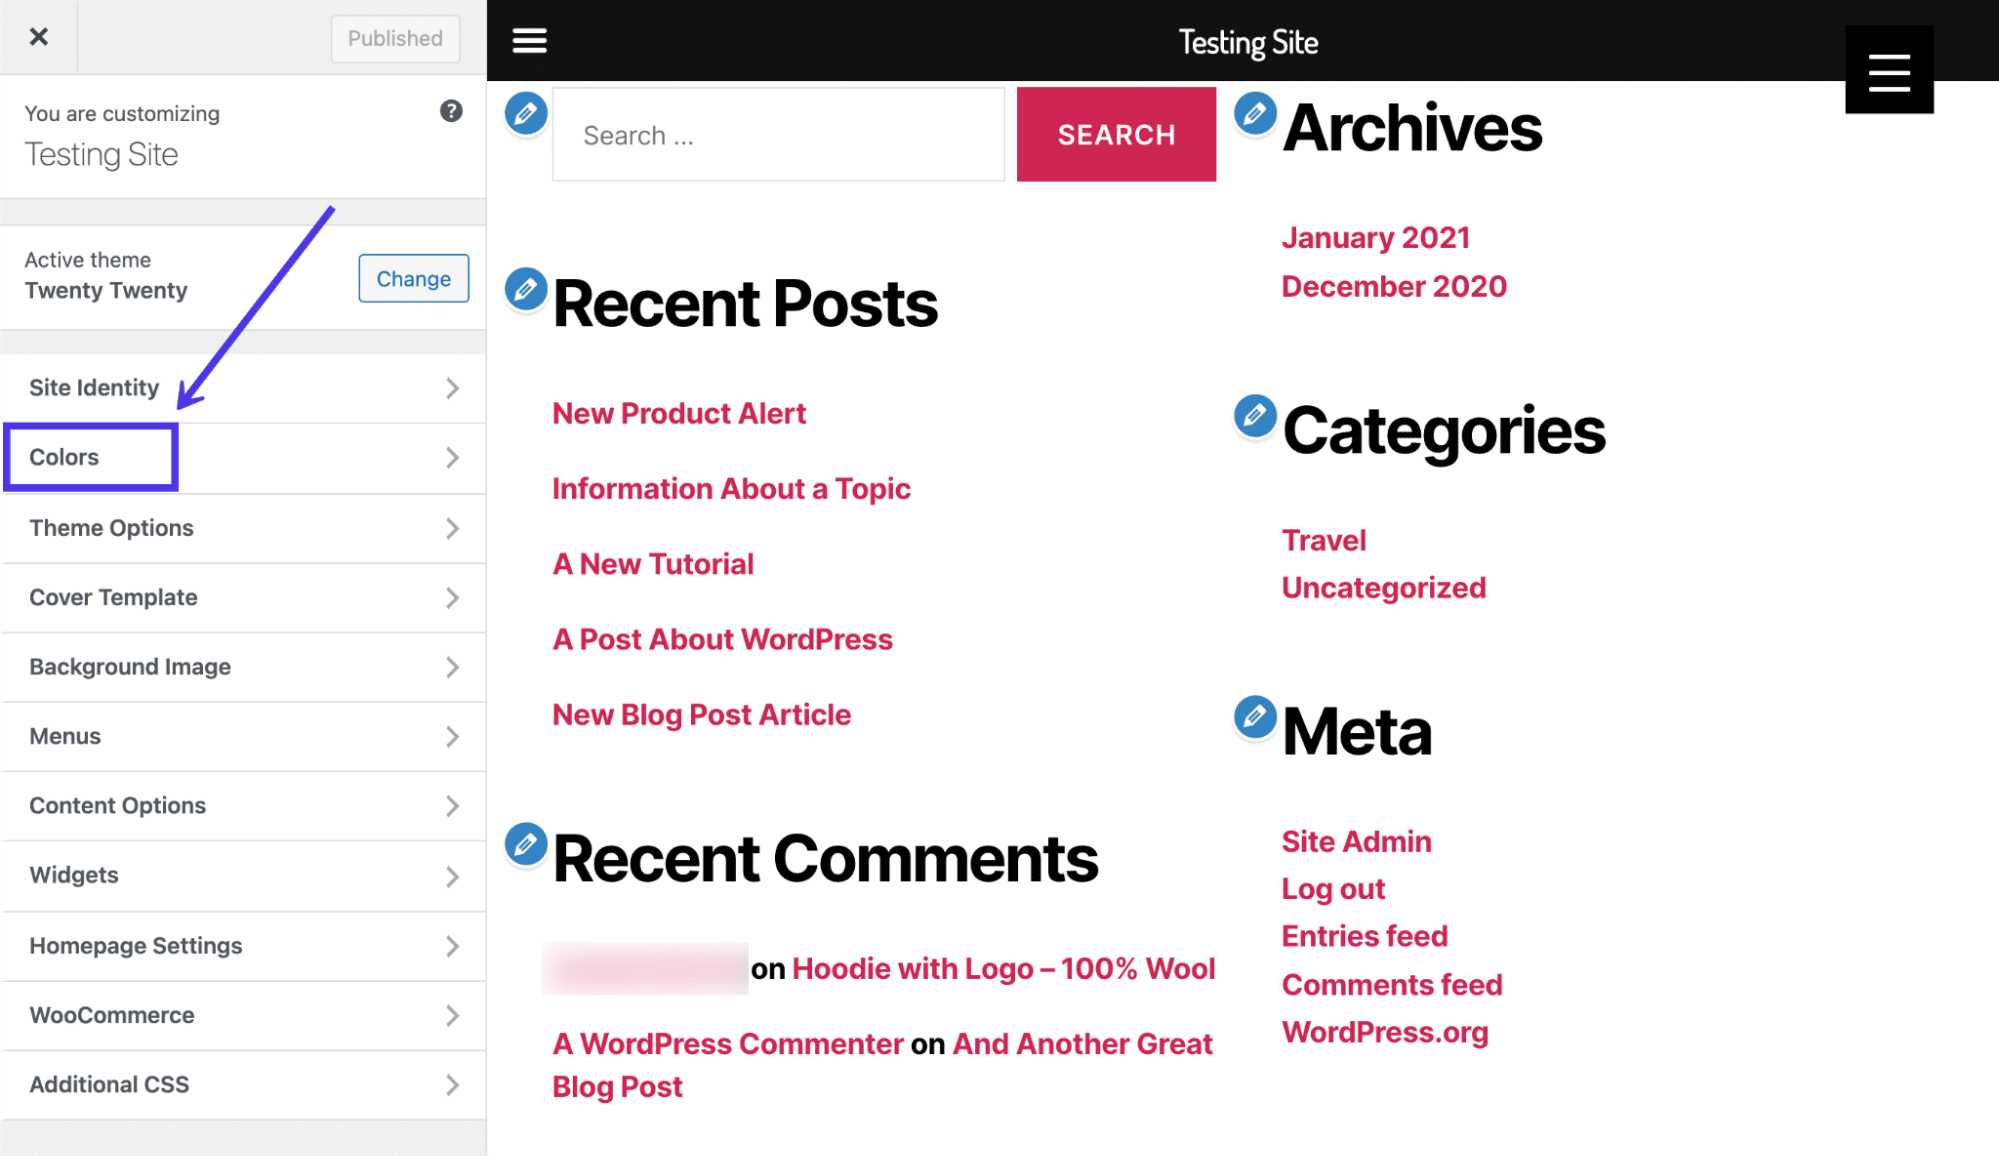
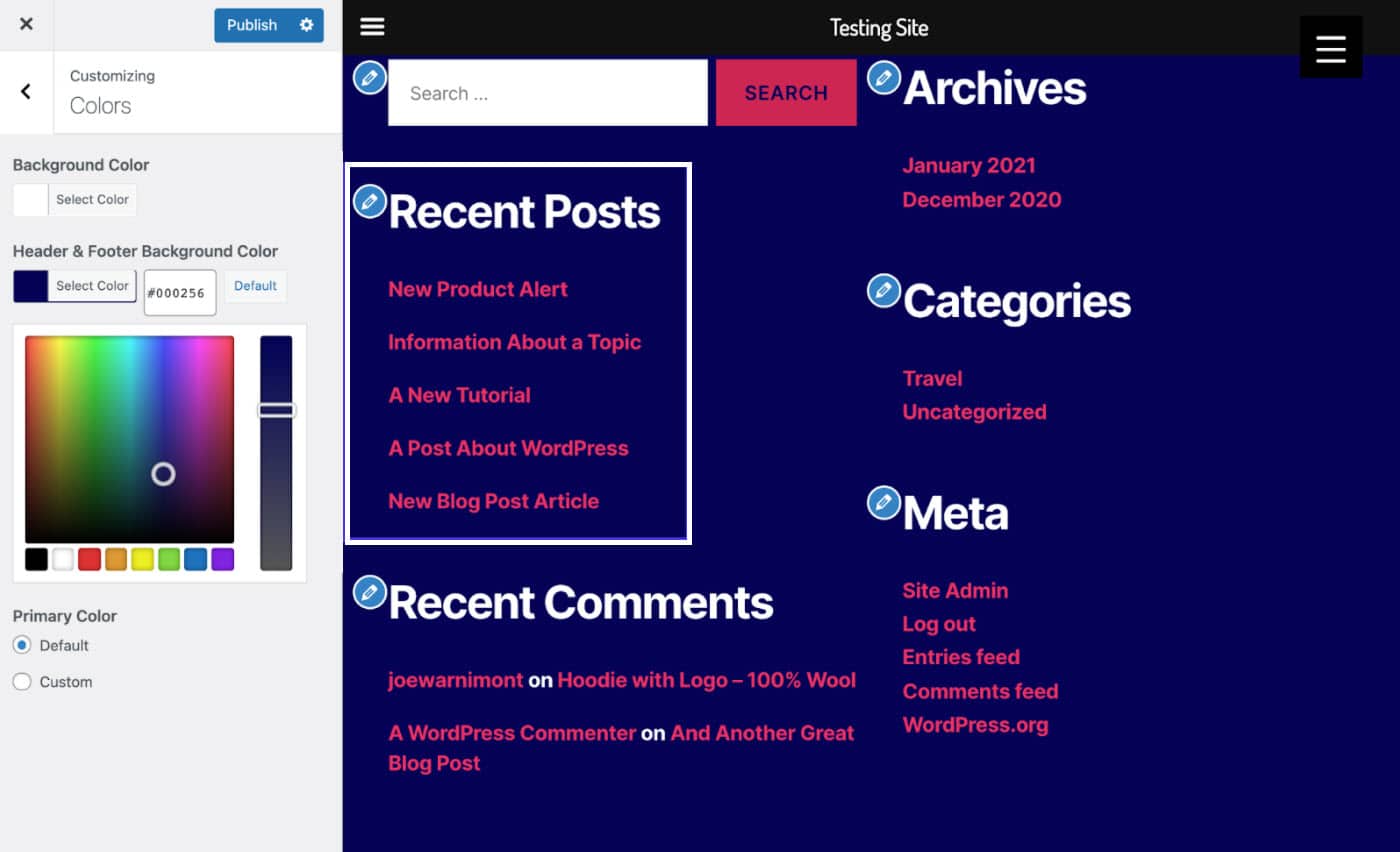
A wonderful place to start with your footer customization is with the colors.
Our current theme has a Colors button, making it easy to identify where we need to go.
Select the Colors button if that’s available in your theme.
Choose the Select Color button under the Header and Footer Background Color field.
Use the color picker to test all types of colors and see which ones match your brand or look good towards the end of your page.
With this particular theme, any color modifications actually adjust the font colors as well, making them look clear regardless of the background color.
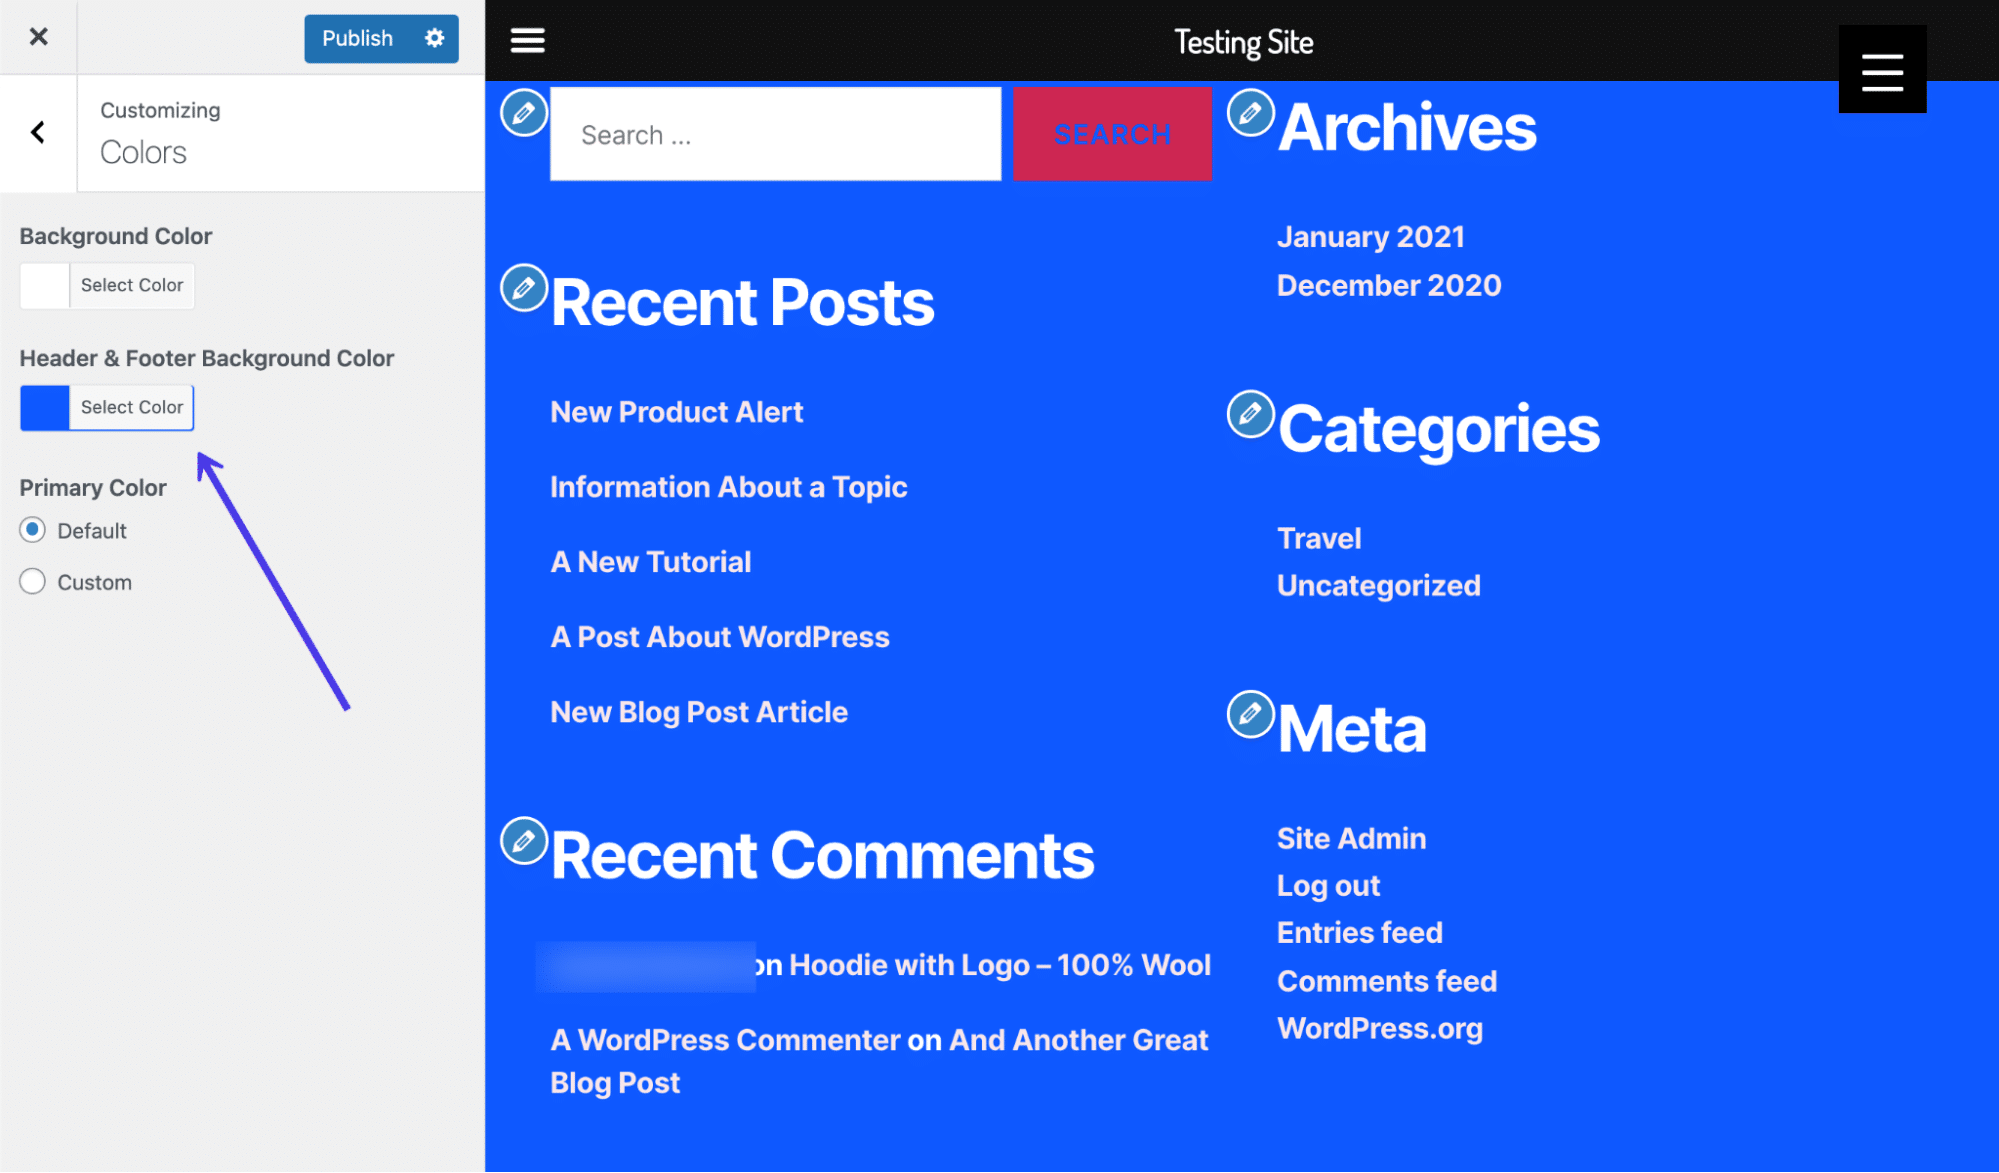
As you can see, a darker WordPress footer color automatically changes the font colors for links, headers, and paragraph text, eliminating the need for you to do that on your own.
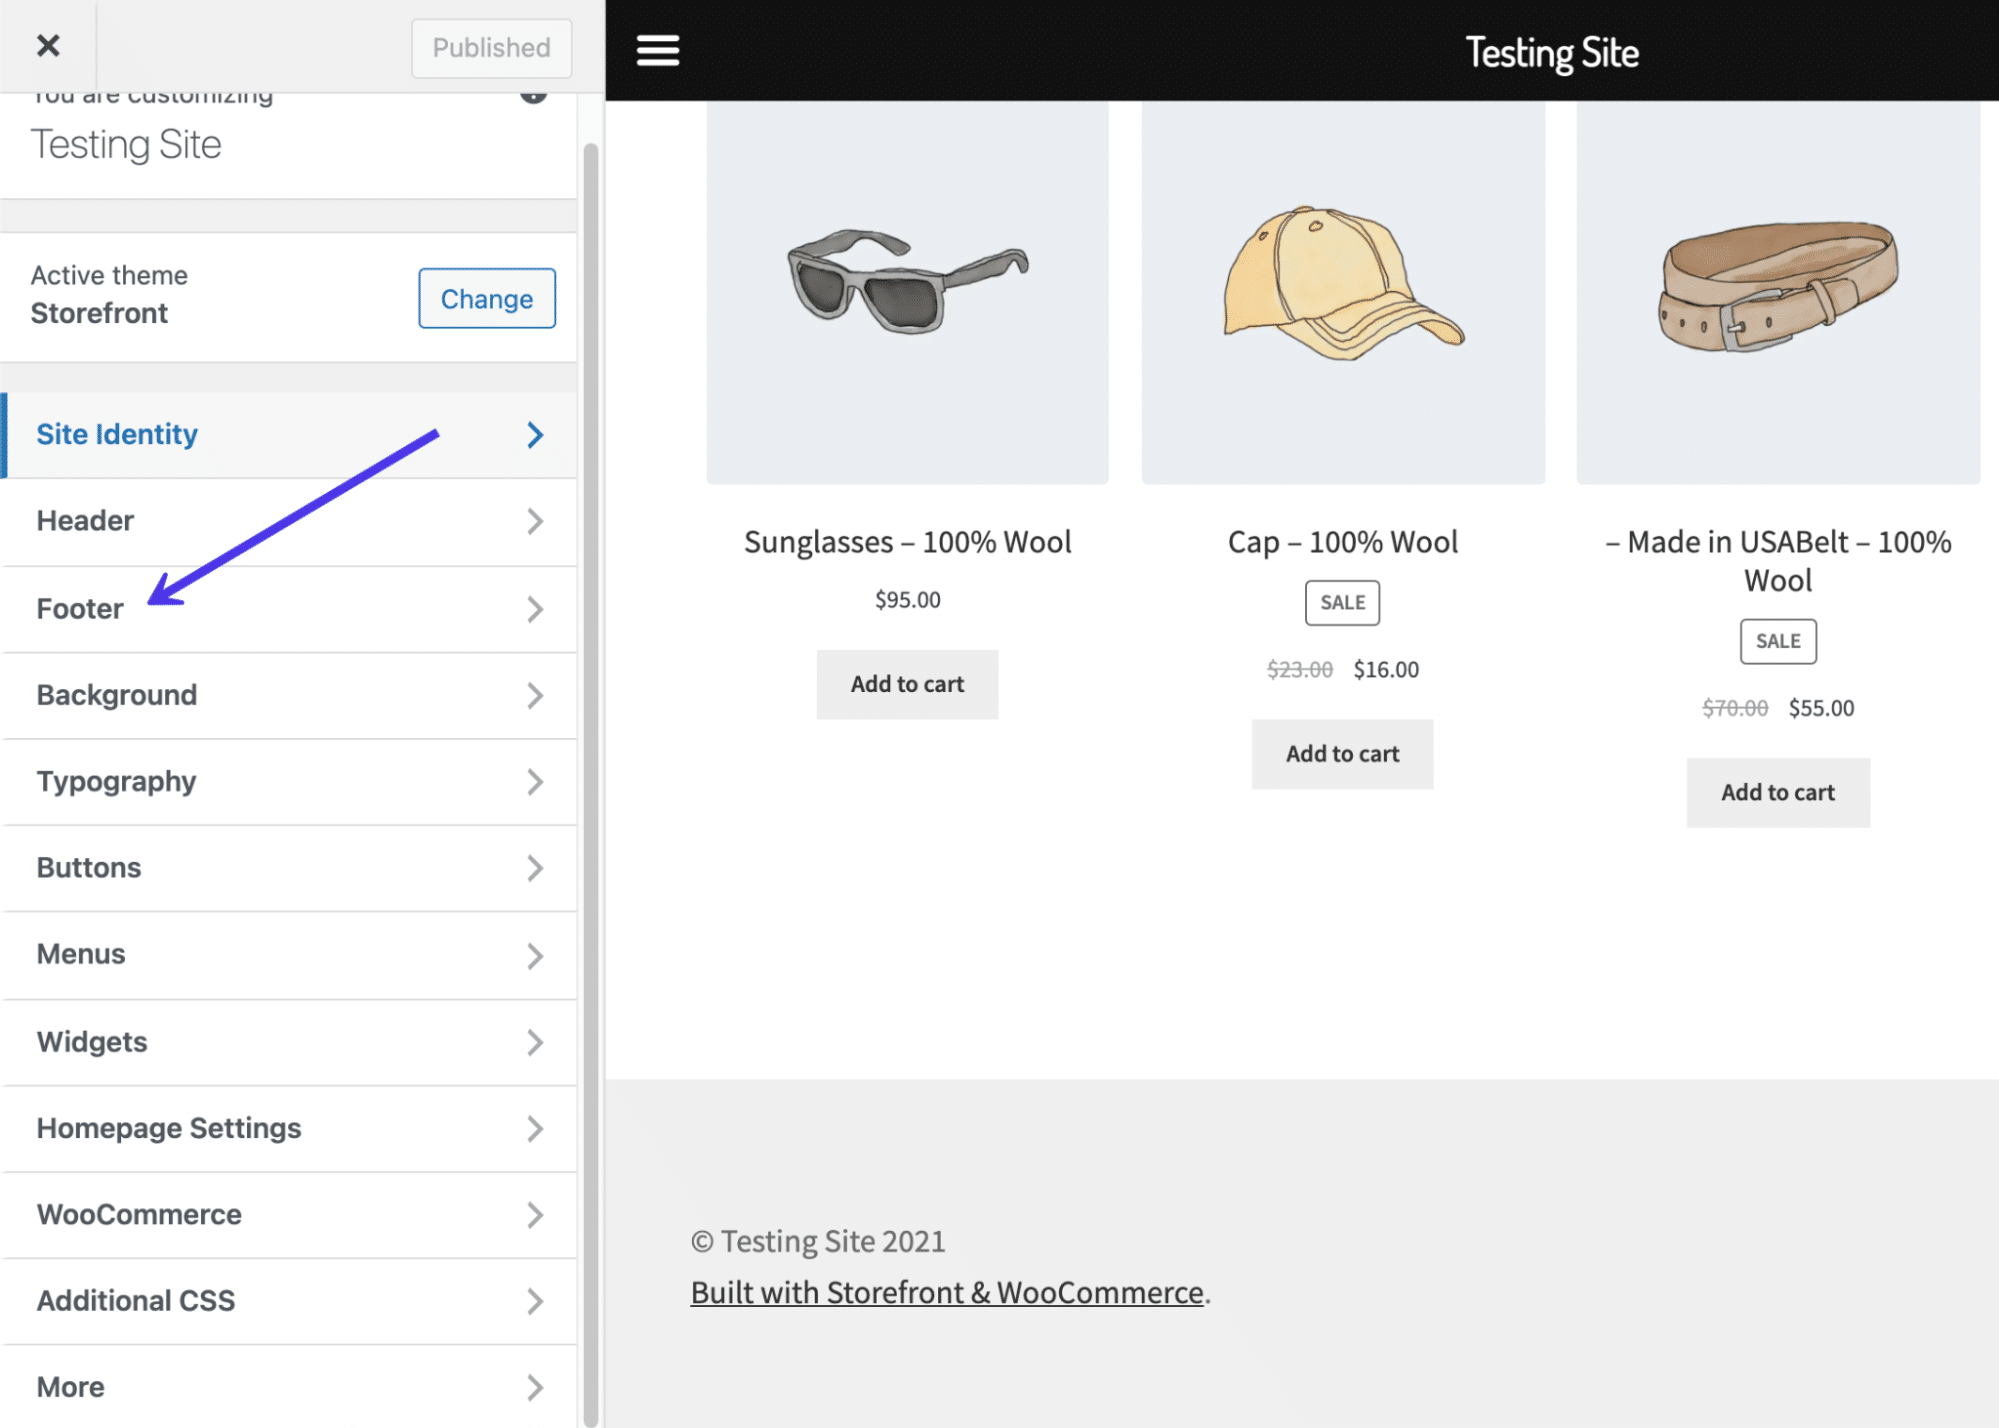
Now let’s try another theme. In this case, we’ve swapped out the Twenty Twenty theme for the Storefront theme.
Sure enough, the WordPress Customizer for the Storefront theme displays buttons not shown in the Twenty Twenty theme.
Therefore, your theme dictates how much control you have over the footer in the WordPress Customizer. Some themes are better than others in this respect.
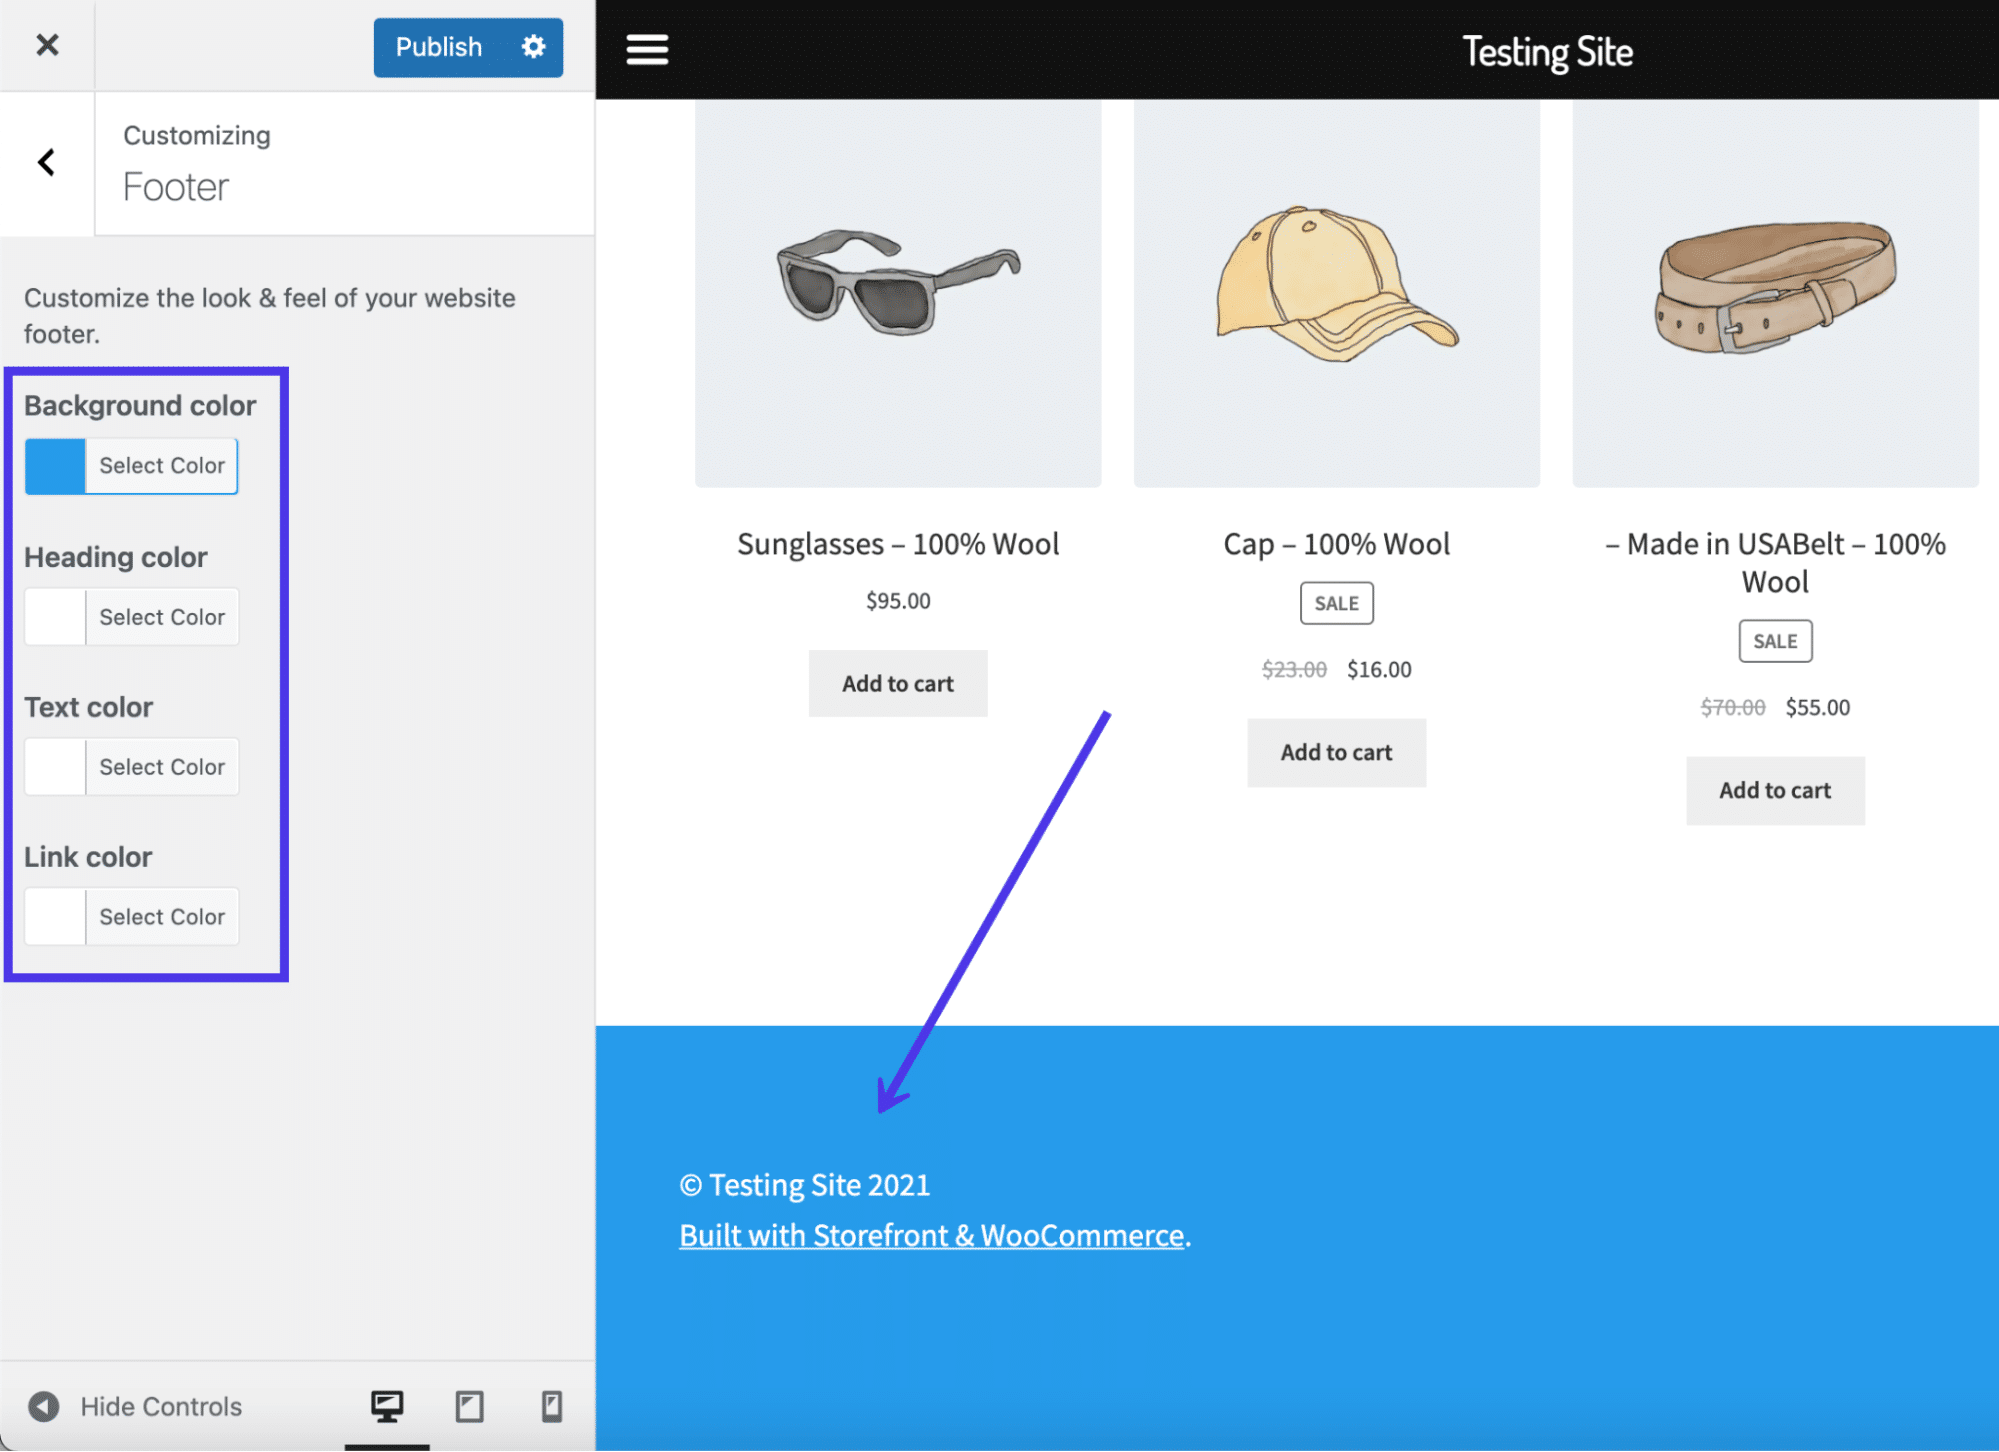
For the Storefront theme, we have a Footer tab. Click on that to see what’s available for customizing the footer.
Unlike the previous theme, Storefront doesn’t automatically change text and link colors when you adjust the background colors. However, you are able to control all of these colors on their own, with fields for the Background Color, Heading Color, Text Color, and Link Color.
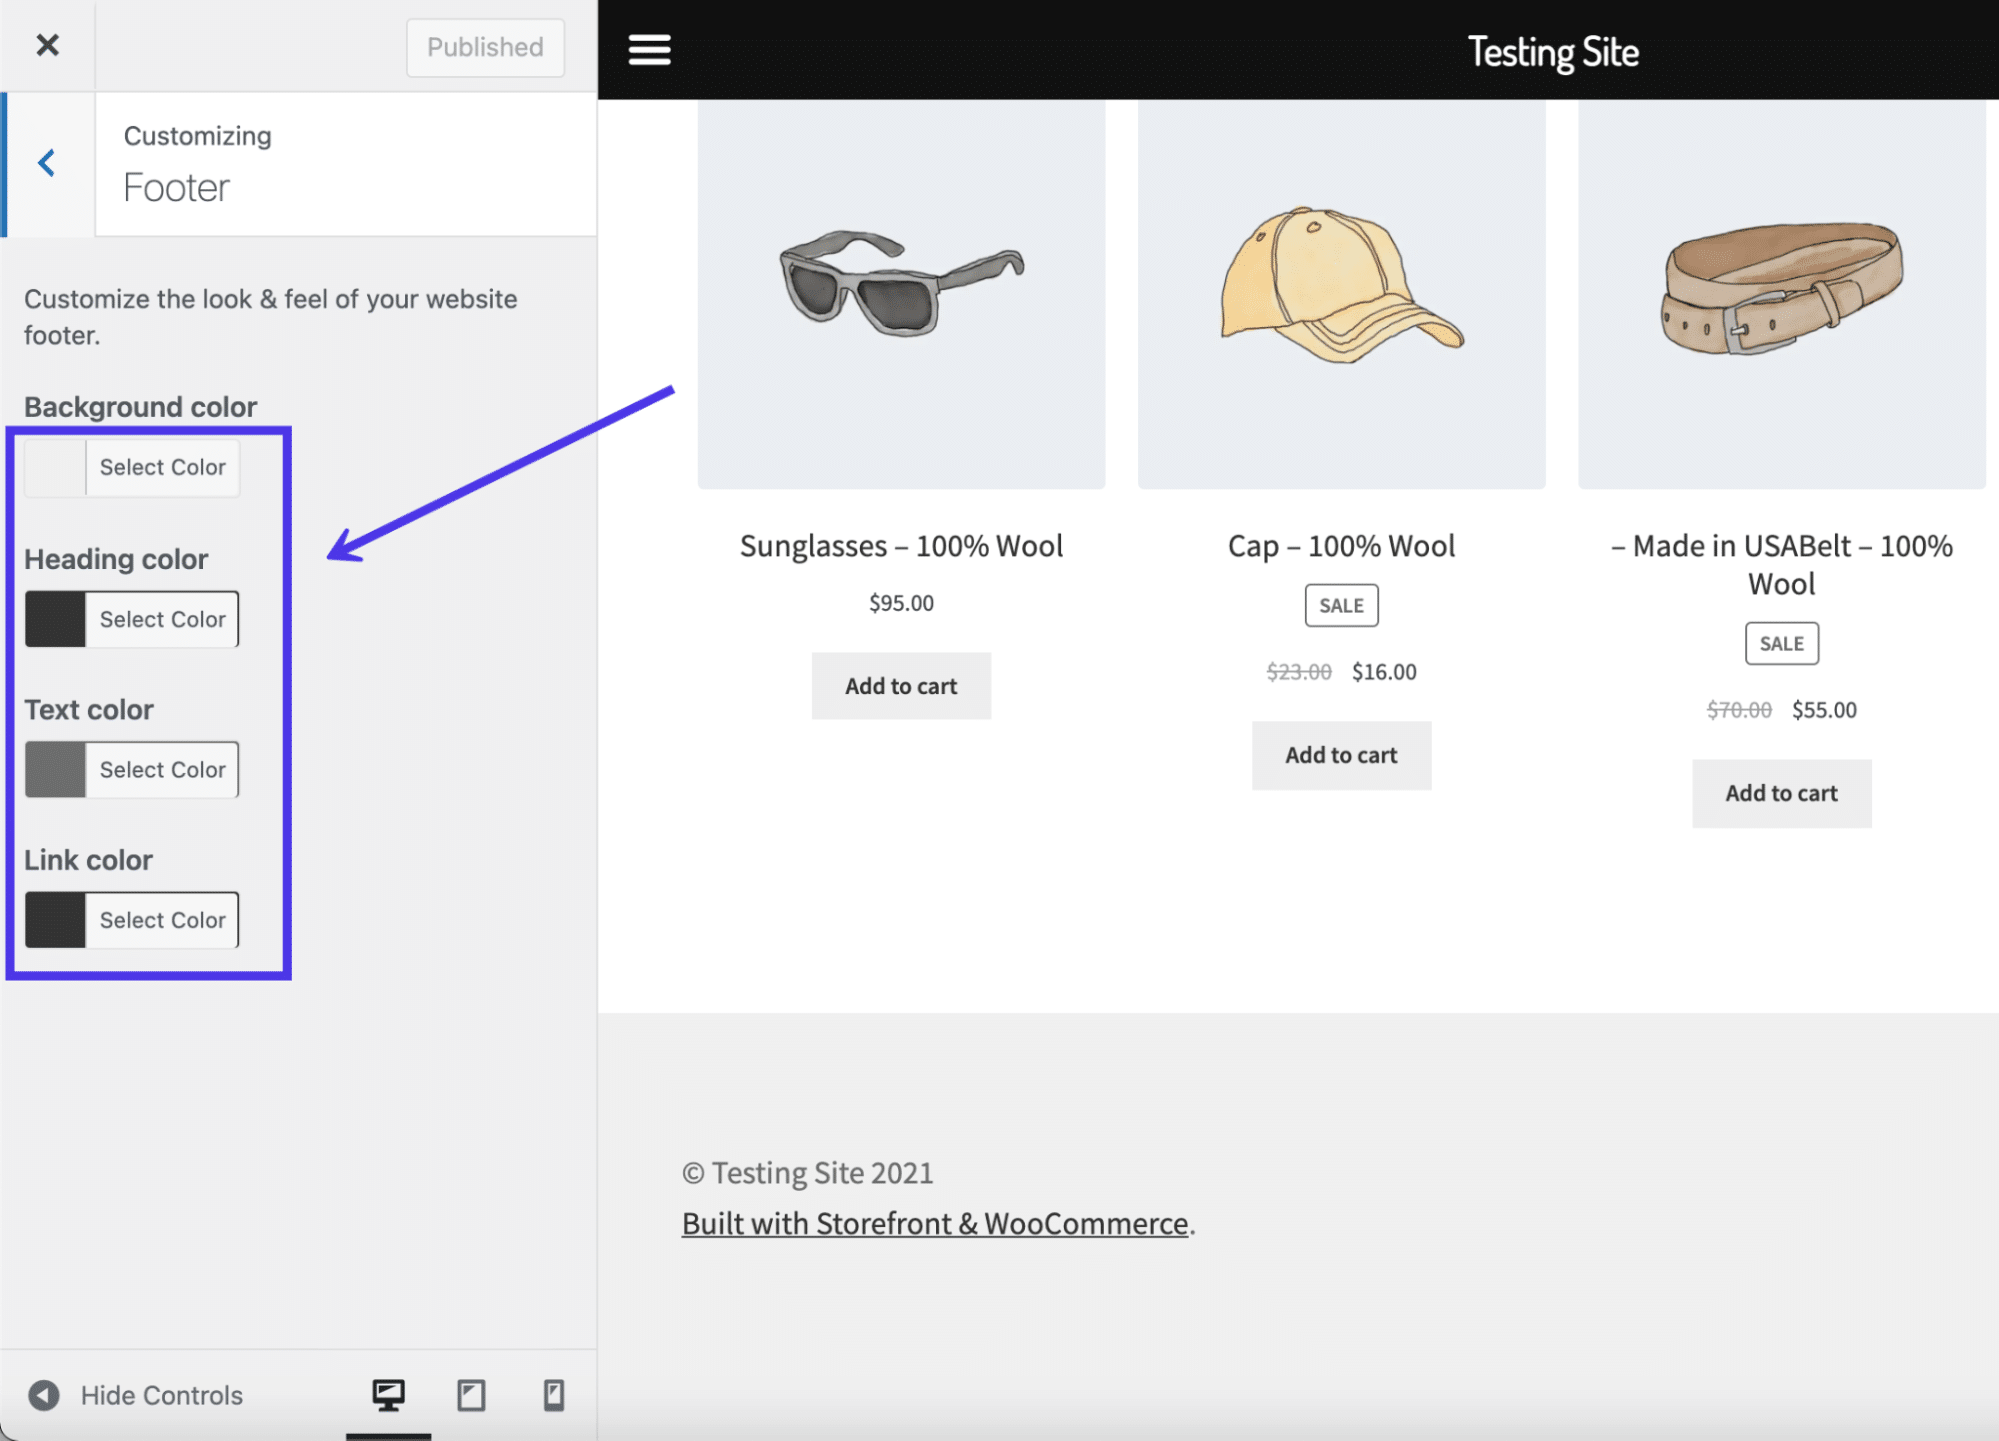
Footer color settings
A quick selection reveals the results in our WordPress footer preview. After this, you should click on the Publish button to see the new footer colors on the front end.
But what about the links and text elements presented by default in the footer?
Again, the primary method to adjust the footer content is in the WordPress Customizer. In the coming sections, we’ll explain how to add and remove text and link content from the footer using two methods: as menu items and as widgets.
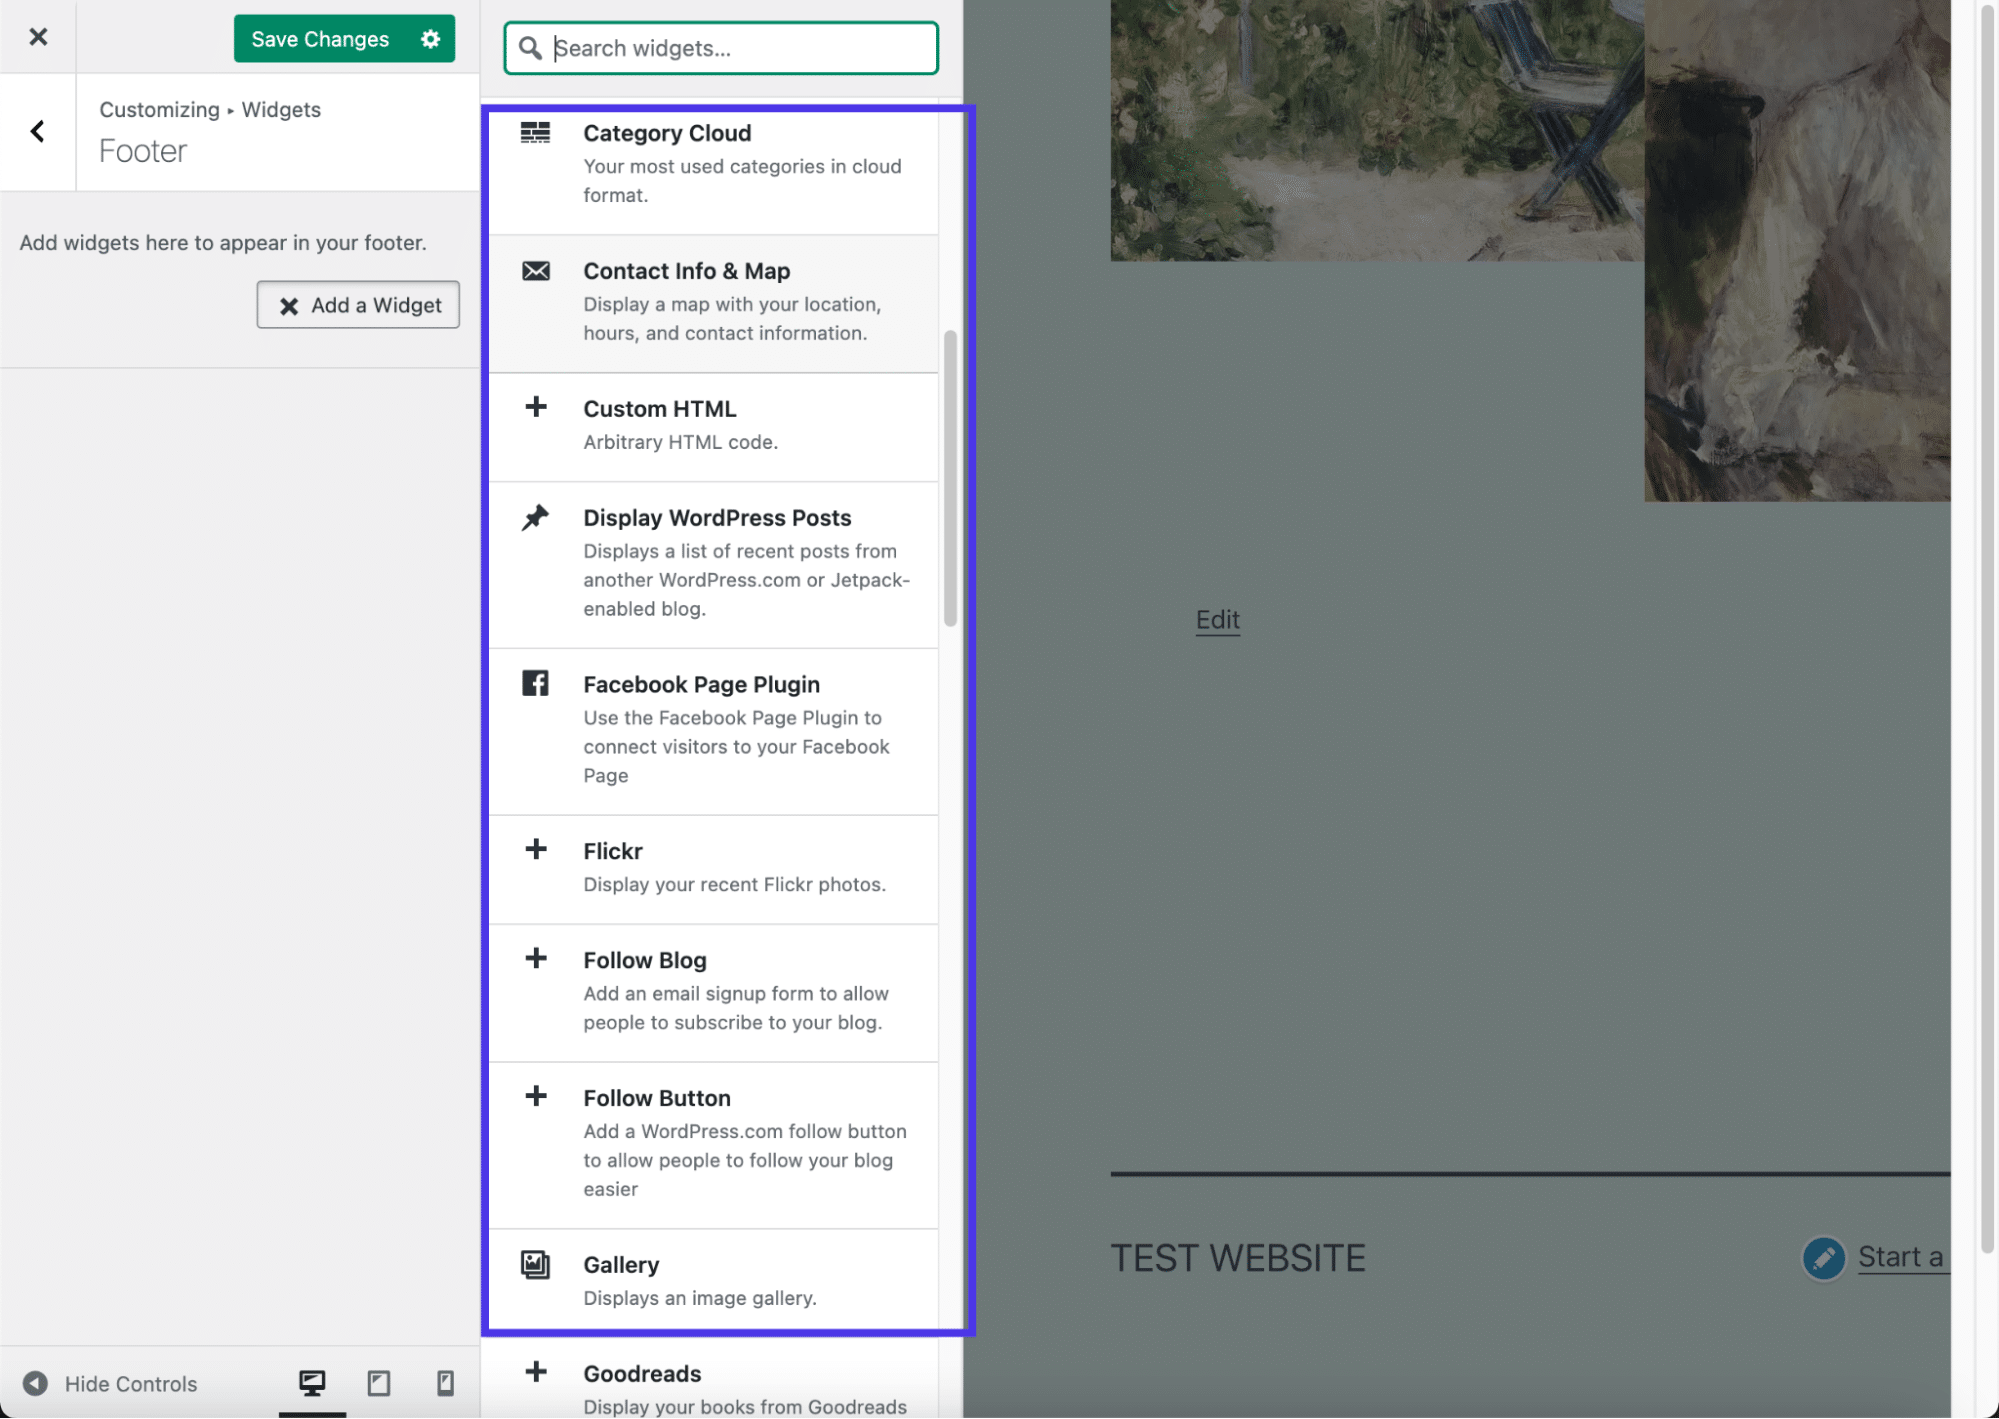
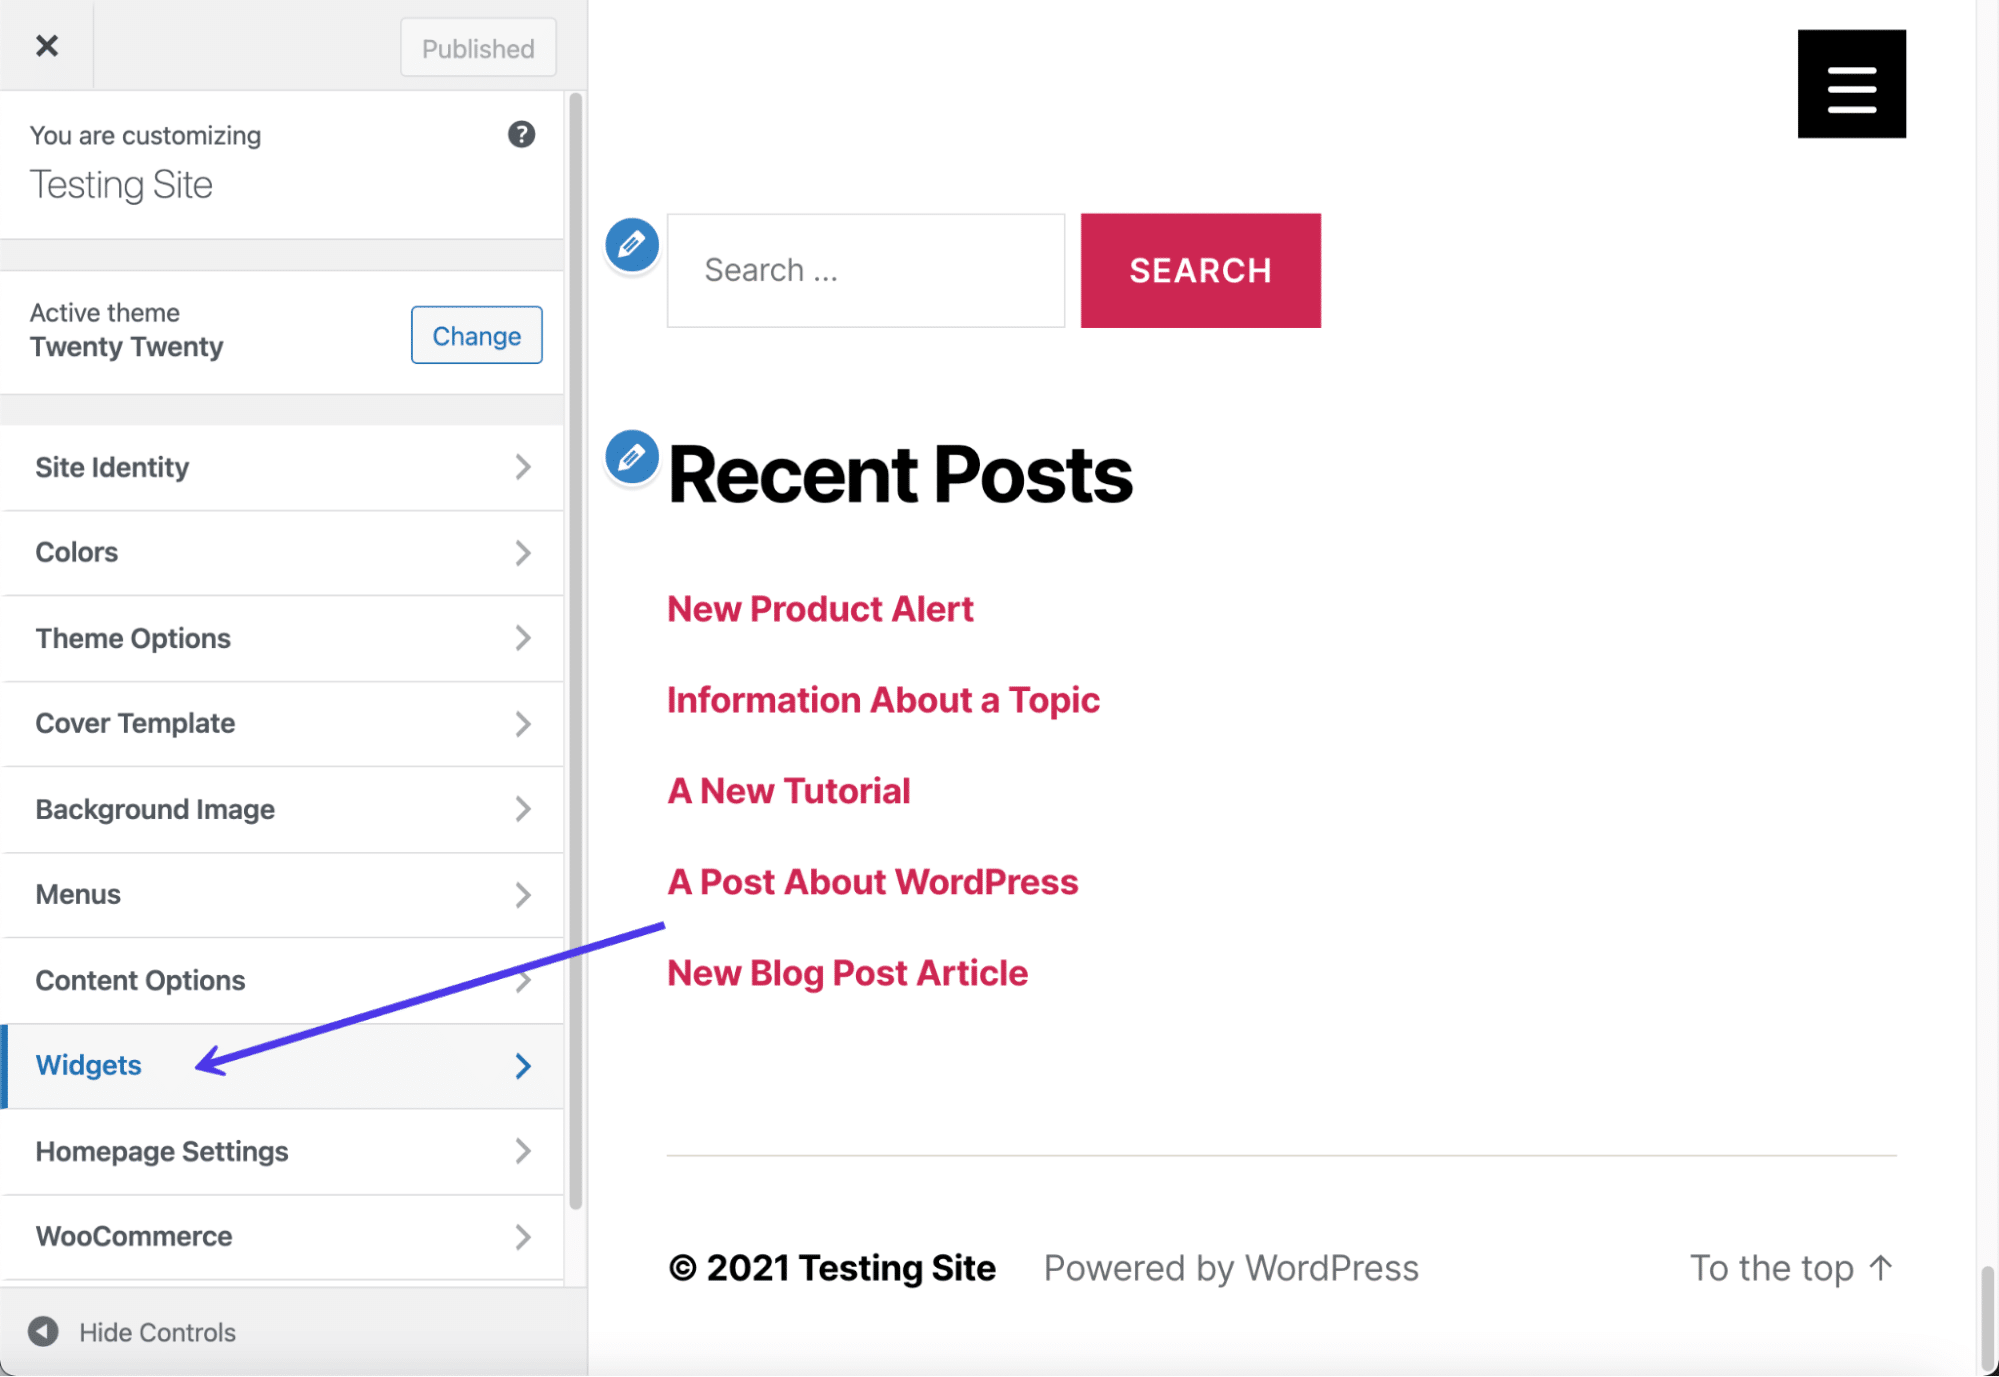
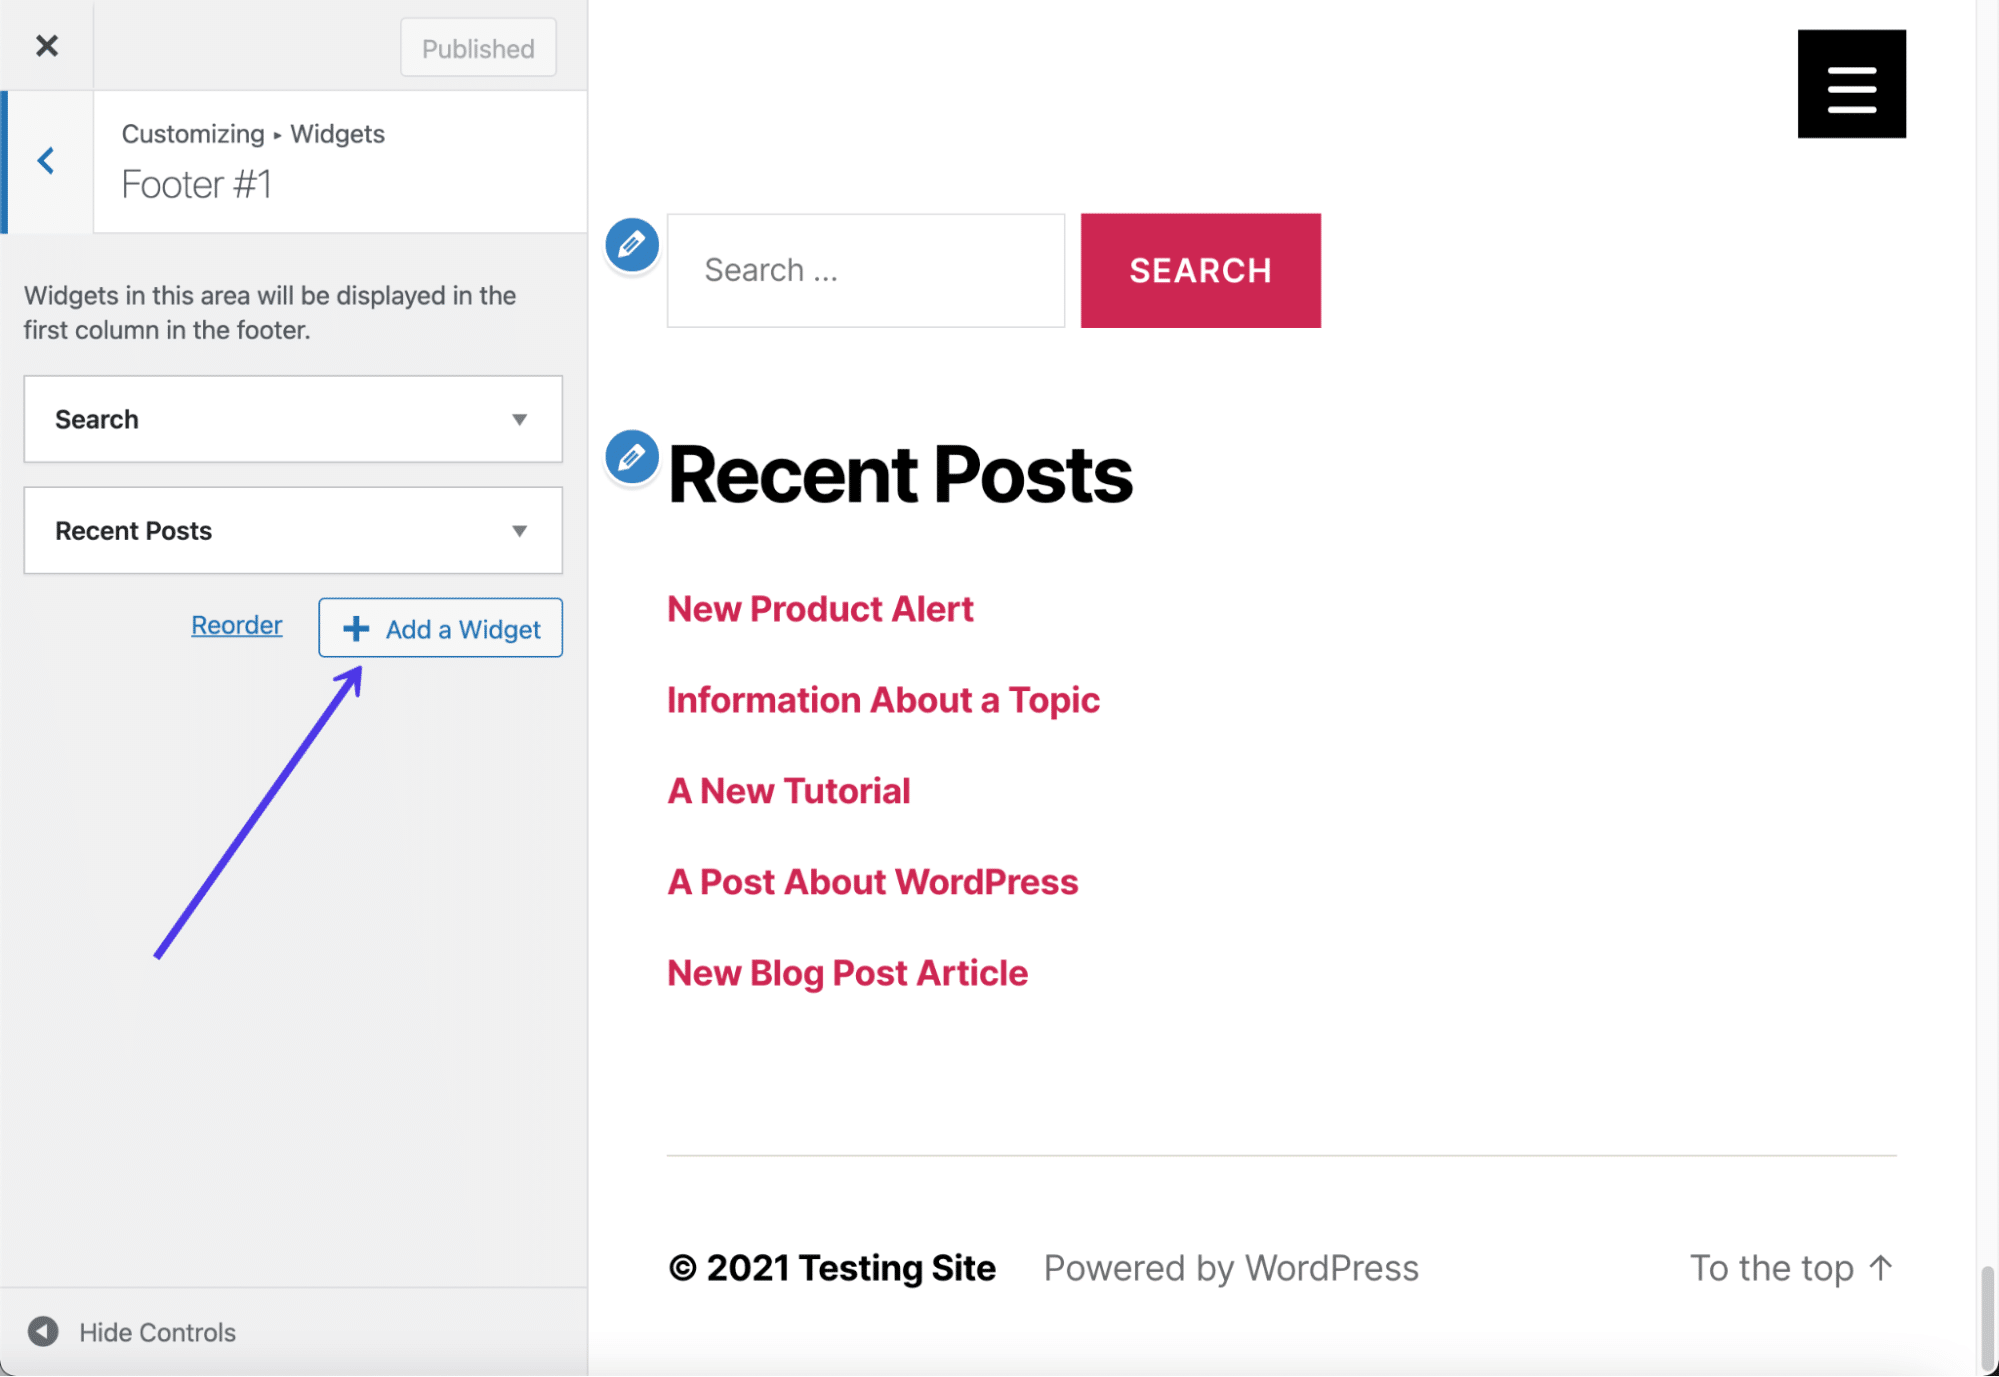
Adding Widgets to Your WordPress Footer
One way to edit the footer content is by adding widgets. WordPress widgets have many functions, along with several locations for them to go, including the sidebar and footer, provided your theme supports that.
Back in the WordPress Customizer, look for the Widgets tab.

Peruse the list of areas to place widgets on your website. You may see options for regions like the sidebar, top menu, and bottom menu. Hopefully, your theme also includes the footer as an area to place widgets. If not, there are other ways to edit your footer, though if you’d rather go with widgets, consider switching to a different theme that allows for widgets inside the footer.
This theme actually provides four widget locations in the footer, arranged in four columns stacked side by side to make a beautiful format that fits as much content inside the footer as possible.
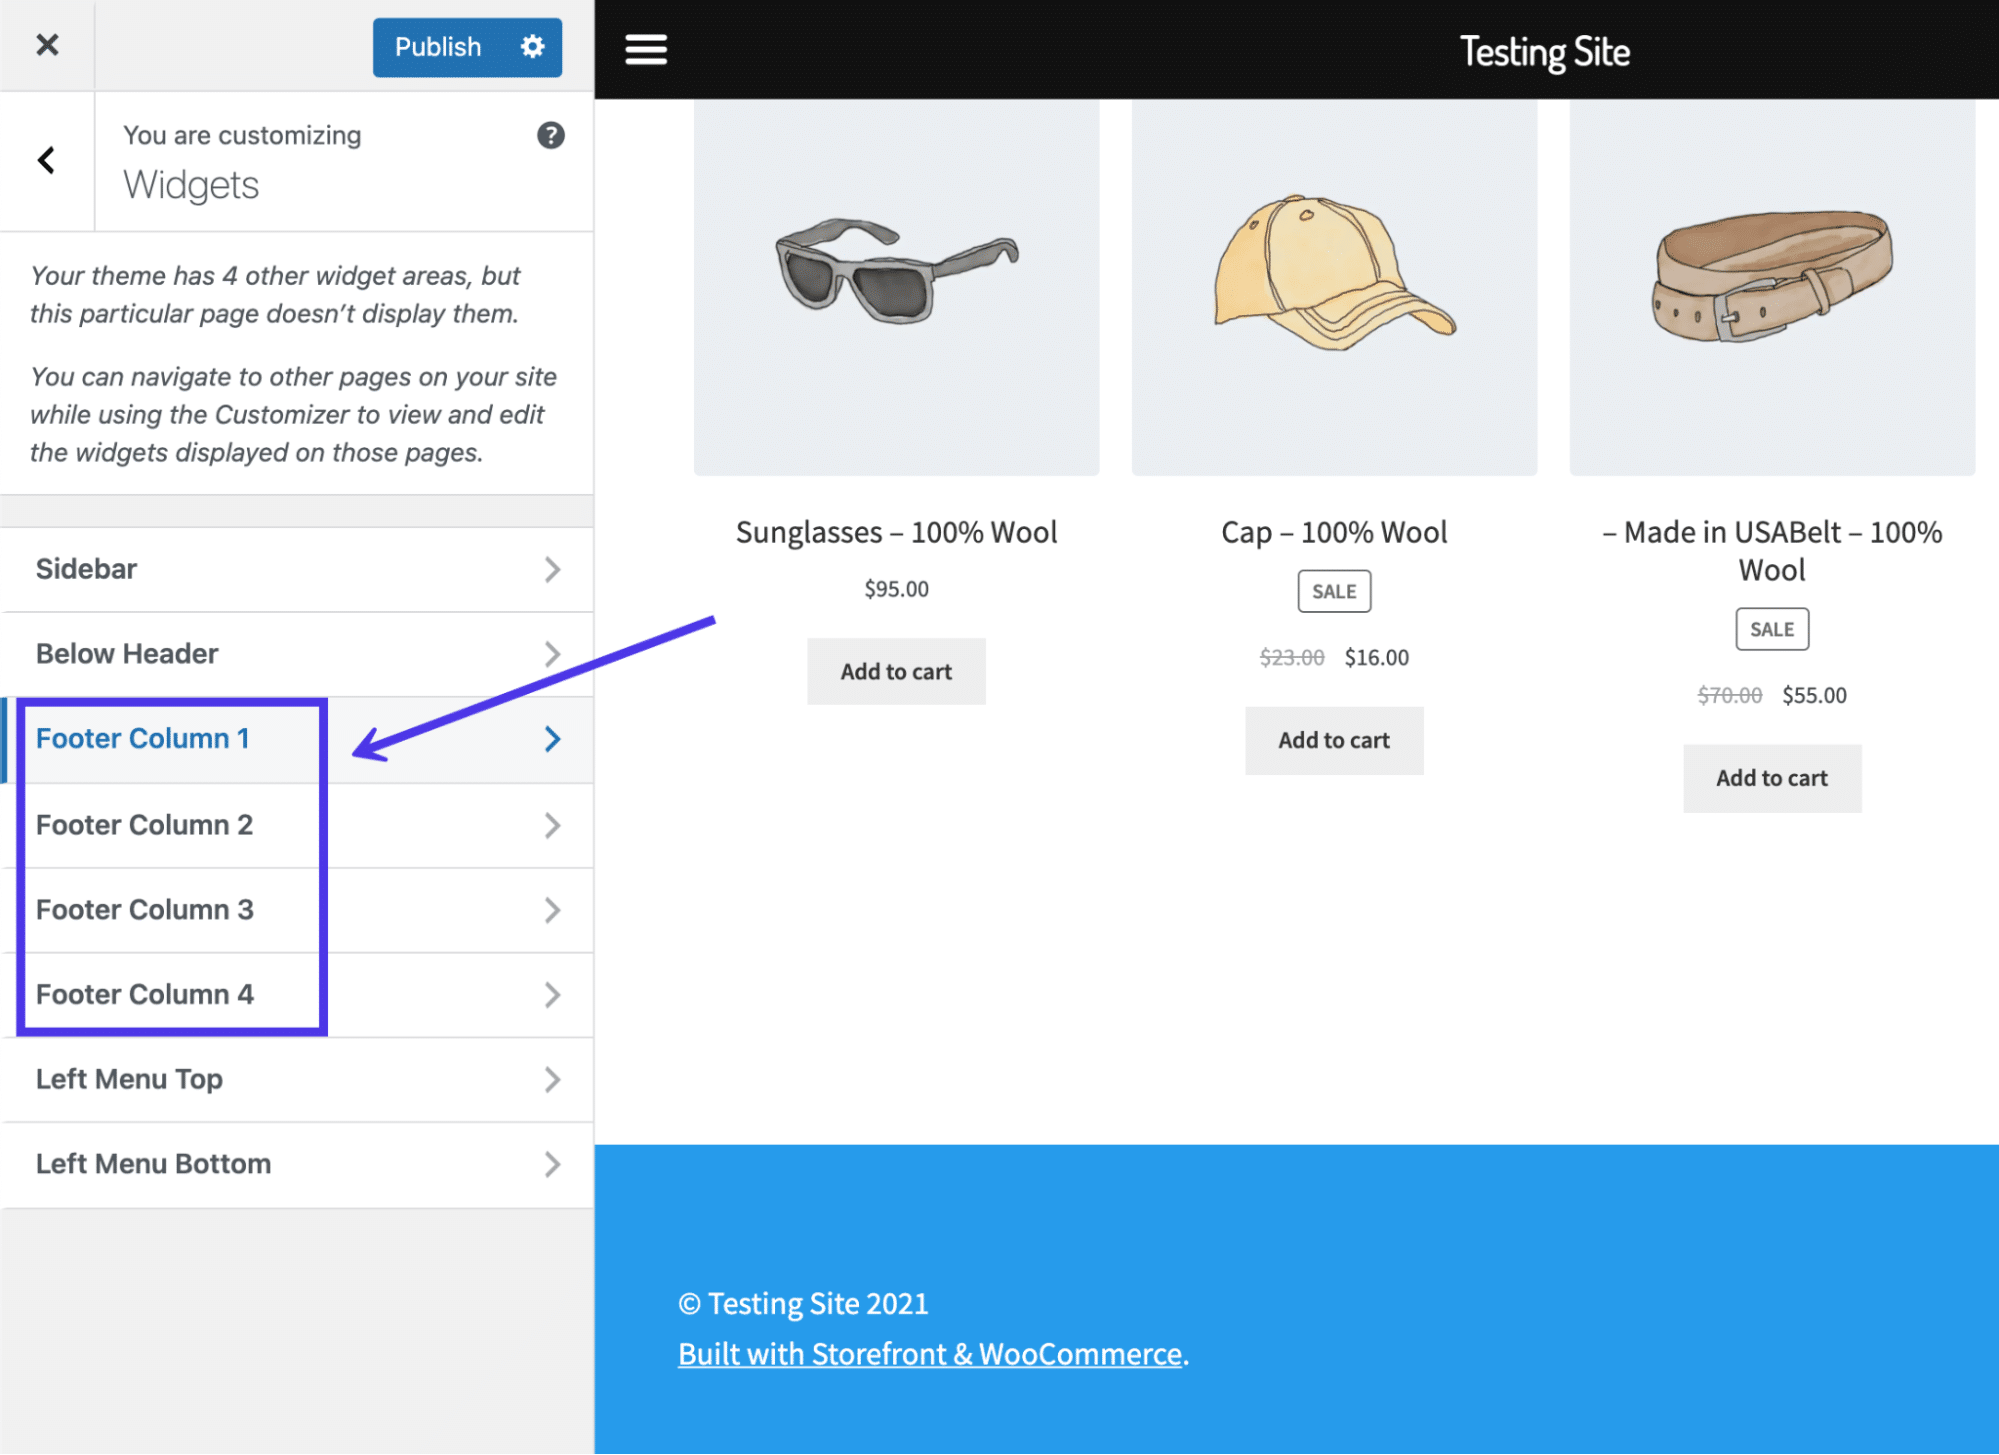
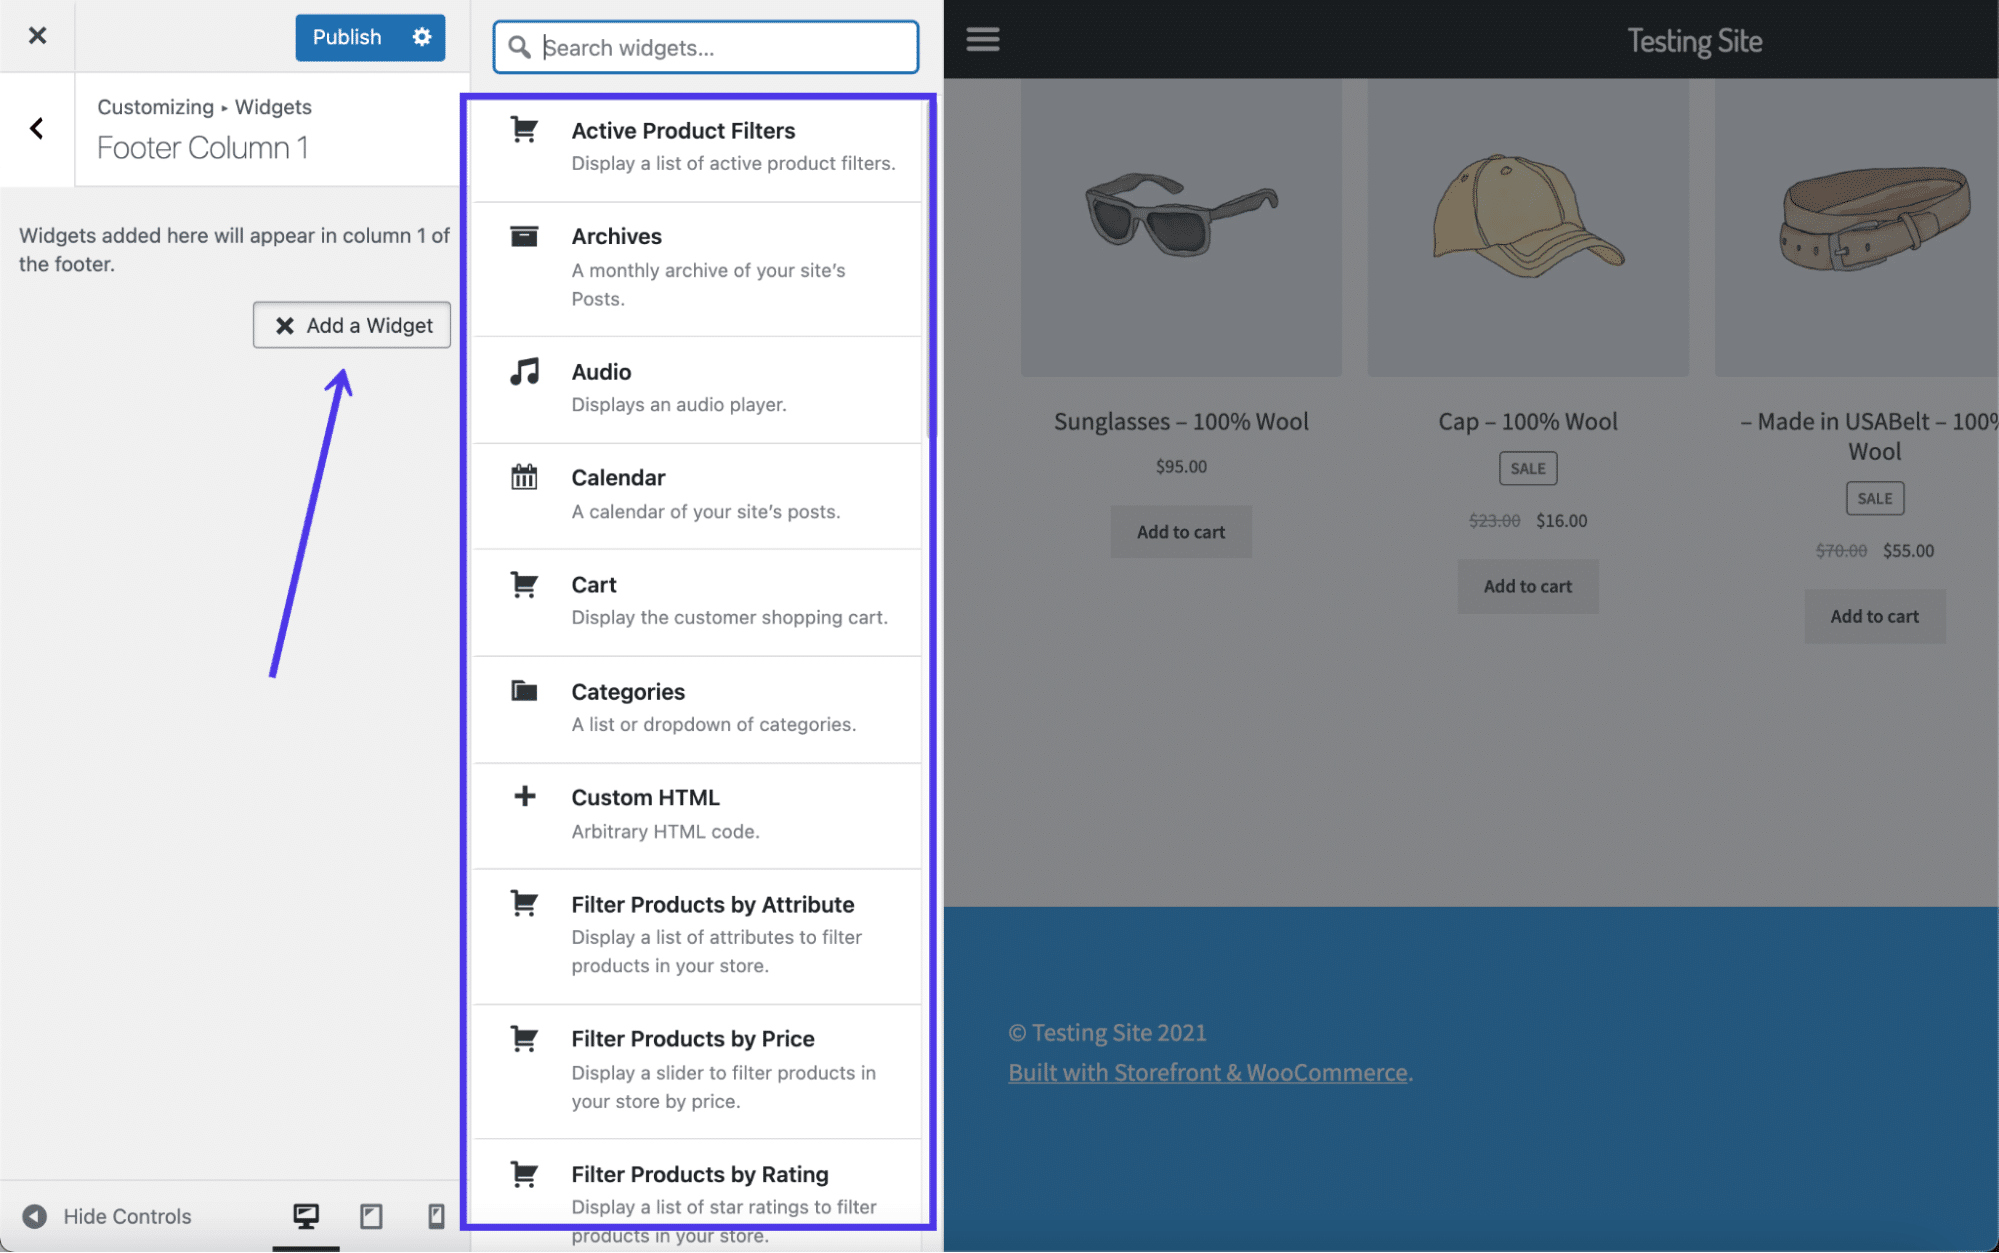
Click on any of the footer widget locations to reveal an area to Add A Widget. Click on that button to show a slideout view of all available widgets on WordPress and the theme. Once again, you may see a completely different set of widgets, considering some themes include their own widgets, or you may have installed an extension or plugin to add more widgets to your dashboard.
Common widgets range from Archives to Audio and Custom HTML to Product Filters.
All you have to do is select the widgets to add to this particular widget area. They’ll show up on the left-hand side for you to reorganize and configure their individual settings.
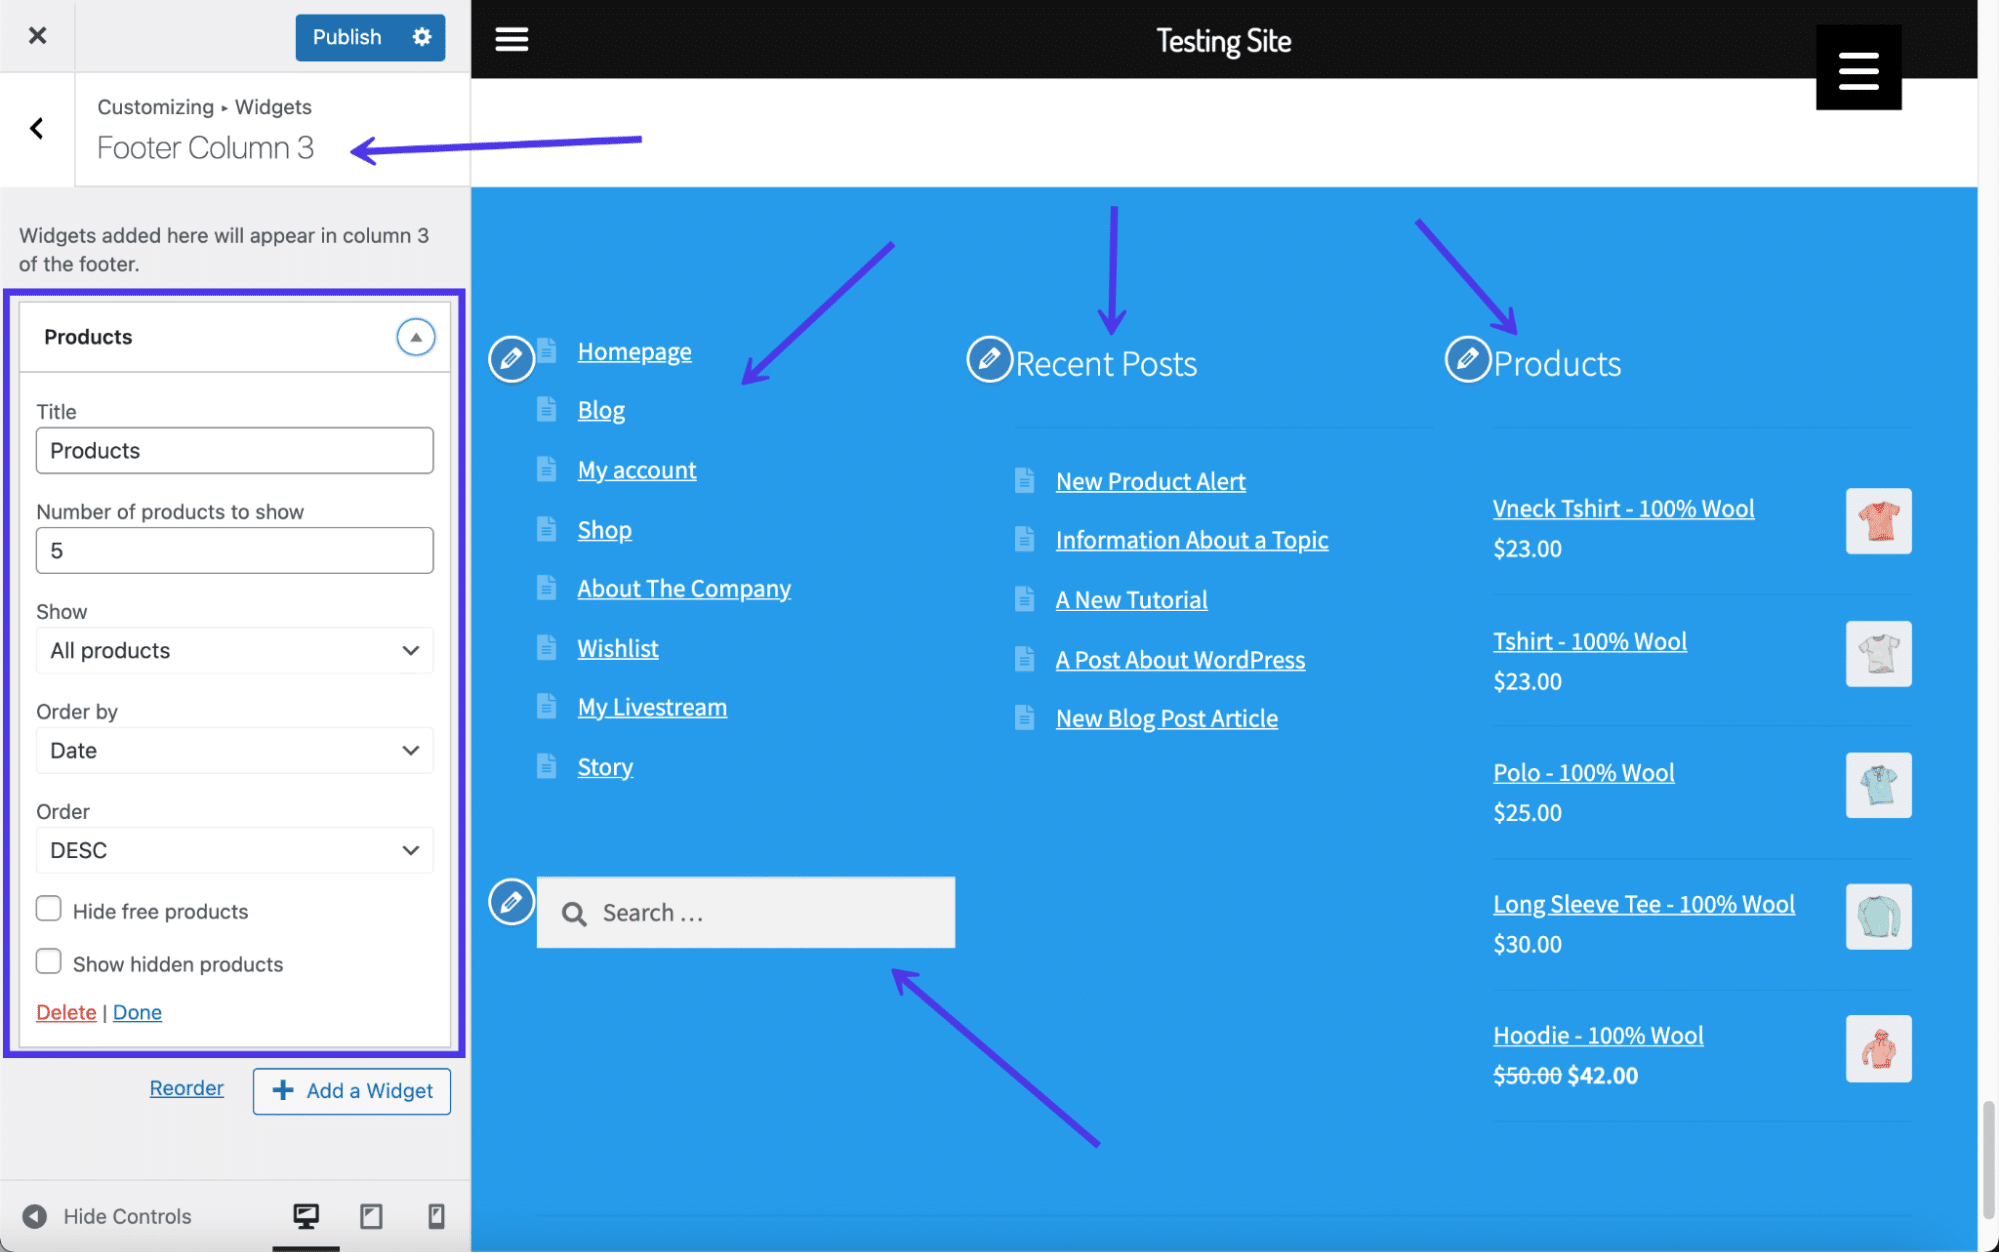
After some quick work, we’ve placed several widgets in three of the footer column modules, including a main menu, a list of recent posts, and a few of the products from our shop. You’ll also notice we added a search bar to make navigation a little easier for our users.
One important area to note is the widget settings section. Each widget has its own settings on the left, so be sure to walk through those fields and make them look exactly as you want.
As you may learn while browsing through the theme settings, not all themes have ways to add menus directly to the footer area using the standard Add Menu setting. Our theme here, for example, has spots to activate menus as primary, secondary, handheld, and mobile menus, but nothing for footers.
We’ll cover menus in the next section, but we wanted to explain a quick workaround to add a menu with a widget, just in case your theme doesn’t support menus in the usual manner.
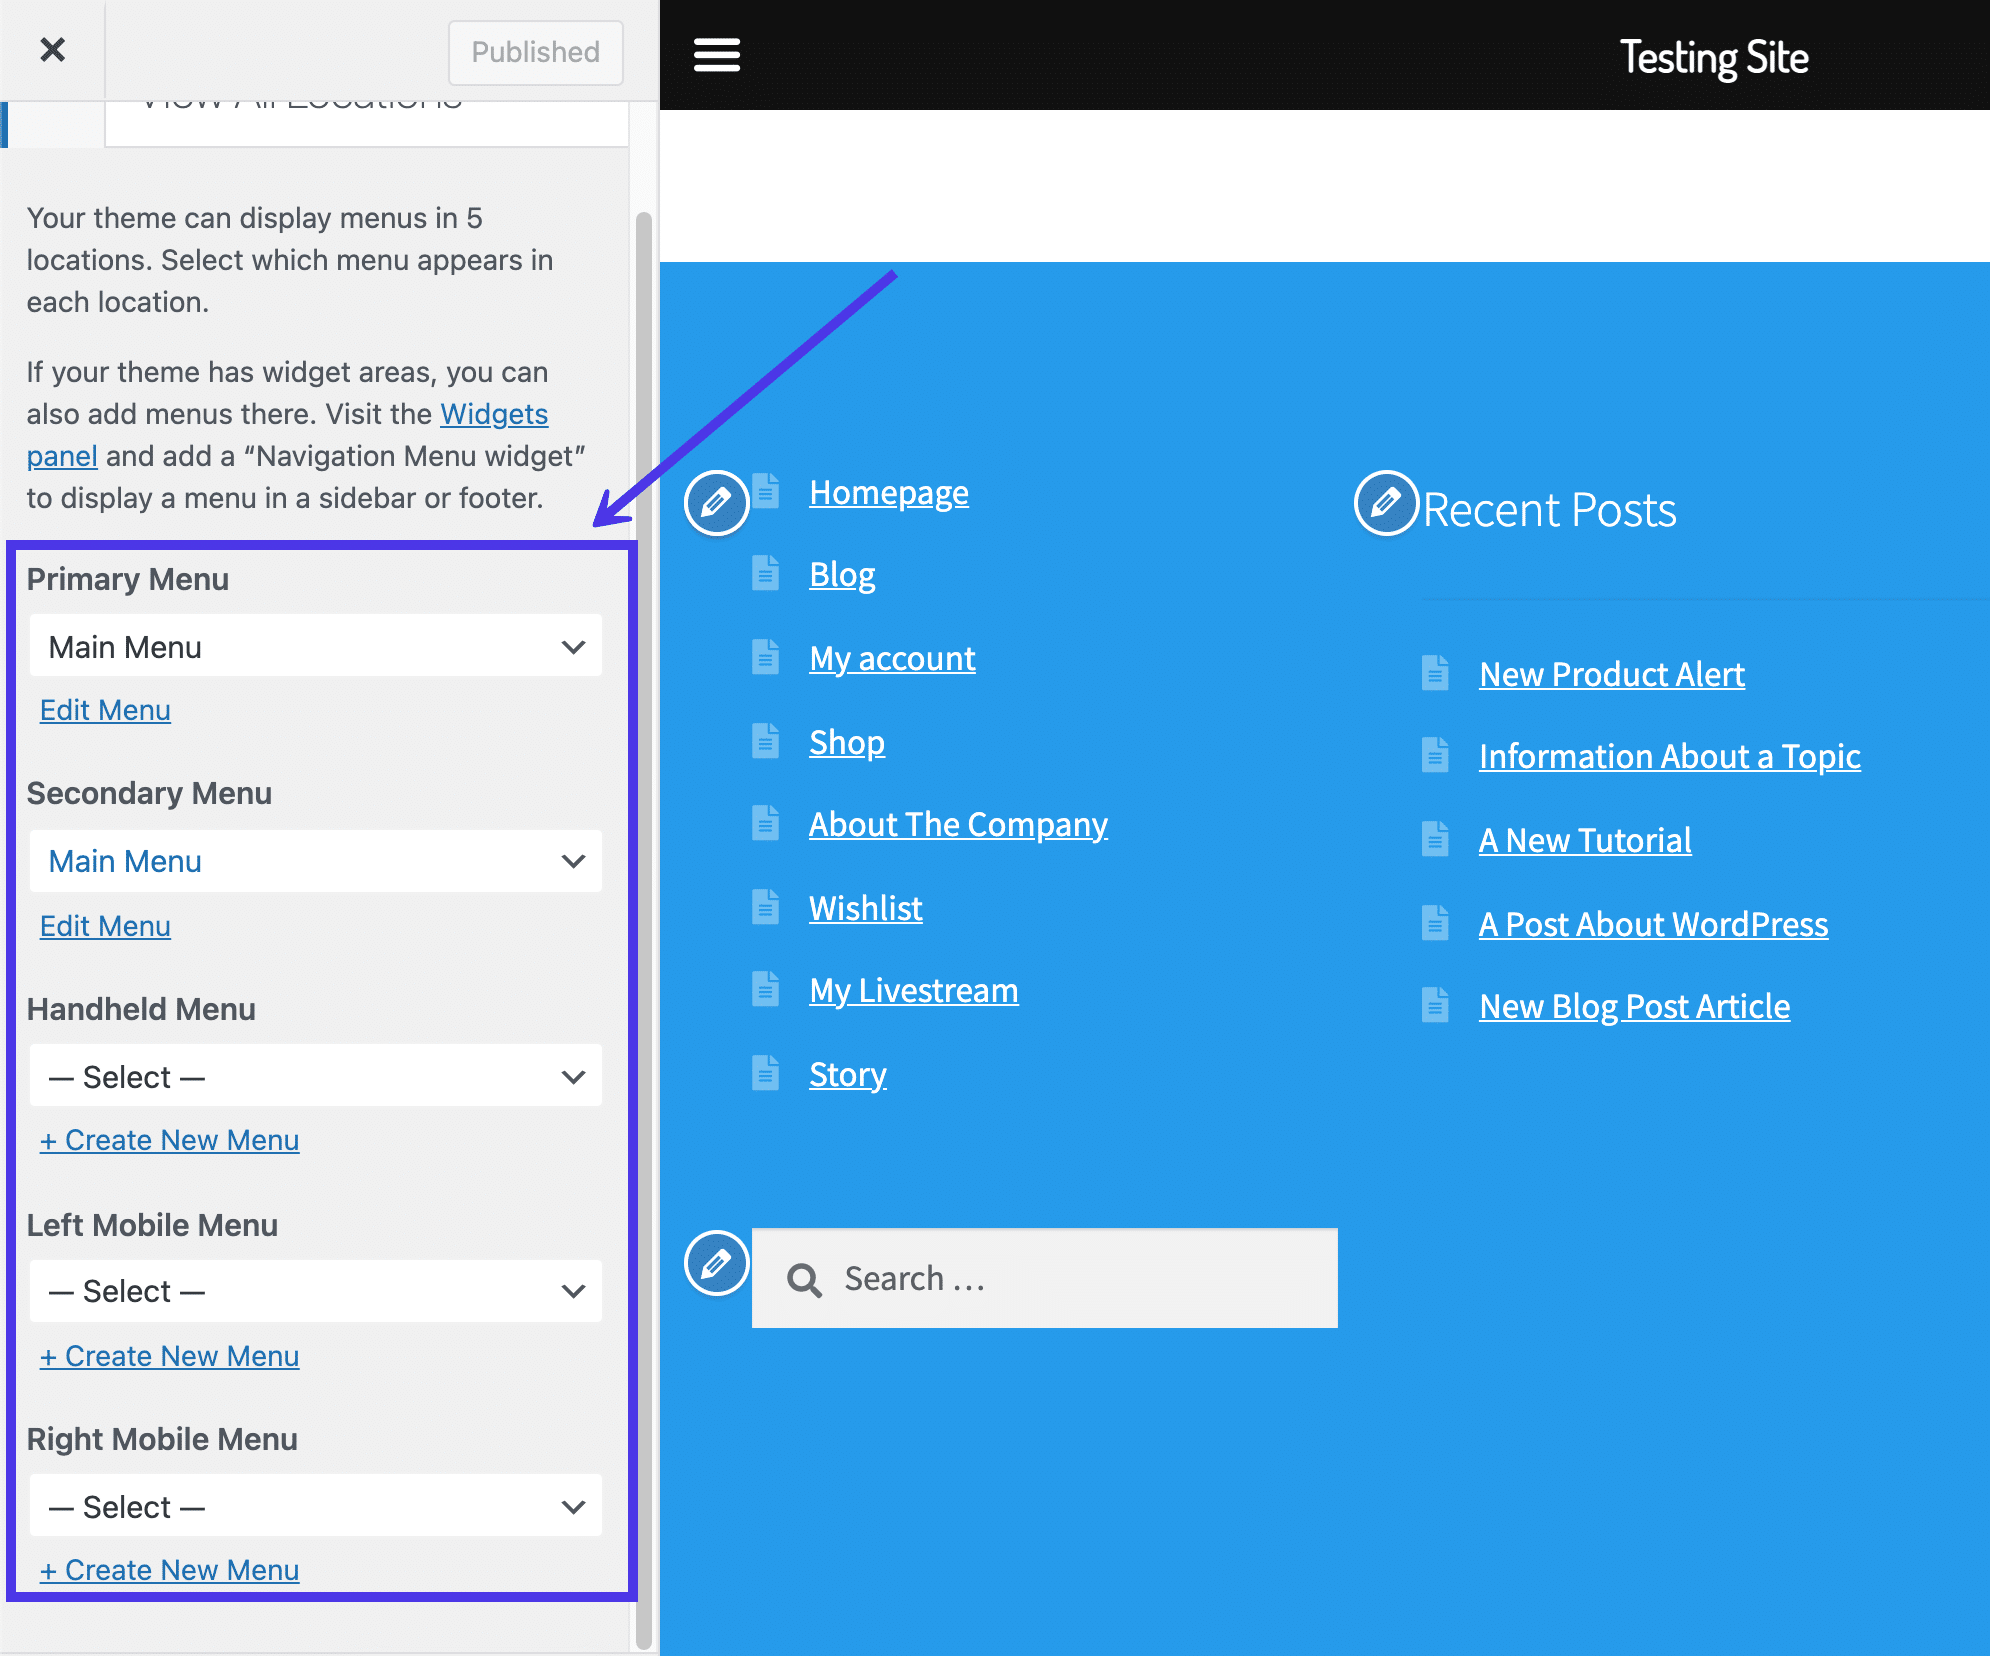
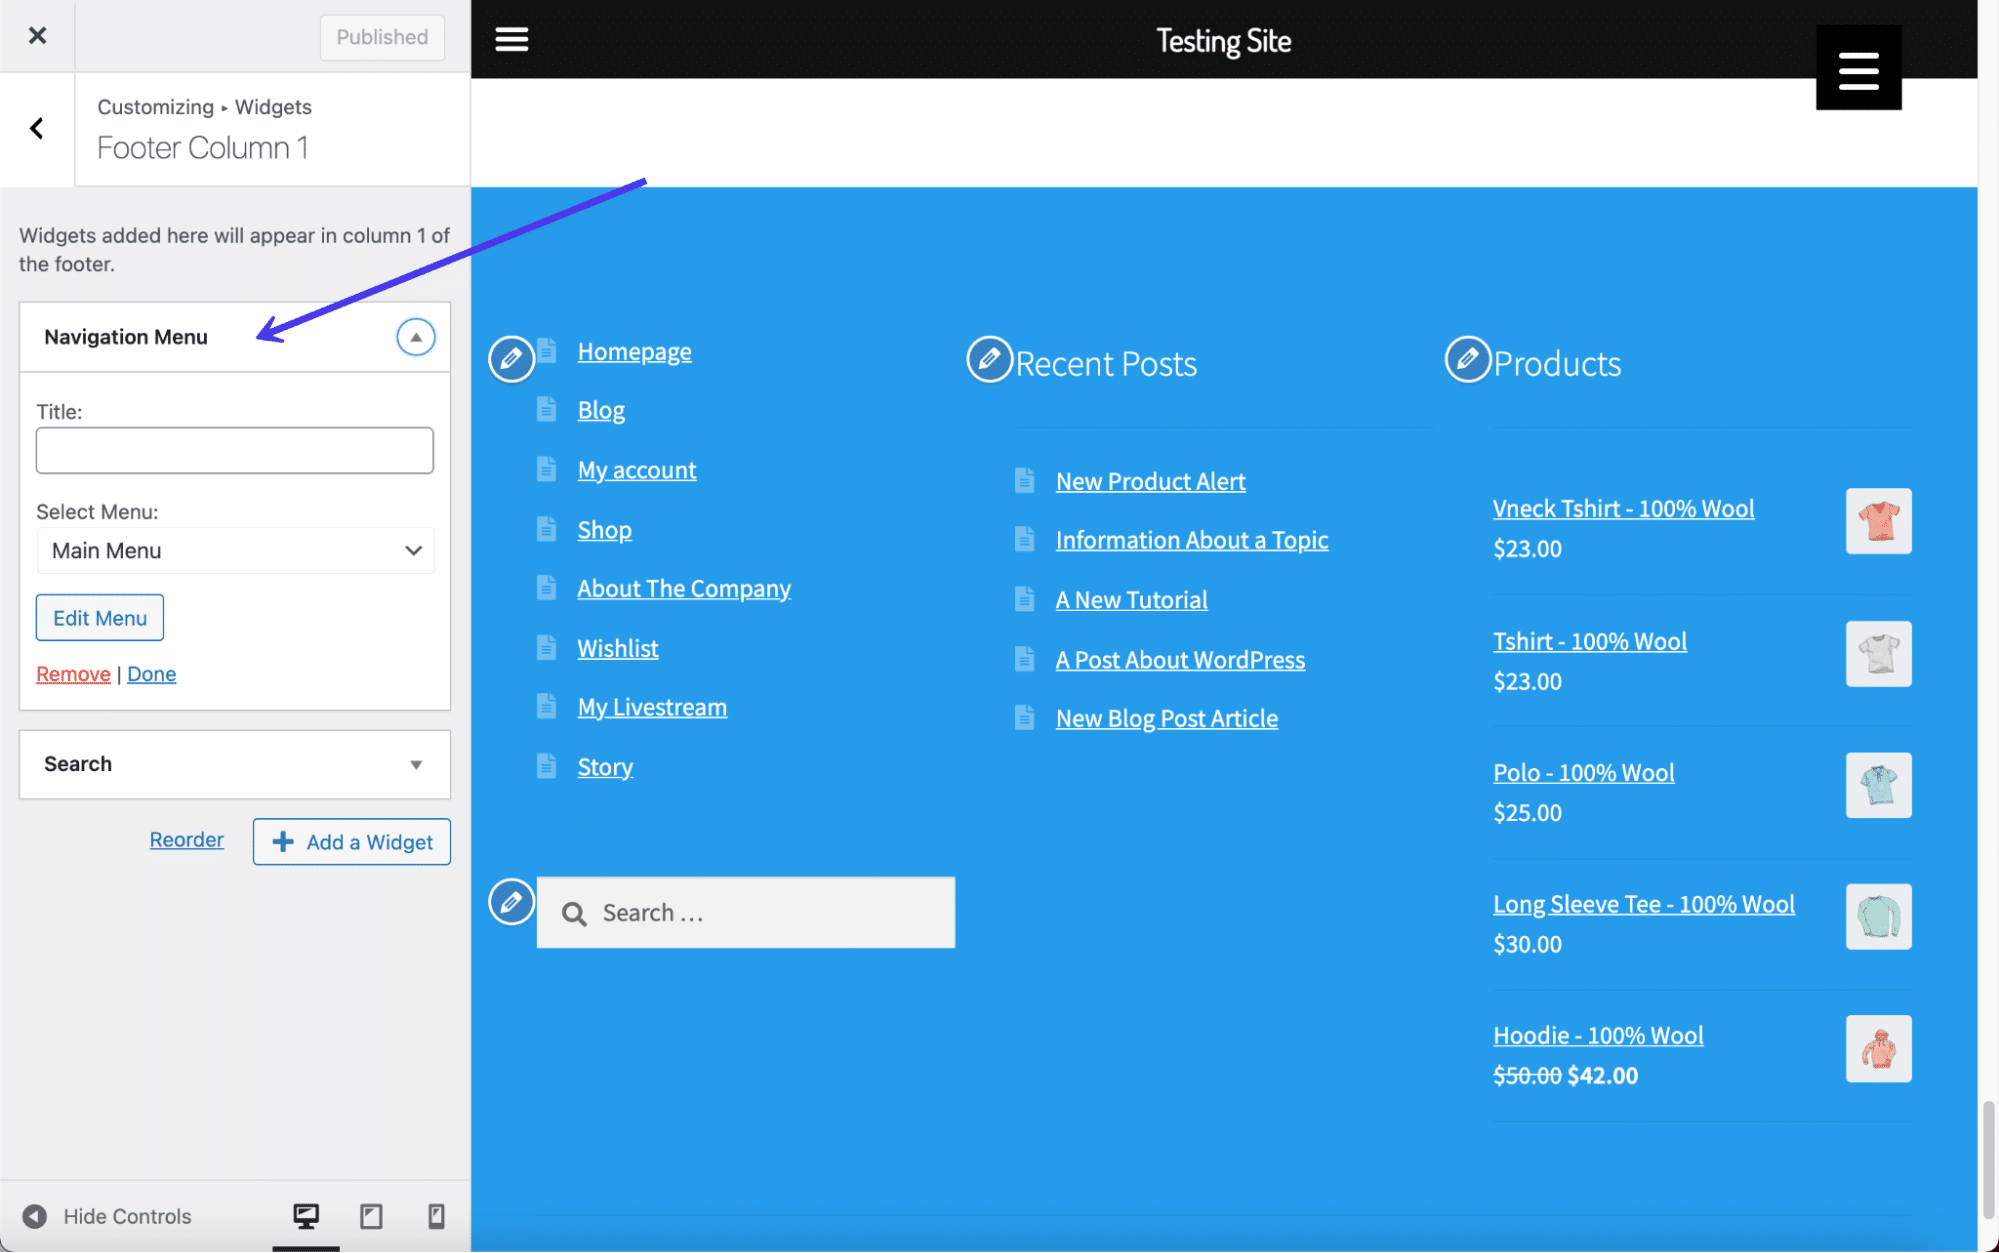
Essentially, all you have to do is go to one of your widget footer modules and search for the Navigational Menu widget. Here, you can click on a dropdown field to view all created menus on your website. Feel free to generate a menu specifically for your footer (in the Menus section of the dashboard) and add it as a widget in this section.
As an alternative, opt for the main menu, or whatever menus you’ve created. They should all show up in the menu widget dropdown.
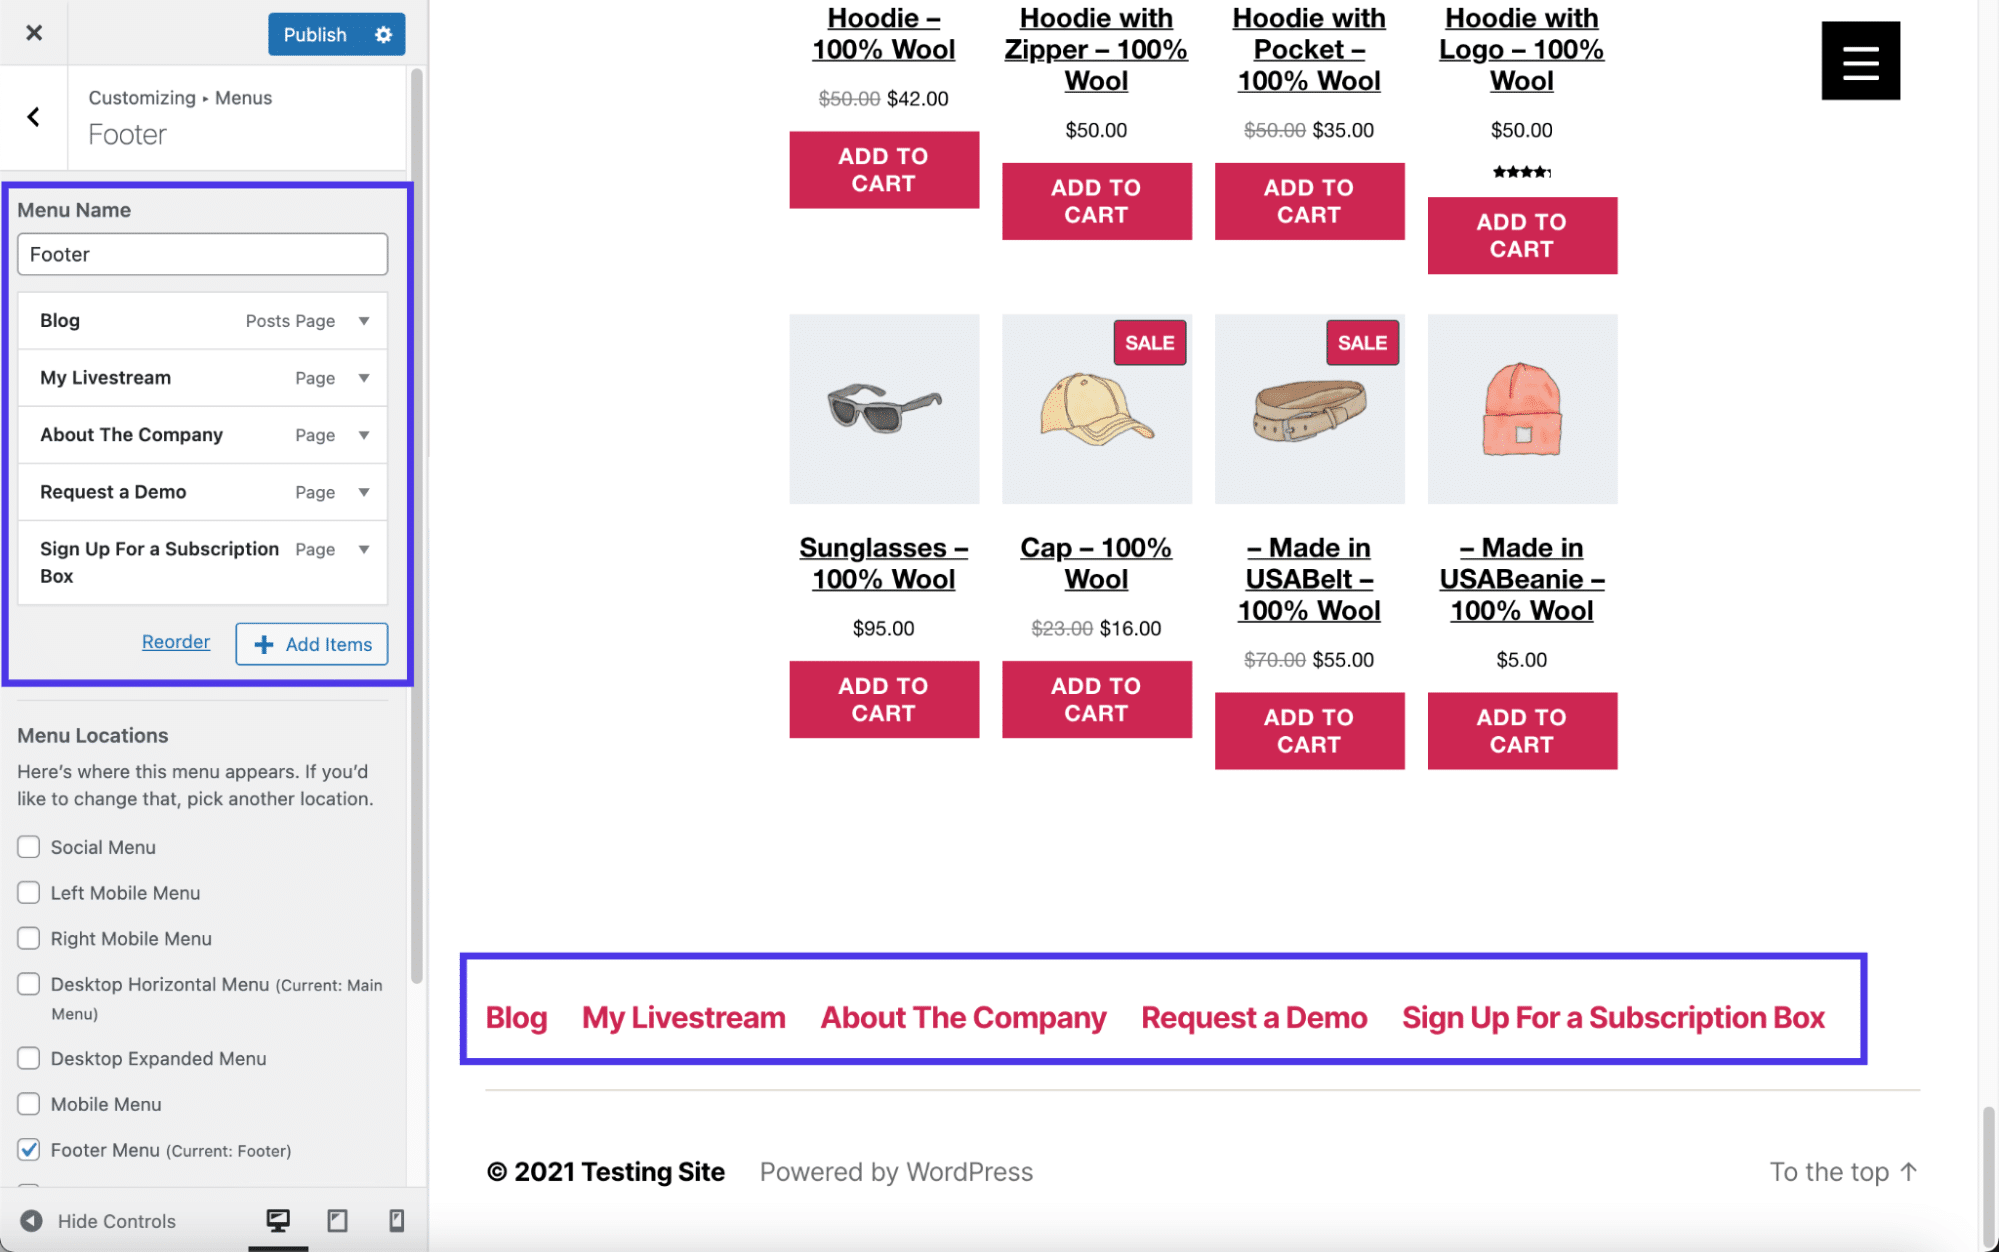
After that, the menu of your choice shows up in the footer, as long as you’ve added the Navigational Menu widget in the right footer area and clicked the Publish button. You can even type in a title for that menu if you’d like to explain what the following links contain.
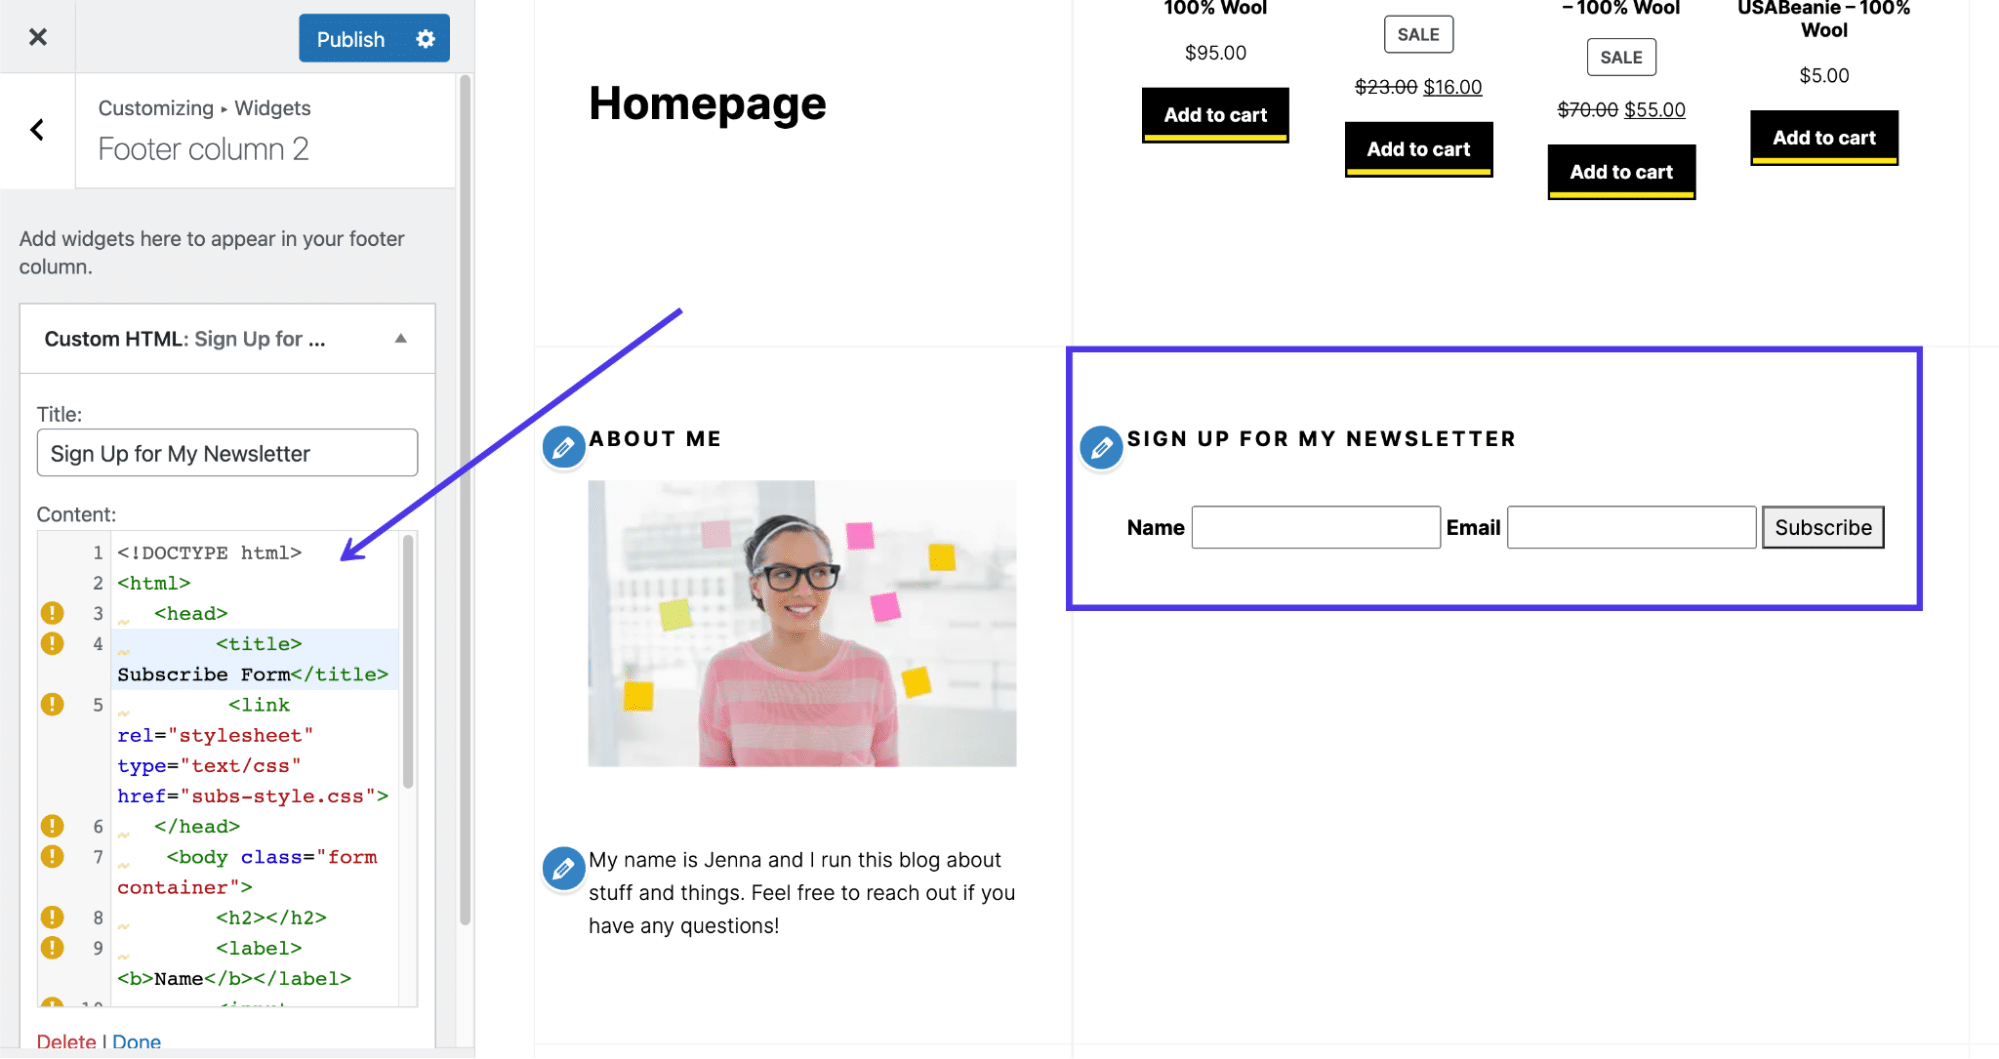
How To Insert Custom Text, Images, and Code as Footer Widgets
Many WordPress widgets offer pre-configured lists of content, like the Recent Posts widget or the Search Bar.
However, sometimes you may want to edit the WordPress footer to include entirely custom content, such as simple text, images, or a bit of code, to create something completely new.
WordPress provides a widget for each of these.
All that’s required is to go to the Theme Customizer > Widgets. Then, choose the widget area that reflects where you want the widgets to go in the footer.
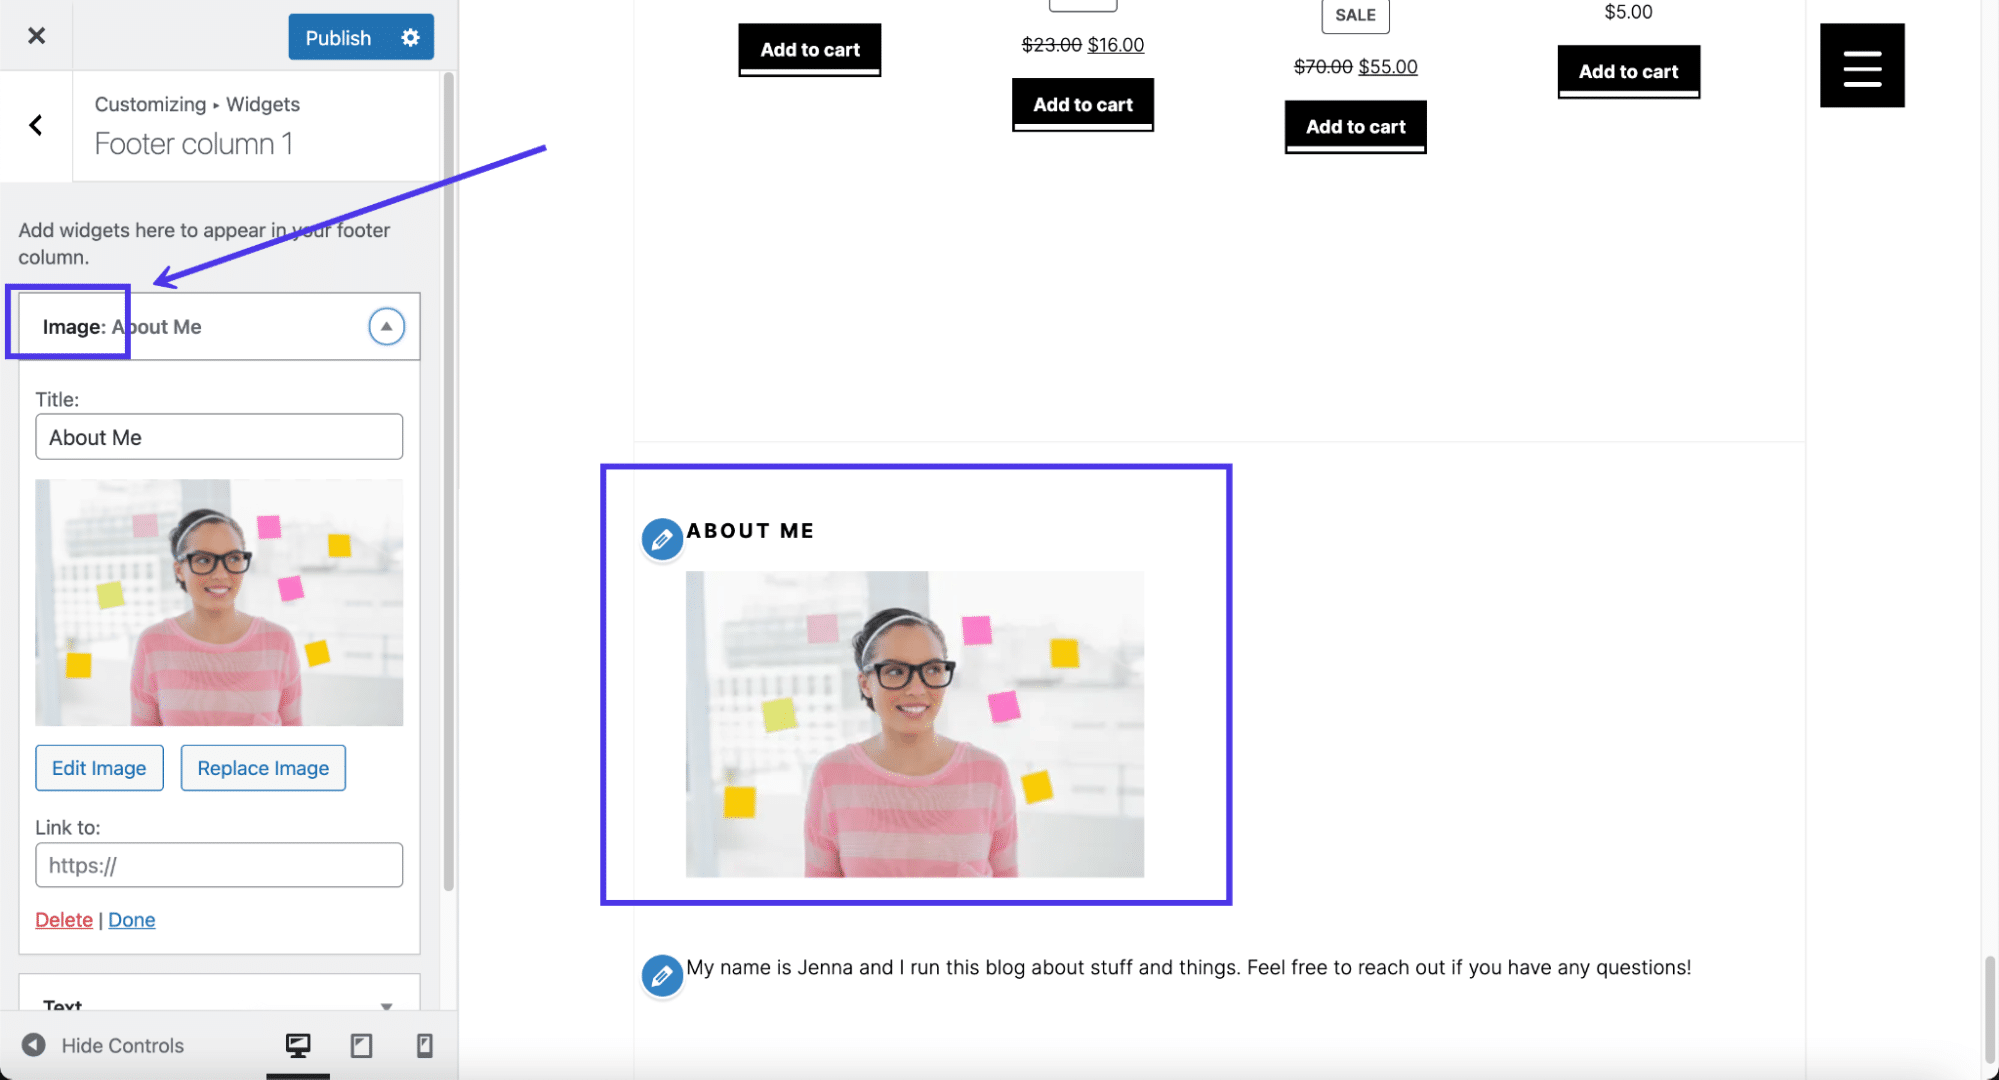
Click on the Add A Widget button and search for “image”.
Add the Image widget and customize the title. Click on Add Image, then consider including a link to the image as well. You can edit the image size by clicking on Edit Image.
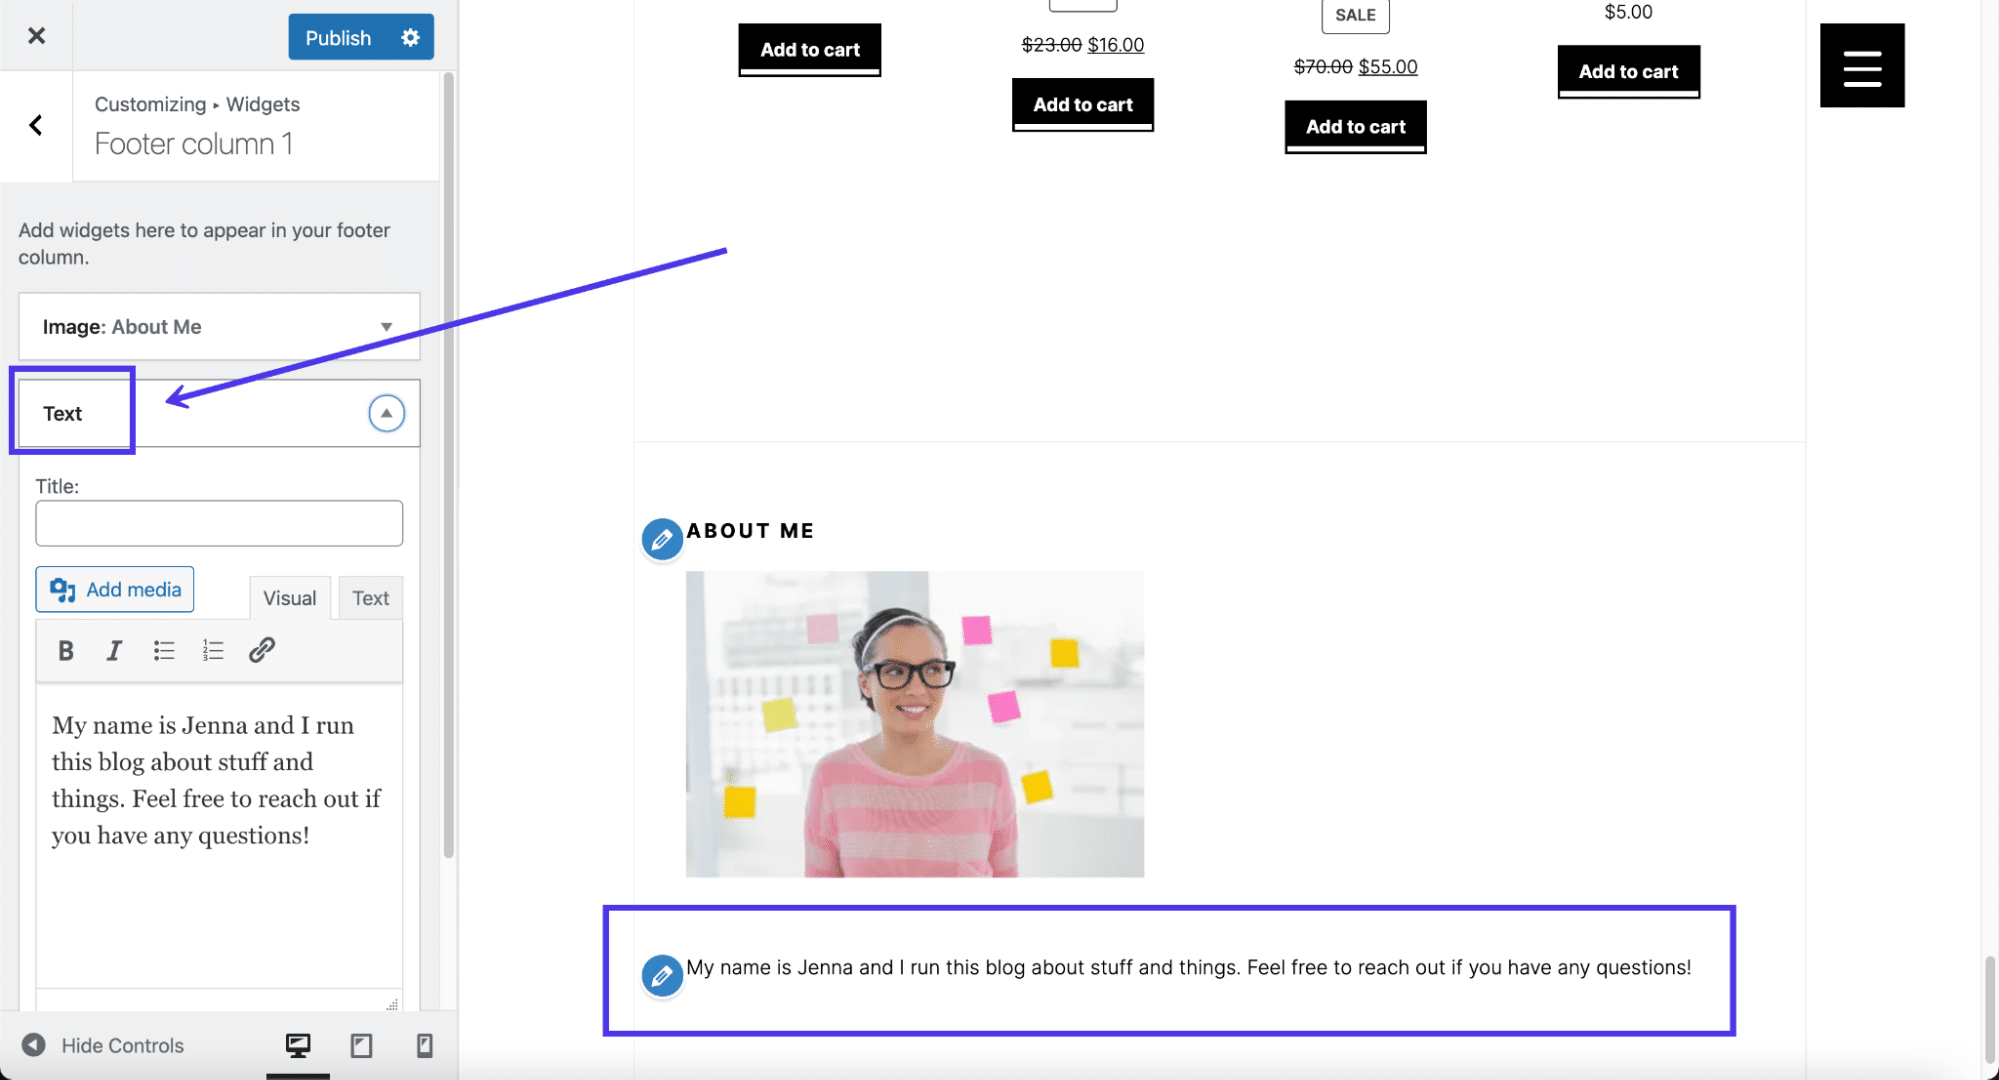
Next up, search for “text” in the widget library.
Add the Text widget to your footer and type in anything you want. It also has a title field along with a visual editor, much like you receive when making a blog post or page in WordPress. We’ve tried inserting images through the Text widget (since it’s technically possible) but many themes don’t allow it.
Finally, you may find that using a Custom HTML widget is the best course of action, especially if you want full control over the footer design or to incorporate a unique design for something like an email signup form.
For that, search for “HTML” in the widget library and choose the Custom HTML widget.
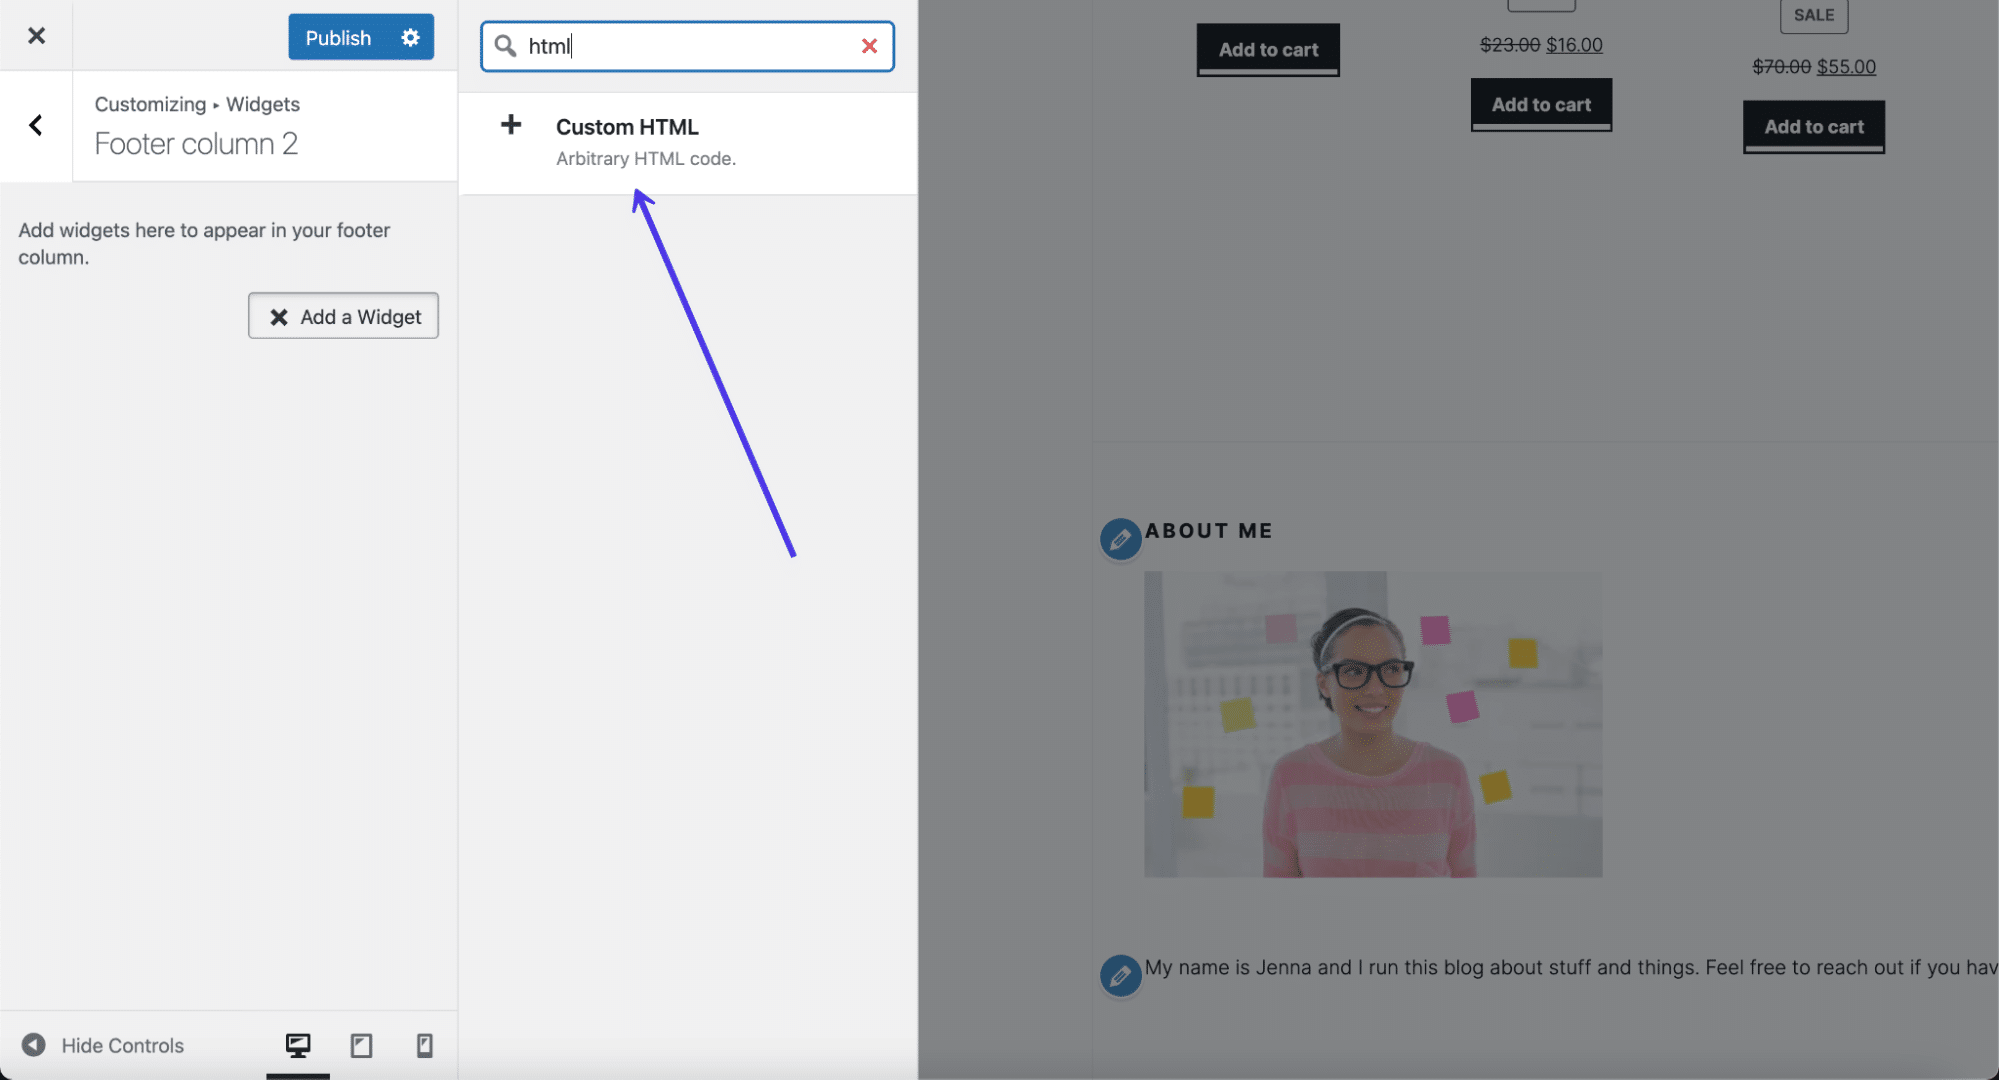
Paste or type in your custom HTML and keep an eye on the right-side preview to ensure it looks the way it’s supposed to. You may also have to add some CSS styling to make it appear the way you want.
As always, remember to click the Publish button at the end.
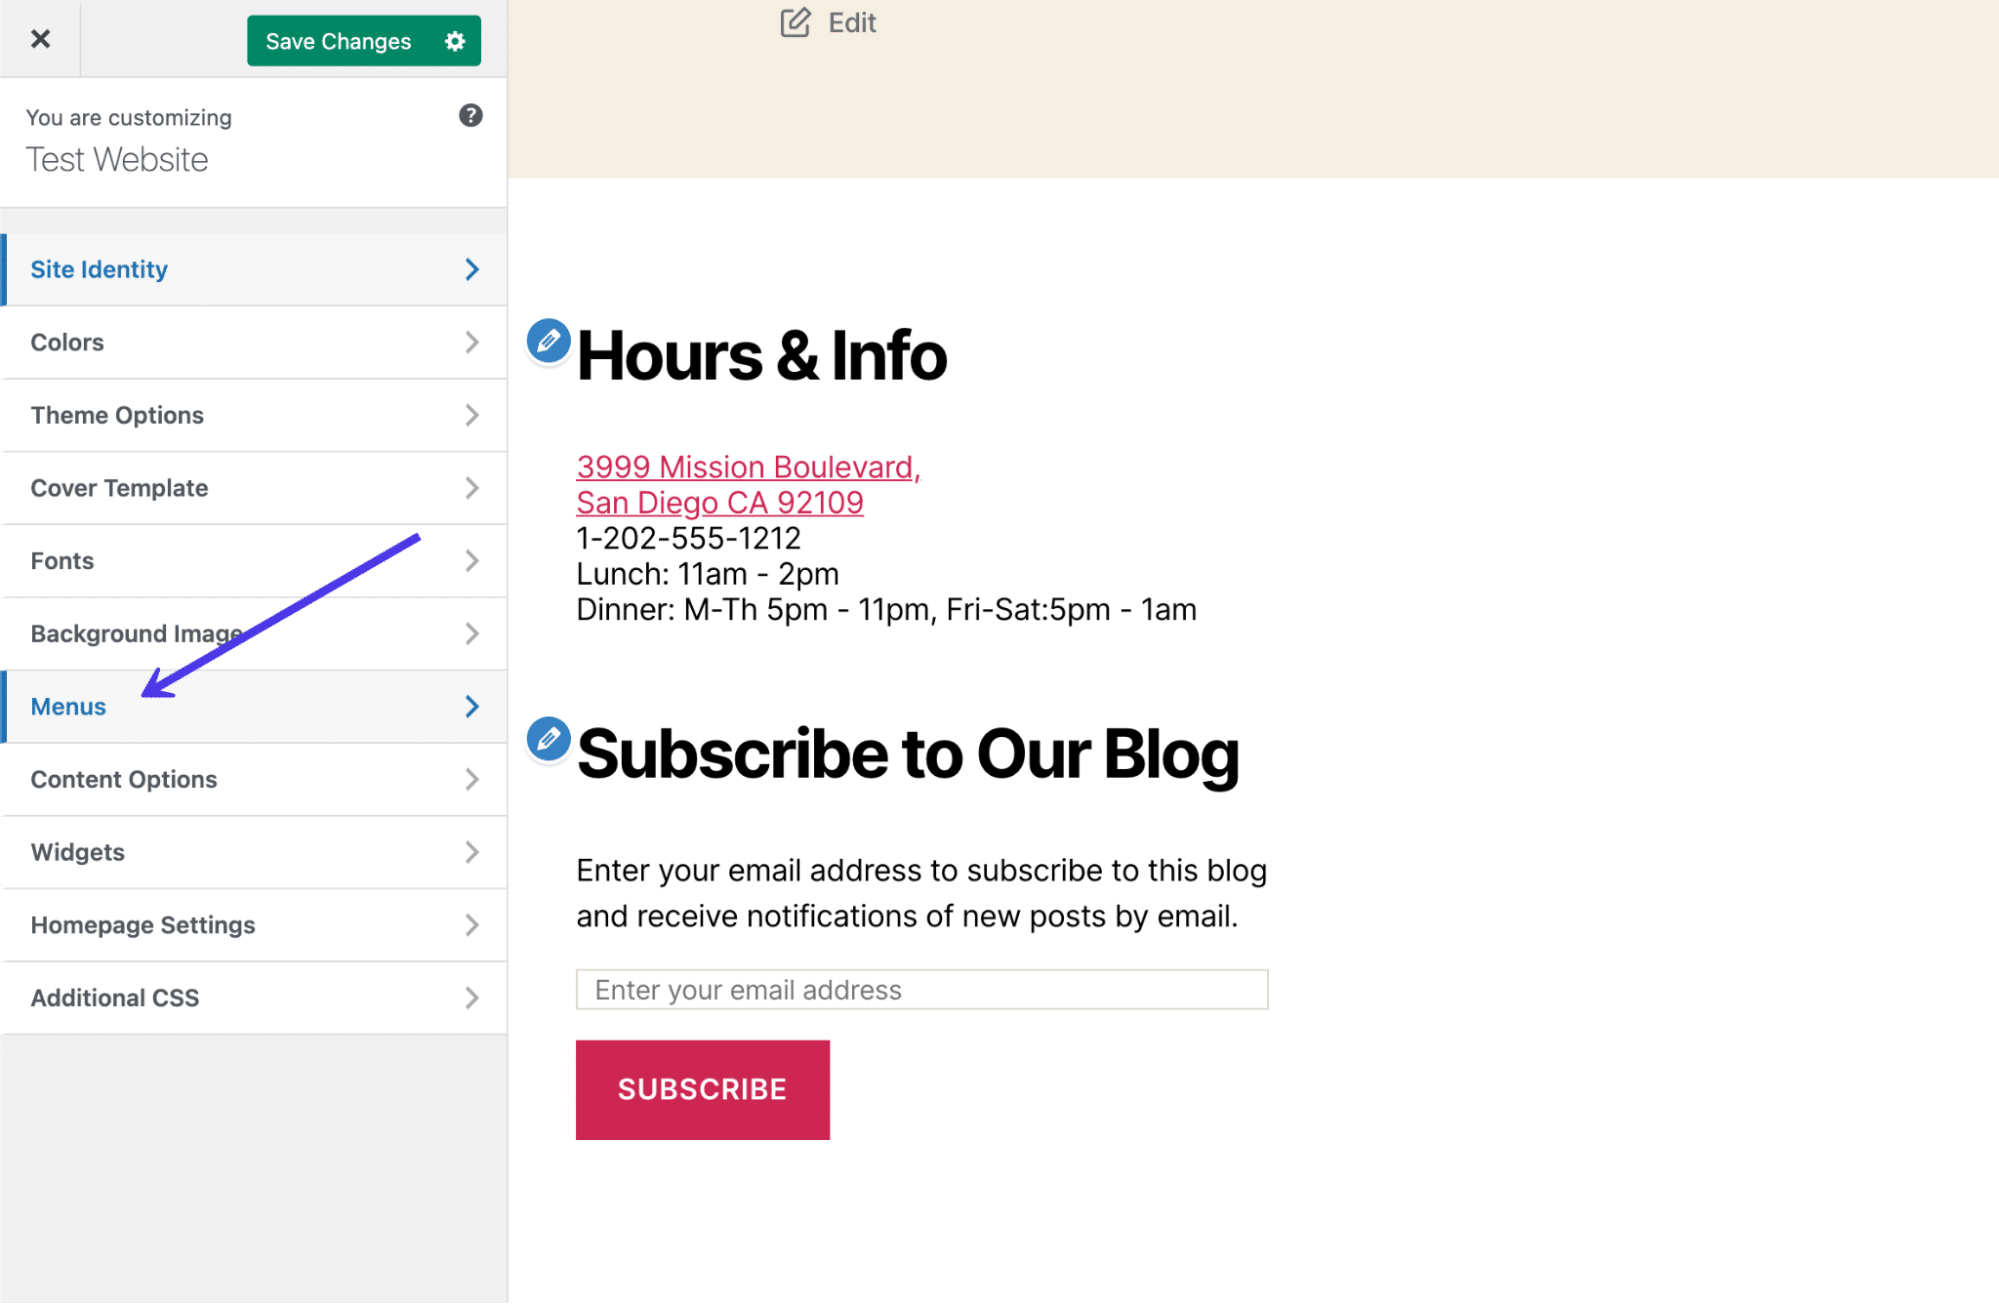
Adding Menus to the WordPress Footer
You make menus in WordPress by going to Appearance > Menus. Once you’ve established a menu, it’s ready to add, at least the locations supported by your chosen theme.
It’s also possible to create your menu within the WordPress Customizer, so it just depends on where you feel most comfortable adding new pages and links to your menus.
Check Out Our Video Guide to Adding Menus to the WordPress Footer
As a reminder, not all WordPress themes allow for menus within the footer. In fact, some of them only have one or two menu locations, so you’ll have to check to see if your theme supports menus. If not, refer back to the previous section for a workaround that uses a widget to incorporate a menu in the footer.
If using a theme that allows for menus in the footer, go to the WordPress Customizer and click on the Menus tab.
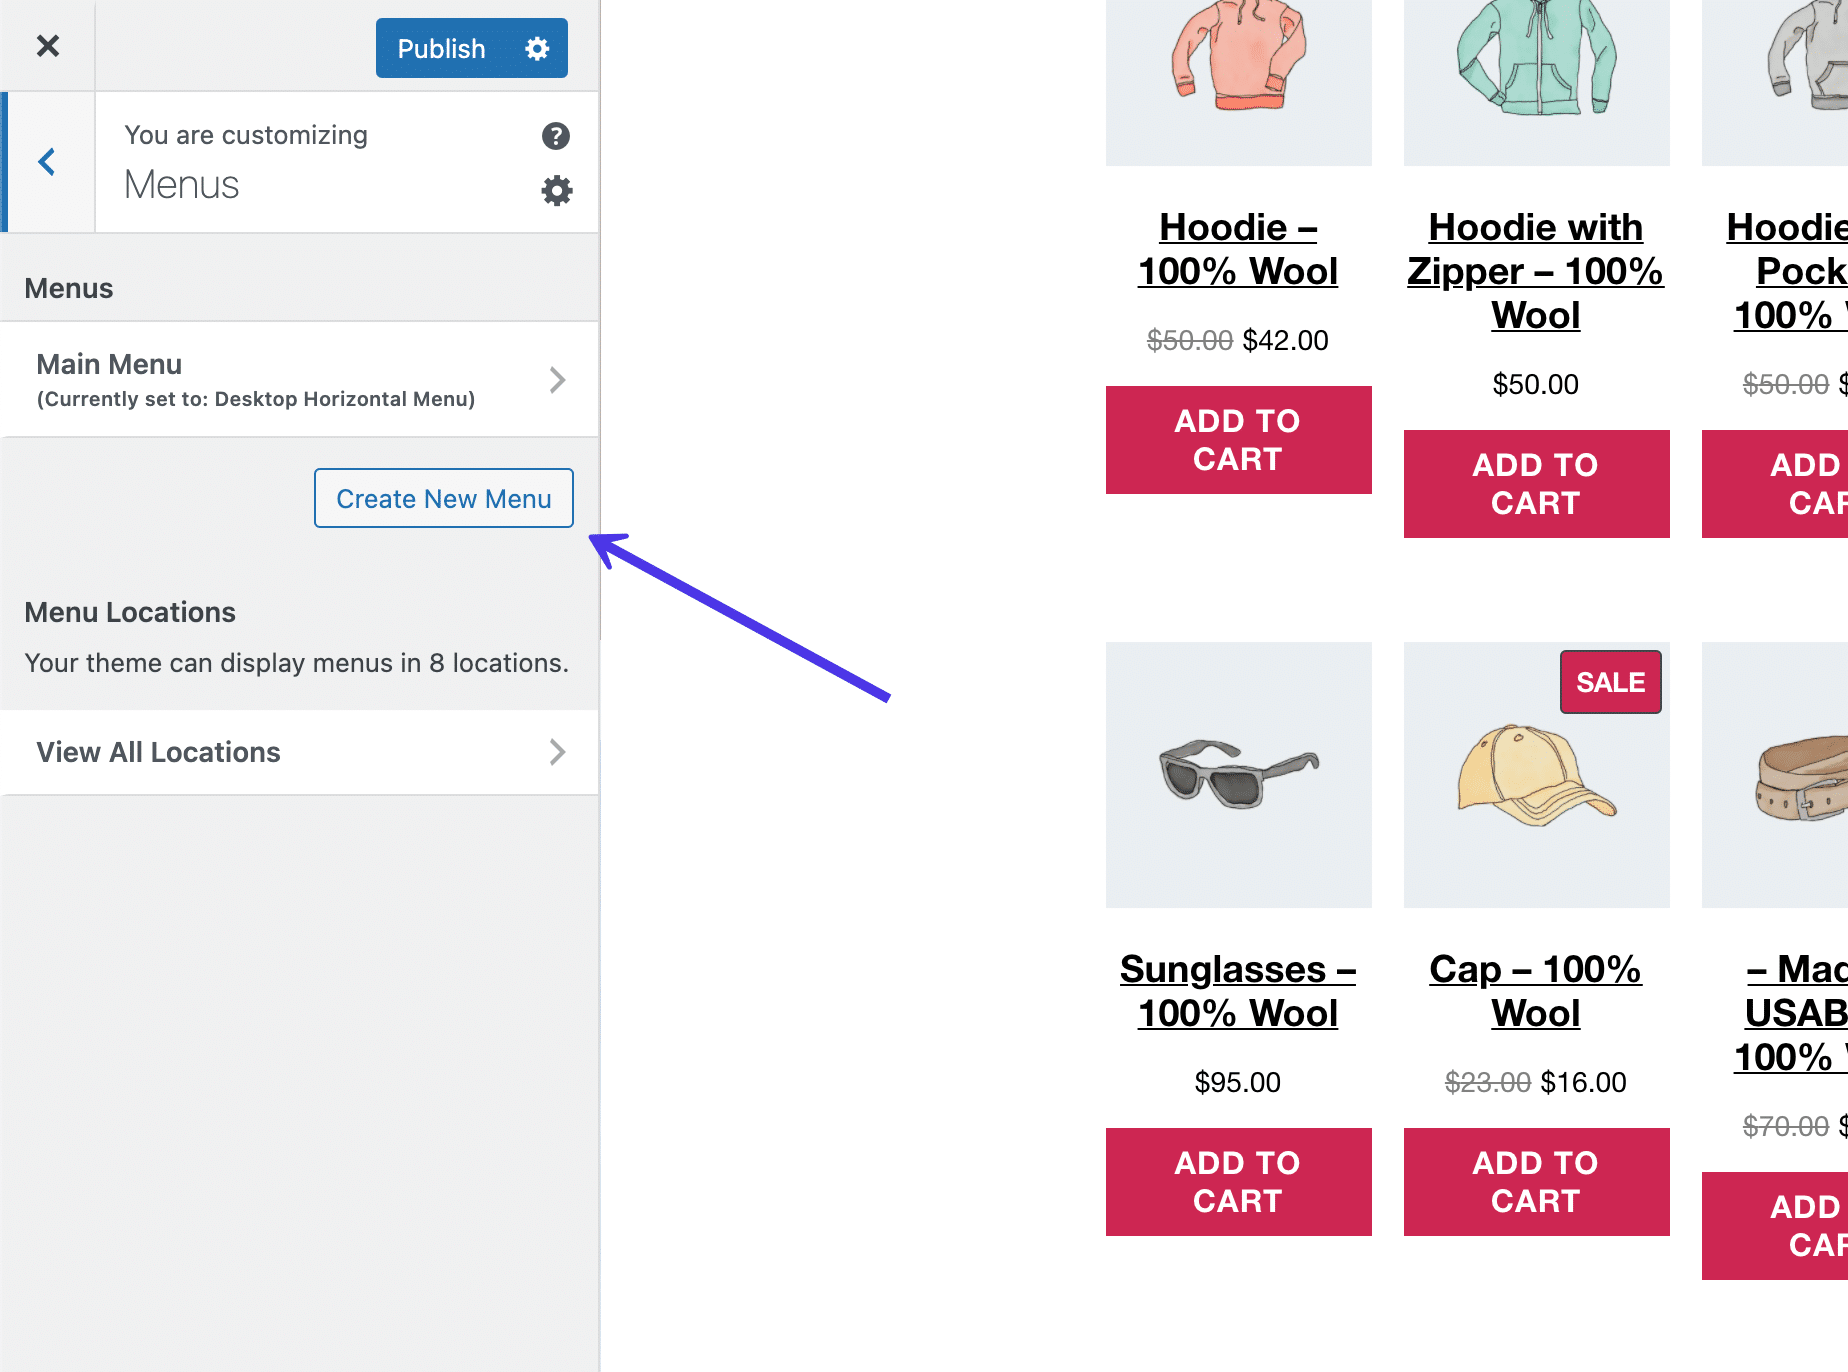
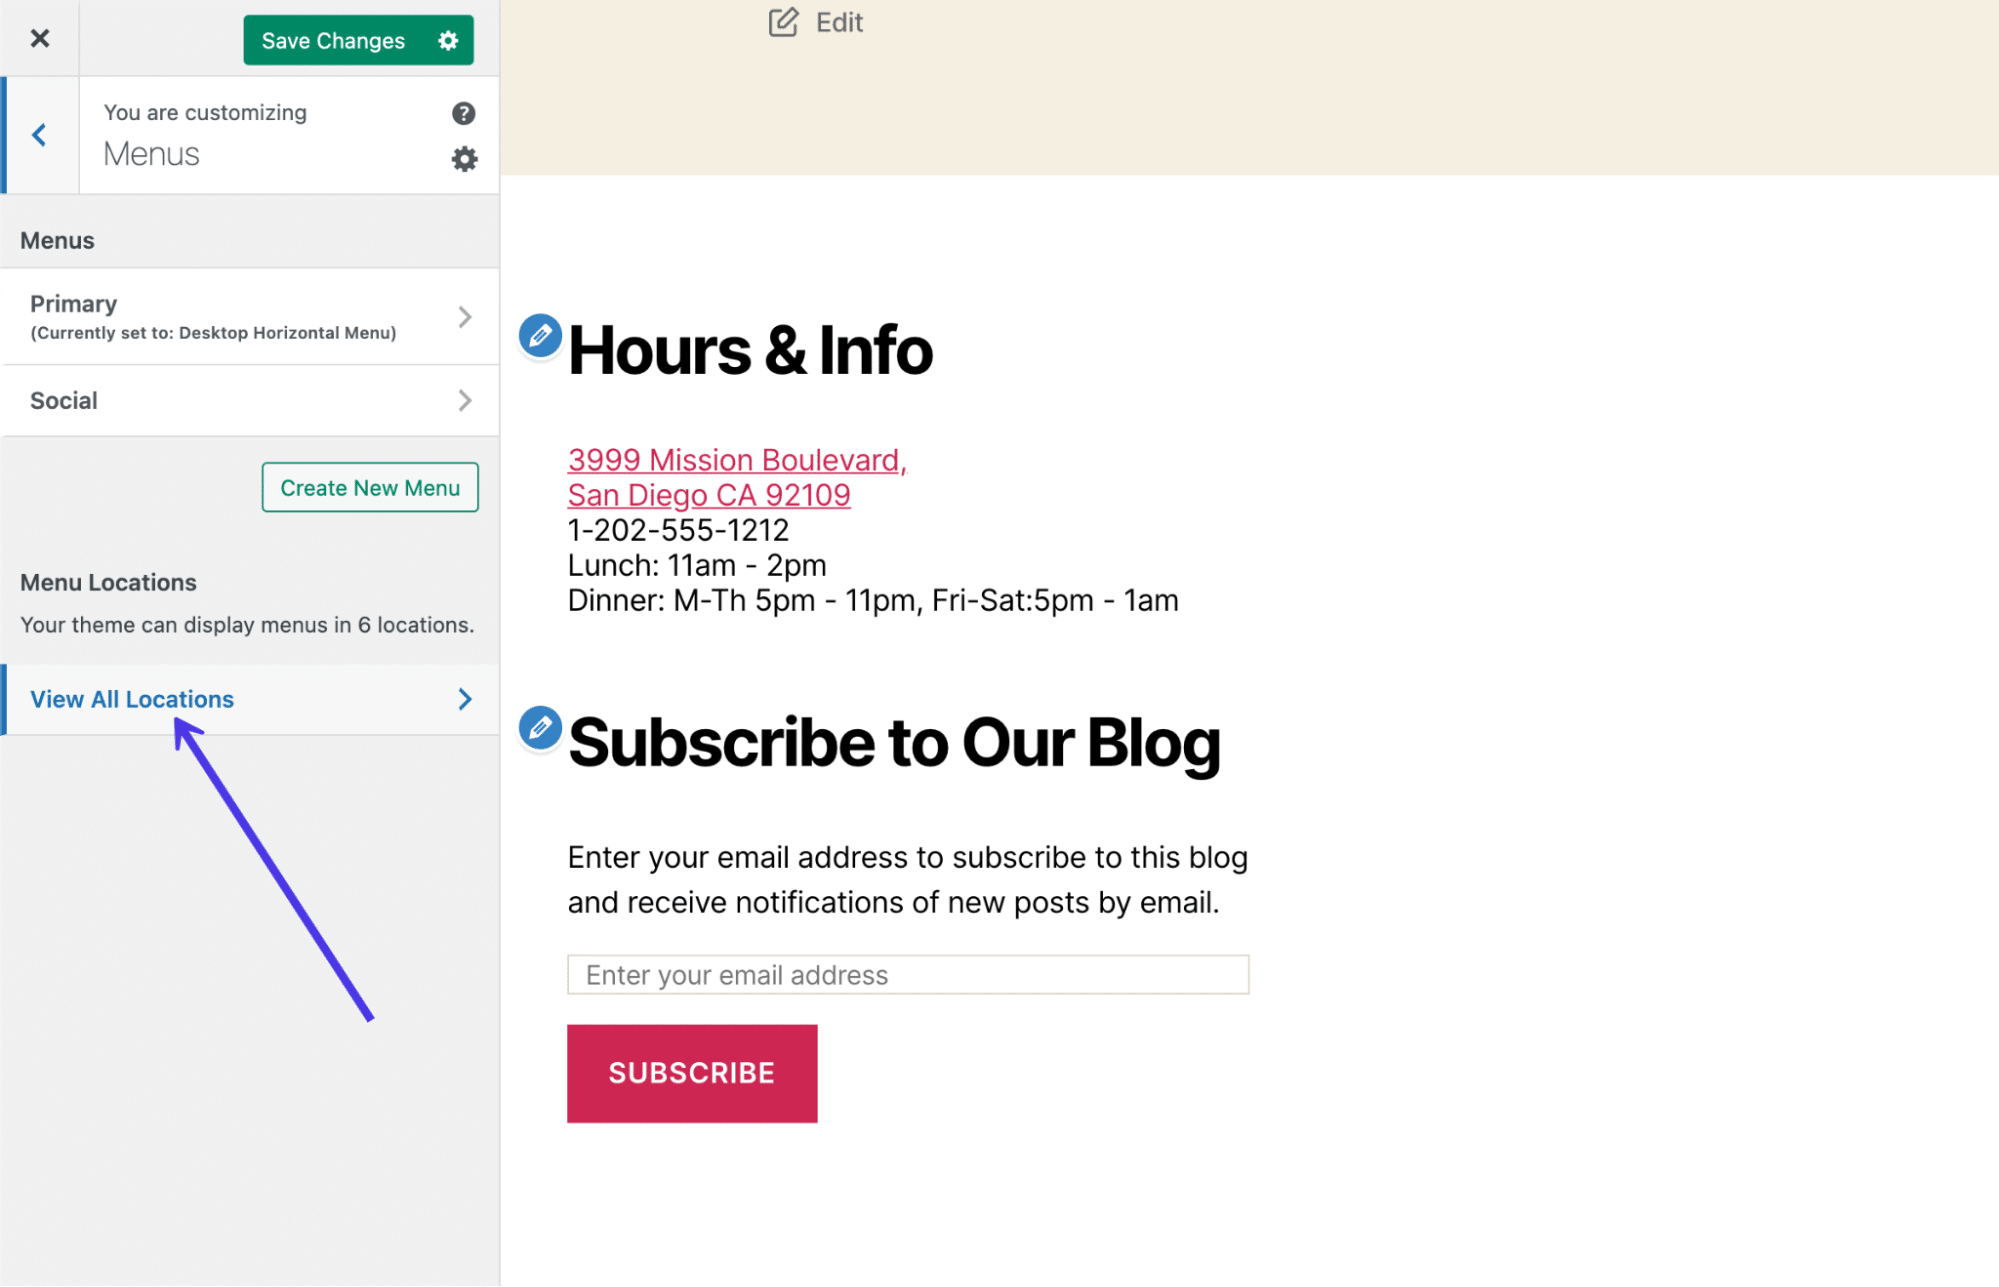
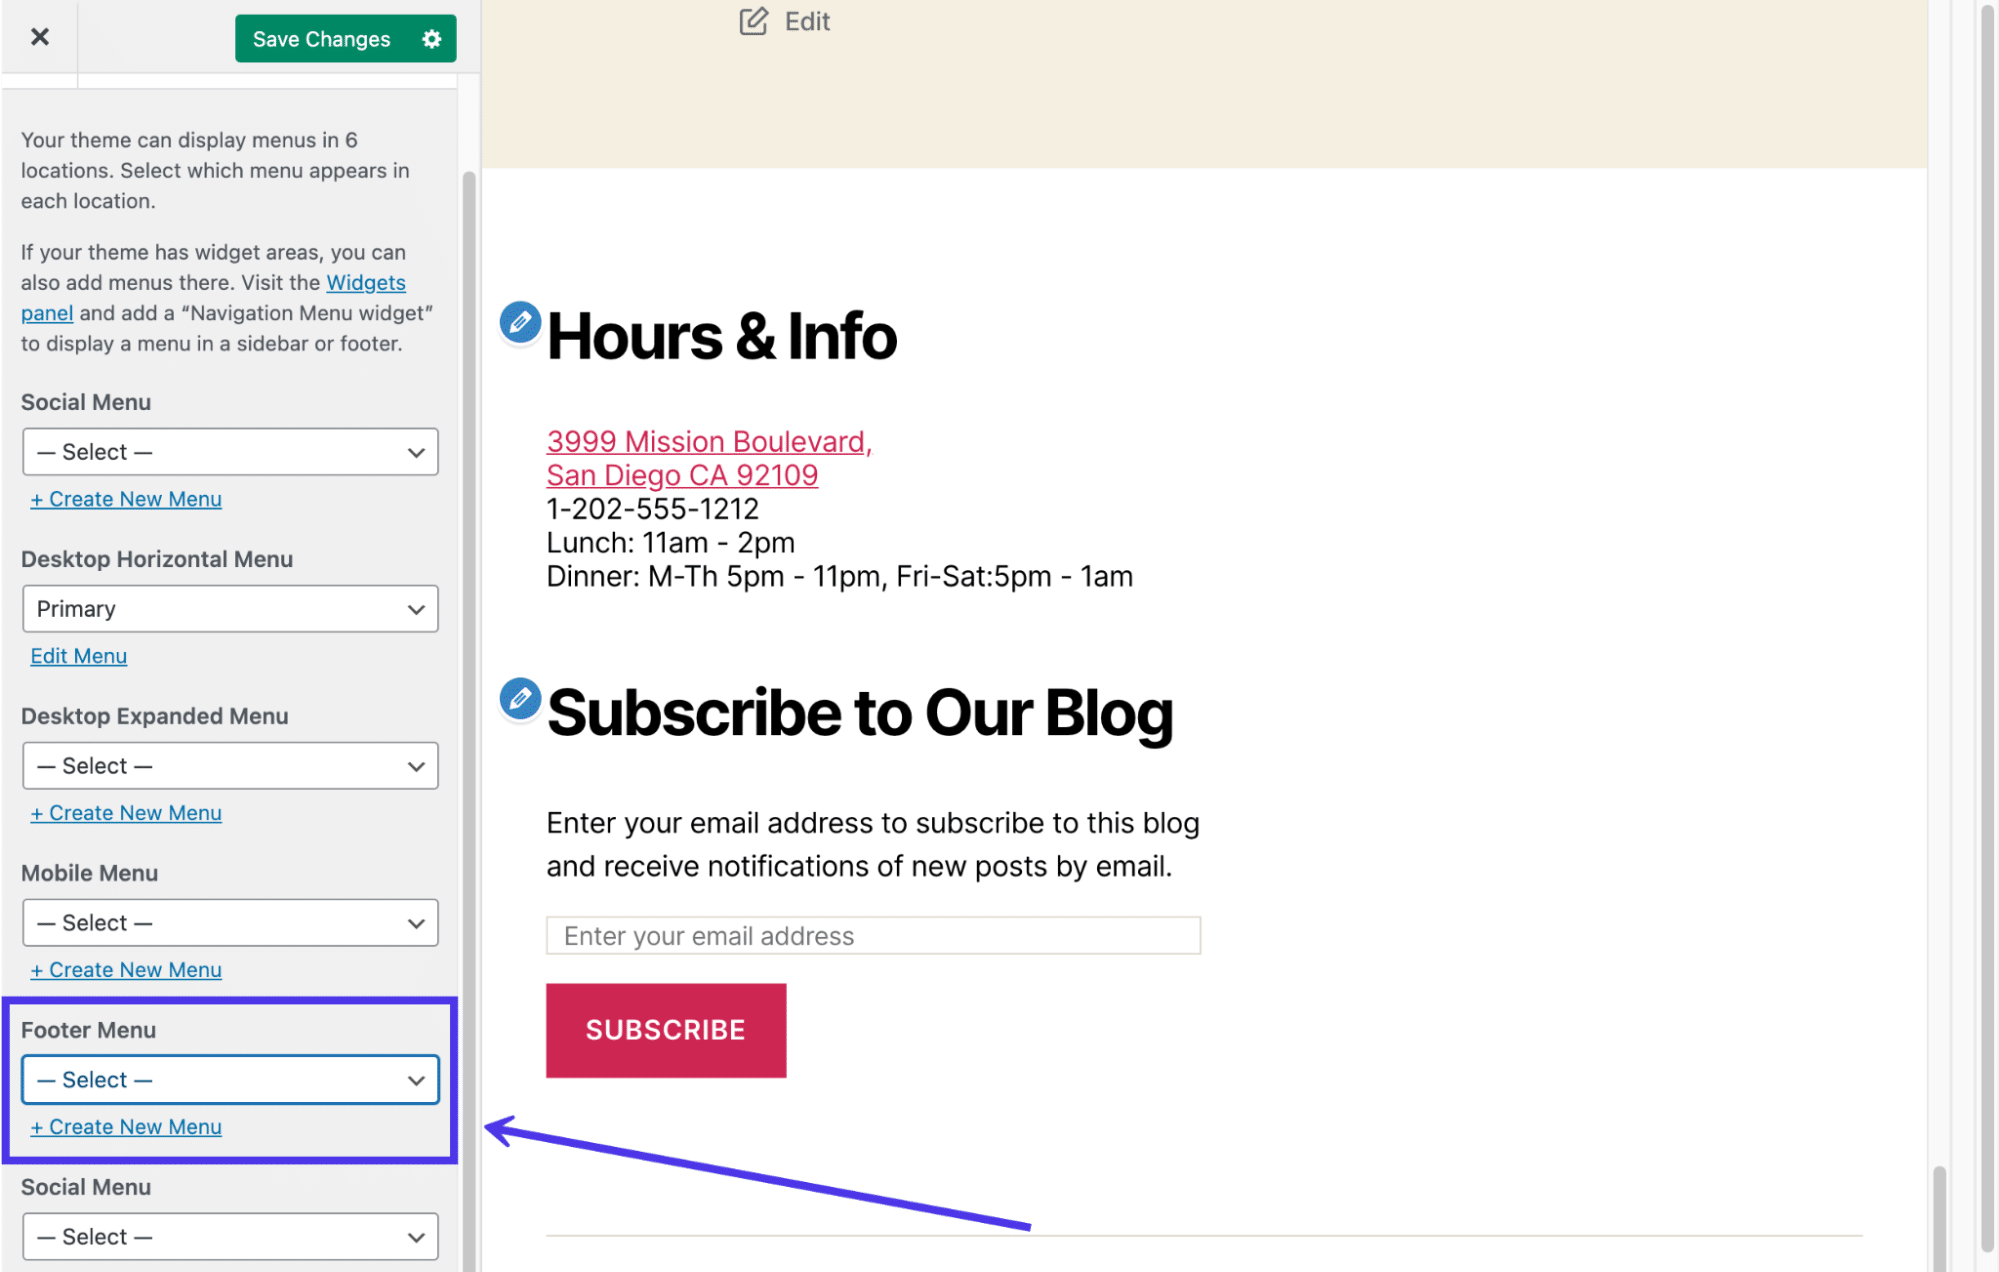
You’ll most likely see an empty menu page with several buttons to decide on. One of the buttons lets you select which menus to reveal and where to show them. The View All Locations tab shares where menus are supported on your theme.
Finally, the Create New Menu button works much like the standard menu creation panel in the dashboard, except it doesn’t require you to exit out of the Customizer.
Click on the Create New Menu button. If you already have a menu ready to go, you can add it to the footer by going to View All Locations.
Name your menu (in this case we’ll go with the obvious Footer name) and check the box called Footer Menu. This tells WordPress you want the Footer menu you create to show up in the Footer location. They’re separate things; one is the actual menu and the other is the region of your website where the menu goes. You’re more than welcome to switch the name of your footer menu if you find it a bit confusing.
Click on the Next button at the bottom of the panel to proceed.
Now you have a menu named Footer, but it lacks any buttons or links to make it a truly functional menu.
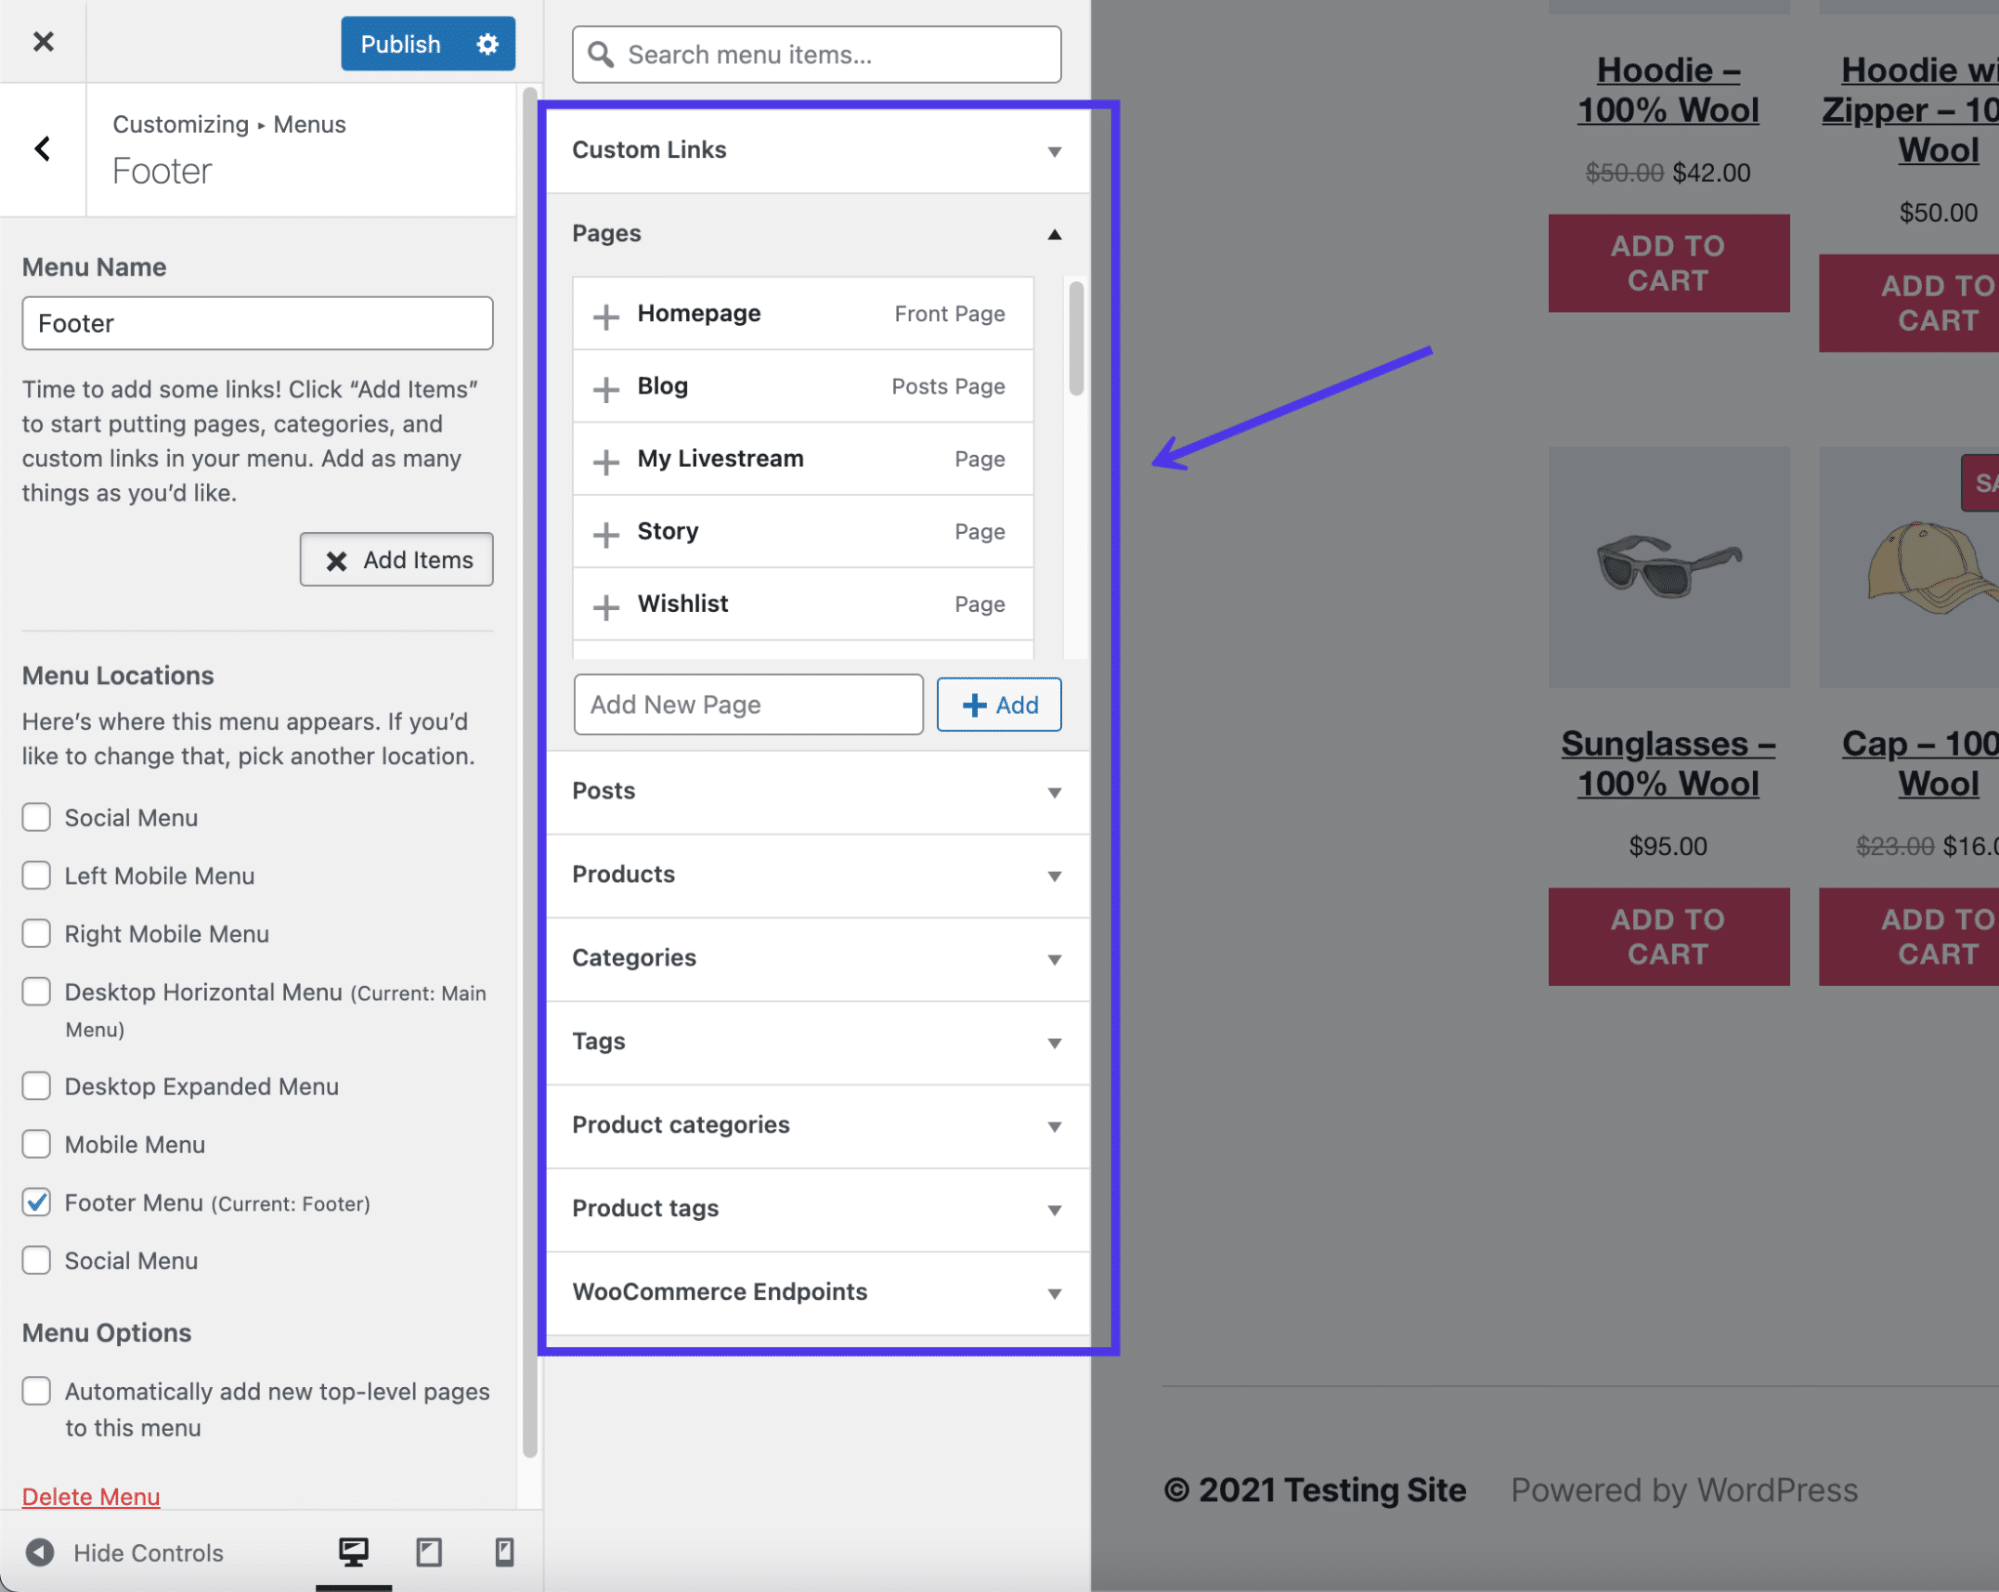
Click the Add Items button to start placing links and buttons to pages in your menu.
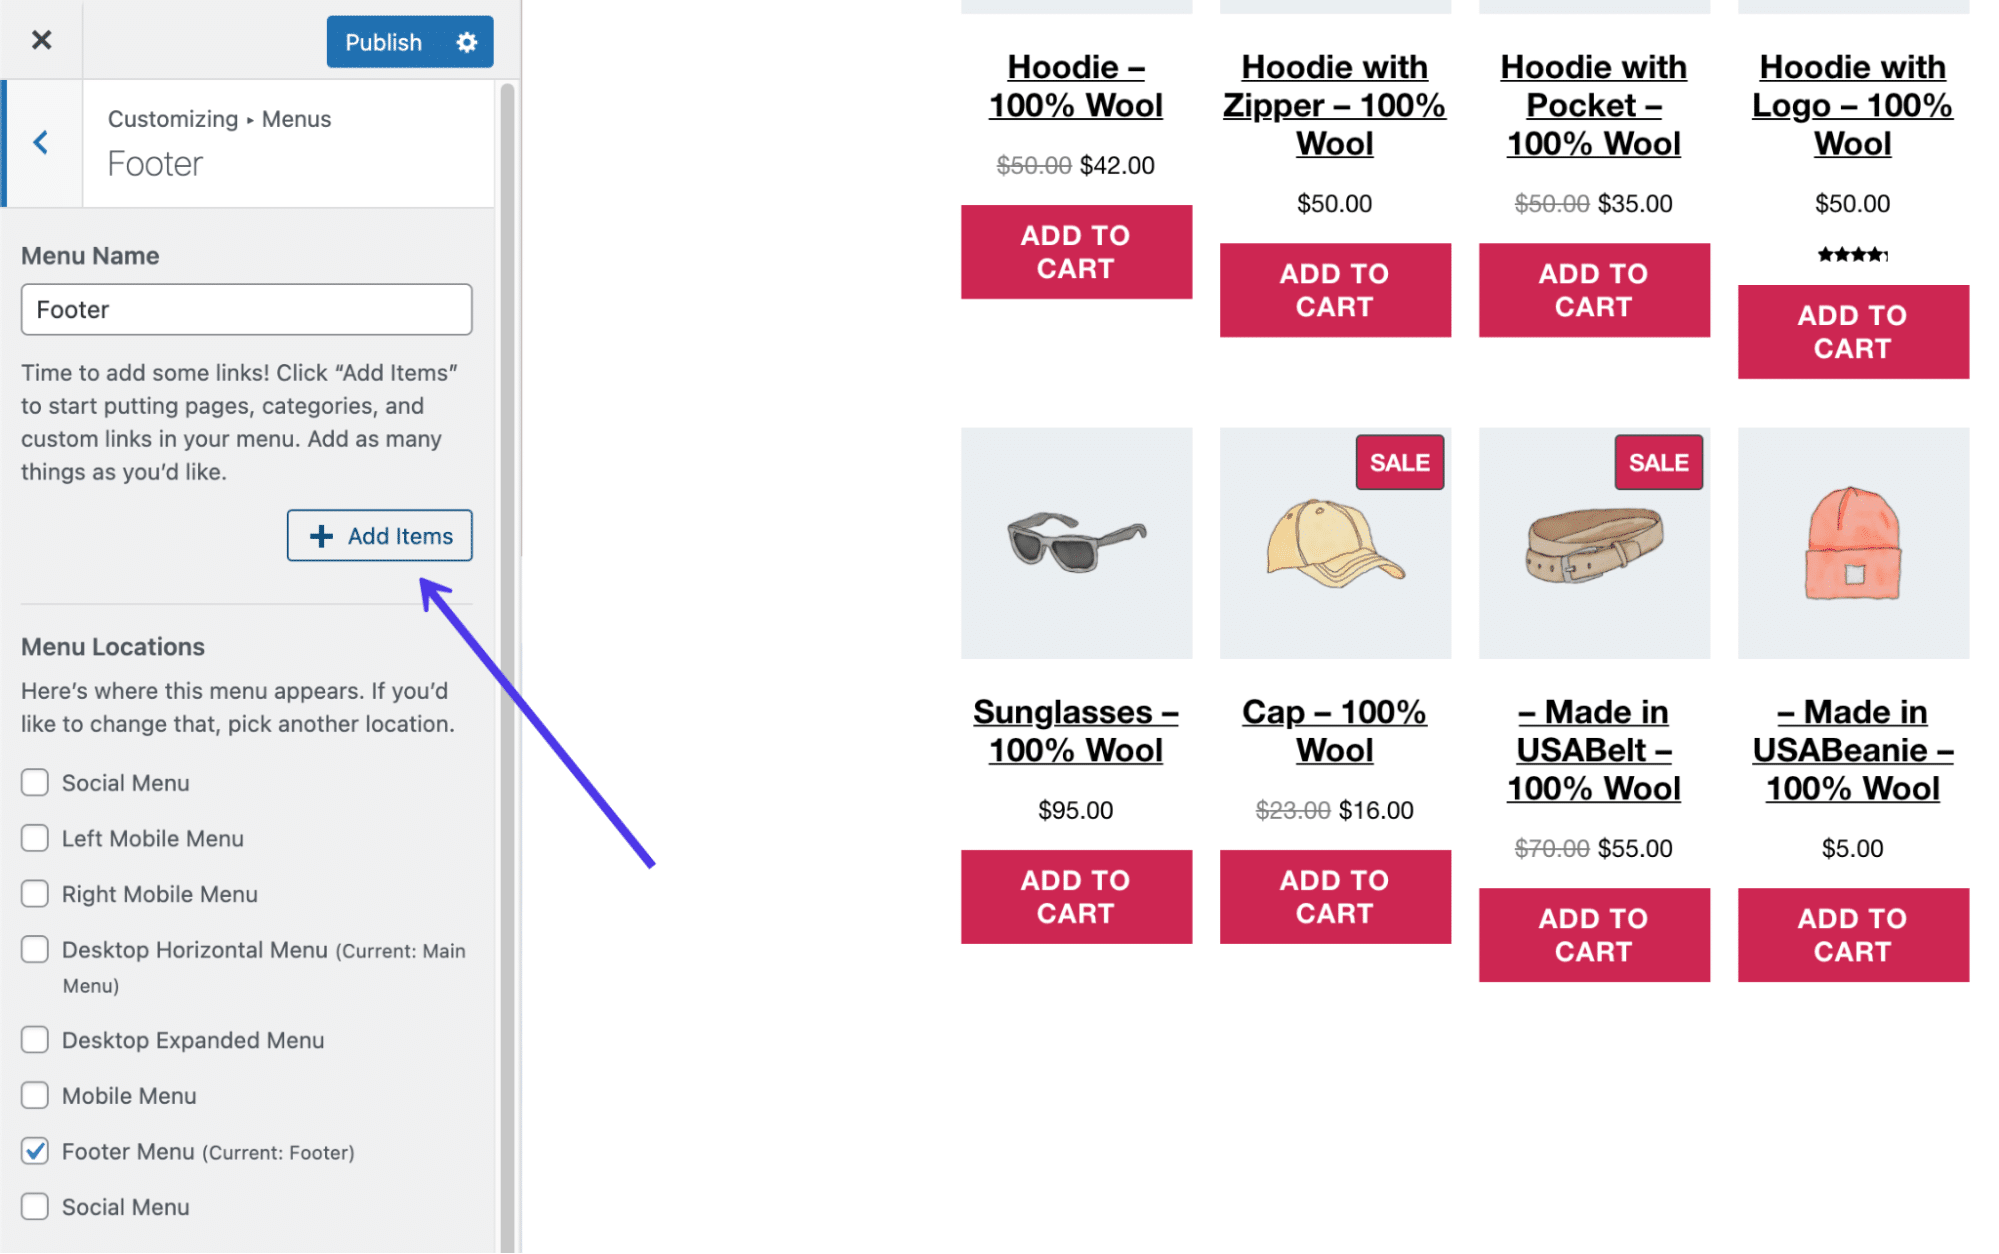
A new slideout panel appears with all the options to add to your menu. For instance, you can include custom links to internal or external pages, posts from your blog, pages from your own site (already created pages), products, tags, and categories, along with whatever other types of content pages you may have.
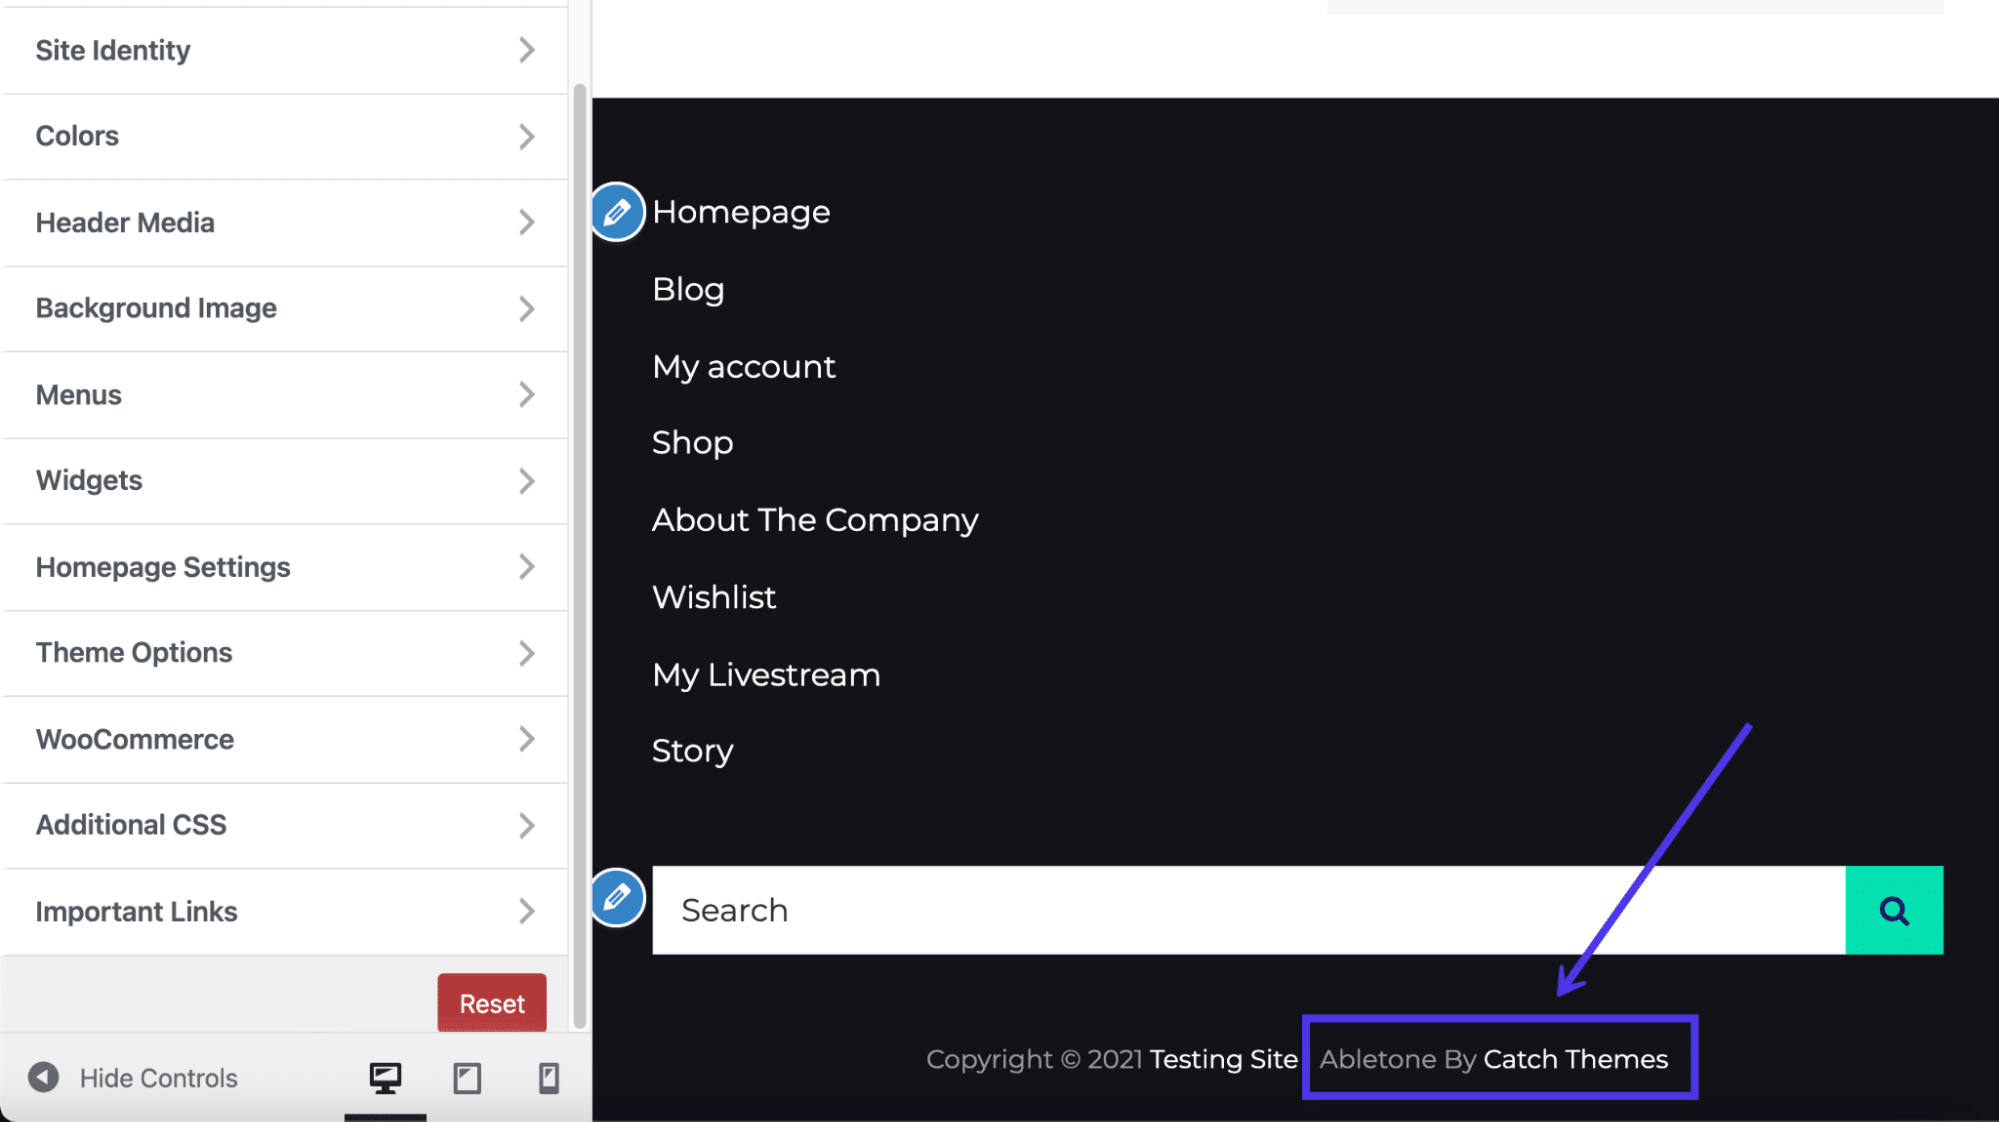
Each menu item you choose gets placed and shown in the menu panel, where you’re able to reorganize them and click on each one to edit their individual settings. For this example, we’ve added five links to pages throughout our website, including the blog, a livestream page, and an About The Company page.
Refer back to our list at the beginning of this article for ideas on what to include in your footer.
Edit Footer in WordPress With Plugins
WordPress already has built-in tools to modify your footer, but the extent to which you can edit your particular site’s footer relies on your theme of choice and whether or not you want to mess with any code.
Check Out Our Video Guide to the Best Footer Plugins
As you’ll learn further down in this article, removing the default “Powered By” text requires you to tap into the footer.php file and remove some code. Therefore, it’s clear several aspects of footer editing may be out of your reach if you don’t have the experience or willingness to mess with code or find a new theme.
That’s where WordPress plugins come into play. Quite a few plugins offer footer editing and expansion features to remove the need to edit code manually and sometimes to make quick changes to your footer, like with colors and columns.
WordPress footer plugins we recommend include the following:
- Footer Mega Grid Columns — This plugin fixes any problems you have with a theme where the footer lacks a grid format with three columns. Some themes only offer one or two columns, while other times a footer gets entirely stripped from the theme. Footer Mega Grid Columns adds a footer widget to not only display three columns but additional ones if needed.
- Remove Footer Credit — Use this plugin to completely remove the footer credit placed there by WordPress or your theme developer. You also have the option to type in your own HTML code to create a footer credit or a bit of content that’s more suitable for your site.
- Header Footer Code Manager — This plugin has a slight learning curve, but it’s an ideal solution for intermediate WordPress users who would rather have access to footer and header coding areas in the dashboard, as opposed to opening up the site files. You can add an unlimited number of styles and scripts to the footer, which often comes in handy for showing information after every blog post or page.
- Footer Putter — Use this plugin to insert a widget for copyright information or for your trademarks. This is a rather useful solution for placing details about your company in the footer area, including things like links, business hours, telephone numbers, and more.
- Footer Text — As one of the simplest ways to modify your WordPress footer, the Footer Text plugin activates a frontend and backend editing panel to change what’s in your footer. It comes with a WYSIWYG (What You See Is What You Get) editor, so it’s possible to format your text and potentially add items like pictures.
In the following sections, we’ll explore how to use some of these plugins for tasks like adding social media buttons or inserting custom code into the WordPress footer.
Manually Edit the WordPress Footer With Code
A more technical way of editing your WordPress footer involves tapping into the footer.php file and editing its contents.
You must have experience with coding — or be eager to learn — in order to make this method useful for you, but there are some minor tweaks that all beginners can handle (mainly just removing preset text in the footer). Take a look at our guide to adding header and footer code for the most detailed information.
To access the footer.php file, link to your WordPress site files by using an FTP client. We also recommend checking out this article on how to use SFTP to link to WordPress as SFTP is more secure than FTP.
Once connected to your WordPress site files through your FTP client, locate the /public folder. Click on /wp-content and then /themes to reveal all themes currently installed on your WordPress dashboard. Note which theme is active on the site and open the folder for that one.
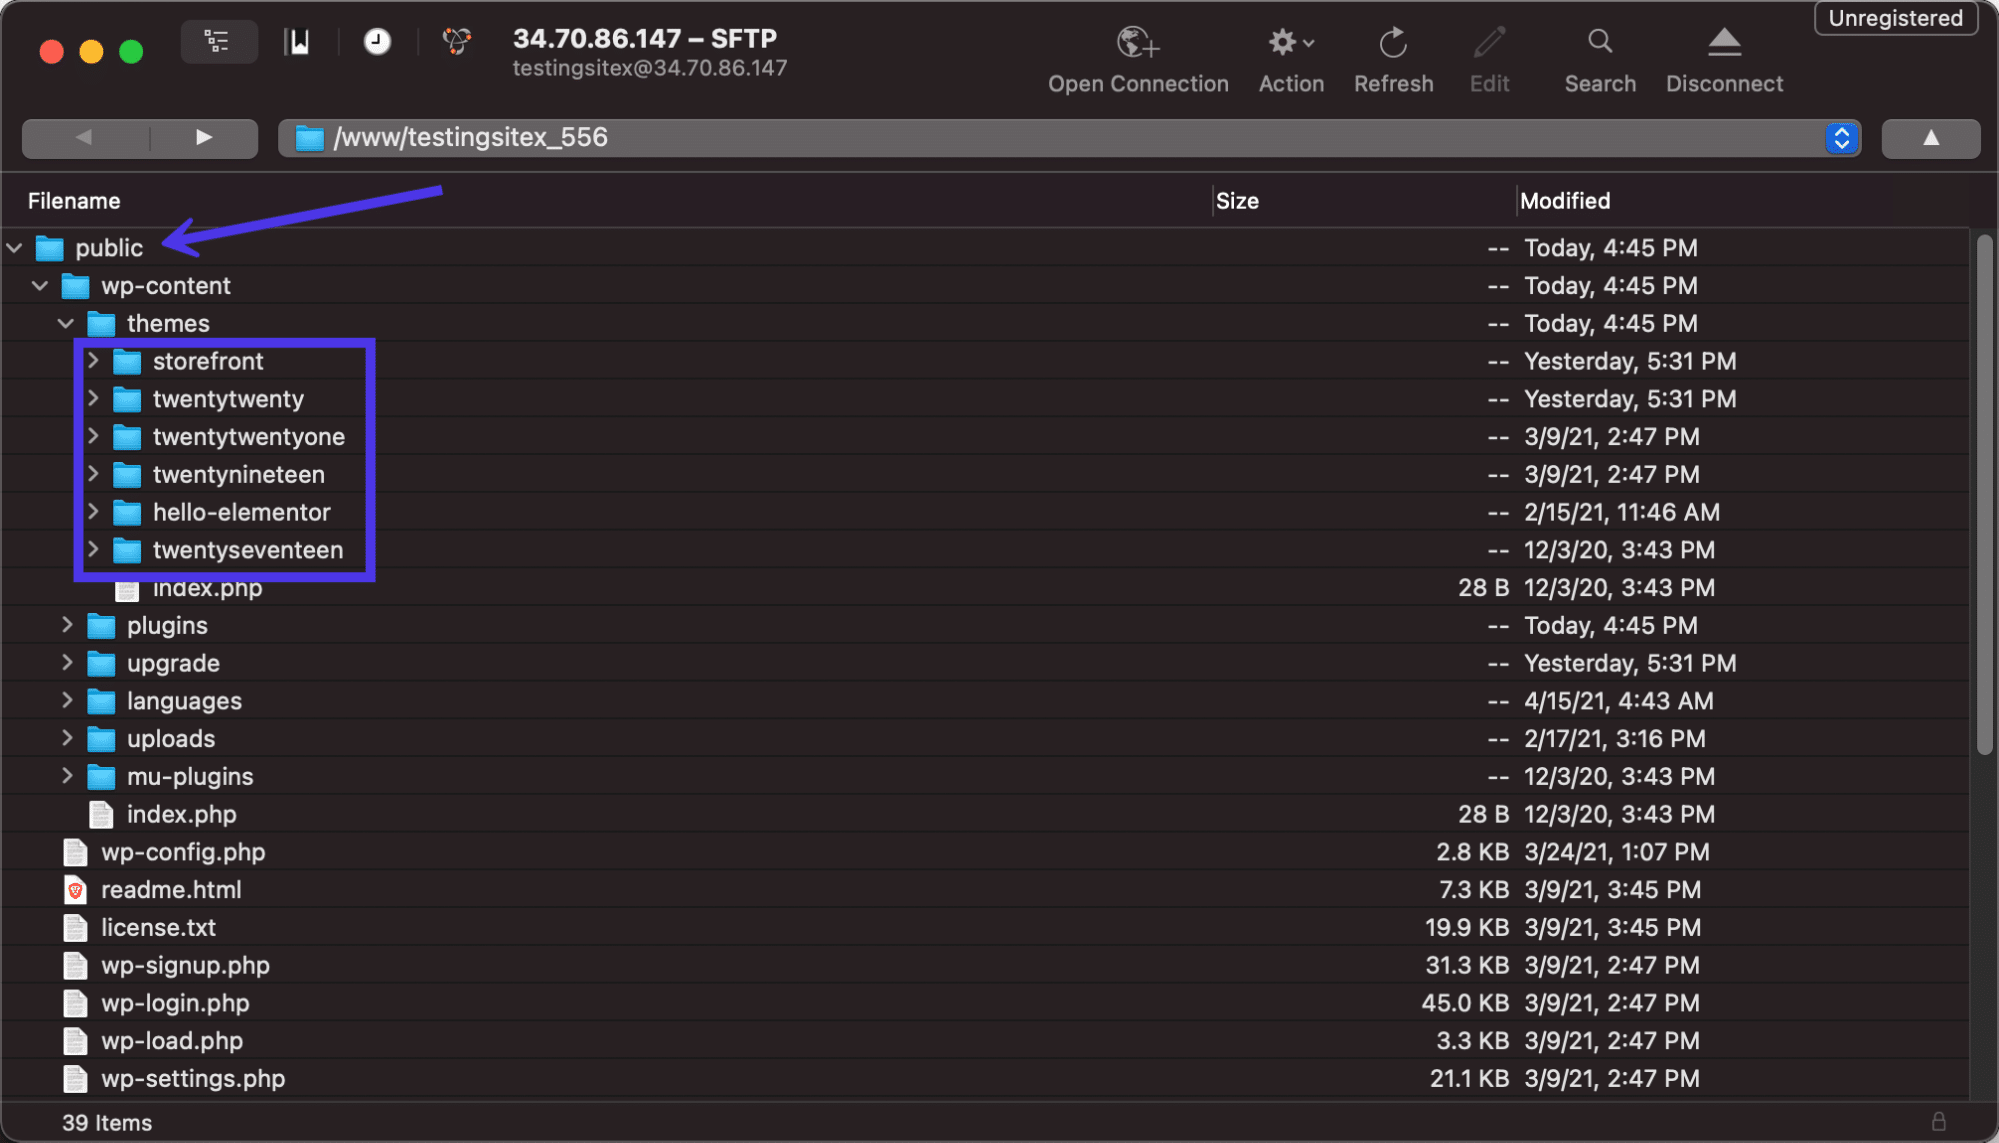
All WordPress themes have a footer.php file somewhere in the theme folder. Scroll through the batch of files to locate that footer.php file.

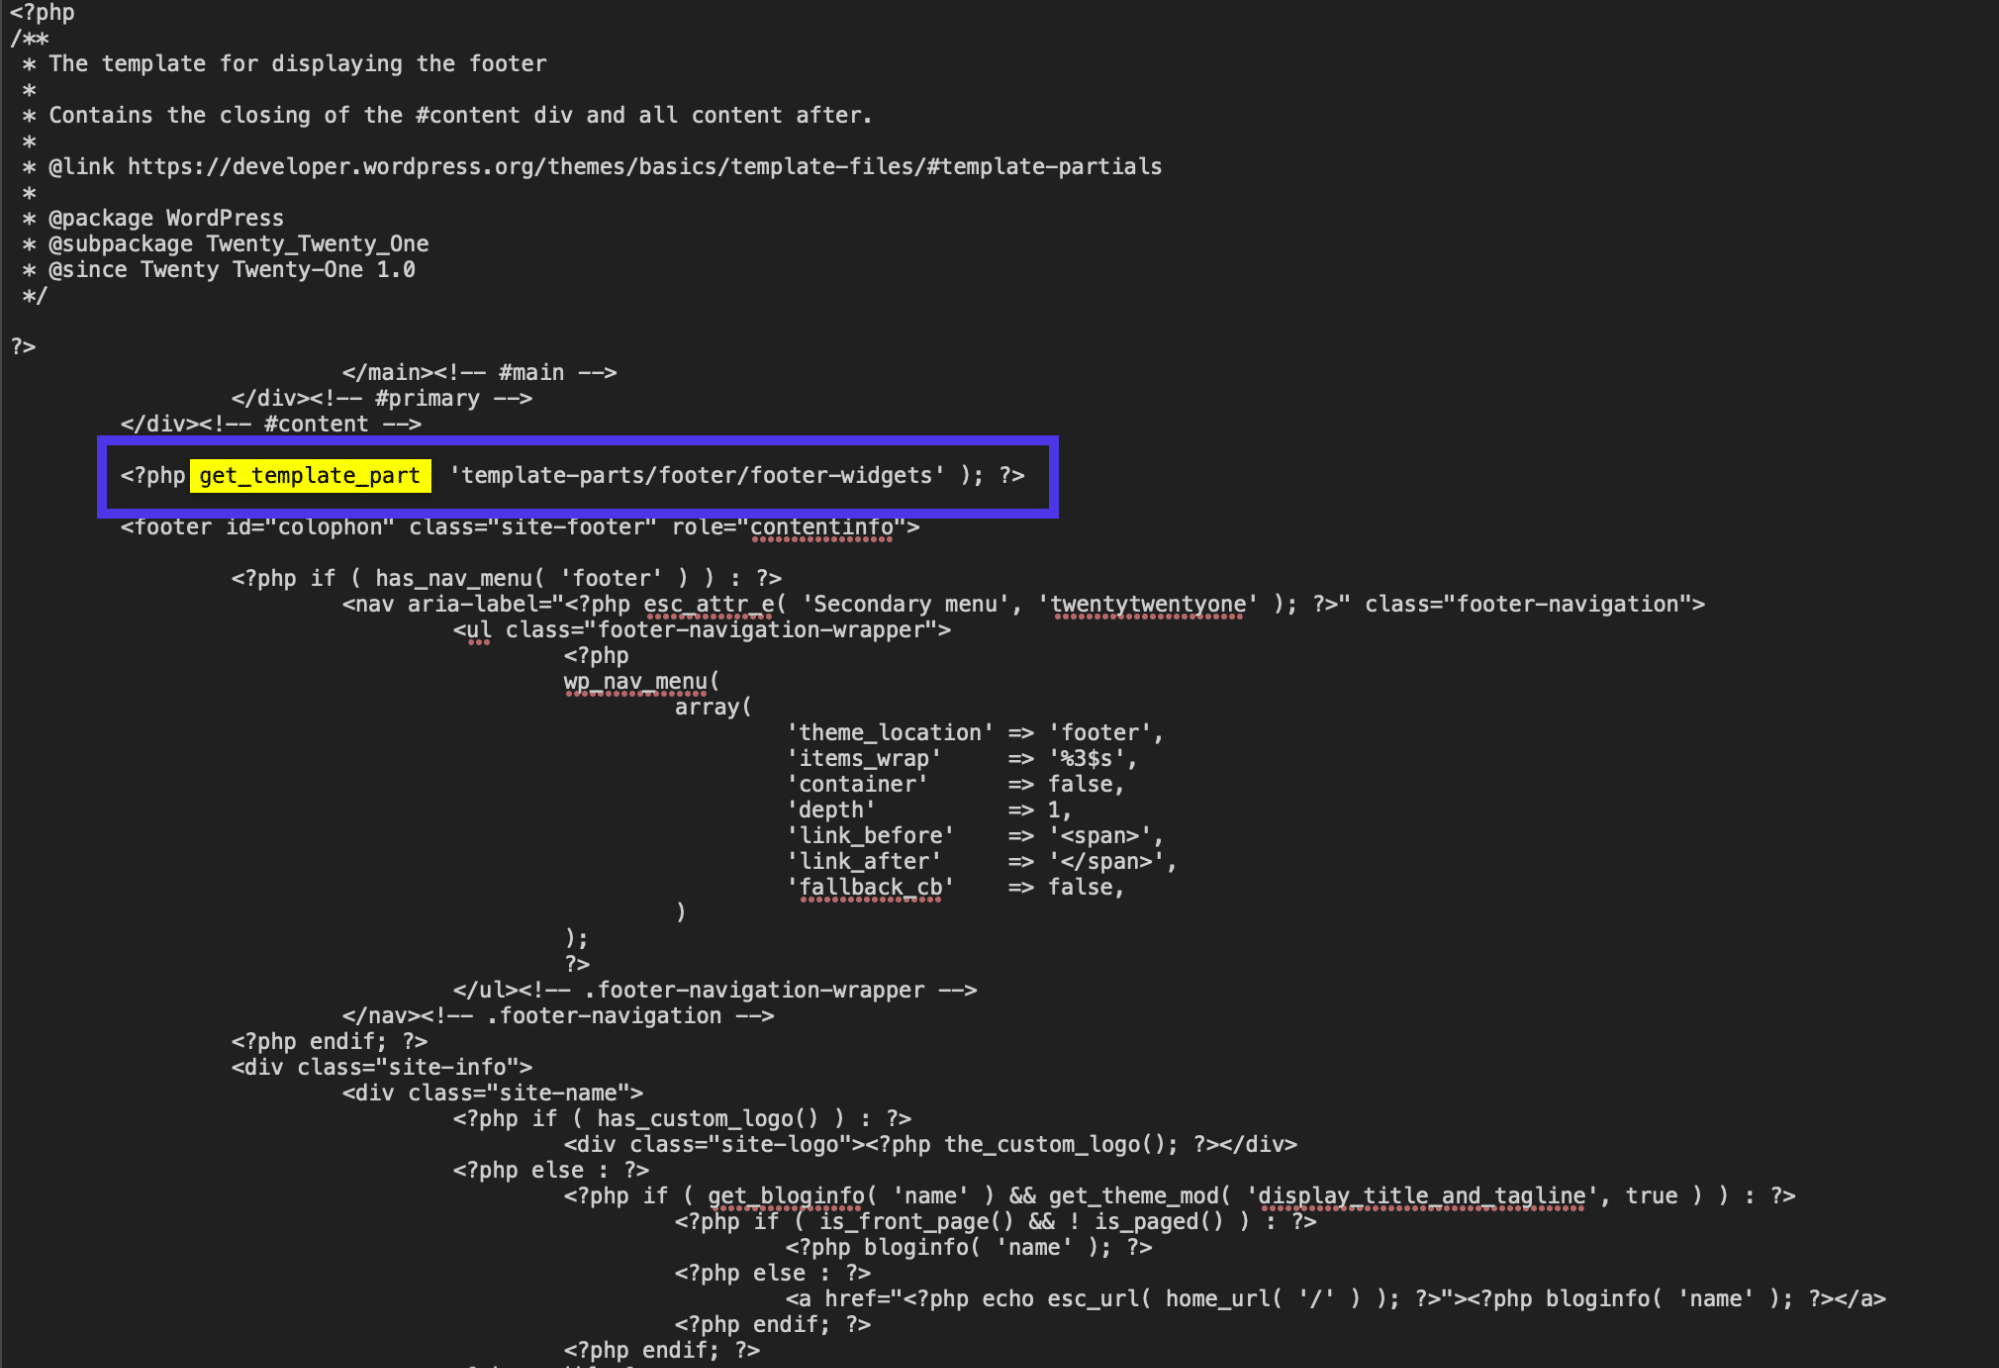
Open the file with the editor of your choice. Once in there, you can edit the current code or add new content depending on what you’re trying to achieve. The get_template_part section is often modified to insert new bits of text, but we’ll leave that up to you since every footer is different.
As an alternative, you can edit the footer code by using a plugin that displays a visual field for the footer.php file. This way, you don’t have to install an FTP client and link it to your website. It’s also a more intuitive, beginner-friendly process that remains available on your dashboard at all times for future edits.
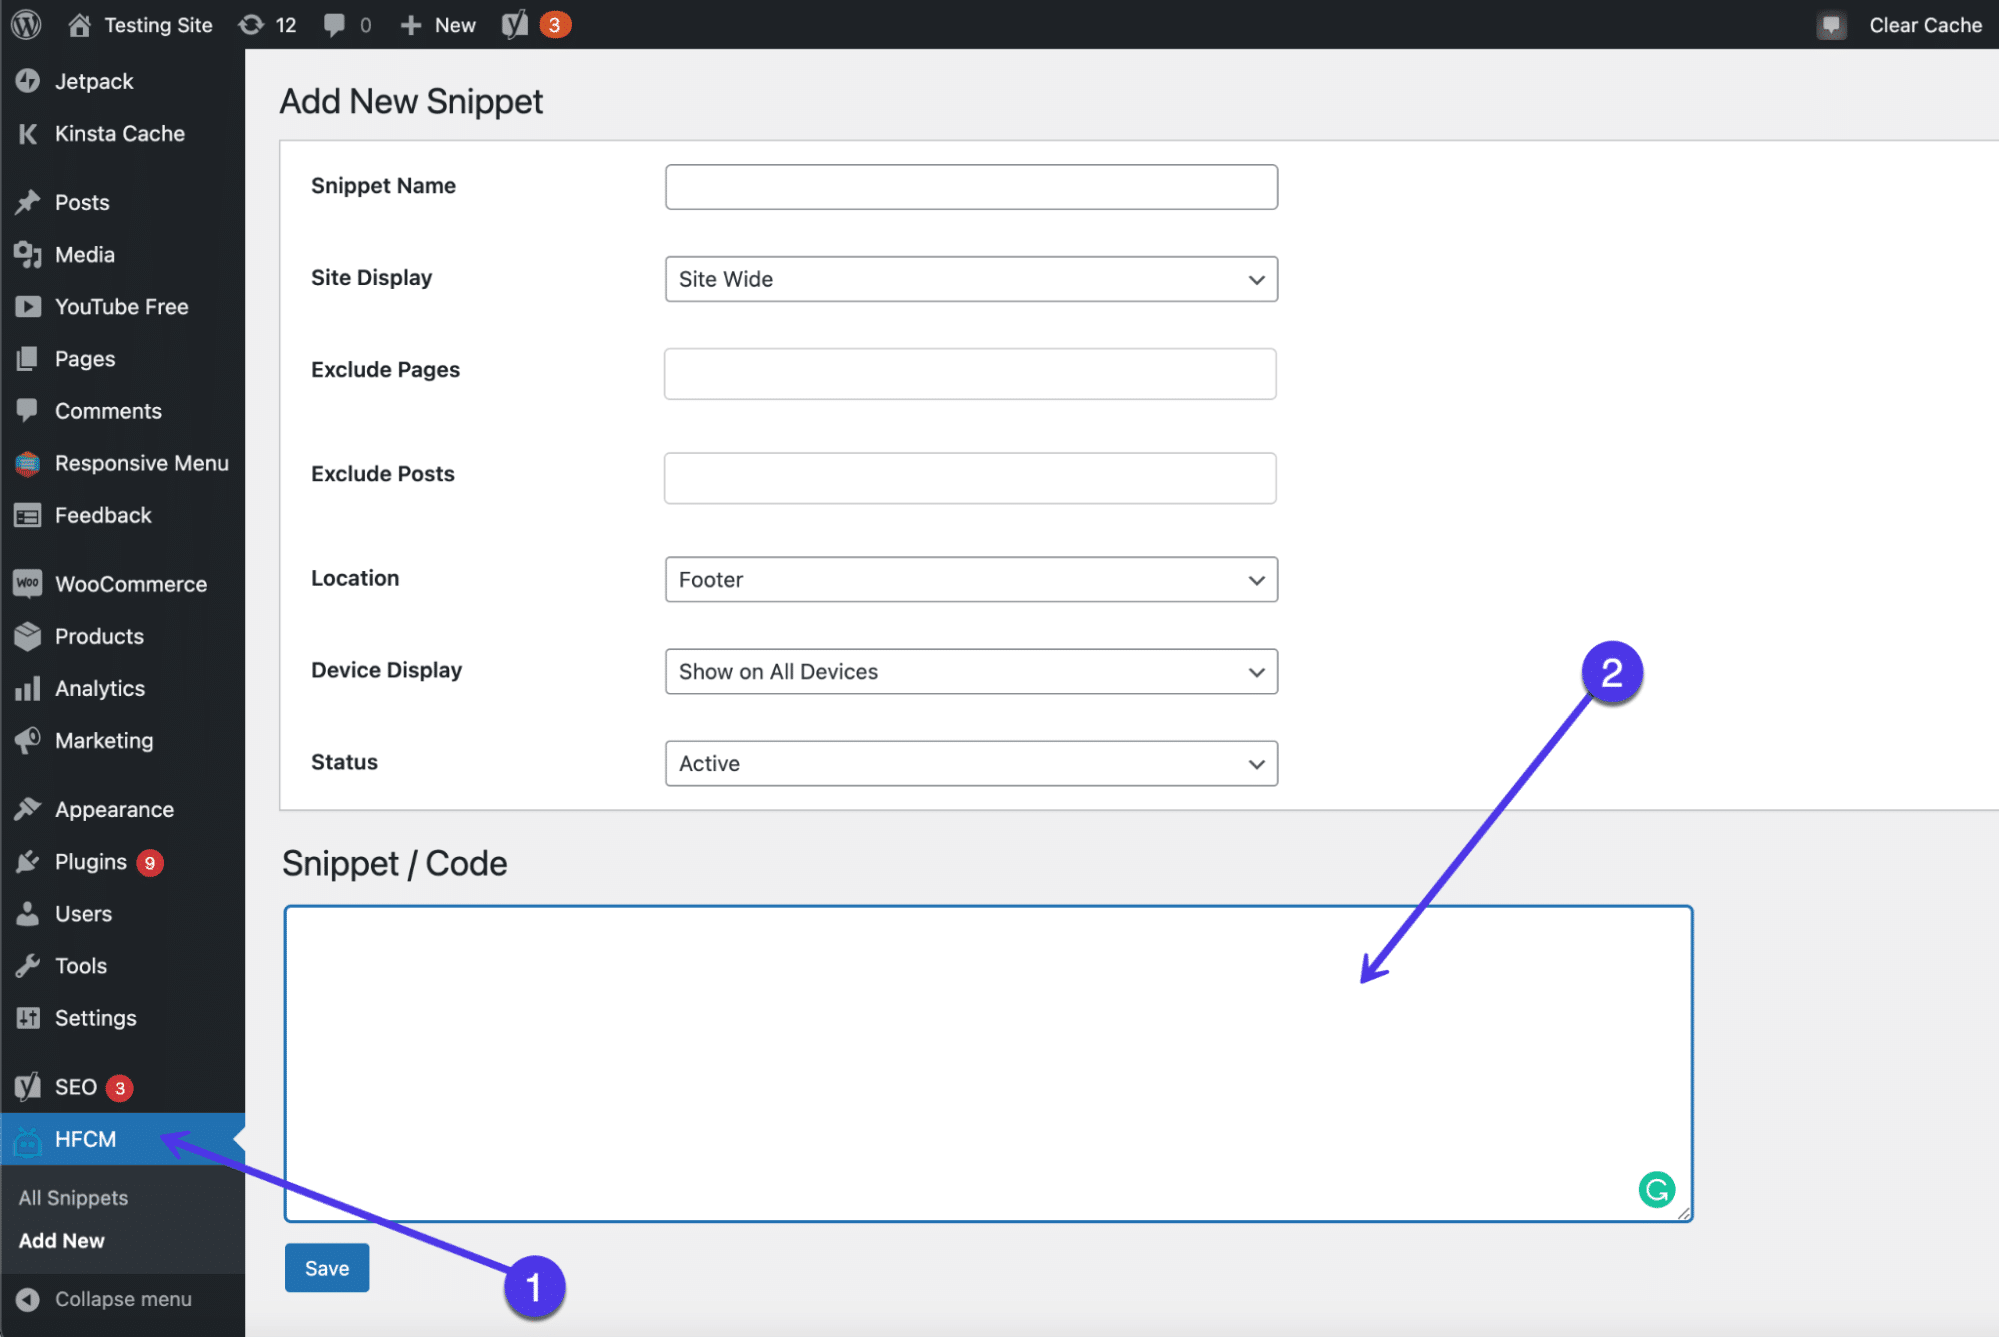
To make this happen, install and activate the Header Footer Code Manager plugin.

Once it’s been installed, click on the HFCM tab that appears in the WordPress dashboard. Then, name the snippet, choose where you want it displayed and set the location as Footer.
The most important part is the Snippet/Code field, which you’ll fill in with whatever code you want. Some people use this plugin for things like verification or tracking codes that don’t show up on the front end. However, it’s also available for you to use for typing in new text and gaining almost complete control over the content in your footer.
Make sure you click on the Save button to see the results.
Use a Page Builder With Footer Designer
A bonus way to modify your WordPress footer, without the need for code or many of the standard WordPress footer tools, is with a page builder. Not all page builders offer footer editors, so it’s important to conduct some research and ensure that either your current page builder offers it or the one you plan on buying has footer features.
Check Out Our Video Guide to Editing the WordPress Footer with Page Builders
Regardless, this is a relatively basic feature for a page builder, so it’s a good idea to only go for a page builder if you plan on customizing your entire site with it.
A few other page builders offer footer editing, but our favorites include Elementor and Visual Composer.
To create a custom footer with Visual Composer, you must have the Pro version. There are some workarounds to edit the lower part of your website with the free version, but the true drag-and-drop builder for the footer requires an upgrade.
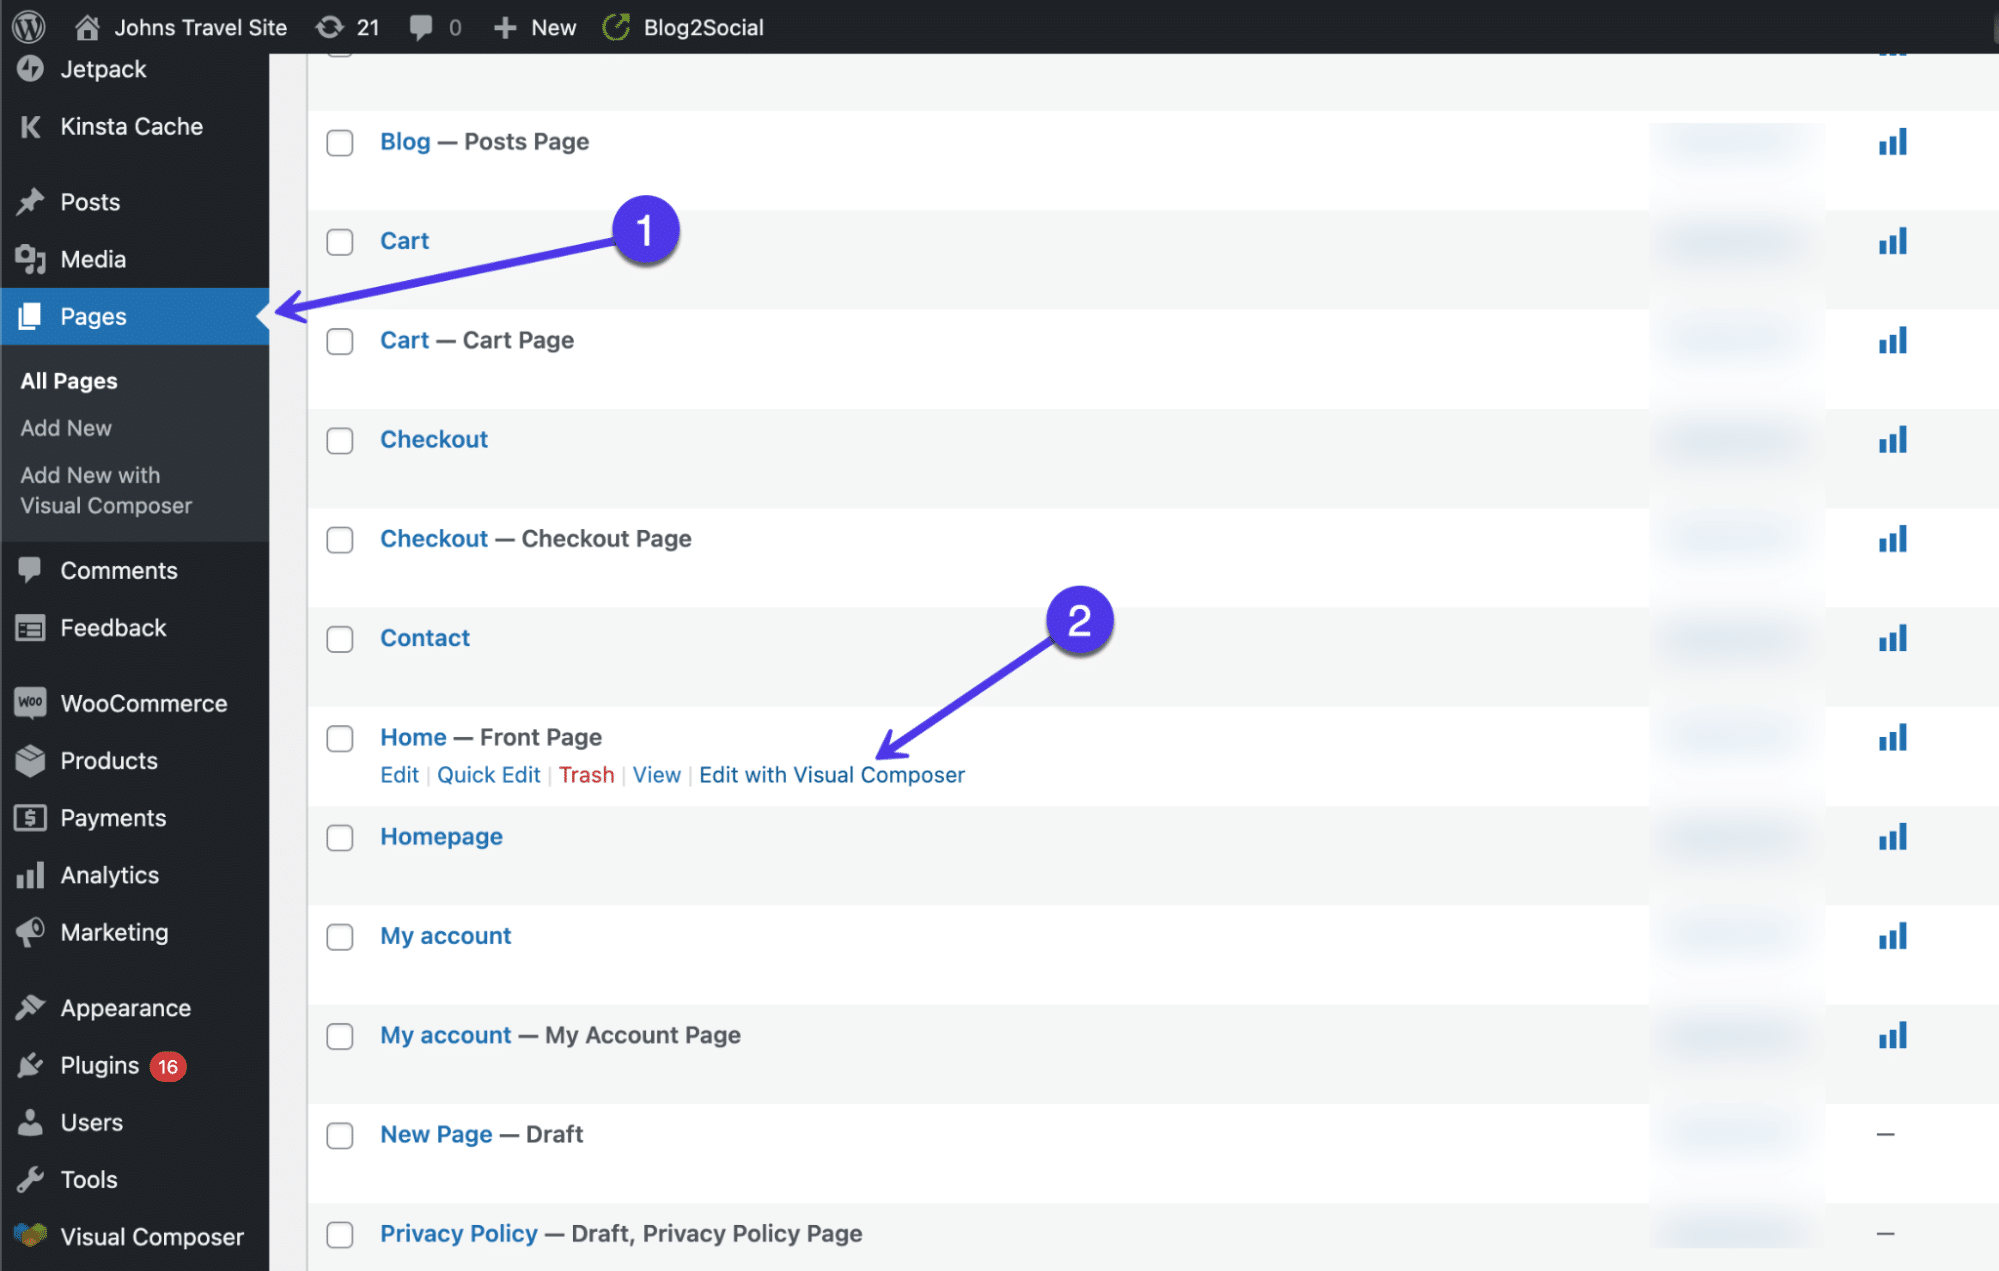
Once installed, click on the Pages button in your dashboard. Scroll through the pages you want to edit and select the Edit With Visual Composer link on any of those pages.
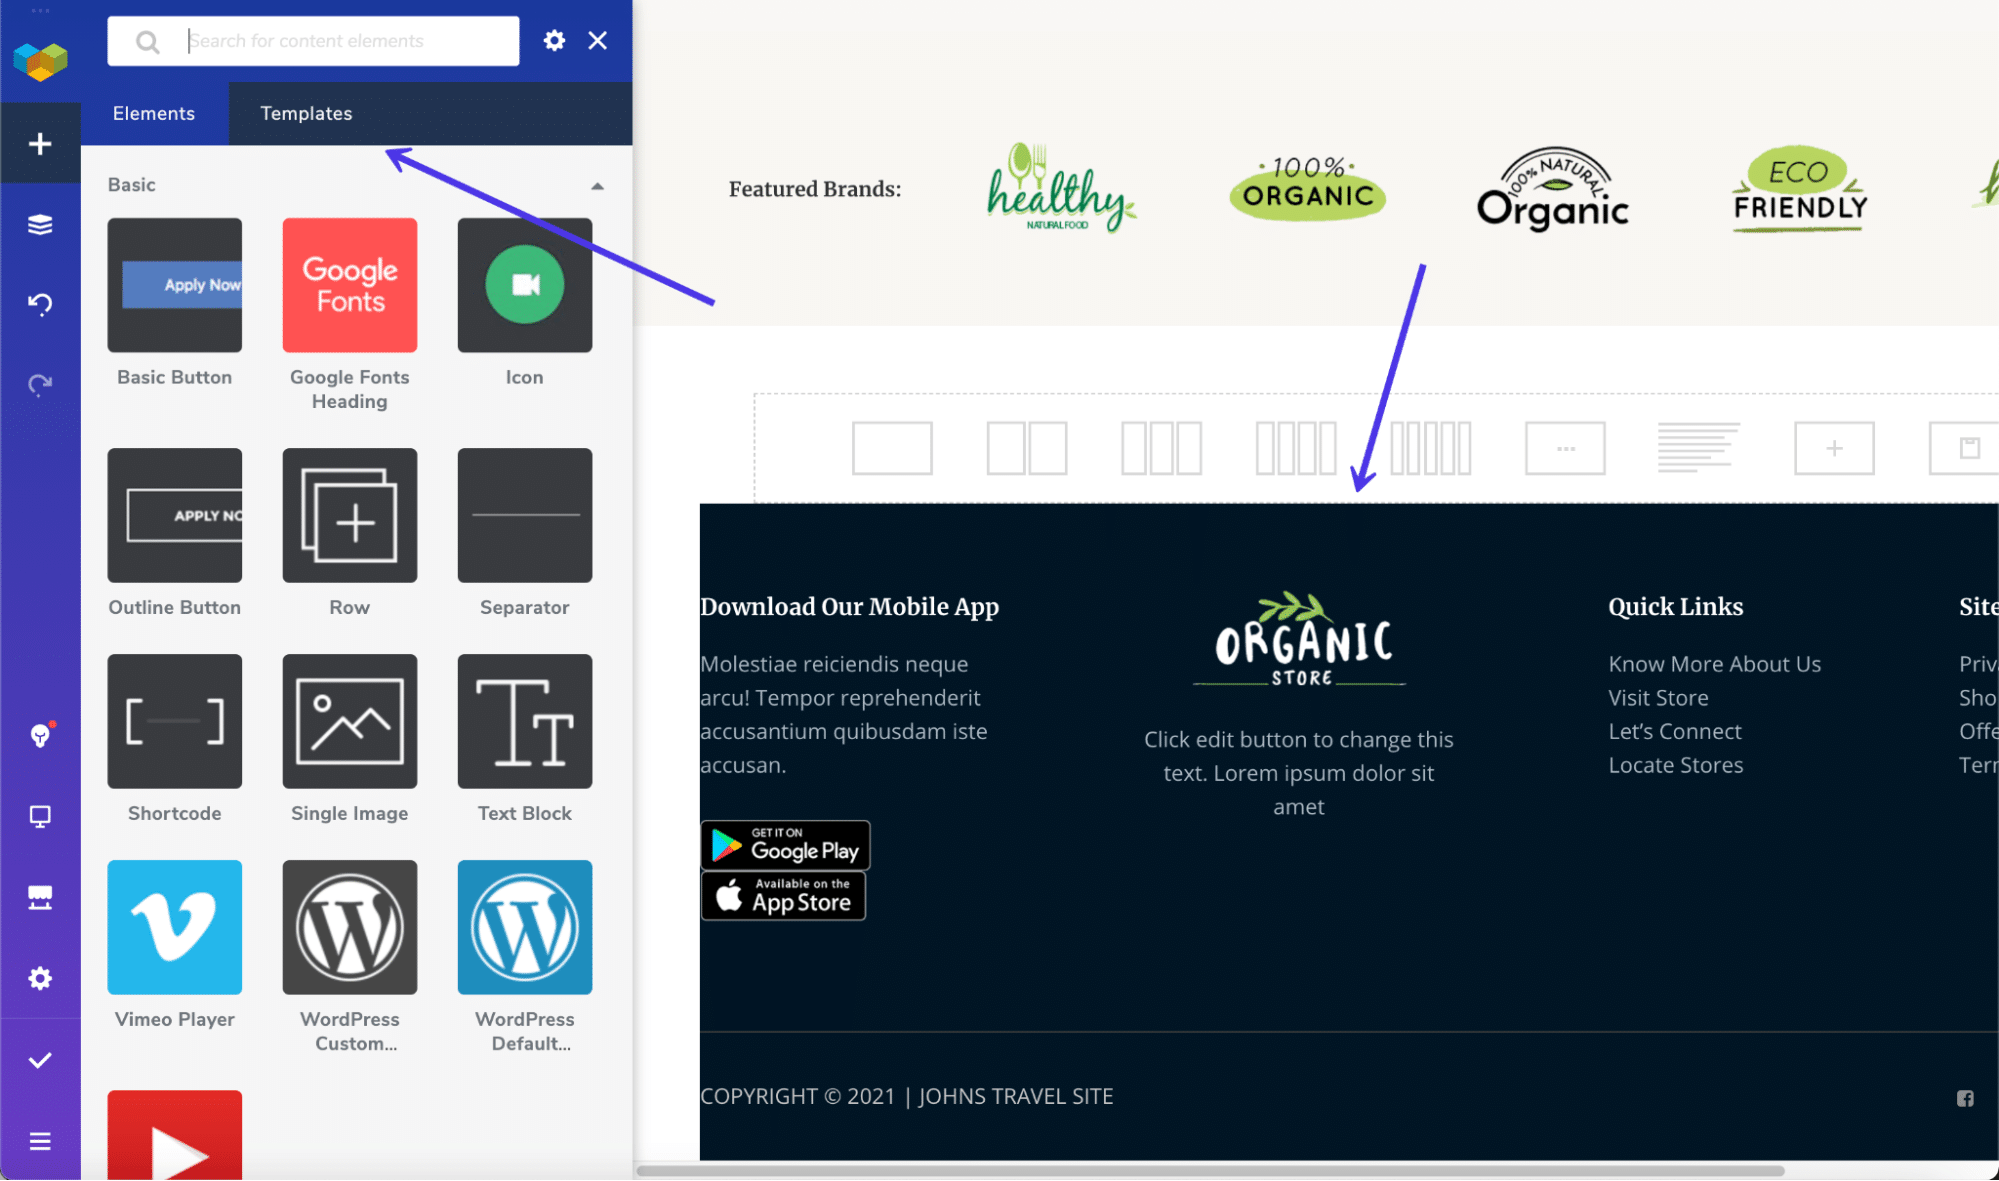
That brings up the Visual Composer designer, with a live preview of your webpage on the right side and drag-and-drop design tools like elements and templates on the left.
One of the easiest ways to implement a beautiful footer is to simply choose a template (many of which are free). These templates provide professional designs for your entire site, along with a nice footer that’s customizable.
To see what’s available, you can click on the Templates tab, then the Get More Templates button. Visual Composer offers templates for all aspects of your site, including headers, footers, and sidebars.
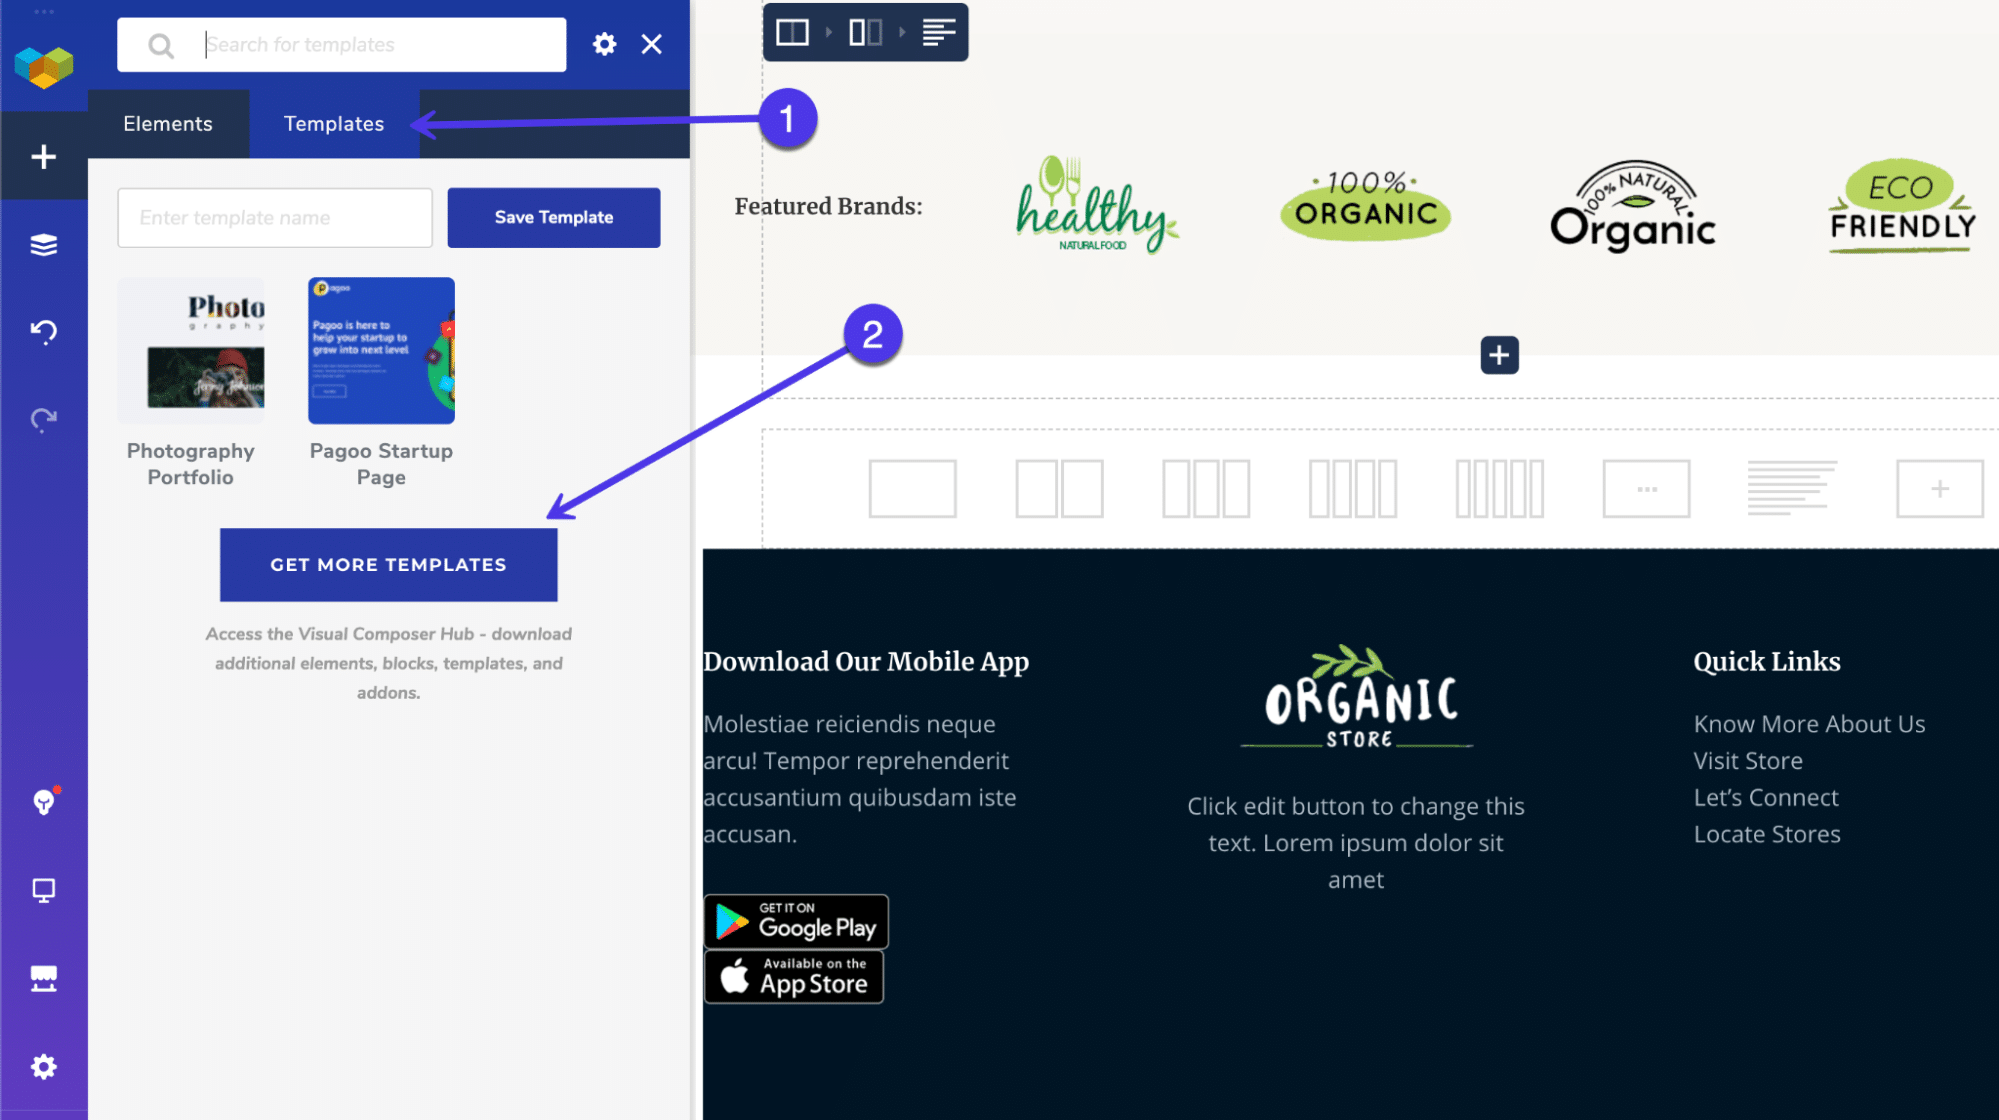
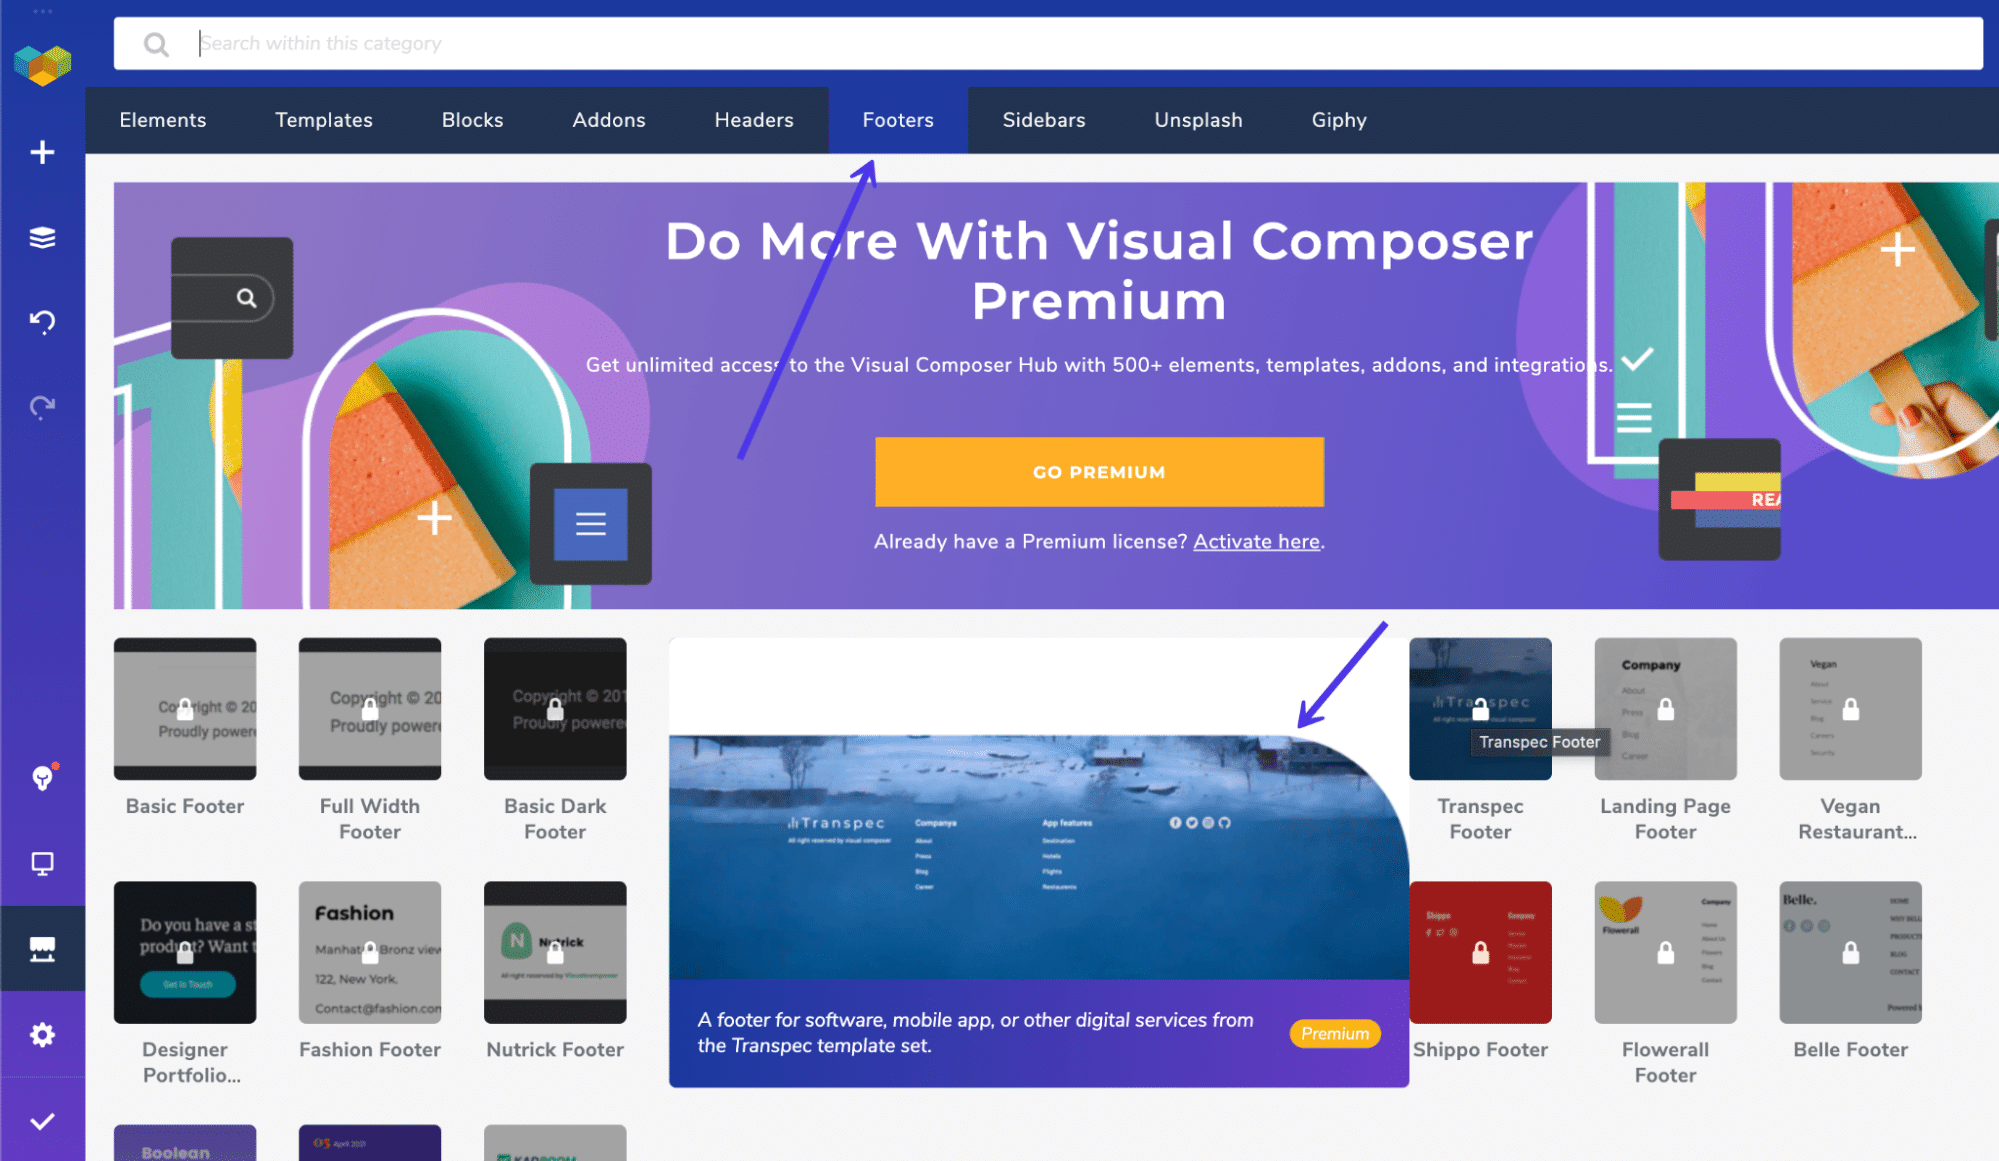
The next window shows a large library of templates, all categorized under filters for things like Elements, Templates, Blocks, and Footers.
Choose the Footers tab to show all premade footer templates.
Once again, this part of Visual Composer requires the Pro version. Once active, you can scroll through the dozens of footer templates to implement them on your website and edit them as you please.
One of the other page builders with footer editing tools is called Elementor. Much like Visual Composer, Elementor provides a full website builder for constructing homepages, product pages, footers, and more.
Keep in mind that you do receive footer content blocks for free with this method, but the actual footer builder uses the Pro version of Elementor. Like Visual Composer, you need to upgrade for full functionality.
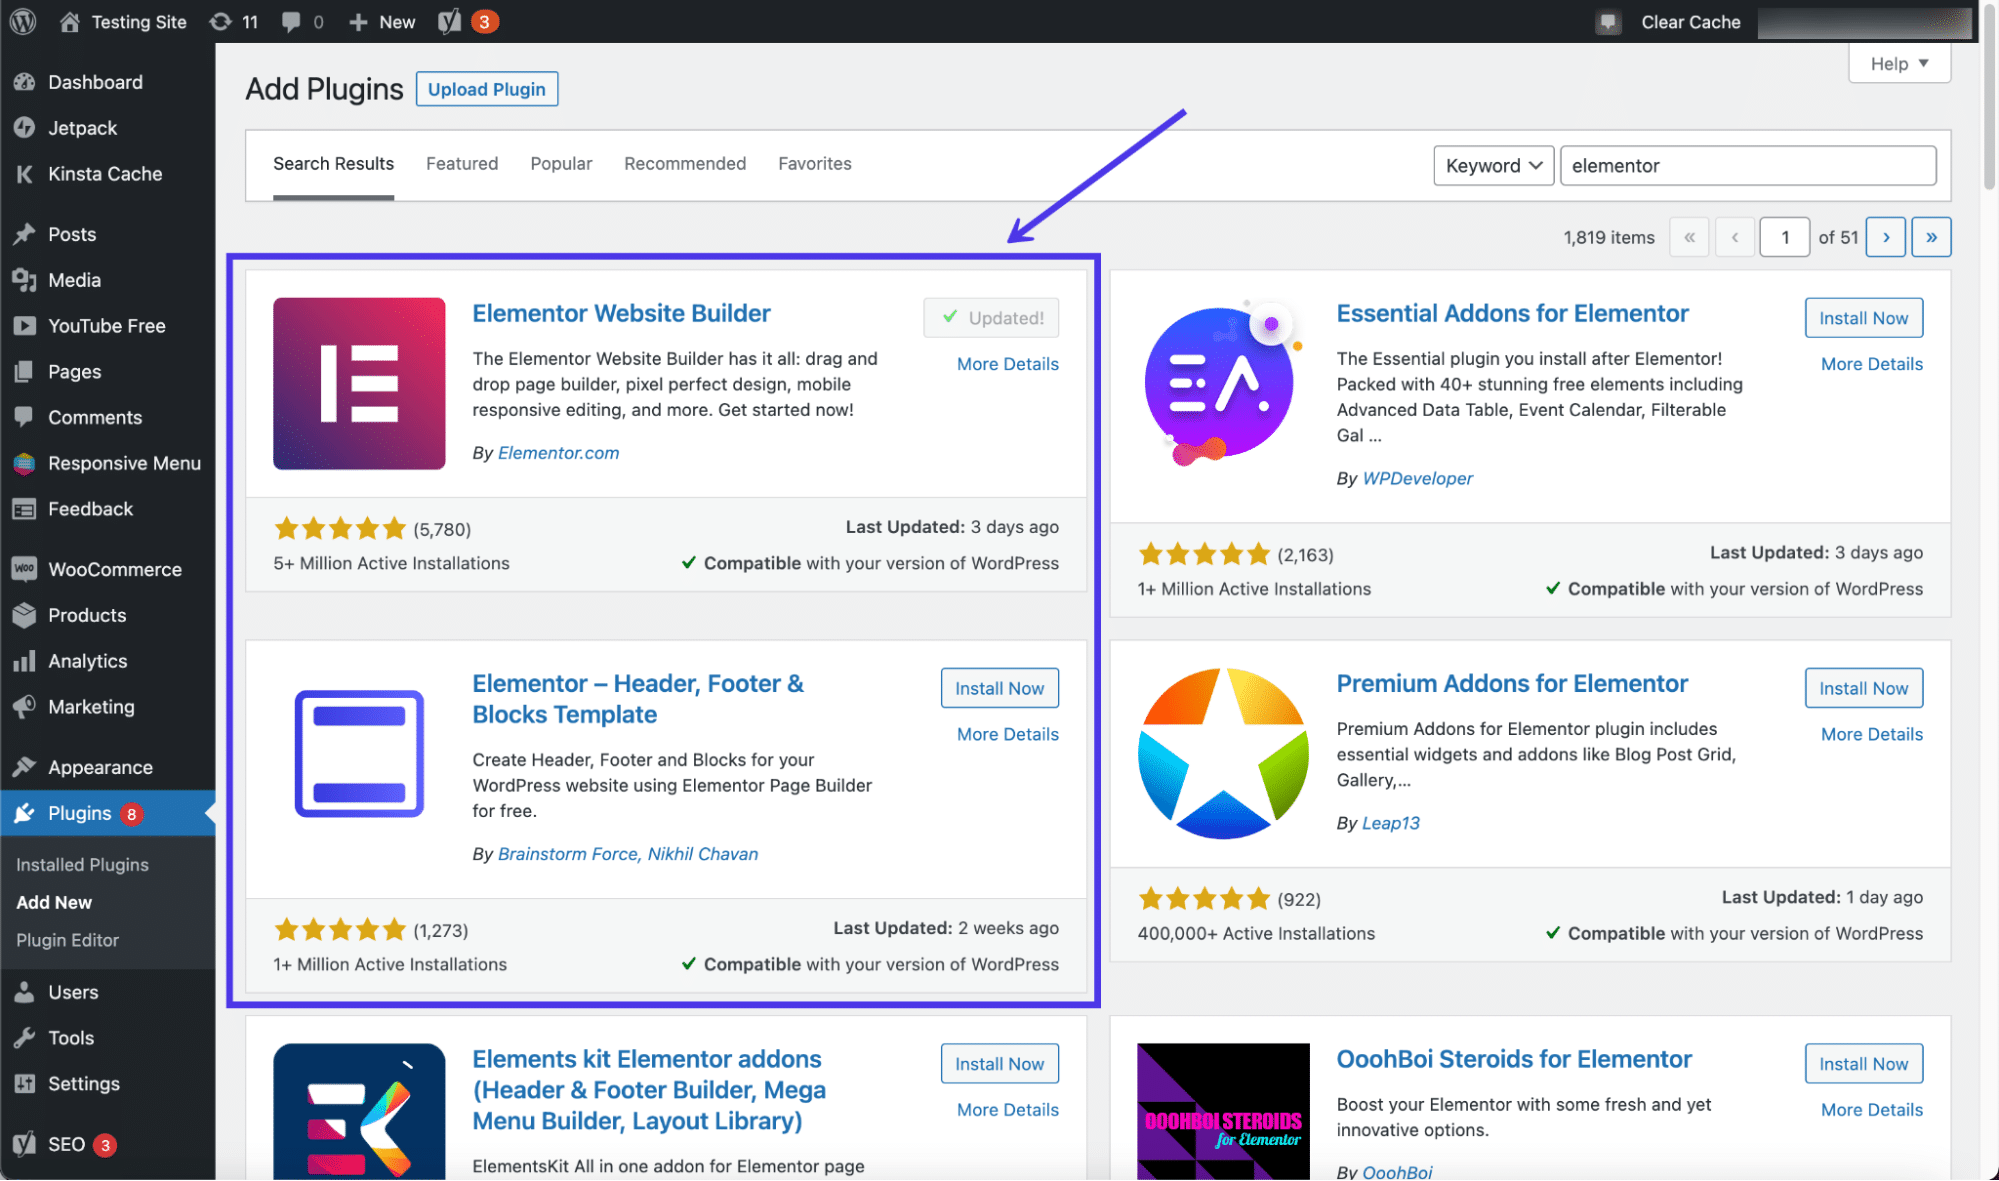
To get started, install and activate both Elementor and the Elementor Header Footer and Blocks Template plugins.
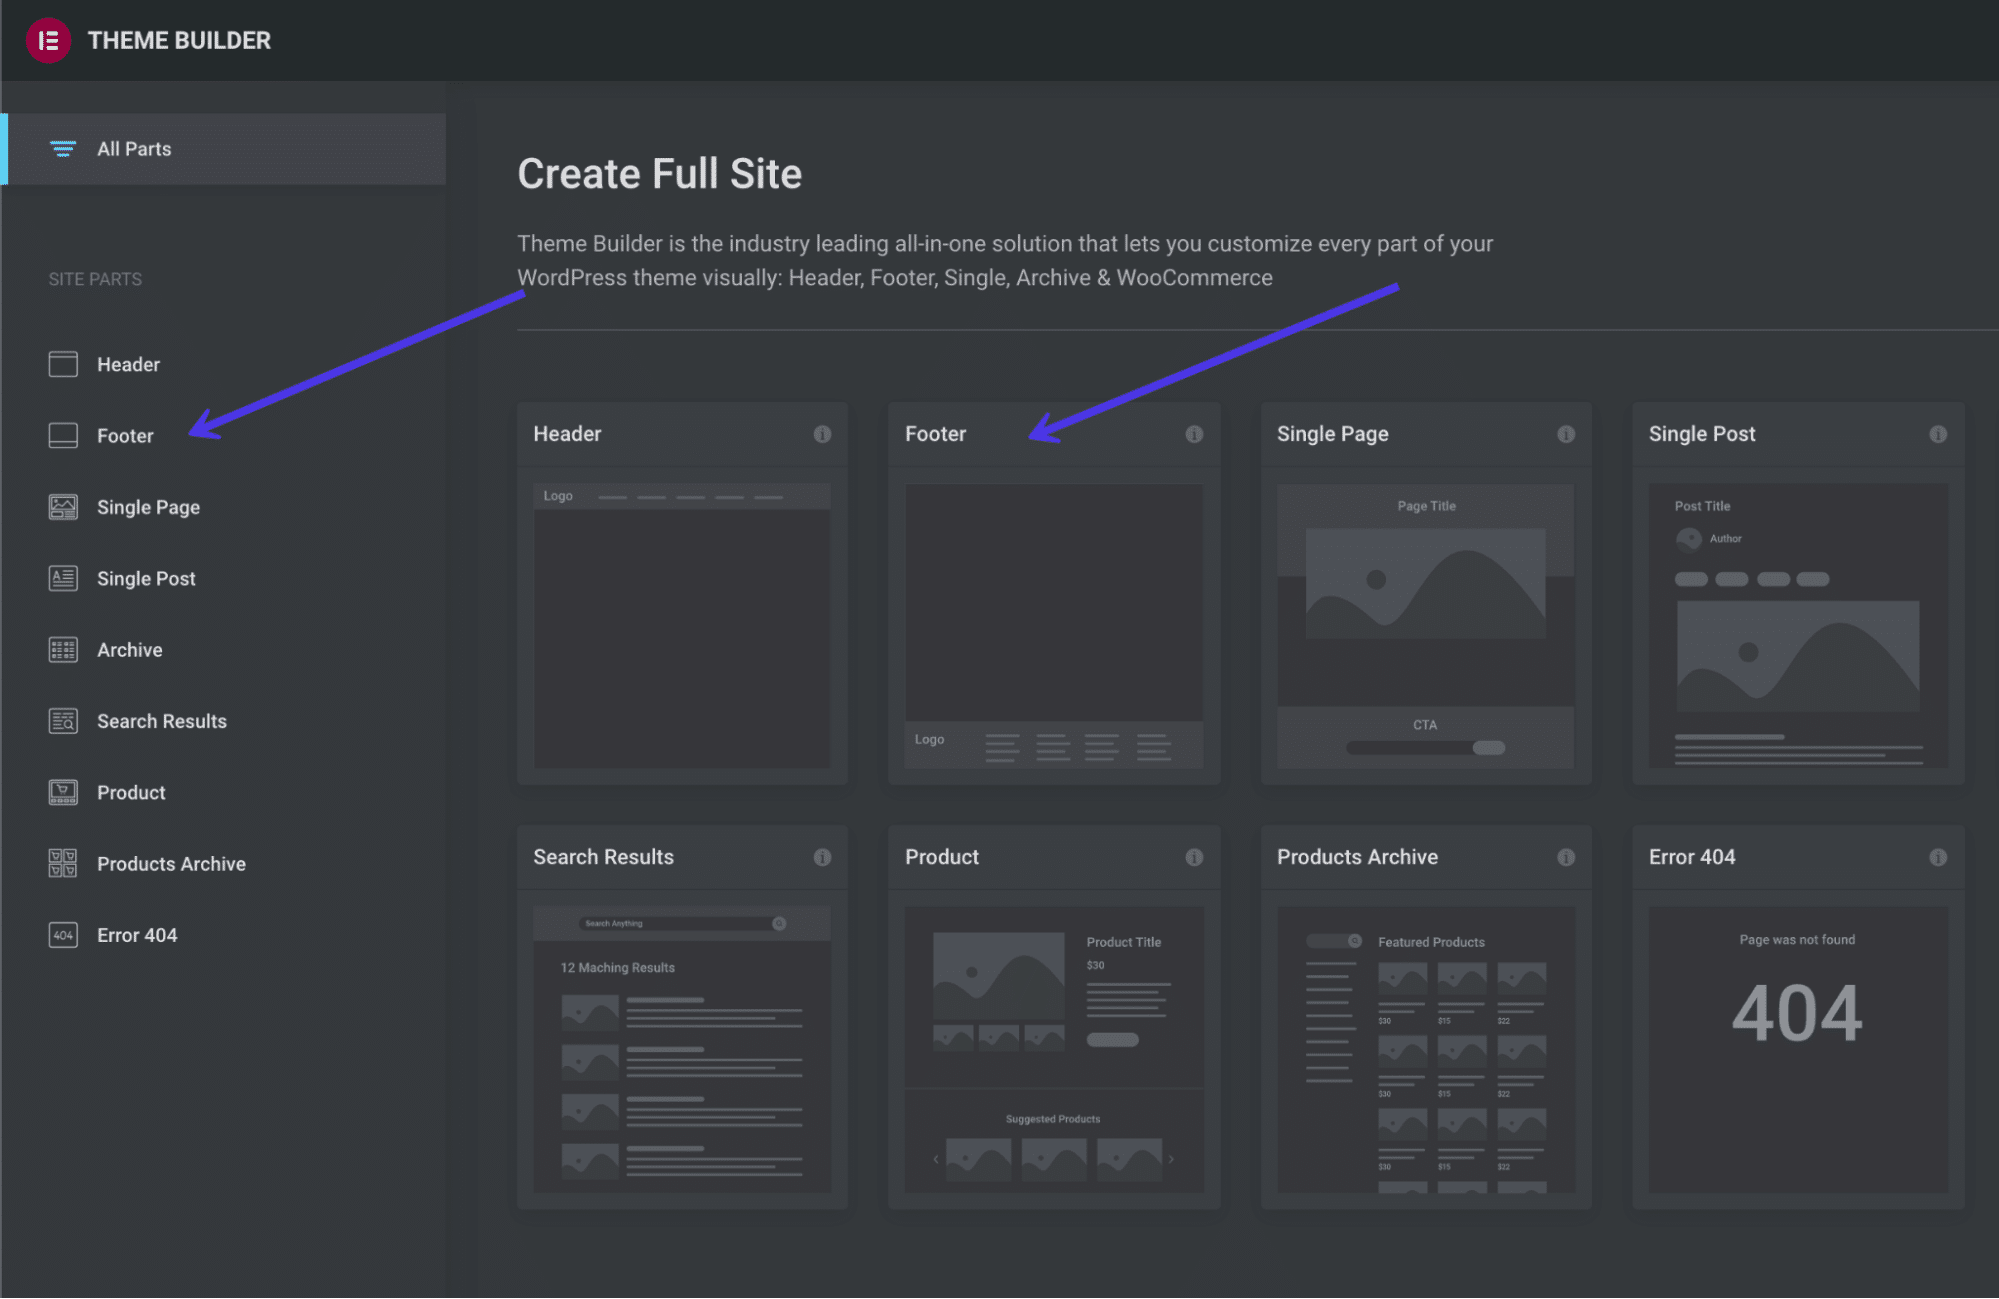
Click on Templates > Theme Builder to open the complete website builder from Elementor.
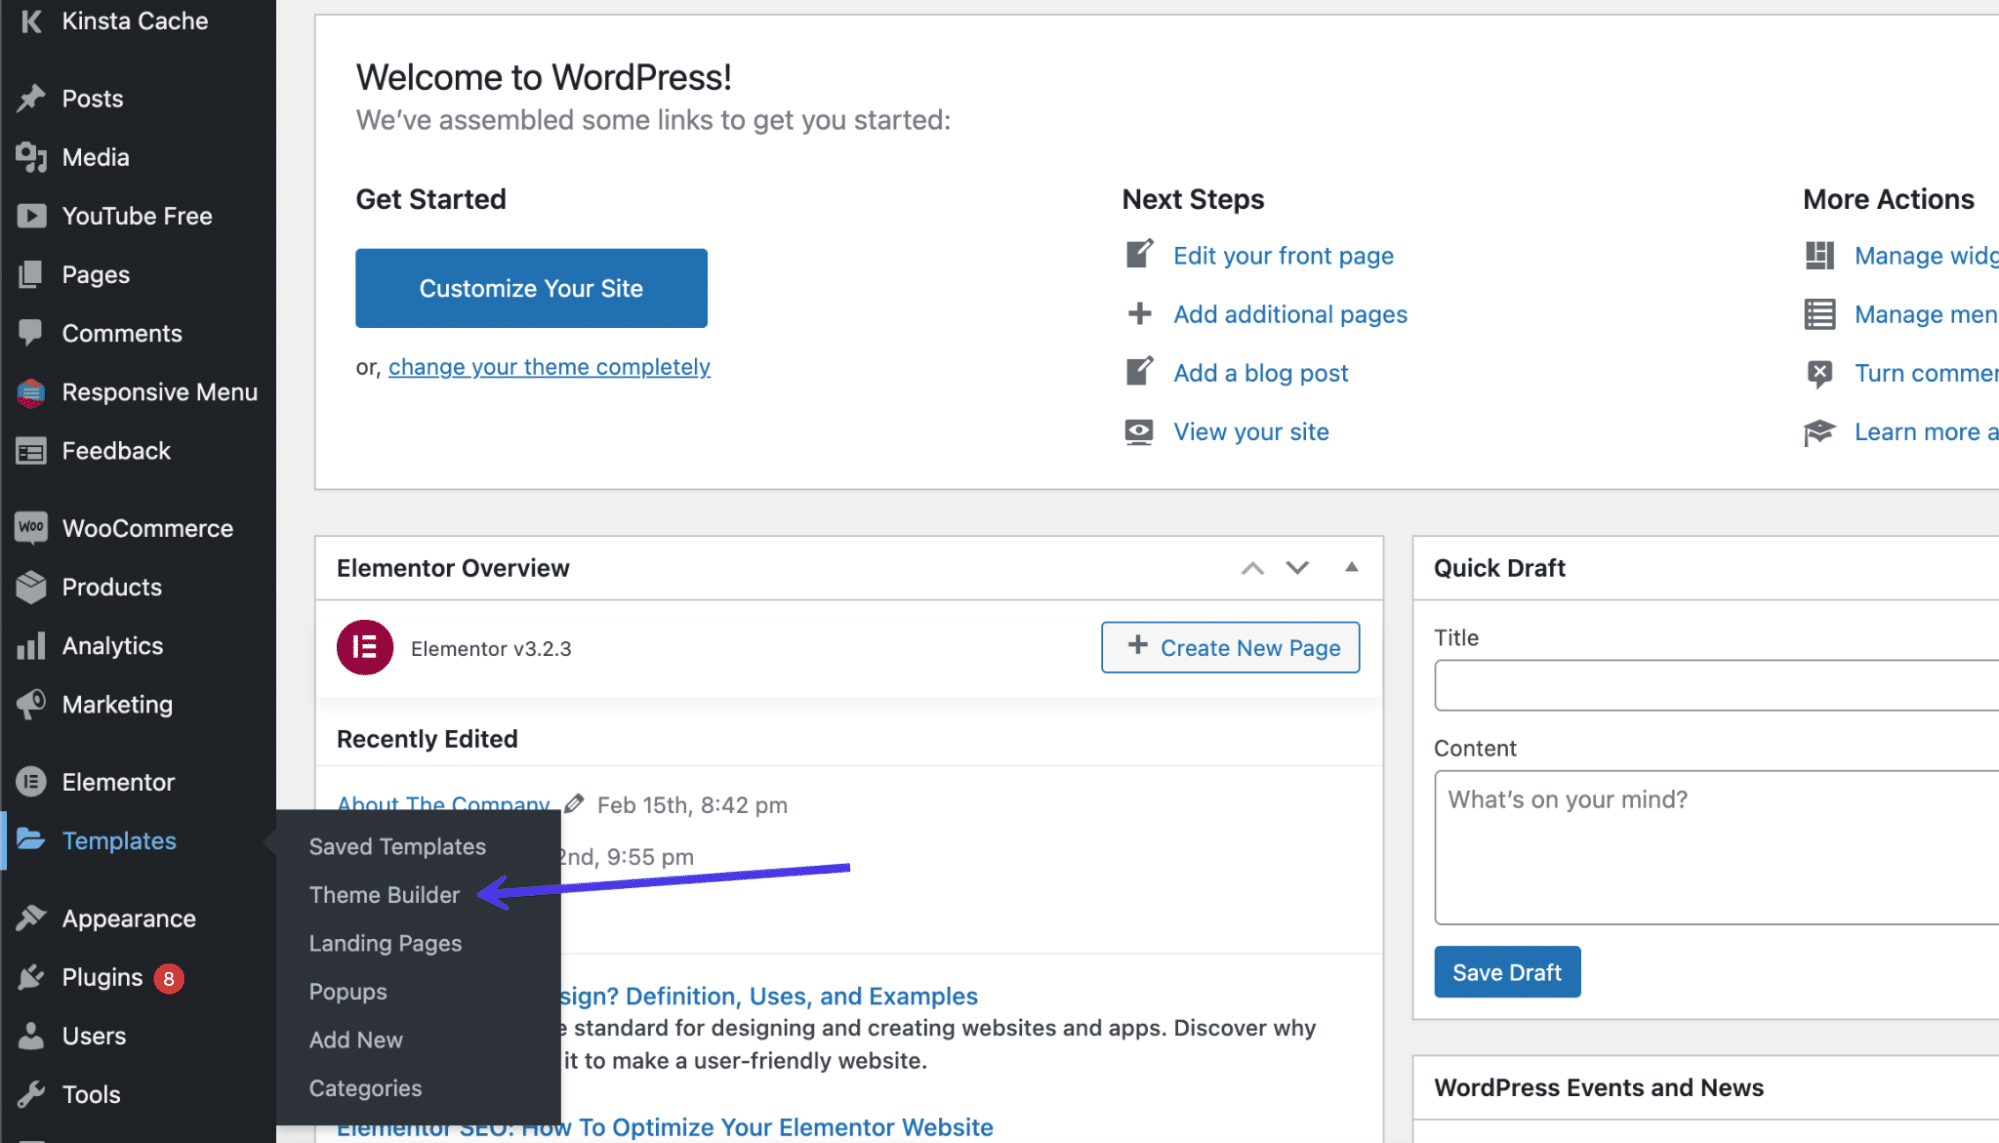
Here, you’ll see a menu to edit various parts of your site such as the header, footer, and single pages.
Select the parts of your site you want to customize on the left side menu or with the icon buttons in the middle of the page. As you can see, there’s a Footer link in two places.
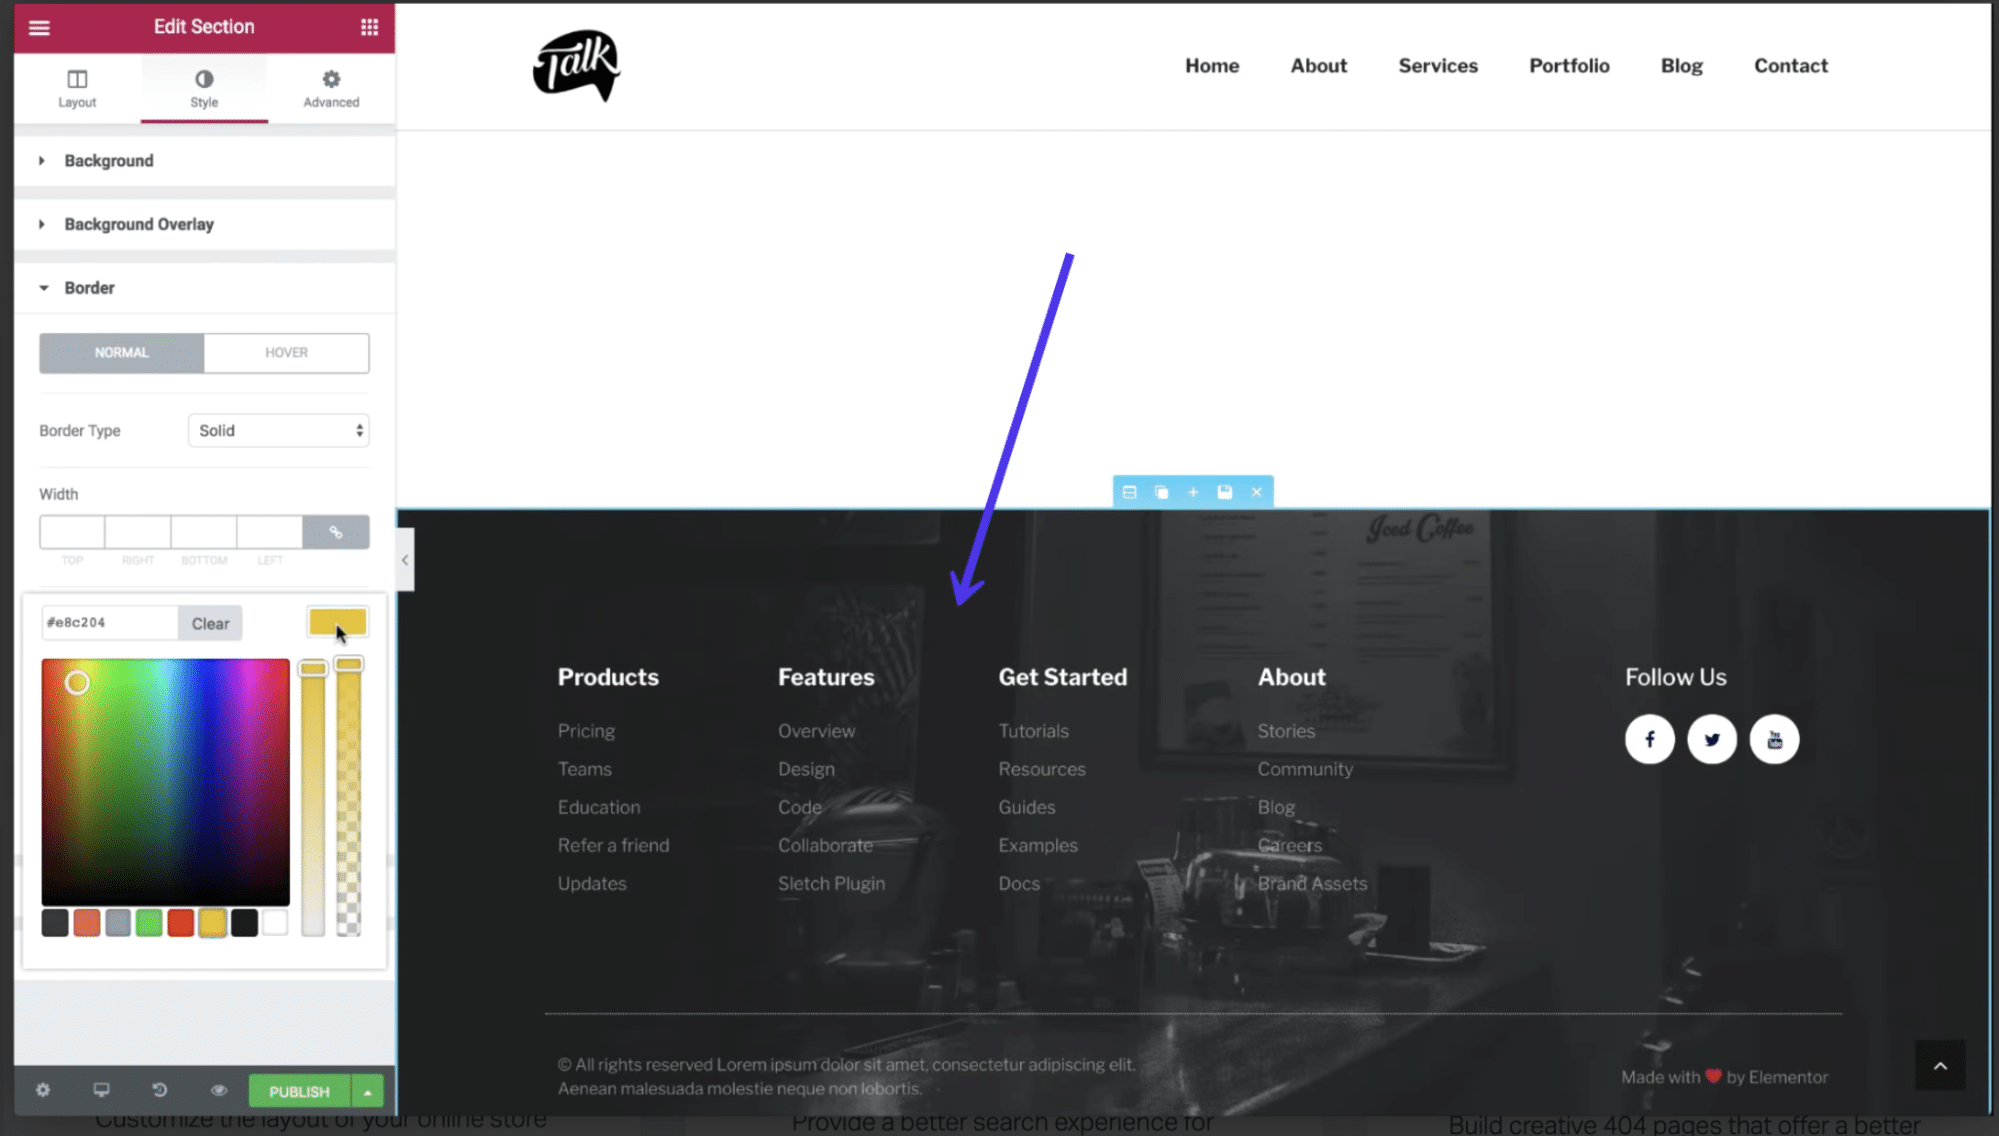
The footer editor works similarly to every other editor in Elementor: You can change the layout, adjust the style, and click on the block to type in new content. Every aspect of the footer is customizable when using Elementor, making it one of the more flexible and desirable options when it comes to footer control and learning how to edit a footer in WordPress.
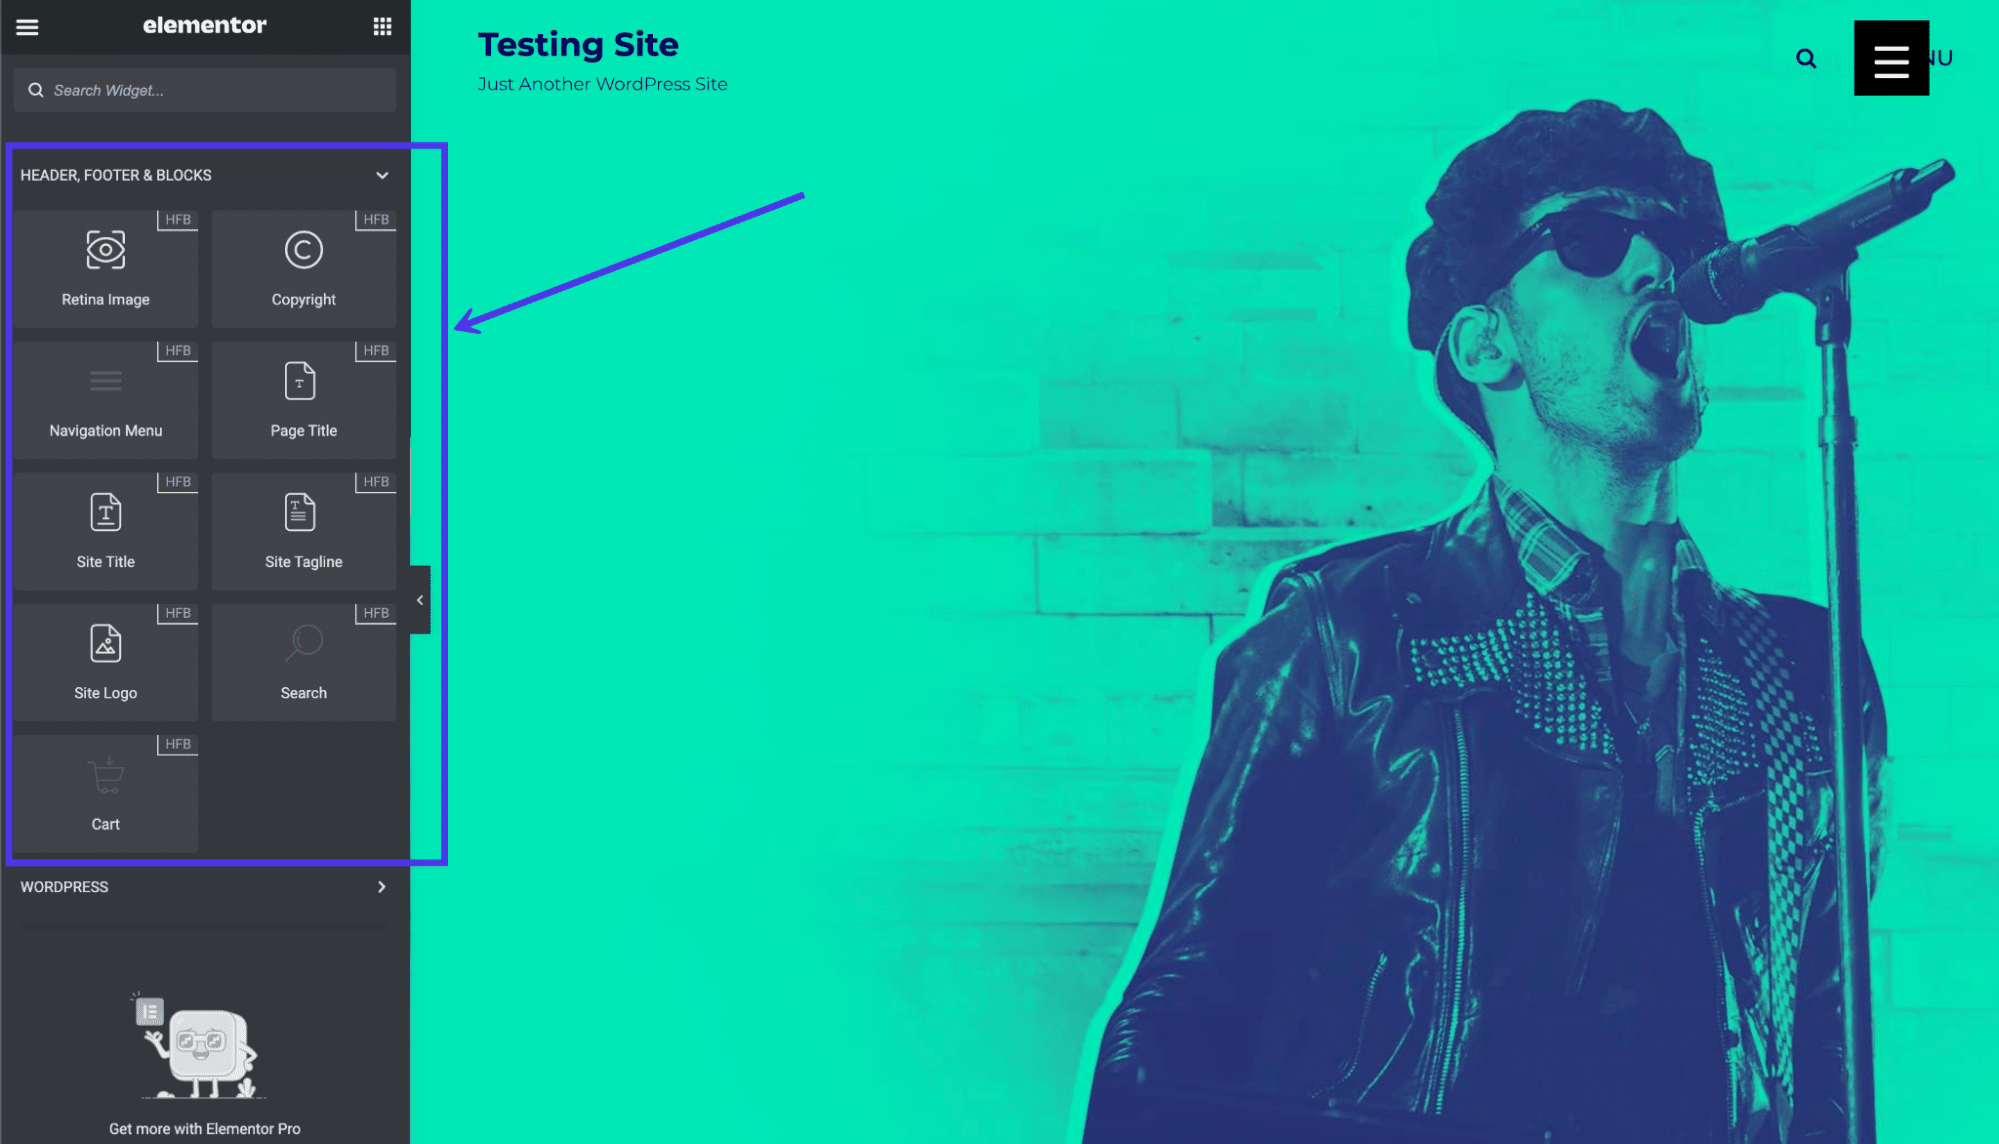
The Header Footer and Blocks plugin provides content modules made specifically for headers and footers. In terms of the footer blocks, you can choose from modules like copyright information, images, site titles, and taglines.
To utilize these blocks, go to Appearance > Header Footer and Blocks in the dashboard.
You can also make a unique block and choose to edit it in the Elementor page builder. Once in Elementor, scroll down to the block collection for Headers Footers and Blocks, then drag any of these elements into your current design to activate some of the more common content items within a footer. As mentioned, you can find everything from search bars to site logos and cart icons to copyright text in these blocks.
How To Edit a Footer in WordPress.com
WordPress.com, the hosted version of WordPress, includes footers for many of its themes, with options to remove or change the footers with a few clicks. The methods for editing footers in WordPress.com are somewhat similar to how it’s done in the self-hosted WordPress.org version, but with a few differences.
Check Out Our Video Guide to Editing a Footer in WordPress.com
First of all, the interface doesn’t look exactly the same.
You must log in to your WordPress.com dashboard and manage your footer in the Theme Customizer. Luckily, many of the themes offered for WordPress.com are similar or exactly the same as what you’d find for WordPress.org. However, that also means the way in which you edit the footer in WordPress.com depends on which theme you install.
To begin, go to Appearance > Customize in the dashboard.
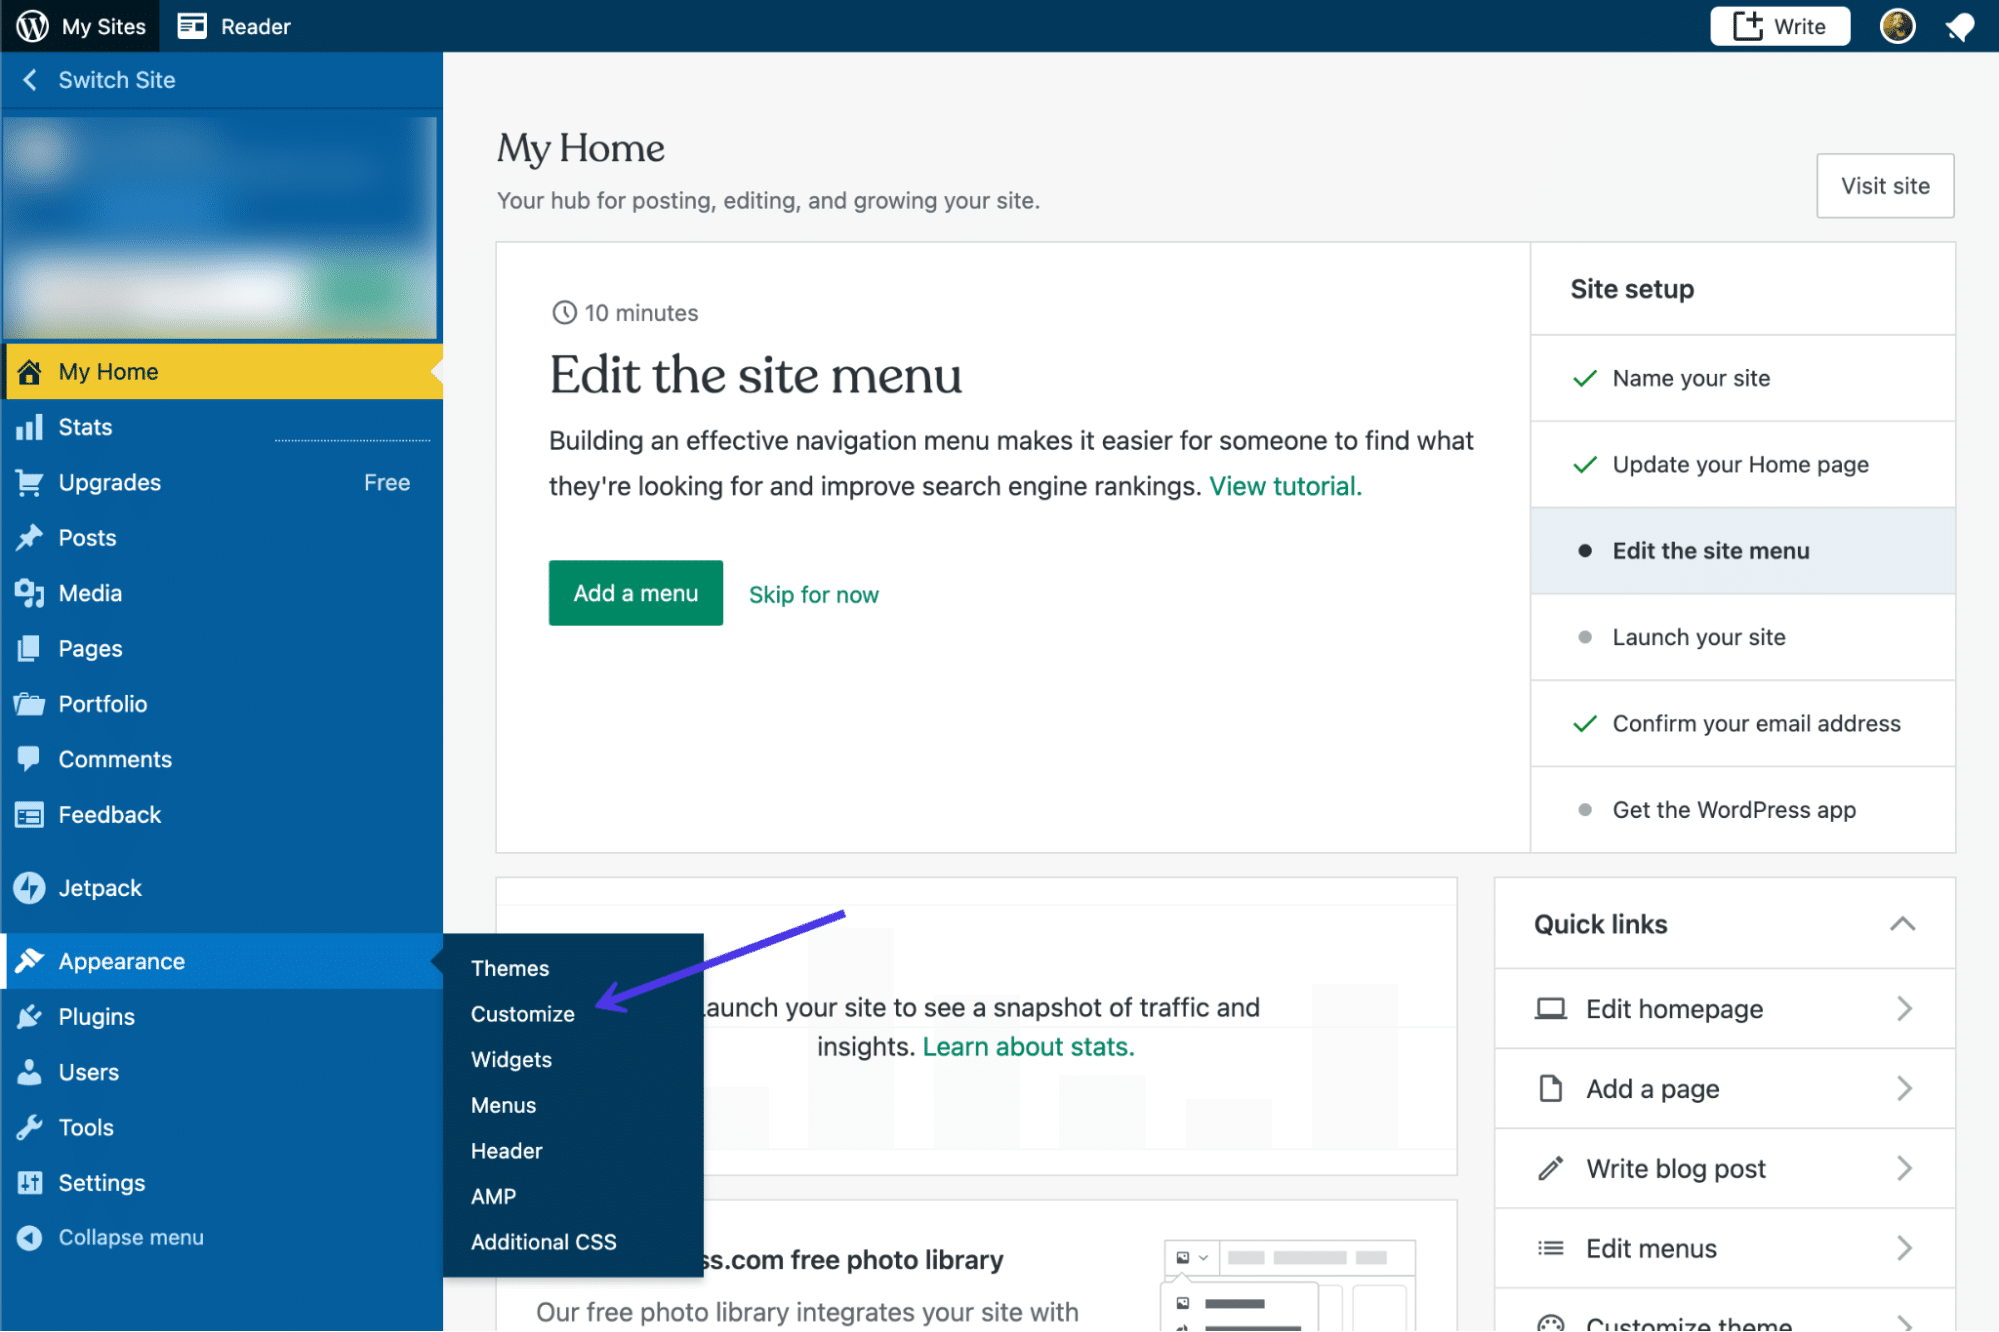
Look at the Theme Customizer tabs available for that particular theme. Most themes have a Widgets tab, but you must figure out if a footer area for placing widgets is provided with your theme. Click on the Widgets tabs to find out.
This current theme we’re using provides a Footer Widget module. If you don’t see an option to put widgets in the footer, consider trying a new theme, or use menus instead of widgets.
For this example (with a footer widget area), click on the Add A Widget button.
A slideout menu appears with a collection of widgets. You can select whichever widgets make the most sense for your company.
Again, the theme dictates how many widgets you can fit into the footer without it looking too cluttered. It appears this particular theme allows for about three columns of widgets before the design starts looking messy.
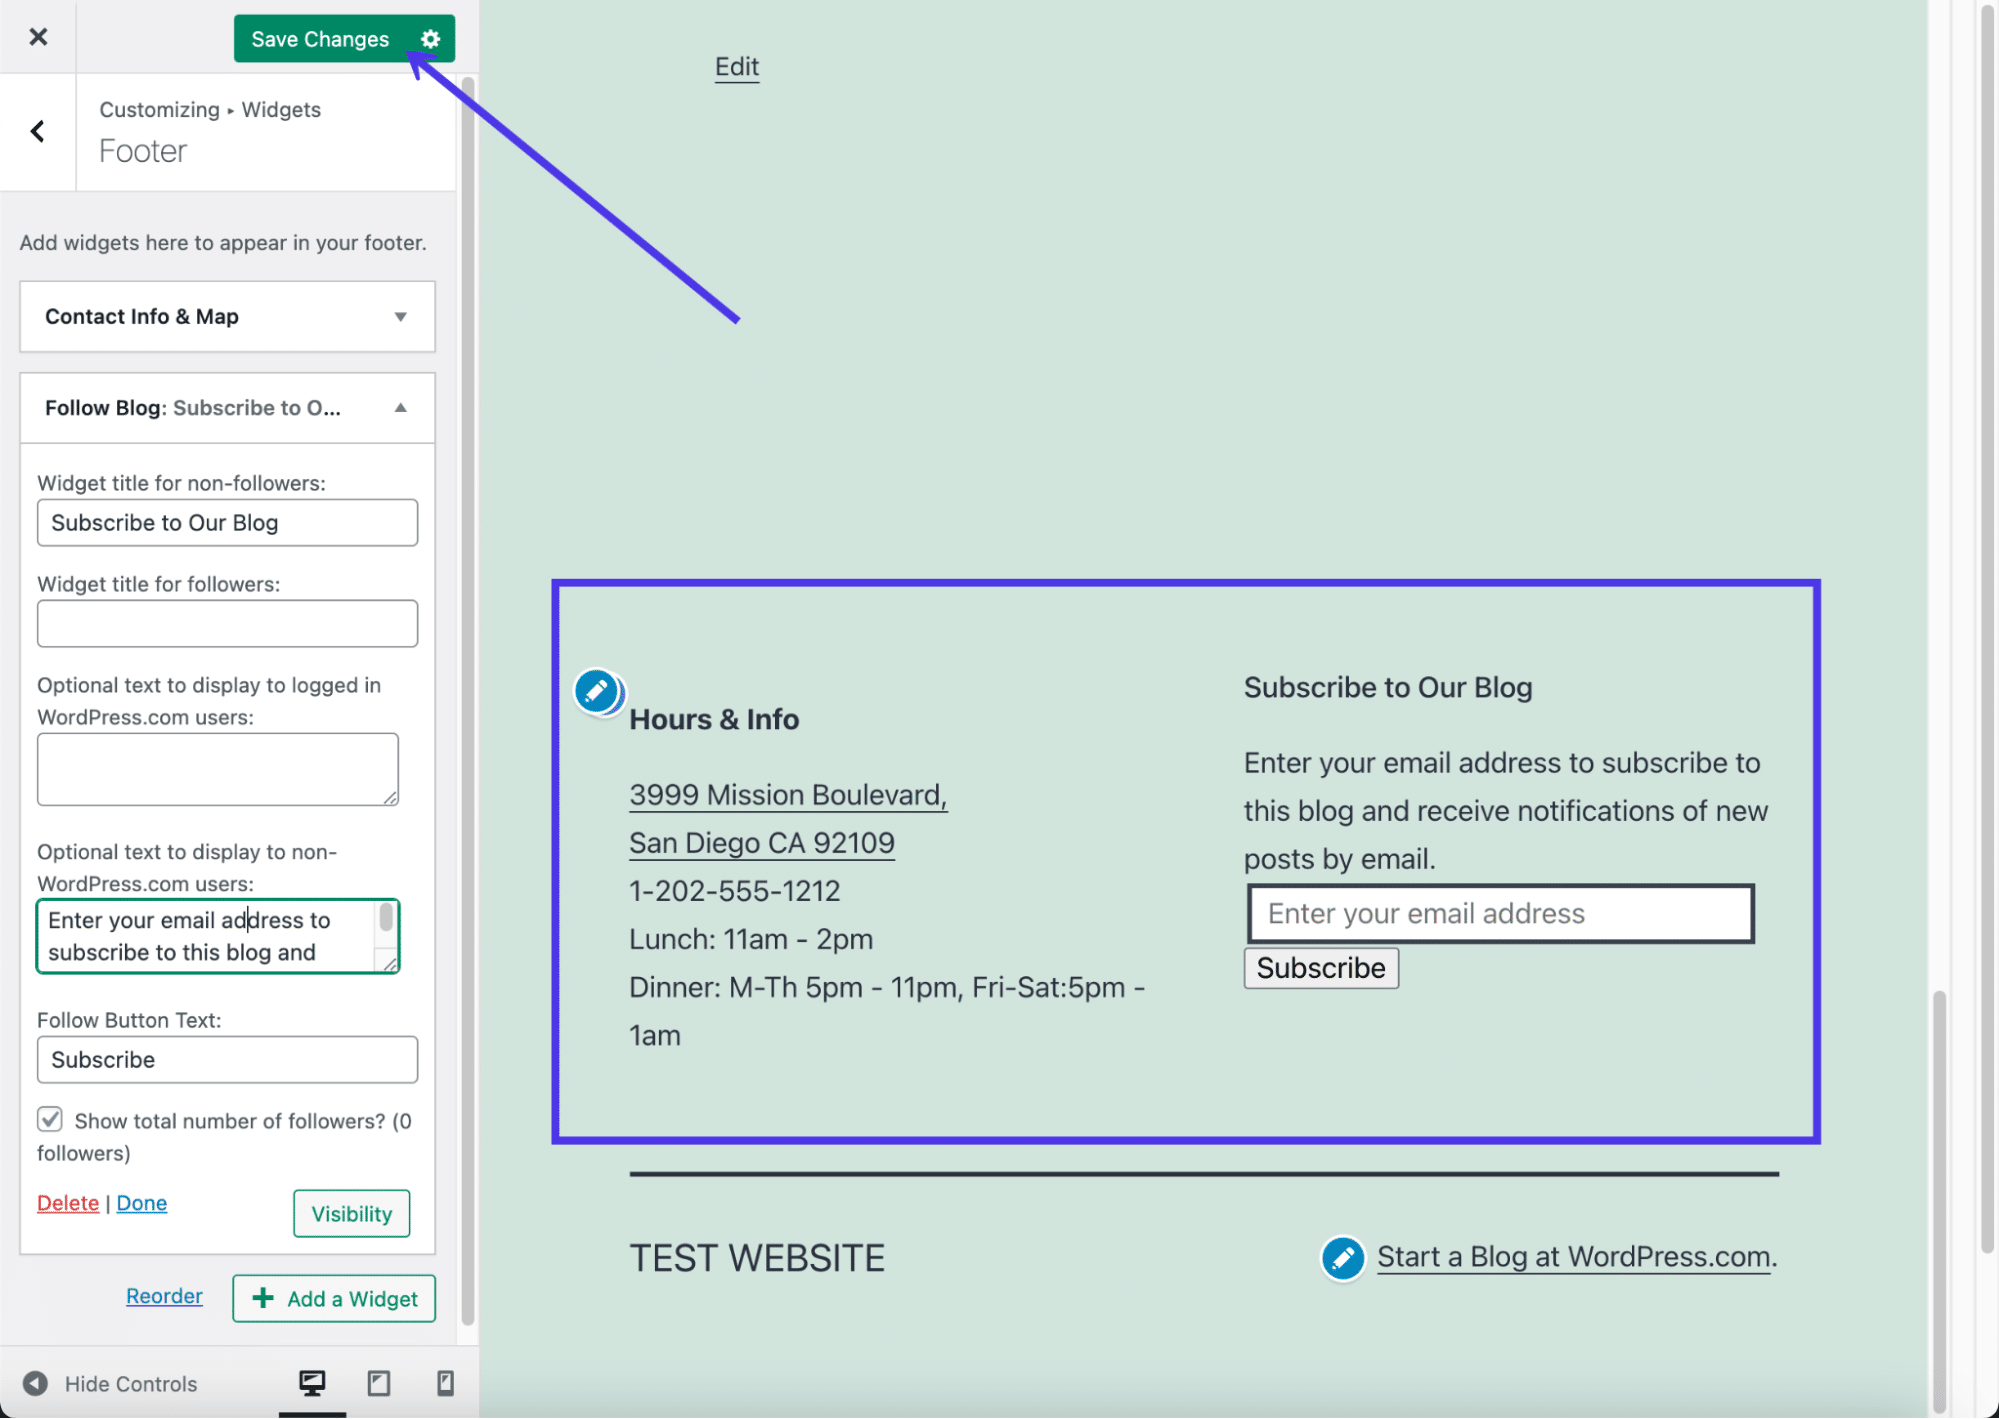
For our example, we’ll choose a Contact Info and Map widget, along with a Follow Blog widget, which prompts visitors to sign up with their email addresses.
The preview on the right shows the widgets in action. We recommend going through each widget settings panel to configure individual elements like the display text and choose which fields you want to show in each widget.
Make sure you click on the Save Changes button so the widgets appear on the front end of your website.
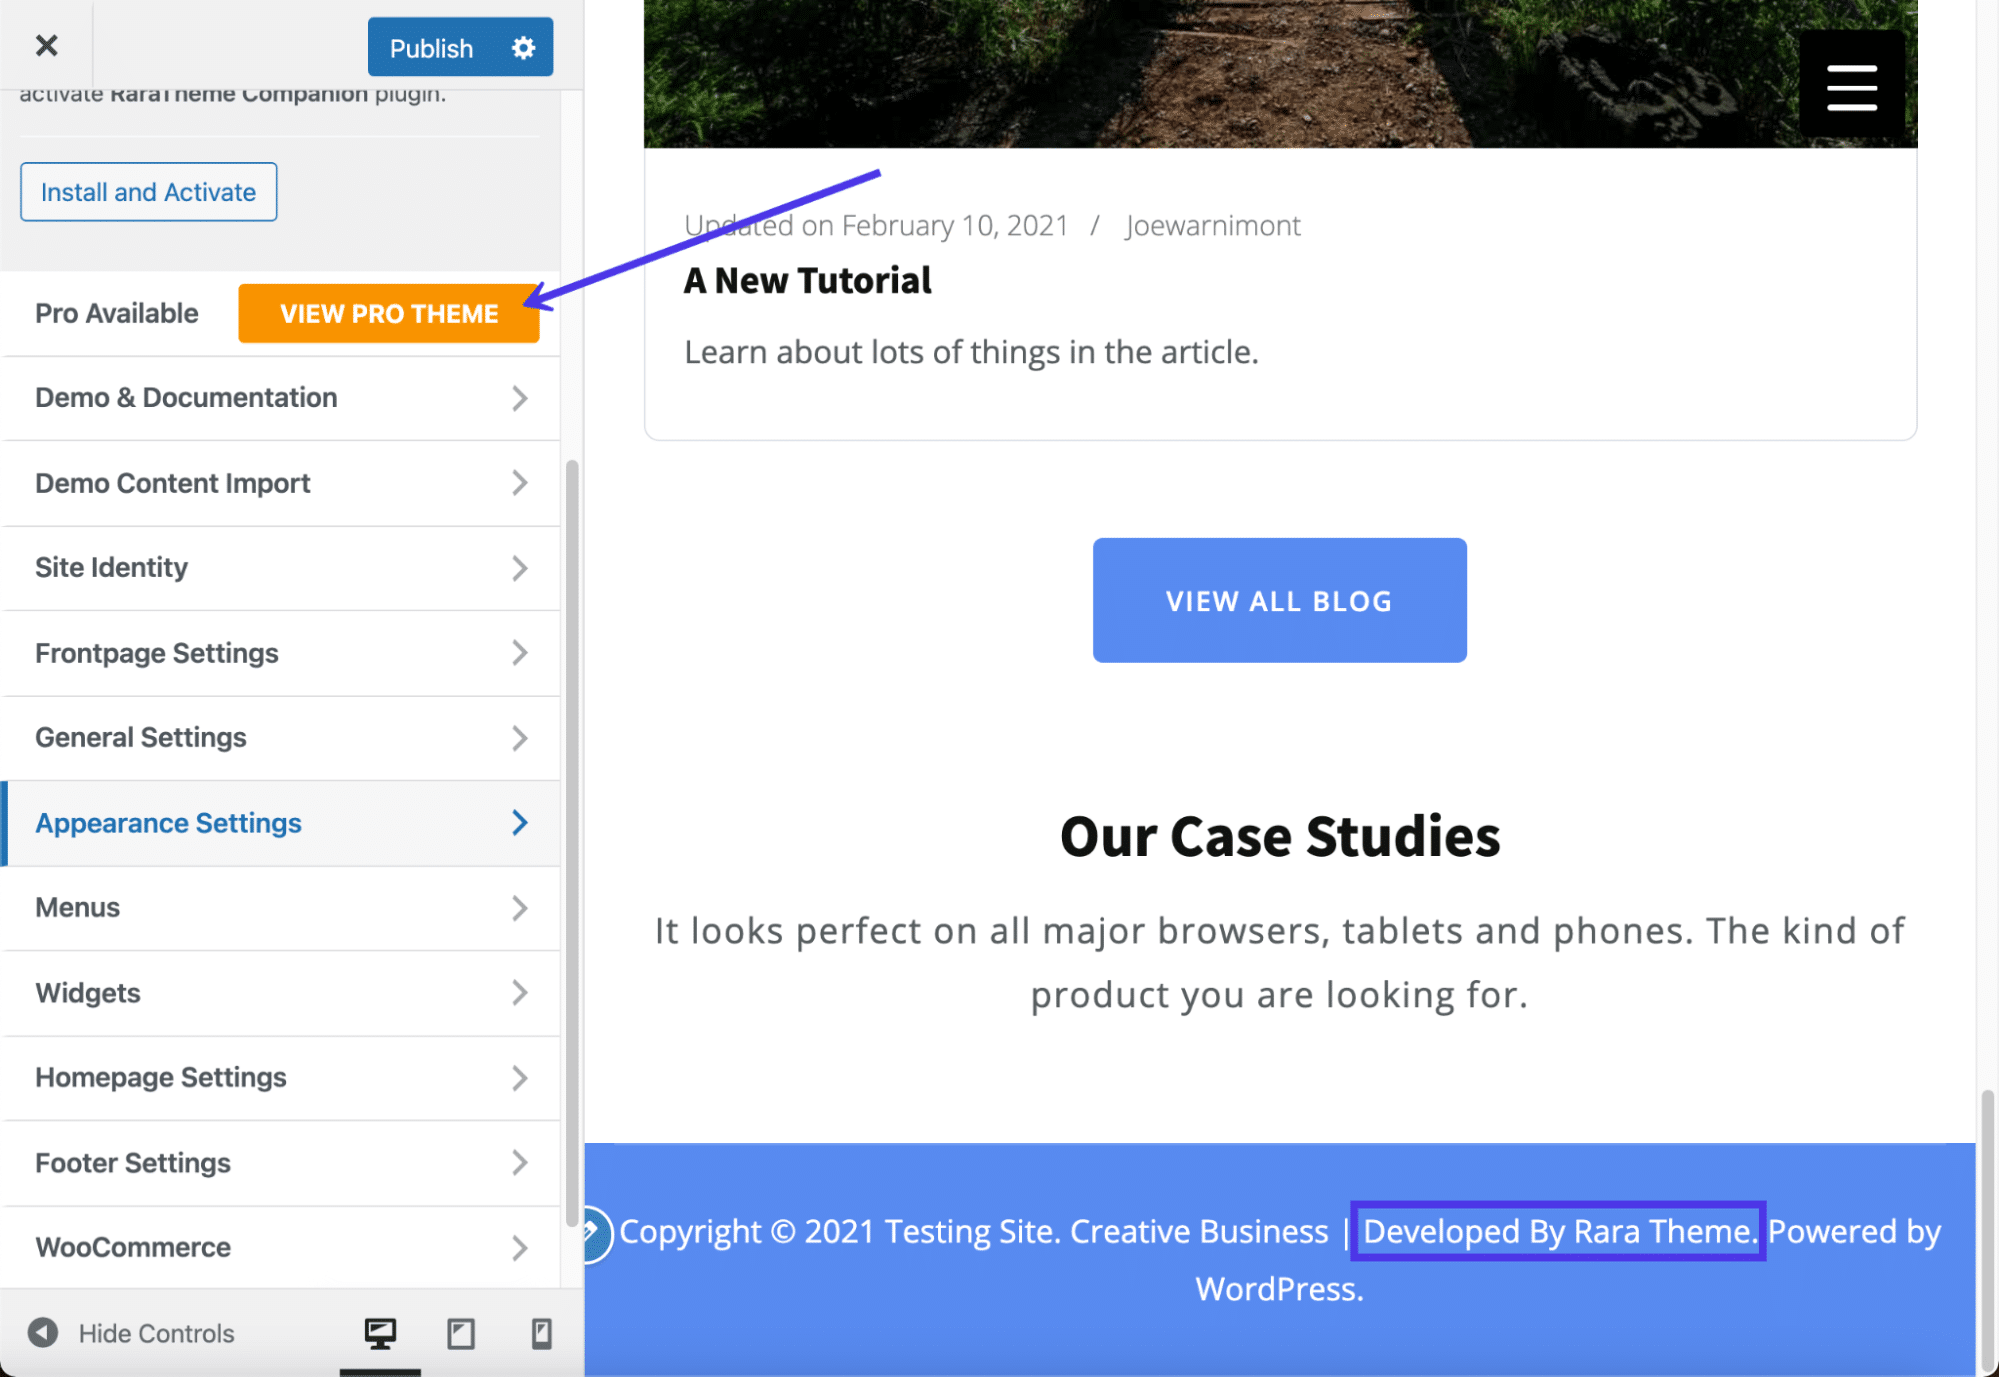
You also may notice that WordPress.com automatically adds your site title and a WordPress credit at the very bottom of your footer. You can usually get rid of the site title if you want, but the WordPress credit removal requires you to pay for the Business Plan.
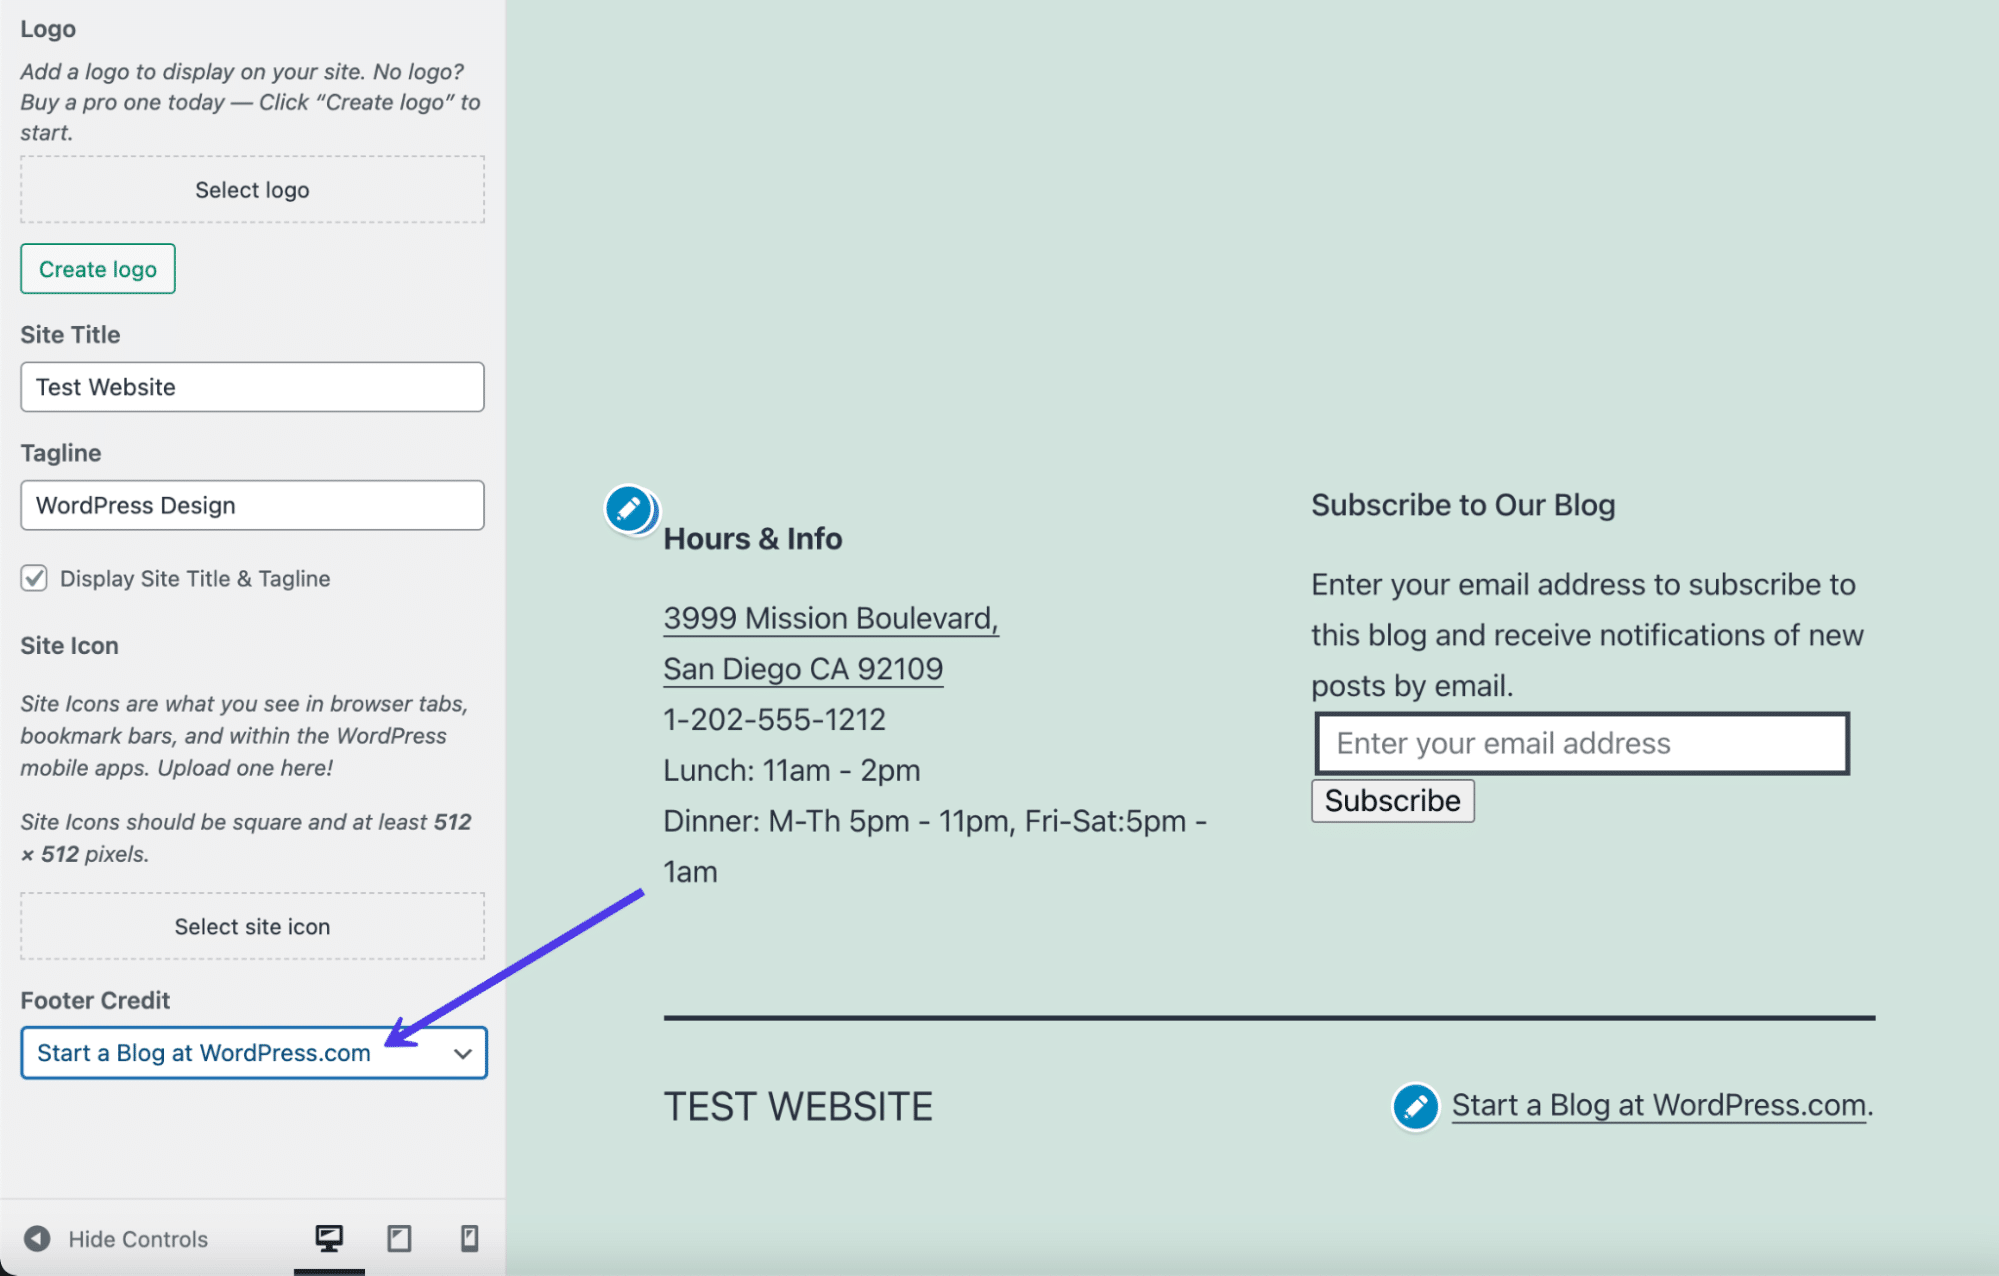
To modify both of these elements, click on the Site Identity button.
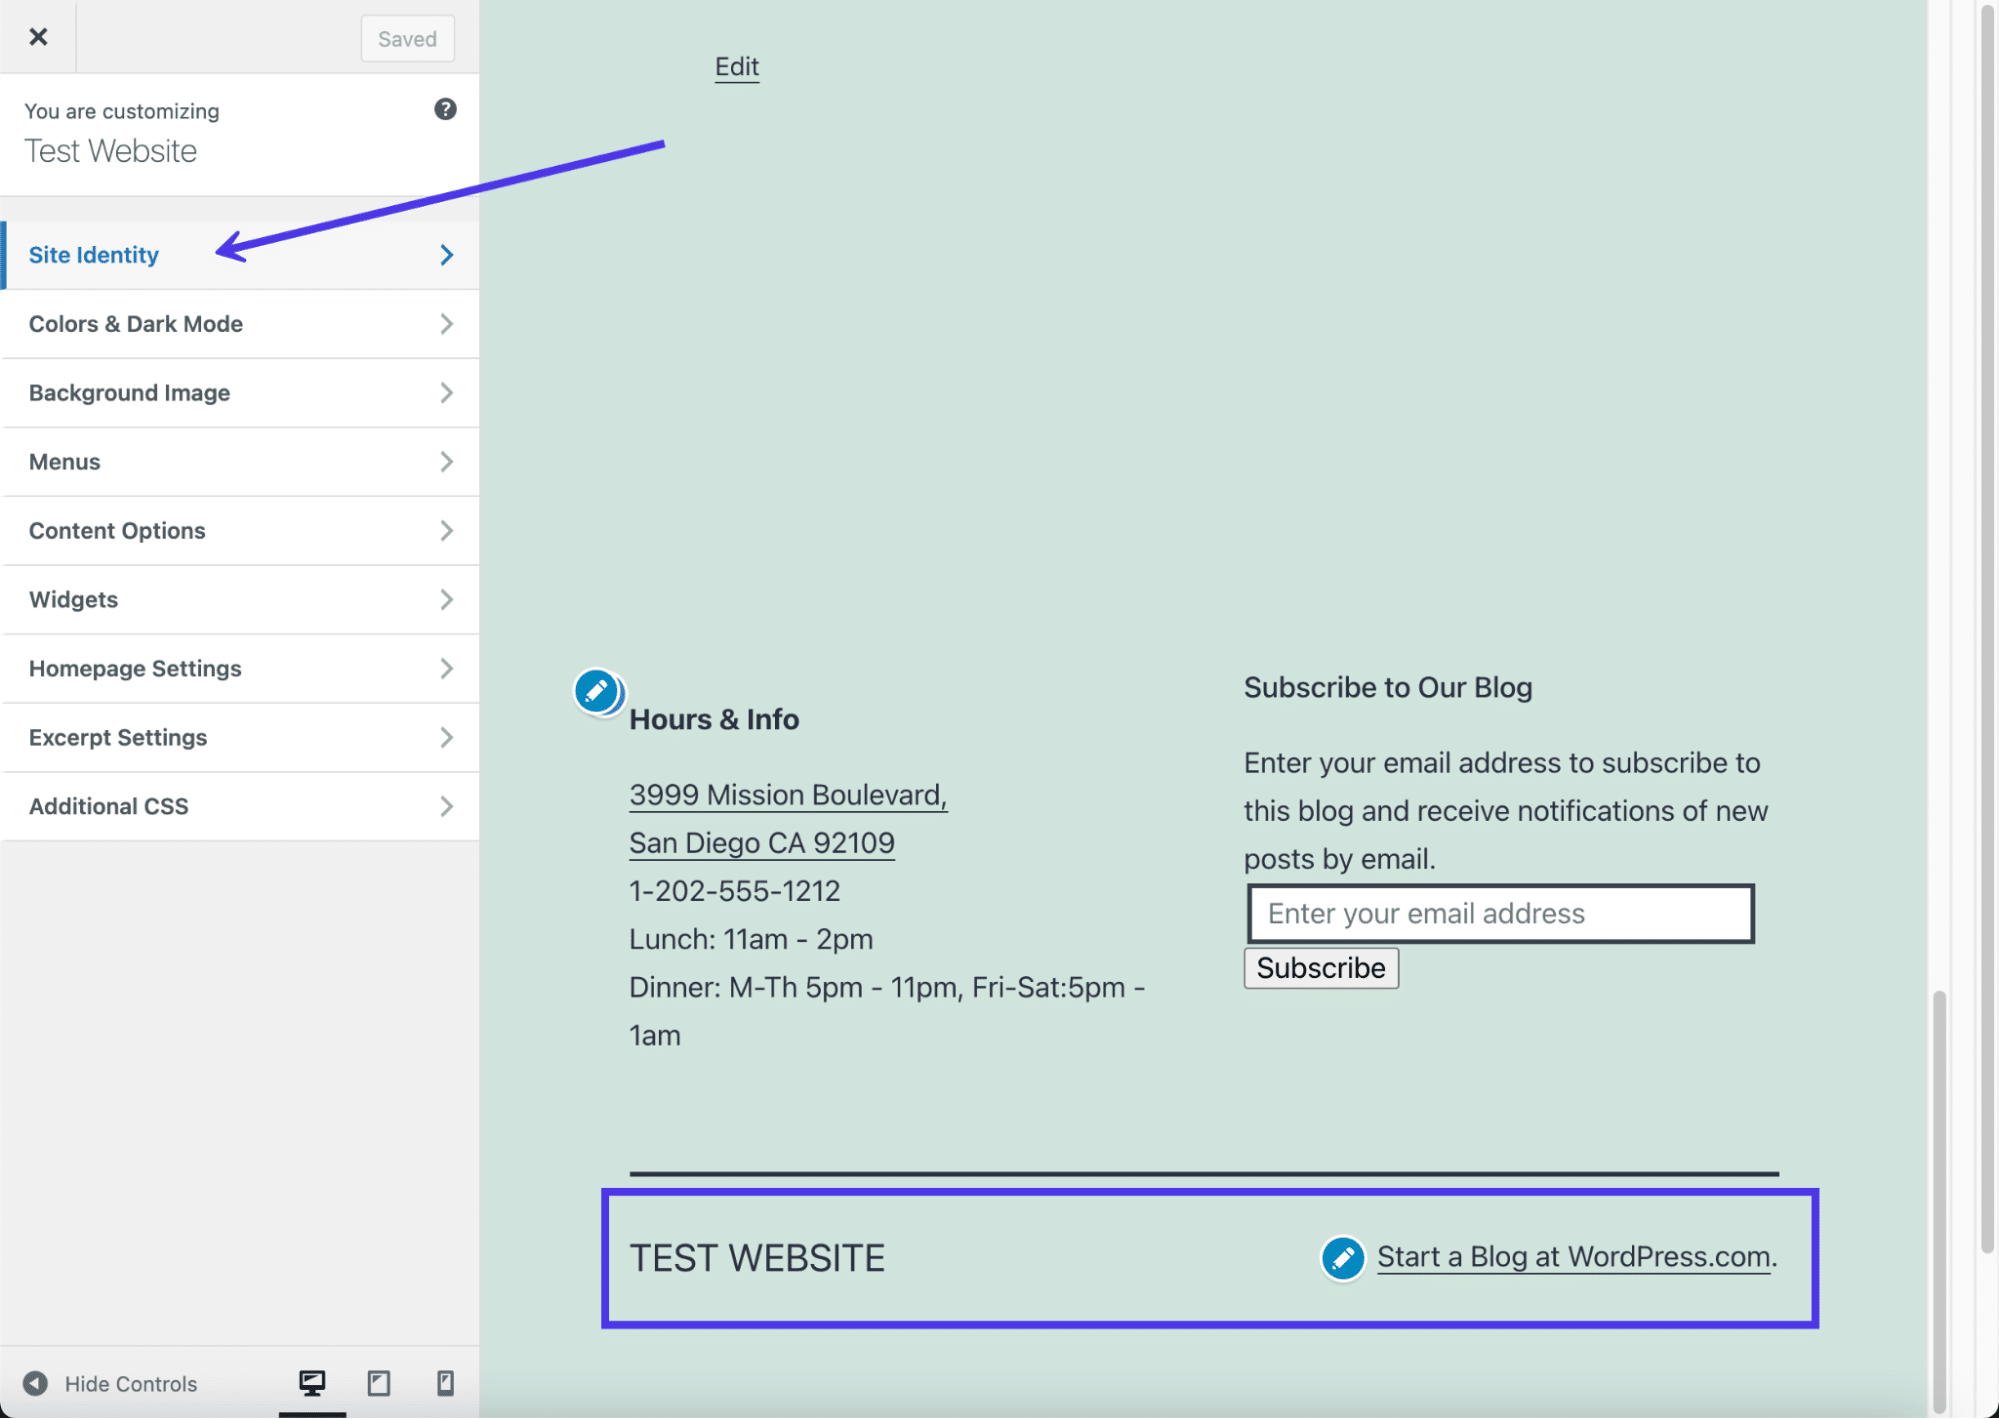
First off, go to the bottom of the settings to find the Footer Credit field. Click that dropdown to reveal all possible options.
Every one of the credits has some sort of reference to WordPress. A WordPress credit isn’t a big deal if you’re running a personal blog or online journal, but we suggest you upgrade to the Business Plan and remove the credit if your site is for a legitimate business.
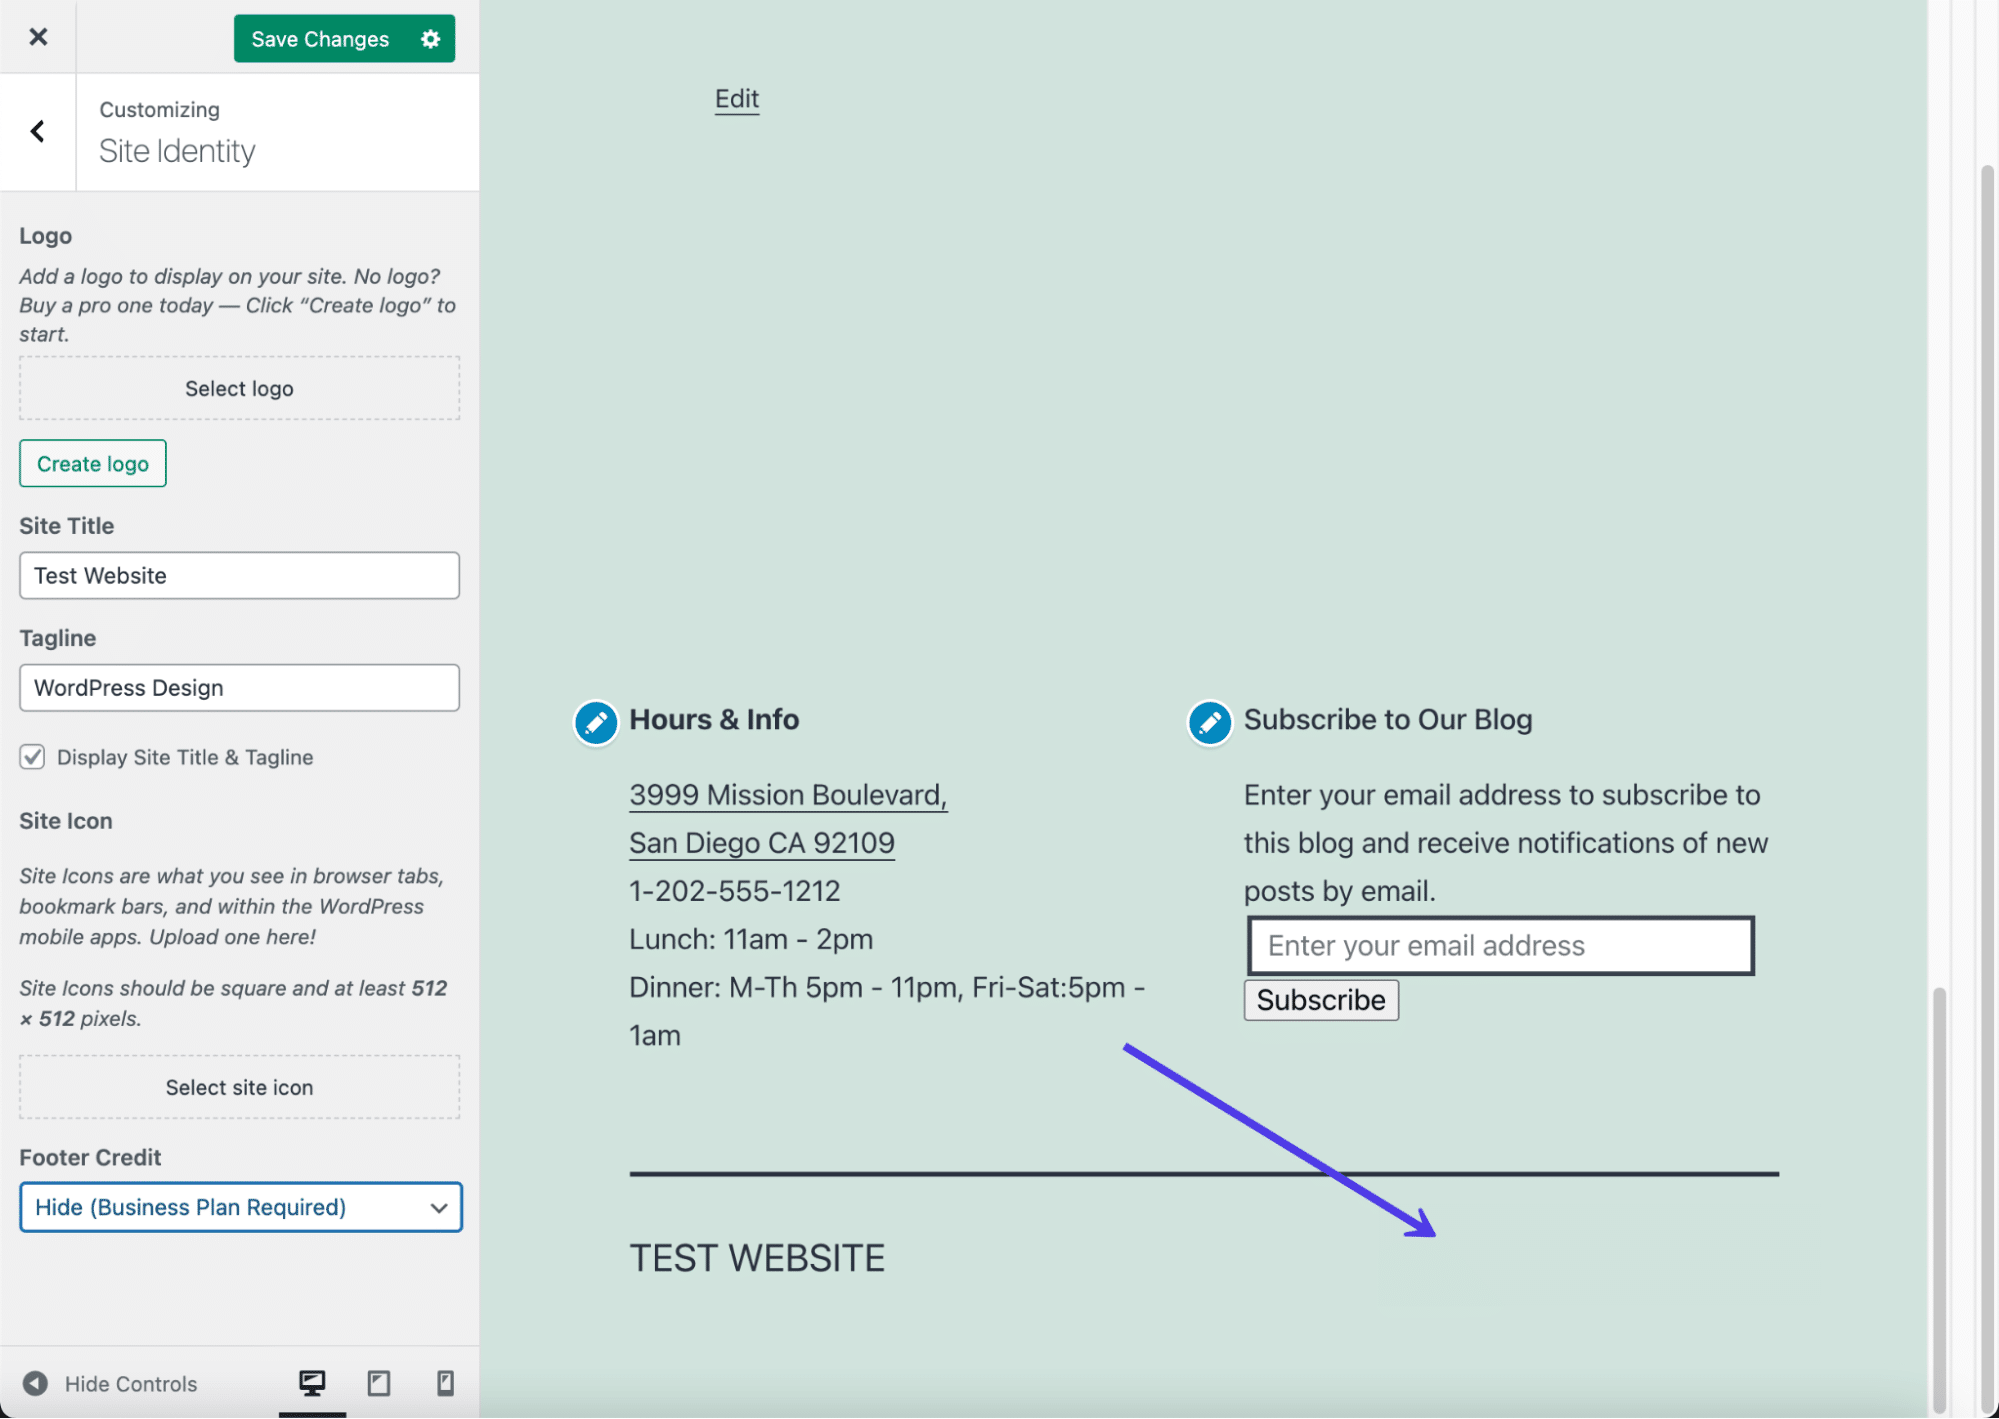
After that, you can click on the dropdown menu and choose the Hide option to get rid of the credit completely.

The credit then disappears in the preview, leaving whatever widgets you added to the footer along with the site title.
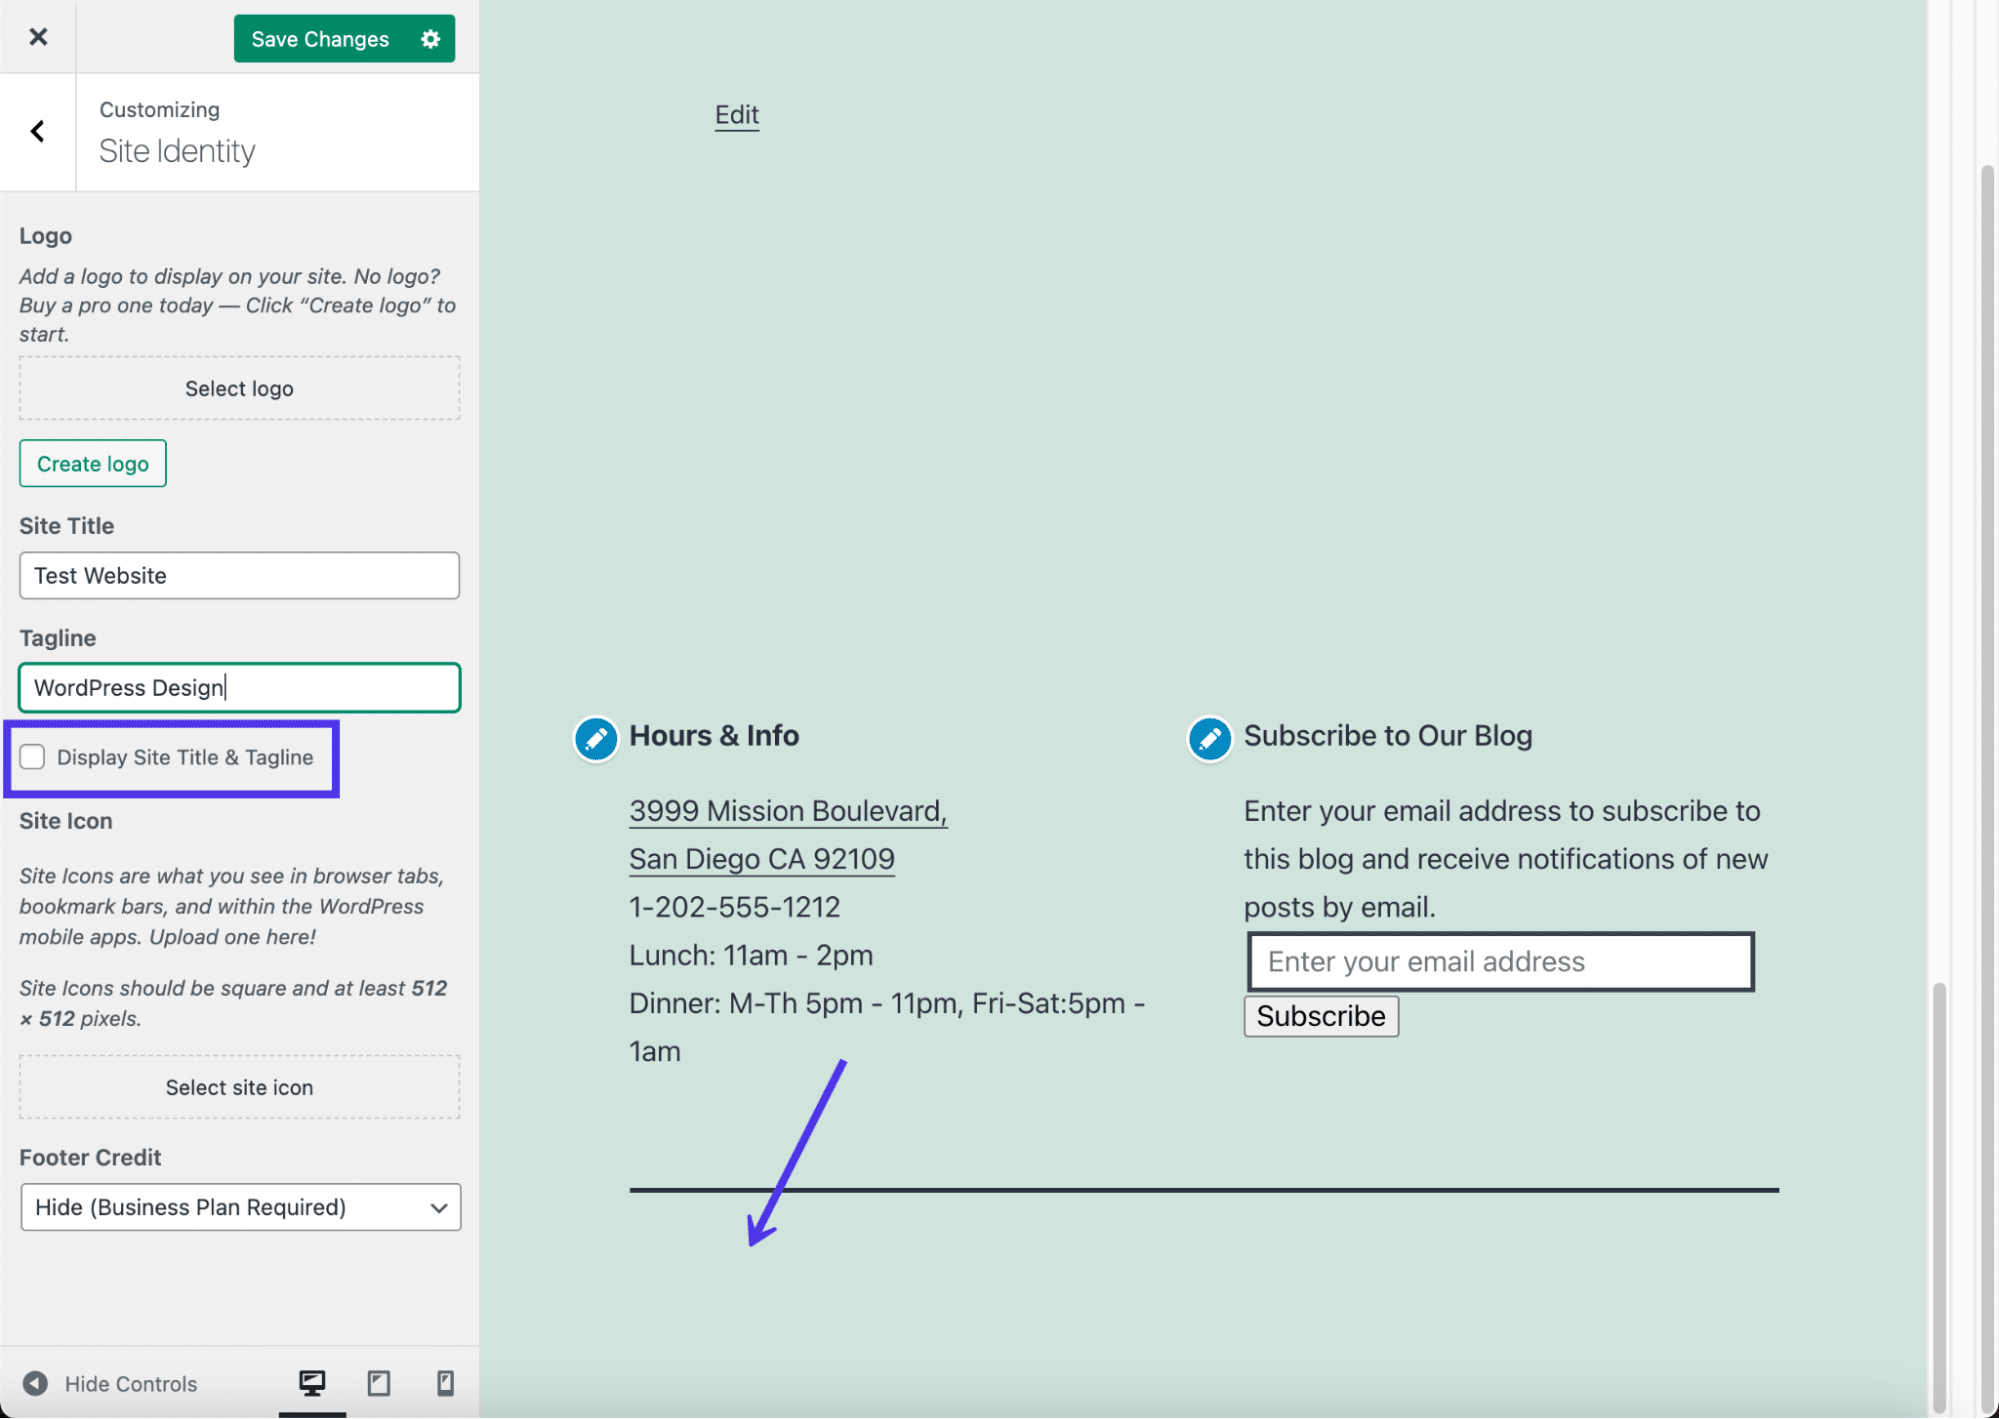
Some themes have the ability to remove the site title from the footer as well. The easiest way is to uncheck the Display Site Title and Tagline box. That gets rid of the site title in the footer and potentially the header. For the header, we recommend uploading a logo anyway.
Other themes have different ways of removing the site title and tagline. Sometimes it’s not possible at all, while other times the site title isn’t included in the footer, to begin with. When in doubt, try deleting what’s inside the Site Title field if you don’t have the Display Site Title and Tagline check box.
Another way to insert content in your WordPress footer is by utilizing the Menus panel. Not all themes allow for menus in the footer, but it’s a good idea to at least check.
Click on the Menus tab to continue.
Select View All Locations. This brings up a list of where you’re allowed to place menus in this particular theme.
For our example theme, we have quite a few menu location options, one of which is for the footer. You won’t be so lucky with every theme you encounter, so be prepared to either swap them out or consider using the widget technique for editing your footer instead.
With themes that support footer menus, click on the Footer dropdown field.
We chose a premade Social menu for the footer. Feel free to select the Create New Menu link if you don’t already have a suitable menu.
The result is a simple text/link menu that appears above whatever widgets you already added to the footer. It’s possible you’re unable to add widgets to your theme, so you may not see the exact same format.
Keep in mind that all menus are simply lists of text and links, so you won’t be able to incorporate something like a social media icon menu unless you consider a separate plugin that supports that.

How To Add Social Media Icons to WordPress Footer
A mainstay of the footer area is the classic list of social media buttons. Many websites add them in their primary menus, but it’s also a wonderful idea to have them at the bottom of your website as well, or as an alternative to placing the social buttons at the top of your site. In general, if you feel the header is already cluttered, go for footer placement instead.
Quite a few plugins provide widgets to add social media icons and links to your footer and header. Therefore, we suggest straying away from any custom coding here.
Although many social icon plugins exist, the goal for our purposes is to find one that specifically provides a quick widget for adding your links and customizing the buttons.
A popular, highly-rated solution is called Social Icons Widget & Block by WPZoom. It has over 400 icons for social media and other platforms, along with a widget to place your icons directly into your footer. Not only that, but you can upload your own custom icons and switch settings for colors and sizes.
![]()
After installing the plugin, you can go to the Settings page and disable certain font packages if you don’t want them. However, all of them are already active, so skip the settings if you’d rather have everything available to you.
To add social icons to your WordPress footer, go to Appearance > Customize.
This brings you into the WordPress Theme Customizer, where you’re able to add widgets to the footer (as long as your theme supports widgets in the footer). As we’ve mentioned earlier in the article, the only way to get around a theme that doesn’t have a footer widget is to find a new theme or custom code the footer yourself.
Find and click on the Widgets tab to proceed.
This theme has two areas to add widgets to the footer. That’s not the case with all themes, so you may find that your theme has no footer widgets areas. On the other hand, you might get lucky and have four or five spots to place widgets in your footer. It all depends on the theme you install.
Click on one of the Footer tabs.

It’s possible to add a myriad of widgets — or at least whichever widgets you have installed — to the footer.
Click on the Add A Widget button to show the menu of widgets available to you.
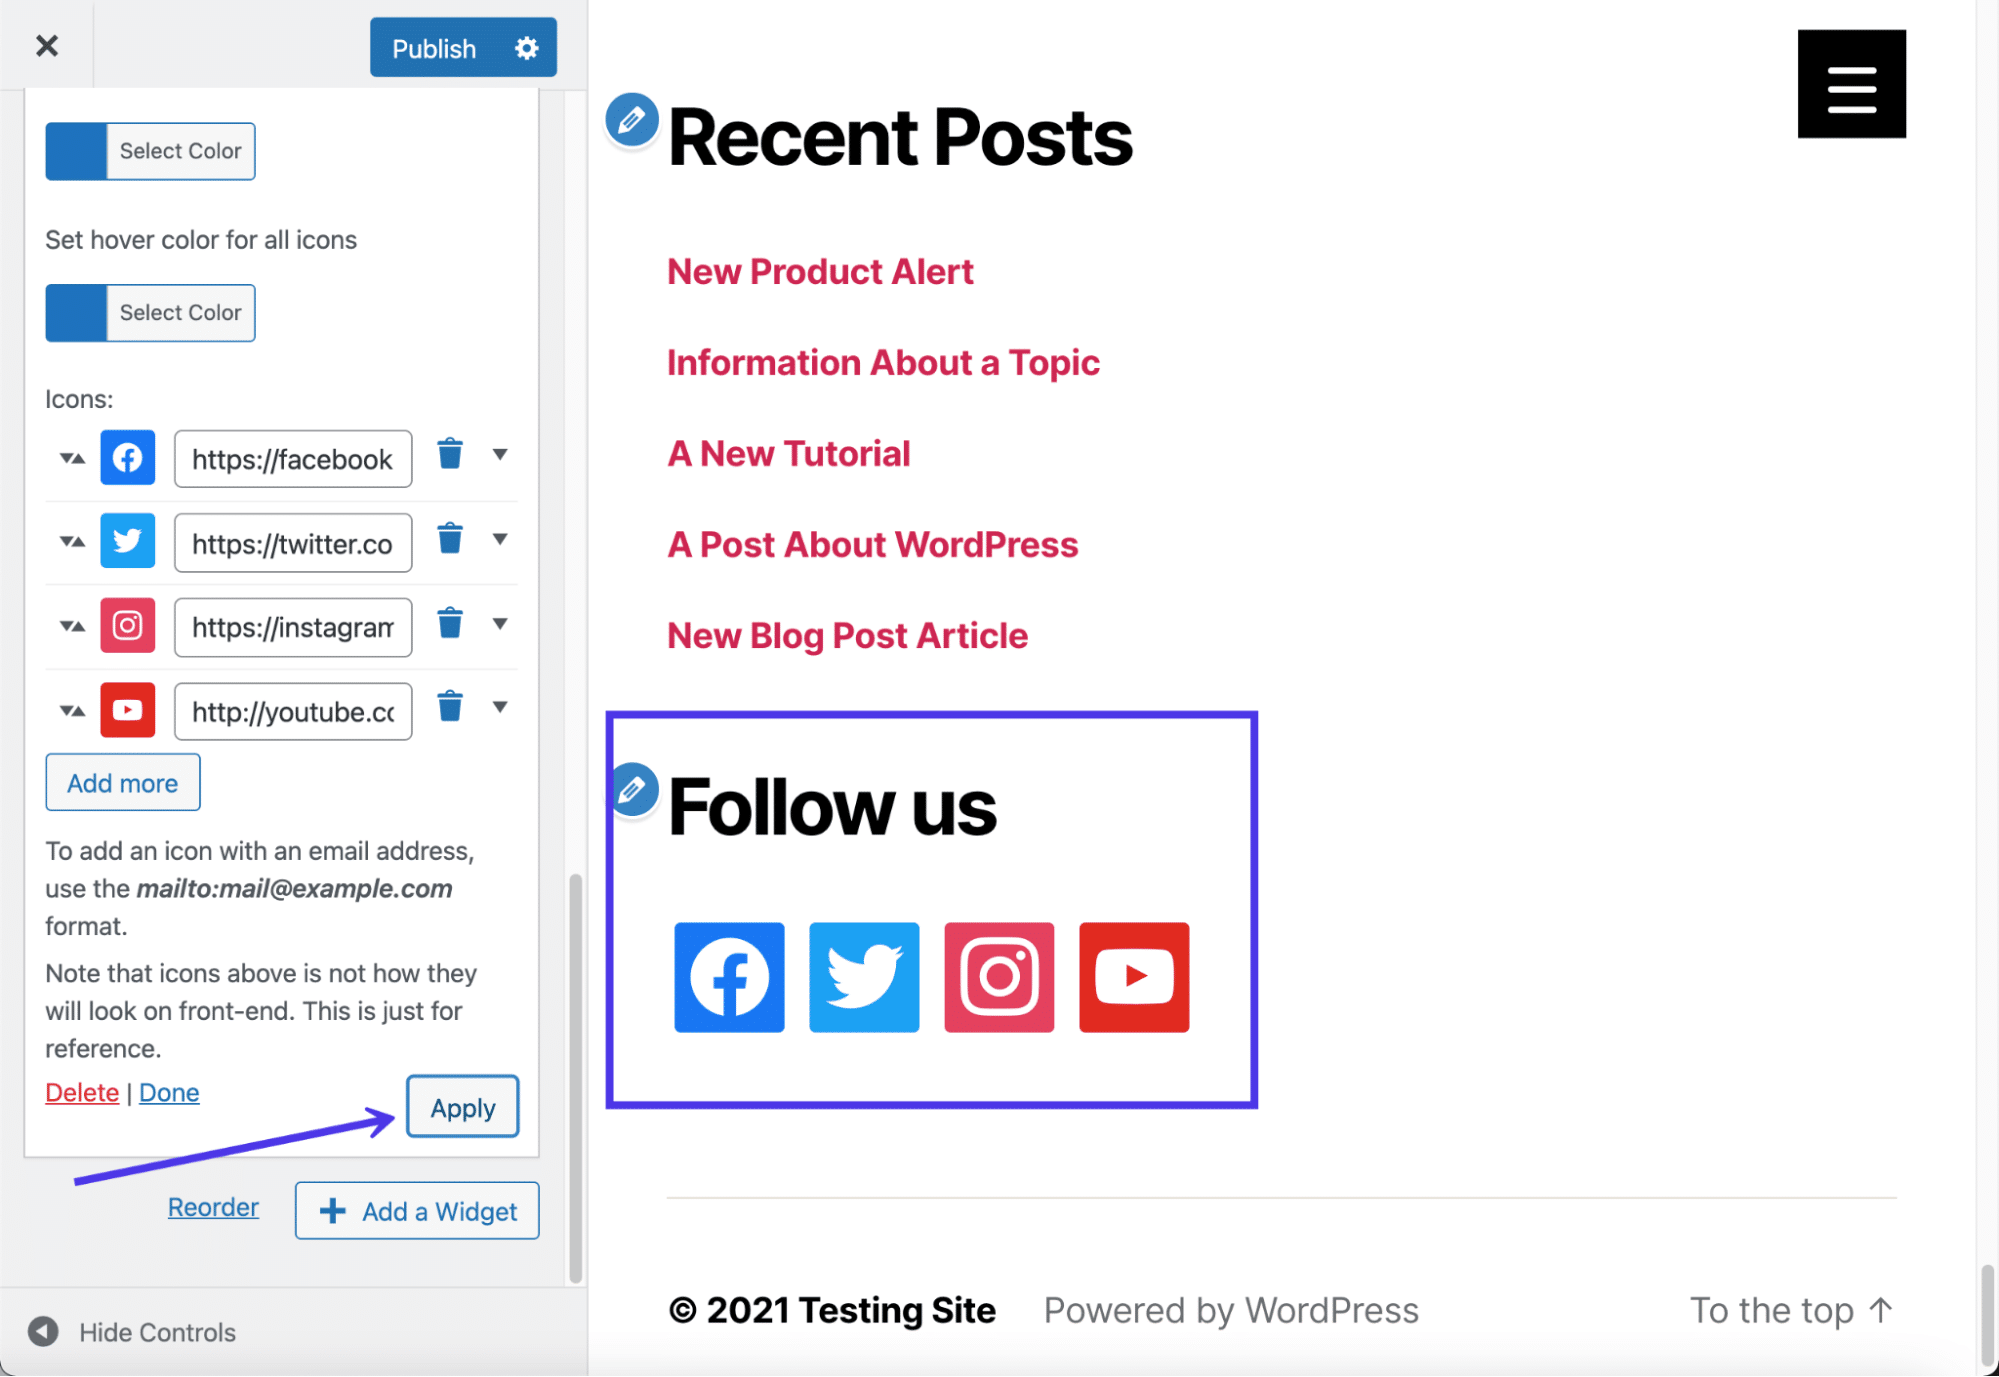
The slide-out menu provides a search bar and a list of possible widgets. Scroll down to locate the widget called Social Icons By WPZOOM.
![]()
You should now see the default social media icons and buttons in the preview for your website.
However, you’ll still need to customize the settings for these buttons to settle on the size of those buttons, coloring, and which links you want them to lead to.
Start by typing in a title for the widget, which appears in the footer (you can also leave this blank if you’d like). Continue by specifying settings like whether you want icon labels, nofollow links, and specific icon alignments.
![]()
Continue on with the settings to specify the icon style, background style, and padding. You can also choose an icon size and color. Keep in mind that you need to click on the Save button at the bottom of the widget customization module in order to see the results of your changes in the preview.
![]()
The Icons field already has some default social icons in there for you. Make a list of the social media sites you run for your company, and copy and paste the links into the respective fields. Remove any icons that don’t make sense for your business.
To open up the icon library and add more icons, click on the Add More button at the bottom of the field list.
![]()
The plugin offers a large collection of icons, with options to set icon colors, hover colors, and the icon kit source. The primary kit is called Socicons, but several other kits come with the plugin for free. Click on the Select Icon Kit dropdown to see your options.
Finally, browse through the icons provided with each kit. Many of them you may not even recognize, so only stick to the ones that you actively run and which will provide value to your customers.
In our example, we’ll choose the YouTube icon to add to our footer as well.
Click on the Save button to place it into the list, then click the next Save button at the bottom of the widget box to see your changes.
![]()
As you can see, we’ve made changes to the size and shape of the icons, while also adding an extra social icon. If your alterations don’t look quite right, go back into the widget settings to resolve the issues.
Always remember to hit the Publish button in order for the widget to take effect on the front end of your website. We also recommend checking the frontend yourself to ensure the social icons appear the right way.
How To Add a Background to Your WordPress Footer
Footer backgrounds are possible with the help of some footer plugins and page builders. However, you also have the ability to place an image or color background behind your footer by using the basic settings that come with your theme.
Check Out Our Video Guide to Adding a WordPress Footer Background
In case all else fails, we’ll show you how to insert CSS code to add a background to the WordPress footer.
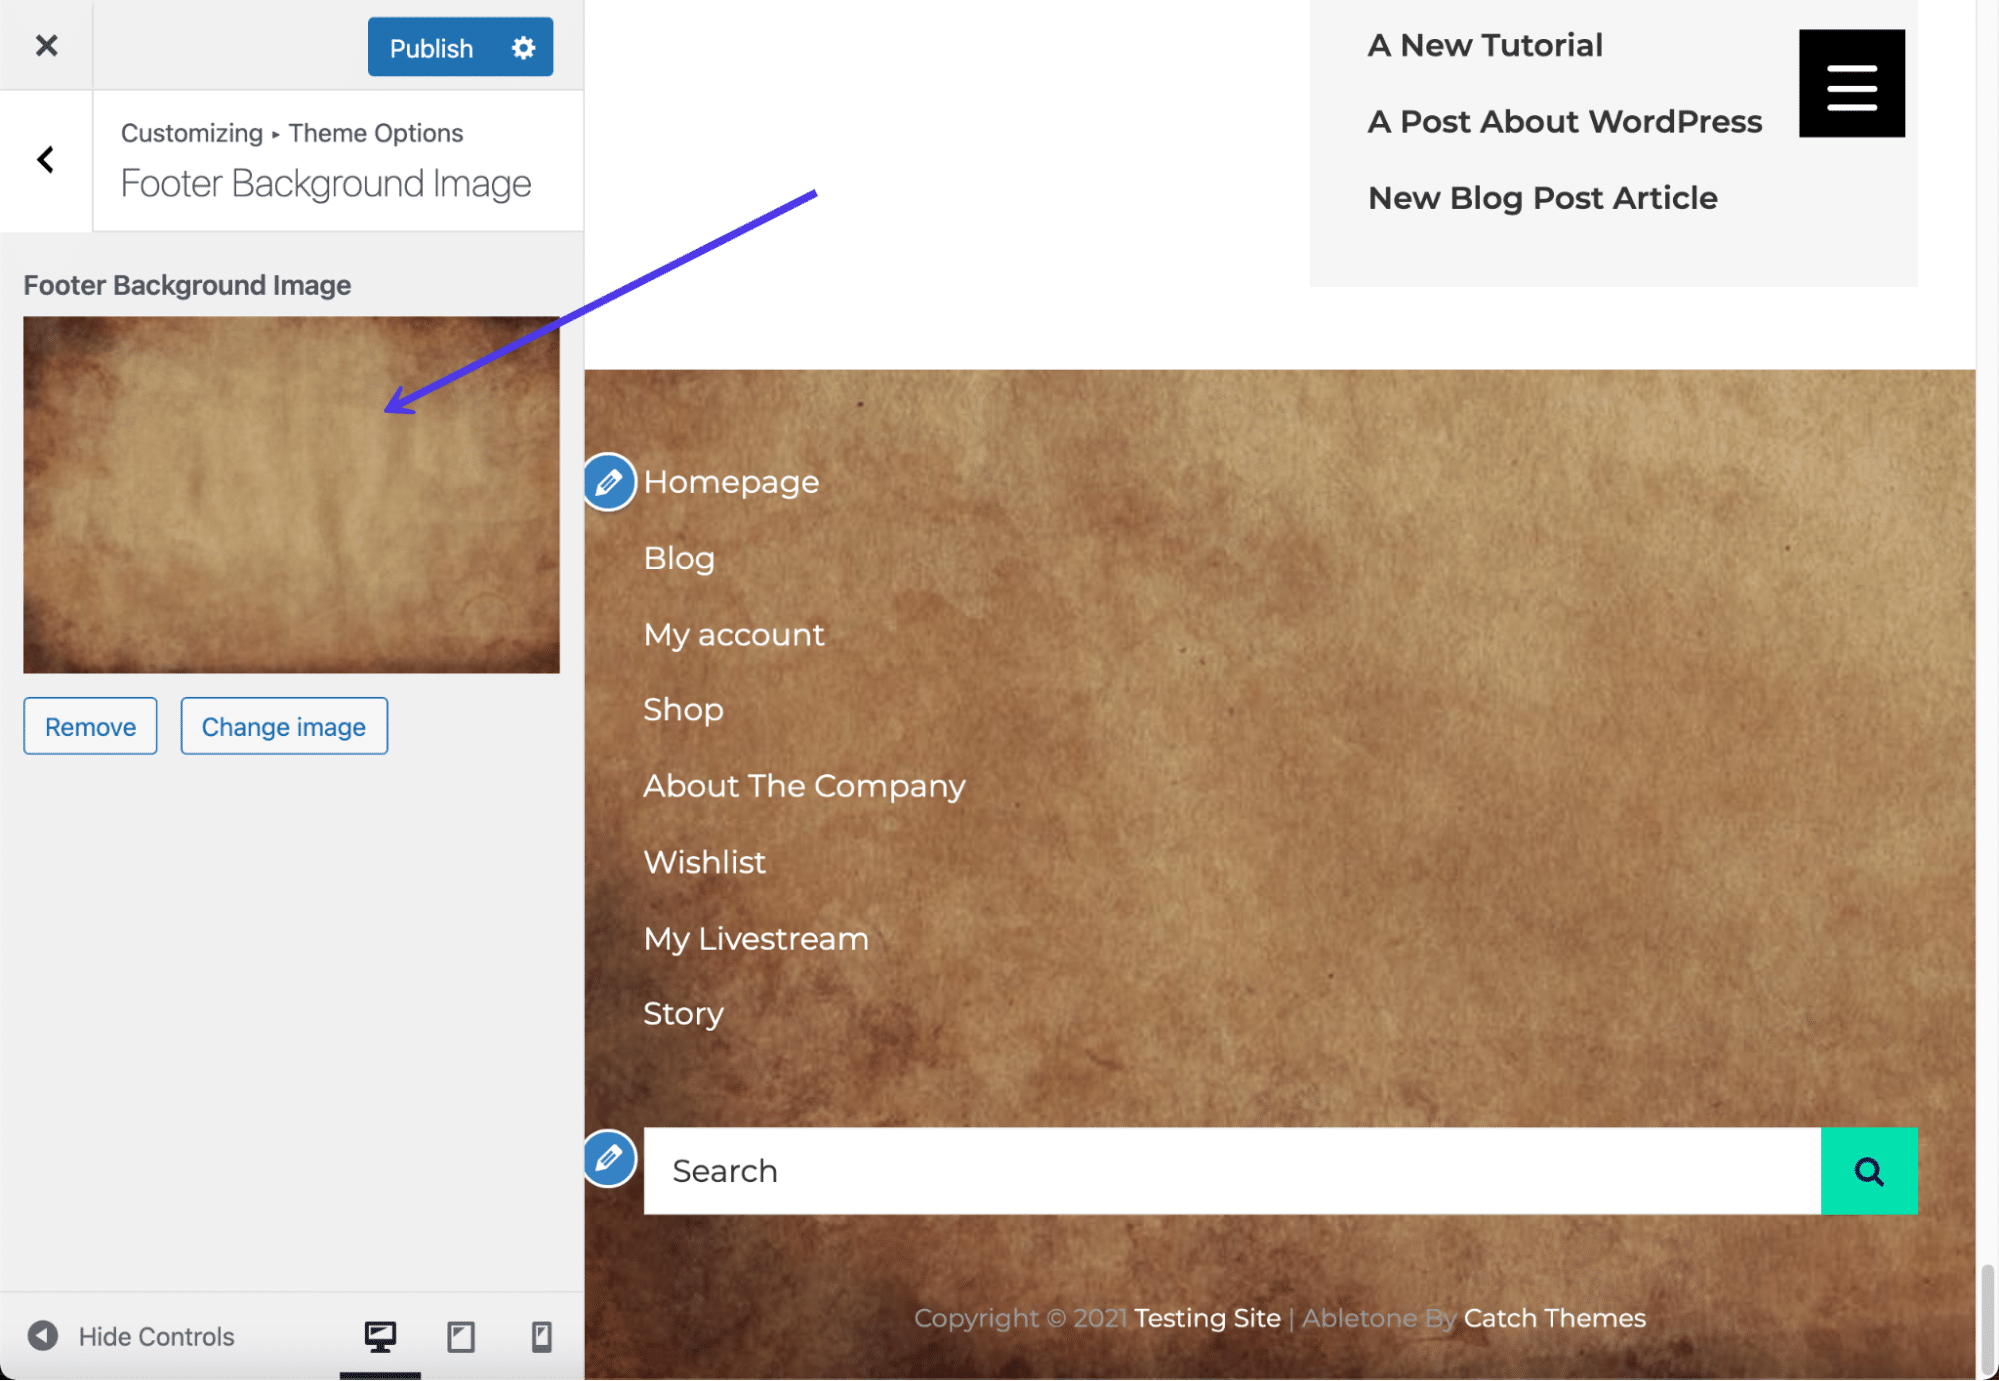
Before anything, check your theme settings to see if footer background capabilities come standard. The Abletone Theme, for instance, offers a Footer Background Image tab inside the Theme Customizer.
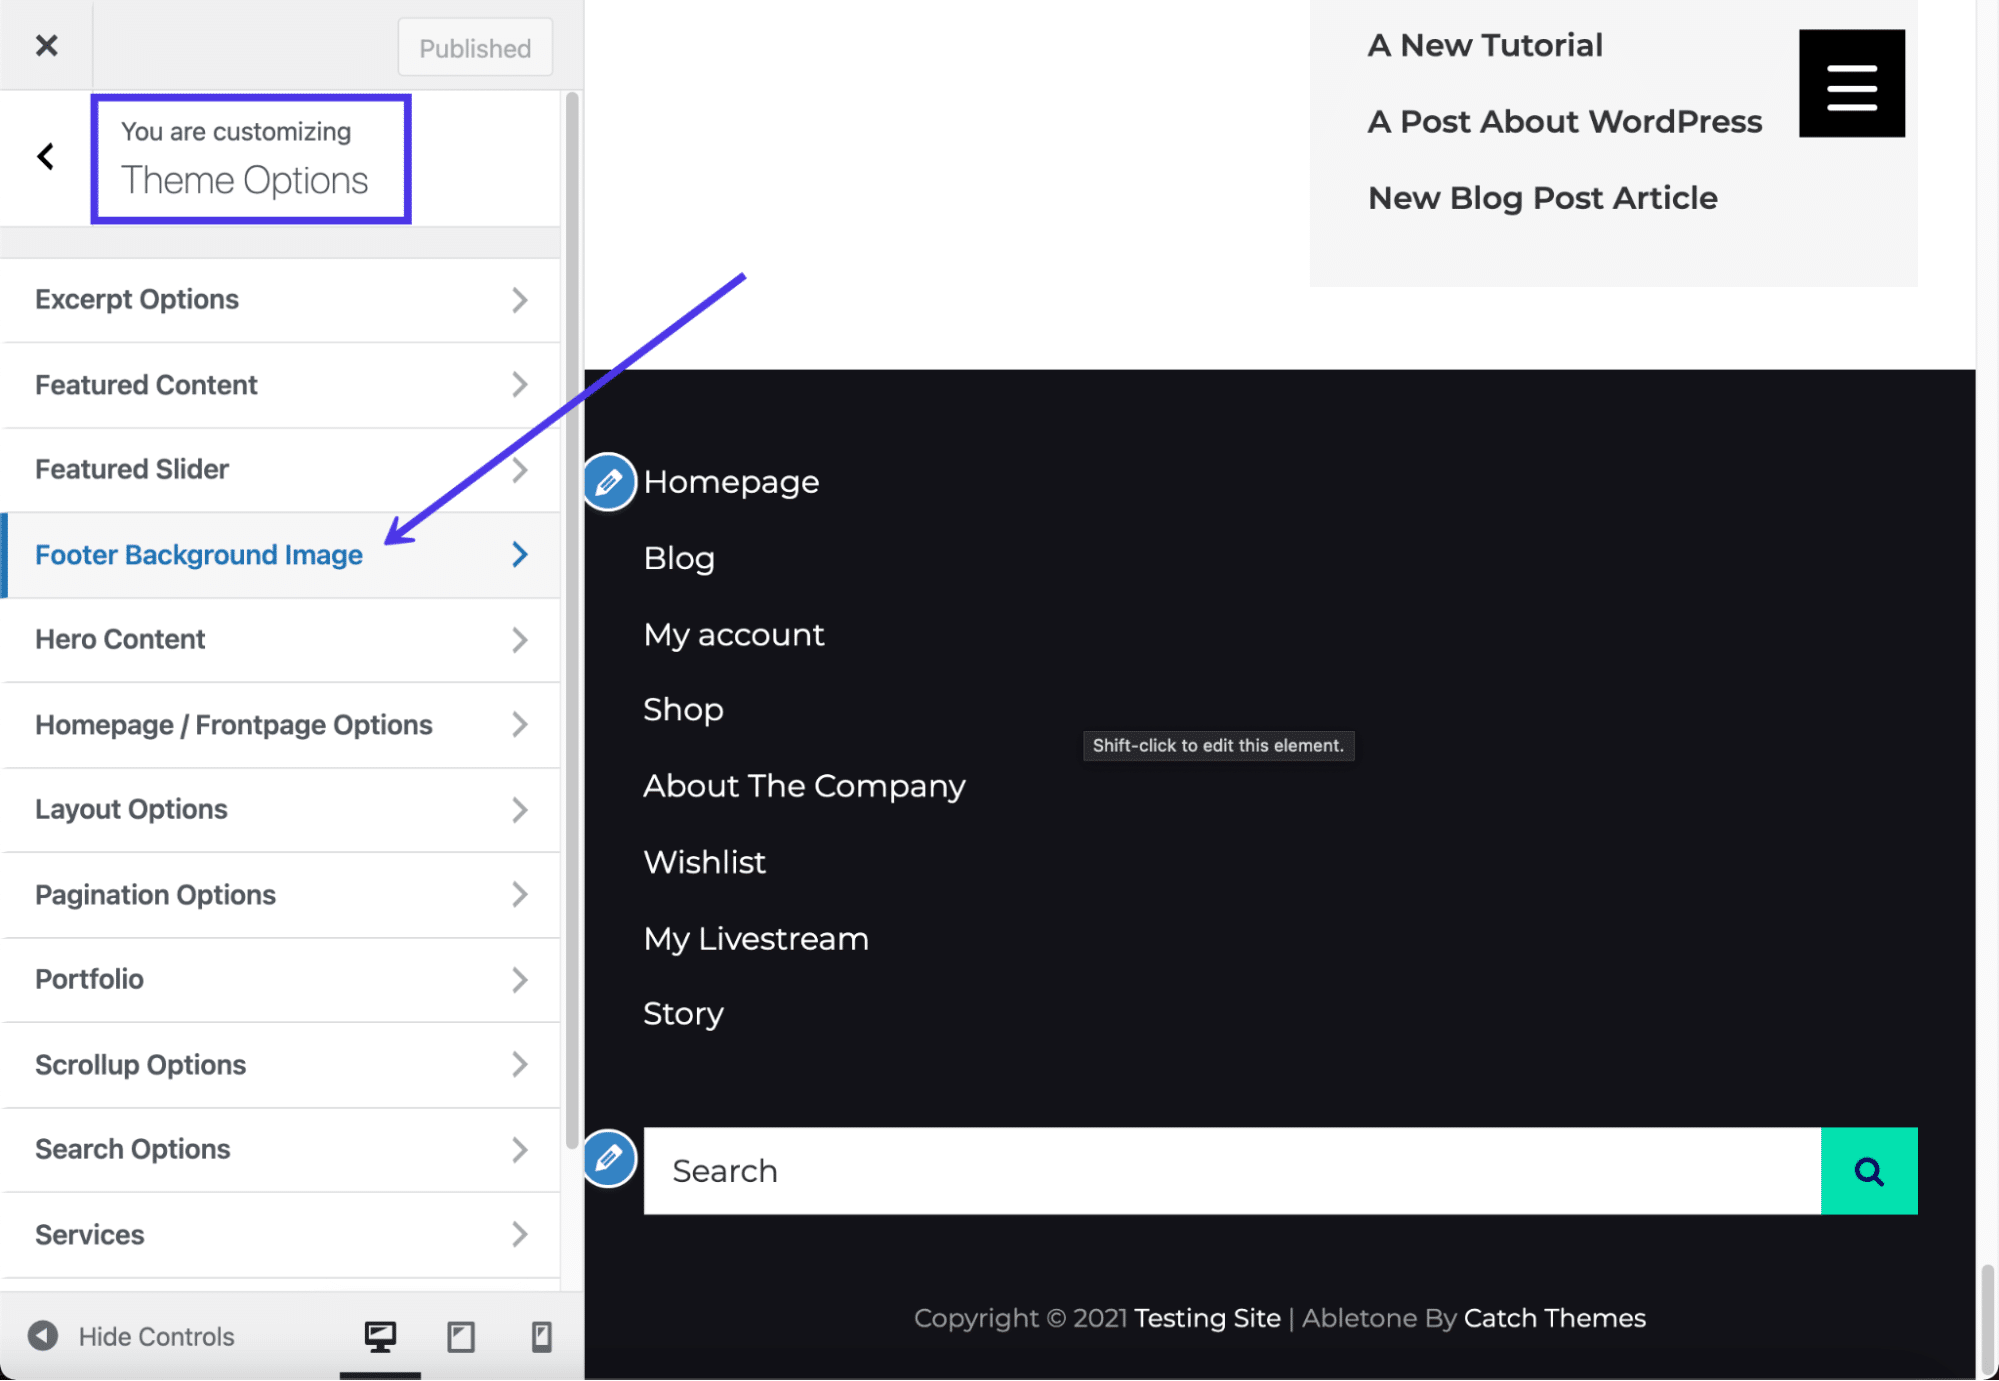
All that’s required is for you to click on the Select Image button and search for an image in your Media Library, upload a new one from your computer, or look for a stock photo that will suit your needs.
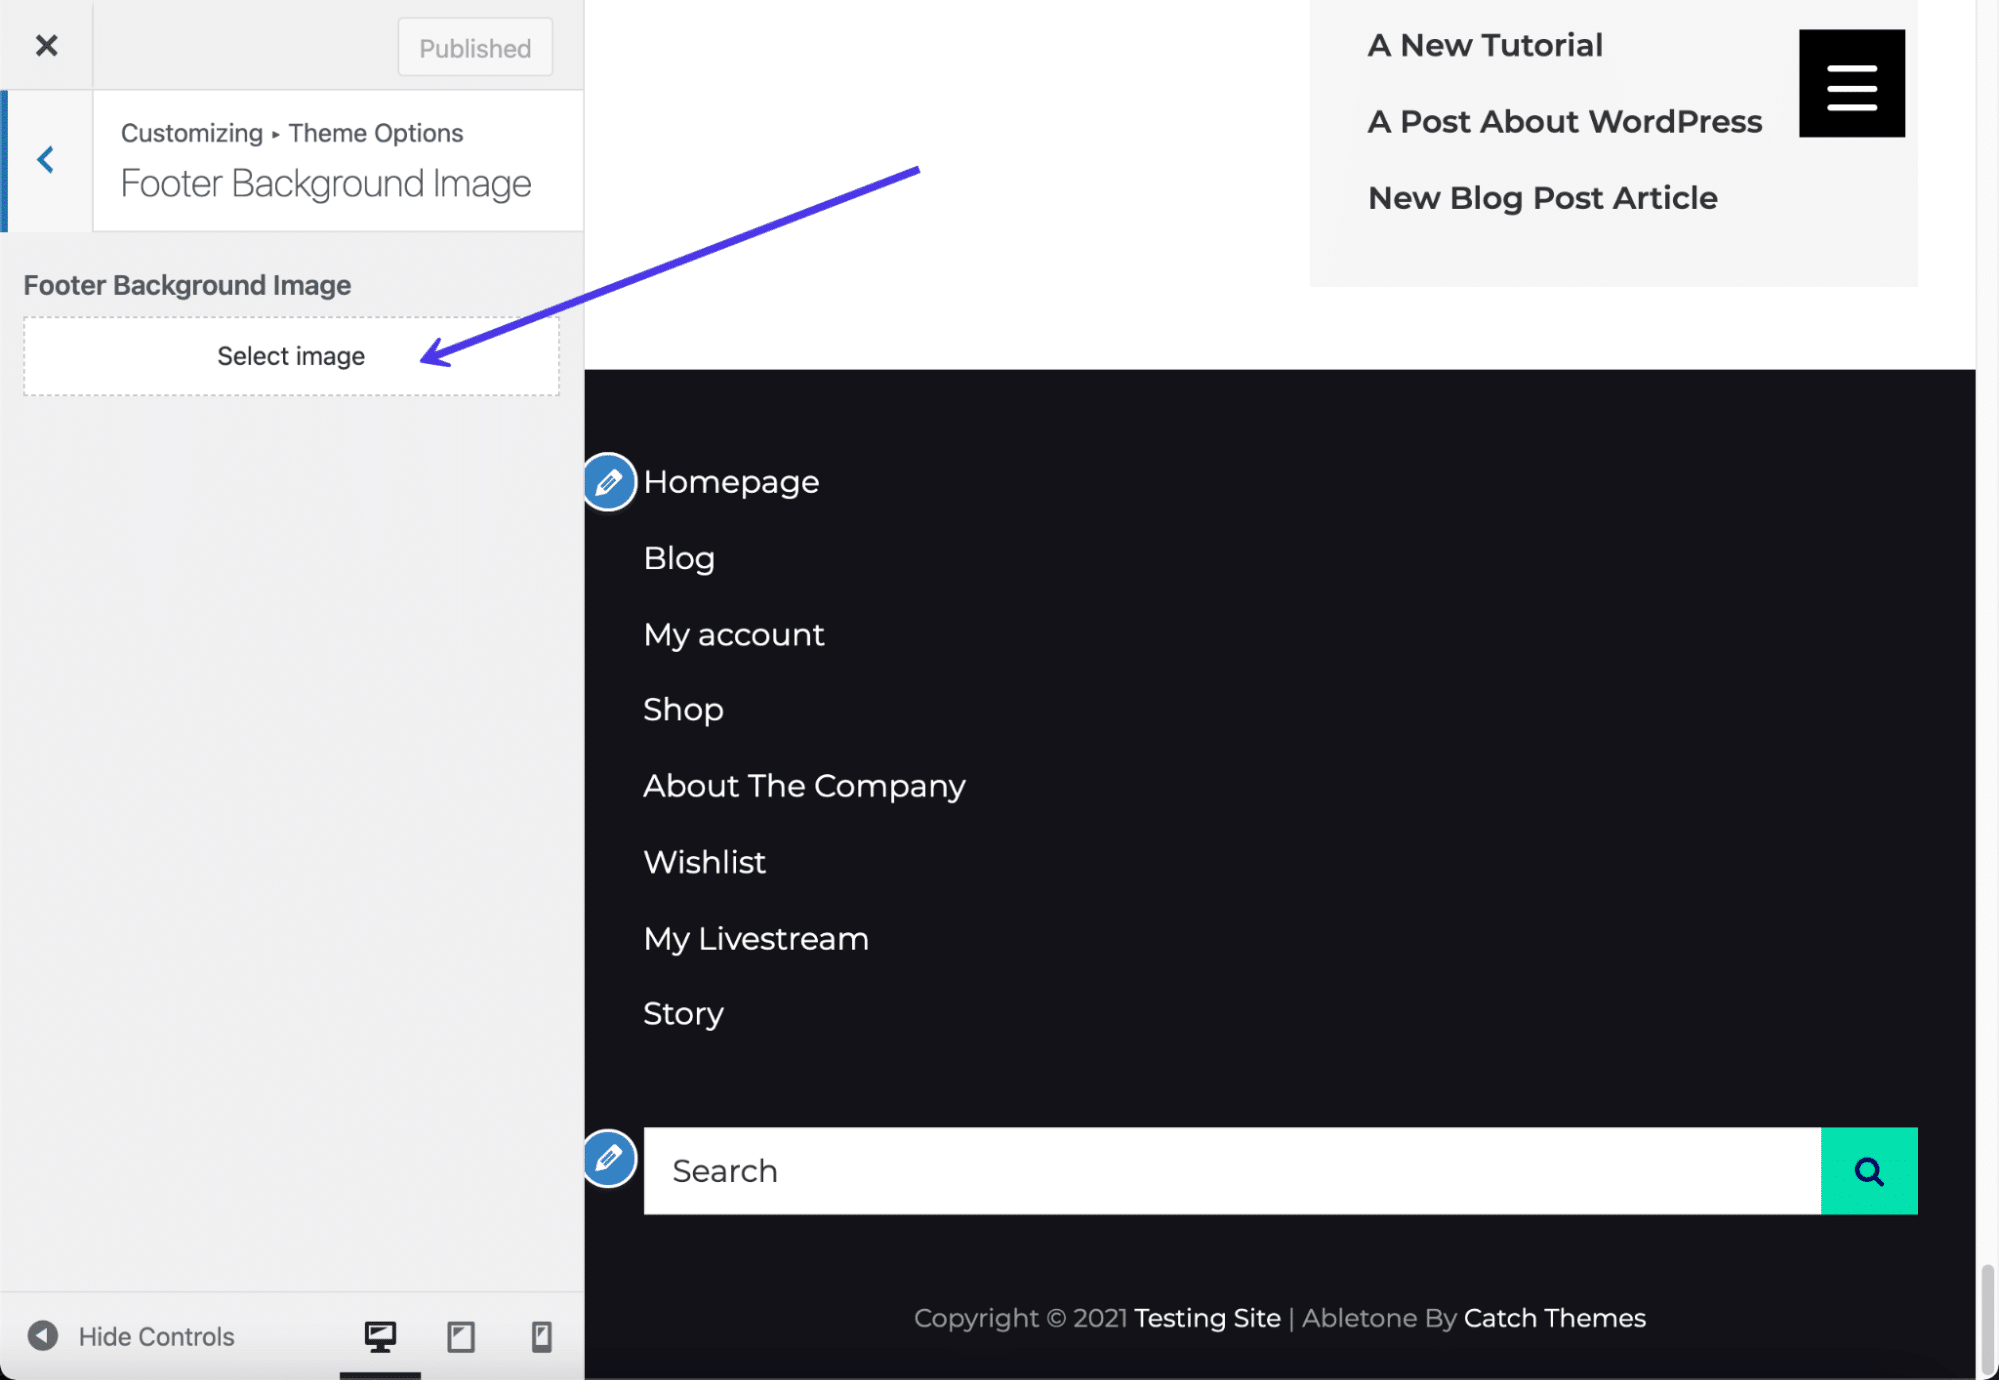
Once uploaded, the image appears as the background for your WordPress footer. Some themes offer additional settings for stretching or tiling the image, but without editing the CSS yourself, you’re stuck with whatever settings come with the theme.
If you don’t have a theme, page builder, or plugin that does the trick for adding a footer background, though, adding CSS code handles this task regardless of your theme or page builder.
Go to the Theme Customizer in WordPress, then click on the Additional CSS menu item.
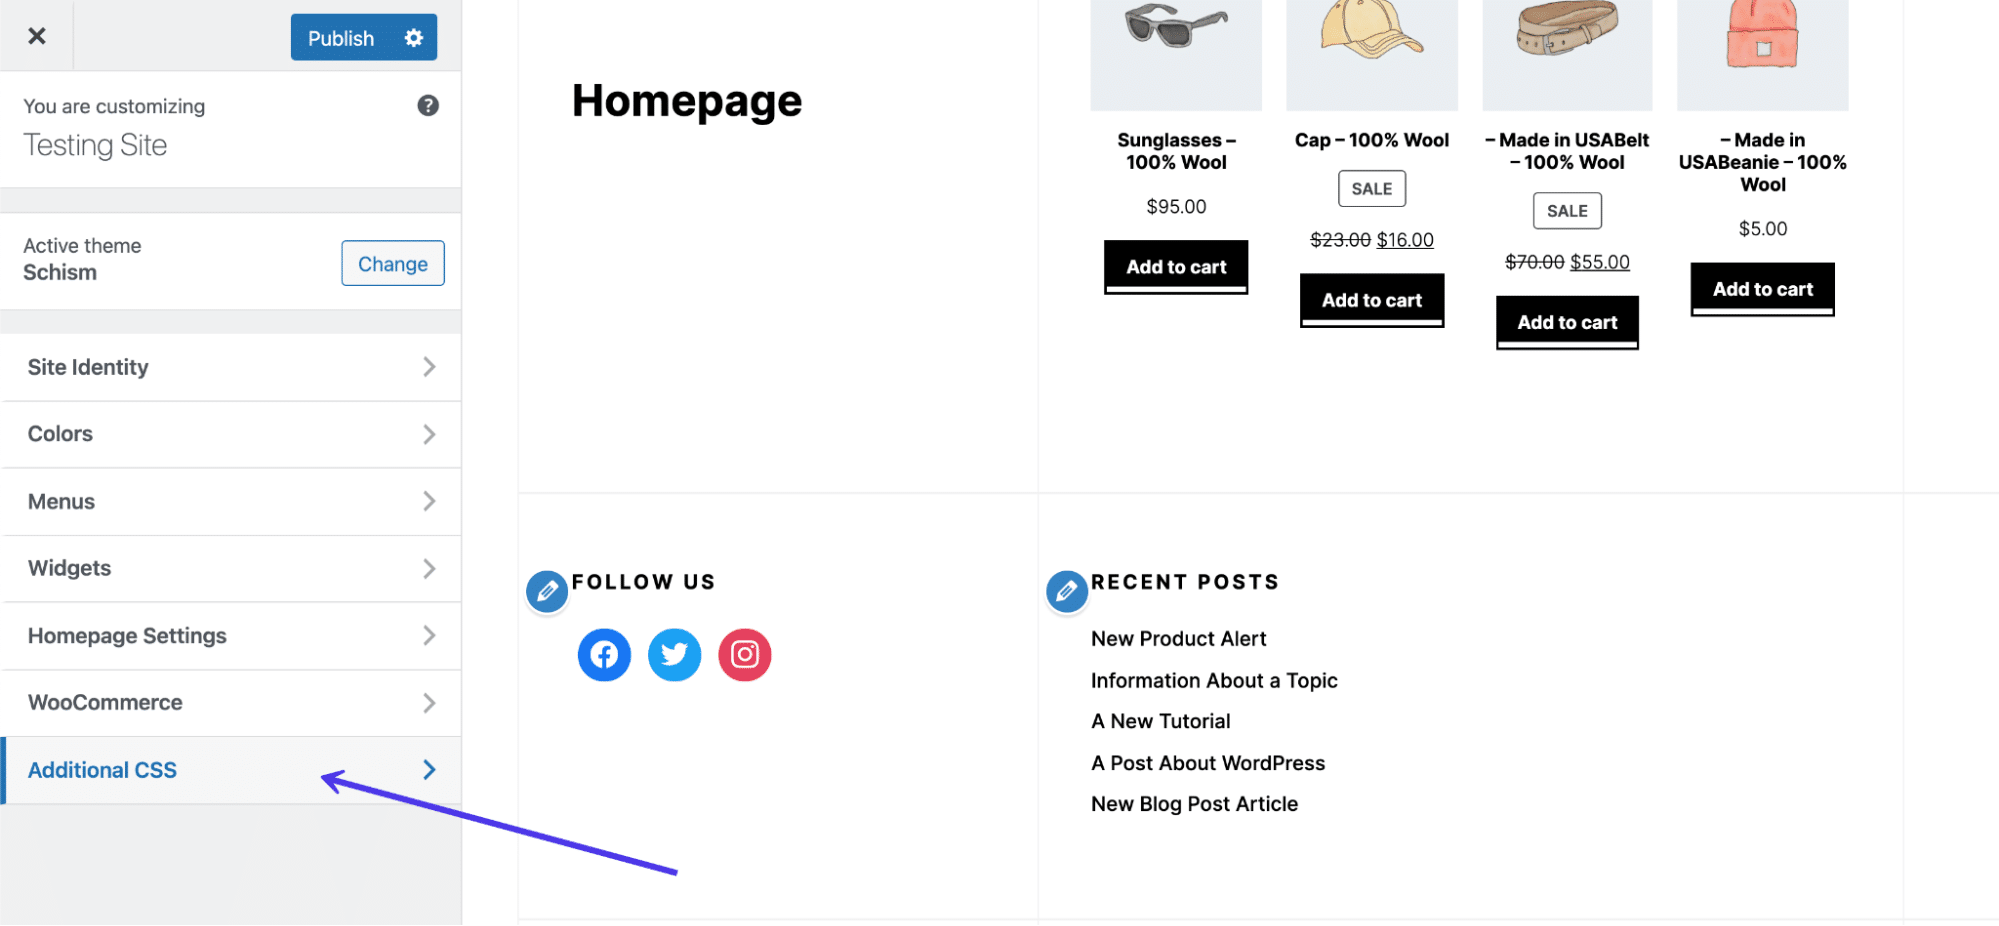
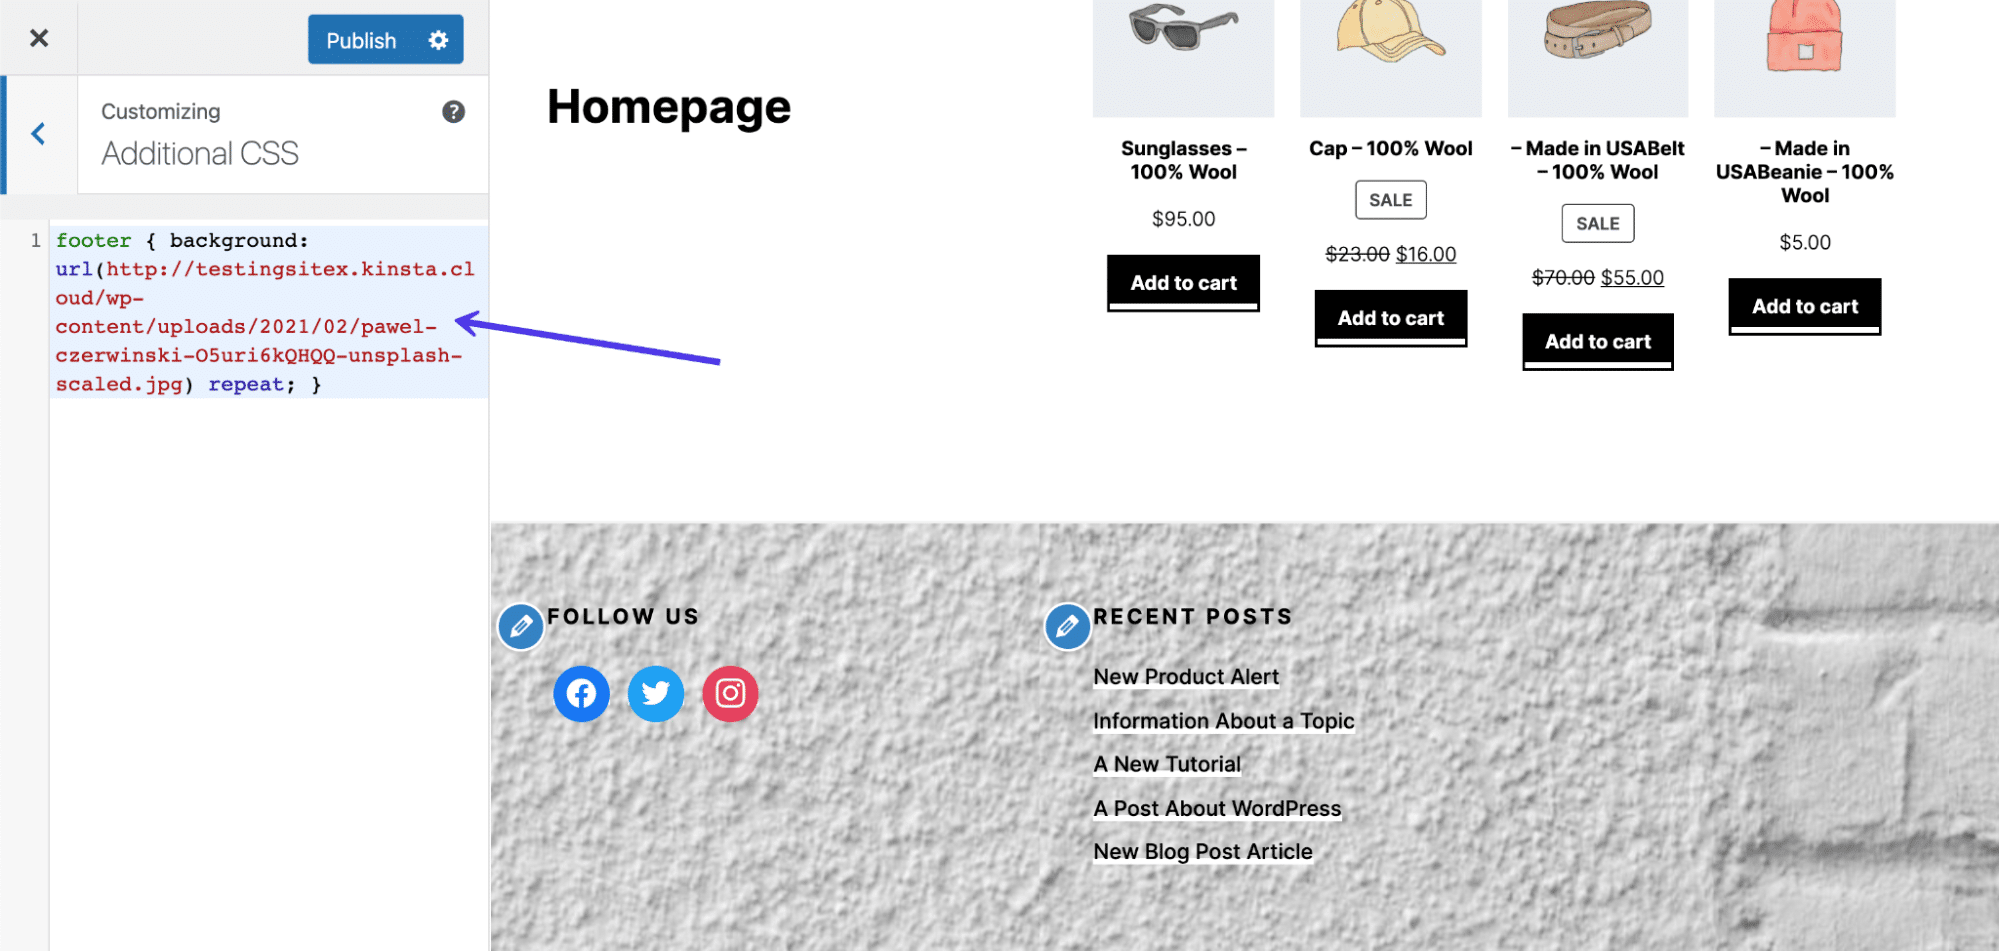
Paste this CSS code into the field, but replace the YOURIMAGEURL with the URL of your desired image:
footer { background: url(YOURIMAGEURL) repeat; }You can find the URL for any image in its details view after it’s been uploaded to your Media Library.
Be sure to click on the Publish button to see it on the front end.
You can also insert other bits of code to change elements like sizing and background stretch size or repetition. As you may imagine, adding the CSS code is a little less simple than clicking on plugin buttons, but a quick search online can help you find the right code for your needs.
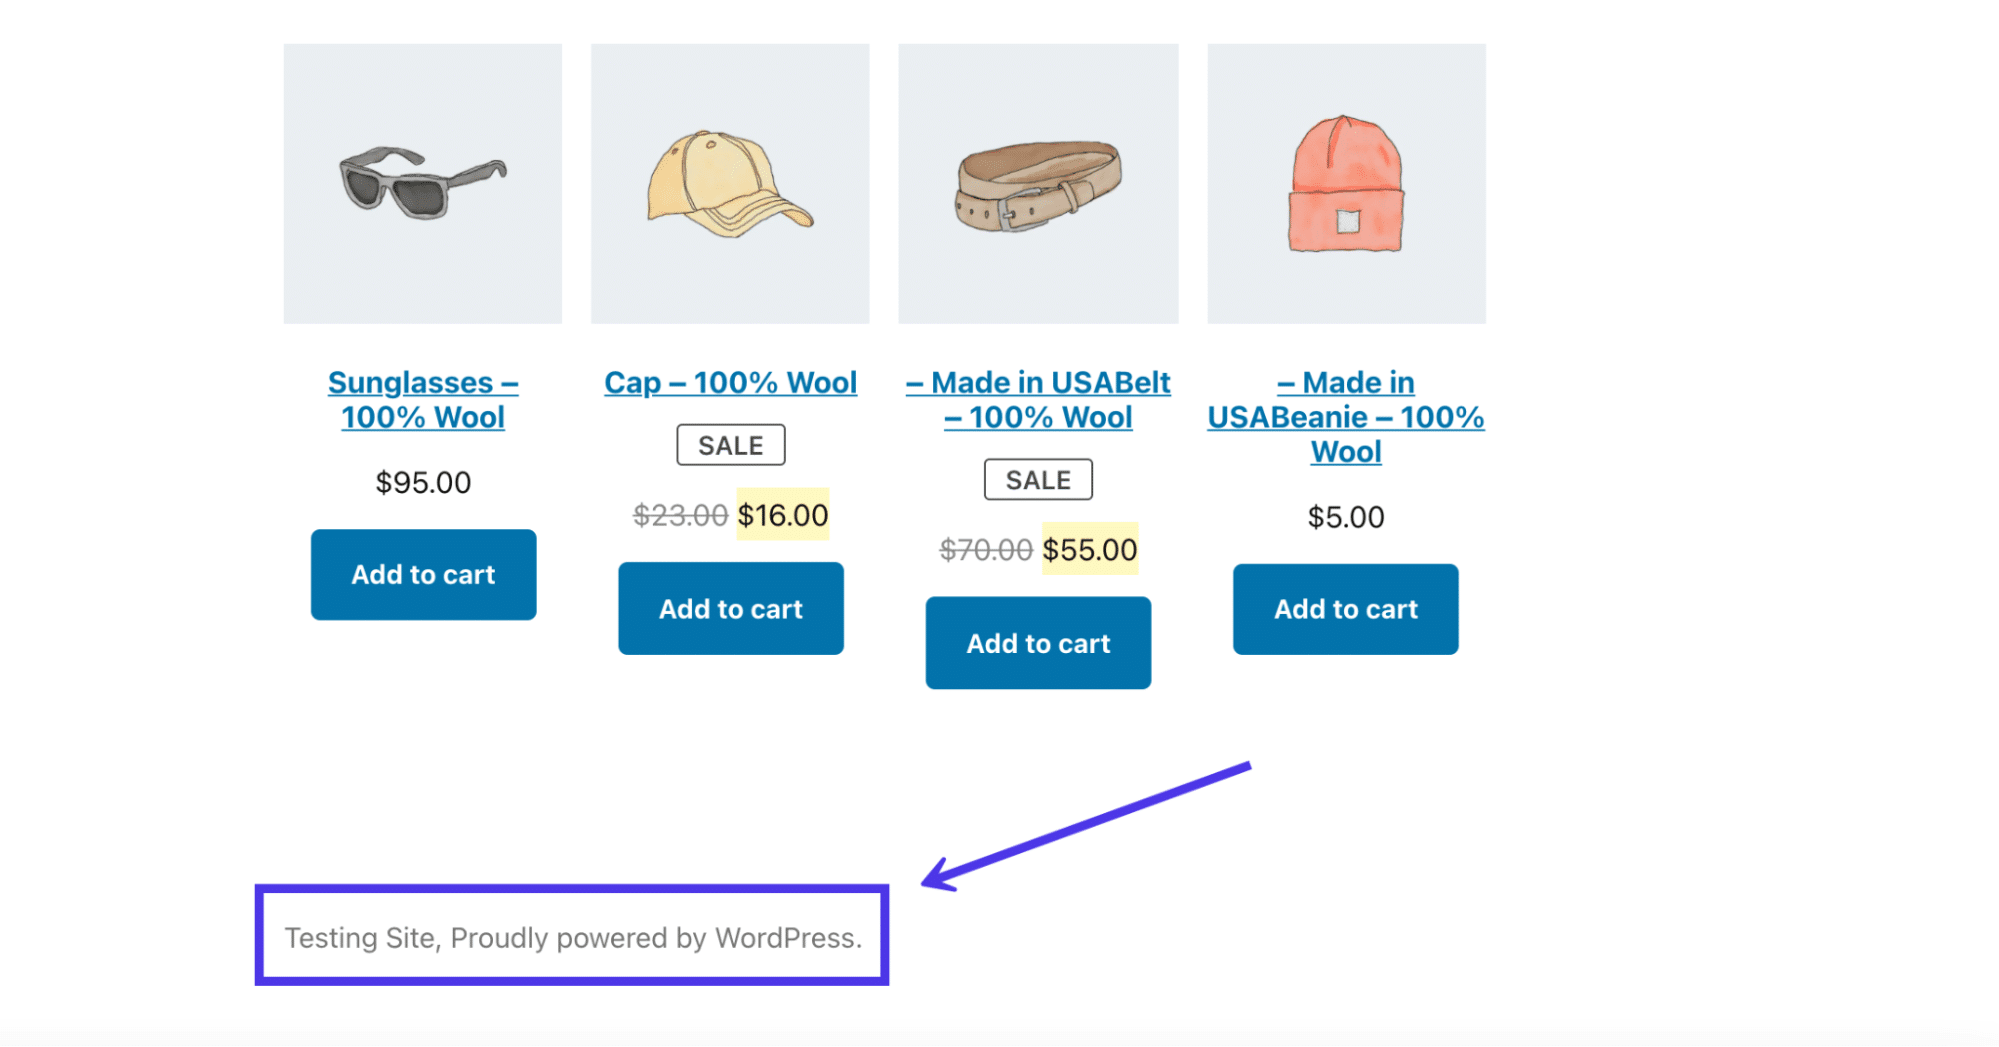
Removing “Powered by WordPress” Text
In the previous section, we covered how to remove the WordPress credit in your WordPress.com footer. It’s a little tricker on a self-hosted WordPress site since most themes don’t offer a way to remove the credit in the Site Identity section of the Theme Customizer.
Therefore, we must look at other ways to remove the “Powered by WordPress” text in the footer.

To tackle this process, read our in-depth guide on removing the “Powered By WordPress” tag in your footer. This knowledge base article covers all of the following topics:
- Why you may want to remove the “Powered By WordPress” message
- When you might not want to remove it
- Methods to avoid when trying to remove the credit
- How to remove the credit with a plugin
- How to manually remove the “Powered By WordPress” credit
- Replacing the footer credit with your own code
Editing the footer credit with a plugin is significantly easier for the average WordPress user. However, going the manual route ensures you have full control over the footer, and it eliminates the need to have another plugin installed on your dashboard.
Is It Legal to Remove “Proudly Powered by WordPress”?
Considering that WordPress makes it a little tricky to remove the “Proudly Powered by WordPress” text from your footer, you may wonder whether it’s kosher to get rid of the message.
The answer is that you’re more than welcome to take out the “Powered by WordPress” text in your footer without having to worry about any legal repercussions or violations of the WordPress Terms of Service. This is because WordPress use falls under a GPL (General Public License), meaning anyone can redistribute and alter WordPress in any way they see fit.
Overall, we highly recommend removing the “Proudly Powered by WordPress” text since it has nothing to do with your brand and simply promotes another organization. Yes, it’s nice to get the word out about WordPress, but not at the expense of your own branding and valuable website space.
Now, footer messages shown by your theme developer are a different story. We’ll talk about that in the next section.
How to Remove “Powered by XYZ Theme” Text in WordPress Footer
We now know that you’ll have no problems with the law or WordPress when eliminating the “Proudly Powered by WordPress” footer message. But what about some of the theme developers who put “Powered by XYZ Theme” in the footer?
Luckily, the vast majority of WordPress themes also fall under a General Public License, making it entirely acceptable to cut out that text and replace it with something more suitable for your business. However, it’s prudent to double-check with your theme developer to ensure they don’t have a requirement in their terms and conditions that stipulates that you keep the development credit in the footer.
You can do this by simply asking the developer if the theme falls under a General Public License. And if it doesn’t, or their terms and conditions make it a requirement to leave the credit, we suggest seeking out another theme, as that’s not exactly a desirable item to have on your website.
So how do you go about removing the “Powered by XYZ Theme” text in your footer?
Check Out Our Video Guide to Removing “Powered by WordPress” from your WordPress Footer
Some plugins that remove the “Powered by WordPress” message also can scrap any messaging inserted by the theme developer. However, this isn’t a sure thing.
Therefore, we suggest opting for one of the following methods:
- Edit the footer site files directly to eliminate the credit message.
- Ask the developer to remove it for you.
- Upgrade to the premium version of the theme.
Editing the footer site files takes a bit of technical knowledge, but you can often get this done in a matter of minutes. Asking the developer to remove the theme developer credit could end up working, but you’re essentially hoping you’ll get a friendly developer who’s willing to walk you through the process. Usually, they won’t offer this if you’re only using the free version of their theme.
The easiest option is to upgrade to the premium version of that theme. Many premium theme developers give away simplified, free versions of their themes in the hopes you’ll upgrade for improved features and increased control.
Since upgrading to a premium theme and speaking with the developer can be done on your own, we’ll mainly talk about how to edit the theme site files to get rid of that credit message.
To begin, check out your theme’s footer to confirm if you have developer credit on the bottom. If so, take note of the exact text being displayed, as this could help seek out the message in your site files.
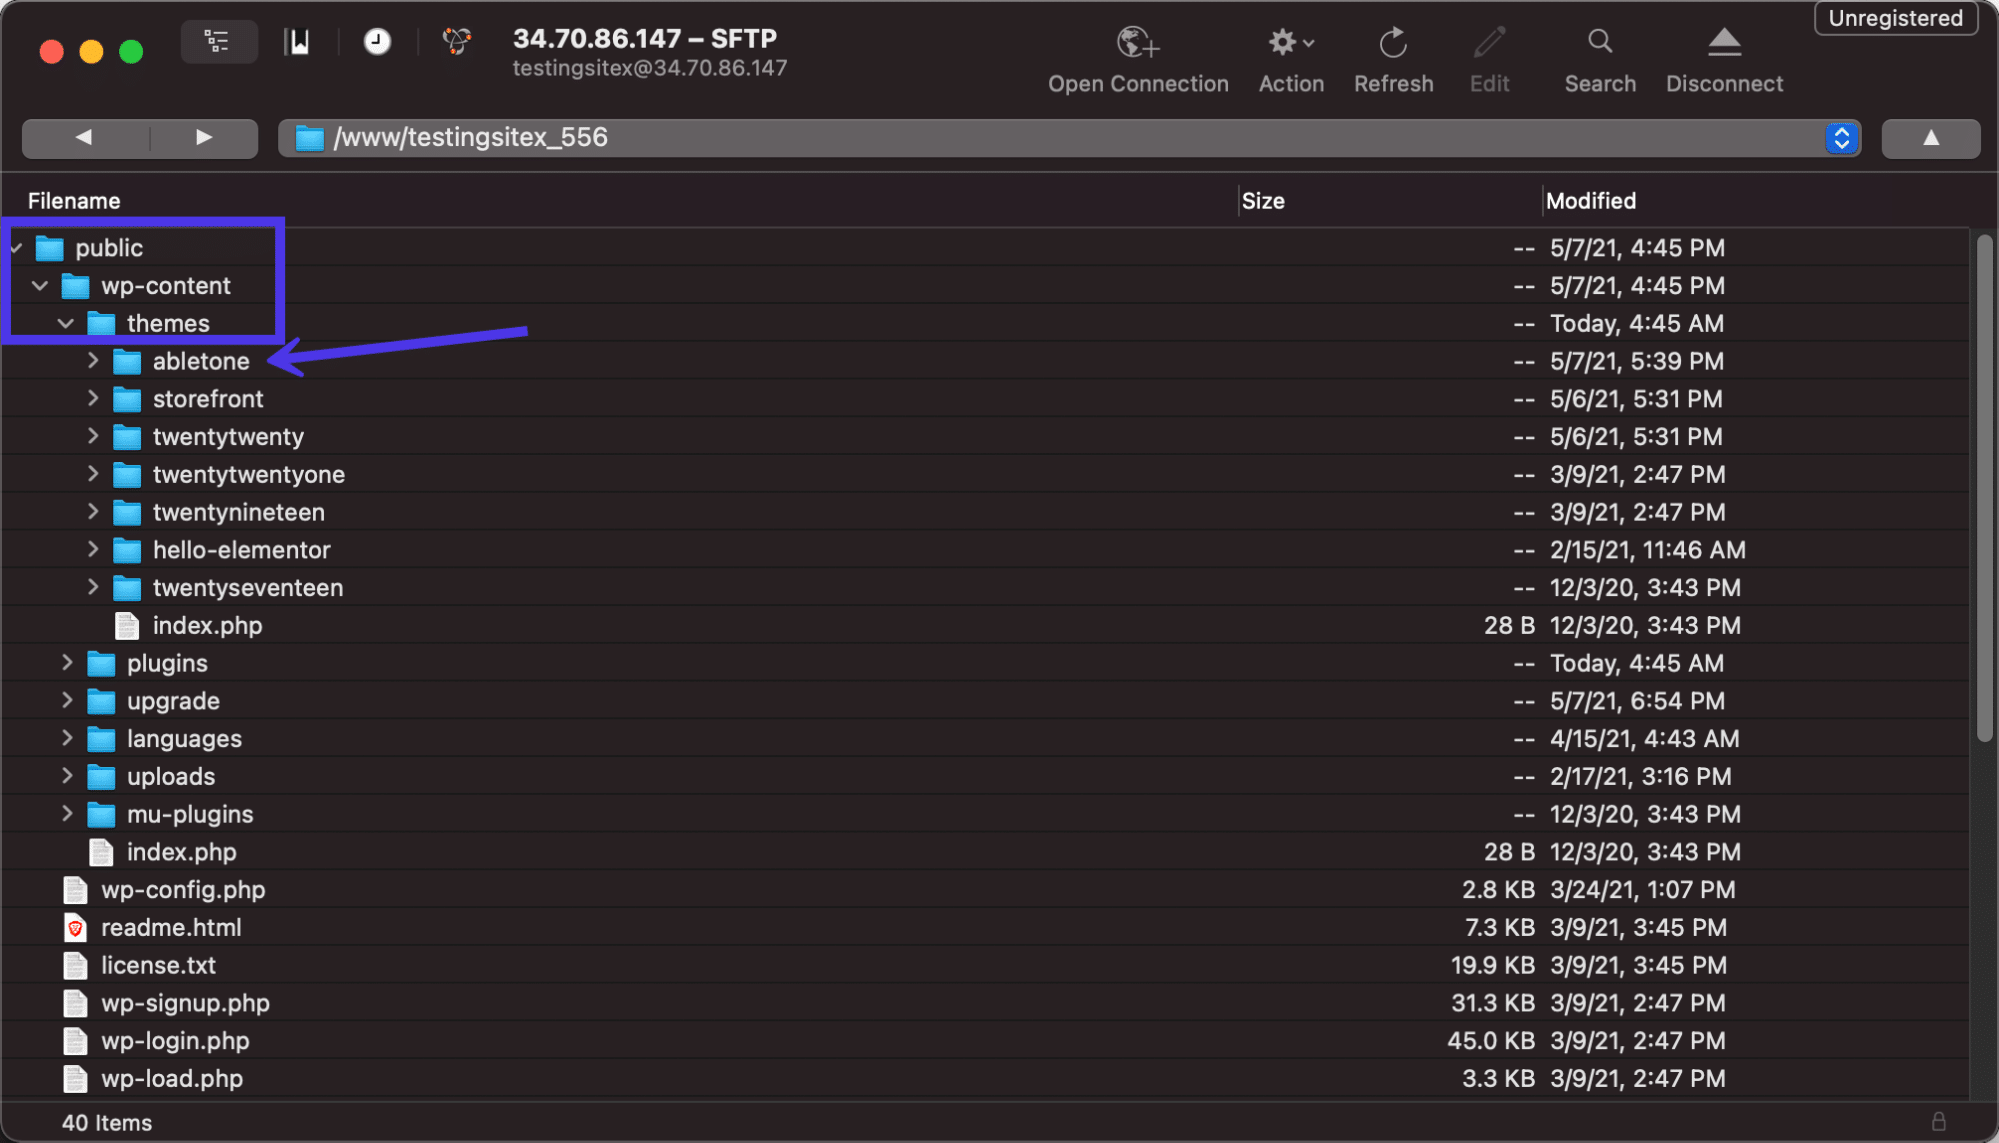
Connect to your site files using an FTP client, as discussed earlier in this article. Each theme developer differs on where they put the footer credit, but a good place to start is going to /public/wp-content/themes.
Choose the theme you have activated on your website.
From here, one option is to open the main footer.php file in a text editor or PHP IDE and search for references to the footer credit. Use the Find function in your chosen editor to type in and search for the exact text that appears as the credit message in your footer.
As with all themes, this may not be the right file for removing the footer credit; it entirely depends on how the theme was built. If you have no luck with the footer.php file, continue looking elsewhere.
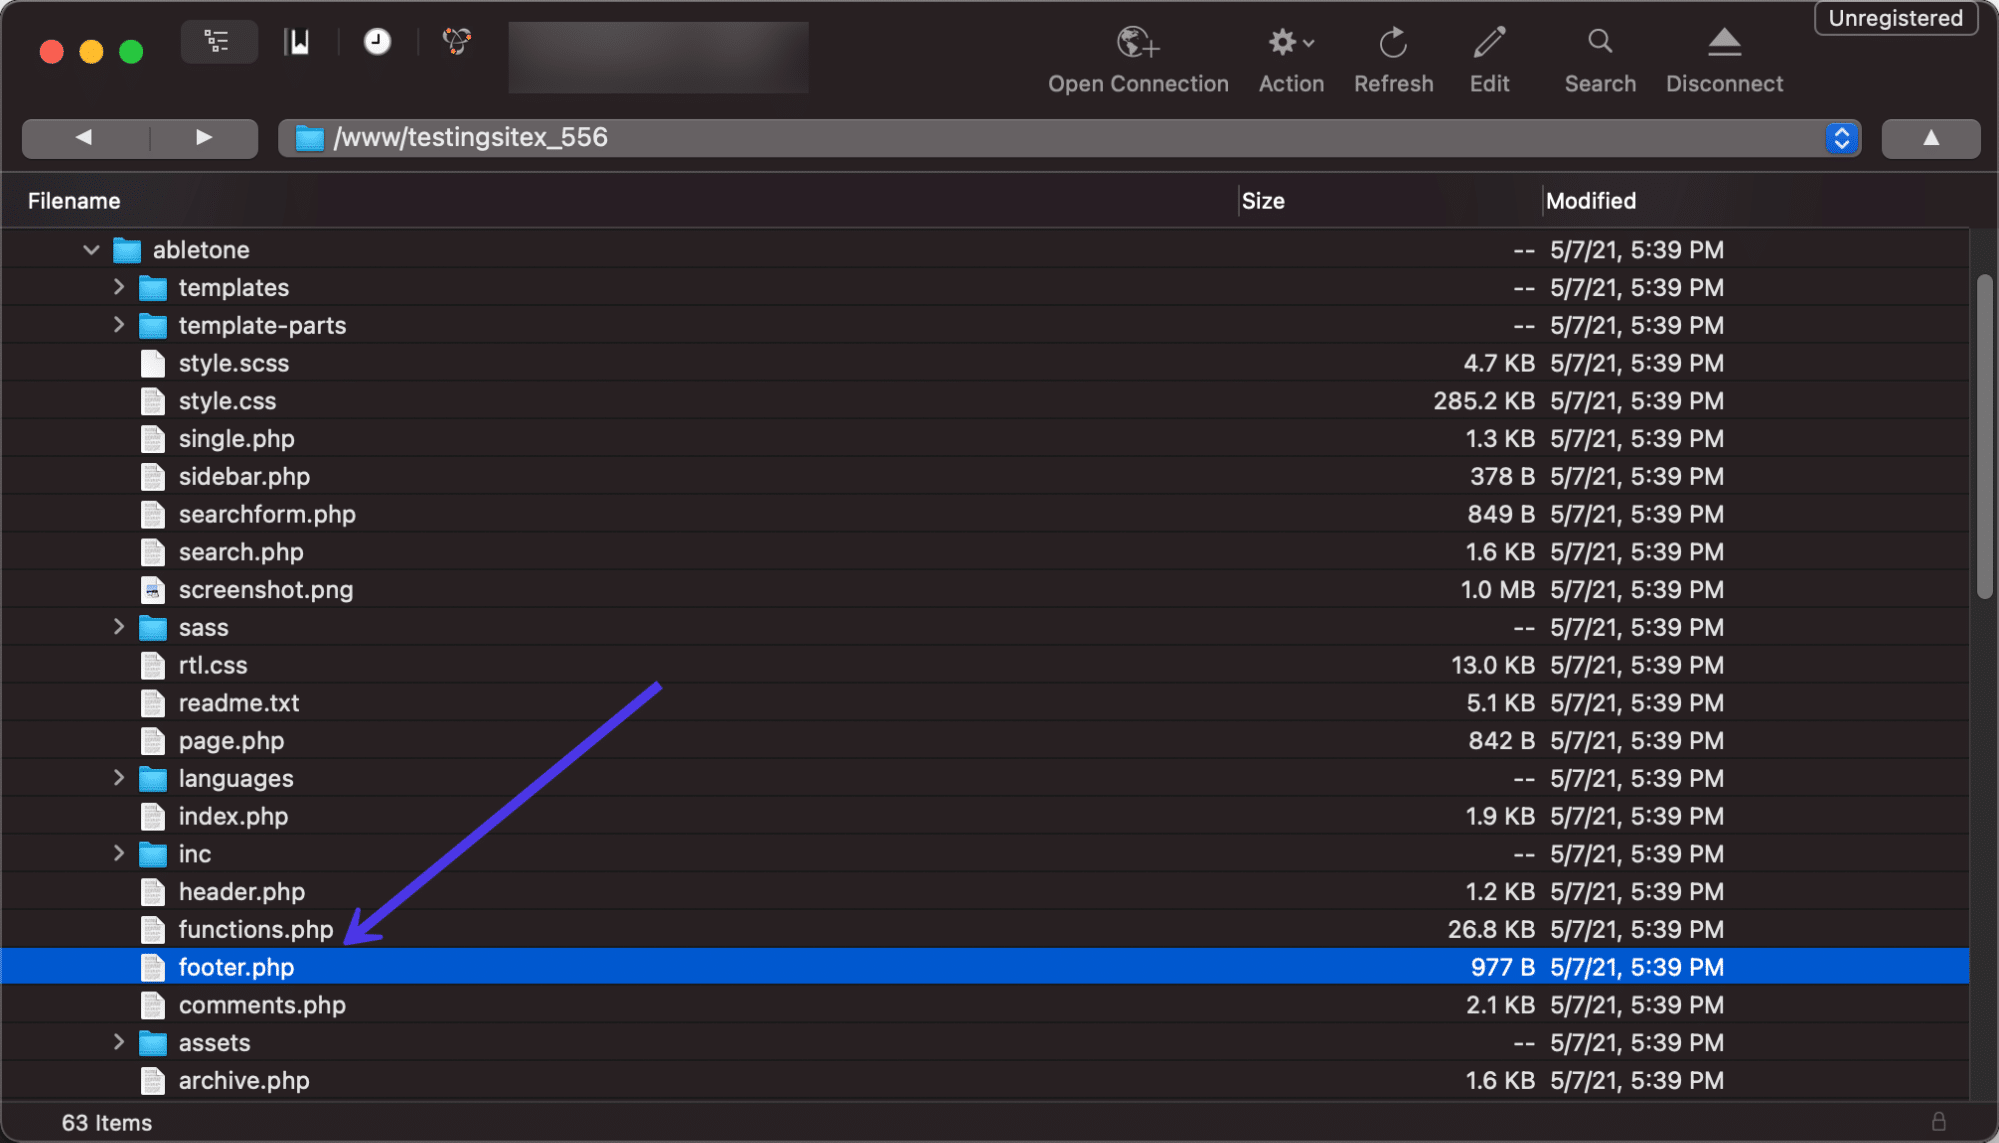
One of the most common places to find the footer credit information code is in the /template-parts folder. We found this was the case for the current test theme we have installed for this tutorial.
We can go to the /footer folder, then click on the site-info.php file. That site-info.php file (or some variant of that) is a common place for storing the theme’s footer credit information.

Feel free to either delete the footer credits or replace them with something else. For this situation, we’ll simply remove the credits hook and the do_action credits code at the bottom.
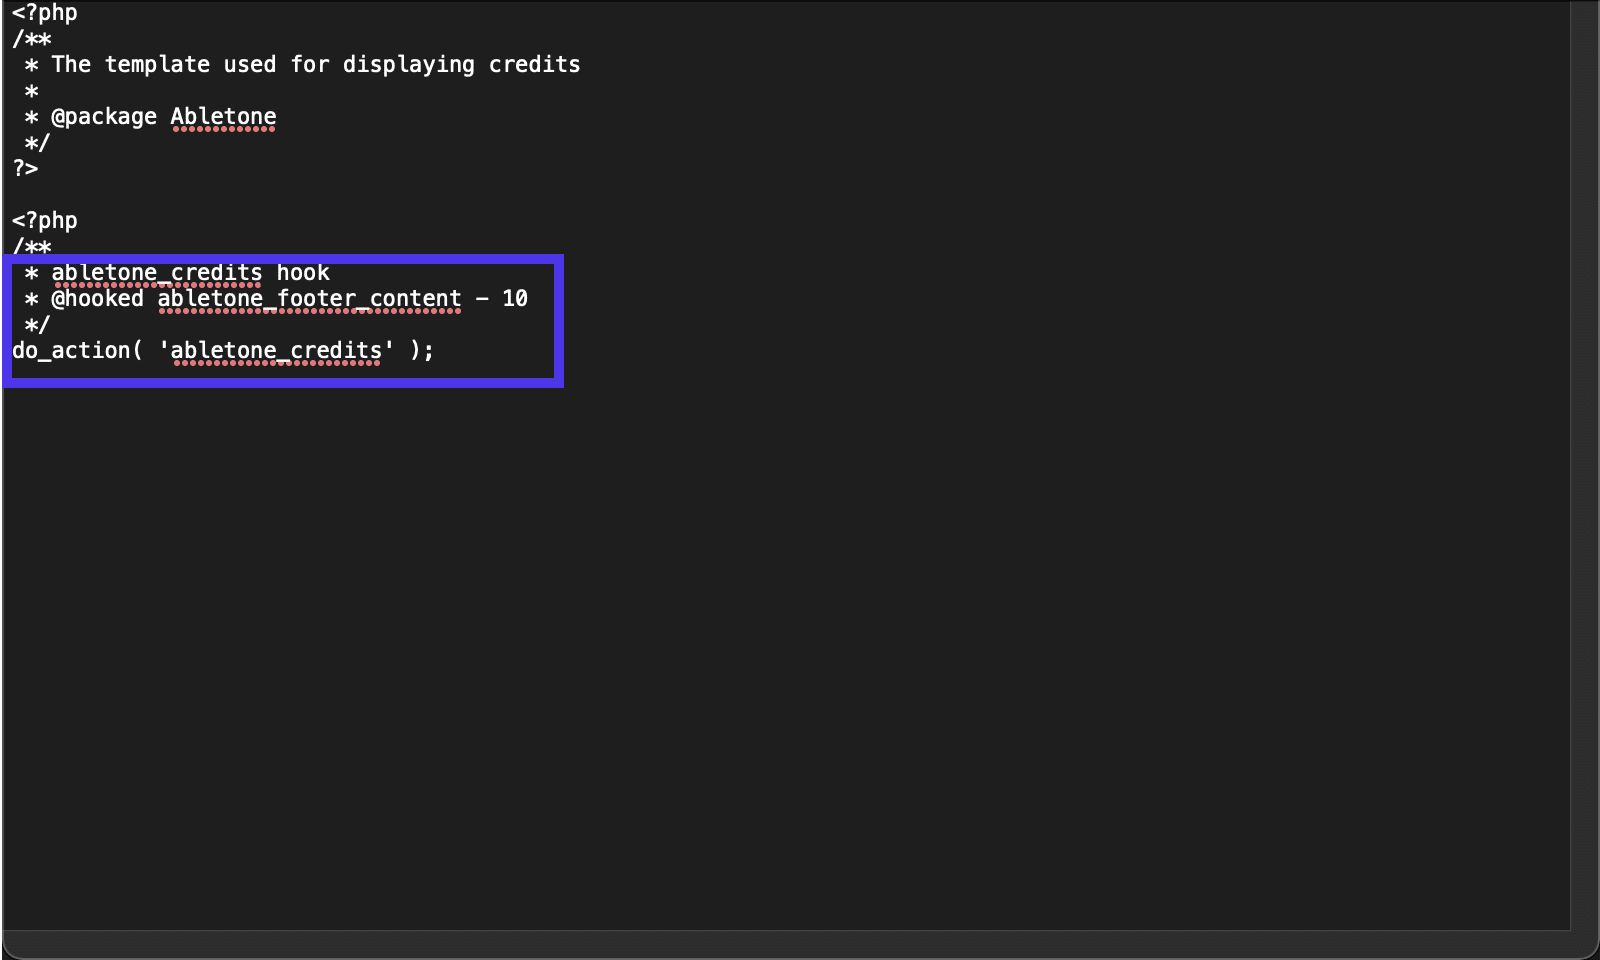
And that’s successfully removed the entirety of the credit being shown for the theme developer. It also didn’t have any effect on the footer content, like our widgets and menus.
As mentioned before, one way to hide the footer credit, while also supporting the theme developer and receiving far better features, is to upgrade to the premium version of the theme. Keep an eye out for a button in your dashboard to upgrade to a Pro version, or go to the developer’s site to make a payment.
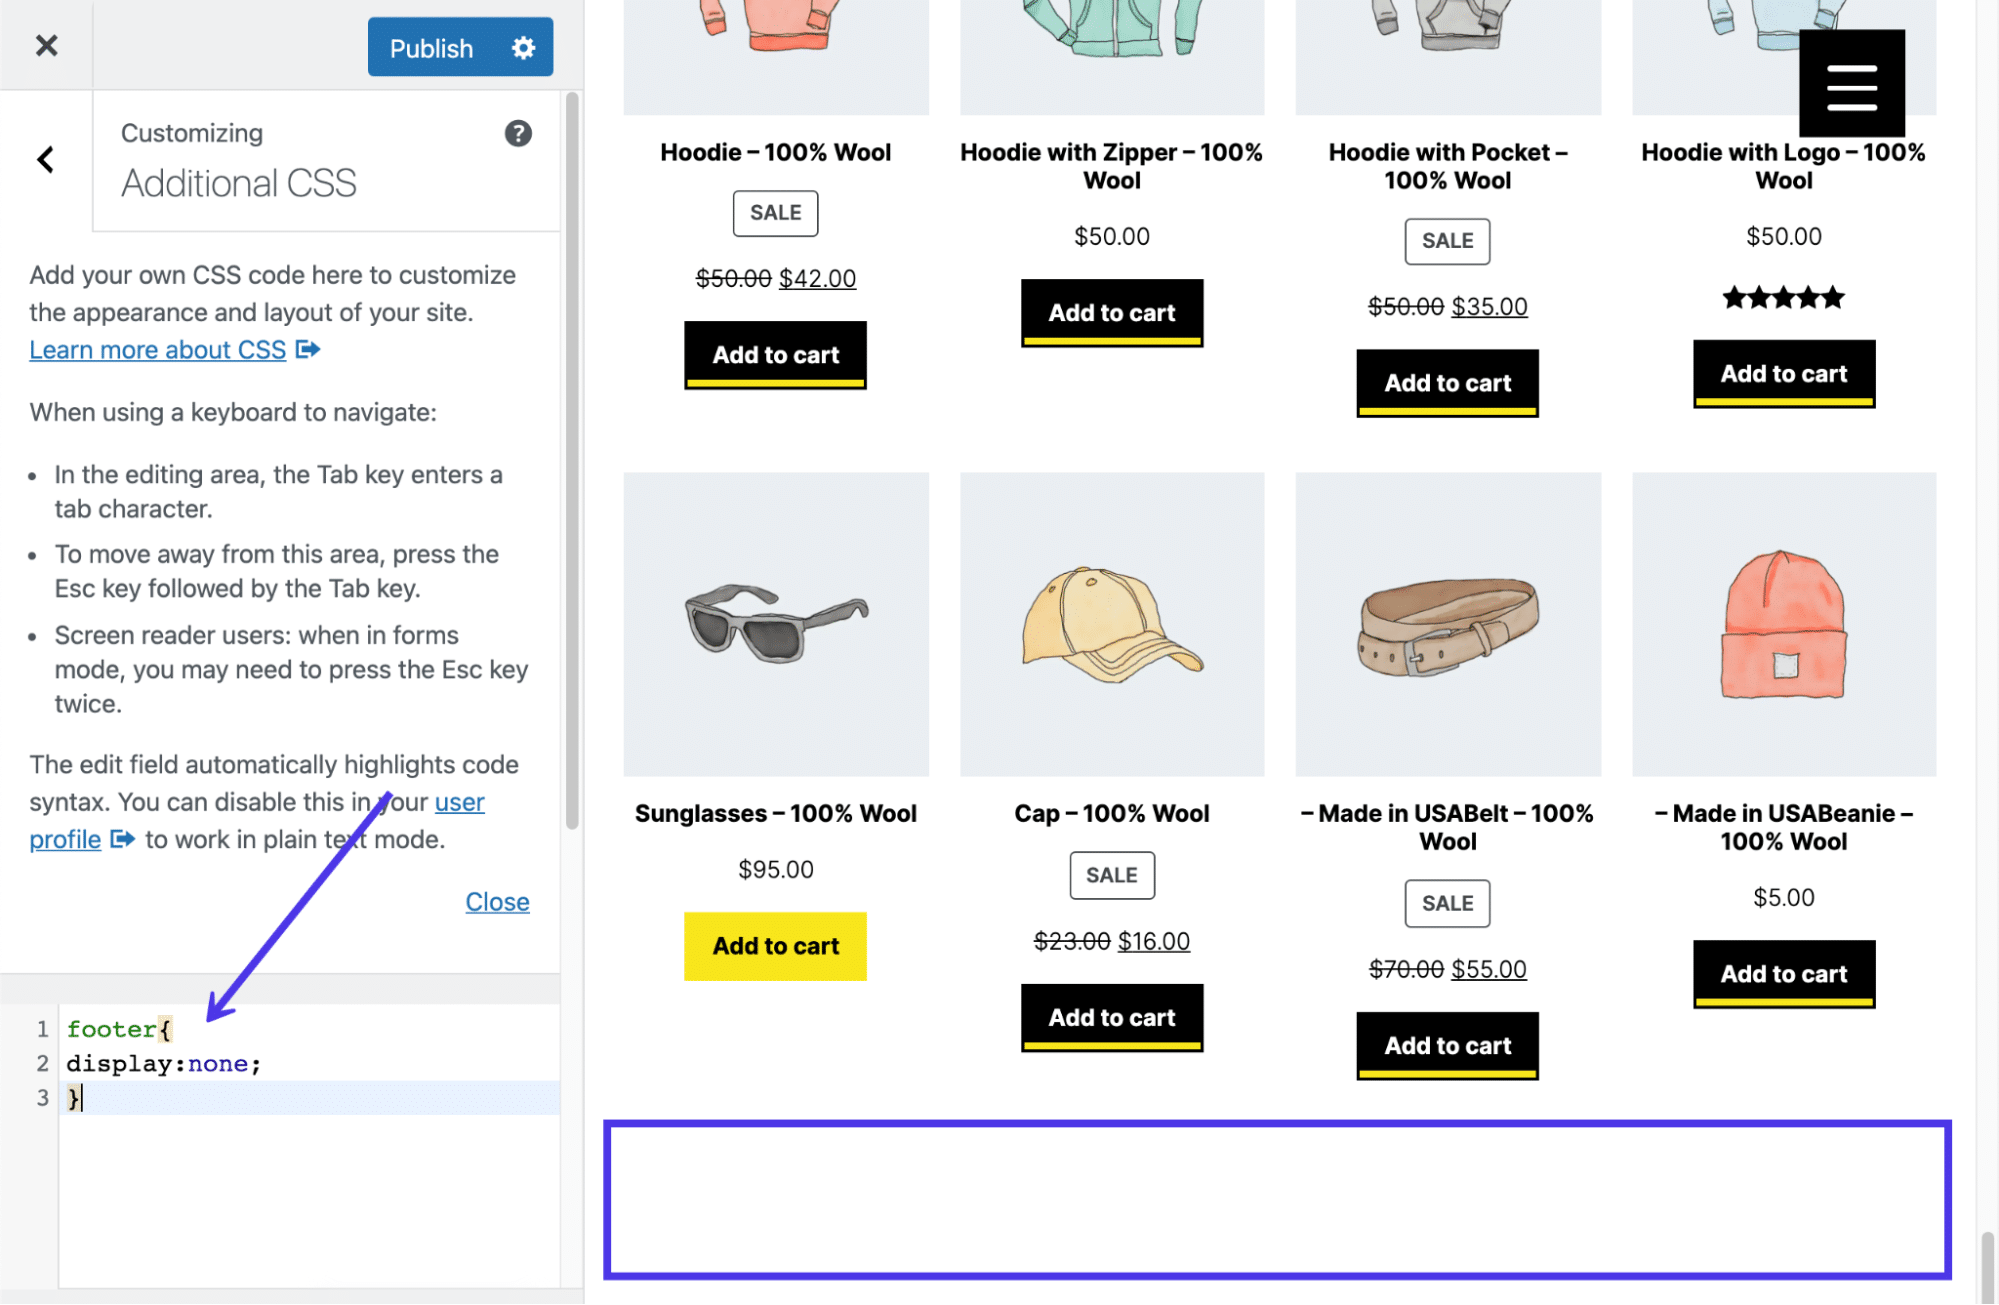
How To Remove the WordPress Footer Entirely
Although not recommended for most sites, it sometimes makes sense to remove the WordPress footer in certain situations altogether.
If you find that a WordPress footer causes too much clutter (which is common with landing pages), or if you’d instead the footer didn’t get crawled by search engines, taking the footer out of the equation entirely may not be a bad option.
Keep in mind, however, that you’re not deleting the footer from your WordPress files. The footer.php file is a core part of the WordPress files, so you must leave it. However, we can use CSS code to tell WordPress not to display the footer and its content.
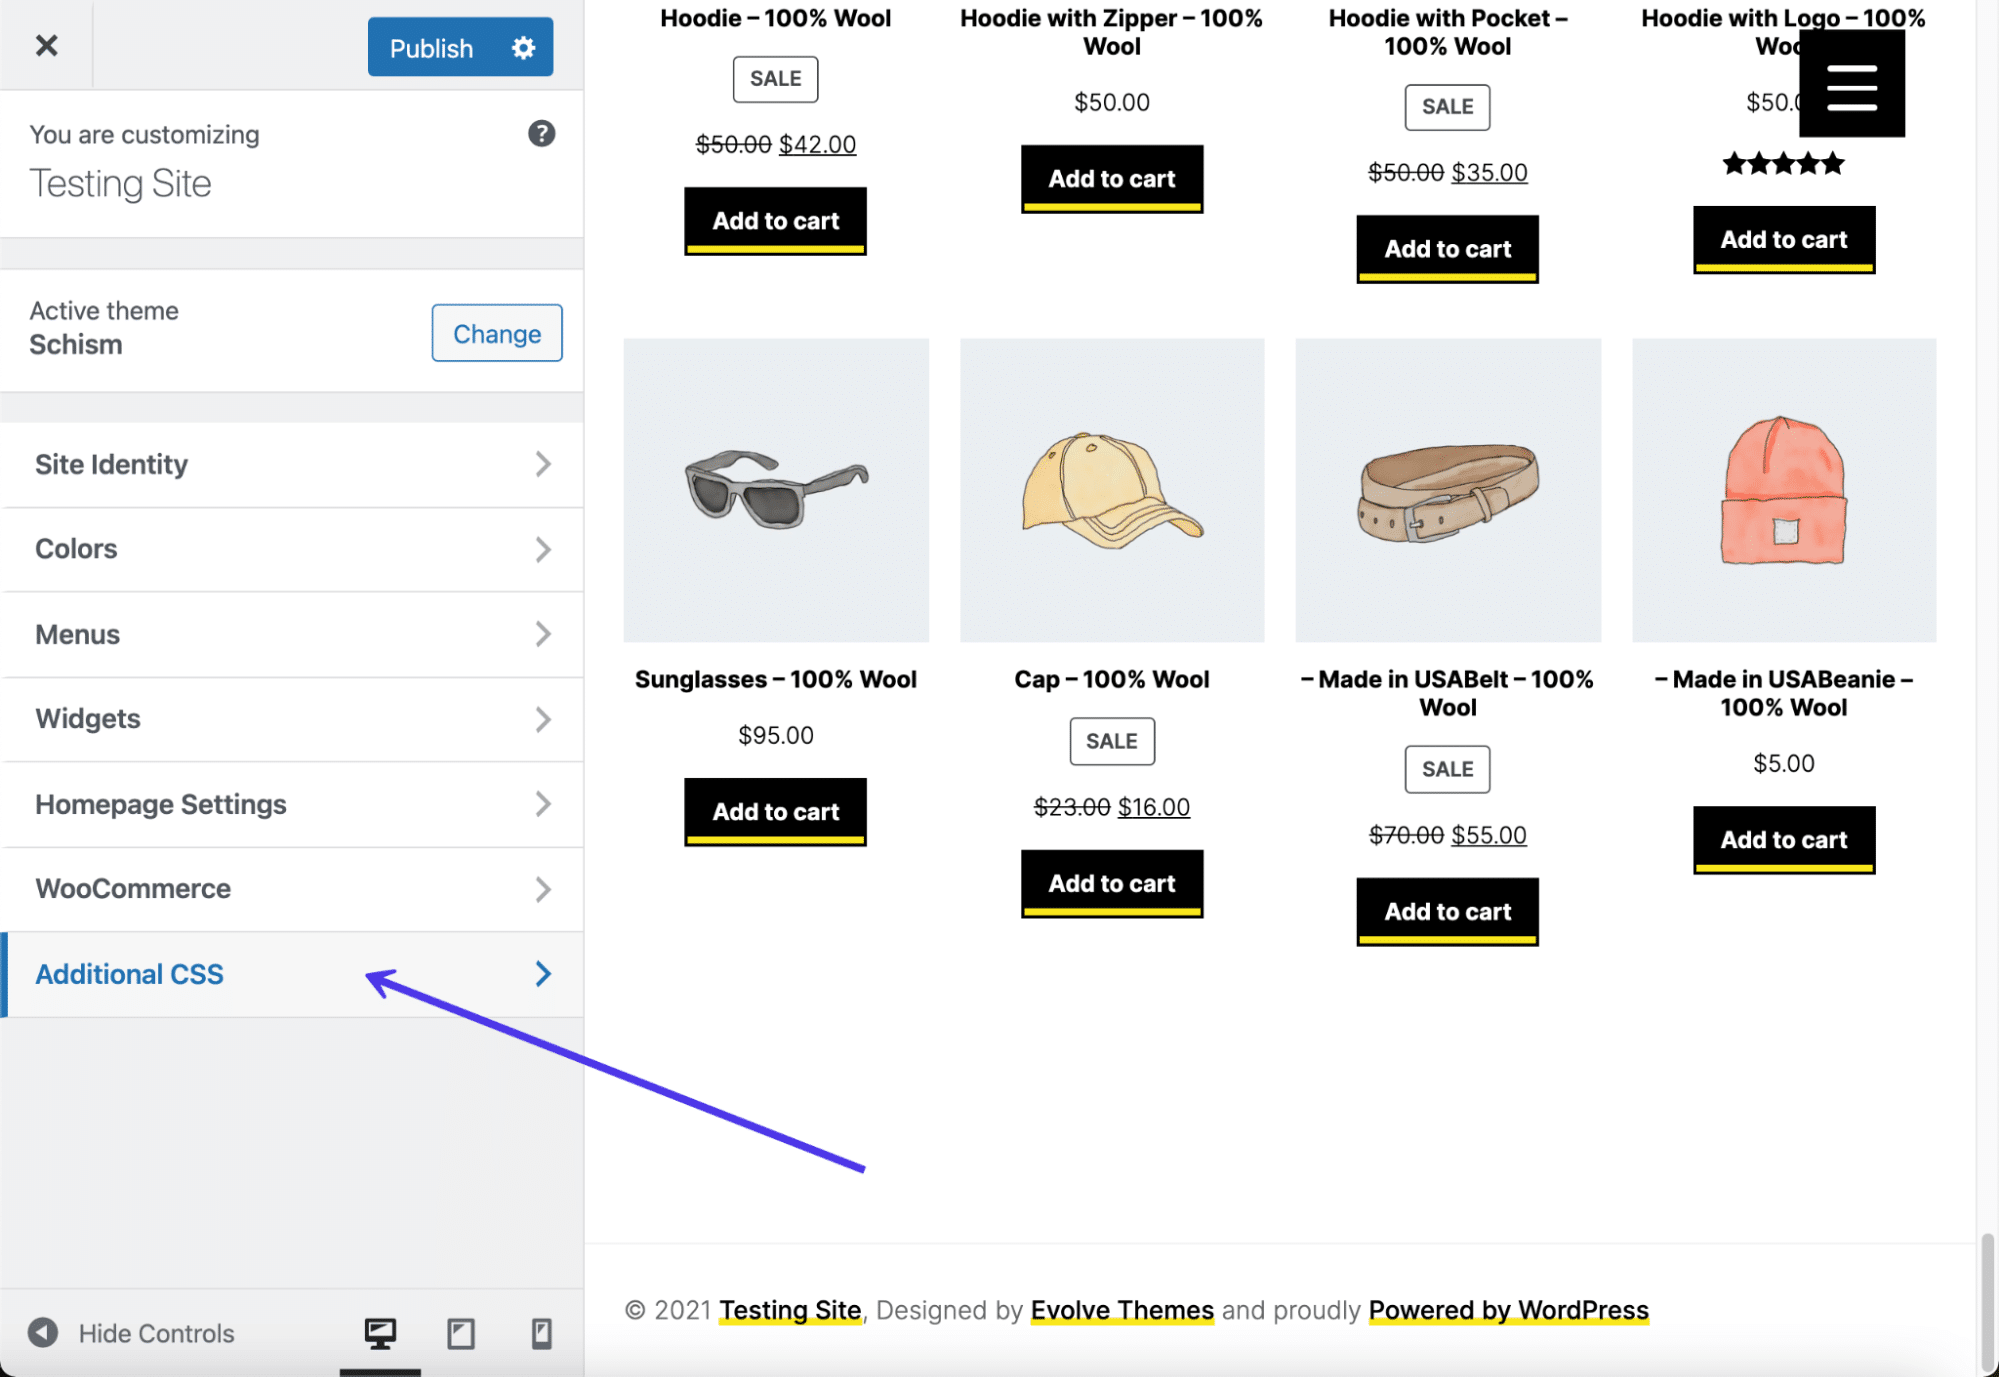
To hide the WordPress footer completely, go to the Theme Customizer and click on the Additional CSS tab.
The goal is to paste CSS to tell WordPress that we don’t want to see the footer on our website.
We’re trying to hide everything in this example, from the copyright information to the WordPress and theme developer credits. You can also use this method to hide items like widgets and menus within your footer.
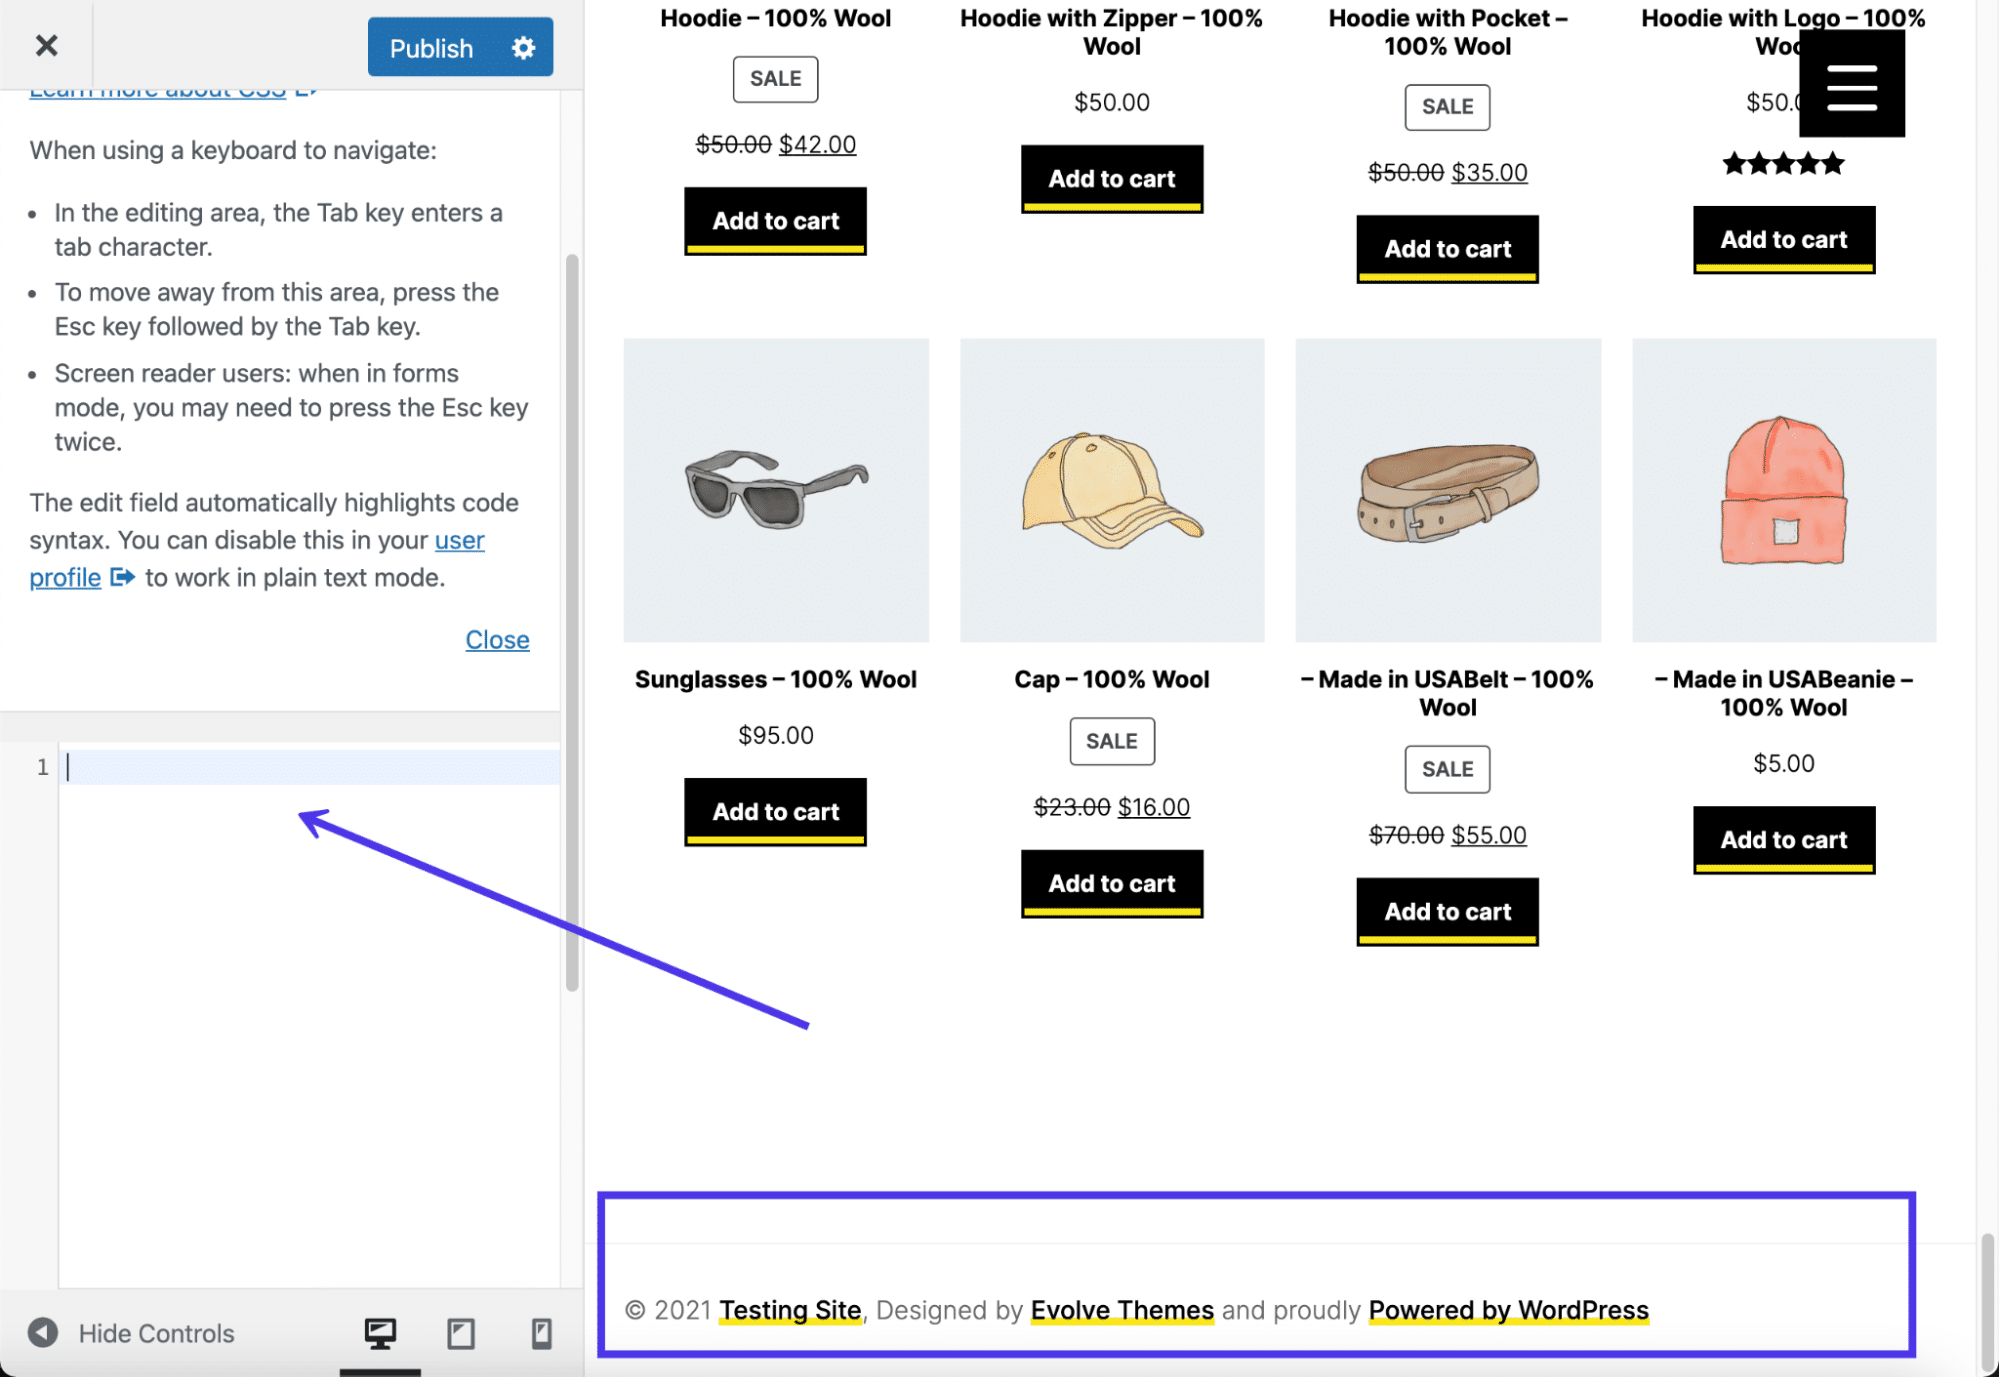
Go ahead and paste the following code in the CSS box:
footer{

display:none;

}
This tells WordPress to hide everything within the footer.php file. The file remains inside your file directory, just in case you’d like to re-add content in the future.
The Theme Customizer preview should now show a blank space. Make sure you hit the Publish button to see the results on the front end.
Although that CSS should work for most themes, you may find that the theme developer has a different file configuration. Another way to potentially remove most of the footer content is by using the following code instead of the previous code discussed:
.site-info { display:none; }This option is less likely to work, but it’s not unheard of for theme developers to make a file called site-info.php in a footer’s template-parts folder.
From links to support documents and social media pages, your website footer contains a lot of important info. 💪 Learn how it works in this guide ⤵️Click to Tweet
Summary
WordPress footers have many purposes, from adding social media buttons to displaying recent blog posts, support pages, and forms. The goal is to take advantage of this extra space, since it’s not wise to pack your main menu with too many links or try to fill your sidebar with an onslaught of content.
You’ve learned many ways to edit a WordPress footer. We hope you can now successfully edit and customize footers on any WordPress site!
Let us know in the comments below if you have any questions about editing the footer in WordPress!
Get all your applications, databases and WordPress sites online and under one roof. Our feature-packed, high-performance cloud platform includes:
- Easy setup and management in the MyKinsta dashboard
- 24/7 expert support
- The best Google Cloud Platform hardware and network, powered by Kubernetes for maximum scalability
- An enterprise-level Cloudflare integration for speed and security
- Global audience reach with up to 35 data centers and 275 PoPs worldwide
Test it yourself with $20 off your first month of Application Hosting or Database Hosting. Explore our plans or talk to sales to find your best fit.
Since a WordPress footer is so useful, at some point, you must learn about the footer, how it works, what’s possible in terms of editing it, and how to remove preset footer content that’s not relevant to your brand. That’s why we want to show you how to edit a footer in WordPress, along with a full explanation of a footer’s benefits and what can go into one.
Website footers have a long history of containing whatever information doesn’t fit within a website’s main menu. From links to support documents and social media pages, various elements go rather well in a footer.
Let’s get started!
Check Out Our Video Guide to Editing the WordPress Footer
What Is a WordPress Footer?
Footers aren’t exclusive to WordPress. Most website builders and content management systems offer the ability to include a footer. However, WordPress offers its unique footer functionality, along with a preset footer design that generally comes with the theme you install.
A WordPress footer sits at the base of your website. It’s a static content area that shows up at the very bottom, regardless of which page a user lands on. Although not as visited as the header, the footer is still extremely important to provide users with social media buttons, customer support links, and contact information.
Overall, if you make a website on WordPress, you can expect to see a footer placed in your design by default. WordPress has a core file built into its system specifically to manage the footer (footer.php).
Footers come in all shapes and sizes, and you can edit them to include different colors, fonts, and backgrounds. You can also insert content elements within the footer, such as blog post lists, security badges, and even forms and images.
Website footers: extremely useful, but potentially confusing to edit. 🥴 Learn how to get started here ⬇️Click to Tweet
The footer is like the conclusion to your entire website. It shows essential links and information for those interested in and dug deep into your content. Finally, the footer completes the overall design of your site, much like the final slide in a slideshow presentation or the conclusion to a speech.
Reasons To Have (and Edit) a WordPress Footer
It’s tempting to forget about your footer or leave it as the last item you design. Many people even want to remove their footers since they don’t see much value in them. This isn’t the greatest plan. The footer does have value, even if it’s not viewed or clicked on as much as your main menu or primary content areas.
To give you an idea of what makes a footer valuable, here’s a list of all the reasons to have one and learn how to edit a footer in WordPress to fit your brand.
- The WordPress footer offers a static module shown on every page of your website, making it more visible than a standard page that disappears when someone clicks away.
- It completes the website’s design, both visually and in your WordPress files. It tells WordPress where to end its code and indicates to users when the content ends. Not to mention, it makes for a cleaner interface.
- Many internet users have come to expect specific links and content in the footer, so they’ll go directly to the footer to find them. Think support links and social media buttons.
- The footer provides more conversion and engagement opportunities, like a call to action at the end of a blog post. You can add forms, links to other content, or even a company tagline.
- It’s a place to include important links that may not make the cut for the main menu.
Now that we know the benefits of using a footer, the big question of what to place in the footer comes into play. All themes differ, but it’s common to see a “Powered by WordPress” message in the footer after installing a new theme.
Other times, theme developers might include their own premade designs or messages about who made the theme.
None of that’s bad, but the goal is to customize your WordPress footer to link to your valuable pages, include content related to your brand, and clear out the default content like messages from theme developers or WordPress. It’s also wise to adjust the styling to match your branding with custom fonts and colors.
So, what are some elements to put inside your WordPress footer?
- Forms for users to subscribe to your newsletter messages or blog updates
- Links to customer support resources, like FAQs, knowledgebase articles, and forums
- Icon links to download digital products like apps and podcasts
- A list of upcoming events
- A list of recent blog post articles
- Links to loyalty and affiliate programs
- Links to informational pages, like an About Us or Career page
- Badges and icons to promote your reputation, past awards, or site security
- Social media icons that link to the pages
- A full sitemap for easier navigation throughout your website
- Legal statements like copyright claims, privacy policies, and terms and conditions
- Contact information such as your address, locations, phone number, and business hours, or a contact form
- A search box for improved navigation
- Any other additional pages that don’t fit in your main menu but still need a place on your site
How To Edit a Footer in WordPress (Self-Hosted Version)
There are a handful of tactics to edit the footer of a WordPress.org (self-hosted) website. In the following sections, we’ll talk about editing a footer in WordPress using the theme customizer, widgets, plugins, and code. As a bonus, we’ll discuss managing the WordPress footer with a visual page builder like Elementor.
Edit WordPress Footer with Theme Customizer
The fastest and most efficient way to edit a WordPress footer is by utilizing the built-in WordPress Theme Customizer. The Theme Customizer settings vary depending on your chosen theme, but the customizer itself is always located in the exact location on the WordPress dashboard.
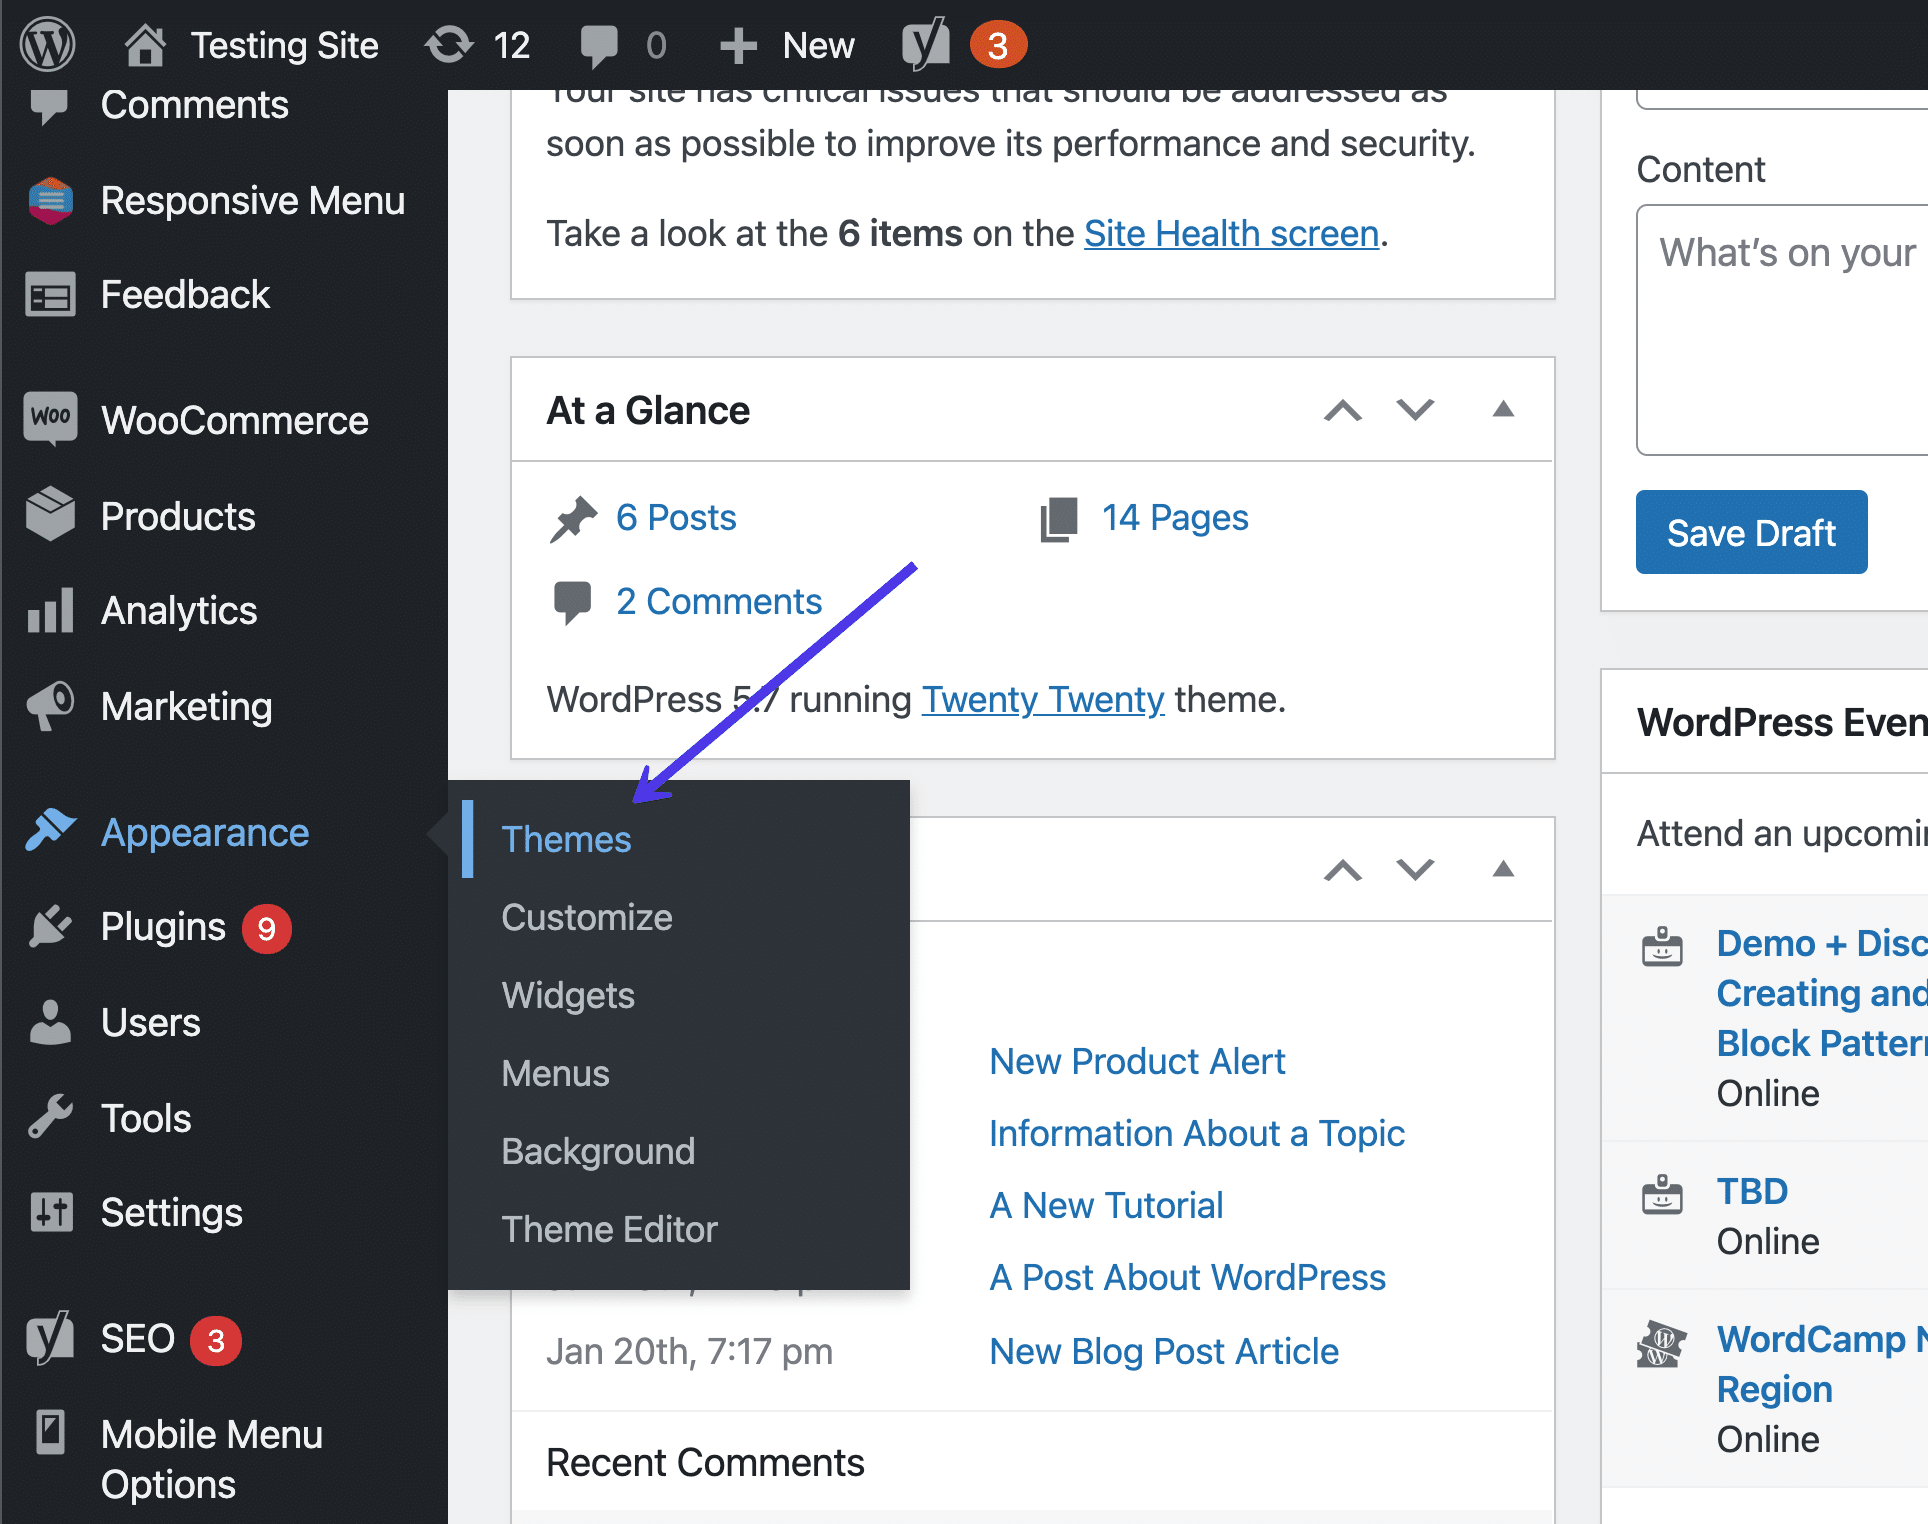
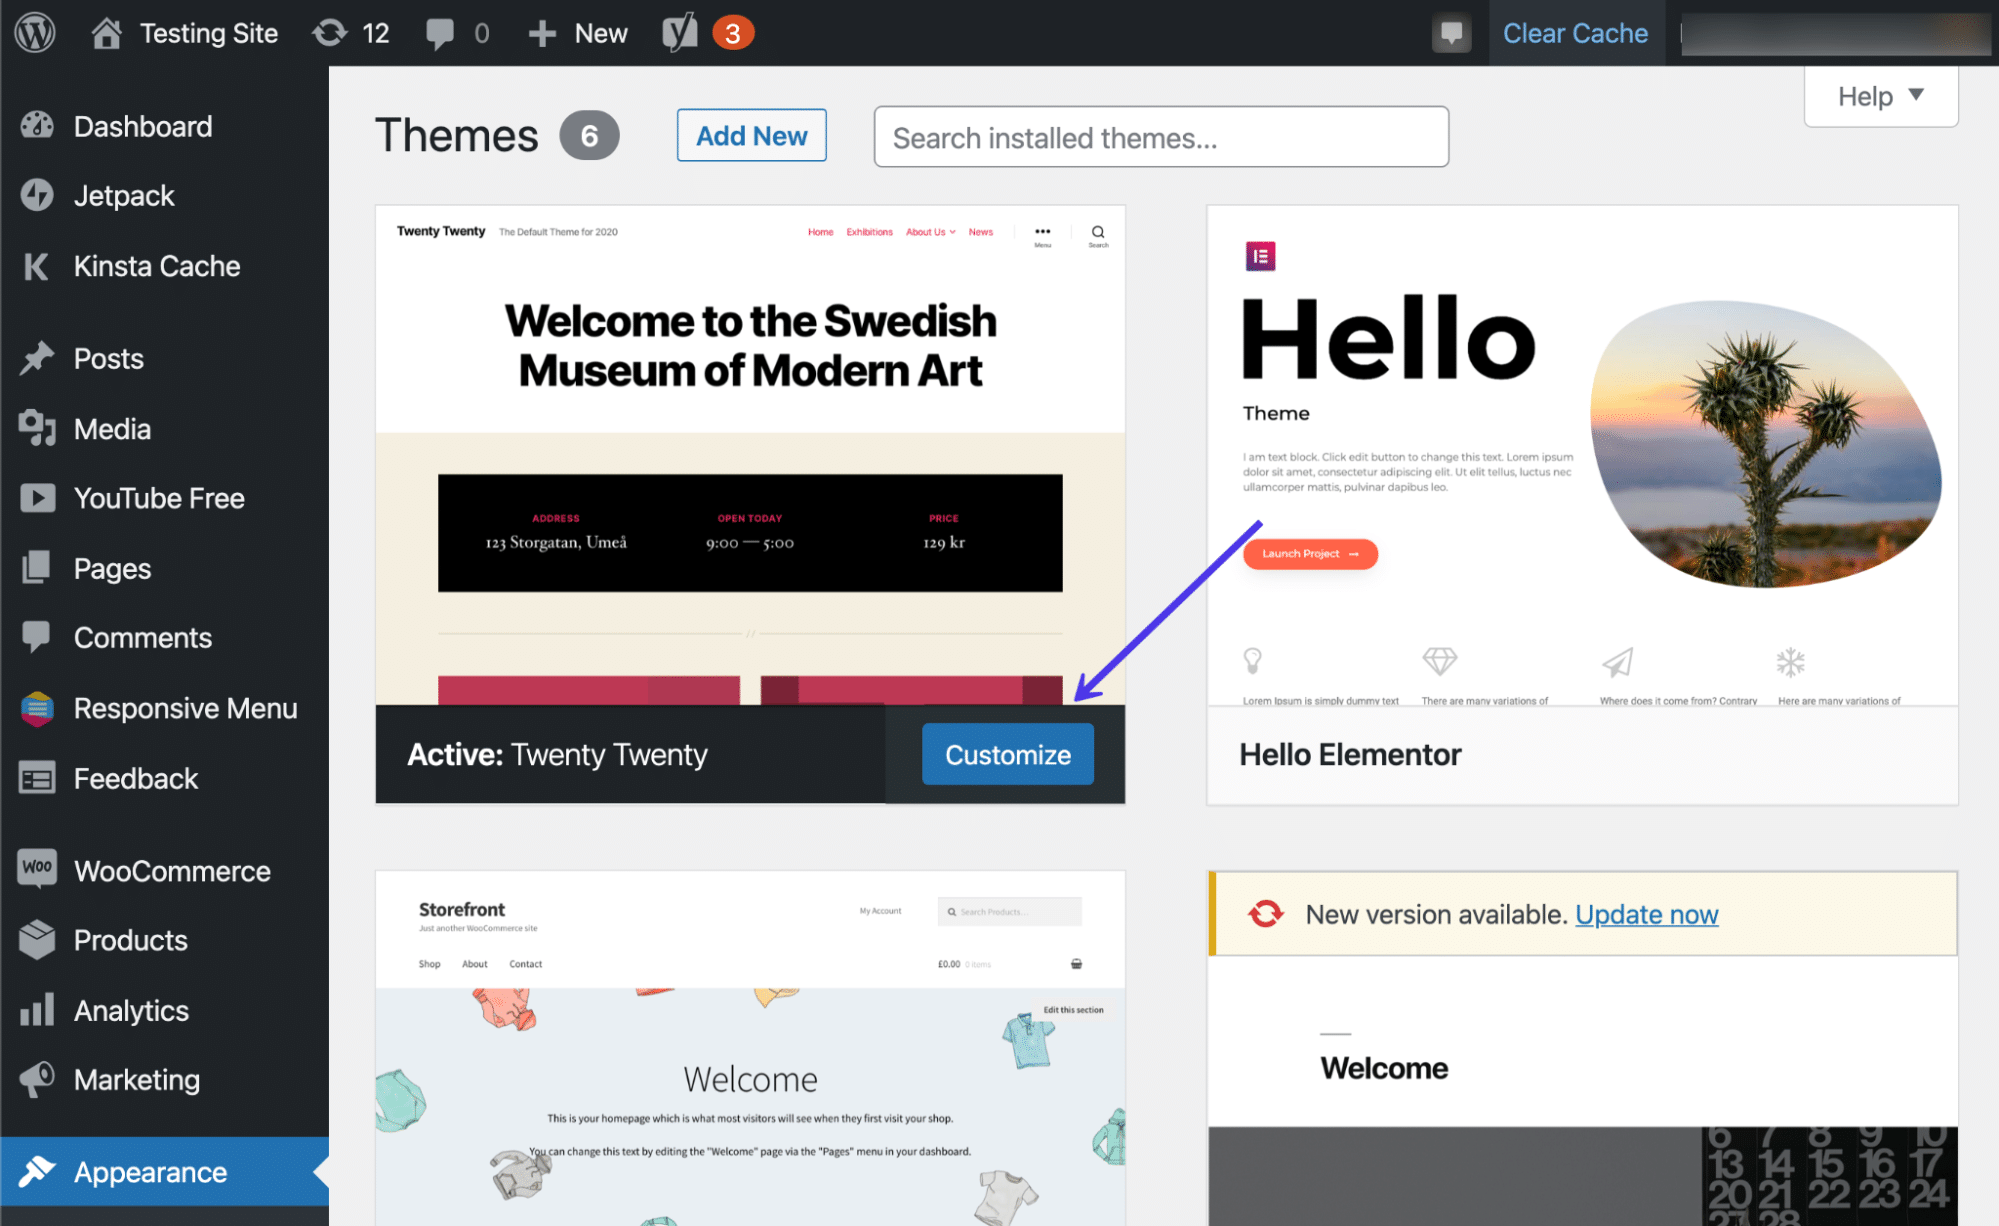
To begin the process, go to the dashboard and click on Appearance and then Themes.
Then, click the Customize button underneath the currently active theme.
Feel free to swap out themes to see how the footers change from theme to theme.
As a slightly faster alternative, you can also click on Appearance > Customize, which brings you directly to the WordPress Theme Customizer for the active theme.
The WordPress Theme Customizer presents a visual of your website on the right side and several menu items on the left that lead to settings and customization tools. Again, every theme has varying customization options, so your screen may look a little different than what’s in our screenshots.
A wonderful place to start with your footer customization is with the colors.
Our current theme has a Colors button, making it easy to identify where we need to go.
Select the Colors button if that’s available in your theme.
Choose the Select Color button under the Header and Footer Background Color field.
Use the color picker to test all types of colors and see which ones match your brand or look good towards the end of your page.
With this particular theme, any color modifications actually adjust the font colors as well, making them look clear regardless of the background color.
As you can see, a darker WordPress footer color automatically changes the font colors for links, headers, and paragraph text, eliminating the need for you to do that on your own.
Now let’s try another theme. In this case, we’ve swapped out the Twenty Twenty theme for the Storefront theme.
Sure enough, the WordPress Customizer for the Storefront theme displays buttons not shown in the Twenty Twenty theme.
Therefore, your theme dictates how much control you have over the footer in the WordPress Customizer. Some themes are better than others in this respect.
For the Storefront theme, we have a Footer tab. Click on that to see what’s available for customizing the footer.
Unlike the previous theme, Storefront doesn’t automatically change text and link colors when you adjust the background colors. However, you are able to control all of these colors on their own, with fields for the Background Color, Heading Color, Text Color, and Link Color.
Footer color settings
A quick selection reveals the results in our WordPress footer preview. After this, you should click on the Publish button to see the new footer colors on the front end.
But what about the links and text elements presented by default in the footer?
Again, the primary method to adjust the footer content is in the WordPress Customizer. In the coming sections, we’ll explain how to add and remove text and link content from the footer using two methods: as menu items and as widgets.
Adding Widgets to Your WordPress Footer
One way to edit the footer content is by adding widgets. WordPress widgets have many functions, along with several locations for them to go, including the sidebar and footer, provided your theme supports that.
Back in the WordPress Customizer, look for the Widgets tab.
Peruse the list of areas to place widgets on your website. You may see options for regions like the sidebar, top menu, and bottom menu. Hopefully, your theme also includes the footer as an area to place widgets. If not, there are other ways to edit your footer, though if you’d rather go with widgets, consider switching to a different theme that allows for widgets inside the footer.
This theme actually provides four widget locations in the footer, arranged in four columns stacked side by side to make a beautiful format that fits as much content inside the footer as possible.
Click on any of the footer widget locations to reveal an area to Add A Widget. Click on that button to show a slideout view of all available widgets on WordPress and the theme. Once again, you may see a completely different set of widgets, considering some themes include their own widgets, or you may have installed an extension or plugin to add more widgets to your dashboard.
Common widgets range from Archives to Audio and Custom HTML to Product Filters.
All you have to do is select the widgets to add to this particular widget area. They’ll show up on the left-hand side for you to reorganize and configure their individual settings.
After some quick work, we’ve placed several widgets in three of the footer column modules, including a main menu, a list of recent posts, and a few of the products from our shop. You’ll also notice we added a search bar to make navigation a little easier for our users.
One important area to note is the widget settings section. Each widget has its own settings on the left, so be sure to walk through those fields and make them look exactly as you want.
As you may learn while browsing through the theme settings, not all themes have ways to add menus directly to the footer area using the standard Add Menu setting. Our theme here, for example, has spots to activate menus as primary, secondary, handheld, and mobile menus, but nothing for footers.
We’ll cover menus in the next section, but we wanted to explain a quick workaround to add a menu with a widget, just in case your theme doesn’t support menus in the usual manner.
Essentially, all you have to do is go to one of your widget footer modules and search for the Navigational Menu widget. Here, you can click on a dropdown field to view all created menus on your website. Feel free to generate a menu specifically for your footer (in the Menus section of the dashboard) and add it as a widget in this section.
As an alternative, opt for the main menu, or whatever menus you’ve created. They should all show up in the menu widget dropdown.
After that, the menu of your choice shows up in the footer, as long as you’ve added the Navigational Menu widget in the right footer area and clicked the Publish button. You can even type in a title for that menu if you’d like to explain what the following links contain.
How To Insert Custom Text, Images, and Code as Footer Widgets
Many WordPress widgets offer pre-configured lists of content, like the Recent Posts widget or the Search Bar.
However, sometimes you may want to edit the WordPress footer to include entirely custom content, such as simple text, images, or a bit of code, to create something completely new.
WordPress provides a widget for each of these.
All that’s required is to go to the Theme Customizer > Widgets. Then, choose the widget area that reflects where you want the widgets to go in the footer.
Click on the Add A Widget button and search for “image”.
Add the Image widget and customize the title. Click on Add Image, then consider including a link to the image as well. You can edit the image size by clicking on Edit Image.
Next up, search for “text” in the widget library.
Add the Text widget to your footer and type in anything you want. It also has a title field along with a visual editor, much like you receive when making a blog post or page in WordPress. We’ve tried inserting images through the Text widget (since it’s technically possible) but many themes don’t allow it.
Finally, you may find that using a Custom HTML widget is the best course of action, especially if you want full control over the footer design or to incorporate a unique design for something like an email signup form.
For that, search for “HTML” in the widget library and choose the Custom HTML widget.
Paste or type in your custom HTML and keep an eye on the right-side preview to ensure it looks the way it’s supposed to. You may also have to add some CSS styling to make it appear the way you want.
As always, remember to click the Publish button at the end.
Adding Menus to the WordPress Footer
You make menus in WordPress by going to Appearance > Menus. Once you’ve established a menu, it’s ready to add, at least the locations supported by your chosen theme.
It’s also possible to create your menu within the WordPress Customizer, so it just depends on where you feel most comfortable adding new pages and links to your menus.
Check Out Our Video Guide to Adding Menus to the WordPress Footer
As a reminder, not all WordPress themes allow for menus within the footer. In fact, some of them only have one or two menu locations, so you’ll have to check to see if your theme supports menus. If not, refer back to the previous section for a workaround that uses a widget to incorporate a menu in the footer.
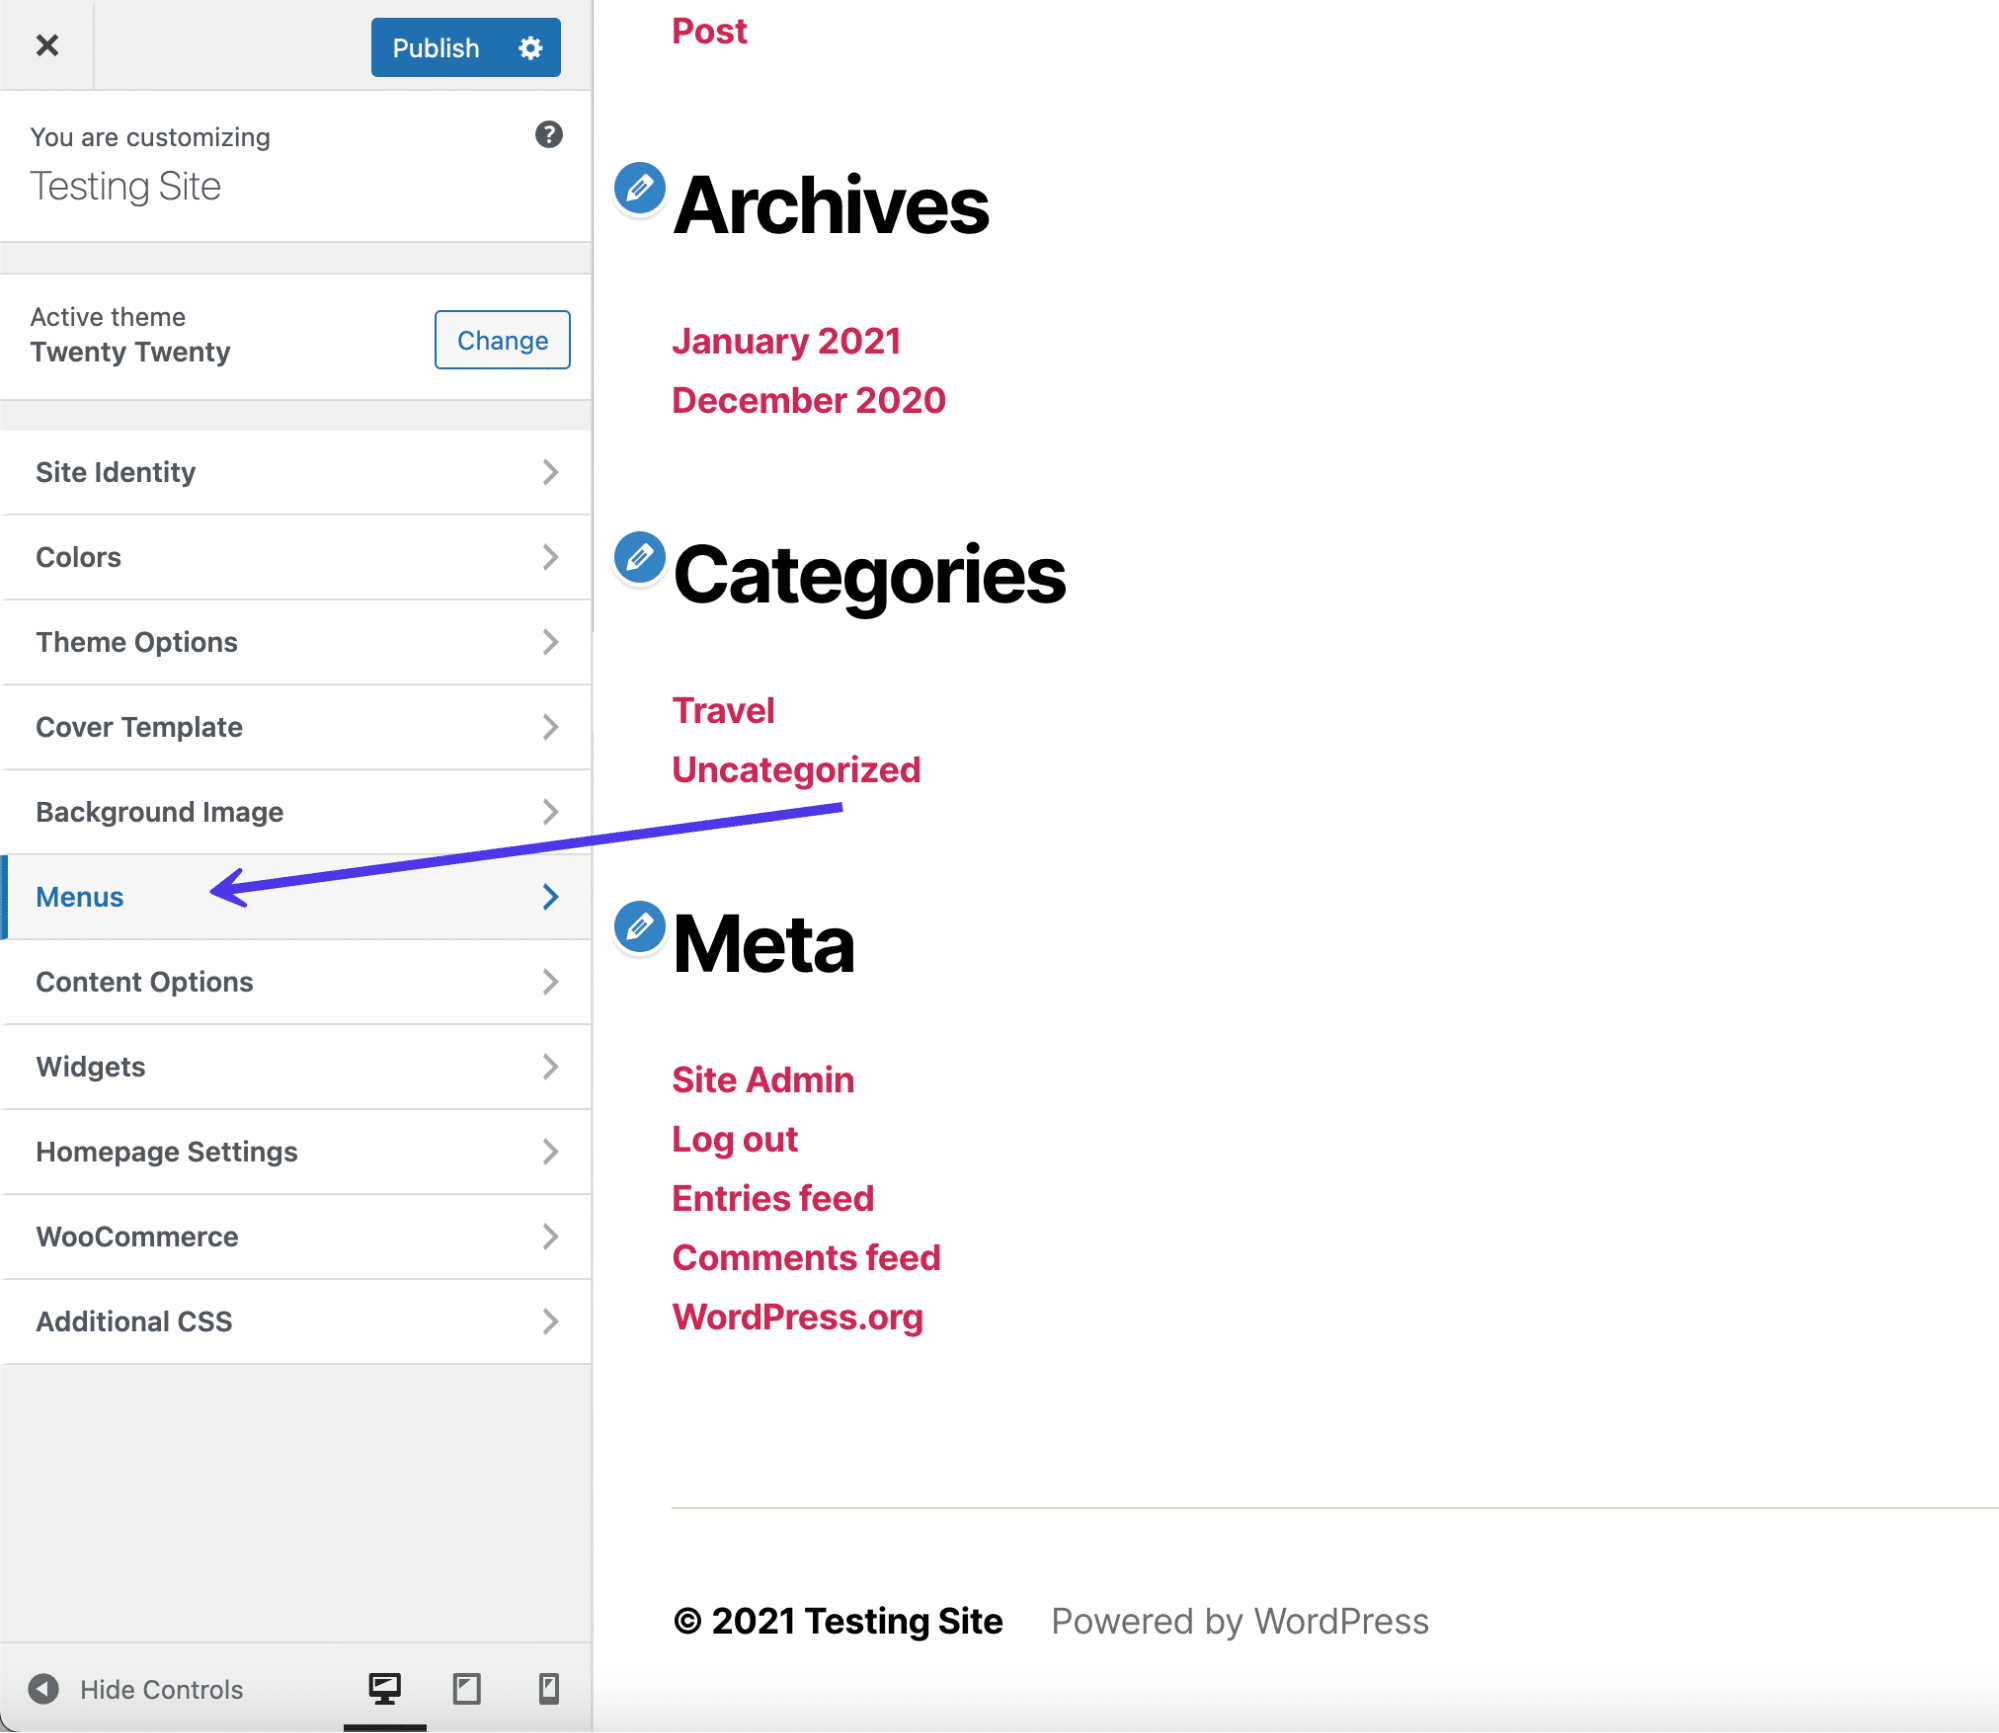
If using a theme that allows for menus in the footer, go to the WordPress Customizer and click on the Menus tab.
You’ll most likely see an empty menu page with several buttons to decide on. One of the buttons lets you select which menus to reveal and where to show them. The View All Locations tab shares where menus are supported on your theme.
Finally, the Create New Menu button works much like the standard menu creation panel in the dashboard, except it doesn’t require you to exit out of the Customizer.
Click on the Create New Menu button. If you already have a menu ready to go, you can add it to the footer by going to View All Locations.
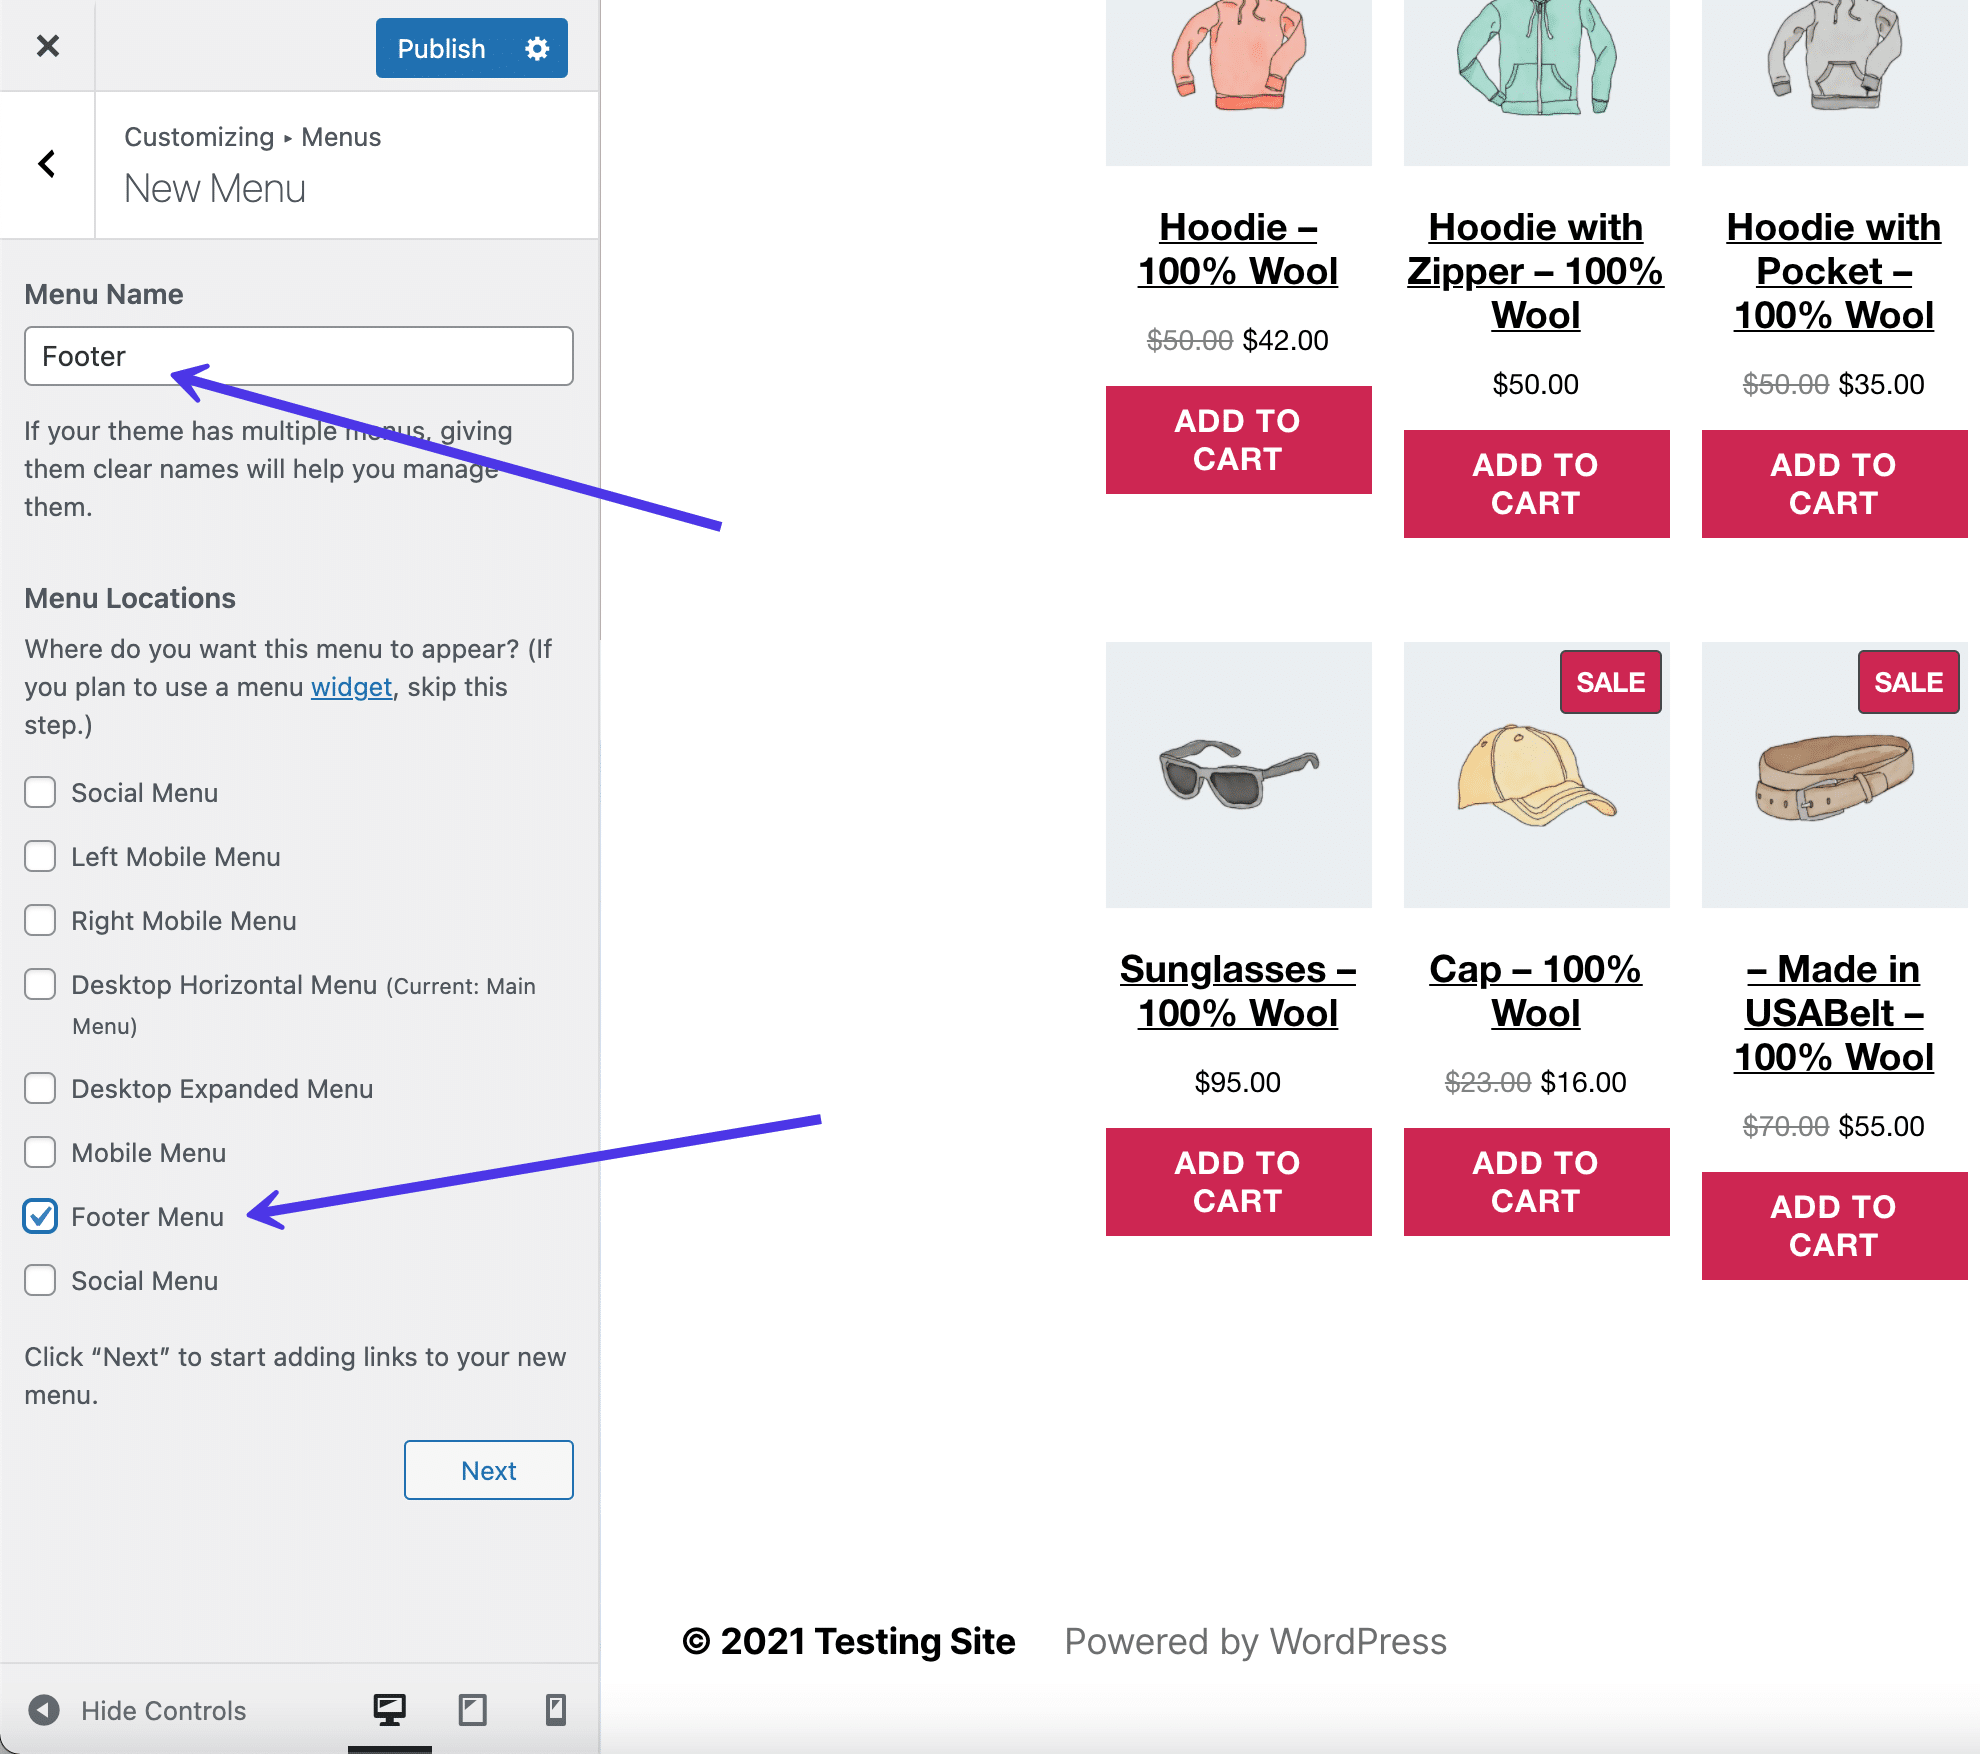
Name your menu (in this case we’ll go with the obvious Footer name) and check the box called Footer Menu. This tells WordPress you want the Footer menu you create to show up in the Footer location. They’re separate things; one is the actual menu and the other is the region of your website where the menu goes. You’re more than welcome to switch the name of your footer menu if you find it a bit confusing.
Click on the Next button at the bottom of the panel to proceed.
Now you have a menu named Footer, but it lacks any buttons or links to make it a truly functional menu.
Click the Add Items button to start placing links and buttons to pages in your menu.
A new slideout panel appears with all the options to add to your menu. For instance, you can include custom links to internal or external pages, posts from your blog, pages from your own site (already created pages), products, tags, and categories, along with whatever other types of content pages you may have.
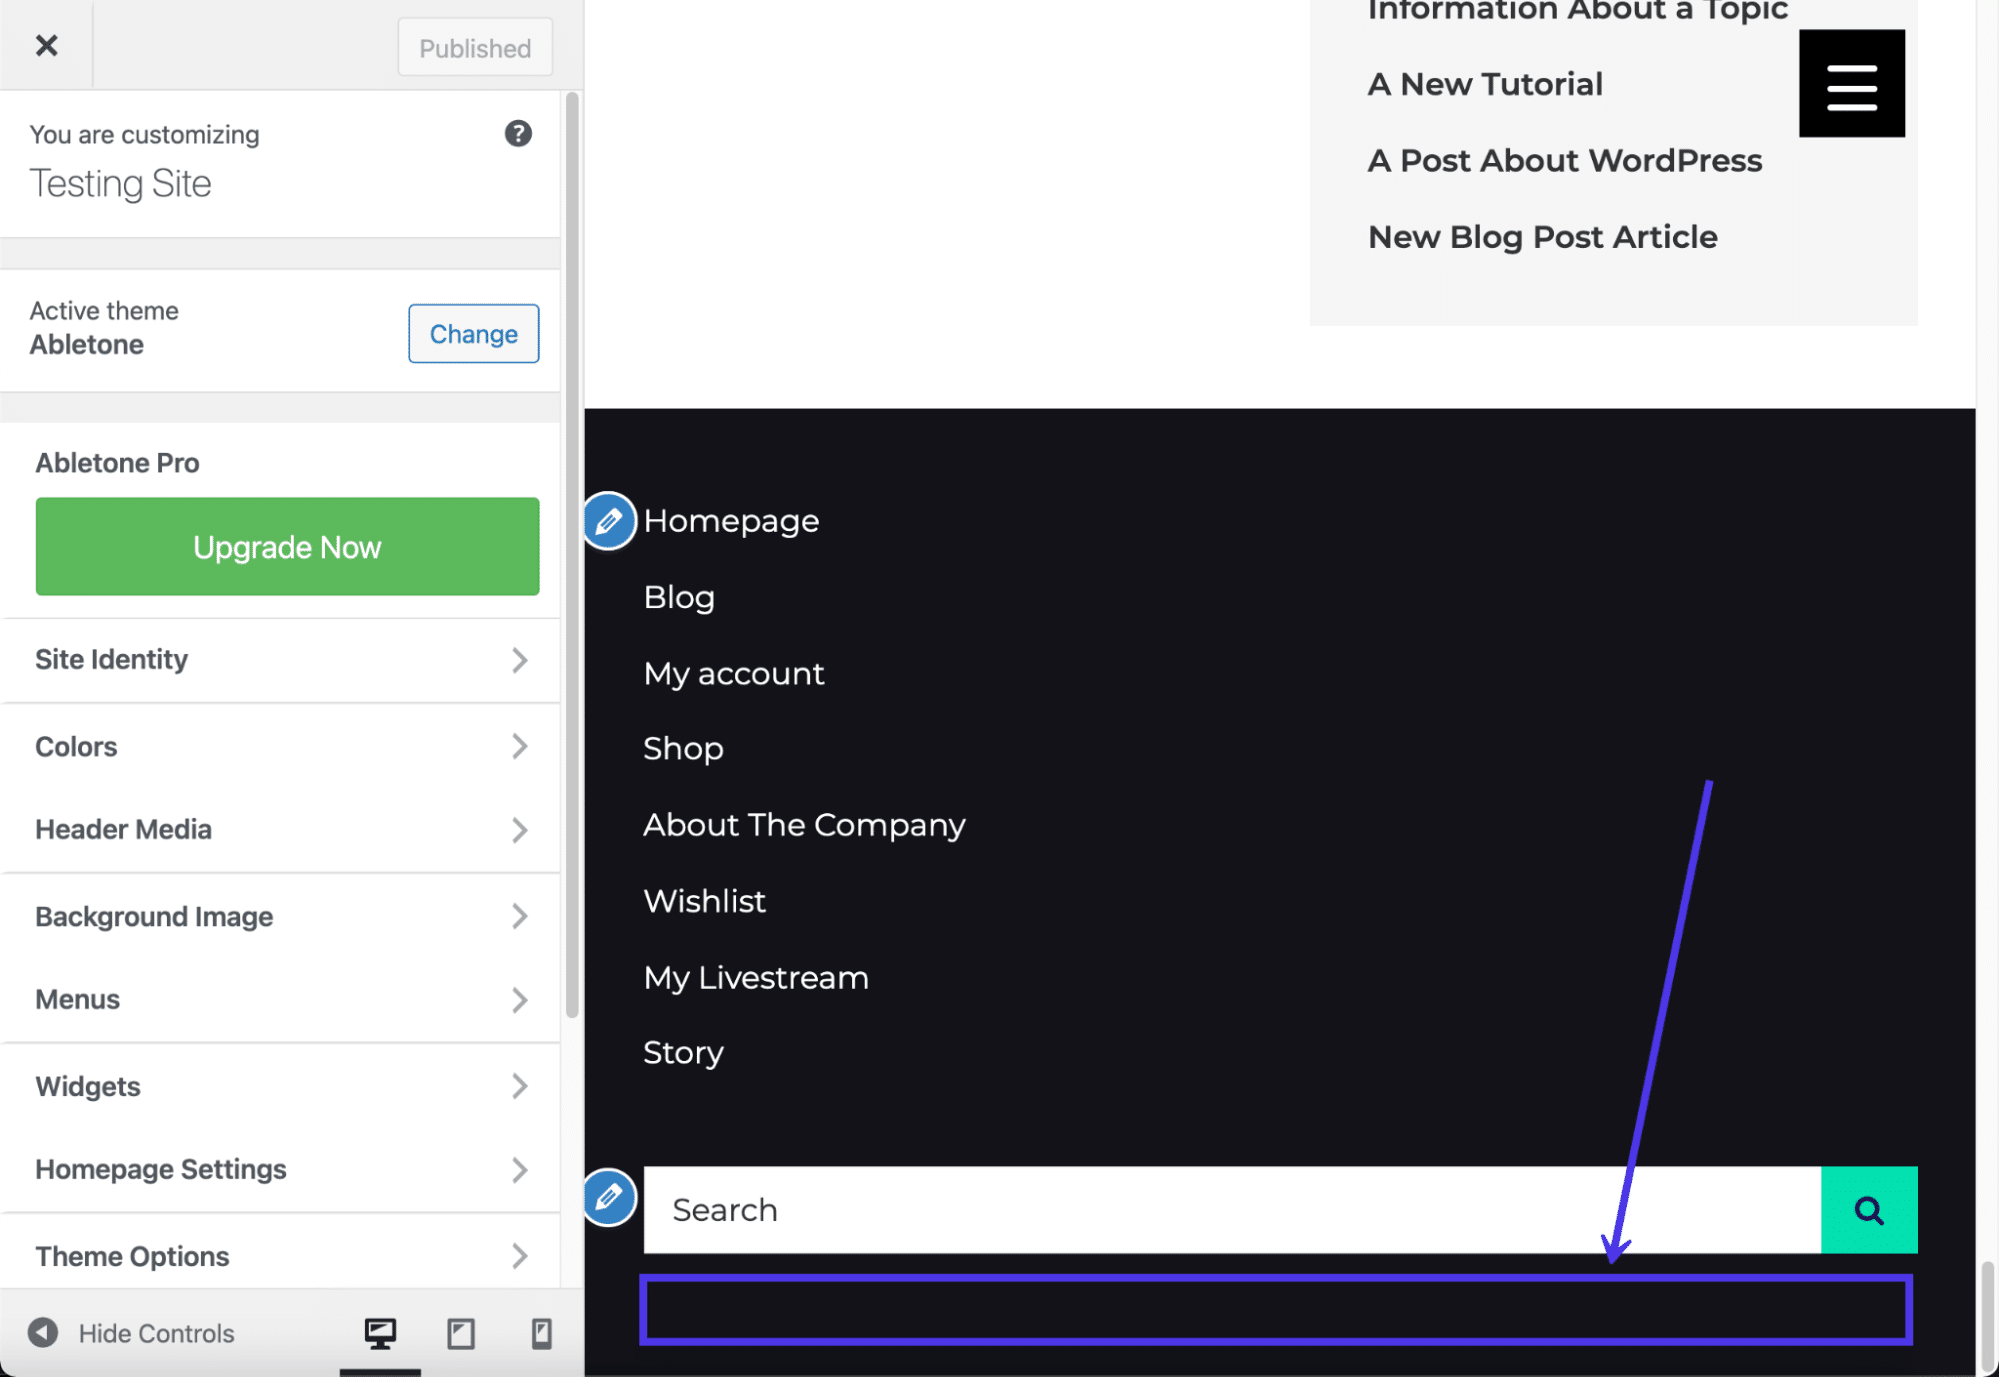
Each menu item you choose gets placed and shown in the menu panel, where you’re able to reorganize them and click on each one to edit their individual settings. For this example, we’ve added five links to pages throughout our website, including the blog, a livestream page, and an About The Company page.
Refer back to our list at the beginning of this article for ideas on what to include in your footer.
Edit Footer in WordPress With Plugins
WordPress already has built-in tools to modify your footer, but the extent to which you can edit your particular site’s footer relies on your theme of choice and whether or not you want to mess with any code.
Check Out Our Video Guide to the Best Footer Plugins
As you’ll learn further down in this article, removing the default “Powered By” text requires you to tap into the footer.php file and remove some code. Therefore, it’s clear several aspects of footer editing may be out of your reach if you don’t have the experience or willingness to mess with code or find a new theme.
That’s where WordPress plugins come into play. Quite a few plugins offer footer editing and expansion features to remove the need to edit code manually and sometimes to make quick changes to your footer, like with colors and columns.
WordPress footer plugins we recommend include the following:
- Footer Mega Grid Columns — This plugin fixes any problems you have with a theme where the footer lacks a grid format with three columns. Some themes only offer one or two columns, while other times a footer gets entirely stripped from the theme. Footer Mega Grid Columns adds a footer widget to not only display three columns but additional ones if needed.
- Remove Footer Credit — Use this plugin to completely remove the footer credit placed there by WordPress or your theme developer. You also have the option to type in your own HTML code to create a footer credit or a bit of content that’s more suitable for your site.
- Header Footer Code Manager — This plugin has a slight learning curve, but it’s an ideal solution for intermediate WordPress users who would rather have access to footer and header coding areas in the dashboard, as opposed to opening up the site files. You can add an unlimited number of styles and scripts to the footer, which often comes in handy for showing information after every blog post or page.
- Footer Putter — Use this plugin to insert a widget for copyright information or for your trademarks. This is a rather useful solution for placing details about your company in the footer area, including things like links, business hours, telephone numbers, and more.
- Footer Text — As one of the simplest ways to modify your WordPress footer, the Footer Text plugin activates a frontend and backend editing panel to change what’s in your footer. It comes with a WYSIWYG (What You See Is What You Get) editor, so it’s possible to format your text and potentially add items like pictures.
In the following sections, we’ll explore how to use some of these plugins for tasks like adding social media buttons or inserting custom code into the WordPress footer.
Manually Edit the WordPress Footer With Code
A more technical way of editing your WordPress footer involves tapping into the footer.php file and editing its contents.
You must have experience with coding — or be eager to learn — in order to make this method useful for you, but there are some minor tweaks that all beginners can handle (mainly just removing preset text in the footer). Take a look at our guide to adding header and footer code for the most detailed information.
To access the footer.php file, link to your WordPress site files by using an FTP client. We also recommend checking out this article on how to use SFTP to link to WordPress as SFTP is more secure than FTP.
Once connected to your WordPress site files through your FTP client, locate the /public folder. Click on /wp-content and then /themes to reveal all themes currently installed on your WordPress dashboard. Note which theme is active on the site and open the folder for that one.
All WordPress themes have a footer.php file somewhere in the theme folder. Scroll through the batch of files to locate that footer.php file.
Open the file with the editor of your choice. Once in there, you can edit the current code or add new content depending on what you’re trying to achieve. The get_template_part section is often modified to insert new bits of text, but we’ll leave that up to you since every footer is different.
As an alternative, you can edit the footer code by using a plugin that displays a visual field for the footer.php file. This way, you don’t have to install an FTP client and link it to your website. It’s also a more intuitive, beginner-friendly process that remains available on your dashboard at all times for future edits.
To make this happen, install and activate the Header Footer Code Manager plugin.
Once it’s been installed, click on the HFCM tab that appears in the WordPress dashboard. Then, name the snippet, choose where you want it displayed and set the location as Footer.
The most important part is the Snippet/Code field, which you’ll fill in with whatever code you want. Some people use this plugin for things like verification or tracking codes that don’t show up on the front end. However, it’s also available for you to use for typing in new text and gaining almost complete control over the content in your footer.
Make sure you click on the Save button to see the results.
Use a Page Builder With Footer Designer
A bonus way to modify your WordPress footer, without the need for code or many of the standard WordPress footer tools, is with a page builder. Not all page builders offer footer editors, so it’s important to conduct some research and ensure that either your current page builder offers it or the one you plan on buying has footer features.
Check Out Our Video Guide to Editing the WordPress Footer with Page Builders
Regardless, this is a relatively basic feature for a page builder, so it’s a good idea to only go for a page builder if you plan on customizing your entire site with it.
A few other page builders offer footer editing, but our favorites include Elementor and Visual Composer.
To create a custom footer with Visual Composer, you must have the Pro version. There are some workarounds to edit the lower part of your website with the free version, but the true drag-and-drop builder for the footer requires an upgrade.
Once installed, click on the Pages button in your dashboard. Scroll through the pages you want to edit and select the Edit With Visual Composer link on any of those pages.
That brings up the Visual Composer designer, with a live preview of your webpage on the right side and drag-and-drop design tools like elements and templates on the left.
One of the easiest ways to implement a beautiful footer is to simply choose a template (many of which are free). These templates provide professional designs for your entire site, along with a nice footer that’s customizable.
To see what’s available, you can click on the Templates tab, then the Get More Templates button. Visual Composer offers templates for all aspects of your site, including headers, footers, and sidebars.
The next window shows a large library of templates, all categorized under filters for things like Elements, Templates, Blocks, and Footers.
Choose the Footers tab to show all premade footer templates.
Once again, this part of Visual Composer requires the Pro version. Once active, you can scroll through the dozens of footer templates to implement them on your website and edit them as you please.
One of the other page builders with footer editing tools is called Elementor. Much like Visual Composer, Elementor provides a full website builder for constructing homepages, product pages, footers, and more.
Keep in mind that you do receive footer content blocks for free with this method, but the actual footer builder uses the Pro version of Elementor. Like Visual Composer, you need to upgrade for full functionality.
To get started, install and activate both Elementor and the Elementor Header Footer and Blocks Template plugins.
Click on Templates > Theme Builder to open the complete website builder from Elementor.
Here, you’ll see a menu to edit various parts of your site such as the header, footer, and single pages.
Select the parts of your site you want to customize on the left side menu or with the icon buttons in the middle of the page. As you can see, there’s a Footer link in two places.
The footer editor works similarly to every other editor in Elementor: You can change the layout, adjust the style, and click on the block to type in new content. Every aspect of the footer is customizable when using Elementor, making it one of the more flexible and desirable options when it comes to footer control and learning how to edit a footer in WordPress.
The Header Footer and Blocks plugin provides content modules made specifically for headers and footers. In terms of the footer blocks, you can choose from modules like copyright information, images, site titles, and taglines.
To utilize these blocks, go to Appearance > Header Footer and Blocks in the dashboard.
You can also make a unique block and choose to edit it in the Elementor page builder. Once in Elementor, scroll down to the block collection for Headers Footers and Blocks, then drag any of these elements into your current design to activate some of the more common content items within a footer. As mentioned, you can find everything from search bars to site logos and cart icons to copyright text in these blocks.
How To Edit a Footer in WordPress.com
WordPress.com, the hosted version of WordPress, includes footers for many of its themes, with options to remove or change the footers with a few clicks. The methods for editing footers in WordPress.com are somewhat similar to how it’s done in the self-hosted WordPress.org version, but with a few differences.
Check Out Our Video Guide to Editing a Footer in WordPress.com
First of all, the interface doesn’t look exactly the same.
You must log in to your WordPress.com dashboard and manage your footer in the Theme Customizer. Luckily, many of the themes offered for WordPress.com are similar or exactly the same as what you’d find for WordPress.org. However, that also means the way in which you edit the footer in WordPress.com depends on which theme you install.
To begin, go to Appearance > Customize in the dashboard.
Look at the Theme Customizer tabs available for that particular theme. Most themes have a Widgets tab, but you must figure out if a footer area for placing widgets is provided with your theme. Click on the Widgets tabs to find out.
This current theme we’re using provides a Footer Widget module. If you don’t see an option to put widgets in the footer, consider trying a new theme, or use menus instead of widgets.
For this example (with a footer widget area), click on the Add A Widget button.
A slideout menu appears with a collection of widgets. You can select whichever widgets make the most sense for your company.
Again, the theme dictates how many widgets you can fit into the footer without it looking too cluttered. It appears this particular theme allows for about three columns of widgets before the design starts looking messy.
For our example, we’ll choose a Contact Info and Map widget, along with a Follow Blog widget, which prompts visitors to sign up with their email addresses.
The preview on the right shows the widgets in action. We recommend going through each widget settings panel to configure individual elements like the display text and choose which fields you want to show in each widget.
Make sure you click on the Save Changes button so the widgets appear on the front end of your website.
You also may notice that WordPress.com automatically adds your site title and a WordPress credit at the very bottom of your footer. You can usually get rid of the site title if you want, but the WordPress credit removal requires you to pay for the Business Plan.
To modify both of these elements, click on the Site Identity button.
First off, go to the bottom of the settings to find the Footer Credit field. Click that dropdown to reveal all possible options.
Every one of the credits has some sort of reference to WordPress. A WordPress credit isn’t a big deal if you’re running a personal blog or online journal, but we suggest you upgrade to the Business Plan and remove the credit if your site is for a legitimate business.
After that, you can click on the dropdown menu and choose the Hide option to get rid of the credit completely.
The credit then disappears in the preview, leaving whatever widgets you added to the footer along with the site title.
Some themes have the ability to remove the site title from the footer as well. The easiest way is to uncheck the Display Site Title and Tagline box. That gets rid of the site title in the footer and potentially the header. For the header, we recommend uploading a logo anyway.
Other themes have different ways of removing the site title and tagline. Sometimes it’s not possible at all, while other times the site title isn’t included in the footer, to begin with. When in doubt, try deleting what’s inside the Site Title field if you don’t have the Display Site Title and Tagline check box.
Another way to insert content in your WordPress footer is by utilizing the Menus panel. Not all themes allow for menus in the footer, but it’s a good idea to at least check.
Click on the Menus tab to continue.
Select View All Locations. This brings up a list of where you’re allowed to place menus in this particular theme.
For our example theme, we have quite a few menu location options, one of which is for the footer. You won’t be so lucky with every theme you encounter, so be prepared to either swap them out or consider using the widget technique for editing your footer instead.
With themes that support footer menus, click on the Footer dropdown field.
We chose a premade Social menu for the footer. Feel free to select the Create New Menu link if you don’t already have a suitable menu.
The result is a simple text/link menu that appears above whatever widgets you already added to the footer. It’s possible you’re unable to add widgets to your theme, so you may not see the exact same format.
Keep in mind that all menus are simply lists of text and links, so you won’t be able to incorporate something like a social media icon menu unless you consider a separate plugin that supports that.
How To Add Social Media Icons to WordPress Footer
A mainstay of the footer area is the classic list of social media buttons. Many websites add them in their primary menus, but it’s also a wonderful idea to have them at the bottom of your website as well, or as an alternative to placing the social buttons at the top of your site. In general, if you feel the header is already cluttered, go for footer placement instead.
Quite a few plugins provide widgets to add social media icons and links to your footer and header. Therefore, we suggest straying away from any custom coding here.
Although many social icon plugins exist, the goal for our purposes is to find one that specifically provides a quick widget for adding your links and customizing the buttons.
A popular, highly-rated solution is called Social Icons Widget & Block by WPZoom. It has over 400 icons for social media and other platforms, along with a widget to place your icons directly into your footer. Not only that, but you can upload your own custom icons and switch settings for colors and sizes.
![]()
After installing the plugin, you can go to the Settings page and disable certain font packages if you don’t want them. However, all of them are already active, so skip the settings if you’d rather have everything available to you.
To add social icons to your WordPress footer, go to Appearance > Customize.
This brings you into the WordPress Theme Customizer, where you’re able to add widgets to the footer (as long as your theme supports widgets in the footer). As we’ve mentioned earlier in the article, the only way to get around a theme that doesn’t have a footer widget is to find a new theme or custom code the footer yourself.
Find and click on the Widgets tab to proceed.
This theme has two areas to add widgets to the footer. That’s not the case with all themes, so you may find that your theme has no footer widgets areas. On the other hand, you might get lucky and have four or five spots to place widgets in your footer. It all depends on the theme you install.
Click on one of the Footer tabs.
It’s possible to add a myriad of widgets — or at least whichever widgets you have installed — to the footer.
Click on the Add A Widget button to show the menu of widgets available to you.
The slide-out menu provides a search bar and a list of possible widgets. Scroll down to locate the widget called Social Icons By WPZOOM.
![]()
You should now see the default social media icons and buttons in the preview for your website.
However, you’ll still need to customize the settings for these buttons to settle on the size of those buttons, coloring, and which links you want them to lead to.
Start by typing in a title for the widget, which appears in the footer (you can also leave this blank if you’d like). Continue by specifying settings like whether you want icon labels, nofollow links, and specific icon alignments.
![]()
Continue on with the settings to specify the icon style, background style, and padding. You can also choose an icon size and color. Keep in mind that you need to click on the Save button at the bottom of the widget customization module in order to see the results of your changes in the preview.
![]()
The Icons field already has some default social icons in there for you. Make a list of the social media sites you run for your company, and copy and paste the links into the respective fields. Remove any icons that don’t make sense for your business.
To open up the icon library and add more icons, click on the Add More button at the bottom of the field list.
![]()
The plugin offers a large collection of icons, with options to set icon colors, hover colors, and the icon kit source. The primary kit is called Socicons, but several other kits come with the plugin for free. Click on the Select Icon Kit dropdown to see your options.
Finally, browse through the icons provided with each kit. Many of them you may not even recognize, so only stick to the ones that you actively run and which will provide value to your customers.
In our example, we’ll choose the YouTube icon to add to our footer as well.
Click on the Save button to place it into the list, then click the next Save button at the bottom of the widget box to see your changes.
![]()
As you can see, we’ve made changes to the size and shape of the icons, while also adding an extra social icon. If your alterations don’t look quite right, go back into the widget settings to resolve the issues.
Always remember to hit the Publish button in order for the widget to take effect on the front end of your website. We also recommend checking the frontend yourself to ensure the social icons appear the right way.
How To Add a Background to Your WordPress Footer
Footer backgrounds are possible with the help of some footer plugins and page builders. However, you also have the ability to place an image or color background behind your footer by using the basic settings that come with your theme.
Check Out Our Video Guide to Adding a WordPress Footer Background
In case all else fails, we’ll show you how to insert CSS code to add a background to the WordPress footer.
Before anything, check your theme settings to see if footer background capabilities come standard. The Abletone Theme, for instance, offers a Footer Background Image tab inside the Theme Customizer.
All that’s required is for you to click on the Select Image button and search for an image in your Media Library, upload a new one from your computer, or look for a stock photo that will suit your needs.
Once uploaded, the image appears as the background for your WordPress footer. Some themes offer additional settings for stretching or tiling the image, but without editing the CSS yourself, you’re stuck with whatever settings come with the theme.
If you don’t have a theme, page builder, or plugin that does the trick for adding a footer background, though, adding CSS code handles this task regardless of your theme or page builder.
Go to the Theme Customizer in WordPress, then click on the Additional CSS menu item.
Paste this CSS code into the field, but replace the YOURIMAGEURL with the URL of your desired image:
footer { background: url(YOURIMAGEURL) repeat; }You can find the URL for any image in its details view after it’s been uploaded to your Media Library.
Be sure to click on the Publish button to see it on the front end.
You can also insert other bits of code to change elements like sizing and background stretch size or repetition. As you may imagine, adding the CSS code is a little less simple than clicking on plugin buttons, but a quick search online can help you find the right code for your needs.
Removing “Powered by WordPress” Text
In the previous section, we covered how to remove the WordPress credit in your WordPress.com footer. It’s a little tricker on a self-hosted WordPress site since most themes don’t offer a way to remove the credit in the Site Identity section of the Theme Customizer.
Therefore, we must look at other ways to remove the “Powered by WordPress” text in the footer.
To tackle this process, read our in-depth guide on removing the “Powered By WordPress” tag in your footer. This knowledge base article covers all of the following topics:
- Why you may want to remove the “Powered By WordPress” message
- When you might not want to remove it
- Methods to avoid when trying to remove the credit
- How to remove the credit with a plugin
- How to manually remove the “Powered By WordPress” credit
- Replacing the footer credit with your own code
Editing the footer credit with a plugin is significantly easier for the average WordPress user. However, going the manual route ensures you have full control over the footer, and it eliminates the need to have another plugin installed on your dashboard.
Is It Legal to Remove “Proudly Powered by WordPress”?
Considering that WordPress makes it a little tricky to remove the “Proudly Powered by WordPress” text from your footer, you may wonder whether it’s kosher to get rid of the message.
The answer is that you’re more than welcome to take out the “Powered by WordPress” text in your footer without having to worry about any legal repercussions or violations of the WordPress Terms of Service. This is because WordPress use falls under a GPL (General Public License), meaning anyone can redistribute and alter WordPress in any way they see fit.
Overall, we highly recommend removing the “Proudly Powered by WordPress” text since it has nothing to do with your brand and simply promotes another organization. Yes, it’s nice to get the word out about WordPress, but not at the expense of your own branding and valuable website space.
Now, footer messages shown by your theme developer are a different story. We’ll talk about that in the next section.
How to Remove “Powered by XYZ Theme” Text in WordPress Footer
We now know that you’ll have no problems with the law or WordPress when eliminating the “Proudly Powered by WordPress” footer message. But what about some of the theme developers who put “Powered by XYZ Theme” in the footer?
Luckily, the vast majority of WordPress themes also fall under a General Public License, making it entirely acceptable to cut out that text and replace it with something more suitable for your business. However, it’s prudent to double-check with your theme developer to ensure they don’t have a requirement in their terms and conditions that stipulates that you keep the development credit in the footer.
You can do this by simply asking the developer if the theme falls under a General Public License. And if it doesn’t, or their terms and conditions make it a requirement to leave the credit, we suggest seeking out another theme, as that’s not exactly a desirable item to have on your website.
So how do you go about removing the “Powered by XYZ Theme” text in your footer?
Check Out Our Video Guide to Removing “Powered by WordPress” from your WordPress Footer
Some plugins that remove the “Powered by WordPress” message also can scrap any messaging inserted by the theme developer. However, this isn’t a sure thing.
Therefore, we suggest opting for one of the following methods:
- Edit the footer site files directly to eliminate the credit message.
- Ask the developer to remove it for you.
- Upgrade to the premium version of the theme.
Editing the footer site files takes a bit of technical knowledge, but you can often get this done in a matter of minutes. Asking the developer to remove the theme developer credit could end up working, but you’re essentially hoping you’ll get a friendly developer who’s willing to walk you through the process. Usually, they won’t offer this if you’re only using the free version of their theme.
The easiest option is to upgrade to the premium version of that theme. Many premium theme developers give away simplified, free versions of their themes in the hopes you’ll upgrade for improved features and increased control.
Since upgrading to a premium theme and speaking with the developer can be done on your own, we’ll mainly talk about how to edit the theme site files to get rid of that credit message.
To begin, check out your theme’s footer to confirm if you have developer credit on the bottom. If so, take note of the exact text being displayed, as this could help seek out the message in your site files.
Connect to your site files using an FTP client, as discussed earlier in this article. Each theme developer differs on where they put the footer credit, but a good place to start is going to /public/wp-content/themes.
Choose the theme you have activated on your website.
From here, one option is to open the main footer.php file in a text editor or PHP IDE and search for references to the footer credit. Use the Find function in your chosen editor to type in and search for the exact text that appears as the credit message in your footer.
As with all themes, this may not be the right file for removing the footer credit; it entirely depends on how the theme was built. If you have no luck with the footer.php file, continue looking elsewhere.
One of the most common places to find the footer credit information code is in the /template-parts folder. We found this was the case for the current test theme we have installed for this tutorial.
We can go to the /footer folder, then click on the site-info.php file. That site-info.php file (or some variant of that) is a common place for storing the theme’s footer credit information.
Feel free to either delete the footer credits or replace them with something else. For this situation, we’ll simply remove the credits hook and the do_action credits code at the bottom.
And that’s successfully removed the entirety of the credit being shown for the theme developer. It also didn’t have any effect on the footer content, like our widgets and menus.
As mentioned before, one way to hide the footer credit, while also supporting the theme developer and receiving far better features, is to upgrade to the premium version of the theme. Keep an eye out for a button in your dashboard to upgrade to a Pro version, or go to the developer’s site to make a payment.
How To Remove the WordPress Footer Entirely
Although not recommended for most sites, it sometimes makes sense to remove the WordPress footer in certain situations altogether.
If you find that a WordPress footer causes too much clutter (which is common with landing pages), or if you’d instead the footer didn’t get crawled by search engines, taking the footer out of the equation entirely may not be a bad option.
Keep in mind, however, that you’re not deleting the footer from your WordPress files. The footer.php file is a core part of the WordPress files, so you must leave it. However, we can use CSS code to tell WordPress not to display the footer and its content.
To hide the WordPress footer completely, go to the Theme Customizer and click on the Additional CSS tab.
The goal is to paste CSS to tell WordPress that we don’t want to see the footer on our website.
We’re trying to hide everything in this example, from the copyright information to the WordPress and theme developer credits. You can also use this method to hide items like widgets and menus within your footer.
Go ahead and paste the following code in the CSS box:
footer{

display:none;

}
This tells WordPress to hide everything within the footer.php file. The file remains inside your file directory, just in case you’d like to re-add content in the future.
The Theme Customizer preview should now show a blank space. Make sure you hit the Publish button to see the results on the front end.
Although that CSS should work for most themes, you may find that the theme developer has a different file configuration. Another way to potentially remove most of the footer content is by using the following code instead of the previous code discussed:
.site-info { display:none; }This option is less likely to work, but it’s not unheard of for theme developers to make a file called site-info.php in a footer’s template-parts folder.
From links to support documents and social media pages, your website footer contains a lot of important info. 💪 Learn how it works in this guide ⤵️Click to Tweet
Summary
WordPress footers have many purposes, from adding social media buttons to displaying recent blog posts, support pages, and forms. The goal is to take advantage of this extra space, since it’s not wise to pack your main menu with too many links or try to fill your sidebar with an onslaught of content.
You’ve learned many ways to edit a WordPress footer. We hope you can now successfully edit and customize footers on any WordPress site!
Let us know in the comments below if you have any questions about editing the footer in WordPress!
Get all your applications, databases and WordPress sites online and under one roof. Our feature-packed, high-performance cloud platform includes:
- Easy setup and management in the MyKinsta dashboard
- 24/7 expert support
- The best Google Cloud Platform hardware and network, powered by Kubernetes for maximum scalability
- An enterprise-level Cloudflare integration for speed and security
- Global audience reach with up to 35 data centers and 275 PoPs worldwide
Test it yourself with $20 off your first month of Application Hosting or Database Hosting. Explore our plans or talk to sales to find your best fit.

The WordPress footer appears at the bottom of each page on your website. This makes it perfect website real estate to add content to. For example, you can link to important pages on your website from the footer to make it useful for people who visit your site.
You might be wondering: what kind of things should you put in your footer?
The short answer is anything and everything can work, but there are a few standard items that are traditionally found in footers.
You can use the WordPress footer to link to pages on your site that don’t fit in the main menu but are still important for users to be able to discover quickly. It’s also a great place to add contact information, link to your privacy policy and terms and conditions, add social media links, and share company information.
You can also use it to provide an easy-to-navigate sitemap, link to apps, share your latest blog posts, or let people subscribe to your newsletter.
The possibilities are endless!
With this in mind, in this tutorial, we’ll show you how to customize your WordPress footer in a variety of different ways.
Finding and editing your WordPress footer area
The phrase “footer” refers to the bottom section of your website. Generally speaking, this is where you find links to the website’s privacy policy, terms and conditions, and other useful links.
If you’re new to WordPress, you might not know exactly how to access the footer customization section. The thing is, different WordPress themes have different numbers of footer areas, and they’re used differently.

So, before you publish any changes, you should preview any changes to make sure that they make sense on your site. You can adjust the WordPress footer’s width, height, spacing, rows, fonts, and background from the Layout tab.
Adding widgets to the footer
You can add all sorts of widgets to the WordPress footer area. To get started, log into your WordPress.com account and head over to the admin panel. Next, navigate to Appearance → Widgets to start adding widgets to the footer.
On the Available Widgets screen, you’ll see a list of all the available widgets you can add to your website. It will look something like this:

Simply scroll to the widget you want to show on your website’s footer and click the Add Widget button. The customizer will display a list of configuration options for your chosen widget. For example, if you choose to add the Pages widget, you’ll be able to give it a title, set the sort by options, choose which pages to exclude, and set conditional logic.

Once you’re done, click the Save button to save changes and continue. You can also drag and drop widgets directly from the block editor.

So, what kind of widgets can you add to your WordPress footer? Loads!
Here are examples of some of the widgets WordPress.com lets you add to your website’s footer:
- Archives. The Archives widget organizes blog posts you’ve published by month. This is particularly useful for visitors that want an easy way to browse through your older content.
- Authors. The Authors widget lets you show the names of authors and writers in the footer. You can display author names or avatars, links to a list of their blog posts, both recent and old. The widget shows posts from the Contributors, Authors, Editors, and Administrators user roles.
- Calendar. The Calendar widget lets you display links to your posts by date.
- Category. The Categories widget lets you show posts by category in the footer area. It’s perfect for websites that want to organize blog posts by topics.
- Contact Info & Map. You can use the Contact Info & Map widget to display a location, hours, and contact information. It also lets you display a map if you’d like.
- Gallery. The WordPress Gallery widget lets you display a photo gallery in your website’s footer.
- Links. The Links widget lets you display a list of links in the WordPress footer. This is perfect for linking to specific blog posts from the footer.
- Navigation Menu. The Navigation Menu widget is the easiest way to display pages, categories, and custom links in the footer area. You need to have a custom menu to add a navigation menu widget to your website’s footer.
- Recent Comments. As the name suggests, the Recent Comments widget lets you display the most recent comments people have left on your blog.
- RSS. You can use the RSS widget to display posts from any RSS feed. If you have multiple blogs or want to share posts from your favorite blogs, you can use this widget in your WordPress site’s footer.
- Search. You can use the Search widget to add a search box to your website’s footer. This is incredibly useful for visitors as it allows them to quickly search your website.
- Video. The Video widget lets you add a video to the footer of your site. You can add videos that you’ve uploaded to your site’s Media Library.
There are many more widgets in addition to these that you can add to your website. To delete a widget from the footer, simply click the Delete link in the configuration options. The widget will automatically be removed from the WordPress footer.
Adding links to the footer widget area
Lots of website owners choose to add links to the WordPress footer widget area. It’s great for helping people find their way around your website. Besides helping with site navigation, it improves internal links, thereby keeping visitors on your site for longer. This also helps boost your website’s SEO.
To add links to the footer widget area, you need to create a new menu first. Go to Appearance → Menus → Edit Menus and click the create a new menu link to get started.

Next, give your menu a name and add links. You can add links to different pages, categories, or legal pages. For example, you might consider linking to your contact page, privacy policy, and terms and conditions page from the footer.
When you’ve finished creating the menu, go to Appearance → Widgets and add a Navigation Menu widget to the footer. This will display the selected links in the WordPress footer area on your website.
You can add as many links to each menu and as many menus to your footer as you’d like using the Navigation Menu widget. For example, you can create a separate menu for different categories or different types of pages such as Company Information or About Us.
Customizing the footer credit
By default, all WordPress.com websites link to the main WordPress.com website to help visitors set up a WordPress site of their own and further grow the WordPress community. This is the Powered by WordPress text in the footer.

However, you can customize the footer credit to something else, if you’d like.
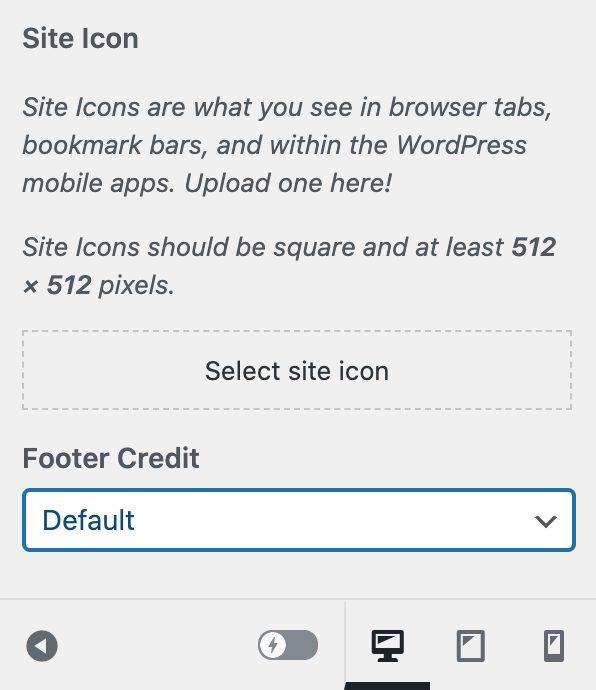
To customize the appearance of the footer credit, go to My Sites → Design → Customize → Site Identity → Footer Credit and choose the one you like. The different options you can choose from include:
- WordPress.com
- WordPress.com logo
- A WordPress.com website
- Blog at WordPress.com
- Powered by WordPress.com
You can even modify the style of the footer text with custom CSS code. And, if you’re on the WordPress.com plugin-enabled plan or higher, you can remove the footer credit altogether. You’ll see an option to hide the footer credit in the Footer Credit dropdown menu. You can also add your own text to the footer credit. For example, you can display something like © 2021 MyBusinessDotCom in the footer.
Start customizing your WordPress footer
Your WordPress footer is one of the most valuable parts of your website. For this reason, it’s important that you don’t overlook it.
If you’re running a WordPress.com-powered website, it’s effortless to customize your footer. You can add widgets to it, drag and drop blocks from the Gutenberg editor, and modify the footer credit.
We showed you different ways to customize your WordPress footer. Hopefully, you’re in a good position now to take the next steps.
Ready to set up your WordPress.com website and start customizing the WordPress footer? Sign up for WordPress.com today!
В данной статье речь пойдет о том как самостоятельно изменить footer блога на wordpress.

Для начала следует рассказать что же такое футер (footer) и зачем его менять.
Футер это нижняя часть шаблона сайта (в нашем случае блога на wordpress). Footer также иногда могут называть подвалом или ногами. От того как его называют смысл не меняется.
Если Вы используете стандартный шаблон для блога или скачали и установили понравившийся Вам бесплатный шаблон, то он может содержать нежелательную для Вас информацию (ссылки на wordpress.org или на сайт разработчика шаблона). Кроме того, возможно Вы захотите кастомизировать нижнюю часть шаблона, добавив какую-нибудь информацию. Например, изменить копирайт Вашего блога, добавить ссылку на другой Ваш ресурс.
Я сейчас покажу как изменить footer на примере темы major_media. Это как раз та тема, которая установлена на моем блоге на момент написания данного поста. Я уберу лишние ссылки и добавлю даты с какого по какой год существует мой блог.
Нам потребуется любой текстовый редактор. Вы можете использовать ваш любимый текстовый редактор. Если у Вас такового нет, то рекомендую использовать либо Notepad++ или SublimtText 2 (3). Программа Notepad++ полностью бесплатна, а SublimeText можно назвать условно бесплатной, т.к. у неё есть неограниченный пробный период и время от времени она будет напоминать Вам о необходимости приобрести лицензию на использование этой программы. Я использую SublimeText 2. Программу эту я не покупал, к слову сказать она стоит 40 USD. Просто когда появляется сообщение с просьбой купить лицензию, закрываешь окно с этим сообщением и продолжаешь использовать программу дальше.
Итак приступим. Первым делом необходимо сделать резервную копию файла которого Вы будете изменять. Можно скопировать целиком папку с изменяемой темой. После этого открываем файл footer.php он должен находится в папке wp-contentthemesназвание_вашей_темыfooter.php. В моём случае он находится по адресу wp-contentthemesmajor-mediafooter.php. Видим следующий код:
	<footer id="colophon" role="contentinfo">
		<div id="site-generator">
			<?php echo __('© ', 'major-media') . esc_attr( get_bloginfo( 'name', 'display' ) );  ?>
            <?php if ( is_home() || is_front_page() ) : ?>
            <?php _e('- Powered by ', 'major-media'); ?><a href="<?php echo esc_url( __( 'http://wordpress.org/', 'major-media' ) ); ?>" title="<?php esc_attr_e( 'Semantic Personal Publishing Platform', 'major-media' ); ?>"><?php _e('Wordpress' ,'major-media'); ?></a>
			<?php _e(' and ', 'major-media'); ?><a href="<?php echo esc_url( __( 'http://wpthemes.co.nz/', 'major-media' ) ); ?>"><?php _e('WPThemes.co.nz', 'major-media'); ?></a>
            <?php endif; ?>
		</div>
	</footer><!-- #colophon -->
</div><!-- #page -->

<?php wp_footer(); ?>

</body>
</html>
Из этого кода удаляем строки начиная с <?php if ( is_home() || is_front_page() ) : ?> по <?php endif; ?> они добавляют, при условии что это главная страница блога, ссылку на производителя темы WordPress и ссылку на wordpress.org.
Далее нам необходимо добавить в строку <?php echo __(‘© ‘, ‘major-media’) . esc_attr( get_bloginfo( ‘name’, ‘display’ ) ); ?> перед точкой с запятой следующий код: . ‘ 2008 — ‘.date(Y) Где вместо 2008 Вы укажете год запуска Вашего блога.
В итоге должно получиться следующее:
<footer id="colophon" role="contentinfo">
<div id="site-generator">
<?php echo __('© ', 'major-media') . esc_attr( get_bloginfo( 'name', 'display' ) ) . ' 2008 - '.date(Y); ?>

</div>
</footer><!-- #colophon -->
</div><!-- #page -->

<?php wp_footer(); ?>

</body>
</html>
Вот такая простая манипуляция позволяет сделать индивидуальной стандартную тему WordPress. Результат работы смотрите в футере :).
Если у Вас появились вопросы или есть какие-либо замечания, оставьте комментарий.
After installing WordPress, you’ll notice some WordPress branded copy at the bottom of your webpages that reads «Proudly powered by WordPress.» This is the default text that appears on all new WordPress websites in the footer.
What is a WordPress footer?
A WordPress footer is the section of your WordPress website that typically appears at the bottom of every web page after the main content. By default, it contains copyright that reads ‘Proudly powered by WordPress.’ The WordPress footer is usually designated in the footer.php template file.
To your visitors, the default text can seem unprofessional and even out of place. So, it makes sense not to display a default footer on your WordPress website. You’ll be relieved to know that you can remove it or edit it to your specifications should you choose to display more pertinent branded information like the logo, copyright notice, or a link to your privacy policy.
To learn what to put in a website footer, check out Website Footers: Best Design Practices & Examples.
A customized footer will help visitors identify with your brand. Read on to learn how to remove and/or edit the footer on your site.
Is It Legal to Remove “Proudly Powered By WordPress”?
In short: Yes. WordPress is open-source software. It’s designed to allow anyone to change the source code.
You have the ability to modify your default WordPress templates. You won’t be breaking any laws if you change your footer to fit your company’s brand.
But before you make any changes, you’ll want to backup your WordPress website. This proactive step ensures that you can quickly restore your site if you make a mistake. Whether you’re editing your footer or doing a full redesign, it’s a good habit to backup your site.
There are a few common methods to edit WordPress footers: removing the footer completely, changing the copyright area using the built-in Customizer, using a footer widget, revising the footer.php code, or using a theme builder. The method you choose will depend on the specific theme you’re using and what will work best for your goals.
Method 1: How to Remove WordPress Footer
If you simply want to remove the footer altogether, the easiest solution is using a plugin.
WordPress plugins extend the functionality of your site. It’s an easy solution when you want to make minor tweaks or major changes to your site. Plus, it requires no coding experience. Follow the steps below to edit your footer with a plugin.
1. Install and activate the Remove Footer Credit plugin.

Image Source
2. Go to Tools > Remove Footer Credit.
3. Enter the text or HTML you would like to remove in the first text field. Then, add your own footer text to the second text field.
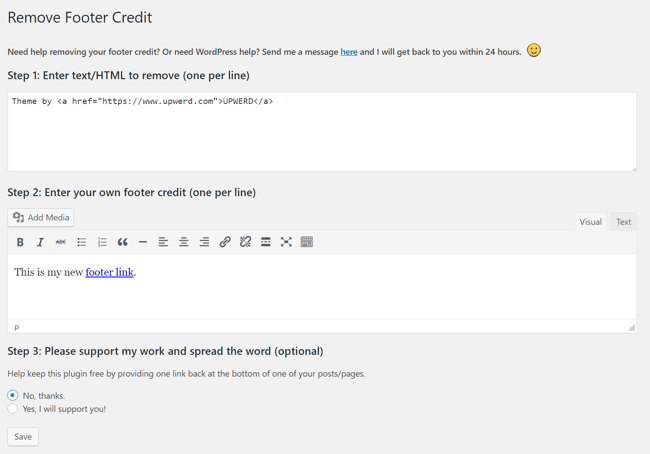
4. Click Save.
If the above option doesn’t work for you or you want to do some more advanced edits, read on for additional ways to make changes to the default branded footer.
Method 2: How to Change the Copyright Footer in WordPress
Most theme developers know that you’ll want to edit their default footers. So, they usually offer a built-in option in the theme to make changes.
Every WordPress theme is different. So, this setting may be available in different sections within the theme.
1. Log in to the WordPress dashboard.
2. Go to Appearance > Customise.
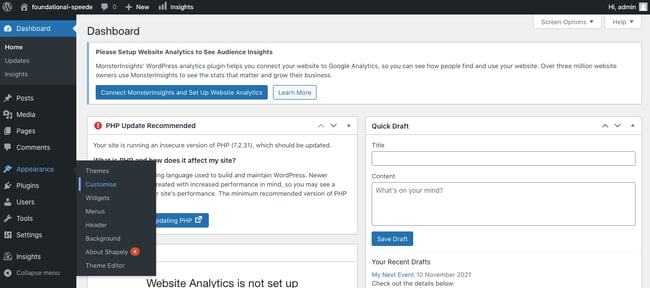
3. Look to see if you have a Footer option.
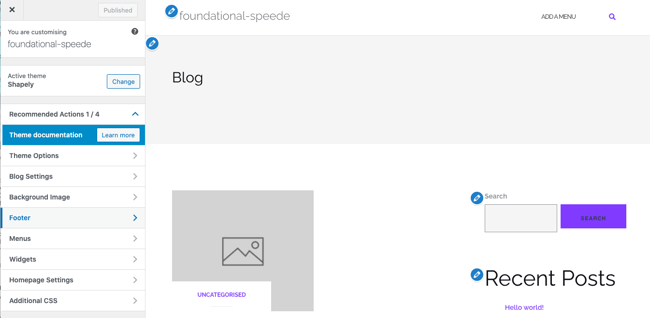
4. If you do, select Footer > Bottom Bar. From there, you’ll be able to disable the footer or put in your own text.
5. If you have the Copyright Area option. If you do, you can make changes to this footer as well.
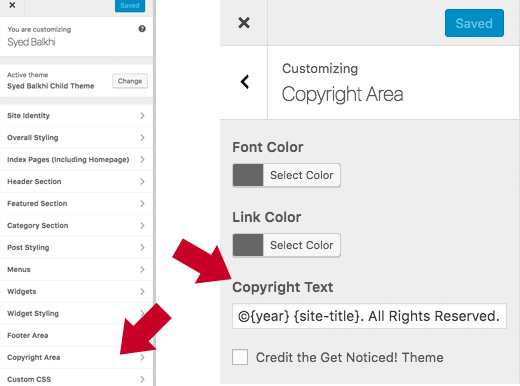
Image Source
If your theme does not have these presets built in, you’ll have to remove the default WordPress footer using another method. We’ve included other options below.
Method 3: How to Edit WordPress Footer Widgets
Some WordPress themes use widgets to add specific features, like footers.
1. You can find your footer widget by going to Appearance > Widgets.
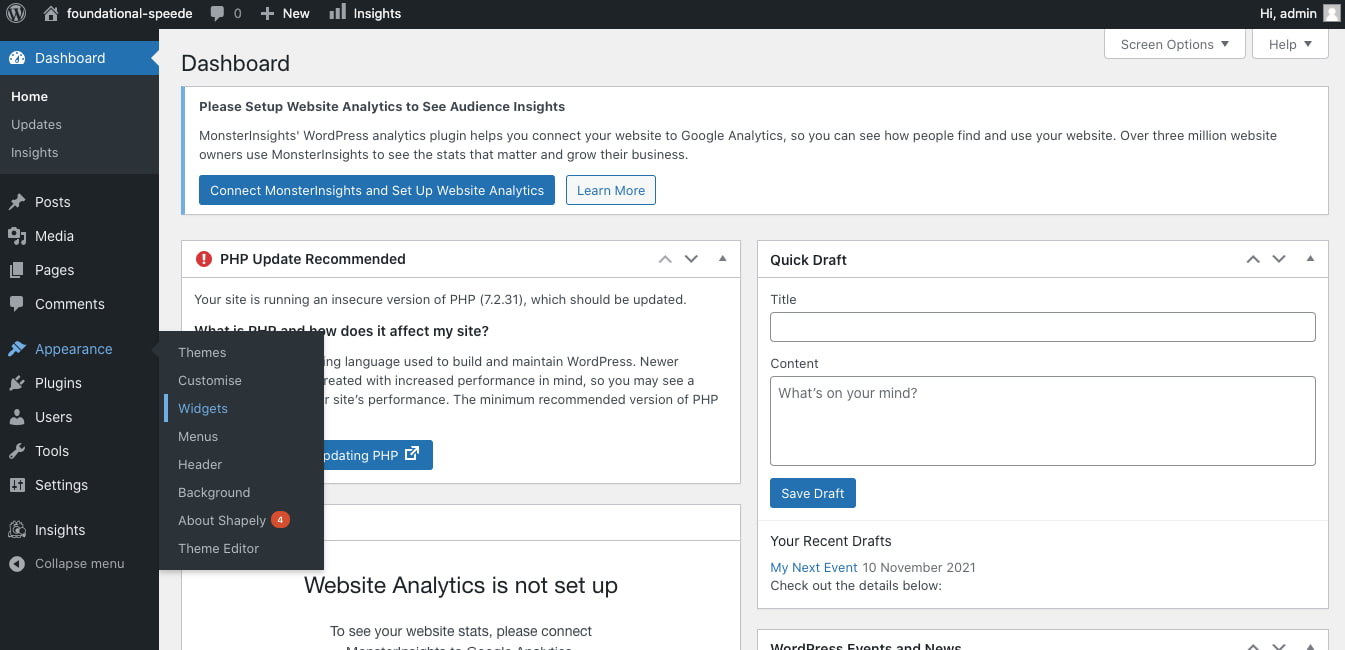
2. On the right, you’ll find the footer widget section, Footer.
3. From the list on the left, drag and drop the Text widget underneath the Footer.
4. Click the down arrow and then add your content in the text field.
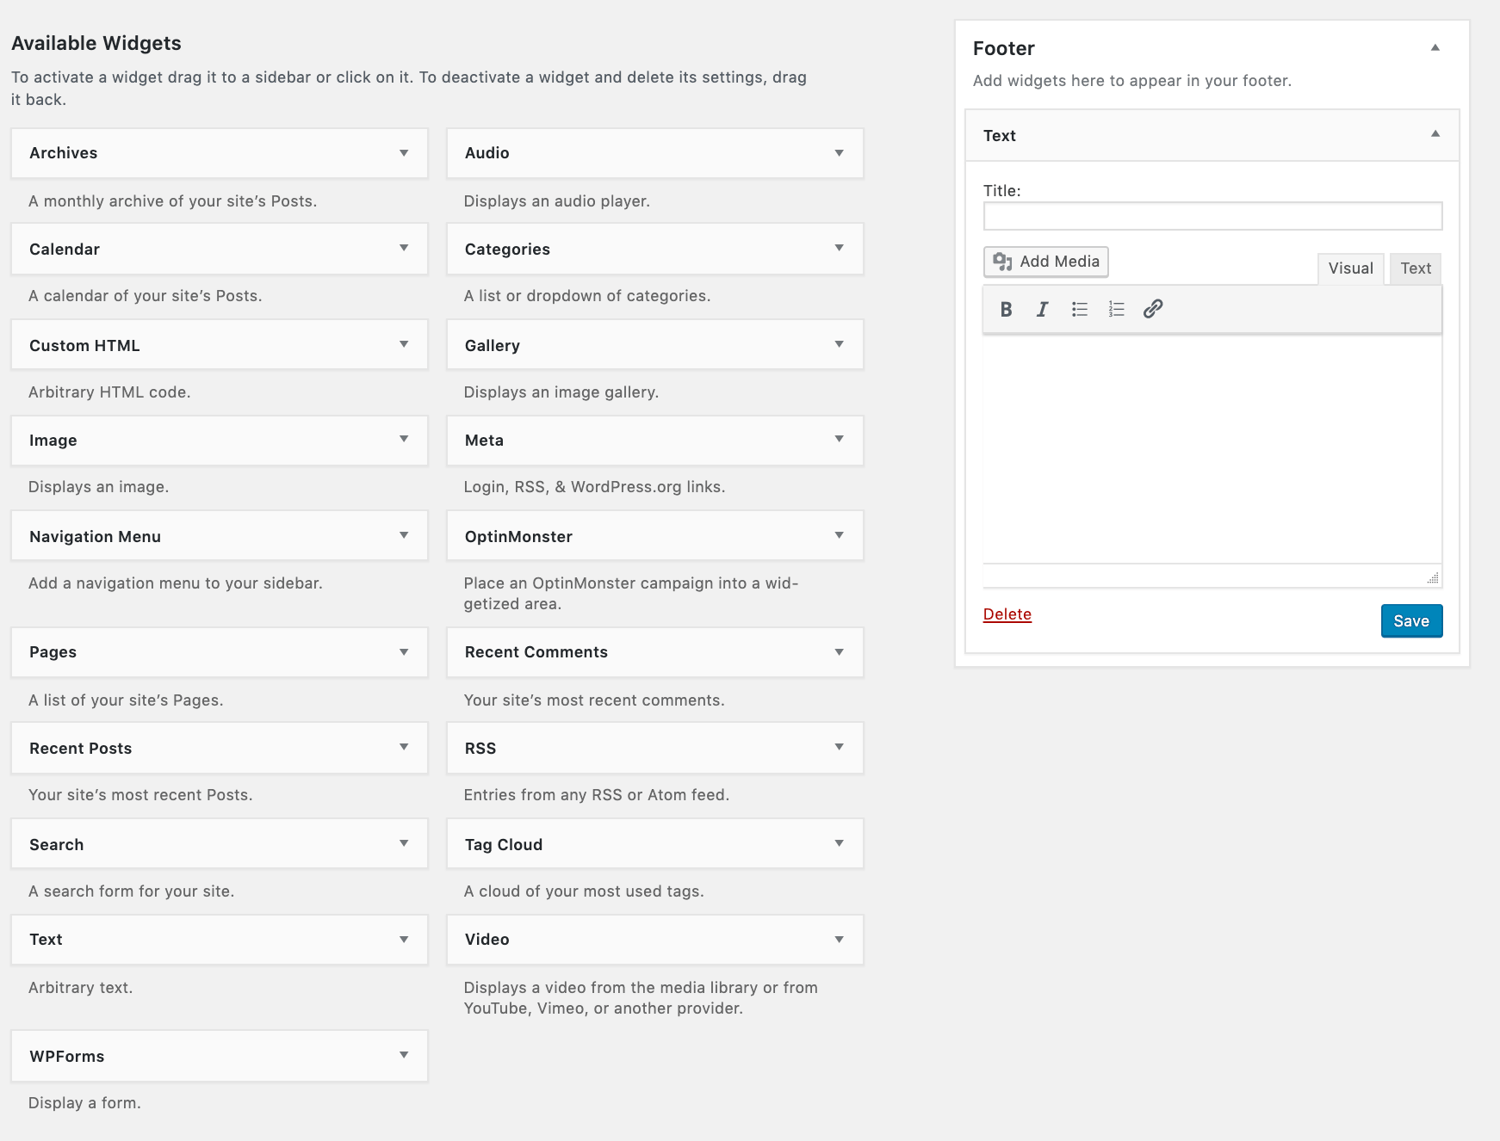
Method 4: How to Edit WordPress Footer PHP File
The footer is defined in a WordPress template file as footer.php. You can edit the file by going to Appearance > Theme Editor. Then, follow the steps below.
1. Select the specific theme in the right-hand corner.
2. Locate the theme footer (footer.php) under Theme Files on the righthand side. You can use Crtl+F to find it if you’re having trouble.
3. Find this PHP code:
get_template_part( 'template-parts/footer/site', 'info' );
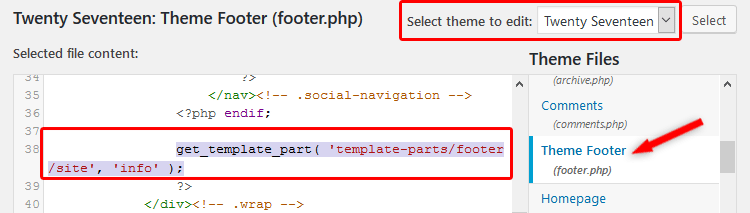 Image Source
4. Replace the PHP code with the code below and change “add text here” with your specific content.
//get_template_part( 'template-parts/footer/site', 'info' );
echo “add text here”;
?>
5. Press the Update File button.
The final result will look like this:

Method 5: How to Edit the WordPress Footer through Your Theme
Theme builders make it easy for you to tweak your website to match the look and feel of your brand. Most theme builders come with a built-in footer plugin.
For example, Jupiter X lets you customize your footer with the help of a drag-and-drop visual editor. You can add, modify, and remove the widgets in real time. There are also dozens of ready-made footer templates available if you’re in a hurry.
The Themify Builder is another intuitive page designer. You can remove the default copyright information and create custom footers with a few simple clicks.
Elementor also offers dynamic templates to build beautiful pages with no coding skills. Let’s walk through the process of editing the WordPress footer with Elementor below.
1. Log in to your WordPress dashboard.
2. Click Templates > ThemeBuilder.
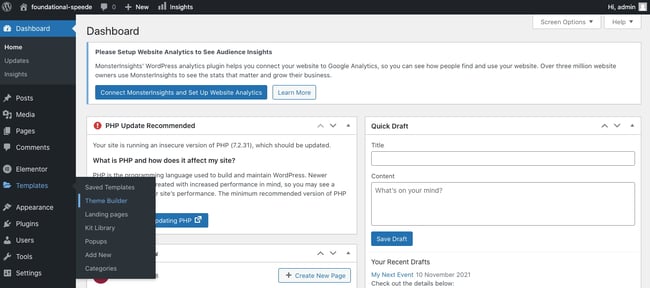
3. Click the plus icon next to Footer in the left panel.
4. You can either choose a premade footer block from the library, or exit out and create one from scratch. Here’s an example of a premade footer block:
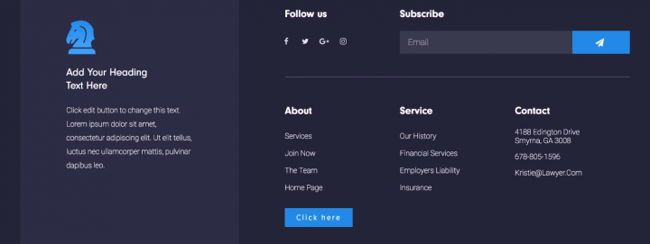
Image Source
5. When you’re ready, click Publish.
6. You can click Add Condition to choose where to publish the footer or stick with the default option (ie. the entire site).
Mistakes When Editing a Footer in WordPress
Editing any part of your website is a big deal. A harmless error can temporarily shut down your entire website. Here are a few common mistakes to avoid when editing your footer.
1. Using CSS to hide the links.
One method of removing the footer involves adding the following code snippet to the CSS editor.
.site-info{display: none;}
This method works simply by hiding the links in your footer. However, hiding links was a common trick used in black hat SEO (search engine optimization) to boost website rankings in search engines. Google sees this action as a violation of its website guidelines and may penalize your site as a result. So, we recommend avoiding this method altogether.
2. Not reading the license documentation.
Third-party themes may have stipulations in their license agreements that could restrict you from removing copyright notices. You’ll want your legal team to contact the theme developer with any questions or concerns.
Removing WordPress Branding from Your Footer
Editing your site footer removes unwanted copy and helps you create a customized look that your visitors will come to recognize each time they come in contact with your brand.
Editor’s note: This post was originally published in January 2020 and has been updated for comprehensiveness.

В этой статье мы поговорим про подвал (футер) WordPress, а именно, как самому создать подвал сайта и как изменить подвал сайта в WordPress. «Подвал сайта html» и «Подвал сайта css» очень популярные поисковые фразы, начинающие веб-мастера хотят получить готовые коды html и css для создания подвала. Готовый код подвала для WordPress можно найти чуть ниже. На CMS WordPress футер можно создать самому, а сам процесс достаточно легкий. Если вас интересует вопросы «Как в WordPress изменить подвал»и «Как сделать футер в WordPress», эта статья будет вам полезна.
Плейлист «Как создать сайт на WordPress»
TimeWeb лучший хостинг для WordPress: домен в подарок, 99 рублей в месяц.
Попробуйте, 10 дней бесплатно: РЕГИСТРАЦИЯ ОБЗОР ВИДЕО

Чтобы сайт выделялся среди сотен тысяч подобных, веб-мастер должен придумать что-нибудь оригинальное в его дизайне. Безусловно, визитная карточка сайта это шапка. Но и футер сайта достаточно важный элемент любого интернет ресурса. Если сайт привлекателен, удобен для посетителей и продуман в каждой детали, шансы сделать его популярным значительно возрастают.
Подвал сайта примеры html. Подвал на этом блоге я создал самостоятельно при помощи различных html кодов, которые совместил воедино. Спустись вниз страницы, посмотрите на футер. Мой подвал сайта обладает различными элементами, счетчиками, ссылками на популярные статьи блога. Помимо всего прочего в подвале сайта я разместил горизонтальное меню. На мой взгляд, подвал на блоге Busines-Expert неплохо смотрится, плюс помогает посетителям найти нужную им информацию.
Подвал сайта код. Вот такой код размещен у меня в подвале вместе с счетчиками, ссылками и меню (стили подключены к html странице, то есть их не нужно добавлять в файл css.style), добавляем его в файл footer.php в самый низ после всех записей:
<body>
<div style="position: relative; text-align: center; overflow: hidden; top: 0; left: 0; height: 100%; width: 100%"><img src='https://busines-expert.com/wp-content/uploads/2016/10/futer-saita.png'></div>
<div style="float: left; position: relative; width: 100%; height: 100%; left: 10px; top: 55px; margin-top: -80px; text-align: left; color: #fff;"> © 2015-2017 Busines-Expert.com. Все права защищены. Все о заработке в интернете</div>
<div style="float: left; position: relative; margin: 0 auto; width: 33%; height: 100%; left: 615px; top: 49px; margin-top: -80px;">
<a target="_blank" href="https://www.bestchange.ru/?p=33854"><img src="https://www.bestchange.ru/images/banners/88x31-5.gif" alt="Лучший обменник WM" title="BestChange.ru - Мониторинг обменников в интернете" width="88" height="31" border="0" /></a></div>
<div style="float: left; position: relative; margin: 0 auto; width: 33%; height: 100%; left: 705px; top: 49px; margin-top: -80px;">
<a href="https://mmgp.com/?referrerid=295457" target="_blank"><img src=" https://busines-expert.com/wp-content/uploads/2016/09/mmgp.gif " border="0" width="88" height="31" alt=" mmgp"/></a></div>
<div style="float: left; position: relative; margin: 0 auto; width: 33%; height: 100%; left: 795px; top: 49px; margin-top: -80px;">
<!-- Yandex.Metrika informer -->
<a href="https://metrika.yandex.ru/stat/?id=33936684&from=informer"
target="_blank" rel="nofollow"><img src="https://informer.yandex.ru/informer/33936684/3_0_86D2FFFF_66B2FFFF_0_pageviews"
style="width:88px; height:31px; border:0;" alt="Яндекс.Метрика" title="Яндекс.Метрика: данные за сегодня (просмотры, визиты и уникальные посетители)" onclick="try{Ya.Metrika.informer({i:this,id:33936684,lang:'ru'});return false}catch(e){}" /></a>
<!-- /Yandex.Metrika informer -->
<!-- Yandex.Metrika counter -->
<script type="text/javascript">
(function (d, w, c) {
(w[c] = w[c] || []).push(function() {
try {
w.yaCounter33936684 = new Ya.Metrika({
id:33936684,
clickmap:true,
trackLinks:true,
accurateTrackBounce:true,
webvisor:true
});
} catch(e) { }
});
var n = d.getElementsByTagName("script")[0],
s = d.createElement("script"),
f = function () { n.parentNode.insertBefore(s, n); };
s.type = "text/javascript";
s.async = true;
s.src = "https://mc.yandex.ru/metrika/watch.js";
if (w.opera == "[object Opera]") {
d.addEventListener("DOMContentLoaded", f, false);
} else { f(); }
})(document, window, "yandex_metrika_callbacks");
</script>
<noscript><div><img src="https://mc.yandex.ru/watch/33936684" style="position:absolute; left:-9999px;" alt="" /></div></noscript>
<!-- /Yandex.Metrika counter --></div>
<div style="float: left; position: relative; margin: 0 auto; width: 33%; height: 100%; left: 885px; top: 49px; margin-top: -80px;">
<!-- Rating@Mail.ru logo -->
<a href="http://top.mail.ru/jump?from=2772985">
<img src="//top-fwz1.mail.ru/counter?id=2772985;t=479;l=1"
style="border:0;" height="31" width="88" alt="Рейтинг@Mail.ru" /></a>
<!-- //Rating@Mail.ru logo -->
<!-- Rating@Mail.ru counter -->
<script type="text/javascript">
var _tmr = window._tmr || (window._tmr = []);
_tmr.push({id: "2772985", type: "pageView", start: (new Date()).getTime()});
(function (d, w, id) {
if (d.getElementById(id)) return;
var ts = d.createElement("script"); ts.type = "text/javascript"; ts.async = true; ts.id = id;
ts.src = (d.location.protocol == "https:" ? "https:" : "http:") + "//top-fwz1.mail.ru/js/code.js";
var f = function () {var s = d.getElementsByTagName("script")[0]; s.parentNode.insertBefore(ts, s);};
if (w.opera == "[object Opera]") { d.addEventListener("DOMContentLoaded", f, false); } else { f(); }
})(document, window, "topmailru-code");
</script><noscript><div style="position:absolute;left:-10000px;">
<img src="//top-fwz1.mail.ru/counter?id=2772985;js=na" style="border:0;" height="1" width="1" alt="Рейтинг@Mail.ru" />
</div></noscript>
<!-- //Rating@Mail.ru counter --></div>
<div style="float: left; position: relative; margin: 0 auto; width: 33%; height: 100%; left: 975px; top: 49px; margin-top: -80px;">
<!--LiveInternet counter--><script type="text/javascript"><!--
document.write("<a href='//www.liveinternet.ru/click' "+
"target=_blank><img src='//counter.yadro.ru/hit?t18.6;r"+
escape(document.referrer)+((typeof(screen)=="undefined")?"":
";s"+screen.width+"*"+screen.height+"*"+(screen.colorDepth?
screen.colorDepth:screen.pixelDepth))+";u"+escape(document.URL)+
";"+Math.random()+
"' alt='' title='LiveInternet: показано число просмотров за 24"+
" часа, посетителей за 24 часа и за сегодня' "+
"border='0' width='88' height='31'></a>")
//--></script><!--/LiveInternet-->
</div>
<div style="float: left; position: relative; margin: 0 auto; width: 33%; height: 100%; left: 1064px; top: 49px; margin-top: -80px;">
<a href="http://www.youtube.com/c/BusinesExpert"><img src="https://busines-expert.com/wp-content/uploads/2016/10/podpiska-na-kanal.png" width="88" height="31" border="0" /></a>
</div>
<div style="width: 100%; height: 0px; z-index: 0; color: #ffba00;">
<div style="float: left; position: relative; text-align: center; width: 100%; height: 100%; left: 15px; top: -490px; margin-top: -80px; border-right: 1px solid #fff; text-align: left; font-size: 12pt;">
<h3>Популярные статьи:</h3>
<ul style="text-align: left;">
<li><span style="font-family: 'arial black', sans-serif; color: #ffba00;font-size: 14pt; text-decoration: underline;"><a style="color: #ffba00;" href="https://busines-expert.com/vse-stati/">Карта сайта</a></span></li>
<li><span style="font-family: 'arial black', sans-serif; color: #ffba00; font-size: 14pt; text-decoration: underline;"><a style="color: #ffba00;" href="https://busines-expert.com/avtoserfing/">Автосерфинг</a></span></li>
<li><span style="font-family: 'arial black', sans-serif; color: #ffba00; font-size: 14pt; text-decoration: underline;"><a style="color: #ffba00;" href="https://busines-expert.com/zarabotok-na-youtube/">Все о заработке на YouTube</a></span></li>
<li><span style="font-family: 'arial black', sans-serif; color: #ffba00; font-size: 14pt; text-decoration: underline;"><a style="color: #ffba00;" href="https://busines-expert.com/investicionnyj-portfel-ot-busines-expert/">Инвестиционный портфель</a></span></li>
<li><span style="font-family: 'arial black', sans-serif; color: #ffba00; font-size: 14pt; text-decoration: underline;"><a style="color: #ffba00;" href="https://busines-expert.com/kak-zarabotat-v-internete-bez-vlozhenij/">Заработок без вложений</a></span></li>
<li><span style="font-family: 'arial black', sans-serif; color: #ffba00; font-size: 14pt; text-decoration: underline;"><a style="color: #ffba00;" href="https://busines-expert.com/kak-privlech-referalov/">Как привлечь рефералов</a></span></li>
<li><span style="font-family: 'arial black', sans-serif; color: #ffba00; font-size: 14pt; text-decoration: underline;"><a style="color: #ffba00;" href="https://busines-expert.com/zarubezhnye-buksi/">Заработок на буксах</a></span></li>
<li><span style="font-family: 'arial black', sans-serif; color: #ffba00; font-size: 14pt; text-decoration: underline;"><a style="color: #ffba00;" href="https://busines-expert.com/zarabotok-na-klikax-i-zadaniayh/">Подработка для начинающих</a></span></li>
</ul>
</div>
</div>
</div>
</body>
</html>
<div class="row">
<span class="header"></span>
<nav class="horizontal-nav center-nav">
<ul>
<li><a href="https://busines-expert.com/">Главная</a></li>
<li><a href="https://busines-expert.com/vse-stati/">Все статьи</a></li>
<li><a href="https://busines-expert.com/uslugi/">Услуги</a></li>
<li><a href="https://busines-expert.com/kontakty/">Контакты</a></li>
<li><a href="https://busines-expert.com/investicionnyj-portfel-ot-busines-expert/">Инвестиции</a></li>
<li><a href="https://busines-expert.com/kak-zarabotat-v-internete-top-25-realnyx-sposobov-luchshie-sajty-dlya-zarabotka-deneg/">Способы заработка</a></li>
<li><a href="https://busines-expert.com/dlya-chego-sozdan-blog-busines-expert/">О проекте</a></li>
</ul>
</nav>
</div>
<style type="text/css">
{
-webkit-box-sizing: border-box;
-moz-box-sizing: border-box;
box-sizing: border-box;
padding: 0;
}
.row .header {
font-size: 9pt;
text-transform: uppercase;
font-weight: bold;
color: #0078c9;
text-align: center;
width: 100%;
display: block;
margin-bottom: 0px;
}
/* Общие стили */
nav.vertical-nav ul > li > a,
nav.horizontal-nav ul > li > a {
background-color: 0078c9;
color: #ffba00;
text-decoration: underline;
font-size: 12pt;
float: left;
}
nav.horizontal-nav ul > li > a,
nav.vertical-nav ul > li {
display: block;
}
nav.left { float: left; }
nav.right { float: right; }
nav.center-nav ul {display: table; margin: 0 auto;}
/* Горизонтальное меню */
nav.horizontal-nav,
nav.vertical-nav {
position: relative;
}
nav.horizontal-nav ul,
nav.vertical-nav ul {
list-style: none;
}
nav.horizontal-nav ul > li {
display: inline-block;
float: left;
}
nav.horizontal-nav ul > li > a {
padding: 10px 20px;
}
nav.horizontal-nav ul > li > a:hover,
nav.horizontal-nav ul > li > a:active,
nav.horizontal-nav ul > li > a:focus,
nav.vertical-nav ul > li > a:hover,
nav.vertical-nav ul > li > a:active,
nav.vertical-nav ul > li > a:focus {
background-color: rgba( 8, 0, 0, 0.25);
color: #ffffff;
}
</style>
Теперь давайте разберемся, как этот код можно отредактировать и добавить нужные именно вам элементы.
Как прижать (закрепить) футер к низу страницы. Первый фрагмент кода отвечает за его расположение. Устанавливаем ширину 100% (width: 100%), тем самым мы растягиваем подвал, это означает, что наш футер будет автоматически растягиваться и подстраиваться под размеры всех типов устройств. Теперь и на экранах с большим разрешением и на мобильных устройствах наш подвал будет отображаться корректно. С этим разобрались, в этой же части кода подгружаем нужное вам фото (замените ‘https://busines-expert.com/wp-content/uploads/2016/10/futer-saita.png’ на путь к вашей картинке):
<div style="position: relative; text-align: center; overflow: hidden; top: 0; left: 0; height: 100%; width: 100%"><img src='https://busines-expert.com/wp-content/uploads/2016/10/futer-saita.png'></div>
Как добавить счетчик в подвал WordPress. Следующий фрагмент кода позволяет прописать авторство (копирайт) и вывести один или несколько счетчиков посещений или любые другие информативные кнопки. Чтобы прописать ваш копирайт, замените этот текст в коде на свой: «© 2015-2017 Busines-Expert.com. Все права защищены. Все о заработке в интернете». Что касается счетчиков, каждый нужно выводить персонально. К каждому счетчику нужно задать координаты вывода, чтобы они корректно отображались в нужных местах. В коде ниже все счетчики выведены горизонтально друг за другом:
<div style="float: left; position: relative; width: 100%; height: 100%; left: 10px; top: 55px; margin-top: -80px; text-align: left; color: #fff;"> © 2015-2017 Busines-Expert.com. Все права защищены. Все о заработке в интернете</div>
<div style="float: left; position: relative; margin: 0 auto; width: 33%; height: 100%; left: 615px; top: 49px; margin-top: -80px;">
<a target="_blank" href="https://www.bestchange.ru/?p=33854"><img src="https://www.bestchange.ru/images/banners/88x31-5.gif" alt="Лучший обменник WM" title="BestChange.ru - Мониторинг обменников в интернете" width="88" height="31" border="0" /></a></div>
<div style="float: left; position: relative; margin: 0 auto; width: 33%; height: 100%; left: 705px; top: 49px; margin-top: -80px;">
<a href="https://mmgp.com/?referrerid=295457" target="_blank"><img src=" https://busines-expert.com/wp-content/uploads/2016/09/mmgp.gif " border="0" width="88" height="31" alt=" mmgp"/></a></div>
<div style="float: left; position: relative; margin: 0 auto; width: 33%; height: 100%; left: 795px; top: 49px; margin-top: -80px;">
<!-- Yandex.Metrika informer -->
<a href="https://metrika.yandex.ru/stat/?id=33936684&from=informer"
target="_blank" rel="nofollow"><img src="https://informer.yandex.ru/informer/33936684/3_0_86D2FFFF_66B2FFFF_0_pageviews"
style="width:88px; height:31px; border:0;" alt="Яндекс.Метрика" title="Яндекс.Метрика: данные за сегодня (просмотры, визиты и уникальные посетители)" onclick="try{Ya.Metrika.informer({i:this,id:33936684,lang:'ru'});return false}catch(e){}" /></a>
<!-- /Yandex.Metrika informer -->
<!-- Yandex.Metrika counter -->
<script type="text/javascript">
(function (d, w, c) {
(w[c] = w[c] || []).push(function() {
try {
w.yaCounter33936684 = new Ya.Metrika({
id:33936684,
clickmap:true,
trackLinks:true,
accurateTrackBounce:true,
webvisor:true
});
} catch(e) { }
});
var n = d.getElementsByTagName("script")[0],
s = d.createElement("script"),
f = function () { n.parentNode.insertBefore(s, n); };
s.type = "text/javascript";
s.async = true;
s.src = "https://mc.yandex.ru/metrika/watch.js";
if (w.opera == "[object Opera]") {
d.addEventListener("DOMContentLoaded", f, false);
} else { f(); }
})(document, window, "yandex_metrika_callbacks");
</script>
<noscript><div><img src="https://mc.yandex.ru/watch/33936684" style="position:absolute; left:-9999px;" alt="" /></div></noscript>
<!-- /Yandex.Metrika counter --></div>
<div style="float: left; position: relative; margin: 0 auto; width: 33%; height: 100%; left: 885px; top: 49px; margin-top: -80px;">
<!-- Rating@Mail.ru logo -->
<a href="http://top.mail.ru/jump?from=2772985">
<img src="//top-fwz1.mail.ru/counter?id=2772985;t=479;l=1"
style="border:0;" height="31" width="88" alt="Рейтинг@Mail.ru" /></a>
<!-- //Rating@Mail.ru logo -->
<!-- Rating@Mail.ru counter -->
<script type="text/javascript">
var _tmr = window._tmr || (window._tmr = []);
_tmr.push({id: "2772985", type: "pageView", start: (new Date()).getTime()});
(function (d, w, id) {
if (d.getElementById(id)) return;
var ts = d.createElement("script"); ts.type = "text/javascript"; ts.async = true; ts.id = id;
ts.src = (d.location.protocol == "https:" ? "https:" : "http:") + "//top-fwz1.mail.ru/js/code.js";
var f = function () {var s = d.getElementsByTagName("script")[0]; s.parentNode.insertBefore(ts, s);};
if (w.opera == "[object Opera]") { d.addEventListener("DOMContentLoaded", f, false); } else { f(); }
})(document, window, "topmailru-code");
</script><noscript><div style="position:absolute;left:-10000px;">
<img src="//top-fwz1.mail.ru/counter?id=2772985;js=na" style="border:0;" height="1" width="1" alt="Рейтинг@Mail.ru" />
</div></noscript>
<!-- //Rating@Mail.ru counter --></div>
<div style="float: left; position: relative; margin: 0 auto; width: 33%; height: 100%; left: 975px; top: 49px; margin-top: -80px;">
<!--LiveInternet counter--><script type="text/javascript"><!--
document.write("<a href='//www.liveinternet.ru/click' "+
"target=_blank><img src='//counter.yadro.ru/hit?t18.6;r"+
escape(document.referrer)+((typeof(screen)=="undefined")?"":
";s"+screen.width+"*"+screen.height+"*"+(screen.colorDepth?
screen.colorDepth:screen.pixelDepth))+";u"+escape(document.URL)+
";"+Math.random()+
"' alt='' title='LiveInternet: показано число просмотров за 24"+
" часа, посетителей за 24 часа и за сегодня' "+
"border='0' width='88' height='31'></a>")
//--></script><!--/LiveInternet-->
</div>
<div style="float: left; position: relative; margin: 0 auto; width: 33%; height: 100%; left: 1064px; top: 49px; margin-top: -80px;">
<a href="http://www.youtube.com/c/BusinesExpert"><img src="https://busines-expert.com/wp-content/uploads/2016/10/podpiska-na-kanal.png" width="88" height="31" border="0" /></a>
</div>
Как изменить координаты счетчика или информативного блока или ссылки в подвале. Давайте рассмотрим на примере вот этой части кода:
<div style="float: left; position: relative; margin: 0 auto; width: 33%; height: 100%; left: 1064px; top: 49px; margin-top: -80px;"> <a href="http://www.youtube.com/c/BusinesExpert"><img src="https://busines-expert.com/wp-content/uploads/2016/10/podpiska-na-kanal.png" width="88" height="31" border="0" /></a>
За изменение координат расположения отвечают команды left и top (на картинке сверху это «left: 1064px; top: 49px»). Чтобы передвинуть проект направо, напротив команды left ставим число, которое больше 1064px. Чтобы передвинуть проект налево, напротив команды left ставим число, которое меньше 1064px. Чтобы передвинуть проект вверх, напротив команды top ставим число, которое больше 49px. Чтобы передвинуть проект вниз, напротив команды top ставим число, которое меньше 49px.
Точно также можно передвигать любые проекты не только в подвале, но и в шапке, сайдбарах и виджетах сайта.
Как вывести произвольные ссылки в футере сайта (информационный блок). Следующий фрагмент кода выводит в левой части футере ссылки на популярные статьи моего блога. Вам нужно изменить название и саму ссылки на ваши. В данном случае блок выравниваем по левому краю, в коде это выглядит так: float: left;.Также, вы можете менять расположение всего блока, размер шрифта, его стиль и так далее:
<div style="width: 100%; height: 0px; z-index: 0; color: #ffba00;"> <div style="float: left; position: relative; text-align: center; width: 100%; height: 100%; left: 15px; top: -490px; margin-top: -80px; border-right: 1px solid #fff; text-align: left; font-size: 12pt;"> <h3>Популярные статьи:</h3> <ul style="text-align: left;"> <li><span style="font-family: 'arial black', sans-serif; color: #ffba00;font-size: 14pt; text-decoration: underline;"><a style="color: #ffba00;" href="https://busines-expert.com/vse-stati/">Карта сайта</a></span></li> <li><span style="font-family: 'arial black', sans-serif; color: #ffba00; font-size: 14pt; text-decoration: underline;"><a style="color: #ffba00;" href="https://busines-expert.com/avtoserfing/">Автосерфинг</a></span></li> <li><span style="font-family: 'arial black', sans-serif; color: #ffba00; font-size: 14pt; text-decoration: underline;"><a style="color: #ffba00;" href="https://busines-expert.com/zarabotok-na-youtube/">Все о заработке на YouTube</a></span></li> <li><span style="font-family: 'arial black', sans-serif; color: #ffba00; font-size: 14pt; text-decoration: underline;"><a style="color: #ffba00;" href="https://busines-expert.com/investicionnyj-portfel-ot-busines-expert/">Инвестиционный портфель</a></span></li> <li><span style="font-family: 'arial black', sans-serif; color: #ffba00; font-size: 14pt; text-decoration: underline;"><a style="color: #ffba00;" href="https://busines-expert.com/kak-zarabotat-v-internete-bez-vlozhenij/">Заработок без вложений</a></span></li> <li><span style="font-family: 'arial black', sans-serif; color: #ffba00; font-size: 14pt; text-decoration: underline;"><a style="color: #ffba00;" href="https://busines-expert.com/kak-privlech-referalov/">Как привлечь рефералов</a></span></li> <li><span style="font-family: 'arial black', sans-serif; color: #ffba00; font-size: 14pt; text-decoration: underline;"><a style="color: #ffba00;" href="https://busines-expert.com/zarubezhnye-buksi/">Заработок на буксах</a></span></li> <li><span style="font-family: 'arial black', sans-serif; color: #ffba00; font-size: 14pt; text-decoration: underline;"><a style="color: #ffba00;" href="https://busines-expert.com/zarabotok-na-klikax-i-zadaniayh/">Подработка для начинающих</a></span></li> </ul> </div>
Как сделать меню в футере WordPress. Следующий фрагмент кода отвечает за вывод меню. Опять же, меняете названия ссылок и ссылки на ваши. CSS cтили включены в код!
<div class="row">
<span class="header"></span>
<nav class="horizontal-nav center-nav">
<ul>
<li><a href="https://busines-expert.com/">Главная</a></li>
<li><a href="https://busines-expert.com/vse-stati/">Все статьи</a></li>
<li><a href="https://busines-expert.com/uslugi/">Услуги</a></li>
<li><a href="https://busines-expert.com/kontakty/">Контакты</a></li>
<li><a href="https://busines-expert.com/investicionnyj-portfel-ot-busines-expert/">Инвестиции</a></li>
<li><a href="https://busines-expert.com/kak-zarabotat-v-internete-top-25-realnyx-sposobov-luchshie-sajty-dlya-zarabotka-deneg/">Способы заработка</a></li>
<li><a href="https://busines-expert.com/dlya-chego-sozdan-blog-busines-expert/">О проекте</a></li>
</ul>
</nav>
</div>
<style type="text/css">
{
-webkit-box-sizing: border-box;
-moz-box-sizing: border-box;
box-sizing: border-box;
padding: 0;
}
.row .header {
font-size: 9pt;
text-transform: uppercase;
font-weight: bold;
color: #0078c9;
text-align: center;
width: 100%;
display: block;
margin-bottom: 0px;
}
/* Общие стили */
nav.vertical-nav ul > li > a,
nav.horizontal-nav ul > li > a {
background-color: 0078c9;
color: #ffba00;
text-decoration: underline;
font-size: 12pt;
float: left;
}
nav.horizontal-nav ul > li > a,
nav.vertical-nav ul > li {
display: block;
}
nav.left { float: left; }
nav.right { float: right; }
nav.center-nav ul {display: table; margin: 0 auto;}
/* Горизонтальное меню */
nav.horizontal-nav,
nav.vertical-nav {
position: relative;
}
nav.horizontal-nav ul,
nav.vertical-nav ul {
list-style: none;
}
nav.horizontal-nav ul > li {
display: inline-block;
float: left;
}
nav.horizontal-nav ul > li > a {
padding: 10px 20px;
}
nav.horizontal-nav ul > li > a:hover,
nav.horizontal-nav ul > li > a:active,
nav.horizontal-nav ul > li > a:focus,
nav.vertical-nav ul > li > a:hover,
nav.vertical-nav ul > li > a:active,
nav.vertical-nav ul > li > a:focus {
background-color: rgba( 8, 0, 0, 0.25);
color: #ffffff;
}
</style>
Вот и все. Как видим, если знаешь коды и места, куда их добавлять, можно самому создать симпатичное и информативное меню. Если у вас есть вопросы или возникли какие-либо трудности с выводом кода в футере, можно написать об этом в комментариях под статьей.
Опубликовано в Как создать сайт. Пошаговая инструкция
Советую посетить следующие страницы:
✓ Подвал сайта оформление и редактирование
✓ Как сделать меню в html и css
✓ Как установить счетчик посещений на сайт
✓ Комментарии Вконтакте для сайта WordPress
✓ Плагин WP Quads. Как разместить рекламу на сайте