Окна
В этом уроке рассмотрим основные настройки окон, в которых располагаются виджеты. Обычные окна в Tkinter порождаются не только от класса Tk, но и Toplevel. От Tk принято создавать главное окно. Если создается многооконное приложение, то остальные окна создаются от Toplevel. Методы обоих классов схожи.
Размер и положение окна
По умолчанию окно приложения появляется в верхнем левом углу экрана. Его размер (ширина и высота) определяется совокупностью размеров расположенных в нем виджетов. В случае если окно пустое, то tkinter устанавливает его размер в 200 на 200 пикселей.
С помощью метода geometry можно изменить как размер окна, так и его положение. Метод принимает строку определенного формата.
from tkinter import *

root = Tk()

root.geometry('600x400+200+100')

root.mainloop()
Первые два числа в строке-аргументе geometry задают ширину и высоту окна. Вторая пара чисел обозначает смещение на экране по осям x и y. В примере окно размерностью 600 на 400 будет смещено от верхней левой точки экрана на 200 пикселей вправо и на 100 пикселей вниз.
Если перед обоими смещениями вместо плюса указывается минус, то расчет происходит от нижних правых углов экрана и окна. Так выражение root.geometry('600x400-0-0') заставит окно появиться в нижнем правом углу.
В аргументе метода geometry можно не указывать либо размер, либо смещение. Например, чтобы сместить окно, но не менять его размер, следует написать root.geometry('+200+100').
Бывает удобно, чтобы окно появлялось в центре экрана. Методы winfo_screenwidth и winfo_screenheight возвращают количество пикселей экрана, на котором появляется окно. Рассмотрим, как поместить окно в центр, если размер окна известен:
…
w = root.winfo_screenwidth()
h = root.winfo_screenheight()
w = w//2 # середина экрана
h = h//2
w = w - 200 # смещение от середины
h = h - 200
root.geometry('400x400+{}+{}'.format(w, h))
…
Здесь мы вычитаем половину ширины и высоты окна (по 200 пикселей). Иначе в центре экрана окажется верхний левый угол окна, а не его середина.
Если размер окна неизвестен, то его можно получить с помощью того же метода geometry, но без аргументов. В этом случае метод возвращает строку, содержащую сведения о размерах и смещении, из которой можно извлечь ширину и высоту окна.
from tkinter import *
root = Tk()

Button(text="Button", width=20).pack()
Label(text="Label", width=20, height=3).pack()
Button(text="Button", width=20).pack()

root.update_idletasks()
s = root.geometry()
s = s.split('+')
s = s[0].split('x')
width_root = int(s[0])
height_root = int(s[1])

w = root.winfo_screenwidth()
h = root.winfo_screenheight()
w = w // 2
h = h // 2
w = w - width_root // 2
h = h - height_root // 2
root.geometry('+{}+{}'.format(w, h))

root.mainloop()
Метод update_idletasks позволяет перезагрузить данные об окне после размещения на нем виджетов. Иначе geometry вернет строку, где ширина и высота равняются по одному пикселю. Видимо таковы параметры на момент запуска приложения.
По умолчанию пользователь может разворачивать окно на весь экран, а также изменять его размер, раздвигая границы. Эти возможности можно отключить с помощью метода resizable. Так root.resizable(False, False) запретит изменение размеров главного окна как по горизонтали, так и вертикали. Развернуть на весь экран его также будет невозможно, при этом соответствующая кнопка разворота исчезает.
Заголовок окна
По умолчанию с стоке заголовка окна находится надпись «tk». Для установки собственного названия используется метод title.
…
root.title("Главное окно")
…
Если необходимо, заголовок окна можно вообще убрать. В программе ниже второе окно (Toplevel) открывается при клике на кнопку, оно не имеет заголовка, так как к нему был применен метод overrideredirect с аргументом True. Через пять секунд данное окно закрывается методом destroy.
from tkinter import *


def about():
    a = Toplevel()
    a.geometry('200x150')
    a['bg'] = 'grey'
    a.overrideredirect(True)
    Label(a, text="About this")
        .pack(expand=1)
    a.after(5000, lambda: a.destroy())


root = Tk()
root.title("Главное окно")
Button(text="Button", width=20).pack()
Label(text="Label", width=20, height=3)
    .pack()
Button(text="About", width=20, command=about)
    .pack()

root.mainloop()
Практическая работа
Напишите программу, в которой на главном окне находятся холст и кнопка «Добавить фигуру». Кнопка открывает второе окно, включающее четыре поля для ввода координат и две радиокнопки для выбора, рисовать ли на холсте прямоугольник или овал. Здесь же находится кнопка «Нарисовать», при клике на которую соответствующая фигура добавляется на холст, а второе окно закрывается. Проверку корректности ввода в поля можно опустить.
Курс с примерами решений практических работ:
pdf-версия,
android-приложение.
The simplest (but possibly inaccurate) method is to use tk::PlaceWindow, which takes the pathname of a toplevel window as an argument. The main window’s pathname is .
import tkinter

root = tkinter.Tk()
root.eval('tk::PlaceWindow . center')

second_win = tkinter.Toplevel(root)
root.eval(f'tk::PlaceWindow {str(second_win)} center')

root.mainloop()
The problem
Simple solutions ignore the outermost frame with the title bar and the menu bar, which leads to a slight offset from being truly centered.
The solution
import tkinter  # Python 3

def center(win):
    """
    centers a tkinter window
    :param win: the main window or Toplevel window to center
    """
    win.update_idletasks()
    width = win.winfo_width()
    frm_width = win.winfo_rootx() - win.winfo_x()
    win_width = width + 2 * frm_width
    height = win.winfo_height()
    titlebar_height = win.winfo_rooty() - win.winfo_y()
    win_height = height + titlebar_height + frm_width
    x = win.winfo_screenwidth() // 2 - win_width // 2
    y = win.winfo_screenheight() // 2 - win_height // 2
    win.geometry('{}x{}+{}+{}'.format(width, height, x, y))
    win.deiconify()

if __name__ == '__main__':
    root = tkinter.Tk()
    root.attributes('-alpha', 0.0)
    menubar = tkinter.Menu(root)
    filemenu = tkinter.Menu(menubar, tearoff=0)
    filemenu.add_command(label="Exit", command=root.destroy)
    menubar.add_cascade(label="File", menu=filemenu)
    root.config(menu=menubar)
    frm = tkinter.Frame(root, bd=4, relief='raised')
    frm.pack(fill='x')
    lab = tkinter.Label(frm, text='Hello World!', bd=4, relief='sunken')
    lab.pack(ipadx=4, padx=4, ipady=4, pady=4, fill='both')
    center(root)
    root.attributes('-alpha', 1.0)
    root.mainloop()
With tkinter you always want to call the update_idletasks() method
directly before retrieving any geometry, to ensure that the values returned are accurate.
There are four methods that allow us to determine the outer-frame’s dimensions.
winfo_rootx() will give us the window’s top left x coordinate, excluding the outer-frame.
winfo_x() will give us the outer-frame’s top left x coordinate.
Their difference is the outer-frame’s width.
frm_width = win.winfo_rootx() - win.winfo_x()
win_width = win.winfo_width() + (2*frm_width)
The difference between winfo_rooty() and winfo_y() will be our title-bar / menu-bar’s height.
titlebar_height = win.winfo_rooty() - win.winfo_y()
win_height = win.winfo_height() + (titlebar_height + frm_width)
You set the window’s dimensions and the location with the geometry method. The first half of the geometry string is the window’s width and height excluding the outer-frame,
and the second half is the outer-frame’s top left x and y coordinates.
win.geometry(f'{width}x{height}+{x}+{y}')
You see the window move
One way to prevent seeing the window move across the screen is to use
.attributes('-alpha', 0.0) to make the window fully transparent and then set it to 1.0 after the window has been centered. Using withdraw() or iconify() later followed by deiconify() doesn’t seem to work well, for this purpose, on Windows 7. I use deiconify() as a trick to activate the window.
Making it optional
You might want to consider providing the user with an option to center the window, and not center by default; otherwise, your code can interfere with the window manager’s functions. For example, xfwm4 has smart placement, which places windows side by side until the screen is full. It can also be set to center all windows, in which case you won’t have the problem of seeing the window move (as addressed above).
Multiple monitors
If the multi-monitor scenario concerns you, then you can either look into the screeninfo project, or look into what you can accomplish with Qt (PySide6) or GTK (PyGObject), and then use one of those toolkits instead of tkinter. Combining GUI toolkits results in an unreasonably large dependency.
Окно приложения
Последнее обновление: 10.09.2022
Основным компонентом графических программ является окно. Затем в окно добавляются все остальные компоненты графического интерфейса. В Tkinter окно представлено классом Tk.
Например, создание окна:
root = Tk()
Для отображения окна и взаимодействия с пользователем у окна вызывается метод mainloop()
from tkinter import *

root = Tk()
root.mainloop()
Класс Tk обладает рядом методов и атрибутов, которые позволяют установить различные аспекты окна. Некоторые из них.
Размеры и начальная позиция окна
По умолчанию окно имеет некоторые стандартные размеры. Для установки размеров используется метод geometry(). Например, определение окна с шириной в 300 единиц и высотой 250 единиц:
from tkinter import *

root = Tk()
root.geometry("300x250")

root.mainloop()
По умолчанию окно позиционируется в верхний левый угол экрана с небольшим смещением. Но мы можем изменить его положение, передав нужные значения в метод geometry():
from tkinter import *

root = Tk()
root.geometry("300x250+400+200")

root.mainloop()
Теперь строка в методе geometry имеет следующий формат: «Ширина x Высота + координатаX + координатаY». То есть при запуске окно шириной в 300 единиц и высотой 250 единиц будет находиться на 400 пикселей вправо и на 200 пикселей вниз от верхнего левого угла экрана.
Для получения данных о размере и позиции также можно использовать метод geometry(), который возвращает данные значения в виде строки в формате «widthxheight+x+y»:
from tkinter import *

root = Tk()
root.geometry("300x250+400+200")

root.update_idletasks()
print(root.geometry())    # "300x250+400+200"

root.mainloop()
Чтобы приложение еще до метода mainloop() принименило для окна переданные ему значения по ширине, высоте и позиции, вызывается метод root.update_idletasks().
В итоге вызов root.geometry() возвратить строку «300×250+400+200»
По умолчанию мы можем изменять размеры окна. Тем не менее иногда может потребоваться сделать размер окна фиксированным. В этом случае мы можем
использовать метод resizable(). Его первый параметр указывает, может ли пользователь растягивать окно по ширине, а второй параметр — можно ли растягивать по высоте.
Чтобы запретить растягивание по какой-либо стороне, необходимо для соответствующего параметра передать значение False.
Например, запретим какое-либо изменение размеров:
from tkinter import *

root = Tk()
root.geometry("300x250")

root.resizable(False, False)

root.mainloop()
Также можно установить минимальные и максимальные размеры окна:
root.minsize(200,150)   # минимальные размеры: ширина - 200, высота - 150
root.maxsize(400,300)   # максимальные размеры: ширина - 400, высота - 300
Установка заголовка
По умолчанию заголовок окна — «tk». Для установки заголовка применяется метод title(), в который передается текст заголовка:
from tkinter import *

root = Tk()
root.title("Hello METANIT.COM")
root.geometry("300x250")
root.mainloop()
Установка иконки
Перед заголовком отображается иконка. По умолчанию это иконка пера. С помощью метода iconbitmap() можно задать любую другую иконку.
Например, определим в одной папке с файлом приложения какой-нибудь файл с иконкой, допустип, он называется «favicon.ico» и используем его для установки иконки:
from tkinter import *

root = Tk()
root.title("Hello METANIT.COM")
root.iconbitmap(default="favicon.ico")
root.geometry("300x250")
root.mainloop()
через параметр default в метод iconbitmap передается путь к иконки. В данном случае файл иконки располагается с файлом приложения в одной папке, поэтому в качестве пути
указывается просто имя файла.
В качестве альтернативы для установки иконки также можно было бы использовать метод iconphoto()
from tkinter import *

root = Tk()
root.geometry("250x200")

root.title("Hello METANIT.COM")
icon = PhotoImage(file = "icon2.png")
root.iconphoto(False, icon)

root.mainloop()
Первый параметр метода iconphoto() указывает, надо ли использовать иконку по умолчанию для всех окон приложения. Второй параметр — объект PhotoImage, который собственно
и устанавливает файл изображения (здесь файл «icon2.png)
Однако что, если мы хотим, чтобы окно вообще не имело иконки? В этом случае можно определить прозрачную иконку и также ее подключать. Можно это сделать также динамически без наличия реального файла:
from tkinter import *
import tempfile, base64, zlib

ICON = zlib.decompress(base64.b64decode("eJxjYGAEQgEBBiDJwZDBysAgxsDAoAHEQCEGBQaIOAg4sDIgACMUj4JRMApGwQgF/ykEAFXxQRc="))

_, ICON_PATH = tempfile.mkstemp()
with open(ICON_PATH, "wb") as icon_file:
    icon_file.write(ICON)

root = Tk()
root.title("Hello METANIT.COM")
root.geometry("300x250")

root.iconbitmap(default=ICON_PATH)

root.mainloop()
В данном случае создается временный файл иконки в памяти.
Перехват закрытия окна
from tkinter import *

def finish():
    root.destroy()  # ручное закрытие окна и всего приложения
    print("Закрытие приложения")

root = Tk()
root.geometry("250x200")

root.title("Hello METANIT.COM")
root.protocol("WM_DELETE_WINDOW", finish)

root.mainloop()
Первый параметр метода protocol() представляет имя события, в данном случае это «WM_DELETE_WINDO». Второй параметр представляет функцию, которая вызывается при
возникновении события. Здесь эта функция finish(), в котором с помощью метода destroy() вручную вызываем закрытие окна (а с ним и всего приложения),
а затем выводим на консоль некоторое сообщение.
Атрибуты окна
С помощью специального метода attributes() можно установать отдельные атрибуты окна, для которых нет специальных методов. В качестве первого параметра
метод принимает название атрибута, которое предваряется дефисом. А второй параметр — значение для этого атрибута. Например, растяжение окна на весь экран:
root.attributes("-fullscreen", True)
Здесь атрибуту fullscreen передается значение True, благодаря чему устанавливается полноэкранный режим.
Другой пример — установка прозрачности с помощью атрибута alpha:
root.attributes("-alpha", 0.5)
Значение 0.5 указывает на полупрозрачность.
Третий пример — отключение верхней панели окна (за исключением заголовка и крестика для закрытия):
root.attributes("-toolwindow", True)
В данном уроке по изучению Tkinter мы познакомимся с менеджерами разметки. Когда мы создаем графический интерфейс нашего приложения, мы определяем, какие виджеты будем использовать, и как они будут расположены в приложении. Для того, чтобы организовать виджеты в приложении, используются специальные невидимые объекты – менеджеры разметки.
Содержание курса
- Создание окна по центру и кнопка выхода в Tkinter
- Разметка виджетов в Tkinter — pack, grid и place
- Виджеты Checkbutton, Label, Scale и Listbox в Tkinter
- Меню, подменю и панель инструментов в Tkinter
- Диалоговые окна в Tkinter
- Рисуем линии, прямоугольники, круг и текст в Tkinter
- Пишем игру змейка на Tkinter
Содержание статьи
- Метод place() в Tkinter — Абсолютное позиционирование
- Tkinter pack() — размещение виджетов по горизонтали и вертикали
- Пример создания кнопок в Tkinter
- Создаем приложение для отзывов на Tkinter
- Разметка grid() в Tkinter для создания калькулятора
- Пример создания диалогового окна в Tkinter
Существует два вида виджетов:
- контейнеры;
- дочерние виджеты.
Контейнеры объединяют виджеты для формирования разметки. У Tkinter есть три встроенных менеджера разметки: pack, grid и place.
- Place – это менеджер геометрии, который размещает виджеты, используя абсолютное позиционирование.
- Pack – это менеджер геометрии, который размещает виджеты по горизонтали и вертикали.
- Grid – это менеджер геометрии, который размещает виджеты в двухмерной сетке.
В большинстве случаев разработчикам необходимо использовать менеджеры разметки. Есть несколько ситуаций, в которых следует использовать именно абсолютное позиционирование. В рамках абсолютного позиционирования разработчик определяет позицию и размер каждого виджета в пикселях. Во время изменения размеров окна размер и позиция виджетов не меняются.
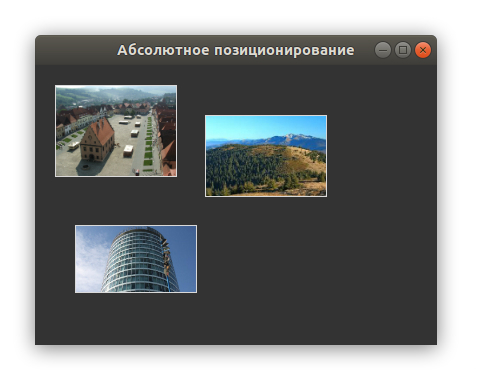
Изображения из примера:
- bardejov.jpg
- rotunda.jpg
- mincol.jpg
Сохраните их в папке рядом с файлом absolute.py код для которого будет ниже.
Таким образом, на разных платформах приложения выглядят по-разному. То, что выглядит нормально на Linux, может отображаться некорректно на Mac OS. Изменение шрифтов в нашем приложении также может испортить разметку. Если мы переведем наше приложение на другой язык, мы должны доработать и разметку.
|
1 2 3 4 5 6 7 8 9 10 11 12 13 14 15 16 17 18 19 20 21 22 23 24 25 26 27 28 29 30 31 32 33 34 35 36 37 38 39 40 41 42 43 44 45 46 47 48 |
from PIL import Image, ImageTk from tkinter import Tk, BOTH from tkinter.ttk import Frame, Label, Style class Example(Frame): def __init__(self): super().__init__() self.initUI() def initUI(self): self.master.title(«Absolute positioning») self.pack(fill=BOTH, expand=1) Style().configure(«TFrame», background=«#333») bard = Image.open(«bardejov.jpg») bardejov = ImageTk.PhotoImage(bard) label1 = Label(self, image=bardejov) label1.image = bardejov label1.place(x=20, y=20) rot = Image.open(«rotunda.jpg») rotunda = ImageTk.PhotoImage(rot) label2 = Label(self, image=rotunda) label2.image = rotunda label2.place(x=40, y=160) minc = Image.open(«mincol.jpg») mincol = ImageTk.PhotoImage(minc) label3 = Label(self, image=mincol) label3.image = mincol label3.place(x=170, y=50) def main(): root = Tk() root.geometry(«300×280+300+300») app = Example() root.mainloop() if __name__ == ‘__main__’: main() |
В этом примере мы расположили три изображения при помощи абсолютного позиционирования. Мы использовали менеджер геометрии place.
|
from PIL import Image, ImageTk |
Мы использовали Image и ImageTk из модуля PIL (Python Imaging Library).
|
style = Style() style.configure(«TFrame», background=«#333») |
При помощи стилей, мы изменили фон нашего окна на темно-серый.
|
bard = Image.open(«bardejov.jpg») bardejov = ImageTk.PhotoImage(bard) |
Мы создали объект изображения и объект фото изображения из сохраненных ранее изображений в текущей рабочей директории.
|
label1 = Label(self, image=bardejov) |
Мы создали Label (ярлык) с изображением. Данные ярлыки могут содержать как изображения, так и текст.
Нам нужно сохранить ссылку на изображение, чтобы не потерять его если сборщик мусора (Garbage collector) его не закроет.
Ярлык размещен в рамке по координатам x=20 и y=20.
Tkinter pack() — размещение виджетов по горизонтали и вертикали
Менеджер геометрии pack() упорядочивает виджеты в горизонтальные и вертикальные блоки. Макетом можно управлять с помощью параметров fill, expand и side.
Пример создания кнопок в Tkinter
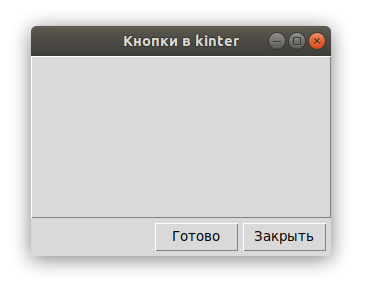
В следующем примере мы разместим две кнопки в нижнем правом углу нашего окна. Для этого мы воспользуемся менеджером pack.
|
1 2 3 4 5 6 7 8 9 10 11 12 13 14 15 16 17 18 19 20 21 22 23 24 25 26 27 28 29 30 31 32 33 34 35 36 |
from tkinter import Tk, RIGHT, BOTH, RAISED from tkinter.ttk import Frame, Button, Style class Example(Frame): def __init__(self): super().__init__() self.initUI() def initUI(self): self.master.title(«Кнопки в kinter») self.style = Style() self.style.theme_use(«default») frame = Frame(self, relief=RAISED, borderwidth=1) frame.pack(fill=BOTH, expand=True) self.pack(fill=BOTH, expand=True) closeButton = Button(self, text=«Закрыть») closeButton.pack(side=RIGHT, padx=5, pady=5) okButton = Button(self, text=«Готово») okButton.pack(side=RIGHT) def main(): root = Tk() root.geometry(«300×200+300+300») app = Example() root.mainloop() if __name__ == ‘__main__’: main() |
Есть вопросы по Python?
На нашем форуме вы можете задать любой вопрос и получить ответ от всего нашего сообщества!
Telegram Чат & Канал
Вступите в наш дружный чат по Python и начните общение с единомышленниками! Станьте частью большого сообщества!
Паблик VK
Одно из самых больших сообществ по Python в социальной сети ВК. Видео уроки и книги для вас!
У нас есть две рамки. Первая рамка – основная, а также вторая – дополнительная, которая растягивается в обе стороны и сдвигает две кнопки в нижнюю часть основной рамки. Кнопки находятся в горизонтальном контейнере и размещены в ее правой части.
|
frame = Frame(self, relief=RAISED, borderwidth=1) frame.pack(fill=BOTH, expand=True) |
Мы создали еще один виджет Frame. Этот виджет занимает практически все пространство окна. Мы изменяем границы рамки, чтобы сама рамка была видна. По умолчанию она плоская.
|
closeButton = Button(self, text=«Закрыть») closeButton.pack(side=RIGHT, padx=5, pady=5) |
Кнопка closeButton создана. Она расположена в горизонтальном контейнере. Параметр side позволяет поместить кнопку в правой части горизонтальной полосы. Параметры padx и pady позволяют установить отступ между виджетами. Параметр padx устанавливает пространство между виджетами кнопки closeButton и правой границей корневого окна.
|
okButton.pack(side=RIGHT) |
Кнопка okButton размещена возле closeButton с установленным отступом (padding) в 5 пикселей.
Создаем приложение для отзывов на Tkinter
Менеджер pack – это простой менеджер разметки. Его можно использовать для простых задач разметки. Чтобы создать более сложную разметку, необходимо использовать больше рамок, каждая из которых имеет собственный менеджер разметки.
|
1 2 3 4 5 6 7 8 9 10 11 12 13 14 15 16 17 18 19 20 21 22 23 24 25 26 27 28 29 30 31 32 33 34 35 36 37 38 39 40 41 42 43 44 45 46 47 48 49 50 51 52 |
from tkinter import Tk, Text, BOTH, X, N, LEFT from tkinter.ttk import Frame, Label, Entry class Example(Frame): def __init__(self): super().__init__() self.initUI() def initUI(self): self.master.title(«Оставить отзыв») self.pack(fill=BOTH, expand=True) frame1 = Frame(self) frame1.pack(fill=X) lbl1 = Label(frame1, text=«Заголовок», width=10) lbl1.pack(side=LEFT, padx=5, pady=5) entry1 = Entry(frame1) entry1.pack(fill=X, padx=5, expand=True) frame2 = Frame(self) frame2.pack(fill=X) lbl2 = Label(frame2, text=«Автор», width=10) lbl2.pack(side=LEFT, padx=5, pady=5) entry2 = Entry(frame2) entry2.pack(fill=X, padx=5, expand=True) frame3 = Frame(self) frame3.pack(fill=BOTH, expand=True) lbl3 = Label(frame3, text=«Отзыв», width=10) lbl3.pack(side=LEFT, anchor=N, padx=5, pady=5) txt = Text(frame3) txt.pack(fill=BOTH, pady=5, padx=5, expand=True) def main(): root = Tk() root.geometry(«300×300+300+300») app = Example() root.mainloop() if __name__ == ‘__main__’: main() |
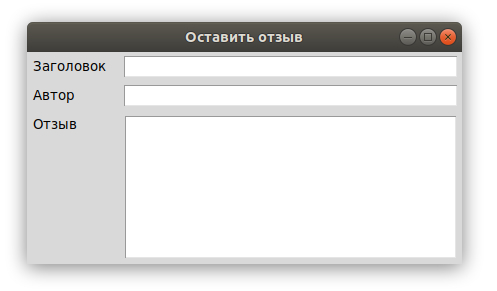
На этом примере видно, как можно создать более сложную разметку с многочисленными рамками и менеджерами pack().
|
self.pack(fill=BOTH, expand=True) |
Первая рамка является базовой. На ней располагаются все остальные рамки. Стоит отметить, что даже при организации дочерних виджетов в рамках, мы управляем ими на базовой рамке.
|
frame1 = Frame(self) frame1.pack(fill=X) lbl1 = Label(frame1, text=«Заголовок», width=10) lbl1.pack(side=LEFT, padx=5, pady=5) entry1 = Entry(frame1) entry1.pack(fill=X, padx=5, expand=True) |
Первые два виджета размещены на первой рамке. Поле для ввода данных растянуто горизонтально с параметрами fill и expand.
|
frame3 = Frame(self) frame3.pack(fill=BOTH, expand=True) lbl3 = Label(frame3, text=«Отзыв», width=10) lbl3.pack(side=LEFT, anchor=N, padx=5, pady=5) txt = Text(frame3) txt.pack(fill=BOTH, pady=5, padx=5, expand=True) |
В третьей рамке мы разместили ярлык и виджет для ввода текста. Ярлык закреплен по северной стороне anchor=N, а виджет текста занимает все остальное пространство.
Разметка grid() в Tkinter для создания калькулятора
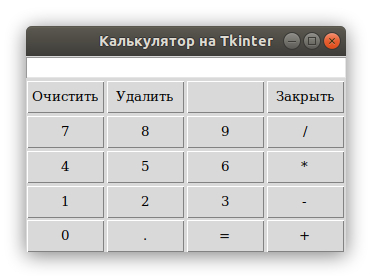
Менеджер геометрии grid() в Tkinter используется для создания сетки кнопок для калькулятора.
|
1 2 3 4 5 6 7 8 9 10 11 12 13 14 15 16 17 18 19 20 21 22 23 24 25 26 27 28 29 30 31 32 33 34 35 36 37 38 39 40 41 42 43 44 45 46 47 48 49 50 51 52 53 54 55 56 57 58 59 60 61 62 63 64 65 66 67 68 69 70 71 72 73 74 75 76 77 78 79 80 81 82 83 |
from tkinter import Tk, W, E from tkinter.ttk import Frame, Button, Entry, Style class Example(Frame): def __init__(self): super().__init__() self.initUI() def initUI(self): self.master.title(«Калькулятор на Tkinter») Style().configure(«TButton», padding=(0, 5, 0, 5), font=‘serif 10’) self.columnconfigure(0, pad=3) self.columnconfigure(1, pad=3) self.columnconfigure(2, pad=3) self.columnconfigure(3, pad=3) self.rowconfigure(0, pad=3) self.rowconfigure(1, pad=3) self.rowconfigure(2, pad=3) self.rowconfigure(3, pad=3) self.rowconfigure(4, pad=3) entry = Entry(self) entry.grid(row=0, columnspan=4, sticky=W+E) cls = Button(self, text=«Очистить») cls.grid(row=1, column=0) bck = Button(self, text=«Удалить») bck.grid(row=1, column=1) lbl = Button(self) lbl.grid(row=1, column=2) clo = Button(self, text=«Закрыть») clo.grid(row=1, column=3) sev = Button(self, text=«7») sev.grid(row=2, column=0) eig = Button(self, text=«8») eig.grid(row=2, column=1) nin = Button(self, text=«9») nin.grid(row=2, column=2) div = Button(self, text=«/») div.grid(row=2, column=3) fou = Button(self, text=«4») fou.grid(row=3, column=0) fiv = Button(self, text=«5») fiv.grid(row=3, column=1) six = Button(self, text=«6») six.grid(row=3, column=2) mul = Button(self, text=«*») mul.grid(row=3, column=3) one = Button(self, text=«1») one.grid(row=4, column=0) two = Button(self, text=«2») two.grid(row=4, column=1) thr = Button(self, text=«3») thr.grid(row=4, column=2) mns = Button(self, text=«-«) mns.grid(row=4, column=3) zer = Button(self, text=«0») zer.grid(row=5, column=0) dot = Button(self, text=«.») dot.grid(row=5, column=1) equ = Button(self, text=«=») equ.grid(row=5, column=2) pls = Button(self, text=«+») pls.grid(row=5, column=3) self.pack() def main(): root = Tk() app = Example() root.mainloop() if __name__ == ‘__main__’: main() |
Менеджер grid() используется для организации кнопок в контейнере рамки.
|
Style().configure(«TButton», padding=(0, 5, 0, 5), font=‘serif 10’) |
Мы настроили виджет кнопки так, чтобы отображался специфический шрифт и применялся отступ (padding) в 3 пикселя.
|
self.columnconfigure(0, pad=3) ... self.rowconfigure(0, pad=3) |
Мы использовали методы columnconfigure() и rowconfigure() чтобы создать определенное пространство в сетке строк и столбцов. Благодаря этому шагу мы разделяем кнопки определенным пустым пространством.
|
entry = Entry(self) entry.grid(row=0, columnspan=4, sticky=W+E) |
Виджет графы ввода – это место, где будут отображаться цифры. Данный виджет расположен в первом ряду и охватывает все четыре столбца. Виджеты могут не занимать все пространство, которое выделяется клетками в созданной сетке.
Параметр sticky расширяет виджет в указанном направлении. В нашем случае, мы можем убедиться, что наш виджет графы ввода был расширен слева направо W+E (восток-запад).
|
cls = Button(self, text=«Очистить») cls.grid(row=1, column=0) |
Кнопка очистки установлена во второй строке и первом столбце. Стоит отметить, что строки и столбцы начинаются с нуля.
Метод pack() показывает виджет рамки и дает ей первоначальный размер. Если дополнительные параметры не указываются, размер будет таким, чтобы все дочерние виджеты могли поместиться. Этот метод компонует виджет рамки в верхнем корневом окне, которое также является контейнером. Менеджер grid() используется для организации кнопок в виджете рамки.
Пример создания диалогового окна в Tkinter
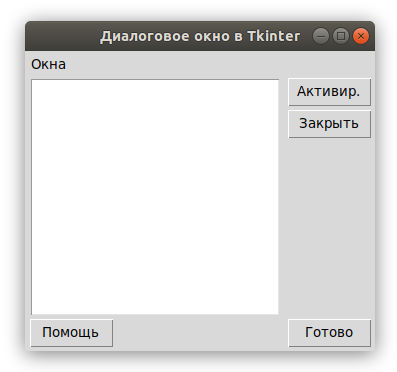
Следующий пример создает диалоговое окно, используя менеджер геометрии grid.
|
1 2 3 4 5 6 7 8 9 10 11 12 13 14 15 16 17 18 19 20 21 22 23 24 25 26 27 28 29 30 31 32 33 34 35 36 37 38 39 40 41 42 43 44 45 46 47 48 49 50 |
from tkinter import Tk, Text, BOTH, W, N, E, S from tkinter.ttk import Frame, Button, Label, Style class Example(Frame): def __init__(self): super().__init__() self.initUI() def initUI(self): self.master.title(«Диалоговое окно в Tkinter») self.pack(fill=BOTH, expand=True) self.columnconfigure(1, weight=1) self.columnconfigure(3, pad=7) self.rowconfigure(3, weight=1) self.rowconfigure(5, pad=7) lbl = Label(self, text=«Окна») lbl.grid(sticky=W, pady=4, padx=5) area = Text(self) area.grid(row=1, column=0, columnspan=2, rowspan=4, padx=5, sticky=E+W+S+N) abtn = Button(self, text=«Активир.») abtn.grid(row=1, column=3) cbtn = Button(self, text=«Закрыть») cbtn.grid(row=2, column=3, pady=4) hbtn = Button(self, text=«Помощь») hbtn.grid(row=5, column=0, padx=5) obtn = Button(self, text=«Готово») obtn.grid(row=5, column=3) def main(): root = Tk() root.geometry(«350×300+300+300») app = Example() root.mainloop() if __name__ == ‘__main__’: main() |
В этом примере мы использовали виджет ярлыка, текстовой виджет и четыре кнопки.
|
self.columnconfigure(1, weight=1) self.columnconfigure(3, pad=7) self.rowconfigure(3, weight=1) self.rowconfigure(5, pad=7) |
Мы добавили небольшое пространство между виджетами в сетке. Параметр weight создает возможность расширения второго столбца и четвертого ряда. В этом ряду и столбце находится текстовой виджет, поэтому оставшееся пространство заполняет данный виджет.
|
lbl = Label(self, text=«Окна») lbl.grid(sticky=W, pady=4, padx=5) |
Виджет ярлыка также создается и помещается в сетку. Если не указываются ряд и столбец, тогда он займет первый ряд и столбец. Ярлык закрепляется у западной части окна sticky=W и имеет определенные отступы вокруг своих границ.
|
area = Text(self) area.grid(row=1, column=0, columnspan=2, rowspan=4, padx=5, sticky=E+W+S+N) |
Создается текстовый виджет и помещается во второй ряд и первый столбец. Он охватывает два столбца и четыре строки.
Между виджетом и левым краем корневого окна присутствует пространство в 4 пикселя. Также, виджет закреплен около всех четырех сторон. Поэтому, когда окно расширяется, виджеты текстов увеличиваются во всех направлениях.
|
abtn = Button(self, text=«Активир.») abtn.grid(row=1, column=3) cbtn = Button(self, text=«Закрыть») cbtn.grid(row=2, column=3, pady=4) |
Эти две кнопки находятся возле текстового виджета.
|
hbtn = Button(self, text=«Помощь») hbtn.grid(row=5, column=0, padx=5) obtn = Button(self, text=«Готово») obtn.grid(row=5, column=3) |
Эти две кнопки находятся под текстовым виджетом. Кнопка «Помощь» расположена в первом столбце, а кнопка «Готово» в последнем столбце.
В этой части изучения Tkinter мы рассказали о работе с разметкой виджетов.
Являюсь администратором нескольких порталов по обучению языков программирования Python, Golang и Kotlin. В составе небольшой команды единомышленников, мы занимаемся популяризацией языков программирования на русскоязычную аудиторию. Большая часть статей была адаптирована нами на русский язык и распространяется бесплатно.
E-mail: vasile.buldumac@ati.utm.md
Образование
Universitatea Tehnică a Moldovei (utm.md)
- 2014 — 2018 Технический Университет Молдовы, ИТ-Инженер. Тема дипломной работы «Автоматизация покупки и продажи криптовалюты используя технический анализ»
- 2018 — 2020 Технический Университет Молдовы, Магистр, Магистерская диссертация «Идентификация человека в киберпространстве по фотографии лица»
Summary: in this tutorial, you’ll learn how to manipulate various attributes of a Tkinter window.
Let’s start with a simple program that consists of a window:
Code language: Python (python)
import tkinter as tk root = tk.Tk() root.mainloop()
Output:
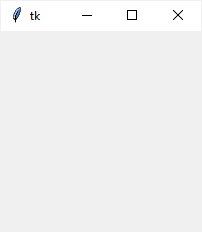
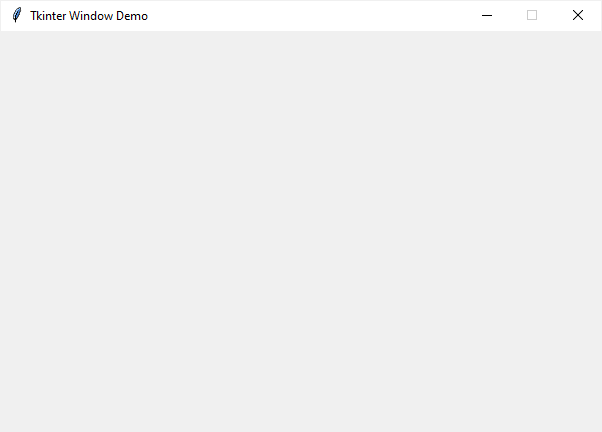
The root window has a title that defaults to tk. It also has three system buttons including Minimize, Maximize, and Close.
Let’s learn how to change the attributes of the root window.
Changing the window title
To change the window’s title, you use the title() method like this:
Code language: Python (python)
window.title(new_title)
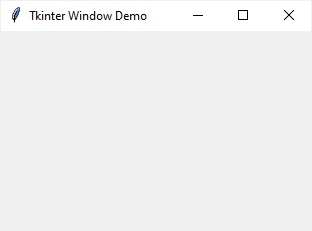
For example, the following changes the title of the root window to 'Tkinter Window Demo':
Code language: Python (python)
import tkinter as tk root = tk.Tk() root.title('Tkinter Window Demo') root.mainloop()
Output:
To get the current title of a window, you use the title() method with no argument:
Code language: Python (python)
title = window.title()
Changing window size and location
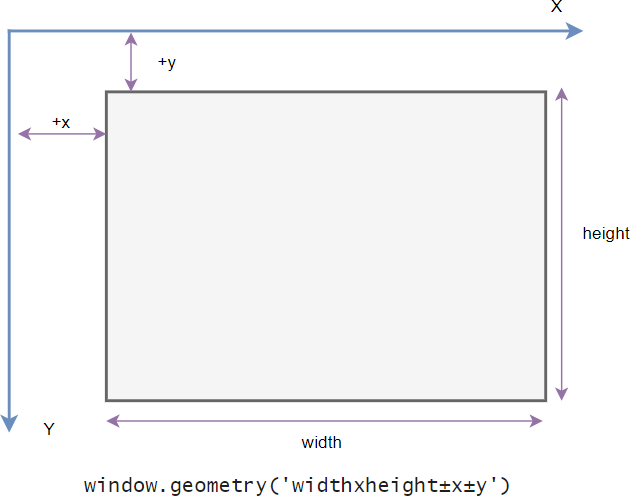
In Tkinter, the position and size of a window on the screen is determined by geometry.
The following shows the geometry specification:
Code language: Python (python)
widthxheight±x±y
In this specification:
- The
widthis the window’s width in pixels. - The
heightis the window’s height in pixels. - The
xis the window’s horizontal position. For example,+50means the left edge of the window should be 50 pixels from the left edge of the screen. And-50means the right edge of the window should be 50 pixels from the right edge of the screen. - The
yis the window’s vertical position. For example,+50means the top edge of the window should be 50 pixels below the top of the screen. And-50means the bottom edge of the window should be 50 pixels above the bottom of the screen.
To change the size and position of a window, you use the geometry() method:
Code language: Python (python)
window.geometry(new_geometry)
The following example changes the size of the window to 600x400 and the position of the window to 50 pixels from the top and left of the screen:
Code language: Python (python)
import tkinter as tk root = tk.Tk() root.title('Tkinter Window Demo') root.geometry('600x400+50+50') root.mainloop()
Sometimes, you may want to center the window on the screen. The following program illustrates how to do it:
Code language: PHP (php)
import tkinter as tk root = tk.Tk() root.title('Tkinter Window - Center') window_width = 300 window_height = 200 # get the screen dimension screen_width = root.winfo_screenwidth() screen_height = root.winfo_screenheight() # find the center point center_x = int(screen_width/2 - window_width / 2) center_y = int(screen_height/2 - window_height / 2) # set the position of the window to the center of the screen root.geometry(f'{window_width}x{window_height}+{center_x}+{center_y}') root.mainloop()
How it works.
- First, get the screen width and height using the
winfo_screenwidth()andwinfo_screenheight()methods. - Second, calculate the center coordinate based on the screen and window width and height.
- Finally, set the geometry for the root window using the
geometry()method.
If you want to get the current geometry of a window, you can use the geometry() method without providing any argument:
Code language: Python (python)
window.geometry()
Resizing behavior
By default, you can resize the width and height of a window. To prevent the window from resizing, you can use the resizable() method:
Code language: Python (python)
window.resizable(width,height)
The resizable() method has two parameters that specify whether the width and height of the window can be resizable.
The following shows how to make the window with a fixed size:
Code language: Python (python)
import tkinter as tk root = tk.Tk() root.title('Tkinter Window Demo') root.geometry('600x400+50+50') root.resizable(False, False) root.mainloop()
Output:
When a window is resizable, you can specify the minimum and maximum sizes using the minsize() and maxsize() methods:
Code language: Python (python)
window.minsize(min_width, min_height) window.maxsize(min_height, max_height)
Transparency
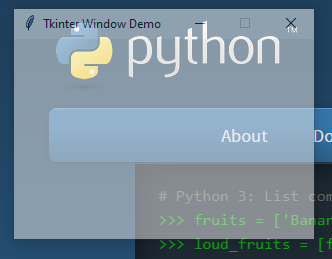
Tkinter allows you to specify the transparency of a window by setting its alpha channel ranging from 0.0 (fully transparent) to 1.0 (fully opaque):
Code language: Python (python)
window.attributes('-alpha',0.5)
The following example illustrates a window with 50% transparent:
Code language: Python (python)
import tkinter as tk root = tk.Tk() root.title('Tkinter Window Demo') root.geometry('600x400+50+50') root.resizable(False, False) root.attributes('-alpha', 0.5) root.mainloop()
Output:
Window stacking order
The window stack order refers to the order of windows placed on the screen from bottom to top. The closer window is on the top of the stack and it overlaps the one lower.
To ensure that a window is always at the top of the stacking order, you can use the -topmost attribute like this:
Code language: Python (python)
window.attributes('-topmost', 1)
To move a window up or down of the stack, you can use the lift() and lower() methods:
Code language: Python (python)
window.lift() window.lift(another_window) window.lower() window.lower(another_window)
The following example places the root window on top of all other windows. In other words, the root window is always on top:
Code language: Python (python)
import tkinter as tk root = tk.Tk() root.title('Tkinter Window Demo') root.geometry('300x200+50+50') root.resizable(0, 0) root.attributes('-topmost', 1) root.mainloop()
Changing the default icon
Tkinter window displays a default icon. To change this default icon, you follow these steps:
- Prepare an image in the
.icoformat. If you have the image in other formats likepngorjpg, you can convert it to the.icoformat. There are many online tools that allow you to do it quite easily. - Place the icon in a folder that can be accessible from the program.
- Call the
iconbitmap()method of the window object.
The following program illustrates how to change the default icon to a new one:
Code language: PHP (php)
import tkinter as tk root = tk.Tk() root.title('Tkinter Window Demo') root.geometry('300x200+50+50') root.resizable(False, False) root.iconbitmap('./assets/pythontutorial.ico') root.mainloop()
Output:
If you want to use the above icon, you can download it to your computer:
Summary
- Use the
title()method to change the title of the window. - Use the
geometry()method to change the size and location of the window. - Use the
resizable()method to specify whether a window can be resizable horizontally or vertically. - Use the
window.attributes('-alpha',0.5)to set the transparency for the window. - Use the
window.attributes('-topmost', 1)to make the window always on top. - Use
lift()andlower()methods to move the window up and down of the window stacking order. - Use the
iconbitmap()method to change the default icon of the window.
Did you find this tutorial helpful ?
Создание окна приложения
Многие программы на сегодняшний день используют графический интерфейс, который более интуитивен и удобен для пользователя, чем консоль. И с помощью языка программирования Python также можно создавать графические программы. Для этого в Python по умолчанию применяется специальный toolkit — набор компонентов, который называется tkinter.
Библиотека tkinter доступна в виде отдельного встроенного модуля, который содержит все необходимые графические компоненты — кнопки, текстовые поля и т.п.
Базовым моментом в построении графических программ является создание окна. Затем в окно добавляются все остальные компоненты графического интерфейса. Поэтому создадим вначале простейшее окно. Для этого определим следующий скрипт:
from tkinter import *

root = Tk()
'''
any code
'''
root.mainloop()
1
2
3
4
5
6
7
Для создания графического окна применяется конструктор Tk(), который определен в модуле tkinter. Создаваемое окно присваивается переменной root, и через эту переменную мы можем управлять атрибутами окна. Вместо комментария '''any code''' добавляются все необходимые компоненты окна.
Для отображения окна надо вызвать у него метод mainloop(), который запускает цикл обработки событий окна для взаимодействия с пользователем.
В результате при запуске скрипта мы увидим такое пустое окошко:
C помощью метода title() можно установить заголовок окна.
С помощью метода geometry() — размер окна. Для установки размера в метод geometry() передается строка в формате «Ширина x Высота». Если при создании окна приложения метод geometry() не вызывается, то окно занимает то пространство, которое необходимо для размещения внутреннего содержимого:
from tkinter import *

root = Tk()
root.title('My first window title')
root.geometry('350x200')
root.mainloop()
1
2
3
4
5
6
Результат выполнения:
Начальная позиция окна
По умолчанию окно позиционируется в верхний левый угол экрана. Но мы можем изменить его положение, передав нужные значения в метод geometry():
from tkinter import *

root = Tk()
root.title("My second Python window")
root.geometry("400x300+300+250")
root.mainloop()
1
2
3
4
5
6
Теперь строка в методе geometry имеет следующий формат: «Ширина x Высота + координатаX + координатаY». То есть при запуске окно будет находиться на 300 пикселей вправо и на 250 пикселей вниз от верхнего левого угла экрана.
Упражнения
-
Создайте 4 окна с заголовками окон: «Top», «Bottom», «Right», «Left». Разместить окна по сторонам рабочего стола:
- вверх по центру,
- низ по центру,
- право по центру,
- лево по центру.
-
Создайте 4 окна с заголовками окон: «Top-right», «Top-left», «Bottom-right», «Bottom-left». Разместить 4 окна по углам рабочего стола.
-
Создайте окно, появляющееся в центре экрана, с заголовком «Center».
-
Текстовые и другие редакторы в заголовках программы указывают имя «активного файла — название программы».
- Создайте окно с заголовком в виде f-строки, в котором указывается имя разработчика, название и версия программы;
- Имя и версия программы хранятся в отдельных переменных;
- Пример вывода заголовка: «Bob’s programm — Empty v.01»
-
Иконки окон не отображаются в системах MacOS, задача только для Windows: Найдите в интернете, как в tkinter сменить иконку, отображаемую в левом верхнем углу окна. И замените её, на любую другую иконку, которую можно скопировать из интернета или создать самому. Картинка для иконки обязательно должна иметь расширение
.ico.


