Windows OS Hub / SQL Server / Change the Default Port Number (TCP/1433) for a MS SQL Server Instance
In this article, we will show you how to check the current TCP port on which a named or default MS SQL Server instance is listening (waiting for connection on), how to change an SQL Server connection port to a static/dynamic one, and how the SQL Server Browser service is used by clients to connect to MSSQL.
- The default SQL Server instance (MSSQLSERVER) uses static TCP port 1433. It is the port the clients or SQL Server Management Studio (SSMS) console connect to;
- Named MSSQL and SQL Server Compact instances are configured to use a dynamic TCP port from the RPC range (49152 – 65535).
A dynamic port means that the port number of the MSSQL instance accepts connections on is assigned after the SQL Server service is started. In most cases, even after a server reboot, SQL Server will listen the same dynamic TCP port assigned prior to the restart. But if the port number is busy, SQL Server will run on a new TCP port. An app that connects to MSSQL usually gets the new port number from the SQL Server Browser service without any problem ( we will tell about it later). Dynamic SQL Server ports are convenient when you manage multiple SQL instances on a single host, but they cause a lot of problems when firewalls are implemented in your network.
Contents:
- Configuring MS SQL Server Instance to Listen on a Specific Port
- SQL Server Browser Service: TCP and UDP Ports
Configuring MS SQL Server Instance to Listen on a Specific Port
You can reconfigure your SQL server to listen on static or dynamic TCP port. Typically, you may need it when multiple SQL Server instances are running on a single host, or firewalls are used in your network.
To manage listen ports, you will need the SQL Server Configuration Manager. Usually, this snap-in is installed together with an MSSQL instance.
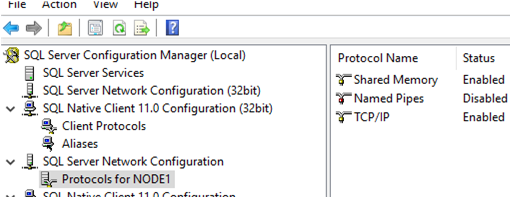
Open SQL Server Configuration Manager and expand the SQL Server Network Configuration section.
In my case, there is only 1 MSSQL instance running on the server, so I will configure listening ports for it. The list of available protocols for an instance contains the following:
- The Shared Memory protocol is used to connect from a local computer (the one an MSSQL instance is installed on). It is not recommended to disable it;
- Named Pipes may be used over the TCP/IP protocol. But its use doesn’t give us much benefit, so we will leave it enabled.
- TCP/IP is where MSSQL network options are configured.
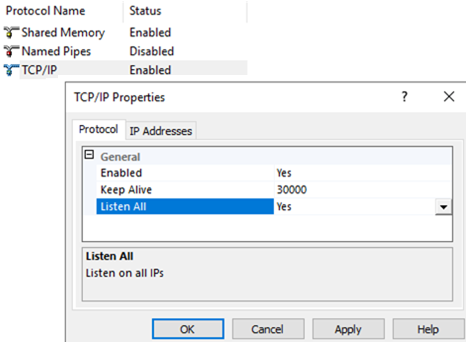
Double-click TCP/IP.
There are only 3 parameters on the Protocol tab::
- Enabled – to make sure that the TCP/IP protocol is enabled;
- Keep Alive how often to send keep-alive packets to make sure the connection is still available (in milliseconds). Do not change the parameter without a need;
- Listen All is an unobvious setting responsible for the contents of the IPAll section in the IP Addresses tab. If the value of Listen All is No, the IPAll section is ignored
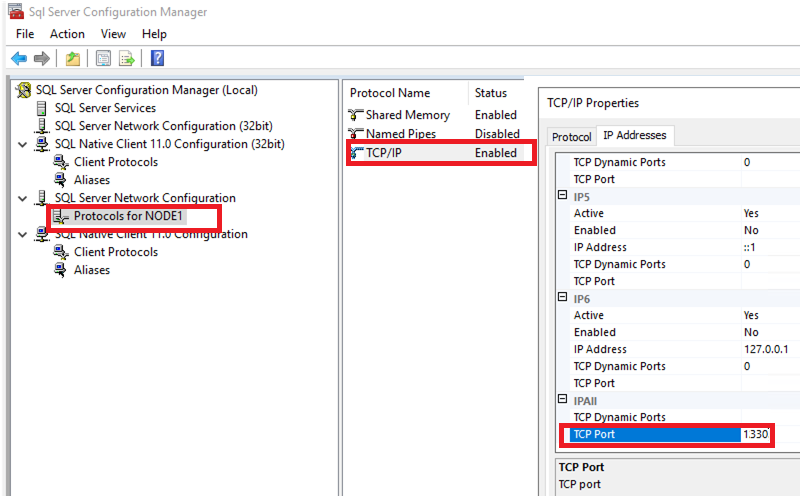
On the IP Addresses tab, you can see the list of all IP addresses of the computer (including IPv6 and local ones) and their settings. Here you can configure different TCP ports for a local and an external connection address, or different ports for different external addresses (if your server has multiple network interfaces in different segments, for example then using VLANs or multiple IP aliases).
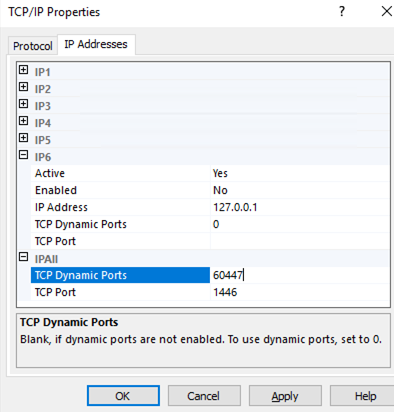
It is likely that you may want to change ports for all IP addresses at once, so change its IPAll section.
The TCP Dynamic Ports option is related to using dynamic ports.
- An empty TCP Dynamic Ports value disables using dynamic SQL Server ports;
- 0 enables using dynamic TCP ports from the RPC range 49152 – 65535;
- It doesn’t make any sense to set any fixed port value here — it changes each time after the MSSQL instance is restarted.
To set a static TCP port for an SQL Server instance, disable TCP Dynamic Ports and specify a new number of the static port in the TCP Port parameter.
To apply the changes, restart the SQL Server service. Note that SQL Server Browser service is stopped.
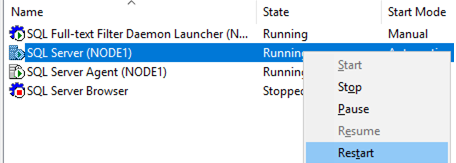
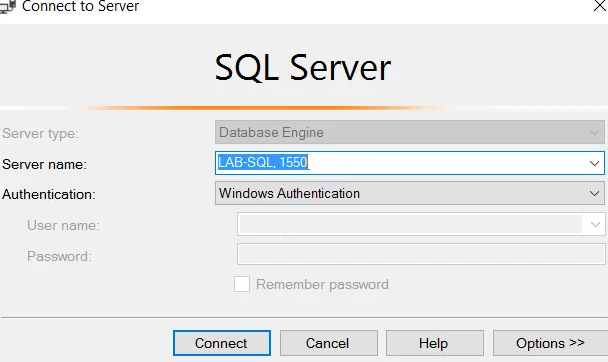
Make sure you can connect to your SQL instance using SSMS over the new fixed TCP port. The connection string format is as follows:
hostnamelab-sql, PortNumber
You won’t be able to connect without specifying the listening port because the SQL Browser service is disabled.
SQL Server Browser Service: TCP and UDP Ports
Before MSSQL 2000 you could not install more than one SQL instance on a host. This feature appeared in newer MSSQL versions. SQL Server Browser appeared in SQL Server 2005 and was used as an intermediary service to distribute connections between multiple MSSQL instances installed on the same computer.
Also, SQL Server Browser is responsible for connection to MSSQL (for example, from SQL Server Management Studio) without specifying a port number (hostnamelab-sql). SQL Server Browser gets the current dynamic port number of an instance from the registry and sends it to a client.
If you disable the SQL Server Browser service, you will have to specify the TCP port manually. For example, hostnamelab-sql, 1440.
If the SQL Server Browser service is stopped and dynamic ports are used, apps won’t be able to get port numbers to connect to.
Standard SQL Server ports:
- TCP 1433 is the standard SQL Server port;
- UDP 1434 is a port used by SQL Server Browser.
Other ports are configured when you install/configure a specific service.
If you are using strict firewall settings or if you want to restrict SQL Server as much as possible, it is recommended to disable Dynamic Ports (set an empty value) and disable the SQL Server Browser.
If your SQL servers have public access, it is worth to change the default port number. It will not protect you from hacker attacks completely, but their frequency will be reduced.
| title | description | author | ms.author | ms.date | ms.service | ms.subservice | ms.topic | ms.custom | helpviewer_keywords | ||||||||||||
|---|---|---|---|---|---|---|---|---|---|---|---|---|---|---|---|---|---|---|---|---|---|
|
Configure the Windows Firewall to allow SQL Server access |
Learn how to configure the Windows firewall to allow access to an instance of the SQL Server through the firewall. |
rwestMSFT |
randolphwest |
10/17/2022 |
sql |
install |
conceptual |
contperf-fy21q3 |
|
Configure the Windows Firewall to allow SQL Server access
[!INCLUDE SQL Server-Windows Only]
Firewall systems help prevent unauthorized access to computer resources. If a firewall is turned on but not correctly configured, attempts to connect to [!INCLUDEssNoVersion] might be blocked.
To access an instance of the [!INCLUDEssNoVersion] through a firewall, you must configure the firewall on the computer that is running [!INCLUDEssNoVersion]. The firewall is a component of [!INCLUDEmsCoName] Windows. You can also install a firewall from another vendor. This article discusses how to configure the Windows Firewall, but the basic principles apply to other firewall programs.
[!NOTE]
This article provides an overview of firewall configuration and summarizes information of interest to a [!INCLUDEssNoVersion] administrator. For more information about the firewall and for authoritative firewall information, see the firewall documentation, such as Windows Firewall security deployment guide.
Users familiar with managing the Windows Firewall, and know which firewall settings they want to configure can move directly to the more advanced articles:
- Configure a Windows Firewall for Database Engine Access
- Configure the Windows Firewall to Allow Analysis Services Access
- Configure a Firewall for Report Server Access
Basic firewall information
Firewalls work by inspecting incoming packets, and comparing them against the following set of rules:
- The packet meets the standards dictated by the rules, then the firewall passes the packet to the TCP/IP protocol for more processing.
- The packet doesn’t meet the standards specified by the rules.
- The firewall then discards the packet.- If logging is enabled, an entry is created in the firewall logging file.
The list of allowed traffic is populated in one of the following ways:
-
Automatically: When a computer with a firewall enabled starts communication, the firewall creates an entry in the list so that the response is allowed. The response is considered solicited traffic, and there’s nothing that needs to be configured.
-
Manually: An administrator configures exceptions to the firewall. It allows either access to specified programs or ports on your computer. In this case, the computer accepts unsolicited incoming traffic when acting as a server, a listener, or a peer. The configuration must be completed to connect to [!INCLUDEssNoVersion].
Choosing a firewall strategy is more complex than just deciding if a given port should be open or closed. When designing a firewall strategy for your enterprise, make sure you consider all the rules and configuration options available to you. This article doesn’t review all the possible firewall options. We recommend you review the following documents:
- Windows Firewall Deployment Guide
- Windows Firewall Design Guide
- Introduction to Server and Domain Isolation
Default firewall settings
The first step in planning your firewall configuration is to determine the current status of the firewall for your operating system. If the operating system was upgraded from a previous version, the earlier firewall settings may have been preserved. The Group Policy or Administrator can change the firewall settings in the domain.
[!NOTE]
Turning on the firewall will affect other programs that access this computer, such as file and print sharing, and remote desktop connections. Administrators should consider all applications that are running on the computer before adjusting the firewall settings.
Programs to configure the firewall
Configure the Windows Firewall settings with either Microsoft Management Console or netsh.
-
Microsoft Management Console (MMC)
The Windows Firewall with Advanced Security MMC snap-in lets you configure more advanced firewall settings. This snap-in presents most of the firewall options in an easy-to-use manner, and presents all firewall profiles. For more information, see Using the Windows Firewall with Advanced Security Snap-in later in this article.
-
netsh
The netsh.exe is an Administrator tool to configure and monitor Windows-based computers at a command prompt or using a batch file. By using the netsh tool, you can direct the context commands you enter to the appropriate helper, and the helper does the command. A helper is a Dynamic Link Library (.dll) file that extends the functionality. The helper provides: configuration, monitoring, and support for one or more services, utilities, or protocols for the netsh tool.
All operating systems that support [!INCLUDEssNoVersion] have a firewall helper. [!INCLUDEwinserver2008] also has an advanced firewall helper called advfirewall. Many of the configuration options described can be configured by using netsh. For example, run the following script at a command prompt to open TCP port 1433:
netsh firewall set portopening protocol = TCP port = 1433 name = SQLPort mode = ENABLE scope = SUBNET profile = CURRENTA similar example using the Windows Firewall for Advanced Security helper:
netsh advfirewall firewall add rule name = SQLPort dir = in protocol = tcp action = allow localport = 1433 remoteip = localsubnet profile = DOMAINFor more information about netsh, see the following links:
- Netsh Command Syntax, Contexts, and Formatting
- How to use the «netsh advfirewall firewall» context instead of the «netsh firewall» context to control Windows Firewall behavior in Windows Server 2008 and in Windows Vista
-
PowerShell
See the following example to open TCP port 1433 and UDP port 1434 for [!INCLUDEssNoVersion] default instance, and [!INCLUDEssNoVersion] Browser Service:
New-NetFirewallRule -DisplayName "SQLServer default instance" -Direction Inbound -LocalPort 1433 -Protocol TCP -Action Allow
New-NetFirewallRule -DisplayName "SQLServer Browser service" -Direction Inbound -LocalPort 1434 -Protocol UDP -Action Allow
For more examples, see New-NetFirewallRule.
-
For Linux
On Linux, you also need to open the ports associated with the services you need access to. Different distributions of Linux and different firewalls have their own procedures. For two examples, see SQL Server on Red Hat, and SQL Server on SUSE.
Ports used by SQL Server
The following tables can help you identify the ports being used by [!INCLUDEssNoVersion].
Ports used by the Database Engine
By default, the typical ports used by [!INCLUDEssNoVersion] and associated database engine services are: TCP 1433, 4022, 135, 1434, UDP 1434. The table below explains these ports in greater detail. A named instance uses Dynamic ports.
The following table lists the ports that are frequently used by the [!INCLUDEssDE].
| Scenario | Port | Comments |
|---|---|---|
| Default instance running over TCP | TCP port 1433 | The most common port allowed through the firewall. It applies to routine connections to the default installation of the [!INCLUDEssDE], or a named instance that is the only instance running on the computer. (Named instances have special considerations. See Dynamic ports later in this article.) |
| Named instances with default port | The TCP port is a dynamic port determined at the time the [!INCLUDEssDE] starts. | See the discussion below in the section Dynamic ports. UDP port 1434 might be required for the [!INCLUDEssNoVersion] Browser Service when you’re using named instances. |
| Named instances with fixed port | The port number configured by the administrator. | See the discussion below in the section Dynamic ports. |
| Dedicated Admin Connection | TCP port 1434 for the default instance. Other ports are used for named instances. Check the error log for the port number. | By default, remote connections to the Dedicated Administrator Connection (DAC) aren’t enabled. To enable remote DAC, use the Surface Area Configuration facet. For more information, see Surface Area Configuration. |
| [!INCLUDEssNoVersion] Browser service | UDP port 1434 | The [!INCLUDEssNoVersion] browser service listens for incoming connections to a named instance.
The service provides the client the TCP port number that corresponds to that named instance. Normally the [!INCLUDEssNoVersion] Browser service is started whenever named instances of the [!INCLUDEssDE] are used. The [!INCLUDEssNoVersion] Browser service isn’t required if the client is configured to connect to the specific port of the named instance. |
| Instance with HTTP endpoint. | Can be specified when an HTTP endpoint is created. The default is TCP port 80 for CLEAR_PORT traffic and 443 for SSL_PORT traffic. | Used for an HTTP connection through a URL. |
| Default instance with HTTPS endpoint | TCP port 443 | Used for an HTTPS connection through a URL. HTTPS is an HTTP connection that uses Transport Layer Security (TLS), previously known as Secure Sockets Layer (SSL). |
| [!INCLUDEssSB] | TCP port 4022. To verify the port used, execute the following query:
|
There’s no default port for [!INCLUDEssNoVersion] [!INCLUDEssSB], Books Online examples use the conventional configuration. |
| Database Mirroring | Administrator chosen port. To determine the port, execute the following query:
|
There’s no default port for database mirroring however Books Online examples use TCP port 5022 or 7022. It’s important to avoid interrupting an in-use mirroring endpoint, especially in high-safety mode with automatic failover. Your firewall configuration must avoid breaking quorum. For more information, see Specify a Server Network Address (Database Mirroring). |
| Replication | Replication connections to [!INCLUDEssNoVersion] use the typical regular [!INCLUDEssDE] ports (TCP port 1433 is the default instance)
Web synchronization and FTP/UNC access for replication snapshot require more ports to be opened on the firewall. To transfer initial data and schema from one location to another, replication can use FTP (TCP port 21), or sync over HTTP (TCP port 80) or File Sharing. File sharing uses UDP port 137 and 138, and TCP port 139 if used along with NetBIOS. File Sharing uses TCP port 445. |
For sync over HTTP, replication uses the IIS endpoint (configurable; port 80 default), but the IIS process connects to the backend [!INCLUDEssNoVersion] through the standard ports (1433 for the default instance.
During Web synchronization using FTP, the FTP transfer is between IIS and the [!INCLUDEssNoVersion] publisher, not between subscriber and IIS. |
| [!INCLUDEtsql] debugger | TCP port 135
See Special Considerations for Port 135 The IPsec exception might also be required. |
If using [!INCLUDEvsprvs], on the [!INCLUDEvsprvs] host computer, you must also add Devenv.exe to the Exceptions list and open TCP port 135.
If using [!INCLUDEssManStudio], on the [!INCLUDEssManStudio] host computer, you must also add ssms.exe to the Exceptions list and open TCP port 135. For more information, see Configure firewall rules before running the TSQL Debugger. |
For step-by-step instructions to configure the Windows Firewall for the [!INCLUDEssDE], see Configure a Windows Firewall for Database Engine Access.
Dynamic ports
By default, named instances (including [!INCLUDEssExpress]) use dynamic ports. means each time [!INCLUDEssDE] starts, it identifies an available port and uses that port number. If the named instance is the only instance of the [!INCLUDEssDE] installed, it will probably use TCP port 1433. If other instances of the [!INCLUDEssDE] are installed, it will probably use a different TCP port. Because the port selected might change every time that the [!INCLUDEssDE] is started, it’s difficult to configure the firewall to enable access to the correct port number. If a firewall is used, we recommend reconfiguring the [!INCLUDEssDE] to use the same port number every time. A fixed port or a static port is recommended. For more information, see Configure a Server to Listen on a Specific TCP Port (SQL Server Configuration Manager).
An alternative to configuring a named instance to listen on a fixed port is to create an exception in the firewall for a [!INCLUDEssNoVersion] program such as sqlservr.exe (for the [!INCLUDEssDE]). The port number won’t appear in the Local Port column of the Inbound Rules page when you’re using the Windows Firewall with Advanced Security MMC snap-in. It can be difficult to audit which ports are open. Another consideration is that a service pack or cumulative update can change the path to the [!INCLUDEssNoVersion] executable file and invalidate the firewall rule.
To add an exception for SQL Server using Windows Firewall with Advanced Security, see Use the Windows Firewall with Advanced Security snap-in later in this article.
Ports used by Analysis Services
By default, the typical ports used by [!INCLUDEssNoVersion] Analysis Services and associated services are: TCP 2382, 2383, 80, 443. The table below explains these ports in greater detail.
The following table lists the ports that are frequently used by [!INCLUDEssASnoversion].
| Feature | Port | Comments |
|---|---|---|
| [!INCLUDEssASnoversion] | TCP port 2383 for the default instance | The standard port for the default instance of [!INCLUDEssASnoversion]. |
| [!INCLUDEssNoVersion] Browser service | TCP port 2382 only needed for an [!INCLUDEssASnoversion] named instance | Client connection requests for a named instance of [!INCLUDEssASnoversion] that don’t specify a port number are directed to port 2382, the port on which [!INCLUDEssNoVersion] Browser listens. [!INCLUDEssNoVersion] Browser then redirects the request to the port that the named instance uses. |
| [!INCLUDEssASnoversion] configured for use through IIS/HTTP
(The PivotTable® Service uses HTTP or HTTPS) |
TCP port 80 | Used for an HTTP connection through a URL. |
| [!INCLUDEssASnoversion] configured for use through IIS/HTTPS
(The PivotTable® Service uses HTTP or HTTPS) |
TCP port 443 | Used for an HTTPS connection through a URL. HTTPS is an HTTP connection that uses TLS. |
If users access [!INCLUDEssASnoversion] through IIS and the Internet, you must open the port on which IIS is listening. Next, specify port in the client connection string. In this case, no ports have to be open for direct access to [!INCLUDEssASnoversion]. The default port 2389, and port 2382, should be restricted together with all other ports that aren’t required.
For step-by-step instructions to configure the Windows Firewall for [!INCLUDEssASnoversion], see Configure the Windows Firewall to Allow Analysis Services Access.
Ports used By Reporting Services
By default, the typical ports used by [!INCLUDEssNoVersion] Reporting Services and associated services are: TCP 80, 443. The table below explains these ports in greater detail.
The following table lists the ports that are frequently used by [!INCLUDEssRSnoversion].
| Feature | Port | Comments |
|---|---|---|
| [!INCLUDEssRSnoversion] Web Services | TCP port 80 | Used for an HTTP connection to [!INCLUDEssRSnoversion] through a URL. We recommend that you don’t use the preconfigured rule World Wide Web Services (HTTP). For more information, see the Interaction with Other Firewall Rules section below. |
| [!INCLUDEssRSnoversion] configured for use through HTTPS | TCP port 443 | Used for an HTTPS connection through a URL. HTTPS is an HTTP connection that uses TLS. We recommend that you don’t use the preconfigured rule Secure World Wide Web Services (HTTPS). For more information, see the Interaction with Other Firewall Rules section below. |
When [!INCLUDEssRSnoversion] connects to an instance of the [!INCLUDEssDE] or [!INCLUDEssASnoversion], you must also open the appropriate ports for those services. For step-by-step instructions to configure the Windows Firewall for [!INCLUDEssRSnoversion], Configure a Firewall for Report Server Access.
Ports used by Integration Services
The following table lists the ports that are used by the [!INCLUDEssISnoversion] service.
| Feature | Port | Comments |
|---|---|---|
| [!INCLUDEmsCoName] remote procedure calls (MS RPC)
Used by the [!INCLUDEssISnoversion] runtime. |
TCP port 135
See Special Considerations for Port 135 |
The [!INCLUDEssISnoversion] service uses DCOM on port 135. The Service Control Manager uses port 135 to do tasks such as starting and stopping the [!INCLUDEssISnoversion] service and transmitting control requests to the running service. The port number can’t be changed.
This port is only required to be open if you’re connecting to a remote instance of the [!INCLUDEssISnoversion] service from [!INCLUDEssManStudio] or a custom application. |
For step-by-step instructions to configure the Windows Firewall for [!INCLUDEssISnoversion], see Integration Services Service (SSIS Service).
Other ports and services
The following table lists ports and services that [!INCLUDEssNoVersion] might depend on.
| Scenario | Port | Comments |
|---|---|---|
| Windows Management Instrumentation
For more information about Windows Management Instrumentation (WMI), see WMI Provider for Configuration Management Concepts |
WMI runs as part of a shared service host with ports assigned through DCOM. WMI might be using TCP port 135.
See Special Considerations for Port 135 |
[!INCLUDEssNoVersion] Configuration Manager uses WMI to list and manage services. We recommend that you use the preconfigured rule group Windows Management Instrumentation (WMI). For more information, see the Interaction with Other Firewall Rules section below. |
| [!INCLUDEmsCoName] Distributed Transaction Coordinator (MS DTC) | TCP port 135
See Special Considerations for Port 135 |
If your application uses distributed transactions, you might have to configure the firewall to allow [!INCLUDEmsCoName] Distributed Transaction Coordinator (MS DTC) traffic to flow between separate MS DTC instances, and between the MS DTC and resource managers such as [!INCLUDEssNoVersion]. We recommend that you use the preconfigured Distributed Transaction Coordinator rule group.
When a single shared MS DTC is configured for the entire cluster in a separate resource group, you should add sqlservr.exe as an exception to the firewall. |
| The browse button in [!INCLUDEssManStudio] uses UDP to connect to the [!INCLUDEssNoVersion] Browser Service. For more information, see SQL Server Browser Service (Database Engine and SSAS). | UDP port 1434 | UDP is a connectionless protocol.
The firewall has a setting (UnicastResponsesToMulticastBroadcastDisabled Property of the INetFwProfile Interface) which controls the behavior of the firewall and unicast responses to a broadcast (or multicast) UDP request. It has two behaviors: If the setting is TRUE, no unicast responses to a broadcast are permitted at all. Enumerating services will fail. If the setting is FALSE (default), unicast responses are permitted for 3 seconds. The length of time isn’t configurable. In a congested or high-latency network, or for heavily loaded servers, tries to enumerate instances of [!INCLUDEssNoVersion] might return a partial list, which might mislead users. |
| IPsec traffic | UDP port 500 and UDP port 4500 | If the domain policy requires network communications to be done through IPsec, you must also add UDP port 4500 and UDP port 500 to the exception list. IPsec is an option using the New Inbound Rule Wizard in the Windows Firewall snap-in. For more information, see Using the Windows Firewall with Advanced Security Snap-in below. |
| Using Windows Authentication with Trusted Domains | Firewalls must be configured to allow authentication requests. | For more information, see How to configure a firewall for domains and trusts. |
| [!INCLUDEssNoVersion] and Windows Clustering | Clustering requires extra ports that aren’t directly related to [!INCLUDEssNoVersion]. | For more information, see Enable a network for cluster use. |
| URL namespaces reserved in the HTTP Server API (HTTP.SYS) | Probably TCP port 80, but can be configured to other ports. For general information, see Configuring HTTP and HTTPS. | For [!INCLUDEssNoVersion] specific information about reserving an HTTP.SYS endpoint using HttpCfg.exe, see About URL Reservations and Registration (SSRS Configuration Manager). |
Special considerations for port 135
When you use RPC with TCP/IP or with UDP/IP as the transport, inbound ports are dynamically assigned to system services as required. TCP/IP and UDP/IP ports that are larger than port 1024 are used. The ports are referred to as «random RPC ports.» In these cases, RPC clients rely on the RPC endpoint mapper to tell them which dynamic ports were assigned to the server. For some RPC-based services, you can configure a specific port instead of letting RPC assign one dynamically. You can also restrict the range of ports that RPC dynamically assigns to a small range, independent of the service. Because port 135 is used for many services, it’s frequently attacked by malicious users. When opening port 135, consider restricting the scope of the firewall rule.
For more information about port 135, see the following references:
- Service overview and network port requirements for the Windows Server system
- Remote procedure call (RPC)
- How to configure RPC dynamic port allocation to work with firewalls
Interaction with other firewall rules
The Windows Firewall uses rules and rule groups to establish its configuration. Each rule or rule group is associated with a particular program or service, and that program or service might modify or delete that rule without your knowledge. For example, the rule groups World Wide Web Services (HTTP) and World Wide Web Services (HTTPS) are associated with IIS. Enabling those rules will open ports 80 and 443, and [!INCLUDEssNoVersion] features that depend on ports 80 and 443 will function if those rules are enabled. However, administrators configuring IIS might modify or disable those rules. If you’re using port 80 or port 443 for [!INCLUDEssNoVersion], you should create your own rule or rule group that maintains your preferred port configuration independently of the other IIS rules.
The Windows Firewall with Advanced Security MMC snap-in allows any traffic that matches any applicable allow rule. So if there are two rules that both apply to port 80 (with different parameters). Traffic that matches either rule will be permitted. So if one rule allows traffic over port 80 from local subnet and one rule allows traffic from any address, the net effect is that all traffic to port 80 is independent of the source. To effectively manage access to [!INCLUDEssNoVersion], administrators should periodically review all firewall rules enabled on the server.
Overview of firewall profiles
Firewall profiles are used by the operating systems to identify and remember each of the networks by: connectivity, connections, and category.
There are three network location types in Windows Firewall with Advanced Security:
- Domain: Windows can authenticate access to the domain controller for the domain to which the computer is joined.
- Public: Other than domain networks, all networks are initially categorized as public. Networks that represent direct connections to the Internet or are in public locations, such as airports and coffee shops should be left public.
- Private: A network identified by a user or application as private. Only trusted networks should be identified as private networks. Users will likely want to identify home or small business networks as private.
The administrator can create a profile for each network location type, with each profile containing different firewall policies. Only one profile is applied at any time. Profile order is applied as follows:
- The domain profile is applied if all interfaces are authenticated to the domain controller where the computer is a member.
- If all interfaces are either authenticated to the domain controller or are connected to networks that are classified as private network locations, the private profile is applied.
- Otherwise, the public profile is applied.
Use the Windows Firewall with Advanced Security MMC snap-in to view and configure all firewall profiles. The Windows Firewall item in Control Panel only configures the current profile.
Additional firewall settings using the Windows Firewall item in Control Panel
The added firewall can restrict the opening of the port to incoming connections from specific computers or local subnet. Limit the scope of the port opening to reduce how much your computer is exposed to malicious users.
[!NOTE]
Using the Windows Firewall item in Control Panel only configures the current firewall profile.
Change the scope of a firewall exception using the Windows Firewall item in Control Panel
-
In the Windows Firewall item in Control Panel, select a program or port on the Exceptions tab, and then select Properties or Edit.
-
In the Edit a Program or Edit a Port dialog box, select Change Scope.
-
Choose one of the following options:
-
Any computer (including computers on the Internet): Not recommended. Any computer that can address your computer to connect to the specified program or port. This setting might be necessary to allow information to be presented to anonymous users on the internet, but increases your exposure to malicious users. Enabling this setting an allow Network Address Translation (NAT) traversal, such as the Allow edge traversal option will increase exposure.
-
My network (subnet) only: A more secure setting than Any computer. Only computers on the local subnet of your network can connect to the program or port.
-
Custom list: Only computers that have the IP addresses listed can connect. A secure setting can be more secure than My network (subnet) only, however, client computers using DHCP can occasionally change their IP address; will disable the ability to connect. Another computer, which you had not intended to authorize, might accept the listed IP address and connect to it. The Custom list is appropriate for listing other servers that are configured to use a fixed IP address.
IP addresses can be spoofed by an intruder. Restricting firewall rules are only as strong as your network infrastructure.
-
Use the Windows Firewall with Advanced Security snap-in
Advanced firewall settings can be configured by using the Windows Firewall with Advanced Security MMC snap-in. The snap-in includes a rule wizard and settings that aren’t available in the Windows Firewall item in Control Panel. These settings include:
- Encryption settings
- Services restrictions
- Restricting connections for computers by name
- Restricting connections to specific users or profiles
- Edge traversal allowing traffic to bypass Network Address Translation (NAT) routers
- Configuring outbound rules
- Configuring security rules
- Requiring IPsec for incoming connections
Create a new firewall rule using the New Rule wizard
- On the Start menu, select Run, type
WF.msc, and then select OK. - In the Windows Firewall with Advanced Security, in the left pane, right-click Inbound Rules, and then select New Rule.
- Complete the New Inbound Rule Wizard using the settings that you want.
Add a program exception for the SQL Server executable
-
From the start menu, type wf.msc. Press Enter or select the search result wf.msc to open Windows Defender Firewall with Advanced Security.
-
In the left pane, select Inbound rules.
-
In the right pane, under Actions, select New rule…. New Inbound Rule Wizard opens.
-
On Rule type, select Program. Select Next.
-
On Program, select This program path. Select Browse to locate your instance of [!INCLUDEssNoVersion]. The program is called
sqlservr.exe. It’s normally located at:C:Program FilesMicrosoft SQL ServerMSSQL<VersionNumber>.<InstanceName>MSSQLBinnsqlservr.exeSelect Next.
-
On Action, select Allow the connection. Select Next.
-
On Profile, include all three profiles. Select Next.
-
On Name, type a name for the rule. Select Finish.
For more information about endpoints, see:
- Configure the Database Engine to Listen on Multiple TCP Ports
- Endpoints Catalog Views (Transact-SQL)
Troubleshoot firewall settings
The following tools and techniques can be useful in troubleshooting firewall issues:
-
The effective port status is the union of all rules related to the port. It can be helpful to review all the rules that cite the port number, when trying to block access to a port. Review the rules with the Windows Firewall with Advanced Security MMC snap-in and sort the inbound and outbound rules by port number.
-
Review the ports that are active on the computer on which [!INCLUDEssNoVersion] is running. The review process includes verifying which TCP/IP ports are listening and also verifying the status of the ports.
-
The PortQry utility can be used to report the status of TCP/IP ports as listening, not listening, or filtered.
(The utility may not receive response from the port if it has a filtered status.)
The PortQry utility is available for download from the Microsoft Download Center.
List which TCP/IP ports are listening
To verify which ports are listening, display active TCP connections and IP statistics use the netstat command-line utility.
-
Open the Command Prompt window.
-
At the command prompt, type
netstat -n -a.The
-nswitch instructs netstat to numerically display the address and port number of active TCP connections. The-aswitch instructs netstat to display the TCP and UDP ports on which the computer is listening.
See also
- Service overview and network port requirements for the Windows Server system
- How to: Configure Firewall Settings (Azure SQL Database)
I am trying to connect to a Microsoft SQL 2005 server which is not on port 1433. How do I indicate a different port number when connecting to the server using SQL Management Studio?
asked Sep 18, 2008 at 2:50
127.0.0.1,6283
Add a comma between the ip and port
gunr2171
15.5k25 gold badges63 silver badges87 bronze badges
answered Sep 18, 2008 at 2:51
NescioNescio
27.3k10 gold badges53 silver badges72 bronze badges
10
If you’re connecting to a named instance and UDP is not available when connecting to it, then you may need to specify the protocol as well.
Example: tcp:192.168.1.21SQL2K5,1443
Michael
7,9816 gold badges62 silver badges88 bronze badges
answered Sep 18, 2008 at 3:11
JamesJames
3,3021 gold badge20 silver badges15 bronze badges
1
Another way is to setup an alias in Config Manager. Then simply type that alias name when you want to connect. This makes it much easier and is more prefereable when you have to manage several servers/instances and/or servers on multiple ports and/or multiple protocols. Give them friendly names and it becomes much easier to remember them.
answered Sep 18, 2008 at 3:09
mattlantmattlant
15.3k4 gold badges34 silver badges43 bronze badges
1
You’ll need the SQL Server Configuration Manager. Go to Sql Native Client Configuration, Select Client Protocols, Right Click on TCP/IP and set your default port there.
answered Sep 18, 2008 at 2:54
MikeMike
5,0913 gold badges25 silver badges19 bronze badges
1
Using the client manager affects all connections or sets a client machine specific alias.
Use the comma as above: this can be used in an app.config too
It’s probably needed if you have firewalls between you and the server too…
answered Oct 13, 2008 at 18:00
gbngbn
417k81 gold badges581 silver badges670 bronze badges
On Windows plattform with server execute command:
netstat -a -b
look for sql server processes and find port f.e 49198
Or easier. Connect with dbvisualizer, run netstat -a -b find dbvis.exe process and get port.
Milen
8,6077 gold badges45 silver badges57 bronze badges
answered Nov 13, 2013 at 10:54
guestguest
271 bronze badge
0
0. Оглавление
- Что понадобится
- Определение / изменения порта для «экземпляра по умолчанию»
- Определение / изменения порта для именованного экземпляра SQL Server
- Добавление правила в Брандмауэр Windows
1. Что понадобится
- Статья будет актуальна для Microsoft SQL Server 2012 и для Microsoft SQL Server 2008 (R2).
- В качестве операционной системы сервера рассматриваются Microsoft Windows Server 2012 (R2) или Microsoft Windows Server 2008 (R2)
2. Определение / изменения порта для «экземпляра по умолчанию»
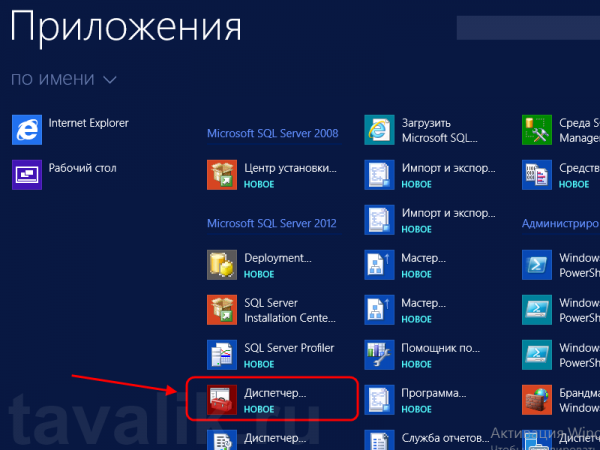
По умолчанию SQL Server использует для соединения порт 1433. Чтобы проверить это, запустим оснастку «Диспетчер конфигурации SQL Server» (SQL Server Configuration Manager). В Microsoft Windows Server 2012 (R2) ее можно найти в списке всех программ.
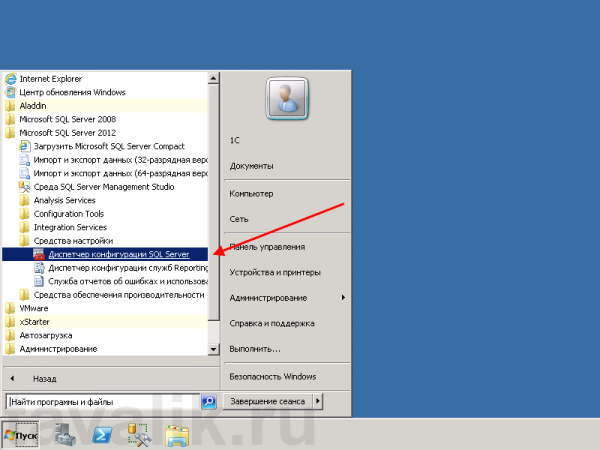
В Microsoft Windows Server 2008 (R2) в меню «Пуск» (Start) — «Microsoft SQL Server 2012» — «Средства настройки» (Configuration Tools) — «Диспетчер конфигурации SQL Server» (SQL Server Configuration Manager)
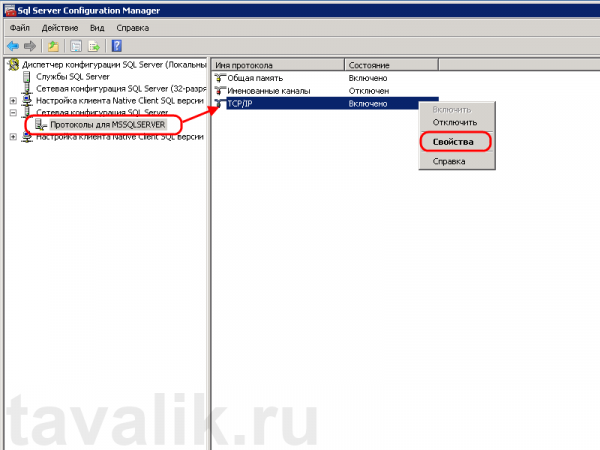
В запустившейся оснастке раскроем вкладку «Сетевая конфигурация SQL Server» (SQL Server Network Configuration), затем выделим вкладку «Протоколы для MSSQLSERVER» (Protocols for MSSQLSERVER). В окне слева в таблице найдем протокол TCP/IP, кликнем по нему правой кнопкой мыши и в контекстном меню выберем «Свойства» (Properties).
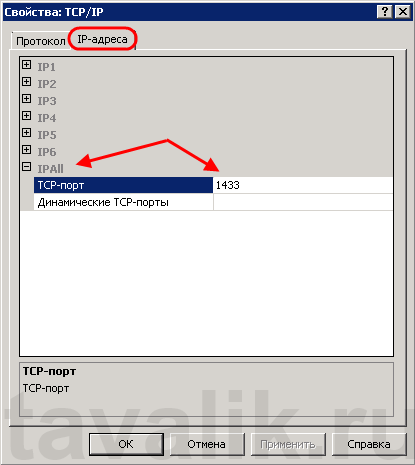
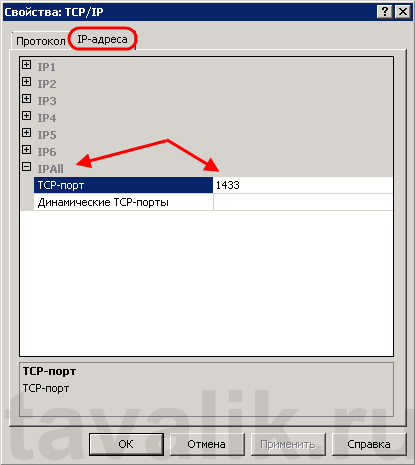
В открывшемся окне свойств перейдем на вкладку «IP-адреса» (IP Addresses), затем найдем и раскроем в дереве настроек ветку «IPAll». Здесь мы видим, что выбранный экземпляр SQL Server использует TCP-порт по умолчанию, а именно порт 1433. Если по каким то причинам требуется использовать другой номер порта, необходимо просто поменять текущее значение, нажать «Применить» (Apply) и перезапустить службу SQL Server.
3. Определение / изменения порта для именованного экземпляра SQL Server
В случае использования именованного экземпляра SQL Server ситуация аналогичная, за тем лишь исключением, что используются динамические TCP-порты. Это значит, что для каждого отдельного экземпляра будет назначен свой номер порта.
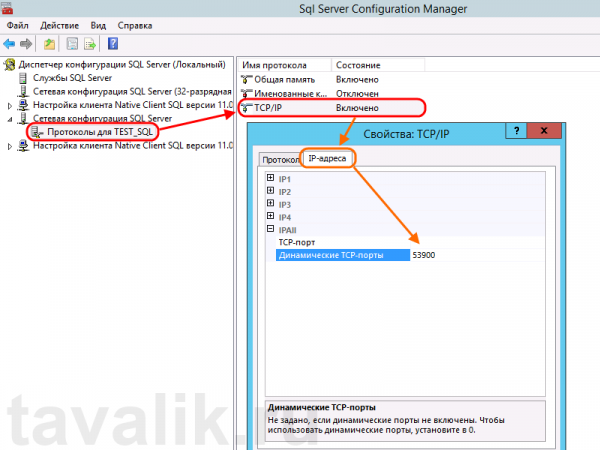
Для определения / изменения текущего порта, найдем в оснастке «Диспетчер конфигурации SQL Server» (SQL Server Configuration Manager) вкладку с сетевой конфигурацией необходимого нам экземпляра SQL Server и перейдем в свойства протокола TCP/IP для данного экземпляра. Здесь, как и в предыдущем случае, на вкладке «IP-адреса» (IP Addresses) в ветке «IPAll» можно узнать, а также изменить динамический TCP-порт для текущего экземпляра SQL Server.
4. Добавление правила в Брандмауэр Windows
Теперь, когда мы определились с номером порта, который будет использоваться для подключения к службе SQL Server, создадим разрешающее правило в Брандмауэре Windows на сервере, где запущена служба.
О том, как добавить разрешающее правило для определенного порта в Microsoft Windows Server 2008 (R2) я уже писал здесь. В Windows Server 2012 (R2) действия аналогичны.
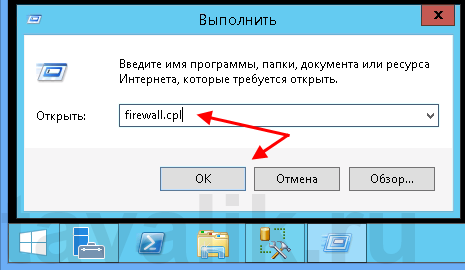
Запускаем брандмауэр Windows (Windows Firewall). Сделать это можно кликнув правой кнопкой мыши по «Пуск» (Start), затем «Панель управления» (Control Panel) — «Система и безопасность» (System and Security) — «Брандмауэр Windows» (Windows Firewall). Или же выполнив команду firewall.cpl (для этого необходимо нажать комбинацию клавиш Win + R, в окне «Отрыть» (Open) ввести имя команды и нажать «ОК» ) .
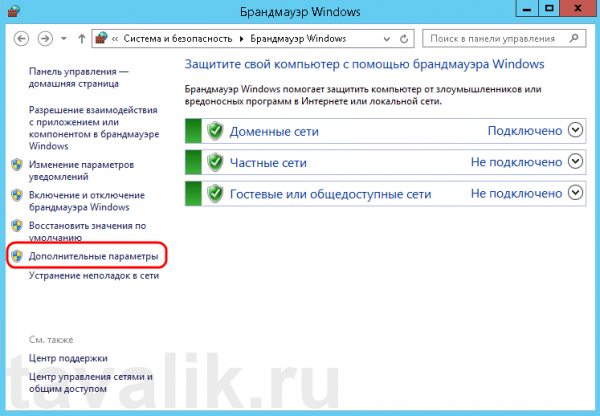
Далее нажимаем на «Дополнительные параметры» (Advanced Settings) в меню слева.
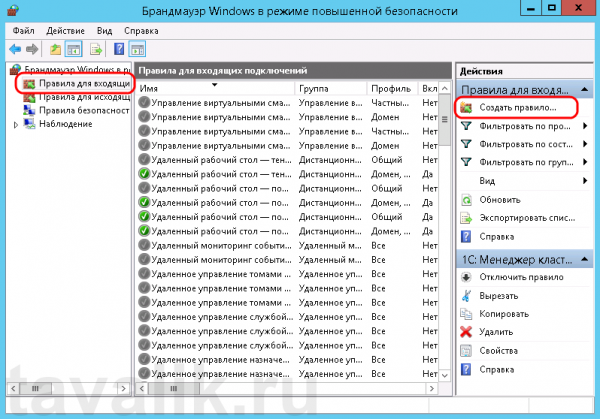
В открывшемся окне, в дереве слева откроем вкладку «Правила для входящих подключений» (Inbound Rules), а затем в меню «Действия» (Actions) выберем пункт «Создать правило…» (New Rule…).
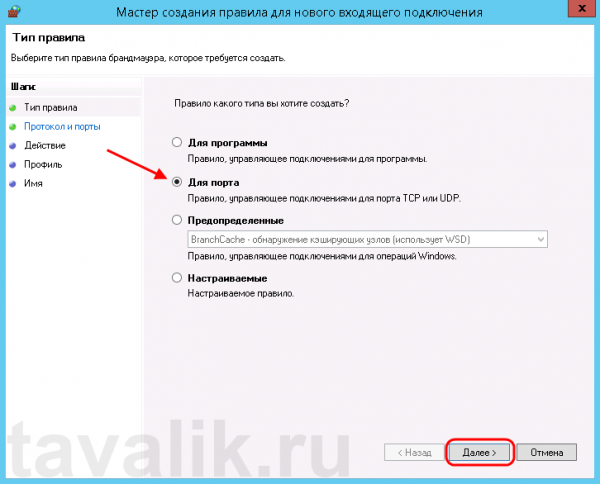
Запустится «Мастер создания правила для нового входящего подключения» (New Inbound Rule Wizard). На первой странице выберем тип правила (Rule Type) «Для порта» (Port) и нажмем «Далее» (Next).
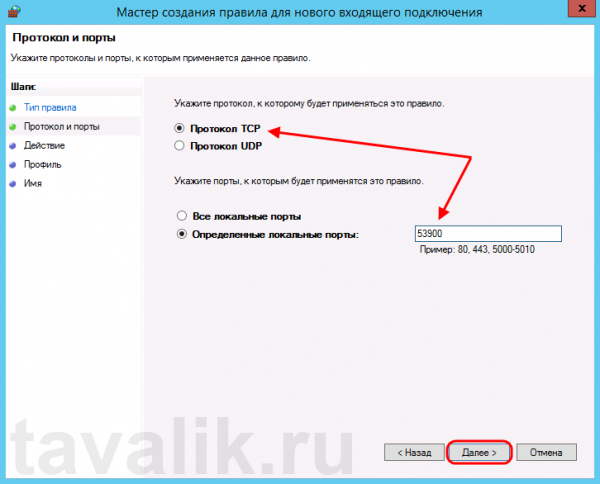
Затем необходимо указать протокол (в нашем примере это TCP) и, непосредственно, номер порта (Specific local ports), который открываем. После чего жмем «Далее» (Next).
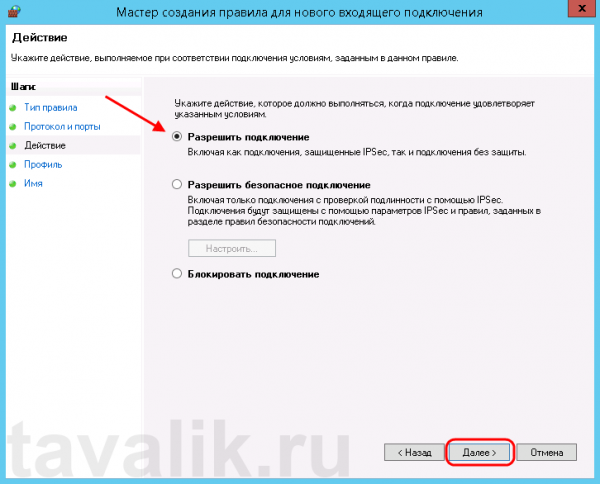
Теперь укажем действие связанное с добавляемым правилом. Выберем «Разрешить подключение» (Allow the connection) и нажмем «Далее» (Next).
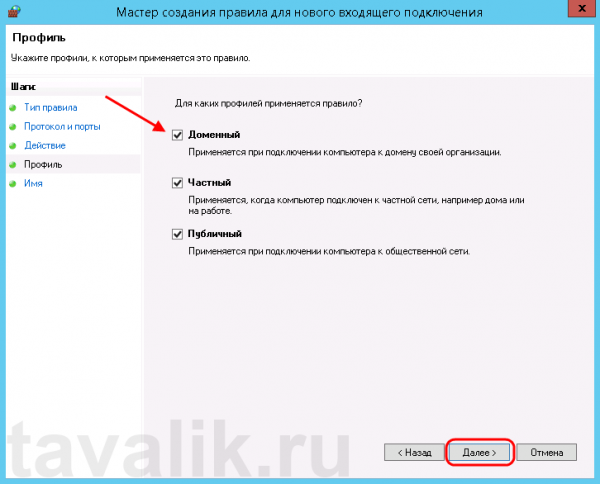
На следующей странице нужно указать, для каких профилей брандмауэра будет действовать правило. Отмечаем нужные профили галочками и жмем «Далее» (Next).
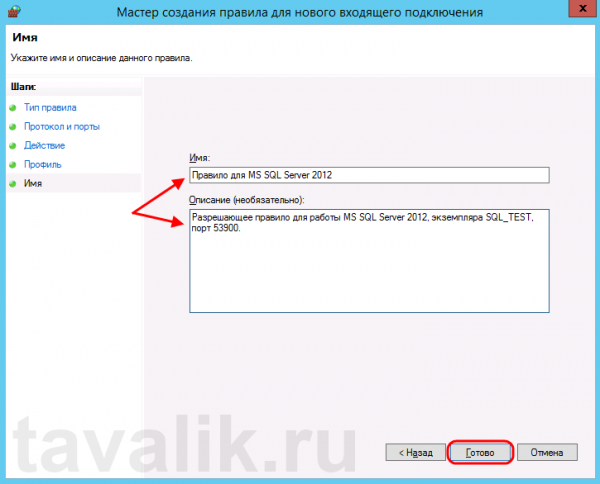
Ну и наконец, вводим имя и описание для нового правила и нажимаем «Готово» (Finish) для завершения работы мастера.
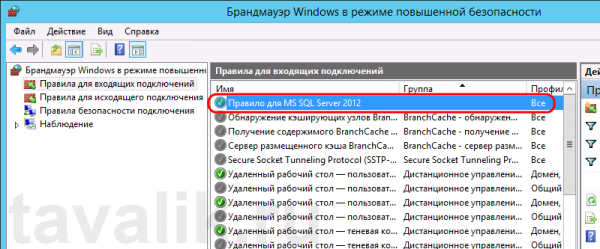
А в оснастке «Брандмауэр Windows в режиме повышенной безопасности» (Windows Firewall with Advanced Security) в таблице «Правила для входящих подключений» (Inbound Rules) мы увидим только что созданное правило.
На этом настройка Брандмауэра завершена. Клиентские программы должны без препятствий подключиться к службе SQL Server.
5. Порт для администрирования MS SQL Server
Для того, чтобы к MS SQL Server можно было подключиться с помощью программы SQL Management Studio, необходимо также добавить правило для протокола UDP и порта 1434.
Подробнее о используемых SQL Server портах здесь.
Содержание
- 1 Определение / изменения порта для «экземпляра по умолчанию»
- 2 Определение / изменения порта для именованного экземпляра
- 3 Добавление правила в Брандмауэр Windows
Определение / изменения порта для «экземпляра по умолчанию»
По умолчанию SQL Server использует для соединения порт 1433. Чтобы проверить это, запустим оснастку «Диспетчер конфигурации SQL Server» (SQL Server Configuration Manager). В Microsoft Windows Server 2012 (R2) ее можно найти в списке всех программ.
В Microsoft Windows Server 2008 (R2) в меню «Пуск» (Start) — «Microsoft SQL Server 2012» — «Средства настройки» (Configuration Tools) — «Диспетчер конфигурации SQL Server» (SQL Server Configuration Manager)
В запустившейся оснастке раскроем вкладку «Сетевая конфигурация SQL Server» (SQL Server Network Configuration), затем выделим вкладку «Протоколы для MSSQLSERVER» (Protocols for MSSQLSERVER). В окне слева в таблице найдем протокол TCP/IP, кликнем по нему правой кнопкой мыши и в контекстном меню выберем «Свойства» (Properties).
В открывшемся окне свойств перейдем на вкладку «IP-адреса» (IP Addresses), затем найдем и раскроем в дереве настроек ветку «IPAll». Здесь мы видим, что выбранный экземпляр SQL Server использует TCP-порт по умолчанию, а именно порт 1433. Если по каким то причинам требуется использовать другой номер порта, необходимо просто поменять текущее значение, нажать «Применить» (Apply) и перезапустить службу SQL Server.
Определение / изменения порта для именованного экземпляра
В случае использования именованного экземпляра SQL Server ситуация аналогичная, за тем лишь исключением, что используются динамические TCP-порты. Это значит, что для каждого отдельного экземпляра будет назначен свой номер порта.
Для определения / изменения текущего порта, найдем в оснастке «Диспетчер конфигурации SQL Server» (SQL Server Configuration Manager) вкладку с сетевой конфигурацией необходимого нам экземпляра SQL Server и перейдем в свойства протокола TCP/IP для данного экземпляра. Здесь, как и в предыдущем случае, на вкладке «IP-адреса» (IP Addresses) в ветке «IPAll» можно узнать, а также изменить динамический TCP-порт для текущего экземпляра SQL Server.
Добавление правила в Брандмауэр Windows
Теперь, когда мы определились с номером порта, который будет использоваться для подключения к службе SQL Server, создадим разрешающее правило в Брандмауэре Windows на сервере, где запущена служба.
Запускаем брандмауэр Windows (Windows Firewall). Сделать это можно кликнув правой кнопкой мыши по «Пуск» (Start), затем «Панель управления» (Control Panel) — «Система и безопасность» (System and Security) — «Брандмауэр Windows» (Windows Firewall). Или же выполнив команду firewall.cpl (для этого необходимо нажать комбинацию клавиш Win + R, в окне «Отрыть» (Open) ввести имя команды и нажать «ОК») . Далее нажимаем на «Дополнительные параметры» (Advanced Settings) в меню слева.
В открывшемся окне, в дереве слева откроем вкладку «Правила для входящих подключений» (Inbound Rules), а затем в меню «Действия» (Actions) выберем пункт «Создать правило…» (New Rule…).
Запустится «Мастер создания правила для нового входящего подключения» (New Inbound Rule Wizard). На первой странице выберем тип правила (Rule Type) «Для порта» (Port) и нажмем «Далее» (Next).
Затем необходимо указать протокол (в нашем примере это TCP) и, непосредственно, номер порта (Specific local ports), который открываем. После чего жмем «Далее» (Next).
Теперь укажем действие связанное с добавляемым правилом. Выберем «Разрешить подключение» (Allow the connection) и нажмем «Далее» (Next).
На следующей странице нужно указать, для каких профилей брандмауэра будет действовать правило. Отмечаем нужные профили галочками и жмем «Далее» (Next).
Ну и наконец, вводим имя и описание для нового правила и нажимаем «Готово» (Finish) для завершения работы мастера.
А в оснастке «Брандмауэр Windows в режиме повышенной безопасности» (Windows Firewall with Advanced Security) в таблице «Правила для входящих подключений» (Inbound Rules) мы увидим только что созданное правило.
На этом настройка Брандмауэра завершена. Клиентские программы должны без препятствий подключиться к службе SQL Server.

