Обновлено 12.06.2018
Добрый день уважаемые читатели и гости блога, сегодня у нас с вами вот такая задача: изменить входящий порт службы RDP (терминального сервера) со стандартного 3389 на какой-то другой. Напоминаю, что RDP служба это функционал операционных систем Windows, благодаря которому вы можете по сети открыть сессию на нужный вам компьютер или сервер по протоколу RDP, и иметь возможность за ним работать, так как будто вы сидите за ним локально.
Что такое RDP протокол
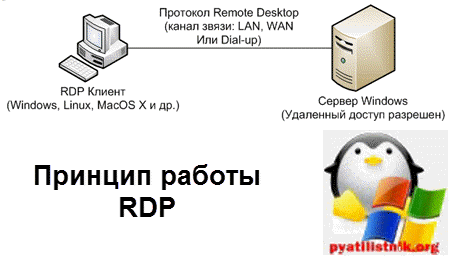
Прежде чем, что то изменять, хорошо бы понимать, что это и как это работает, я вам об этом не перестаю повторять. RDP или Remote Desktop Protocol это протокол удалённого рабочего стола в операционных системах Microsoft Windows, хотя его происхождение идет от компании PictureTel (Polycom). Microsoft просто его купила. Используется для удаленной работы сотрудника или пользователя с удаленным сервером. Чаще всего такие сервера несут роль сервер терминалов, на котором выделены специальные лицензии, либо на пользователе, либо на устройства, CAL. Тут задумка была такой, есть очень мощный сервер, то почему бы не использовать его ресурсы совместно, например под приложение 1С. Особенно это становится актуальным с появлением тонких клиентов.
Сам сервер терминалов мир увидел, аж в 1998 году в операционной системе Windows NT 4.0 Terminal Server, я если честно тогда и не знал, что такое есть, да и в России мы в то время все играли в денди или сегу. Клиенты RDP соединения, на текущий момент есть во всех версиях Windows, Linux, MacOS, Android. Самая современная версия RDP протокола на текущий момент 8.1.
Порт rdp по умолчанию
Сразу напишу порт rdp по умолчанию 3389, я думаю все системные администраторы его знают.
Принцип работы протокола rdp
И так мы с вами поняли для чего придумали Remote Desktop Protocol, теперь логично, что нужно понять принципы его работы. Компания Майкрософт выделяет два режима протокола RDP:
- Remote administration mode > для администрирования, вы попадаете на удаленный сервер и настраиваете и администрируете его
- Terminal Server mode > для доступа к серверу приложений, Remote App или совместное использование его для работы.
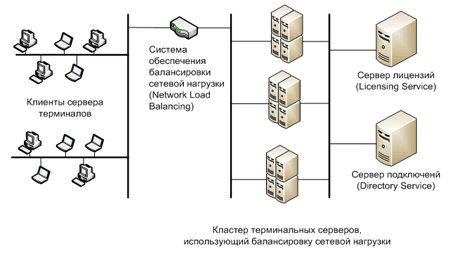
Вообще если вы без сервера терминалов устанавливаете Windows Server 2008 R2 — 2016, то там по умолчанию у него будет две лицензии, и к нему одновременно смогут подключиться два пользователя, третьему придется для работы кого то выкидывать. В клиентских версиях Windows, лицензий всего одна, но и это можно обойти, я об этом рассказывал в статье сервер терминалов на windows 7. Так же Remote administration mode, можно кластеризировать и сбалансировать нагрузку, благодаря технологии NLB и сервера сервера подключений Session Directory Service. Он используется для индексации пользовательских сессий, благодаря именно этому серверу у пользователя получиться войти на удаленный рабочий стол терминальных серверов в распределенной среде. Так же обязательными компонентами идут сервер лицензирования.
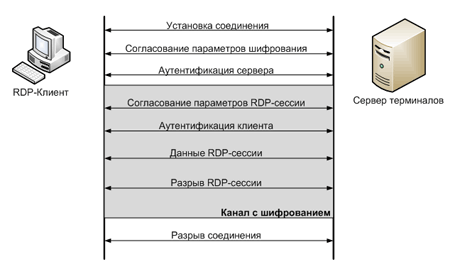
RDP протокол работает по TCP соединению и является прикладным протоколом. Когда клиент устанавливает соединение с сервером, на транспортном уровне создается RDP сессия, где идет согласование методов шифрования и передачи данных. Когда все согласования определены и инициализация окончена, сервер терминалов, передает клиенту графический вывод и ожидает входные данные от клавиатуры и мыши.
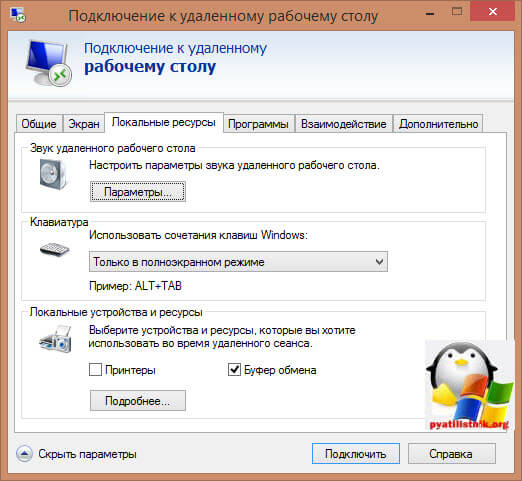
Remote Desktop Protocol поддерживает несколько виртуальных каналов в рамках одного соединения, благодаря этому можно использовать дополнительный функционал
- Передать на сервер свой принтер или COM порт
- Перенаправить на сервер свои локальные диски
- Буфер обмена
- Аудио и видео
Этапы RDP соединения
- Установка соединения
- Согласование параметров шифрования
- Аутентификация серверов
- Согласование параметров RDP сессии
- Аутентификация клиента
- Данные RDP сессии
- Разрыв RDP сессии
Безопасность в RDP протоколе
Remote Desktop Protocol имеет два метода аутентификации Standard RDP Security и Enhanced RDP Security, ниже рассмотрим оба более подробно.
Standard RDP Security
RDP протокол при данном методе аутентификации, шифрует подключение средствами самого RDP протокола, которые есть в нем, вот таким методом:
- Когда ваша операционная система запускается, то идет генерация пары RSA ключиков
- Идет создание сертификата открытого ключа Proprietary Certificate
- После чего Proprietary Certificate подписывается RSA ключом созданным ранее
- Теперь RDP клиент подключившись к терминальному серверу получит Proprietary Certificate
- Клиент его смотрит и сверяет, далее получает открытый ключ сервера, который используется на этапе согласования параметров шифрования.
Если рассмотреть алгоритм с помощью которого все шифруется, то это потоковый шифр RC4. Ключи разной длины от 40 до 168 бит, все зависит от редакции операционной системы Windows, например в Windows 2008 Server – 168 бит. Как только сервер и клиент определились с длиной ключа, генерируются два новых различных ключа, для шифрования данных.
Если вы спросите про целостность данных, то тут она достигается за счет алгоритма MAC (Message Authentication Code) базируемого на SHA1 и MD5
Enhanced RDP Security
RDP протокол при данном методе аутентификации использует два внешних модуля безопасности:
- CredSSP
- TLS 1.0
TLS поддерживается с 6 версии RDP. Когда вы используете TLS, то сертификат шифрования можно создать средствами терминального сервера, самоподписный сертификат или выбрать из хранилища.
Когда вы задействуете CredSSP протокол, то это симбиоз технологий Kerberos, NTLM и TLS. При данном протоколе сама проверка, при которой проверяется разрешение на вход на терминальный сервер осуществляется заранее, а не после полноценного RDP подключения, и тем самым вы экономите ресурсы терминального сервера, плюс тут более надежное шифрование и можно делать однократный вход в систему (Single Sign On), благодаря NTLM и Kerberos. CredSSP идет только в ОС не ниже Vista и Windows Server 2008. Вот эта галка в свойствах системы
разрешить подключения только с компьютеров, на которых работает удаленный рабочий стол с проверкой подлинности на уровне сети.
Изменить порт rdp
Для того, чтобы изменить порт rdp, вам потребуется:
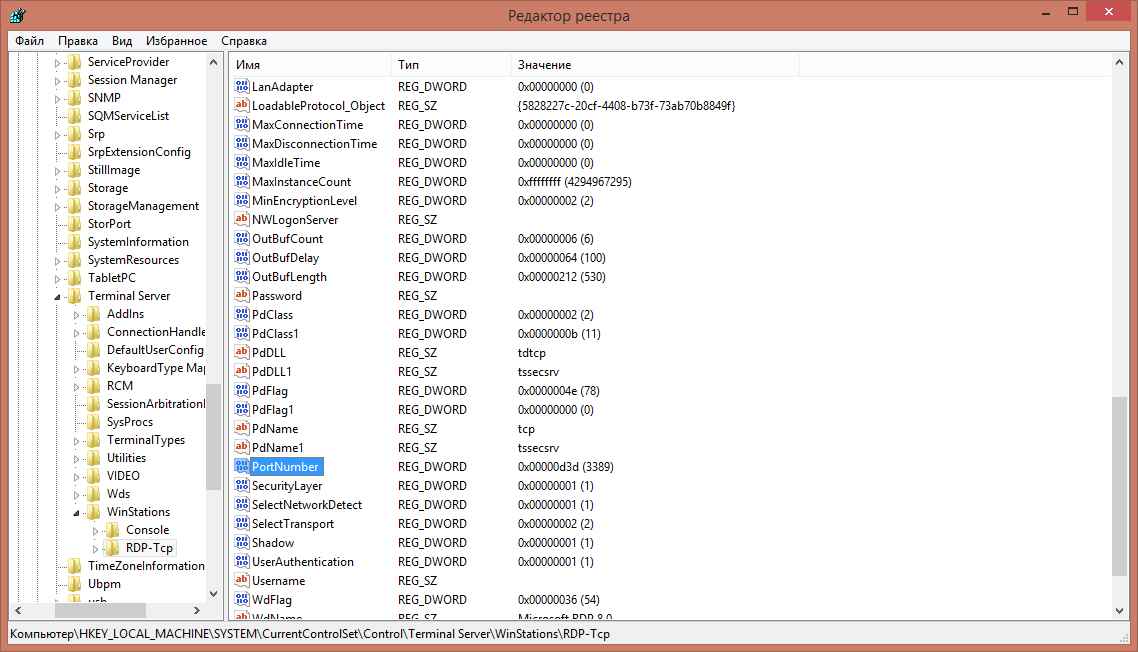
- Открываем редактор реестра (Пуск -> Выполнить -> regedit.exe)
- Переходим к следующему разделу:
HKEY_LOCAL_MACHINESystemCurrentControlSetControlTerminal ServerWinStationsRDP-Tcp
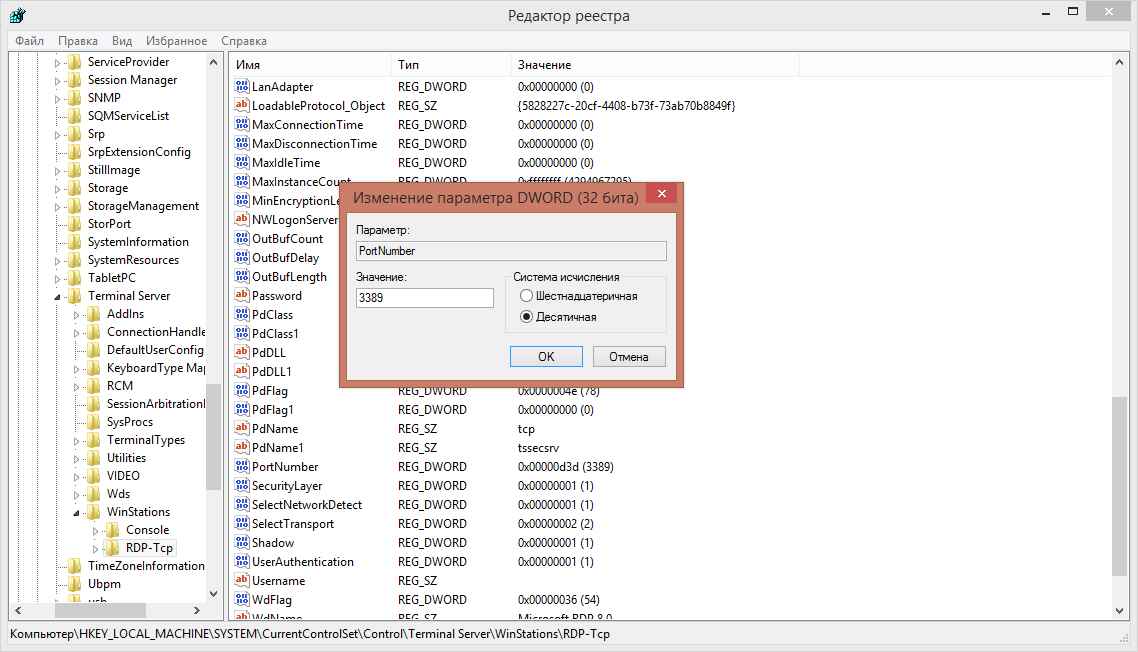
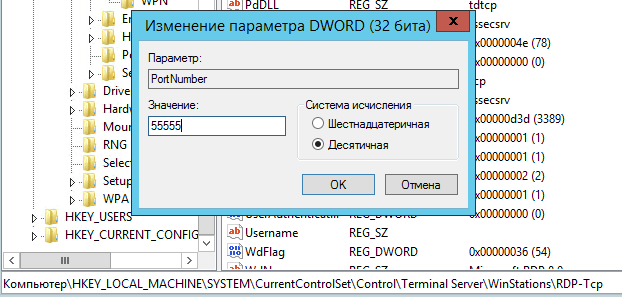
Находим ключ PortNumber и меняем его значение на номер порта, который Вам нужен.
Выберите обязательно десятичное значение, я для примера поставлю порт 12345.
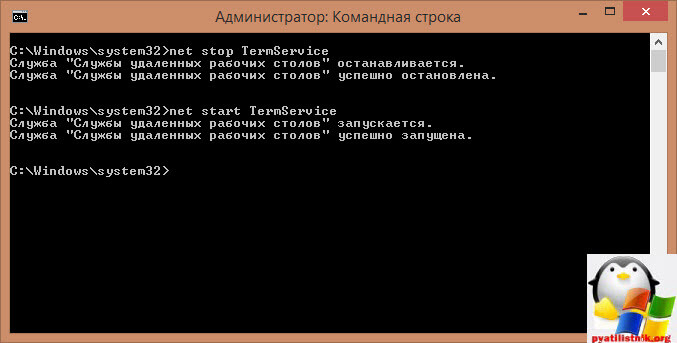
Как только вы это сделали, то перезапустите службу удаленных рабочих столов, через командную строку, вот такими командами:
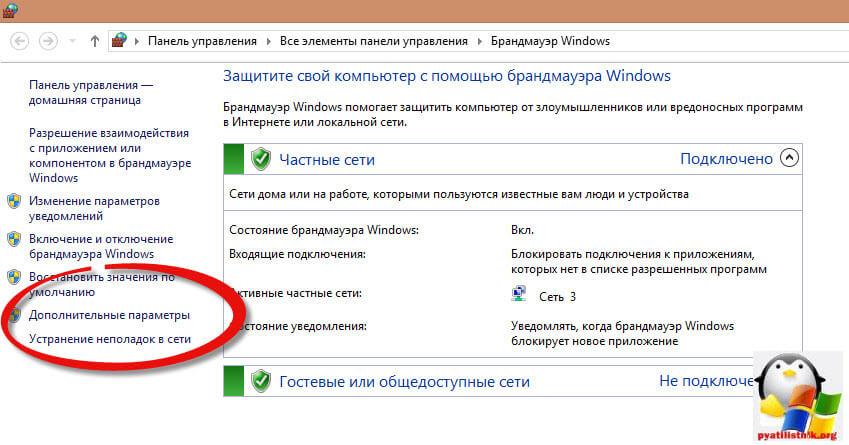
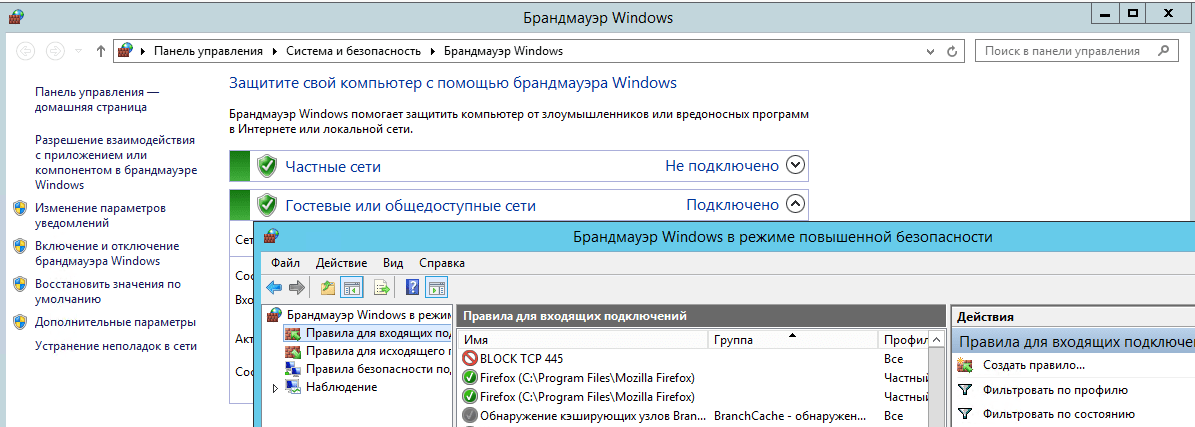
Далее не забудьте в брандмауэре Windows после изменения порта RDP открыть его, для этого жмем WIN+R и в окне выполнить пишем firewall.cpl.
Далее переходим в пункт Дополнительные параметры
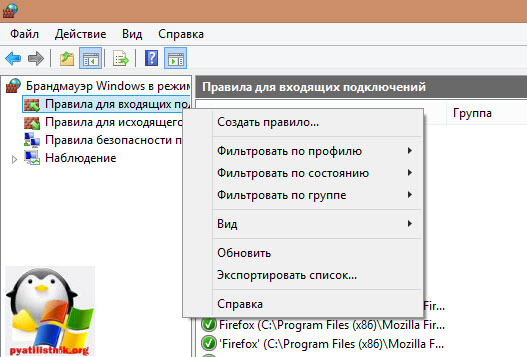
И создаем новое входящее правило для нового rdp порта. Напоминаю, что порт rdp по умолчанию 3389.
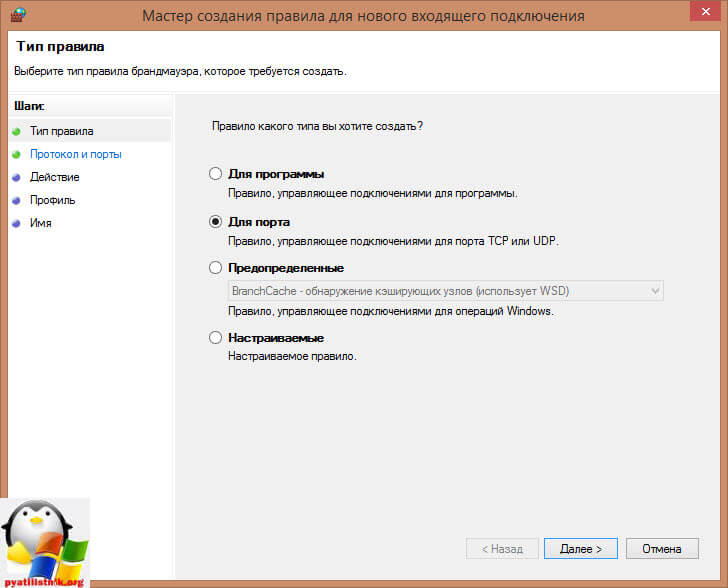
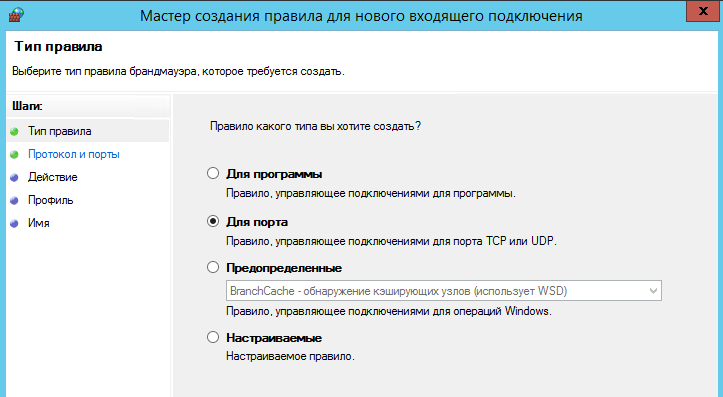
Выбираем, что правило будет для порта
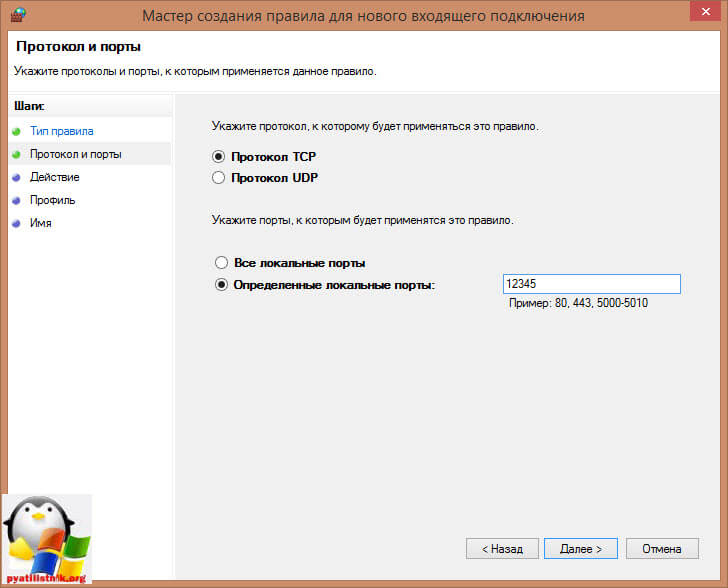
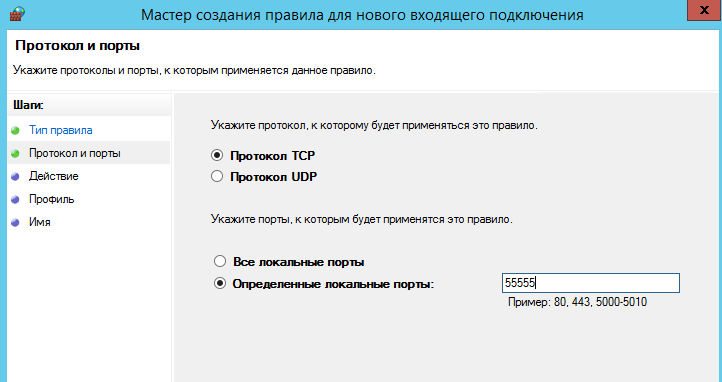
Протокол оставляем TCP и указываем новый номер RDP порта.
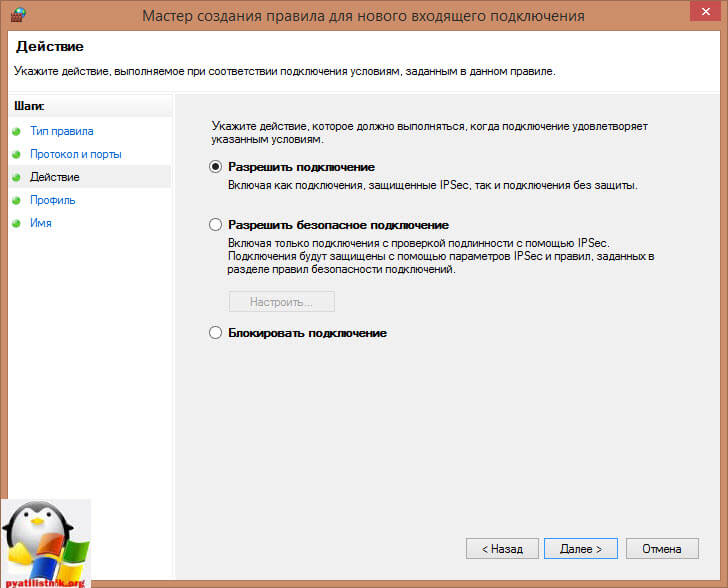
Правило у нас будет разрешающее RDP соединение по не стандартному порту
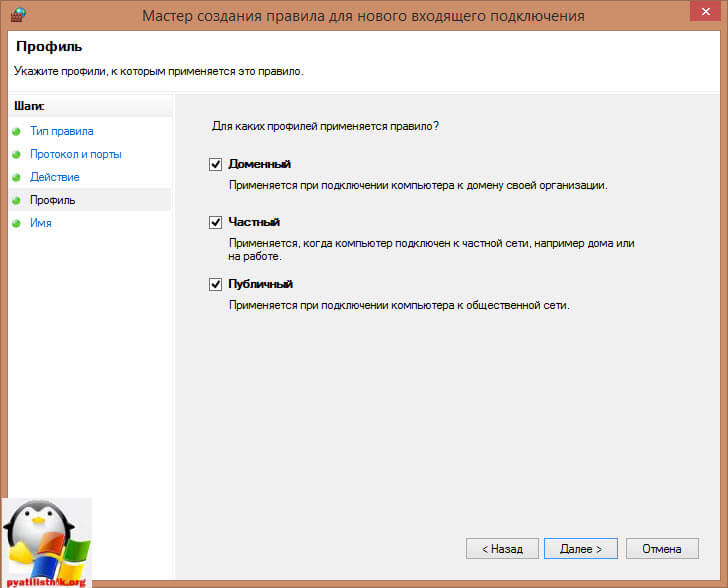
При необходимости задаем нужные сетевые профили.
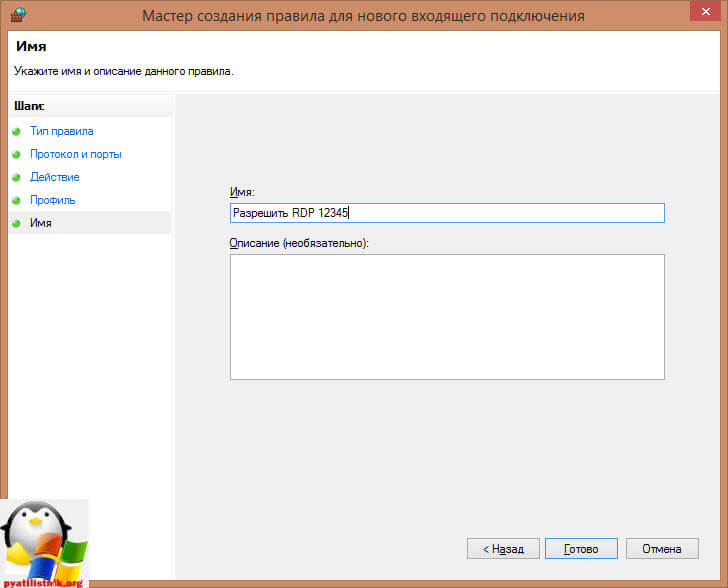
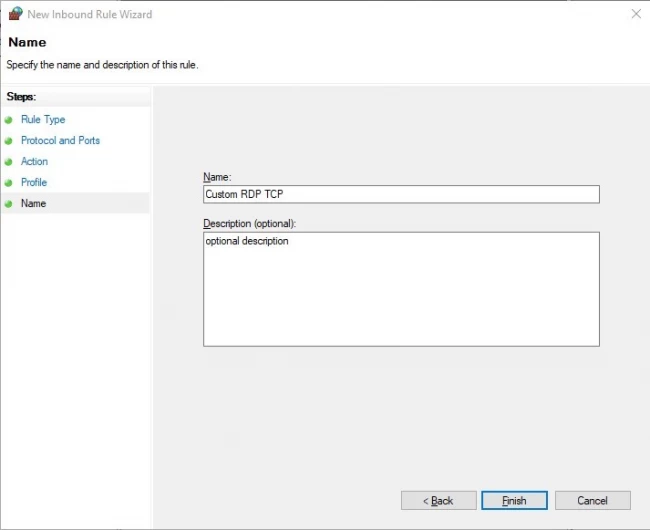
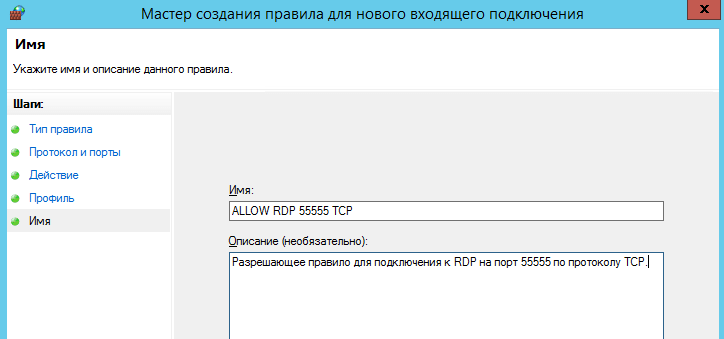
Ну и назовем правило, понятным для себя языком.
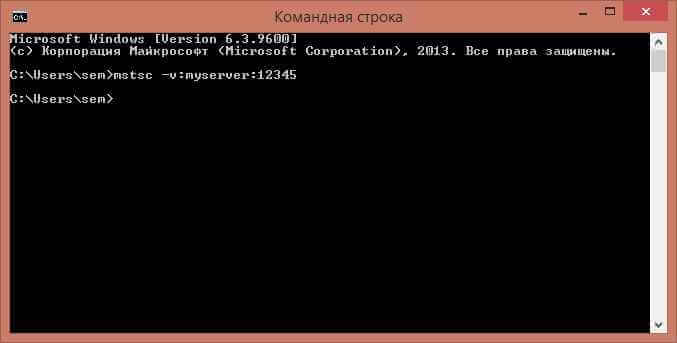
Для подключения с клиентских компьютеров Windows адрес пишите с указанием порта. Например, если порт Вы изменили на 12345, а адрес сервера (или просто компьютера, к которому подключаетесь): myserver, то подключение по MSTSC будет выглядеть так:
mstsc -v:myserver:12345
или через командную строку.
Как видите изменить порт rdp совсем не трудная задача, все тоже самое можно проделать средствами групповой политики.
По умолчанию во всех операционных системах Windows для подключения по протоколу RDP (Remote Desktop Protocol / Удаленный рабочий стол) использует порт TCP 3389. После того, как вы включили RDP доступ в Windows, служба TermService (Remote Desktop Services) начинает слушать на порту 3389. В этой статье мы покажем, как изменить стандартный номер RDP порта в дестопных редакциях Windows (7/8/10/11) и Windows Server.
Обратите внимание, что в современных версиях Windows для удаленного рабочего стола используется также протокол UDP с тем же номером порта 3389.
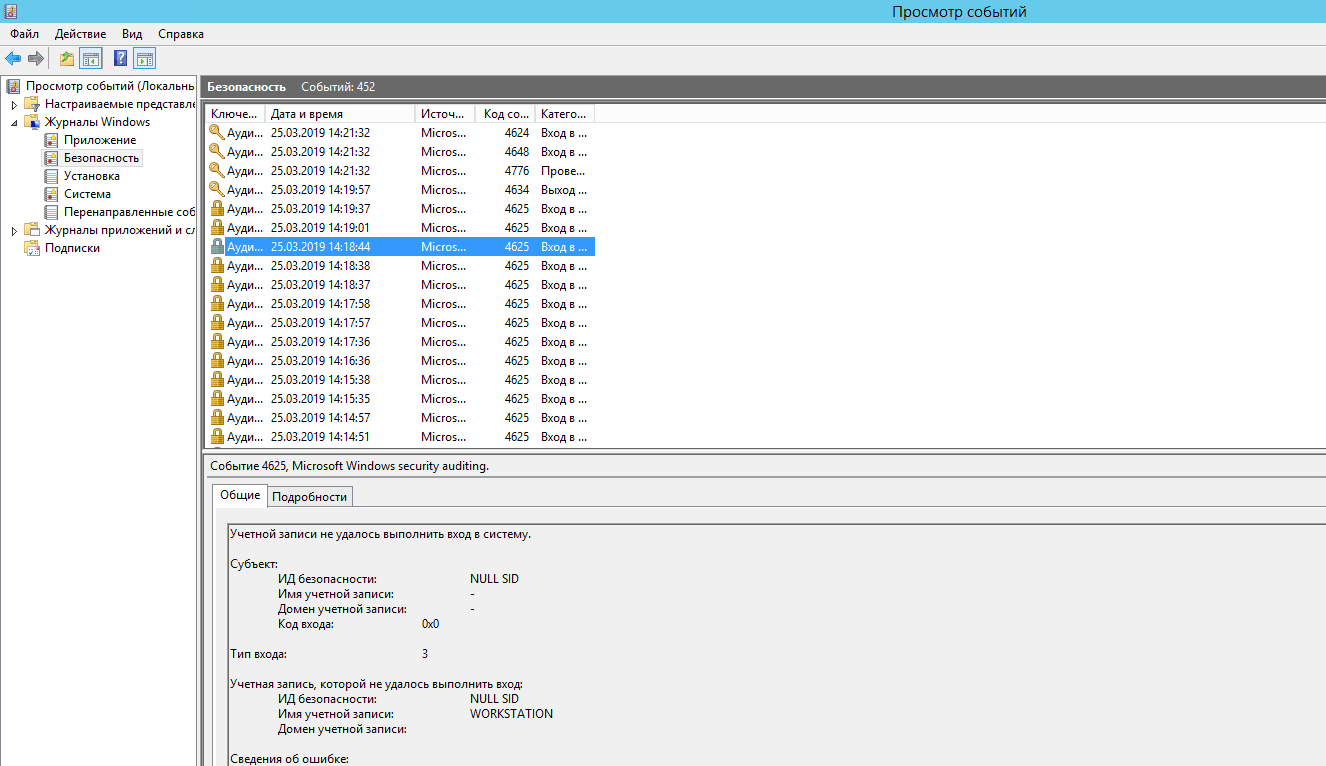
Вы можете изменить номер стандартного порта RDP в Windows с 3389 на любой другой. Чаще всего это используется, когда нужно спрятать ваш RDP/RDS хост от автоматических сканеров портов, которые ищут в сети хосты Windows с открытым стандартным RDP портом 3389. Смена RDP порта позволит уменьшить вероятность эксплуатации RDP уязвимостей (последняя критическая уязвимость в RDP BlueKeep описана в CVE-2019-0708), уменьшить количество попыток удалённого подбора паролей по RDP (не забывает периодически анализировать логи RDP подключений), SYN и других типов атак (особенно при отключенном NLA). Чаще всего RDP порт меняют на компьютерах с прямым подключением к интернету (VPS/VDS), или в сетях, где пограничный маршрутизатор перенаправляет порт 3389/RDP в локальную сеть на компьютер/сервер с Windows.
Несмотря на смену порта, нежелательно выставлять открытый RDP порт в интернет. Сканеры портов позволяют по сигнатуре понять, что на новом порту находится RDP Listener. Если вы хотите открыть RDP доступ к компьютеру в своей сети, лучше использовать такие технологии подключения, как VPN, RD Web Access, RD Gateway и другие
Если вы решили использовать нестандартный номер порта для RDP, обратите внимание, что нежелательно использовать номера портов в диапазоне от 1 до 1023 (известные порты). Используйте динамический порт из RPC диапазона (от 49152 до 65535), или любой портов в диапазоне от 1024 до 49151, который не используется другим сервисом или приложением.
Изменить номер RDP порта по-умолчанию в Windows
В нашем примере мы изменим номер порта, на котором ожидает подключения служба Remote Desktop на 1350. Для этого:
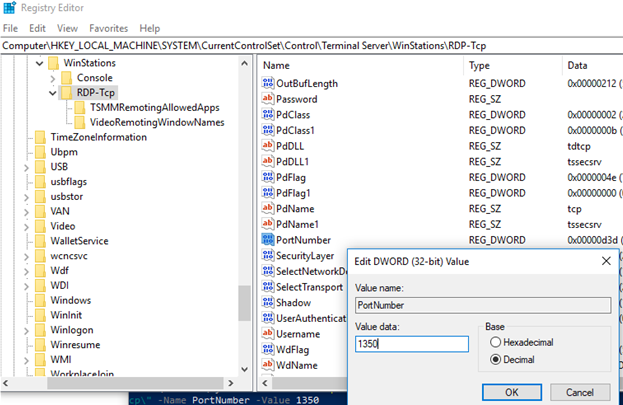
- Откройте редактор реестра (regedit.exe) и перейдите в ветку HKEY_LOCAL_MACHINESystemCurrentControlSetControlTerminal ServerWinStationsRDP-Tcp;
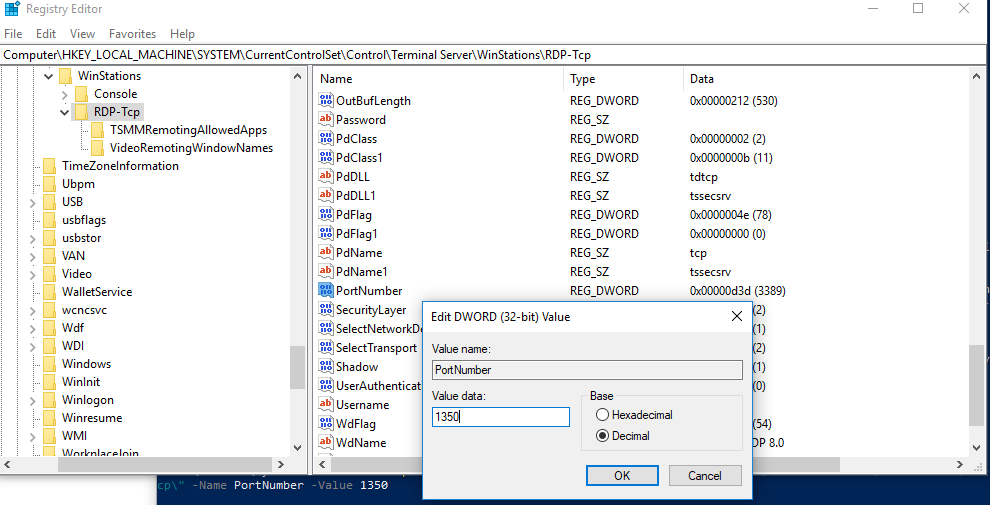
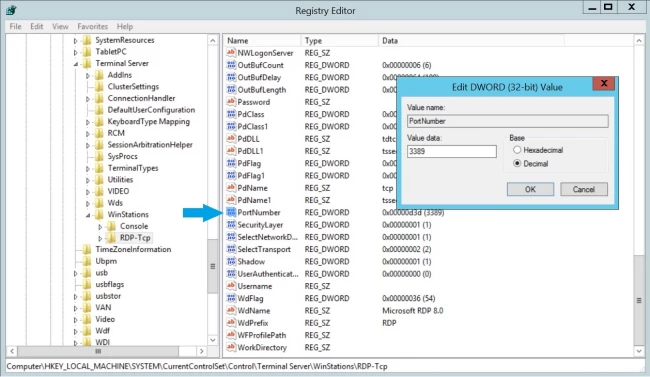
- Найдите DWORD параметр реестра с именем PortNumber.. В этом параметре указан порт, на котором ожидает подключения служба Remote Desktop. Значение по умолчанию – 3389 (decimal);
- Измените значение этого порта. Я изменил RDP порт на 1350 в десятичном значении (Deciamal);
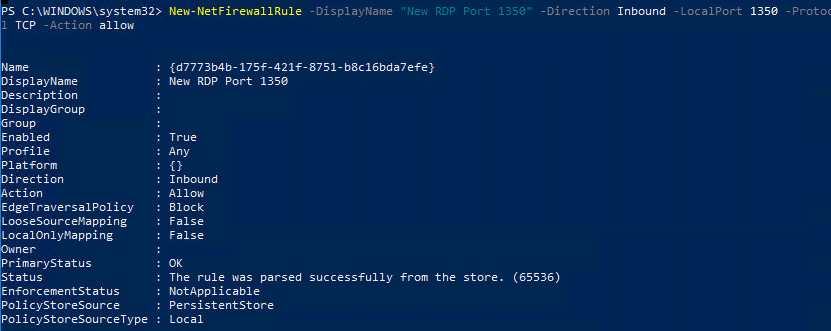
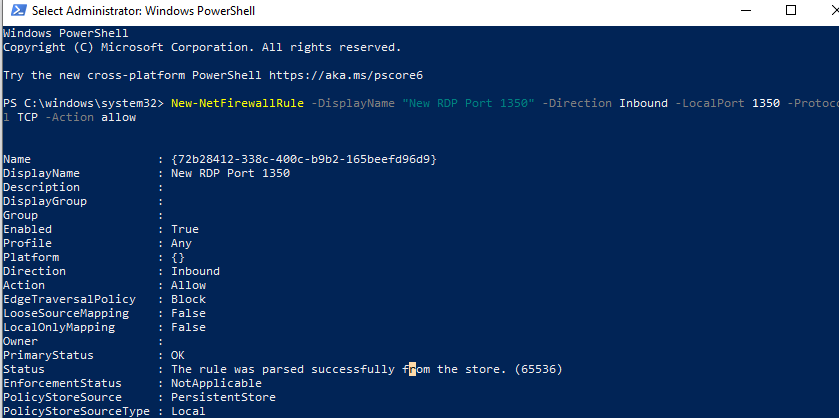
- Если на вашем компьютере включен Windows Firewall, вы должны создать новое правило, разрешающее входящие подключения на новый RDP порт (если вы перенастраиваете удаленный сервер через RDP, создайте разрешающее правило в файерволе до перезапуска службы TermService, иначе вы потеряете доступ к серверу). Вы можете создать разрешающее входящее правило для нового TCP/UDP порта RDP вручную из консоли ‘Брандмауэр Защитника Windows’ (firewall.cpl) или с помощью PowerShell команд:
New-NetFirewallRule -DisplayName "NewRDPPort-TCP-In" -Direction Inbound -LocalPort 1350 -Protocol TCP -Action allow
И:
New-NetFirewallRule -DisplayName "NewRDPPort-UDP-In" -Direction Inbound -LocalPort 1350 -Protocol UDP -Action allow
- Перезагрузите компьютер или перезапустите службу удаленных рабочих столов командой:
net stop termservice & net start termservice
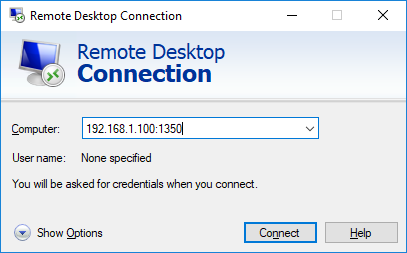
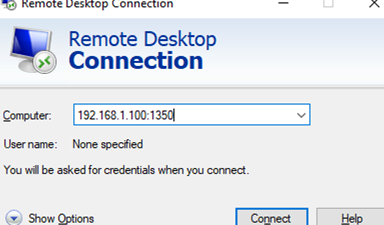
- Теперь для подключения к данному Windows компьютеру по RDP, в клиенте mstsc.exe нужно указывать порт RDP подключения через двоеточие следующим образом:
Your_Computer_Name:1350
или по IP адресу
192.168.1.100:1350
или из командной строки:
mstsc.exe /v 192.168.1.100:1350
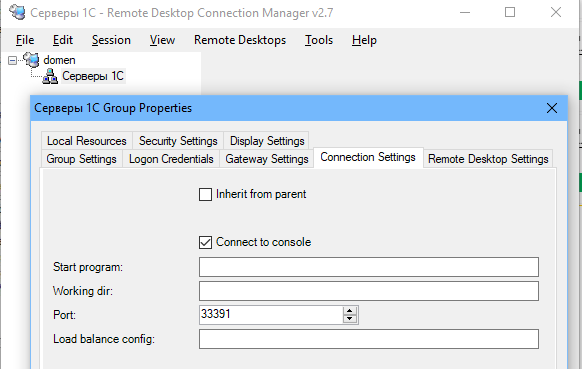
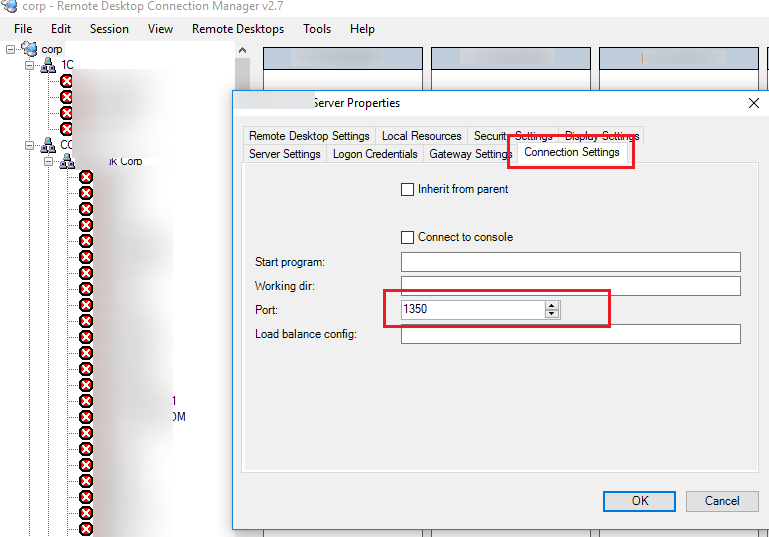
Если для управления множеством RDP подключений вы используете менеджер RDP подключений RDCMan, новый номер RDP порта подключения можно указать на вкладке “Connection Settings”.
- В результате вы успешно подключитесь к рабочему столу удаленного компьютера через новый номер RDP порта (с помощью команды
nenstat –na | Find “LIST”
убедитесь, что служба RDP теперь слушает на другом порту).
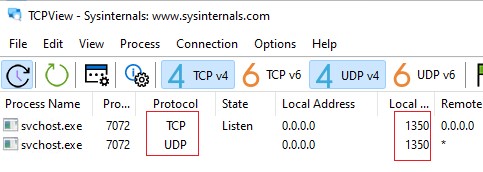
Обратите внимание, что номер UDP порта RDP также изменился на 1350 (проще всего проверить это с помощью утилиты TCPView).
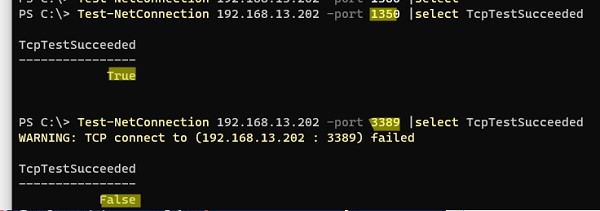
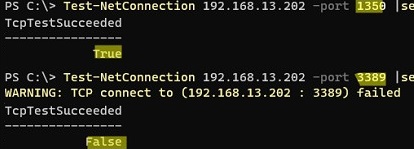
С помощью команды Test-NetConnection, проверьте что старый RDP порт теперь закрыт (
TcpTestSucceeded : False
):
Test-NetConnection 192.168.13.202 -port 3389 |select TcpTestSucceeded
И для RDP подключения теперь нужно использовать новый порт 1350.
Если вы хотите изменить номер RDP порта на компьютерах в домене, можно воспользоваться групповыми политиками. Создайте новую GPO, которая распространит параметр реестра PortNumber с новым значением RDP порта на компьютеры домена.
PowerShell скрипт для смены номера RDP порта в Windows
Полный код PowerShell скрипт для смены номера RDP порта, создания правила в брандмауэре и перезапуска службы RDP может выглядеть так:
Write-host "Укажите номер нового RDP порта: " -ForegroundColor Yellow -NoNewline;$RDPPort = Read-Host
Set-ItemProperty -Path "HKLM:SYSTEMCurrentControlSetControlTerminal ServerWinStationsRDP-TCP" -Name PortNumber -Value $RDPPort
New-NetFirewallRule -DisplayName "NewRDPPort-TCP-In-$RDPPort" -Direction Inbound –LocalPort $RDPPort -Protocol TCP -Action Allow
New-NetFirewallRule -DisplayName "NewRDPPort-UDP-In-$RDPPort" -Direction Inbound –LocalPort $RDPPort -Protocol UDP -Action Allow
Restart-Service termservice -force
Write-host "Номер RDP порта изменен на $RDPPort " -ForegroundColor Magenta
Вы можете удаленно изменить номер порта на компьютере. Для этого на удаленном компьютере должен быть настроен WinRM, тогда для подключения к компьютеру можно использовать командлет Invoke-Command:
Invoke-Command -ComputerName PC1name -ScriptBlock {Set-ItemProperty -Path "HKLM:SYSTEMCurrentControlSetControlTerminal ServerWinStationsRDP-TCP" -Name PortNumber -Value 1350}
Если нужно изменить номер RDP на нескольких компьютерах в домене AD (определенной OU), используйте такой скрипт (список компьютеров в OU можно получить с помощью Get-ADComputer):
Write-host "Укажите номер нового RDP порта: " -ForegroundColor Yellow -NoNewline;$RDPPort = Read-Host
$PCs = Get-ADComputer -Filter * -SearchBase "CN=DMZ,CN=Computers,DC=winitpro,DC=ru"
Foreach ($PC in $PCs) {
Invoke-Command -ComputerName $PC.Name -ScriptBlock {
param ($RDPPort)
Set-ItemProperty -Path "HKLM:SYSTEMCurrentControlSetControlTerminal ServerWinStationsRDP-TCP" -Name PortNumber -Value $RDPPort
New-NetFirewallRule -DisplayName "New RDP Port $RDPPort" -Direction Inbound –LocalPort $RDPPort -Protocol TCP -Action Allow
New-NetFirewallRule -DisplayName "New RDP Port $RDPPort" -Direction Inbound –LocalPort $RDPPort -Protocol TCP -Action Allow
Restart-Service termservice -force
}
Это инструкция по смене стандартного RDP порта подойдёт для любой версии Windows, начиная с Windows XP (Windows Server 2003) и заканчивая Windows 11 (Windows Server 2022).
List of content you will read in this article:
- 1. How to Change RDP Port in Windows Using Windows Registry? [Change Default RDP Port]
- 2. How to Connect a Remote Desktop with a Custom RDP Port?
- 3. How to Configure Windows Firewall for Custom RDP Port?
- 4. Conclusion
RDP port is an essential feature for many users while setting up a remote desktop connection in windows or mac devices with the remote access port. However, changing the default RDP port [Default RDP Port Number is 3389, and it is used for Microsoft terminal server.] can also create issues in maintaining the usual working devices. To fix this problem, this guide will help you with this tutorial on change RDP port in windows.
When you connect to a remote computer (either a Windows client or Windows Server) through the Remote Desktop connection, the Remote Desktop feature on your computer «hears» the connection through a listening port (3389 by default). You can change that listening port on Windows computers by modifying the registry. This article will change the RDP port used in remote desktop access.
How to Change RDP Port in Windows Using Windows Registry? [Change Default RDP Port]
In Windows, Windows Registry works as a configuration settings database for installed apps, Windows services, etc. Windows Registry is the best way to change the default RDP port from 3389 to the desired custom port. Here you go with a complete step-by-step guide to change default RDP port.
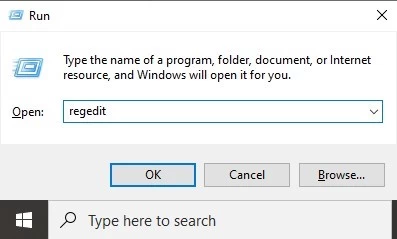
Step 1: First, right-click on the start menu and click on the Run option, or you can use the Windows+R keys on the keyboard to open the Run utility. Then, type the regedit and press OK to launch Windows Registry Editor.
Step 2: In the Windows Registry Editor, go to the below path and click on the following registry folder:
HKEY_LOCAL_MACHINESystemCurrentControlSetControlTerminal ServerWinStationsRDP-Tcp
Step 3: After that, double-click on the PortNumber in the RDP-TCP folder.
Step 4: Select the Decimal option in the Edit DWORD(32-bit) value box and type a new port number. You can select the values between 1 and 65353.
Important Note: You have to ensure that the values don’t match any common ports, so if you select a common port (like port 80 for the web traffic), you can’t establish the Remote Desktop connection afterward.
Step 5: Finally, press OK to save the changes and restart the system to make changes successfully.
How to Connect a Remote Desktop with a Custom RDP Port?
Here you will get a detailed step-by-step guide that will help you to connect a remote desktop with a custom RDP port:
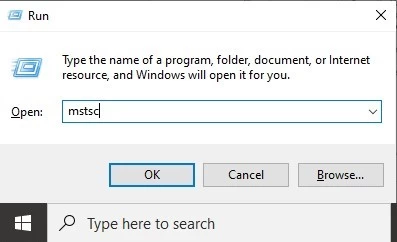
Step 1: Open the run utility by pressing Windows + R keys, then type mstsc and press Enter button. Using Windows 10, you can also simply type RDP into the Windows search bar.
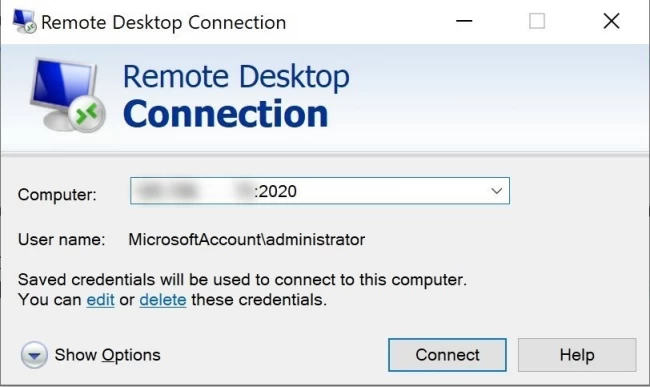
Step 2: Now provide a specific IP address of the remote server and a new port number in a «Remote Desktop Connection» window, then press Enter button to begin the connection. It should be written in the following format: serveripaddress:customport. For our example, we used port 2020.
We hope this guide help you how can connect RDP with the custom RDP port. Let’s learn how to configure a windows firewall for a custom RDP port.
How to Configure Windows Firewall for Custom RDP Port?
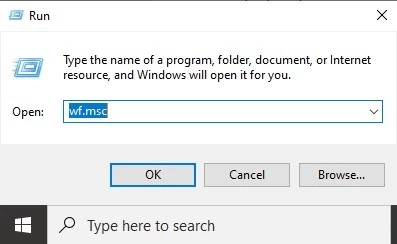
Step 1: Open the Run utility using Win+R key and type wf.msc, then click the press Enter button. This command will open the Windows Firewall management options in which you can add a new firewall rule.
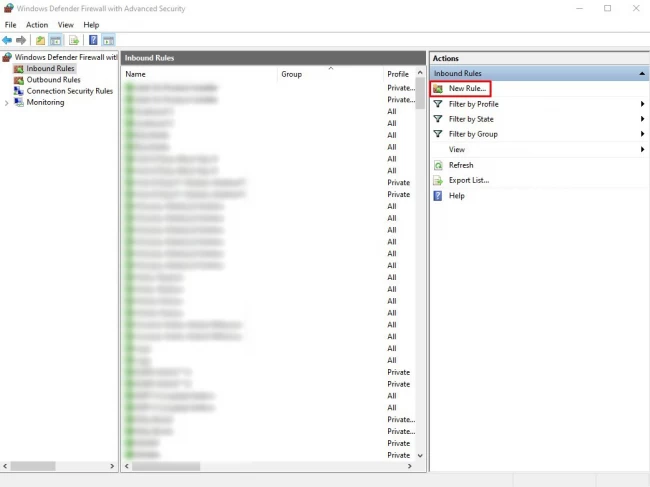
Step 2: Now select inbound rules in the Windows Firewall MMC menu. After selecting these values, select a new rule by Actions Panel on the right.
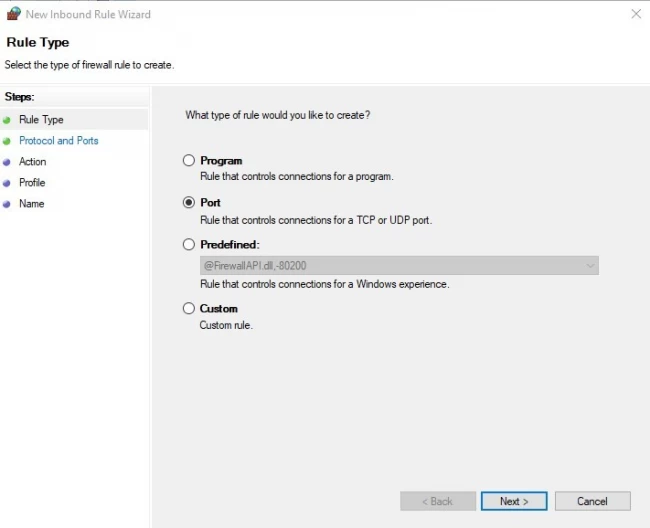
Step 3: Afterward, select Port from the options list in the new Inbound Rule window. Then click on Next.
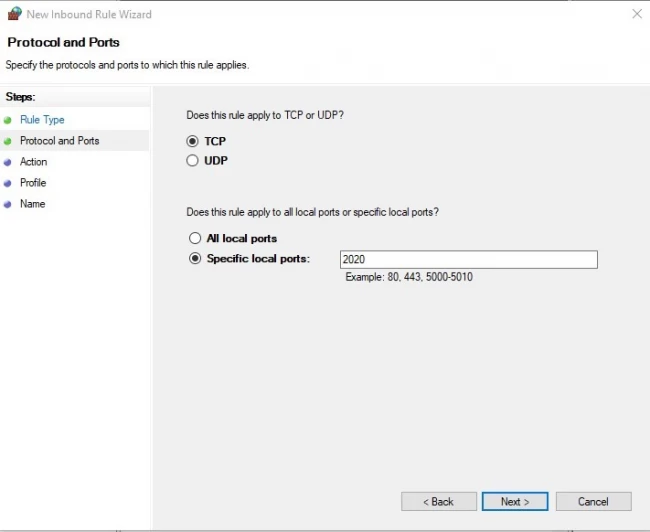
Step 4: As we are creating a custom rule for UDP and TCP ports, so first select TCP, then select Specific Local Ports, type in the custom RDP port you chose in section one, and click Next.
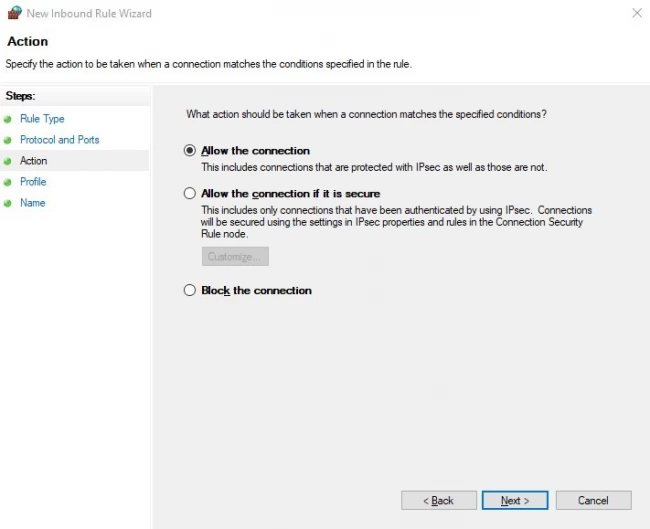
Step 5: Select Allow the connection and press Next to continue.
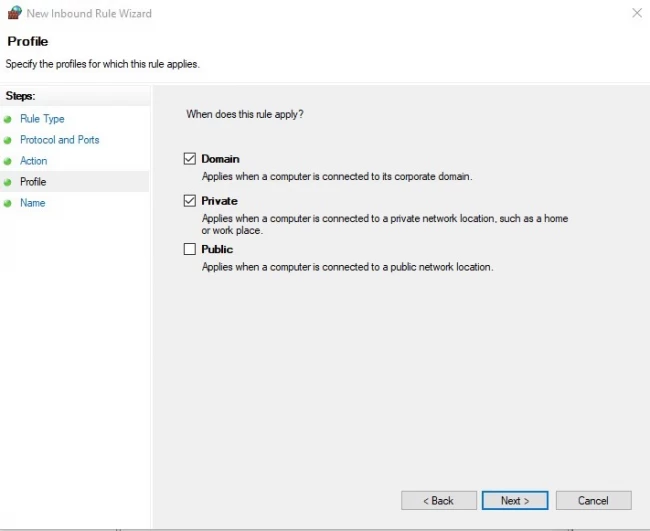
Step 6: Now, leave all entries selected for full access except for Public to prevent establishing the Remote Desktop Connection on a public network. Then, click on Next to continue.
Step 7: Finally, provide the new network rule name with the description in the appropriate text boxes and click on the Finish button to add a new rule.
Step 8: Repeat steps 1 to 7 listed above, but select TCP in step 4 and restart the system after making the changes.
Conclusion
We have tested this article for various versions of Windows to change default RDP port like Windows 7, Windows 8, Microsoft Windows 10, Microsoft Windows Server 2003, Windows Server 2008, Windows Server 2012, Windows Server 2016, and Windows Server 2019. Here we have explained how to change the default RDP port, connect RDP with a custom port, and configure the RDP custom port in the windows firewall. Also, we provide RDP admin services which you can buy for best practice.
People are also reading:
- 10 Best Remote Desktop Software
- The Best RDP Alternatives
- How to Use RDP?
- What is the Difference Between VPS and RDP Account?
— Advertisement —
Hello! One of the many tasks that system administrators have is to manage computers remotely. This way they can solve users’ problems. They can also update computers or resolve concerns about the use of computers. Although there are third-party applications, Windows Server has its own remote connection manager. Indeed, Remote Desktop allows you to connect to Windows Server with any device with a Remote Desktop client. However, this technology uses the Remote Desktop Protocol (RDP). Which is connected through port 3389. Additionally, today we will see how to change the remote desktop port in Windows Server 2019, 2016.
How to modify the port for the remote desktop connection in Windows Server
The main reason to modify this port is very simple. Because security is a crucial element in any server. Indeed, hackers know that port 3389 is the one used for remote connection. They can then try to access the computer to steal information or make unauthorized changes. Consequently, it is highly recommended to change this port. To do this we will modify the Windows Server Registry. With this intention, press the Win+R combination and execute the following command:
regedit
Now please follow the next path:
HKEY_LOCAL_MACHINE / SYSTEM / CurrentControlSet / Control / Terminal Server / WinStations / RDP-Tcp
Then select the value corresponding to PortNumber
Then double-click on the value. Immediately the values are displayed. Also, you can see that the value is displayed as d3d. This is because it is in a hexadecimal format. When you pass it to a decimal value, it is displayed as 3389.
Well, please edit it and add the value 6000. This will set this port. Finally, it is necessary to check a couple of steps. First, please check that the port is not blocked by the Windows Firewall. Finally, restart the server to set the changes.
Check access to the remote desktop.
Once the port is modified, it is time to check if the access to the remote desktop is correct. With this intention, please open the Remote Desktop client and enter the server name or IP address.
However, the connection will not be successful and you will see the following error message.
To access correctly, it is necessary to add the port number at the end of the IP address. For example:
192.168.30.128:6000
In this way, you will be asked for credentials to connect:
Lately, we have seen How to change the remote desktop port in Windows Server 2019, 2016. This way you can increase the security of the server. We hope that you like this. If so, please share on your social networks and don’t miss our post about How to use Active Directory Administrative Center in Windows Server 2019/2016.
It’s highly recommended to change windows remote desktop default port for added security.
You can change the default port with a few easy steps, first, you’ll change the port and define this port in a firewall rule.
Change RDP TCP port on Windows Server 2016
- Open registry editor app by searching for
regeditin windows search or useRUN. - Locate the following from
regeditapp:HKEY_LOCAL_MACHINESystemCurrentControlSetControlTerminal ServerWinStationsRDP-Tcp
- look for
PortNumberand right-click on it andModify - Make sure to select
DecimalunderBaseoption - Change the port number to any number you prefer, let’s say
1234and clickOK - Quit the registry editor
- Open Firewall (Windows Defender Firewall with Advanced Security)
- From the left sidebar click on
Inbound Rules - From the right sidebar click on
New Rule - Select
Portand clickNext - Select
TCPand type the port number inSpecific local portand clickNextuntil you reach the step where you asked to enter a rule name, give the rule a name and ClickFinish. (Repeat from #7 to #11 for UDP) - Restart the server or execute this PowerShell command
Restart-Service -Force -DisplayName "Remote Desktop Services" - Try to connect to RDP as usual but when you type the IP, don’t forget to type the custom port number after the IP in this format
IP:Port(e.g. 192.168.1.5:1234)
PowerShell
You can also change the RDP port by running the following PowerShell commands. In this command, we’ll specify the new RDP port as 1234.
To add a new RDP Port to the registry:
Set-ItemProperty -Path 'HKLM:SYSTEMCurrentControlSetControlTerminal ServerWinStationsRDP-Tcp' -name "PortNumber" -Value 1234
Then Add Firewall Rule to open port 1234 on the Public profile using PowerShell
New-NetFirewallRule -DisplayName 'RDPPORT_TCP' -Profile 'Public' -Direction Inbound -Action Allow -Protocol TCP -LocalPort 1234
Repeat to open UDP port 1234 (recommended)
New-NetFirewallRule -DisplayName 'RDPPORT_UDP' -Profile 'Public' -Direction Inbound -Action Allow -Protocol UDP -LocalPort 1234
Restart Remote Desktop Service from PowerShell
Restart-Service -Force -DisplayName "Remote Desktop Services"
Find this tutorial on Microsoft.com:
https://support.microsoft.com/en-gb/help/306759/how-to-change-the-listening-port-for-remote-desktop
Watch Video Tutorial: https://www.youtube.com/watch?v=k8mswkiok70
In all Windows operating systems, the default port assigned to RDP (Remote Desktop Protocol) is TCP 3389. After you enable RDP in Windows, the TermService (Remote Desktop Services) starts listening on port 3389. In this article, we’ll show you how to change the default RDP port number on the desktop editions of Windows (7/8/10/11) and on Windows Server using the Registry Editor and PowerShell.
Note that modern versions of Windows also use UDP with the same port number (3389) for Remote Desktop connections in addition to TCP.
You can change the default RDP port number in Windows from 3389 to any other. This is most often used when you need to hide your RDP/RDS host from port scanners that look for Windows hosts on the network with an open RDP port TCP/3389.
Changing the RDP port will reduce the chances of exploiting RDP vulnerabilities (the last critical vulnerability in RDP BlueKeep is described in CVE-2019-0708), reduce the number of RDP brute force attacks (don’t forget to regularly analyze RDP connection logs), SYN, and other types of attacks when NLA is disabled. Most often, the RDP port is changed on computers with a direct connection to the Internet (VPS/ VDS), or in networks where the edge router forwards port 3389/RDP to a Windows host in your LAN.
Despite changing the port number, it is unsecure to open the RDP port on your host to the Internet. Port scanners allow an attacker to discover the RDP listener on a new port (by signature). If you want to open RDP access to a computer on your network, it is better to use VPN, RD Web Access, RDS Gateway, and other secure connection tools.
When choosing a non-standard RDP port, please note that it is not recommended to use ports in the range 1-1023 (known ports). Use a dynamic port in the RPC port range (49152 to 65535), or any port in the range 1024 to 49151 that is not in use by another service or application.
Contents:
- How to Change the Remote Desktop Port on Windows?
- Change RDP Listening Port Number with PowerShell
How to Change the Remote Desktop Port on Windows?
In our example, we will change the port number on which the Remote Desktop service is listening to 1350. To do this:
- Open the Registry Editor (
regedit.exe) and go to the registry key HKEY_LOCAL_MACHINESystemCurrentControlSetControlTerminal ServerWinStationsRDP-Tcp; - Find the DWORD parameter with the name PortNumber. This parameter shows the port, on which the Remote Desktop service is listening. The default is 3389 (decimal);
- Change the value of this parameter. I have changed the RDP port to 1350 (Decimal);
You can change the registry parameter using PowerShell:
Set-ItemProperty -Path "HKLM:SystemCurrentControlSetControlTerminal ServerWinStationsRDP-Tcp" -Name PortNumber -Value 1350 - If Windows Firewall is enabled on your computer, you will have to create a new rule that allows inbound connection to your new RDP port. If you are reconfiguring a remote Windows host via RDP, make sure you create allow rules in the firewall before restarting TermService, otherwise, you will lose access to the server;
- You can create an allowing inbound rule for your new TCP/UDP RDP port manually in the Windows Defender Firewall console (
firewall.cpl) or using PowerShell cmdlets from the NetSecurity module:New-NetFirewallRule -DisplayName "NewRDPPort-TCP-In" -Direction Inbound -LocalPort 1350 -Protocol TCP -Action allow
New-NetFirewallRule -DisplayName "NewRDPPort-UDP-In" -Direction Inbound -LocalPort 1350 -Protocol UDP -Action allow - Reboot your computer or restart your Remote Desktop service with this command:
net stop termservice & net start termservice - To connect to this Windows host via Remote Desktop, you have to specify the new RDP connection port in your mstsc.exe client using the colon as follows:
RDPComputerName:1350or by IP address:192.168.1.10:1350or from the command prompt:mstsc.exe /v 192.168.1.10:1350If you are using RDCMan to manage multiple RDP connections, you can specify the RDP port you have configured in the Connection Settings tab.
- Then you will successfully connect to the remote desktop of a computer using the new RDP port. You can use the
netstat –na | Find “LIST”command to make sure that your Remote Desktop Service is listening on a new port.
Note that the UDP RDP port number also automatically changed to 1350 (you can check this with the TCPView tool).
Use the Test-NetConnection command to check that the default RDP port 3389 is now closed (TcpTestSucceeded: False):
Test-NetConnection 192.168.3.102 -port 3389 |select TcpTestSucceeded
Now you need to use the new port 1350 for the RDP connection.
If you want to change the RDP port number on domain computers, you can use the Group Policy features. Create a new GPO that will deploy the PortNumber registry parameter with the new RDP port number to domain computers.
Change RDP Listening Port Number with PowerShell
A complete PowerShell script to change the RDP port number, create the firewall rule, and restart the Remote Desktop service might look like this:
Write-host "Specify the number of your new RDP port: " -ForegroundColor Yellow -NoNewline;$RDPPort = Read-Host

Set-ItemProperty -Path "HKLM:SYSTEMCurrentControlSetControlTerminal ServerWinStationsRDP-TCP" -Name PortNumber -Value $RDPPort

New-NetFirewallRule -DisplayName "NewRDPPort-TCP-In-$RDPPort" -Direction Inbound –LocalPort $RDPPort -Protocol TCP -Action Allow

New-NetFirewallRule -DisplayName "NewRDPPort-UDP-In-$RDPPort" -Direction Inbound –LocalPort $RDPPort -Protocol UDP -Action Allow

Restart-Service termservice -force

Write-host "The number of the RDP port has been changed to $RDPPort " -ForegroundColor Magenta
You can change the RDP port number on a remote computer. To do this, you need to enable WinRM on the remote computer, and then you can use the Invoke-Command cmdlet to connect to the computer:
Invoke-Command -ComputerName wksname112 -ScriptBlock {Set-ItemProperty -Path "HKLM:SYSTEMCurrentControlSetControlTerminal ServerWinStationsRDP-TCP" -Name PortNumber -Value 1350}
If you need to change the RDP number remotely on multiple computers in your AD domain (in the specific OU), use the following script (you can get a list of computers in the OU using the Get-ADComputer cmdlet):
Write-host "Specify the number of your new RDP port: " -ForegroundColor Yellow -NoNewline;$RDPPort = Read-Host

$PCs = Get-ADComputer -Filter * -SearchBase "CN=IT,CN=Computers,CN=NY,DC=woshub,DC=com"

Foreach ($PC in $PCs) {

Invoke-Command -ComputerName $PC.Name -ScriptBlock {

param ($RDPPort)

Set-ItemProperty -Path "HKLM:SYSTEMCurrentControlSetControlTerminal ServerWinStationsRDP-TCP" -Name PortNumber -Value $RDPPort

New-NetFirewallRule -DisplayName "NewRDPPort-TCP-In-$RDPPort" -Direction Inbound –LocalPort $RDPPort -Protocol TCP -Action Allow

New-NetFirewallRule -DisplayName "NewRDPPort-UDP-In-$RDPPort" -Direction Inbound –LocalPort $RDPPort -Protocol TCP -Action Allow

Restart-Service termservice -force

}
This guide for changing the default RDP port is suitable for any Windows version starting from Windows XP (Windows Server 2003) and up to modern Windows 10, Windows 11, and Windows Server 2022 builds.
В инструкции ниже рассмотрим на примере как изменить стандартный порт удаленного подключения RDP в Windows Server с 3389 на любой другой.
Необходимо открыть элемент управления Windows PowerShell и выполнить команду regedit
В появившемся окне необходимо перейти в папку HKEY_LOCAL_MACHINESYSTEMCurrentControlSetControlTerminal ServerWinStationsRDP-Tcp
В данной папке необходимо изменить значение элемента PortNumber. Для удобства выбираем десятичную систему исчисления. Порт по умолчанию – 3389. Изменяем данный порт на любой порт из диапазона от 49152 до 65535.
Необходимо добавить разрешающее правило в брандмауэр Windows, чтобы разрешить входящие подключения с указанных портов.
Далее перейти по следующему пути: панель управления -> Система и безопасность -> Брандмауэр Windows -> Дополнительные параметры -> Правила для входящих подключений -> Создать правило
Создать два разрешающих правила для доступа по протоколам TCP и UDP.
Выберите тип правила «Для порта»
Выберите соответствующий протокол для правила и укажите порт, который был внесен в редактор реестра Windows ранее
Далее разрешаем подключение и изменяем соответствующее имя правила
После изменений в реестре Windows может понадобиться перезагрузка системы.
После проведенных настроек вы сможете подключаться к вашему серверу, используя стандартное средство подключения к удаленному рабочему столу RDP, указав при этом новый порт подключения следующим образом: <ip адрес вашего сервера>:<новый порт подключения>
Советуем после проведения всех действий отключить правила Брандмауэра Windows, разрешающие подключения по стандартным портам RDP
Смена порта подключения RDP не решит всех ваших проблем безопасности, т.к. сканирование портов сможет в любом случае выявить открытые порты вашей ОС, однако, при должном внимании системного администратора к системным журналам (Панель управления -> Система и безопасность -> Администрирование -> Просмотр журналов событий -> Журналы Windows -> Безопасность), можно защитить сервер от атак, в том числе вирусных
Инструкция актуальна для всех Виртуальных серверов VPS, и серверов, созданных в Виртуальной IaaS инфраструктуре, на базе Windows Server.
Для продвинутых пользователей доступен PowerShell команды для смены порта подключения и добавления правила для нового порта в исключения в Firewall.
Write-host «What Port would you like to set for RDP: » -ForegroundColor Yellow -NoNewline;$RDPPort = Read-Host
Get-ItemProperty -Path «HKLM:SystemCurrentControlSetControlTerminal ServerWinStationsRDP-Tcp» -Name PortNumber | Select-Object PortNumber
Set-ItemProperty -Path «HKLM:SystemCurrentControlSetControlTerminal ServerWinStationsRDP-Tcp» -Name PortNumber -Value $RDPPort
New-NetFirewallRule -DisplayName «Remote Desktop — User Mode (TCP-In) $($RDPPort)» -Direction Inbound –Protocol TCP -Profile Any –LocalPort $RDPPort -Action allow
New-NetFirewallRule -DisplayName «Remote Desktop — User Mode (UDP-In) $($RDPPort)» -Direction Inbound –Protocol UDP -Profile Any –LocalPort $RDPPort -Action allow
[ValidateSet(‘y’,’n’)]$Answer = Read-Host «`nAre you sure you want to restart $($DC.Name) ? Enter y/n»
If ($Answer -eq ‘y’) { Restart-Computer -Force }


