Simple Version
One way is to use the carriage return ('r') character to return to the start of the line without advancing to the next line.
Python 3
for x in range(10):
    print(x, end='r')
print()
Python 2.7 forward compatible
from __future__ import print_function
for x in range(10):
    print(x, end='r')
print()
Python 2.7
for x in range(10):
    print '{}r'.format(x),
print
Python 2.0-2.6
for x in range(10):
    print '{0}r'.format(x),
print
In the latter two (Python 2-only) cases, the comma at the end of the print statement tells it not to go to the next line. The last print statement advances to the next line so your prompt won’t overwrite your final output.
Line Cleaning
If you can’t guarantee that the new line of text is not shorter than the existing line, then you just need to add a “clear to end of line” escape sequence, 'x1b[1K' ('x1b' = ESC):
for x in range(75):
    print('*' * (75 - x), x, end='x1b[1Kr')
print()
![]()
answered Mar 24, 2011 at 12:56
![]()
Mike DeSimoneMike DeSimone
40.9k10 gold badges72 silver badges96 bronze badges
12
Since I ended up here via Google but am using Python 3, here’s how this would work in Python 3:
for x in range(10):
    print("Progress {:2.1%}".format(x / 10), end="r")
Related answer here: How can I suppress the newline after a print statement?
![]()
answered Feb 17, 2014 at 21:56
![]()
PascalPascal
16.8k4 gold badges59 silver badges68 bronze badges
4
@Mike DeSimone answer will probably work most of the time. But…
for x in ['abc', 1]:
    print '{}r'.format(x),

-> 1bc
This is because the 'r' only goes back to the beginning of the line but doesn’t clear the output.
If POSIX support is enough for you, the following would clear the current line and leave the cursor at its beginning:
print 'x1b[2Kr',
It uses ANSI escape code to clear the terminal line. More info can be found in wikipedia and in this great talk.
Other approach
This other, (arguably worse) solution I have found looks like this:
last_x = ''
for x in ['abc', 1]:
    print ' ' * len(str(last_x)) + 'r',
    print '{}r'.format(x),
    last_x = x

-> 1
One advantage is that it will work on windows too.
![]()
Neuron
4,8435 gold badges36 silver badges54 bronze badges
answered Aug 3, 2014 at 13:27
![]()
Nagasaki45Nagasaki45
2,5441 gold badge21 silver badges27 bronze badges
1
I had the same question before visiting this thread. For me the sys.stdout.write worked only if I properly flush the buffer i.e.
for x in range(10):
    sys.stdout.write('r'+str(x))
    sys.stdout.flush()
Without flushing, the result is printed only at the end out the script
![]()
Sнаđошƒаӽ
16.2k12 gold badges74 silver badges88 bronze badges
answered Aug 2, 2015 at 23:47
![]()
user2793078user2793078
3996 silver badges12 bronze badges
2
Suppress the newline and print r.
print 1,
print 'r2'
or write to stdout:
sys.stdout.write('1')
sys.stdout.write('r2')
![]()
ashastral
2,7981 gold badge20 silver badges32 bronze badges
answered Mar 24, 2011 at 12:53
![]()
0
for x in range(10):
    time.sleep(0.5) # shows how its working
    print("r {}".format(x), end="")
time.sleep(0.5) is to show how previous output is erased and new output is printed
«r» when its at the start of print message , it gonna erase previous output before new output.
![]()
Zim
3933 silver badges13 bronze badges
answered Apr 9, 2017 at 3:20
![]()
RubixredRubixred
1491 silver badge4 bronze badges
Try this:
import time
while True:
    print("Hi ", end="r")
    time.sleep(1)
    print("Bob", end="r")
    time.sleep(1)
It worked for me. The end="r" part is making it overwrite the previous line.
WARNING!
If you print out hi, then print out hello using r, you’ll get hillo because the output wrote over the previous two letters. If you print out hi with spaces (which don’t show up here), then it will output hi. To fix this, print out spaces using r.
answered Jun 20, 2016 at 0:20
![]()
E.T.E.T.
5945 silver badges16 bronze badges
2
This works on Windows and python 3.6
import time
for x in range(10):
    time.sleep(0.5)
    print(str(x)+'r',end='')
answered Aug 1, 2018 at 17:16
![]()
Here’s a cleaner, more «plug-and-play», version of @Nagasaki45’s answer. Unlike many other answers here, it works properly with strings of different lengths. It achieves this by clearing the line with just as many spaces as the length of the last line printed print. Will also work on Windows.
def print_statusline(msg: str):
    last_msg_length = len(getattr(print_statusline, 'last_msg', ''))
    print(' ' * last_msg_length, end='r')
    print(msg, end='r')
    sys.stdout.flush()  # Some say they needed this, I didn't.
    setattr(print_statusline, 'last_msg', msg)
Usage
Simply use it like this:
for msg in ["Initializing...", "Initialization successful!"]:
    print_statusline(msg)
    time.sleep(1)
This small test shows that lines get cleared properly, even for different lengths:
for i in range(9, 0, -1):
    print_statusline("{}".format(i) * i)
    time.sleep(0.5)
answered May 13, 2017 at 10:46
![]()
erberb
13.8k4 gold badges30 silver badges36 bronze badges
2
I couldn’t get any of the solutions on this page to work for IPython, but a slight variation on @Mike-Desimone’s solution did the job: instead of terminating the line with the carriage return, start the line with the carriage return:
for x in range(10):
    print 'r{0}'.format(x),
Additionally, this approach doesn’t require the second print statement.
answered Apr 22, 2015 at 22:22
![]()
David MarxDavid Marx
7,9143 gold badges42 silver badges62 bronze badges
3
The accepted answer is not perfect. The line that was printed first will stay there and if your second print does not cover the entire new line, you will end up with garbage text.
To illustrate the problem save this code as a script and run it (or just take a look):
import time

n = 100
for i in range(100):
    for j in range(100):
        print("Progress {:2.1%}".format(j / 100), end="r")
        time.sleep(0.01)
    print("Progress {:2.1%}".format(i / 100))
The output will look something like this:
Progress 0.0%%
Progress 1.0%%
Progress 2.0%%
Progress 3.0%%
What works for me is to clear the line before leaving a permanent print. Feel free to adjust to your specific problem:
import time

ERASE_LINE = 'x1b[2K' # erase line command
n = 100
for i in range(100):
    for j in range(100):
        print("Progress {:2.1%}".format(j / 100), end="r")
        time.sleep(0.01)
    print(ERASE_LINE + "Progress {:2.1%}".format(i / 100)) # clear the line first
And now it prints as expected:
Progress 0.0%
Progress 1.0%
Progress 2.0%
Progress 3.0%
answered Jul 17, 2018 at 20:48
![]()
mimoraleamimoralea
9,3527 gold badges56 silver badges56 bronze badges
I’m a bit surprised nobody is using the backspace character. Here’s one that uses it.
import sys
import time

secs = 1000

while True:
    time.sleep(1)  #wait for a full second to pass before assigning a second
    secs += 1  #acknowledge a second has passed

    sys.stdout.write(str(secs))

    for i in range(len(str(secs))):
        sys.stdout.write('b')
answered Feb 6, 2018 at 20:09
![]()
1
Here’s my solution! Windows 10, Python 3.7.1
I’m not sure why this code works, but it completely erases the original line. I compiled it from the previous answers. The other answers would just return the line to the beginning, but if you had a shorter line afterwards, it would look messed up like hello turns into byelo.
import sys
#include ctypes if you're on Windows
import ctypes
kernel32 = ctypes.windll.kernel32
kernel32.SetConsoleMode(kernel32.GetStdHandle(-11), 7)
#end ctypes

def clearline(msg):
    CURSOR_UP_ONE = '33[K'
    ERASE_LINE = 'x1b[2K'
    sys.stdout.write(CURSOR_UP_ONE)
    sys.stdout.write(ERASE_LINE+'r')
    print(msg, end='r')

#example
ig_usernames = ['beyonce','selenagomez']
for name in ig_usernames:
    clearline("SCRAPING COMPLETE: "+ name)
Output — Each line will be rewritten without any old text showing:
SCRAPING COMPLETE: selenagomez
Next line (rewritten completely on same line):
SCRAPING COMPLETE: beyonce
answered Dec 19, 2018 at 1:12
![]()
(Python3) This is what worked for me. If you just use the 10 then it will leave characters, so I tweaked it a bit to make sure it’s overwriting what was there. This also allows you to have something before the first print item and only removed the length of the item.
print("Here are some strings: ", end="")
items = ["abcd", "abcdef", "defqrs", "lmnop", "xyz"]
for item in items:
    print(item, end="")
    for i in range(len(item)): # only moving back the length of the item
        print("10 10", end="") # the trick!
        time.sleep(0.2) # so you can see what it's doing
answered Aug 8, 2019 at 0:53
![]()
One more answer based on the prevous answers.
Content of pbar.py:
import sys, shutil, datetime
last_line_is_progress_bar=False


def print2(print_string):
    global last_line_is_progress_bar
    if last_line_is_progress_bar:
        _delete_last_line()
        last_line_is_progress_bar=False
    print(print_string)


def _delete_last_line():
    sys.stdout.write('bbr')
    sys.stdout.write(' '*shutil.get_terminal_size((80, 20)).columns)
    sys.stdout.write('br')
    sys.stdout.flush()


def update_progress_bar(current, total):
    global last_line_is_progress_bar
    last_line_is_progress_bar=True

    completed_percentage = round(current / (total / 100))
    current_time=datetime.datetime.now().strftime('%m/%d/%Y-%H:%M:%S')
    overhead_length = len(current_time+str(current))+13
    console_width = shutil.get_terminal_size((80, 20)).columns - overhead_length
    completed_width = round(console_width * completed_percentage / 100)
    not_completed_width = console_width - completed_width
    sys.stdout.write('bbr')

    sys.stdout.write('{}> [{}{}] {} - {}% '.format(current_time, '#'*completed_width, '-'*not_completed_width, current,
                                        completed_percentage),)
    sys.stdout.flush()
Usage of script:
import time
from pbar import update_progress_bar, print2


update_progress_bar(45,200)
time.sleep(1)

update_progress_bar(70,200)
time.sleep(1)

update_progress_bar(100,200)
time.sleep(1)


update_progress_bar(130,200)
time.sleep(1)

print2('some text that will re-place current progress bar')
time.sleep(1)

update_progress_bar(111,200)
time.sleep(1)

print('n') # without n next line will be attached to the end of the progress bar
print('built in print function that will push progress bar one line up')
time.sleep(1)

update_progress_bar(111,200)
time.sleep(1)
answered Oct 8, 2019 at 12:12
![]()
KriszKrisz
6916 silver badges21 bronze badges
Better to overwrite the whole line otherwise the new line will mix with the old ones if the new line is shorter.
import time, os
for s in ['overwrite!', 'the!', 'whole!', 'line!']:
    print(s.ljust(os.get_terminal_size().columns - 1), end="r")
    time.sleep(1)
Had to use columns - 1 on Windows.
answered Aug 12, 2020 at 11:24
![]()
This worked for me, using Python 3.7.9 within Spyder, in Windows:
from IPython.display import clear_output
from time import sleep

def print_and_overwrite(text):
    '''Remember to add print() after the last print that you want to overwrite.'''
    clear_output(wait=True)
    print(text, end='r')

for i in range(15):
    #I print the results backwards (from 15 to 1), to test shorter strings
    message = "Iteration %d out of 15" %(15-i)
    print_and_overwrite(message)
    sleep(0.5)

print() #This stops the overwriting
print("This will be on a new line")
answered Apr 1, 2021 at 23:04
![]()
Anyway if somebody wants to overprint (clear) a many lines previously printed in stdout, than this answer should be helpful for him. (Thanks Thijmen Dam for the nice article Overwrite Previously Printed Lines)
In ANSI console you can use special sequences:
33[1A and 33[K
First of them lift up a cursor, second — erase a line entirely.
Example of the clearing a console (Python 3):
LINE_UP = '33[1A'
LINE_CLEAR = '33[K'
CONSOLE_HEIGHT = 24 #lines

def clear_console():
    for a in range(CONSOLE_HEIGHT):
        print(LINE_UP, end=LINE_CLEAR, flush=True)
or eventually simply (will clear screen and move cursor to 0,0):
print('33[2J', end='', flush=True)
If you want just positioning cursor, then use this:
print('33[<L>;<C>f', end='', flush=True)
where <L> and <C> are Line and Column correspondingly.
Handful reference for you ANSI escape sequences
answered May 5, 2022 at 22:16
![]()
Yan PakYan Pak
1,7272 gold badges19 silver badges14 bronze badges
Содержание:развернуть
- Синтаксис
- Параметры
- Пример использования функции print
- Кодировка
- Буферизация ввода-вывода
-
Блочная буферизация (block-buffered)
-
Линейная буферизация (line-buffered)
-
Небуферизированный вывод (unbuffered)
- Стилизированный print
-
pprint
-
reprlib
-
json.dumps
- Цвет (управляющие коды ANSI)
- Анимация (прелоадеры)
-
Вращающееся колесо
-
Progress Bar
- Best practice
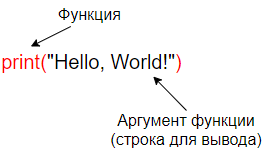
Каждый, кто изучает язык программирования Python, начинает с функции print(), выводя с ее помощью на экран первое сообщение — «Привет, мир!». Ее можно использовать для вывода текстовых сообщений, однако ошибочно полагать, что это все, что нужно знать о print() в Python.
Функция print() в языке Питон предназначена для вывода заданных объектов на стандартное устройство вывода — обычно экран, также может отправлять их в файл.
Синтаксис
Рассмотрим синтаксис этой функции. Самый простой пример:
>>> print()
Даже если функция не получает никаких аргументов, все равно необходимо вставлять после названия пустые скобки, что значит для интерпретатора выполнить функцию, а не просто ссылаться на нее.
В результате этого будет выведен неотображаемый символ пустой строки, она появиться на экране, не нужно путать это с пустой строкой, в которой вообще нет никаких символов.
Но чаще всего нужно передать какое-то сообщение пользователю, к примеру:
>>> print('Your message here')
Параметры
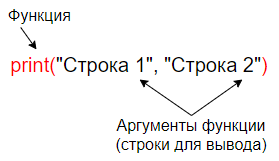
Как было сказано, print() можно вызывать без всяких аргументов при необходимости создать пустую строку, или указывать один аргумент для вывода сообщения. Кроме того, функция может принимать любое количество позиционных аргументов, разделяя их запятой, что очень удобно при необходимости объединения нескольких элементов.
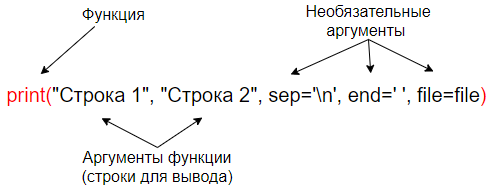
Полная версия print выглядит так:
print(object1, object2, ..., sep=' ', end='n', file=sys.stdout, flush=False)
- *objects — объект/объекты которые необходимо вывести;
- sep — разделитель между объектами. В качестве своего значения можно передавать строку или None (по умолчанию пробел » «);
- end — символ в конце строки (по умолчанию перенос строки n);
- file — file-like объект [поток] (по умолчанию sys.stdout);
- flush — принудительный сброс потока [работает с версии Python 3.3] (по умолчанию False).
Пример использования функции print
Самый простой пример:
>>> print('Hello world')
Следующий пример – вывод строкового значения из переменной:
>>> message = 'Hello world'

>>> print(message)
Выведем разные типы:
>>> print('one', 'two', 'three')  # str

one two three
>>> print(42) # int
42
>>> print(3.14) # float
3.14
>>> print(True) # bool
True
>>> print([1, 2, 3]) # list
[1, 2, 3]
>>> print({'red', 'green', 'blue'}) # set
{'red', 'green', 'blue'}
>>> print({'name': 'Alice', 'age': 42}) # dict
{'name': 'Alice', 'age': 42}
>>> print((1, 2, 3)) # tuple
(1, 2, 3)
Ниже — пример использования параметра sep:
>>> print('hello', 'world', sep=None)

hello world

>>> print('hello', 'world', sep=' ')

hello world

>>> print('hello', 'world')

hello world
Если функция должна выводить аргументы в виде отдельных строк, можно передать символ экранирования:
>>> print('hello', 'world', sep='n')

hello

world
Более полезный пример — вывод аргументов в виде пути к файлу:
>>> print('home', 'user', 'documents', sep='/')

home/user/documents
Второй необязательный параметр — end. Он позволяет предотвратить разрыв строки, когда выведенное сообщение не должно заканчиваться символом новой строки. Для этого передается пустая строка:
print('Checking file integrity...', end='')

print('ok')

Checking file integrity...ok
Как и в случае с sep, end можно использовать для объединения отдельных фрагментов в один большой. При этом вместо объединения аргументов текст из каждого вызова функции будет располагаться в одной строке:
>>> print('The first sentence', end='. ')

>>> print('The second sentence', end='. ')

>>> print('The last sentence.')

The first sentence. The second sentence. The last sentence.
При необходимости можно указывать одновременно два ключевых аргумента:
print('Mercury', 'Venus', 'Earth', sep=', ', end='!')

Mercury, Venus, Earth!
Еще одни параметры print() — file и flush. В примере ниже реализована запись логов в файл порциями. С помощью параметра file данные выводятся не на экран, а в файл. Flush незамедлительно сбрасывает накопленный буфер в файл каждые 10 итераций.
import time
source_file = open('parse.txt', 'w')
for i in range(0, 30):
if i % 10 == 0 and i > 0:
print(f"iteration #{i}", file=source_file, flush=True)
else:
print(f"iteration #{i}", file=source_file)
time.sleep(1)
source_file.close()
Кодировка
Функция print() в Python 3 и выше никак не контролирует кодировку символов — это определяется потоком кода. В большинстве случаев нет необходимости менять кодировку, так как по умолчанию используется UTF-8.
В Python 2 кодировка зависит от того, данные какого типа выводятся на экран. При выводе текста кириллицей рекомендуется указывать способ кодировки:
>>> print u'Привет'

>>> print "Привет".decode('utf-8')
Системную кодировку можно узнать через sys.stdout.encoding:
>>> import sys

>>> sys.stdout.encoding

'utf-8'
Буферизация ввода-вывода
Буферизация (от англ. buffer) — способ организации обмена, который подразумевает использование буфера для временного хранения данных.
Блочная буферизация (block-buffered)
Операции ввода и вывода иногда буферизуются с целью повышения производительности. Рассмотрим пример:
import time
num_seconds = 1
for countdown in reversed(range(num_seconds + 1)):
if countdown > 0:
print(countdown, end="...")
time.sleep(1)
else:
print('Go!')
В качестве конца строки мы используем «…». В такой реализации функция print() будет накапливать строки в буфер, и выведет сразу весь результат после вызова print('Go!')
3...2...1...Go!
Линейная буферизация (line-buffered)
Линейная буферизация потока, перед началом ввода/вывода, ожидает момента, пока в буфере не появится разрыв строки. Изменив print() в примере выше на следующий:
print(countdown, end="n")
мы увидим последовательную печать на экран:
3

2

1

Go!
Небуферизированный вывод (unbuffered)
Unbuffered поток соответствует своему названию — никакой буферизации не происходит, операция ввода/вывода выполняются без промедления. Для этого достаточно переписать print() из примера выше следующим образом:
print(countdown, end='...', flush=True)
Тем самым функция print() принудительно очищает поток, не ожидая символа новой строки в буфере.
Стилизированный print
pprint
С помощью модуля pprint, который входит в стандартную библиотеку Python, можно более наглядно отображать некоторые объекты, при этом структура их сохраняется.
Один из примеров использования модуля — словарь со вложенными словарями:
from pprint import pprint
ifaces = [{
"name": "eth0",
"ip": "192.10.120.100",
"speed": 10000,
"options": {
"test1": {
"var1": True,
"var2": False,
},
"test2": True,
}
}]
pprint(ifaces)
вместо длинной строки будет отображен так:
[{'ip': '192.10.120.100',

  'name': 'eth0',

  'options': {'test1': {'var1': True, 'var2': False}, 'test2': True},

  'speed': 10000}]
Есть необязательный параметр depth и indent. Depth указывает — ключи какого уровня вложенности отображать, скрытые уровни будут заменены на троеточие. Indent устанавливает размер отступов:
pprint(ifaces, depth=2, indent=2)[ { 'ip': '192.10.120.100',
'name': 'eth0',
'options': {'test1': {...}, 'test2': True},
'speed': 10000}]
reprlib
Модуль reprlib позволяет использовать функцию repr(), благодаря которой сокращается отображение глубоко вложенных или больших контейнеров, а также множества рекурсивных вызовов:
>>> import reprlib

>>> reprlib.repr([x**10 for x in range(5)])

'[0, 1, 1024, 59049, 1048576]'
json.dumps
Словари часто представляют собой данные JSON, широко используемые во всемирной сети. Для правильной стилизации словаря в строку JSON можно воспользоваться одноименным модулем, который имеет хорошие возможности печати:
import json
users = [{
"name": "Alex",
"age": "30",
"login": "alex89",
}, {
"name": "Petr",
"age": "25",
"login": "one_user1",
}]
print(json.dumps(users, indent=4, sort_keys=True))
результат:
[

    {

        "age": "30",

        "login": "alex89",

        "name": "Alex"

    },

    {

        "age": "25",

        "login": "one_user1",

        "name": "Petr"

    }

]
Цвет (управляющие коды ANSI)
Для выделения важной информации при выводе текста можно воспользоваться возможностью форматировать текст с помощью ANSI кодов. Это может выглядеть как «33[31m«, где 33 — указание на то, что дальше описывается управляющий код, [31m – задание красного цвета текста.
Пример:
def out_red(text):

    print("33[31m {}".format(text))
def out_yellow(text):
print("33[33m {}".format(text))
def out_blue(text):
print("33[34m {}".format(text))
out_red("Вывод красным цветом")
out_yellow("Текст жёлтого цвета")
out_blue("Синий текст")
Чтобы такой вариант работал не только на Linux, но и на Windows, необходимо активировать поддержку ANSI для stdout в запущенной консоли, делается это так:
import ctypes
kernel32 = ctypes.windll.kernel32
kernel32.SetConsoleMode(kernel32.GetStdHandle(-11), 7)
Анимация (прелоадеры)
Чтобы сделать интерфейс программы более привлекательным, можно анимировать его. Например, используя preloader, пользователь будет знать, что программа все еще работает.
Вращающееся колесо
Одним из примеров прелоадера является вращающее колесо, что указывает на незавершенную работу, когда точно не известно, сколько времени осталось до завершения запущенной операции. Часто такой прием используется во время загрузки данных с сети, устанавливая простую анимацию движения из последовательности нескольких символов, циклически повторяющихся:
from itertools import cycle

from time import sleep
for frame in cycle(r'-|/-|/'):
print('r', frame, sep='', end='', flush=True)
sleep(0.2)
Progress Bar
Если же время до завершения операции известно или же есть возможность определить процент выполнения задачи, можно установить анимированный прелоадер. В таком случае необходимо определить, сколько знаков «#» нужно отобразить и сколько пробелов вставить. После этого текст удаляется и строится сначала:
from time import sleep
def progress(percent=0, width=30):
left = width * percent // 100
right = width - left
print('r[', '#' * left, ' ' * right, ']',
f' {percent:.0f}%',
sep='', end='', flush=True)
for i in range(101):
progress(i)
sleep(0.1)
Best practice
Как убрать пробелы в print()
Многие начинающие Python разработчики забывают о том, что разделителем у функции print() по умолчанию является пробел (» «)
name = input()

print("Hello,", name, '!')  # Hello, Alex !
Для удаления пробела, используйте параметр sep:
print("Hello, ", name, '!', sep='') # Hello, Alex!
Python print to file (печать в файл)
При необходимости записать какой-то объект в файл можно воспользоваться стандартными возможностями функции print():
1 открыть нужный файл для записи, вовсе не обязательно создавать его вручную, следующий код сделает это автоматически:
sample = open('samplefile.txt', 'w')
2 записать нужное значение в открытый файл:
print("I'm starting to learn the language Python", file = sample)
3 закрыть файл после окончания операции:
sample.close()
В результате этого будет создан обычный текстовый файл с записанным значением, работать с которым можно будет точно так же, как и с созданным самостоятельно.
Таким образом, несмотря на свою кажущуюся простоту, стандартная функция для вывода print() имеет немало скрытых возможностей, некоторые из которых были рассмотрены.
I’m using mod_wsgi and was wondering if it’s possible to over-write the print() command (since it’s useless).
Doing this doesn’t work:
print = myPrintFunction
Since it’s a syntax error. 
![]()
asked Apr 21, 2009 at 0:53
![]()
2
Print is not a function in Python 2.x, so this is not directly possible.
You can, however, override sys.stdout.
If you are on Python 3.0 in which print is now a function what you have would then work, assuming you have the right signature. Also see a related question in this site.
![]()
answered Apr 21, 2009 at 0:56
![]()
Paolo BergantinoPaolo Bergantino
476k79 gold badges518 silver badges436 bronze badges
Would
import sys
sys.stdout = MyFileWrapper()
or something similar work?
answered Apr 21, 2009 at 0:56
![]()
CAdakerCAdaker
14k3 gold badges30 silver badges31 bronze badges
2
If you are using 3.0, print is a function. If you are using 2.6, you can from __future__ import print_function and continue with a print function.
If <= 2.5, you can replace stdout like others have suggested, but be very careful if your wsgi server will call your app in multiple threads simultaneously. You WILL end up with simultaneous requests being sent down the same pipe.
I haven’t tested it, but you could try something like this:
import sys
import threading

class ThreadedStdout(object):
    def __init__(self):
        self.local = threading.local()
    def register(self, fh):
        self.local.fh = fh
    def write(self, stuff):
        self.local.fh.write(stuff)

sys.stdout = ThreadedStdout()

def app(environ, start):
    sys.stdout.register(environ['wsgi.stdout'])

    # Whatever.
answered Apr 21, 2009 at 15:40
![]()
Mike BoersMike Boers
6,6553 gold badges30 silver badges40 bronze badges
It is worth noting that use of ‘print’ to sys.stdout in Apache/mod_wsgi was deliberately restricted. This is because a portable WSGI application should not use either sys.stdin or sys.stdout as some WSGI implementations use them to communicate to the server.
Apache/mod_wsgi is therefore trying to force you to write your WSGI application such that it will be portable to other WSGI implementations.
Unfortunately, too many people seem not to care about writing good code and so mod_wsgi 3.0 will allow you to write to sys.stdout and thus use ‘print’ without redirecting output to ‘sys.stderr’ as you should be doing.
Either way, the mod_wsgi documentation details how to remove the restriction in versions of mod_wsgi prior to 3.0. In particular, see documentation about the WSGIRestrictStdout directive. The documentation about debugging techniques also talks about the issue and about mapping sys.stdout to sys.stderr.
You can read a commentary which summaries this issue at:
http://blog.dscpl.com.au/2009/04/wsgi-and-printing-to-standard-output.html
answered Jun 24, 2009 at 11:43
![]()
Graham DumpletonGraham Dumpleton
57.2k6 gold badges117 silver badges132 bronze badges
While you can redirect stdout to different sources like file for logging, as Paolo mentions, you probably wouldn’t need it. I didn’t need it. If you really needed to log stuff, you would be using logging itself in the first place, wouldn’t you? Also, even when you don’t print a thing, the third party libraries you use may do. Just redirect it and get going.
The simplest solution to this problem is to redirect all stdout into stderr. In the wsgi configuration file, just redirect as necessary.
sys.stdout = sys.stderr
answered Nov 30, 2009 at 8:49
![]()
lprsdlprsd
83.2k47 gold badges134 silver badges168 bronze badges
1
I’m using mod_wsgi and was wondering if it’s possible to over-write the print() command (since it’s useless).
Doing this doesn’t work:
print = myPrintFunction
Since it’s a syntax error.
![]()
asked Apr 21, 2009 at 0:53
![]()
2
Print is not a function in Python 2.x, so this is not directly possible.
You can, however, override sys.stdout.
If you are on Python 3.0 in which print is now a function what you have would then work, assuming you have the right signature. Also see a related question in this site.
![]()
answered Apr 21, 2009 at 0:56
![]()
Paolo BergantinoPaolo Bergantino
476k79 gold badges518 silver badges436 bronze badges
Would
import sys
sys.stdout = MyFileWrapper()
or something similar work?
answered Apr 21, 2009 at 0:56
![]()
CAdakerCAdaker
14k3 gold badges30 silver badges31 bronze badges
2
If you are using 3.0, print is a function. If you are using 2.6, you can from __future__ import print_function and continue with a print function.
If <= 2.5, you can replace stdout like others have suggested, but be very careful if your wsgi server will call your app in multiple threads simultaneously. You WILL end up with simultaneous requests being sent down the same pipe.
I haven’t tested it, but you could try something like this:
import sys
import threading

class ThreadedStdout(object):
    def __init__(self):
        self.local = threading.local()
    def register(self, fh):
        self.local.fh = fh
    def write(self, stuff):
        self.local.fh.write(stuff)

sys.stdout = ThreadedStdout()

def app(environ, start):
    sys.stdout.register(environ['wsgi.stdout'])

    # Whatever.
answered Apr 21, 2009 at 15:40
![]()
Mike BoersMike Boers
6,6553 gold badges30 silver badges40 bronze badges
It is worth noting that use of ‘print’ to sys.stdout in Apache/mod_wsgi was deliberately restricted. This is because a portable WSGI application should not use either sys.stdin or sys.stdout as some WSGI implementations use them to communicate to the server.
Apache/mod_wsgi is therefore trying to force you to write your WSGI application such that it will be portable to other WSGI implementations.
Unfortunately, too many people seem not to care about writing good code and so mod_wsgi 3.0 will allow you to write to sys.stdout and thus use ‘print’ without redirecting output to ‘sys.stderr’ as you should be doing.
Either way, the mod_wsgi documentation details how to remove the restriction in versions of mod_wsgi prior to 3.0. In particular, see documentation about the WSGIRestrictStdout directive. The documentation about debugging techniques also talks about the issue and about mapping sys.stdout to sys.stderr.
You can read a commentary which summaries this issue at:
http://blog.dscpl.com.au/2009/04/wsgi-and-printing-to-standard-output.html
answered Jun 24, 2009 at 11:43
![]()
Graham DumpletonGraham Dumpleton
57.2k6 gold badges117 silver badges132 bronze badges
While you can redirect stdout to different sources like file for logging, as Paolo mentions, you probably wouldn’t need it. I didn’t need it. If you really needed to log stuff, you would be using logging itself in the first place, wouldn’t you? Also, even when you don’t print a thing, the third party libraries you use may do. Just redirect it and get going.
The simplest solution to this problem is to redirect all stdout into stderr. In the wsgi configuration file, just redirect as necessary.
sys.stdout = sys.stderr
answered Nov 30, 2009 at 8:49
![]()
lprsdlprsd
83.2k47 gold badges134 silver badges168 bronze badges
1
При разработке программ постоянно используется вывод данных в консоль. Например, при тестировании функций программы, которая ещё не обзавелась графическим интерфейсом, или как средство нахождения ошибок и отладки кода.
Python предоставляет программисту инструменты, позволяющие не просто выводить данные в консоль, но и форматировать их.
Функция print и её параметры
Функция print() включена в стандартную библиотеку языка Python, как основной инструмент для вывода данных в консоль или любое другое устройство (экран, принтер и так далее).
Программист может настраивать вывод данных, используя аргументы функции:
*objects
Это данные, которые выводятся на экран. Программист передает в функцию сколько угодно объектов, которые автоматически преобразуются в строковый формат и направляются в поток вывода.
Передавая объекты в функцию, программист может их передавать через запятую или использовать конкатенацию. Передача нескольких аргументов не приведёт к конфликту между *objects и другими необязательными аргументами, потому что интерпретатор автоматически распознаёт остальные параметры по ключевому слову (sep, end, file, flush)!
Вот пример:
print("apple", "orange" + " banana", "cherry")

apple orange banana cherry
sep
Этот аргумент определяет, что будет стоять между переданными объектами. По умолчанию параметр sep имеет значение » «, то есть при выводе нескольких объектов, между ними будет установлен пробел, поменяем его на другой символ, например «-«:
print("Один", "Два", "Три", sep="-")

Один-Два-Три
end
Аргумент определяет символ, которым заканчивается выполнение функции print(). По умолчанию это символ переноса строки «n», то есть после вывода всех данных каретка переходит на следующую строку, и следующий вывод функции print начинается с новой строки. Если нужно, чтобы вывод нескольких print был в одну строку — следует заменить последний символ.
Вот пример:
print("Один")
print("Два", end=" ")
print("Три")

Один
Два Три
file
Этот аргумент позволяет переопределить поток вывода. По умолчанию установлено значение «sys.stdout», то есть данные выводятся в консоль. Если вместо этого указать какой-нибудь файл, то в данные запишутся в него.
Вот пример скрипта на Python, который откроет файл temp.txt и запишет в него текст с помощью функции print:
with open("temp.txt", "w") as f:
    print("Write to file", file=f)
flush
Этот необязательный аргумент позволяет отчистить поток вывода. По умолчанию имеет значение False, когда вывод буферизуется, программист может указать значение «True», чтобы вывод производился сразу. Например, если вы пишете в файл данные, то они попадают в буфер и записываются реально в файл когда буфер заполнится или будет закрыт файл.
Аналогично и с выводом в консоль, данные записываются в буфер и выводятся из него в консоль. Если flush выставлен в True, то вывод производится немедленно.
print("Some text", flush=True)
Форматированный вывод
Для того чтобы выведенную в консоль информацию можно было без проблем прочитать и понять, она должна быть форматирована. Python предоставляет программисту инструменты, позволяющие форматировать вывод в консоль разными способами. С их помощью можно даже создать ровную и читаемую таблицу.
Оператор %
Оператор % часто используется для форматирования и хорошо известен не только программистам на Python, но и программистам на C/С++. По сути, оператор % — это метка, вместо которой подставляется значение переменной или выражение. Оператор % размещается непосредственно в выводимой строке, а подставляемые значения — в кортеже после второго %. Пример:
print("Программа номер %2d, получила результат: %5.2f" % (4, 7.3333))

Программа номер  4, получила результат:  7.33
Помимо символа % указывается тип значения, а также, по желанию, длина и точность. Синтаксис выглядит так:
%(флаги)(ширина)(.точность)тип
Если рассмотреть пример, можно увидеть, что:
- «
%2d» используется для первого элемента кортежа, целого числа «4». Так как после % указана длина «2», а число в кортеже состоит только из одной цифры, в выводе добавится дополнительный пробел. - «
%5.2f» — это формат для чисел с плавающей точкой. «5» — это общее количество цифр, которые должна содержать строка, а «.2» — это количество цифр после запятой.
Метод format
Этот инструмент был добавлен в Python версии 2.6. В сравнении с предыдущем способом format оказывается чуть более громоздким. Программист использует символ «{}», чтобы отметить место, в которое будет подставлена переменная или выражение. Внутри фигурных скобок можно указать имя, тип значения, ширину и точность.
Подставляемые значения указываются в кортеже после ключевого слова format. Их можно указывать как позиционно, так и присваивать по имени. Пример:
print('{0} {1} января празднует {other} день рождения'
    .format('Никита', '25', other ='15-ый'))

Никита 25 января празднует 15-ый день рождения
Метод format также позволяет форматировать числа, то есть указывать их ширину и точность:
print("Робот №{r:4d} весит {w:6.2f}"
    .format(r = 1134, w = 112.5534))

Робот №1134 весит 112.55
Этот способ позволяет очень гибко форматировать вывод данных. Например, программист может передавать в строку данные из готового словаря:
data = dict(name ="Бендер", race ="Робот")
print("Это {name}, он - {race}".format(**data))

Это Бендер, он - Робот
Строковый метод
Вывод с помощью строкового метода формируется с использованием операций среза и методов строк. Для работы со строковым типом данных создано несколько методов, которые позволяют просто и изящно форматировать вывод, среди них методы: ljust(), rjust(), center().
centre()
Эта функция выравнивает строку по центру в соответствии с указанной шириной, заполняя недостающую ширину пробелами. Она имеет следующий синтаксис:
str.center(len, fillchr)
Здесь:
str— это строка, которую будем центрировать.len– это ширина строки.fillchr— символ, которым заполняется недостающее пространство (по умолчанию — пробел).
Пример:
text = "Этот текст расположен в центре"
print(text.center(50))

          Этот текст расположен в центре
Важно понимать, что функция располагает текст не в центре консоли, а в центре поля указанной ширины (в примере это 50 символов).
Если поменять символ заполнения, получится следующее:
text = "Этот текст расположен в центре"
print(text.center(50, "_"))

__________Этот текст расположен в центре__________
ljust()
Метод работает аналогично centre(), только выравнивает текст не по центру, а по левому краю. То есть недостающие символы дополняются не с двух сторон, а только с правой.
rjust()
Метод работает аналогично centre(), но выравнивает текст по правому краю. То есть символы дополняются только с левой стороны.
f-строки
Иногда нужно просто вставить значение переменной в какую-то часть строки. Можно воспользоваться одним из методов форматирования, строить длинные конструкции из комбинаций строк и имён переменных, соединённых запятыми (или «+»), например:
print("Мне", age, ", теперь я могу пойти в", place, "когда захочу")
Однако в Python версии 3.6 в язык был добавлен простой и удобный инструмент, который называется f-строка или интерполированная строка. С его помощью можно удобно вставлять переменные в любое место выводимой строки. Для этого используются фигурные скобки «{}», внутри которых указывается имя переменной, а перед строкой ставится символ «f». Пример:
name = "Боб"
age = 25
print(f"{name} сегодня празднует {age}-ый день рождения")

Боб сегодня празднует 25-ый день рождения
Поля заданной ширины
В приведённых выше примерах уже использовались инструменты для настройки ширины полей. Ширина поля вывода настраивается с помощью вставки численного значения между знаком «%» и типом вывода (например, «d»). То есть установка ширины поля выглядит так:
print("%6d %6d" % (6, 6))

     6      6
Установка ширины полей работает так:
- Интерпретатор получает информацию о численном значении ширины вывода (в примере это «6»).
- Затем он получает информацию о подставляемом значение, то есть считает, из скольки символов оно состоит (в примере это «1»).
- Если количество символов в подставляемом значение меньше, чем ширина строки, при выводе в строку добавляются дополнительные пробелы, иначе значение просто выводится.
Поля заданной ширины жизненно необходимы для вывода в консоль таблиц или двумерных массивов. Из-за разной длинный элементов столбцы искривляются, что приводит к потери читаемости, однако если использовать поля заданной ширины, то пока длинны значений меньше, чем ширина поля, все они будут располагаться строго друг под другом.
Примеры
С помощью форматированного вывода можно полностью настроить любой вывод в консоль, например:
Вывод ошибки
Ниже пример обработки ошибки. Мы перехватываем исключение в блоке except и выводим сообщение о ней с помощью функции print.
try:
    for i in range(4):
        if (i == 3):
            i = text
        print(f"Попытка {i} прошла успешно")
except Exception as err:
    print("Возникла ошибка: "{}"".format(err))

Попытка 0 прошла успешно
Попытка 1 прошла успешно
Попытка 2 прошла успешно
Возникла ошибка: "name 'text' is not defined"
Вывод списка
Ниже пример того как выводится список в одну строку:
a = ['python', 3, 'лучший', 'язык', 'программирования']
for val in a:
    print(val, end=' ')

python 3 лучший язык программирования
Если нужно перечислить элементы списка в столбик с указанием порядковых номеров, то это можно сделать следующим образом:
mylist = ["кот", "собака", "крот", "ёж"]
for i, x in enumerate(mylist):
    print("{a:d} : {b:6s}".format(a = i + 1, b = x))

1 : кот
2 : собака
3 : крот
4 : ёж
Вывод массива
Здесь выводим массив построчно с указанием номеров элементов.
from array import *
arr = array('i', [1,3,6,2,5])
for i in range(len(arr)):
    print("%d-й элемент массива = %d" %(i, arr[i]))

0-й элемент массива = 1
1-й элемент массива = 3
2-й элемент массива = 6
3-й элемент массива = 2
4-й элемент массива = 5
Вывод словаря
Здесь приведём два варианта для словарей.
Простой вариант:
a = {1: "one", 2: "two", 3: "three"}
for key, value in a.items():
  print("{0}: {1}".format(key,value))

1: one
2: two
3: three
В виде таблицы:
arr = {"Один": "one", "Два": "two", "Три": "three"}
print(" _________________ ")
print("|  Rus   :  Eng   |")
print("|-----------------|")
for key, value in arr.items():
    print("|  {r:5s} :  {w:5s} |".format(r = key, w = value))
print("|-----------------|")

 _________________
|  Rus   :  Eng   |
|-----------------|
|  Один  :  one   |
|  Два   :  two   |
|  Три   :  three |
|-----------------|
Вывод матрицы
Сложность в выводе матрицы состоит в том, что из-за разных длин чисел элементы столбца будут стоять не друг под другом, а со смещением. С помощью форматирования можно решить эту проблему.
mtx = [[  2, 4, 12],
       [ -6, 3,  9],
       [334, 0, 11]]
for row in mtx:
    for x in row:
        print("%3d" %(x), end = " ")
    print()

  2   4  12
 -6   3   9
334   0  11
Здесь мы создали матрицу в виде двумерных списков, но если вы работаете с матрицами с помощью библиотеки NumPy, то там вывод в консоль форматируется автоматически.
На чтение 9 мин Просмотров 4.2к. Опубликовано 20.12.2021
Как правило, программа – это обработчик данных. Это означает, что она получает данные, обрабатывает их и возвращает. Одним из простейших способов показать пользователю результат работы программы – вывести сообщение в консоль. Часто простоту языка оценивают по тому, сколько кода необходимо для этой операции. Давайте посмотрим на несколько языков и попробуем вывести в консоль классическое «Hello, World»:
Assembler
format PE Console ;
entry start ;
include 'win32a.inc' ;
section '.data' data readable writeable ;
hello db 'hello, world!', 0 ;
section '.code' code readable writeable executable ;
start: ;
invoke printf, hello ;
invoke getch ;
invoke ExitProcess, 0 ;
section '.idata' data import readable ;
library kernel, 'kernel32.dll', msvcrt, 'msvcrt.dll'

import kernel, ExitProcess, 'ExitProcess'
import msvcrt, printf, 'printf', getch, '_getch'
C++
#include

int main()
{
std::cout << "Hello, World!n";
}
Java
public class HelloWorld {
public static void main(String[] args) {
System.out.println("Hello, World!");
}
}
А вот, как это выглядит в Python:
Лаконичность – сильная сторона Питона. Давайте изучим данную функцию детальнее.
Содержание
- Полный синтаксис функции print
- Параметры print
- sep
- end
- file
- flush
- Возвращаемое значение
- Задачи к уроку
Полный синтаксис функции print
Простейший случай применения этой функции выглядит следующим образом:
Такой код выведет в консоль пустую строку и перейдёт на следующую. Если говорить совсем уж техническим языком – будет напечатан неотображаемый символ перевода строки.
Важно, как и в остальных функциях, не забывать про круглые скобки. Без них не произойдёт вызов функции, а будет передана сама функция (её объект).
Теперь давайте продвинемся дальше и напишем что-нибудь более осмысленное, чем пустая строка:
print('I`m Python master')
# Вывод:
I`m Python master
Как видите, всё просто.
Полный синтаксис функции print выглядит так:
print(*items, sep=' ', end='n', file=sys.stdout, flush=False)
Про параметры функции поговорим позже, но, стоит отметить, что при передаче в качестве аргумента переменной, будет распечатано её значение, а любой объект будет приведён к строковому типу:
from math import pi, inf
переменная = 1
print('переменная:', переменная)
print('PI:', pi)
print('Бесконечность:', inf)
print('Элипсис:', ...)
print('Тип данных:', float())
print('Функция:', print)
# Вывод:
переменная: 1
PI: 3.141592653589793
Бесконечность: inf
Элипсис: Ellipsis
Тип данных: 0.0
Функция: <built-in function print>
Советы: 1. Если перечислить несколько аргументов, функция выведет все из них, «склеив» в одну строку, разделяя пробелом (поведение по умолчанию):
print('I`m', 'Python', 'master')
# Вывод:
I`m Python master
2. Не забывайте заключать аргументы в круглые скобки: print – это обычная функция.
3. Не забывайте заключать строки в одинарные или двойные кавычки. Лучшей практикой является применение одинаковых кавычек во всём проекте.
4. Переменные и прочие объекты не строкового типа обрамлять кавычками не надо.
Параметры print
Как уже говорилось ранее, полный синтаксис функции print выглядит так:
print(*items, sep=' ', end='n', file=sys.stdout, flush=False)
Давайте разберёмся с параметрами функции. Вот их список:
- sep — разделитель (по умолчанию пробел » «). Значением может быть любой символ либо None;
- end — символ, завершающий строку (по умолчанию перенос строки n). Значением может быть любой символ либо None;
- file — место, куда направляется вывод (по умолчанию sys.stdout — консоль). Изредка, кроме стандартного значения, здесь указывают какой-нибудь файл;
- flush — отключить буферизацию стандартного потока вывода (по умолчанию False).
Рассмотрим параметры подробнее.
sep
Если Вы хотите, чтобы позиционные аргументы разделялись не пробелом, а другим символом, передайте его значение в именованный параметр sep:
print('I`m', 'Python', 'master')
print('I`m', 'Python', 'master', sep='n')
# Вывод:
I`m Python master
I`m
Python
Master
Здесь мы заменили пробел на ‘n’ – перенос строки и каждый новый аргумент был напечатан на новой строке. Набор символов в разделителе может быть любым:
print('I`m', 'Python', 'master', sep=' тру-ля-ля ')
print('I`m', 'Python', 'master', sep='|/-\+-~`')
# Вывод:
I`m тру-ля-ля Python тру-ля-ля master
I`m|/-+-~`Python|/-+-~`master
Здесь напомним, что если Вы используете в строке символ ‘’, то его надо экранировать (‘\’) либо использовать сырые строки (r’’).
end
Параметр end похож на sep, но этот символ вставляется не между аргументами, а после них. По умолчанию это перевод строки, именно поэтому каждый новый вызов функции печатается на новой строке:
print('I`m', 'Python', 'master')
print('I`m', 'Python', 'master')
print('I`m', 'Python', 'master', end=' ')
print('I`m', 'Python', 'master', end='')
file
По умолчанию функция print печатает всё в консоль, но Python позволяет передавать в параметр file любой объект с методом write(string). За счет этого с помощью print можно записывать строки в файл:
file = open('result.txt', 'w', encoding='utf-8')
with file as f:
    print('I`m', 'Python', 'master', file=f)
flush
Когда Вы используете вывод в файл этот параметр может отключить буферизацию. Это означает всего лишь то, что запись в файл произойдёт не после выхода из цикла, как здесь:
import time

file = open('result.txt', 'w', encoding='utf-8')
with file as f:
    for _ in range(10):
         print('I`m', 'Python', 'master')
         time.sleep(10)
а после каждого вызова функции:
import time

file = open('result.txt', 'w', encoding='utf-8')
with file as f:
    for _ in range(10):
        print('I`m', 'Python', 'master', flush=True)
        time.sleep(10)
Возвращаемое значение
Функция print() в Пайтоне не возвращает значений (то есть возвращает None).
Задачи к уроку
Для закрепления материала давайте вместе выполним несколько простых заданий.
1. Классика, как она есть: вывести строку “Hello, World!”
Решение:
Надеемся, сложностей у Вас не возникло, ведь мы это уже делали в сам начале.
print('Hello, World!')
# Вывод:
Hello, World!
2. Распечатайте ту же строку, но с кавычками.
Решение:
Всё, что Вам надо – использовать разные кавычки вокруг строки и внутри неё, иначе интерпретатор Вас не поймёт.
print('"Hello, World!"')
# Вывод:
"Hello, World!"
Что же делать, если в строке встречаются как одинарные, так и двойные кавычки? Экранировать!
print(""Hello, World!"")
# Вывод:
"Hello, World!"
3. Готовы к задачке со звёздочкой? Пользователь вводит целое число 2 раза. После каждого ввода программа выводит чему равно это число, если его умножить на два. Написанный код должен занимать одну строку. Пример:
Введите целое число 0
0 * 2 = 0
Введите целое число 3
3 * 2 = 6
Решение:
[print(переменная:=input('Введите целое число '), '*', 2, end=' = '+str(int(переменная)*2)+'n') for i in range(2)]
# Вывод:
Введите целое число 0
0 * 2 = 0
Введите целое число 3
3 * 2 = 6
В статье узнаем как в Python 3, с помощью встроенной функции print(), вывести текст на консоль. А для закрепления напишем небольшую программу.
Первая программа
По традиции первая программа должна выводить на экран консоли фразу “Hello World!”. Мы не будем отходить от традиции. Вот код этой программы:
print("Hello, World!")
Функция print() – это встроенная функция, то-есть она заранее определена. Используя Python 3 вы можете создавать и собственные функции.
Эта функция в качестве аргументов принимает строки и выводит их на консоль, или может сохранить их в файл. То есть мы попросили Python вывести на экран строку “Hello, World!”, что он и сделал:
$ python3 hello.py
Hello, World!
Строка обязательно должна быть написана в кавычках!
Вывод нескольких строк
В предыдущем примере мы выводили только одну строку – “Hello, World!”. Но функция print() может принимать несколько аргументов и выводить несколько строк. Для этого строки разделяются с помощью запятой.
Вот пример кода:
print("Hello, World!", "Привет, Мир!")
А вот что делает этот код:
$ python3 hello.py
Hello, World! Привет, Мир!
Необязательные параметры
Помимо строк функция print() может использовать необязательные параметры:
- sep – с помощью этого параметра вы можете указать разделитель строк. А по умолчанию в качестве разделителя используется пробел;
- end – этот параметр позволяет указать, что нужно добавить после последней строки. По умолчанию добавляется управляющий символ ‘n’ (перевод строки);
- file – по умолчанию функция print() выводит строки на консоль, а с помощью этого параметра можно поместить строки в файл.
Параметр sep
Следующий код выводит две строки и разделяет их символом перевода строки:
print("Hello, World!", "Привет, Мир!", sep='n')
Вот как это работает:
$ python3 hello.py
Hello, World!
Привет, Мир!
Параметр end
Если мы выводим две строки с помощью двух функций priint(), то они будут на разных строках. Это происходит потому что, по умолчанию, после каждой последней строки ставится знак перевода строки. Вот пример кода:
print("Меня зовут")
print("Александр")
А вот его выполнение:
$ python3 hello.py
Меня зовут
Александр
А теперь используем параметр end и укажем что в конце строки нужно добавлять пробел:
print("Меня зовут", end=' ')
print("Александр")
И выполним этот код:
$ python3 hello.py
Меня зовут Александр
Параметр file
По умолчанию функция print() выводит информацию на консоль. А используя параметр file, мы можем поместить вывод в файл.
Работать с файлами мы пока не умеем, но в коде я оставил комментарии которые должны помочь его понять:
file = open('print.txt','a+') # открываем файл
print("Hello, World!", file=file) # выполняем функцию print с сохранением в файл
file.close() # закрываем файл
А теперь посмотрим как это сработает:
$ python3 hello.py
$ cat print.txt
Hello, World!

$ python3 hello.py
$ cat print.txt
Hello, World!
Hello, World!
При выполнении этого кода на экран консоли ничего не вывелось, так как текст был помещён вместо консоли в файл. Если файла нет, то он создастся. При этом файл не перезаписывается, а строка записывается в конец файла.
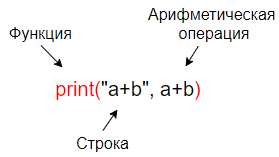
Вывод результатов арифметических операций
Функция print() позволяет в себя поместить другие функции или операторы. Например мы можем вывести результат арифметических операций:
print("5 + 2 =", 5+2)
print("7 + 4 =", 7+4)
print("3*(3+4) =", 3*(3+4))
Как вы могли заметить, математическую операцию (5+2) не нужно брать в кавычки. Так как, всё что в кавычках считается строкой а не операцией и не высчитывается.
Выполним этот код:
$ python3 hello.py
5 + 2 = 7
7 + 4 = 11
3*(3+4) = 21
Подробнее математические операции рассмотрим в отдельной статье.
Вывод значений переменных
Ну и конечно мы можем выводить значения переменных. Переменную, также как и операцию, не нужно брать в кавычки, вот пример кода:
a=6
b=8
print(a, "*", b, "=", a*b, sep='')
Я изменил разделитель, чтобы убрать пробелы.
Код написанный выше выполняется следующим образом:
$ python3 hello.py
6*8=48
Итоговый пример
И для закрепления материала давайте напишем и разберём такую программку:
# Для вывода строк используем функцию print()
print("Привет!", "Сейчас посчитаем, сколько будет 6 * 8", sep='n')

# Устанавливаем переменные
a=6
b=8

# Производим вычисления
print("Производим вычисления", end='... ')
print(a, "*", b, "=", a*b, sep='')

# И сохриним результат в файл
file = open('print.txt','a+')
print(a, "*", b, "=", a*b, sep='', file=file)
file.close()

print("Результат был записан в файл 'print.txt'")
print("Выполните команду 'cat print.txt',", end=' ')
print("чтобы посмотреть содержимое файла.")
Вот результат выполнения этой программы:
$ python3 hello.py
Привет!
Сейчас посчитаем, сколько будет 6 * 8
Производим вычисления... 6*8=48
Результат был записан в файл 'print.txt'
Выполните команду 'cat print.txt', чтобы посмотреть содержимое файла.

$ cat print.txt
6*8=48
В официальной документации встроенная в Python функция print() описана здесь.
Другие статьи по python доступны здесь.
Сводка

Имя статьи
Python 3. Вывод текста на консоль. Функция print()
Описание
В статье узнаем как в Python 3, с помощью встроенной функции print(), вывести текст на консоль. А для закрепления напишем небольшую программу
In Python 3, print() is now a function and uses arguments to control its output. In this lesson, you’ll learn about the sep, end, and flush arguments.
By default, print() inserts a space between the items it is printing. You can change this by using the sep parameter:
>>>
>>> print('There are', 6, 'members of Monty Python')
There are 6 members of Monty Python
>>> message = 'There are' + 6 + 'members of Monty Python'
Traceback (most recent call last):
  File "<stdin>", line 1, in <module>
TypeError: can only concatenate str (not "int") to str
>>> message = 'There are' + str(6) + 'members of Monty Python'
>>> print(message)
There are6members of Monty Python
>>> print('There are', 6, 'members of Monty Python', sep='😀')
There are😀6😀members of Monty Python
>>> print('There are', 6, 'members of Monty Python', sep=' ')
There are 6 members of Monty Python
>>> print('There are', 6, 'members of Monty Python', sep=None)
There are 6 members of Monty Python
>>> print('There are', 6, 'members of Monty Python', sep='')
There are6members of Monty Python
>>> print('There are', 6, 'members of Monty Python', sep='n')
There are
6
members of Monty Python
>>> data = [
...     ['year', 'last', 'first'],
...     [1943, 'Idle', 'Eric'],
...     [1939, 'Cleese', 'John']
... ]
>>> for row in data:
...     print(*row, sep=',')
...
year,last,first
1943,Idle,Eric
1939,Cleese,John
Unless told otherwise, print() adds a n at the end of what is being printed. This can be changed with the end parameter. Output from print() goes into a buffer. When you change the end parameter, the buffer no longer gets flushed. To ensure that you get output as soon as print() is called, you also need to use the flush=True parameter:
import time

def count_items(items):
    print('Counting ', end='', flush=True)
    num = 0
    for item in items:
        num += 1
        time.sleep(1)
        print('.', end='', flush=True)

    print(f'nThere were {num} items')
You can combine sep and end to create lists, CSV output, bulleted lists, and more.
00:00
In the previous lesson, I gave a quick introduction to string formatting. In this one, I’ll be talking about the arguments that you can pass to print() to change how print() functions: sep, end, and flush.
00:15
As I showed you in the first lesson, print() can take multiple arguments. Here, I’m putting in a string, an integer, and a string, and print() puts it all out to the screen.
00:26
Notice that it’s not just concatenating those values. If I try to concatenate them using the plus operation (+), I get an error. That’s because Python is strongly typed.
00:38
You cannot add an integer to a string. You can call the built-in method str() to convert something to a string, which is what print() is doing underneath.
00:53
Well, it’s doing a little more than that, obviously. In addition to converting everything to strings, it’s also putting a space (' ') in between these pieces.
01:02
You can control what character it puts between the strings using the sep argument. Let’s have a little fun and change the sep to a happy happy little face.
01:15
Of course, the default is actually a space (' ').
01:24
That’s the same as if you did not specify the sep argument. You can also set its value to None. None is the same as space (' ') in this case.
01:35
It causes the default to be used.
01:40
Oftentimes, what you really want to do is get rid of the separator. You can do that simply by passing in an empty string (''). It doesn’t make sense for our sentence here, but if you’re trying to avoid the addition of the spaces inside of your printing, this is how you do it.
02:00
Escape sequences are just as valid. Here is 'n', and that gives us multiple lines of output. One possible use of this is to create CSVs. Let me put in some data…
02:18
and now a for loop. The asterisk (*) in front of row here takes the row value—which will be a single row from the data array—and passes it in as separate parameters, separate arguments to print(). For example, when it’s processing the first row—containing 'year', 'last', and 'first'—*row is the equivalent of passing in 'year', 'last', 'first' and then the separator of comma (,). By doing this, you can see a CSV-style file being printed to the screen.
03:00
In case you haven’t come across this before, being able to pass in multiple arguments to Python is something built into functions—there’s nothing magic going on here specific to print(). The signature of print() takes *objects.
03:13
*objects, in this case, is treated as a list inside of the print() function, and the calling signature says you can pass in as many arguments as you like that are unnamed.
03:25
The consequences of this is the rest of the arguments after objects have to be named, because otherwise Python doesn’t know where the unnamed arguments stop and the named ones begin. You can use this mechanism even when you define your own functions. Let’s look at another argument that print() takes—the end argument. By default, print() puts a 'n' on the end of whatever string you are asking it to print before sending it to the screen.
03:52
You can change that by passing in the end argument. On line 3 and line 7 I’m going to set this so it prints no 'n'—just an empty string ('').
04:03
I’ve done this by creating a function called count_items() inside of a file called count_items. I’m going to import that…
04:15
create some data…
04:20
and now I’m going to call the function.
04:25
And there it is. Counting ... 3 items. You’ll notice this happened very quickly. There isn’t a lot of processing going on inside of this function.
04:33
Let’s pretend that there was more work that needed to be done. I’m going to simulate that by pausing, using the sleep() method. I’ll add some code, import the time library, and time.sleep() will wait for 1 second when it executes. Just a quick note: if you’re following along in the REPL, in order to use this changed code, you’ll have to exit the REPL and come back in in order to reload the function.
04:57
Python caches the functions that are in there—it doesn’t automatically reload it from the file. Here I go. Re-call count_items(). You’ll notice it paused for three seconds and then came out all at once.
05:10
This is probably not the effect that you’re looking for. The reason for this is print() actually puts the strings into a buffer. When it encounters the n, it flushes that buffer and sends it to the screen. As a result, by taking the n’s off the end of the print, you no longer see this, so everything gets put to the buffer and then the buffer gets put to the screen when line 12 is called. This isn’t really the intention I have. I want to show dot dot dot (...) as the work is happening.
05:42
I’m going to make some more changes to the code—this time adding a new argument, which is flush. flush flushes the buffer. So if you’ve modified the end argument, you usually want to add flush=True in addition. Let’s this in action…
06:03
and the function returns a dot (.) each time the print() is called, and it looks like a little progress mechanism. Changing the value of the end argument changes when things are put in the buffer, versus when things are put to the screen, as well as how they’re combined together. In the function sentences() defined above, the first two lines will be printed to the buffer, the third line—because end isn’t changed—will cause the 'n' to be appended to the string and the buffer to be sent to the actual output.
06:32
This combines our first, second, and third sentences into one long string on the screen. You can combine the sep and end arguments together to create comma-separated lists. The first and second print() functions here will put things into the buffer with commas between the words and commas at the end, and the third print() puts commas between the words and flushes the buffer with a 'n'.
06:59
This last example shows you how you can combine 'n' with other characters to make things look like a bullet list.
07:11
Up until now, I’ve only been printing to the screen. This is called the stdout (standard out) stream. There are more streams than this, and you can also print to files. In the next lesson, I’ll show you how.