# Входные параметры
Подразумевается, что вы уже изучили и разобрались с разделом Основы компонентов. Если нет — прочитайте его сначала.
# Указание типа входных параметров
До сих пор мы видели только входные параметры, перечисленные в виде массива строк:
props: ['title', 'likes', 'isPublished', 'commentIds', 'author']
1
Однако лучше, когда каждый входной параметр будет определённого типа. В этих случаях вы можете перечислить входные параметры объектом, где свойство и значение будут содержать информацию об имени входного параметра и его типе, соответственно:
props: {
  title: String,
  likes: Number,
  isPublished: Boolean,
  commentIds: Array,
  author: Object,
  callback: Function,
  contactsPromise: Promise // или любой другой конструктор
}
1
2
3
4
5
6
7
8
9
Это не только документирует ваш компонент, но также предупреждает пользователей в консоли JavaScript браузера, если они передают неправильный тип. Вы узнаете гораздо больше о проверках типов и других валидациях входных параметров дальше на этой странице.
# Передача статических и динамических входных параметров
До сих пор вы встречали, что во входные параметры передавались статические значения, например:
<blog-post title="My journey with Vue"></blog-post>
1
Вы также встречали входные параметры, присваивающие динамическое значение с помощью v-bind или сокращения :, например:
<!-- Динамически присваиваем значение переменной -->
<blog-post :title="post.title"></blog-post>

<!-- Динамически присваиваем значение комплексного выражения -->
<blog-post :title="post.title + ' by ' + post.author.name"></blog-post>
1
2
3
4
5
В этих двух примерах мы передаём строковые значения, но могут передаваться значения любого типа во входной параметр.
# Передача чисел
<!-- Несмотря на то, что `42` статическое значение, нам нужен v-bind, -->
<!-- чтобы сообщить Vue, что это выражение JavaScript, а не строка.   -->
<blog-post :likes="42"></blog-post>

<!-- Динамическое присвоение значения переменной. -->
<blog-post :likes="post.likes"></blog-post>
1
2
3
4
5
6
# Передача булевых значений
<!-- Указание входного параметра без значения будет означать `true`. -->
<blog-post is-published></blog-post>

<!-- Несмотря на то, что `false` статическое значение, нам нужен v-bind -->
<!-- чтобы сообщить Vue, что это выражение JavaScript, а не строка.     -->
<blog-post :is-published="false"></blog-post>

<!-- Динамическое присвоение значения переменной. -->
<blog-post :is-published="post.currentUserFavorited"></blog-post>
1
2
3
4
5
6
7
8
9
# Передача массивов
<!-- Несмотря на то, что указан статический массив, нам нужен v-bind, -->
<!-- чтобы сообщить Vue, что это выражение JavaScript, а не строка.   -->
<blog-post :comment-ids="[234, 266, 273]"></blog-post>

<!-- Динамическое присвоение значения переменной. -->
<blog-post :comment-ids="post.commentIds"></blog-post>
1
2
3
4
5
6
# Передача объектов
<!-- Несмотря на то, что указан статический объект, нам нужен v-bind, -->
<!-- чтобы сообщить Vue, что это выражение JavaScript, а не строка.   -->
<blog-post
  :author="{ name: 'Veronica', company: 'Veridian Dynamics' }"
></blog-post>

<!-- Динамическое присвоение значения переменной. -->
<blog-post :author="post.author"></blog-post>
1
2
3
4
5
6
7
8
# Передача свойств объекта
Если вы хотите передать все свойства объекта в качестве входных параметров, вы можете использовать v-bind без аргументов (v-bind вместо v-bind:prop-name). Например, для объекта post:
post: {
  id: 1,
  title: 'My Journey with Vue'
}
1
2
3
4
Следующий шаблон:
<blog-post v-bind="post"></blog-post>
1
Будет аналогичен:
<blog-post v-bind:id="post.id" v-bind:title="post.title"></blog-post>
1
# Однонаправленный поток данных
Все входные параметры образуют одностороннюю привязку между дочерним свойством и родительским: когда родительское свойство обновляется — оно будет передаваться дочернему, но не наоборот. Это предотвращает случайное изменение дочерними компонентами родительского состояния, что может затруднить понимание потока данных вашего приложения.
Кроме того, каждый раз, когда обновляется родительский компонент, все входные параметры дочернего компонента будут обновлены актуальными значениями. Это означает, что вы не должны пытаться изменять входной параметр внутри дочернего компонента. Если вы это сделаете, Vue отобразит предупреждение в консоли.
Обычно встречаются два случая, когда возникает соблазн изменять входной параметр:
- Входной параметр используется для передачи начального значения; дочерний компонент хочет использовать его как локальное свойство данных в дальнейшем. В этом случае лучше всего определить локальное свойство в данных, которое использует значение входного параметра в качестве начального:
props: ['initialCounter'],
data() {
  return {
    counter: this.initialCounter
  }
}
1
2
3
4
5
6
- Входной параметр передаётся как необработанное значение, которое необходимо преобразовать. В этом случае лучше всего определить вычисляемое свойство с использованием входного параметра:
props: ['size'],
computed: {
  normalizedSize: function () {
    return this.size.trim().toLowerCase()
  }
}
1
2
3
4
5
6
Совет
Обратите внимание, что объекты и массивы в JavaScript передаются по ссылке, поэтому если входной параметр является массивом или объектом, то изменение объекта или массива внутри дочернего компонента будет влиять на состояние родителя.
# Валидация входных параметров
Компоненты могут указывать требования к своим входным параметрам, такие как определение типа, которые вы уже видели. Если эти требования не выполнены — Vue предупредит вас сообщением в JavaScript-консоли браузера. Это особенно полезно при разработке компонента, который предназначен для использования другими.
Чтобы указать валидации входного параметра, вы можете предоставить в props объект с валидациями для проверки значения, вместо массива строк. Например:
app.component('my-component', {
  props: {
    // Просто проверка типа (`null` и `undefined` проходят проверку для любого типа)
    propA: Number,
    // Несколько допустимых типов
    propB: [String, Number],
    // Обязательное значение строкового типа
    propC: {
      type: String,
      required: true
    },
    // Число со значением по умолчанию
    propD: {
      type: Number,
      default: 100
    },
    // Объект со значением по умолчанию
    propE: {
      type: Object,
      // Для объектов или массивов значения по умолчанию
      // должны возвращаться из функции
      default: function() {
        return { message: 'hello' }
      }
    },
    // Пользовательская функция для валидации
    propF: {
      validator: function(value) {
        // Значение должно соответствовать одной из этих строк
        return ['success', 'warning', 'danger'].indexOf(value) !== -1
      }
    },
    // Функция с значением по умолчанию
    propG: {
      type: Function,
      // В отличие от объекта или массива по умолчанию, это не фабричная функция — это функция, служащая в качестве значения по умолчанию
      default: function() {
        return 'Функция по умолчанию'
      }
    }
  }
})
1
2
3
4
5
6
7
8
9
10
11
12
13
14
15
16
17
18
19
20
21
22
23
24
25
26
27
28
29
30
31
32
33
34
35
36
37
38
39
40
41
42
Когда валидация входного параметра заканчивается ошибкой — Vue выдаст предупреждение в консоли (если используется сборка для разработки).
Совет
Обратите внимание, что входные параметры валидируются перед созданием экземпляра компонента, поэтому свойства экземпляра (например, data, computed и т.д.) не будут доступны внутри default или функций validator.
# Проверка типа
Значением type может быть один из следующих нативных конструкторов:
- String
- Number
- Boolean
- Array
- Object
- Date
- Function
- Symbol
Кроме того, type также может быть пользовательской функцией-конструктором и валидация будет выполняться проверкой с помощью instanceof. Например, если существует следующая функция-конструктор:
function Person(firstName, lastName) {
  this.firstName = firstName
  this.lastName = lastName
}
1
2
3
4
Вы можете использовать:
app.component('blog-post', {
  props: {
    author: Person
  }
})
1
2
3
4
5
чтобы проверить, что значение входного параметра author было создано с помощью new Person.
# Регистр в именах входных параметров
Имена HTML-атрибутов не чувствительны к регистру, поэтому любые заглавные символы браузеры будут интерпретировать как строчные. Это значит, что при использовании шаблонов в DOM, входные параметры в camelCase должны быть указаны в kebab-case (разделённые дефисом) эквиваленте:
const app = Vue.createApp({})

app.component('blog-post', {
  // camelCase в JavaScript
  props: ['postTitle'],
  template: '<h3>{{ postTitle }}</h3>'
})
1
2
3
4
5
6
7
<!-- kebab-case в HTML -->
<blog-post post-title="hello!"></blog-post>
1
2
Опять же, при использовании строковых шаблонов это ограничение не применяется.
I’m a bit confused about how to change properties inside components, let’s say I have the following component:
{
    props: {
        visible: {
            type: Boolean,
            default: true
        }
    },
    methods: {
         hide() {
              this.visible = false;
         }
    }
}
Although it works, it would give the following warning:
Avoid mutating a prop directly since the value will be overwritten whenever the parent component re-renders. Instead, use a data or computed property based on the prop’s value. Prop being mutated: «visible»
(found in component )
Now I’m wondering what the best way to handle this is, obviously the visible property is passed in when created the component in the DOM: <Foo :visible="false"></Foo>
![]()
Saurabh
70.1k40 gold badges177 silver badges241 bronze badges
asked Nov 24, 2016 at 7:53
![]()
7
Referencing the code in your fiddle
Somehow, you should decide on one place for the state to live, not two. I don’t know whether it’s more appropriate to have it just in the Alert or just in it’s parent for your use case, but you should pick one.
How to decide where state lives
Does the parent or any sibling component depend on the state?
- Yes: Then it should be in the parent (or in some external state management)
- No: Then it’s easier to have it in the state of the component itself
- Kinda both: See below
In some rare cases, you may want a combination. Perhaps you want to give both parent and child the ability to hide the child. Then you should have state in both parent and child (so you don’t have to edit the child’s props inside child).
For example, child can be visible if: visible && state_visible, where visible comes from props and reflects a value in the parent’s state, and state_visible is from the child’s state.
I’m not sure if this is the behavour that you want, but here is a snippet. I would kinda assume you actually want to just call the toggleAlert of the parent component when you click on the child.
var Alert = Vue.component('alert', {
  template: `
        <div class="alert" v-if="visible && state_visible">
        Alert<br>
        <span v-on:click="close">Close me</span>
      </div>`,
  props: {
    visible: {
      required: true,
      type: Boolean,
      default: false
    }
  },
  data: function() {
    return {
      state_visible: true
    };
  },
  methods: {
    close() {
      console.log('Clock this');
      this.state_visible = false;
    }
  }
});

var demo = new Vue({
  el: '#demo',
  components: {
    'alert': Alert
  },
  data: {
    hasAlerts: false
  },
  methods: {
    toggleAlert() {
      this.hasAlerts = !this.hasAlerts
    }
  }
})
.alert {
background-color: #ff0000;
}<script src="https://cdnjs.cloudflare.com/ajax/libs/vue/2.5.17/vue.js"></script>
<div id="demo" v-cloak>
<alert :visible="hasAlerts"></alert>
<span v-on:click="toggleAlert">Toggle alerts</span>
</div>![]()
leonheess
13.3k13 gold badges67 silver badges104 bronze badges
answered Nov 24, 2016 at 10:52
![]()
ArneHugoArneHugo
5,8451 gold badge25 silver badges47 bronze badges
9
According to the Vue.js component doc:
When the parent property updates, it will flow down to the child, but not the other way around. So, how do we communicate back to the parent when something happens? This is where Vue’s custom event system comes in.
Use $emit('my-event) from the child to send an event to the parent. Receive the event on the child declaration inside the parent with v-on:my-event (or @my-event).
Working example:
// child

Vue.component('child', {
  template: '<div><p>Child</p> <button @click="hide">Hide</button></div>',
  methods: {
    hide () {
      this.$emit('child-hide-event')
    }
  },
})

// parent

new Vue({
  el: '#app',
  data: {
    childVisible: true
  },
  methods: {
    childHide () {
      this.childVisible = false
    },
    childShow () {
      this.childVisible = true
    }
  }
})
.box {
border: solid 1px grey;
padding: 16px;
}<script src="https://unpkg.com/vue/dist/vue.min.js"></script>
<div id="app" class="box">
<p>Parent | childVisible: {{ childVisible }}</p>
<button @click="childHide">Hide</button>
<button @click="childShow">Show</button>
<p> </p>
<child @child-hide-event="childHide" v-if="childVisible" class="box"></child>
</div>![]()
tony19
117k16 gold badges203 silver badges272 bronze badges
answered Nov 7, 2017 at 0:26
![]()
François RomainFrançois Romain
13.2k17 gold badges87 silver badges120 bronze badges
If the prop is only useful for this child component, give the child a prop like initialVisible, and a data like mutableVisible, and in the created hook (which is called when the component’s data structure is assembled), simply this.mutableVisible = this.initialVisible.
If the prop is shared by other children of the parent component, you’ll need to make it the parent’s data to make it available for all children. Then in the child, this.$emit('visibleChanged', currentVisible) to notify the parent to change visible. In parent’s template, use <ThatChild ... :visibleChanged="setVisible" ...>. Take a look at the guide: https://v2.vuejs.org/v2/guide/components.html
![]()
tony19
117k16 gold badges203 silver badges272 bronze badges
answered Nov 24, 2016 at 10:01
![]()
JJPandariJJPandari
3,4141 gold badge16 silver badges23 bronze badges
After a read of your latest comments it seems that you are concerned about having the logic to show/hide the alerts on the parent. Therefore I would suggest the following:
parent
# template
<alert :alert-visible="alertVisible"></alert>

# script
data () {
  alertVisible: false,
  ...
},
...
Then on the child alert you would $watch the value of the prop and move all logic into the alert:
child (alert)
# script
data: {
  visible: false,
  ...
},
methods: {
  hide () {
    this.visible = false
  },
  show () {
    this.visible = true
  },
  ...
},
props: [
  'alertVisible',
],
watch: {
  alertVisible () {
    if (this.alertVisible && !this.visible) this.show()
    else if (!this.alertVisible && this.visible) this.hide()
  },
  ...
},
...
answered Nov 24, 2016 at 9:52
![]()
GuyCGuyC
6,4741 gold badge29 silver badges43 bronze badges
3
To help anybody, I was facing the same issue. I just changed my var that was inside v-model=»» from props array to data. Remember the difference between props and data, im my case that was not a problem changing it, you should weight your decision.
E.g.:
<v-dialog v-model="dialog" fullscreen hide-overlay transition="dialog-bottom-transition">
Before:
export default {
    data: function () {
        return {
            any-vars: false
        }
    },
    props: {
            dialog: false,
            notifications: false,
            sound: false,
            widgets: false
        },
    methods: {
        open: function () {
            var vm = this;

            vm.dialog = true;
        }
    }
}
After:
export default {
    data: function () {
        return {
            dialog: false
        }
    },
    props: {
            notifications: false,
            sound: false,
            widgets: false
        },
    methods: {
        open: function () {
            var vm = this;

            vm.dialog = true;
        }
    }
}
answered May 22, 2018 at 20:12
![]()
MarcoMarco
2,6501 gold badge20 silver badges24 bronze badges
Maybe it looks like on hack and violates the concept of a single data source, but its work)
This solution is creating local proxy variable and inherit data from props. Next work with proxy variable.
Vue.component("vote", {
    data: function() {
        return {
            like_: this.like,
            dislike_: this.dislike,
        }
    },

    props: {
        like: {
            type: [String, Number],
            default: 0
        },
        dislike: {
            type: [String, Number],
            default: 0
        },
        item: {
            type: Object
        }
    },

    template: '<div class="tm-voteing"><span class="tm-vote tm-vote-like" @click="onVote(item, 'like')"><span class="fa tm-icon"></span><span class="tm-vote-count">{{like_}}</span></span><span class="tm-vote tm-vote-dislike" @click="onVote(item, 'dislike')"><span class="fa tm-icon"></span><span class="tm-vote-count">{{dislike_}}</span></span></div>',

    methods: {
        onVote: function(data, action) {
            var $this = this;
            // instead of jquery ajax can be axios or vue-resource
            $.ajax({
                method: "POST",
                url: "/api/vote/vote",
                data: {id: data.id, action: action},
                success: function(response) {
                    if(response.status === "insert") {
                        $this[action + "_"] = Number($this[action + "_"]) + 1;
                    } else {
                        $this[action + "_"] = Number($this[action + "_"]) - 1;
                    }
                },
                error: function(response) {
                    console.error(response);
                }
            });
        }
    }
});
use component and pass props
<vote :like="item.vote_like" :dislike="item.vote_dislike" :item="item"></vote>
answered Jul 15, 2017 at 19:17
![]()
VitaliyVitaliy
4904 silver badges6 bronze badges
I wonder why it is missed by others when the warning has a hint
Avoid mutating a prop directly since the value will be overwritten whenever the parent component re-renders. Instead, use a data or computed property based on the prop’s value. Prop being mutated: «visible» (found in component )
Try creating a computed property out of the prop received in the child component as
computed: {
  isVisible => this.visible
}
And use this computed in your child component as well as to emit the changes to your parent.
![]()
vsync
113k55 gold badges297 silver badges382 bronze badges
answered Apr 13, 2020 at 18:23
![]()
SakshamSaksham
8,9056 gold badges44 silver badges72 bronze badges
You don’t have to use the JSON object.
const child = {
  props:["user"],
  data(){
    return {
      localUser: Object.assign({}, this.user)
    }
  }
}
Use localUser (or whatever you want to call it) inside your child.
Edit
I had modified a fiddle created for another answer to this question to demonstrate the above concept and @user3743266 asked
I’m coming to grips with this myself, and I’m finding this very
useful. Your example works well. In the child, you’ve created an
element in data that takes a copy of the prop, and the child works
with the copy. Interesting and useful, but… it’s not clear to me
when the local copy gets updated if something else modifies the
parent. I modified your fiddle, removing the v-ifs so everything is
visible, and duplicating the edit component. If you modify name in one
component, the other is orphaned and gets no changes?
The current component looks like this:
Vue.component('edit-user', {
  template: `
  <div>
    <input type="text" v-model="localUser.name">
    <button @click="$emit('save', localUser)">Save</button>
    <button @click="$emit('cancel')">Cancel</button>
  </div>
  `,
  props: ['user'],
  data() {
    return {
      localUser: Object.assign({}, this.user)
    }
  }
})
Because I made the design decision to use a local copy of the user, @user3743266 is correct, the component is not automatically updated. The property user is updated, but localUser is not. In this case, if you wanted to automatically update local data whenever the property changed, you would need a watcher.
Vue.component('edit-user', {
  template: `
  <div>
    <input type="text" v-model="localUser.name">
    <button @click="$emit('save', localUser)">Save</button>
    <button @click="$emit('cancel')">Cancel</button>
  </div>
  `,
  props: ['user'],
  data() {
    return {
      localUser: Object.assign({}, this.user)
    }
  },
  watch:{
    user(newUser){
        this.localUser = Object.assign({}, newUser)
    }
  }
})
Here is the updated fiddle.
This allows you full control over when/if the local data is updated or emitted. For example, you might want to check a condition before updating the local state.
  watch:{
    user(newUser){
      if (condition)
        this.localUser = Object.assign({}, newUser)
    }
  }
As I said elsewhere, there are times when you might want to take advantage of objects properties being mutable, but there are also times like this where you might want more control.
Однонаправленный поток данных
Последнее обновление: 29.09.2017
При использовании props в компонентах следует учитывать, что данные в props представляют однонаправленный поток данных от родительского компонента к
дочерним компонентам. Изменение свойства родителя приведет к изменению в дочерних компонентах. Однако дочерние компоненты не могут изменить свойство родителя.
То есть поток данных идет только в одном направлении: родителя к потомкам. Кроме того, если мы попробуем изменить в дочерних компонентах
значения, переданные через props, то на консоль браузера будет выведено предупреждение о том, что это не следует делать.
Более того при любом обновлении родительского компонента у дочерних компонентов обновляются значения, передаваемые через props.
Например, рассмотрим следующую ситуацию:
<!DOCTYPE html>
<html>
<head>
<title>Компоненты Vue.js</title>
<meta charset="utf-8" />
</head>
<body>
<div id="app">
	<h2>Hello, {{name}}</h2>
    <useredit :user="name"></useredit>
	<button v-on:click="resetName">Set Name</button>
</div>
<script src="https://unpkg.com/vue@2.7.14/dist/vue.js"></script>
<script>
Vue.component('useredit', {
	props: ["user"],
	template: '<div><input type="text" v-model="user" /><p>Name: {{user}}</p></div>'
});
new Vue({
    el: "#app",
    data: {
        name: 'Tom'
    },
	methods:{
		resetName: function(){
			this.name = 'Bob';
		}
	}
});
</script>
</body>
</html>
Из родителя — объекта Vue в компонент useredit через props передается значение name. В этом компоненте мы можем попробовать управлять переданным значением через
поле ввода и механизм двусторонней привязки:
<input type="text" v-model="user" />
Но если мы попробуем изменить через поле ввода данное значение, то оно изменится только в рамках компонента useredit, а на консоль будет выведено предупреждение:
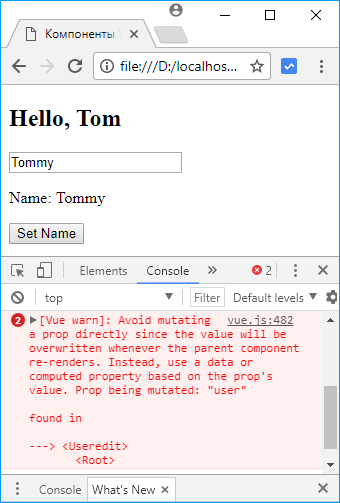
Значение свойства name в родительском объекте Vue никак не будет затронуто. Почему так происходит? Дело в том, что данные простых типов — String, Number, Boolean передаются по значению, то есть в дочерний компонент
передается копия значения. И в данном случае в компонент useredit как раз передается копия строки name. Соответственно все действия с этой копией никак не повлияют на
родительский объект.
В отличие от простых типов сложные объекты и массивы передаются по ссылке. Поэтому из дочерних компонентов мы можем изменять массивы или сложные объекты, которые определены
в родительских объектах.
Более того в объекте Vue посредством нажатия кнопки мы можем вызвать метод resetName, который изменит свойство name с Tom на Bob:
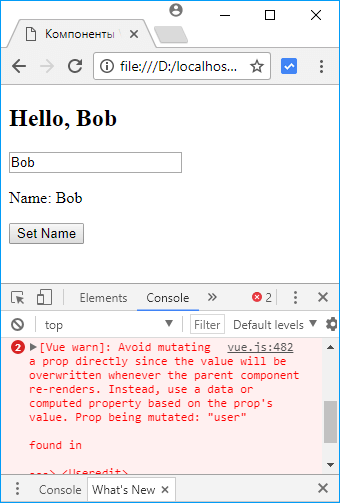
То есть несмотря на то, что внутри компонента useredit мы меняем значение из props, но изменение родителя — объекта Vue приведет к изменению дочернего компонента.
Однако могут быть ситуации, когда нам все таки нужно изменить значения в props и при этом не допустить изменения этих значений извне.
Что делать в этом случае? В этом случае мы можем определить локальную переменную. Через props устанавливается ее начальное значение, и затем компонент работает только с этой переменной:
<div id="app">
	<h2>Hello, {{name}}</h2>
    <useredit :user="name"></useredit>
	<button v-on:click="resetName">Set Name</button>
</div>
<script src="https://unpkg.com/vue@2.7.14/dist/vue.js"></script>
<script>
Vue.component('useredit', {
	props: ["user"],
	data: function () {
	  return { userName: this.user}
	},
	template: '<div><input type="text" v-model="userName" /><p>Name: {{userName}}</p></div>'
});
new Vue({
    el: "#app",
    data: {
        name: 'Tom'
    },
	methods:{
		resetName: function(){
			this.name = 'Bob';
		}
	}
});
</script>
Теперь все действия будут идти с локальной переменной userName. Значения из props в компоненте не будут изменяться, а изменения в родительском компоненте
никак не повлияют на значение переменной userName.

We use props to pass information/data from a parent component to child components. In this article, I will explain everything you need to know about props and why you should use props in Vue.js.
Here’s a brief outline of what we’ll cover in this guide:
- What are props in Vue.js?
- How to register props inside a component
- How to work with multiple props
- Vue.js prop types
- How to pass data to props
- How to pass functions to props
- How to validate props
- How to set default values for props
What are Props in Vue.js?
“Props” is a special keyword which stands for properties. It can be registered on a component to pass data from a parent component to one of its children components.
This is a lot easier compared to using state management libraries like vuex for Vue.js applications.
Data in props can only flow one way – from the top, or parent component, to the bottom, or child components. This simply means you cannot pass data from a child to a parent.
Another thing to keep in mind is that Props are read-only and cannot be modified by the child component because the parent component «owns» that value.
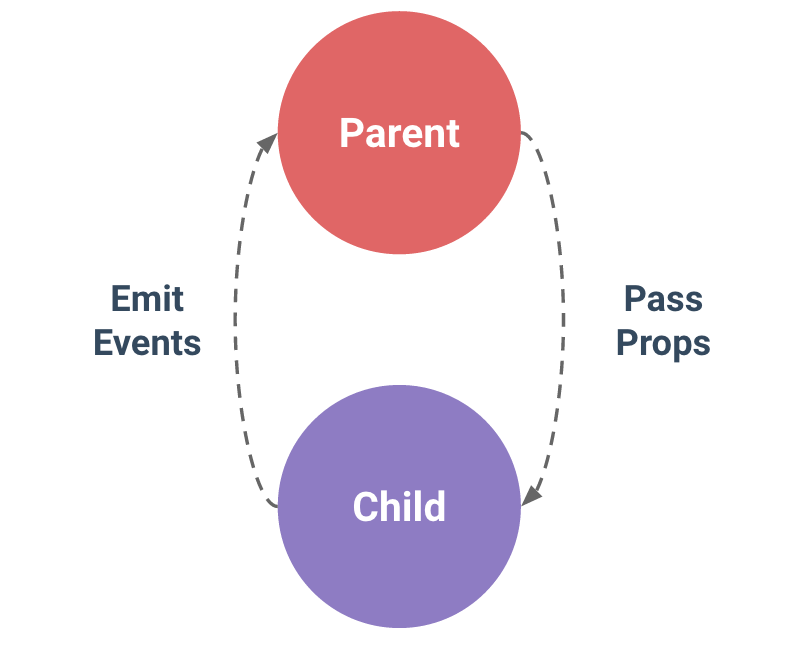
Let’s balance things up now – the parent components pass props to the child component(s) while the child component emit events to the parent component(s).
How to Register Props Inside a Component
Let’s now take a look at how we can register props inside a component.
Vue.component('user-detail', {
  props: ['name'],
  template: '<p>Hi {{ name }}</p>'
})
.js
or, in a Vue Single File Component:
<template>
  <p>{{ name }}</p>
</template>

<script>
export default {
  props: ['name']
}
</script>
In the above code, we registered a prop called name which we can call in the template section of our app.
Note: This is the child component and this prop is going to receive data from the parent component. I will explain this more later.
How to Work with Multiple Props
You can have more than one prop by appending them to the props array, just like this:
Vue.component('user-detail', {
  props: ['firstName', 'lastName'],
  template: '<p>Hi {{ firstName }} {{ lastName }}</p>'
})
or, in a Vue Single File Component:
<template>
  <p>Hi {{ firstName }} {{ lastName }}</p>
</template>

<script>
export default {
  props: [
    'firstName',
    'lastName'
  ],
}
</script>
Vue.js Prop Types
To specify the type of prop you want to use in Vue, you will use an object instead of an array. You’ll use the name of the property as the key of each property, and the type as the value.
If the type of the data passed does not match the prop type, Vue sends an alert (in development mode) in the console with a warning. The valid types you can use are:
- String
- Number
- Boolean
- Array
- Object
- Date
- Function
- Symbol
Vue.component('user-detail', {
  props: {
    firstName: String,
    lastName: String
  },
  template: '<p>Hi {{ firstName }} {{ lastName }}</p>'
})
or, in a Vue Single File Component:
<template>
  <p>Hi {{ firstName }} {{ lastName }}</p>
</template>

<script>
export default {
  props: {
    firstName: String,
    lastName: String
  },
}
</script>
How to Pass Data to Props in Vue
The major goal of using props is to pass down data/information. You can either pass your value as a data property using v-bind, such as in this code:
<template>
  <ComponentName :title=title />
</template>

<script>
export default {
  //...
  data() {
    return {
      title: 'Understanding Props in vuejs'
    }
  },
  //...
}
</script>
or as a static value like this:
<ComponentName title="Understanding Props in vuejs" />Suppose we are building an app which has so many buttons with different text/background colors. Instead of repeating the button syntax in all our files, it’s better to create a button component and then pass the text/background colors as props.
Here’s the parent component:
<template>
  <div id="app">
    <Button :name='btnName' bgColor='red' />
    <Button :name='btnName' bgColor='green' />
    <Button :name='btnName' bgColor='blue' />
  </div>
</template>

<script>
import Button from './components/Button'

export default {
  name: 'App',
  data(){
    return{
      btnName:"Joel",
    }
  },
  components: {
    Button
  }
}
</script>
And here’s the child component:
<template>
  <button class="btn" :style="{backgroundColor:bgColor}">{{name}}</button>
</template>
<script>
export default {
  name: 'Button',
  props:{
    name:String,
    bgColor:String
  }
}
</script>
The above code shows you how to use both data property and static values when you’re getting data from a parent component and using that data in a child component.
Note: you can also use a ternary operator inside the prop value to check a truthy condition and pass a value that depends on it.
<template>
  <div id="app">
    <Button :tagUser="signedUp ? 'Logout' : 'Login'" bgColor='red' />
  </div>
</template>
<script>
import Button from './components/Button'
export default {
  name: 'App',
  data(){
    return{
      signedUp: true,
    }
  },
  components: {
    Button
  }
}
</script>
In the above code, we are checking the signedUp data property. If it’s true, the data sent should be Logout, else it should be Login.
How to Pass Functions to Props
Passing a function or a method down to a child component as a prop is relatively straightforward. It’s basically the same process as passing any other variable.
But there are reasons why you shouldn’t use props as functions – instead you should use emit. This article properly explains why.
<template>
  <ChildComponent :function="newFunction" />
</template>
<script>
export default {
methods: {
newFunction() {
// ...
}
}
};
</script>How to Validate Props in Vue
Vue makes validating props very easy. All you have to do is add the required key and its value to the prop. We can validate with both the prop type and by using required:
props: {
  name: {
    type: String,
    required: true
  }
}
How to Set Default Prop Values
Before concluding this article, let’s now see how to set default values to our props. Default values are rendered if the child component is unable to get data from the parent component.
Vue allows you to specify a default value, just as we specified required earlier.
props: {
  name: {
    type: String,
    required: true,
    default: 'John Doe'
  },
  img: {
    type: String,
    default: '../image-path/image-name.jpg',
   },
}
You can also define the default value as an object. And it can be a function that returns an appropriate value, rather than being the actual value.
Conclusion
In this article, we have learned what props do and how props works in Vue.js.
In summary, we use props to pass down data from the parent components to the child component(s). The child component also emit events to the parent component(s) in case you need to send data/events from the child to the parent component.
Thank you for reading!
Useful Links
- Vue.js Component Props — flaviocopes
- Props — Vue documentation
Learn to code for free. freeCodeCamp’s open source curriculum has helped more than 40,000 people get jobs as developers. Get started
| title | type | order |
|---|---|---|
|
Props |
guide |
102 |
<script>
const __pageRedirects = {
‘#Non-Prop-Attributes’: ‘/guide/components/attrs.html’
}
</script>
This page assumes you’ve already read the Components Basics. Read that first if you are new to components.
Prop Casing (camelCase vs kebab-case)
HTML attribute names are case-insensitive, so browsers will interpret any uppercase characters as lowercase. That means when you’re using in-DOM templates, camelCased prop names need to use their kebab-cased (hyphen-delimited) equivalents:
Vue.component('blog-post', {
  // camelCase in JavaScript
  props: ['postTitle'],
  template: '<h3>{{ postTitle }}</h3>'
})
<!-- kebab-case in HTML -->
<blog-post post-title="hello!"></blog-post>
Again, if you’re using string templates, this limitation does not apply.
Prop Types
So far, we’ve only seen props listed as an array of strings:
props: ['title', 'likes', 'isPublished', 'commentIds', 'author']
Usually though, you’ll want every prop to be a specific type of value. In these cases, you can list props as an object, where the properties’ names and values contain the prop names and types, respectively:
props: {
  title: String,
  likes: Number,
  isPublished: Boolean,
  commentIds: Array,
  author: Object,
  callback: Function,
  contactsPromise: Promise // or any other constructor
}
This not only documents your component, but will also warn users in the browser’s JavaScript console if they pass the wrong type. You’ll learn much more about type checks and other prop validations further down this page.
Passing Static or Dynamic Props
So far, you’ve seen props passed a static value, like in:
<blog-post title="My journey with Vue"></blog-post>
You’ve also seen props assigned dynamically with v-bind, such as in:
<!-- Dynamically assign the value of a variable -->
<blog-post v-bind:title="post.title"></blog-post>

<!-- Dynamically assign the value of a complex expression -->
<blog-post
  v-bind:title="post.title + ' by ' + post.author.name"
></blog-post>
In the two examples above, we happen to pass string values, but any type of value can actually be passed to a prop.
Passing a Number
<!-- Even though `42` is static, we need v-bind to tell Vue that -->
<!-- this is a JavaScript expression rather than a string.       -->
<blog-post v-bind:likes="42"></blog-post>

<!-- Dynamically assign to the value of a variable. -->
<blog-post v-bind:likes="post.likes"></blog-post>
Passing a Boolean
<!-- Including the prop with no value will imply `true`. -->
<blog-post is-published></blog-post>

<!-- Even though `false` is static, we need v-bind to tell Vue that -->
<!-- this is a JavaScript expression rather than a string.          -->
<blog-post v-bind:is-published="false"></blog-post>

<!-- Dynamically assign to the value of a variable. -->
<blog-post v-bind:is-published="post.isPublished"></blog-post>
Passing an Array
<!-- Even though the array is static, we need v-bind to tell Vue that -->
<!-- this is a JavaScript expression rather than a string.            -->
<blog-post v-bind:comment-ids="[234, 266, 273]"></blog-post>

<!-- Dynamically assign to the value of a variable. -->
<blog-post v-bind:comment-ids="post.commentIds"></blog-post>
Passing an Object
<!-- Even though the object is static, we need v-bind to tell Vue that -->
<!-- this is a JavaScript expression rather than a string.             -->
<blog-post
  v-bind:author="{
    name: 'Veronica',
    company: 'Veridian Dynamics'
  }"
></blog-post>

<!-- Dynamically assign to the value of a variable. -->
<blog-post v-bind:author="post.author"></blog-post>
Passing the Properties of an Object
If you want to pass all the properties of an object as props, you can use v-bind without an argument (v-bind instead of v-bind:prop-name). For example, given a post object:
post: {
  id: 1,
  title: 'My Journey with Vue'
}
The following template:
<blog-post v-bind="post"></blog-post>
Will be equivalent to:
<blog-post
  v-bind:id="post.id"
  v-bind:title="post.title"
></blog-post>
One-Way Data Flow
All props form a one-way-down binding between the child property and the parent one: when the parent property updates, it will flow down to the child, but not the other way around. This prevents child components from accidentally mutating the parent’s state, which can make your app’s data flow harder to understand.
In addition, every time the parent component is updated, all props in the child component will be refreshed with the latest value. This means you should not attempt to mutate a prop inside a child component. If you do, Vue will warn you in the console.
There are usually two cases where it’s tempting to mutate a prop:
- The prop is used to pass in an initial value; the child component wants to use it as a local data property afterwards. In this case, it’s best to define a local data property that uses the prop as its initial value:
props: ['initialCounter'],
data: function () {
  return {
    counter: this.initialCounter
  }
}
- The prop is passed in as a raw value that needs to be transformed. In this case, it’s best to define a computed property using the prop’s value:
props: ['size'],
computed: {
  normalizedSize: function () {
    return this.size.trim().toLowerCase()
  }
}
Note that objects and arrays in JavaScript are passed by reference, so if the prop is an array or object, mutating the object or array itself inside the child component **will** affect parent state.
Prop Validation
Components can specify requirements for their props, such as the types you’ve already seen. If a requirement isn’t met, Vue will warn you in the browser’s JavaScript console. This is especially useful when developing a component that’s intended to be used by others.
To specify prop validations, you can provide an object with validation requirements to the value of props, instead of an array of strings. For example:
Vue.component('my-component', {
  props: {
    // Basic type check (`null` and `undefined` values will pass any type validation)
    propA: Number,
    // Multiple possible types
    propB: [String, Number],
    // Required string
    propC: {
      type: String,
      required: true
    },
    // Number with a default value
    propD: {
      type: Number,
      default: 100
    },
    // Object with a default value
    propE: {
      type: Object,
      // Object or array defaults must be returned from
      // a factory function
      default: function () {
        return { message: 'hello' }
      }
    },
    // Custom validator function
    propF: {
      validator: function (value) {
        // The value must match one of these strings
        return ['success', 'warning', 'danger'].includes(value)
      }
    }
  }
})
When prop validation fails, Vue will produce a console warning (if using the development build).
Note that props are validated **before** a component instance is created, so instance properties (e.g. `data`, `computed`, etc) will not be available inside `default` or `validator` functions.
Type Checks
The type can be one of the following native constructors:
- String
- Number
- Boolean
- Array
- Object
- Date
- Function
- Symbol
In addition, type can also be a custom constructor function and the assertion will be made with an instanceof check. For example, given the following constructor function exists:
function Person (firstName, lastName) {
  this.firstName = firstName
  this.lastName = lastName
}
You could use:
Vue.component('blog-post', {
  props: {
    author: Person
  }
})
to validate that the value of the author prop was created with new Person.
Non-Prop Attributes
A non-prop attribute is an attribute that is passed to a component, but does not have a corresponding prop defined.
While explicitly defined props are preferred for passing information to a child component, authors of component libraries can’t always foresee the contexts in which their components might be used. That’s why components can accept arbitrary attributes, which are added to the component’s root element.
For example, imagine we’re using a 3rd-party bootstrap-date-input component with a Bootstrap plugin that requires a data-date-picker attribute on the input. We can add this attribute to our component instance:
<bootstrap-date-input data-date-picker="activated"></bootstrap-date-input>
And the data-date-picker="activated" attribute will automatically be added to the root element of bootstrap-date-input.
Replacing/Merging with Existing Attributes
Imagine this is the template for bootstrap-date-input:
<input type="date" class="form-control">
To specify a theme for our date picker plugin, we might need to add a specific class, like this:
<bootstrap-date-input
  data-date-picker="activated"
  class="date-picker-theme-dark"
></bootstrap-date-input>
In this case, two different values for class are defined:
form-control, which is set by the component in its templatedate-picker-theme-dark, which is passed to the component by its parent
For most attributes, the value provided to the component will replace the value set by the component. So for example, passing type="text" will replace type="date" and probably break it! Fortunately, the class and style attributes are a little smarter, so both values are merged, making the final value: form-control date-picker-theme-dark.
Disabling Attribute Inheritance
If you do not want the root element of a component to inherit attributes, you can set inheritAttrs: false in the component’s options. For example:
Vue.component('my-component', {
  inheritAttrs: false,
  // ...
})
This can be especially useful in combination with the $attrs instance property, which contains the attribute names and values passed to a component, such as:
{
  required: true,
  placeholder: 'Enter your username'
}
With inheritAttrs: false and $attrs, you can manually decide which element you want to forward attributes to, which is often desirable for base components:
Vue.component('base-input', {
  inheritAttrs: false,
  props: ['label', 'value'],
  template: `
    <label>
      {{ label }}
      <input
        v-bind="$attrs"
        v-bind:value="value"
        v-on:input="$emit('input', $event.target.value)"
      >
    </label>
  `
})
Note that `inheritAttrs: false` option does **not** affect `style` and `class` bindings.
This pattern allows you to use base components more like raw HTML elements, without having to care about which element is actually at its root:
<base-input
  label="Username:"
  v-model="username"
  required
  placeholder="Enter your username"
></base-input>