Особенность операционной системы Windows состоит в том, что игры и программы по дефолту устанавливаются на основной диск (часто именуется “диск C”). Иногда возникают ситуации, когда файл, например, попросту не помещается на выбранном по умолчанию накопителе или у пользователя есть какие-то личные предпочтения в установке. В таких случаях сильно волноваться не стоит, ведь смена диска на основной загрузочный происходит за пару минут, а перенести с одного на накопителя на другой игру или программу еще проще. В статье будет рассмотрено, как установить Valorant на другой диск (не основной).
Как перенести Валорант на другой диск
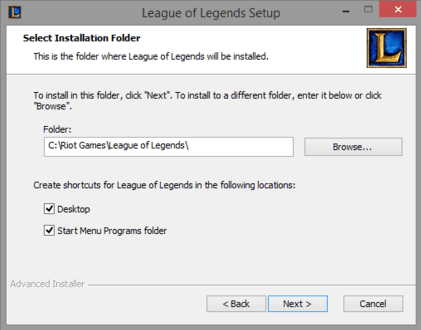
Чтобы установить игру на определенный накопитель, требуется провести подобную настройку сразу при установке файлов. После удачной загрузки установщика и его открытия, на начальной стадии следует выбрать “Расширенные настройки”. Запуститься дополнительное окно, в котором необходимо указать директорию инсталляции Valorant. Таким образом, можно выбрать подходящий накопитель в строке “Путь установки”. Сохраняемся и нажимаем “Установить”. Отметим, что желательно отсутствие русских символов в пути к файлам игры, иначе могут возникнуть ошибки.
Если Valorant уже установлена на нежелательный внутренний накопитель и вы хотите перенести ее, то уверяем — делается это быстро и просто. Рассмотрим на конкретном примере, как установить Валорант на диск Д c любого другого диска. Самое первое, что понадобится — отыскать игру. Далее копируем папку “Riot Games” и вставляем ее нужном накопителе в любой директории. Правило одно: путь не должен содержать кириллических символов. Не забываем старую версию Valorant деинсталлировать.
Еще один способ, который позволит перенести программные файлы с одного диска на другой — полная переустановка. Для этого необходимо снова отыскать игру. Открываем папку с ней и находим там файл “uninstall.exe”. Данная мини-программа поможет без лишних усилий избавиться от всех файлов и подпрограмм Валорант. Следующим шагом переходим на сайт разработчика и ищем кнопку “Download Game”. В установщике прописываем необходимый путь установки (важный критерий — отсутствие кириллицы).
Возможные ошибки
На самом деле, касательно текущей темы, существуют всего две часто возникающие ошибки: невозможность повторной установки и некорректный выбор пути. В первом случае решением является полная деинсталляция файловой системы Valorant. Обычно с этим хорошо справляется встроенная подпрограмма “uninstall.exe”. Если при выборе директории установки игры возникает проблема некорректного пути, то удостоверьтесь что путь не содержит кириллических символов и пробелов.
Вывод
Переустановка Valorant может решить кучу возникших проблем. Програмнные перезапишутся, данные обновятся. Разобравшись на примере, как установить Валорант на диск D с диска C, можно смело идти и применять полученные знания на практике, реализовывая интересные идеи.
FAQ
Что делать, если “невозможно установить игру”?
Такая ошибка возникает при неправильной деинсталляции предыдущей версии. То есть устанавливая Валорант заново, следует полностью устранить старые файлы с компьютера.
Нужно ли переносить игру, если уже скачал на диск С?
Особой разницы в том, на каком диске расположена программа нет. Лишь в паре случаев, когда, например, вы используете два накопителя с разными скоростями (HDD и SSD), тогда лучшим вариантом станет инсталляция Валорант на более быстрый диск. Таким образом, игра будет запускаться за меньший промежуток времени, а лаги пропадут.
Где скачать официальный Валорант?
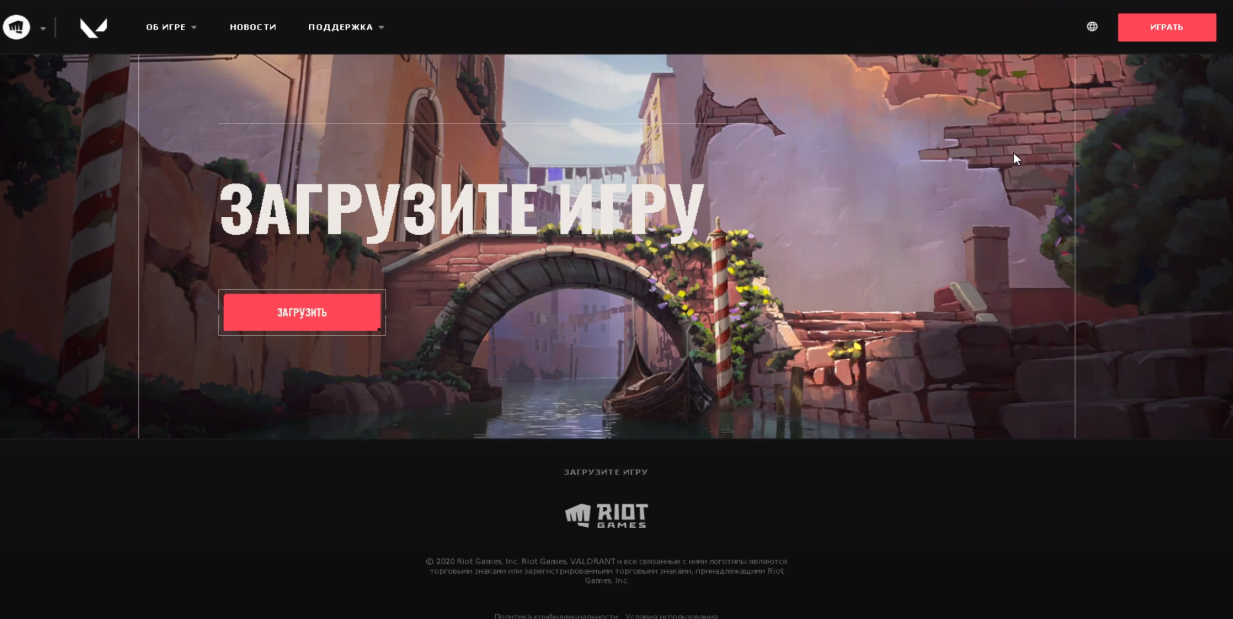
Скачать лицензионную версию Valorant можно по следующей ссылке. Листаем до “подвала” сайта, жмем кнопку “Download game (скачать игру)” и следуем инструкциям установщика.
Почему игра не переустанавливается?
Вообще, причин невозможности повторной установки может быть куча. Наиболее типичное решение — полная деинсталляция файлов Валорант со всех внутренних накопителей. Они могут запрещать установщику заменять себя. Также частой причиной становится переполненность диска. Проверьте, сколько места осталось на накопителе, если не хватает — освободите нужное количество памяти (20-30 Гб).
На чтение 2 мин Просмотров 418 Опубликовано 17 июня, 2022
Valorant — захватывающий многопользовательский шутер, в котором игроки сражаются в командах 5 на 5. Однако им нужно не только уничтожить друг друга, но и установить бомбу или обезвредить ее. Но в отличие от Counter-Strike, в этой игре есть разные Герои с уникальными способностями, кардинально меняющими игровой процесс. Игра занимает много места на диске, поэтому в этом гайде мы расскажем, как изменить папку установки.
Как изменить папку установки Valorant

С каждым обновлением размер Valorant увеличивается. А если у вас не хватает места на диске, то это становится серьезной проблемой. Кроме того, если вы хотите большей производительности, вам нужно перенести игру на SSD. К счастью, вы можете легко изменить папку установки Valorant. Однако вместе с игрой вы перенесете и Riot Client.
И так, откройте диск, на котором у вас установлен Valorant. Затем найдите папку Riot Games и щелкните ее правой кнопкой мыши. В появившемся контекстном меню нажмите «Вырезать». Теперь выберите другую папку или диск и вставьте вырезанную папку Riot Games. После этого начнется процесс переноса, который займет некоторое время.
Затем вам нужно скачать установщик Valorant. Сделать это можно на официальном сайте игры. После загрузки установщика дважды щелкните его, чтобы начать установку. В появившемся окне необходимо нажать кнопку «Дополнительные параметры».
Выберите папку Riot Games, которую вы переместили ранее. Затем нажмите OK, чтобы начать процесс проверки. После завершения проверки необходимо перезагрузить компьютер. Наконец, запустите Valorant, чтобы начать игру.
Как видите, изменить папку установки Valorant не очень сложно. Однако заранее подумайте, куда вы собираетесь переносить файлы игры и достаточно ли места на вашем диске. А пока вы здесь, взгляните на наше руководство о том, как записывать и смотреть повторы в Valorant
На чтение 3 мин Просмотров 109 Опубликовано 15 ноября, 2022
Перемещать клиентские игры из папки в папку сложнее, чем когда-либо. Вот как вы перемещаете Valorant.
Перенос игр, в которых для запуска используются клиенты, может быть относительно сложным. В основном это связано с тем, что клиент должен знать конкретный путь к игре, прежде чем ее можно будет запустить. На некоторых клиентах изменить этот путь легко, а на других, например, на клиенте Riot, это может быть немного сложно. Однако Valorant можно переместить на другой диск, в папку или на ПК.
Переместить Valorant на другой диск, в папку или на ПК
Игра можно перенести простым перетаскиванием, но вам нужно изменить место, где, по мнению клиента, находится игра, это более сложная часть.
Чтобы найти его местоположение и переместить, выполните следующие действия:
- Нажмите клавишу Windows + R.
- Введите «%programdata%» и нажмите Enter. .
- Найдите папку Riot Games и дважды щелкните ее.
- После этого откройте файл RiotClientInstalls.json.
- Скопируйте следующий путь:
- Вставьте его в проводник Windows.
- Оказавшись в папке VALORANT/live, вернитесь на две папки обратно в Riot Games.
- Щелкните правой кнопкой мыши папку VALORANT и выберите «Вырезать».
- Затем вставьте ее на другой диск. , папку или ПК и дождитесь окончания переноса.
После этого скопированный путь необходимо изменить на новый путь, в котором находится Valorant. После переноса перейдите на «живую» папку внутри папки Valorant, нажмите на адресный путь вверху и скопируйте его, нажав CTRL + C.
Затем вставьте его в файл «RiotClientInstalls.json» в место, как показано на картинке выше. Обязательно замените обратную косую черту на прямую косую черту. Выйдите из этого документа и нажмите «Сохранить».
Однако вы еще не в безопасности. Вам все равно нужно будет изменить еще одну вещь:
- Нажмите клавишу Windows + R.
- Введите «%programdata%» и один раз нажмите Enter. еще раз.
- Откройте папку Riot Games, а затем перейдите в папку «Метаданные» > valorant.live.
- Затем откройте «valorant.live.product_settings.yaml» с помощью блокнота.
- Найдите «product_install_full_path».
- Измените «product_install_full_path» на новый путь, который вы уже скопировали, просто вставьте его туда.
- Для «product_install_root» скопируйте указанный выше путь в папку VALORANT. Это означает, что путь к любой папке, которая находится перед папкой VALORANT, заканчивается следующим образом:
- Прежде чем выйти, снова измените обратную косую черту на прямую косую черту.
- Выйдите из текстового документа, а затем нажмите «Сохранить».

Когда вы закончите с этими вещами, вы, наконец, сможете запустить Valorant через клиент. Если вы тщательно выполнили все шаги, игра должна запуститься без каких-либо проблем.
Если есть проблемы, убедитесь, что путь, который вы изменили в обоих документах, совпадает с путем, который вы указали. перенесли вашу игру на.
В загрузке и установке клиента Valorant нет ничего сложного. Но мы все-таки решили написать подробный гайд. Вдруг у кого-то возникнут трудности. Рассказываем, как правильно скачать Valorant на ПК.
Откуда скачивать
Valorant – бесплатная игра. За деньги продается только косметика, которую покупать совсем не обязательно. Поэтому ее можно загрузить на официальном сайте Riot Games.
Но если ввести в любую поисковую систему запрос «Скачать Valorant», можно увидеть кучу ссылок на загрузку игры со сторонних сайтов. Вот, например, результаты поиска на Яндексе:
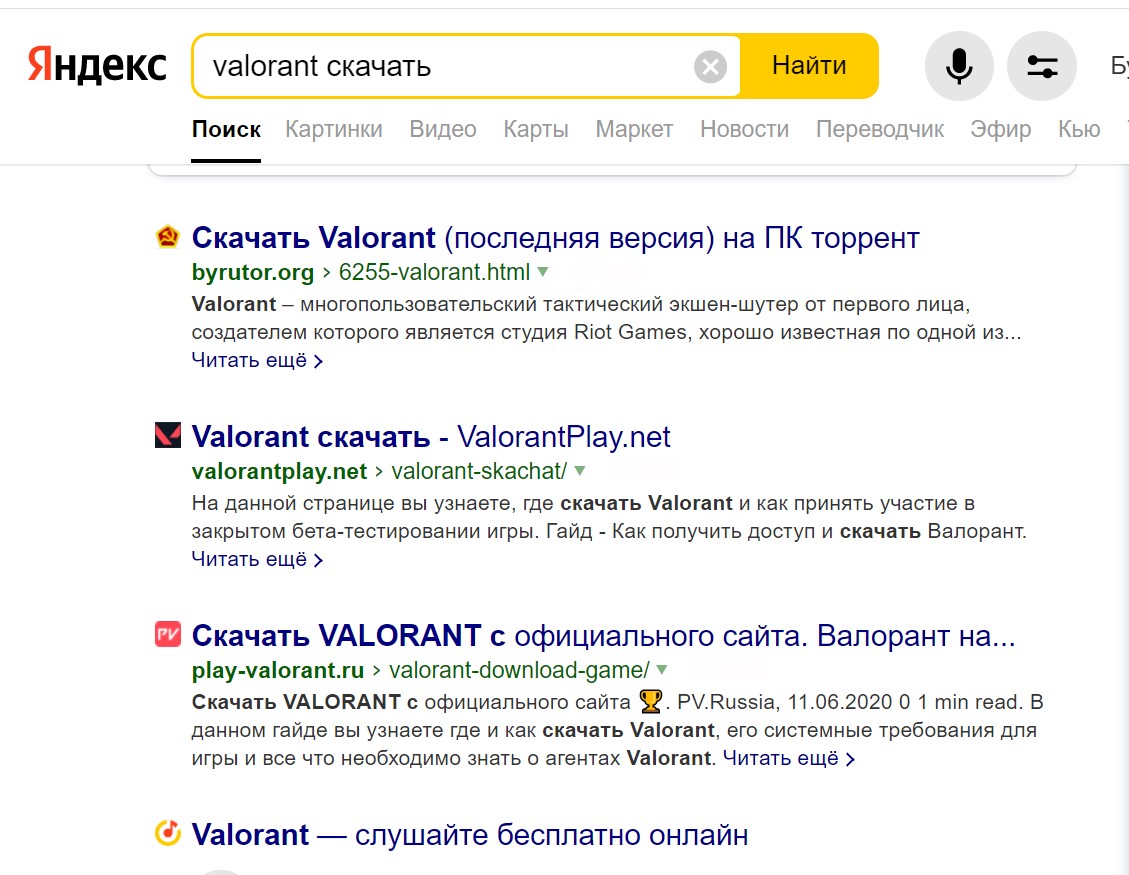
Этими ссылками пользоваться не нужно. По ним может быть расположен модифицированный клиент игры со встроенным вредоносным кодом. Поэтому загружаем Valorant строго с официального сайта Riot.
Как загрузить
Для скачивания установщика нужно перейти по адресу playvalorant.com. Там мы увидим страницу с двумя ярко-красными кнопками, которые называются:
- «Играть»;
- «Играть бесплатно».
Жмем на любую из них.

Результат будет одинаковый. Нам предложат создать новый аккаунт Riot Games или войти в уже существующий.

Для регистрации потребуется заполнить небольшую анкету, в которой надо указать:
- электронную почту;
- дату рождения;
- имя пользователя;
- пароль.
Еще нужно будет пройти капчу.
Кстати, созданную учетную запись в дальнейшем можно будет использовать не только для Valorant, но и для других игр от Riot Games. Например, League of Legends.
Если аккаунт уже есть, выбираем пункт «Авторизоваться», а потом вводим свои логин и пароль. Это актуально для пользователей, которые играли в другие проекты Riot, а теперь хотят попробовать Valorant.
Когда все это будет сделано, на экране появится новая кнопка – «Загрузить».
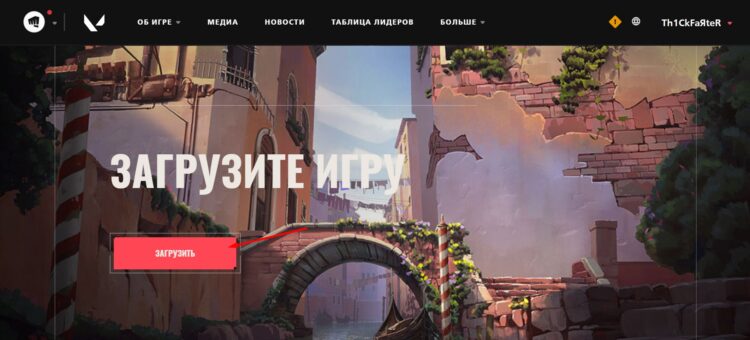
Нажимаем ее и выбираем путь сохранения установочного файла. Указать можно любую папку на любом накопителе.
Когда .exe-файл сохранен, находим его и запускаем двойным щелчком левой кнопки мыши. После этого на экране появится вот такое окно:
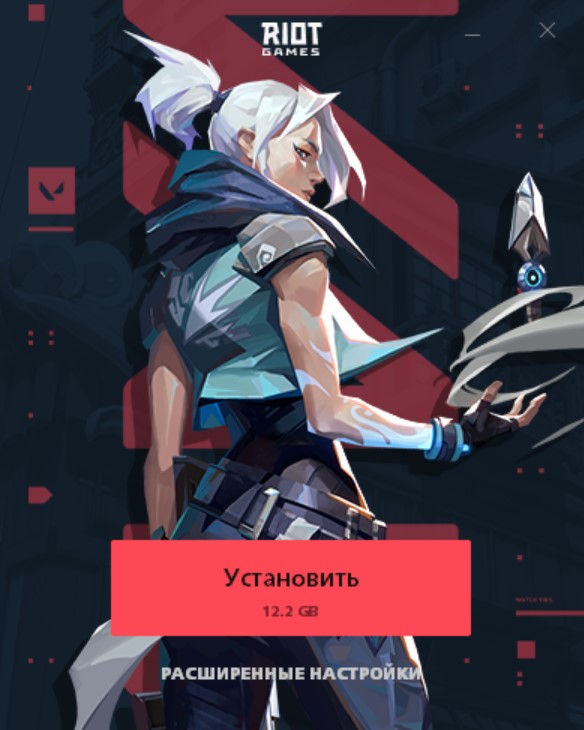
Тут есть два вариант действий. Первый – просто кликнуть по кнопке «Установить». В этом случае начнется загрузка файлов игры. Она осуществляется через торрент и зависит от скорости интернет-соединения, а также характеристик накопителя. Например, при скорости 100 мб/с и при условии использования SSD процедура может продлится от 25 до 40 минут. По ее окончании на рабочем столе появится ярлык клиента игры. Он запускается двойным нажатием левой кнопки мыши.
Второй вариант – зайти в раздел установщика под названием «Расширенные настройки». В нем можно установить дополнительные параметры инсталляции. На самом деле настройки не такие уж и расширенные. Ведь изменить можно всего один параметр – путь установки клиента игры.
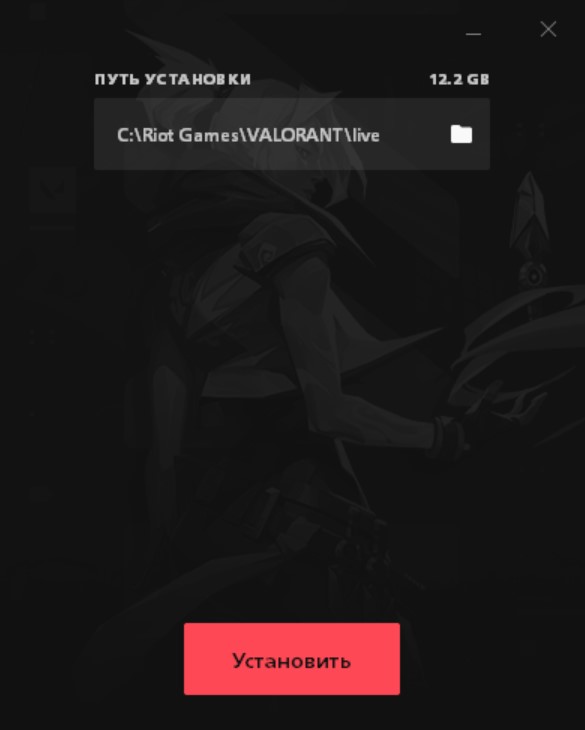
Для этого нажимаем на значок папки рядом с единственным полем в меню расширенных настроек и указываем нужную папку на любом накопителе. По умолчанию игра устанавливается сюда: C:Riot GamesVALORANTlive.
Античит
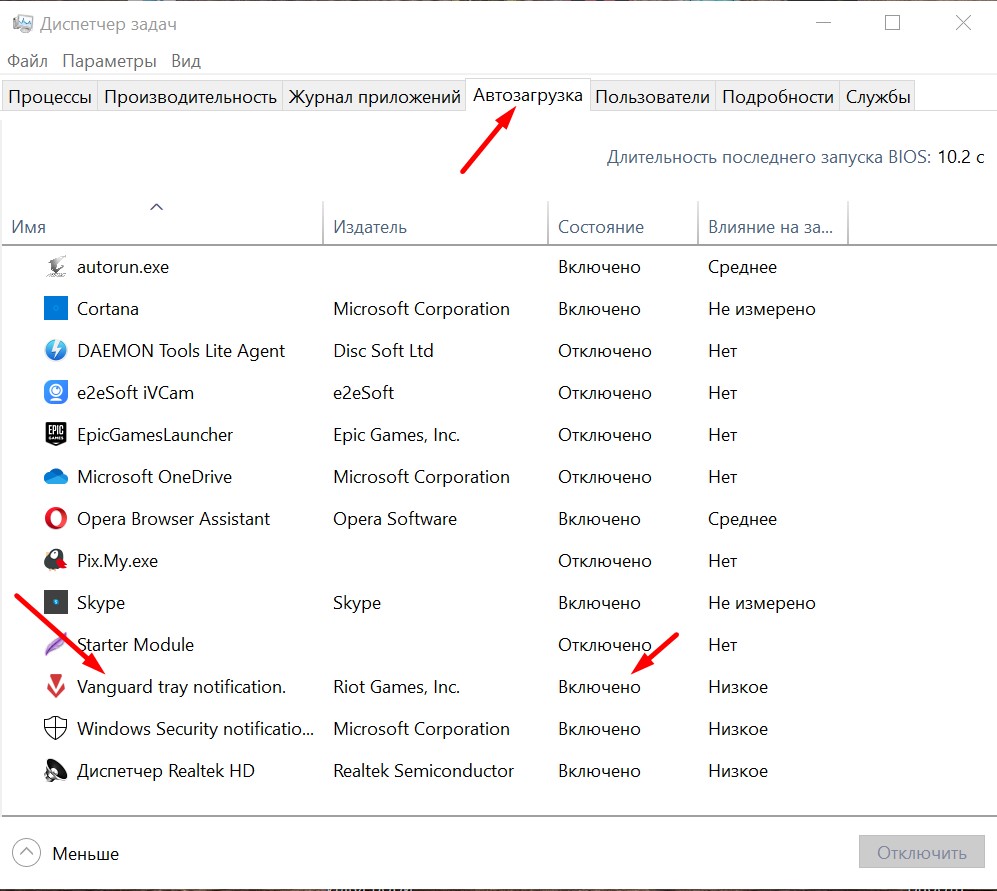
Одновременно с игрой устанавливается античит Vanguard. Справедливости ради, дополнительное ПО не дает стопроцентной гарантии защиты от читов. Но без него присоединиться к матчу невозможно. Поэтому нужно запускать его каждый раз перед стартом игры. Но гораздо удобнее установить запуск античита одновременно с системой. Это можно сделать в диспетчере задач на вкладке автозагрузка. Нужно найти Vanguard и переключить его состояние на «Включено»:
Если античит активен, он отображается на панели задач:

Античит порой вызывает проблемы – на него ругаются некоторые антивирусы, он иногда крашит игру. Но такое происходит довольно редко. А если и происходит, с ситуацией придется смириться – ведь без Vanguard поиграть не получится.
Запуск игры
Для запуска игрового клиента достаточно дважды кликнуть левой кнопкой мышки по его ярлыку. После этого нам предложат повторно авторизоваться в системе:
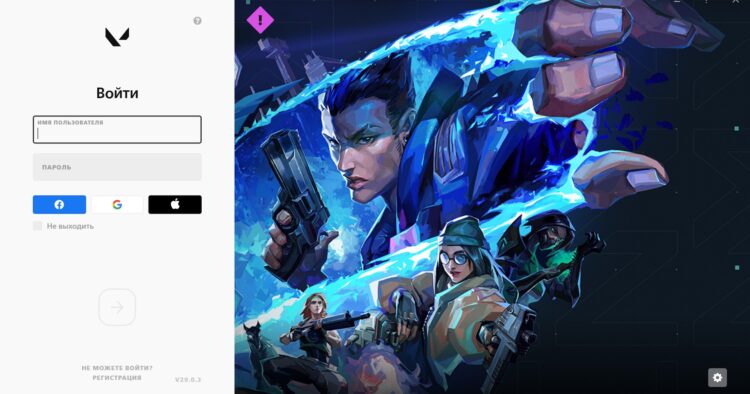
Вводим свои логин и пароль от аккаунта Riot и жмем стрелку. Если не хотим входить в профиль каждый раз при запуске клиента игры, нужно установить чекбокс напротив пункт «Не выходить». После этого авторизация будет выполняться автоматически.
После входа в аккаунт на экране появляется главное меню игры:

Все, теперь можно играть.
Немного об удалении
Игра удаляется стандартным образом – через раздел «Программы и компоненты» панели задач. Иконка Valorant там выглядит вот так:
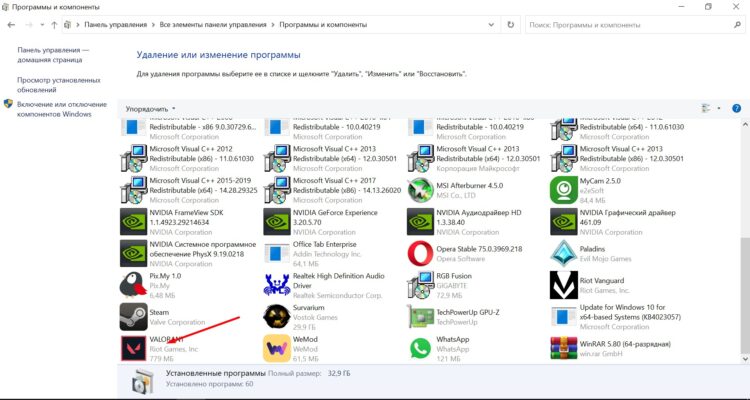
Для деинсталляции просто жмем на нее. Подтверждать ничего не надо – процедура стартует сразу после двойного клика по значку игры. Настройки графики, звука и управления после удаления сохраняются.
Вывод
Скачать Valorant на ПК очень просто. Достаточно создать аккаунт Riot (или войти в существующий) и загрузить установщик клиента игры. Скачивать Valorant со сторонних сайтов не стоит. В игру может быть встроено вредоносное ПО.
Объяснял: arm89i
Are you a dedicated Riot Games fan? If yes, you definitely want to play graphic-rich Valorant or League of Legends series uninterruptedly on your computer.
Unfortunately, if you are unable to properly load or run your favorite Riot Games on your brand new Windows 11 computer, this might have something to do with the space issue.
You see, gamers, Riot Games files are by default stored on C: drive. As you already know, this drive is also a home for all your Windows updates and other system files. So, when your C drive gets overloaded with files and folders, it can impact your gaming experience.
To smoothly run Riot Games’ graphics and high-tech elements, you at least required 15% to 20% of free space on your drive. If your C drive doesn’t have that much free space left, the best option is to move Riot Games to another drive.
But won’t that be complicated? Not really! Here you can use data transfer software like EaseUS Todo PCTrans to transfer Riot Games to another drive with one click. Also, there you have numerous manual ways to move Riot Games like Valorant to another drive. So, let’s study both the software and manual method in depth and select the right one for your smooth Riot Games shift.
PAGE CONTENT:
| Workable Solutions | Step-by-step Troubleshooting |
|---|---|
| Fix 1. Move Riot Games to Another Drive |
1. (Fastest) Use free transfer software…Full steps 2. Manually Transfer Riot Games to Another Drive…Full steps |
| Fix 2. Transfer Riot Games to Another Computer (League of Legends/Valorant) |
1. Run free program mover…Full steps 2. Copy Valorant files…Full steps |
Why Do You Want to Transfer Riot Games to Another Drive or PC
Before moving Riot Games to another drive, let’s understand why it is a good idea to store your files on another drive:
Free Up Space on C: drive
Today, if you are planning to update your system with Windows 11, you at least require 64GB or more free storage space for it. Since Windows 11 and Riot Games are both stored in C: drive by default. Thus, for an easy Windows update and uninterrupted gaming experience, you need to move Riot Games to another drive.
Move to A Larger SSD
To render the high-quality gaming experience, boasting sequential read and write speeds of around 7,000MB/s and 5300MB/s is required. So here, if your SSD doesn’t support ideal gaming speed, you should get a larger SSD to boost your PC’s gaming performance. And for that, you need to transfer Riot Games to another drive.
Create Room for Updates
Riot Games often share new updates with their users for better performance and bug fixes. Here having a dedicated drive for Riot Games can provide you with sufficient space to install all the latest game updates on your device.
Replace A New Computer
Reinstall all programs is an annoying experience. With the help of efficient methods, you are free to move all programs to another computer after you replace a new device.
How to Move Riot Games to Another Drive with Free Transfer Software
If you are a new Windows user or want to quickly move Riot Games to another drive, use data transfer software. Using the software, you can securely and seamlessly free up sufficient space to run Riot Games on your drives.
Importantly, you can use free and robust tools like EaseUS Todo PCTrans Free to migrate your files. This software is designed by EaseUS, a legacy utility software development company. Besides the great developer team’s support, Todo lets you:
- Transfer Riot Games to Another Drive with One-click
- Intuitive and Automatic Transfer Process
- A Large Community and Customer Support
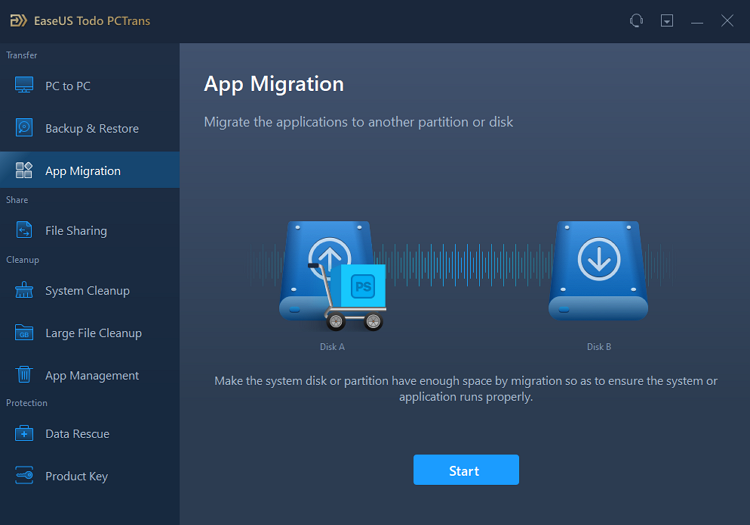
Step 1. Run EaseUS Todo PCTrans on your PC
Go to «App Migration» and click «Start» to continue.
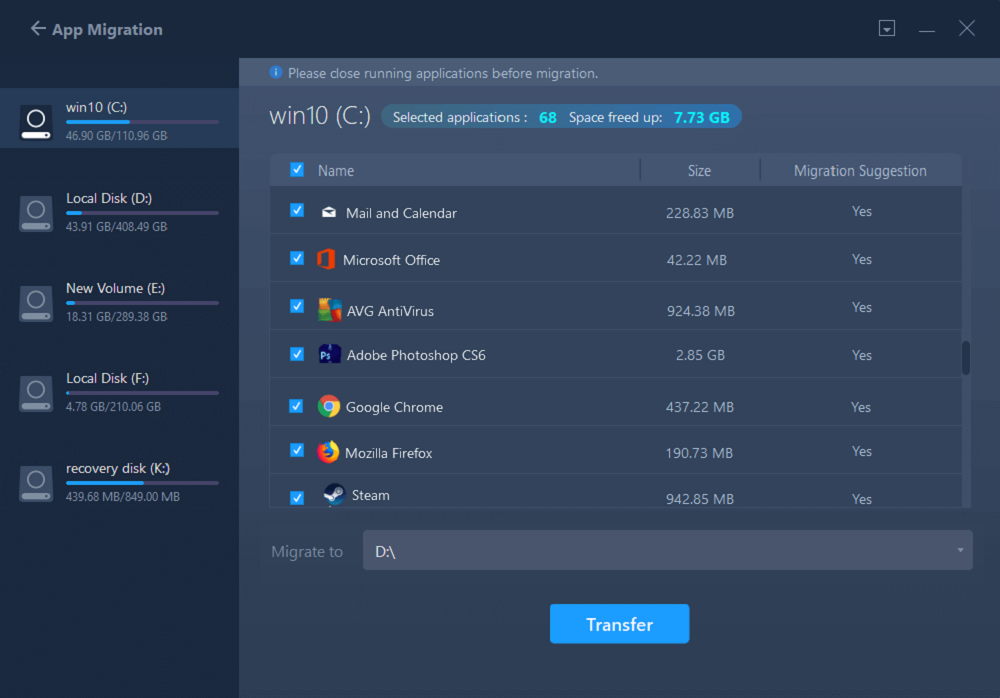
Step 2. Select programs to move from C drive to another drive
1. Tick the C drive and select programs (marked as «Yes») that you want to transfer.
2. Click the triangle icon to select another drive on your computer as the destination, and click «Transfer» to start the process.
Step 3. Finish the transferring
Wait patiently until the transferring process finishes and click «OK» to confirm.
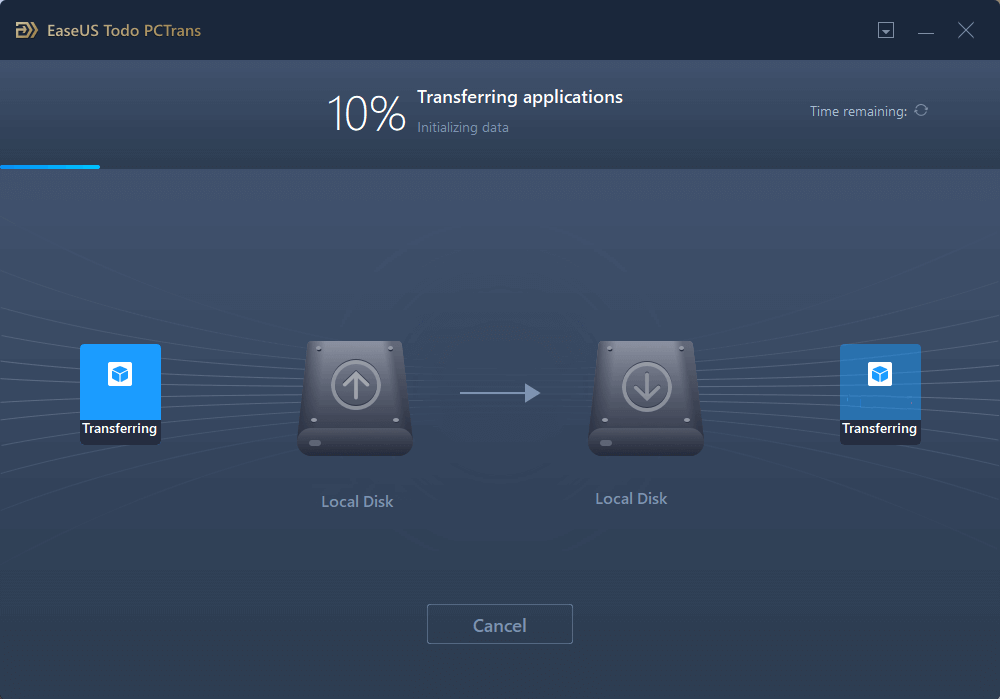
When it has done, you can restart PC if necessary. This will keep all changes on your PC and then you can run and programs from another hard drive without reinstallation.
Manually Transfer Riot Games to Another Drive
Besides the easy and quick software method, you can also manually move Riot Games to another drive on your computer. There you have three ways to transfer data from one drive to another manually, such as:
Transfer Riot Games Using Copy and Paste Method
Transfer Riot Games Using Uninstalling and Reinstalling Method
Transfer Riot Games Using the Notepad Method
Transfer Riot Games Using Copy and Paste Method
Unlike regedit relying programs, you can easily move and launch Riot Games by copying and pasting to another location. However, this method might not work on all systems, so you have to try and see if it works on your computer. To do so:
- Go to the location where Riot Games is installed. Mostly, the path is C:Riot Games.
- Right-click on the folder and click on the Copy.
- Now, go to the drive where you want to save your games; let’s say G: drive.
- Right-click anywhere in the empty area and click on the Paste.
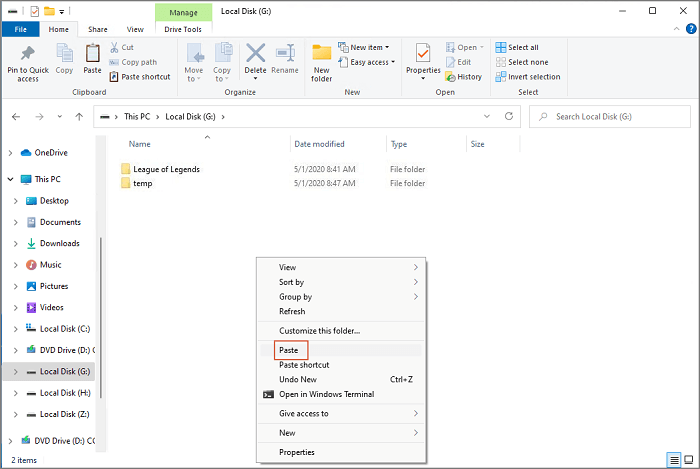
Once the process is complete, launch the Riot Games and see if it’s working.
Transfer Riot Games Using Uninstalling and Reinstalling Method
If the copy and paste method didn’t work for you, try the uninstalling and reinstalling method. As the name suggests, you have to first uninstall Riot Games and then reinstall in the new location like this:
- Next, go to Settings and select the Apps.
- Click on the Riot Games and then click on the Uninstall button.
- Next, delete all the files related to the game from the directory.
- Now, open your web browser and go to any Riot Games site like League of Legends or Valorant and download it.
- Now, open the installation wizard and follow the steps on your screen.
- By default, you will get path C:Riot Games. So, change it to the new location where you want to move it like D:Riot Games.
- Now, launch the Riot Games, log into your account and download your game components to the new location as well.
Transfer Riot Games Using the Notepad Method
For pro-Windows users, the command line method is also a great way to move Riot Games to another drive, as:
- Go to C: drive > ProgramData folder > Open Riot Games folder.
- Now, open the RiotClientInstalls.json file with notepad.
- Change the path to the new one and save the file.
- Now, go to Metadata in the Riot Games folder and open any games folder like valorant.live.
- Click open the «valorant.live.product_settings.yaml» file with notepad.
- Replace the «product_install_full_path» and «product_install_root» lines with new paths and save the changes.
How to Transfer Riot Games to Another Computer (League of Legends/Valorant)
For users who change a gaming computer, it is important to transfer installed games and data to another PC without data loss. You can also complete this PC to PC transfer mission by EaseUS Todo PCTrans Free.
1. How to Transfer Valorant (Riot Games) to Another PC
Step 1. Run EaseUS Todo PCTrans on both PCs
On the source PC, select «PC to PC» on the main screen of EaseUS Todo PCTrans and move on.

Step 2. Choose transfer direction — Old or New Computer
«New» — Transfer all data from remote old computer to current new computer.
«Old» — Transfer all data from current old device to a new computer.

Step 3. Connect two computers
1. Select your target PC to connect via its IP address or device name and click «Connect».
2. Enter the login password of your target PC and click «OK» to confirm.
If you didn’t see the target PC in the listed devices, you can also click «Add PC» to manually connect the target PC by inputting its IP address or device name.

Step 4. Select apps, programs, and software and transfer to the target computer
1. You can select and choose what you want to transfer from the current computer to the target PC.
2. After selecting desired applications and programs, click «Transfer» to start the transferring process.

2. Copy Valorant to Another PC
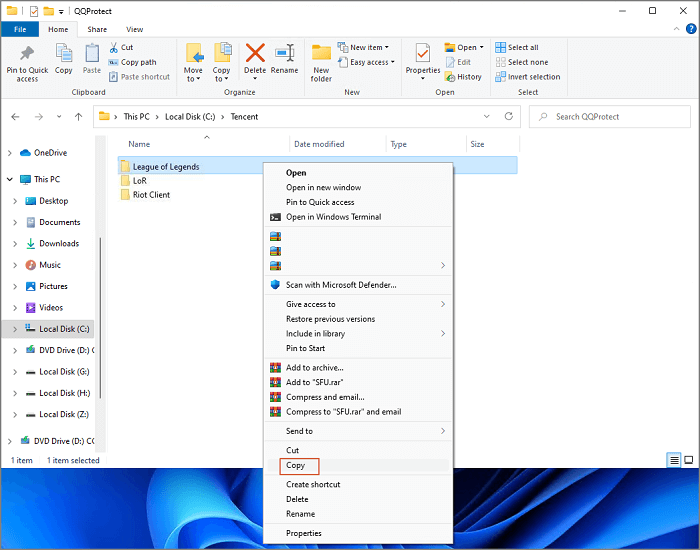
On the old computer:
- Right-click the Valorant icon and select to open the file location.
- Go to the Riot Games folder named Riot Client and VALORANT.
- Copy and paste the Valorant folder to the external hard drive. (Make sure your device has enough space.)
On the new computer:
- Click the link to download and install the riot client on the C drive.
- Pause the game download process.
- Connect external hard drive to PC. Then paste and replace the valorant folder in the existing Riot games directory.
- Back to open valorant. Wait for verifying data is finished.
Bottom Line
There you go, gamers! Now, you know how to transfer Riot Games to another drive or PC using both software and manual methods.
With software, you get a quick, secure and easy solution to transfer Riot Games. Plus, you have EaseUS Todo PCTrans for free and robust file migration software to ease your job further.
In contrast, manual methods like copy and paste don’t work on all the systems, and with the uninstalling and reinstalling method, you might lose some of your data. And, the command line isn’t a cup of tea for everyone.
All in all, the software approach is the right one to move Riot Games to another drive or computer. But, the final choice is yours. So, make your decision wisely.
Are you a dedicated Riot Games fan? If yes, you definitely want to play graphic-rich Valorant or League of Legends series uninterruptedly on your computer.
Unfortunately, if you are unable to properly load or run your favorite Riot Games on your brand new Windows 11 computer, this might have something to do with the space issue.
You see, gamers, Riot Games files are by default stored on C: drive. As you already know, this drive is also a home for all your Windows updates and other system files. So, when your C drive gets overloaded with files and folders, it can impact your gaming experience.
To smoothly run Riot Games’ graphics and high-tech elements, you at least required 15% to 20% of free space on your drive. If your C drive doesn’t have that much free space left, the best option is to move Riot Games to another drive.
But won’t that be complicated? Not really! Here you can use data transfer software like EaseUS Todo PCTrans to transfer Riot Games to another drive with one click. Also, there you have numerous manual ways to move Riot Games like Valorant to another drive. So, let’s study both the software and manual method in depth and select the right one for your smooth Riot Games shift.
PAGE CONTENT:
| Workable Solutions | Step-by-step Troubleshooting |
|---|---|
| Fix 1. Move Riot Games to Another Drive |
1. (Fastest) Use free transfer software…Full steps 2. Manually Transfer Riot Games to Another Drive…Full steps |
| Fix 2. Transfer Riot Games to Another Computer (League of Legends/Valorant) |
1. Run free program mover…Full steps 2. Copy Valorant files…Full steps |
Why Do You Want to Transfer Riot Games to Another Drive or PC
Before moving Riot Games to another drive, let’s understand why it is a good idea to store your files on another drive:
Free Up Space on C: drive
Today, if you are planning to update your system with Windows 11, you at least require 64GB or more free storage space for it. Since Windows 11 and Riot Games are both stored in C: drive by default. Thus, for an easy Windows update and uninterrupted gaming experience, you need to move Riot Games to another drive.
Move to A Larger SSD
To render the high-quality gaming experience, boasting sequential read and write speeds of around 7,000MB/s and 5300MB/s is required. So here, if your SSD doesn’t support ideal gaming speed, you should get a larger SSD to boost your PC’s gaming performance. And for that, you need to transfer Riot Games to another drive.
Create Room for Updates
Riot Games often share new updates with their users for better performance and bug fixes. Here having a dedicated drive for Riot Games can provide you with sufficient space to install all the latest game updates on your device.
Replace A New Computer
Reinstall all programs is an annoying experience. With the help of efficient methods, you are free to move all programs to another computer after you replace a new device.
How to Move Riot Games to Another Drive with Free Transfer Software
If you are a new Windows user or want to quickly move Riot Games to another drive, use data transfer software. Using the software, you can securely and seamlessly free up sufficient space to run Riot Games on your drives.
Importantly, you can use free and robust tools like EaseUS Todo PCTrans Free to migrate your files. This software is designed by EaseUS, a legacy utility software development company. Besides the great developer team’s support, Todo lets you:
- Transfer Riot Games to Another Drive with One-click
- Intuitive and Automatic Transfer Process
- A Large Community and Customer Support
Step 1. Run EaseUS Todo PCTrans on your PC
Go to «App Migration» and click «Start» to continue.
Step 2. Select programs to move from C drive to another drive
1. Tick the C drive and select programs (marked as «Yes») that you want to transfer.
2. Click the triangle icon to select another drive on your computer as the destination, and click «Transfer» to start the process.
Step 3. Finish the transferring
Wait patiently until the transferring process finishes and click «OK» to confirm.
When it has done, you can restart PC if necessary. This will keep all changes on your PC and then you can run and programs from another hard drive without reinstallation.
Manually Transfer Riot Games to Another Drive
Besides the easy and quick software method, you can also manually move Riot Games to another drive on your computer. There you have three ways to transfer data from one drive to another manually, such as:
Transfer Riot Games Using Copy and Paste Method
Transfer Riot Games Using Uninstalling and Reinstalling Method
Transfer Riot Games Using the Notepad Method
Transfer Riot Games Using Copy and Paste Method
Unlike regedit relying programs, you can easily move and launch Riot Games by copying and pasting to another location. However, this method might not work on all systems, so you have to try and see if it works on your computer. To do so:
- Go to the location where Riot Games is installed. Mostly, the path is C:Riot Games.
- Right-click on the folder and click on the Copy.
- Now, go to the drive where you want to save your games; let’s say G: drive.
- Right-click anywhere in the empty area and click on the Paste.
Once the process is complete, launch the Riot Games and see if it’s working.
Transfer Riot Games Using Uninstalling and Reinstalling Method
If the copy and paste method didn’t work for you, try the uninstalling and reinstalling method. As the name suggests, you have to first uninstall Riot Games and then reinstall in the new location like this:
- Next, go to Settings and select the Apps.
- Click on the Riot Games and then click on the Uninstall button.
- Next, delete all the files related to the game from the directory.
- Now, open your web browser and go to any Riot Games site like League of Legends or Valorant and download it.
- Now, open the installation wizard and follow the steps on your screen.
- By default, you will get path C:Riot Games. So, change it to the new location where you want to move it like D:Riot Games.
- Now, launch the Riot Games, log into your account and download your game components to the new location as well.
Transfer Riot Games Using the Notepad Method
For pro-Windows users, the command line method is also a great way to move Riot Games to another drive, as:
- Go to C: drive > ProgramData folder > Open Riot Games folder.
- Now, open the RiotClientInstalls.json file with notepad.
- Change the path to the new one and save the file.
- Now, go to Metadata in the Riot Games folder and open any games folder like valorant.live.
- Click open the «valorant.live.product_settings.yaml» file with notepad.
- Replace the «product_install_full_path» and «product_install_root» lines with new paths and save the changes.
How to Transfer Riot Games to Another Computer (League of Legends/Valorant)
For users who change a gaming computer, it is important to transfer installed games and data to another PC without data loss. You can also complete this PC to PC transfer mission by EaseUS Todo PCTrans Free.
1. How to Transfer Valorant (Riot Games) to Another PC
Step 1. Run EaseUS Todo PCTrans on both PCs
On the source PC, select «PC to PC» on the main screen of EaseUS Todo PCTrans and move on.
Step 2. Choose transfer direction — Old or New Computer
«New» — Transfer all data from remote old computer to current new computer.
«Old» — Transfer all data from current old device to a new computer.
Step 3. Connect two computers
1. Select your target PC to connect via its IP address or device name and click «Connect».
2. Enter the login password of your target PC and click «OK» to confirm.
If you didn’t see the target PC in the listed devices, you can also click «Add PC» to manually connect the target PC by inputting its IP address or device name.
Step 4. Select apps, programs, and software and transfer to the target computer
1. You can select and choose what you want to transfer from the current computer to the target PC.
2. After selecting desired applications and programs, click «Transfer» to start the transferring process.
2. Copy Valorant to Another PC
On the old computer:
- Right-click the Valorant icon and select to open the file location.
- Go to the Riot Games folder named Riot Client and VALORANT.
- Copy and paste the Valorant folder to the external hard drive. (Make sure your device has enough space.)
On the new computer:
- Click the link to download and install the riot client on the C drive.
- Pause the game download process.
- Connect external hard drive to PC. Then paste and replace the valorant folder in the existing Riot games directory.
- Back to open valorant. Wait for verifying data is finished.
Bottom Line
There you go, gamers! Now, you know how to transfer Riot Games to another drive or PC using both software and manual methods.
With software, you get a quick, secure and easy solution to transfer Riot Games. Plus, you have EaseUS Todo PCTrans for free and robust file migration software to ease your job further.
In contrast, manual methods like copy and paste don’t work on all the systems, and with the uninstalling and reinstalling method, you might lose some of your data. And, the command line isn’t a cup of tea for everyone.
All in all, the software approach is the right one to move Riot Games to another drive or computer. But, the final choice is yours. So, make your decision wisely.