You may need to add Python to PATH if you’ve installed Python, but typing python on the command line doesn’t seem to work. You may be getting a message saying that the term python isn’t recognized, or you may end up with the wrong version of Python running.
A common fix for these problems is adding Python to the PATH environment variable. In this tutorial, you’ll learn how to add Python to PATH. You’ll also learn about what PATH is and why PATH is vital for programs like the command line to be able to find your Python installation.
The steps that you’ll need to take to add something to PATH will depend significantly on your operating system (OS), so be sure to skip to the relevant section if you’re only interested in this procedure for one OS.
Note that you can use the following steps to add any program to PATH, not just Python.
How to Add Python to PATH on Windows
The first step is to locate the directory in which your target Python executable lives. The path to the directory is what you’ll be adding to the PATH environment variable.
To find the Python executable, you’ll need to look for a file called python.exe. The Python executable could be in a directory in C:Python or in your AppData folder, for instance. If the executable were in AppData, then the path would typically look something like this:
C:Users<USER>AppDataLocalProgramsPython
In your case, the <USER> part would be replaced by your currently logged-in user name.
Once you’ve found the executable, make sure it works by double-clicking it and verifying that it starts up a Python REPL in a new window.
If you’re struggling to find the right executable, you can use Windows Explorer’s search feature. The issue with the built-in search is that it’s painfully slow. To perform a super-fast full system search for any file, a great alternative is Everything:
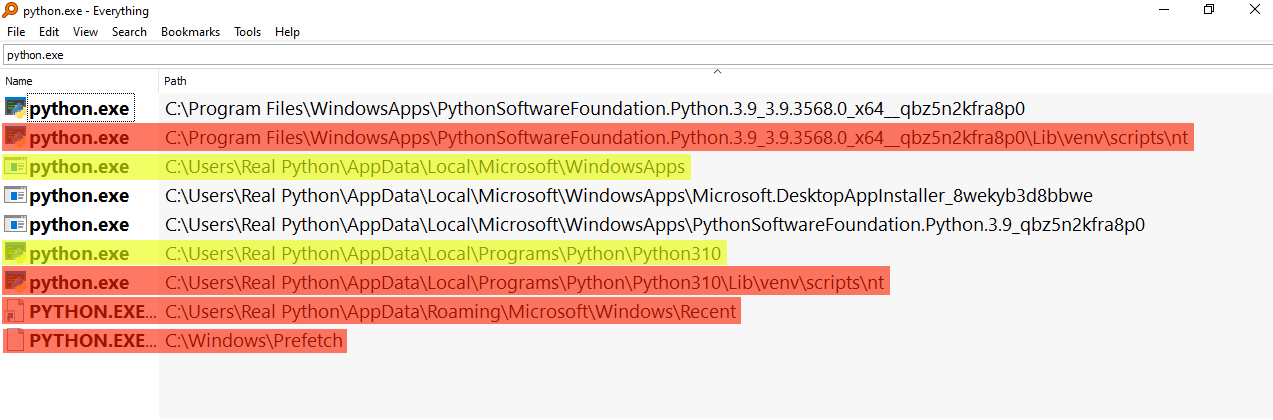
Those paths highlighted in yellow, namely those at WindowsApps and Python310, would be ideal candidates to add to PATH because they look like executables at the root level of an installation. Those highlighted in red wouldn’t be suitable because some are part of a virtual environment—you can see venv in the path—and some are shortcuts or internal Windows installations.
You may also encounter Python executables that are installed within the folder for a different program. This is due to the fact that many applications bundle their own version of Python within them. These bundled Python installations would also be unsuitable.
Once you’ve located your Python executable, open the Start menu and search for the Edit the system environment variables entry, which opens up a System Properties window. In the Advanced tab, click on the button Environment Variables. There you’ll see User and System variables, which you’ll be able to edit:
In the section entitled User Variables, double-click on the entry that says Path. Another window will pop up showing a list of paths. Click the New button and paste the path to your Python executable there. Once that’s inserted, select your newly added path and click the Move Up button until it’s at the top.
That’s it! You may need to reboot your computer for the changes to take effect, but you should now be able to call python from the command line.
For setting the PATH environment variable from the command line, check out the section on Configuring Environment Variables in the Windows Python coding setup guide. You can also find instructions in the supplemental materials:
You may also want to set up PATH on your Linux or macOS machine, or perhaps you’re using Windows Subsystem for Linux (WSL). If so, read the next section for the procedure on UNIX-based systems.
How to Add Python to PATH on Linux and macOS
Since Python typically comes pre-installed on UNIX-based systems, the most common problem on Linux and macOS is for the wrong python to run, rather than not finding any python. That said, in this section, you’ll be troubleshooting not being able to run python at all.
The first step is locating your target Python executable. It should be a program that you can run by first navigating to the containing directory and then typing ./python on the command line.
You need to prepend the call to the Python executable with its relative path in the current folder (./) because otherwise you’ll invoke whichever Python is currently recorded on your PATH. As you learned earlier, this might not be the Python interpreter that you want to run.
Often the Python executable can be found in the /bin/ folder. But if Python is already in the /bin/ folder, then it’s most likely already on PATH because /bin/ is automatically added by the system. If this is the case, then you may want to skip to the section on the order of paths within PATH.
Since you’re probably here because you’ve installed Python but it’s still not being found when you type python on the command line, though, you’ll want to search for it in another location.
That said, it might be that /bin/ has been removed from PATH altogether, in which case you might skip forward to the section on mangaging PATH.
Once you’ve located your Python executable and are sure it’s working, take note of the path for later. Now it’s time to start the process of adding it to your PATH environment variable.
First, you’ll want to navigate to your home folder to check out what configuration scripts you have available:
You should see a bunch of configuration files that begin with a period (.). These are colloquially known as dotfiles and are hidden from ls by default.
One or two dotfiles get executed whenever you log in to your system, another one or two run whenever you start a new command-line session, and most others are used by other applications for configuration settings.
You’re looking for the files that run when you start your system or a new command-line session. They’ll probably have names similar to these:
.profile.bash_profile.bash_login.zprofile.zlogin
The keywords to look for are profile and login. You should, in theory, only have one of these, but if you have more than one, you may need to read the comments in them to figure out which ones run on login. For example, .profile file on Ubuntu will typically have the following comment:
# This file is not read by bash(1), if ~/.bash_profile or ~/.bash_login
# exists.
So, if you have .profile but also .bash_profile, then you’ll want to use .bash_profile.
You can also use a .bashrc or .zshrc file, which are scripts that run whenever you start a new command-line session. Run command (rc) files are common places to put PATH configurations.
To add the Python path to the beginning of your PATH environment variable, you’re going to be executing a single command on the command line.
Use the following line, replacing <PATH_TO_PYTHON> with your actual path to the Python executable, and replace .profile with the login script for your system:
$ echo export PATH="<PATH_TO_PYTHON>:$PATH" >> ~/.profile
This command adds export PATH="<PATH_TO_PYTHON>:$PATH" to the end of .profile. The command export PATH="<PATH_TO_PYTHON>:$PATH" prepends <PATH_TO_PYTHON> to the PATH environment variable. It’s similar to the following operation in Python:
>>>
>>> PATH = "/home/realpython/apps:/bin"
>>> PATH = f"/home/realpython/python:{PATH}"
>>> PATH
'/home/realpython/python:/home/realpython/apps:/bin'
Since PATH is just a string separated by colons, prepending a value involves creating a string with the new path, a colon, then the old path. With this string, you set the new value of PATH.
To refresh your current command-line session, you can run the following command, replacing .profile with whichever login script you’ve chosen:
Now, you should be able to call python from the command line directly. The next time you log in, Python should automatically be added to PATH.
If you’re thinking this process seems a bit opaque, you’re not alone! Read on for more of a deep dive into what’s going on.
Understanding What PATH Is
PATH is an environment variable that contains a list of paths to folders. Each path in PATH is separated by a colon or a semicolon—a colon for UNIX-based systems and a semicolon for Windows. It’s like a Python variable with a long string as its value. The difference is that PATH is a variable accessible by almost all programs.
Programs like the command line use the PATH environment variable to find executables. For example, whenever you type the name of a program into the command line, the command line will search various places for the program. One of the places that the command line searches is PATH.
All the paths in PATH need to be directories—they shouldn’t be files or executables directly. Programs that use PATH take each directory in turn and search all the files within it. Subdirectories within directories in PATH don’t get searched, though. So it’s no good just adding your root path to PATH!
It’s also important to note that programs that use PATH typically don’t search for anything except executables. So, you can’t use PATH as a way to define shortcuts to commonly used files.
Understanding the Importance of Order Within PATH
If you type python into the command line, the command line will look in each folder in the PATH environment variable for a python executable. Once it finds one, it’ll stop searching. This is why you prepend the path to your Python executable to PATH. Having the newly added path first ensures that your system will find this Python executable.
A common issue is having a failed Python installation on your PATH. If the corrupted executable is the first one that the command line comes across, then the command line will try and run that and then abort any further searching. The quick fix for this is just adding your new Python directory before the old Python directory, though you’d probably want to clean your system of the bad Python installation too.
Reordering PATH on Windows is relatively straightforward. You open the GUI control panel and adjust the order using the Move Up and Move Down buttons. If you’re on a UNIX-based operating system, however, the process is more involved. Read on to learn more.
Managing Your PATH on UNIX-based Systems
Usually, your first task when managing your PATH is to see what’s in there. To see the value of any environment variable in Linux or macOS, you can use the echo command:
$ echo $PATH
/usr/local/sbin:/usr/local/bin:/usr/sbin:/home/realpython/badpython:/usr/bin:/sbin:/bin:/usr/games:/usr/local/games
Note that the $ symbol is used to tell the command line that the following identifier is a variable. The issue with this command is that it just dumps all the paths on one line, separated by colons. So you might want to take advantage of the tr command to translate colons into newlines:
$ echo $PATH | tr ":" "n"
/usr/local/sbin
/usr/local/bin
/usr/sbin
/home/realpython/badpython
/usr/bin
/sbin
/bin
/usr/games
/usr/local/games
In this example, you can see that badpython is present in PATH. The ideal course of action would be to perform some PATH archaeology and figure out where it gets added to PATH, but for now, you just want to remove it by adding something to your login script .
Since PATH is a shell string, you don’t have access to convenient methods to remove parts of it, like you would if it were a Python list. That said, you can pipe together a few shell commands to achieve something similar:
export PATH=`echo $PATH | tr ":" "n" | grep -v 'badpython' | tr "n" ":"`
This command takes the list from the previous command and feeds it into grep, which, together with the -v switch, will filter out any lines containing the substring badpython. Then you can translate the newlines back to colons, and you have a new and valid PATH string that you use right away to replace your old PATH string.
Though this can be a handy command, the ideal solution would be to figure out where that bad path gets added. You could try looking at other login scripts or examine specific files in /etc/. In Ubuntu, for instance, there’s a file called environment, which typically defines a starting path for the system. In macOS, that might be /etc/paths. There can also be profile files and folders in /etc/ that might contain startup scripts.
The main difference between configurations in /etc/ and in your home folder is that what’s in /etc/ is system-wide, while whatever’s in your home folder will be scoped to your user.
It can often involve a bit of archeology to track down where something gets added to your PATH, though. So, you may want to add a line in your login or rc script that filters out certain entries from PATH as a quick fix.
Conclusion
In this tutorial, you’ve learned how to add Python, or any other program, to your PATH environment variable on Windows, Linux, and macOS. You also learned a bit more about what PATH is and why its internal order is vital to consider. Finally, you also discovered how you might manage your PATH on a UNIX-based system, seeing as it’s more complex than managing your PATH on Windows.
I know the obvious answer is to use virtualenv and virtualenvwrapper, but for various reasons I can’t/don’t want to do that.
So how do I modify the command
pip install package_name
to make pip install the package somewhere other than the default site-packages?
![]()
asked May 26, 2010 at 17:55
![]()
Monika SulikMonika Sulik
16.1k15 gold badges49 silver badges51 bronze badges
8
The —target switch is the thing you’re looking for:
pip install --target=d:somewhereotherthanthedefault package_name
But you still need to add d:somewhereotherthanthedefault to PYTHONPATH to actually use them from that location.
-t, —target <dir>
Install packages into <dir>. By default this will not replace existing files/folders in <dir>.
Use —upgrade to replace existing packages in <dir> with new versions.
Upgrade pip if target switch is not available:
On Linux or OS X:
pip install -U pip
On Windows (this works around an issue):
python -m pip install -U pip
![]()
answered Oct 16, 2013 at 13:10
![]()
Janusz SkoniecznyJanusz Skonieczny
16.8k10 gold badges54 silver badges63 bronze badges
25
Use:
pip install --install-option="--prefix=$PREFIX_PATH" package_name
You might also want to use --ignore-installed to force all dependencies to be reinstalled using this new prefix. You can use --install-option to multiple times to add any of the options you can use with python setup.py install (--prefix is probably what you want, but there are a bunch more options you could use).
answered May 26, 2010 at 19:59
![]()
17
Instead of the --target or --install-options options, I have found that setting the PYTHONUSERBASE environment variable works well (from discussion on a bug regarding this very thing):
PYTHONUSERBASE=/path/to/install/to pip install --user
(Or set the PYTHONUSERBASE directory in your environment before running the command, using export PYTHONUSERBASE=/path/to/install/to)
This uses the very useful --user option but tells it to make the bin, lib, share and other directories you’d expect under a custom prefix rather than $HOME/.local.
Then you can add this to your PATH, PYTHONPATH and other variables as you would a normal installation directory.
Note that you may also need to specify the --upgrade and --ignore-installed options if any packages upon which this depends require newer versions to be installed in the PYTHONUSERBASE directory, to override the system-provided versions.
A full example
PYTHONUSERBASE=/opt/mysterypackage-1.0/python-deps pip install --user --upgrade numpy scipy
..to install the scipy and numpy package most recent versions into a directory which you can then include in your PYTHONPATH like so (using bash and for python 2.6 on CentOS 6 for this example):
export PYTHONPATH=/opt/mysterypackage-1.0/python-deps/lib64/python2.6/site-packages:$PYTHONPATH
export PATH=/opt/mysterypackage-1.0/python-deps/bin:$PATH
Using virtualenv is still a better and neater solution!
![]()
answered Mar 17, 2015 at 15:24
![]()
David GardnerDavid Gardner
6,8223 gold badges34 silver badges37 bronze badges
13
Installing a Python package often only includes some pure Python files. If the package includes data, scripts and or executables, these are installed in different directories from the pure Python files.
Assuming your package has no data/scripts/executables, and that you want your Python files to go into /python/packages/package_name (and not some subdirectory a few levels below /python/packages as when using --prefix), you can use the one time command:
pip install --install-option="--install-purelib=/python/packages" package_name
If you want all (or most) of your packages to go there, you can edit your ~/.pip/pip.conf to include:
[install]
install-option=--install-purelib=/python/packages
That way you can’t forget about having to specify it again and again.
Any excecutables/data/scripts included in the package will still go to their default places unless you specify addition install options (--prefix/--install-data/--install-scripts, etc., for details look at the custom installation options).
![]()
answered Jun 13, 2012 at 14:39
![]()
AnthonAnthon
65.7k29 gold badges179 silver badges236 bronze badges
2
Tested these options with python3.5 and pip 9.0.3:
pip install —target /myfolder [packages]
Installs ALL packages including dependencies under /myfolder. Does not take into account that dependent packages are already installed elsewhere in Python. You will find packages from /myfolder/[package_name]. In case you have multiple Python versions, this doesn’t take that into account (no Python version in package folder name).
pip install —prefix /myfolder [packages]
Checks if dependencies are already installed. Will install packages into /myfolder/lib/python3.5/site-packages/[packages]
pip install —root /myfolder [packages]
Checks dependencies like —prefix but install location will be /myfolder/usr/local/lib/python3.5/site-packages/[package_name].
pip install —user [packages]
Will install packages into $HOME:
/home/[USER]/.local/lib/python3.5/site-packages
Python searches automatically from this .local path so you don’t need to put it to your PYTHONPATH.
=> In most of the cases —user is the best option to use.
In case home folder can’t be used because of some reason then —prefix.
![]()
Seppo Enarvi
3,0493 gold badges28 silver badges25 bronze badges
answered Dec 20, 2018 at 14:06
![]()
MikkoMikko
8798 silver badges5 bronze badges
3
Nobody seems to have mentioned the -t option but that the easiest:
pip install -t <direct directory> <package>
answered Feb 20, 2018 at 0:02
![]()
ErwanErwan
3,71529 silver badges25 bronze badges
1
pip install packageName -t pathOfDirectory
or
pip install packageName --target pathOfDirectorty
![]()
answered Feb 22, 2019 at 8:35
![]()
1
Just add one point to @Ian Bicking’s answer:
Using the --user option to specify the installed directory also work if one wants to install some Python package into one’s home directory (without sudo user right) on remote server.
E.g.,
pip install --user python-memcached
The command will install the package into one of the directories that listed in your PYTHONPATH.
![]()
answered Dec 23, 2014 at 19:46
![]()
Good WillGood Will
1,16115 silver badges10 bronze badges
Newer versions of pip (8 or later) can directly use the --prefix option:
pip install --prefix=$PREFIX_PATH package_name
where $PREFIX_PATH is the installation prefix where lib, bin and other top-level folders are placed.
answered May 24, 2017 at 6:37
![]()
Mike TMike T
40k18 gold badges148 silver badges197 bronze badges
To add to the already good advice, as I had an issue installing IPython when I didn’t have write permissions to /usr/local.
pip uses distutils to do its install and this thread discusses how that can cause a problem as it relies on the sys.prefix setting.
My issue happened when the IPython install tried to write to ‘/usr/local/share/man/man1’ with Permission denied. As the install failed it didn’t seem to write the IPython files in the bin directory.
Using «—user» worked and the files were written to ~/.local. Adding ~/.local/bin to the $PATH meant I could use «ipython» from there.
However I’m trying to install this for a number of users and had been given write permission to the /usr/local/lib/python2.7 directory. I created a «bin» directory under there and set directives for distutils:
vim ~/.pydistutils.cfg

[install]
install-data=/usr/local/lib/python2.7
install-scripts=/usr/local/lib/python2.7/bin
then (-I is used to force the install despite previous failures/.local install):
pip install -I ipython
Then I added /usr/local/lib/python2.7/bin to $PATH.
I thought I’d include this in case anyone else has similar issues on a machine they don’t have sudo access to.
![]()
answered May 29, 2015 at 14:24
![]()
Stuart BrockStuart Brock
3,4261 gold badge21 silver badges20 bronze badges
If you are using brew with python, unfortunately, pip/pip3 ships with very limited options. You do not have —install-option, —target, —user options as mentioned above.
Note on pip install —user
The normal pip install —user is disabled for brewed Python. This is because of a bug in distutils, because Homebrew writes a distutils.cfg which sets the package prefix.
A possible workaround (which puts executable scripts in ~/Library/Python/./bin) is:
python -m pip install --user --install-option="--prefix=" <package-name>
You might find this line very cumbersome. I suggest use pyenv for management.
If you are using
brew upgrade python python3
Ironically you are actually downgrade pip functionality.
(I post this answer, simply because pip in my mac osx does not have —target option, and I have spent hours fixing it)
answered Sep 17, 2018 at 13:22
![]()
anonymousanonymous
1,2921 gold badge16 silver badges22 bronze badges
1
With pip v1.5.6 on Python v2.7.3 (GNU/Linux), option --root allows to specify a global installation prefix, (apparently) irrespective of specific package’s options. Try f.i.,
$ pip install --root=/alternative/prefix/path package_name
answered Aug 18, 2014 at 14:53
![]()
sphakkasphakka
4574 silver badges11 bronze badges
I suggest to follow the documentation and create ~/.pip/pip.conf file. Note in the documentation there are missing specified header directory, which leads to following error:
error: install-base or install-platbase supplied, but installation scheme is incomplete
The full working content of conf file is:
[install]
install-base=$HOME
install-purelib=python/lib
install-platlib=python/lib.$PLAT
install-scripts=python/scripts
install-headers=python/include
install-data=python/data
Unfortunatelly I can install, but when try to uninstall pip tells me there is no such package for uninstallation process…. so something is still wrong but the package goes to its predefined location.
answered Dec 5, 2017 at 10:57
![]()
kensaikensai
9459 silver badges15 bronze badges
pip install /path/to/package/
is now possible.
The difference with this and using the -e or --editable flag is that -e links to where the package is saved (i.e. your downloads folder), rather than installing it into your python path.
This means if you delete/move the package to another folder, you won’t be able to use it.
answered Jan 18, 2019 at 8:37
![]()
A HA H
2,0341 gold badge21 silver badges34 bronze badges
2
system` option, that will install pip package-bins to /usr/local/bin thats accessible to all users. Installing without this option may not work for all users as things go to user specific dir like $HOME/.local/bin and then it is user specific install which has to be repeated for all users, also there can be path issues if not set for users, then bins won’t work. So if you are looking for all users — yu need to have sudo access:
sudo su -
python3 -m pip install --system <module>
logout
log back in
which <module-bin> --> it should be installed on /usr/local/bin/
answered Mar 17, 2021 at 13:50
![]()
ashishashish
3993 silver badges7 bronze badges
Sometimes it works only works with Cache argument
-m pip install -U pip --target=C:xxxpythonlibsite-packages Pillow --cache-dir C:tmp
answered Dec 29, 2022 at 10:47
![]()
dazzafactdazzafact
2,3383 gold badges30 silver badges46 bronze badges
Запуск Python с терминала зачастую неизбежен. Однако, если вы впервые установили Python в Windows 10, запуск его через Терминал Windows возможен только в том случае, если он добавлен в переменную среды Windows PATH.
Это может показаться сложным, но бояться нечего. Чтобы помочь вам преодолеть повороты, связанные с добавлением Python в PATH Windows после его установки, давайте рассмотрим варианты и несколько необходимых шагов.
Если вам не удалось добавить Python в PATH в вашей ОС Windows, вы не сможете запустить интерпретатор Python, запустить виртуальную среду программирования или выполнить такие команды, как pip install, из терминала.
Мы исследуем лучшие способы создания виртуальных сред Python и управления ими.
Это потому, что, когда вы запускаете любую программу, отличную от программы по умолчанию, из командной строки, машина ищет исполняемый файл в текущей папке или в ПУТИ Windows.
Если его нет в переменной PATH, терминал возвращает ошибку «команда не найдена». Добавление в PATH — это мощный инструмент, даже если вы выполняете команду из созданного или пакетного файла по умолчанию , добавление родительского исполняемого файла в переменную PATH также делает его доступным для вызова из терминала.
Как Вручную Добавить Python В ПУТЬ Windows
Во-первых, если вы не установили Python на свой компьютер, перейдите на сайт python.org, чтобы загрузить и установить предпочитаемую версию.
После успешной установки Python на ваш компьютер проверьте, не добавлен ли он в PATH Windows. Откройте свой терминал и введите python, затем нажмите клавишу Enter. Команда может вернуть ошибку, в которой говорится, что «python не распознается как внутренняя или внешняя команда, работающая программа или пакетный файл», что означает, что Python еще не добавлен в переменную PATH вашего компьютера.
Чтобы запускать программы Python из командной строки, выполните шаги, выделенные ниже.
Найдите путь установки Python на свой компьютер
Чтобы добавить Python в ваш Windows PATH, вам нужно получить путь его установки. Для этого откройте панель поиска Windows и введите python.exe (не нажимайте клавишу Enter). Затем кликните правой кнопкой мыши Python.exe, который появляется в появившемся меню, и выберите опцию Открыть расположение файла.
В открывшихся окнах проводника кликните длинную панель каталогов слева от строки поиска. Выделите и скопируйте весь текст пути в буфер обмена с помощью Ctrl + С. Затем перейдите к следующим шагам ниже.
Далее: Добавить Python В PATH В пользовательских переменных
Чтобы добавить Python в PATH в пользовательских переменных, кликните правой кнопкой мыши «Этот компьютер» и выберите «Свойства». Оказавшись в меню свойств, нажмите на опцию Advanced system settings. В следующем окне выберите вкладку Advanced и выберите Environment Variables.
Environment Variables меню состоит из двух отдельных частей: верхняя часть называется Пользовательские переменные, а нижняя часть имени системных переменных. Однако в этом случае мы сосредоточимся на пользовательских переменных.
В меню пользовательских переменных найдите переменную с именем Path. Затем вставьте путь, который вы скопировали ранее, в параметр «Значение переменной», используя Ctrl + v, и нажмите «ОК».
Однако, если вы не можете найти эту переменную, вам может потребоваться ее создать. Для этого нажмите New. Затем в форме имени переменной введите путь и вставьте свой путь Python в поле значения переменной.
Вернитесь в папку пути установки Python и дважды кликните Scripts, чтобы открыть этот каталог. Затем скопируйте его путь из панели пути в верхней части окон (помимо панели поиска), как вы это делали ранее для пути установки Python.
Скопировав путь к скриптам, вернитесь к переменным среды. Затем выберите переменную Path и нажмите Edit. Введите точку с запятой после пути к исполняемому файлу Python и вставьте после него путь скриптов, который вы только что скопировали. Затем нажмите ОК.
Добавление Python в PATH с опцией системных переменных
Вы также можете добавить Python в системную переменную PATH. Хотя это всего лишь альтернатива, и в ней нет необходимости, если вы уже добавили ее в переменные Users.
Чтобы использовать параметр «Системные переменные», выполните шаги, выделенные выше, для копирования пути Python и его сценария. Затем вернитесь в переменные среды. Затем в сегменте системных переменных найдите переменную с именем Path. Кликните эту переменную и кликните Изменить.
В следующем появившемся окне нажмите New и вставьте путь, который вы скопировали ранее, в открывшееся пространство. Повторите этот процесс и для пути скриптов. Затем нажмите ОК и закройте окно переменных среды.
Автоматически добавлять Python в Windows PATH
Вы также можете автоматически добавить Python в PATH Windows во время установки. Хотя этот метод работает не во всех случаях, вы все равно можете попробовать.
Для этого щелкните свой установочный файл и установите флажок «Добавить Python 3.7 в PATH». Номер версии будет меняться при установке разных версий Python.
Установка этого флажка автоматически добавляет Python в ваш путь к Windows. Это означает, что вы можете запускать команды Python через командную строку сразу после установки.
Подтвердите, что Python добавлен в Windows PATH
Чтобы узнать, добавлен ли Python в PATH Windows, откройте терминал и введите python —version, затем нажмите клавишу Enter. Если команда возвращает текущую установленную версию Python, это означает, что вы успешно добавили ее в Windows PATH.
Однако, чтобы проверить, добавили ли вы каталог Scripts в Windows PATH, попробуйте запустить пакет установки pip на терминале, заменив «package» на предпочитаемую вами библиотеку. Если вы установили Python 2.7.9 и выше, команда устанавливает названный пакет, указывая, что вы также успешно добавили скрипты Python в путь.
Помимо добавления Python в PATH Windows, вы можете добавить текстовые редакторы, интегрированные среды разработки (IDE), Git, Node, Anaconda и многие другие программы.
Например, управлять проектом с помощью Sublime Text легко, когда вы открываете терминал в каталоге папки вашего проекта и запускаете subl. команда. Это откроет редактор в вашей текущей папке и отобразит его на боковой панели, еще один экономящий время ярлык для продуктивной работы с Sublime Text.
Начиная с этой статьи будет запущен цикл публикаций, посвященный языку Python, с позиции его изучения. Каждая статья будет представлена в виде урока на определенную тему. Не будем отходить от канонов и первую статью посвятим установке языка Python.
В этой статье рассмотрим следующие темы:
- Версии Python (2 и 3)
- Установка Python
- Установка Anaconda
- Установка IDE PyCharm
- Проверка работоспособности
На сегодняшний день существуют две версии Python – это Python 2 и Python 3, у них отсутствует полная совместимость друг с другом. На момент написания статьи вторая версия Python ещё широко используется, но, судя по изменениям, которые происходят, со временем, он останется только для того, чтобы запускать старый код. В нашей с вами работе, мы будем использовать Python 3, и, в дальнейшем, если где-то будет встречаться слово Python, то под ним следует понимать Python 3. Случаи применения Python 2 будут специально оговариваться.
2. Установка Python
Для установки интерпретатора Python на ваш компьютер, первое, что нужно сделать – это скачать дистрибутив. Загрузить его можно с официального сайта, перейдя по ссылке https://www.python.org/downloads/
2.1 Установка Python в Windows
Для операционной системы Windows дистрибутив распространяется либо в виде исполняемого файла (с расширением exe), либо в виде архивного файла (с расширением zip). Если вы используете Windows 7, не забудьте установить Service Pack 1!

Порядок установки.
1. Запустите скачанный установочный файл.
2. Выберет способ установки.

В данном окне предлагается два варианта Install Now и Customize installation. При выборе Install Now, Python установится в папку по указанному пути. Помимо самого интерпретатора будет установлен IDLE (интегрированная среда разработки), pip (пакетный менеджер) и документация, а также будут созданы соответствующие ярлыки и установлены связи файлов, имеющие расширение .py с интерпретатором Python. Customize installation – это вариант настраиваемой установки. Опция Add python 3.5 to PATH нужна для того, чтобы появилась возможность запускать интерпретатор без указания полного пути до исполняемого файла при работе в командной строке.
3. Отметьте необходимые опций установки (доступно при выборе Customize installation)

На этом шаге нам предлагается отметить дополнения, устанавливаемые вместе с интерпретатором Python. Рекомендуем выбрать все опции.
- Documentation – установка документаций.
- pip – установка пакетного менеджера pip.
- tcl/tk and IDLE – установка интегрированной среды разработки (IDLE) и библиотеки для построения графического интерфейса (tkinter).
4. Выберете место установки (доступно при выборе Customize installation)

Помимо указания пути, данное окно позволяет внести дополнительные изменения в процесс установки с помощью опций:
- Install for all users – Установить для всех пользователей. Если не выбрать данную опцию, то будет предложен вариант инсталляции в папку пользователя, устанавливающего интерпретатор.
- Associate files with Python – Связать файлы, имеющие расширение .py, с Python. При выборе данной опции будут внесены изменения в Windows, позволяющие запускать Python скрипты по двойному щелчку мыши.
- Create shortcuts for installed applications – Создать ярлыки для запуска приложений.
- Add Python to environment variables – Добавить пути до интерпретатора Python в переменную PATH.
- Precomple standard library – Провести прекомпиляцию стандартной библиотеки.
Последние два пункта связаны с загрузкой компонентов для отладки, их мы устанавливать не будем.
5. После успешной установки вас ждет следующее сообщение.

2.2 Установка Python в Linux
Чаще всего интерпретатор Python уже в входит в состав дистрибутива. Это можно проверить набрав в терминале
> python
или
> python3
В первом случае, вы запустите Python 2 во втором – Python 3. В будущем, скорее всего, во всех дистрибутивах Linux, включающих Python, будет входить только третья версия. Если у вас, при попытке запустить Python, выдается сообщение о том, что он не установлен, или установлен, но не тот, что вы хотите, то у вас есть два пути: а) собрать Python из исходников; б) взять из репозитория.
Для установки из репозитория в Ubuntu воспользуйтесь командой
> sudo apt-get install python3
Сборку из исходников в данной статье рассматривать не будем.
3. Установка Anaconda
Для удобства запуска примеров и изучения языка Python, советуем установить на свой ПК пакет Anaconda. Этот пакет включает в себя интерпретатор языка Python (есть версии 2 и 3), набор наиболее часто используемых библиотек и удобную среду разработки и исполнения, запускаемую в браузере.
Для установки этого пакета, предварительно нужно скачать дистрибутив https://www.continuum.io/downloads.
Есть варианты под Windows, Linux и MacOS.
3.1 Установка Anaconda в Windows
1. Запустите скачанный инсталлятор. В первом появившемся окне необходимо нажать “Next”.

2. Далее следует принять лицензионное соглашение.

3. Выберете одну из опций установки:
- Just Me – только для пользователя, запустившего установку;
- All Users – для всех пользователей.

4. Укажите путь, по которому будет установлена Anaconda.

5. Укажите дополнительные опции:
- Add Anaconda to the system PATH environment variable – добавить Anaconda в системную переменную PATH
- Register Anaconda as the system Python 3.5 – использовать Anaconda, как интерпретатор Python 3.5 по умолчанию.
Для начала установки нажмите на кнопку “Install”.

5. После этого будет произведена установка Anaconda на ваш компьютер.

3.2 Установка Anaconda в Linux
- Скачайте дистрибутив Anaconda для Linux, он будет иметь расширение .sh, и запустите установку командой:
> bash имя_дистрибутива.sh
В результате вы увидите приглашение к установке. Для продолжения процессе нажмите “Enter”.

2. Прочитайте лицензионное соглашение, его нужно пролистать до конца.

Согласитесь с ним, для этого требуется набрать в командной строке “yes”, в ответе на вопрос инсталлятора:
Do you approve the license terms? [yes|no]

3. Выберете место установки. Можно выбрать один из следующих вариантов:
- Press ENTER to confirm the location – нажмите ENTER для принятия предложенного пути установки. Путь по умолчанию для моей машины: /home/tester/anaconda3, он представлен чуть выше данного меню.
- Press CTRL-C to abort the installation – нажмите CTRL-C для отмены установки.
- Or specify a different location below – или укажите другой путь в строке ниже.
Нажмите ENTER.

4. После этого начнется установка.

4. Установка PyCharm
Если в процессе разработки вам необходим отладчик и вообще вы привыкли работать в IDE, а не в текстовом редакторе, то тогда одним из лучших вариантов будет IDE PyCharm от JetBrains. Для скачивания данного продукта нужно перейти по ссылке https://www.jetbrains.com/pycharm/download/
IDE доступна для Windows, Linux и MacOS. Существуют два вида лицензии PyCharm – это Professional и Community. Мы будем использовать версию Community, так как она бесплатна и её функционала более чем достаточно для наших задач.
4.1 Установка PyCharm в Windows
1. Запустите скачанный дистрибутив PyCharm.

2. Выберете путь установки программы.

3. Укажите ярлыки, которые нужно создать на рабочем столе (запуск 32-х и 64-х разрядной версии PyCharm) и отметить опцию из блока Create associations если требуется связать файлы с расширением .py с PyCharm.

4. Выберете имя для папки в меню Пуск.

5. Далее PyCharm будет установлен на ваш компьютер.

4.2 Установка PyCharm в Linux
1. Скачайте с сайта дистрибутив на компьютер.
2. Распакуйте архивный файл, для этого можно воспользоваться командой:
> tar xvf имя_архива.tar.gz

Перейдите в каталог, который был создан после распаковки дистрибутива, найдите в нем подкаталог bin и зайдите в него. Запустите pycharm.sh командой:
> ./pycharm.sh

В результате должен запуститься PyCharm.
5. Проверка работоспособности
Теперь проверим работоспособность всего того, что мы установили.
5.1 Проверка интерпретатора Python
Для начала протестируем интерпретатор в командном режиме. Если вы работаете в Windows, то нажмите сочетание Win+R и в появившемся окне введите python. В Linux откройте окно терминала и в нем введите python3 (или python).
В результате Python запустится в командном режиме, выглядеть это будет примерно так (картинка приведена для Windows, в Linux результат будет аналогичным):

В окне введите:
print("Hello, World!")
Результат должен быть следующий:

5.2 Проверка Anaconda
Здесь и далее будем считать, что пакет Anaconda установлен в Windows, в папку C:Anaconda3, в Linux, вы его можно найти в каталоге, который выбрали при установке.
Перейдите в папку Scripts и введите в командной строке:
ipython notebook
Если вы находитесь в Windows и открыли папку C:Anaconda3Scripts через проводник, то для запуска интерпретатора командной строки для этой папки в поле адреса введите cmd.


В результате запустится веб-сервер и среда разработки в браузере.

Создайте ноутбук для разработки, для этого нажмите на кнопку New (в правом углу окна) и в появившемся списке выберете Python.
В результате будет создана новая страница в браузере с ноутбуком. Введите в первой ячейке команду
print("Hello, World!")
и нажмите Alt+Enter на клавиатуре. Ниже ячейки должна появиться соответствующая надпись.

5.3 Проверка PyCharm
Запустите PyCharm и выберете Create New Project в появившемся окне.

Укажите путь до проекта Python и интерпретатор, который будет использоваться для запуска и отладки.

Добавьте Python файл в проект.

Введите код программы.

Запустите программу.

В результате должно открыться окно с выводом программы.

На этом первый урок закончен.
P.S.
Если вам интересна тема анализа данных, то мы рекомендуем ознакомиться с библиотекой Pandas. На нашем сайте вы можете найти вводные уроки по этой теме. Все уроки по библиотеке Pandas собраны в книге “Pandas. Работа с данными”.

Спасибо за внимание!
Python. Урок 2. Запуск программ на Python >>>
Часто работает Питон Из Терминала это неизбежно. Однако, если вы впервые установили Python в Windows 10, запуск его через Терминал Windows возможен только в том случае, если он добавлен в переменную среды Windows PATH.
Это может показаться трудным, но бояться нечего. Чтобы помочь вам пройти через все взлеты и падения, связанные с добавлением Python в ваш Windows PATH после его установки, давайте рассмотрим несколько задействованных вариантов и шагов.
Если вам не удалось добавить Python в PATH в вашей Windows, вы не сможете запустить компилятор Python, запустить виртуальную среду программирования или выполнить такие команды, как пип установить от Терминала.
Это связано с тем, что, когда вы запускаете любое приложение, отличное от заданного по умолчанию, из командной строки, Терминал ищет исполняемый файл в текущей папке или по пути Windows.
Если его нет в переменной PATH, Терминал возвращает ошибку «Не существует«. Добавление в PATH — это мощная команда, поэтому, даже если вы выполняете команду из сгенерированного или пакетного файла по умолчанию, добавление ее основного исполняемого файла в переменную PATH также делает ее вызываемой из Терминала.
Как вручную добавить Python в Windows PATH
Во-первых, если на вашем устройстве не установлен Python, перейдите на сайт python.org Загрузите и установите желаемую версию.
После успешной установки Python на ваш компьютер проверьте, не был ли он уже добавлен в PATH Windows. Откройте Терминал и введите питон , затем нажмите клавишу. Enter. Команда может отображать сообщение об ошибке «‘python’ не распознается как внутренняя или внешняя команда, работающая программа или командный файл», Указывая на то, что Python еще не добавлен в переменную PATH вашего устройства.
Чтобы запускать программы Python из командной строки, выполните следующие действия.
Найдите путь установки Python на вашем компьютере
Чтобы добавить Python в PATH Windows, вам необходимо получить путь его установки. Для этого откройте панель поиска Windows и введите python.exe (не нажимайте клавишу Enter). Затем щелкните правой кнопкой мыши Python.exe, который появляется в появившемся меню, и выберите вариант. местонахождение открытого файла.
В открывшемся окне проводника щелкните длинную панель каталогов слева от строки поиска. Выделите весь текст пути и скопируйте его в буфер обмена с помощью Ctrl + C. Затем перейдите к следующим шагам ниже.
Добавление Python в PATH в пользовательских переменных
Чтобы добавить Python в PATH в пользовательских переменных, щелкните правой кнопкой мыши «Этот компьютер» и выберите ئصائص. Оказавшись в меню свойств, нажмите на опцию Расширенные системные настройки. В следующем окне выберите вкладку Расширенные настройки , и выберите переменные среды.
Список переменных среды состоит из двух отдельных частей: верхней части, называемой пользовательскими переменными, и нижней части, называемой системными переменными. Однако в этом случае мы сосредоточимся на пользовательских переменных.
в списке Пользовательские переменные найдите переменную с именем. Path. Затем вставьте путь, который вы скопировали ранее, в параметр значения переменной, используя Ctrl + V И нажмите Ok.
Однако, если вы не можете найти эту переменную, вам может потребоваться ее создать. Для этого нажмите Новое. Затем в форме имени переменной введите Path и вставьте путь Python в поле значения переменной.
Вернитесь в папку пути установки Python и дважды щелкните Сценарии чтобы открыть этот каталог. Затем скопируйте его путь из панели пути в верхней части окна (рядом с панелью поиска), как вы это делали ранее с путем установки Python.
Как только вы скопируете трек Сценарии , вернитесь к переменным среды. Затем выберите переменную Path и щелкните «Изменить». Введите точку с запятой после пути к исполняемому файлу Python и вставьте путь Сценарии который вы только что скопировали после. Затем нажмите Ok.
Добавление Python в PATH с опцией системных переменных
Вы также можете добавить Python в системные переменные PATH. Хотя это всего лишь альтернатива, и в ней нет необходимости, если вы уже добавили ее в пользовательские переменные.
Чтобы использовать параметр «Системные переменные», выполните описанные выше действия, чтобы скопировать путь Python и его путь к сценариям. Затем вернитесь к переменным среды. Затем в разделе «Системные переменные» найдите переменную с именем Path. Щелкните эту переменную и щелкните Выпуск.
В следующем появившемся окне нажмите New и вставьте путь, который вы скопировали ранее, в открытое пространство. Повторите этот процесс также для пути скриптов. Далее коснитесь Ok И закройте окно переменных среды.
Добавить Python в Windows PATH автоматически
Вы также можете автоматически добавить Python в свой Windows PATH во время установки. Хотя этот метод работает не во всех случаях, вы все же можете попробовать.
Для этого щелкните свой установочный файл и установите флажок «Добавить Python 3.7 в PATH». Номер версии изменится при установке разных версий Python.
Установка этого флажка автоматически добавит Python в ПУТЬ Windows. Это означает, что вы можете запускать команды Python через командную строку сразу после установки.
Убедитесь, что вы добавили Python в свой путь к Windows.
Чтобы узнать, был ли Python уже добавлен в Windows PATH, откройте Терминал и введите python — version, затем нажмите клавишу Enter. Если команда возвращает текущую установленную версию Python, это означает, что вы успешно добавили ее в свой путь Windows.
Однако, чтобы проверить, добавили ли вы путь к сценариям в Windows PATH, попробуйте выполнить команду пакет установки pip в Терминале и замените «пакет» своей любимой библиотекой. Если вы установили Python 2.7.9 и новее, команда устанавливает указанный пакет, указывая, что вы также успешно добавили скрипты Python в путь.
Еще одно приложение, о котором вам следует подумать о добавлении в ваш путь к Windows.
Помимо добавления Python в ваш Windows PATH, вы можете добавить приложения для редактирования текста, интегрированные среды разработки (IDE), Git, Node, Anaconda и многие другие.
Например, управлять проектами с помощью Sublime Text легко, когда вы открываете Терминал в каталоге папки проекта и запускаете команду subl.. Это откроет отредактированную команду в вашей текущей папке и отобразит ее на боковой панели, еще один экономящий время ярлык для продуктивной работы. Sublime Text.