С развитием технологий экраны для компьютеров смогли значительно увеличить разрешение. Если старые экраны показывали 640х800 пикселей, то более новые отображают уже 1920х1080. У последних моделей разрешение ещё выше.
В операционной системе Linux существует несколько способов настройки разрешения экрана. В обычных системах, как правило, это не нужно. Но если вы хотите использовать несколько мониторов или решили запустить Linux на виртуальной машине, то разрешение может определиться неправильно и тогда придётся его настроить. В этой статье мы рассмотрим, как изменить разрешение экрана в Linux через графический интерфейс и терминал.
Настройка разрешения экрана в GUI
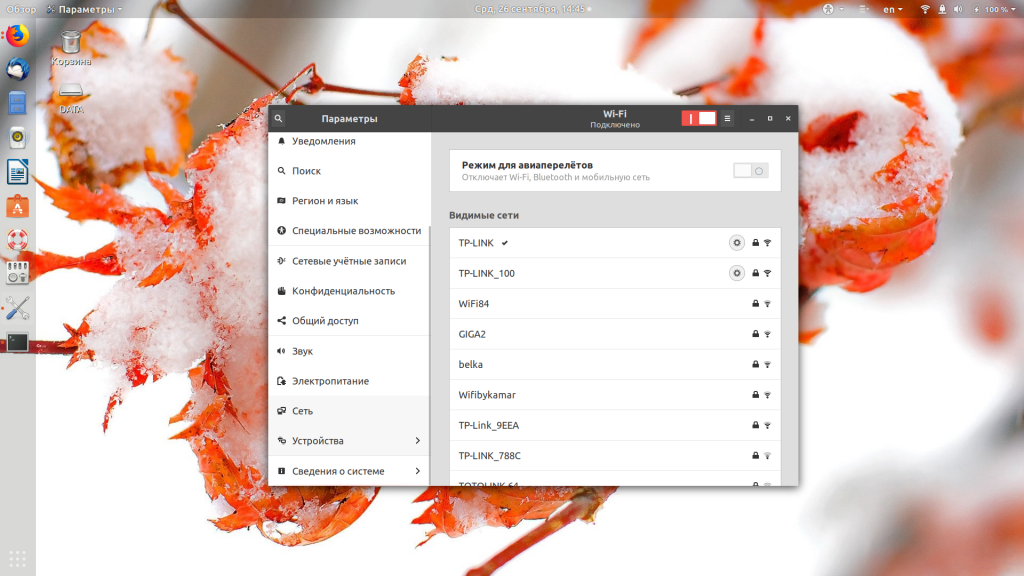
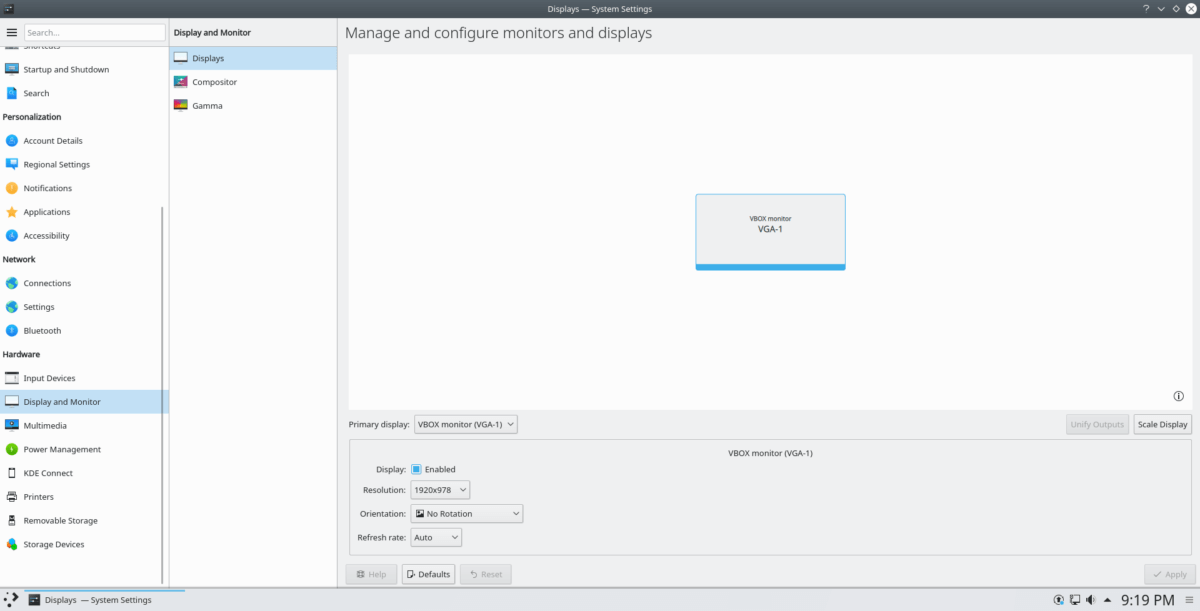
Разберём настройку разрешения на примере дистрибутива Ubuntu и окружения рабочего стола Gnome. Откройте утилиту Настройки из главного меню:
Перейдите на вкладку Устройства, а затем выберите пункт Настройка экранов:
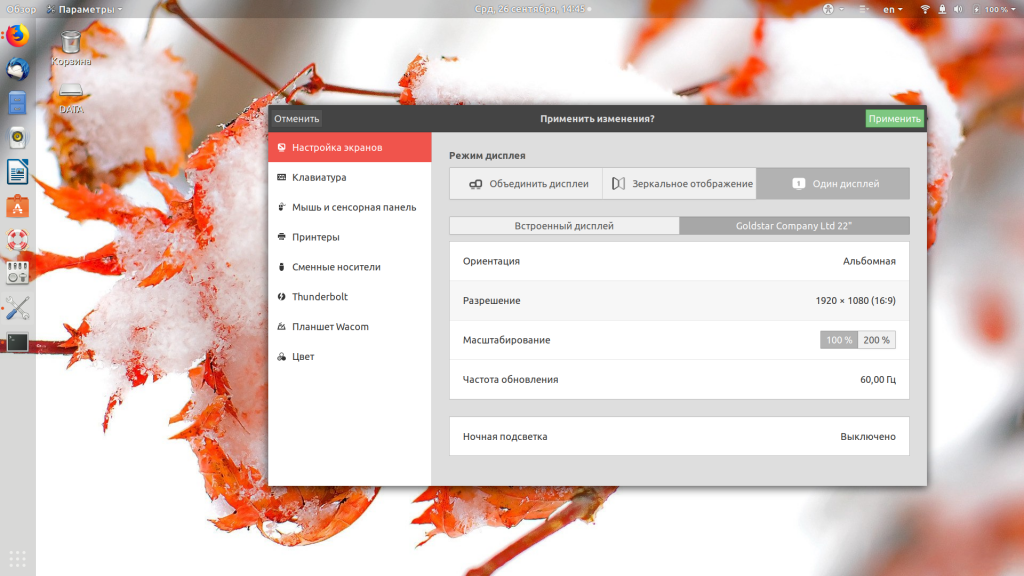
Если к компьютеру подключено два монитора Linux или больше, то у вас будет три варианта работы экранов:
- Объединение — все экраны объединяются в одно рабочее пространство;
- Зеркальное отображение — одинаковая картинка на всех экранах;
- Один экран — картинка только на одном экране, другие отключены.
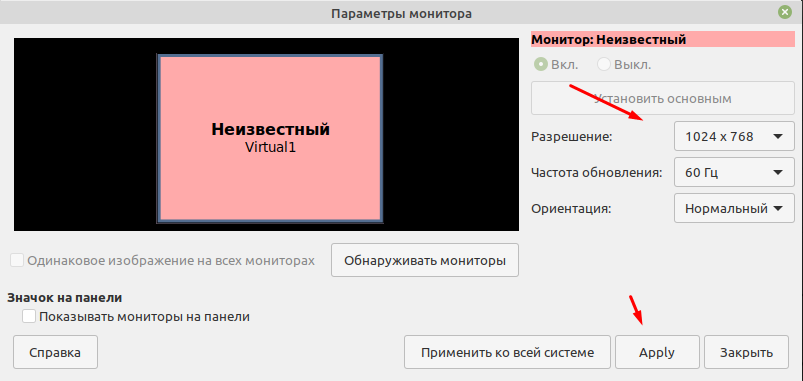
Независимо от того, какой режим вы выбираете, будут доступны настройки Разрешение и Частота обновления, где вы сможете настроить нужные вам параметры:
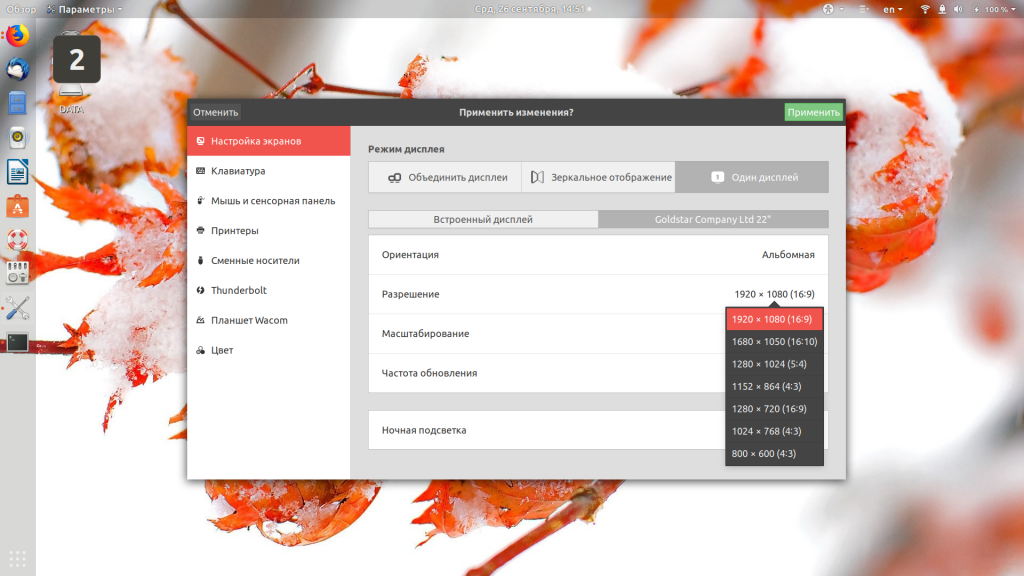
Так выполняется настройка монитора Linux через графический интерфейс. Если вы хотите объединить экраны, то можно указать разрешение мониторов Linux для каждого из них отдельно:
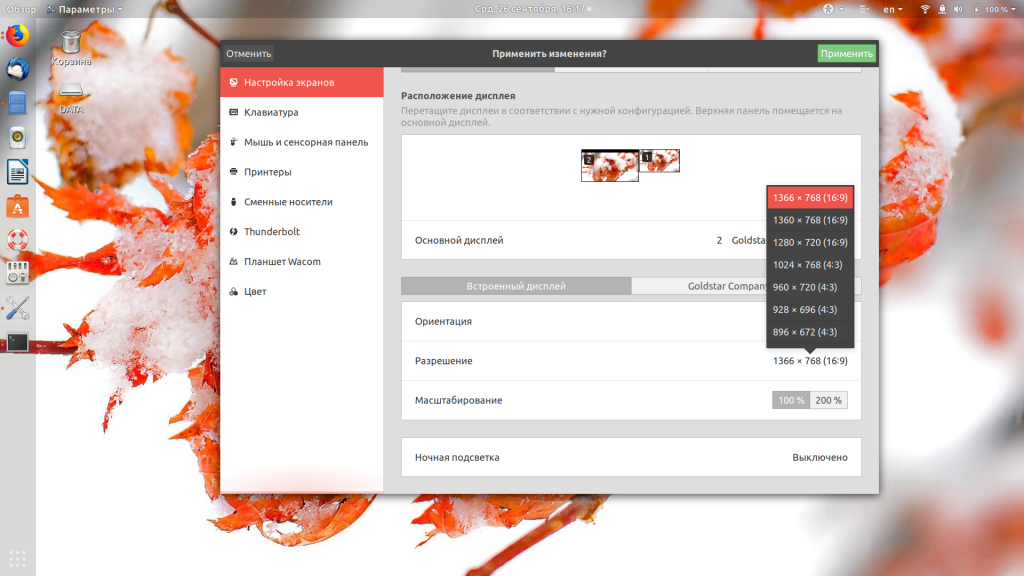
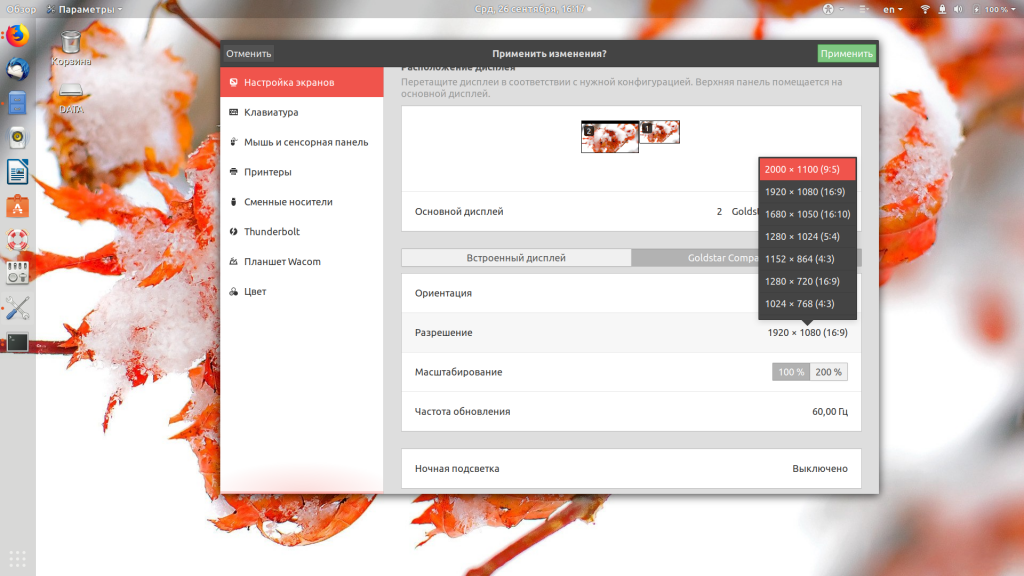
Но здесь есть один недостаток, вы можете выбрать только то разрешение экрана, которое предлагает система. Если вы захотите установить разрешение выше или ниже тех, что есть, то у вас ничего не выйдет. Для этого надо воспользоваться терминалом.
Как изменить разрешение экрана через терминал
Для управления настройками экрана из терминала можно использовать утилиту xrandr. Синтаксис утилиты очень прост:
xrandr опции параметры
Разберём основные опции утилиты, которые будем использовать:
- —verbose — включить более подробный вывод;
- —version — версия программы;
- —query — когда установлена эта опция или не указанно никаких опций, выводится текущая конфигурация;
- -d, —display — позволяет указать какой X экран использовать по имени;
- -s, —screen — устанавливает дисплей для настройки по ID;
- —output — устанавливает дисплей для настройки по имени или ID;
- —primary — выбрать основной экран;
- —size — позволяет указать размер экрана;
- —rate — устанавливает частоту обновления;
- —dpi — устанавливает DPI, количество точек на дюйм, которое позволяет вычислить правильный размер для окон;
- —newmode — создаёт новый режим отображения по размеру и частоте;
- —rmmode — удаляет режим отображения;
- —addmode — добавляет созданный режим к списку доступных для использования;
- —delmode — удалить режим из списка доступных;
- —mode — активирует указанный режим;
- —off — отключает экран;
- —gamma — позволяет установить коррекцию гаммы, в формате красный:зеленый:синий;
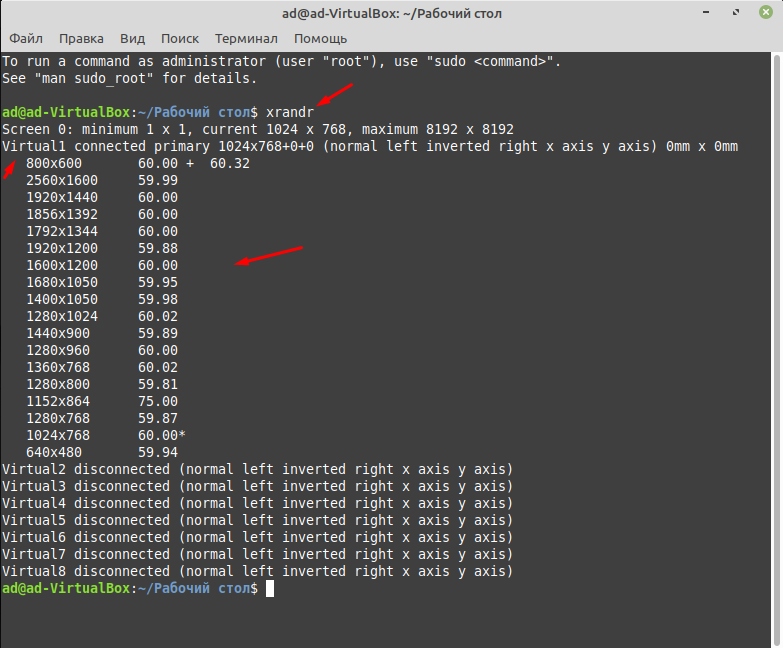
Чтобы посмотреть текущие параметры системы, запустите утилиту без параметров:
xrandr
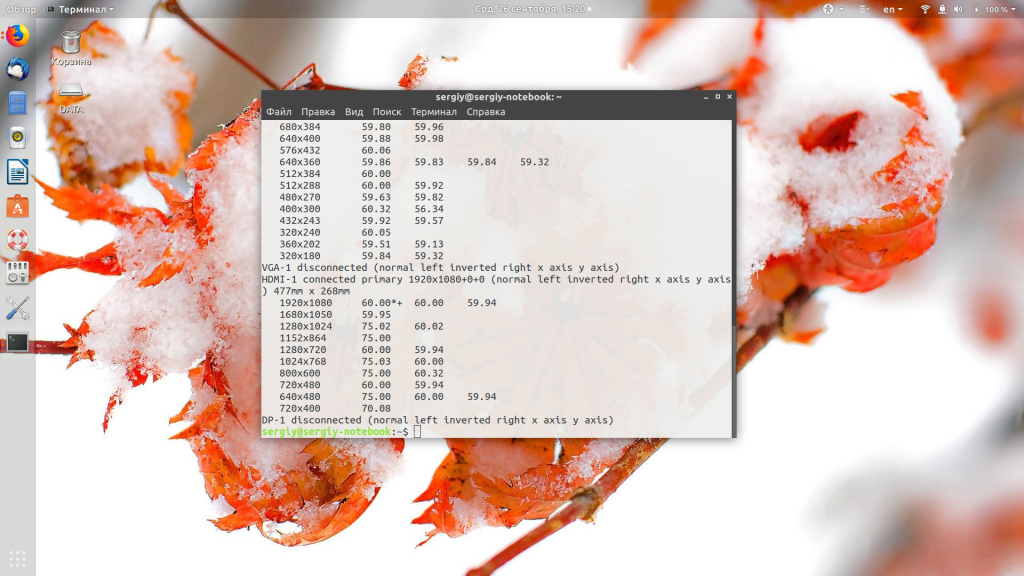
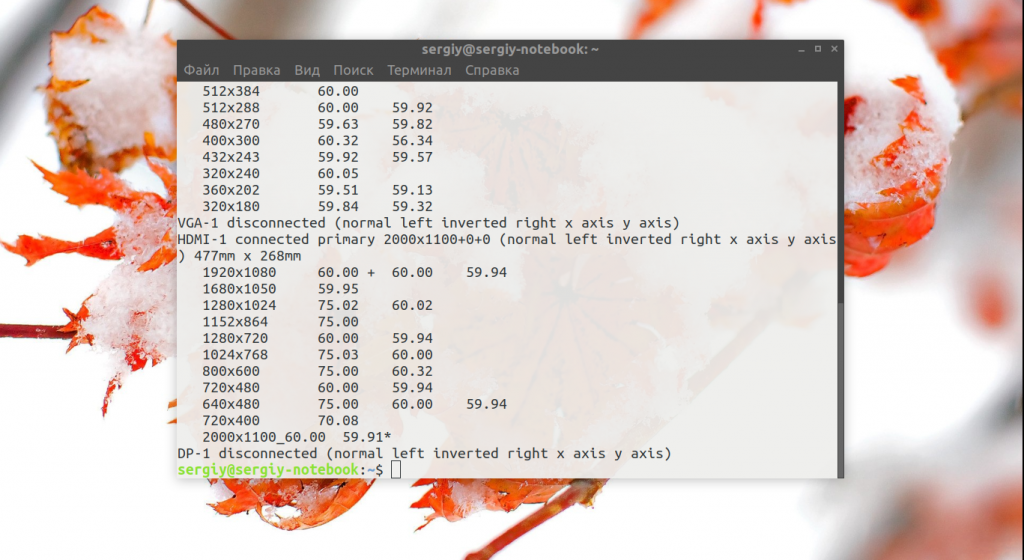
Как видите, к моей системе подключено два экрана:
- LVDS-1 — встроенный экран ноутбука;
- HDMI-1 — внешний экран;
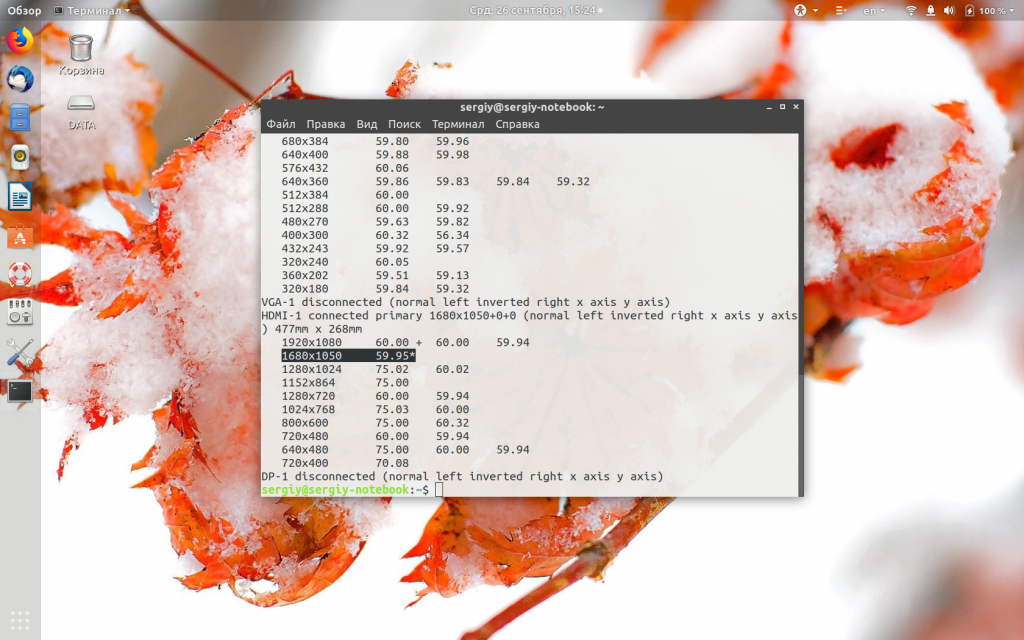
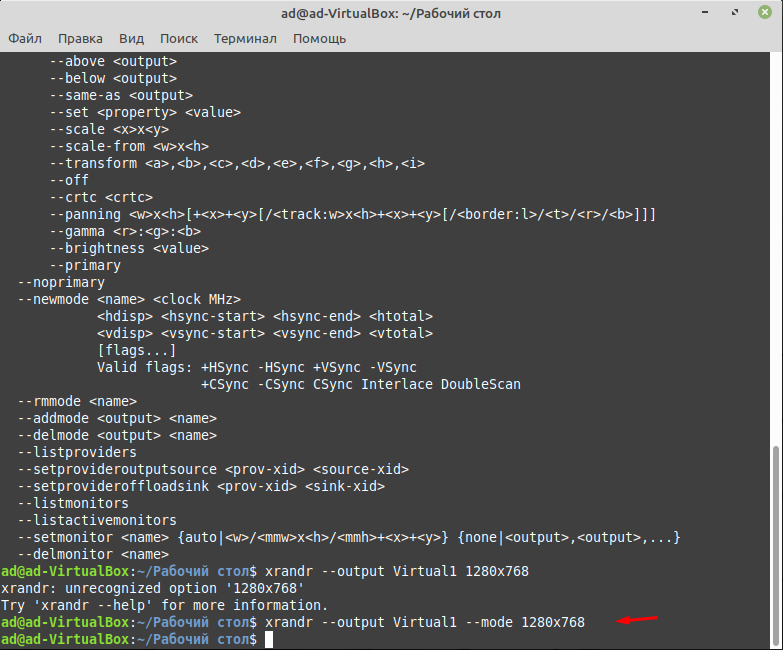
Для каждого экрана доступно несколько разрешений, текущее разрешение отмечено звёздочкой. Чтобы изменить разрешение экрана Linux на одно из доступных, используйте опцию —mode вместе с —output:
xrandr --output HDMI-1 --mode 1680x1050

Теперь звёздочка выводится около разрешения 1680х1050.
Хорошо, мы разобрались с тем, как добавить одно из существующих разрешений. По сути, то же самое, что и в графическом интерфейсе. Но если нужного разрешения в списке нет, то его можно добавить. Для этого сначала нужно конвертировать обычную запись в формат VESA. Для этого используйте утилиту cvt. Например, создадим режим с разрешением 2000х1100 и частотой обновления 60:
cvt 2000 1100 60
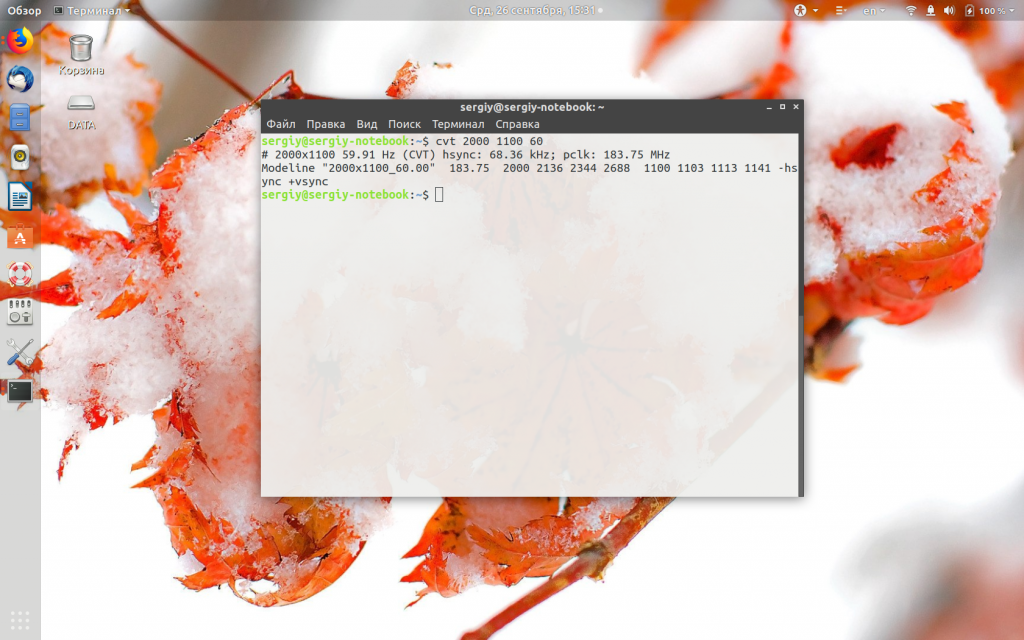
Дальше надо скопировать из вывода утилиты всё, что написано после «Modeline». Осталось использовать скопированный текст в xrandr:
xrandr --newmode "2000x1100_60.00" 183.75 2000 2136 2344 2688 1100 1103 1113 1141 -hsync +vsync
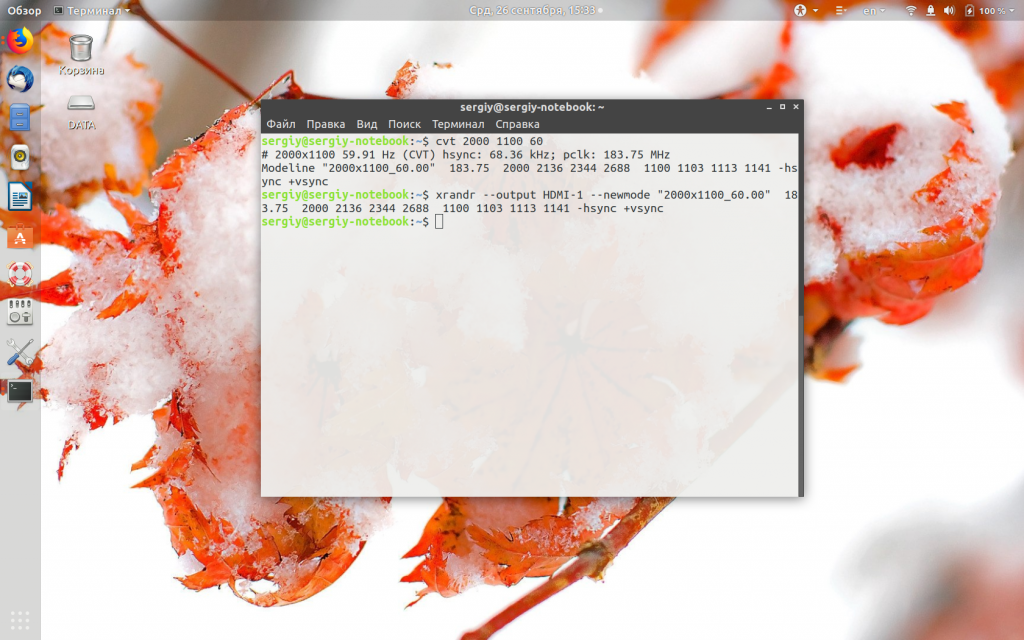
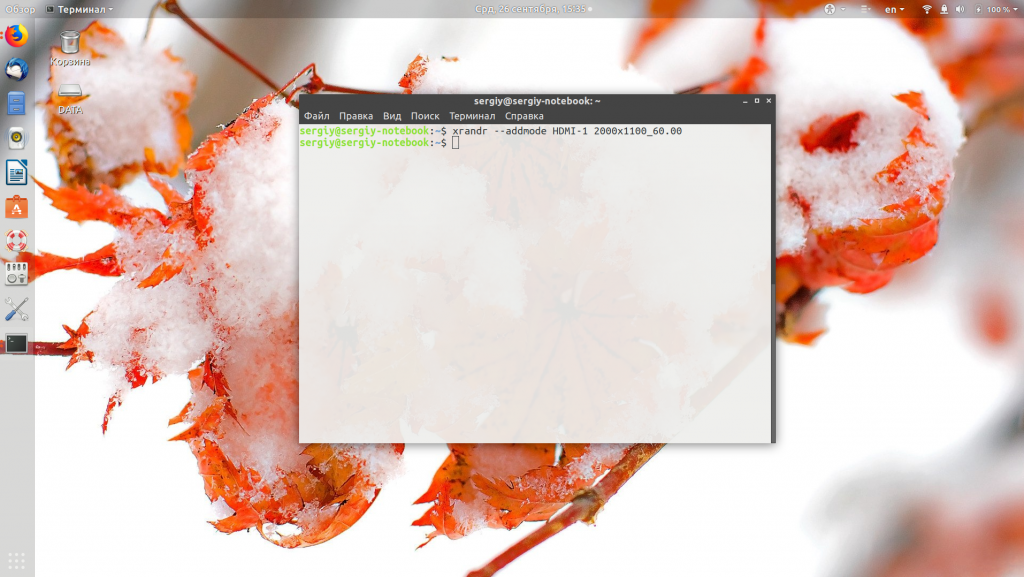
Добавляем только что созданное разрешение к списку доступных для нужного нам экрана:
xrandr --addmode HDMI-1 2000x1100_60.00
А затем активируем, как описывалось выше:
xrandr --output HDMI-1 --mode 2000x1100_60.00
xrandr
Но будьте аккуратны с новыми разрешениями. Если вы устанавливаете разрешение выше, чем поддерживает ваш монитор, то он просто не будет показывать. Но такая штука может быть полезна с VirtualBox, или если компьютер не определяет, что ваш монитор поддерживает более высокое разрешение.
Чтобы сохранить настройки после перезагрузки, добавьте команду активации разрешения в конфигурационный файл ~/.xprofile:
vi ~/.xprofile

Синтаксис файла очень похож на ~/.xinitrc. Все команды из него автоматически выполняются при старте сессии. Или же вы можете использовать любой другой метод автозагрузки, который работает после запуска X.
Выводы
В этой статье мы рассмотрели несколько способов настроить разрешение экрана Linux с помощью графического интерфейса или через терминал. Как видите, это не так сложно, как может показаться на первый взгляд.

Статья распространяется под лицензией Creative Commons ShareAlike 4.0 при копировании материала ссылка на источник обязательна .
Об авторе
![]()
Основатель и администратор сайта losst.ru, увлекаюсь открытым программным обеспечением и операционной системой Linux. В качестве основной ОС сейчас использую Ubuntu. Кроме Linux, интересуюсь всем, что связано с информационными технологиями и современной наукой.
Contents
- Resetting an out-of-range resolution
- Dynamically testing different resolutions
- Panning viewport
-
How to setup a dual monitor
-
Introduction
- Output port names
-
Four methods to setup
- By Session with .xprofile
- Dynamic setup with xrandr
- statically setup in xorg.conf
- Xrandr Graphical Front End GUI
- Not recognised video cards
-
Introduction
- Adding undetected resolutions
-
Setting xrandr changes persistently
- Setting xrandr commands in .xprofile
- Setting xrandr commands in kdm/gdm startup scripts
- Setting resolution changes in xorg.conf
-
Setting resolution changes in xorg.conf — resolution lower than expected
- Try this first
- Use cvt/xrandr tool to add the highest mode the LCD can do
- Goto Ubuntu Menu: System -> Preference -> Display
- Obtaining modelines from Windows program PowerStrip
Resetting an out-of-range resolution
If you set a resolution inappropriate for your monitor in the Screen Resolution GUI tool, you can reset it from a terminal by running
-
$ rm ~/.config/monitors.xml
Dynamically testing different resolutions
You can either use the Screen Resolution GUI tool to experiment with different resolutions, or the more powerful xrandr command-line tool. Without parameters, xrandr shows you the names of different outputs available on your system (LVDS, VGA-0, etc.) and resolutions available on each:
-
$ xrandr
Screen 0: minimum 320 x 200, current 1400 x 1050, maximum 1400 x 1400
VGA disconnected (normal left inverted right x axis y axis)
LVDS connected 1400x1050+0+0 (normal left inverted right x axis y axis) 286mm x 214mm
   1400x1050      60.0*+   50.0
[...]
You can direct xrandr to set a different resolution like this:
-
$ xrandr --output LVDS --mode 1024x768
$ xrandr --output VGA1 --mode 1024x768
The refresh rate may also be changed, either at the same time or independently:
-
$ xrandr --output LVDS --mode 1024x768 --rate 75
$ xrandr --output VGA1 --mode 1024x768 --rate 60
Note that changes you make using xrandr only last through the current session. xrandr has a lot more capabilities — see man xrandr for details.
Panning viewport
If you want to have a panning viewport, i.e., a virtual screen that’s bigger than your physical screen that moves when you move the mouse to the edge («zoomed in» view) specify the desired physical resolution with —mode and the virtual screen size with —fb and panning area (typically same as virtual screen size) with —panning.
For example,
-
$ xrandr --output VGA1 --rate 60 --mode 800x600 --fb 1280x1024 --panning 1280x1024
How to setup a dual monitor
Introduction
This article above will give you some important background information. I will summarize the points that I think are important and add a few points. It makes life easier if you pop open a terminal and type to open your gui monitor program:
-
$ gnome-display-properties
Next uncheck same image in all Monitors. If your watch a lot of movies it is important to set your Monitors to your lower resolution. For example, if they are both 1440 x 900 monitors, make sure it is set to that resolution. If the monitors are different resolutions, you will need it to the resolution of the smaller monitor. So, for example, if one monitor is 1440 x 900 and the other is full HD resolution, you will have to set it at 1440×900. The reason for this is your video will be a black screen when trying to watch a movie so this is very important. Click APPLY. Then you will get a warning and you need to keep your new configuration. You will need to restart your session for this to take effect sometimes. There are 2 simple ways to do this. The first is to log out then log back in, and the second is to hit ctrl+alt+backspace. The second method restarts your x session so make you save your work.
This guide is targeted for people who want to use extended desktop mode on two outputs. Clone mode should work out-of-box with a normal configuration.
With RandR 1.2, you can setup dual head and add/remove monitor dynamically (i.e. on-the-fly, without restarting X).
Output port names
Intel driver — UMS
-
VGA — Analog VGA output
-
LVDS — Laptop panel
-
DP1 — DisplayPort output
-
TV — Integrated TV output
-
TMDS-1 — First DVI SDVO output
-
TMDS-2 — Second DVI SDVO output
The SDVO and DVO TV outputs are not supported by the driver at this time.
Intel driver — KMS
-
LVDS1 — Laptop panel
-
VGA1 — Analog VGA output
-
DVI1 — Digital video output
radeon driver
-
VGA-0 — Analog VGA output
-
LVDS — Laptop panel
-
S-video — Integrated TV output
-
DVI-0 — DVI output
http://www.thinkwiki.org/wiki/Xorg_RandR_1.2
Four methods to setup
- By session with .xprofile.
- Dynamically by using xrandr tool
- Statically by setting in xorg.conf.
- Xrandr Graphical Front End GUI.
xrandr tool (an app component in Xorg) is a command line interface to RandR extension, and can be used to set outputs for a screen dynamically, without any specific setting in xorg.conf. You can refer the xrandr manual for details.
By Session with .xprofile
Use your favorite editor to create ~/.xprofile containing something like:
-
xrandr --output VGA1 --mode 1024x768 --rate 60
Now that command will be run every time your start your Xsession. You can force it to run by logging out and logging back in or by executing ~/.xprofile from your terminal.
Here is an example of my ~/.xprofile. The # are for comments just like you do with shell scripts. The purpose of my setup is sometime have laptop on the left and other times I have my laptop on the right. This makes very simple and easy to change which side you want each monitor to be on. I just added the information on how to set your primary monitor.
-
xrandr --output VGA1 --mode 1024x768 --rate 60

#Laptop right extra Monitor Left
#xrandr --output VGA1 --left-of LVDS1

#Laptop left extra Monitor right
xrandr --output LVDS1 --left-of VGA1

#This is to set your primary monitor.

#This sets your laptop monitor as your primary monitor.
xrandr --output LVDS1 --primary

#This sets your VGA monitor as your primary monitor.
#xrandr --output VGA1 --primary
Some people think it is a disadvantage that this only works for one user, other people think this is an advantage. If you want to be able to use this just copy it over to your profile folder.
Important Note: If you just blindly copy some commands from a website, you may see an error message:
-
xrandr: cannot find mode 1024×768
This may be due to some CMS’ way of modifying content: xrandr expects the letter x and not the multiplication cross × between horizontal and vertical resolution.
Incorrect example:
-
$ xrandr --output VGA1 --mode 1024×768 --rate 60
Corrected example
-
$ xrandr --output VGA1 --mode 1024x768 --rate 60
Dynamic setup with xrandr
Xrandr can be used to change outputs’ mode, rotation direction, position, etc. In this guide, we only introduce options related with dual head setting.
You can see the outputs’ status with option ‘-q’. Below is an example:
-
$ xrandr -q
Screen 0: minimum 320 x 200, current 2048 x 768, maximum 4096 x 4096
VGA1 connected 1024x768+1024+0 (normal left inverted right x axis y axis) 338mm x 270mm
 1280x1024      60.0 +   75.0
 1280x960       75.0     70.0     60.0
 1152x864       75.0     70.0     60.0
 1024x768       75.1     70.1     66.0     60.0*
 832x624        74.6
 800x600        72.2     75.0     60.3     56.2
 640x480        72.8     75.0     66.7     60.0
 720x400        70.1
LVDS1 connected 1024x768+0+0 (normal left inverted right x axis y axis) 304mm x 228mm
 1024x768       60.0*+
 800x600        60.3
 640x480        59.9
DVI1 disconnected (normal left inverted right x axis y axis)
TV1 disconnected (normal left inverted right x axis y axis)
In the above example, two outputs (VGA1 and LVDS1) are connected, the resolution of both is 1024×768@60, output VGA’s viewport is at (1024, 0) and output LVDS’s viewport is at (0, 0), i.e. LVDS1 is located at left of VGA. The size of occupied area by both outputs is 2048×768. The virtual screen size (maximum framebuffer) is 4096 x 4096 which is statically set in xorg.conf (see next section). You can decrease the maximum with ‘—fb’ option but can not increase it. You need make sure your screen size fall into the maximum framebuffer, otherwise you should increase the value in xorg.conf.
There are five xrandr options that can be used to set Dual Monitor:
-
$ xrandr --pos <x>x<y>
$ xrandr --left-of <output>
$ xrandr --right-of <output>
$ xrandr --above <output>
$ xrandr --below <output>
The last four will set the output’s relative position to another output, for example:
-
$ xrandr --output VGA1 --left-of LVDS1
Option ‘-pos’ is more flexible which can place output to anywhere, for example:
-
$ xrandr --output VGA1 --pos 200x200
$ xrandr --output LVDS1 --pos 400x500
statically setup in xorg.conf
RandR1.2 configuration in xorg.conf is based on per monitor. So you need write a ‘Monitor’ section for each output and specify these monitors in ‘Device’ section.
Below is a example snippet in xorg.conf.
-
Section "Device"
        Identifier      "Intel 945G "
        Driver         "intel"

        # Using the name of the output defined by the video driver plus the identifier of a
        #     monitor section, one associates a monitor section with an output by adding an
        #     option to the Device section in the following format:
        #     Option "Monitor-outputname" "monitor ID"

        Option          "monitor-VGA" "foo"
        Option          "monitor-LVDS" "bar"
        #Option         "monitor-TMDS-1" "dvi"
EndSection

Section "Monitor"
        Identifier      "foo"

        # specifies a mode to be marked as the preferred initial mode of the monitor
        # Option "PreferredMode"  "800x600"
        # This optional entry specifies the position of the monitor within the X screen.
        #Option        "Position" "1024 0"
        #This optional entry specifies that the monitor should be ignored
        #     entirely, and not reported through RandR.  This is useful if the
        #     hardware reports  the  presence  of  outputs  that do not exist.
        #Option "Ignore"  "true"
EndSection

Section "Monitor"
        Identifier      "bar"

        #Options LeftOf, RightOf, Above, Below specify monitors' relative position

        Option "LeftOf"  "foo"

        # This optional entry specifies  whether  the  monitor  should  be
        #     turned  on  at  startup.  By default, the server will attempt to
        #     enable all connected monitors.
        #Option "Enable"  "true"

        #This optional entry specifies the initial rotation of the given monitor.
        #     Valid values for rotation are "normal", "left", "right", and "inverted".
        # Option "Rotate"  "left"
EndSection

Section "Screen"
        Identifier      "Default Screen"
        Device        "Intel Corporation 945G Integrated Graphics Controller"
        Monitor       "foo"
        DefaultDepth  24
        SubSection "Display"
                Depth          24
                Modes         "1280x1024"  "1024x768"   "640x480"
        EndSubSection
EndSection
Xrandr Graphical Front End GUI
-
ARandR
-
Grandr
-
LXRandR
-
Urandr
-
zarfy
Not recognised video cards
It is possible, that resolutions higher than 1024×768 (or 800×600.. 640×480) are not avalaible by default, because the videocard isn’t recognised propely. If you can add and apply the desired undetected resolution(s) dinamically with cvt and xrandr, but you get an error after applying static changes to xorg.conf, etc/gdm/init/default, or .xprofile etc. & reboot, something like ‘Stored settings can’t be applied to monitors, any of the selected modes are not compatible with avalaible modes.. trying modes to 79.CRTC..’, than You could try forcing X to recognize the video RAM.
Use your favorite text editor as root: (open a terminal)
-
$ sudo nano /usr/share/X11/xorg.conf.d/99-vesahack
or
-
$ gksudo gedit /usr/share/X11/xorg.conf.d/99-vesahack
and put this in the newly created file:
-
Section "Device"
    Identifier "Screen0"
    VideoRam 10000
EndSection
This tells X that there is 10000 kB (~10 MB) of video RAM, enough for 1920×1200 at 4 bytes per pixel. You can replace ‘10000’ above with the amount of avalaible video ram. Save and reboot. (Remove the 99-vesahack file if it doesn’t help.)
Adding undetected resolutions
Due to buggy hardware or drivers, your monitor’s correct resolutions may not always be detected. For example, the EDID data block queried from your monitor may be incorrect.
If the mode already exists, but just isn’t associated for the particular output, you can add it like this:
-
$ xrandr --addmode S-video 800x600
If the mode doesn’t yet exist, you’ll need to create it first by specifying a modeline:
-
$ xrandr --newmode <Mode``Line>
You may create a modeline using the gtf or cvt utility. For example, if you want to add a mode with resolution 800×600 at 60 Hz, you can enter the following command: (The output is shown following.)
-
$ cvt 800 600 60
# 800x600 59.86 Hz (CVT 0.48M3) hsync: 37.35 kHz; pclk: 38.25 MHz
Modeline "800x600_60.00"   38.25  800 832 912 1024  600 603 607 624 -hsync +vsync
Then copy the information after the word «Modeline» into the xrandr command:
-
$ xrandr --newmode "800x600_60.00" 38.25 800 832 912 1024 600 603 607 624 -hsync +vsync
After the mode is entered, it needs to be added to the output using the —addmode command as explained above.
Setting xrandr changes persistently
There are several ways to make xrandr customizations permanent from session to session: a) .xprofile, b) kdm/gdm, c) xorg.conf. Each of these mechanisms will be discussed in turn.
Setting xrandr commands in .xprofile
A user’s ~/.xprofile file is executed on Xorg startup if it exists and is executable. You can copy and paste xrandr command line strings into this file so they’re executed when you log in. For example:
-
$ xrandr --output VGA-0 --mode 800x600
There are two disadvantages to using .xprofile for xrandr settings. First, it occurs fairly late in the startup process, so you’ll see some resolution resizing during the initial screen draw; in some cases panel windows may resize improperly as a result. Second, as this is a per-user setting, it won’t affect the resolutions of other users, nor will it alter the resolution on the login screen.
Setting xrandr commands in kdm/gdm startup scripts
Both KDM and GDM have startup scripts that are executed when X is initiated. For GDM, these are in /etc/gdm/ , while for KDM this is done at /etc/kde4/kdm/Xsetup. In either case, you can paste in an xrandr command line string into one of these scripts. For GDM, try putting them right before
-
initctl -q emit login-session-start DISPLAY_MANAGER=gdm
in /etc/gdm/Init/Default.
This process requires root access and mucking around in system config files, but will take effect earlier in the startup process than using .xprofile, and will apply to all users including the login screen.
Setting resolution changes in xorg.conf
While xorg.conf is largely empty these days, it can still be used for setting up resolutions. For example:
-
Section "Monitor"
    Identifier      "External DVI"
    Modeline        "1280x1024_60.00"  108.88  1280 1360 1496 1712  1024 1025 1028 1060  -HSync +Vsync
    Option          "PreferredMode" "1280x1024_60.00"
EndSection
Section "Device"
    Identifier      "ATI Technologies, Inc. M22 [Radeon Mobility M300]"
    Driver          "ati"
    Option          "Monitor-DVI-0" "External DVI"
EndSection
Section "Screen"
    Identifier      "Primary Screen"
    Device          "ATI Technologies, Inc. M22 [Radeon Mobility M300]"
    DefaultDepth    24
    SubSection "Display"
        Depth           24
        Modes   "1280x1024" "1024x768" "640x480"
    EndSubSection
EndSection

Section "ServerLayout"
        Identifier      "Default Layout"
        Screen          "Primary Screen"
EndSection
See man xorg.conf for full details on how to craft an xorg.conf file.
Setting resolution changes in xorg.conf — resolution lower than expected
Try this first
If you video card is recognized but the resolution is lower than you expect, you may try this.
Background: I use Ubuntu 9.0.4 x86, ATI X1550 based video card and two LCD monitors DELL 2408(up to 1920×1200) and Samsung 206BW(up to 1680×1050). Upon first login after installation, the resolution default to 1152×864. xrandr does not list any resolution higher than 1152×864. You may want to try editing /etc/X11/xorg.conf, add a section about virtual screen, logout, login and see if this helps. If not then read on.
Change the default xorg.conf
-
Section "Device"
        Identifier      "Configured Video Device"
EndSection

Section "Monitor"
        Identifier      "Configured Monitor"
EndSection

Section "Screen"
        Identifier      "Default Screen"
        Monitor         "Configured Monitor"
        Device          "Configured Video Device"
EndSection
To:
Section "Monitor"
        Identifier      "Configured Monitor"
EndSection

Section "Screen"
        Identifier      "Default Screen"
        Monitor         "Configured Monitor"
        Device          "Configured Video Device"
->        SubSection "Display"
->                Virtual 3600 1200
->        EndSubSection
EndSection

Section "Device"
        Identifier      "Configured Video Device"
EndSection
About the numbers: I put DELL on the left and Samsung on the right. So the virtual width is of sum of both LCD width 3600=1920+1680; Height then is figured as the max of them, which is max(1200,1050)=1200. If you put one LCD above the other, use this calculation instead: (max(width1, width2), height1+height2).
If that does not help, here’s what I did:
Use cvt/xrandr tool to add the highest mode the LCD can do
The actual order was different, as I tried to add new mode to one LCD at a time. Below is the combined/all-in-one quote
-
aa@aa-desktop:/$ cvt 1920 1200 60
# 1920x1200 59.88 Hz (CVT 2.30MA) hsync: 74.56 kHz; pclk: 193.25 MHz
Modeline "1920x1200_60.00"  193.25  1920 2056 2256 2592  1200 1203 1209 1245 -hsync +vsync
aa@aa-desktop:/$ cvt 1680 1050 60
# 1680x1050 59.95 Hz (CVT 1.76MA) hsync: 65.29 kHz; pclk: 146.25 MHz
Modeline "1680x1050_60.00"  146.25  1680 1784 1960 2240  1050 1053 1059 1089 -hsync +vsync
aa@aa-desktop:/$ xrandr --newmode "1920x1200_60.00"  193.25  1920 2056 2256 2592  1200 1203 1209 1245 -hsync +vsync
aa@aa-desktop:/$ xrandr --newmode "1680x1050_60.00"  146.25  1680 1784 1960 2240  1050 1053 1059 1089 -hsync +vsync
aa@aa-desktop:/$ xrandr --addmode DVI-1 "1920x1200_60.00"
aa@aa-desktop:/$ xrandr --addmode DVI-0 "1680x1050_60.00"
Change one of the LCD’s resolution to a lower one, e.g. 800×600. Apply change, then (I don’t remember the exact order/wording here:) hopefully the GUI will give you a prompt saying something like «the resolution can be improved but virtual screen has to be enabled, you need to however logout and log back in». I did it and on 2nd login, I am able to find the higher resolution listed for that LCD. After that I follow suite and make similar change to 2nd LCD and am able to get both of them working.
Obtaining modelines from Windows program PowerStrip
X.Org Wiki has an article about this.
Время прочтения
5 мин
Просмотры 5.4K

Дисплеи с высокой плотностью пикселей уже давно не редкость. И для того, чтобы UI не выглядел слишком мелко, применяется масштабирование. В разных системах используются разные подходы и имеются различные возможности настроек. Но одно объединяет их все — безмерное количество кривизны, костылей и глюков. Посмотрим как на сегодняшний день обстоит ситуация в лагере Linux.
Цель первой части — обрисовать ситуацию с настройками масштабирования в системе из коробки, без лишних плясок с бубном — так, как ее видит обычный пользователь.
Десктопных окружений великое множество, проверить все займет огромное количество времени, поэтому критерии выбора такие — находится в активной разработке и не требует отдельной установки, т.е. идет в комплекте с каким-н дистрибутивом. Ну и конечно оно должно быть более мене известным, потому выбирал просто из перечня в таблице.
Дистрибутивы для обзора были использованы следующие: Ubuntu и Fedora для Gnome, openSUSE для KDE, Manjaro для XFCE, Debian для MATE, Mint для Cinnamon, Ubuntu для LXQt и Deepin с его одноименным окружением.
Gnome
Поддерживает независимые настройки масштабирования для каждого монитора.

Доступные коэффициенты рассчитываются в зависимости от разрешения монитора, для 4K возможны варианты от 100% до 400%, для FullHD — 100% и 200%.
Дробное масштабирование (Fractional scaling) поддерживается частично. Возможность установки дробного масштабирования в различных дистрибутивах либо присутствует в настройках дисплея (например в Ubuntu), либо скрыта (как в Fedora). Но даже если опция скрыта, включить этот режим можно с помощью команды
gsettings set org.gnome.mutter experimental-features "['scale-monitor-framebuffer']"Доступные коэффициенты также рассчитываются в зависимости от разрешения монитора, для 4K возможны варианты от 100% до 400% с шагом 25%, для FullHD — от 100% до 225%.
Поскольку актуальная версия Gnome использует протокол Wayland, то для полноценной работы приложения должны поддерживать эту технологию. Для обычных X11 приложений написанных с использованием UI-фреймворков, которые не поддерживают Wayland используется реализация X Server под названием XWayland. К сожалению дробное масштабирование среди того что не поддерживается в режиме совместимости, в этом случае X11 приложения отрисовываются в 100% масштабе а затем просто растягиваются до необходимых размеров, даже если в этом режиме выбран целочисленный коэффициент. Когда то за подобное ругали Windows… лет десять назад.
Изменения настроек применяются сразу, log out не требуется.


KDE

В сессии X11 не поддерживает независимые настройки масштабирования для нескольких мониторов.
Дробное масштабирование поддерживается, доступные коэффициенты от 100% до 300% (не зависят от разрешения) с шагом 25%.
С ходу бросается в глаза что высота панели задач не меняется.
Изменения требуют сделать restart, по факту достаточно перелогиниться.
В Wayland сессии можно указать независимые настройки для разных мониторов, масштабирование дробное и по умолчанию X11 приложения будут отображаться с размытием так же как и в Gnome. Но начиная с Plasma 5.26 добавилась опция позволяющая X11 приложениям масштабироваться самостоятельно, в этом случае все работает прекрасно и никакого размытия. С панелью задач тоже все в порядке.

XFCE
Тут все плохо. Поддержка с виду как бы есть но лучше бы ее совсем не было, такое впечатление что код не то что не тестировали, а даже не запускали.


Независимые настройки для каждого монитора есть, также есть секретная опция Window Scaling в Appearance.
Дробное масштабирование с виду поддерживается, но теперь самое интересное — ставим в первом окне коэффициент 1.5x вместо 1x и… весь UI уменьшается. Причем чем больше коэффициент тем мельче будет UI

Взяв линейку легко выявить что все размеры не умножаются на scale factor, а делятся на него т.е. Вместо 150% получаем 66%, вместо 200% — 50% и.т.п. Что интересно, настройки позволяют указывать произвольное значение от 0.1 до 10.0 с шагом 0.1. Если указать значение меньше единицы то UI таки увеличится (например 0.7 даст примерно 143%), но размыто будет абсолютно все. Ситуацию немного улучшает секретная опция Window scale, там всего два варианта 1x и 2x, если выбрать 2x, то размер окон будет умножен на 2 и поделен на коэффициент из настроек дисплея. Тогда коэффициент 1.5 даст масштаб 133%, а коэффициент 2 сократится до 100% и в этом случае проще оставить везде единицы.
Применение настроек требует перелогиниться. Причем делать это придется видимо с клавиатуры, потому что кнопки на панели задач отваливаются (видно на первом скриншоте) и не реагируют на нажатия. Короче это не лучший выбор для дисплеев с высокой плотностью пикселей.
MATE
Не поддерживает независимые настройки масштабирования для нескольких мониторов.
Также нет гибкости выбора коэффициентов, только Regular (x1) или HiDPI (x2).
Среди настроек дисплея эту опцию искать бесполезно, она запрятана довольно далеко и неочевидно в System -> Preferences -> Look And Feel -> MATE Tweak.
Изменения применяются сразу.

Cinnamon

Поддерживает независимые настройки масштабирования для нескольких мониторов.
Поддерживает дробное масштабирование, эта опция помечена как experimental, но по умолчанию включена. Отключение дробного масштабирования отключит также и возможность независимой настройки для разных мониторов. Для дробного масштабирования диапазон настроек от 100% до 200% с шагом 25% независимо от разрешения монитора. При отключенном дробном масштабировании диапазон зависит от разрешения, так же как и на Gnome — от 100% до 400% для 4K и 100% и 200% для FullHD.
Изменения применяются сразу.

LXQt

Не поддерживает независимые настройки масштабирования для нескольких мониторов.
Настройки здесь снова бесполезно искать среди конфигурации дисплея, они запрятаны далеко. Можно указать дробный коэффициент — произвольное значение от 1.0 до 4.0 с точностью в два знака. Заголовки окон не масштабируются.
Применение изменений требует перелогиниться.
Deepin

Окружение используется в одноименном китайском дистрибутиве. До недавних пор не знал о его существовании, включил в список только потому что он фигурирует в таблице из Википедии, оказалось что по визуальному оформлению пожалуй один из лучших среди перечисленного.
Не поддерживает независимые настройки масштабирования для нескольких мониторов.
Дробное масштабирование поддерживается, доступные коэффициенты зависят от подключенных мониторов. Например если использовать только 4К то коэффициенты от 1.0 до 3.0 с шагом 0.25, а если в дополнение к 4К подключить FullHD, то доступные коэффициенты только 1.0 и 1.25.
Применение настроек требует перелогиниться.
Вывод
Из всех рассматриваемых окружений только Cinnamon и KDE (начиная с Plasma 5.26) масштабируют наиболее адекватно, можно настроить например 150% для High-DPI монитора (мне например 200% слишком много), и оставить 100% для второго Low-DPI монитора, и это будет работать.
Вторая часть будет о том, как программно определить системные настройки масштабирования из приложения. Поскольку в Linux нет единого API для этого, то зоопарк с этим творится еще похлеще.
Изменение разрешения экрана в Linux зависит от среды рабочего стола, которую вы используете. Это является причиной того, почему многие пользователи Linux не могут понять, как изменить разрешение экрана в Linux.
В этом руководстве мы рассмотрим основные рабочие столы Linux и покажем, как быстро изменить разрешение экрана в Linux для каждого отдельного рабочего стола.
Содержание
- Как изменить разрешение экрана в Gnome Shell / Budgie
- Изменение разрешения экрана в KDE Plasma
- Как изменить разрешение экрана в XFCE4
- Изменения разрешения экрана в Mate
- Как изменить разрешение экрана в Cinnamon
Как изменить разрешение экрана в Gnome Shell / Budgie
Те, кто работают в Gnome Shell, Budgie и любой другой среде рабочего стола, использующей Gnome в качестве основы для рабочего стола, могут настроить разрешение экрана в приложении Gnome Settings.
РЕКОМЕНДУЕМ:
Аналоги Microsoft Office для Linux
Если вы используете Gnome, вы можете быстро получить доступ к настройкам дисплея двумя способами. Чтобы получить доступ к этим настройкам, вам нужно нажать Win на клавиатуре. Затем введите «Настройки». Дважды щелкните по значку настроек, чтобы открыть область основных настроек. В качестве альтернативы введите «монитор» и нажмите на значок монитора.
В области отображения оболочки Gnome найдите раздел «Разрешение». Нажмите на разрешение по умолчанию, которое ваш компьютер использует, чтобы открыть меню с различными разрешениями меню. Используя меню, выберите подходящее для вас разрешение.
Помимо переключения между различными разрешениями монитора, настройка экрана Gnome также позволяет пользователям менять ориентацию дисплея. Поэтому, если вам не нравится ландшафтный режим вы можете с легкостью его изменить.
Изменение разрешения экрана в KDE Plasma
Чтобы изменить настройки экрана в KDE Plasma 5, необходимо перейти в область настроек системы Plasma. Чтобы попасть в эту область, нажмите клавишу Win на клавиатуре и введите «Системные настройки» в поле поиска. Затем выберите приложение в результатах поиска с этим именем.
РЕКОМЕНДУЕМ:
Как изменить цвет терминала Linux
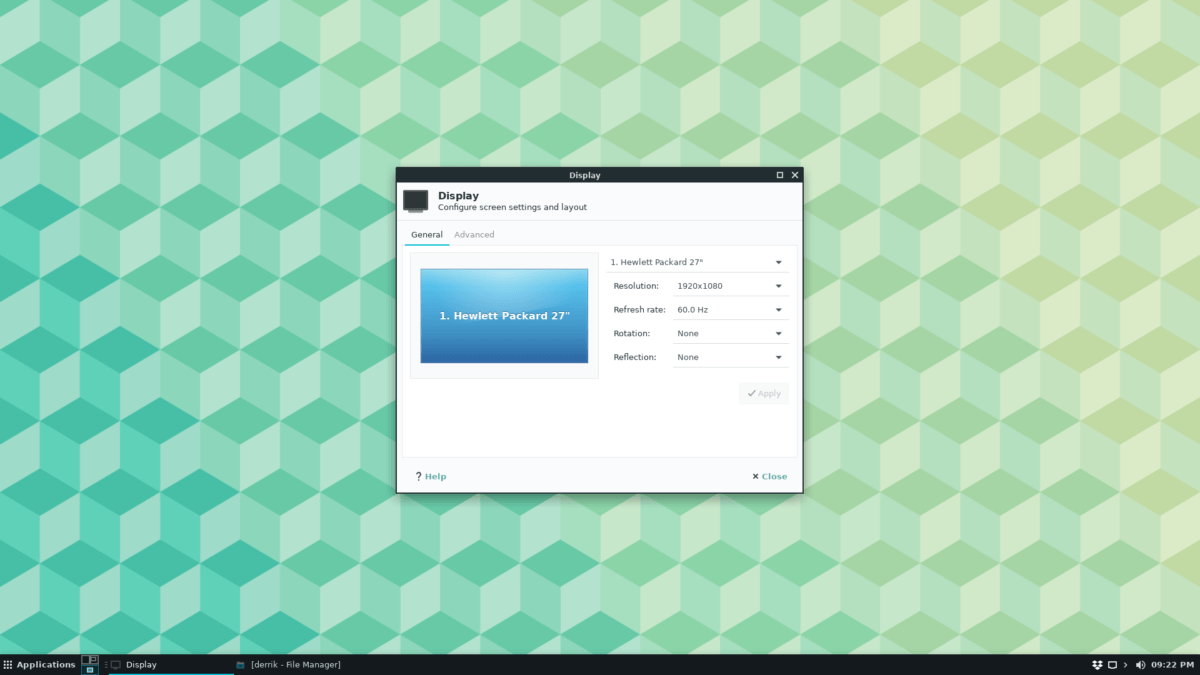
Открыв приложение KDE Plasma System Settings, посмотрите на левую часть приложения. Прокрутите левую часть, пока не дойдете до раздела «Оборудование». В разделе «Оборудование» нажмите на пункте «Экран», чтобы открыть раздел конфигурации монитора KDE Plasma.
Чтобы изменить разрешение вашего экрана в KDE Plasma 5, откройте меню «Разрешение» и щелкните по выпадающему меню. В разделе меню «Ориентация» вы можете изменить другие настройки дисплея. Чтобы узнать частоту обновления, нажмите на меню рядом с «Частота обновления».
Как изменить разрешение экрана в XFCE4
В XFCE4 вы можете получить доступ к настройкам дисплея, открыв меню своего приложения и открыв приложение системных настроек.
Примечание. Не можете найти приложение системных настроек? Нажмите Alt + F2 на клавиатуре, чтобы открыть панель быстрого запуска. Открыв панель запуска, введите «xfce4-settings-manager» и нажмите Enter, чтобы открыть настройки.
В настройках XFCE4 нажмите значок «Дисплей», чтобы запустить приложение для настройки экрана.
При нажатии на «Дисплей» появится окно конфигурации монитора с различными настройками, такими как «Разрешение», «Частота обновления», «Поворот» и «Отражение».
Чтобы изменить разрешение монитора, зайдите в меню «Разрешение». Чтобы изменить частоту обновления, зайдите в меню «Частота обновления» и т. д.
Изменения разрешения экрана в Mate
Используете среду рабочего стола Mate и вам нужно знать, как изменить разрешение экрана? На рабочем столе Mate откройте приложение Control Center, выполнив поиск в меню вашего приложения.
Примечание. Не можете найти Центр управления в меню? Нажмите Alt + F2, чтобы открыть панель быстрого запуска. Затем чтобы запустить его введите «mate-control-center».
Открыв приложение Control Center на рабочем столе Mate, перейдите в раздел «Оборудование». Затем для настройки экрана в разделе «Оборудование» нажмите значок «Дисплеи».
В области конфигурации монитора Mate есть различные параметры, такие как «Разрешение», «Частота обновления» и «Поворот».
Чтобы изменить разрешение экрана, щелкните по выпадающему меню «Разрешение» и выберите один из вариантов в списке. Для изменения частоты обновления, нажмите на меню рядом, и так далее.
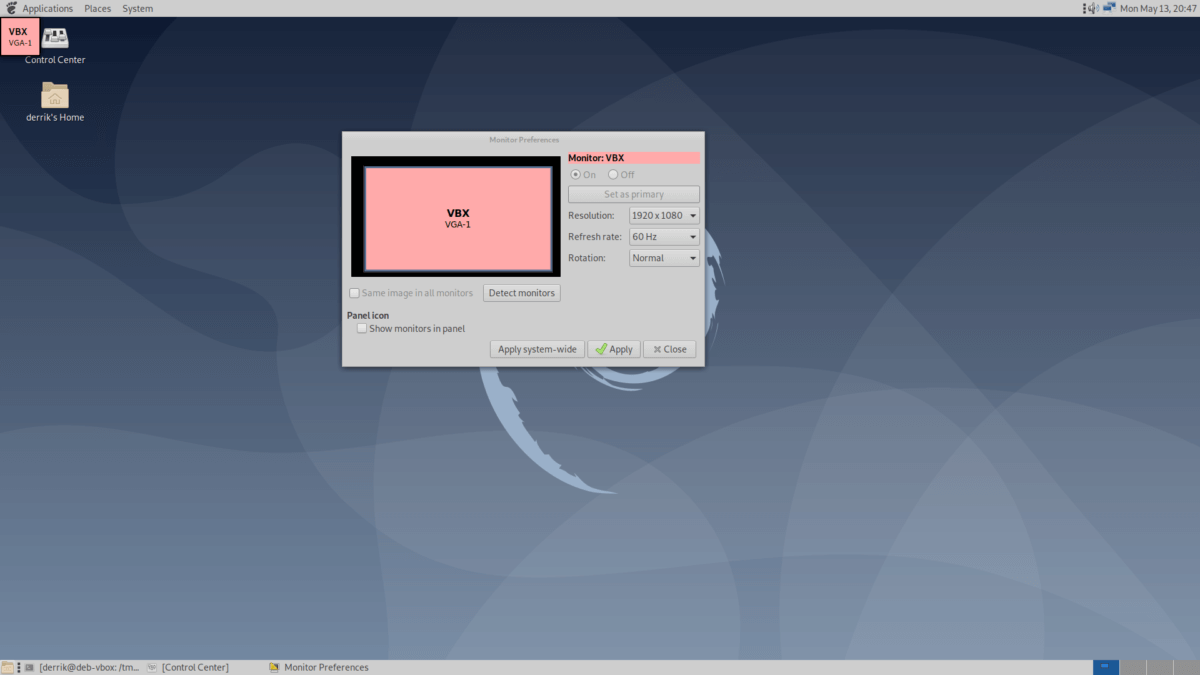
После внесения изменений нажмите «Применить для всей системы», чтобы мгновенно изменить разрешение экрана.
Как изменить разрешение экрана в Cinnamon
Хотя Cinnamon основан на Gnome Shell, у него другая система настройки экрана. Чтобы получить доступ к настройкам экрана в Cinnamon, нажмите клавишу Win. В меню приложения, нажмите на значок гаечного ключа вверху, чтобы перейти в область настроек Cinnamon.
В области настроек Cinnamon прокрутите вниз и найдите раздел «Оборудование». Затем найдите значок «Дисплей» и щелкните по нему, чтобы получить доступ к настройкам экрана.

Далее найдите меню «Разрешение». Чтобы выбрать новое разрешение экрана кликом мышки откройте выпадающее меню. Для изменения ориентации экрана, щелкните меню рядом с «Поворот».
Чтобы применить новые изменения, внесенные в приложение, нажмите «Применить».
РЕКОМЕНДУЕМ:
Установка и использование Teamviewer в Linux
На этом все. Теперь вы знаете как изменить разрешение экрана в Linux.


 (6 оценок, среднее: 3,83 из 5)
![]() Загрузка…
Загрузка…
Is your screen (or external monitor) resolution is low? thus making the items on your screen look larger and less clear? Or do you want to simply increase the current maximum resolution or add a custom resolution?
In this article, we will show how to add missing or set custom display resolution in Ubuntu and its derivatives such as Linux Mint. By the end of this article, you will be able to set to a higher resolution, making content on your screen appear sharper and clearer.
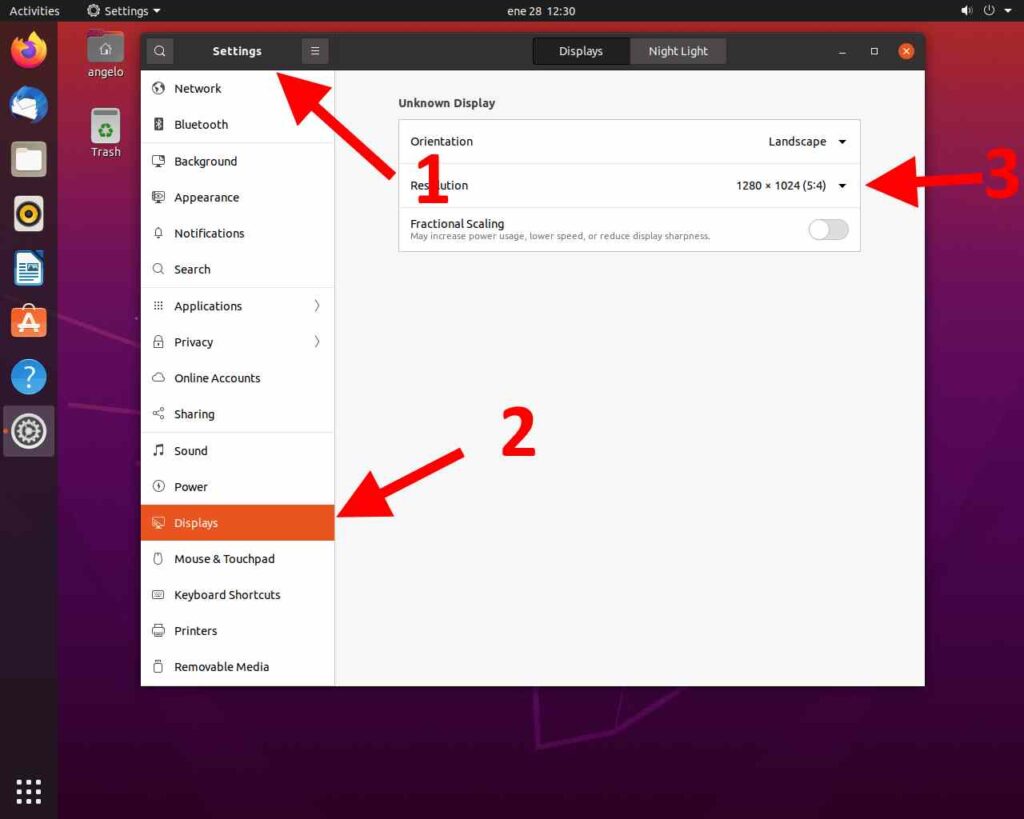
Changing the Resolution or Orientation of the Screen Using Displays
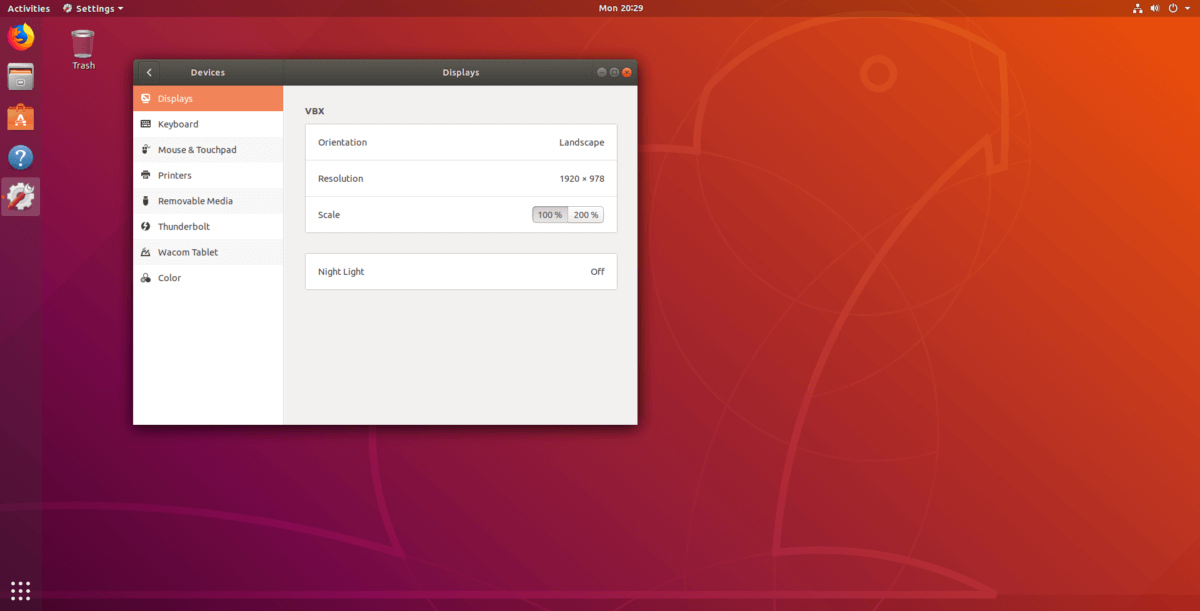
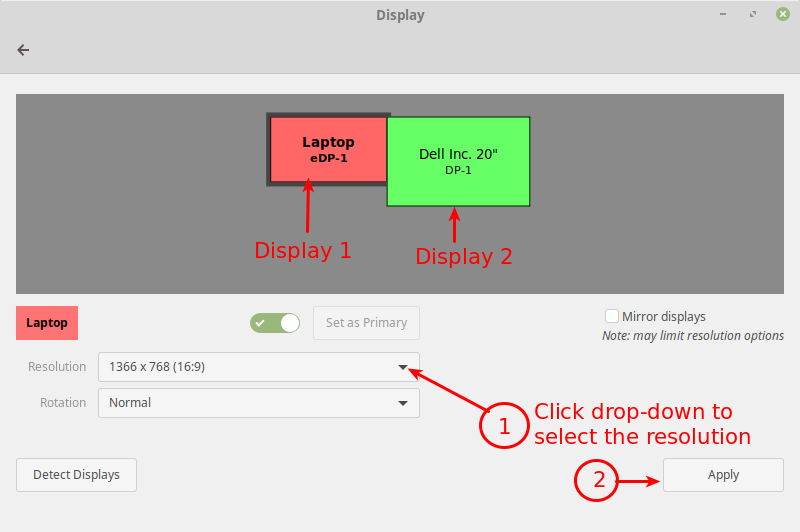
Normally, to change the resolution or orientation of the screen, you can use the Displays graphical user interface tool (open the Activities overview and type Displays, click to open it or System Menu then type Displays and open it).
Note: In case you have multiple displays connected to your computer (as shown in the following image), if they are not mirrored, you can have different settings on each display. To change the settings for a display device, select it in the preview area.
Next, select the resolution or scale you want to use, and choose the orientation then click Apply. Then select Keep This Configuration.
Changing the Resolution or Orientation of the Screen Using Xrandr
Alternatively, you can also use the powerful xrandr tool (a command-line interface to RandR (Resize and Rotate) X Window System extension) which is used to set the size, orientation and/or reflection of the outputs for a screen.
You can also use it to set the screen size or list all active monitors as shown.
$ xrandr --listactivemonitors

To show the names of different outputs available on your system and resolutions available on each, run xrandr without any arguments.
$ xrandr
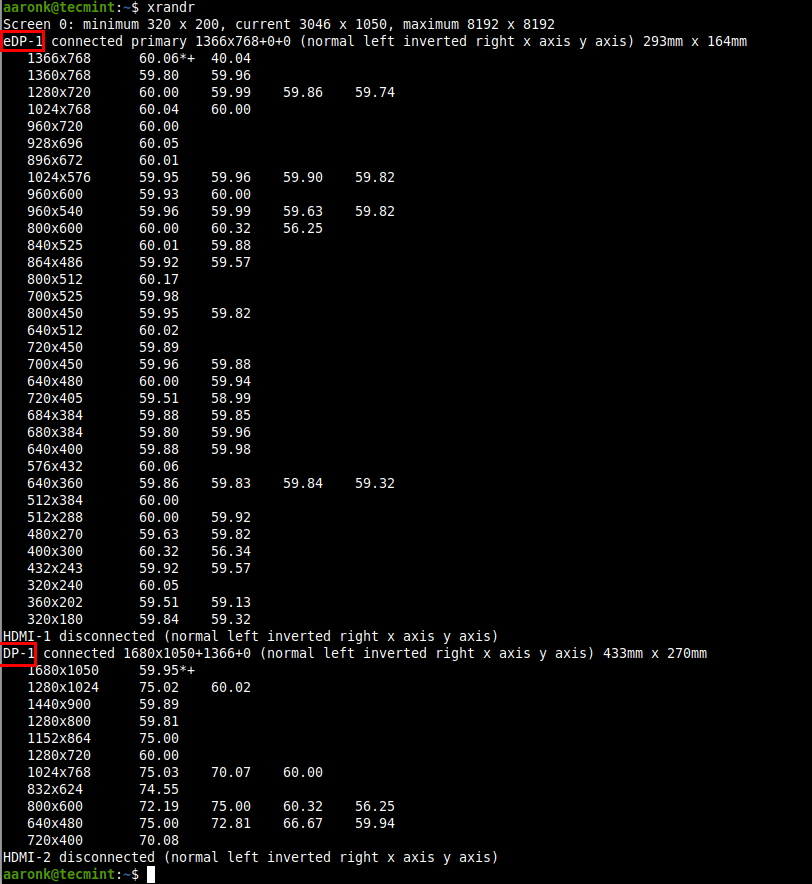
Set Screen Resolution in Ubuntu
To set the resolution for a screen for an external monitor named DP-1 to 1680×1050, use the --mode flag as shown.
$ xrandr --output DP-1 --mode 1680x1050
You can also set the refresh rate using the --rate flag as shown.
$ xrandr --output DP-1 --mode 1680x1050 --rate 75
You can also use the --left-of, --right-of, --above, --below, and --same-as options to arrange your screens either relatively to each other.
For example, I want my external monitor (DP-1) to be positioned left of the Laptop screen (eDP-1) in correspondence to the actual physical positioning:
$ xrandr --output DP-1 --left-of eDP-1
Keep in mind that any changes made using xrandr will only last until you log out or restart the system. To make xrandr changes persistently, use the xorg.conf configuration files for Xorg X server (run man xorg.conf for details on how to create a xorg.conf file) – this is the most effective method.
You can also use the ~/.xprofile file (add xrandr commands in it), however, there are some disadvantages of using this method, one is that this script is read fairly late in the startup process, thus it will not alter the resolution of the display manager (if you use one e.g lightdm).
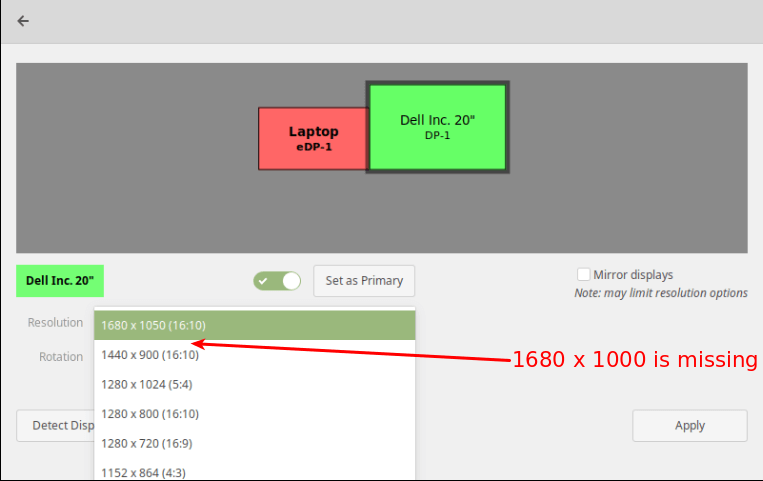
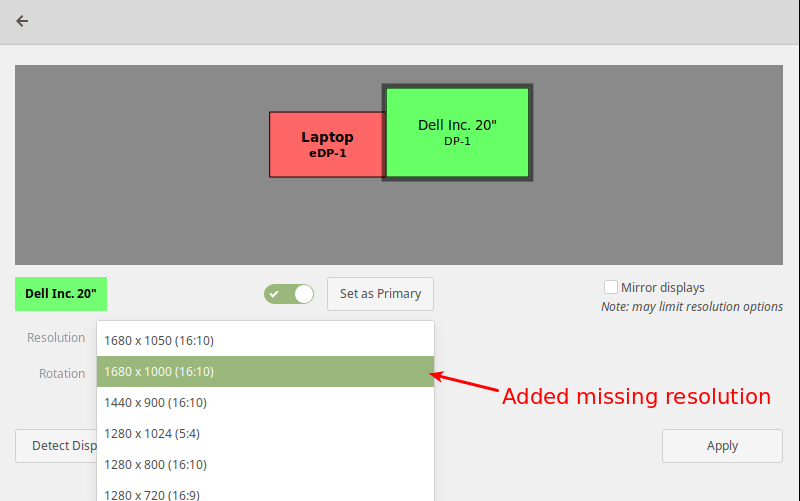
How to Add Missing or Set Custom Display Resolution Using xrandr
It is possible to add a missing or custom display resolution e.g 1680 x 1000 to Displays panel, for a specific display device (DP-1), as explained below.
To add a missing or custom display resolution, you need to calculate the VESA Coordinated Video Timing (CVT) modes for it. You can do this using the cvt utility as follows.
For example, if you need a horizontal and vertical resolution of 1680 x 1000, run the following command.
$ cvt 1680 1000
Next, copy the Modeline (“1680x1000_60.00″ 139.25 1680 1784 1960 2240 1000 1003 1013 1038 -hsync +vsync) from the output of the cvt command and use it to create a new mode using the xrandr as shown.
$ xrandr --newmode "1680x1000_60.00" 139.25 1680 1784 1960 2240 1000 1003 1013 1038 -hsync +vsync
Then add the new mode to the display.
$ xrandr --addmode DP-1 "1680x1000_60.00"

Now open the Displays and check if the new resolution has been added.
The above changes are only temporary and work for the current session (they last until you log out or restart the system).
To add the resolution permanently, create a script called external_monitor_resolution.sh in the directory /etc/profile.d/.
$ sudo vim /etc/profile.d/external_monitor_resol.sh
Then add the following lines in the file:
xrandr --newmode "1680x1000_60.00"  139.25  1680 1784 1960 2240  1000 1003 1013 1038 -hsync +vsync
xrandr --addmode DP-1 "1680x1000_60.00"
Save the changes and exit the file.
For more information on how xrandr works and how to use it, read its man page:
$ man xrandr
That brings us to the end of this article. If you have any thoughts to share or queries, reach us via the feedback form below.
If You Appreciate What We Do Here On TecMint, You Should Consider:
TecMint is the fastest growing and most trusted community site for any kind of Linux Articles, Guides and Books on the web. Millions of people visit TecMint! to search or browse the thousands of published articles available FREELY to all.
If you like what you are reading, please consider buying us a coffee ( or 2 ) as a token of appreciation.

We are thankful for your never ending support.
Linux display
This is detailed in depth on how does Linux’s display works? QA.
On most desktops system (like KDE or Gnome) there are settings available on their respective settings panel, this guide is for additional/manual settings that can be applied to scale an application or the whole desktop. This reference article have many valuable informations for the matter.
Scaling applications
Scaling application can be done mainly via DPI, specific environment variable (explained bellow), application own setting or some specific desktop setting (out of scope of this QA).
-
Qt applications can be scaled with the following environment variables, note that many applications are hard-coding sizing and font and thus the result on such app may not be as expected.
export QT_AUTO_SCREEN_SET_FACTOR=0 export QT_SCALE_FACTOR=2 export QT_FONT_DPI=96 -
Gnome/GTK applications can be scaled with the following environment variables
export GDK_SCALE=2 export GDK_DPI_SCALE=0.5 -
Gnome/GTK can as well be scaled globally with this Gnome setting
gsettings set org.gnome.desktop.interface text-scaling-factor 2.0 -
Chromium, can be scaled with the following command
chromium --high-dpi-support=1 --force-device-scale-factor=1.5 -
Xpra (python) can be used along with Run scaled to achieve a per app scaling.
-
Environment variables modification can be placed in
~/.profilefor a global and automatic appliance after login.
Scaling the desktop with Xorg X11
Xorg’s extension RandR have a scaling feature and can be configured with xrandr. This can be used to scale the desktop to display a bigger environment, this can be useful for HiDPI (High Dots Per Inch) displays.
RandR can also be used the other way around, example making a screen with 1366×768 max resolution support a greater resolution like 1920×1080. This is achieved by simulating the new greater resolution while rendering it for the supported max resolution, similar to when we watch a Full-HD video on a screen that is not Full-HD.
Scaling the desktop without changing the resolution
-
Getting the screen name:
xrandr | grep connected | grep -v disconnected | awk '{print $1}' -
Reduce the screen size by 20% (zoom-in)
xrandr --output screen-name --scale 0.8x0.8 -
Increase the screen size by 20% (zoom-out)
xrandr --output screen-name --scale 1.2x1.2 -
Reset
xrandrchangesxrandr --output screen-name --scale 1x1
Scaling the desktop and simulate/render a new resolution
When using xrandr to «zoom-in» with the previous method, the desktop remain full screen but when we «zoom-out» with for instance xrandr --output screen-name --scale 1.2x1.2 (to get an unsupported resolution) the desktop is not displayed in full screen because this require updating the resolution (to probably a higher unsupported resolution by the screen), we can use a combinaison of --mode, --panning and --scale, xrandr’s parameters to achieve a full screen «zoom-out» scaling (simulate a new resolution), example:
-
Get the current setup
xdpyinfo | grep -B 2 resolution # or xdpyinfo -
Configuration example
Scaling at: 120% Used/max screen resolution: 1366 x 768 Resolution at 120% (res x 1.2): 1640 x 922 (round) Scaling factor (new res / res): 1.20058565 x 1.20208604 -
The idea here is to increase the screen resolution virtually (because we are limited to 1366×768 physically) the command would be (replace
screen-name):xrandr --output screen-name --mode 1366x768 --panning 1640x922 --scale 1.20058565x1.20208604 -
Reset the changes with
xrandr --output screen-name --mode 1366x768 --panning 1366x768 --scale 1x1

# restarting the desktop may be required example with KDE
# kquitapp5 plasmashell
# plasmashell &
Making xrandr changes persistant
There is a multitude of methods to make xrandr changes persistant, this and this QA have many examples.
Experiments notes
As a side note and experiments result while using SDDM + KDE, and after many tests to achieve a persistant config, I ended up loading a script with ~/.config/autostart (systemsettings5 > Startup… > Autostart), and naming my script 00-scriptname to make it run first.
# 00-scriptname

# Applying the main xrandr suited changes (scaling at x1.15)

xrandr --output eDP1 --mode 1366x768 --panning 1574x886 --scale 1.15226939x1.15364583

# This is where it get odd/complicated, sometimes the screen resolution is not applied correctly or not applied at all...
# Note that "xrandr --fb" can be used alone to change the screen resolution on a normal situation...
# Here we will be taking advantage of xrandr's "--fb" feature to make the config appliance stable and works every-time.

# The odd thing here is while re-applying the new resolution 1574x886 with "--fb" nothing happen, but
# if we use use an unsupported resolution like 1574x884 (vs 1574x886) then xrandr force the resolution
# to "reset itself" to the configured resolution (1574x886)...

# In short just re-apply the setting with "--fb" and an unsupported resolution to force a reset.
# ("--fb" can be used alone here without re-applying everything)

#xrandr --fb 1574x884
xrandr --fb 1574x884 --output eDP1 --mode 1366x768 --panning 1574x886 --scale 1.15226939x1.15364583
References
Some KDE’s gui tools: systemsettings5 > display, kcmshell5 xserver and kinfocenter.
Links and sources:
1,
2,
3,
4,
5,
6,
7,
8,
9,
10,
11 and
12.
После установки операционной системы она должна сама установить оптимальное разрешение экрана. Но иногда этого не происходит и пользователю приходиться самостоятельно изменять его. Если взять Windows то там все просто а вот с системами Linux могут возникнуть трудности. Изменить разрешения в них можно двумя способами, используя терминал но с этим справятся только опытные пользователи или используя графический интерфейс. Но даже используя графическую оболочку не опытному пользователю все равно будет сложно это сделать. Так как найти данные настройки будет не просто. Сегодня хочу рассказать и показать как это делается в операционной системе Linux Mint 20.1 MATE. Рассмотрим оба варианта.
Прежде чем продолжить дальше хочу вам порекомендовать ранее написанные мною статьи на тему настройки ОС Linux Mint 20.1.
Linux Mint 20.1 установка
Linux Mint 20.1 подключение сетевой папки
Linux Mint 20.1 настройка принтеров
Как поменять разрешение Linux Mint 20.1
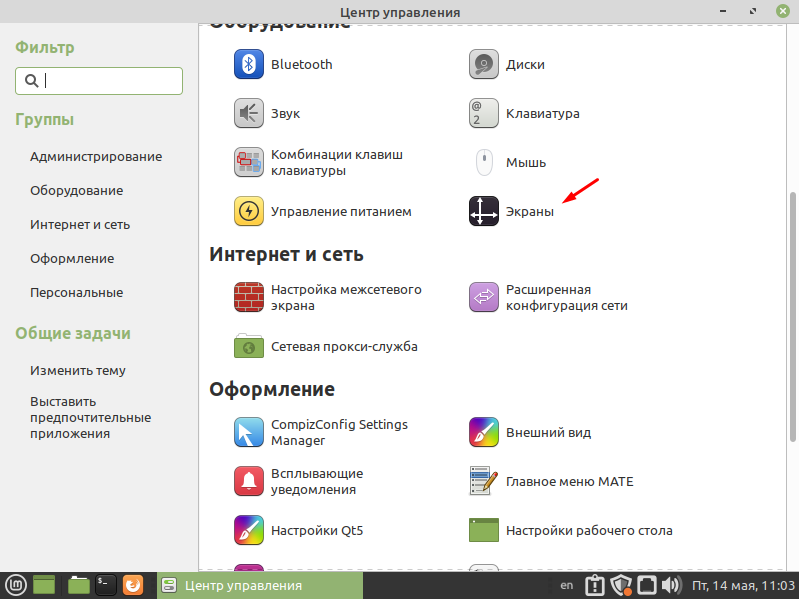
Найти настройки экрана можно в «Центре управления» который в свою очередь находиться в пуске.

В открывшемся окне переходим в раздел «Оборудование» и выбираем пункт «Экраны».
Вот тут и можно изменить разрешение экрана, указать частоту обновления Гц и ориентацию.
Теперь рассмотрим второй вариант изменения разрешения экрана через терминал. Первое что нужно сделать это узнать все доступные разрешения введя команду
xrandr
После этого вы должны увидеть количество подключенных мониторов и доступных для разрешений экрана. Так как у меня Linux Mint 20.1 установлена на виртуальную машину, монитор называется Virtual1 и ниже отображен список, из которого я могу выбрать.
Для того чтобы изменить разрешение нужно ввести команду.
xrandr —output Virtual1 —mode 1280×768
Кстати таким образом можно изменить разрешения экрана практически в любой операционной систем Linux. Так же кода будет вводить команду не ставьте лишних пробелов. Например, если вы напишите так.
xrandr —output Virtual1 — mode 1280×768
Команда не сработает, если кто не заметил то я постав пробел вот тут —_mode.
В общем все достаточно просто, главное нужно быть внимательней.
Главная » Linux » Ubuntu » Два способа изменить разрешение экрана в Ubuntu 22.04 / 20.04
Содержание
- Как изменить разрешение экрана в Ubuntu 22.04 / 20.04
- Способ 1: Использование графического интерфейса пользователя
- Способ 2: Изменение разрешения экрана в Ubuntu с помощью терминала
- Заключение
Общаясь с друзьями, которые только что установили Linux, я заметил, что такая простая вещь, как изменение разрешения экрана, может быть немного сложной. Поэтому в этом посте вы узнаете, как изменить разрешение экрана в Ubuntu из графического интерфейса, так и из терминала.
Многие новички переходят на Linux и в частности в ОС Ubuntu и соответственно теряются. Но со временем они понимают, что Ubuntu проще и интуитивно понятнее, чем другие системы. Но не только это, Ubuntu еще и довольно гибкая. Так как вы можете менять разрешение экрана как через графический интерфейс, так и из терминала.
Как изменить разрешение экрана в Ubuntu 22.04 / 20.04
Способ 1: Использование графического интерфейса пользователя
Обычно новичкам не нравится терминал, поэтому мы начнем с графического интерфейса, которым является GNOME. Эта современная графическая среда имеет все необходимые опции, поэтому вы ничего не пропустите.
Сначала откройте главное меню и наберите Settings (Настройки). Затем откройте системные опции.
Теперь перейдите в раздел Displays (Дисплеи) и в нем вы увидите настройку Resolution (Разрешение).
В раскрывающемся списке вы увидите разрешения, совместимые с вашим экраном. Это также зависит от установленной видеокарты и драйвера. Поэтому, если соответствующее разрешение экрана не отображается, это связано с проблемой драйвера или его совместимости.
Далее вам нужно выбрать нужное разрешение.
Если вы удовлетворены и вам все нравится, то сохраните изменения и все.
Способ 2: Изменение разрешения экрана в Ubuntu с помощью терминала
Вы можете выполнить этот процесс с помощью терминала. Это просто, благодаря инструменту xrandr. С помощью этого инструмента можно быстро настроить экран.
Для вас это может показаться не очень полезным, но в будущем это может пригодиться в скриптах конфигурации или других ситуациях.
По умолчанию этот пакет установлен в Ubuntu 22.04, поэтому вам не придется много делать.
Откройте терминал из главного меню и выполните следующую команду.
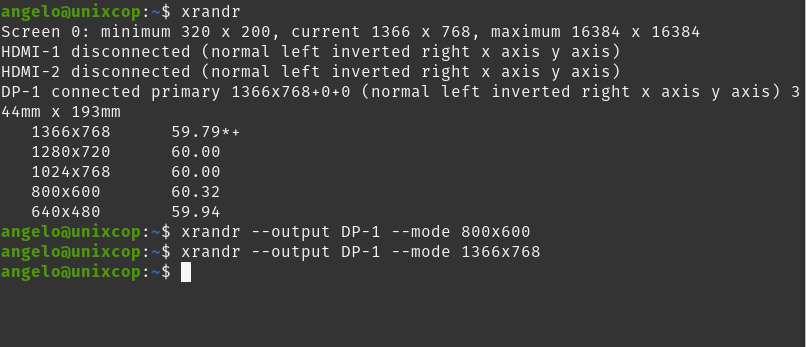
xrandr
Вы получите на выходе следующее окно.
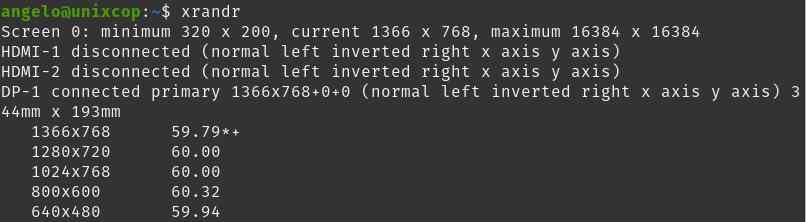
Из этого экрана вы получите важную информацию о конфигурации монитора. В данном случае она показывает минимально допустимое разрешение, текущее разрешение и максимально допустимое разрешение.
Вы также увидите информацию о портах и поддерживаемых разрешениях экрана.
Обратите внимание, что в этом выводе дисплея псевдоним монитора — DP-1. Вы быстро узнаете его, так как на нем написано connected и показано активное разрешение.
Чтобы изменить разрешение на основном мониторе, вам требуется выполнить следующую команду.
xrandr --output [monitor-alias] --mode [resolution]
Например работающей команду.
xrandr --output DP-1 --mode 800x600
Изменения будут происходить автоматически.
Заключение
Это был короткий пост, с его помощью вы узнали, как изменить разрешение экрана в Ubuntu, используя графический интерфейс и терминал. Надеюсь, вам понравилось.