Вы также можете изменить размер холста с помощью Image ‣ Resize Canvas… (или сочетания клавиш Ctrl + Alt + C).
Re: Krita как масштабировать без потери качества.
просто используйте фильтр «коробка» при масштабировании. другие программы могут называть это «ближайшей» или «точечной» фильтрацией. он вообще не будет смешиваться между значениями пикселей при изменении размера.
Как изменить размер слоя в Krita?
чтобы открыть изображение как слой, вы можете перейти в меню слоев> импортировать слой и просмотреть изображение. или просто перетащите изображение на холст, что даст вам контекстное меню, нажмите «Импортировать как новый слой» из этого контекстного меню. Слой -> Масштабировать слой до нового размера.
Как изменить соотношение сторон в Krita?
«Изображение» > «Масштабировать изображение до нового размера…», установите нужные размеры в пикселях. Инструмент преобразования также позволяет вам установить точные значения масштабирования в параметрах инструмента. Имейте в виду, что в вашем примере вы собираетесь растянуть содержимое, потому что соотношение сторон изменится.
Какое лучшее разрешение для Krita?
Я предпочитаю больший размер файла, не менее 3,000 пикселей в самом коротком размере и не более 7,000 пикселей в самом длинном. Наконец, установите разрешение на 300 или 600; чем выше разрешение, тем выше качество конечного изображения.
Как изменить размер изображения?
Как изменить размер изображения на ПК с Windows
- Откройте изображение, щелкнув его правой кнопкой мыши и выбрав «Открыть с помощью» или щелкнув «Файл», а затем «Открыть» в верхнем меню Paint.
- На вкладке «Главная» в разделе «Изображение» нажмите «Изменить размер».
- Отрегулируйте размер изображения в процентах или в пикселях по своему усмотрению. …
- Нажмите на кнопку OK.
2.09.2020
Преобразовать. Как и наша кисть деформации, кисть пластики позволяет рисовать деформации прямо на холсте. Перетащите изображение вдоль мазка кисти. Увеличение/уменьшение изображения под курсором.
Почему Крита не разрешает мне рисовать?
крита не будет рисовать??
Попробуйте выбрать «Выбрать» -> «Выбрать все», а затем «Выбрать» -> «Отменить выбор». Если это работает, пожалуйста, обновитесь до Krita 4.3. 0, так как ошибка, требующая от вас этого, исправлена в новой версии.
Как изменить размер текста в Krita?
При использовании художественного текста вам необходимо выделить текст с помощью инструмента по умолчанию, затем использовать появившийся инструмент редактирования текста исполнителя, выделить весь текст и изменить его размер с помощью параметров инструмента.
Как изменить размер окна Krita?
Вместо этого вы можете использовать Alt + O. (Вы можете перейти в «Настроить Krita… ‣ Общие ‣ Окно» и убедиться, что флажок «Включить HiDPI» не установлен, чтобы отключить масштабирование для Krita и получить меньший пользовательский интерфейс).
Как обрезать и перемещать в Krita?
Перемещение и трансформация содержимого осуществляется с помощью инструментов в Krita. Затем вы можете найти их на панели инструментов. Если вы знакомы с тем, как перемещать слои в PS, удерживая нажатой клавишу Ctrl, вы можете сделать то же самое в Krita, нажав клавишу T для инструмента перемещения (например, «T’translate») или Ctrl+T для инструмента преобразования.
Настройки инструментов
Предоставляет вам параметры инструмента на панели инструментов рядом с настройками кисти. Вы можете открыть его с помощью ключа. В Krita 4.2 было изменено поведение потока в сочетании с непрозрачностью.
С помощью этого инструмента вы можете перемещать текущий слой или выделение, перетаскивая мышь. Все, что находится на выбранном слое, будет перемещено. Любое содержимое слоя, находящегося под четырехголовым курсором перемещения, будет перемещено.
Computers work with files and as a painting program, Krita works with
images as the type of file it creates and manipulates.
What do Images Contain?
If you have a text document, it of course contains letters, strung in
the right order, so the computer loads them as coherent sentences.
Raster Data
This is the main data on the paint layers you make. So these are the
strokes with the paint brush and look pixelated up close. A multi-layer
file will contain several of such layers, that get overlaid on top of
each other so make the final image.
A single layer file will usually only contain raster data.
Vector Data
These are mathematical operations that tell the computer to draw pixels
on a spot. This makes them much more scalable, because you just tell the
operation to make the coordinates 4 times bigger to scale it up. Due to
this vector data is much more editable, lighter, but at the same time
it’s also much more CPU intensive.
Operation Data
Stuff like the filter layers, that tells Krita to change the colors of a
layer, but also transparency masks, group layer and transformation masks
are saved to multi-layer files. Being able to load these depend on the
software that initially made the file. So Krita can load and save
groups, transparency masks and layer effects from PSD, but not load or
save transform masks.
Metadata
Metadata is information like the creation date, author, description and
also information like DPI.
Image size
The image size is the dimension and resolution of the canvas. Image size
has direct effect file size of the Krita document. The more pixels that
need to be remembered and the higher the bit depth of the color, the
heavier the resulting file will be.
DPI/PPI
DPI stands for Dots per Inch, PPI stands for Pixels per
Inch. In printing industry, suppose if your printer prints at 300
DPI. It means it is actually putting 300 dots of colors in an area
equal to an Inch. This means the number of pixels your artwork has in a
relative area of an inch.
DPI is the concern of the printer, and artists while creating
artwork should keep PPI in mind. According to the PPI you have
set, the printers can decide how large your image should be on a piece
of paper.
Some standards:
- 72 PPI
-
This is the default PPI of monitors as assumed by all programs. It
is not fully correct, as most monitors these days have 125 PPI or
even 300 PPI for the retina devices. Nonetheless, when making an
image for computer consumption, this is the default. - 120 PPI
-
This is often used as a standard for low-quality posters.
- 300 PPI
-
This is the minimum you should use for quality prints.
- 600 PPI
-
The quality used for line art for comics.
Color depth
We went over color depth in the Color Management page. What you need to
understand is that Krita has image color spaces, and layer color spaces,
the latter which can save memory if used right. For example, having a
line art layer in grayscale can half the memory costs.
Image color space vs layer color space vs conversion.
Because there’s a difference between image color space and layer color space, you can change only the image color space in which will leave the layers alone. But if you want to change the color space of the file including all the layers you can do it by going to this will convert all the layers color space as well.
Author and Description
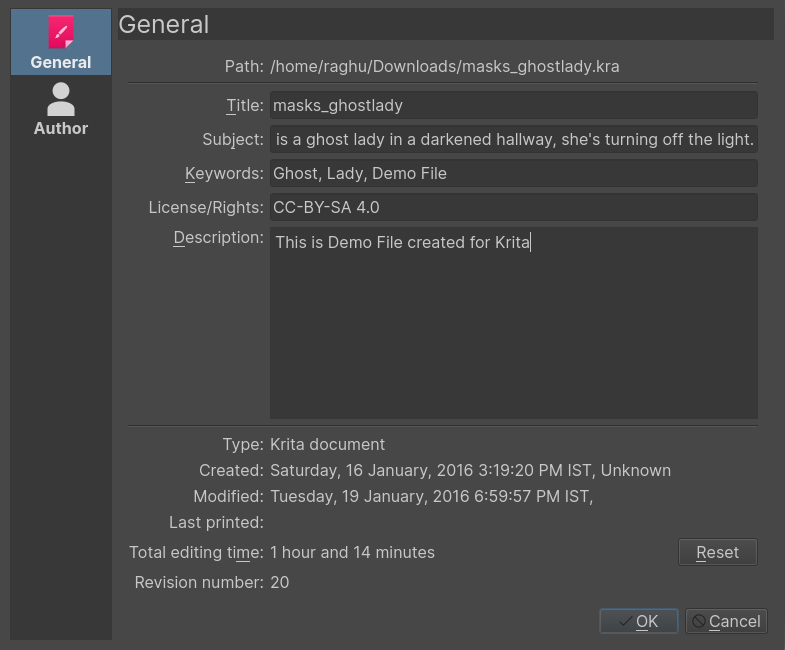
Krita will automatically save who created the image into your image’s
metadata. Along with the other data such as time and date of creation
and modification, Krita also shows editing time of a document in the
document information dialog, useful for professional illustrators,
speed-painters to keep track of the time they worked on artwork for
billing purposes. It detects when you haven’t performed actions for a
while, and has a precision of ±60 seconds. You can empty it in the
document info dialog and of course by unzipping you .kra file and
editing the metadata there.
These things can be edited in , and for the author’s information . Profiles can be switched under .
Setting the canvas background color
You can set the canvas background color via menu item. This allows you to turn the background color
non-transparent and to change the color. This is also useful for certain file
formats which force a background color instead of transparency. PNG and
JPG export use this color as the default color to fill in transparency
if you do not want to export transparency.
If you come in from a program like Paint Tool SAI, then using this
option, or using As canvas color radio button at Background:
section in the new file options, will allow you to work in a slightly more comfortable
environment, where transparency isn’t depicted with checkered boxes.
Basic transforms
There are some basic transforms available in the Image menu.
- Shear Image…
-
This will allow you to skew the whole image and its layers.
- Rotate
-
This show a submenu that will allow you to rotate the image and all its layers quickly.
- Mirror Image Horizontally/Vertically
-
This will allow you to mirror the whole image with all its layers.
But there are more options than that…
Cropping and resizing the canvas
You can crop and image with the
Crop Tool, to cut away extra space and improve the composition.
Trimming
Using , Krita resizes the
image to the dimensions of the layer selected. Useful for when you paste
a too large image into the layer and want to resize the canvas to the extent
of this layer.
is a faster cousin to the crop
tool. This helps us to resize the canvas to the dimension of any active selection.
This is especially useful with right-clicking the layer on the layer stack and
choosing Select Opaque.
will then crop the canvas to the selection bounding box.
is actually for layers, and will trim all
layers to the size of the image, making your files lighter by getting
rid of invisible data.
Resizing the canvas
You can also resize the canvas via (or
the Ctrl + Alt + C shortcut). The dialog box is shown below.
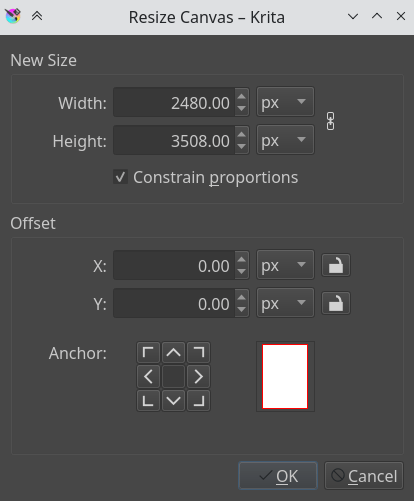
In this, Constrain proportions checkbox will make sure the height and width stay
in proportion to each other as you change them. Offset indicates
where the new canvas space is added around the current image. You
basically decide where the current image goes (if you press the
left-button, it’ll go to the center left, and the new canvas space will
be added to the right of the image).
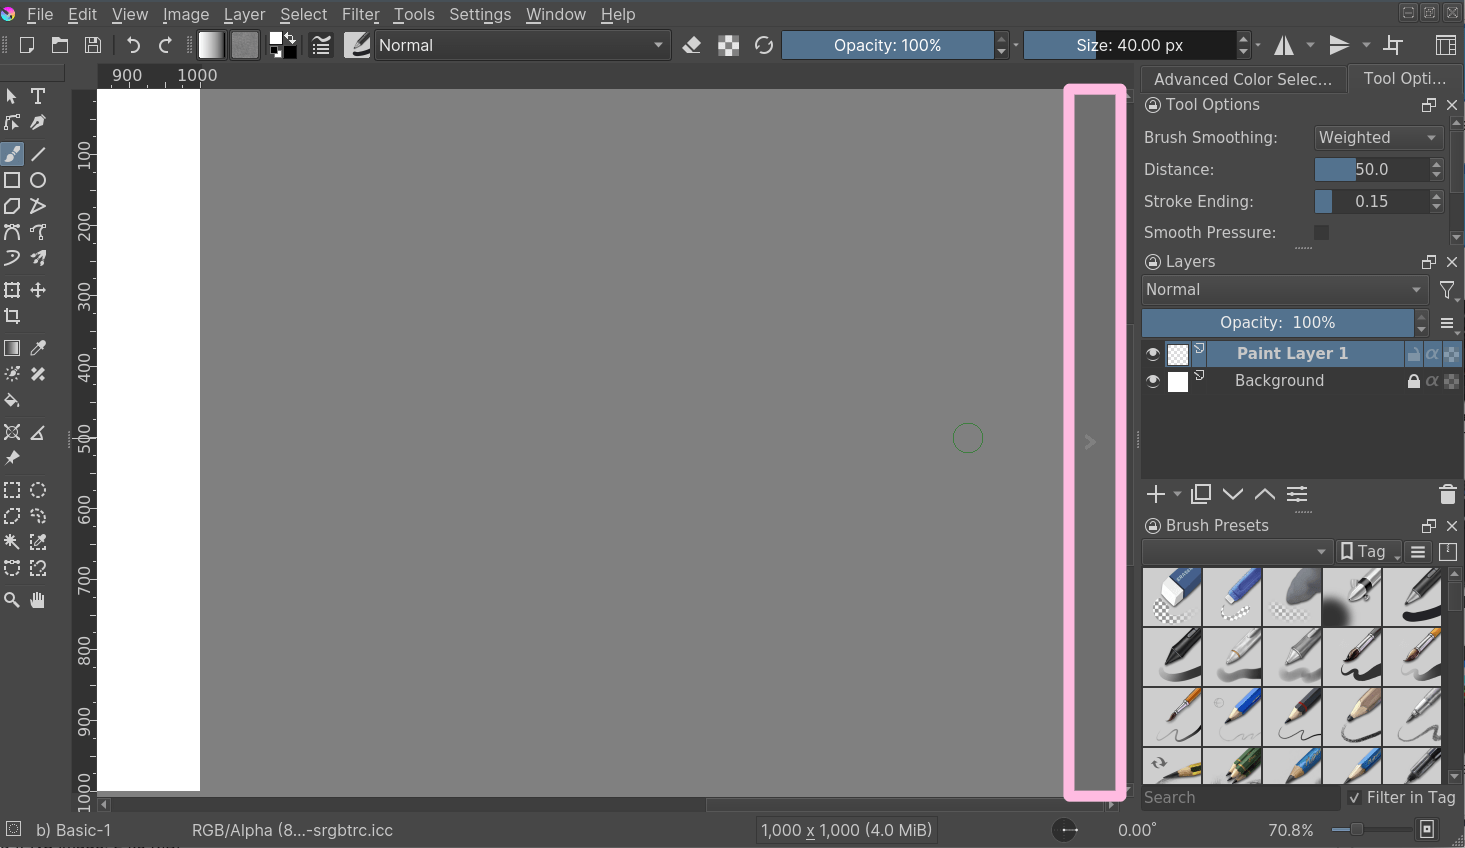
Another way to resize the canvas according to the need while drawing is
when you scroll away from the end of the canvas, you can see a strip with
an arrow appear. Clicking this will extend the canvas in that direction.
You can see the arrow marked in red in the example below:
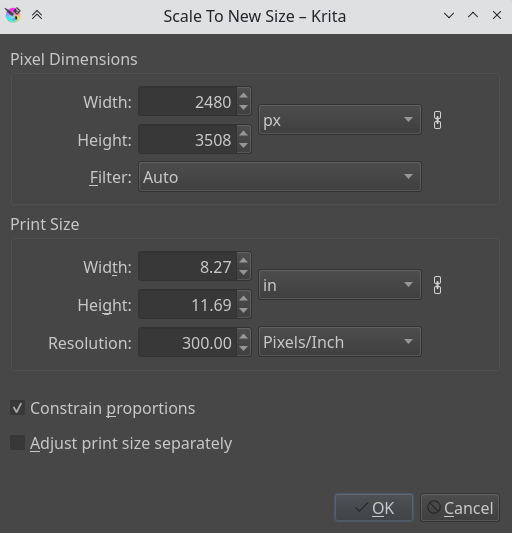
Resizing the image
Scale Image to New Size… allows you to resize the whole image. Also,
importantly, this is where you can change the resolution or upres your
image. So for instance, if you were initially working at 72 PPI to block
in large shapes and colors, images, etc… And now you want to really get
in and do some detail work at 300 or 400 PPI this is where you would make
the change.
Like all other dialogs where a chain link appears, when the chain is
linked the aspect ratio is maintained. To disconnect the chain, just click
on the link and the two halves will separate.
Separating Images
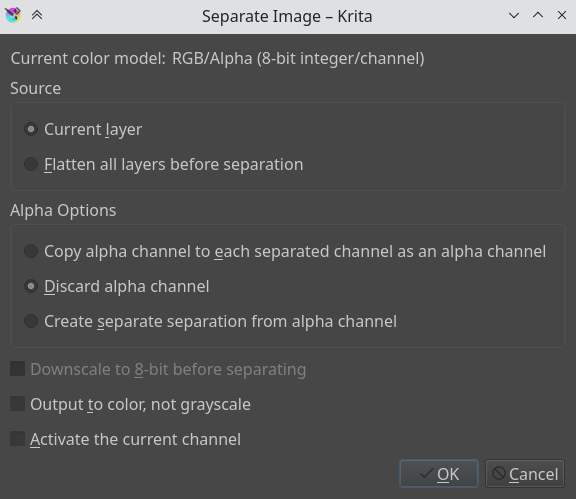
This powerful image manipulation feature lets you separate an image into
its different components or channels.
This is useful for people working in print, or people manipulating game
textures. There’s no combine functionality, but what you can do, if
using colored output, is to set two of the channels to the addition
Blending Modes.
For grayscale images in the RGB space, you can use the Copy Red, Copy
Green and Copy Blue blending modes, with using the red one for the red
channel image, etc.
Saving, Exporting and Opening Files
When Krita creates or opens a file, it has a copy of the file in memory,
that it edits. This is part of the way how computers work: They make a
copy of their file in the RAM. Thus, when saving, Krita takes its copy
and copies it over the existing file. There’s a couple of tricks you can
do with saving.
- Save
-
Krita saves the current image in its memory to a defined place on
the hard-drive. If the image hadn’t been saved before, Krita will
ask you where to save it. - Save As…
-
Make a copy of your current file by saving it with a different name.
Krita will switch to the newly made file as its active document. - Open…
-
Open a saved file. Fairly straightforward.
- Export…
-
Save a file to a new location without actively opening it. Useful
for when you are working on a layered file, but only need to save a
flattened version of it to a certain location. - Open Existing Document as Untitled Document…
-
This is a bit of an odd one, but it opens a file, and forgets where
you saved it to, so that when pressing ‘save’ it asks you where to
save it. This is also called ‘import’ in other programs. - Create Copy from Current Image
-
Makes a new copy of the current image. Similar to , but then with already
opened files. - Save Incremental Version
-
Saves the current image as
filename_XXX.kraand switches the
current document to it. - Save Incremental Backup
-
Copies and renames the last saved version of your file to a backup file and saves your document under the original name.
Note
Since Krita’s file format is compressed data file, in case of a corrupt or broken file you can open it with archive managers and extract the contents of the layers. This will help you to recover as much as possible data from the file. On Windows, you will need to rename it to filename.zip to open it.
- Как экспортировать изображение из Krita?
- Как уменьшить размер файла Krita?
- Как изменить размер изображения без потери качества Krita?
- JPEG или PNG лучше?
- Как повысить резкость изображения в Krita?
- Какое лучшее разрешение для Крита?
- Как сделать фон прозрачным?
Как экспортировать изображение из Krita?
Вместо использования команды «Сохранить как» попробуйте «Файл» > Экспортируйте и выберите нужный тип файла. Более эффективен при сохранении в формате JPG или PNG.
Как уменьшить размер файла Krita?
размер, поэтому файлы могут быть немного больше с 4.3. 0. Но обратите внимание, что по умолчанию krita не прилагает никаких усилий для сжатия данных слоев, поэтому для файлов меньшего размера включите параметр «Сжать . kra files more »в настройках обработки файлов.
Как изменить размер изображения без потери качества Krita?
Re: Krita как масштабировать без потери качества.
просто используйте «коробочный» фильтр при масштабировании. другие программы могут называть это «ближайшей» или «точечной» фильтрацией. он не будет смешивать значения пикселей вообще при изменении размера.
JPEG или PNG лучше?
В общем, PNG — это формат сжатия более высокого качества. Изображения JPG, как правило, имеют более низкое качество, но загружаются быстрее. Эти факторы влияют на то, решите ли вы использовать PNG или JPG, а также то, что содержит изображение и как оно будет использоваться.
Как повысить резкость изображения в Krita?
На вкладке «Фильтр» вверху есть опция «Улучшить».
- И есть опция Sharpen. …
- Затем появится новое окно, в котором будут параметры фильтра, как и раньше. …
- Тогда ваше изображение будет четче.
Какое лучшее разрешение для Крита?
Я предпочитаю файл большего размера, не менее 3000 пикселей в самом коротком размере, но не более 7000 пикселей в самом длинном. Наконец, установите разрешение на 300 или 600; чем выше разрешение, тем выше качество конечного изображения.
Как сделать фон прозрачным?
Вы можете создать прозрачную область на большинстве изображений.
- Выберите изображение, на котором вы хотите создать прозрачные области.
- Щелкните Инструменты изображения > Перекрасить > Установить прозрачный цвет.
- На картинке щелкните цвет, который хотите сделать прозрачным. Заметки: …
- Выберите картинку.
- Нажмите CTRL + T.
Горячая клавиша — это клавиша или комбинация клавиш на клавиатуре компьютера, при одновременном нажатии которой задача (например, запуск приложения) выполняется быстрее, чем при использовании мыши или другого устройства ввода. Горячие клавиши иногда называют клавишами быстрого доступа. Горячие клавиши поддерживаются многими операционными системами и приложениями.
Конкретная задача, выполняемая той или иной горячей клавишей, зависит от операционной системы или приложения. Однако существуют часто используемые горячие клавиши.
Например, нажатие клавиши F1 в любом приложении под управлением Windows обычно вызывает меню справки. Комбинация «Alt + F4» приводит к закрытию текущего приложения или, если приложение не открыто, к завершению работы Windows.
Ниже представлены горячие клавиши для программы Krita:
1. Рисование
| E | Ластик |
| Insert | Новый слой |
| Delete | Очистить |
| Backspace | Заполнить фоновым цветом |
| R | Выбрать слой |
| Page up | Активировать следующий слой |
| page down | Активировать предыдущий слой |
| G | Инструмент градиента |
| T | Инструмент перемещения |
| Q | Мультикисть |
| P | Выбор цвета |
| Ctrl+E | Слияние вниз |
| Ctrl+R | Выделение |
| Ctrl+T | Инструмент трансформации |
| Ctrl+U | HSV/HSL корректировка |
| Ctrl+I | Инвертировать |
| Ctrl+J | Дублировать слой |
| Ctrl+L | Уровни |
| Ctrl+H | Отобразить выделение |
| W | Режим обводки |
| / | Переход к предыдущему пресету |
2. Установка/сброс
| D | Сброс цвета |
| F | Заливка |
| J | Эллиптическое выделение |
| [ | Уменьшение размера кисти |
| ] | Увеличение размера кисти |
| , | Предыдущая избранная предустановка |
| . | Следующая избранная предустановка |
3. Общие
| Ctrl+A | Выбрать все |
| Ctrl+Z | Отменить |
| Shift+Ctrl+Z | Повторить |
| Ctrl+O | Открыть |
| Shift+Ctrl+D | Отменить |
| F4 | Сохранить резервную копию |
| F5 | Экспорт |
| Ctrl+P | Печать |
| Ctrl+X/Shift+Delete | Вырезать |
| Shift+Ctrl+S | Сохранить как |
| Ctrl+Q | Выход |
| Alt+Ctrl+S | Сохранить |
| Ctrl+W | Закрыть |
| Alt+Ctrl+J/Ctrl+C | Скопировать |
| F1 | Помощь |
| Shift+Ctrl+C | Копия объединена |
| Ctrl+S | Сохранить |
| Ctrl+V | Вставить |
| Ctrl+N | Новый слой |
4. Другое
| Shift+F1 | Что это |
| Shift+I | Селектор цвета |
| Shift+R | Установить ось зеркала |
| Shift+H | Скрыть панель инструментов подсказки |
| Shift+B | Показать докеры |
| Shift+N | Минимальный селектор оттенков |
| Shift+M | Селектор оттенков |
| Shift+Z | Отмена точек выделения полигонов |
| Shift+Ctrl+E | Сплющить изображение |
| Shift+Ctrl+R | Полное обновление |
| Shift+Ctrl+F | Полноэкранный режим |
| Shift+Ctrl+U | Обесцвечивание |
| Shift+Ctrl+I | Инвертировать выделение |
| Shift+Ctrl+J | Обрезать выделение до слоя |
| Shift+Ctrl+A | Снять выделение |
5. Зум
| Ctrl+—/— | Уменьшить масштаб |
| Ctrl++/= | Увеличить |
| 3 | Масштабирование по ширине |
| 2 | Увеличить по ширине |
| 1 | Масштабирование 1:1 |
| 0 | Увеличить 1:1 |
6. Поворот
| Shift++Alt+Space | Поворот холста мышью |
| Ctrl+] | Повернуть вправо |
| Ctrl+‘ | Сброс вида холста |
| Ctrl+[ | Повернуть влево |
| 5 | Сброс поворота |
| 6 | Повернуть вправо |
| 4 | Повернуть влево |
7. Canvas
| Tab | Canvas мод |
| F11 | Переключить полный экран |
8. Цвета
| I | Уменьшить непрозрачность |
| Shift+Backspace | Заливка цветом фона |
| K | Затемнить цвет |
| B | Инструмент «Кисть» |
| C | Показать общий цвет |
| L | Осветлить цвет |
| O | Увеличить непрозрачность |
| Ctrl+B | Цветовой баланс |
| X | Поменять цвета fg/bg |
| H | Показать историю цветов |
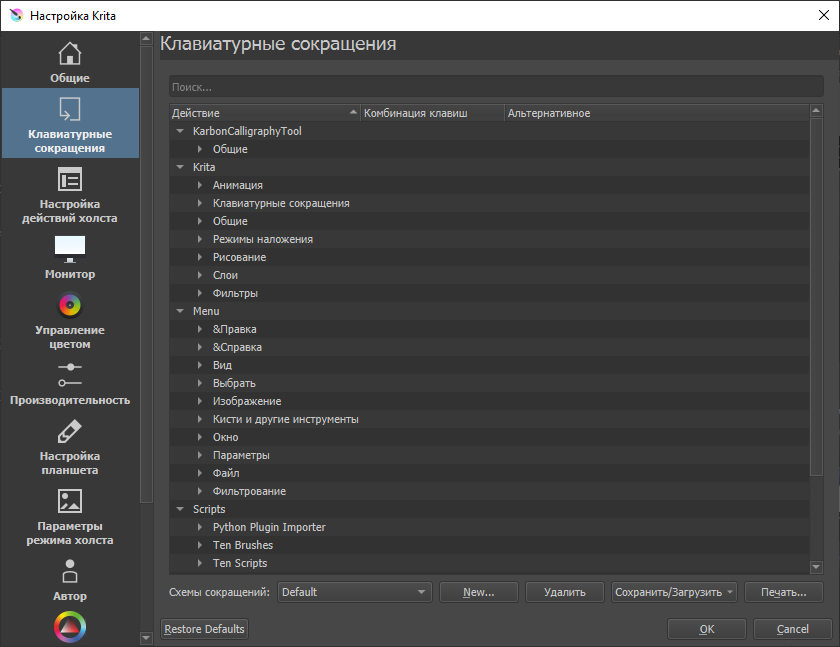
Как назначить горячие клавиши в Krita
Чтобы назначить свою комбинацию горячих клавиш нажмите Настройки => Настроить Krita . В выпадающем окне выберите пункт клавиатурные сокращения.