Карьер — механизм, который вскапывает зону 9х9 или определённую игроком с помощью меток 64х64, пока не достигнет коренной породы. Карьер не может добывать источники жидкостей, и будет пропускать абсолютно все блоки под ними. Карьер не может предотвращать протекание жидкостей извне зоны. Поэтому жидкости желательно удалять чтобы карьер не пропускал ценные руды. Карьер должен быть подпитан любым двигателем (кроме механического), от типа и количества двигателей и топлива двигателей зависит скорость работы карьера.
Работа
Минимальное количество энергии которое нужно карьеру для работы составляет 10 RF/t, а максимальное 480 RF/t. Однако если подать на карьер 480 RF/t пока рамка ещё не построена, он может не работать, в этом режиме отключите часть двигателей. Карьер имеет внутренний буфер для накопления энергии и требует несколько секунд для зарядки. Минимальное количество энергии, необходимое для непрерывной работы, составляет 90 RF/t. На максимальной мощности скорость перемещения карьера будет составлять 5.2 м/такт (1 блок = 1м).
Можно использовать и промышленный паровой двигатель из модификации Railcraft, он даёт 80 RF/t, что обеспечивает достаточно высокую скорость работы (для максимально скорости работы его стоит прогреть до зелёного или жёлтого состояния, обычно он успевает прогреться когда карьер строит большую рамку, для малой надо запустить его на холостом ходу), также можно использовать электродвигатель из модификации Forestry, он переводит EU энергию в RF. После запуска начнётся строительство рамки карьера размером 9х3х9 (или размером заданными игроком при помощи меток) и удаление всех блоков в этой области (блоки уничтожаются навсегда, не выпадая) (в этом режиме может потреблять до 210 RF/t)(с помощью меток можно расширить или уменьшить удаляемую зону (максимально до 64х64, минимально до 1х1)).
Для достижения максимальной скорости карьера нужно поставить 3 двигателя внутреннего сгорания с BuildCraft/газообразным топливом.
После завершения строительства рамки появится кран, который начнет добывать блоки в заданной зоне Добытые блоки будут вылетать сверху карьера, поэтому желательно поставить трубы от него к сундукам.
Карьер обладает своеобразным «сканером» — если в том месте, где он уже убрал блоки, вновь поставить какой-либо блок, то буровая труба вернётся назад и заберёт его.
Если на дне карьера рассыпать много предметов (к примеру умереть) то карьер также соберет эти предметы
Примечания:
Карьер игнорирует блоки находящиеся под блоками любой жидкости, поэтому из нужно убирать чтобы карьер не пропустил ценные руды.
Рамки карьера(и рамки которые двигаются)являются твёрдыми блоками и по ним можно ходить. При уничтожении рамка не выпадает. Если уничтожить блок рамки в процессе работы, то он снова сгенерируется. Если уничтожить карьер, который установил рамки, то они моментально исчезнут.
Сервер
При игре на сервере с плагином WorldGuard Карьер (и прочие изменяющие мир механизмы) не копает заприваченную территорию. Выход: добавить модификацию в приват командой /rg addmember [название региона] [BuildCraft]. Квадратные скобки обязательны. Например /rg addmember house [BuildCraft]. Осторожно — грифинг, любой другой игрок при добавлении модификации в приват сможет при помощи своего карьера разгрифить и собрать все с вашей заприваченной территории.
Крафт
| Ингредиенты | Процесс | Описание |
|---|---|---|
| Золотая шестерня + Железная шестерня + Красная пыль + Алмазная шестерня + Алмазная кирка |
||
| Золотая шестерня + Железная шестерня + Улучшенная электросхема + Алмазная шестерня + Алмазный бур |
С дополнением GregTech | |
| Золотая шестерня + Стальная шестерня + Улучшенная электросхема + Алмазная шестерня + Алмазный бур |
В версии GregTech 3.11 |
Ошибки работы карьера
В версии модификации 3.4.3 карьер может не работать (Обычно на порте версии 1.4.7).
На старых версиях мода если рассыпать вещи, то появится второй кран который подберет эти вещи. После этого он не исчезнет.
Каркас
Блоки каркаса служат для создания рамки карьера. Рамка генерируется автоматически размером 11x11x4 или размером, заданным игроком при помощи меток. Служит как бы «опорой» для бура карьера. Если в процессе работы сломать блок в рамке, то он снова сгенерируется.
При уничтожении каркаса он не выпадает. То есть уничтожить рамку карьера, а затем установить её в другом месте не получится.
Если уничтожить карьер, который установил каркасы, то они моментально исчезнут.
В старых версиях после уничтожения карьера рамки не исчезают сразу а со временем.
Полуисчезнувший каркас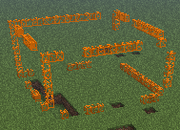
‘For the quarry in buildcraft 1 — see this.’
‘For the quarry in buildcraft 2 — see this.’
A Quarry is a machine that automatically mines a large area. This area, by default, is 9×9 blocks, but it can be defined by landmarks to a maximum of 64×64. It rarely requires any manual work, and only needs a supply of energy (Mj).
Recipe
Ingredients:
- 2 x Diamond Gears
- 2 x Gold Gears
- 3 x Iron Gears
- 1 x Diamond Pickaxe
- 1 x Redstone Dust
Produces: 1 x Quarry
See: Crafting Guide
Process
The Quarry Miner when Finished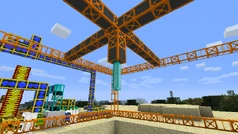
The Quarry will start by removing any and all obstructing blocks in the way of its frame. IMPORTANT: Items in chests and blocks in the area will NOT be dropped. This frame is 5 blocks tall. They support a moving structure with a diamond-like object at the bottom, likely a drill of some kind. This «miner» moves around, excavating each layer block by block. The speed at which it mines a block is determined by how much power is being supplied.
During excavation, each block mined will be ejected from the top. These items will be ejected with extreme kinetic energy, unless a pipe is connected. There is no need for a wood pipe to fetch the items, the Quarry will place the items into a connected stone, cobblestone, gold, iron, or diamond pipe on its own. In the event that the quarry encounters lava, the rest of the blocks located under the lava will not be mined. If the lava is converted to obsidian or cobblestone, the quarry will start re-mining those blocks.
The Quarry’s miner tool. Possibly a laser or drill.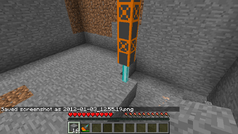
Underground Operation
A Quarry can function at any level. Simply placing it against a shaft wall and powering it is all that is required to start the default 9×9 area. The blocks in the frame area will be destroyed. It is possible to create a landmark-drawn frame as per above ground, use a Redstone torch next to a land marker to see where to place the next markers. Using this method it becomes possible to save time and fuel by placing your Quarry right above the gold/diamond levels.
Power
Four Quarry blocks in action. Note the different positions of the miner tool.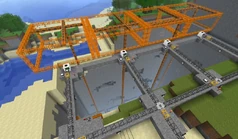
The Quarry must be powered by one or more engines. Quarries have an internal buffer of energy, and require a few seconds to charge. The lowest the power must be at is 5 RF/tick (it may be lower, hasn’t been tested).
The Quarry doesn’t have an upper limit of power input, although the Quarry is much more efficient at higher power.
Quarry efficiency. Tested on Buildcraft version 7.99.24.1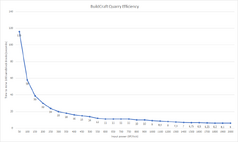
Tips
- The landmarks can specify an area up to 64×64, giving a maximum possible quarry size of 62×62. An area this large provides a low-maintenance quarry that doesn’t need replacing nearly as frequently as the default 9×9 quarry, but be advised that mining from a quarry this large takes about ten minutes per layer at full speed. Also, a few layers will fill several chests of sand, dirt and cobblestone, depending on the selected region (there is a lot of dirt and sand under water).
- By placing the frame above water, or by placing a water source block on the first layer of the quarry, any lava encountered will immediately turn into cobblestone or obsidian, avoiding delays. The water will also prevent hostile mob spawning.
- Mining in this fashion requires very little additional interaction from the player and is nearly fully automated, but is considerably less time-efficient than mining manually, and in particular, gathering the ores encrusted in the walls of a cave while exploring it. A good way to take advantage of both cases is to select a relatively small area to dig (the default is good) and to gather any ore visible on the walls of the quarry once it is finished.
- Use of enderchests and pipes can make it very easy to send all of the blocks from the quarry to your home/base/castle etc.
- When mining through an aboveground or underground water the quarry will extend the water blocks’ ‘running distance’ through the entire dig site as each level is dug progressively. An entire quarry site may be filled from a single water block slopping down to its extremities. Removing it (filling that block) will evacuate the remaining water in a chain reaction. If the quarry digs through a large body of water (such as the sea or a lake), the water blocks will duplicate at each level mined and the quarry site will fill with individual water blocks.
- Be careful when sneaking on the frame (to prevent falling). If the tube rests directly on top of a block your motion will not be stopped when reaching the end of the pipe but step down to the block below. If you step down at a straight angle you may overstep and fall into your quarry pit. The same applies to all other pipe structures.
- When removing the quarry, take precautions to stand in the path of its popping motion, as it otherwise may fall into your pit with the hazard of losing it. Standing on top of it, or moving forward with the sneak key pressed may help.
- Never place a quarry BELOW or INSIDE a landmark pathway and activate it. The quarry will attempt to remove blocks, and destroy itself.
- Even with a protected circuit (shut-off circuits with gates), a combustion engine is in liability of exploding through user mistake or bug. The immediate radius of the explosion destroys the blocks completely. Unless properly supervised, ensure that the quarry is within safe distance of combustion engines or protected by blocks with a high blast resistance . Note: Some Mods (Such as Industrial Craft 2) modify the blast resistance of certain items.
Notes
- Ice blocks, spawners, and glass blocks will break upon mining, giving you nothing.
- If a chest is mined, the chest will be dispensed out of the quarry, but the contents will be scattered where the chest was broken, as if it were broken by hand. The quarry will also pick up the scattered items unless breaking the chest sent them out of its range, as in the case of a dig site cutting a dungeon in half.
- Can make a sphere of objects in the frame, as the laser will destroy the nearest block in a sphere within the quarry scaffolding
Setup Demonstration
A short video guide on how to use the Quarry. More
information can be found at Tutorials/Getting Started
Quarry — Tekkit In Less Than 90 Seconds
-

Модератор сервера
- Регистрация:
- июл 12, 2020
- Сообщения:
- 72
- Симпатии:
- 30
В этой теме расскажу всё, что знаю про обычный и улучшенный карьеры.Важно:
Прежде, чем ставить обычный карьер, убедитесь, что понимаете, как это делать — он одноразовый и не выпадает после установки.
Для понимания рекомендую дочитать до конца.
Где ставить карьер?
В обычном мире никакой карьер поставить не получится — запрещено. Для этого есть специальный мир, куда можно попасть с помощью телепорта. (ненадолго зажать пкм с ним в руке)
![[IMG]](data:image/svg+xml,%3Csvg%20xmlns='http://www.w3.org/2000/svg'%20viewBox='0%200%200%200'%3E%3C/svg%3E)
Как ставить карьер?
Сам по себе карьер делает очень маленькую рамку — для расширения рамки до максимального размера 64х64 блока нужно 4 метки (id 704) и 4 красных факела для их активации.
Чтобы начать разметку, нужно поставить метку в любое место в мире крафта, рядом с ней красный факел — от метки появятся синие полосы.
Идем по одной из полос до её конца и на конце ставим еще одну метку с красным факелом. Повторить это действие, пока не получится квадрат из меток, активированных факелами.
Теперь необходимо нажать пкм по любой из меток, чтобы разметка сменила цвет на красный. Если этого не сделать — карьер поставит свой стандартный маленький размер.
Разметка готова. Можно ставить карьер лицом к метке. Если всё сделали правильно — получаем такую картину.
После этого можно забрать выпавшие метки и факелы, они больше не нужны.Карьер установлен, теперь ему нужна RF энергия и ёмкость, куда будет сбрасывать ресурсы. Источник энергии и хранилище ресурсов полностью зависит от развития игрока, но по моему мнению удобнее всего использовать такую сборку:
Важно:
Чтобы карьер прогружал сборку и работал, нужно располагать её в одном чанке с карьером.
При использовании хранилища панелей необходимо ставить после него power converter, потому что у хранилища есть баг, когда конвертация в RF сама меняется на EU.Хватит двух ячеек на 64к, но можно и меньше (вторая заполнена наполовину, можно две по 16к как вариант)Обычный карьер потребляет около 900RF/тик (примерно 120Eu), двух ультимейт панелей хватает для нормальной работы (две потому что в мире часто непогода и одна не справляется). (можно использовать другие источники энергии, подходящие по мощности)Карьер установлен, работает, но приват так и не поставлен. Чтобы он работал исправно, не нужно приватить всю территорию вместе с рамкой — так он будет работать плохо, либо не будет вообще. Необходимо заприватить механизмы, не захватывая при этом рамку, например, так:
На этом установка карьера закончена. Главное не забыть отметить его на карте (или /sethome) и убрать после того, как докопает. На этом часть про обычный карьер закончена.Улучшенный карьер
Что важно знать о нем:
В отличие от обычного, этот карьер многоразовый, площадь его работы — 256х256 блоков, сам карьер доступен со статуса Luxury, но маркеры для расширения — с Ancient , этот карьер может быть зачарован, не самый простой крафт.Важно: этот карьер можно поставить на обычные метки и будет работать 64х64 (для Luxury).
Где ставить улучшенный карьер?
Всё там же — в крафт мире.Как ставить улучшенный карьер?
Процесс идентичен процессу установки обычного карьера, только вместо меток используются улучшенные маркеры.
(по краям любой желтый краситель)6 ячеек на 256к хватило, чтобы он докопал (копал 5 дней на ультимейт панели)
Как зачаровать улучшенный карьер?
Зачаровать карьер можно на прочность, эффективность, удачу и шелк. Чтобы это сделать, крафтим передаватель чар (доступен с Ancient):
Передать чары можно с любого алмазного инструмента, положив в левый слот передавателя; стрелками можно выбрать зачарование, если их несколько; нажимая на надпись зачарования, оно передается на карьер.
На этом мой рассказ окончен. Удачи в игре.

![[IMG]](https://sun9-5.userapi.com/impg/FlhfDJXmOKHH0ku5L8u3sdoFco83AA1D7G6xiA/gWIWAYHJYZk.jpg?size=668x169&quality=96&sign=e1f5db90bf3c9fe1e6baa0bff805b4bb&type=album)
![[IMG]](https://sun9-28.userapi.com/impg/bsWRIJdkL0aU4F3rDtJ6r3zVrs8M_Uh_MEjLXA/Mh7XjQvAJhQ.jpg?size=382x187&quality=96&sign=fb29cd96c0b8268169eb9b14eb28751f&type=album)
![[IMG]](https://sun9-53.userapi.com/impg/EKTqz5DZfodiT40R0v8eueBaYNKbKWkGFI0uoQ/vgwUuXmmFZE.jpg?size=1209x839&quality=96&sign=7750e1f2c992aa9f2ffb7bfe90dd98a9&type=album)
![[IMG]](https://sun9-74.userapi.com/impg/dzLCHYWtyQiA_XsEvqMZf4nPZ8eVQYIZ4doKrg/SFwKZC7KWBc.jpg?size=1901x827&quality=96&sign=1b4eb86c4297f99da05877e4dd6408fd&type=album)
![[IMG]](https://sun9-26.userapi.com/impg/hQJTTVWyi0UUnE6JOAsrkZE7WUTMko1E2x6HUA/ktt-dLOxDo8.jpg?size=1125x631&quality=96&sign=6855abe2b273b0fd065512402b31d2b9&type=album)
![[IMG]](https://sun9-25.userapi.com/impg/QHUbJsrzln3f7kbqKWDhOQYO_hufdZl1cRRM6Q/1LPdfGtg_is.jpg?size=1213x757&quality=96&sign=d0823217198667385a155305f639f60a&type=album)
![[IMG]](https://sun9-40.userapi.com/impg/AFFsK0bXjRMJPIcNBohjcfuA9hsu_Rgx6ySsqQ/sakBKUoE01Q.jpg?size=517x779&quality=95&sign=234c6f7a5a004674d3c16512fda49fad&type=album)
![[IMG]](https://sun9-5.userapi.com/impg/_GH3gfeTdgXvSYF8UMD8ZnO70xC2JOatTJJMuA/XWt6gvLSnAc.jpg?size=548x255&quality=96&sign=fc1921bb540d3663c5f89607d5af3db6&type=album)
![[IMG]](https://sun9-54.userapi.com/impg/VmZF0qWEek27J2DoDlLv9by2V37A2ie99HxjtA/skTWRIL7tpY.jpg?size=1133x829&quality=96&sign=f31644790f85d96bd317a5afc72a955d&type=album)
![[IMG]](https://sun9-30.userapi.com/impg/2hwjLdTHd7XvbqFGRqSSFmKhCXbsP5ob1poYrw/zJghnCLg9IY.jpg?size=676x499&quality=96&sign=5dd4825bdfb9a20f60ab3c7a7e4ba89a&type=album)
![[IMG]](https://sun9-57.userapi.com/impg/WT6Q1JQJpcr8pz1GNRHMbNN4NCCo1EoxaWNPbg/KAAKUkmrCeg.jpg?size=532x125&quality=96&sign=03b2857598e2ea8b136969b4f4fe5f00&type=album)
![[IMG]](https://sun9-25.userapi.com/impg/X5pOoSBP8a_ZA79xPLCVBCEwHP4x8AbgiLM6vA/tqUyyyVtDp4.jpg?size=383x177&quality=96&sign=16e2d48b61027825fb5e1435584d8ef3&type=album) (по краям любой желтый краситель)
(по краям любой желтый краситель)![[IMG]](https://sun9-16.userapi.com/impg/HHzG_0pzOSn_h_f_1opLWxTRILsuGbkEJjgheA/5oh2OObp4lY.jpg?size=504x414&quality=96&sign=54e301bbfe457cd72ddd08f0c9145a08&type=album)
![[IMG]](https://sun9-42.userapi.com/impg/mKY-rfgjWFbsI0ywHSkjAAzw1ym2xiY7Y7OaYw/oTQy4jG_Nb8.jpg?size=556x134&quality=96&sign=2d722968cccbce8b85d3eb6ccc1660a8&type=album)
![[IMG]](https://sun9-24.userapi.com/impg/9oyxrKnmBGx-b63eHFOLTnwoLWDBqvfdiG1mQw/lnfqN0lExUI.jpg?size=398x194&quality=96&sign=8eb8666c9c7ab8eb1fbed36b257f7849&type=album)
![[IMG]](https://sun9-64.userapi.com/impg/ATDUHE-N58ULE5ndwILvahQO3NvDpbRt9CPy0w/PcGychWwJlA.jpg?size=502x206&quality=96&sign=161005360a749db0e54c3999ea5fc875&type=album)
Зная как добывать нефть и делать топливо, использовать трубы и двигатели, размечать территорию, можно начинать использовать самые мощные из машин в Buildcraft. Сегодня мы займемся добычей ресурсов, а именно, поговорим про буровую установку и карьер.
Буровая установка
Начнем с буровой установки. Эта машина не такая дорогая и полезная по сравнению с карьером, но возможно вы найдете ей применение. Рецепт буровой установки был в предыдущих статьях, но все же я повторю его.

Машину нужно поставить на землю, и снабдить энергией. Еще желательно присоединить трубу или сундук, а то выкопанные ресурсы полетят на землю. Копает буровая установка вертикальный туннель шириной в один блок до самого низа карты. При этом опускает какое-то подобие трубы. Как это выглядит смотрите на картинке ниже. Если вам нужно сделать вертикальный туннель – пользуйтесь.

Карьер
Карьер в Buildcraft является визитной карточкой мода, наравне с трубами. Он позволяет выкапывать ресурсы в огромных количествах за сравнительно небольшое время, освобождая вас от этого нудного занятия. Рецепт карьера вы видите на картинке ниже.

Крафт достаточно дорогой, использует 11 алмазов, но они быстро окупятся. Перед установкой карьера можно разметить территорию синими метками, как описано в предыдущей статье. Если вы этого не сделаете, машина будет использовать для раскопок свой стандартный контур. Я разметил для карьера небольшой прямоугольник, и вот что из этого вышло.

Для питания вам понадобится хотя бы 2 двигателя внутреннего сгорания. Карьер будет работать и с небольшим количеством энергии, но это будет очень медленно. Также стоит подвести трубу, и прицепить к ней несколько сундуков. Когда вы начнете подачу энергии, появиться маленький летающий квадратный робот, который лазером очистит территорию внутри контура от посторонних блоков, и начнет строить оранжевое ограждение.

Построив его, робот исчезнет, и карьер начнет копать. Стоит помнить, что если карьер найдет лаву, то он остановится, хотя в воде он копает прекрасно. Можете заливать яму водой, тогда лава будет превращаться в обсидиан, который будет выкапываться. После того как карьер достигнет коренной породы, он остановиться. Осторожно, яма получиться очень глубокая, не упадите. Ну, или можете сталкивать туда друзей.

Заключение
Карьер, конечно, гораздо мощнее буровой установки, но она используется в других рецептах. Кроме того, она стоит намного дешевле и поможет вам делать вертикальные туннели. Ну а карьер позволит быстро добывать ресурсы. Можете расположить его под землей, например прямо над уровнем алмазов, чтобы не ждать пока он раскопает весь камень. Тогда добыча будет еще быстрее. В следующий раз, речь пойдет о терраформинге. Вы узнаете как пользоваться заполнителем, и какие шаблоны он использует.