In this Python tutorial, we will learn how to add image in Python Tkinter. let us start the Python Tkinter Image with below examples.
- Python Tkinter Image
- Python Tkinter Image Display
- Python Tkinter Image Button
- Python Tkinter Image Background
- Python Tkinter Image Resize
- Python Tkinter Image Size
- Python Tkinter Image Label
- Python Tkinter Image Doesn’t Exist
Python Tkinter has the method PhotoImage which allows reading images in Python Tkinter. And then Image can be placed by providing adding PhotoImage variable in image property of widgets like Label, Button, Frame, etc.
- There are three ways of adding images on Python Tkinter.
- PhotoImage
- Pillow Module
- PhotoImage is the built-in library that comes with Python Tkinter and provides limited options. But is good to get started or for small tasks wherein the application just aims at putting the image on the screen. Also, it supports limited image extensions.
- Pillow module in Python Tkinter provides more features like you can read images of any extension, resize the image, etc. The Pillow module needs to be installed before use.
- Pillow can be installed using pip or pip3 in Python Tkinter.
pip install pillow

or

pip3 install pillow- In our below example, we have demonstrated the use of PhotoImage. Pillow is discussed in the later sections of the same tutorial. We will be demonstrating the best method to be used in the situation.
Code
This is the basic code to demonstrate how to add images in Python Tkinter. Since the below code is just to display an image so we have used the PhotoImage method in Python Tkinter.
from tkinter import *

ws = Tk()
ws.title('PythonGuides')


img = PhotoImage(file='images/sasuke.png')
Label(
    ws,
    image=img
).pack()

ws.mainloop()
Output
In this output, image is displayed using label widget and since we have not provided any geometry so the application size is to the size of image.

Read: How to make a calculator in Python
Python Tkinter Image Display
Image in Python Tkinter can be displayed either by using the PhotoImage module or by using the Pillow library.
- In this section, we will display images using both PhotoImage and Pillow libraries. Also, we will use the create_image method from the canvas.
- Canvas is used to add images or text on the application screen.
Code using PhotoImage method
In this code, you can observe that we have not imported any libraries as PhotoImage automatically loaded when everything is imported.
from tkinter import *

ws = Tk()
ws.title('PythonGuides')
ws.geometry('500x500')

canvas = Canvas(
    ws,
    width = 500,
    height = 500
    )
canvas.pack()
img = PhotoImage(file='images/sasuke.png')
canvas.create_image(
    10,
    10,
    anchor=NW,
    image=img
    )
ws.mainloop()
Output of PhotoImage method
The image is displayed on the canvas and it is showing incomplete because we have provided height and width of canvas less than the size of image.

Code using Pillow Library
In this code, we have imported ImageTk, the Image method from the PIL library. PIL is the short name for a pillow. Though the code looks much similar to the previous one now we can read more image extensions like jpg, png, bitmap, etc.
from tkinter import *
from PIL import ImageTk,Image

ws = Tk()
ws.title('PythonGuides')
ws.geometry('500x500')

canvas = Canvas(
        ws,
        width = 500,
        height = 500
        )
canvas.pack()
img = ImageTk.PhotoImage(Image.open('images/sasuke.png'))
canvas.create_image(
        10,
        10,
        anchor=NW,
        image=img
        )
ws.mainloop()
Output Of image displayed using Pillow Library
The output is similar to the PhotoImage section, and photo is incomplete because the size of the window provided is less than the original size of image.
Read: Python Tkinter Menu bar – How to Use
Python Tkinter Image Button
Button widget in Python Tkinter has image property, by providing image variable we can place image on the button widget.
- The first step in the process is to read the image and to do so we will use the PhotoImage method in Python Tkinter.
- Button in Tkinter has image property, you can provide the variable assigned to PhotoImage here.
- In this way an image can be placed on the button widget in Python Tkinter.
In this section, we will learn how to put image on the button in Python Tkinter.
Code
In this code, we have added an image on the button. User can click on the image to perform the action.
from tkinter import *

ws = Tk()
ws.title('PythonGuides')


img = PhotoImage(file='images/downloadbtn.png')
Button(
    ws,
    image=img,
    command=None
).pack()

ws.mainloop()
Output
In this output, Download image is added on the button. Users can click on this image to download the file.

Read: Python Tkinter Checkbutton – How to use
Python Tkinter Image Background
In this section, we will learn how to insert a background image in Python Tkinter. In other words, how to set background image in Python Tkinter.
- There are mainly two ways of placing background in Python Tkinter
- Using Place layout manager we can put the background image on the label and the stretch it all the way to the screen.
- Using canvas create_image method we can put the image on the screen and later using create_text method of canvas we can place text widget.
- Out of these two methods, second method which says using canvas is more efficient and accurate and we will recommend to do using canvas.
- In the below example, we have created an application using canvas. The application has background image, text and a button. When user will click on the button, he/she will be redirected to our website.
Code
In this code, we have imported webbrowser so that we can open the webpage. We have placed image in the background using canvas method create_image and then using create _text and create_window we have placed the button and text on the window.
from tkinter import *
import webbrowser

ws = Tk()
ws.title('PythonGuides')
ws.geometry('500x400')


new = 1
url = "https://www.pythonguides.com"

def openbrowser():
    webbrowser.open(url,new=new)

bg = PhotoImage(file = 'images/bg.png')

canvas = Canvas(
	ws,
	width = 500,
	height = 400
	)

canvas.pack(fill='both', expand = True)

canvas.create_image(
	0,
	0,
	image=bg,
	anchor = "nw"
	)

canvas.create_text(
	250,
	150,
	text = 'PythonGuides',
	font=('Arial', 50),
	)

btn = Button(
	ws,
	text = 'EXPLORE MORE',
	command=openbrowser,
	width=20,
	height=2,
	relief=SOLID,
	font=('arial', 18)
	)

btn_canvas = canvas.create_window(
	100,
	200,
	anchor = "nw",
	window = btn,
	)


ws.mainloop()
Output
In this output, you can see that application has background image, text and button. When user will click on the button he/she will be redirected to a website.

Read: Python Tkinter Radiobutton – How to use
Python Tkinter Image Resize
In this section, we will learn how to resize the image in Python Tkinter.
- Using Pillow library in Python Tkinter we can resize the images. to import Pillow use this code
from PIL import Image, ImageTk image.resize((w, h))this command allows us to change the height(h) and width(w) of the image.- In the below example, we have created an application in which the user can provide width and height and the image will change the size in real-time.
Code
In this code, we have used Image method from Pillow module to change the size of the image.
from tkinter import *
from PIL import Image, ImageTk

ws = Tk()
ws.title('PythonGuides')
ws.geometry('500x400')
ws.config(bg='#4a7a8c')


def resize_func():
    image = Image.open("images/sasuke.png")
    w = int(width.get())
    h = int(height.get())
    resize_img = image.resize((w, h))
    img = ImageTk.PhotoImage(resize_img)
    disp_img.config(image=img)
    disp_img.image = img


frame = Frame(ws)
frame.pack()

Label(
    frame,
    text='Width'
    ).pack(side=LEFT)
width = Entry(frame, width=10)
width.insert(END, 300)
width.pack(side=LEFT)

Label(
    frame,
    text='Height'
    ).pack(side=LEFT)

height = Entry(frame, width=10)
height.insert(END, 350)
height.pack(side=LEFT)

resize_btn = Button(
    frame,
    text='Resize',
    command=resize_func
)
resize_btn.pack(side=LEFT)

disp_img = Label()
disp_img.pack(pady=20)


ws.mainloop()
Output
In this output, you can see that image is resizing as per the height and width provided by the user. The is a full fledged application created in Python Tkinter that can be used for daily activities.

Read: Python Tkinter Button – How to use
Python Tkinter Image Size
In this section, we will learn how to get the image size in Python Tkinter.
- first thing in the process is to import Image, ImageTk from PIL.
- then ImageTk provides width and height method using which we can get the size of an image.
Code
In this code, text=f'width: {img.width()} height: {img.height()}' this command displays the height and width of the image. Here, img is the variable that stores the file file.
from tkinter import *
from PIL import ImageTk,Image

ws = Tk()
ws.title('PythonGuides')
ws.geometry('500x500')

canvas = Canvas(
        ws,
        width = 500,
        height = 400
        )
canvas.pack()
img = ImageTk.PhotoImage(Image.open('images/workstation.jpg'))

canvas.create_image(
        10,
        10,
        anchor=NW,
        image=img
        )
Label(
    ws,
    text=f'width: {img.width()} height: {img.height()}'
).pack()

ws.mainloop()
Output
In this output, you can see that height and width of the image is displayed at the bottom of the page.

Read: Create a Snake Game in Python Tkinter
Python Tkinter Image Label
In this section, we will learn how to set image on the Label widget in Python Tkinter.
- The label widget in Python Tkinter is used to display text and images on the application window.
- The label widget has a property image. Adding an image file to this property will set the image on the label widget.
- If you are dealing with PNG images then you can simply use the PhotoImage method which is a built-in method in Python Tkinter.
- For advanced features and all extensions, use the Image, ImageTk in pillow library.
Code
Here is the simple code to display image using Label widget in Python Tkinter.
from tkinter import *

ws = Tk()
ws.title('PythonGuides')


img = PhotoImage(file='images/sasuke.png')
Label(
    ws,
    image=img
).pack()

ws.mainloop()
Output
Read: How to Take User Input and Store in Variable using Python Tkinter
Python Tkinter Image Doesn’t Exist
This is a common error that is encountered by almost all the programmers working with images in Python Tkinter that says, Python Tkinter Image Doesn’t Exist.
- There are mainly three reasons for this error:
- image path provided is incorrect
- You have read the image using
var = Image.open(pathToImage)but you have not passed it toImageTk.PhotoImage(var). - declare a global variable in case you are trying image in function.
- _tkinter.TclError: couldn’t recognize data in image file “images/workstation.jpg”
- If you are seeing the above error code, that means you are trying to use a JPG image file using PhotoImage.
- To fix that either use a PNG image file or switch to Pillow. As Pillow module allows the use of various image extensions.
You may like the following Python tkinter tutorials:
- Python Tkinter Frame
- Python Tkinter TreeView – How to Use
- Python Tkinter ToDo List
- Python Tkinter Window Size
- Python Tkinter Canvas Tutorial
- Python Tkinter Table Tutorial
- Create Word Document in Python Tkinter
In this tutorial, we have learned how to add images in Python Tkinter. Also, we have covered these topics.
- Python Tkinter Image
- Python Tkinter Image Display
- Python Tkinter Image Button
- Python Tkinter Image Background
- Python Tkinter Image Resize
- Python Tkinter Image Size
- Python Tkinter Image Label
- Python Tkinter Image Doesn’t Exist

Python is one of the most popular languages in the United States of America. I have been working with Python for a long time and I have expertise in working with various libraries on Tkinter, Pandas, NumPy, Turtle, Django, Matplotlib, Tensorflow, Scipy, Scikit-Learn, etc… I have experience in working with various clients in countries like United States, Canada, United Kingdom, Australia, New Zealand, etc. Check out my profile.
Basics of Python Tkinter Displaying Image
-
Video Tutorial on Tkinter Image resize
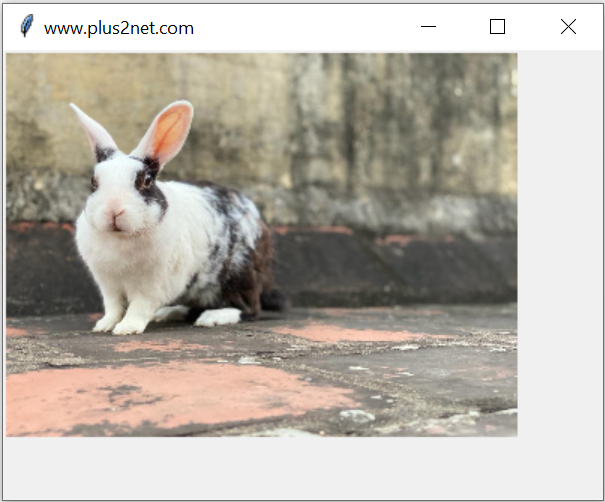
Original size of the image is 1024 x 768, we are reducing the size and displaying the image using one Label.
Python Imaging Library PIL
import tkinter as tk
from PIL import Image, ImageTk
my_w=tk.Tk()
my_w.geometry('400x300')
my_w.title('www.plus2net.com')
img_old=Image.open('D:\images\rabbit.jpg')
img_resized=img_old.resize((341,256)) # new width & height
my_img=ImageTk.PhotoImage(img_resized)

l1=tk.Label(my_w,image=my_img)
l1.grid(row=1,column=2)

my_w.mainloop()
resize() with box option
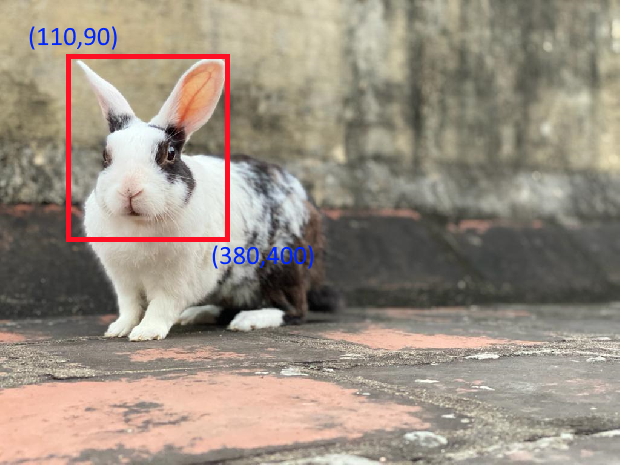
We can use part of the picture or part of the area of the image with coordinates to resize. Here we will display the face only as resized output. Note the coordinates used.
import tkinter as tk
from PIL import Image, ImageTk
my_w=tk.Tk()
my_w.geometry('400x320')
my_w.title('www.plus2net.com')
img_old=Image.open('D:\images\rabbit.jpg')

img_resized=img_old.resize((270,310),box=(110,90,380,400))
#im.save('D:\images\rabbit_face.jpg')
#im.show()
my_img=ImageTk.PhotoImage(img_resized)
l1=tk.Label(my_w,image=my_img)
l1.grid(row=1,column=2)
my_w.mainloop()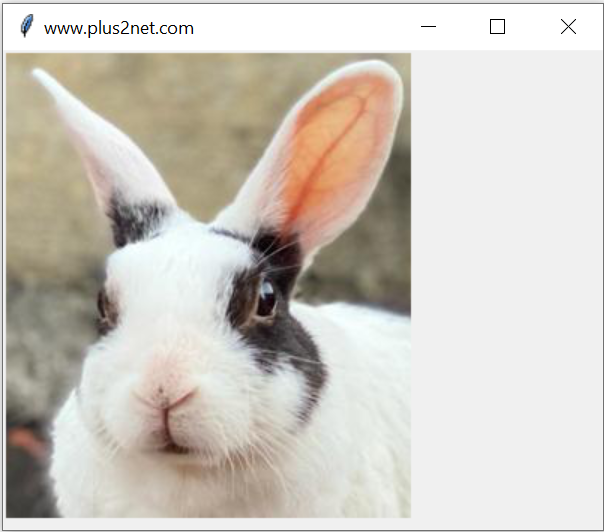
Maintaining Aspect ratio while resizing
Some time we need to maintain the same aspect ratio while resizing the image. In such cases we have to read the height and width of the image and then change the values equally. By using int() we are converting the float output to integer.
import tkinter as tk
from PIL import Image, ImageTk
my_w=tk.Tk()
my_w.geometry('400x300')
my_w.title('www.plus2net.com')
img_old=Image.open('D:\images\rabbit.jpg')
width, height = img_old.size
width_new=int(width/3)
height_new=int(height/3)
img_resized=img_old.resize((width_new,height_new))
my_img=ImageTk.PhotoImage(img_resized)
l1=tk.Label(my_w,image=my_img)
l1.grid(row=1,column=2)
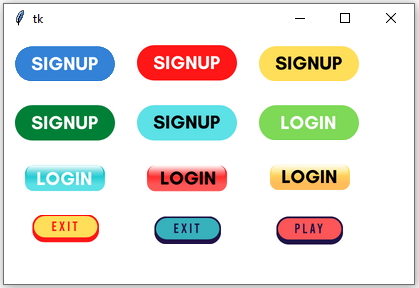
my_w.mainloop()Colourful Buttons by using images
Upload and display image file
Images used over button to create ON / Off switch

plus2net.com
- Use the
photoimage()Method to Display Image in Tkinter - Use the
resize()Method to Resize an Image in Tkinter - Photoimage Zoom in Tkinter
In this article, you will be introduced to the photoimage() method and how to use it in Tkinter. Tkinter is very popular among Python programmers because it lets you do some interesting things with Python.
You can use this method for adding a picture to a button, a label, or a canvas. It makes the application more interactive, beautiful and useful.
Use the photoimage() Method to Display Image in Tkinter
PhotoImage can only display images that are supported by the widget. If they cannot be displayed on the widget, it will return an error.
The general widgets to display an image are labels, buttons and canvas.
We need to install the Pillow module to use the PhotoImage() method, so install this module using this command.
from tkinter import *
from PIL import ImageTk,Image
# CreateTK object
gui = Tk()
# Create canvas object
cnv = Canvas(gui, width = 400, height =400)
cnv.pack()
# create an object of PhotoImage
photo = ImageTk.PhotoImage(Image.open("lion.png"))
cnv.create_image(30, 30, anchor=NW, image=photo)
gui.mainloop()
We import the ImageTk and Image classes into this code. The ImageTk class has several methods; one is the PhotoImage() method that helps display images.
We used the open() method from the Image class. The open() method contains the file path you want to display and accepts several formats like jpg, png, gif, and more.
In this case, the canvas widget is used to display an image; in the next example, we will use the Label widget to display an image.

Use the resize() Method to Resize an Image in Tkinter
Sometimes we need to resize an image in GUI; fortunately, Tkinter provides the resize() method that helps to resize an image.
from tkinter import *
from PIL import Image,ImageTk
gui= Tk()

width =100
height =100
photo= Image.open("lion.png")
photo= photo.resize((width, height),Image.ANTIALIAS)
# create an object of PhotoImage
photoImg = ImageTk.PhotoImage(photo)
photo_label= Label(gui, image=photoImg)
photo_label.pack()
gui.mainloop()
When we work with the resize() method, we cannot pass the image in PhotoImage() directly because we will be unable to use the resize() method after passing the image in the PhotoImage() method. The resize() method takes two parameters, the width and the height.
The resized image has passed in this code’s PhotoImage() method. The Label widget displays an image using the image attribute.

Photoimage Zoom in Tkinter
In this code, you will learn how to use the zoom feature in Tkinter.
The ZoomIn() function helps to zoom in on the image. The zoom_in variable restrains to create an image object until the second execution.
img1 = img1._PhotoImage__photo.zoom(max_num)
Since we are using a global image object, we set the if condition by the zoom_in variable. The _PhotoImage__photo.zoom() method helps zoom in the image; this method takes an integer.
We passed the max_num variable in this method; this variable will be incremented by 1 when the ZoomIn() function calls.
Let’s demonstrate the ZoomOut() function, this function works the same as ZoomIn() function.
img2 = img2._PhotoImage__photo.subsample(min_num)
The _PhotoImage__photo.subsample() method makes it different from ZoomIn() function.
This method helps to reduce an image; the method takes an integer. In short, when the ZoomOut() function calls the image, it will be reduced.
from tkinter import *
from PIL import Image as PIL_image, ImageTk as PIL_imagetk

window =Tk()
zoom_in=1
zoom_out=1
max_num=1
min_num=1
def ZoomIn():
    global img1
    global img2
    global zoom_in
    global max_num
    # A condition which will let create image object in second execution
    if zoom_in > 1:
        img1 = PIL_imagetk.PhotoImage(file='lion.png')
    max_num += 1
    if max_num <3:
        img1 = img1._PhotoImage__photo.zoom(max_num)
        label.config(image=img1)
    else:
        img1 = img1._PhotoImage__photo.zoom(3)
        label.config(image=img1)
        max_num=1

    img2 = PIL_imagetk.PhotoImage(file='lion.png')
    zoom_in+=1


def ZoomOut():
    global img2
    global img1
    global zoom_out
    global min_num
    # A condition which will let create image object in second execution
    if zoom_out > 1:
        img2 = PIL_imagetk.PhotoImage(file='lion.png')
    min_num += 1
    if min_num<3:
        img2 = img2._PhotoImage__photo.subsample(min_num)
        label.config(image=img2)
    else:
        img2 = img2._PhotoImage__photo.subsample(3)
        label.config(image=img2)
        min_num=1

    img1 = PIL_imagetk.PhotoImage(file='lion.png')
    zoom_out+=1


img1 = PIL_imagetk.PhotoImage(file='lion.png')

img2 = PIL_imagetk.PhotoImage(file='lion.png')
label =Label(window, image=img1)
label.pack()

btn=Button(window,text='zoom in',command=ZoomIn)
btn.pack()

btn2=Button(window,text='zoom out',command=ZoomOut)
btn2.pack()
window.mainloop()
Output:
In this first part we will see how to build an app to resize images. The app will be very basic, just to show a practical application of tkinter and Python.
Where those lines of code at the beginning come
This will take the code that we’ve seen in another post to make covers for Youtube with the PIL module, so I invite you to read that one before you watch this video below, if you do not get immediately the first lines of code. I am going to use a function that i made for that purpose to create an app with a GUI (graphic user interface) that makes easier to resize images. We will see the images in a folder and then we can select an image and resize them clicking a button. Nothin’ too fancy, but useful to get a little into the way tkinter works to make a little more easy to use the function (shrink), withount having to change the code of the app everytime we want to resize an image.
Import
We need to import Image form PIL, for images, tkinter for the GUI and glob to search files
- from PIL import Image
- import tkinter as tk
- import glob
|
from PIL import Image import tkinter as tk import glob |
Then we will create a class that will create a window with the widgets for an image, the list of images in the folder, an entry for the shrink ratio (how much we want to make the image smaller… or bigger) and a button to do the action.

The image in the label
After we created a window and a frame
|
class Resize: def __init__( self,image=«», shrink_ratio=2): self.image = image self.root = tk.Tk() self.root.title(«Shrink») self.frame = tk.Frame(self.root) self.frame.pack() |
we do create a label with the image passed to the class Resize
|
self.img = tk.PhotoImage(file=self.image) self.label = tk.Label(self.root, image=self.img) self.label.pack() |
I think it’s a good idea to put a label below the image in wich we will show the name of the image, the size and the with and height of it.
|
self.lab1 = tk.Label(self.root) self.lab1[‘text’] = «…» self.lab1.pack() |
At the moment we do not write anything, until something is selected in the listbox below:
|
self.listbox = tk.Listbox(self.root) self.listbox.pack(fill=tk.BOTH) |
Before we make the listbox visible, we populate it with the files in the folder with the glob function
|
for file in glob.glob(«*.png»): self.listbox.insert(0, file) self.lab2 = tk.Label(self.root, text=«Insert ratio to shrink image (2=50%)») self.lab2.pack() |
Finally we add the entry widget that will tell how much we will resize the image. We must add a button to save the file resized.
|
self.entry = tk.Entry(self.root) self.entry.pack() self.root.mainloop() |
When we will see the entire code
This is just the first part, where we place the tkinter widgets in the window. In the second part we will see how to make the GUI interact with the user to do the job. It will probably be onlilne for the 18/07/2019.
The code until now
|
1 2 3 4 5 6 7 8 9 10 11 12 13 14 15 16 17 18 19 20 21 22 23 24 25 26 27 28 29 30 31 32 33 |
from PIL import Image import tkinter as tk import glob class Resize: def __init__( self,image=«», shrink_ratio=2): self.image = image self.root = tk.Tk() self.root.title(«Shrink») self.frame = tk.Frame(self.root) self.frame.pack() self.img = tk.PhotoImage(file=self.image) self.label = tk.Label(self.root, image=self.img) self.label.pack() self.lab1 = tk.Label(self.root) self.lab1[‘text’] = «…» self.lab1.pack() self.listbox = tk.Listbox(self.root) self.listbox.pack(fill=tk.BOTH) for file in glob.glob(«*.png»): self.listbox.insert(0, file) self.lab2 = tk.Label(self.root, text=«Insert ratio to shrink image (2=50%)») self.lab2.pack() self.entry = tk.Entry(self.root) self.entry.pack() self.root.mainloop() app = GUI(image = «h:\jupyter\covermaker\imgs\python_big.png», shrink_ratio = 2) |
The output window

To be continued…
The app is a spin off of this code: Make a cover image with Python
A different project. While I am doing this post, I am using the following code to make covers. I just mentioned this in another post, but I want to show you a way to make a script that does not use a GUI. This has always the shrink function inside of it.
If you do not want to use a GUI, I have this code that is pretty easy to modify, even if there is no GUI, and I think it is not too unconfortable to read.
|
1 2 3 4 5 6 7 8 9 10 11 12 13 14 15 16 17 18 19 20 21 22 23 24 25 26 27 28 29 30 31 32 33 34 35 36 37 38 39 |
from PIL import Image, ImageFont, ImageDraw import os class App: size = 600, 400 background = («darkred») img = «logo.png» shrink = 2 # use this in case you need to resize the image in the middle fnt = «arial», 38 title = «Images in Powerpointn with Python» subtitle = «The module python-pptx» filename = «output\» + img[:—4] + «_cover.png» # do not need to change this fnt = ImageFont.truetype(App.fnt[0], App.fnt[1]) fnt2 = ImageFont.truetype(«arial», 28) img = Image.new(«RGB», (App.size), color=App.background) def shrink(link, ratio=2): img = Image.open(link) w,h = img.size w = w // ratio # 2 is 50% h = h // ratio img = img.resize((w,h), Image.ANTIALIAS) return img def middle(img, m=2): return App.size[0] // m -img.size[0] // m, App.size[1] // 2 — img.size[1] // 4 img_middle = shrink(App.img, App.shrink) draw = ImageDraw.Draw(img) title = App.title subtitle = App.subtitle draw.text((48,30), title, font=fnt) draw.text((50,115), subtitle, font=fnt2) half4 = (middle(img_middle,2)) img.paste(img_middle, half4, img_middle) img.save(App.filename) img.show() |
The output
I used the output for a cover of my youtube video and a post on my blog pythonprogramming.altervista.org about powerpoint and python:
