This practical and straightforward article walks you through 4 different ways to create full-width buttons in Flutter.
Using ElevatedButton + Container/SizedBox
Wrap your ElevatedButton (or TextButton, OutlinedButton) widget inside a Container or a SizedBox whose width is double.infinity.
Example:

The code:
Scaffold(
      appBar: AppBar(title: const Text('KindaCode.com')),
      body: Padding(
        padding: const EdgeInsets.symmetric(vertical: 30, horizontal: 10),
        child: Column(
          children: [
            // Full width button 1
            SizedBox(
                width: double.infinity,
                child: ElevatedButton(
                    onPressed: () {}, child: const Text('Elevated Button'))),
            const SizedBox(
              height: 20,
            ),
            // Full width button 2
            Container(
              width: double.infinity,
              color: Colors.transparent,
              child: OutlinedButton.icon(
                  onPressed: () {},
                  icon: const Icon(Icons.add),
                  label: const Text('Outlined Button')),
            ),
            const SizedBox(
              height: 20,
            ),
            // Full width button 3
            SizedBox(
              width: double.infinity,
              child: TextButton.icon(
                  onPressed: () {},
                  icon: const Icon(Icons.play_arrow),
                  label: const Text('Text Button')),
            ),
          ],
        ),
      ),
)
Using MaterialButton
You can simply implement a full-width button with the MaterialButton widget by setting its minWidth property to double.infinity.
Example:

The code:
Scaffold(
      appBar: AppBar(title: const Text('KindaCode.com')),
      body: Padding(
        padding: const EdgeInsets.symmetric(vertical: 30, horizontal: 10),
        child: Column(
          children: [
            MaterialButton(
                minWidth: double.infinity,
                height: 60,
                color: Colors.red,
                textColor: Colors.white,
                onPressed: () {},
                child: const Text('Material Button')),
          ],
        ),
      ),
);
Setting minimumSize for ElevatedButton/TextButton
If you style your ElevatedButton (or TextButton, OutlinedButton) with the styleFrom static method, you can make its width match the parent width by setting the minimumSize parameter to Size.fromHeight(x), where x is the height of the button.
Example:

The code:
Column(
          children: [
            ElevatedButton(
                style: ElevatedButton.styleFrom(
                    // The width will be 100% of the parent widget
                    // The height will be 60
                    minimumSize: const Size.fromHeight(60)),
                onPressed: () {},
                child: const Text('Elevated Button')),
            const SizedBox(height: 20),
            OutlinedButton.icon(
                style: OutlinedButton.styleFrom(
                    // the height is 50, the width is full
                    minimumSize: const Size.fromHeight(50)),
                onPressed: () {},
                icon: const Icon(Icons.run_circle),
                label: const Text('Outlined Button')),
          ],
),
Using ConstrainedBox
Example:
Scaffold(
appBar: AppBar(title: const Text('KindaCode.com')),
body: Padding(
padding: const EdgeInsets.symmetric(vertical: 30, horizontal: 10),
child: Center(
child: ConstrainedBox(
constraints: const BoxConstraints(
minWidth: double.infinity, minHeight: 70),
child: ElevatedButton(
onPressed: () {},
child: const Text('Elevated Button'),
)),
),
),
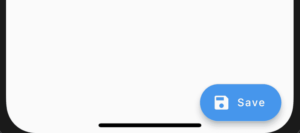
);Screenshot:

Wrapping Up
We’ve covered a bunch of techniques to create full-width buttons in Flutter. Choose from them the one you like the most and go with it.
Flutter is fantastic and rapidly evolving. Continue exploring more new and exciting things by taking a look at the following articles:
- Hero Widget in Flutter: A Practical Guide
- Flutter AnimatedList – Tutorial and Examples
- Flutter Cupertino Button – Tutorial and Examples
- Working with ElevatedButton in Flutter (updated)
- Flutter: 2 Ways to Create Gradient Background Buttons
- Using GetX (Get) for State Management in Flutter
You can also check out our Flutter category page or Dart category page for the latest tutorials and examples.
2 min read
Flutter allows you to combine various widgets and create a UI that matches your design. Sometimes, you may need to add a Button inside a Column. By default, the width of the button is set as per the length of the text inside. So in this tutorial, we’ll see how to create a full width button in Flutter.
For the example purpose, we’ll use the ElevatedButton. We could have also used a RaisedButton but it is now deprecated With Flutter 2.0.
Here’s what we’ll cover:
- The Problem
- Creating a Full Width Button in Flutter (The Solution)
The problem
To develop a UI such as Form, you may add some TextFields widget to receive the user input and a Button at the last to submit the data. When you add a button, the size (height and width) of the button stays in sync with the text of the button. For example, if you increase the size or length of the text, the button size increases, and when you decrease size or length, the button size decreases.
Example Code:
Column(
  children: [
    const SizedBox(
      height: 30,
    ),
    const TextField(
      decoration: InputDecoration(
        border: OutlineInputBorder(
            borderSide: BorderSide(color: Colors.teal)),
        labelText: 'Enter Email',
      ),
    ),
    ElevatedButton(
      style: ElevatedButton.styleFrom(
        primary: Colors.black,

      ),
      onPressed: () {},
      child: const Text(
        'Submit',
        style: TextStyle(fontSize: 24),
      ),
    ),
  ],
)
Here’s how it looks:

As you can see in the figure above, the size of the button is not full width. So how do we set the full widget to a button in Flutter? Let’s see.
Creating a Full Width Button in Flutter (The Solution)
The full width is set to the Elevated Button by adding a style parameter. Then you can use the ElevatedButton.styleFrom class to provide the size of the button using the property called minimumSize.
Here are the steps to create a full width button in Flutter:
Step 1: Add the ElevatedButton widget.
Step 2: Add the style parameter (inside ElevatedButton) and assign the ElevatedButton.styleFrom().
Step 3: Add the minimumSize parameter (inside ElevatedButton.styleFrom) and assign the const Size.fromHeight(50).
Step 4: Run the App.
Code Example:
Column(
  children: [
    const SizedBox(
      height: 30,
    ),
    const TextField(
      decoration: InputDecoration(
        border: OutlineInputBorder(
            borderSide: BorderSide(color: Colors.teal)),
        labelText: 'Enter Email',
      ),
    ),
    const SizedBox(
      height: 10,
    ),
    ElevatedButton(
      style: ElevatedButton.styleFrom(
        primary: Colors.black,
        minimumSize: const Size.fromHeight(50), // NEW
      ),
      onPressed: () {},
      child: const Text(
        'Submit',
        style: TextStyle(fontSize: 24),
      ),
    ),
  ],
)
Explanation:
- The minimumSize: const Size.fromHeight(50) creates a button with a height of 50 and width set to infinite.
- We are simply telling the button to set the minimum size of height set to 50 and width set to full.
Output:

That’s it. Thanks!
Conclusion
In this tutorial, we learned how to create a full width button in Flutter with a practical example. We also saw how to set a full width to the ElevatedButton in Flutter.
Would you like to check other interesting Flutter tutorials?
- Документация
- Widget классы
- ButtonTheme class — настройка стиля кнопок

Егор Долгов
08.09.2019 13:45:29
За все время: 4661 просмотр, 1084 посетителя.
За последние 30 дней: 68 просмотров, 38 посетителей.
ButtonTheme class — настройка стиля кнопок
Источник https://api.flutter.dev/flutter/material/ButtonTheme-class.html
Используйте ButtonTheme для настройки цвета и геометрии кнопок.
ButtonTheme может быть определен в ThemeData.buttonTheme. Или можно использовать его как виджет для переопределения стиля для дочерних виджетов.
С помощью ButtonTheme можно изменить размер кнопок по умолчанию.
Фактический внешний вид кнопок зависит от темы кнопки, включенного состояния кнопки, ее высоты (если таковая имеется) и общей темы.
Наследование: Object > Diagnosticable > DiagnosticableTree > Widget > ProxyWidget > InheritedWidget > ButtonTheme
Конструкторы класса:
- ButtonTheme() — создает тему кнопки;
- ButtonTheme.bar() — создает тему кнопки, которая подходит для панелей кнопок, используемых в нижних колонтитулах диалоговых окон и в заголовках таблиц данных;
- ButtonTheme.fromButtonThemeData() — создает тему кнопки из существующей темы.
ButtonTheme() конструктор
Параметры
textTheme → ButtonTextTheme
по умолчанию: ButtonTextTheme.normal
layoutBehavior → ButtonBarLayoutBehavior
по умолчанию: ButtonBarLayoutBehavior.padded
minWidth → double
Минимальная ширина.
по умолчанию: 88.0
height → double
Высота кнопки.
по умолчанию: 36.0
padding → EdgeInsetsGeometry
Задать отступы внутри контейнера кнопки.
shape → ShapeBorder
alignedDropdown → bool
по умолчанию: false
buttonColor → Color
disabledColor → Color
focusColor → Color
hoverColor → Color
highlightColor → Color
splashColor → Color
colorScheme → ColorScheme
materialTapTargetSize → MaterialTapTargetSize
child → Widget
Дочерний элемент.
Пример использования ButtonTheme() для создания единого стиля кнопок в цифровой клавиатуре
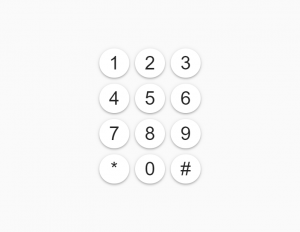
Свойства ButtonTheme которые используются в данном примере
Пример кода полностью:
Подборка заметок
- Создание игры «Косынка» (Kondike)
- Создание бит-машины во Flutter
- Image class – класс изображения
- Основы Dart 2.x (Классы и объекты) Часть II
- Button — кнопки | Flutter
In this Flutter post, we’ll learn how to customize Flutter elevated button height with 2 methods and using multiple examples for practical demonstration.
Everything about its customization will be discussed step by step in detail so you can have a better idea of how the height of elevated button can be customized.
So without further delay, let’s just get right into it.
Outline
- What is Flutter Elevated Button Height?
- Default Height of Flutter Elevated Button
- Customizing Flutter Elevated Button Height (2 Easy Methods)
- Using Padding Constructor
- Using Flutter Sized Box Widget
- Custom Flutter Elevated Button Height Complete Source Code
- Conclusion
As the name suggests, its the vertical size of the Flutter elevated button. We will see multiple ways on how to customize its height. So let’s now dive right into its practical implementation.
Default Height of Flutter Elevated Button
In order to see the default height, we have to define a simple Flutter elevated button with its required onPressed and child constructor. We’ll pass an empty function to the onPressed, you can specify any action in its body. After that, we will pass an empty text widget to see the default height. See below code:
ElevatedButton(onPressed: () {}, child: Text(''))

Customizing Flutter Elevated Button Height (2 Easy Methods)
These two ways are listed below:
- Using Padding Constructor
- Using Flutter SizedBox Widget
Using Padding Constructor
We’ll be using the padding constructor to specify the height of elevated button. See below:
- Edge In Sets Symmetric
- Edge In Sets Only
- Edge In Sets All
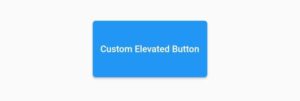
Edge In Sets Symmetric
It’s used to give vertical padding of the same value for both up and down direction. See below code:
ElevatedButton(
                onPressed: () {},
                    style: ElevatedButton.styleFrom(
                        padding:
                            EdgeInsets.symmetric(vertical: 30, horizontal: 10)),
                    child: Text('Custom Elevated Button'))
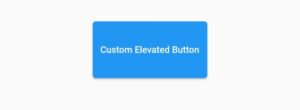
You can see that the height of Flutter elevated button is successfully customized. We have used the horizontal padding as well to give some width(left and right) to the elevated button.
You can use the copy with method if you want one side to have a different value. See below:
style: ElevatedButton.styleFrom(
                     padding:
                         EdgeInsets.symmetric(vertical: 30, horizontal: 10).copyWith(top: 50))
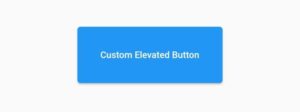
Edge In Sets Only
It is used to specify each side with different or same value. See below code:
style: ElevatedButton.styleFrom(
                    padding: EdgeInsets.only(
                            top: 30, bottom: 30, right: 10, left: 10))
You can use copy with method here as well if you want, but its not recommended.
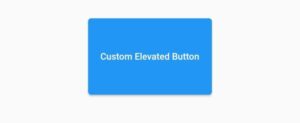
Edge In Sets All
It is used to give elevated button a padding of same value from all sides. See below code:
 style:
        ElevatedButton.styleFrom(padding: EdgeInsets.all(30))
You can use copy with method here to give one or more sides a different value.
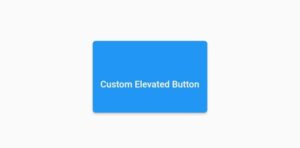
Using Flutter Sized Box Widget
You can wrap the elevated button with the sizedBox widget and easily set the height and width of elevated button using the sizedBox constructors. See below code:
SizedBox(
      height: 100,
      child: ElevatedButton(
          onPressed: () {}, child: Text('Custom Elevated Button')),
    )
You can also set the width using its width constructor.
So this is how we can easily customize the Flutter elevated button height. Hope you like this post and now have a complete idea on how to practically change the height or width of Flutter elevated button widget.
Don’t hesitate to ask if you still have any questions regarding the customization of Flutter elevated button height. I’d be glad to answer them all.
Below section has the complete source code in which Flutter elevated button height is customized.
Custom Flutter Elevated Button Height Complete Source Code

import 'package:flutter/material.dart';
void main() {
  runApp(const MyApp());
}
class MyApp extends StatelessWidget {
  const MyApp({Key? key}) : super(key: key);
  @override
  Widget build(BuildContext context) {
    return MaterialApp(
      debugShowCheckedModeBanner: false,
      home: Homepage(),
    );
  }
}
class Homepage extends StatefulWidget {
  @override
  State<Homepage> createState() => _HomepageState();
}
class _HomepageState extends State<Homepage> {
  @override
  Widget build(BuildContext context) {
    return SafeArea(
        child: Scaffold(
            body: Center(
                child: ElevatedButton(
                    onPressed: () {},
                    style: ElevatedButton.styleFrom(
                        padding:
                            EdgeInsets.symmetric(vertical: 30, horizontal: 10)),
                    child: Text('Custom Elevated Button Height')))));
  }
}
Conclusion
To conclude, we’ve practically discussed and customized Flutter elevated button height by using multiple examples. I’d be more than happy to have your feedback on this post.
I’d love to see you visit my other posts on Flutter app development and many more.
Flutter app articles you might: Flutter appbar actions, Flutter widgets, Flutter sliverappbar, widgets in flutter, custom animations in Flutter, Flutter appbar title center, amazing gradient login UI, Flutter bottom navigation bar, Flutter web, Flutter architecture, Flutter books, beautiful Flutter templates Flutter app development, Flutter development.
Previously, there was the provision of property on RaisedButton to change background color, but it is deprecated now. So, you have to use ElevatedButton instead of RaisedButton. On ElevatedButton, there is the provision of style property that is used to style the button. See the example below to know more about it.
Use style property of ElevatedButton and implement ElevatedButton.styleFrom() on it.
ElevatedButton(
    style: ElevatedButton.styleFrom(
       primary: Colors.redAccent, //background color of button
       side: BorderSide(width:3, color:Colors.brown), //border width and color
       elevation: 3, //elevation of button
       shape: RoundedRectangleBorder( //to set border radius to button
                borderRaius: BorderRadius.circular(30)
            ),
        padding: EdgeInsets.all(20) //content padding inside button
   )
)
Wrap ElevatedButton() widget with SizedBox() widget to change height and widget of button like below:
SizedBox(
     height:100, //height of button
     width:300, //width of button
     child:ElevatedButton(
           //parameters of Button class
     )
)
To make Elevated Button’s width equal to parent widget’s width, pass width like below:
SizedBox(
     height:100, //height of button
     width:double.infinity, //width of button equal to parent widget
     child:ElevatedButton(
           //parameters of Button class
     )
)
import 'package:flutter/material.dart';
void main() {
runApp(MyApp());
}
class MyApp extends StatelessWidget{
@override
Widget build(BuildContext context) {
return MaterialApp(
title: "Test App",
home: HomePage(),
);
}
}
class HomePage extends StatelessWidget{
@override
Widget build(BuildContext context) {
return Scaffold(
appBar: AppBar(
title:Text("Elevated Button"),
backgroundColor: Colors.redAccent, //background color of app bar
),
body:Center(
child: SizedBox(
height:100, //height of button
width:300, //width of button
child:ElevatedButton(
style: ElevatedButton.styleFrom(
primary: Colors.redAccent, //background color of button
side: BorderSide(width:3, color:Colors.brown), //border width and color
elevation: 3, //elevation of button
shape: RoundedRectangleBorder( //to set border radius to button
borderRadius: BorderRadius.circular(30)
),
padding: EdgeInsets.all(20) //content padding inside button
),
onPressed: (){
//code to execute when this button is pressed.
},
child: Text("Elevated Button")
)
)
)
);
}
}
In this way, you can change the size, background color, padding, border-radius, elevation of the ElevatedButton() widget.
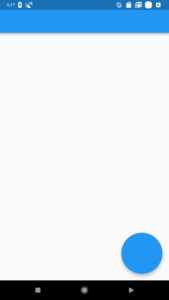
The floating Action Button represents the primary action of the screen and generally located at the right bottom of the screen. In today’s article, we will go through how to set the size to FloatingActionButton in Flutter.
Use a Container where you can specify width and height, then use a RawMaterialButton, like this:
myFabButton = Container(
      width: 200.0,
      height: 200.0,
      child: new RawMaterialButton(
        shape: new CircleBorder(),
        elevation: 0.0,
        child: Icon(
          Icons.favorite,
          color: Colors.blue,
         ),
      onPressed: (){},
  );
Wrap your FAB with a FittedBox inside a Container or SizedBox and then change the width and the height of it.
floatingActionButton: Container(
        height: 100.0,
        width: 100.0,
        child: FittedBox(
          child: FloatingActionButton(onPressed: () {}),
        ),
      ),
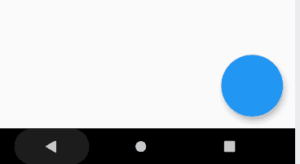
We will get output like a below:
- You can wrap your button with a Transform.scale() widget:
floatingActionButton: Transform.scale( scale: 1.5, child: FloatingActionButton(onPressed: () {}), ) - Use a SizedBox Widget
SizedBox( width: 200.0, height: 200.0, child: FloatingActionButton( onPressed: () {}, ), ) - You can also use RawMaterialButton like a below:
RawMaterialButton( elevation: 2.0, shape: CircleBorder(), fillColor: Colors.red, onPressed: (){}, child: Icon( Icons.add, color: Colors.white, size: 20.0, ), constraints: BoxConstraints.tightFor( width: 56.0, height: 56.0, ), ) - Instead of using regular FloatingActionButton() use FloatingActionButton.extended()
FloatingActionButton.extended(
  onPressed: () {},
  icon: Icon(Icons.save),
  label: Text("DOWNLOAD"),
),
We will get output like a below:

Floating Action Button - This makes FAB 40 logical pixels wide and tall compared to its original size of 56.
FloatingActionButton( mini: true, // set it to true onPressed: () {}, ) - We have to apply generic solutions here, which should be constant in all the UI.
Scaffold(
      floatingActionButton: Container(
        height: MediaQuery.of(context).size.width * 0.2,
        width: MediaQuery.of(context).size.width * 0.2,
        child: FloatingActionButton(onPressed: () {}),
      ),
Set width and height using MediaQuery which will be the same across the devices. The above code will give us output like a below:

Floating Action Button Widget
Here is an Extra tip of the day for you :
Why Should Mobile App Startups Choose Flutter…Flutter uses its own graphics rendering engine called Skia which is google’s performance graphics engine.
This gives you complete control over the entire pixels which are present on the screen, opening the door to new possibilities. Continue reading on Think Technologies.
Conclusion:
Hope you have learned from this article !!!
Keep Learning!!! Keep Fluttering !!!
So in this article, we have been through how to set the size to FloatingActionButton in flutter.
Do not forget to drop your valuable suggestions/feedback. We would love to assist you.
FlutterAgency.com is our portal Platform dedicated to Flutter Technology and Flutter Developers. The portal is full of cool resources from Flutter like Flutter Widget Guide, Flutter Projects, Code libs and etc.
FlutterAgency.com is one of the most popular online portals dedicated to Flutter Technology and daily thousands of unique visitors come to this portal to enhance their knowledge of Flutter.