In this article we will see how to change the size of push button. There are basically two ways in order to change the size of button i.e using resize method and setGeometry method.
The main difference between them is resize method will only resize the push button. on the other hand setGeometry method will change the size and also set the position of the push button.
Способ №1:
Syntax : button.setGeometry(left, top, width, height)
Argument : It takes four integer as argument, first two are the position and second two are the size.
Action performed : It sets the position and the size of push button.
Code :
from PyQt5.QtWidgets import *
from PyQt5.QtGui import *
from PyQt5.QtCore import *
import sys
class Window(QMainWindow):
def __init__(self):
super().__init__()
self.setWindowTitle("Python ")
self.setGeometry(100, 100, 600, 400)
self.UiComponents()
self.show()
def UiComponents(self):
button = QPushButton("CLICK", self)
button.setGeometry(200, 150, 100, 40)
button.clicked.connect(self.clickme)
def clickme(self):
print("pressed")
App = QApplication(sys.argv)
window = Window()
sys.exit(App.exec())
Выход : 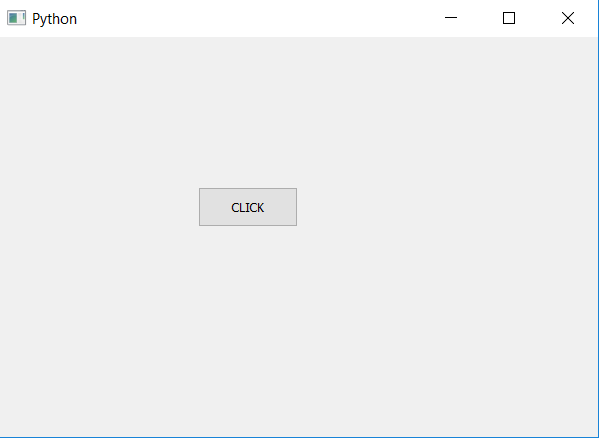
Способ №2:
Syntax : button.resize(width, height)
Argument : It takes two integer as argument i.e width and height.
Action performed : It sets the size of push button
Code :
from PyQt5.QtWidgets import *
from PyQt5.QtGui import *
from PyQt5.QtCore import *
import sys
class Window(QMainWindow):
def __init__(self):
super().__init__()
self.setWindowTitle("Python ")
self.setGeometry(100, 100, 600, 400)
self.UiComponents()
self.show()
def UiComponents(self):
button = QPushButton("CLICK", self)
button.resize(150, 50)
button.clicked.connect(self.clickme)
def clickme(self):
print("pressed")
App = QApplication(sys.argv)
window = Window()
sys.exit(App.exec())
Выход :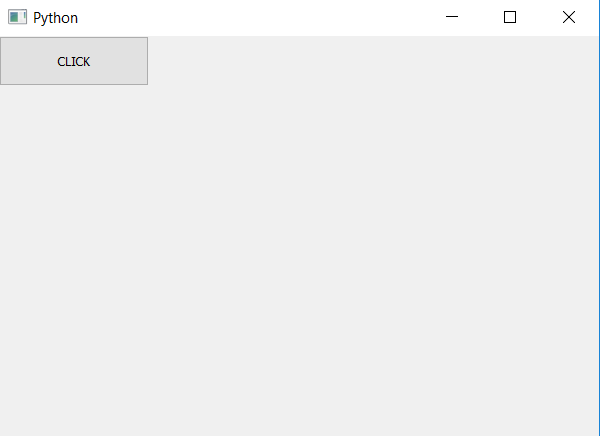
Внимание компьютерщик! Укрепите свои основы с помощью базового курса программирования Python и изучите основы.
Для начала подготовьтесь к собеседованию. Расширьте свои концепции структур данных с помощью курса Python DS. А чтобы начать свое путешествие по машинному обучению, присоединяйтесь к курсу Машинное обучение — базовый уровень.
The push button, or command button, is perhaps the most commonly used widget in any graphical user interface (GUI). A button is a rectangular widget that typically displays a text describing its aim.
When we click a button, we command the computer to perform actions or to answer a question. Typical buttons include Ok, Apply, Cancel, Close, Yes, No and Help. However, they’re not restricted to this list.
In this tutorial, you’ll learn how to create and customize button widgets in your GUI applications.
Buttons are probably the most common widgets in GUI applications. They come in handy when you need to create dialogs for communicating with your users. You’ll probably be familiar with Accept, Ok, Canel, Yes, No, and Apply buttons, which are commonplace in modern graphical user interfaces.
In general, buttons allow you to trigger actions in response to the user’s clicks on the button’s area. Buttons often have a rectangular shape and include a text label that describes their intended action or command.
If you’ve used PyQt or PySide to create GUI applications in Python, then it’d be pretty likely that you already know about the QPushButton class. This class allows you to create buttons in your graphical interfaces quickly.
The QPushButton class provides three different constructors that you can use to create buttons according to your needs:
| Constructor | Description |
|---|---|
QPushButton(parent: QWidget = None) |
Constructs a button with a parent widget but without text or icon |
QPushButton(text: str, parent: QWidget = None) |
Constructs a button with a parent widget and the description text but without an icon |
QPushButton(icon: QIcon, text: str, parent: QWidget = None) |
Constructs a button with an icon, text, and parent widget |
To illustrate how to use the above constructors, you can code the following example:
- PyQt6
- PySide6
python
import sys

from PyQt6.QtCore import QSize
from PyQt6.QtGui import QIcon
from PyQt6.QtWidgets import QApplication, QPushButton, QVBoxLayout, QWidget

class Window(QWidget):
    def __init__(self, parent=None):
        super().__init__(parent)
        # Button with a parent widget
        topBtn = QPushButton(parent=self)
        topBtn.setFixedSize(100, 60)
        # Button with a text and parent widget
        centerBtn = QPushButton(text="Center", parent=self)
        centerBtn.setFixedSize(100, 60)
        # Button with an icon, a text, and a parent widget
        bottomBtn = QPushButton(
            icon=QIcon("./icons/logo.svg"),
            text="Bottom",
            parent=self
        )
        bottomBtn.setFixedSize(100, 60)
        bottomBtn.setIconSize(QSize(40, 40))
        layout = QVBoxLayout()
        layout.addWidget(topBtn)
        layout.addWidget(centerBtn)
        layout.addWidget(bottomBtn)
        self.setLayout(layout)

if __name__ == "__main__":
    app = QApplication(sys.argv)
    window = Window()
    window.show()
    sys.exit(app.exec())
python
import sys

from PySide6.QtCore import QSize
from PySide6.QtGui import QIcon
from PySide6.QtWidgets import QApplication, QPushButton, QVBoxLayout, QWidget

class Window(QWidget):
    def __init__(self, parent=None):
        super().__init__(parent)
        # Button with a parent widget
        topBtn = QPushButton(parent=self)
        topBtn.setFixedSize(100, 60)
        # Button with a text and parent widget
        centerBtn = QPushButton(text="Center", parent=self)
        centerBtn.setFixedSize(100, 60)
        # Button with an icon, a text, and a parent widget
        bottomBtn = QPushButton(
            icon=QIcon("./icons/logo.svg"),
            text="Bottom",
            parent=self
        )
        bottomBtn.setFixedSize(100, 60)
        bottomBtn.setIconSize(QSize(40, 40))
        layout = QVBoxLayout()
        layout.addWidget(topBtn)
        layout.addWidget(centerBtn)
        layout.addWidget(bottomBtn)
        self.setLayout(layout)

if __name__ == "__main__":
    app = QApplication(sys.argv)
    window = Window()
    window.show()
    sys.exit(app.exec())
You can download the logo here or use your own image file. You can also use PNG format images if you prefer.
This code does a lot! First, we do the required imports. Inside our Window class, we create three QPushButton instances. To create the first button, we use the first constructor of QPushButton. That’s why we only pass a parent widget.
For the second button, we use the second constructor of QPushButton. This time, we provide the button’s text and parent. Note that the text is a regular Python string.
Our last button uses the third constructor. In this case, we need to provide the button’s icon, text, and parent. We use the QIcon class with an SVG image as an argument to provide the icon. Note that we can also use a QPixmap object as the button’s icon.
Save this code to a .py file and run it. You’ll get a window that looks something like this:

QPushButton constructors example, showing three buttons with labels & icon
The first button has no text. It’s just a rectangular shape on the app’s windows. The second button in the center has text only, while the third button at the bottom of the window has an icon and text. That looks great!
These buttons don’t do any action jet. If you click them, then you’ll realize that nothing happens. To make your buttons perform concrete actions, you need to connect their signals to some useful slots. You’ll learn how to do this in the next section.
Connecting Signals and Slots
Depending on specific user events, the QPushButton class can emit four different signals. Here’s is a summary of these signals and their corresponding meaning:
| Signal | Emitted |
|---|---|
clicked(checked=false) |
When the user clicks the button and activates it. |
pressed() |
When the user presses the button down. |
released() |
When the user releases the button. |
toggled(checked=false) |
Whenever a checkable button changes its state from checked to unchecked and vice versa. |
When you’re creating a GUI application, and you need to use buttons, then you need to think of the appropriate signal to use. Most of the time, you’ll use the button’s clicked() signal since clicking a button is the most common user event you’ll ever need to process.
The other part of the signal and slot equation is the slot itself. A slot is a method or function that performs a concrete action in your application. Now, how can you connect a signal to a slot so that the slot gets called when the signal gets emitted? Here’s the required syntax to do this:
python
button.<signal>.connect(<method>)
In this construct, button is the QPushButton object we need to connect with a given slot. The <signal> placeholder can be any of the four abovementioned signals. Finally, <method> represents the target slot or method.
Let’s write an example that puts this syntax into action. For this example, we’ll connect the clicked signal with a method that counts the clicks on a button:
- PyQt6
- PySide6
python
import sys

from PyQt6.QtWidgets import QApplication, QPushButton, QVBoxLayout, QWidget

class Window(QWidget):
    def __init__(self, parent=None):
        super().__init__(parent)
        self.count = 0
        self.button = QPushButton(f"Click Count: {self.count}", self)
        self.button.setFixedSize(120, 60)
        self.button.clicked.connect(self.count_clicks)
        layout = QVBoxLayout()
        layout.addWidget(self.button)
        self.setLayout(layout)

    def count_clicks(self):
        self.count += 1
        self.button.setText(f"Click Count: {self.count}")

if __name__ == "__main__":
    app = QApplication(sys.argv)
    window = Window()
    window.show()
    sys.exit(app.exec())
python
import sys

from PySide6.QtWidgets import QApplication, QPushButton, QVBoxLayout, QWidget

class Window(QWidget):
    def __init__(self, parent=None):
        super().__init__(parent)
        self.count = 0
        self.button = QPushButton(f"Click Count: {self.count}", self)
        self.button.setFixedSize(120, 60)
        self.button.clicked.connect(self.count_clicks)
        layout = QVBoxLayout()
        layout.addWidget(self.button)
        self.setLayout(layout)

    def count_clicks(self):
        self.count += 1
        self.button.setText(f"Click Count: {self.count}")

if __name__ == "__main__":
    app = QApplication(sys.argv)
    window = Window()
    window.show()
    sys.exit(app.exec())
The button variable holds an instance of QPushButton. To create this button, we use a text and parent widget. This parent widget works as our current window. Then we connect the button’s clicked signal with the count_clicks() method.
The count_clicks() method counts the number of clicks on the button and updates the button’s text accordingly. Go ahead and run the app!
Exploring the Public API of QPushButton
Up to this point, you’ve learned about the different ways to create buttons in your GUI applications. You’ve also learned how to make your buttons perform actions in response to the user’s actions by connecting the buttons’ signals with concrete methods known as slots.
In the following sections, you’ll learn about the QPushButton class’s public API and its most useful properties, including the following:
| Property | Description | Getter Method | Setter Method |
|---|---|---|---|
text |
Holds the text shown on the button | text() |
setText() |
icon |
Holds the icon shown on the button | icon() |
setIcon() |
shortcut |
Holds the keyboard shortcut associated with the button | shortcut() |
setShortcut() |
Let’s kick things off by learning how to set and get a button’s text, icon, and keyboard shortcut. These actions can be an essential part of your GUI design process.
Setting a Button’s Text, Icon, and Shortcut
In previous sections, you’ve learned how to create buttons using different class constructors. Some of these constructors allow you to set the button’s text directly. However, sometimes you need to manipulate a button’s text at runtime. To accomplish this, you can use setText() and text().
As its name suggests, the setText() method allows you to set the text of a given button. On the other hand, the text() lets you retrieve the current text of a button. Here’s a toy example of how to use these methods:
- PyQt6
- PySide6
python
import sys

from PyQt6.QtWidgets import QApplication, QPushButton, QVBoxLayout, QWidget

class Window(QWidget):
    def __init__(self, parent=None):
        super().__init__(parent)
        self.button = QPushButton("Hello!")
        self.button.setFixedSize(120, 60)
        self.button.clicked.connect(self.onClick)
        layout = QVBoxLayout()
        layout.addWidget(self.button)
        self.setLayout(layout)

    def onClick(self):
        text = self.button.text()
        if text == "Hello!":
            self.button.setText(text[:-1] + ", World!")
        else:
            self.button.setText("Hello!")

if __name__ == "__main__":
    app = QApplication(sys.argv)
    window = Window()
    window.show()
    sys.exit(app.exec())
python
import sys

from PySide6.QtWidgets import QApplication, QPushButton, QVBoxLayout, QWidget

class Window(QWidget):
    def __init__(self, parent=None):
        super().__init__(parent)
        self.button = QPushButton("Hello!")
        self.button.setFixedSize(120, 60)
        self.button.clicked.connect(self.onClick)
        layout = QVBoxLayout()
        layout.addWidget(self.button)
        self.setLayout(layout)

    def onClick(self):
        text = self.button.text()
        if text == "Hello!":
            self.button.setText(text[:-1] + ", World!")
        else:
            self.button.setText("Hello!")

if __name__ == "__main__":
    app = QApplication(sys.argv)
    window = Window()
    window.show()
    sys.exit(app.exec())
In this example, we use text() and setText() inside the onClick() method to manipulate the text of our button object. These methods come in handy when we need to set and retrieve a button’s text at run time, which would be useful in a few situations. For example, if we need a button to fold and unfold a tree of widgets or other objects.
Go ahead and run the app! You’ll get a window like the following:

Window with a single button, with the text Hello! Click to change the text.
In this example, when you click the button, its text alternate between Hello! and Hello, World!.
QPushButton also has methods to manipulate the icon of a given button. In this case, the methods are setIcon() and icon(). You can set the button’s icon at run time with the first method. The second method allows you to retrieve the icon of a given button. There’s also a third method related to icons. It’s called .setIconSize() and allows you to manipulate the icon size.
Here’s an example that illustrates how to use these methods:
- PyQt6
- PySide6
python
import sys

from PyQt6.QtCore import QSize
from PyQt6.QtGui import QIcon
from PyQt6.QtWidgets import QApplication, QPushButton, QVBoxLayout, QWidget

class Window(QWidget):
    def __init__(self, parent=None):
        super().__init__(parent)
        self.btnOne = QPushButton(
            icon=QIcon("./icons/logo.svg"), text="Click me!", parent=self
        )
        self.btnOne.setFixedSize(100, 60)
        self.btnOne.clicked.connect(self.onClick)
        self.btnTwo = QPushButton(parent=self)
        self.btnTwo.setFixedSize(100, 60)
        self.btnTwo.setEnabled(False)
        self.btnTwo.clicked.connect(self.onClick)
        layout = QVBoxLayout()
        layout.addWidget(self.btnOne)
        layout.addWidget(self.btnTwo)
        self.setLayout(layout)

    def onClick(self):
        sender = self.sender()
        icon = sender.icon()

        if sender is self.btnOne:
            sender.setText("")
            sender.setIcon(QIcon())
            sender.setEnabled(False)
            self.btnTwo.setEnabled(True)
            self.btnTwo.setText("Click me!")
            self.btnTwo.setIcon(icon)
            self.btnTwo.setIconSize(QSize(20, 20))
        elif sender is self.btnTwo:
            sender.setText("")
            sender.setIcon(QIcon())
            sender.setEnabled(False)
            self.btnOne.setEnabled(True)
            self.btnOne.setText("Click me!")
            self.btnOne.setIcon(icon)
            self.btnOne.setIconSize(QSize(30, 30))

if __name__ == "__main__":
    app = QApplication(sys.argv)
    window = Window()
    window.show()
    sys.exit(app.exec())
python
import sys

from PySide6.QtCore import QSize
from PySide6.QtGui import QIcon
from PySide6.QtWidgets import QApplication, QPushButton, QVBoxLayout, QWidget

class Window(QWidget):
    def __init__(self, parent=None):
        super().__init__(parent)
        self.btnOne = QPushButton(
            icon=QIcon("./icons/logo.svg"), text="Click me!", parent=self
        )
        self.btnOne.setFixedSize(100, 60)
        self.btnOne.clicked.connect(self.onClick)
        self.btnTwo = QPushButton(parent=self)
        self.btnTwo.setFixedSize(100, 60)
        self.btnTwo.setEnabled(False)
        self.btnTwo.clicked.connect(self.onClick)
        layout = QVBoxLayout()
        layout.addWidget(self.btnOne)
        layout.addWidget(self.btnTwo)
        self.setLayout(layout)

    def onClick(self):
        sender = self.sender()
        icon = sender.icon()

        if sender is self.btnOne:
            sender.setText("")
            sender.setIcon(QIcon())
            sender.setEnabled(False)
            self.btnTwo.setEnabled(True)
            self.btnTwo.setText("Click me!")
            self.btnTwo.setIcon(icon)
            self.btnTwo.setIconSize(QSize(20, 20))
        elif sender is self.btnTwo:
            sender.setText("")
            sender.setIcon(QIcon())
            sender.setEnabled(False)
            self.btnOne.setEnabled(True)
            self.btnOne.setText("Click me!")
            self.btnOne.setIcon(icon)
            self.btnOne.setIconSize(QSize(30, 30))

if __name__ == "__main__":
    app = QApplication(sys.argv)
    window = Window()
    window.show()
    sys.exit(app.exec())
In this example, we create an app with two buttons. Both buttons are connected to the onClick() method. Inside the method, we first get the clicked button using the sender() method on our app’s window, self.
Next, we get a reference to the sender button’s icon using the icon() method. The if statement checks if the clicked object was btnOne. If that’s the case, then we reset the icon with setIcon() and disable the button with setEnabled(). The following four lines enable the btnTwo button, set its text to "Click me!", change the button’s icon, and resize the icon. The elif clause does something similar, but this time the target button is btnOne.
If you run this application, then you’ll get a window like this:

Window with two buttons, the top with a icon & label, the bottom empty. Click to toggle which button has the label & icon.
When we click the top button, the bottom button’s text and icon will be set to Click me! and to the PythonGUIs.com logo, respectively. At the same time, the top button’s text and icon will disappear. Note that the logo’s size will change as well.
Another useful feature of buttons is that you can assign them a keyboard shortcut for those users that prefer the keyboard over the mouse. These methods are .setShortcut() and .shortcut(). Again, you can use the first method to set a shortcut and the second method to get the shortcut assigned to the underlying button.
These methods are commonly helpful in situations where we have a button that doesn’t have any text. Therefore we can’t assign it an automatic shortcut using the ampersand character &.
Checking the Status of a Button
Sometimes you’d need to check the status of a given button and take action accordingly. The QPushButton class provides a few methods that can help you check different properties related to the current status of your buttons:
| Property | Description | Access Method | Setter Method |
|---|---|---|---|
down |
Indicates whether the button is pressed down or not | isDown() |
setDown() |
checked |
Indicates whether the button is checked or not | isChecked() |
setChecked() |
enabled |
Indicates whether the button is enabled or not | isEnabled() |
setEnabled() |
The down status is typically transitory and naturally happens between the pressed and released statuses. However, we can use the setDown() method to manipulate the down status at runtime.
The checked status is only available when we use checkable buttons. Only checkable buttons can be at either the checked or unchecked status.
Finally, when we enable or disable a given button, we allow or disallow the user’s click on the button. In other words, disabled buttons don’t respond to the user’s clicks or other events, while enabled buttons do respond.
Here’s an example that shows how these three sets of statuses work:
- PyQt6
- PySide6
python
import sys

from PyQt6.QtWidgets import QApplication, QPushButton, QVBoxLayout, QWidget

class Window(QWidget):
    def __init__(self, parent=None):
        super().__init__(parent)
        self.btnOne = QPushButton(text="I'm Down!", parent=self)
        self.btnOne.setFixedSize(150, 60)
        self.btnOne.setDown(True)
        self.btnOne.clicked.connect(self.onBtnOneClicked)

        self.btnTwo = QPushButton(text="I'm Disabled!", parent=self)
        self.btnTwo.setFixedSize(150, 60)
        self.btnTwo.setEnabled(False)

        self.btnThree = QPushButton(text="I'm Checked!", parent=self)
        self.btnThree.setFixedSize(150, 60)
        self.btnThree.setCheckable(True)
        self.btnThree.setChecked(True)
        self.btnThree.clicked.connect(self.onBtnThreeClicked)

        layout = QVBoxLayout()
        layout.addWidget(self.btnOne)
        layout.addWidget(self.btnTwo)
        layout.addWidget(self.btnThree)
        self.setLayout(layout)

    def onBtnOneClicked(self):
        if not self.btnOne.isDown():
            self.btnOne.setText("I'm Up!")
            self.btnOne.setDown(False)

    def onBtnThreeClicked(self):
        if self.btnThree.isChecked():
            self.btnThree.setText("I'm Checked!")
        else:
            self.btnThree.setText("I'm Unchecked!")

if __name__ == "__main__":
    app = QApplication(sys.argv)
    window = Window()
    window.show()
    sys.exit(app.exec())
python
import sys

from PySide6.QtWidgets import QApplication, QPushButton, QVBoxLayout, QWidget

class Window(QWidget):
    def __init__(self, parent=None):
        super().__init__(parent)
        self.btnOne = QPushButton(text="I'm Down!", parent=self)
        self.btnOne.setFixedSize(150, 60)
        self.btnOne.setDown(True)
        self.btnOne.clicked.connect(self.onBtnOneClicked)

        self.btnTwo = QPushButton(text="I'm Disabled!", parent=self)
        self.btnTwo.setFixedSize(150, 60)
        self.btnTwo.setEnabled(False)

        self.btnThree = QPushButton(text="I'm Checked!", parent=self)
        self.btnThree.setFixedSize(150, 60)
        self.btnThree.setCheckable(True)
        self.btnThree.setChecked(True)
        self.btnThree.clicked.connect(self.onBtnThreeClicked)

        layout = QVBoxLayout()
        layout.addWidget(self.btnOne)
        layout.addWidget(self.btnTwo)
        layout.addWidget(self.btnThree)
        self.setLayout(layout)

    def onBtnOneClicked(self):
        if not self.btnOne.isDown():
            self.btnOne.setText("I'm Up!")
            self.btnOne.setDown(False)

    def onBtnThreeClicked(self):
        if self.btnThree.isChecked():
            self.btnThree.setText("I'm Checked!")
        else:
            self.btnThree.setText("I'm Unchecked!")

if __name__ == "__main__":
    app = QApplication(sys.argv)
    window = Window()
    window.show()
    sys.exit(app.exec())
In this example, we first set btnOne down using the setDown() method. Then we disable btnTwo using the setEnabled() with False as an argument. This will make this button unresponsive to user events. Finally, we set btnThree as checkable with setCheckable(). Being checkable means that we can use the checked and unchecked statuses in our code.
The onBtnOneClicked() method is connected to btnOne. This method checks if the button is not down and changes the button text accordingly.
The onBtnThreeClicked() is connected to btnThree. This method alternatively changes the button’s text depending on its checked status.
If you run this app, you’ll get the following window:

Window with 3 buttons: one starting in the down state, one disabled and one checked & toggleable.
First, note that these three buttons have different tones of gray. These different tones of gray indicate three different states. The first button is down, the second button is disabled, and the third button is checked.
If you click the first button, then it’ll be released, and its text will be set to I'm Up!. The second button won’t respond to your clicks or actions. The third button will alternate its status between unchecked and checked.
Exploring Other Properties of Button Objects
QPushButton has several other useful properties we can use in our GUI applications. Some of these properties with their corresponding setter and getter method include:
| Property | Description | Access Method | Setter Method |
|---|---|---|---|
default |
Indicates whether the button is the default button on the containing window or not | isDefault() |
setDefault() |
flat |
Indicates whether the button border is raised or not | isFlat() |
setFlat() |
The default property comes in handy when you have several buttons on a window, and you need to set one of these buttons as the default window’s action. For example, say we have a dialog with the Ok and Cancel buttons. In this case, the Ok button can be your default action.
The flat property is closely related to the look and feel of your app’s GUI. If we set flat to True, then the button’s border won’t be visible.
Over 10,000 developers have bought Create GUI Applications with Python & Qt!
[[ discount.discount_pc ]]% OFF for
the next [[ discount.duration ]]
[[discount.description ]]
with the code [[ discount.coupon_code ]]
Purchasing Power Parity
Developers in [[ country ]] get [[ discount.discount_pc ]]% OFF on all books & courses
with code [[ discount.coupon_code ]]
QPushButton objects can also display a menu when you click them. To set up this menu, you must have a proper popup menu beforehand. Then you can use the setMenu() method to associate the menu with the button.
Here’s an example that creates a button with an attached popup menu:
- PyQt6
- PySide6
python
import sys

from PyQt6.QtWidgets import (
    QApplication,
    QMenu,
    QPushButton,
    QVBoxLayout,
    QWidget,
)

class Window(QWidget):
    def __init__(self, parent=None):
        super().__init__(parent)
        self.btnOne = QPushButton(text="Menu!", parent=self)

        self.menu = QMenu(self)
        self.menu.addAction("First Item")
        self.menu.addAction("Second Item")
        self.menu.addAction("Third Item")

        self.btnOne.setMenu(self.menu)

        layout = QVBoxLayout()
        layout.addWidget(self.btnOne)
        self.setLayout(layout)

if __name__ == "__main__":
    app = QApplication(sys.argv)
    window = Window()
    window.show()
    sys.exit(app.exec())
python
import sys

from PySide6.QtWidgets import (
    QApplication,
    QMenu,
    QPushButton,
    QVBoxLayout,
    QWidget,
)

class Window(QWidget):
    def __init__(self, parent=None):
        super().__init__(parent)
        self.btnOne = QPushButton(text="Menu!", parent=self)

        self.menu = QMenu(self)
        self.menu.addAction("First Item")
        self.menu.addAction("Second Item")
        self.menu.addAction("Third Item")

        self.btnOne.setMenu(self.menu)

        layout = QVBoxLayout()
        layout.addWidget(self.btnOne)
        self.setLayout(layout)

if __name__ == "__main__":
    app = QApplication(sys.argv)
    window = Window()
    window.show()
    sys.exit(app.exec())
In this example, we create a button with an associated popup menu. To attach the menu to the target button, we use setMenu(), which turns the button into a menu button.
If you run this application, then you’ll get a window that will look something like this:

Window with a single button, with attached drop-down menu.
In some window styles, the button will show a small triangle on the right end of the button. If we click the button, then the pop-up menu will appear, allowing us to select any available menu option.
Conclusion
Push buttons are pretty useful widgets in any GUI application. Buttons can respond to the user’s events and perform actions in our applications.
In this tutorial, you’ve learned how to create, use, and customize your button while building a GUI application.
This article covers the PyQt5 QPushButton widget with examples.
One of the most basic and common widgets in PyQt5, is QPushButton. As the name implies, it’s a button that triggers a function when pushed (clicked).
You will find a list of all the methods for the PyQt QPushButton available at the bottom of this page.
Creating a QPushButton Widget
Using the QtWidgets.QPushButton() function, we’re able to create a button widget. We can then customize this button with methods like setText() and move() which determine the text and location of the widget respectively.
from PyQt5 import QtWidgets
from PyQt5.QtWidgets import QApplication, QMainWindow
import sys

WIDTH = 500
HEIGHT = 300

app = QApplication(sys.argv)
win = QMainWindow()
win.setGeometry(400,400,WIDTH,HEIGHT)
win.setWindowTitle("CodersLegacy")

button = QtWidgets.QPushButton(win)
button.setText("A Button")
button.move(WIDTH/2,HEIGHT/2)

win.show()
sys.exit(app.exec_())
Below is the output of the code we just wrote. We haven’t mapped this button to any function yet, so clicking it won’t do anything.
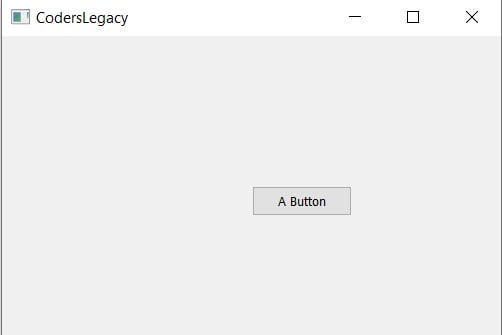
We added a little extra code by creating two variables WIDTH and HEIGHT in the attempt to get the widget to appear in the center of the screen. However, the move() function does not center the QPushButton at the coordinates passed to it, rather it starts drawing the widget from there. In other words, the top left hand corner of the button we created above is located at the center of the screen.
move() is a very basic layout system, and not suitable for actual projects. PyQt5 comes with actual layouts, in charge of managing positions of the widgets inside the window. Learn more about them in our PyQt5 layout management tutorial.
Connecting Buttons to Functions
A button which isn’t connected to a function is a useless button. Buttons are meant to be connected to a function which will execute once the button has been pressed.
We’ll explore several popular usages of the QPushButton widget in PyQt5, such as closing the window, updating text and retrieving widget values.
Buttons with Labels
You can learn more about PyQt Labels in it’s own dedicated tutorial.
from PyQt5 import QtWidgets
from PyQt5.QtWidgets import QApplication, QMainWindow
import sys

def update():
    label.setText("Updated")

def retrieve():
    print(label.text())

app = QApplication(sys.argv)
win = QMainWindow()
win.setGeometry(400,400,500,300)
win.setWindowTitle("CodersLegacy")

label = QtWidgets.QLabel(win)
label.setText("GUI application with PyQt5")
label.adjustSize()
label.move(100,100)

button = QtWidgets.QPushButton(win)
button.clicked.connect(update)
button.setText("Update Button")
button.move(100,150)

button2 = QtWidgets.QPushButton(win)
button2.clicked.connect(retrieve)
button2.setText("Retrieve Button")
button2.move(100,200)

win.show()
sys.exit(app.exec_())
Here’s a short video to show you how the output of the above code would look like.
Shutting down a PyQt application
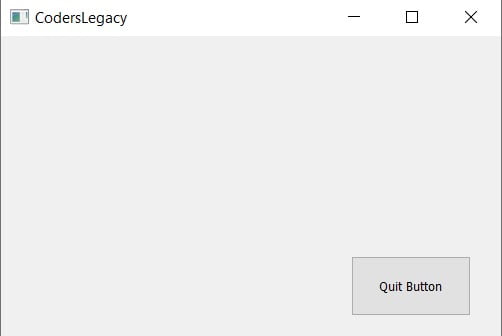
Another popular usage of QPushButton is to create a “Quit Button” that closes the PyQt5 application when clicked. Here’s how to do it.
We simply use the close() method on the window that we created using the QMainWindow() function.
Instead of creating a whole separate function and then calling win.close(), we can take a shortcut and simply pass win.close to the connect function. Remember to leave off the parenthesis, else the function will call itself automatically.
We’ve also thrown in an extra method, called resize() which is used to change the size of the QPushButton. The first parameter defines the new width, and the second defines the new height.
from PyQt5 import QtWidgets
from PyQt5.QtWidgets import QApplication, QMainWindow
import sys

app = QApplication(sys.argv)
win = QMainWindow()
win.setGeometry(400,400,500,300)
win.setWindowTitle("CodersLegacy")

button = QtWidgets.QPushButton(win)
button.clicked.connect(win.close)
button.setText("Quit Button")
button.resize(120,60)
button.move(350,220)

win.show()
sys.exit(app.exec_())
Setting an Image
You can set an image onto your button to make it look more stylish using the QIcon widget. Just pass the filepath into it and you’re done.
from PyQt5 import QtGui

button = QPushButton(win)
button.setIcon(QtGui.QIcon('myImage.jpg'))
QPushButton Methods
This is a compilation of all important and common methods for the QPushButton widget.
| Method | Description |
|---|---|
isDefault() |
A button with this property set to true (i.e., the dialog’s default button,) will automatically be pressed when the user presses enter |
setIcon() |
Displays an image icon on the button. |
setEnabled() |
True by Default. If set to False, but will become grey and unresponsive. |
setText() |
Sets the displayed text on the button. |
text() |
Returns the displayed text on the button. |
toggle() |
Toggles the state of the button. |
This marks the end of the PyQt5 QPushButton widget article. Any suggestions or contributions for CodersLegacy are more than welcome. Questions regarding the article content can be asked in the comments section below.
Head over to the main PyQt5 section to learn more about other great widgets!

В этой части руководства PyQt5
мы изучим некоторую базовую функциональность.
Этот простой пример выводит маленькое окно. Мы можем делать множество вещей с этим окном. Мы можем менять его размер, раскрывать на весь экран или свернуть в панель задач. Это потребовало бы много программного кода. Кто-то уже запрограммировал эту функциональность. Поскольку это повторяется в большинстве приложений, нет необходимости программировать это с самого начала. PyQt5 – это инструментарий высокого уровня. Если бы мы писали с помощью инструментов более низкого уровня, нижеследующий пример кода мог бы с лёгкостью содержать сотни строк.
#!/usr/bin/python3
# -*- coding: utf-8 -*-

import sys
from PyQt5.QtWidgets import QApplication, QWidget

if __name__ == '__main__':
    app = QApplication(sys.argv)
    w = QWidget()
    w.resize(250, 150)
    w.move(300, 300)
    w.setWindowTitle('Simple')
    w.show()

    sys.exit(app.exec_())
Пример кода выше выводит маленькое окно на экране.
import sys
from PyQt5.QtWidgets import QApplication, QWidget
Здесь мы обеспечили необходимый импорт модулей. Основные виджеты расположены в модуле PyQt5.QtWidgets.
app = QApplication(sys.argv)Каждое приложение PyQt5 должно создать объект приложения. Параметр sys.argv — это список аргументов из командной строки. Скрипты Python могут быть запущены из программной оболочки. Это один из способов, как мы можем контролировать запуск наших скриптов.
w = QWidget()Виджет QWidget – это основной класс всех объектов пользовательского интерфейса в PyQt5. Мы обеспечиваем конструктор по умолчанию для QWidget. Конструктор по умолчанию не имеет родителя. Виджет без родителя называется окном.
w.resize(250, 150)Метод resize() изменяет размер виджета. Здесь задана ширина 250px и высота 150px.
w.move(300, 300)Метод move() перемещает виджет на позицию с координатами x=300 и y=300 на экране.
w.setWindowTitle('Simple')Здесь мы устанавливаем название нашего окна. Оно показывается в строке заголовка.
w.show()Метод show() отображает виджет на экране. Виджет сначала создаётся в памяти и позже показывается на экране.
sys.exit(app.exec_())Наконец, мы входим в главный цикл приложения. Обработка событий начинается в этой точке. Главный цикл получает события из системы и отправляет их виджетам приложения. Цикл завершается, если мы вызываем метод exit() или главное окно было закрыто. Метод sys.exit() гарантирует чистый выход. Среда будет проинформирована, когда приложение завершится.
Метод exec_() содержит нижнее подчеркивание, потому что exec – уже используемое имя в Python. И, соответственно, имя exec_() было использовано взамен.

Рисунок: Окно Simple
Иконка приложения
Иконка приложения – это маленькое изображение, которое обычно отображается в верхнем левом углу строки заголовка. В следующем примере мы увидим, как сделать её в PyQt5. Мы также познакомимся с несколькими новыми методами.
#!/usr/bin/python3
# -*- coding: utf-8 -*-

import sys
from PyQt5.QtWidgets import QApplication, QWidget
from PyQt5.QtGui import QIcon

class Example(QWidget):
    def __init__(self):
        super().__init__()
        self.initUI()

    def initUI(self):
        self.setGeometry(300, 300, 300, 220)
        self.setWindowTitle('Icon')
        self.setWindowIcon(QIcon('web.png'))

        self.show()


if __name__ == '__main__':
    app = QApplication(sys.argv)
    ex = Example()
    sys.exit(app.exec_())
Предыдущий пример был написан в процедурном стиле. Язык программирования Python поддерживает и процедурный, и объектно-ориентированный стиль программирования. Программирование в PyQt5 означает объектно-ориентированное программирование (ООП).
class Example(QWidget):
    def __init__(self):
        super().__init__()
        ...
Есть три важных вещи в объектно-ориентированном программировании – это классы, данные и методы. Здесь мы создаём новый класс с именем Example. Класс Example наследуется из класса QWidget. Это значит, что мы вызываем два конструктора: первый для класса Example и второй для унаследованного класса. Метод super() возвращает объект родителя класса Example и мы вызываем его конструктор. Метод __init__() – это конструктор класса в языке Python.
self.initUI()Создание GUI поручено методу initUI().
self.setGeometry(300, 300, 300, 220)
self.setWindowTitle('Icon')
self.setWindowIcon(QIcon('web.png'))
Все три метода были унаследованы из класса QWidget. setGeometry делает две вещи: он определяет место окна на экране и устанавливает его размер. Первые два параметра – позиции x и y нашего окна. Третий – ширина, и четвёртый – высота окна. Фактически, setGeometry сочетает методы resize() и move() в одном. Последний метод устанавливает иконку приложения. Чтобы сделать это, мы создали объект QIcon. QIcon принимает путь к нашей иконке для её отображения.
if __name__ == '__main__':
    app = QApplication(sys.argv)
    ex = Example()
    sys.exit(app.exec_())
Приложение и объекты примера созданы. Главный цикл запущен.
![]()
Рисунок: Окно с иконкой
Показ всплывающих подсказок
Мы можем обеспечить любой из наших виджетов всплывающей подсказкой.
#!/usr/bin/python3
# -*- coding: utf-8 -*-
import sys
from PyQt5.QtWidgets import (QWidget, QToolTip, QPushButton, QApplication)
from PyQt5.QtGui import QFont
class Example(QWidget):

    def __init__(self):
        super().__init__()
        self.initUI()


    def initUI(self):
        QToolTip.setFont(QFont('SansSerif', 10))

        self.setToolTip('This is a <b>QWidget</b> widget')

        btn = QPushButton('Button', self)
        btn.setToolTip('This is a <b>QPushButton</b> widget')
        btn.resize(btn.sizeHint())
        btn.move(50, 50)

        self.setGeometry(300, 300, 300, 200)
        self.setWindowTitle('Tooltips')
        self.show()


if __name__ == '__main__':
    app = QApplication(sys.argv)
    ex = Example()
    sys.exit(app.exec_())
В этом примере, мы показываем подсказку для двух PyQt5 виджетов.
QToolTip.setFont(QFont('SansSerif', 10))Этот статический метод устанавливает шрифт, используемый для показа всплывающих подсказок. Мы используем шрифт 10px SansSerif.
self.setToolTip('This is a <b>QWidget</b> widget')Чтобы создать подсказку, мы вызываем метод setTooltip(). Мы можем использовать HTML форматирование текста.
btn = QPushButton('Button', self)
btn.setToolTip('This is a <b>QPushButton</b> widget')
Мы создаём виджет кнопки и устанавливаем всплывающую подсказку для неё.
btn.resize(btn.sizeHint())
btn.move(50, 50)
Меняем размер у кнопки, перемещаем её в окно. Метод sizeHint() даёт рекомендуемый размер для кнопки.

Рисунок: Всплывающие подсказки
Закрытие окна
Очевидный способ закрыть окно – это кликнуть на знаке «X» в строке заголовка. В следующем примере, мы покажем, как мы можем программно закрыть наше окно. Мы кратко коснёмся темы сигналов и слотов.
Ниже следует конструктор виджета QPushButton, который мы используем в нашем примере.
QPushButton(string_text, QWidget parent = None)Параметр string_text – это текст, который будет отображён на кнопке. Parent – это виджет, на котором мы разместим нашу кнопку. В этом случае это будет QWidget.
Виджеты имеют иерархическую форму. В этой иерархии большинство виджетов имеют родителей. Виджеты без родителей – это окна верхнего уровня.
#!/usr/bin/python3
# -*- coding: utf-8 -*-
import sys
from PyQt5.QtWidgets import QWidget, QPushButton, QApplication
from PyQt5.QtCore import QCoreApplication

class Example(QWidget):

    def __init__(self):
        super().__init__()
        self.initUI()

    def initUI(self):
        qbtn = QPushButton('Quit', self)
        qbtn.clicked.connect(QCoreApplication.instance().quit)
        qbtn.resize(qbtn.sizeHint())
        qbtn.move(50, 50)

        self.setGeometry(300, 300, 250, 150)
        self.setWindowTitle('Quit button')
        self.show()

if __name__ == '__main__':
    app = QApplication(sys.argv)
    ex = Example()
    sys.exit(app.exec_())
В этом примере, мы создали кнопку выхода. После нажатия на кнопку, приложение завершается.
from PyQt5.QtCore import QCoreApplicationНам необходим объект из модуля QtCore.
qbtn = QPushButton('Quit', self)Мы создали кнопку. Кнопка является образцом класса QPushButton. Первый параметр конструктора – это метка кнопки. Второй параметр – родительский виджет. Виджет родителя – это Example, который наследуется из QWidget.
qbtn.clicked.connect(QCoreApplication.instance().quit)Система обработки событий в PyQt5 построена на механизме сигналов и слотов. Если мы кликаем по кнопке, выдаётся сигнал clicked. Слот может быть слотом Qt или любым слотом, вызываемым из Python. QCoreApplication содержит цикл главного события; он обрабатывает и выполняет все события. Метод instance даёт нам его текущий экземпляр. Заметим, что QCoreApplication создаётся с QApplication. Кликнутый сигнал соединяется с методом quit(), который и завершает приложение. Взаимосвязь сделана между двумя объектами: отправителем и получателем. Отправитель – нажатие кнопки, получатель – объект приложения.

Рисунок: Кнопка выхода
Диалоговое окно
По умолчанию, если вы кликаете по кнопке «X» в строке заголовка, QWidget закрывается. Иногда мы хотим изменить это стандартное поведение. К примеру, если у нас есть открытый в редакторе файл, в котором мы сделали некоторые изменения, мы показываем сообщение для подтверждения выхода.
#!/usr/bin/python3
# -*- coding: utf-8 -*-

import sys
from PyQt5.QtWidgets import QWidget, QMessageBox, QApplication

class Example(QWidget):

    def __init__(self):
        super().__init__()
        self.initUI()

    def initUI(self):
        self.setGeometry(300, 300, 250, 150)
        self.setWindowTitle('Message box')
        self.show()

    def closeEvent(self, event):
        reply = QMessageBox.question(self, 'Message', "Are you sure to quit?", QMessageBox.Yes | QMessageBox.No, QMessageBox.No)
        if reply == QMessageBox.Yes:
            event.accept()
        else:
            event.ignore()


if __name__ == '__main__':
    app = QApplication(sys.argv)
    ex = Example()
    sys.exit(app.exec_())
Если мы закрываем QWidget, вызывается QCloseEvent. Чтобы изменить поведение виджета, нам необходимо переопределить обработчик событий closeEvent().
reply = QMessageBox.question(self, 'Message', "Are you sure to quit?", QMessageBox.Yes | QMessageBox.No, QMessageBox.No)Мы показываем сообщение с двумя кнопками: «Yes» и «No». Первая строка появляется в строке заголовка. Вторая строка – это текст сообщения, отображаемый с помощью диалогового окна. Третий аргумент указывает комбинацию кнопок, появляющихся в диалоге. Последний параметр – кнопка по умолчанию. Это кнопка, которая первоначально имеет на себе указатель клавиатуры. Возвращаемое значение хранится в переменной reply.
if reply == QtGui.QMessageBox.Yes:
    event.accept()
else:
    event.ignore()
Здесь мы проверяем возвращаемое значение. Если мы кликаем кнопку «Yes», мы принимаем событие, которое ведёт к закрытию виджета и завершению приложения. В противном случае, мы игнорируем закрывающее событие.

Рисунок: Диалоговое окно
Центрирование окна на экране
Нижеследующий скрипт показывает, как мы можем центрировать окно экране.
#!/usr/bin/python3
# -*- coding: utf-8 -*-

import sys
from PyQt5.QtWidgets import QWidget, QDesktopWidget, QApplication

class Example(QWidget):
    def __init__(self):
        super().__init__()
        self.initUI()

    def initUI(self):
        self.resize(250, 150)
        self.center()
        self.setWindowTitle('Center')
        self.show()

    def center(self):
        qr = self.frameGeometry()
        cp = QDesktopWidget().availableGeometry().center()
        qr.moveCenter(cp)
        self.move(qr.topLeft())

if __name__ == '__main__':
    app = QApplication(sys.argv)
    ex = Example()
    sys.exit(app.exec_())
Класс QtGui.QDesktopWidget предоставляет информацию о пользовательском рабочем столе, включая размер экрана.
self.center()Код, который будет центрировать окно, размещён в специальном методе center().
qr = self.frameGeometry()Мы получаем прямоугольник, точно определяющий форму главного окна.
cp = QDesktopWidget().availableGeometry().center()Мы выясняем разрешение экрана нашего монитора. Из этого разрешения, мы получаем центральную точку.
qr.moveCenter(cp)Наш прямоугольник уже имеет высоту и ширину. Теперь мы устанавливаем центр прямоугольника в центр экрана. Размер прямоугольника не изменяется.
self.move(qr.topLeft())Мы перемещаем верхнюю левую точку окна приложения в верхнюю левую точку прямоугольника qr, таким образом центрируя окно на нашем экране.
В этой части руководства PyQt5, мы успели изучить некоторые основы…