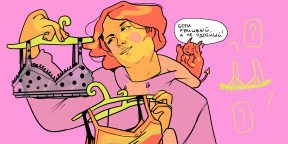
Как определить размер бюстгальтера и не ошибиться при покупке в интернете
Достаточно всего двух параметров.
Эксперты рекомендуют не ориентироваться на размер удобного старого бюстгальтера при покупке нового. Дело в том, что в процессе носки материал растягивается, а сами женщины могут набирать либо сбрасывать вес, из‑за чего меняются пропорции.
Так, если девушка купила размер 75B три года назад, поправилась с тех пор на пять килограммов и сейчас бюстгальтер сидит на ней как влитой, это вовсе не значит, что ей подойдёт новенький 75B. С высокой вероятностью чашечка окажется маловата, а поддерживающая планка (пояс) — слишком туга.
Чтобы поместиться в лифчик неподходящего размера, девушке придётся подтягивать лямки и максимально отпускать пояс. В результате в одних местах бюстгальтер будет провисать, в других — впиваться в кожу. А о поддержке груди и вовсе придётся забыть.
Чтобы такого не случилось, каждую новую модель белья стоит покупать как совершенно отдельный элемент гардероба — под тот размер бюста, который есть сейчас.
Как измерить размер груди
Вам понадобятся гибкая сантиметровая (портняжная) лента, лист бумаги и ручка либо карандаш.
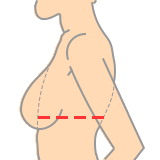
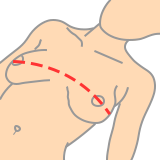
Измерьте обхват под грудью
Оберните сантиметровую ленту вокруг груди на уровне, где расположены косточки лифчика.
Следите, чтобы сантиметр не был ниже или выше спереди или сзади. Из‑за уклона измерения окажутся неверными.
Округлите результат и запишите его в сантиметрах. Это обхват под грудью (ОПГ).
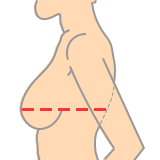
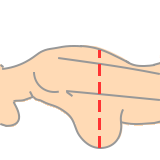
Измерьте обхват груди по выступающим точкам
Оберните портняжную ленту вокруг груди на уровне сосков.
Не затягивайте ленту слишком туго. И опять‑таки следите за её расположением.
Полученный результат называется обхватом груди по выступающим точкам (ОГ). Тоже не забудьте его округлить.
Как определить, какой бюстгальтер вам нужен
Размер лифчика традиционно определяют с помощью двух параметров — цифрового и буквенного. Например, так: 75А. Или так: 90D.
Число обозначает размер бюстгальтера. Буква — полноту чашки.
Как высчитать размер бюстгальтера
Его определяют исходя из обхвата под грудью.
| Обхват под грудью, см | Размер |
| 68–72 | 70 |
| 73–77 | 75 |
| 78–82 | 80 |
| 83–87 | 85 |
| 88–92 | 90 |
| 93–97 | 95 |
Как узнать полноту чашки бюстгальтера
Этот параметр высчитывают по разнице между ОГ и ОПГ. Из первого числа вычитают второе, а полученный результат соотносят с таблицей.
| Разница между ОГ и ОПГ | Полнота чашки бюстгальтера |
| 10–11 | АА |
| 12–13 | А |
| 14–15 | В |
| 16–17 | С |
| 18–19 | D |
| 20–21 | E |
| 22–23 | F |
| 24–25 | G |
На этом вычисления закончены.
Простой пример для сверки: если ваш ОПГ — 80 см, а ОГ — 96 см, то нужный размер — 80С.
Как не ошибиться при покупке бюстгальтера без примерки
Самый надёжный способ подобрать лифчик — это надеть его. Причём лучше посмотреть несколько моделей одного размера от разных производителей, чтобы найти бюстгальтер именно того кроя, который будет сидеть на вас лучше всего.
Если же вы покупаете вещь без примерки, например в интернет‑магазине, придерживайтесь следующих правил.
Сверьте размеры
В России нижнее бельё маркируют в соответствии с европейской (международной) сеткой размеров. Однако существуют и другие варианты — например американский и французский.
Чтобы не ошибиться, уточните, в интернет‑магазине какой страны вы покупаете бюстгальтер. И сверьтесь с таблицей соответствия размеров.
| Европейский (Россия, Германия) | Французский | Американский (США, Великобритания) |
| 70 | 85 | 32 |
| 75 | 90 | 34 |
| 80 | 95 | 36 |
| 85 | 100 | 38 |
| 90 | 105 | 40 |
| 95 | 110 | 42 |
Полнота чашечек во всех сетках совпадает.
Присмотритесь к «параллельным» размерам
Иногда бывает так, что бюстгальтер всем хорош, но вот именно вашего размера нет. В этом случае можно попробовать заменить его «параллельным». Вот табличка для выбора подходящей альтернативы.
| 75А = 70В |
| 80А = 75В = 70С |
| 85А = 80В = 75С |
| 80В = 75С = 70D |
| 85B = 80C = 75D |
| 90B = 85C = 80D |
| 85C = 80D = 75E |
| 90D = 85E = 80F |
Если вы впервые покупаете бельё определённого бренда, почитайте отзывы
Каждый производитель шьёт бельё по собственным лекалам. В общих чертах размеры бюстгальтеров вряд ли будут отличаться. Но, например, один бренд ставит чашечки ближе друг к другу, а другой — дальше. Кто‑то шьёт «большемерные» модели, по самой верхней границе, а кто‑то специализируется на «маломерках».
Такие нюансы важно знать до покупки. Особенно если вы не нашли свой размер и решили попробовать заменить его «параллельным». Нужно понимать, уменьшать или увеличивать чашку.
Узнайте больше о магазине, в котором собираетесь делать покупку
Как быстро отправляют товар, часто ли присылают брак, можно ли оформить возврат — все эти вопросы стоит выяснить до покупки.
Что делать, если бюстгальтер всё-таки не подошёл
Согласно закону о защите прав потребителей, нижнее бельё обмену и возврату не подлежит. Однако это всё-таки возможно, если:
- на купленном бюстгальтере обнаружился очевидный брак, например неровные строчки, неоднородная окраска ткани, разошедшиеся швы, повреждённая фурнитура;
- размер белья отличается от указанного на бирке или этикетке;
- изделие не соответствует описанию или изображению на сайте.
В подобных ситуациях вы вправе обменять или вернуть бюстгальтер в течение семи дней со дня доставки заказа. Или 90 дней, если продавец не выдал памятку о сроках возврата. Деньги должны перечислить на карту, с которой вы оплатили покупку, за период в 10 дней с момента возврата.
Читайте также 🧐
- Как определить размер перчаток
- Как узнать размер головы и правильно подобрать шляпу, кепку или шапку
- Как правильно подобрать рубашку по размеру
- Как искать вещи нестандартных размеров? Советуем в шестом эпизоде подкаста «Потрачено»
- 5 простых способов узнать размер кольца
Как правильно определить размер бюстгальтера с помощью таблиц или точного калькулятора
Онлайн-калькулятор
Несколько измерений помогут вам рассчитать идеальный размер бюстгальтера для вас.
На нашем сайте есть онлайн-калькулятор, который поможет вам рассчитать подходящие размеры чашки и пояса лифчика для вашей груди. Он также показывает результаты в различных системах измерения, которые используются в разных странах: России (Ru), США (US), Великобритании (UK) и других. Вам необходимо только правильно снять мерки, строго по инструкции выше, и указать их в соответствующих полях, выбрав единицу измерения (сантиметры или дюймы).
Содержание
- Калькулятор размера бюстгальтера (выше)
- Как правильно определить размер груди
- Простой способ
- Продвинутый способ
- Как правильно подобрать бюстгальтер
- Таблица размеров пояса бюстгальтера
- Таблица соответствия размеров чашек лифчика
Как правильно определить размер груди в домашних условиях
У девушек есть два способа узнать правильный размер груди самостоятельно — простой и продвинутый.
Простой способ
Чтобы узнать российский размер (RU/EU) простым способом, вам нужно снять две мерки: обхват под грудью и обхват груди стоя.
Бюст стоя. Измерьте свою грудь в положении стоя или сидя, полностью выпрямившись. Лента должна быть параллельна земле. Не сжимайте ею свою грудь слишком сильно, но и не позволяйте ей свисать.
Под грудью. Поместите ленту удобно под грудью, убедившись, что она находится в идеально горизонтальном положении. Стяните ленту так, как вам хотелось бы, чтобы давил пояс бюстгальтера. Лента должна плотно лежать под грудью, но не должна слишком туго сдавливать кожу.
Чтобы узнать размер пояса лифчика, округлите снятую под грудью мерку до ближайшего числа кратного 5 или используйте таблицу ниже. Например, вы намерили под грудью 87 см. Округляем до 85. Следовательно размер вашего пояса – 85.
| СМ | 57.5 | 62.5 | 67.5 | 72.5 | 77.5 | 82.5 | 87.5 | 92.5 | 97.5 | 102.5 | 107.5 | 112.5 | 117.5 | 122.5 | 127.5 | 132.5 | 137.5 | 142.5 | 147.5 | 152.5 | 157.5 | 162.5 | 167.5 | 172.5 | |
|---|---|---|---|---|---|---|---|---|---|---|---|---|---|---|---|---|---|---|---|---|---|---|---|---|---|
| Международный RU/EU/JP/KO |
60 | 65 | 70 | 75 | 80 | 85 | 90 | 95 | 100 | 105 | 110 | 115 | 120 | 125 | 130 | 135 | 140 | 145 | 150 | 155 | 160 | 165 | 170 | 175 |
Чтобы правильно определить размер чашки, вычтите из мерки «Бюст стоя» измерение «Под грудью» и воспользуйтесь таблицей ниже. Например, вы намерили под грудью 87 см, а грудь – 104 см. 104 – 87 = 17. Согласно таблице, это соответствует размеру чашки С. А ваш размер лифчика – 85С.
| СМ | 10 | 12 | 14 | 16 | 18 | 20 | 22 | 24 | 26 | 28 | 30 | 32 | 34 | 36 | 40 | 42 | 44 | 46 | 48 | 50 | 52 | 54 | 56 | 58 | 60 | 62 | 64 | |
|---|---|---|---|---|---|---|---|---|---|---|---|---|---|---|---|---|---|---|---|---|---|---|---|---|---|---|---|---|
| Международный RU/EU/FR/ES/BE/IT |
AA | A | B | C | D | E | F | G | H | I | J | K | L | M | N | O | P | Q | R | S | T | U | V | W | X | Y | Z |
Продвинутый способ узнать размер бюстгальтера
Вы можете использовать наш онлайн-калькулятор размеров бюстгальтера (расширенный режим), чтобы найти размер, который подходит вам лучше всего. Следуйте инструкции ниже.
Без нажатия под грудью. Измерьте обхват прямо под грудью так, чтобы лента была параллельна полу и едва касалась кожи.
Комфортное нажатие под грудью. Это измерение совпадает с меркой «Под грудью» для простого способа.
Сильное нажатие под грудью. Максимально затяните измерительную ленту прямо под грудью, предварительно полностью выдохнув.
Бюст стоя. Это измерение совпадает с меркой «Бюст стоя» для простого способа.
Бюст наклонившись. Снимите мерку, согнувшись более чем на 90 градусов, при этом лента должна быть натянутой, но едва касаться груди.
Лежа на спине. Измеряйте лежа на спине так, чтобы лента была натянутой, но едва касалась груди. Для удобства вы можете использовать зеркало—это помогает держать измерительную ленту под прямым углом к полу.
Примечание: при измерении в этом положении нельзя сдавливать женскую грудь лентой. Другими словами, измерительная лента должна мягко охватывать вашу грудь, не изменяя естественного положения груди, когда вы лежите горизонтально.
Примечание: женщине обязательно стоит примерить лифчик не только рассчитанного размера, но и чуть большего и чуть меньшего размера. Кроме того, идеальная посадка также зависит от формы бюстгальтера, а размеры бюстгальтеров различаются в зависимости от бренда, поэтому некоторые из них могут не подойти даже после того, как вы правильно рассчитали все размеры и поняли свой размер груди.
Примечание: многие женщины, особенно с маленькой грудью, часто не верят размерам чашек, рассчитанным продвинутым способом. Они не учитывают переменную зависимость размера чашки от размера ремешка. Кроме того, при измерении чашки они не наклоняются. Когда вы примеряете бюстгальтер, вы должны наклониться вперед и поместить в чашечки всю так называемую «боковую грудь».
Однако вы можете избежать всех этих ошибок, точно следуя нашему руководству. Не стоит игнорировать наши инструкции только потому, что вы не можете поверить в размер, который вы рассчитали с помощью нашего калькулятора.
Как правильно подобрать бюстгальтер женщине
Мы должны рассмотреть каждую часть бюстгальтера, чтобы проверить, хорошо ли он сидит. Эти части включают чашки, пояс, бретельки, каркас и центральная часть (скрепляет чашки).
В приведенной ниже таблице объясняется, как выбрать бюстгальтер, который хорошо сидит, и как узнать, что он сидит плохо.
Свайп ↔
| Хорошо сидит | Плохо сидит | Примечание | |
| Пояс | Комфортно сидит и не сползает ни спереди, ни сзади. | Сползает спереди или сзади и настолько тесен, что вызывает дискомфорт. | Пояс, который хорошо сидит, может оставлять красные следы. И это нормально, пока это не причиняет боль. Если чашечки слишком малы, вам может показаться, что ремешок слишком тугой. Чтобы убедиться, что пояс сидит хорошо, вы можете надеть бюстгальтер любым способом: задом наперед или вверх ногами, при условии, что ваша грудь не находится в чашках. |
| Чашки | Ваша грудь заполняет чашечки, не выпирает из них. | Ваша грудь сдавливается или выпячивается с любой стороны чашечек, создавая так называемую «боковую грудь». | Плохая посадка бюстгальтера может быть результатом плохой формы или неправильного размера чашек. Чтобы узнать, что с вашим бюстгальтером, наденьте ту же модель на один размер больше или меньше. Если проблема была с размером, она должна исчезнуть или стать меньше; в противном случае, это, вероятно, проблема формы. |
| Бретельки | Они не причиняют боль и не соскальзывают с плеч. | Они причиняют боль или соскальзывают с плеч. | Даже если вы выбрали бюстгальтер подходящего размера, его бретельки все равно могут соскользнуть, если у вас покатые или узкие плечи. В этом случае для решения проблемы вам может понадобиться специальный зажим/клипса для бретелей. |
| Центральная часть | Удобно лежит на грудной кости. | Свободно свисает над грудной костью. | Иногда центральная часть плохо прилегает к груди, даже если бюстгальтер хороший. Как правило, это происходит, если у женщины слишком близко посаженная грудь или при определенных скелетных аномалиях передней грудной стенки (так называемая впалая грудь). В первом случае лучше носить бюстгальтеры с U-образным вырезом или любой другой конструкции с более низким декольте. Однако в случае с впалой грудью вам, возможно, придется привыкать жить со свободно свисающей центральной частью. |
| Каркасы | Они прилегают к месту, где грудь соединяется с грудной клеткой. | Они настолько свободные, что остается место внутри. Или они слишком узкие и впиваются в грудь или упираются ниже положенного. |
Таблица размеров пояса бюстгальтера для женщин
В разных системах измерения шаги размеров (5 см и 2 дюйма) не совпадают, в результате чего возникают смещения. Кроме того, чем больше размер груди, тем более выраженными становятся различия.
Приведенная ниже таблица поможет женщинам учесть эти различия и преобразовать размеры поясов лифчика во французские, американские, британские, итальянские или другие региональные эквиваленты.
| СМ | 57.5 | 62.5 | 67.5 | 72.5 | 77.5 | 82.5 | 87.5 | 92.5 | 97.5 | 102.5 | 107.5 | 112.5 | 117.5 | 122.5 | 127.5 | 132.5 | 137.5 | 142.5 | 147.5 | 152.5 | 157.5 | 162.5 | 167.5 | 172.5 | |
|---|---|---|---|---|---|---|---|---|---|---|---|---|---|---|---|---|---|---|---|---|---|---|---|---|---|
| Международный RU/EU/JP/KO |
60 | 65 | 70 | 75 | 80 | 85 | 90 | 95 | 100 | 105 | 110 | 115 | 120 | 125 | 130 | 135 | 140 | 145 | 150 | 155 | 160 | 165 | 170 | 175 | |
| FR/ES/BE | 75 | 80 | 85 | 90 | 95 | 100 | 105 | 110 | 115 | 120 | 125 | 130 | 135 | 140 | 145 | 150 | 155 | 160 | 165 | 170 | 175 | 180 | 185 | 190 | |
| IT | 0 | 1 | 2 | 3 | 4 | 5 | 6 | 7 | 8 | 9 | 10 | 11 | 12 | 13 | 14 | 15 | 16 | 17 | 18 | 19 | 20 | 21 | 22 | 23 | |
| AU/NZ | 6 | 8 | 10 | 12 | 14 | 16 | 18 | 20 | 22 | 24 | 26 | 28 | 30 | 32 | 34 | 36 | 38 | 40 | 42 | 44 | 46 | 48 | 50 | 52 |
| US+4/UK+4 | 28 | 30 | 32 | 34 | 36 | 38 | 40 | 42 | 44 | 46 | 48 | 50 | 52 | 54 | 56 | 58 | 60 | 62 | 64 | 66 | 68 | 70 | 72 | |
|---|---|---|---|---|---|---|---|---|---|---|---|---|---|---|---|---|---|---|---|---|---|---|---|---|
| US+0/UK+0 | 24 | 26 | 28 | 30 | 32 | 34 | 36 | 38 | 40 | 42 | 44 | 46 | 48 | 50 | 52 | 54 | 56 | 58 | 60 | 62 | 64 | 66 | 68 | |
| дюймы | 23 | 25 | 27 | 29 | 31 | 33 | 35 | 37 | 39 | 41 | 43 | 45 | 47 | 49 | 51 | 53 | 55 | 57 | 59 | 61 | 63 | 65 | 67 |
Таблица соответствия размеров чашек лифчика по буквам

Когда дело доходит до размеров чашки, различия между системами измерения, со всеми перекрытиями и смещениями, даже важнее учитывать, чем в случае с размерами пояса.
Особенно это касается чашек размером больше D.
Вы найдете множество таблиц преобразования в интернете, но большинство из них игнорируют этот фактор и по этой причине показывают неточное соответствие. Вот почему мы решили включить сюда таблицу для более точного сравнения российских, международных, европейских, американских и других систем измерения размеров чашек.
Мы настоятельно рекомендуем вам использовать приведенную ниже таблицу вместо приблизительных и ошибочных таблиц, которые вы можете найти в интернете в изобилии.
| СМ | 0 | 2 | 4 | 6 | 8 | 10 | 12 | 14 | 16 | 18 | 20 | 22 | 24 | 26 | 28 | 30 | 32 | 34 | 36 | 40 | 42 | 44 | 46 | 48 | 50 | 52 | 54 | 56 | 58 | 60 | 62 | 64 | 66 | 68 | 70 | 72 | 74 | 76 | |
|---|---|---|---|---|---|---|---|---|---|---|---|---|---|---|---|---|---|---|---|---|---|---|---|---|---|---|---|---|---|---|---|---|---|---|---|---|---|---|---|
| Международный RU/EU/FR/ES/BE/IT |
AA | A | B | C | D | E | F | G | H | I | J | K | L | M | N | O | P | Q | R | S | T | U | V | W | X | Y | Z | ||||||||||||
| AU/NZ | AA | A | B | C | D | DD | E | F | G | H | I | J | K | L | M | N | O | P | Q | R | S | T | U | V | W | X | Y | Z |
| JP/KO | AA | A | B | C | D | E | F | G | H | I | J | K | L | M | N | O | P | Q | R | S | T | U | V | W | X | Y | Z |
|---|
| US+0 | AA | A | B | C | D | DD/E | DDD/F | DDDD/G | H | I | J | K | L | M | N | O | P | Q | R | ||||||||||||
|---|---|---|---|---|---|---|---|---|---|---|---|---|---|---|---|---|---|---|---|---|---|---|---|---|---|---|---|---|---|---|---|
| UK+0 | AA | A | B | C | D | DD | E | F | FF | G | GG | H | HH | J | JJ | K | KK | L | LL | M | MM | N | NN | P | PP | Q | |||||
| US+4 | AA | A | B | C | D | DD/E | DDD/F | DDDD/G | H | I | J | K | L | M | N | O | P | Q | R | ||||||||||||
| UK+4 | AA | A | B | C | D | DD | E | F | FF | G | GG | H | HH | J | JJ | K | KK | L | LL | M | MM | N | NN | P | PP | Q | |||||
| дюймы | 0 | 1 | 2 | 3 | 4 | 5 | 6 | 7 | 8 | 9 | 10 | 11 | 12 | 13 | 14 | 15 | 16 | 17 | 18 | 19 | 20 | 21 | 22 | 23 | 24 | 25 | 26 | 27 | 28 | 30 |
![]()
Download Article
![]()
Download Article
Believe it or not, at least 80% of women wear an incorrectly sized bra! Most people wear a bra too large in the back and too small in the cups. Although sizing can vary slightly between brands, all follow a basic measurement system that you can use to measure your bra size in the comfort of your own home.
-

1
Measure your band size. This is the easiest part of the process — your band size should be fairly stable and straightforward.[1]
- Run a tape measure all the way around your body just underneath your breasts and take a measurement in inches.[2]
Make sure the tape measure is horizontal and fairly snug. Your arms should be down. Write down this number. - If this measurement is an odd number, then you should try out bras in both the size below your measurement and the size above. [3]
For example, if you measured 31 inches (78.7cm), your band size could be 30 or 32. - If your measurement is already an even number, this is almost always your band size, but you may need a smaller or larger size depending on your body type. For example, if your band size is smaller than 28, you may want to go up a band size since these sizes run quite tight. If you do this, you should go down a cup size so your cups will have the same volume (known as a ‘sister size’). So if you are a 26C, you may find a 28B is more comfortable.
- Run a tape measure all the way around your body just underneath your breasts and take a measurement in inches.[2]
-
2
Determine your cup size. Remember, your cup size isn’t an absolute measure — it’s in proportion to your band size.[4]
- Bend over so that your chest is parallel to the ground. This is so that you’ll be measuring all of your breast tissue — not just what protrudes outward when you’re standing up.
- Measure around your torso, so that the tape is over the fullest part of your breasts.[5]
Don’t pull the tape too tightly — it should be tight enough that it doesn’t evenly move, but not so tight that’s pressing into your breast tissue. Write down the number. - Make sure your tape measure is level to the ground. It shouldn’t be a few inches down your back, or you’ll end up with an uneven measurement. To combat this, try to measure yourself in front of a mirror, or ask your partner or close friend to help you.
- Calculate your cup size. To do this, you’ll subtract your band measurement from the cup measurement you just took. The difference between the two numbers determines your cup size:
- Less than 1 inch (2.5 cm) = AA
- 1 inch (2.5 cm) = A
- 2 inches (5 cm) = B
- 3 inches (7.5 cm) = C
- 4 inches (10 cm) = D
- 5 inches (12.5 cm) = DD
- 6 inches (15 cm) = DDD (E in UK sizing)
- 7 inches (18 cm) = DDDD/F (F in UK sizing)
- 8 inches (20.5 cm) = G/H (FF in UK sizing)
- 9 inches (23 cm) = I/J (G in UK sizing)
- 10 inches (25.5 cm) = J (GG in UK sizing)
- The majority of leading brands use UK cup sizing: AA, A, B, C, D, DD, E, F, FF, G, GG, H, HH, J, JJ, K, KK, L, LL. If you’re shopping in the US you might see cup sizes such as DDD or DDDD. These are equivalent to E and F. If you’re in any doubt, particularly with larger cup sizes, you can refer to an international bra sizing chart.


-
1
Know that cup size is not absolute. This is the biggest myth about bra sizes: that a D cup looks the same on every band size, or that having small breasts automatically means you’re an A cup. Actually, cup size is proportional to band size — meaning it’s dependent on your band measurement. For instance, a 32 D will fill out less volume than a 36 D, but they’re both D cups. The cup size (the letter) is determined by the difference between your underbust and bust measurements. A 32D would mean you have a 32 inch underbust and a 36 inch bust, whereas a 32A would mean you have a 32 inch underbust and a 33 inch bust. [6]
-
2
Understand how a correctly fitted bra should look and feel. There are a few tell-tale signs that indicate whether or not a bra fits you. Here’s what to keep an eye out for as you’re measuring yourself and trying on different sizes:[7]
- A snug band: The band is what should do the majority of the work supporting your breasts, not the straps. You should be able to put one or two fingers under the band, but no more. Straps falling off your shoulders or your band riding up are signs you need a smaller band; straps digging into your shoulders can be a sign it is too small.
- Sufficient side coverage: You shouldn’t have any tissue coming out from the sides of the cups, beneath your armpits. On an underwire bra, you can assess side coverage with the underwire: if the end of it is pointing toward the middle of your armpit, you’re good to go.
- A flat gore: The gore (the part of the bra band that’s between the cups) should sit flat against your chest, without digging into your skin uncomfortably. If it doesn’t, you’re wearing the wrong bra.
- A smooth curve: Avoid the dreaded «quad-boob» that results from the top of a too-small cup cutting into breast tissue above the bra. Instead, look for a fit that results in a clean silhouette with no stray tissue.
-
3
Be aware of different breast shapes. So what happens if you find a bra in your size, but it still fits wrong? You’re probably not picking the right bra cut for your breast shape. Try these solutions to common shape issues:[8]
- Shallow breasts: If your breast tissue is evenly spread over a wider area, with less projection, you probably have a shallow shape. (Another tell-tale sign: having breast tissue near your collarbones despite being relatively small-busted.) Shallow breasts fit best in balconette or demi-cup bras, with a cup that’s open on top and cut horizontally. Avoid plunge styles.
- Pendulous or tuberous breasts: If the base of your breast is relatively narrow, but the actual tissue hangs down quite a bit, don’t despair! Instead, look for bras that have underwires, well-separated cups and fuller breast coverage. Avoid demi cups and plunge bras.
-
4
Know about sister sizes. If you find a bra that’s close to a perfect fit but not quite there, try a sister size. It might provide just enough variation to correct the slight differences between manufacturers.[9]
- Go down a sister size: Reduce your band size by two, but take your cup size up one interval. For instance, you might go from a 36 C to a 34 D.
- Go up a sister size: Increase your band size by two, but go down one cup size. For instance, you might go from a 36 C to a 38 B.
- Once you find your true bra size, some women may still chose a sister size in certain scenarios, such as with a difficult to find bra size. If you chose to do this, know that going up or down by more than one size usually results in a band that is much too large or too small.
-
5
Navigate different fitting styles. Currently, there are two different bra fitting styles (outlined below). The modern measurement is being adopted by more manufacturers, though some still use the traditional style. Unfortunately, it’s difficult to know which system individual designers and labels use. Here’s how to hedge your bets:[10]
- If you’re trying on bras in a store, it’s a good idea to know what your size is for both styles.
- If you’re ordering online, try to find a site that has a flexible return policy.
-
6
Be wary of professional fittings. Asking for a seasoned professional to measure you is a great idea if you’re starting from square one — she’ll probably be able to suggest cuts and styles that could work for you. However, being fitted comes with a few caveats:
- Avoid stores that carry a limited range. A fitter at one of these shops might try to incorrectly sell you a size that they have on-hand, instead of your true size. Before you commit to a fitting, make sure the store carries smaller band sizes (such as 28 and 30) and larger cups (DDD and up). Good choices in the US include department stores like Nordstrom and Dillard’s.
- Ask to be fitted with both measurement systems. That way, you have an idea of what size to try if one style produces a completely wrong fit.
- Don’t leave your current bra on. If your fitter tries to measure you with your bra still on, it’s probably not going to be the correct measurement. If you’re concerned about modesty, wear a thin but close-fitting tank top to your fitting, and simply remove the bra underneath.


-
1
Try on a bra with the band and cup size you’ve arrived at in these steps. You should not regard this as your definitive size until you have tried on a few bras, and even then you will often find you need a different size in different brands or styles of bra.
-
2
Put on the bra correctly. Known as the «scoop and swoop,» this is a more correct way to make sure all of your breast tissue is in the bra:[11]
- After taking the bra off its hanger the shoulder straps will need to be lengthened. Put your arms through them and lean forward slightly so that your bust falls into the cups.
- Fasten the bra on the largest set of hooks and eyes. Don’t worry if it’s tricky to fasten, if you’re trying a smaller back size you will notice that you need to stretch it around you to make the hooks and eyes meet.
- Still leaning forward, take hold of the underwires and give them a wiggle from side to side to make sure you’re settled comfortably into the cups.
- For each side in turn, slip your hand into the side of the cup and lift each breast towards the centre.
- You will probably have to adjust the length of the shoulder straps. Slip them off your shoulders and adjust the sliders so that the straps are short enough to stay in place but don’t cut in.
-
3
Check the band size. The correct band size is the smallest you can comfortably wear. (This might be smaller than your underbust measurement-bra bands are quite stretchy, especially at 42+.) It needs to be firm enough that the bra is still fairly supportive without weighing down heavily on the shoulder straps.[12]
- You should be able to run your fingers around the inside of the band, but not much more. A good rule of thumb is that you should be able to fit no more than a fist under the back of the bra where your spine is at.
- It should fit on the biggest adjustment, but will probably be too tight if you try to fasten it on the smallest size. Bras are designed to fit like this so that you can tighten the band as the elastic starts to wear out.
- If the band is roomy enough for you to be able to comfortably fasten it on the tightest adjustment, try a smaller band, for example if a 32D is too loose, try a 30DD. Remember that the cup size has to be changed when you move to a different band size — for every band you go down, you must go up by one cup size in order for the cups to remain the same capacity and vice versa.
- If you find the band painfully tight you should try going up a cup size because too small of cups can make a band which is too big or the right size seem ill fitting. If going up a size, maybe even several does not work, then try going a band up and a cup down, e.g. 28G to 30FF. However, try the first method before the latter.
-
4
Check the cup size. The correct cup size should be completely filled out with no wrinkling of the fabric or space in the cups, but any spillage or «double boob» means the cup size is too small, even in low cut or pushup bras.[13]
- Check around the cups for any bulging, not only at the front but also at the sides under your arms.
- Make sure the underwire encloses your whole breast and lies flat against your rib cage.
- Check at the sides under your arms to make sure the underwires are sitting on your ribs, not on soft breast tissue. If they’re cutting into the sides of your breasts then you need a larger cup size. Also be aware that if you have been wearing a bra with a too big band and too small cups, you may have ended up with migrated tissue, which will seem to be armpit rolls, or back rolls. This can be fixed after getting a well fitting bra.
- If the underwires are pressing painfully against your breastbone at the centre front you may need a smaller cup size or you could try a plunge style with a lower centre front (this is more likely to be an issue with the cups than the band.) Or you might just be human, and it’s the shaping of your ribcage. In that case, wait for the bra to be «broken in» and see how it fits then, or go with the lower centre front.
- If you think the cups might be too small but you’re not sure, try on a bigger cup size as well to double check. It will usually be obvious if the smaller size fits better.
-
5
See how it looks with your top on. You’ve found a new bra that fits well, maybe in a different size or style to the ones you’re used to. Now it’s time to see what it does for your figure! If you’re trying a t-shirt bra it’s also important to make sure it gives you a smooth line under fitted clothes.
- If you look side on to the mirror, you should be able to see that your bust is approximately halfway between your elbow and your shoulder.
- In a well fitting bra, your bustline will be supported at the right level. A lot of people find that their clothes fit a lot better, and they discover a waist that could never be seen before! If your bustline had previously been quite low because of a poorly supporting bra, you may even find that you need to wear a smaller dress size.
- A fitted t-shirt will show up any bulges from cups which are too small, and likewise a moulded bra that is not filled out will show lines at the bust where the edge of the cups are visible. It’s also useful to make sure that the colour of your bra is not showing through a thin or light coloured top — if you need to make your bra invisible, go for seamless cups which match your own skin colour rather than the colour of your top.
- It is a common concern that wearing a smaller band size will make a big bulge around your back. However, these bulges are actually caused by the back of the bra riding up when it is too large. You should find that when the band sits lower at the back, it fits firmly and remains horizontal, rather than pushing upwards creating a bulge.


-
1
Measure your band size. Wrap a tape measure around your ribcage, just beneath where your breast tissue ends. Then:[14]
- If the measurement is even: Add 4 inches (10 centimeters).
- If the measurement is odd: Add 5 inches (12.5 centimeters).
- Be aware that most brands no longer use this band measurement system. The «add four» method was popularized by Warners in the 1930s when bra design was in its infancy and it simply doesn’t work with modern bras.[15]
Still, it’s good to be aware that it’s out there.
-
2
Measure your cup size. Stay standing up, and wrap the tape measure around the fullest part of your breasts. (Keep the tape as horizontal as possible — make sure that it’s not sagging around your back.) Subtract your band size from this new number to calculate your cup size:[16]
- Less than 1 inch = AA
- 1 inch (2.5 cm) = A
- 2 inches (5 cm) = B
- 3 inches (7.5 cm) = C
- 4 inches (10 cm) = D
- 5 inches (12.5 cm) = DD
- 6 inches (15 cm) = DDD (E in UK sizing)
- 7 inches (18 cm) = DDDD/F (F in UK sizing)
- 8 inches (20.5) = G/H (FF in UK sizing)
- 9 inches (23 cm) = I/J (G in UK sizing)
- 10 inches (25.5 cm) = J (GG in UK sizing)


Add New Question
-
Question
How do I measure my bust for a dress?

Kpoene Kofi-Bruce is a tailor, couture wedding gown designer, and the Creative Director of Mignonette Bridal and Ette the Wedding Tailor in Chicago, Illinois. With nearly two decades of experience as a wedding gown designer, small business owner, and vintage sewing enthusiast, Kpoene specializes in wedding gown design and the social history of wedding dresses. She received a BA in Creative Writing from Middlebury College and studied the business of fashion at the Fashion Institute of Technology. She is also a graduate of the Goldman Sachs 10KSB program and the Chicago Fashion Incubator and has written about wedding fashion for Jezebel, Catalyst, the Sun Times, and XO Jane.
Wear a bra that is unpadded and measure above your bust (the tape will be in your armpits), at the fullest part of your bust, and then below your bust.
-
Question
I’m 12 and I have to figure out this whole bra fitting thing myself. Is it normal to be a B cup at my age?
Yes, that is certainly possible.
-
Question
How do I measure my bra size without a flexible measuring tape?
Get a ribbon and mark your measurements, then you can measure the ribbon with a yardstick or steel tape measure.

See more answers
Ask a Question
200 characters left
Include your email address to get a message when this question is answered.
Submit
-
If you want your bras to last and keep their fit, never wear the same bra two days in a row, even if it has been washed. You should have at least three bras which you can wash and wear in rotation, allowing the elastic to fully recover before it is put under stress again.
-
A well-fitted bra should provide 90 percent of the support from the band, and the straps the remaining 10 percent.
-
Do not expect to need the same size in every style of bra, or to able to buy any bra in your «true size» without having to try it on. Different styles will suit different breast shapes, so two women who wear the same size in one bra might need different sizes in another bra.
Show More Tips
Things You’ll Need
- Soft tape measure
- Bras to try on
References
About This Article
Article SummaryX
To measure your bra size, first stand in front of a mirror with a non-padded bra on. Then, wrap some soft measuring tape around your torso directly under your bust, where your bra band is. If this measurement is even, add 4 to get your band size. If it’s odd, add 5 instead. Next, measure loosely around the fullest part of your bust. Make sure the measuring tape is level with the ground. Once you have both numbers, subtract your band size from the cup measurement you took to get your cup size. If the difference is less than 1 inch (2 1/2 cm), your cup size is AA. If the difference is 1 inch (2 1/2 cm), your cup size is A. Two inches (5 cm) is B, 3 inches (7 1/2 cm) is C, 4 inches (10 cm) is D, 5 inches (12 1/2 cm) if DD, 6 inches (15 cm) is F, and 7 inches (18 cm) is G. To learn what cup size you are based on the measurement you got, scroll down!
Did this summary help you?
Thanks to all authors for creating a page that has been read 7,663,718 times.
Reader Success Stories
-

Cary Collins
Apr 19, 2018
«Like many women, I’ve had a terrible time figuring out my correct bra size. One thing I learned from your article…» more
Did this article help you?
![]()
Download Article
![]()
Download Article
Believe it or not, at least 80% of women wear an incorrectly sized bra! Most people wear a bra too large in the back and too small in the cups. Although sizing can vary slightly between brands, all follow a basic measurement system that you can use to measure your bra size in the comfort of your own home.
-
1
Measure your band size. This is the easiest part of the process — your band size should be fairly stable and straightforward.[1]
- Run a tape measure all the way around your body just underneath your breasts and take a measurement in inches.[2]
Make sure the tape measure is horizontal and fairly snug. Your arms should be down. Write down this number. - If this measurement is an odd number, then you should try out bras in both the size below your measurement and the size above. [3]
For example, if you measured 31 inches (78.7cm), your band size could be 30 or 32. - If your measurement is already an even number, this is almost always your band size, but you may need a smaller or larger size depending on your body type. For example, if your band size is smaller than 28, you may want to go up a band size since these sizes run quite tight. If you do this, you should go down a cup size so your cups will have the same volume (known as a ‘sister size’). So if you are a 26C, you may find a 28B is more comfortable.
- Run a tape measure all the way around your body just underneath your breasts and take a measurement in inches.[2]
-
2
Determine your cup size. Remember, your cup size isn’t an absolute measure — it’s in proportion to your band size.[4]
- Bend over so that your chest is parallel to the ground. This is so that you’ll be measuring all of your breast tissue — not just what protrudes outward when you’re standing up.
- Measure around your torso, so that the tape is over the fullest part of your breasts.[5]
Don’t pull the tape too tightly — it should be tight enough that it doesn’t evenly move, but not so tight that’s pressing into your breast tissue. Write down the number. - Make sure your tape measure is level to the ground. It shouldn’t be a few inches down your back, or you’ll end up with an uneven measurement. To combat this, try to measure yourself in front of a mirror, or ask your partner or close friend to help you.
- Calculate your cup size. To do this, you’ll subtract your band measurement from the cup measurement you just took. The difference between the two numbers determines your cup size:
- Less than 1 inch (2.5 cm) = AA
- 1 inch (2.5 cm) = A
- 2 inches (5 cm) = B
- 3 inches (7.5 cm) = C
- 4 inches (10 cm) = D
- 5 inches (12.5 cm) = DD
- 6 inches (15 cm) = DDD (E in UK sizing)
- 7 inches (18 cm) = DDDD/F (F in UK sizing)
- 8 inches (20.5 cm) = G/H (FF in UK sizing)
- 9 inches (23 cm) = I/J (G in UK sizing)
- 10 inches (25.5 cm) = J (GG in UK sizing)
- The majority of leading brands use UK cup sizing: AA, A, B, C, D, DD, E, F, FF, G, GG, H, HH, J, JJ, K, KK, L, LL. If you’re shopping in the US you might see cup sizes such as DDD or DDDD. These are equivalent to E and F. If you’re in any doubt, particularly with larger cup sizes, you can refer to an international bra sizing chart.
-
1
Know that cup size is not absolute. This is the biggest myth about bra sizes: that a D cup looks the same on every band size, or that having small breasts automatically means you’re an A cup. Actually, cup size is proportional to band size — meaning it’s dependent on your band measurement. For instance, a 32 D will fill out less volume than a 36 D, but they’re both D cups. The cup size (the letter) is determined by the difference between your underbust and bust measurements. A 32D would mean you have a 32 inch underbust and a 36 inch bust, whereas a 32A would mean you have a 32 inch underbust and a 33 inch bust. [6]
-
2
Understand how a correctly fitted bra should look and feel. There are a few tell-tale signs that indicate whether or not a bra fits you. Here’s what to keep an eye out for as you’re measuring yourself and trying on different sizes:[7]
- A snug band: The band is what should do the majority of the work supporting your breasts, not the straps. You should be able to put one or two fingers under the band, but no more. Straps falling off your shoulders or your band riding up are signs you need a smaller band; straps digging into your shoulders can be a sign it is too small.
- Sufficient side coverage: You shouldn’t have any tissue coming out from the sides of the cups, beneath your armpits. On an underwire bra, you can assess side coverage with the underwire: if the end of it is pointing toward the middle of your armpit, you’re good to go.
- A flat gore: The gore (the part of the bra band that’s between the cups) should sit flat against your chest, without digging into your skin uncomfortably. If it doesn’t, you’re wearing the wrong bra.
- A smooth curve: Avoid the dreaded «quad-boob» that results from the top of a too-small cup cutting into breast tissue above the bra. Instead, look for a fit that results in a clean silhouette with no stray tissue.
-
3
Be aware of different breast shapes. So what happens if you find a bra in your size, but it still fits wrong? You’re probably not picking the right bra cut for your breast shape. Try these solutions to common shape issues:[8]
- Shallow breasts: If your breast tissue is evenly spread over a wider area, with less projection, you probably have a shallow shape. (Another tell-tale sign: having breast tissue near your collarbones despite being relatively small-busted.) Shallow breasts fit best in balconette or demi-cup bras, with a cup that’s open on top and cut horizontally. Avoid plunge styles.
- Pendulous or tuberous breasts: If the base of your breast is relatively narrow, but the actual tissue hangs down quite a bit, don’t despair! Instead, look for bras that have underwires, well-separated cups and fuller breast coverage. Avoid demi cups and plunge bras.
-
4
Know about sister sizes. If you find a bra that’s close to a perfect fit but not quite there, try a sister size. It might provide just enough variation to correct the slight differences between manufacturers.[9]
- Go down a sister size: Reduce your band size by two, but take your cup size up one interval. For instance, you might go from a 36 C to a 34 D.
- Go up a sister size: Increase your band size by two, but go down one cup size. For instance, you might go from a 36 C to a 38 B.
- Once you find your true bra size, some women may still chose a sister size in certain scenarios, such as with a difficult to find bra size. If you chose to do this, know that going up or down by more than one size usually results in a band that is much too large or too small.
-
5
Navigate different fitting styles. Currently, there are two different bra fitting styles (outlined below). The modern measurement is being adopted by more manufacturers, though some still use the traditional style. Unfortunately, it’s difficult to know which system individual designers and labels use. Here’s how to hedge your bets:[10]
- If you’re trying on bras in a store, it’s a good idea to know what your size is for both styles.
- If you’re ordering online, try to find a site that has a flexible return policy.
-
6
Be wary of professional fittings. Asking for a seasoned professional to measure you is a great idea if you’re starting from square one — she’ll probably be able to suggest cuts and styles that could work for you. However, being fitted comes with a few caveats:
- Avoid stores that carry a limited range. A fitter at one of these shops might try to incorrectly sell you a size that they have on-hand, instead of your true size. Before you commit to a fitting, make sure the store carries smaller band sizes (such as 28 and 30) and larger cups (DDD and up). Good choices in the US include department stores like Nordstrom and Dillard’s.
- Ask to be fitted with both measurement systems. That way, you have an idea of what size to try if one style produces a completely wrong fit.
- Don’t leave your current bra on. If your fitter tries to measure you with your bra still on, it’s probably not going to be the correct measurement. If you’re concerned about modesty, wear a thin but close-fitting tank top to your fitting, and simply remove the bra underneath.
-
1
Try on a bra with the band and cup size you’ve arrived at in these steps. You should not regard this as your definitive size until you have tried on a few bras, and even then you will often find you need a different size in different brands or styles of bra.
-
2
Put on the bra correctly. Known as the «scoop and swoop,» this is a more correct way to make sure all of your breast tissue is in the bra:[11]
- After taking the bra off its hanger the shoulder straps will need to be lengthened. Put your arms through them and lean forward slightly so that your bust falls into the cups.
- Fasten the bra on the largest set of hooks and eyes. Don’t worry if it’s tricky to fasten, if you’re trying a smaller back size you will notice that you need to stretch it around you to make the hooks and eyes meet.
- Still leaning forward, take hold of the underwires and give them a wiggle from side to side to make sure you’re settled comfortably into the cups.
- For each side in turn, slip your hand into the side of the cup and lift each breast towards the centre.
- You will probably have to adjust the length of the shoulder straps. Slip them off your shoulders and adjust the sliders so that the straps are short enough to stay in place but don’t cut in.
-
3
Check the band size. The correct band size is the smallest you can comfortably wear. (This might be smaller than your underbust measurement-bra bands are quite stretchy, especially at 42+.) It needs to be firm enough that the bra is still fairly supportive without weighing down heavily on the shoulder straps.[12]
- You should be able to run your fingers around the inside of the band, but not much more. A good rule of thumb is that you should be able to fit no more than a fist under the back of the bra where your spine is at.
- It should fit on the biggest adjustment, but will probably be too tight if you try to fasten it on the smallest size. Bras are designed to fit like this so that you can tighten the band as the elastic starts to wear out.
- If the band is roomy enough for you to be able to comfortably fasten it on the tightest adjustment, try a smaller band, for example if a 32D is too loose, try a 30DD. Remember that the cup size has to be changed when you move to a different band size — for every band you go down, you must go up by one cup size in order for the cups to remain the same capacity and vice versa.
- If you find the band painfully tight you should try going up a cup size because too small of cups can make a band which is too big or the right size seem ill fitting. If going up a size, maybe even several does not work, then try going a band up and a cup down, e.g. 28G to 30FF. However, try the first method before the latter.
-
4
Check the cup size. The correct cup size should be completely filled out with no wrinkling of the fabric or space in the cups, but any spillage or «double boob» means the cup size is too small, even in low cut or pushup bras.[13]
- Check around the cups for any bulging, not only at the front but also at the sides under your arms.
- Make sure the underwire encloses your whole breast and lies flat against your rib cage.
- Check at the sides under your arms to make sure the underwires are sitting on your ribs, not on soft breast tissue. If they’re cutting into the sides of your breasts then you need a larger cup size. Also be aware that if you have been wearing a bra with a too big band and too small cups, you may have ended up with migrated tissue, which will seem to be armpit rolls, or back rolls. This can be fixed after getting a well fitting bra.
- If the underwires are pressing painfully against your breastbone at the centre front you may need a smaller cup size or you could try a plunge style with a lower centre front (this is more likely to be an issue with the cups than the band.) Or you might just be human, and it’s the shaping of your ribcage. In that case, wait for the bra to be «broken in» and see how it fits then, or go with the lower centre front.
- If you think the cups might be too small but you’re not sure, try on a bigger cup size as well to double check. It will usually be obvious if the smaller size fits better.
-
5
See how it looks with your top on. You’ve found a new bra that fits well, maybe in a different size or style to the ones you’re used to. Now it’s time to see what it does for your figure! If you’re trying a t-shirt bra it’s also important to make sure it gives you a smooth line under fitted clothes.
- If you look side on to the mirror, you should be able to see that your bust is approximately halfway between your elbow and your shoulder.
- In a well fitting bra, your bustline will be supported at the right level. A lot of people find that their clothes fit a lot better, and they discover a waist that could never be seen before! If your bustline had previously been quite low because of a poorly supporting bra, you may even find that you need to wear a smaller dress size.
- A fitted t-shirt will show up any bulges from cups which are too small, and likewise a moulded bra that is not filled out will show lines at the bust where the edge of the cups are visible. It’s also useful to make sure that the colour of your bra is not showing through a thin or light coloured top — if you need to make your bra invisible, go for seamless cups which match your own skin colour rather than the colour of your top.
- It is a common concern that wearing a smaller band size will make a big bulge around your back. However, these bulges are actually caused by the back of the bra riding up when it is too large. You should find that when the band sits lower at the back, it fits firmly and remains horizontal, rather than pushing upwards creating a bulge.
-
1
Measure your band size. Wrap a tape measure around your ribcage, just beneath where your breast tissue ends. Then:[14]
- If the measurement is even: Add 4 inches (10 centimeters).
- If the measurement is odd: Add 5 inches (12.5 centimeters).
- Be aware that most brands no longer use this band measurement system. The «add four» method was popularized by Warners in the 1930s when bra design was in its infancy and it simply doesn’t work with modern bras.[15]
Still, it’s good to be aware that it’s out there.
-
2
Measure your cup size. Stay standing up, and wrap the tape measure around the fullest part of your breasts. (Keep the tape as horizontal as possible — make sure that it’s not sagging around your back.) Subtract your band size from this new number to calculate your cup size:[16]
- Less than 1 inch = AA
- 1 inch (2.5 cm) = A
- 2 inches (5 cm) = B
- 3 inches (7.5 cm) = C
- 4 inches (10 cm) = D
- 5 inches (12.5 cm) = DD
- 6 inches (15 cm) = DDD (E in UK sizing)
- 7 inches (18 cm) = DDDD/F (F in UK sizing)
- 8 inches (20.5) = G/H (FF in UK sizing)
- 9 inches (23 cm) = I/J (G in UK sizing)
- 10 inches (25.5 cm) = J (GG in UK sizing)
Add New Question
-
Question
How do I measure my bust for a dress?
Kpoene Kofi-Bruce is a tailor, couture wedding gown designer, and the Creative Director of Mignonette Bridal and Ette the Wedding Tailor in Chicago, Illinois. With nearly two decades of experience as a wedding gown designer, small business owner, and vintage sewing enthusiast, Kpoene specializes in wedding gown design and the social history of wedding dresses. She received a BA in Creative Writing from Middlebury College and studied the business of fashion at the Fashion Institute of Technology. She is also a graduate of the Goldman Sachs 10KSB program and the Chicago Fashion Incubator and has written about wedding fashion for Jezebel, Catalyst, the Sun Times, and XO Jane.
Wear a bra that is unpadded and measure above your bust (the tape will be in your armpits), at the fullest part of your bust, and then below your bust.
-
Question
I’m 12 and I have to figure out this whole bra fitting thing myself. Is it normal to be a B cup at my age?
Yes, that is certainly possible.
-
Question
How do I measure my bra size without a flexible measuring tape?
Get a ribbon and mark your measurements, then you can measure the ribbon with a yardstick or steel tape measure.
See more answers
Ask a Question
200 characters left
Include your email address to get a message when this question is answered.
Submit
-
If you want your bras to last and keep their fit, never wear the same bra two days in a row, even if it has been washed. You should have at least three bras which you can wash and wear in rotation, allowing the elastic to fully recover before it is put under stress again.
-
A well-fitted bra should provide 90 percent of the support from the band, and the straps the remaining 10 percent.
-
Do not expect to need the same size in every style of bra, or to able to buy any bra in your «true size» without having to try it on. Different styles will suit different breast shapes, so two women who wear the same size in one bra might need different sizes in another bra.
Show More Tips
Things You’ll Need
- Soft tape measure
- Bras to try on
References
About This Article
Article SummaryX
To measure your bra size, first stand in front of a mirror with a non-padded bra on. Then, wrap some soft measuring tape around your torso directly under your bust, where your bra band is. If this measurement is even, add 4 to get your band size. If it’s odd, add 5 instead. Next, measure loosely around the fullest part of your bust. Make sure the measuring tape is level with the ground. Once you have both numbers, subtract your band size from the cup measurement you took to get your cup size. If the difference is less than 1 inch (2 1/2 cm), your cup size is AA. If the difference is 1 inch (2 1/2 cm), your cup size is A. Two inches (5 cm) is B, 3 inches (7 1/2 cm) is C, 4 inches (10 cm) is D, 5 inches (12 1/2 cm) if DD, 6 inches (15 cm) is F, and 7 inches (18 cm) is G. To learn what cup size you are based on the measurement you got, scroll down!
Did this summary help you?
Thanks to all authors for creating a page that has been read 7,663,718 times.
Reader Success Stories
-
Cary Collins
Apr 19, 2018
«Like many women, I’ve had a terrible time figuring out my correct bra size. One thing I learned from your article…» more
Did this article help you?
Каждая женщина знает, насколько неприятно носить бюстгальтер, не подходящий по размеру. Если бретели натирают или спадают, если на коже видны следы сдавливания, или белье приходится постоянно поправлять, то это прямое следствие неправильного подбора размера. Не пытайтесь терпеть неудобство: ошибки при выборе размера вредны для здоровья. Правильно подобранный бюстгальтер сделает грудь не только красивой, но и здоровой.
Содержание
- Как правильно снять мерки
- Как определить размер бюстгальтера по простой таблице
- Как определить размер чашки бюстгальтера
- Размеры бюстгальтеров на обхват груди от 75 до 100 см
- Размеры бюстгальтеров на обхват груди более 100 см
- Как определить размер чашки бюстгальтера
- Калькулятор размеров бюстгальтеров
- Что такое параллельные размеры бюстгальтеров
- Соответствие международным размерам
- Как подобрать форму бюстгальтера
- Как подобрать бюстгальтер по форме груди
- Если грудь круглая
- Если грудь ассиметричная
- Если груди конической формы
- Если грудь совсем маленькая
- Как подобрать бюстгальтеры для маленьких размеров
- Как подобрать бюстгальтер большого размера
- Как подобрать размер бюстгальтера для беременных и кормящих
- Как подобрать спортивный бюстгальтер
- Если бюстгальтер не подходит
Как правильно снять мерки
Для подбора этого предмета туалета важно правильно снять мерки. Делать замеры лучше в удобной модели с мягкой чашкой без вставок. Попросите вам помочь, чтобы расположить ленту для измерений правильно.

Сначала определим обхват под грудью. Для этого встаньте, выпрямите спину, измерьте обхват под молочными железами на вдохе и на выдохе и запишите среднее значение.
Следующее измерение – обхват груди по выступающим точкам. Для снятия этой мерки не поднимайте руки. Держите ленту параллельно полу. Запишите полученные результаты.
Как определить размер бюстгальтера по простой таблице
Предлагаем понятную инструкцию для выбора по буквам и цифрам.
Как определить размер чашки бюстгальтера
Например, у вас по замерам получились значения 92 см и 108 см. Отнимите от большего значения меньшее, и определите размер чашки бюстгальтера по буквам. Считаем так: 108-92=16 см. По таблице находим соответствие – С.

Зная параметры чашки, смотрим в таблице пояс. В нашем примере в строке с размером чашки С ищем наш обхват под грудью, т.е. 92 см. Этому значению соответствует столбец 75. То есть нам нужен 75С. Вот такая простая расшифровка.
Размеры бюстгальтеров на обхват груди от 75 до 100 см

Размеры бюстгальтеров на обхват груди более 100 см

Обратите внимание:
- бюст должен свободно помещаться в чашке, при этом не должно быть пустот, но и выпирать грудь не должна ни сверху, ни с боков;
- при наклонах вперед молочные железы не должны «выпадать» из бюстгальтера так, чтобы его приходилось поправлять;
- бретели бюста не скатываются с плеч при поворотах корпуса и подъемах рук, но и не давят;
- во время примерки застегивайте понравившуюся модель только на самый свободный ряд крючков, при этом обновка должна сидеть надежно;
- если груди отличаются по размеру — подбираем по бОльшей из них.
Калькулятор размеров бюстгальтеров
Размер вашего бюстгальтера (груди):
——
Что такое параллельные размеры бюстгальтеров
Иногда подобранный по замерам бюстгальтер сидит неудобно. В этом случае на помощь придут параллельные размеры. Их также называют взаимозаменяемыми, соседними или смежными.
Посмотрите таблицу ниже. По таблице видно, что размеру 75С из нашего примера, соответствует два смежных размера – 70D и 80В. Возможно, один из них будет лучше смотреться именно на вас. Примерьте, чтобы определить разницу.

Обратите внимание: современные модели бюстгальтеров выполнены из эластичных материалов, не стоит выбирать объем с запасом, иначе при естественном растяжении ткани белье в итоге окажется большим. Наоборот начните примерку с размера пояса чуть меньше измеренного, новая модель должна сидеть идеально, застегнутой на самый крайний ряд крючков. Второй и третий ряд крючков предназначены для утягивания пояса, когда он начнет растягиваться после стирок.
Соответствие международным размерам
Соответствие русских размеров бюстгальтеров европейским (в США и Европе) можно посмотреть на ярлыке, если вещь ввезена из-за границы официально или сшита в России. Также можно использовать нашу таблицу.


Как подобрать форму бюстгальтера
Грудь может быть разной по форме, «подать» ее соблазнительно и красиво поможет нужная форма чашки. Выбор основывается на том, для какой одежды и ситуации покупается белье, а главное — на особенностях фигуры обладательницы.
Классический бюстгальтер сшит из нескольких деталей, подходит для большинства видов бюстов.

Балконет поддерживает снизу, открывая обзору верхнюю часть груди и одновременно приподнимая ее. Подходит для почти соприкасающихся друг с другом молочных желез, и груди типа «колокольчики» (когда соски смотрят вниз). Модели, поддерживающие грудь без бретелек и подходящие для платьев с глубоким декольте и открытыми плечами называют «анжелика».

Планж отличается наличием узкой полоски между чашками. При правильном подборе размера видна соблазнительная ложбинка. Идеален, если соски смотрят в разные стороны (тип «Восток-Запад») и для широко расположенных грудей. Корбей по конструкции похож на планж, отличается только более открытой формой чашечек.

Вандербра по конструкции похож на планж, но сами чашки формованные и более закрытые. Иногда называют «треугольник».

Шельф практически не скрывает формы (открыты даже соски), поддерживает грудь по бокам и снизу. У шельфов очень игривый настрой.

Бюстгальтер-брасье отличается фигурной формой чашечки, покрой очень открытый, что делает грудь визуально больше и соблазнительней. Брасье подходит для малых объемов.

Минимайзеры отлично подходят для пышной груди, придавая и делая ее более компактной на вид. 
Бандо не имеют в конструкции бретелей.

Бралетт — это бюстгальтер без пуш-апа и косточек. Девушки с аккуратной упругой грудью их носят как в качестве нижнего белья, так и вместо топа. Поэтому иногда такую модель так и называют — топ.

Невидимки не имеют бретелей и пояса. Их надевают с платьями с открытой спиной. Иногда невидимками также называют модели с перекрещивающимися на спине лямочками.

Холтер закрывает грудную клетку спереди, имея стандартную конструкцию сзади. Холтер — довольно редкая, но безусловно красивая и элегантная вещь.

Бюстгальтеры с формованной чашкой и гладкой поверхностью создают красивую форму и почти не выделяются под одеждой. Модели с пуш-ап эффектом отличаются наличием вставок, увеличивающих объем чашки и визуально делающих бюст больше.
Как подобрать бюстгальтер по форме груди
Анатомические особенности играют важную роль в подборе: широкая или узкая спина, есть ли проблемы с осанкой, какова упругость и форма груди – всё имеет значение.
Если грудь круглая
В этом случае вам повезло – подойдет практически любой фасон. Можно смело покупать как открытые, так и закрытые чашечки с косточками или без. Ширина бретелей зависит от объема молочных желез: чем больше, тем шире.
Если грудь ассиметричная
Эта ситуация встречается очень часто. Иногда после грудного вскармливания разница в размере становится еще более заметной. Чтобы зрительно сгладить расхождения лучше предпочесть мягкие кружевные или трикотажные чашечки и модели с поддержкой (пуш-ап).
Если груди конической формы
Чаще всего молочные железы принимают форму конуса, если грудь малых размеров. Исправить ситуацию помогут топы в спортивном стиле, лифчики-бандо, модели с вкладышами или пуш-апом. Отлично показали себя чашечки с гелевыми корректорами формы – они формируют идеальные полусферы и очень удобны.
Если грудь совсем маленькая
В этом случае зрительно увеличить объем и откорректировать вытянутую форму помогает глубокий V-образный вырез на бюстгальтере. Хорошо садятся бандо и мягкие кружевные чашечки.
Как подобрать бюстгальтеры для маленьких размеров
Подбор бюстгальтера лучше начинать с объема на 5-10 см меньше того, который рассчитан с помощью замеров. Бретели бюстгальтера оптимально выбирать узкие, чашку лучше предпочесть с пуш-апом. Следите за оптимальным облеганием, чтобы не было пустот, при этом грудь не должна выпирать.
Как подобрать бюстгальтер большого размера
Выбрать правильный бюст для большого размера особенно важно. Неправильный подбор размера влияет на осанку и даже приводит к образованию постоянных болей в спине и головных болей. Не стоит останавливать выбор на моделях пуш-ап, это утяжелит образ.
Следите за тем, чтобы у бюстгальтера были удобные широкие бретели с хорошей поддержкой. Пояс бюста для большой груди должен застегиваться минимум на два крючка, чтобы надежно удерживать пышные формы. Обязательно используйте покрой с косточками, помогающими корректировать форму груди.
Как подобрать размер бюстгальтера для беременных и кормящих
Главное при подборе бюстгальтера для беременных и кормящих – следите за размером груди. В разные месяцы беременности и в течение срока кормления объем груди меняется, иногда существенно. Поэтому требуется менять размер бюстгальтера.

При подборе бюста для кормления опробуйте его в магазине. Попробуйте расстегнуть и застегнуть бюст одной рукой. Когда ребенок будет у вас на руках, потребуется сноровка, чтобы это сделать. Если застежка расположена спереди, то вернуть грудь на место будет не так-то просто, потребуются обе руки.
Удобно, если лепесток чашки отстегивается с помощью кнопки или крючка, тогда его легко вернуть назад. В продаже есть модели, как полностью открывающие грудь, так и освобождающие только сосок. Модели с застежкой-молнией травмоопасны. Фасоны с эластичной чашкой удобны в использовании, но практически не поддерживают грудь. Прекрасный выбор для нежной кожи — бесшовные изделия.
Как подобрать спортивный бюстгальтер
В плане выбора размера спортивный бюстгальтер ничем не отличается – выбирать нужно так же. Особое внимание важно уделить конструкции и материалам. Бюст должен надежно фиксировать грудь, чтобы не мешать при тренировках, поэтому чашечки стоит выбирать закрытые.
От ткани требуется гигроскопичность. Для занятий активными видами спорта лучше предпочесть модель с широкими надежными лямками, тонкие бретельки больше подойдут для спокойных видов тренировок типа йоги или пилатеса.
Подытожим: для выбора бюстгальтера важно правильно снять мерки, причем повторять это лучше перед каждой покупкой, потому что размер иногда меняется. Начинайте выбор с размера пояса на один-два размера меньше. Обязательно примерьте параллельные размеры бюстгальтеров, чтобы проверить, какой сидит лучше. Идеально, если при застегнутом на крайний ряд крючков поясе, под него проходит один палец, а чашка сидит так, что нет пустот, грудь нигде не выпирает и не давит на косточки.
Если бюстгальтер не подходит
Что делать, если покупка совершена, но вещь всё-таки не подходит? По закону о защите прав потребителей РФ нижнее бельё обмену и возврату не подлежит.
Возврат покупки возможен только при обнаружении брака, при ошибке производителя в маркировке товара (на этикетке указан один размер, а по факту другой) или в случае несоответствия товара описанию или фото на сайте продавца.
Если покупка была совершена в интернет-магазине, то расходы по оплате доставки возвращаемого товара продавцу несет покупатель. Подробнее о деталях процедуры можно узнать на сайте интернет-магазина.