Improve Article
Save Article
Improve Article
Save Article
Python have many libraries for GUI. Tkinter is one of the libraries that provides a Graphical user interface. For the Short Message, we can use the MessageBox Library. It has many functions for the effective interface. In this MessageBox library provide different type of functions to Display Message Box.
- showinfo():- To display some usual Information
- showwarning():- To display warning to the User
- showerror():- To display different type of Error
- askquestion():- to Ask Query to the User
Example:
Python3
from tkinter import *
from tkinter import messagebox
top = Tk()
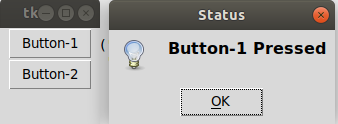
def Button_1():
messagebox.showinfo("Status",
"Button-1 Pressed")
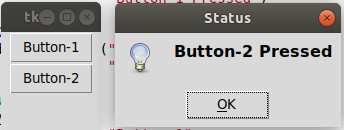
def Button_2():
messagebox.showinfo("Status",
"Button-2 Pressed")
top.geometry("100x100")
B1 = Button(top, text = "Button-1",
command = Button_1)
B2 = Button(top, text = "Button-2",
command = Button_2)
B1.pack()
B2.pack()
top.mainloop()
Output:


By default, the size of the message box is Fix. We can’t change the size of that Message Box. Different Boxes have different sizes. However, we can use Different alternative methods for this purpose
- Message Widget
- By Changing ReadMe File
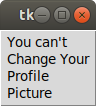
1. Message Widget
MessageBox library doesn’t provide the functions to change the configuration of the box. We can use the other function. The message can also be used to display the information. The size of the message is the size of the window so that we can set the size of the message by geometry, pack.
Python3
from tkinter import *
main = Tk()
str_var = StringVar()
label = Message( main, textvariable=str_var,
relief=RAISED )
str_var.set("You can't Change Your Profile Picture ")
label.pack()
main.mainloop()
Output:

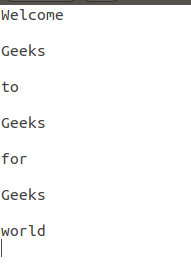
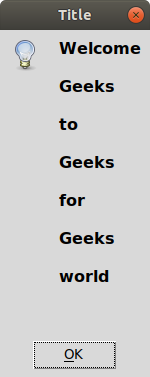
2. By Changing ReadMe File
This is another alternative option of the Message Box. In this, We are Opening the file readme.txt the length of the content of the readme file determines the size of the messagebox.
Input File:

Python3
from tkinter import *
from tkinter import messagebox
top = Tk()
def helpfile(filetype):
if filetype==1:
with open("read.txt") as f:
readme = f.read()
messagebox.showinfo(title="Title",
message = str(readme))
helpfile(1)
top.mainloop()
Output:

Improve Article
Save Article
Improve Article
Save Article
Python have many libraries for GUI. Tkinter is one of the libraries that provides a Graphical user interface. For the Short Message, we can use the MessageBox Library. It has many functions for the effective interface. In this MessageBox library provide different type of functions to Display Message Box.
- showinfo():- To display some usual Information
- showwarning():- To display warning to the User
- showerror():- To display different type of Error
- askquestion():- to Ask Query to the User
Example:
Python3
from tkinter import *
from tkinter import messagebox
top = Tk()
def Button_1():
messagebox.showinfo("Status",
"Button-1 Pressed")
def Button_2():
messagebox.showinfo("Status",
"Button-2 Pressed")
top.geometry("100x100")
B1 = Button(top, text = "Button-1",
command = Button_1)
B2 = Button(top, text = "Button-2",
command = Button_2)
B1.pack()
B2.pack()
top.mainloop()
Output:
By default, the size of the message box is Fix. We can’t change the size of that Message Box. Different Boxes have different sizes. However, we can use Different alternative methods for this purpose
- Message Widget
- By Changing ReadMe File
1. Message Widget
MessageBox library doesn’t provide the functions to change the configuration of the box. We can use the other function. The message can also be used to display the information. The size of the message is the size of the window so that we can set the size of the message by geometry, pack.
Python3
from tkinter import *
main = Tk()
str_var = StringVar()
label = Message( main, textvariable=str_var,
relief=RAISED )
str_var.set("You can't Change Your Profile Picture ")
label.pack()
main.mainloop()
Output:
2. By Changing ReadMe File
This is another alternative option of the Message Box. In this, We are Opening the file readme.txt the length of the content of the readme file determines the size of the messagebox.
Input File:
Python3
from tkinter import *
from tkinter import messagebox
top = Tk()
def helpfile(filetype):
if filetype==1:
with open("read.txt") as f:
readme = f.read()
messagebox.showinfo(title="Title",
message = str(readme))
helpfile(1)
top.mainloop()
Output:
One method that worked for me was to subclass QMessageBox and control the size with modified show and resize events:
TMessageBox::TMessageBox(
	const QWidget 						*Parent)
:QMessageBox(const_cast<QWidget*>(Parent))
{
	d_FixedWidth = 500;
	this->setTextFormat(Qt::RichText);
    this->setStyleSheet("dialogbuttonbox-buttons-have-icons: 0;nbutton-layout: 1;");
}
void TMessageBox::showEvent(
	QShowEvent							*Event)
{
	QMessageBox::showEvent(Event);
	this->setFixedWidth(d_FixedWidth);
}

void TMessageBox::resizeEvent(
	QResizeEvent						*Event)
{
	QMessageBox::resizeEvent(Event);
	this->setFixedWidth(d_FixedWidth);
}
I didn’t find another method that worked. I did find that the size must be set each time a resize or show event was received otherwise it would default back to whatever it decided to use.
I removed the fixed size completely about a year ago (I don’t remember exactly why but it was not because it didn’t work — there was some other reason). It is nice to have a constant look to the message boxes and not have them shrunk down to a minimum size.
Some other changes unrelated to your post …
The style sheet command in the constructor turns off the button icons and sets the format to OSX layout regardless of the platform it is run on (‘button-layout: 1;’). Probably not a good idea to force the button layout to something non-native but I always perferred the OSX version (with detailed text on left, options on right). I hate icons on buttons (on any software) so this was something I wanted to kill.
I use rich text for the members ‘setText’ and ‘setInformativeText’ so that it stands out a bit better. These member functions are subclassed to wrap the supplied text with RTF tags before passing to QMessageBox. Member ‘setText()’ is set to a larger bold font meant to have a very short description such as ‘Error Loading File’. Member ‘setInformativeText()’ has a bit more detail regarding whatever I am trying to comunicate such as ‘File ‘name.txt’ has an invalid entry’. The detailed text section of the messagebox, if used, contains all the details from the message and can contain quite a bit of text.
4 ответа
Вы можете отредактировать css метки:
msg.setStyleSheet("QLabel{min-width: 700px;}");
Вы также можете отредактировать css кнопок для добавления поля или увеличения размера.
Например:
msg.setStyleSheet("QLabel{min-width:500 px; font-size: 24px;} QPushButton{ width:250px; font-size: 18px; }");
Существует также трюк:
QSpacerItem* horizontalSpacer = new QSpacerItem(800, 0, QSizePolicy::Minimum, QSizePolicy::Expanding);
QGridLayout* layout = (QGridLayout*)msg.layout();
layout->addItem(horizontalSpacer, layout->rowCount(), 0, 1, layout->columnCount());
Но это не работает для всех.
coyotte508
07 июнь 2016, в 02:52
Поделиться
Ответ coyotte508 привел к тому, что моя раскладка была ужасно смещена от центра и при разной ширине была обрезана. В поисках вокруг я нашел эту ветку, которая объясняет лучшее решение.
По сути, макет окна сообщения является сеткой, поэтому вы можете добавить к нему SpacerItem, чтобы контролировать ширину. Вот пример кода c++ по этой ссылке:
QMessageBox msgBox;
QSpacerItem* horizontalSpacer = new QSpacerItem(500, 0, QSizePolicy::Minimum, QSizePolicy::Expanding);
msgBox.setText( "SomText" );
QGridLayout* layout = (QGridLayout*)msgBox.layout();
layout->addItem(horizontalSpacer, layout->rowCount(), 0, 1, layout->columnCount());
msgBox.exec();
Spencer
27 май 2018, в 07:43
Поделиться
Я хотел, чтобы ширина моего QMessageBox адаптировалась пропорционально длине текстового содержимого с определенным количеством буфера, чтобы избежать переноса строк. Изучив многочисленные форумы и темы, в том числе и этот, я придумал:
int x_offset = (2.0 * MainWindow::geometry().x());
int y_offset = (0.5 * MainWindow::geometry().y());
msgBox.setText(vers_msg.data());
QSpacerItem* horizontalSpacer = new QSpacerItem
    (8 * vers_msg.size(), 0,
    QSizePolicy::Minimum, QSizePolicy::Expanding);
QGridLayout* layout = (QGridLayout*)msgBox.layout();
layout->addItem(horizontalSpacer, layout->rowCount(),
    0, 1, layout->columnCount());
msgBox.setGeometry(
    MainWindow::geometry().x() + x_offset,
    MainWindow::geometry().y() + y_offset,
    msgBox.geometry().width(),
    msgBox.geometry().height());
Настройте жесткие числа в x_offset, y_offset и horizontalSpacer в соответствии с вашей ситуацией. Я надеялся, что это будет легче, чем это, но по крайней мере это работает.
Dave Sieving
26 апр. 2019, в 03:19
Поделиться
Вы можете QMessageBox подкласс QMessageBox и переопределить обработчик события изменения размера следующим образом:
void MyMessageBox::resizeEvent(QResizeEvent *Event)
{
    QMessageBox::resizeEvent(Event);
    this->setFixedWidth(myFixedWidth);
    this->setFixedHeight(myFixedHeight);
}
ephemerr
05 март 2019, в 07:38
Поделиться
Ещё вопросы
- 0Эмулятор пульсаций, выдающий 404 для локального файла
- 0Реализация алгоритмов шифрования с использованием целочисленных ключей: как хранить ключ во время процесса
- 0Angularjs — функция не работает
- 1Внедрение Seq2Seq с GRU в Керасе
- 1Как агрегировать расширенные значения — python — pandas
- 1Android Как узнать, прокручивает ли Галерея?
- 1преобразование входного источника в значимые данные в Android
- 0java.sql.SQLException: строка байтов геометрии должна иметь младший порядок
- 1Хранение чрезвычайно больших массивов
- 1Dropbox API — файл для чтения и загрузки node.js
- 0Неспособность открыть файл
- 1Как я могу проверить в Spring-DSL, выключается ли Camel?
- 0JPlayer не может играться в IE8
- 0JavaScript воспроизводится, пока я не обновлю
- 0Полезно ли использовать суррогатный первичный ключ, даже если таблица содержит только один столбец, а сама таблица содержит уникальные значения?
- 0Индикатор выполнения JQuery останавливает анимацию при открытии другой вкладки
- 0Как добавить div с JavaScript внутри
- 1используя FFT в обработке
- 0Как добавить флажки из базы данных в диалоговое окно Jquery UI
- 1Как установить таймаут на мыльный вызов с помощью ksoap2-android?
- 0Как узнать, доступен ли уровень отладки dx?
- 1Когда мне нужны инфляторы?
- 1В Java, когда один из методов в объекте «синхронизирован», все ли методы «синхронизированы»?
- 1Java замки и условия
- 0QGraphicsScene отключить установку правого и нижнего поля
- 0Ошибка «неопределенная ссылка» в связи между Arduino и переданной библиотекой IMU
- 0вызывающий сервис геолокации с асинхронным вызовом API
- 1Привязать селектор длинного списка к результату метода POST
- 0Использовать время как int для расчета в функции?
- 0Использование JS для циклического перемещения списка в соответствии с текстом
- 1Android: возможно ли одноадресное намерение?
- 0Использование | в PHP
- 0Невозможно сослаться на члена класса (Array) в $ scope в AngularJS
- 0как редактировать значения флажков в Drupal 7
- 0Как установить фоновое изображение в HTML, который работает в Internet Explorer? [Дубликат]
- 0Сбой jQuery Rotater, когда я скрываю и показываю новый контент
- 1Запрос не выполнен. Неожиданный ответ от сервера. нулевая ошибка в Sharepoint 2013 онлайн
- 1Как извлечь сообщения журнала приложения Android во время выполнения?
- 1Почему моя конфигурация маршрута ASP.NET MVC вызывает ошибку HTTP 404?
- 1вызов getSystemService внутри службы
- 0Spring Boot — Hibernate не сохраняет дату правильно
- 0Сбой алгоритма сортировки кучи C ++ после 4100+ записей данных?
- 1Решение для анализа данных Bliffoscope с использованием JavaScript
- 0Синтаксическая ошибка в полном внешнем соединении?
- 0Вернуть разные обещания из одной и той же функции
- 0Цикл do-while продолжает повторяться
- 1EF6 Дочерние объекты не обновляются в отношениях «многие ко многим»
- 0_wfopen_s не работает должным образом в приложении Windows Phone
- 1Как удалить SMS перед сохранением в почтовом ящике
- 0ARRAY — Удалить максимально отрицательный элемент
This post shows you How to Custom a Message Box in C# .NET Windows Forms Application.
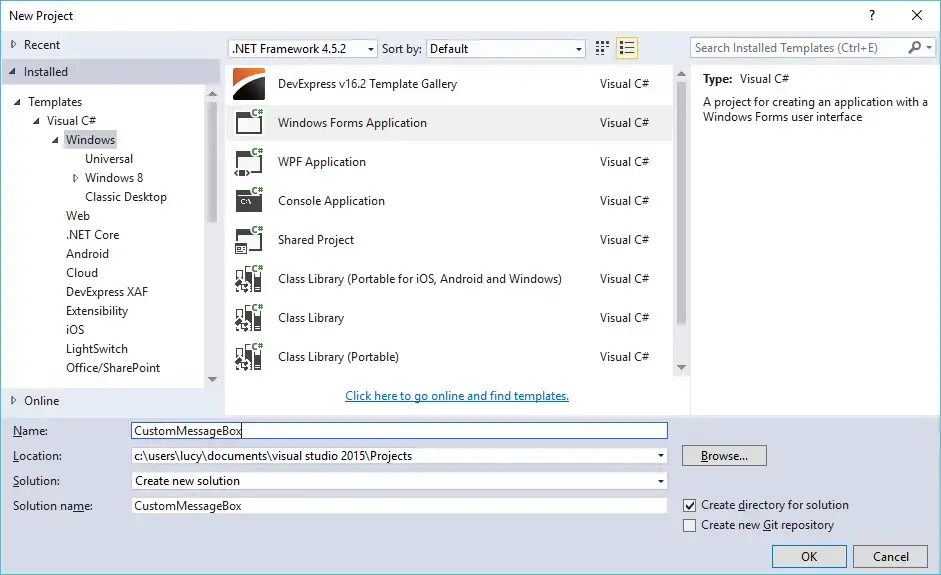
First, Open your Visual Studio, then click New Project. Next, Select Visual C# on the left, then Windows and then select Windows Forms Application. Name your project «CustomMessageBox» and then click OK button.
Custom message box c#
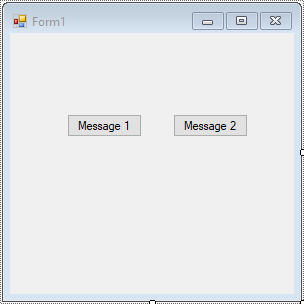
Dragging two Button controls from the Visual Toolbox, then design your form as shown below.
Form1
Next, We will create custom message boxes.
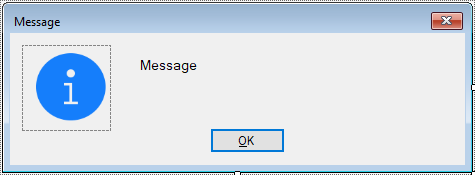
For example: MessageBox with OK button and MessageBox with YesNo button. You can do the same for other custom message boxes.
Creating a custom message box allows you to easily increase the size of message box in c#.
C# Message box ok
frmMessageOK
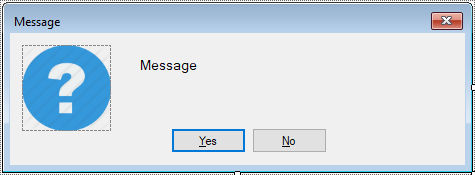
C# Message box yes no
frmMessageYesNo
C# Custom message box
Creating a MyMessageBox class that allows you to show your custom mesagebox.
public static class MyMessageBox
{
    public static System.Windows.Forms.DialogResult ShowMessage(string message, string caption, System.Windows.Forms.MessageBoxButtons button, System.Windows.Forms.MessageBoxIcon icon)
    {
        System.Windows.Forms.DialogResult dlgResult = System.Windows.Forms.DialogResult.None;
        switch (button)
        {
            case System.Windows.Forms.MessageBoxButtons.OK:
                using (frmMessageOK msgOK = new frmMessageOK())
                {
                    //Change text, caption, icon
                    msgOK.Text = caption;
                    msgOK.Message = message;
                    switch (icon)
                    {
                        case System.Windows.Forms.MessageBoxIcon.Information:
                            msgOK.MessageIcon = CustomMessageBox.Properties.Resources.Information;
                            break;
                        case System.Windows.Forms.MessageBoxIcon.Question:
                            msgOK.MessageIcon = CustomMessageBox.Properties.Resources.Question;
                            break;
                    }
                    dlgResult = msgOK.ShowDialog();
                }
                break;
            case System.Windows.Forms.MessageBoxButtons.YesNo:
                using (frmMessageYesNo msgYesNo = new frmMessageYesNo())
                {
                    msgYesNo.Text = caption;
                    msgYesNo.Message = message;
                    switch (icon)
                    {
                        case System.Windows.Forms.MessageBoxIcon.Information:
                            msgYesNo.MessageIcon = CustomMessageBox.Properties.Resources.Information;
                            break;
                        case System.Windows.Forms.MessageBoxIcon.Question:
                            msgYesNo.MessageIcon = CustomMessageBox.Properties.Resources.Question;
                            break;
                    }
                    dlgResult = msgYesNo.ShowDialog();
                }
                break;
        }
        return dlgResult;
    }
}
Open your Form1 code behind, then add click event handler to your button controls as shown below
Form1
using System;
using System.Collections.Generic;
using System.ComponentModel;
using System.Data;
using System.Drawing;
using System.Linq;
using System.Text;
using System.Threading.Tasks;
using System.Windows.Forms;

namespace CustomMessageBox
{
    public partial class Form1 : Form
    {
        public Form1()
        {
            InitializeComponent();
        }

        private void button1_Click(object sender, EventArgs e)
        {
            MyMessageBox.ShowMessage("Hello world !", "Message", MessageBoxButtons.OK, MessageBoxIcon.Information);
        }

        private void button2_Click(object sender, EventArgs e)
        {
            //Display your message box
            if(MyMessageBox.ShowMessage("Are you sure want to delete this record ?", "Message", MessageBoxButtons.YesNo, MessageBoxIcon.Question) == DialogResult.Yes)
            {
                MyMessageBox.ShowMessage("Yes !", "Message", MessageBoxButtons.OK, MessageBoxIcon.Information);
            }
            else
                MyMessageBox.ShowMessage("No !", "Message", MessageBoxButtons.OK, MessageBoxIcon.Information);
        }
    }
}
Open your frmMessageOK form, then add MessageIcon and Message properties to your form allows you to set icon and message to your custom message box.
C# Custom dialog box example
frmMessageOK
//c# custom messagebox
public partial class frmMessageOK : Form
{
    public frmMessageOK()
    {
        InitializeComponent();
    }

    public Image MessageIcon
    {
        get { return pictureBox.Image; }
        set { pictureBox.Image = value; }
    }

    public string Message
    {
        get { return lblMessage.Text; }
        set { lblMessage.Text = value; }
    }
}
Do the same for frmMessageOK form
frmMessageYesNo
//c# custom message box
public partial class frmMessageYesNo : Form
{
    public frmMessageYesNo()
    {
        InitializeComponent();
    }

    public Image MessageIcon
    {
        get { return pictureBox.Image; }
        set { pictureBox.Image = value; }
    }

    public string Message
    {
        get { return lblMessage.Text; }
        set { lblMessage.Text = value; }
    }
}
You can easily increase the size of message box in c# or change messagebox font color in c# by creating a custom message box. This is the best way to make your own message box instead of using the default message box.
VIDEO TUTORIAL
У Python есть много библиотек для графического интерфейса . Tkinter — одна из библиотек, предоставляющих графический пользовательский интерфейс. Для короткого сообщения мы можем использовать библиотеку MessageBox. Он имеет множество функций для эффективного интерфейса. В этой библиотеке MessageBox предусмотрены различные типы функций для отображения окна сообщения.
- showinfo (): — Для отображения обычной информации
- showwarning (): — Отображать предупреждение пользователю
- showerror (): — Для отображения различных типов ошибок
- askquestion (): — Задать запрос пользователю
Example:
Python3
from tkinter import *
from tkinter import messagebox
top = Tk()
def Button_1():
messagebox.showinfo("Status",
"Button-1 Pressed")
def Button_2():
messagebox.showinfo("Status",
"Button-2 Pressed")
top.geometry("100x100")
B1 = Button(top, text = "Button-1",
command = Button_1)
B2 = Button(top, text = "Button-2",
command = Button_2)
B1.pack()
B2.pack()
top.mainloop()
Выход:
По умолчанию размер окна сообщения — Исправить. Мы не можем изменить размер этого окна сообщения . Разные коробки имеют разные размеры. Однако для этой цели мы можем использовать различные альтернативные методы.
- Виджет сообщений
- Изменяя файл ReadMe
1. Message Widget
MessageBox library doesn’t provide the functions to change the configuration of the box. We can use the other function. The message can also be used to display the information. The size of the message is the size of the window so that we can set the size of the message by geometry, pack.
Python3
from tkinter import *
main = Tk()
str_var = StringVar()
label = Message( main, textvariable=str_var,
relief=RAISED )
str_var.set("You can"t Change Your Profile Picture ")
label.pack()
main.mainloop()
Выход:
2. Изменив файл ReadMe
Это еще один альтернативный вариант окна сообщения. Здесь мы открываем файл readme.txt, длина содержимого файла readme определяет размер окна сообщений.
Входной файл:
Python3
from tkinter import *
from tkinter import messagebox
top = Tk()
def helpfile(filetype):
if filetype==1:
with open("read.txt") as f:
readme = f.read()
messagebox.showinfo(title="Title",
message = str(readme))
helpfile(1)
top.mainloop()
Выход:
Внимание компьютерщик! Укрепите свои основы с помощью базового курса программирования Python и изучите основы.
Для начала подготовьтесь к собеседованию. Расширьте свои концепции структур данных с помощью курса Python DS. А чтобы начать свое путешествие по машинному обучению, присоединяйтесь к курсу Машинное обучение — базовый уровень.
Возможный дубликат:
C # форматирование MessageBox
как изменить размер окна MessageBox по умолчанию в С#. Есть ли код для него? я не хочу, чтобы мое персонализированное диалоговое окно? так есть ли какое-либо решение для изменения размера окна сообщений по умолчанию для Windows?
3 ответы
создайте пользовательскую форму и установите свойства по своему усмотрению
Создан 06 июля ’12, 09:07
![]()
Для этого нет кода, потому что это невозможно. Для создания собственного окна сообщения вы можете проверить эту ссылку например.
Создан 06 июля ’12, 09:07
![]()
Вы должны попытаться создать собственный класс, который содержит ваш дизайн/свойства.
Вы можете создать функцию в своем пользовательском классе окна сообщений, которая вызовет ваш «Большой ящик сообщений» и установит текст
CustomBox.Show("sdhsfs")
Эта медитация может помочь с классом (вам нужно будет добавить тег размера в конструктор)
Кроме того, в учебнике используются статические методы, вместо этого создайте экземпляр. Это позволит использовать несколько окон сообщений с разным текстом.
Создан 06 июля ’12, 13:07
![]()
Не тот ответ, который вы ищете? Просмотрите другие вопросы с метками
c#
messagebox
or задайте свой вопрос.