While the provided answers should have already given you enough suggestions, I’d like to add some insight.
Are there python sources for Qt?
First of all, you cannot find «the class written in python», because (luckily) there’s none. PyQt is a binding: it is an interface to the actual Qt library, which is written in C++.
As you might already know, while Python is pretty fast on nowadays computers, it’s not that fast, so using a binding is a very good compromise: it allows the simple syntax Python provides, and gives all speed provided by C++ compiled libraries under the hood.
You can find the source code for Qt widgets here (official mirror), or here.
How to override the default font?
Well, this depends on how you’re going to manage your project.
Generally speaking, you can set the default font [size] for a specific widget, for its child widgets, for the top level window or even for the whole application. And there are at least two ways to do it.
- use
setFont(): it sets the default font for the target; you can get the current default font usingsomething.font(), then usefont.setPointSize()(orsetPointSizeF()for float values, if the font allows it) and then callsetFont(font)on the target. - use
font[-*]in the targetsetStyleSheet();
Target?
The target might be the widget itself, one of its parents or even the QApplication.instance(). You can use both setFont() or setStyleSheet() on any of them:
    font = self.font()
    font.setPointSize(24)
    # set the font for the widget:
    self.pushButton.setFont(someFont)
    # set the font for the top level window (and any of its children):
    self.window().setFont(someFont)
    # set the font for *any* widget created in this QApplication:
    QApplication.instance().setFont(someFont)

    # the same as...
    self.pushButton.setStyleSheet(''' font-size: 24px; ''')
    # etc...
Also, consider setting the Qt.AA_UseStyleSheetPropagationInWidgetStyles attribute for the application instance.
Setting and inheritance
By default, Qt uses font propagation (as much as palette propagation) for both setFont and setStyleSheet, but whenever a style sheet is set, it takes precedence, even if it’s set on any of the parent widgets (up to the top level window OR the QApplication instance).
Whenever stylesheets are applied, there are various possibilities, based on CSS Selectors:
'font-size: 24px;': no selector, the current widget and any of its child will use the specified font size;'QClass { font-size: 24px; }': classes and subclasses selector, any widget (including the current instance) and its children of the same class/subclass will use the specified font size:'QClass[property="value"] {...}': property selector, as the above, but only if thepropertymatches the value; note that values are always quoted, and bool values are always lower case;'.QClass {...}': classes selector, but not subclasses: if you’re using a subclass of QLabel and the stylesheet is set for.QLabel, that stylesheet won’t be applied;'QClass#objectName {...}': apply only for widgets for whichobjectName()matches;'QParentClass QClass {...}‘: apply for widget of class QClass that are children ofQParentClass'QParentClass > QClass {...}‘: apply for widget of class QClass that are direct children ofQParentClass
Note that both setFont and setStyleSheet support propagation, but setStyle only works on children when set to the QApplication instance: if you use widget.setStyle() it won’t have effect on any of the widget’s children.
Finally, remember:
- whenever a widget gets reparented, it receives the font, palette and stylesheet of its parent, in «cascading» mode (the closest parent has precedence);
- stylesheets have precedence on both palette and font, whenever any of the related properties are set, and palette/font properties are not compatible with stylesheets (or, at least, they behave in unexpected ways);
- PyQt5 Label Widget
- PyQt5
QLabelSet Font - PyQt5 Label Alignment

We will learn to use PyQt5 label widget QLabel in this tutorial.
We’re going to add two labels to our window, where one of those labels is going to hold some text and one of those labels is going to hold an image.
import sys
from PyQt5 import QtWidgets, QtGui

def basicWindow():
    app = QtWidgets.QApplication(sys.argv)
    windowExample = QtWidgets.QWidget()
    labelA = QtWidgets.QLabel(windowExample)
    labelB = QtWidgets.QLabel(windowExample)
    labelA.setText('Label Example')
    labelB.setPixmap(QtGui.QPixmap('python.jpg'))
    windowExample.setWindowTitle('Label Example')
    windowExample.setGeometry(100, 100, 300, 200)
    labelA.move(100, 40)
    labelB.move(120, 120)
    windowExample.show()
    sys.exit(app.exec_())

basicWindow()
Where,
labelA = QtWidgets.QLabel(w)
The first label labelA is a QtWidgets.QtLabel and the QtWidgets— w is in parentheses because it tells the program that the label labelA is added to the window w.
labelA.setText('Label Example')
labelA.setText sets the text in the label.
windowExample.setGeometry(100, 100, 300, 200)
It sets the window size to be (300, 200) and left upper corner coordinate to be (100, 100). You could refer to the setGeometry explanation in last section.
labelA.move(100, 40)
labelB.move(120, 120)
move() method moves the label to the direction of right and down. Like labelA.move(100, 40) moves the labelA to the coordinate of (100, 40) relative to the left-upper corner of the window.
labelB.setPixmap(QtGui.QPixmap('globe.png'))
It displays images in the labelB. QPixmap is the module in QtGui and it takes an image of Qt.
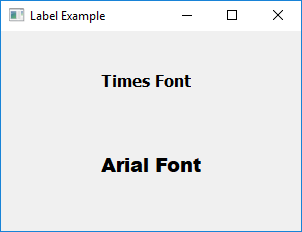
PyQt5 QLabel Set Font
In the example above, we use the default font in label widget, and you could specify the preferred font like size, weight and font family of the label text.
import sys
from PyQt5 import QtWidgets, QtGui

def basicWindow():
    app = QtWidgets.QApplication(sys.argv)
    windowExample = QtWidgets.QWidget()
    labelA = QtWidgets.QLabel(windowExample)
    labelB = QtWidgets.QLabel(windowExample)
    labelA.setText('Times Font')
    labelA.setFont(QtGui.QFont("Times", 12, QtGui.QFont.Bold))
    labelB.setText('Arial Font')
    labelB.setFont(QtGui.QFont("Arial", 14, QtGui.QFont.Black))
    windowExample.setWindowTitle('Label Example')
    windowExample.setGeometry(100, 100, 300, 200)
    labelA.move(100, 40)
    labelB.move(100, 120)
    windowExample.show()
    sys.exit(app.exec_())

basicWindow()
labelA.setFont(QtGui.QFont("Times", 12, QtGui.QFont.Bold))
setFont() method sets the font of the label. The QFont class specifies a font with specific attributes.
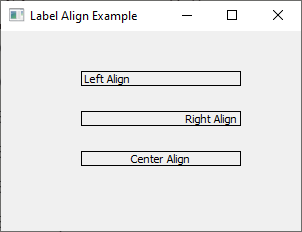
PyQt5 Label Alignment
The label text is by default aligned to the left edge, and this property could be modified with the method QLabel.setAlignment().
import sys
from PyQt5 import QtWidgets, QtGui, QtCore

def basicWindow():
    app = QtWidgets.QApplication(sys.argv)
    windowExample = QtWidgets.QWidget()

    labelLeft = QtWidgets.QLabel(windowExample)
    labelRight = QtWidgets.QLabel(windowExample)
    labelCenter = QtWidgets.QLabel(windowExample)

    labelLeft.setText('Left Align')
    labelRight.setText('Right Align')
    labelCenter.setText('Center Align')

    windowExample.setWindowTitle('Label Align Example')
    windowExample.setGeometry(100, 100, 300, 200)

    labelLeft.setFixedWidth(160)
    labelRight.setFixedWidth(160)
    labelCenter.setFixedWidth(160)

    labelLeft.setStyleSheet("border-radius: 25px;border: 1px solid black;")
    labelRight.setStyleSheet("border-radius: 25px;border: 1px solid black;")
    labelCenter.setStyleSheet("border-radius: 25px;border: 1px solid black;")

    labelLeft.setAlignment(QtCore.Qt.AlignLeft)
    labelRight.setAlignment(QtCore.Qt.AlignRight)
    labelCenter.setAlignment(QtCore.Qt.AlignCenter)

    labelLeft.move(80, 40)
    labelRight.move(80, 80)
    labelCenter.move(80, 120)

    windowExample.show()
    sys.exit(app.exec_())

basicWindow()
labelLeft.setFixedWidth(160)
labelRight.setFixedWidth(160)
labelCenter.setFixedWidth(160)
It sets the fixed width to the three labels, otherwise, the label width is automatically set according to the label text length.
labelLeft.setStyleSheet("border-radius: 25px;border: 1px solid black;")
We could use CSS-alike style sheet to set the styles of the PyQt5 widgets. Here, the border of the label is set to be solid black with the border with of 1px, and the border radius is specified as 25px.
labelLeft.setAlignment(QtCore.Qt.AlignLeft)
labelRight.setAlignment(QtCore.Qt.AlignRight)
labelCenter.setAlignment(QtCore.Qt.AlignCenter)
The alignment property of the widget is set by the method setAlignment and its options are in the module PyQt5.QtCore.Qt, like
PyQt5.QtCore.Qt.AlignLeftPyQt5.QtCore.Qt.AlignRightPyQt5.QtCore.Qt.AlignCenter
As you could see from the image below, the labels are aligned according to their alignment properties.
Get started with this series with part one!
In the previous part of my tutorial series on Building a text editor with PyQt, we created our text editor’s basic skeleton and added some useful features for file management, printing, inserting lists and more. This part will focus on the format bar, which we’ll populate with a number of features, including actions to change the font family, background color, alignment and more.
Font
We’ll start with actions related to font, meaning the user will be able to:
- Change font family
- Adjust font size
- Set font color
- Choose background color
Now to the code. Just like last time, I’ll only show the functions that change relative to the previous code:
initFormatbar():
fontBox = QtGui.QFontComboBox(self)
fontBox.currentFontChanged.connect(self.fontFamily)
fontSize = QtGui.QComboBox(self)
fontSize.setEditable(True)
# Minimum number of chars displayed
fontSize.setMinimumContentsLength(3)
fontSize.activated.connect(self.fontSize)
# Typical font sizes
fontSizes = ['6','7','8','9','10','11','12','13','14',
'15','16','18','20','22','24','26','28',
'32','36','40','44','48','54','60','66',
'72','80','88','96']
for i in fontSizes:
fontSize.addItem(i)
fontColor = QtGui.QAction(QtGui.QIcon("icons/font-color.png"),"Change font color",self)
fontColor.triggered.connect(self.fontColor)
backColor = QtGui.QAction(QtGui.QIcon("icons/highlight.png"),"Change background color",self)
backColor.triggered.connect(self.highlight)
self.formatbar = self.addToolBar("Format")
self.formatbar.addWidget(fontBox)
self.formatbar.addWidget(fontSize)
self.formatbar.addSeparator()
self.formatbar.addAction(fontColor)
self.formatbar.addAction(backColor)
self.formatbar.addSeparator()
Below initUI():
def fontFamily(self,font):
self.text.setCurrentFont(font)
def fontSize(self, fontsize):
self.text.setFontPointSize(int(fontsize))
def fontColor(self):
# Get a color from the text dialog
color = QtGui.QColorDialog.getColor()
# Set it as the new text color
self.text.setTextColor(color)
def highlight(self):
color = QtGui.QColorDialog.getColor()
self.text.setTextBackgroundColor(color)
Note that the actions we just created don’t follow the code pattern for actions I described last time. We don’t make these actions class members because we only need to create and use them within the scope of initFormatbar(). We also don’t give them tooltips or shortcuts anymore (unless you want to, of course).
We start out by creating a QFontComboBox, which is a very convenient combo box that automatically includes all the fonts available to the system. We instantiate it and connect its currentFontChanged signal to a slot function, self.fontFamily(), which we later created underneath the initUI() method. As you can see, we also give this slot function a second parameter font, so PyQt will pass the user-selected QFont object to our function, reducing our work to setting this font to the text’s current font.
Next up, we need a combo box for font sizes. PyQt itself doesn’t have such a thing, so we need to create one ourself. This is easily done by instantiating a normal combo box, here called fontSize, which we set editable, meaning the user can enter any number they want for the font. After connecting the activated signal to a slot function, we populate the combo box with some common font sizes. For the slot function, we again set a second parameter, font size, which PyQt passes to us when the user selects a font size from the combo box or, alternatively, enters a custom size. We set the user’s selection as the text’s current font point size.
The last two actions are very similar. In both cases, we create two actions that open a QColorDialog when activated. In case of fontColor, we set the color selection as the font color. For backColor, we set the color as the current text’s background color.
Bold moves
Next, we’ll add actions to make text:
- bold
- italic
- underlined
- strikeout
- superscript
- subscript
The code for this is relatively simple:
initFormatbar():
boldAction = QtGui.QAction(QtGui.QIcon("icons/bold.png"),"Bold",self)
boldAction.triggered.connect(self.bold)
italicAction = QtGui.QAction(QtGui.QIcon("icons/italic.png"),"Italic",self)
italicAction.triggered.connect(self.italic)
underlAction = QtGui.QAction(QtGui.QIcon("icons/underline.png"),"Underline",self)
underlAction.triggered.connect(self.underline)
strikeAction = QtGui.QAction(QtGui.QIcon("icons/strike.png"),"Strike-out",self)
strikeAction.triggered.connect(self.strike)
superAction = QtGui.QAction(QtGui.QIcon("icons/superscript.png"),"Superscript",self)
superAction.triggered.connect(self.superScript)
subAction = QtGui.QAction(QtGui.QIcon("icons/subscript.png"),"Subscript",self)
subAction.triggered.connect(self.subScript)
Further below:
self.formatbar.addAction(boldAction)
self.formatbar.addAction(italicAction)
self.formatbar.addAction(underlAction)
self.formatbar.addAction(strikeAction)
self.formatbar.addAction(superAction)
self.formatbar.addAction(subAction)
self.formatbar.addSeparator()
Below initUI():
def bold(self):
if self.text.fontWeight() == QtGui.QFont.Bold:
self.text.setFontWeight(QtGui.QFont.Normal)
else:
self.text.setFontWeight(QtGui.QFont.Bold)
def italic(self):
state = self.text.fontItalic()
self.text.setFontItalic(not state)
def underline(self):
state = self.text.fontUnderline()
self.text.setFontUnderline(not state)
def strike(self):
# Grab the text's format
fmt = self.text.currentCharFormat()
# Set the fontStrikeOut property to its opposite
fmt.setFontStrikeOut(not fmt.fontStrikeOut())
# And set the next char format
self.text.setCurrentCharFormat(fmt)
def superScript(self):
# Grab the current format
fmt = self.text.currentCharFormat()
# And get the vertical alignment property
align = fmt.verticalAlignment()
# Toggle the state
if align == QtGui.QTextCharFormat.AlignNormal:
fmt.setVerticalAlignment(QtGui.QTextCharFormat.AlignSuperScript)
else:
fmt.setVerticalAlignment(QtGui.QTextCharFormat.AlignNormal)
# Set the new format
self.text.setCurrentCharFormat(fmt)
def subScript(self):
# Grab the current format
fmt = self.text.currentCharFormat()
# And get the vertical alignment property
align = fmt.verticalAlignment()
# Toggle the state
if align == QtGui.QTextCharFormat.AlignNormal:
fmt.setVerticalAlignment(QtGui.QTextCharFormat.AlignSubScript)
else:
fmt.setVerticalAlignment(QtGui.QTextCharFormat.AlignNormal)
# Set the new format
self.text.setCurrentCharFormat(fmt)
The changes in initFormatbar() should be relatively understandable by now. We create actions and connect the triggered signals to slot functions, after which we add the actions to the format bar.
In bold(), we invert the font weight of the current text. If the text is bold, we set the font weight to “normal”. If the font weight is normal, we set it to bold.
For italic() and underline(), our QTextEdit object has functions for setting and getting the state of the text. Therefore, we just grab the current state of the text and invert it.
The strike() function is a bit different. We retrieve our text’s currentCharFormat, invert the state of the fontStrikeOut property and finally set our new char format to the text’s “current” char format.
Lastly, in superScript() and subScript(), we again fetch the current char format, toggle the verticalAlignment property like we did in bold() and reset the new char format to make our changes visible.
Alignment
Alignment is very simple, as PyQt provides us with the necessary methods:
initFormatbar():
alignLeft = QtGui.QAction(QtGui.QIcon("icons/align-left.png"),"Align left",self)
alignLeft.triggered.connect(self.alignLeft)
alignCenter = QtGui.QAction(QtGui.QIcon("icons/align-center.png"),"Align center",self)
alignCenter.triggered.connect(self.alignCenter)
alignRight = QtGui.QAction(QtGui.QIcon("icons/align-right.png"),"Align right",self)
alignRight.triggered.connect(self.alignRight)
alignJustify = QtGui.QAction(QtGui.QIcon("icons/align-justify.png"),"Align justify",self)
alignJustify.triggered.connect(self.alignJustify)
Further below:
self.formatbar.addAction(alignLeft)
self.formatbar.addAction(alignCenter)
self.formatbar.addAction(alignRight)
self.formatbar.addAction(alignJustify)
self.formatbar.addSeparator()
Below the initUI() method:
def alignLeft(self):
self.text.setAlignment(Qt.AlignLeft)
def alignRight(self):
self.text.setAlignment(Qt.AlignRight)
def alignCenter(self):
self.text.setAlignment(Qt.AlignCenter)
def alignJustify(self):
self.text.setAlignment(Qt.AlignJustify)
Changes in the initFormatbar() method follow the previous pattern and the slot functions are also very simple. We change the text’s alignment using our QTextEdit‘s setAlignment method, passing it the respective member of the Qt namespace, e.g. Qt.AlignCenter.
Indent – dedent
Indenting and dedenting is a little more complex, as PyQt provides us with no methods to efficiently adjust the tabbing of a selected area, meaning we need to come up with our own method of doing so:
initFormatbar():
indentAction = QtGui.QAction(QtGui.QIcon("icons/indent.png"),"Indent Area",self)
indentAction.setShortcut("Ctrl+Tab")
indentAction.triggered.connect(self.indent)
dedentAction = QtGui.QAction(QtGui.QIcon("icons/dedent.png"),"Dedent Area",self)
dedentAction.setShortcut("Shift+Tab")
dedentAction.triggered.connect(self.dedent)
Further below:
self.formatbar.addAction(indentAction)
self.formatbar.addAction(dedentAction)
Below initUI():
def indent(self):
# Grab the cursor
cursor = self.text.textCursor()
if cursor.hasSelection():
# Store the current line/block number
temp = cursor.blockNumber()
# Move to the selection's last line
cursor.setPosition(cursor.selectionEnd())
# Calculate range of selection
diff = cursor.blockNumber() - temp
# Iterate over lines
for n in range(diff + 1):
# Move to start of each line
cursor.movePosition(QtGui.QTextCursor.StartOfLine)
# Insert tabbing
cursor.insertText("t")
# And move back up
cursor.movePosition(QtGui.QTextCursor.Up)
# If there is no selection, just insert a tab
else:
cursor.insertText("t")
def dedent(self):
cursor = self.text.textCursor()
if cursor.hasSelection():
# Store the current line/block number
temp = cursor.blockNumber()
# Move to the selection's last line
cursor.setPosition(cursor.selectionEnd())
# Calculate range of selection
diff = cursor.blockNumber() - temp
# Iterate over lines
for n in range(diff + 1):
self.handleDedent(cursor)
# Move up
cursor.movePosition(QtGui.QTextCursor.Up)
else:
self.handleDedent(cursor)
def handleDedent(self,cursor):
cursor.movePosition(QtGui.QTextCursor.StartOfLine)
# Grab the current line
line = cursor.block().text()
# If the line starts with a tab character, delete it
if line.startswith("t"):
# Delete next character
cursor.deleteChar()
# Otherwise, delete all spaces until a non-space character is met
else:
for char in line[:8]:
if char != " ":
break
cursor.deleteChar()
Changes to initFormatbar() as previously discussed.
Let’s go through the indent() function step by step. The first thing we need to do is grab our text’s current QTextCursor object. We check if the user currently has any text under selection. If not, we just insert a tab. If he or she does have something under selection, however, we need to get a bit more funky. More specifically, we have to find out how many lines the user has under selection and insert a tab before each line.
We do so by first getting the current line/block number at the start of the selection, then moving the cursor to the end and subtracting the previously stored block/line number from the new one. This provides us with the range of lines over which we subsequently iterate. For each iteration, we move the cursor to the start of the current line, insert a tab and finally move up one line until we reach the top. (Remember that before we start iterating, we have the cursor at the end of the selection, where we moved it to find out the selection’s last line number)
The dedent() method is quite similar, it differs, however, in our need to also handle excess space and not only tabs. That’s what handleDedent() is for. It’s called at each iteration of the loop that moves up the lines of the selection. In it, we again set the cursor to the beginning of each line, after which we grab the current line’s text. If the line starts with a tab, we can just delete it and our job is done. If it doesn’t, we also check wether there is any excess space (up to 8 spaces, which equals a tab) and delete it if so. This ensures two things:
- People who prefer 8 spaces over a tab character (‘/t’) also get their money’s worth
- Excess space that could block from you from completely dedenting a block of text is deleted
Final customization options
Now that our tool bar, our format bar and our status bar are populated, we can add some final customization options to toggle the visibility of these three bars:
initMenubar():
# Toggling actions for the various bars
toolbarAction = QtGui.QAction("Toggle Toolbar",self)
toolbarAction.triggered.connect(self.toggleToolbar)
formatbarAction = QtGui.QAction("Toggle Formatbar",self)
formatbarAction.triggered.connect(self.toggleFormatbar)
statusbarAction = QtGui.QAction("Toggle Statusbar",self)
statusbarAction.triggered.connect(self.toggleStatusbar)
view.addAction(toolbarAction)
view.addAction(formatbarAction)
view.addAction(statusbarAction)
Below initUI():
def toggleToolbar(self):
state = self.toolbar.isVisible()
# Set the visibility to its inverse
self.toolbar.setVisible(not state)
def toggleFormatbar(self):
state = self.formatbar.isVisible()
# Set the visibility to its inverse
self.formatbar.setVisible(not state)
def toggleStatusbar(self):
state = self.statusbar.isVisible()
# Set the visibility to its inverse
self.statusbar.setVisible(not state)
We create three actions in our initMenubar() method…
- toolbarAction
- formatbarAction
- statusbarAction
…and connect them to slot functions. Note that we don’t add these actions to any of the toolbars, but only to the drop-down menus at the top of our screen.
In the slot functions, we do what we did for some of the formatting functions: we retrieve the visibility states of the various bars and set the them to their opposite.
That’ll be it for this post, be sure to check back for the upcoming part of this series on Building a text editor with PyQt, in which we’ll add some interesting actions for find-and-replace, inserting images and more.
Subscribe below to receive updates on new tutorials!
Read part three here!
Author: Peter Goldsborough
PyQt6 offers various default fonts that we can use to change the style of our text. But often these fonts are not enough, and we need to import some Custom Fonts into our PyQt6 Application. In this PyQt6 tutorial, we will explore how to do so.
The first thing we need to do, is add the Custom Font to the QFontDatabase.
from PyQt6.QtGui import QFont, QFontDatabase
First import the QFont and QFontDatabase Classes from PyQt6.QtGUI.
id = QFontDatabase.addApplicationFont("Frostbite.ttf")
if id < 0: print("Error")
Next, add the font file you downloaded to our QFontDatabase using the addApplicationFont() function. Simply pass in the file path, or file name of the Font File into this function, and it will be ready for use.
If you want the fonts we are using in this tutorial, use this download link.
We need to find out the name of the Font File we just added. This information is stored within the Font file, and can be acquired by calling the following function.
families = QFontDatabase.applicationFontFamilies(id)
The reason why we need it’s name, is because we require it as an argument when changing our Fonts from default to custom.
Here we create a simple QLabel Widget to display some text. We then change the Font of this label widget, by passing in a QFont Object.
label = QLabel("Hello World", self)
label.setFont(QFont(families[0], 80))
QFont objects take two main parameters. The first is the name of the Font, and the second is the Font size.
If all went well, our QLabel will now have the text “Hello World”, using the Font “Frostbite” with a size of 80.
Complete Code
Here is the complete code required to add a Custom Font in PyQt6. Just remember to download and place the Font File in the appropriate location.
from PyQt6.QtWidgets import QApplication, QWidget, QLabel
from PyQt6.QtGui import QFont, QFontDatabase
import sys

class Window(QWidget):
    def __init__(self):
        super().__init__()
        self.resize(600, 300)
        self.setWindowTitle("CodersLegacy")
        self.setContentsMargins(20, 20, 20, 20)

        id = QFontDatabase.addApplicationFont("Frostbite.ttf")
        if id < 0: print("Error")

        families = QFontDatabase.applicationFontFamilies(id)
        print(families[0])

        label = QLabel("Hello World", self)
        label.setFont(QFont(families[0], 80))
        label.move(50, 100)

app = QApplication(sys.argv)
window = Window()
window.show()
sys.exit(app.exec())
Want to learn more about PyQt6 and it’s various applications? Follow the link for more!
This marks the end of the PyQt6, Adding Custom Fonts Tutorial. Any suggestions or contributions for CodersLegacy are more than welcome. Questions regarded the tutorial can be asked in the comments section.